XChange
XChange is a package management and distribution platform that enables organizations to standardize and govern automation assets across workspaces.
Builders package automation assets such as MCP servers, Genies, recipes, connections, and lookup tables, and submit them for review. Curators review and approve package versions, and control distribution through two models. Curators can publish packages to a private community where tenant workspace users can browse and install them, or distribute packages directly into tenant workspaces.
This creates a governed, end-to-end pipeline from asset creation and approval to controlled distribution and visibility into installed versions.
AVAILABILITY
XChange is available for Automation HQ and Embedded workspaces. Contact your Workato representative to enable XChange for your organization.
Roles and permissions
XChange uses role-based access control (RBAC) to manage access to package creation, curation, and consumption.
The following roles are used throughout this guide:
- Builder: Packages automation assets.
- Curator: Reviews and approves package versions and manages distribution.
- Consumer: Users in tenant workspaces who browse, install, and use packages. The XChange tab in Admin privileges controls access to package creation, curation, and consumption.
The following permissions map to these roles and define what actions each role can perform:
Package creation
Create and submit packages to XChange.
| Permission | Full access | View | Edit | Create |
|---|---|---|---|---|
| Version | ✔ | ✔ | ✔ | ✔ |
Curation
Approve, manage, and distribute packages in XChange.
| Permission | Full access | View | Edit | Delete | Publish/Distribute | Review |
|---|---|---|---|---|---|---|
| Packages | ✔ | ✔ | ✔ | ✔ | ||
| Settings | ✔ | ✔ | ✔ |
Consumption
Browse and install packages from XChange.
| Permission | Full access | View | Install |
|---|---|---|---|
| Verified Packages | ✔ | ✔ | ✔ |
Dashboard
The XChange dashboard provides a centralized view of all packages in your organization. Builders and curators can use this view to explore existing packages, track status, and create new packages.
Package statuses
The XChange dashboard groups packages by status:
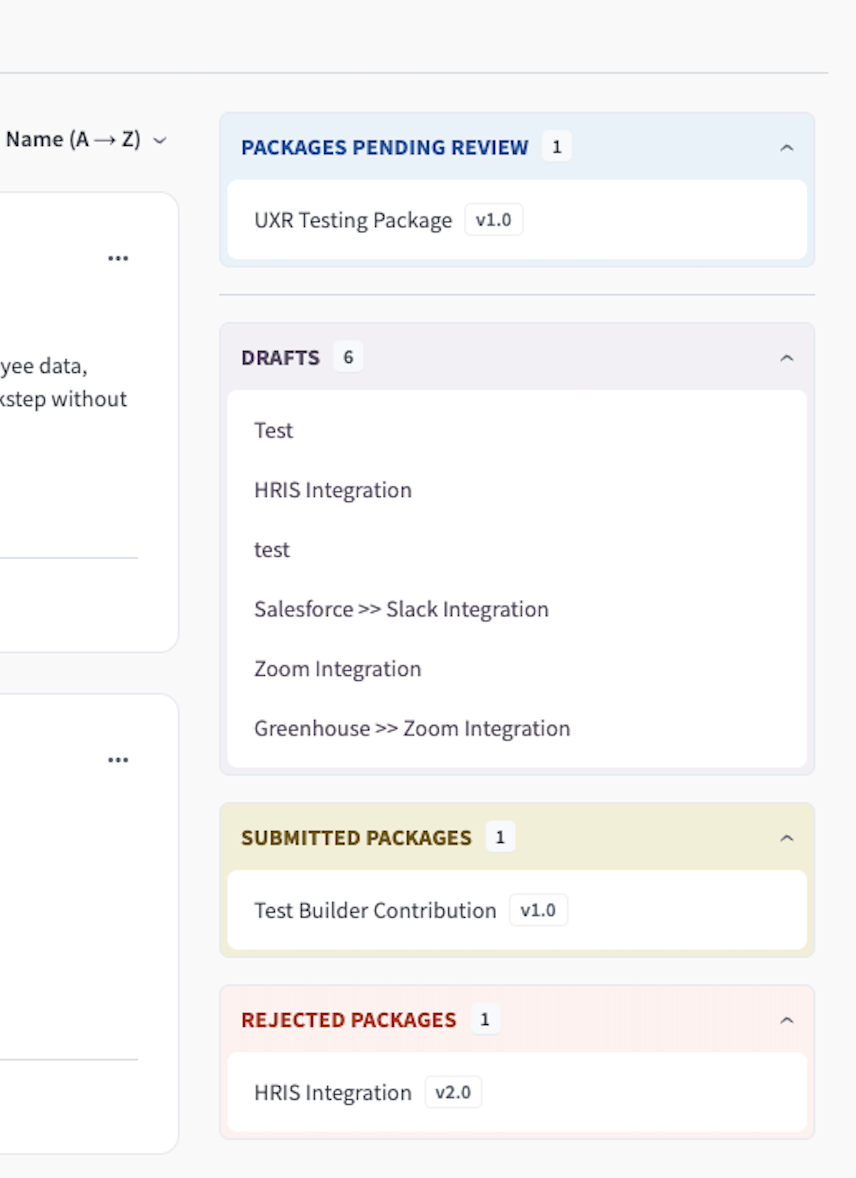 Package statuses
Packages pending review
Packages that require approval from you.
Drafts
Package versions in progress. You can save a new package version as a draft and resume it later.
Submitted packages
Packages you submitted that require approval from another user. You can't take action on your own submissions.
Rejected packages
Packages you submitted that were rejected.
Search and filter packages
Builders and curators can use the Search packages bar to find packages by name.
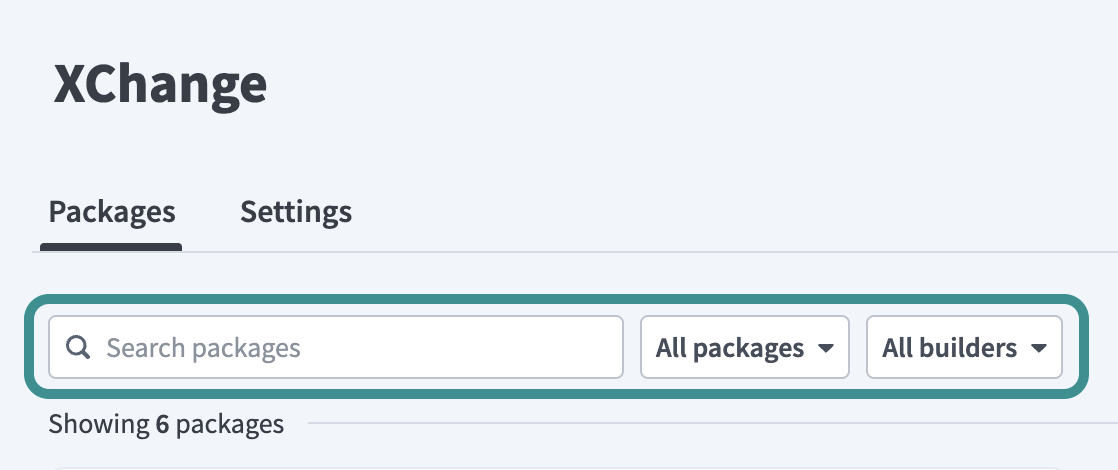 Filter packages
You can also filter the list using the following filters:
- All packages: Filter by status, such as Pending review, Ready to distribute, or Rejected
- All builders: Show packages created by a specific builder
Create a package
Builders create packages by selecting projects and grouping relevant assets into a versioned release.
You can click Save draft & close at any point in the creation flow to save your progress. Drafts appear under Drafts on the XChange dashboard, where you can resume them later.
You can start a new package from scratch or import an existing package from a .zip file when you create a package. Refer to Import a package to build from an exported package.
Complete the following steps to create a new package:
Click XChange in the navigation panel.
Click Create package on the XChange dashboard.
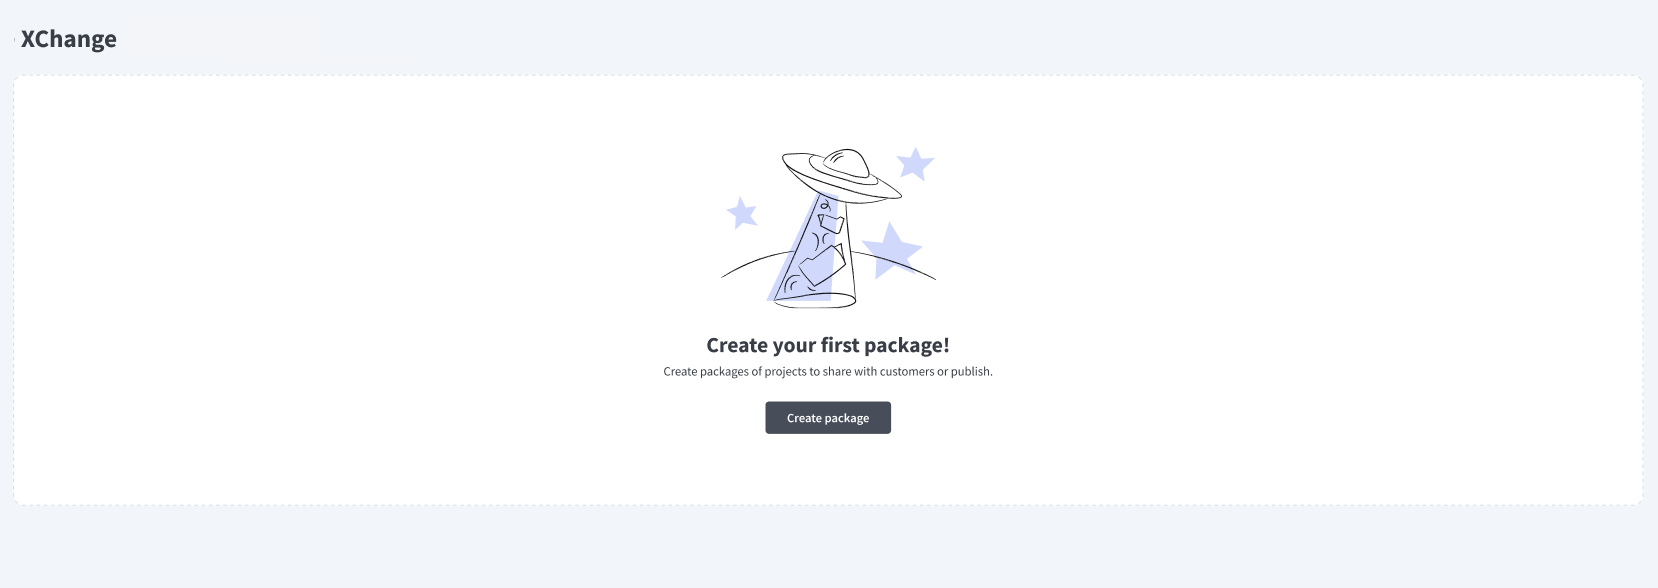 Create a package
Select Start over to build a new package from scratch, then click Next.
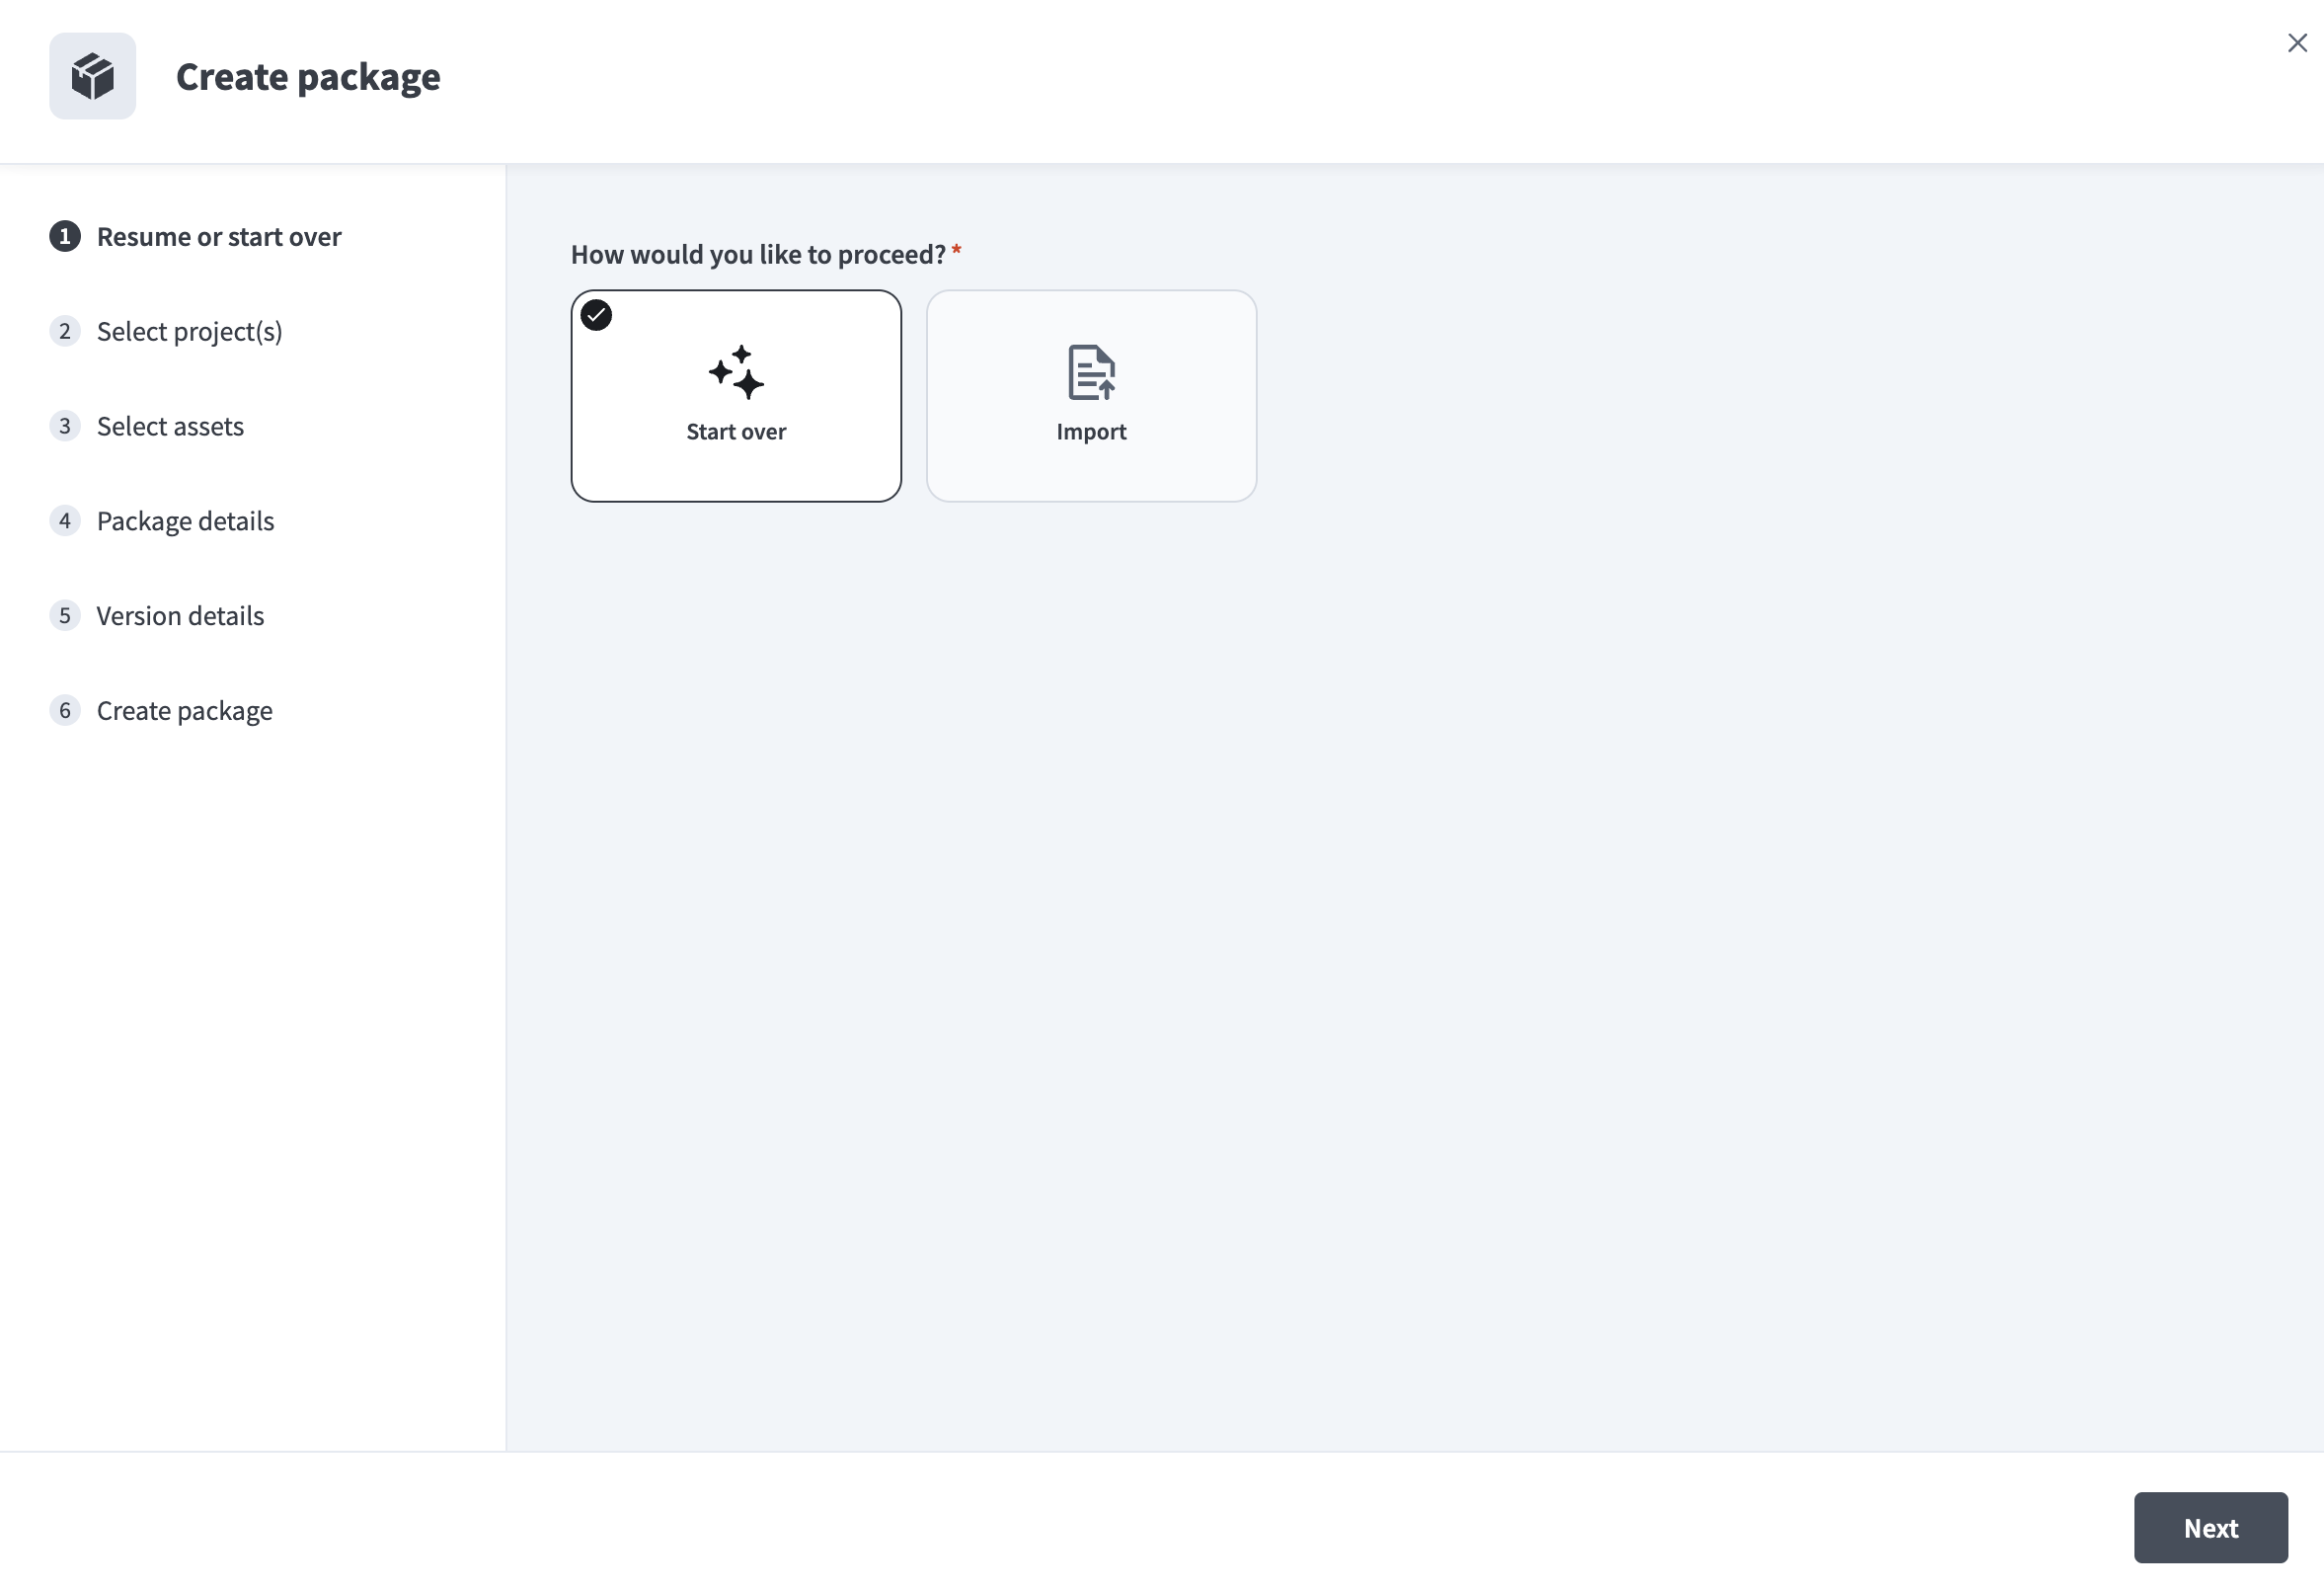 Choose how to proceed
Search for and select one or more projects. The list displays 25 projects per page.
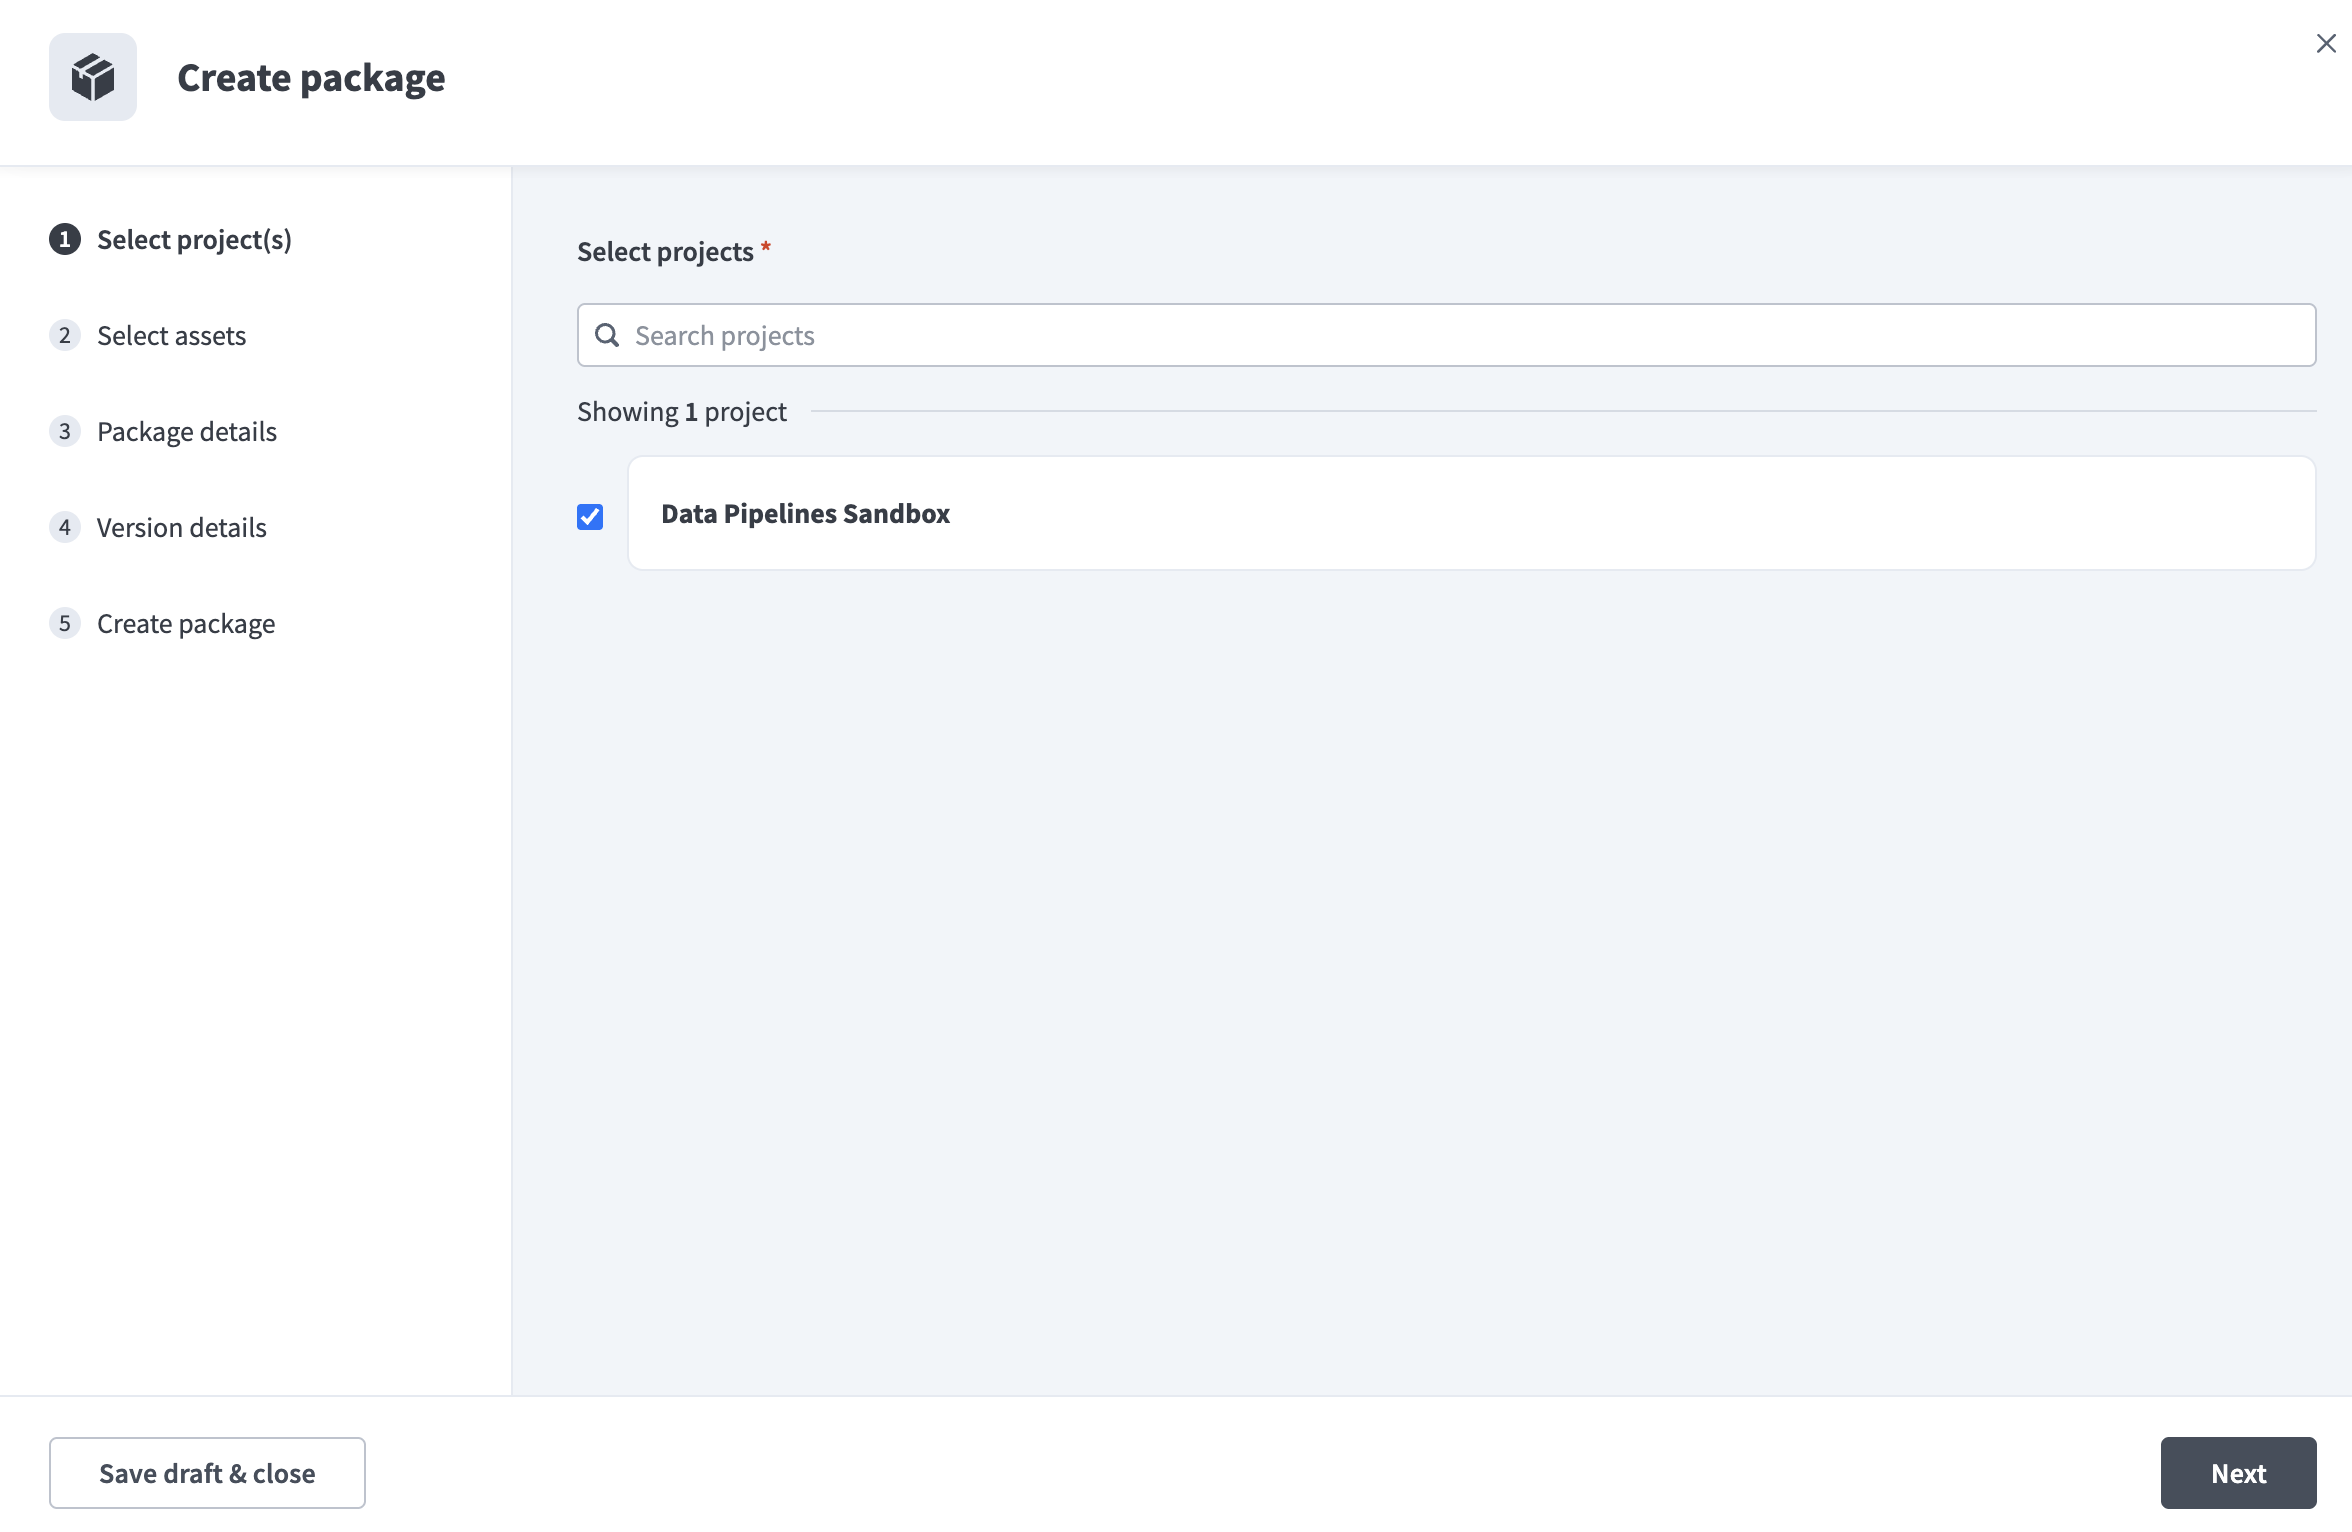 Select project(s)
Click Next.
Expand folders to include recipes, connections, and lookup tables. You can optionally include test cases per recipe. The summary updates to reflect your selections.
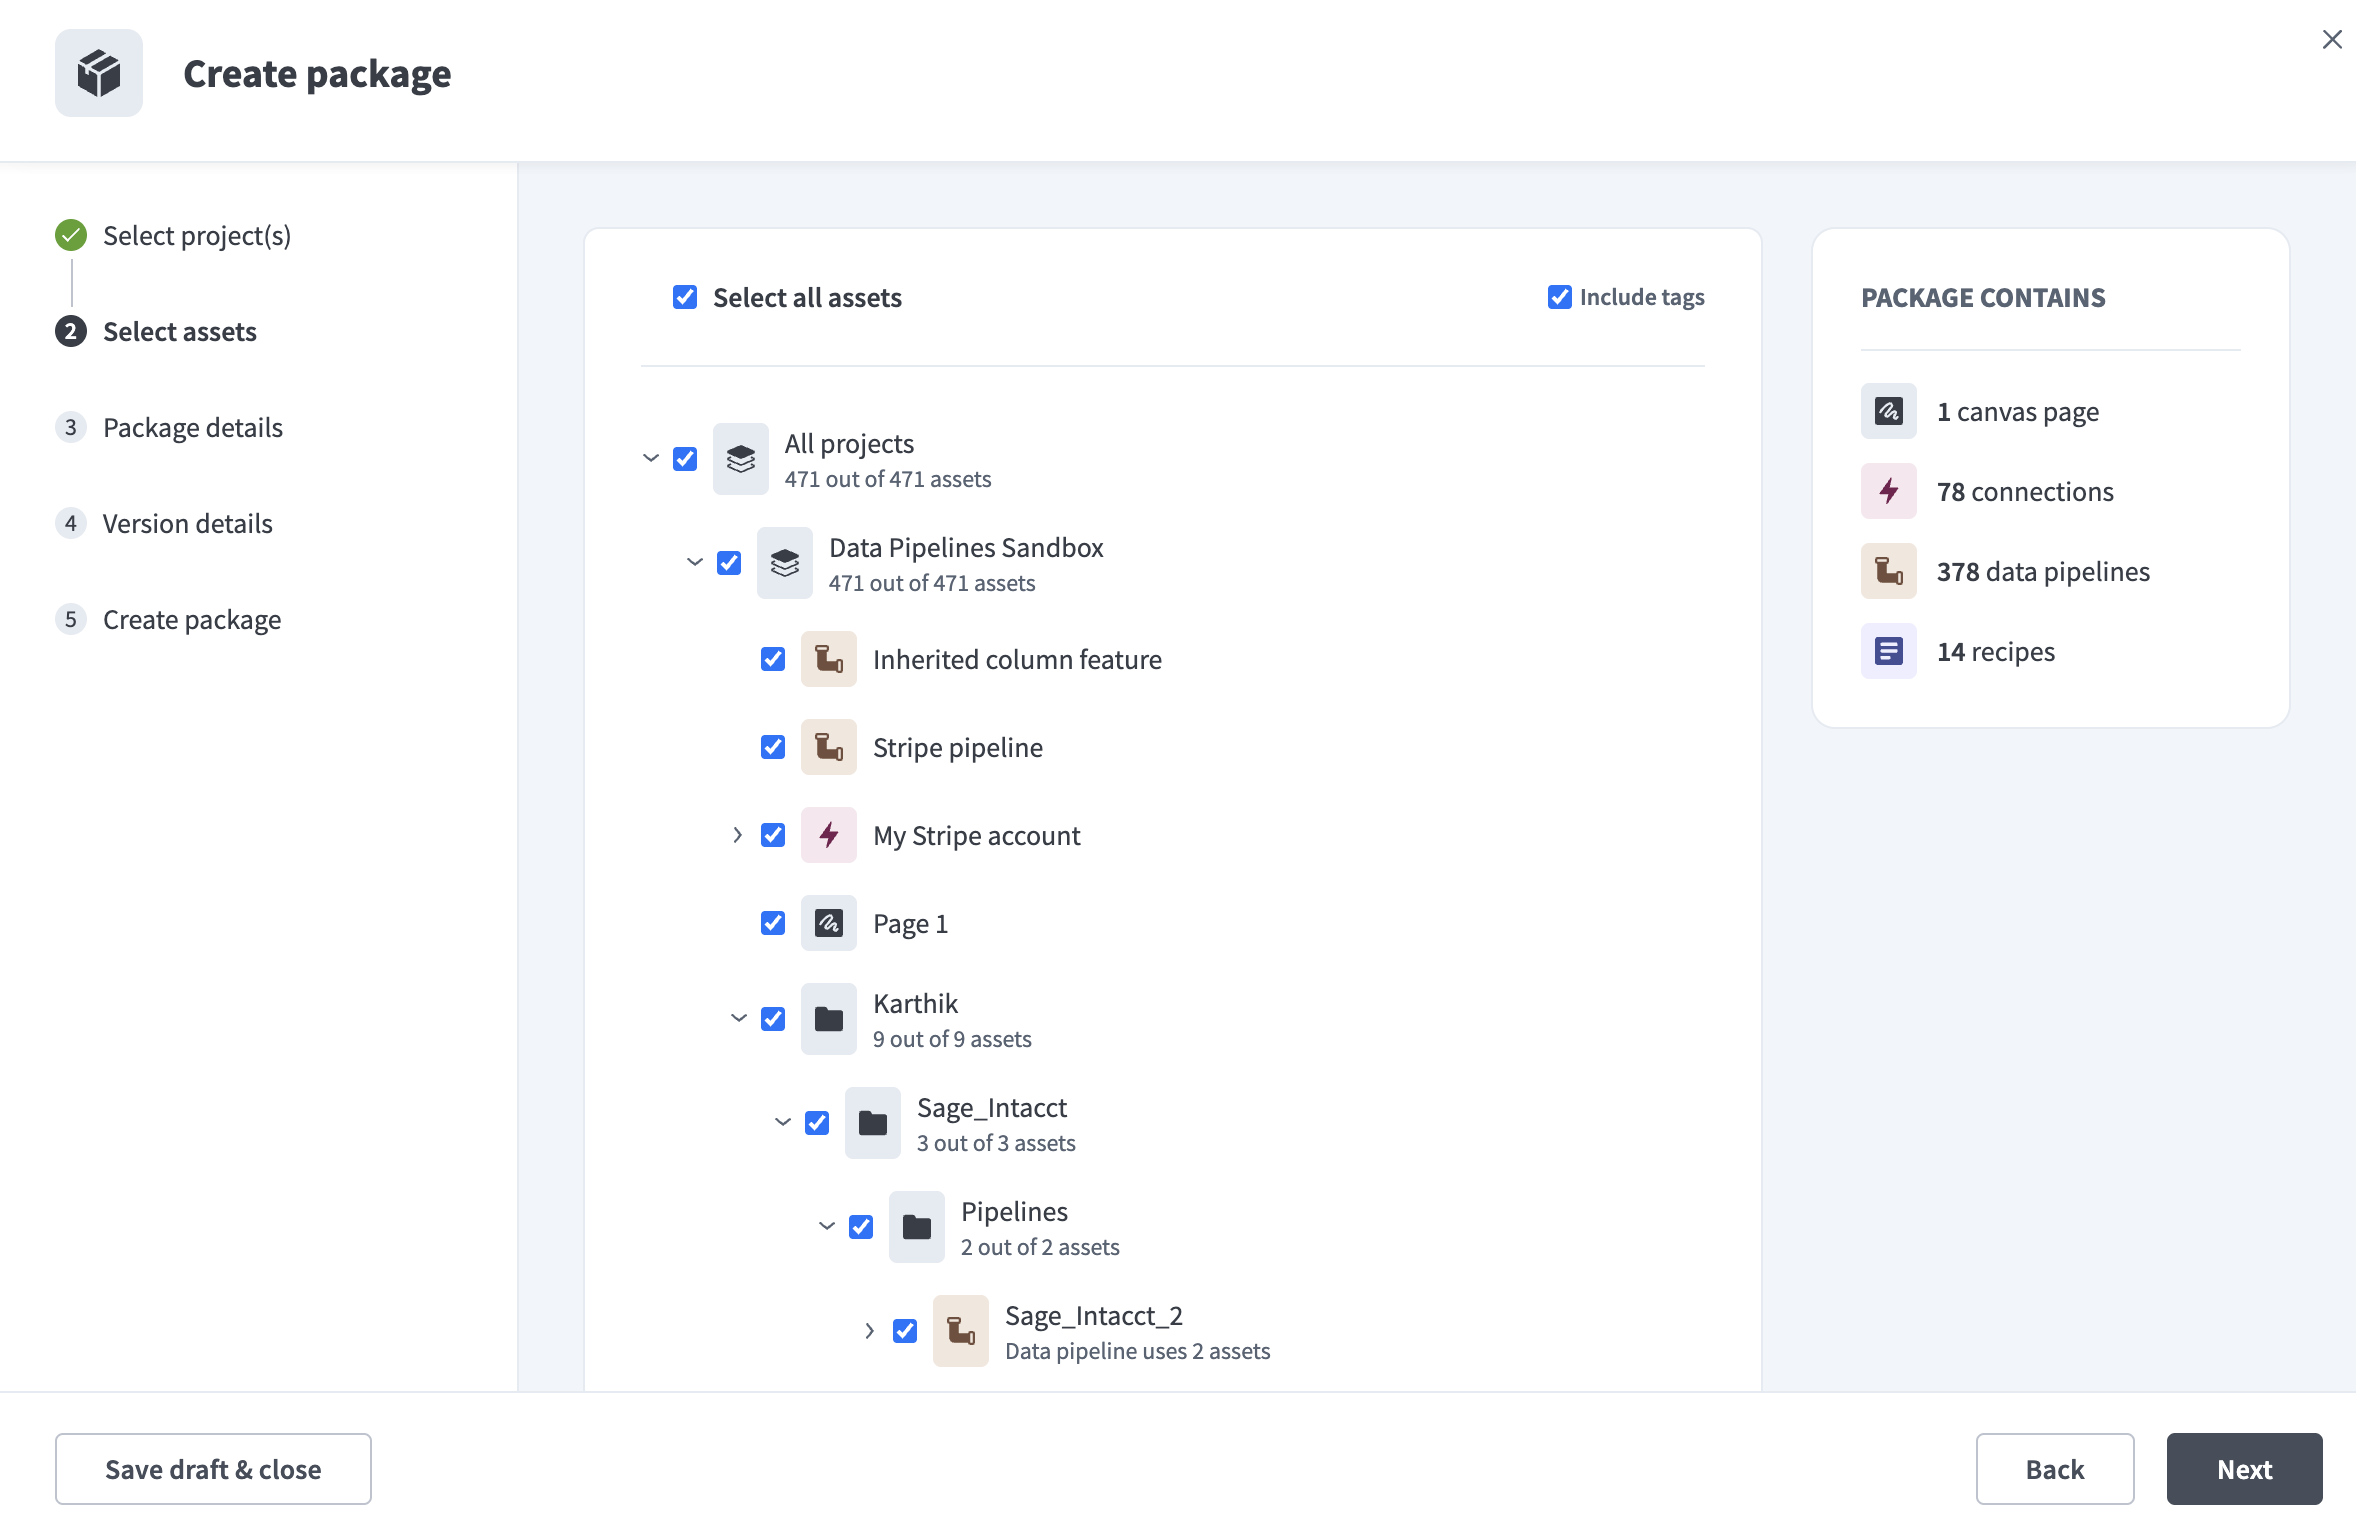 Select assets
Click Next.
Enter a name for the package in the Package name field.
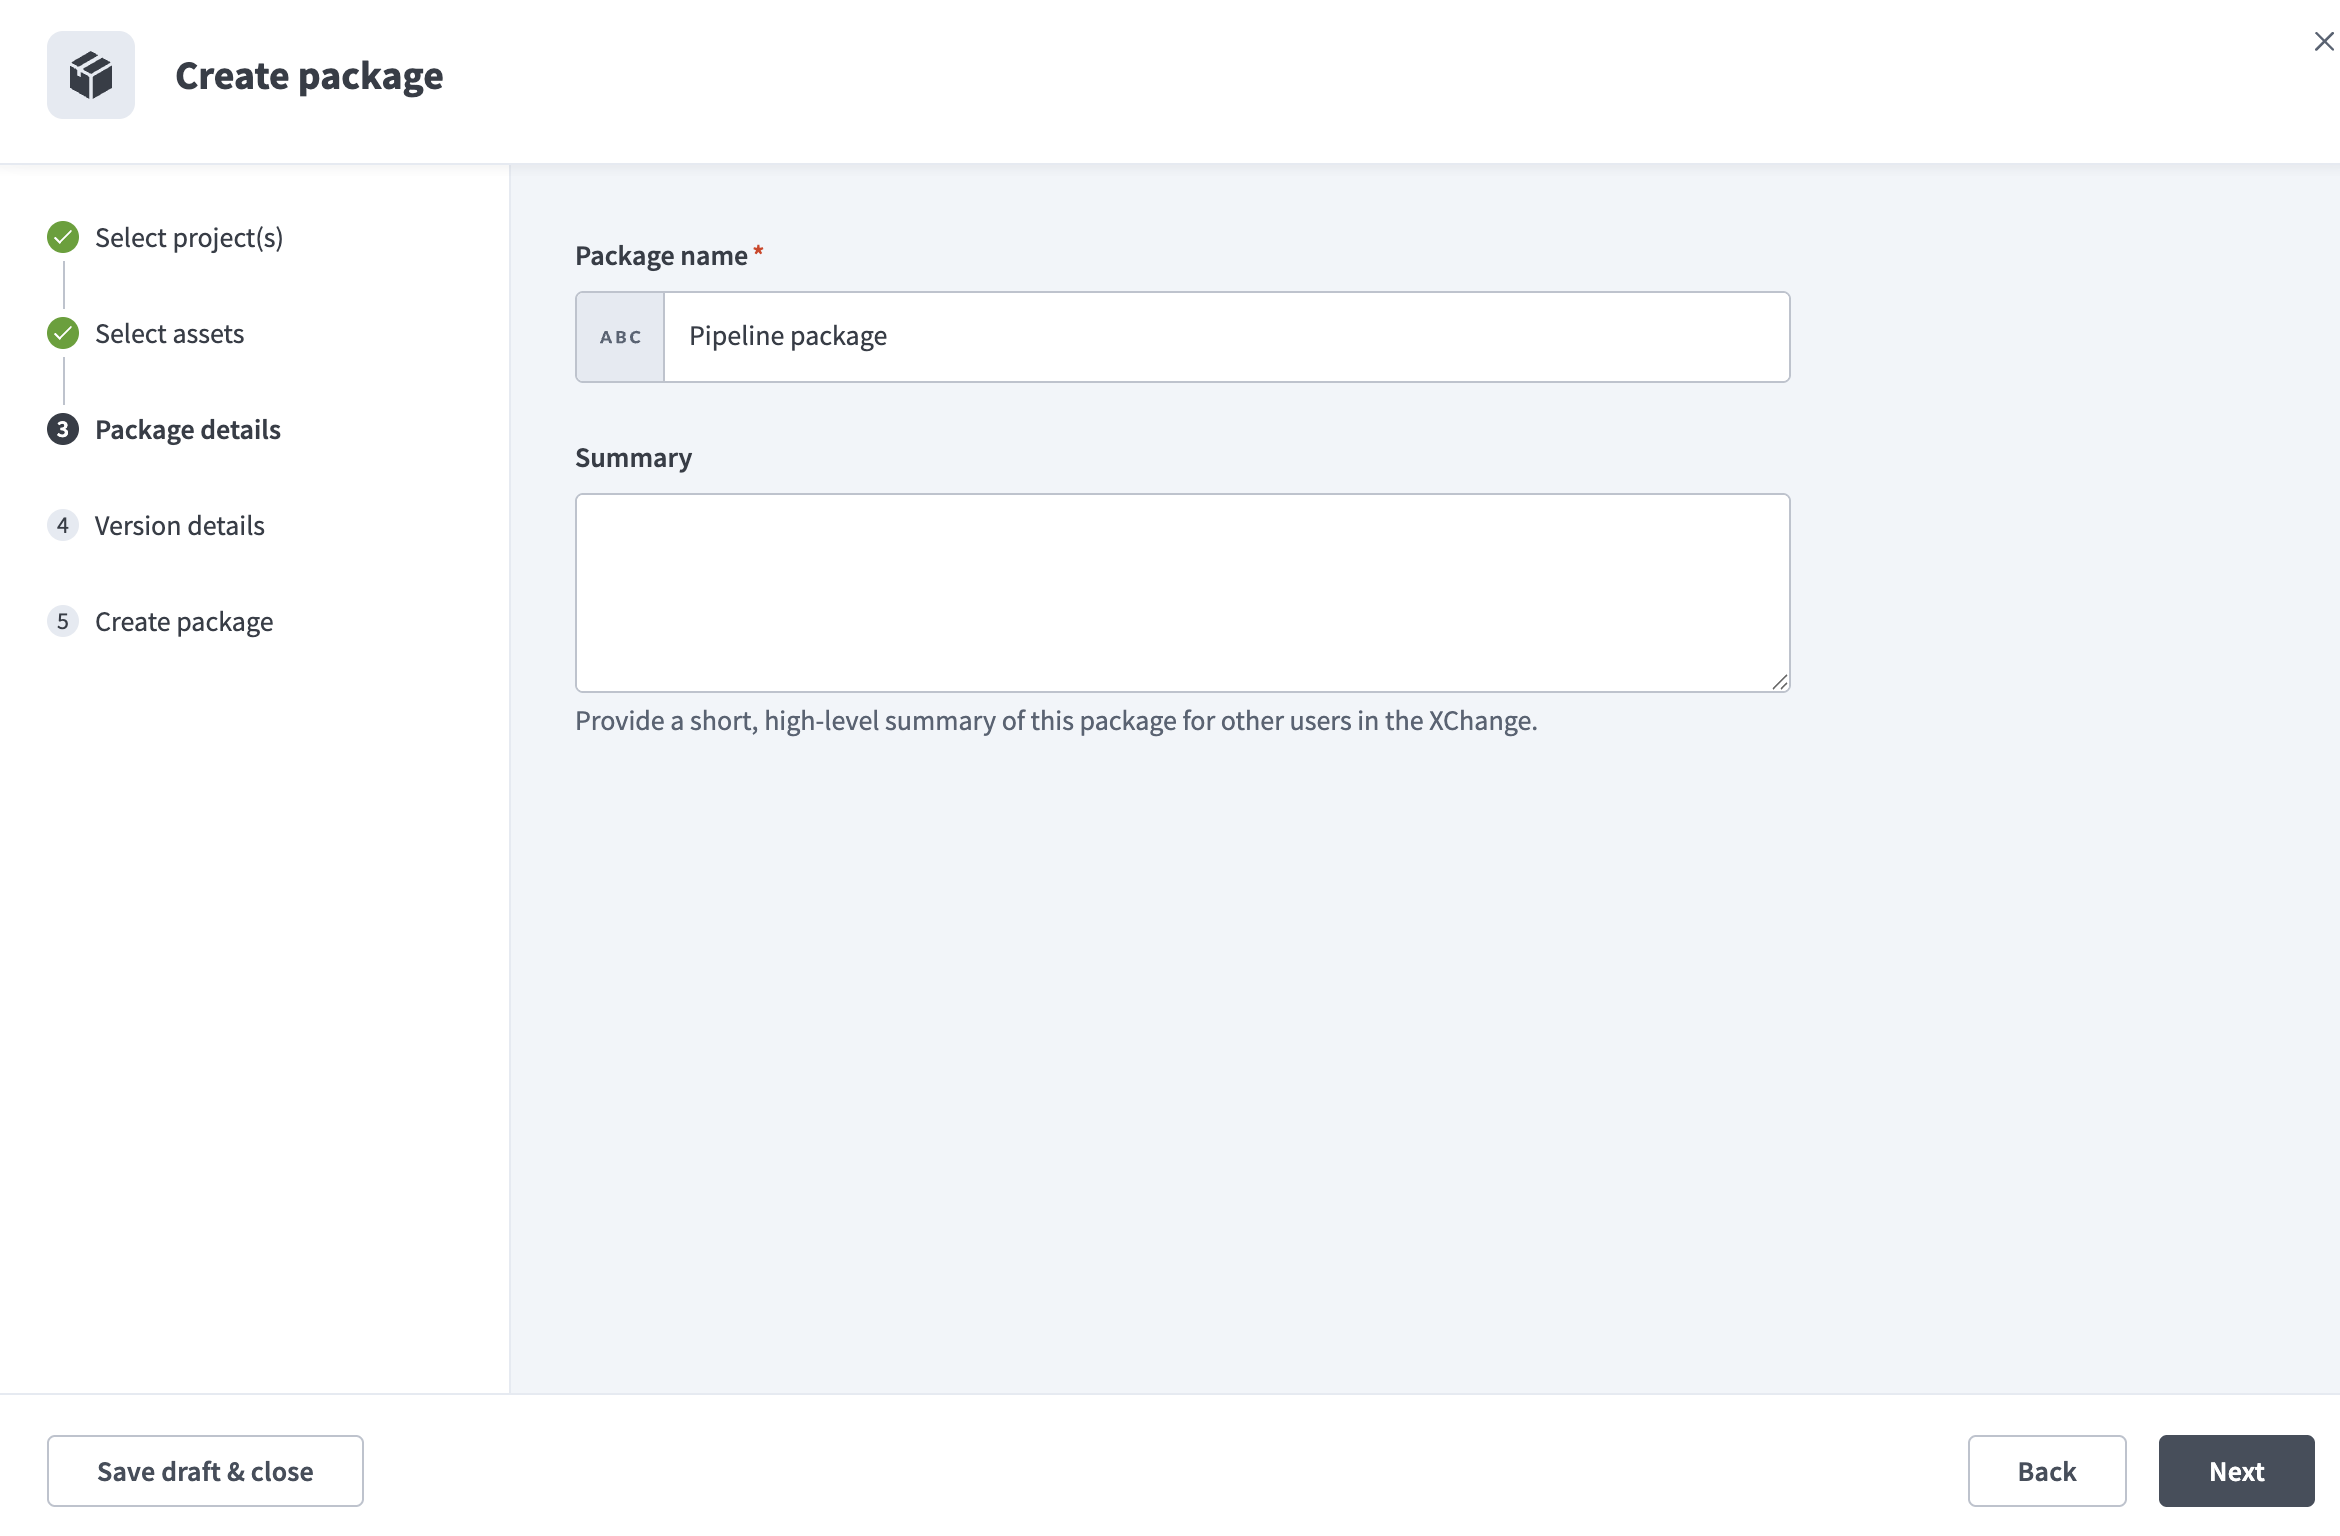 Add package details
Optional. Add a Summary. Use this field to give other XChange users a short, high-level description of the package.
Click Next.
Enter the Version.
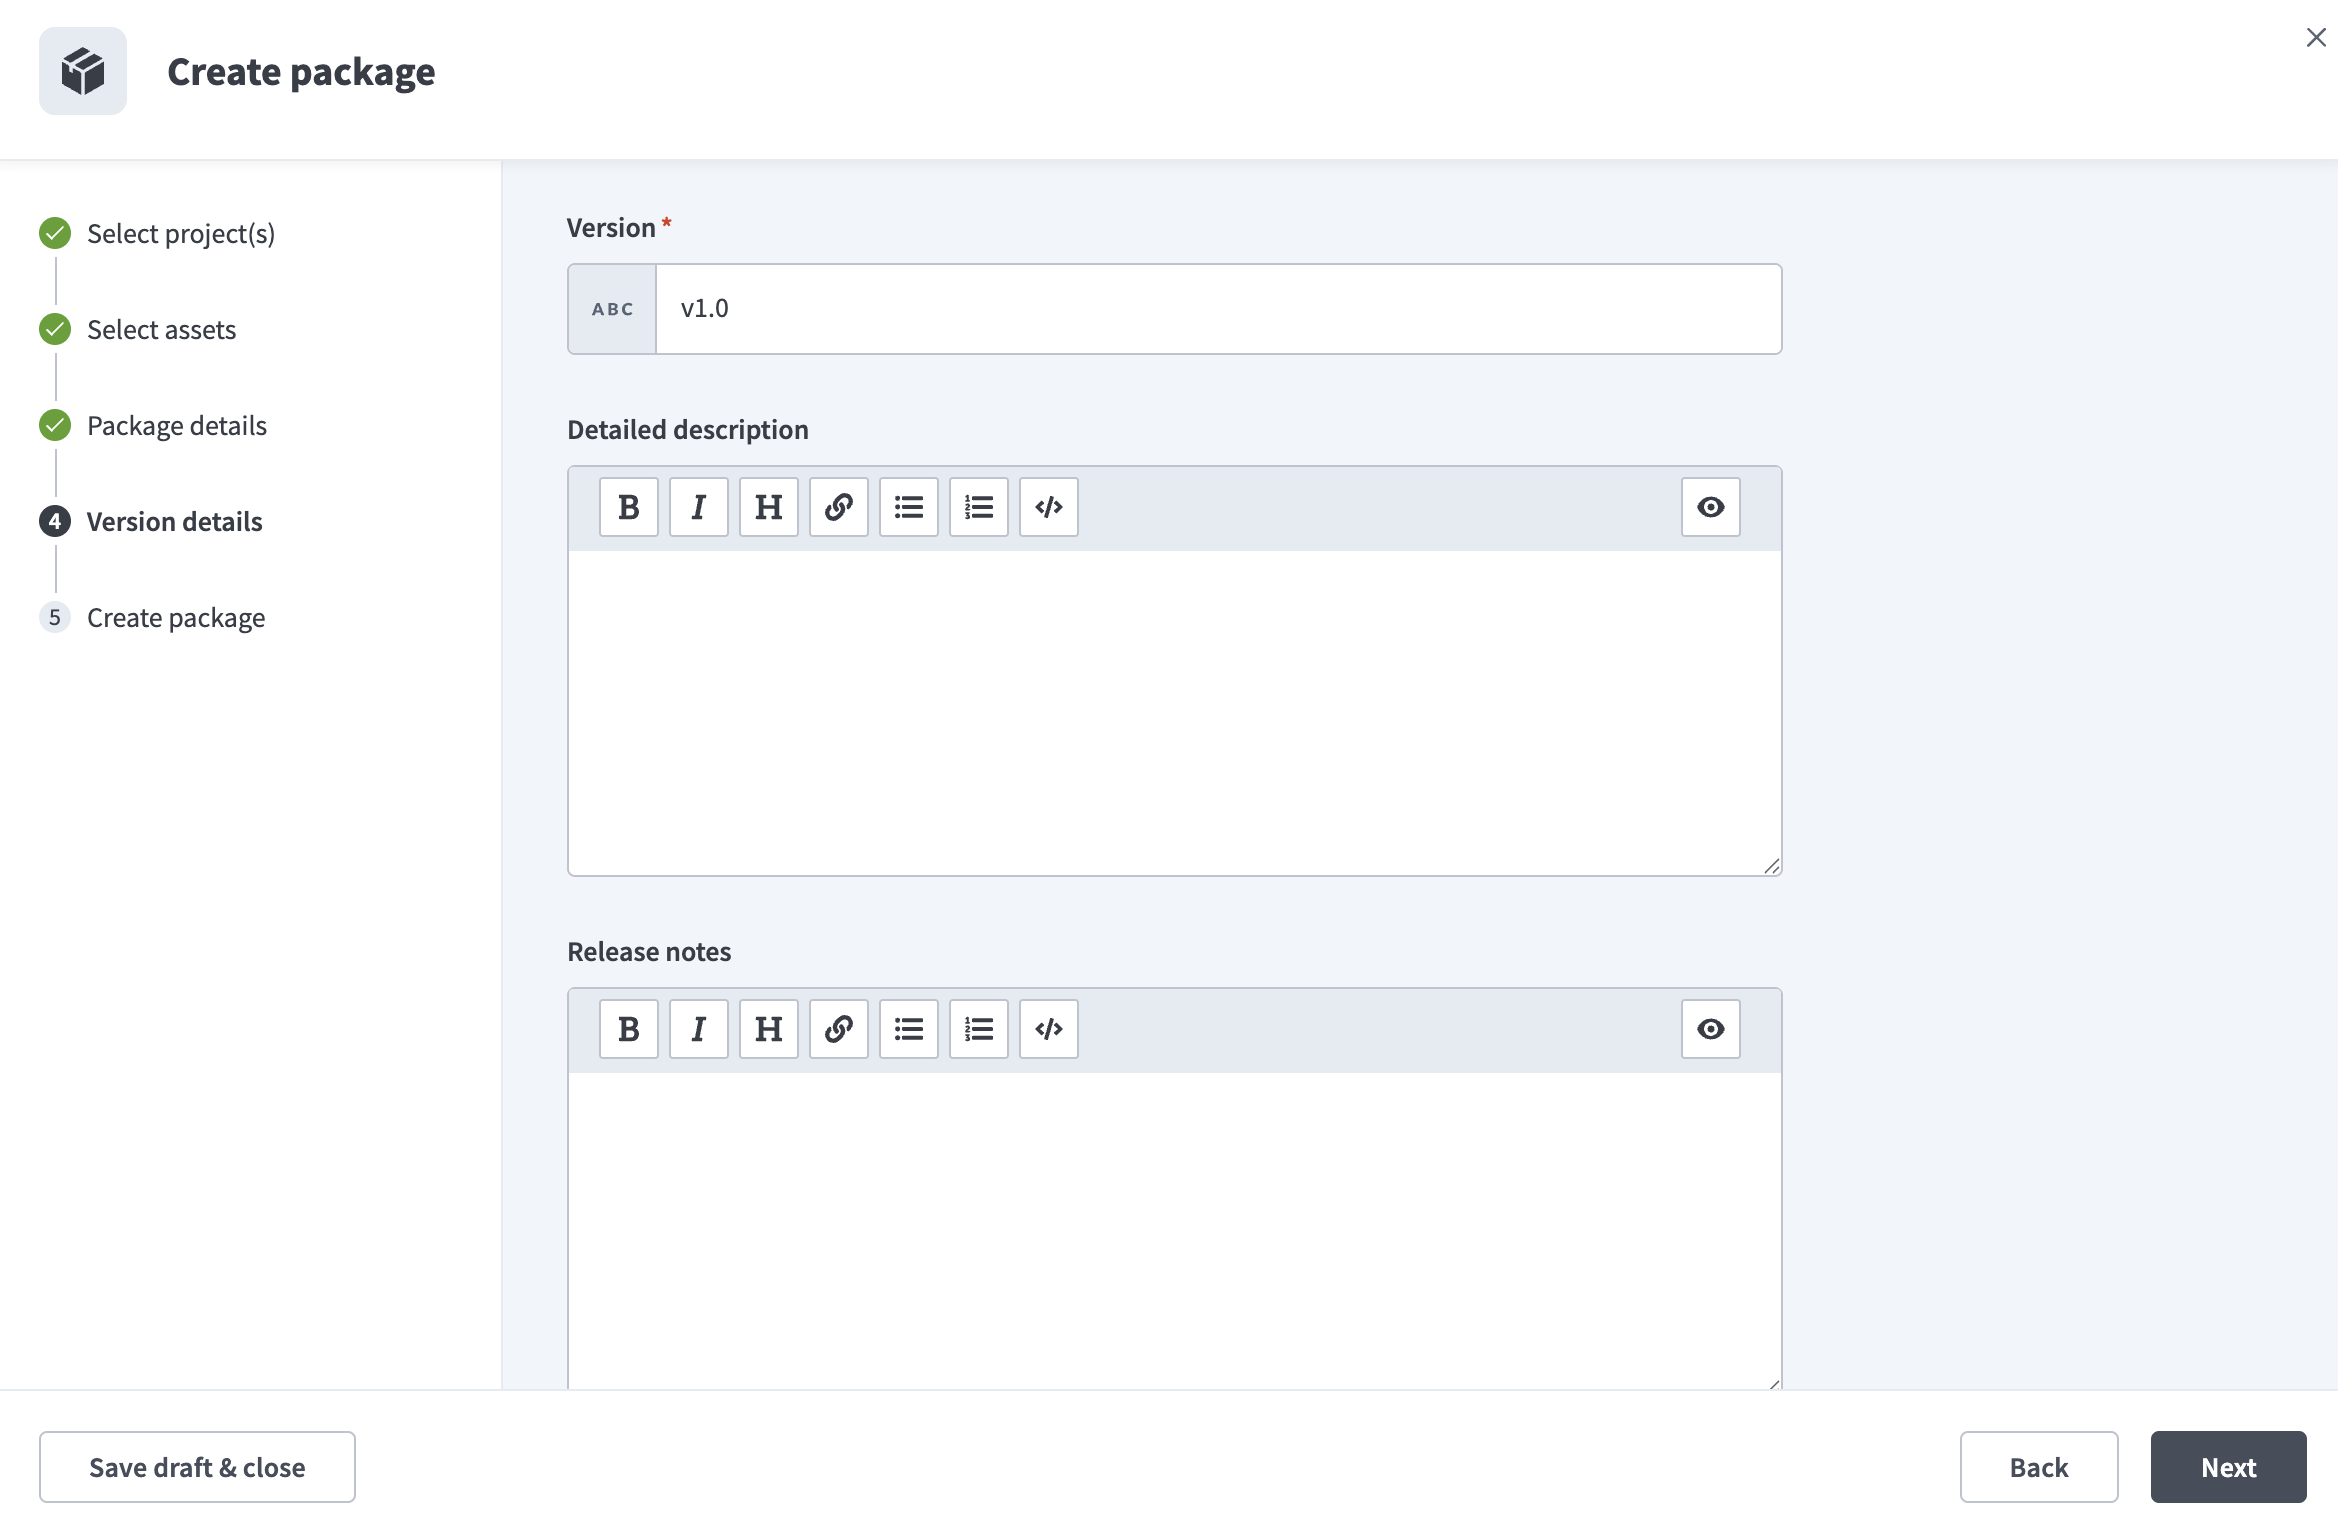 Add version details
The version defaults to v1.0. Use any string that meets the following requirements:
- Maximum 16 characters
- No spaces
Optional. Add a Detailed description of what the package includes. The field supports rich text formatting.
Optional. Add Release notes and explain what's included or changed in this version.
Click Next to submit the package.
Import a package
Builders can import an existing package to start a new package from a .zip file. You can import .zip files exported from XChange or from Recipe lifecycle management.
Complete the following steps to import a package:
Click Create package on the XChange dashboard.
Select Import, then click Next.
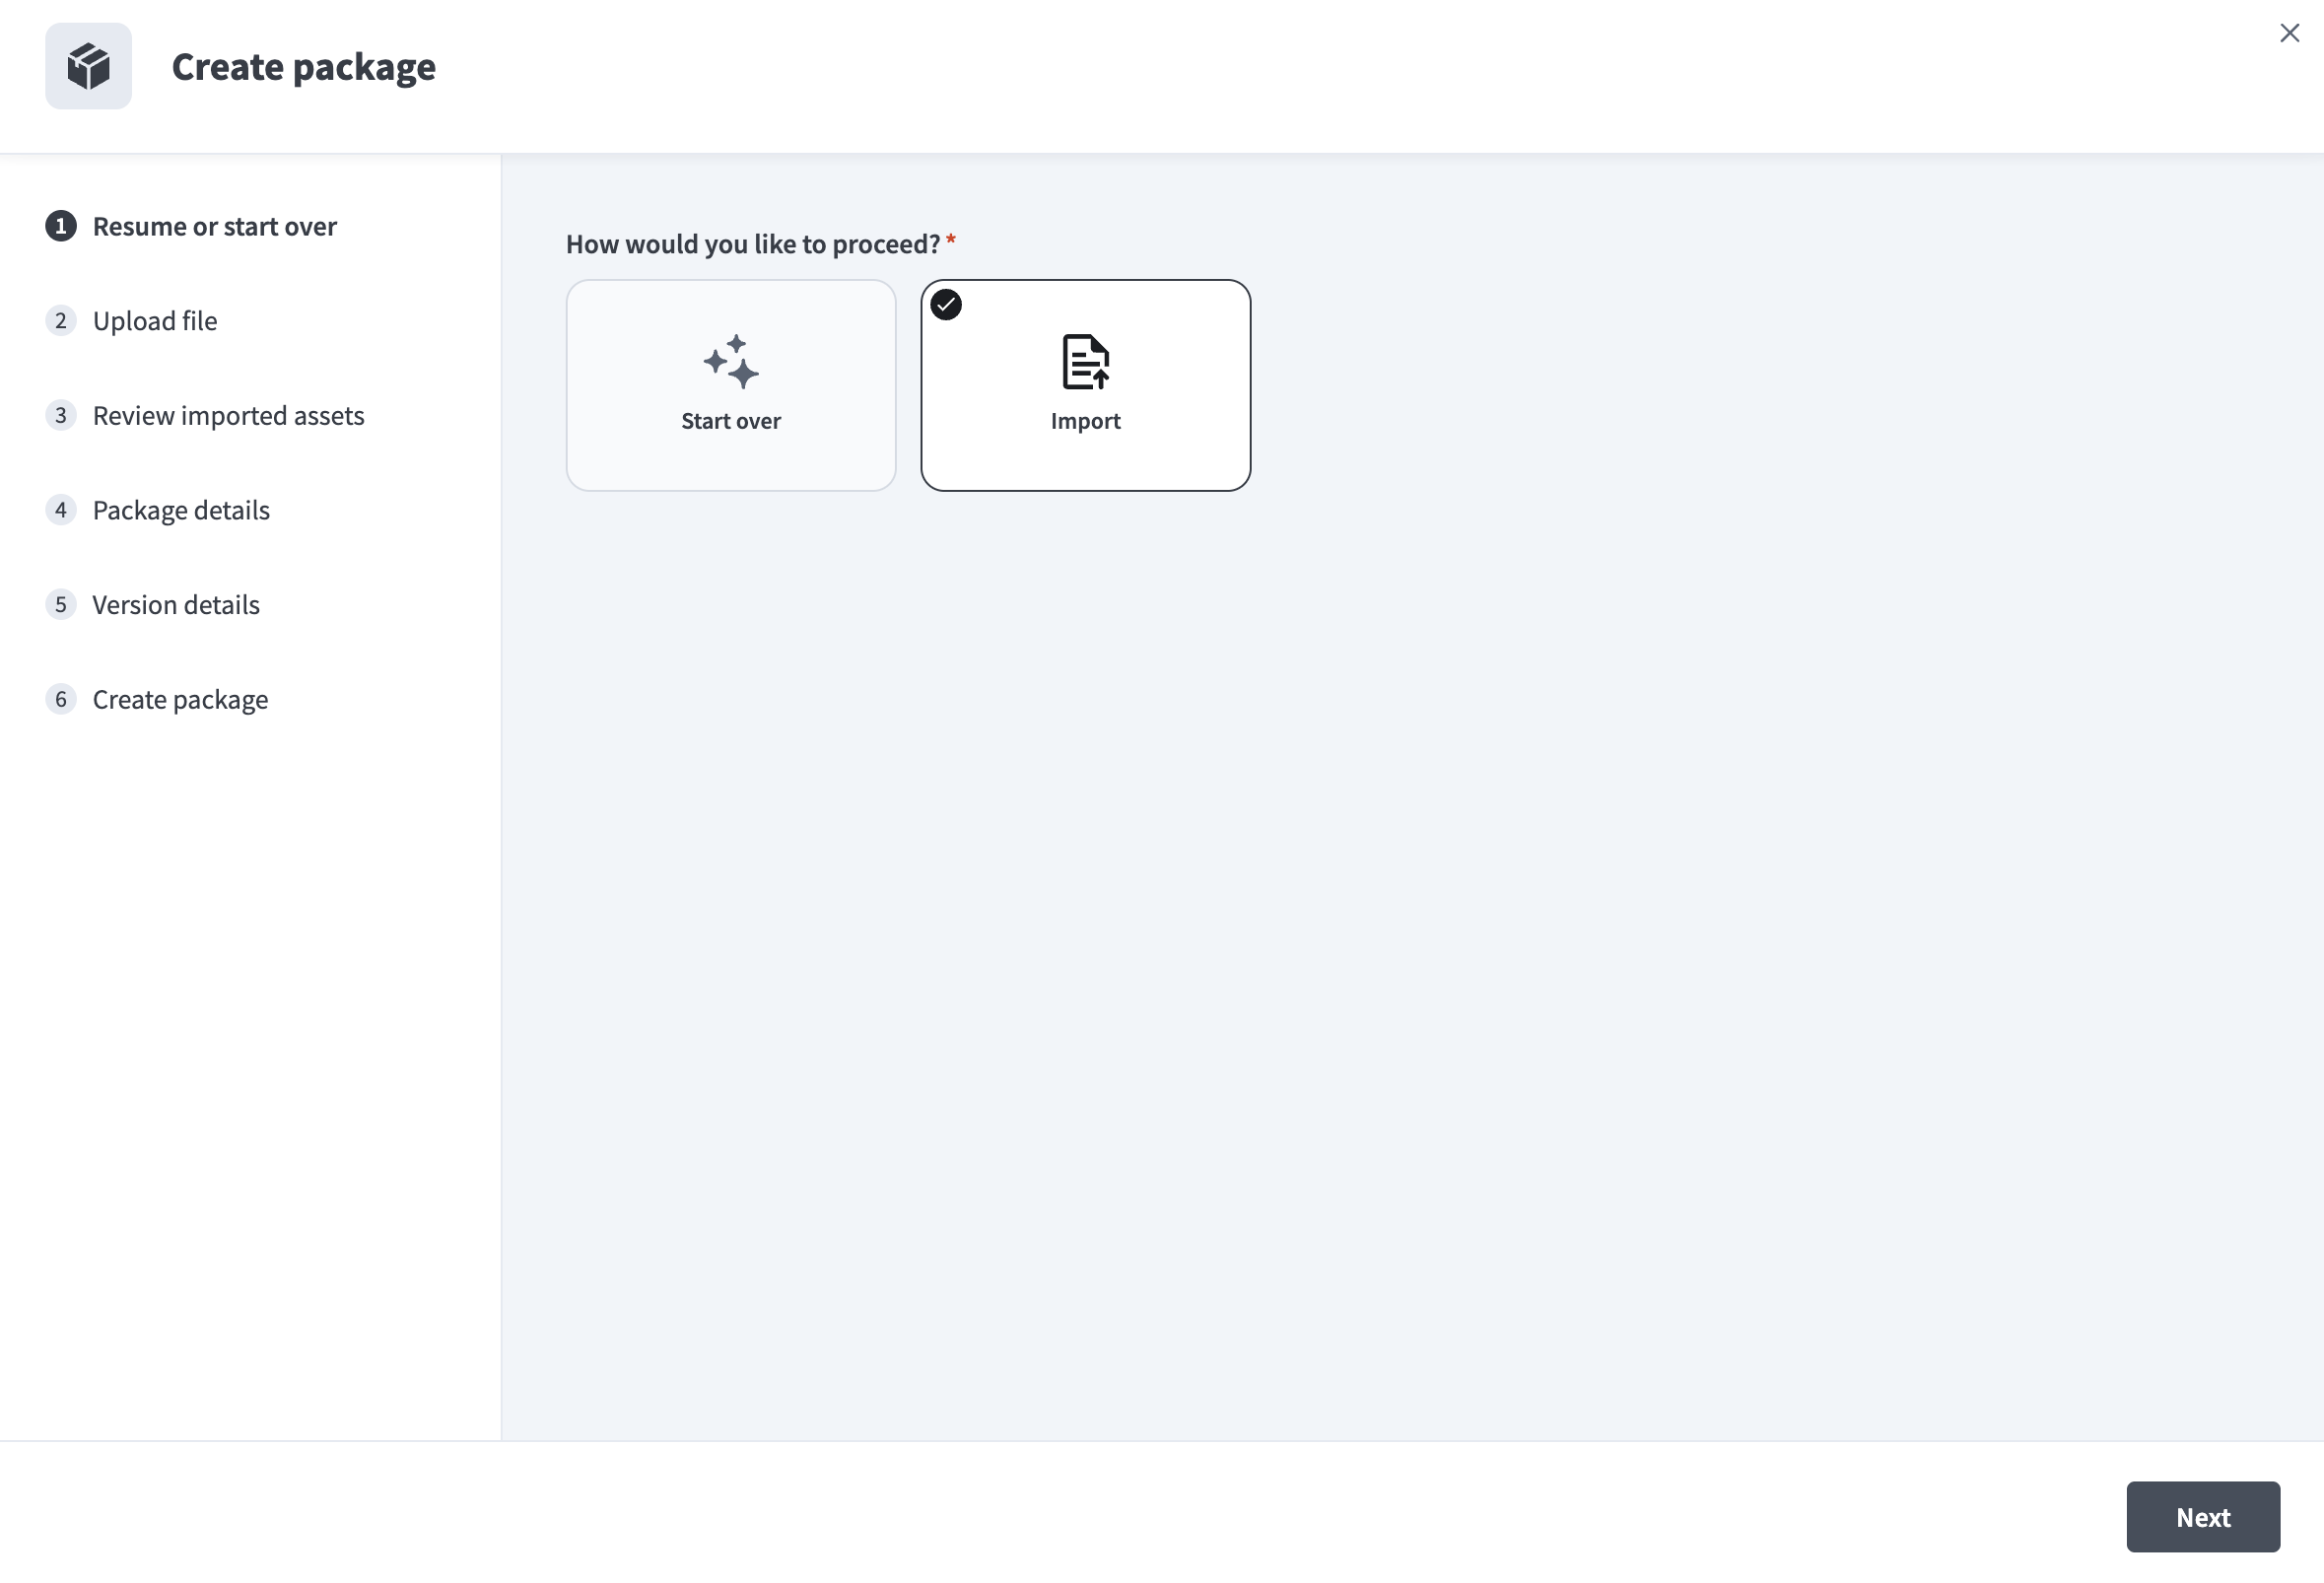 Import a package
Upload the .zip file you plan to import.
Review the imported assets, then click Next.
IMPORTED ASSETS
An imported package includes every asset in the .zip file. You can't select or deselect individual assets during import, unlike the standard Create a package flow.
Complete the Package details and Version details steps. These fields match the standard Create a package flow.
Click Next to create the package.
Versions
The Versions tab displays all versions of the package in a table.
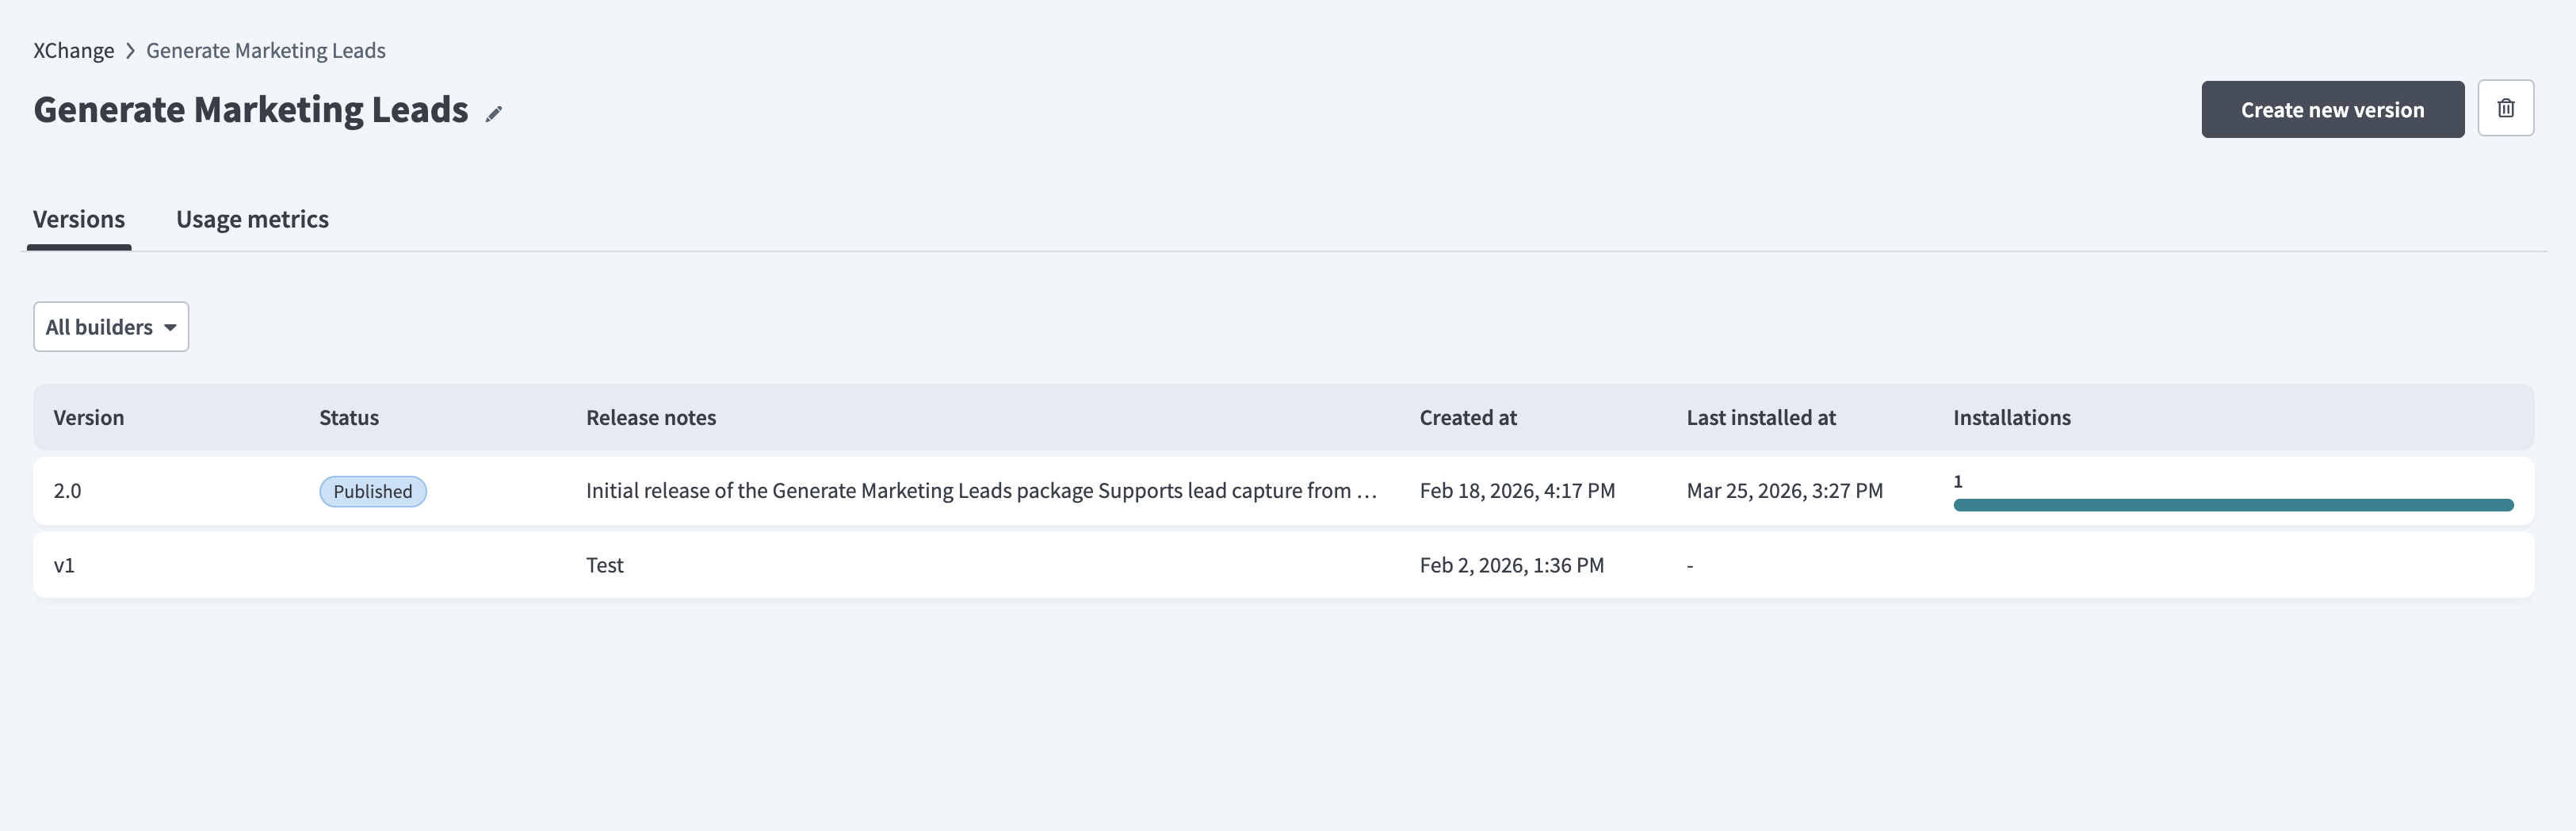 Versions tab
Builders and curators use this tab to review version history, track adoption, and manage package updates, including creating new versions using the Create new version button.
The Installations column shows the total number of installations for each version. Hover over the bar to view a breakdown of library installations from the private community and direct installations to workspaces.
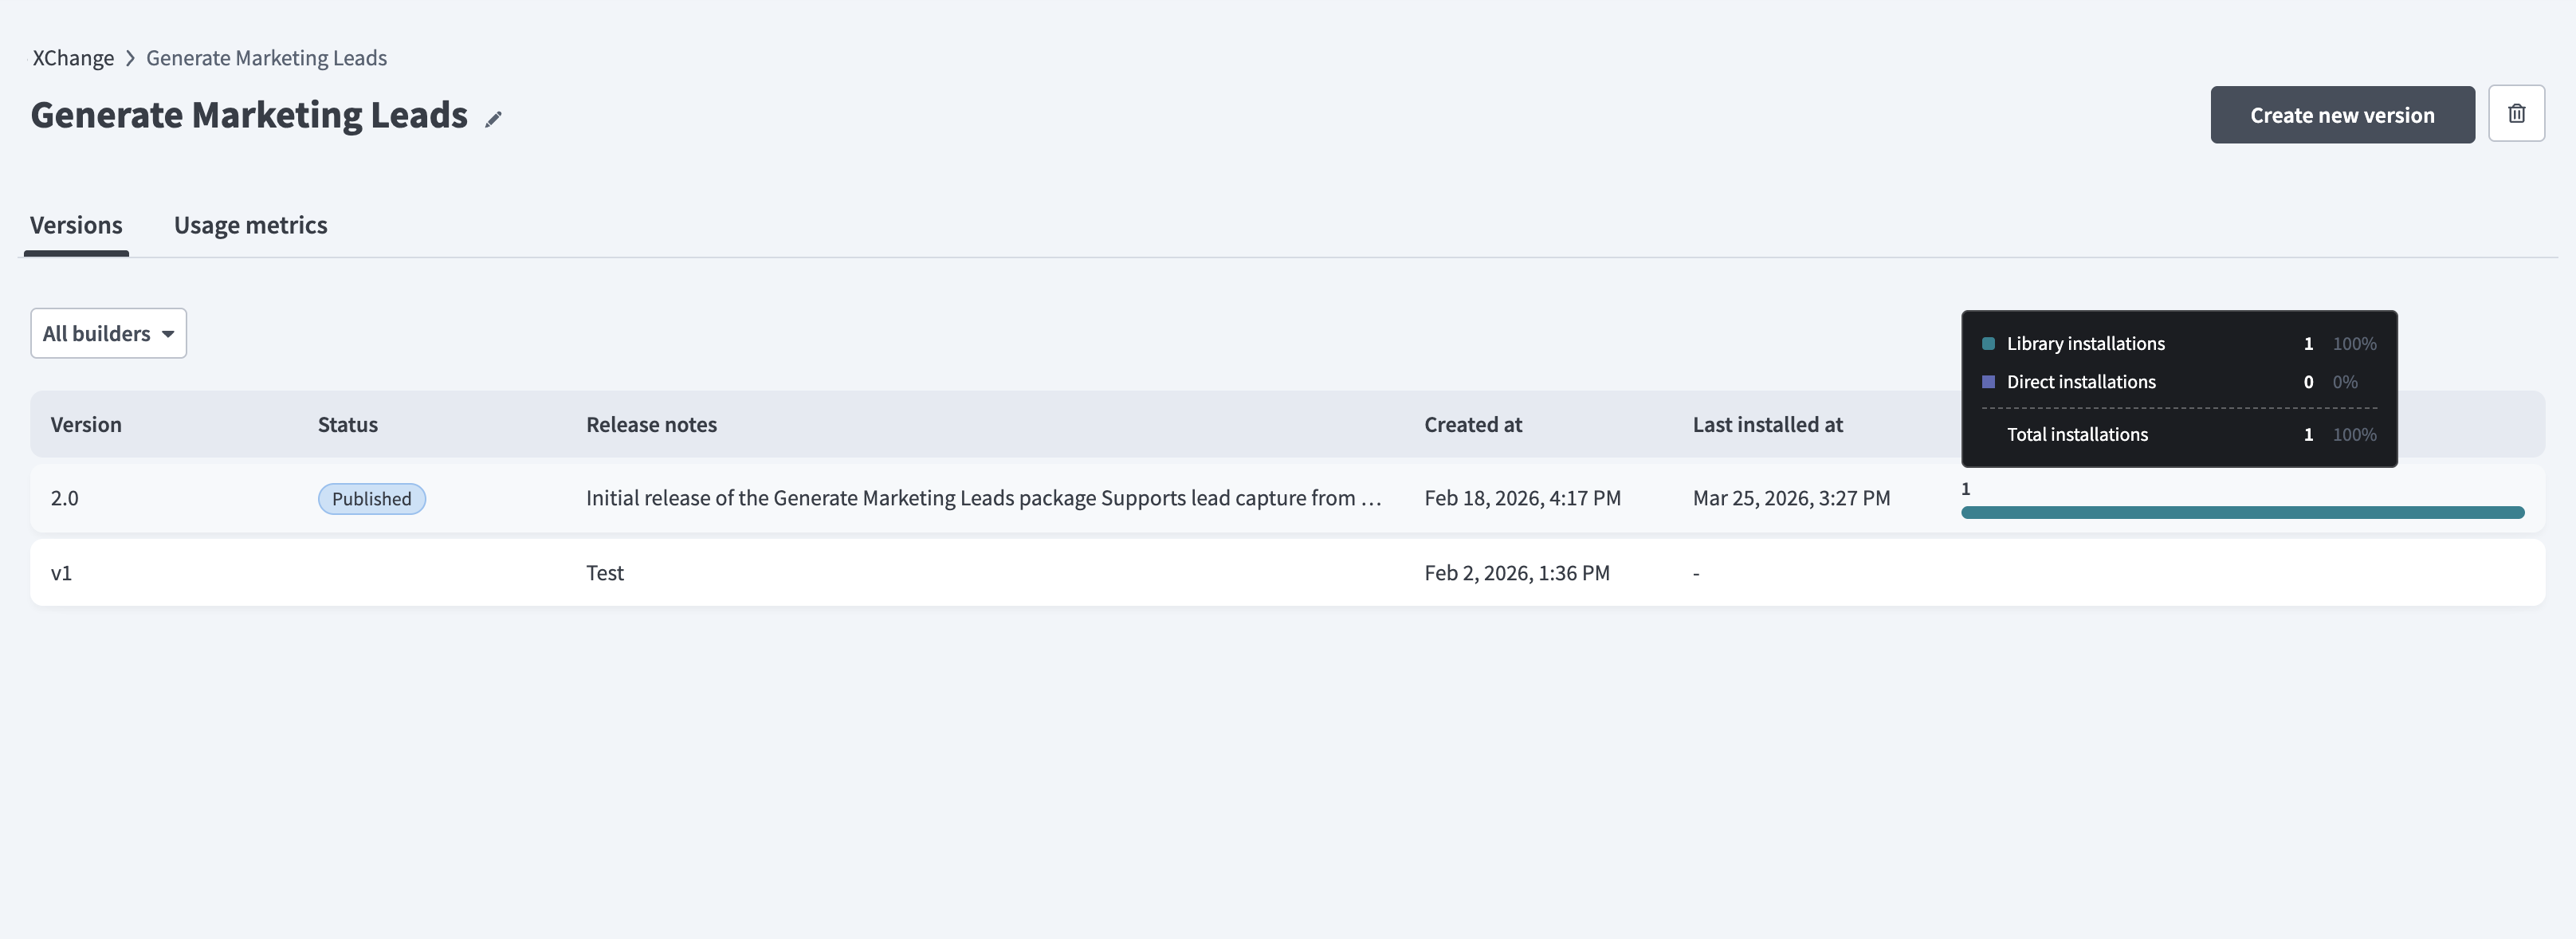 View installations
Selecting a version opens its details page.
Export a package version
You can download any version of a package as a .zip file. Click the download icon on a version row in the Versions tab to export that version.
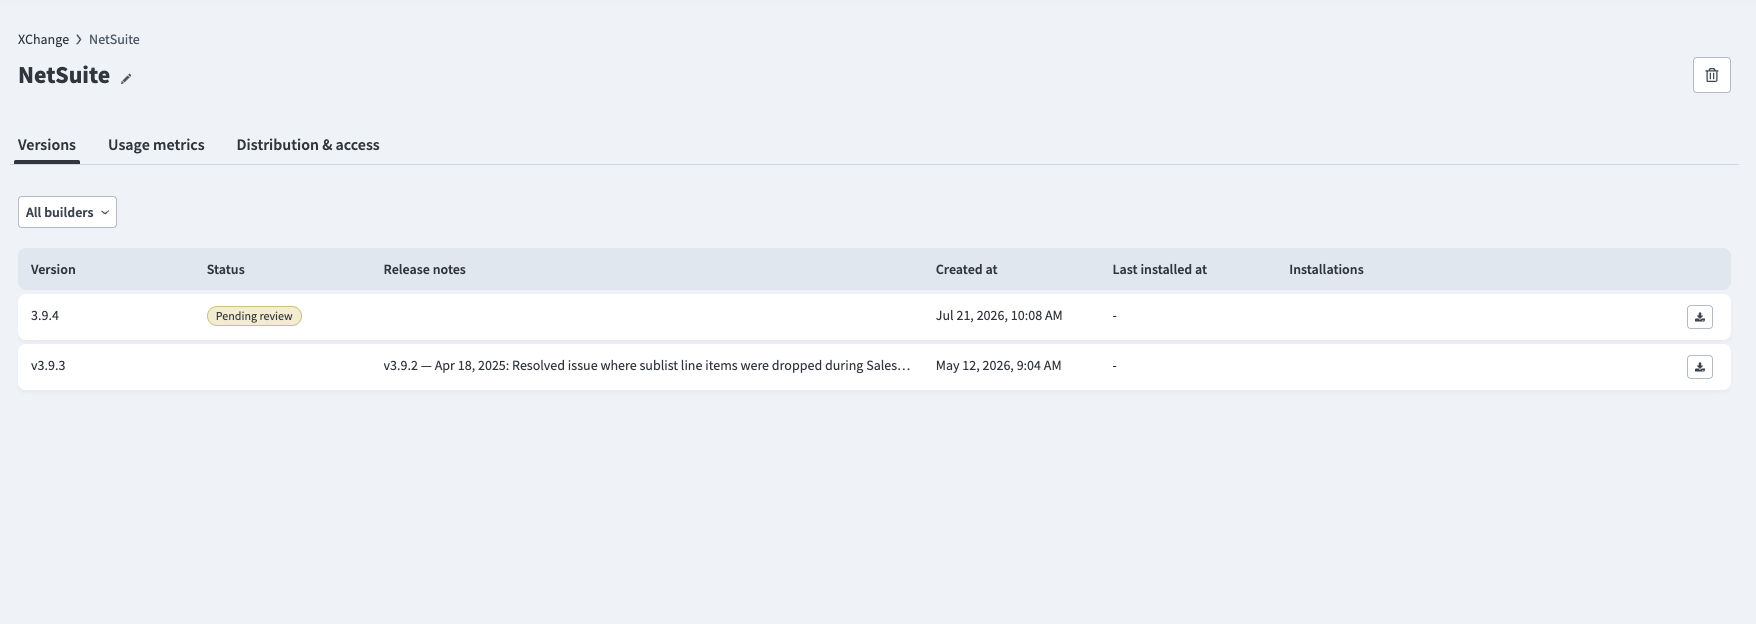 Export a package version
You can import an exported .zip file back into XChange to start a new package. Refer to Import a package.
Version details
The version details page provides information about the selected version, including description, release notes, and status.
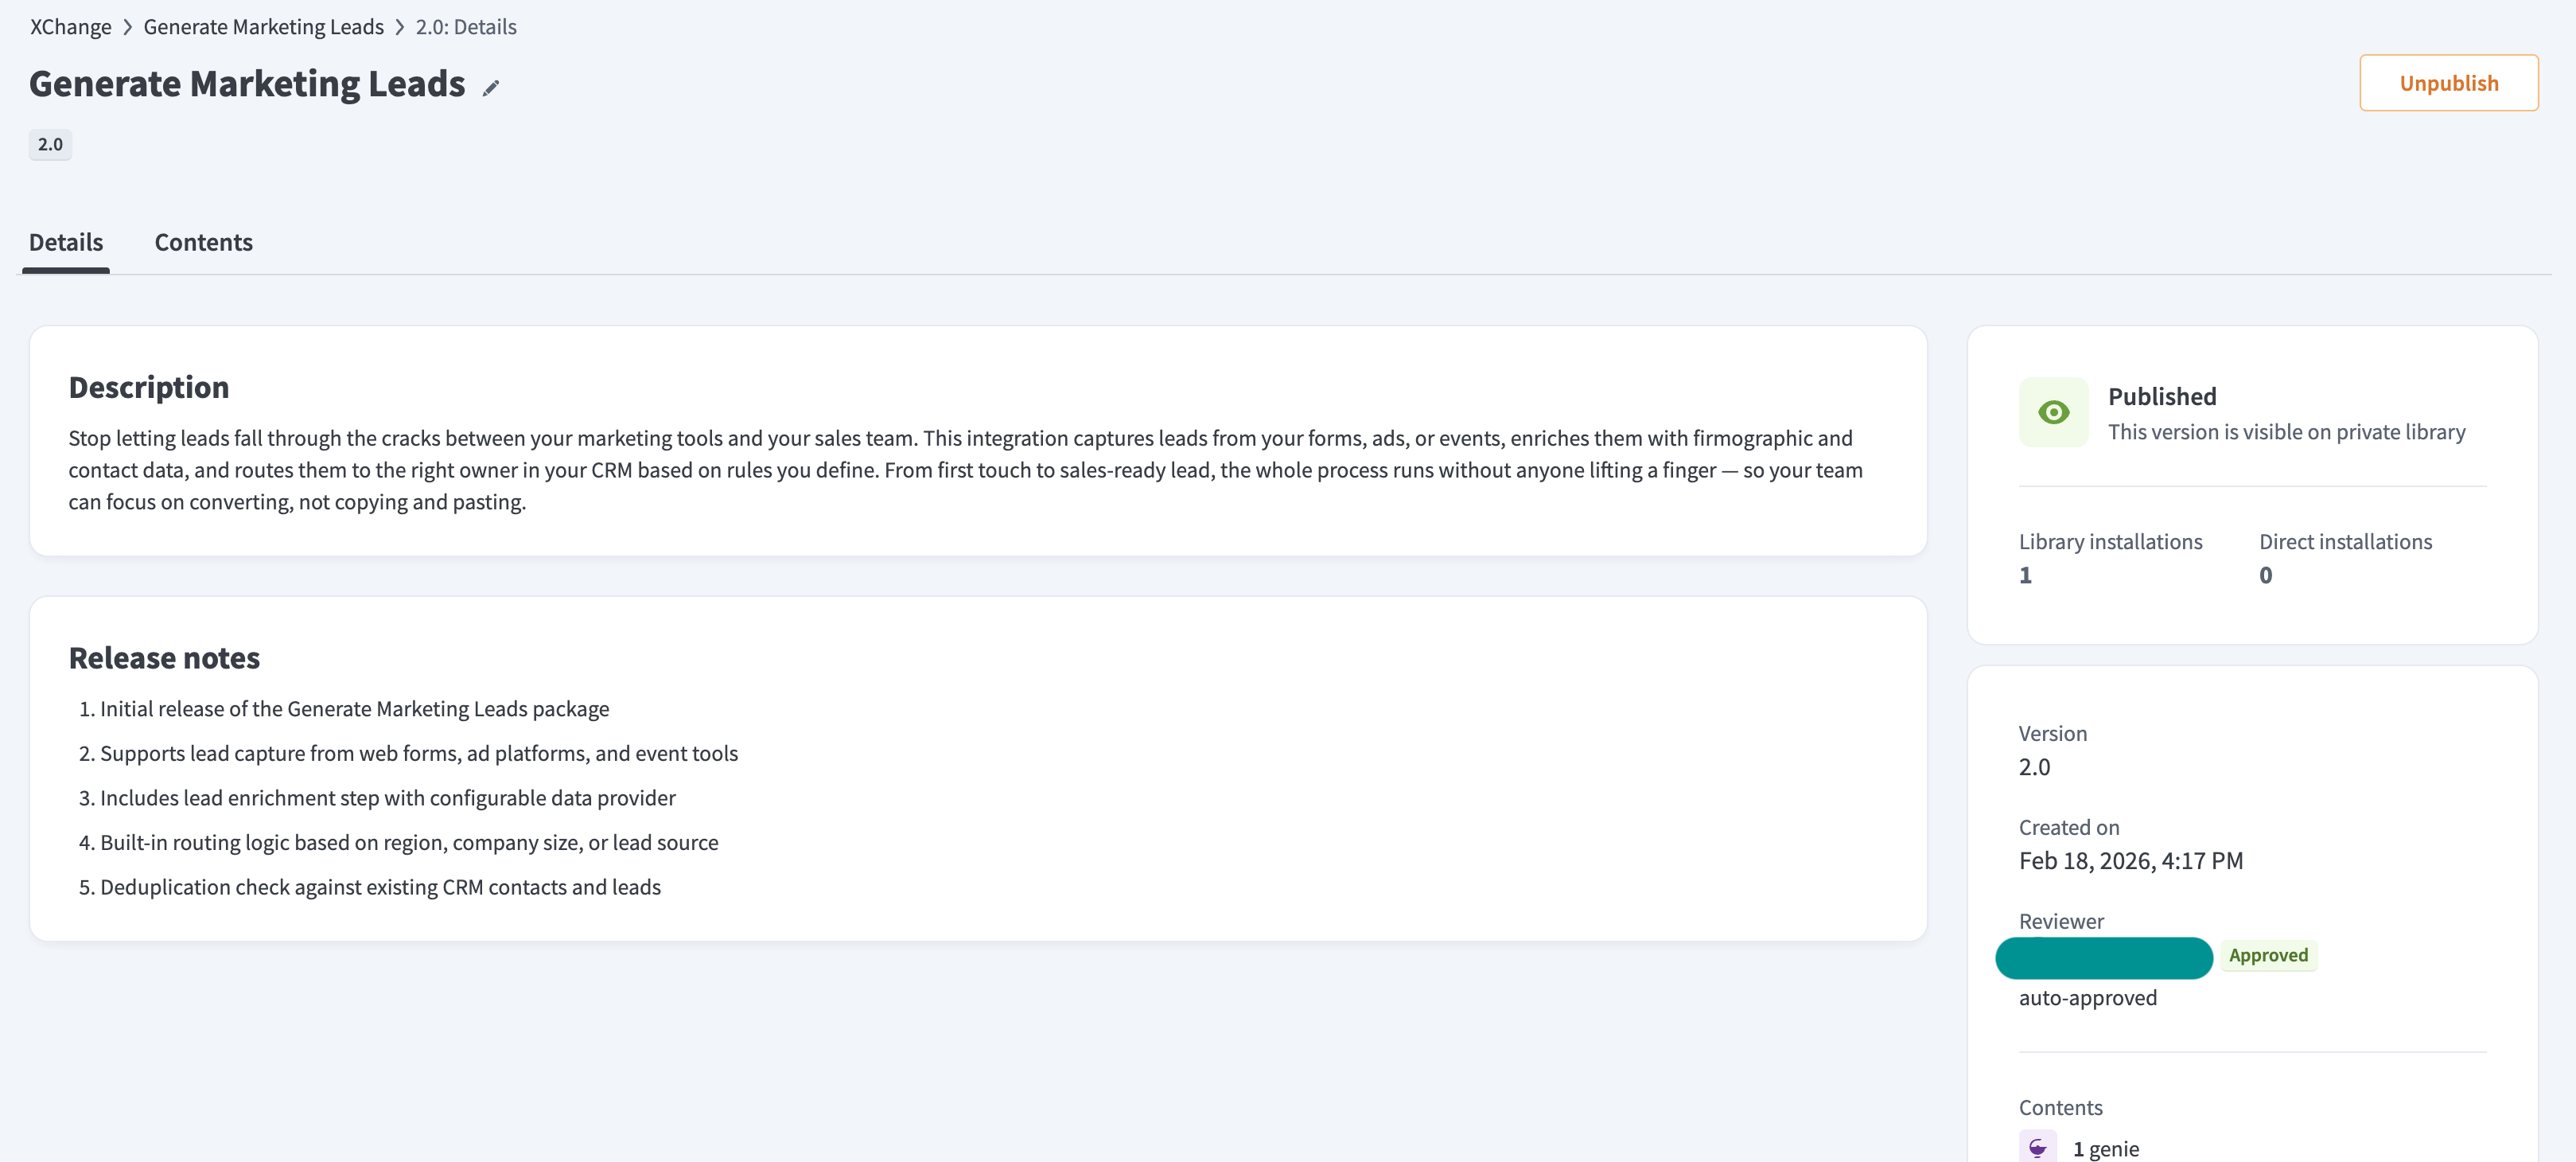 Version details page
The page includes the following:
- Description: Overview of the package functionality
- Release notes: Full list of changes included in the version
- Status: The current state, such as Published
- Installations: Library and direct installation counts
The page also includes the following tabs:
- Details: View description, release notes, and version information
- Contents: View included assets such as recipes and connections
Usage metrics
The Usage metrics tab displays installation data for the selected version across workspaces.
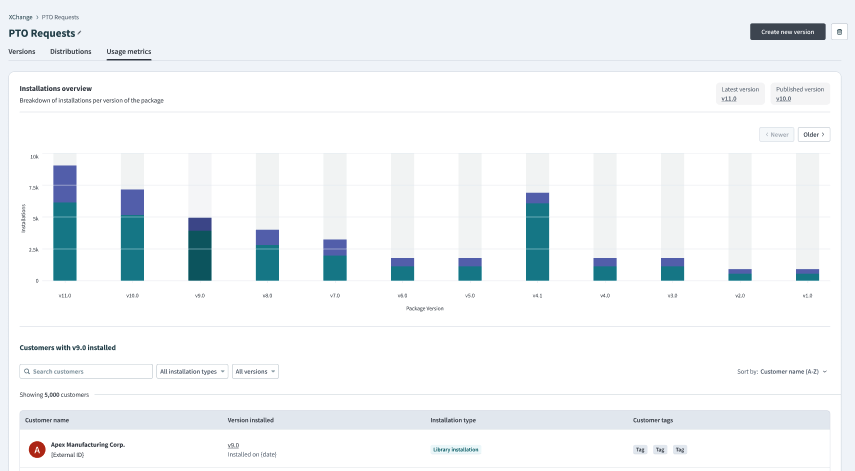 Usage metrics page
The Installations overview chart shows the number of installations per version. Builders and curators use this view to compare adoption across versions and identify trends.
The customers table provides a detailed view of installations by workspace. This includes the customer name, installed version, installation timestamp, and installation type, such as library or direct installation.
Review and approve a new package
Curators review submitted packages, validate contents, and approve or reject versions. Packages submitted by curators bypass review when the Auto-approve packages submitted by curators setting is enabled.
Open a pending package
Packages awaiting approval are available on the XChange dashboard.
Complete the following steps to open a pending package:
Click XChange in the navigation panel.
Locate and click the package labeled Pending review.
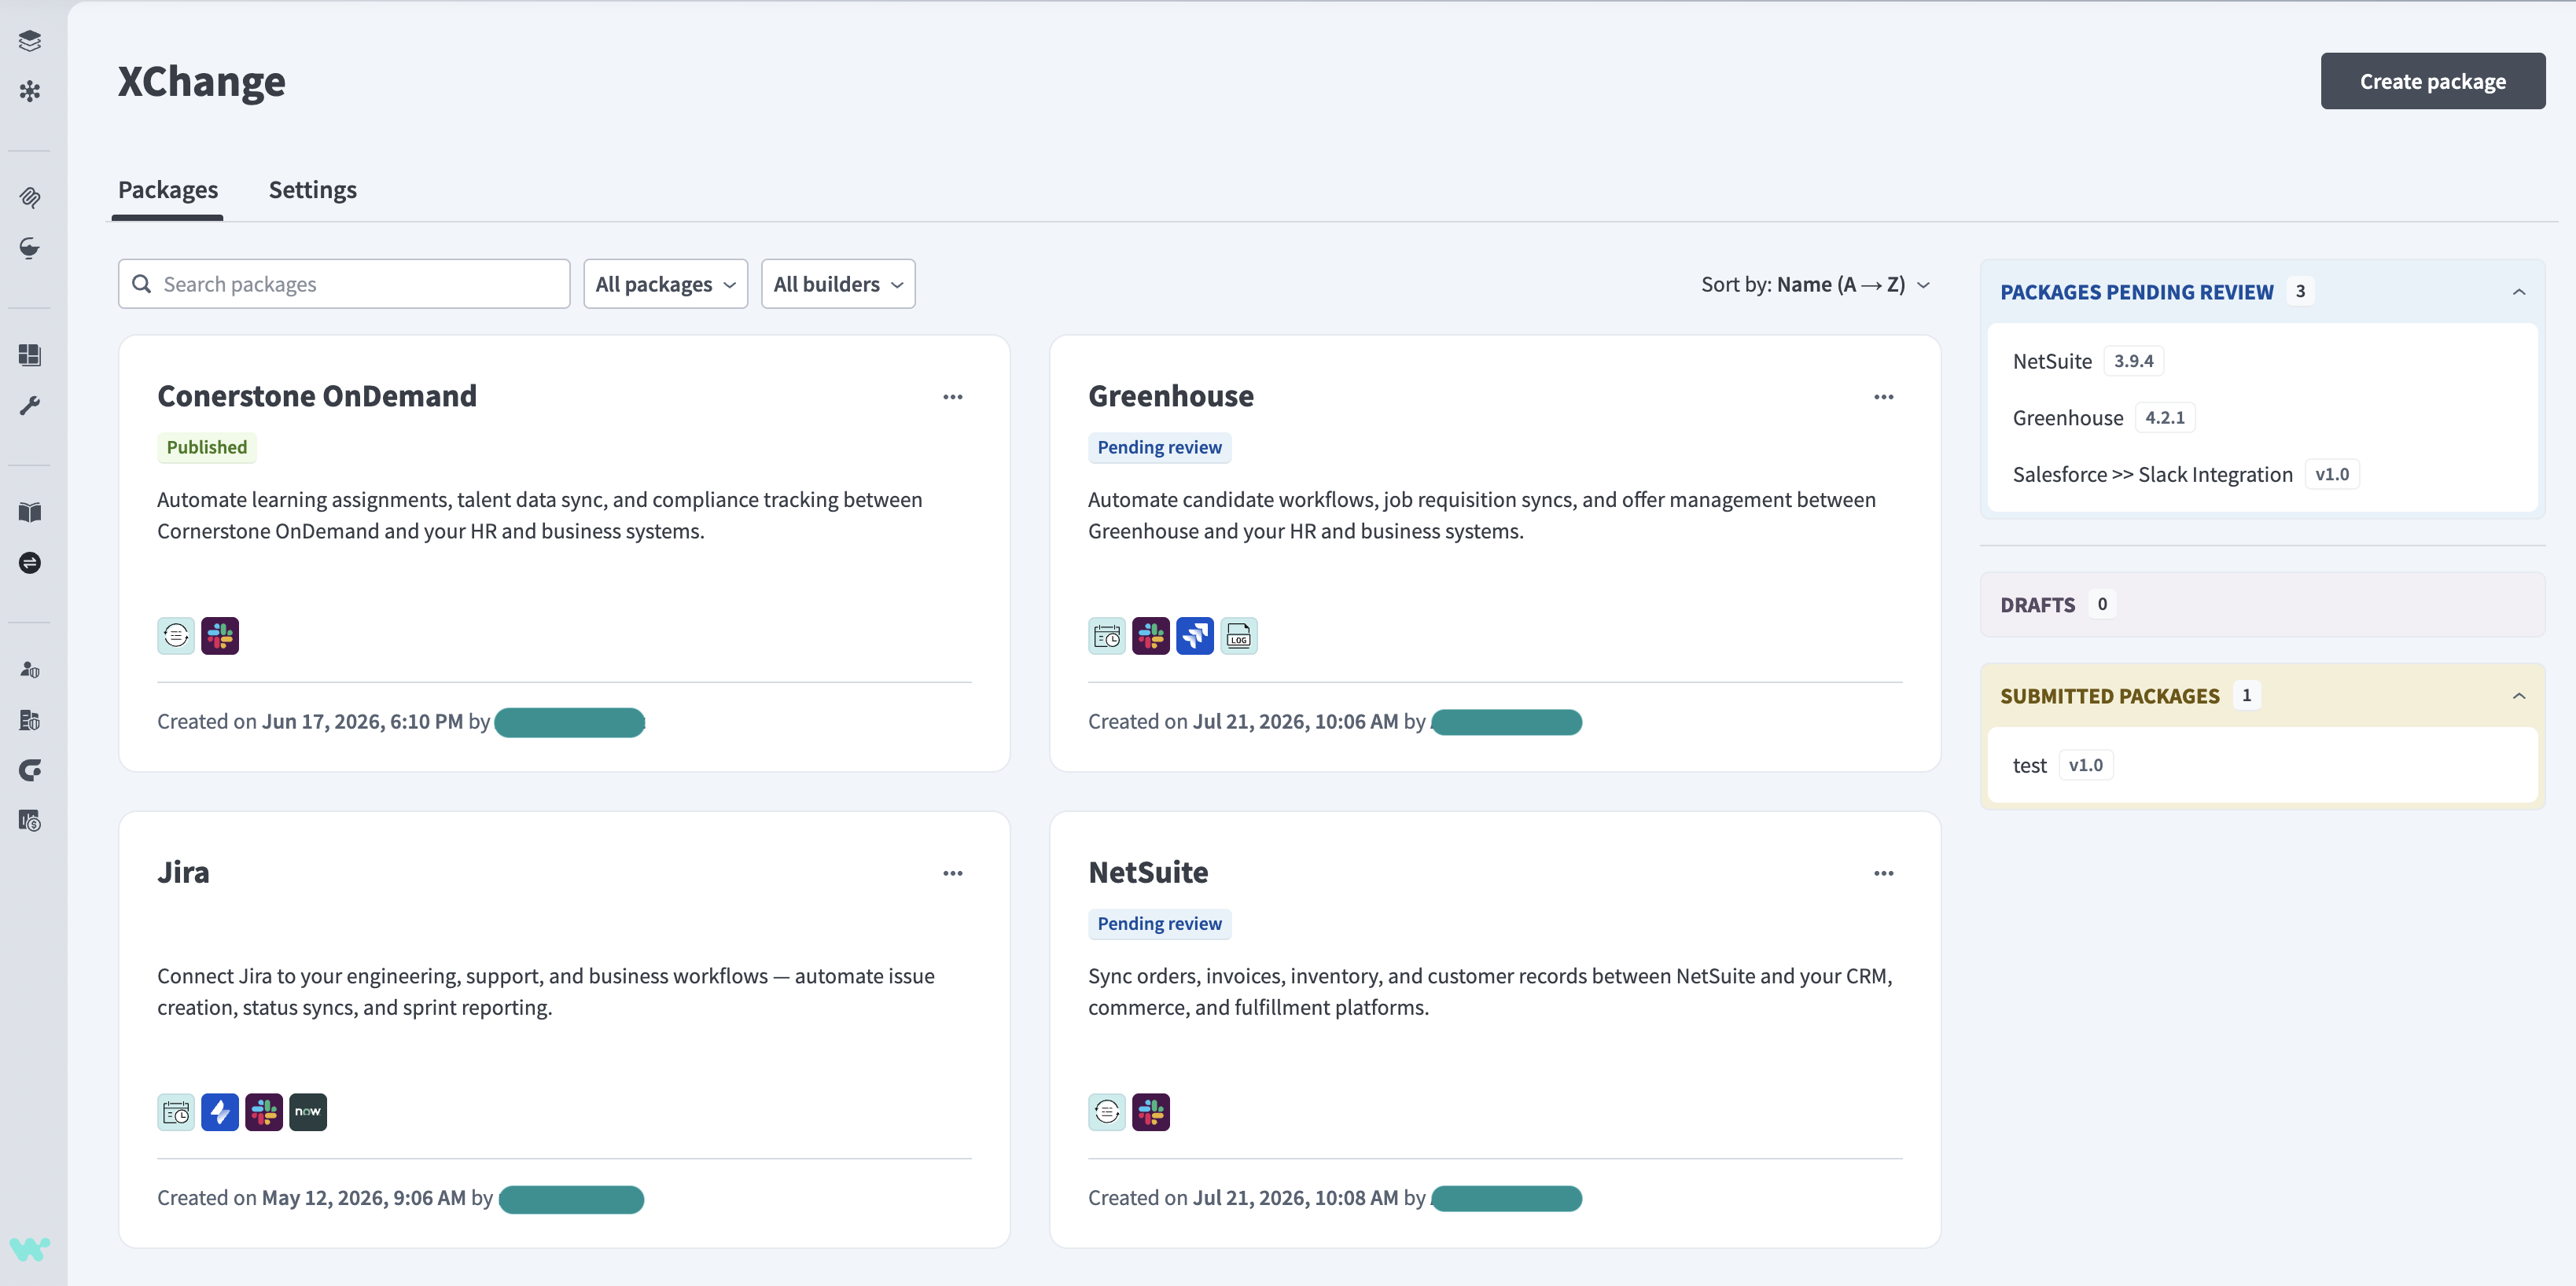 XChange dashboard
The package opens with two primary tabs:
- Details: Review the description, version, package name, and release notes.
- Contents: Inspect package recipes, connections, and lookup tables in their original folder structure.
VERSION LOCK
Workato disables Create new version when a version remains in Pending review. You must complete or reopen the review before creating another version.
Submit your review
Reviews allow curators to approve or reject a package with optional comments attached to explain your decision.
Complete the following steps to submit your decision when you finish reviewing the package:
Click Review package or Review version on the package card.
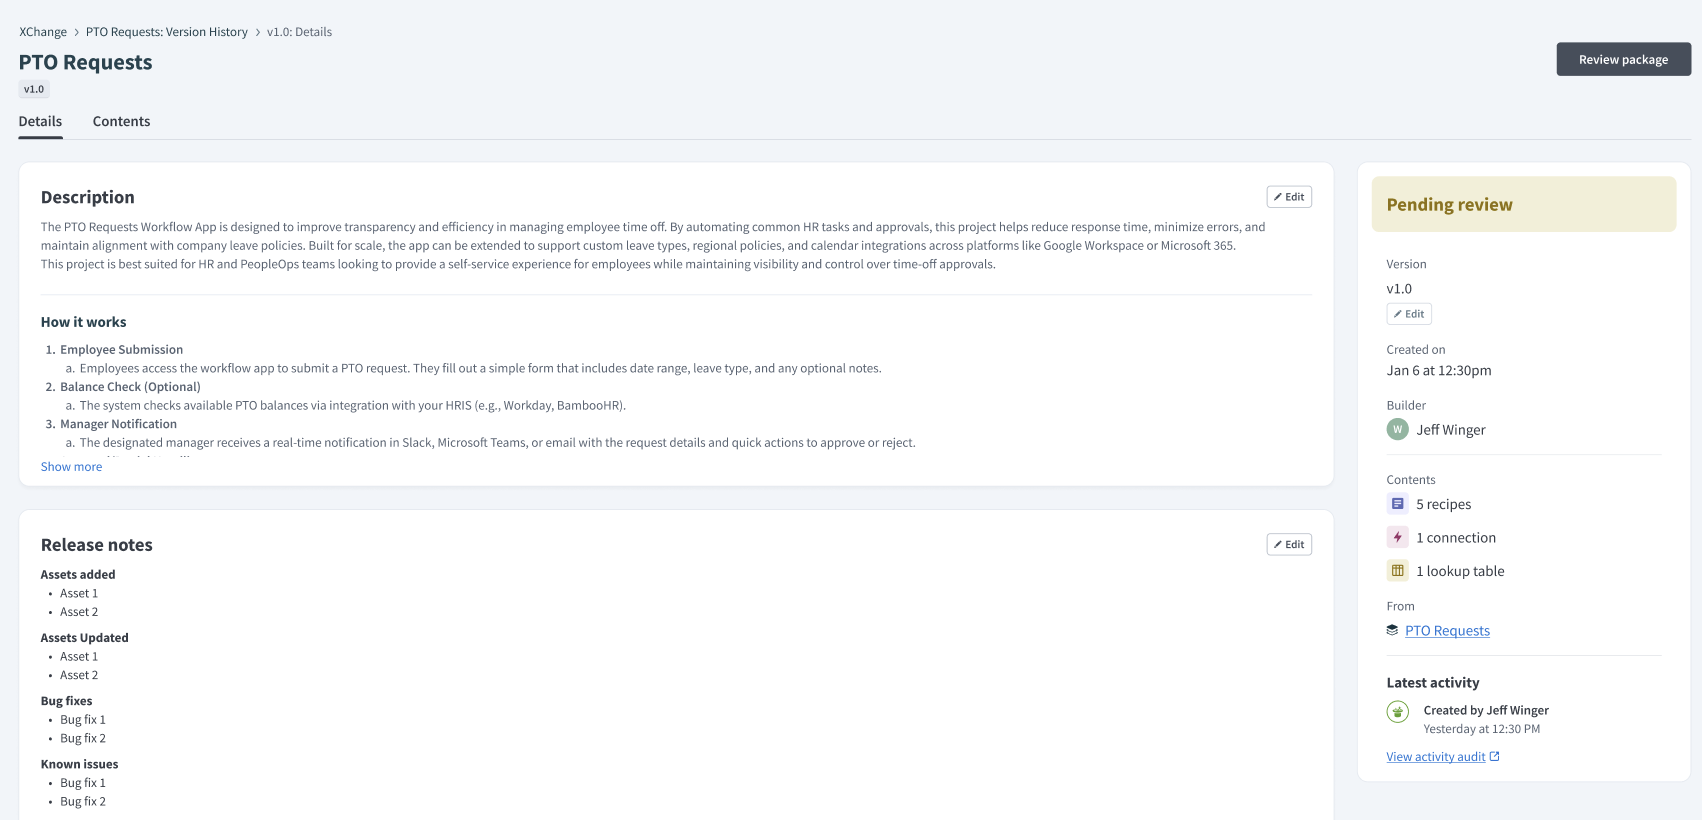 Add package details
Choose Approve or Reject.
Optional. Enter Comments to explain your decision or request changes.
Click Submit.
Workato sets the version status to Ready to distribute after approval. This indicates that the package has passed review.
After approval, you can distribute a package to workspaces or publish the package to a library.
Publish a package to library
Curators publish an approved package version to a library so external users can discover and install it. Publishing makes the version visible in the library you chose and replaces existing published versions. Users with access can install this version.
Complete the following steps to publish to a private library:
Open an approved package.
Click Publish.
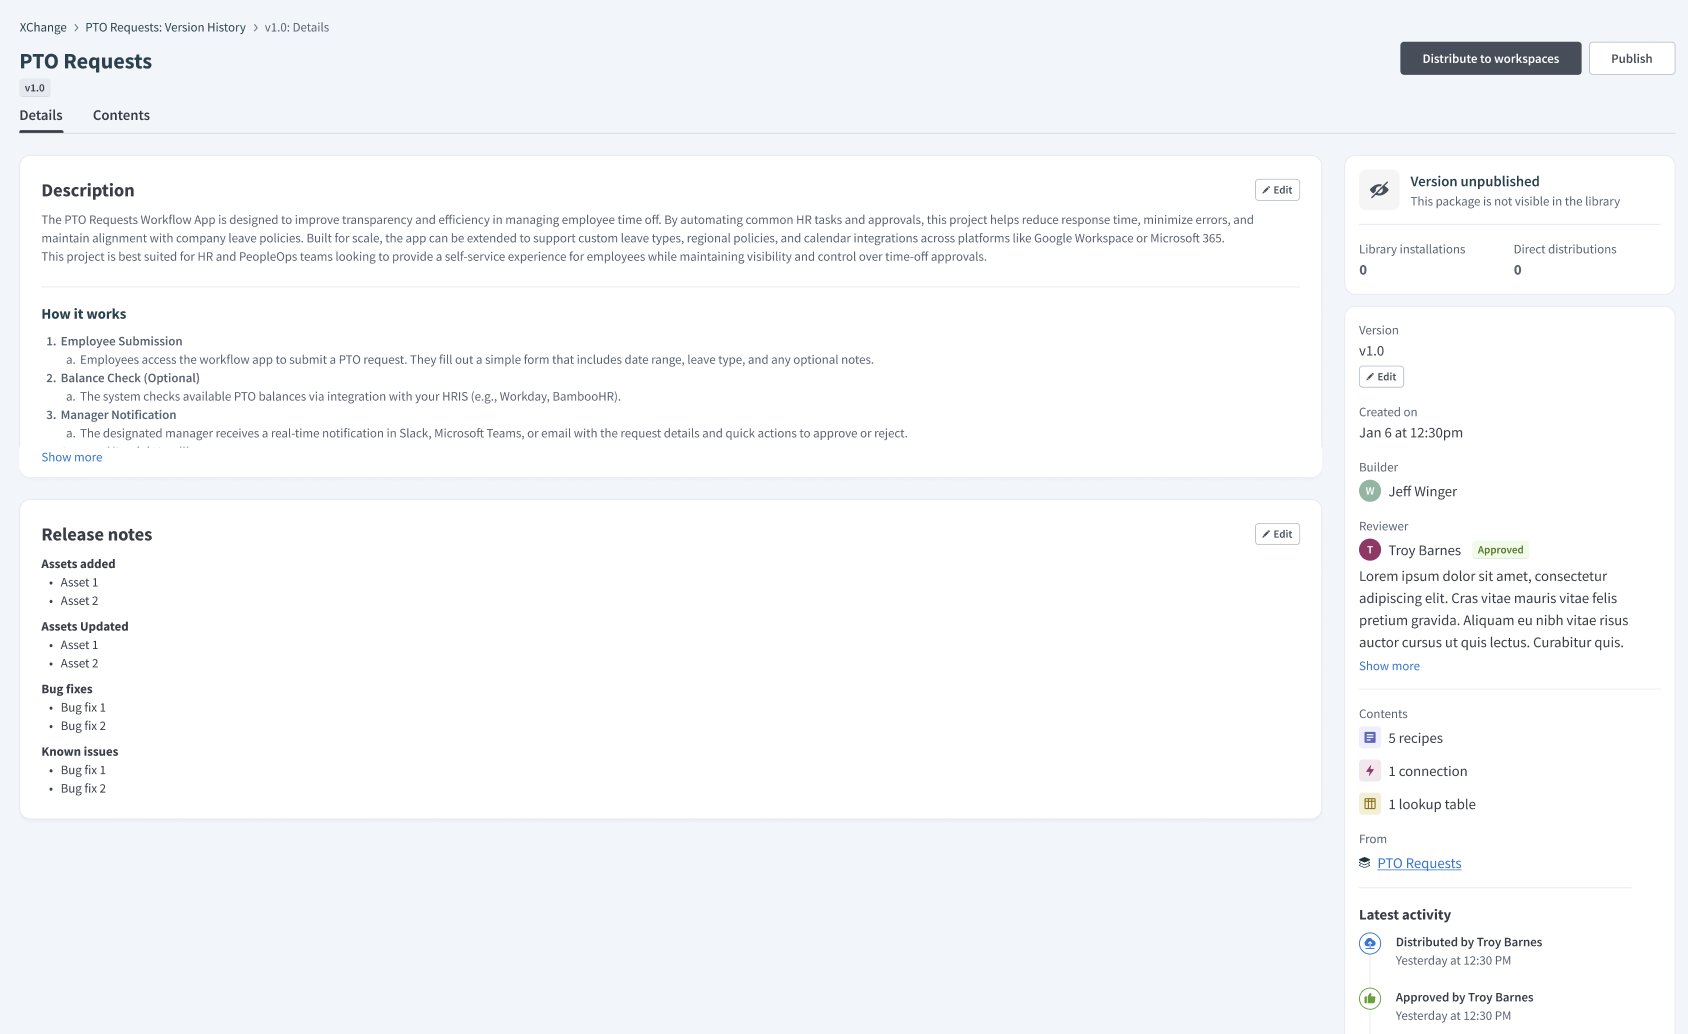 Publish a package
Enter a short summary of the package in the Card description field. You can write your own text or click Generate to have AIRO create a description automatically.
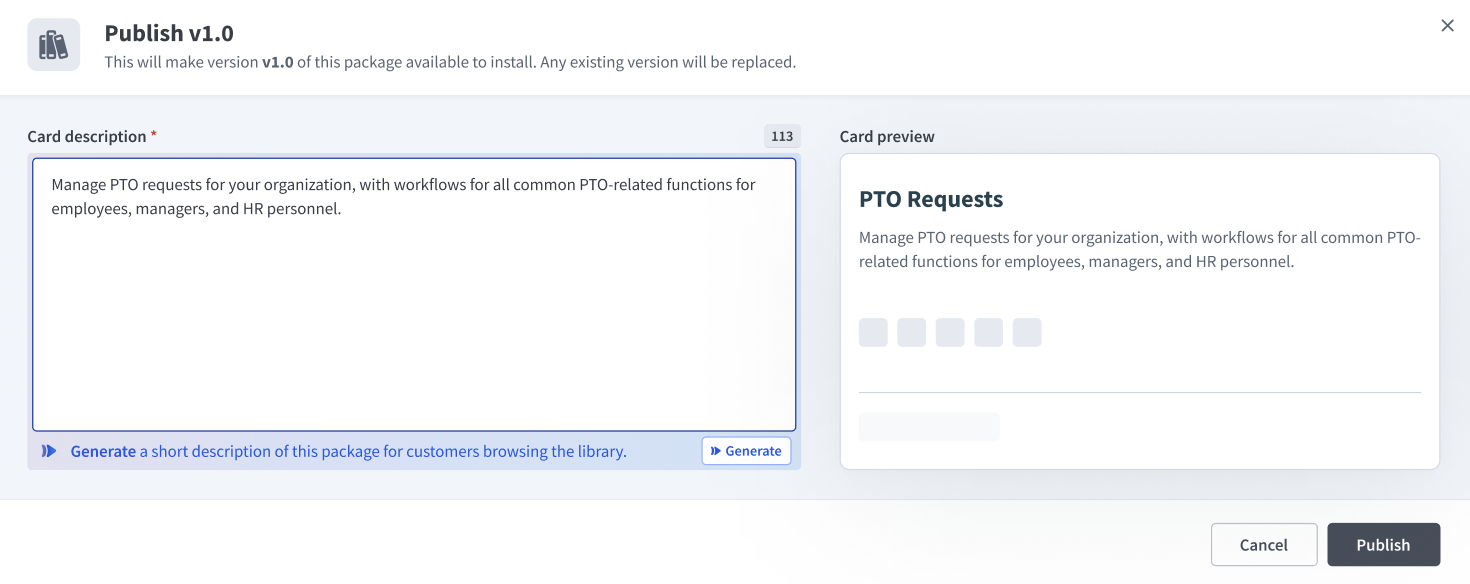 Enter a card description
Use the Card preview to review how the description appears in the library after publishing.
Click Publish to confirm.
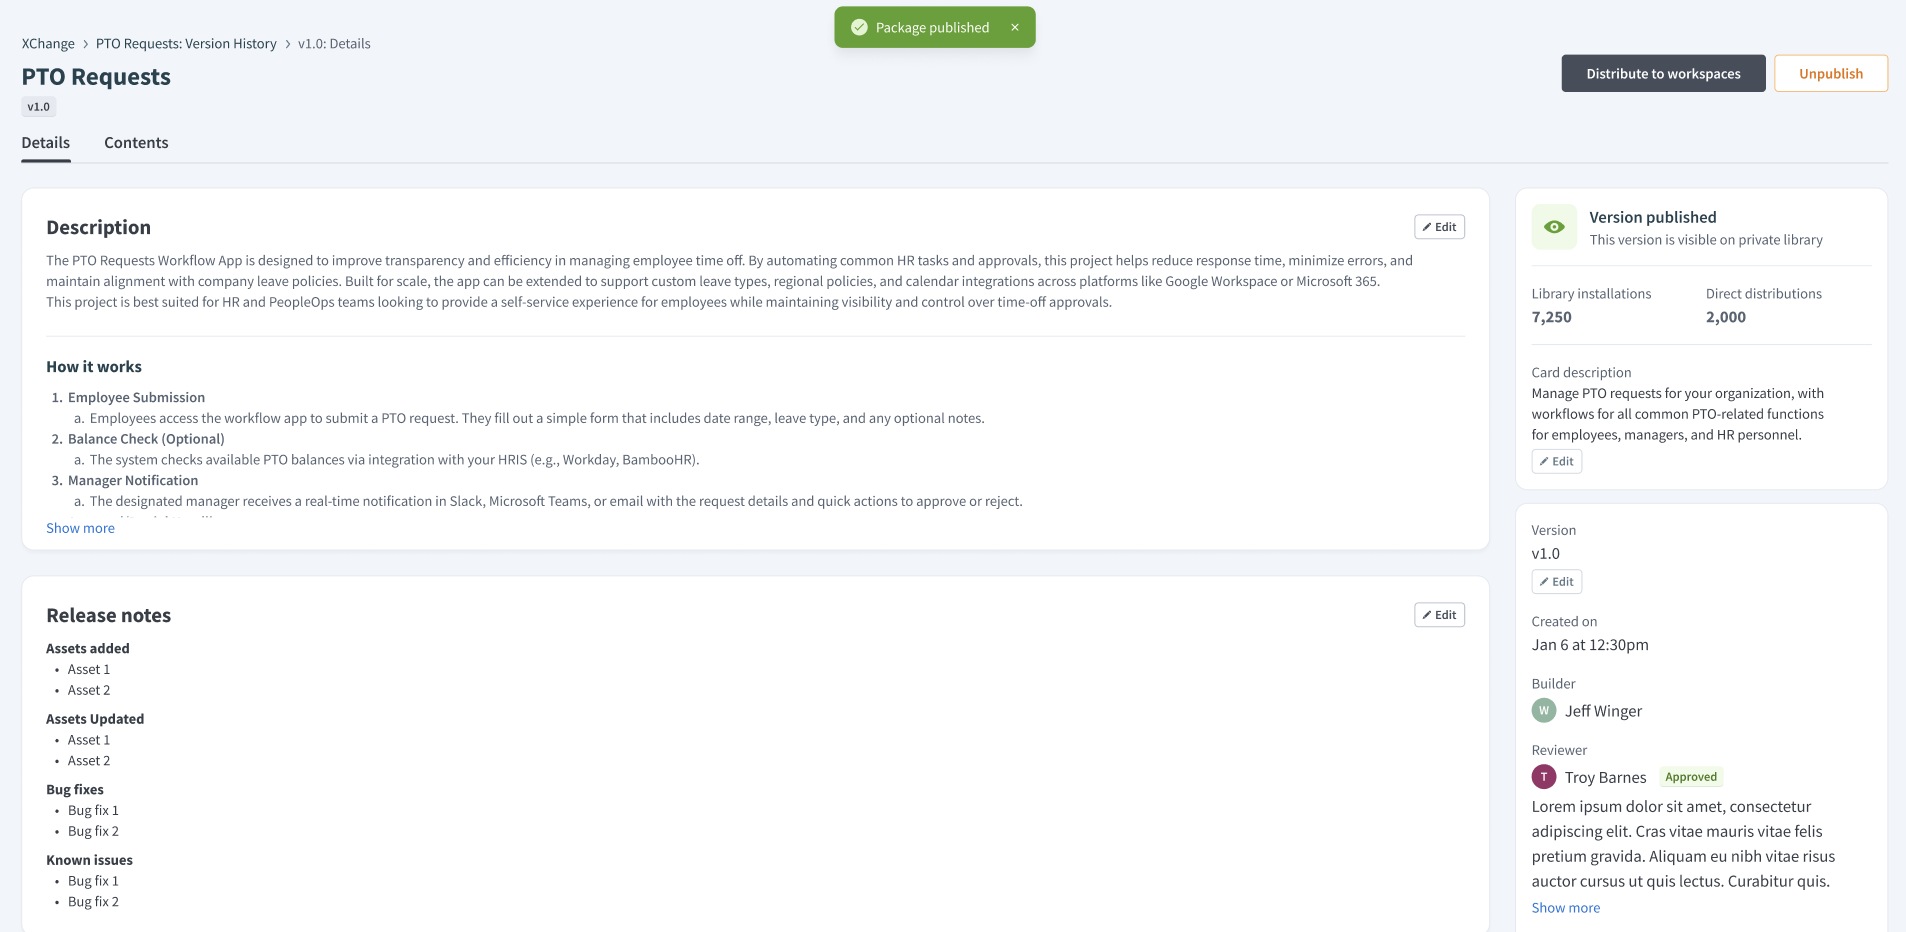 Package published to library
Workato sets the package status to Published.
Unpublish a package version
Curators unpublish a package version to remove it from a library.
Complete the following steps to remove a version from the library:
Click Unpublish.
Confirm the unpublish action when prompted. This removes the version from the library but keeps it available in XChange.
Distribute a package to workspaces
Curators can distribute a published package version directly to one or more tenant workspaces. This bypasses the self-serve library and installs the package's assets, such as recipes, connections, and lookup tables, into the target tenant environments.
Distribution supports both one-time pushes and ongoing version updates across previously-distributed workspaces.
Complete the following steps to distribute a package to workspaces:
Open a published package from the XChange dashboard.
Click Distribute to workspaces.
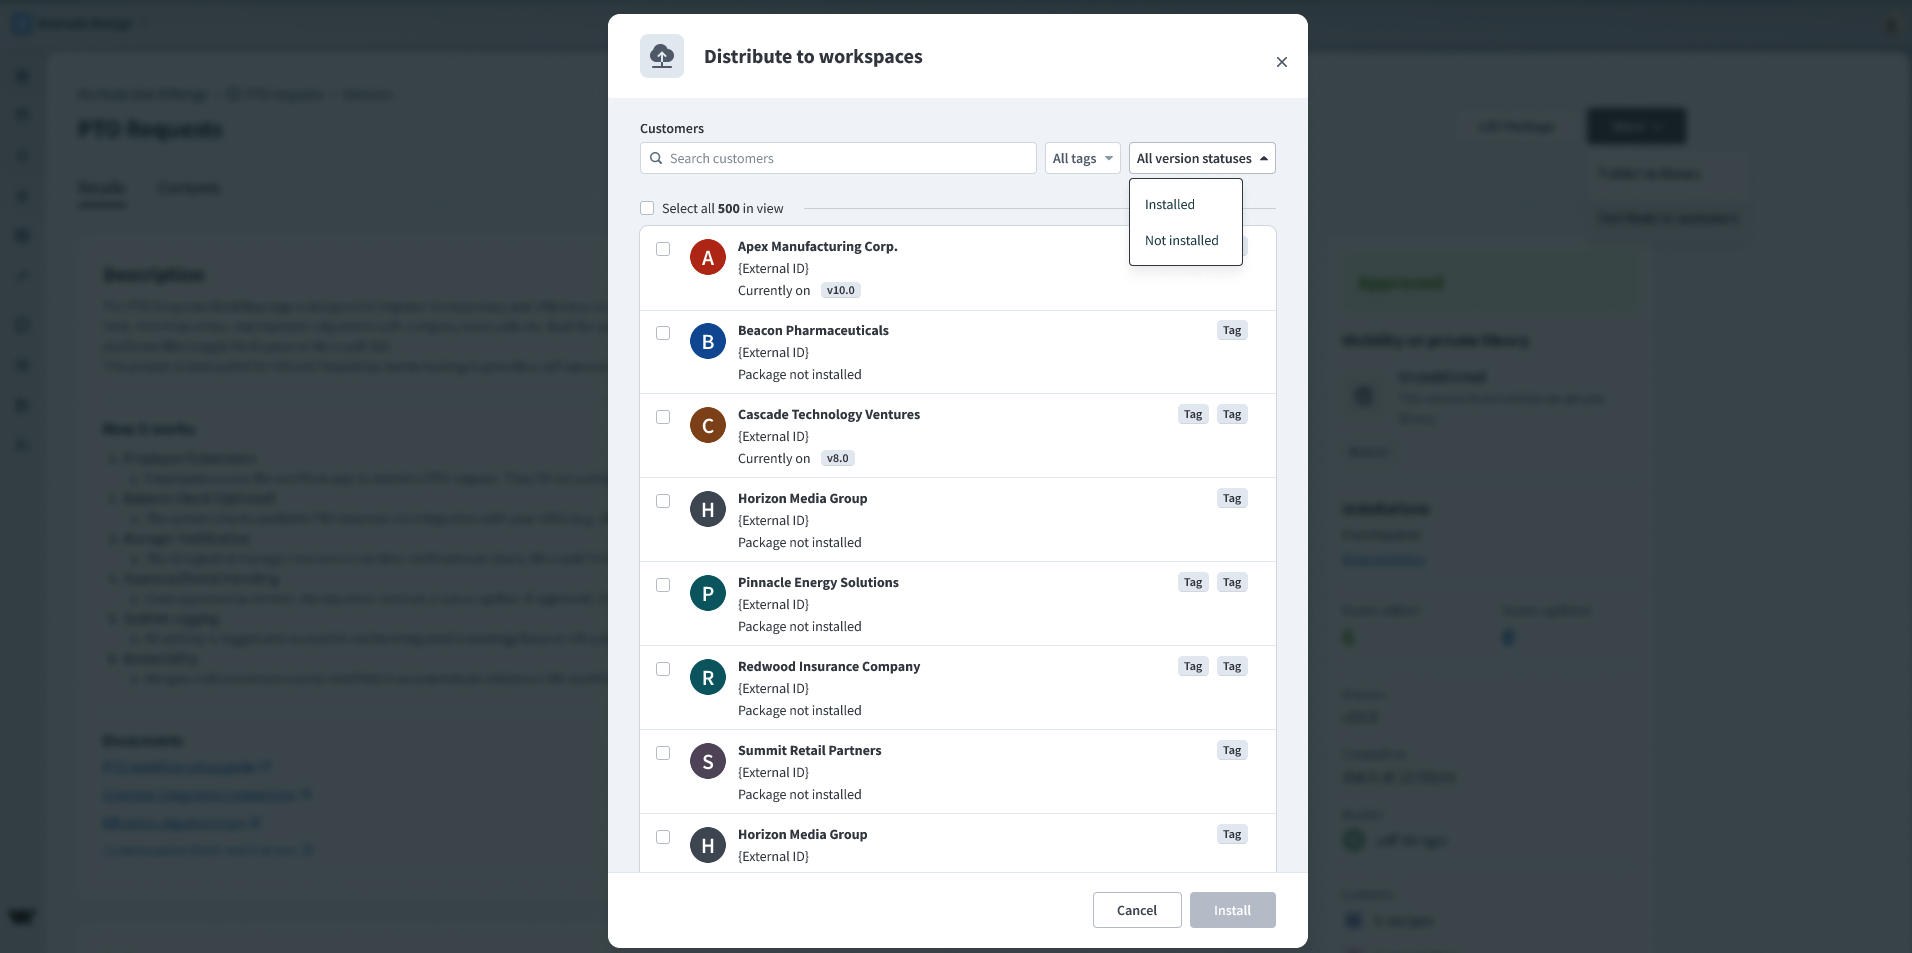 Distribute a package to workspaces
Use the search bar to locate specific workspaces, or use filters such as Tags or Installation statuses to narrow the list.
Select the workspaces where you plan to install the package.
Click Install to start the distribution process.
The package displays a distribution progress banner with a real-time count of completed installations after the process begins. You can close the window at any time without interrupting the distribution.
Distributions log
The distributions log records all push-based distribution events initiated from the Admin workspace. Each entry captures the following information:
- Package name: The distributed package
- Version: The version distributed
- Target workspace(s): The tenant workspaces that received the package
- Timestamp: The date and time of the distribution event
- Status: The outcome of the distribution, such as success, failed, or partial
Curators can use this log as an audit trail to verify deployments and troubleshoot distribution issues.
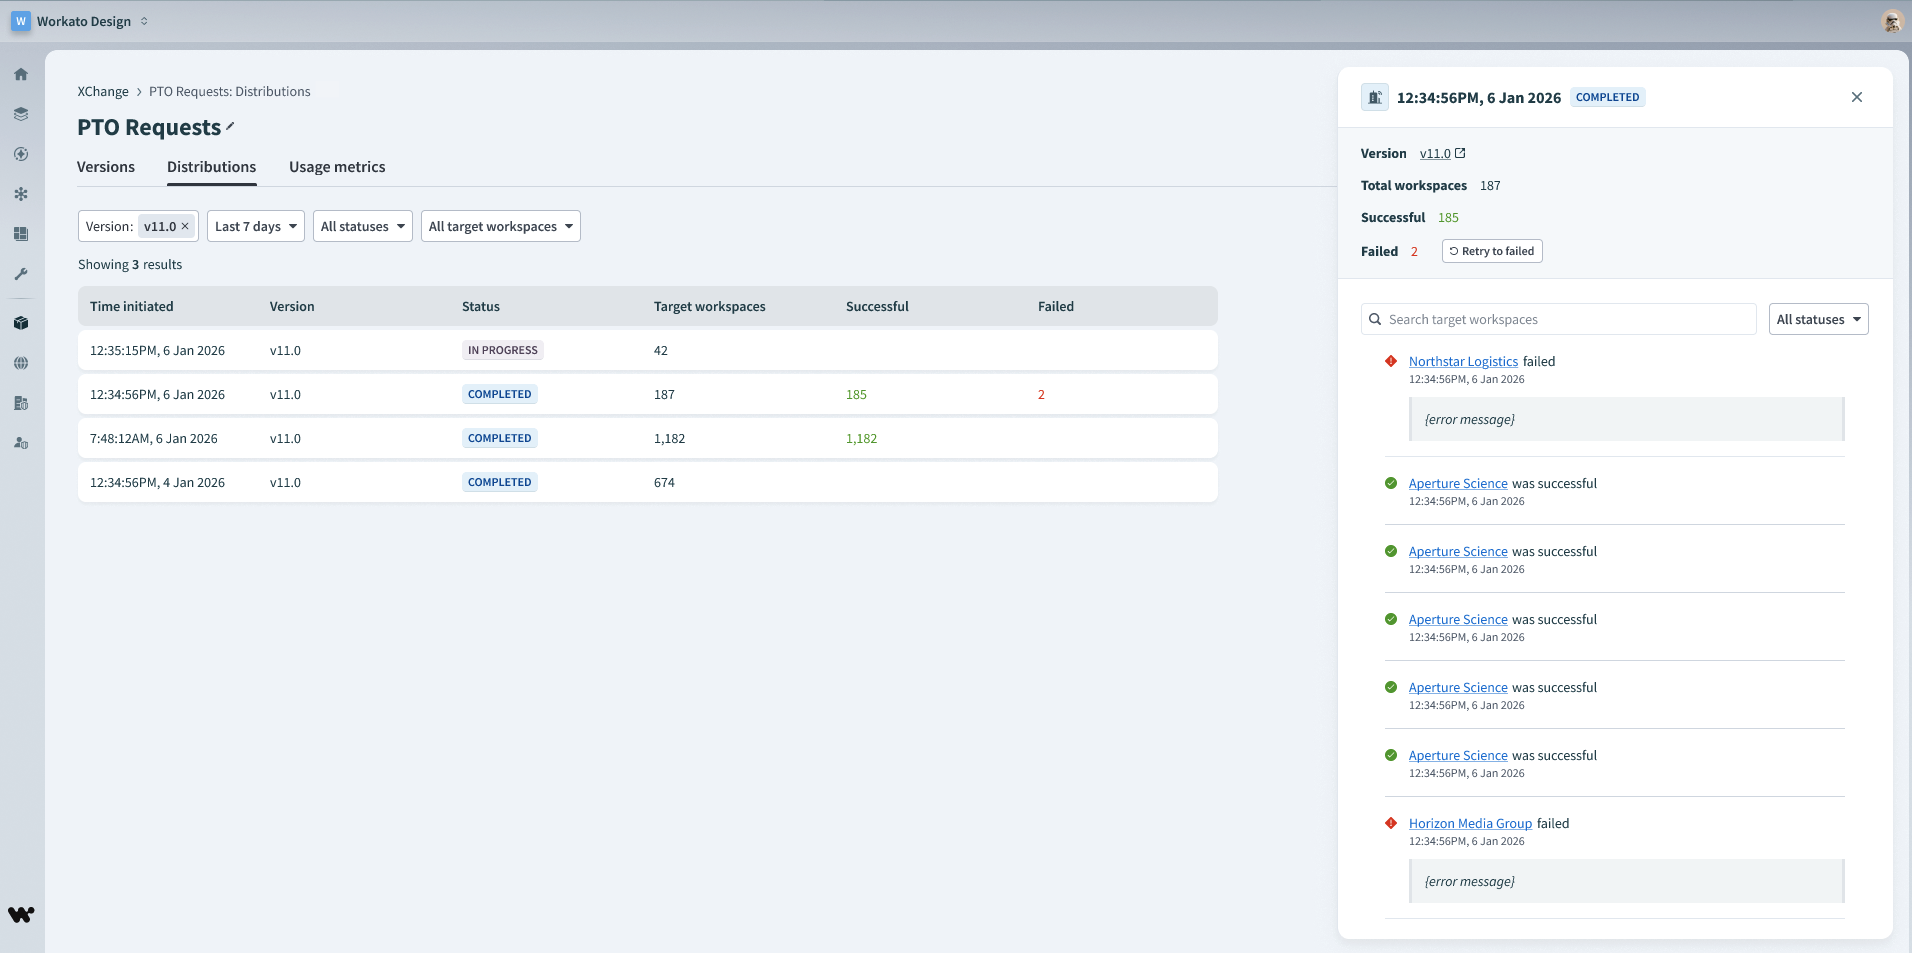 Distributions log
Share a package using links
Curators can generate shareable links to distribute a package to independent, unconnected workspaces. A recipient opens the link and installs the package into their workspace without a direct connection between the two organizations.
Sharing links has the following characteristics:
- You can create multiple links for a single package.
- All active links for a package install the same version. Changing the version updates every active link.
- You can revoke a link at any time.
Links are either public or scoped to a specific workspace:
- Public: Anyone with the link can install the package.
- Workspace-scoped: Only the workspace that matches the workspace ID you provide can install the package. A scoped link displays Pending as the workspace name until the recipient accepts and installs the package.
DATA CENTER
Sharing links works only between workspaces in the same data center. A link generated from a US workspace is valid only for other US workspaces.
Generate a sharing link
Complete the following steps to generate a sharing link:
Open a package from the XChange dashboard.
Go to the Distributions & access tab, then select Sharing links.
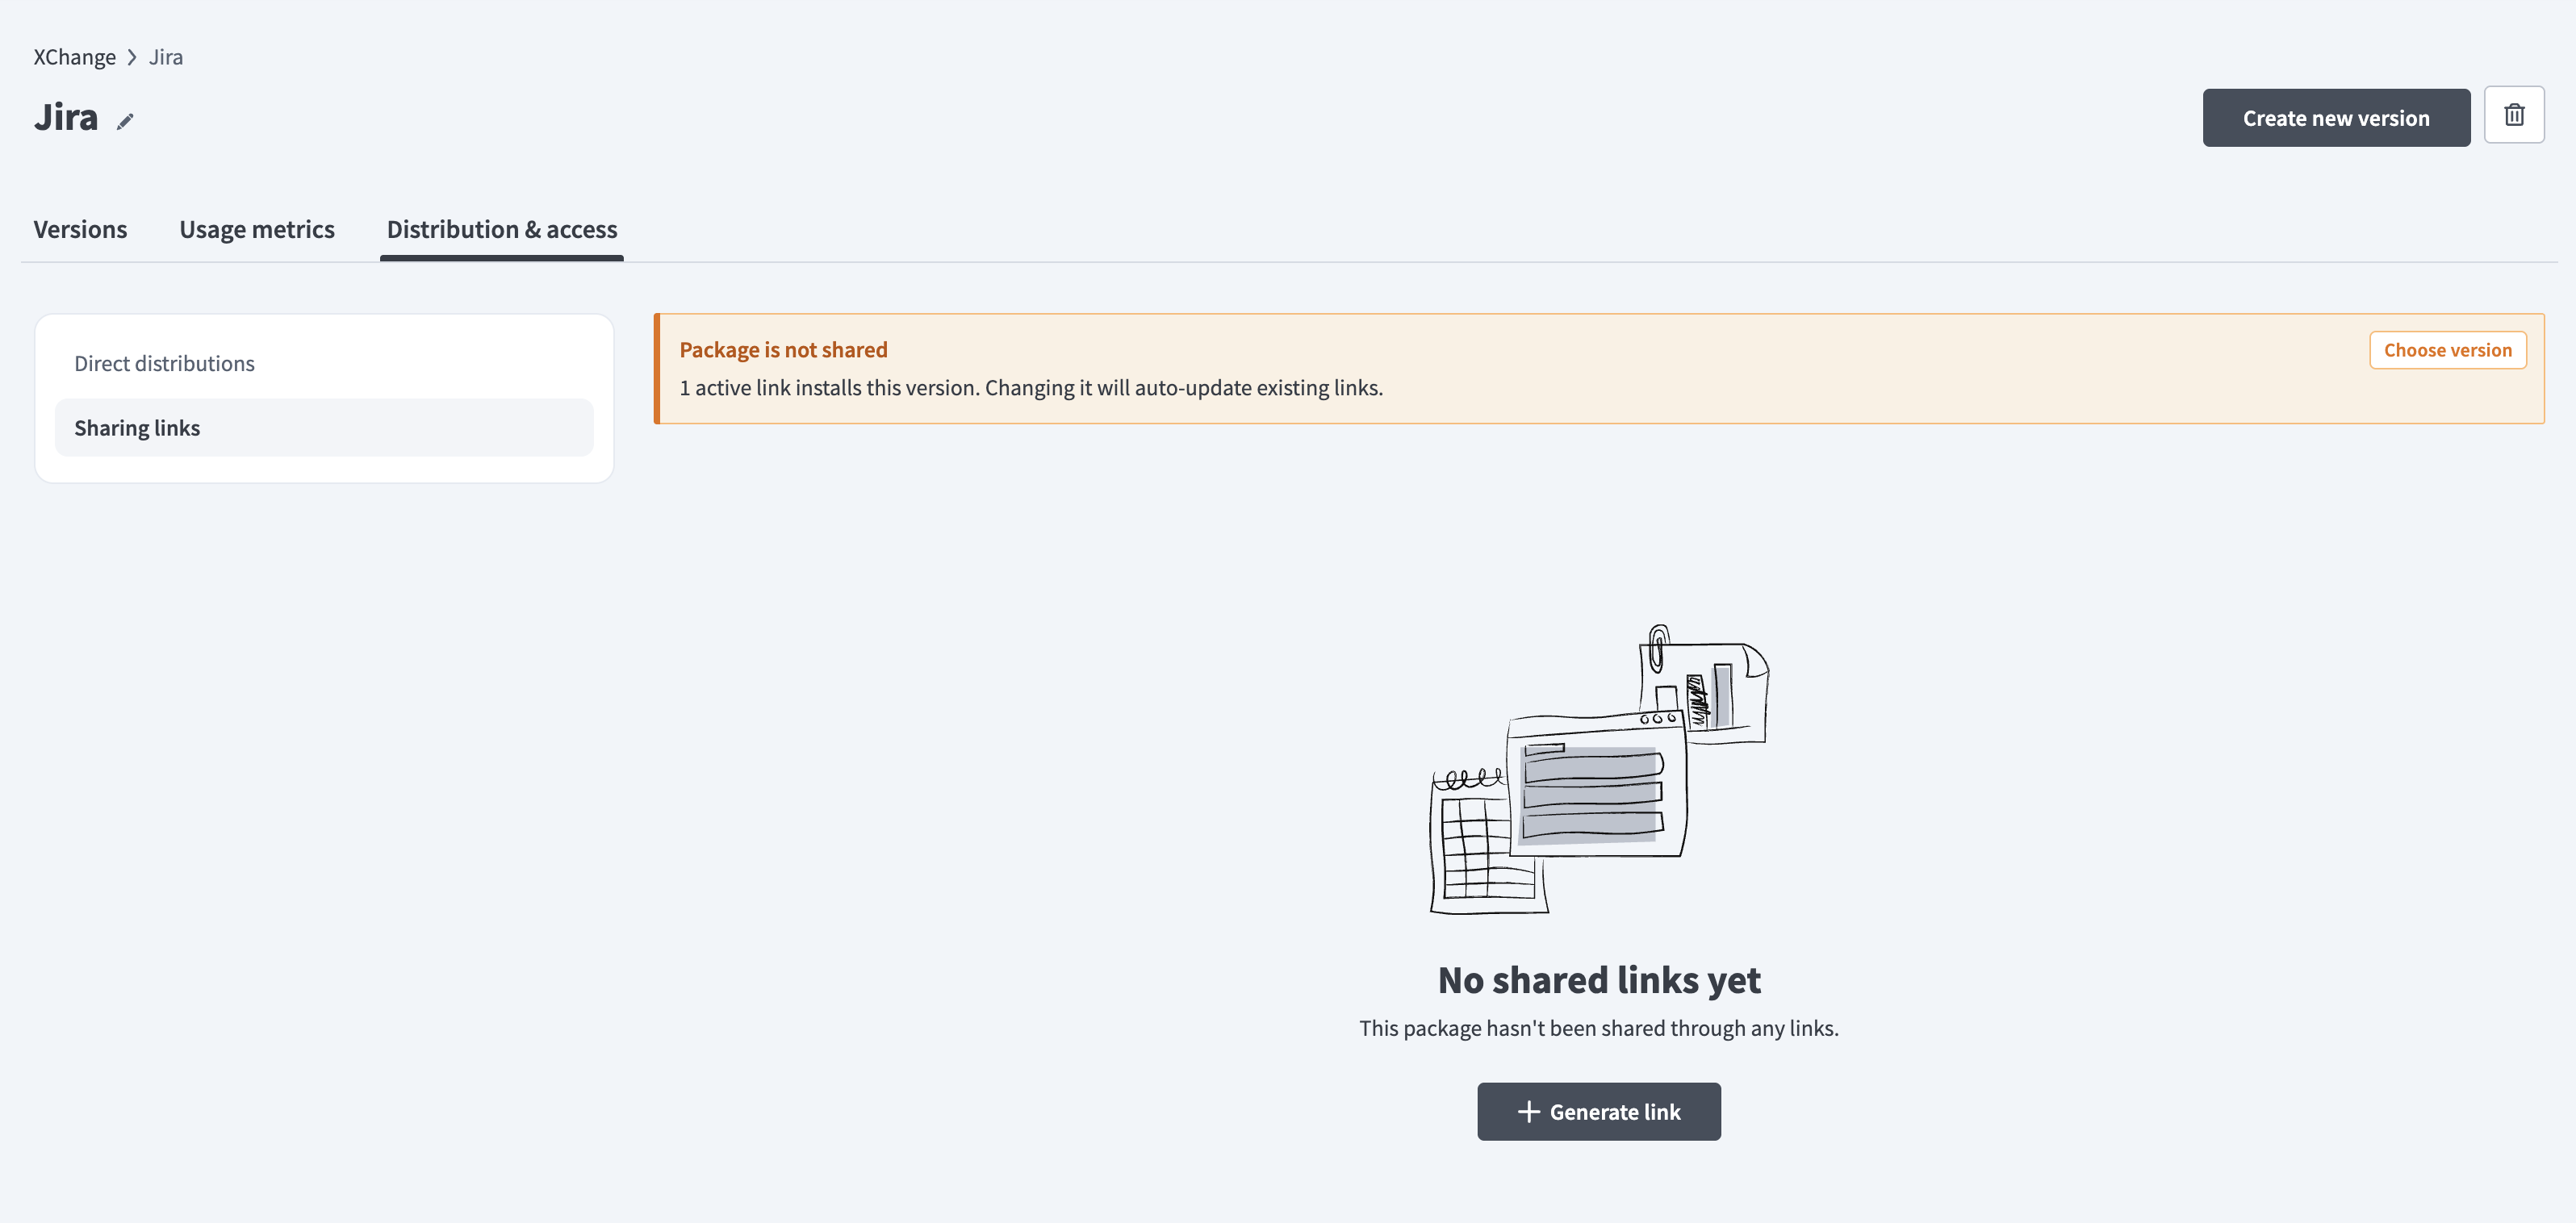 Sharing links
Click Generate link. This opens the Generate sharing links dialog.
Set the link scope using the Publicly available toggle:
- Keep Publicly available enabled to create a public link that anyone with the link can install. Enter a Link name to identify the link in the Sharing links table.
- Disable Publicly available to restrict the link to specific workspaces. Add one or more workspace IDs in the Workspaces field. Press Enter after each ID, or paste a comma-separated list.
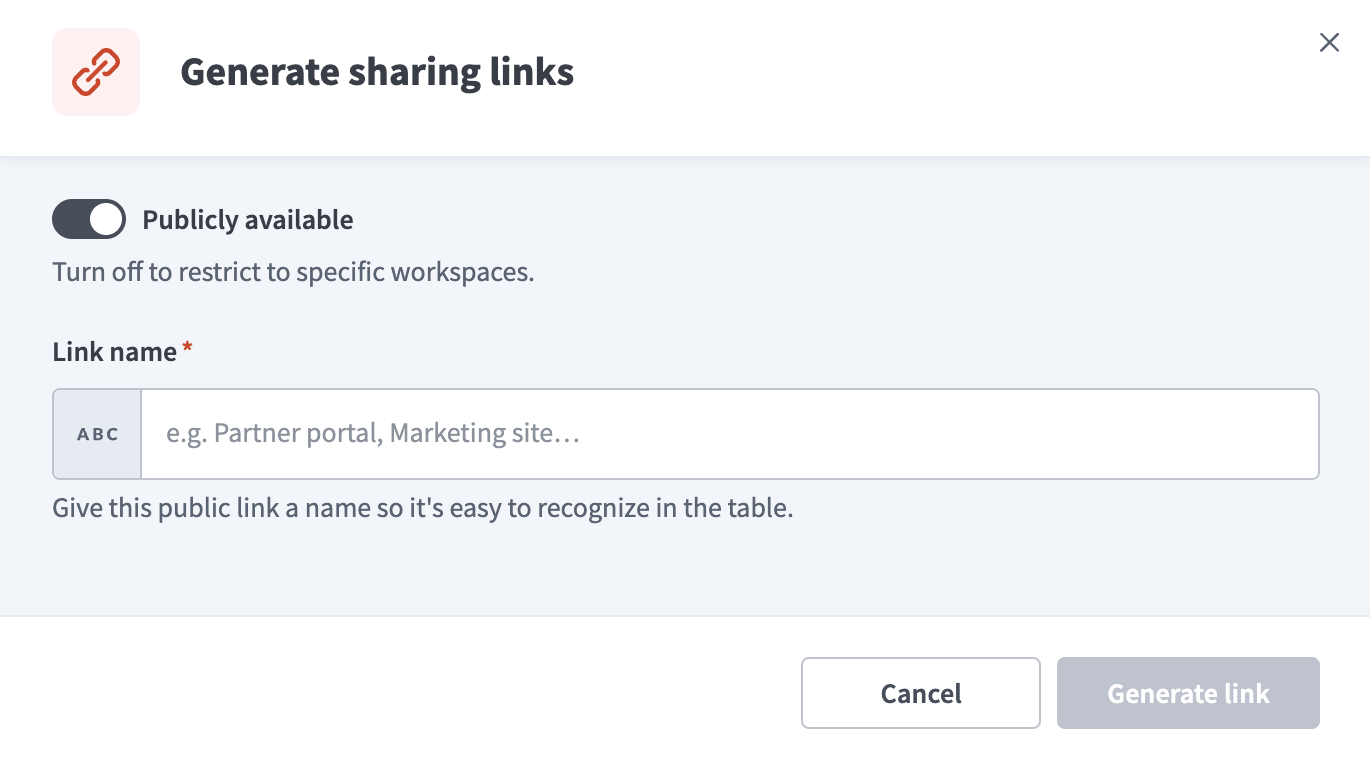 Generate sharing links
Click Generate link to create the link.
Copy the generated link and share it with the recipient workspace.
Manage sharing links
The Sharing links view lists all links created for the package. Each row includes the following information:
- Workspace: The recipient workspace name, or the workspace ID for a scoped link. Scoped links display Pending until the recipient accepts and installs the package.
- Created: The date the link was created.
- Created by: The user who generated the link.
- Last installed: The most recent installation timestamp.
- Installs: The total number of installations from the link.
- Link: The shareable URL.
- Active: A toggle that enables or disables the link.
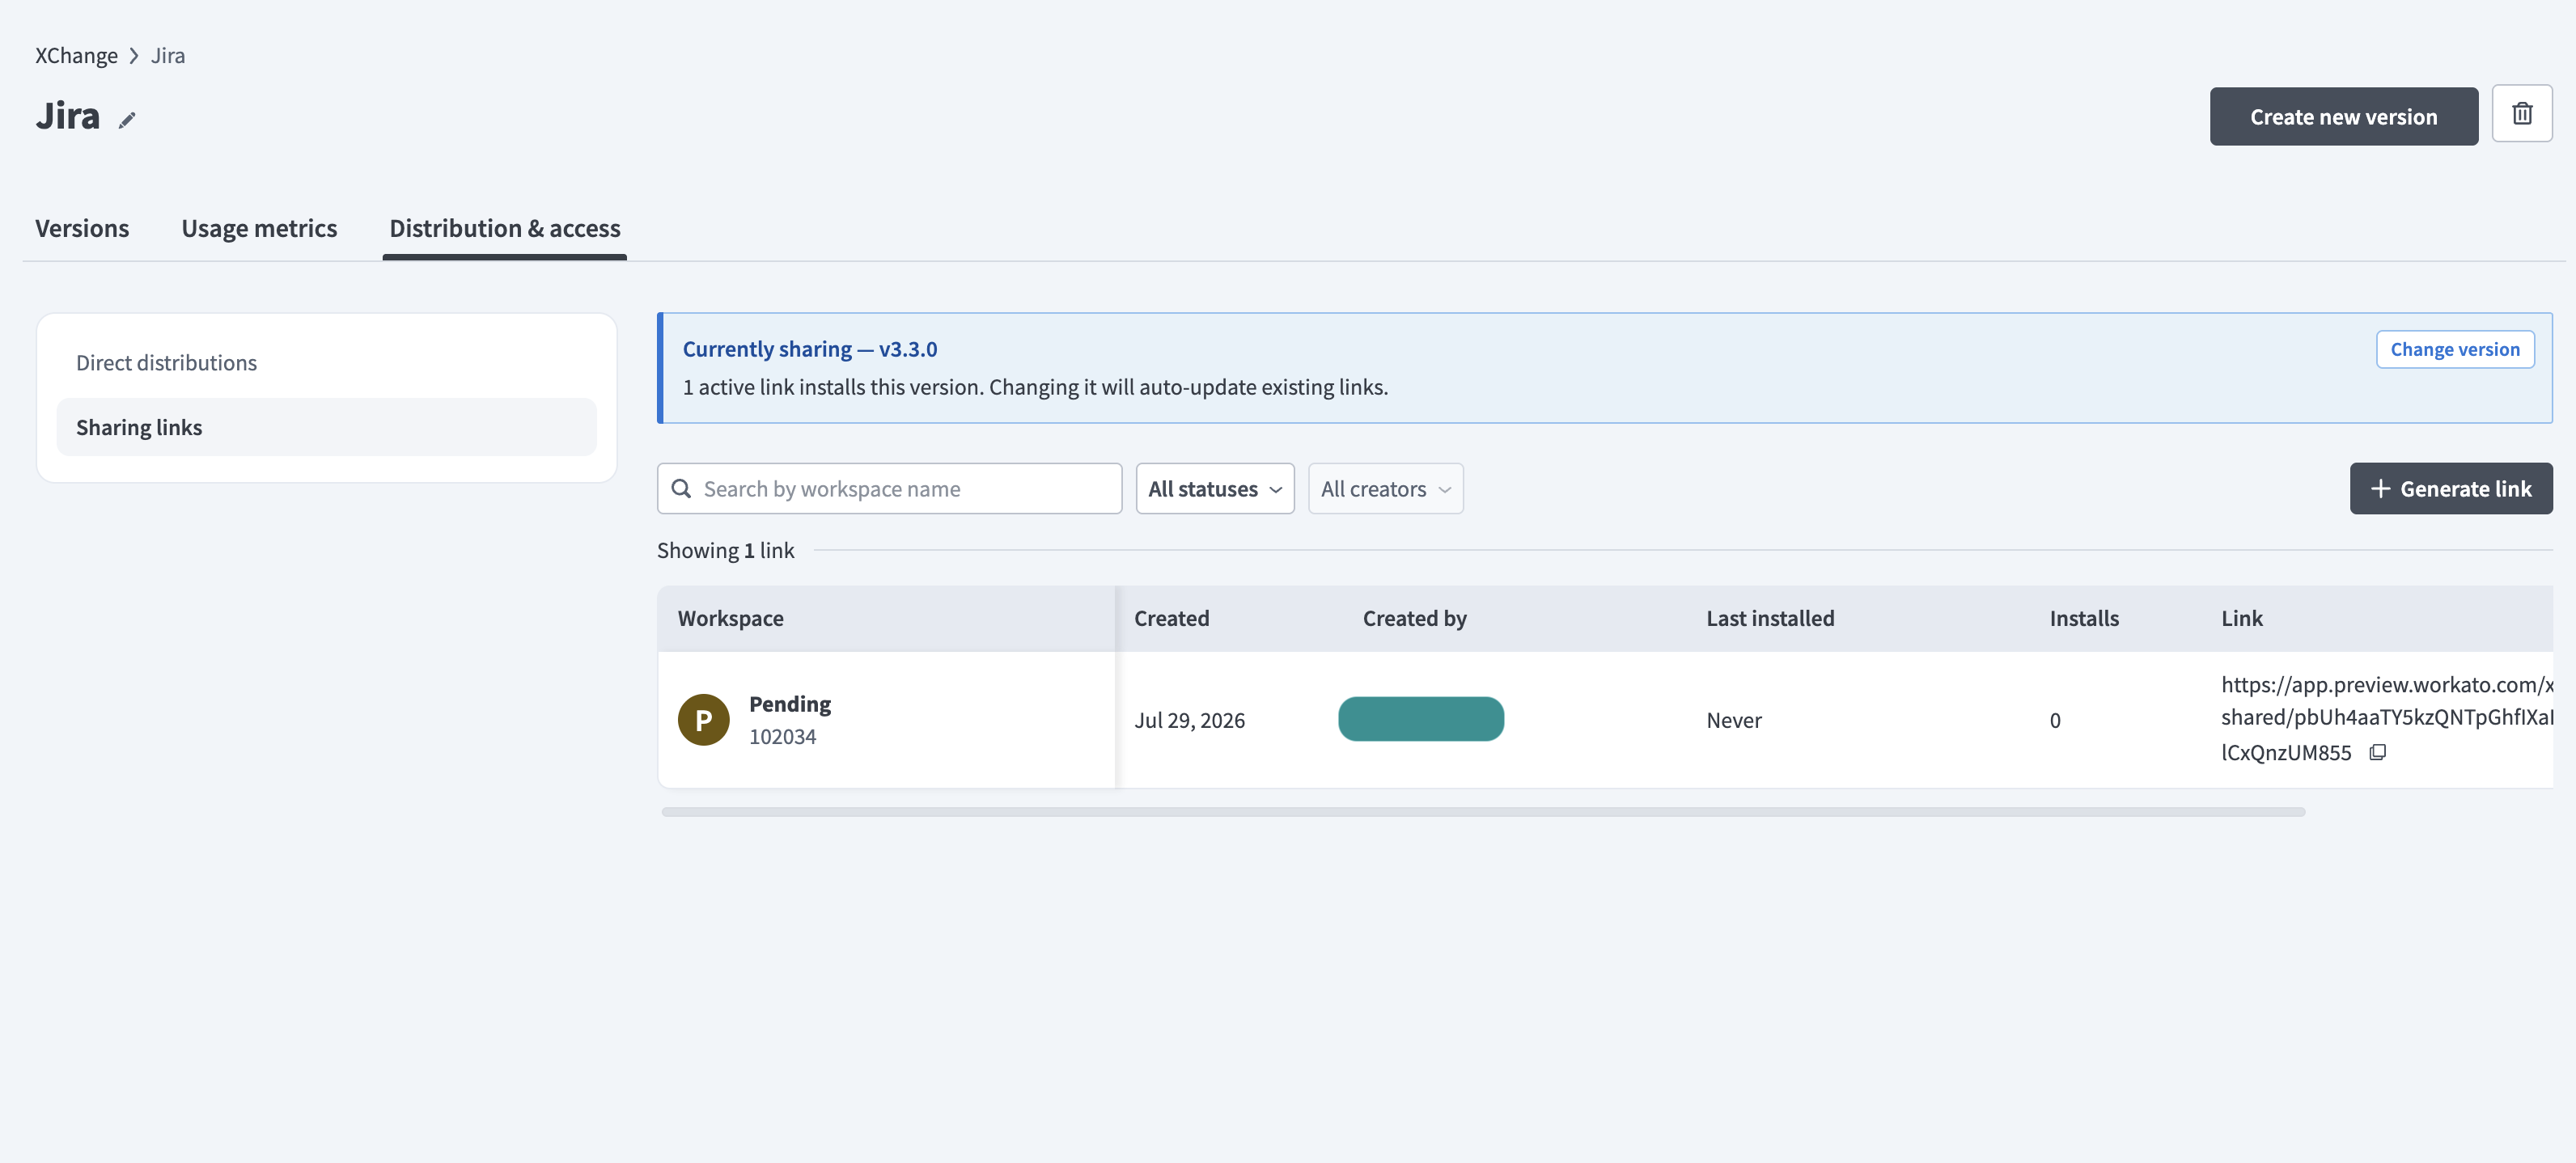 Manage sharing links
Use the Search by workspace name field or the All statuses and All creators filters to find specific links.
To revoke a link, disable the Active toggle or delete the link. A revoked link can no longer install the package.
Change the shared version
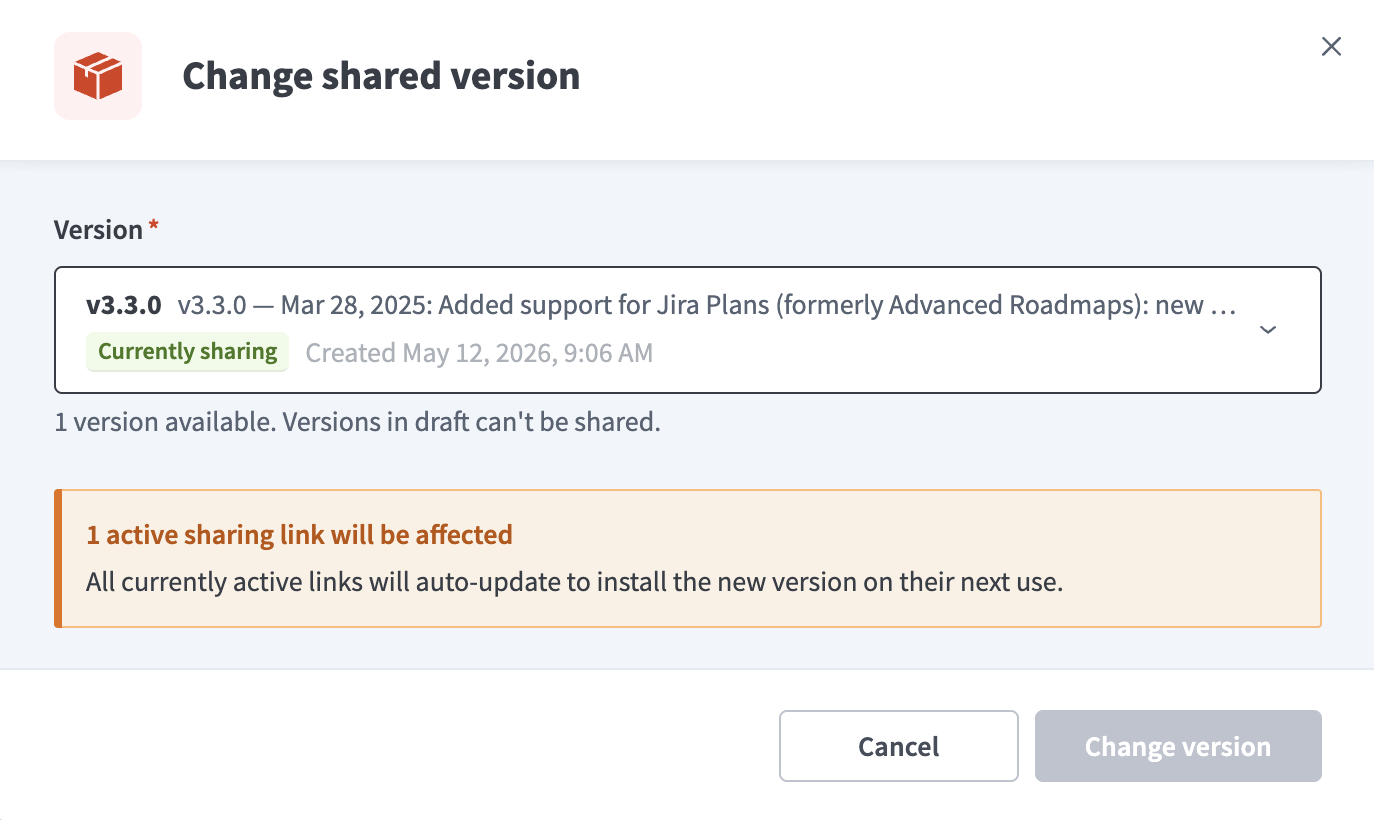
All active links for a package install the same version. The Currently sharing banner displays the version that active links install.
 Change shared version
Click Change version to select a different version. Workato updates all active links to install the new version.
Settings
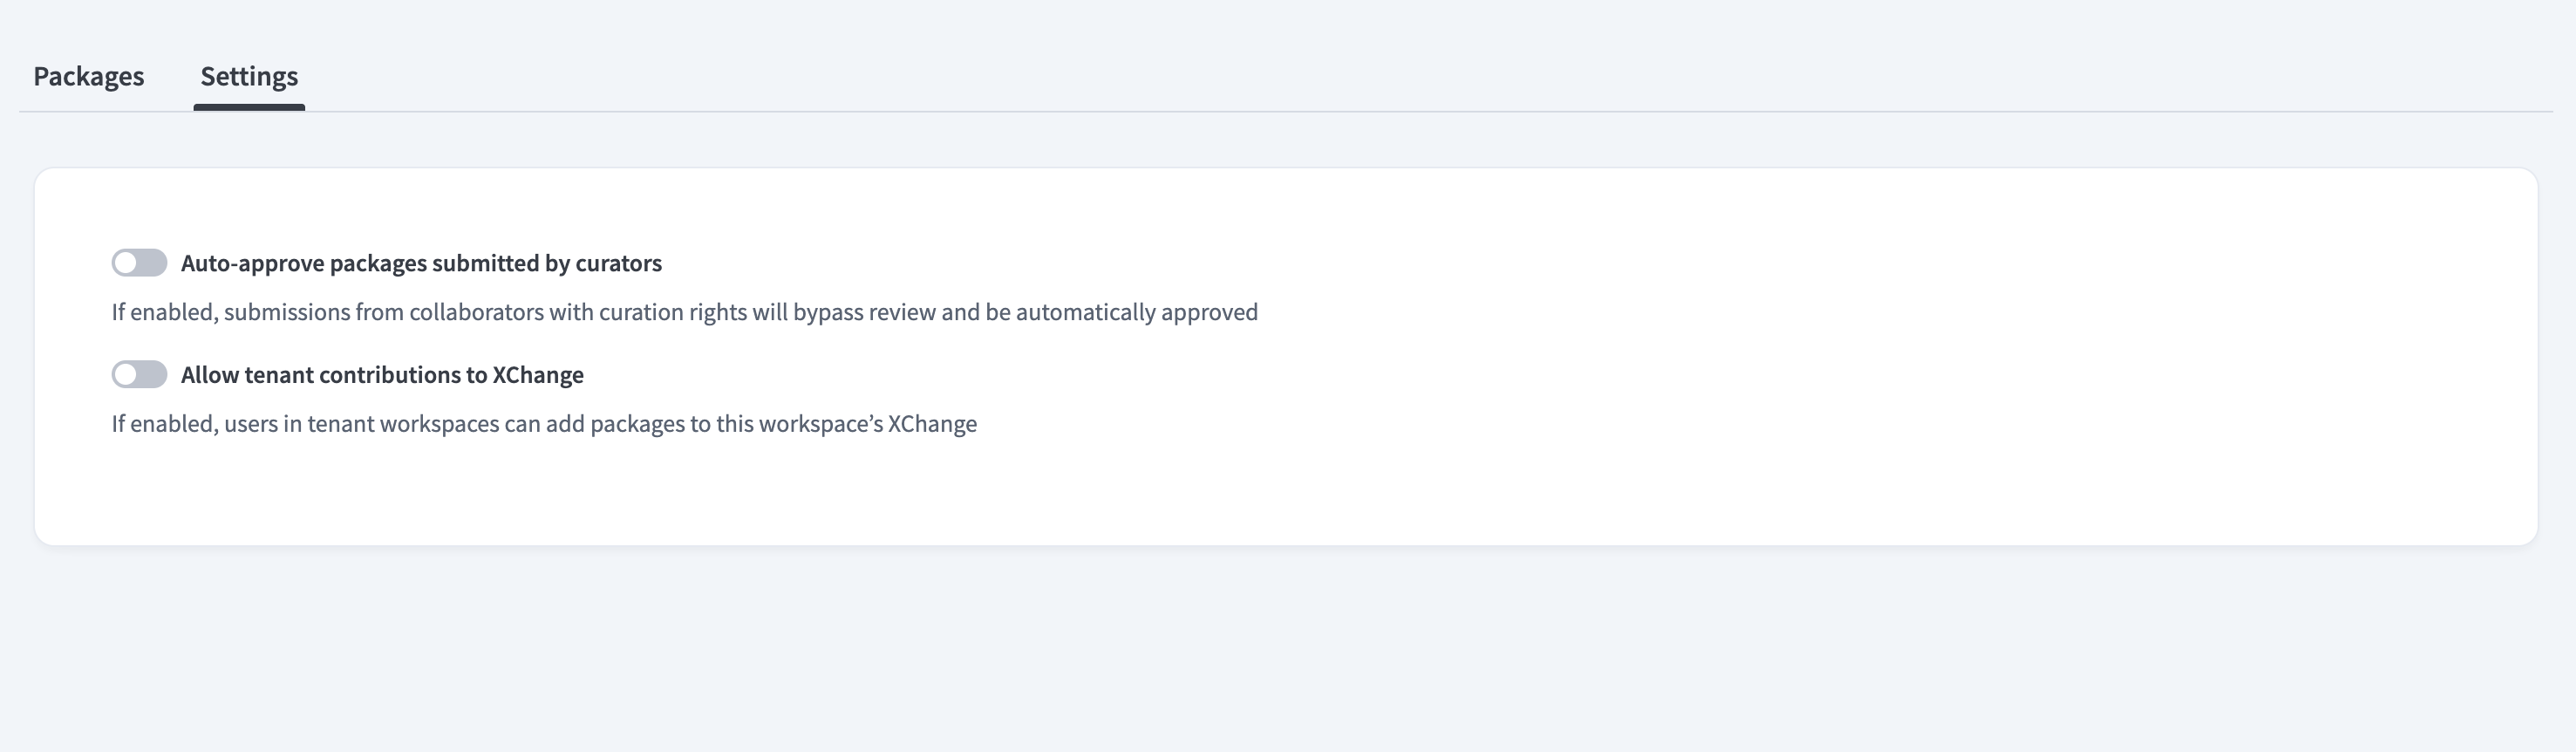
The Settings tab allows curators to configure governance controls for XChange.
 XChange settings
Auto-approve packages submitted by curators
The Auto-approve packages submitted by curators toggle controls whether packages submitted by users with curation rights require review.
- Enabled: Submissions from users with curation rights bypass review and are approved automatically.
- Disabled: Packages submitted by curators require approval from another curator. Curators can't approve their own submissions.
Build packages from tenant workspaces
Designated tenant workspaces can author and submit packages to the XChange for curator review. Approved packages are available for distribution exactly as if they were created in the Admin workspace.
Enable tenant contributions
Curators can enable this feature using the Allow tenant contributions to XChange toggle in XChange settings. Users in tenant workspaces can submit packages to this workspace's XChange when enabled.
The Contributors table displays all authorized tenant workspaces, including the following information:
- Customer: The tenant workspace name
- Added: The date the workspace was added as a contributor
- Number of contributors: Total users contributing from the workspace
- Packages submitted: Number of packages submitted by the workspace
Curators can add or remove contributors to control which tenants can submit packages.
How it works
The tenant contribution workflow covers workspace authorization, package creation, submission, and distribution.
Authorization
Authorized tenant workspaces can assign Builder roles to their collaborators and access the XChange in Builder view.
Package creation
Builders in authorized workspaces can access their own XChange and create packages or new package versions from Dev environment projects using the same flow as in the Admin workspace.
Submission
Submitted packages are routed to the curator for review. The submission includes the contributing workspace's name and ID for traceability. Curators can approve or reject the submission. Rejected packages are returned to the builder for revision.
Distribution
Approved packages enter the XChange and follow the standard distribution flow. Curators can publish them to the Private Community or distribute them directly to tenant workspaces from the Admin workspace.
Consumer experience
End users access published packages through the Community library, where they can browse, view, and install packages available to their workspace.
The community library supports two key flows:
- Browse packages: Search and explore verified packages
- Install or update packages: Open a package and install or update versions
View verified packages in the community library
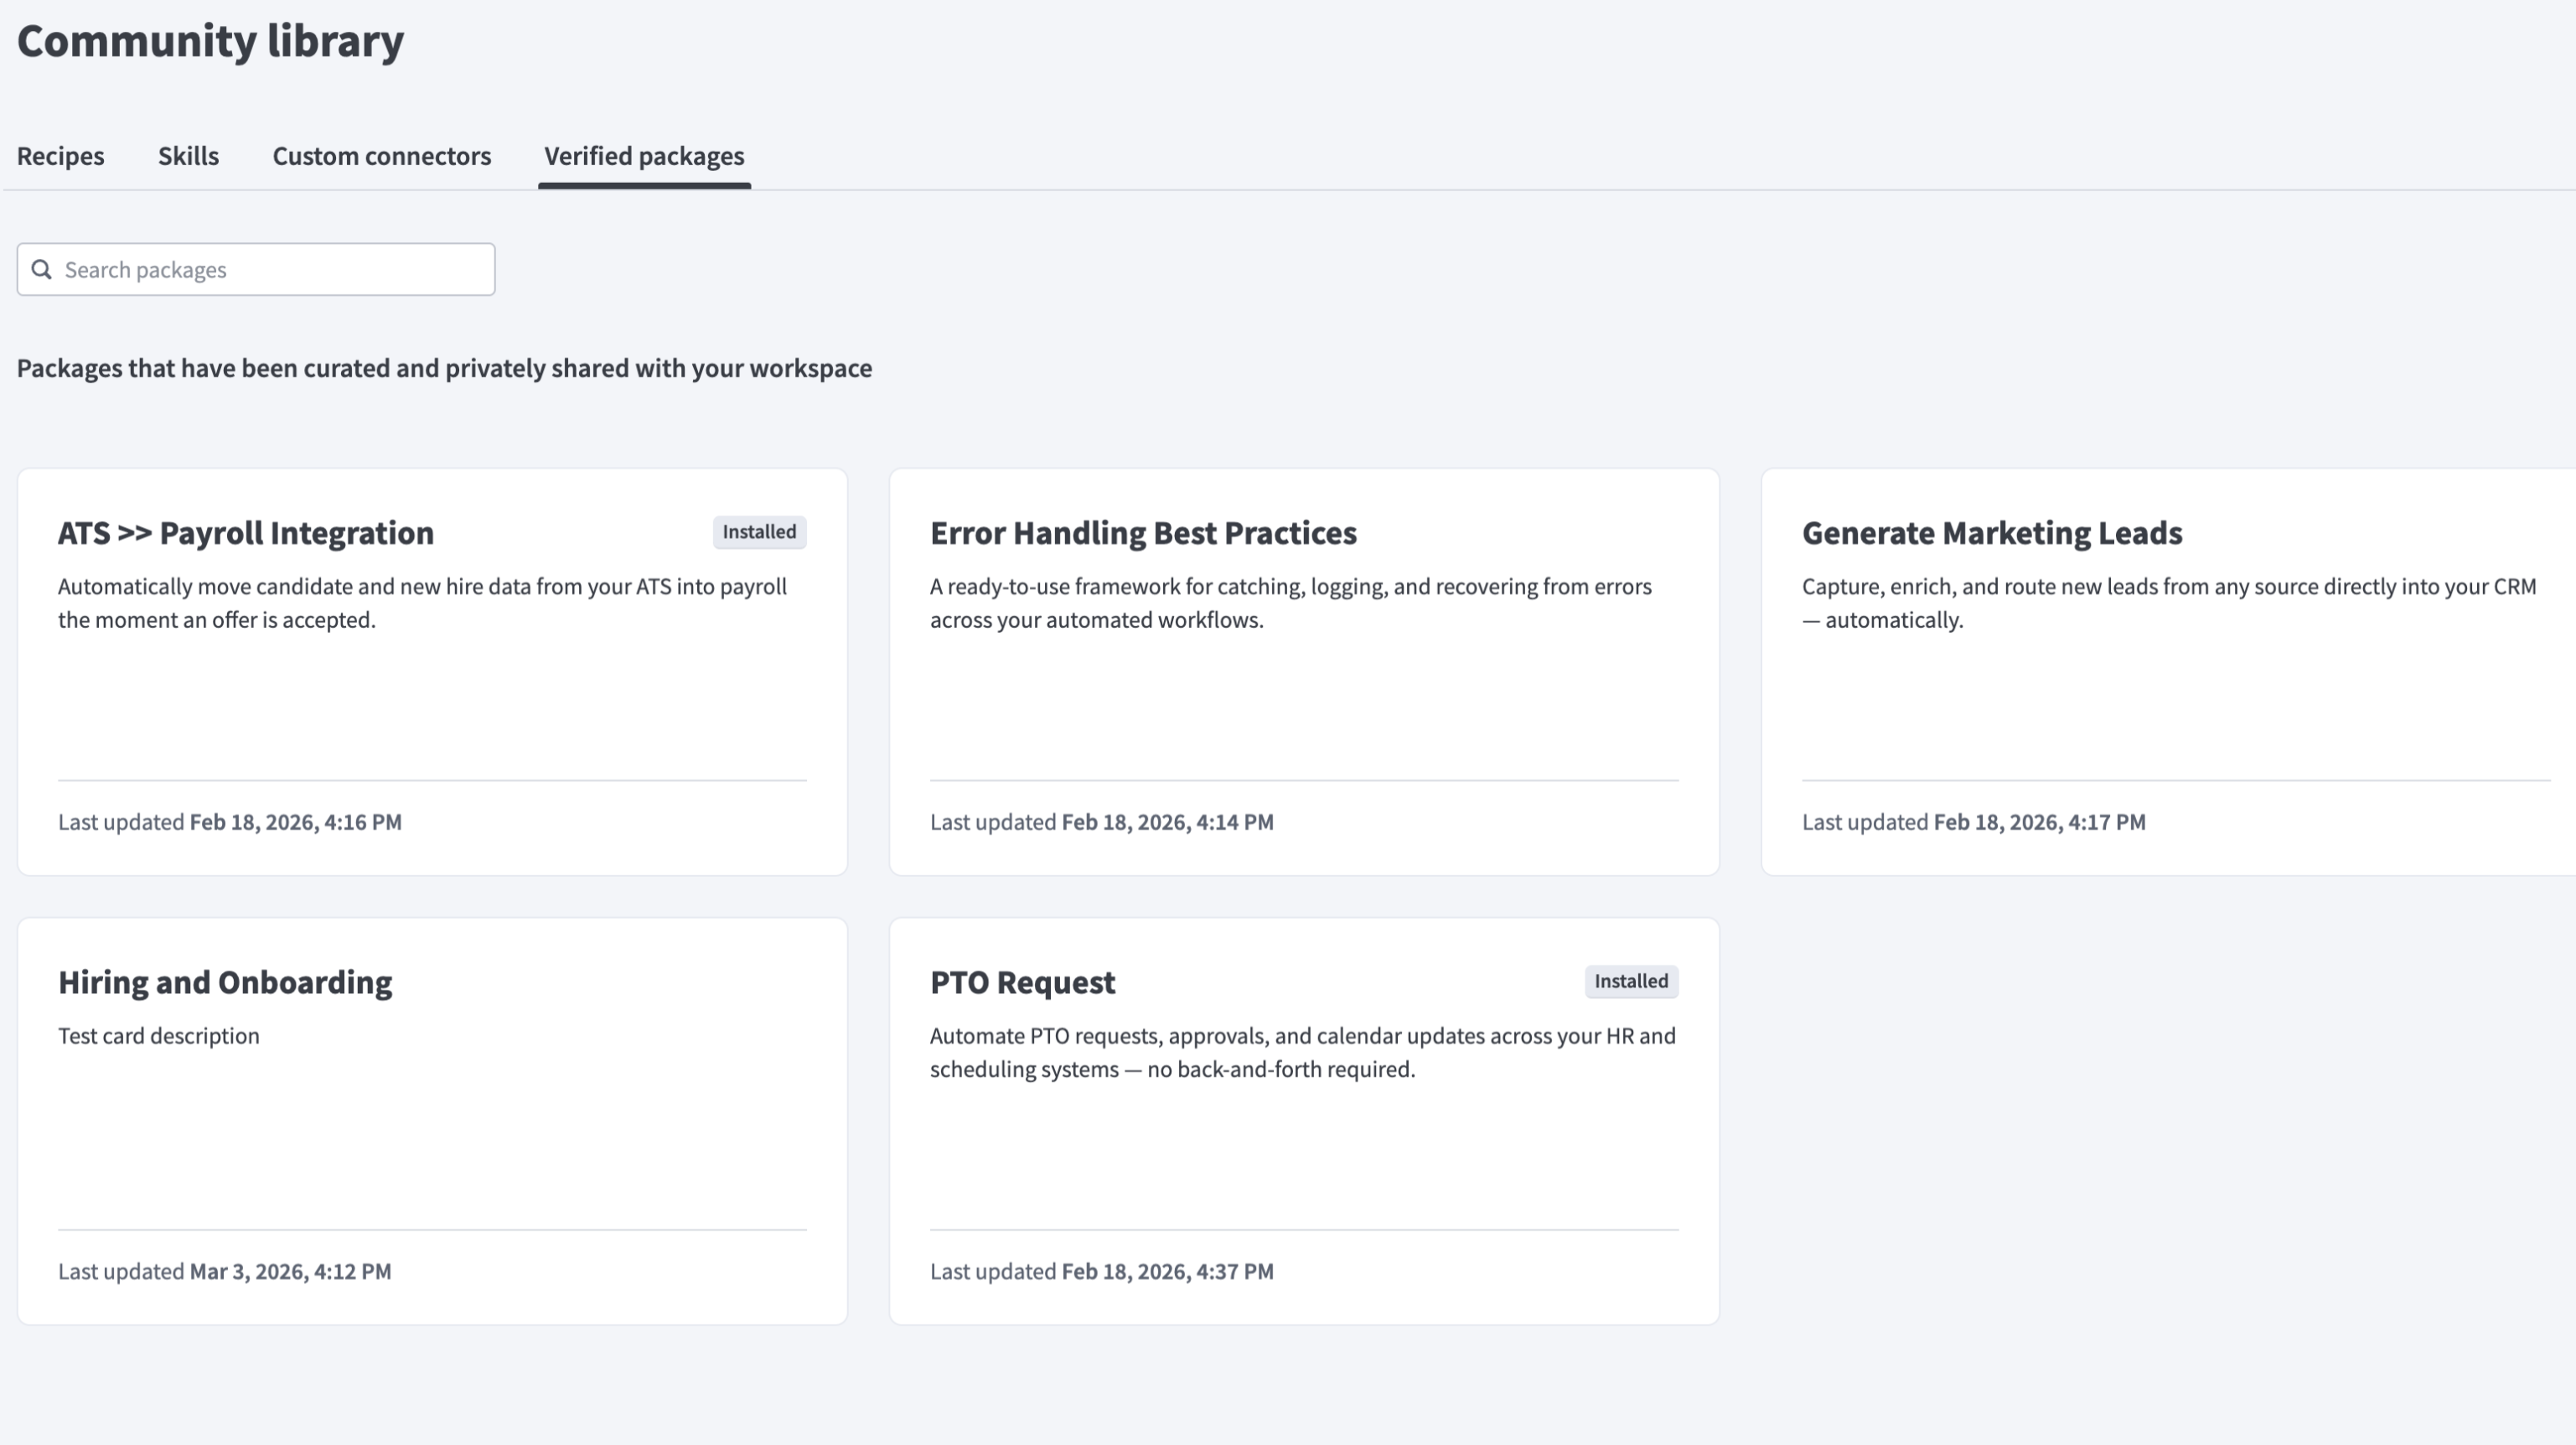
All published packages appear in the Verified packages tab of the Community library.
Complete the following steps to view verified packages in the Community library:
Go to Community library.
Click the Verified packages tab.
Browse the list of packages.
 Browse verified packages
Each package card displays information such as the package name, description, and the last updated timestamp.
STATUS BADGES
Package cards display status badges to indicate the installation state of each package version.
- Installed indicates the latest version is installed
- Update available indicates a newer version is available
Use the Search packages field to find a package, or click a package to open its details page.
View package details
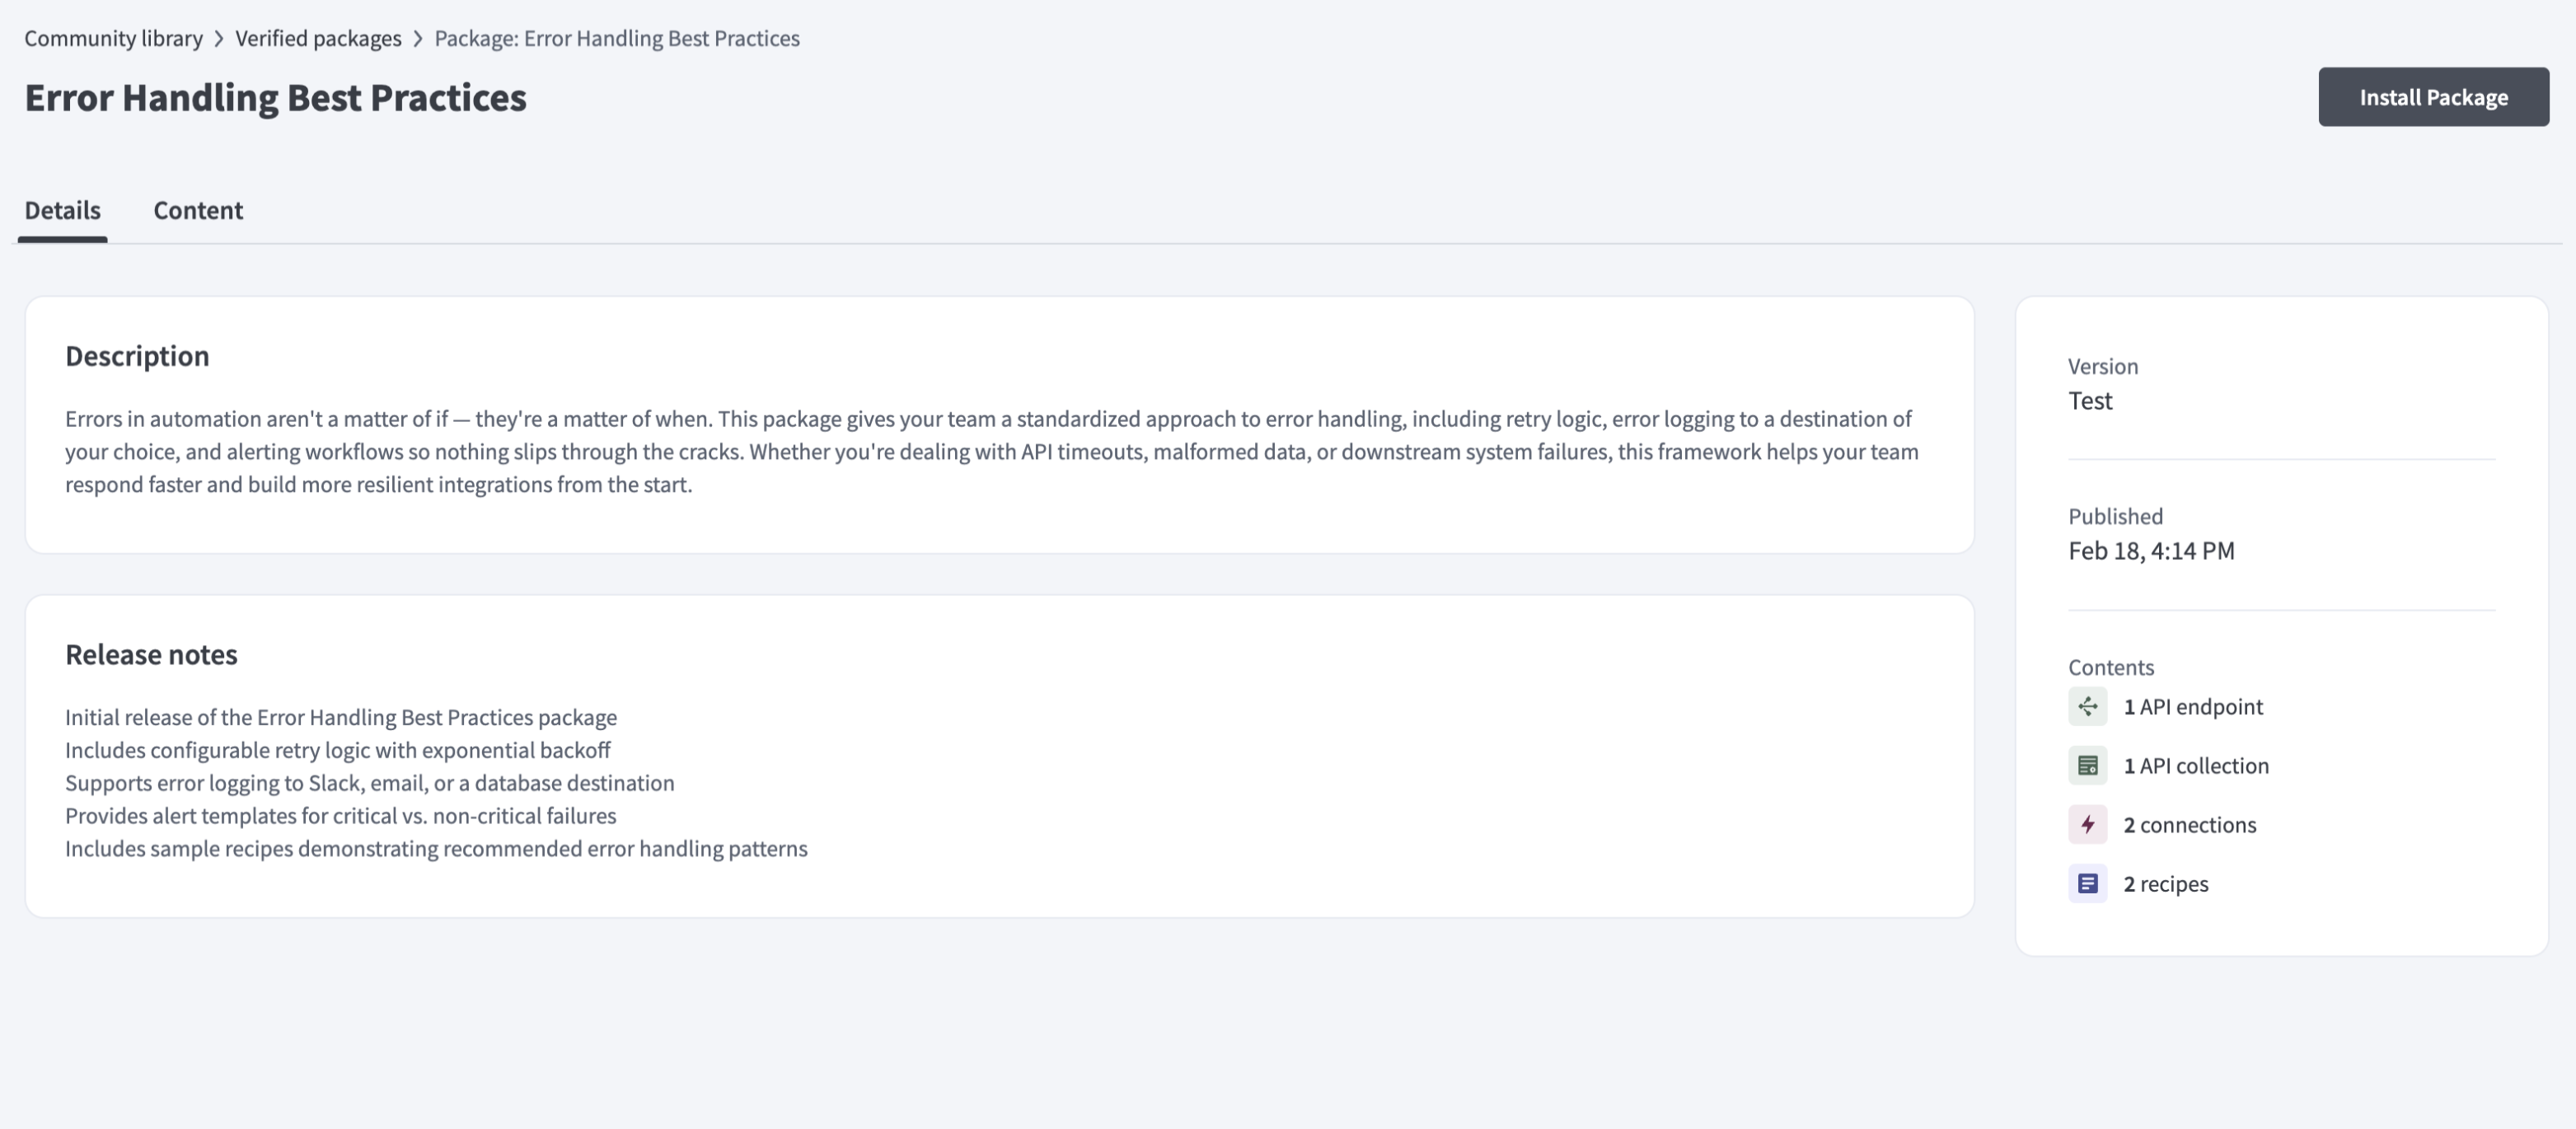
The package details page displays information about the selected version.
Complete the following steps to view package details:
Click a package from the Verified packages tab.
Review the package details page to understand what the version includes:
- Details: Includes the description, release notes, and overview
- Content: Includes assets such as recipes, connections, and lookup tables
 View package details
Review the panel for information, such as the version information and contents used.
Click Install package to install the version. The page indicates whether the version is Installed or if an Update is available.
Last updated: