GitHub interactive images MCP app
This use case provides step-by-step instructions to add a custom GitHub fetch file tool to your MCP server to enable your LLM to render pannable and zoomable images from your GitHub repo directly in your LLM chat.
What does this MCP app do?
This MCP app enables you to view, pan, and zoom your GitHub repo images directly in your LLM, such as ChatGPT, Claude, or Cursor.
Create an MCP app
Complete the following steps to build an MCP app that enables you to view, pan, and zoom your GitHub repo images directly in your LLM, such as ChatGPT, Claude, or Cursor.
USE CASES ARE INTENDED AS EXAMPLES ONLY
This use case serves as an example. Modifications to tool configurations, MCP server connections, or conditional logic may be necessary to adapt this recipe to your workflow. This use case has been tested with ChatGPT, Claude, and Cursor. MCP app configuration and usage may vary with other LLMs.
Sign in to your Workato account.
Create a GitHub connection.
Create a GitHub connection
Connect to GitHub on Workato using one of the following authentication methods:
- OAuth authentication. Workato recipes act on your behalf.
- GitHub Apps. Workato recipes act as the app. Refer to GitHub App authentication.
- A personal access token
Refer to the GitHub documentation for more information.
OAuth authentication
View OAuth authentication steps
Complete the following steps to connect your GitHub to Workato using OAuth authentication:
Sign in to your Workato account and go to the project where you plan to add your GitHub connection.
Click Create > Connection (or press C twice), then select GitHub as your connection.
Provide a Connection name that identifies which GitHub instance Workato is connected to.
Use the Location drop-down menu to select the project where you plan to store the connection.
Use the Authentication type drop-down menu and select OAuth App.
Optional. Click Advanced configuration to display the Host name field.
Optional. Enter a Host name. This is applicable when using Github Enterprise Server. Enter your Github subdomain. For example, if your host URL is https://github.example-organisation.com, the subdomain is github.example-organisation.com.
Click Connect. Workato redirects you to GitHub. The OAuth App requests authorization to act on your behalf. Workato performs actions such as creating comments, issues, and pull requests under your GitHub user.
GitHub App authentication
You must first register the app in your GitHub account and retrieve the credentials to connect to GitHub using a GitHub App.
 Select Authentication type as GitHub app and collect details from your GitHub App!
Register your GitHub app
View step to register your GitHub App
Complete the following steps to register your GitHub App and retrieve the credentials required to connect it to Workato:
Complete the steps in the GitHub documentation to register your GitHub App.
Retrieve your GitHub App ID in the General settings page of your GitHub app.
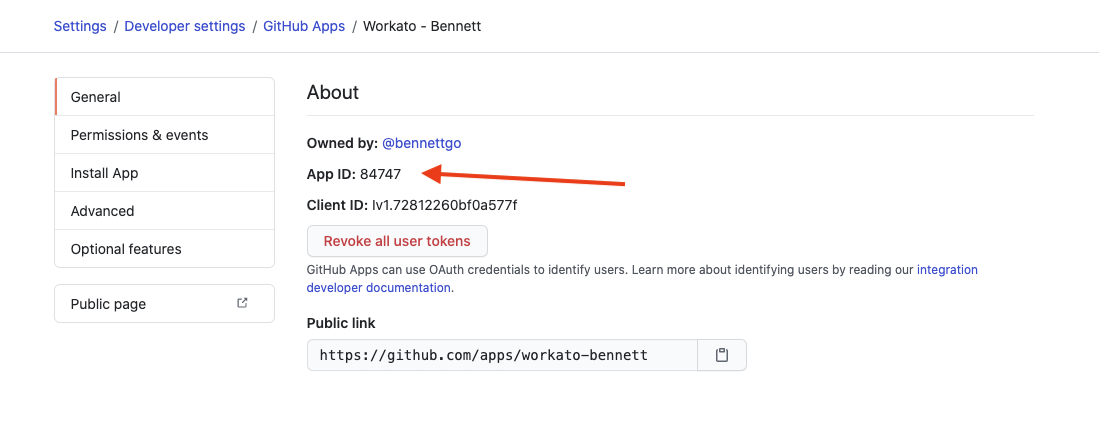 Save this App ID and place it into your connection
Generate a Private key on the same page. GitHub automatically downloads this .pem file to your machine.
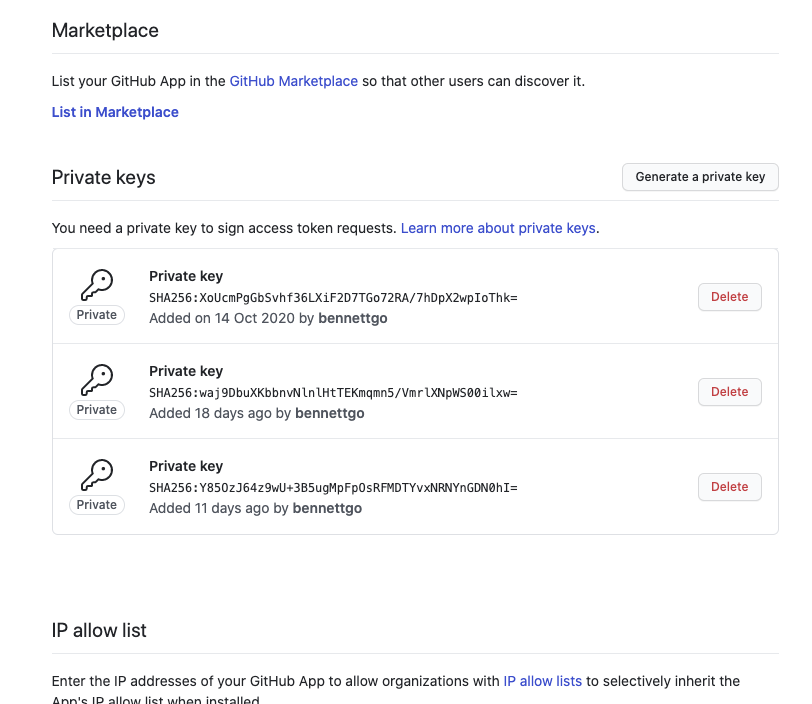 Generate the private key
Open the .pem file in a text editor. The file should look similar to the following:
-----BEGIN RSA PRIVATE KEY-----
MIIEpAIBAAKCAQEAyL/wuiSaWoH0pyf366G5E7dbzzmON1qMMrWvls8RtZtgOLjb
FBxj6gO2aUfoGbMCMqOYRV6xCn6tK118sGYMd5U/kCFu3IRPr/2GoEtcrf0TecQG
ON+27ijH0Vpn62o8NzGejdy0AWujrtAl6F8xGZeze0PzrGvW6h/GnAdZO1gJnp8t
wmEqEMXqAsPOQ0hkY+r+pE8RKQVsJCe+PIanBKp7RKWDi9usPFZQdQ==
-----END RSA PRIVATE KEY-----Copy the entire private key, including the -----BEGIN RSA PRIVATE KEY----- and -----END RSA PRIVATE KEY-----. Use this private key when you set up the connection in Workato.
Retrieve your Installation ID from the organization or user where you installed your GitHub App:
- Users accounts: Go to Settings > Applications > Your GitHub App > Configure.
- Organizations: Go to your organization's GitHub homepage. Click Settings > Installed GitHub Apps > Configure.
The installation ID appears in the URL. For example, if the URL is https://github.com/settings/installations/13876669, the installation ID is 13876669.
Save the installation ID. Enter this ID when creating the GitHub App connection in Workato.
Configure GitHub app authentication
View steps to authenticate your GitHub app
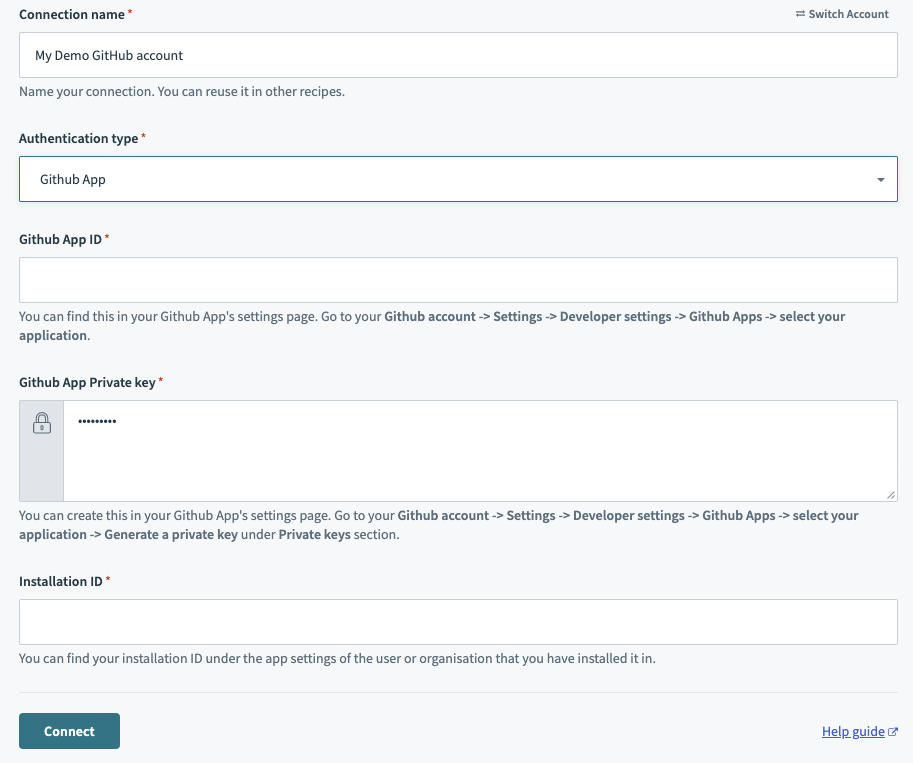
Provide a Connection name that identifies which GitHub instance Workato is connected to.
Use the Location drop-down menu to select the project where you plan to store the connection.
Use the Authentication type drop-down menu and select GitHub App.
Enter your GitHub App ID.
Enter your Github App Private key.
Enter your Installation ID.
Optional. Click Advanced configuration to display the Host name field.
Optional. Enter a Host name if using GitHub Enterprise Server. Use your GitHub subdomain. For example, if your host URL is https://github.example-organisation.com, the subdomain is github.example-organisation.com.
Optional. Enter a Custom OAuth profile. This selection ensures that all requests to the app use the specified profile.
Click Connect.
Personal access token authentication
Retrieve your personal access token from GitHub to connect your GitHub account to Workato using a personal access token:
View steps to retrieve your GitHub personal access token
Go to Github account > Settings > Developer settings > Personal access tokens > Generate new token.
Click Generate new token.
Copy the token. Enter this token in Workato to authenticate the connection.
Complete setup in Workato
View Complete setup in Workato steps
Complete the following steps to set up your GitHub connection using a personal access token:
Sign in to your Workato account and go to the project where you plan to add your GitHub connection.
Click Create > Connection (or press C twice), then select GitHub as your connection.
Provide a Connection name that identifies which GitHub instance Workato is connected to.
Use the Location drop-down menu to select the project where you plan to store the connection.
Use the Authentication type drop-down menu and select Personal Access Token.
Optional. Click Advanced configuration to display the Host name field.
Optional. Enter a Host name. This is applicable when using Github Enterprise Server. Enter your Github subdomain. For example, if your host URL is https://github.example-organisation.com, your subdomain is github.example-organisation.com.
Enter your Personal Access Token.
Optional. Enter a Custom OAuth profile. This ensures all requests to the app use the specified profile.
Click Connect.
Create a GitHub fetch file tool.
Create a GitHub skill
This section provides steps to create and configure a GitHub fetch image skill that you can add to an MCP server.
Create a skill and set up the trigger.
Create a skill and set up the trigger
This step creates a skill with a trigger that defines how the MCP server calls your recipe and what parameters it expects.
Complete the following steps to create the skill and configure the trigger:
Go to Projects and click Create > Skill.
Enter a name for the skill in the Skill name field.
Use the Location drop-down menu to select the project where you plan to store the skill.
Click Start building.
The recipe editor opens with the Start workflow trigger and Return response action automatically selected.
Enter the following description for your skill workflow in the When should this skill run? field. This description helps the LLM recognize when to fetch a file from a GitHub repository versus when a user asks a general question.
Fetch a file (such as PNG, JPG, SVG, or other binary/text file) from a GitHub repository. Returns the file contents (base64-encoded for binary files) along with metadata like size, encoding, and download URL.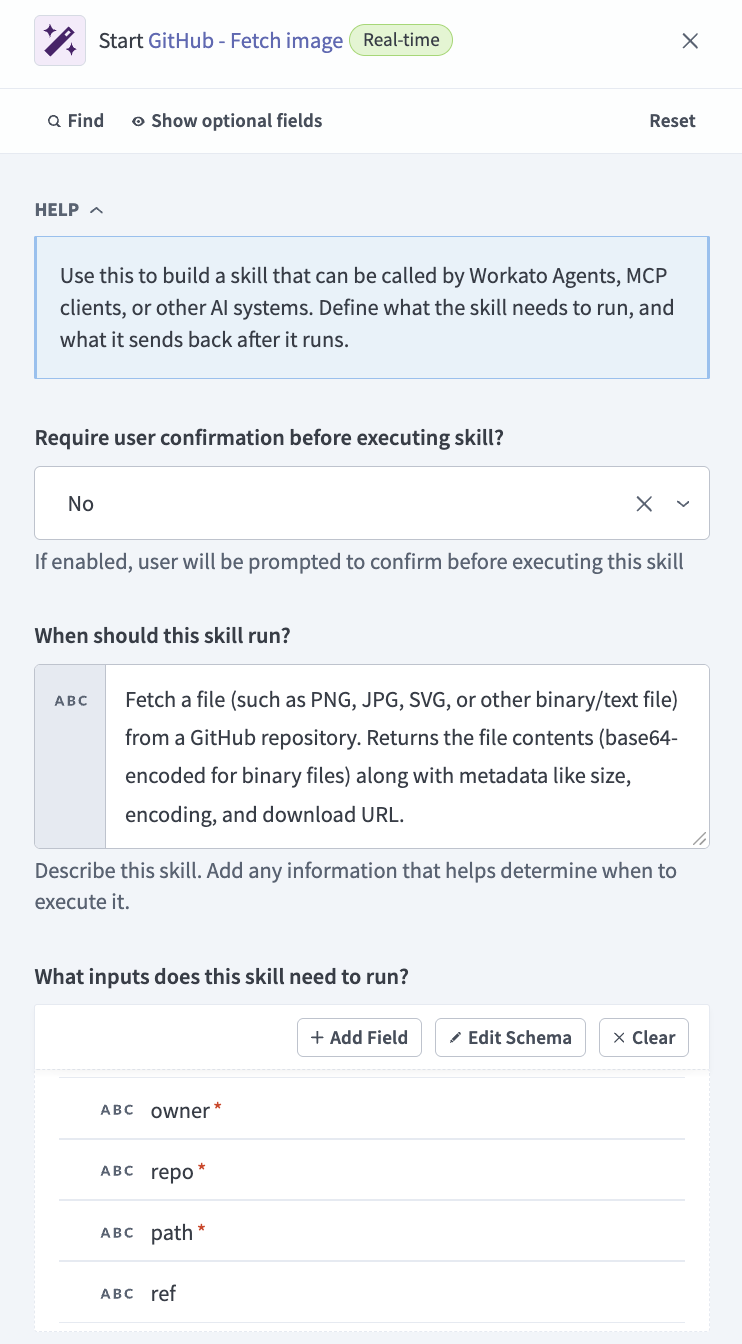 Enter a description for the skill
Go to the What inputs does this skill need to run? section and click Use JSON.
Copy and paste the following JSON schema to provide a description of the schema recipe parameters:
[
  {
    "name": "owner",
    "type": "string",
    "optional": false,
    "control_type": "text",
    "hint": "Repository owner (user or organization), such as 'octocat'"
  },
  {
    "name": "repo",
    "type": "string",
    "optional": false,
    "control_type": "text",
    "hint": "Repository name, such as 'Hello-World'"
  },
  {
    "name": "path",
    "type": "string",
    "optional": false,
    "control_type": "text",
    "hint": "File path within the repository, such as 'images/logo.png'"
  },
  {
    "name": "ref",
    "type": "string",
    "optional": true,
    "control_type": "text",
    "hint": "Optional branch name, tag, or commit SHA. Defaults to the repository's default branch."
  }
]Go to the What information does this skill send back? section and click Use JSON.
Copy and paste the following JSON schema to define the skill output:
[
  {
    "name": "name",
    "type": "string",
    "optional": true,
    "control_type": "text"
  },
  {
    "name": "path",
    "type": "string",
    "optional": true,
    "control_type": "text"
  },
  {
    "name": "sha",
    "type": "string",
    "optional": true,
    "control_type": "text"
  },
  {
    "name": "size",
    "type": "integer",
    "optional": true,
    "control_type": "number"
  },
  {
    "name": "type",
    "type": "string",
    "optional": true,
    "control_type": "text"
  },
  {
    "name": "encoding",
    "type": "string",
    "optional": true,
    "control_type": "text"
  },
  {
    "name": "content",
    "type": "string",
    "optional": true,
    "control_type": "text",
    "hint": "File contents. Base64-encoded for binary files (PNG/JPG/SVG/etc.)."
  },
  {
    "name": "download_url",
    "type": "string",
    "optional": true,
    "control_type": "text"
  },
  {
    "name": "html_url",
    "type": "string",
    "optional": true,
    "control_type": "text"
  },
  {
    "name": "git_url",
    "type": "string",
    "optional": true,
    "control_type": "text"
  },
  {
    "name": "url",
    "type": "string",
    "optional": true,
    "control_type": "text"
  },
  {
    "name": "error",
    "type": "string",
    "optional": true,
    "control_type": "text"
  }
]Click Save.
Create a GitHub fetch image action.
Create a GitHub fetch image action
This step queries your GitHub repo and returns the image contents.
Complete the following steps to create the GitHub action:
Click + Add step and select Action in app.
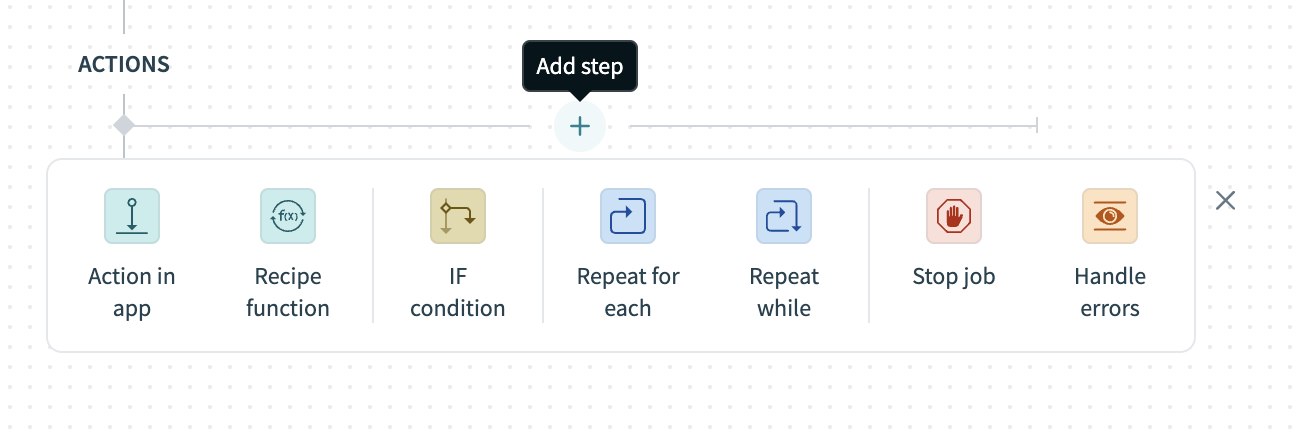 Click Add step > Action in app
Search for GitHub and select it as your app.
Select Custom action.
DON'T USE GUIDED SETUP
The steps in this use case don't use the guided setup option. Steps for guided setup vary from the steps provided in this use case.
Enter a name in the Action name field. For example: Get repository image contents.
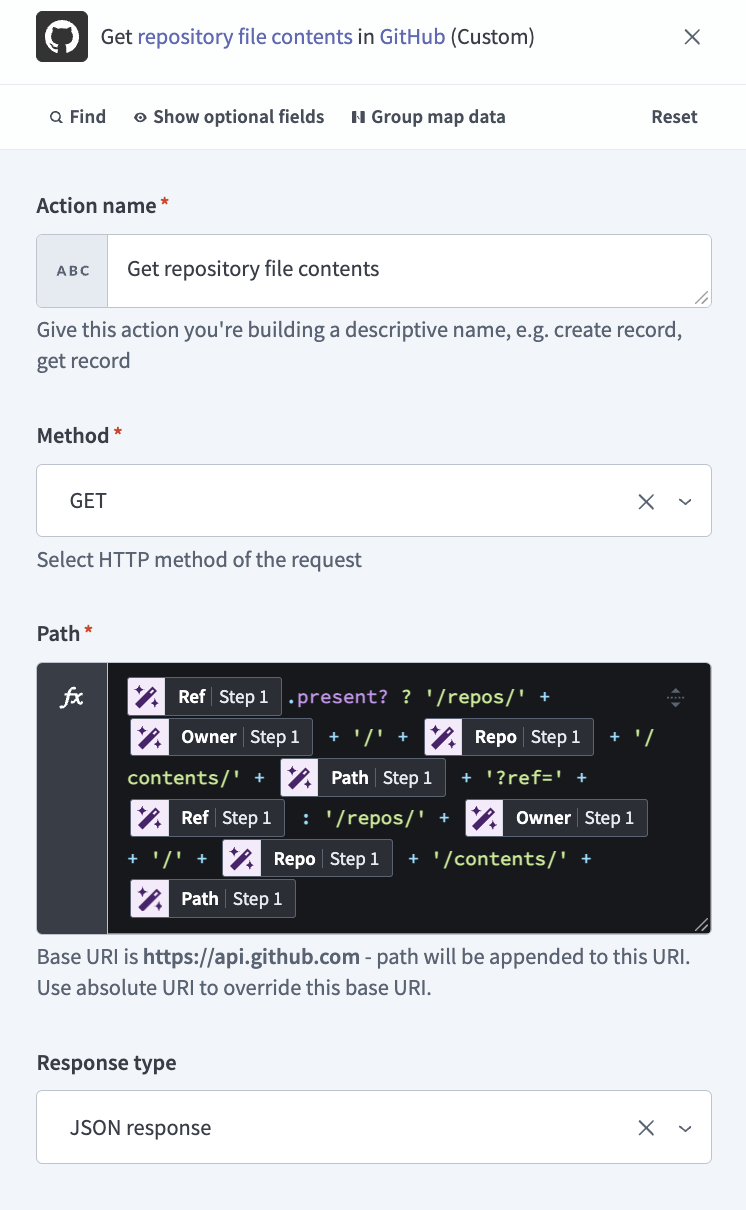 Set up the action
Use the Method drop-down menu to select GET.
Go to the Path field and switch to formula mode.
Copy and paste the following formula into the Path field, replacing each datapill placeholder, such as <RefStep 1 datapill>, <OwnerStep 1 datapill>, <RepoStep 1 datapill>, and <PathStep 1 datapill>, by mapping the corresponding datapill from the RECIPE DATA panel:
<RefStep 1 datapill>.present? ? '/repos/' + <OwnerStep 1 datapill> + '/' + <RepoStep 1 datapill> + '/contents/' + <PathStep 1 datapill> + '?ref=' + <RefStep 1 datapill> : '/repos/' + <OwnerStep 1 datapill> + '/' + <RepoStep 1 datapill> + '/contents/' + <PathStep 1 datapill>The resulting formula should look like this:
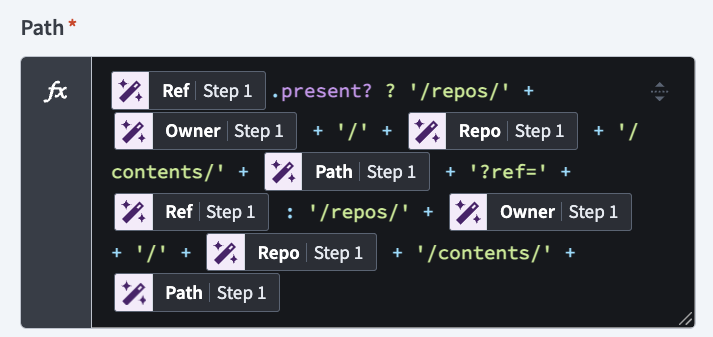 Path formula
Ensure that Response type is set to JSON response.
Expand the Request headers section and click Add header.
Enter Accept in the Name field and application/vnd.github+json in the Value field.
Go to the Response body section and click Use JSON.
Copy and paste the following schema into the field:
[
  {
    "control_type": "text",
    "name": "name",
    "type": "string"
  },
  {
    "control_type": "text",
    "name": "path",
    "type": "string"
  },
  {
    "control_type": "text",
    "name": "sha",
    "type": "string"
  },
  {
    "control_type": "integer",
    "name": "size",
    "type": "integer"
  },
  {
    "control_type": "text",
    "name": "type",
    "type": "string"
  },
  {
    "control_type": "text",
    "name": "encoding",
    "type": "string"
  },
  {
    "control_type": "text",
    "name": "content",
    "type": "string"
  },
  {
    "control_type": "text",
    "name": "download_url",
    "type": "string"
  },
  {
    "control_type": "text",
    "name": "html_url",
    "type": "string"
  },
  {
    "control_type": "text",
    "name": "git_url",
    "type": "string"
  },
  {
    "control_type": "text",
    "name": "url",
    "type": "string"
  }
]Click Save.
Configure the RETURN response.
Configure the RETURN response
This step defines the response the skill returns.
Complete the following steps to configure the RETURN response:
Click the RETURN response step in the recipe editor.
Map the NameStep 2 datapill to the Name field.
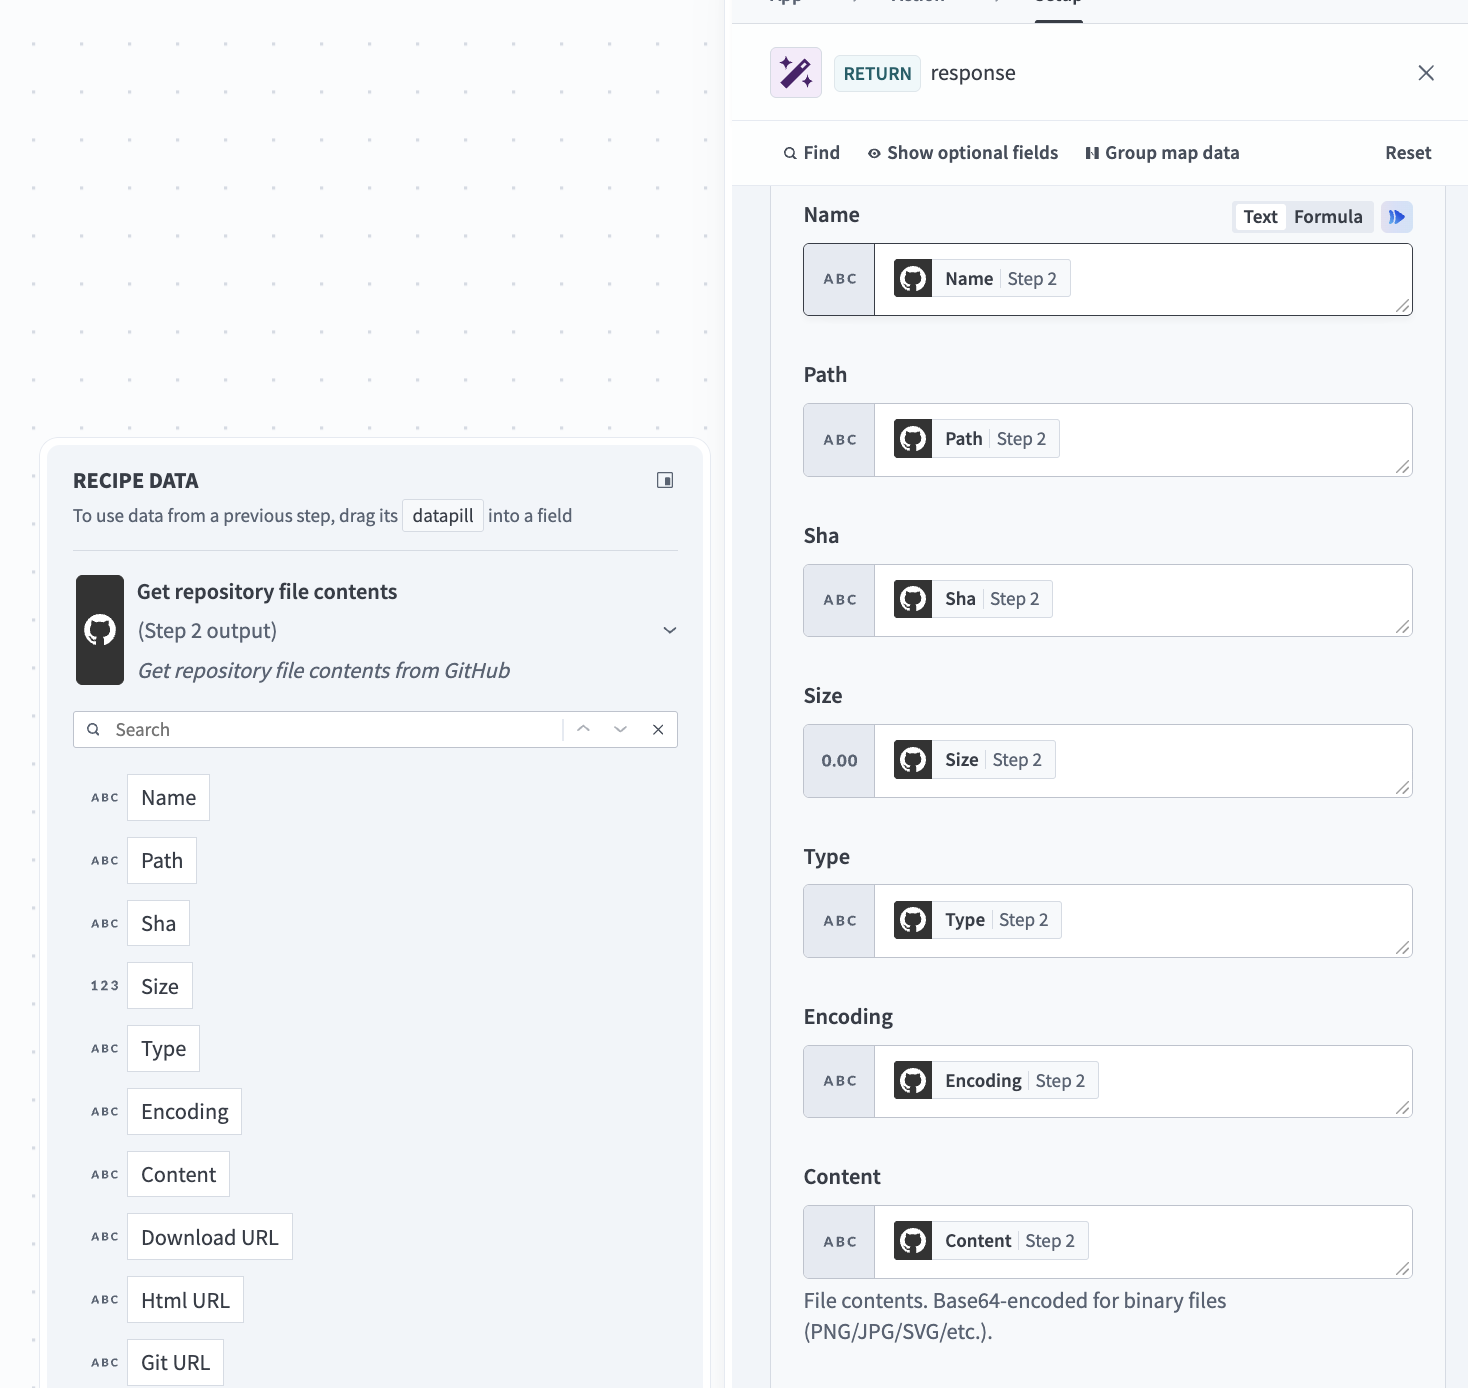 Map the corresponding datapills for the RETURN response
Map the PathStep 2 datapill to the Path field.
Map the ShaStep 2 datapill to the Sha field.
Map the SizeStep 2 datapill to the Size field.
Map the TypeStep 2 datapill to the Type field.
Map the EncodingStep 2 datapill to the Encoding field.
Map the ContentStep 2 datapill to the Content field.
Map the Download URLStep 2 datapill to the Download URL field.
Map the Html URLStep 2 datapill to the Html URL field.
Map the Git URLStep 2 datapill to the Git URL field.
Map the URLStep 2 datapill to the URL field.
Click Save.
Go to AI Hub > Enterprise MCP and click + Create an MCP server.
Create an MCP server.
Create an MCP server
This step creates a MCP server and adds your skill to it. Skills you add to the MCP server become tools you can use in your LLM.
Complete the following steps to create an MCP server:
Go to the Start from scratch section and click New MCP server. Refer to GitHub MCP server if you plan to use the GitHub prebuilt MCP server template.
Select Project assets as your tool source.
Use the Project drop-down menu to select the project where you plan to store the MCP server.
Select the tool you built in the preceding steps.
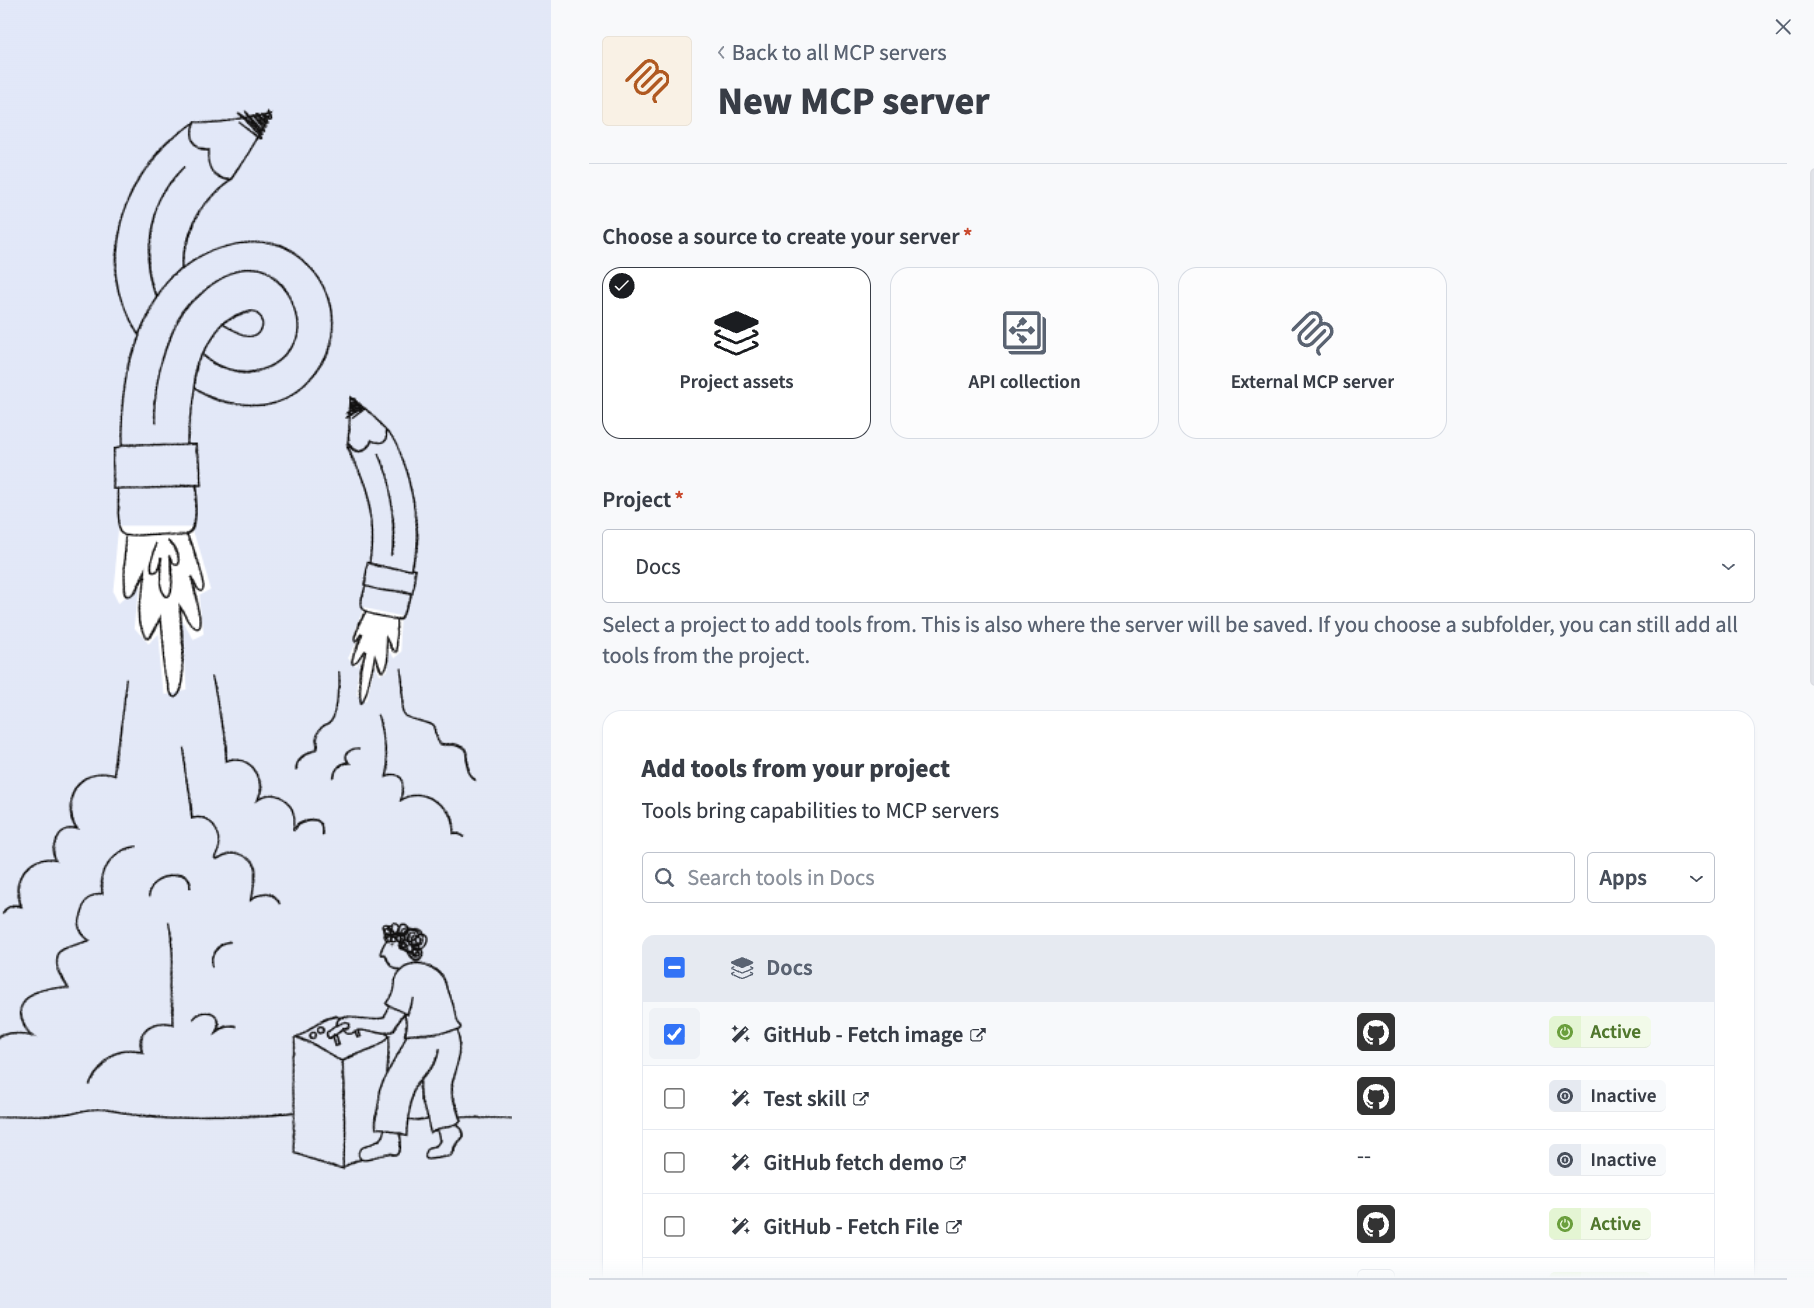 Select the tool you built in the preceding steps
Enter a name for your MCP server in the Server name field.
Optional. Enter instructions for the LLM to understand the purpose and goals for the MCP server in the Server instruction field.
Click Start building. The MCP server tools, description, remote MCP URL, and additional server information displays in the Overview tab.
Create an MCP app.
Create an MCP app
This steps creates an MCP app for your GitHub fetch image tool that enables it render images from your GitHub repo. You can pan and zoom images directly in an LLM chat.
Complete the following steps to create MCP app for your GitHub tool:
Go to AI Hub > Enterprise MCP.
Select the MCP server where you plan to add an MCP app.
Go to the Server capabilities section and select the Apps tab.
 Select the Apps tab
Click + Add App.
Enter a name for the MCP app in the Name field.
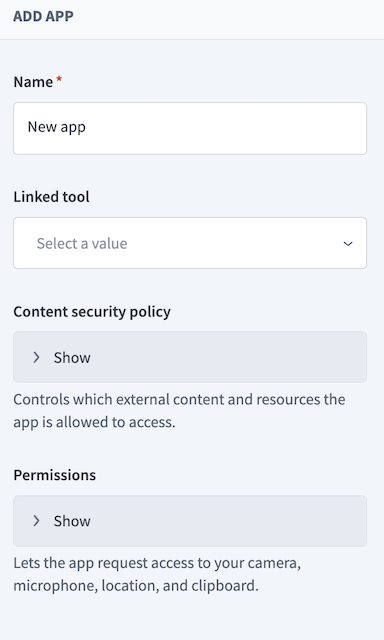 Configure the MCP app
Use the Linked tool drop-down menu to select the tool you created in the preceding steps.
Expand the Content security policy section to select the following external content and resources the MCP app is allowed to access:
Go to the Connect domains section and add the following domains:
https://api.github.comhttps://*.githubusercontent.com
Go to the Resource domains section and add the following domains:
https://cdn.jsdelivr.netraw.githubusercontent.comhttps://*.githubusercontent.com
Go to the Frame domains section and add the following domains:
-https://github.com
Select Start from scratch.
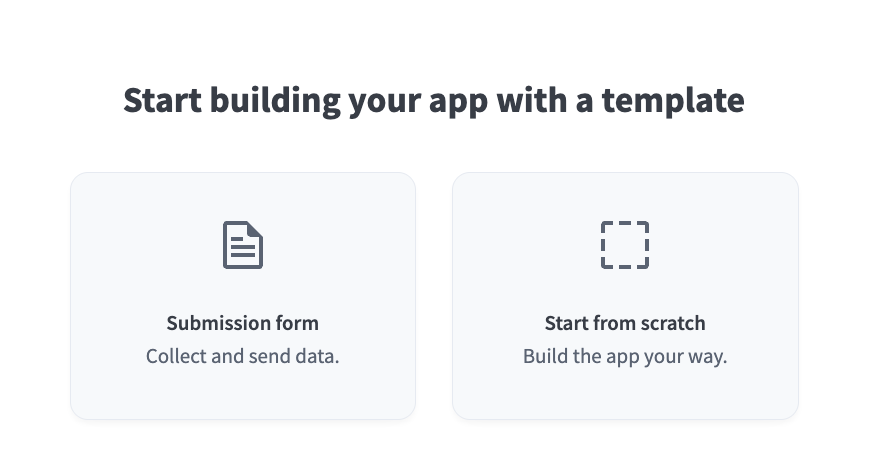 Select Start from scratch
Copy and paste the following code into the code editor:
<!DOCTYPE html>
<html lang="en">
<head>
  <meta charset="UTF-8" />
  <style>
    body { margin: 0; font-family: system-ui, sans-serif; background: #0d1117; }
    #status { padding: 8px 12px; color: #8b949e; font-size: 13px; word-break: break-all; }
    #viewport {
      overflow: hidden;
      width: 100%;
      height: 80vh;
      min-height: 420px;
      background: #0d1117;
      cursor: grab;
      touch-action: none;
      position: relative;
    }
    #viewport.grabbing { cursor: grabbing; }
    #img {
      max-width: 100%;
      display: block;
      transform-origin: 0 0;
      user-select: none;
      -webkit-user-drag: none;
    }
    .controls {
      position: absolute; top: 8px; right: 8px; z-index: 2;
      display: flex; gap: 6px;
    }
    .controls button {
      background: #21262d; color: #c9d1d9; border: 1px solid #30363d;
      border-radius: 6px; padding: 6px 10px; cursor: pointer; font-size: 13px;
      min-width: 34px;
    }
    .controls button:hover { background: #30363d; }
  </style>
</head>
<body>
  <div id="status">Connecting…</div>
  <div id="viewport">
    <div class="controls">
      <button id="zoomout" title="Zoom out">−</button>
      <button id="zoomin" title="Zoom in">+</button>
      <button id="reset">Reset</button>
      <button id="expand">⤢ Expand</button>
    </div>
    <img id="img" alt="" draggable="false" />
  </div>

  <script type="module">
    import { App } from 'https://cdn.jsdelivr.net/npm/@modelcontextprotocol/[email protected]/dist/src/app-with-deps.js';

    const app = new App({ name: 'GitHub Image Viewer', version: '1.0.0' });

    // NOTE: this host does not send the `ui/notifications/tool-input`
    // notification (it's optional in the MCP Apps spec), so `ontoolinput`
    // never fires here reliably. `ontoolresult` DOES fire — but it can
    // fire more than once per turn, e.g. if the model made an earlier
    // exploratory call (like reading README.md) before the actual image
    // fetch. So we don't latch onto the *first* result — we inspect every
    // result that arrives and only render the ones that actually look
    // like image data. Non-image results still update our "last known
    // context" (owner/repo/path), which we use as a fallback if nothing
    // image-shaped ever arrives on its own.
    const TOOL_NAME = 'GitHub_Fetch_File';   // verify exact name in AI Hub > Tools

    let lastContext = {};
    let imageRendered = false;

    function mimeFromPath(p) {
      const ext = (p.split('.').pop() || '').toLowerCase();
      return ({
        png: 'image/png', jpg: 'image/jpeg', jpeg: 'image/jpeg',
        gif: 'image/gif', webp: 'image/webp', svg: 'image/svg+xml',
        bmp: 'image/bmp', ico: 'image/x-icon'
      })[ext] || 'application/octet-stream';
    }

    function isImageData(data) {
      const p = data?.path || data?.download_url || data?.name || '';
      return mimeFromPath(p).startsWith('image/');
    }

    function extractData(raw) {
      let parsed = raw && raw.structuredContent;
      if (!parsed) {
        const text = raw?.content?.[0]?.text;
        try { parsed = text ? JSON.parse(text) : raw; } catch { parsed = raw; }
      }
      return parsed?.result ? parsed.result : parsed;
    }

    function renderImage(data, fallbackPath) {
      if (data?.download_url) {
        img.src = data.download_url;
        return true;
      }
      if (data?.content && data?.encoding === 'base64') {
        const clean = data.content.replace(/\s/g, '');
        img.src = `data:${mimeFromPath(data.path || fallbackPath || '')};base64,${clean}`;
        return true;
      }
      return false;
    }

    app.ontoolinput = (params) => {
      Object.assign(lastContext, params?.arguments || {});
    };

    app.ontoolresult = (result) => {
      const data = extractData(result);
      if (!data) return;
      if (data.error) {
        status.textContent = 'Tool error: ' + (typeof data.error === 'string' ? data.error : JSON.stringify(data.error));
        return;
      }
      // Remember context even from non-image results (e.g. an earlier lookup).
      if (data.owner) lastContext.owner = data.owner;
      if (data.repo) lastContext.repo = data.repo;
      if (data.path) lastContext.path = data.path;
      if (data.ref) lastContext.ref = data.ref;

      if (isImageData(data)) {
        imageRendered = renderImage(data, data.path);
      }
    };

    const status = document.getElementById('status');
    const vp = document.getElementById('viewport');
    const img = document.getElementById('img');

    img.addEventListener('error', () => {
      status.textContent = 'Image failed to load: ' + (img.src || '(empty src)');
    });
    img.addEventListener('load', () => {
      status.textContent = `Image loaded ✓ (${img.naturalWidth}×${img.naturalHeight})`;
    });

    async function callTool(name, args) {
      const raw = await app.callServerTool({ name, arguments: args });
      return extractData(raw);
    }

    await app.connect();

    // Give the host a few seconds to deliver an actual image result via
    // ontoolresult on its own. If nothing image-shaped has shown up yet,
    // but we've picked up enough context (owner/repo/path) from whatever
    // did arrive, make an explicit fetch call ourselves as a fallback.
    setTimeout(async () => {
      if (imageRendered) return;
      const FILE = {
        owner: lastContext.owner,
        repo: lastContext.repo,
        path: lastContext.path,
        ref: lastContext.ref || 'main'
      };
      if (!FILE.owner || !FILE.repo || !FILE.path) {
        status.textContent = 'Waiting for image data. Last known context: ' + JSON.stringify(lastContext);
        return;
      }
      try {
        const data = await callTool(TOOL_NAME, FILE);
        if (data?.error) {
          status.textContent = 'Tool error: ' + (typeof data.error === 'string' ? data.error : JSON.stringify(data.error));
        } else if (!renderImage(data, FILE.path)) {
          status.textContent = 'No image data returned. Keys: ' + Object.keys(data || {}).join(', ');
        }
      } catch (e) {
        status.textContent = 'Error: ' + e.message;
      }
    }, 4000);

    // ---- Pan / zoom state ----
    let scale = 1, x = 0, y = 0, dragging = false, sx = 0, sy = 0;
    const MIN = 0.2, MAX = 10;
    const apply = () => { img.style.transform = `translate(${x}px,${y}px) scale(${scale})`; };

    // Zoom toward a point (cx, cy) in viewport coordinates so the content
    // under the cursor / center stays put. Buttons pass the viewport center.
    function zoomAt(factor, cx, cy) {
      const newScale = Math.min(Math.max(scale * factor, MIN), MAX);
      const ratio = newScale / scale;
      x = cx - (cx - x) * ratio;
      y = cy - (cy - y) * ratio;
      scale = newScale;
      apply();
    }

    function zoomCenter(factor) {
      const r = vp.getBoundingClientRect();
      zoomAt(factor, r.width / 2, r.height / 2);
    }

    // Wheel zoom toward the cursor.
    vp.addEventListener('wheel', e => {
      e.preventDefault();
      const r = vp.getBoundingClientRect();
      zoomAt(e.deltaY < 0 ? 1.1 : 0.9, e.clientX - r.left, e.clientY - r.top);
    }, { passive: false });

    // Drag to pan.
    vp.addEventListener('pointerdown', e => {
      if (e.target.tagName === 'BUTTON') return;
      dragging = true; sx = e.clientX - x; sy = e.clientY - y;
      vp.classList.add('grabbing'); vp.setPointerCapture(e.pointerId);
    });
    vp.addEventListener('pointerup', () => { dragging = false; vp.classList.remove('grabbing'); });
    vp.addEventListener('pointermove', e => {
      if (!dragging) return;
      x = e.clientX - sx; y = e.clientY - sy; apply();
    });

    // ---- Controls ----
    document.getElementById('zoomin').addEventListener('click', () => zoomCenter(1.25));
    document.getElementById('zoomout').addEventListener('click', () => zoomCenter(0.8));
    document.getElementById('reset').addEventListener('click', () => {
      scale = 1; x = 0; y = 0; apply();
    });
    let expanded = false;
    document.getElementById('expand').addEventListener('click', () => {
      expanded = !expanded;
      vp.style.height = expanded ? '100vh' : '80vh';
    });
  </script>
</body>
</html>Click Save.
Go to the LLM where you plan to create an MCP integration and complete the following configuration steps:
Configure your MCP integration for ChatGPT.
ChatGPT MCP configuration
This step configures a new MCP server connector in your OpenAI account.
Go to your ChatGPT account.
Go to Settings > Apps & Connectors > Advanced settings and enable the Developer mode toggle.
Go to Settings > Apps & Connectors.
Click Create. This button is only visible when the Developer mode toggle is enabled.
Enter a name for your MCP connector in the Name field.
 Configure your ChatGPT MCP connector
Paste your MCP URL and token in the URL field.
Optional. Enter a description in the Description field.
Use the Authentication drop-down menu to select No Auth.
Select the checkbox to accept the risk of adding a custom MCP server.
Click Create.
Create a new chat in ChatGPT to use your MCP tools.
Configure your MCP integration for Claude.
Claude MCP configuration
This step configures a new MCP server connector in your Anthropic account.
Go to Settings > Connectors.
Click + Add new connector.
Enter a name for your MCP connector in the Name field.
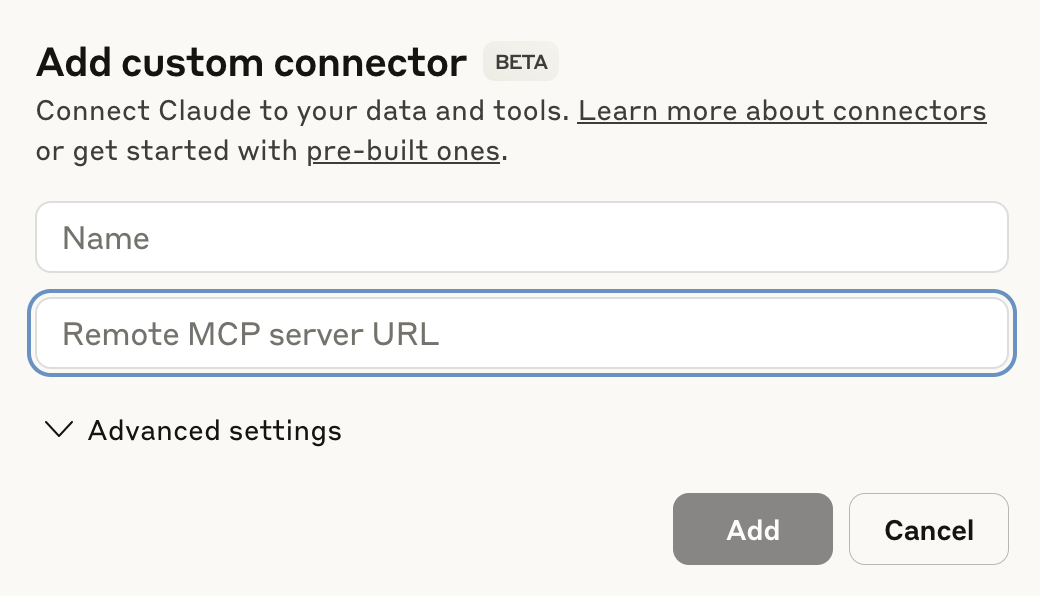 Configure your Claude MCP connector
Paste your MCP URL and token into the Remote MCP server URL field.
Click Add. The newly created MCP connector appears in the list of connectors.
Click Configure.
Use the permissions drop-down menu to select Always ask permission or Allow unsupervised. Always ask permission is selected by default.
Create a new chat in Claude to use your MCP tools.
Configure your MCP integration for Cursor.
Cursor MCP configuration
This step configures a new MCP server connector in your Cursor account.
Go to Settings > Cursor settings.
Click MCP & Integrations in the sidebar.
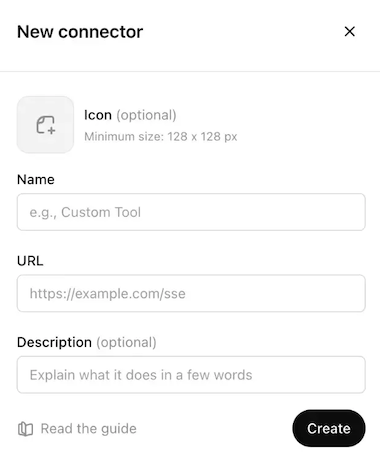
Click + New MCP Server to open the mcp.json file.
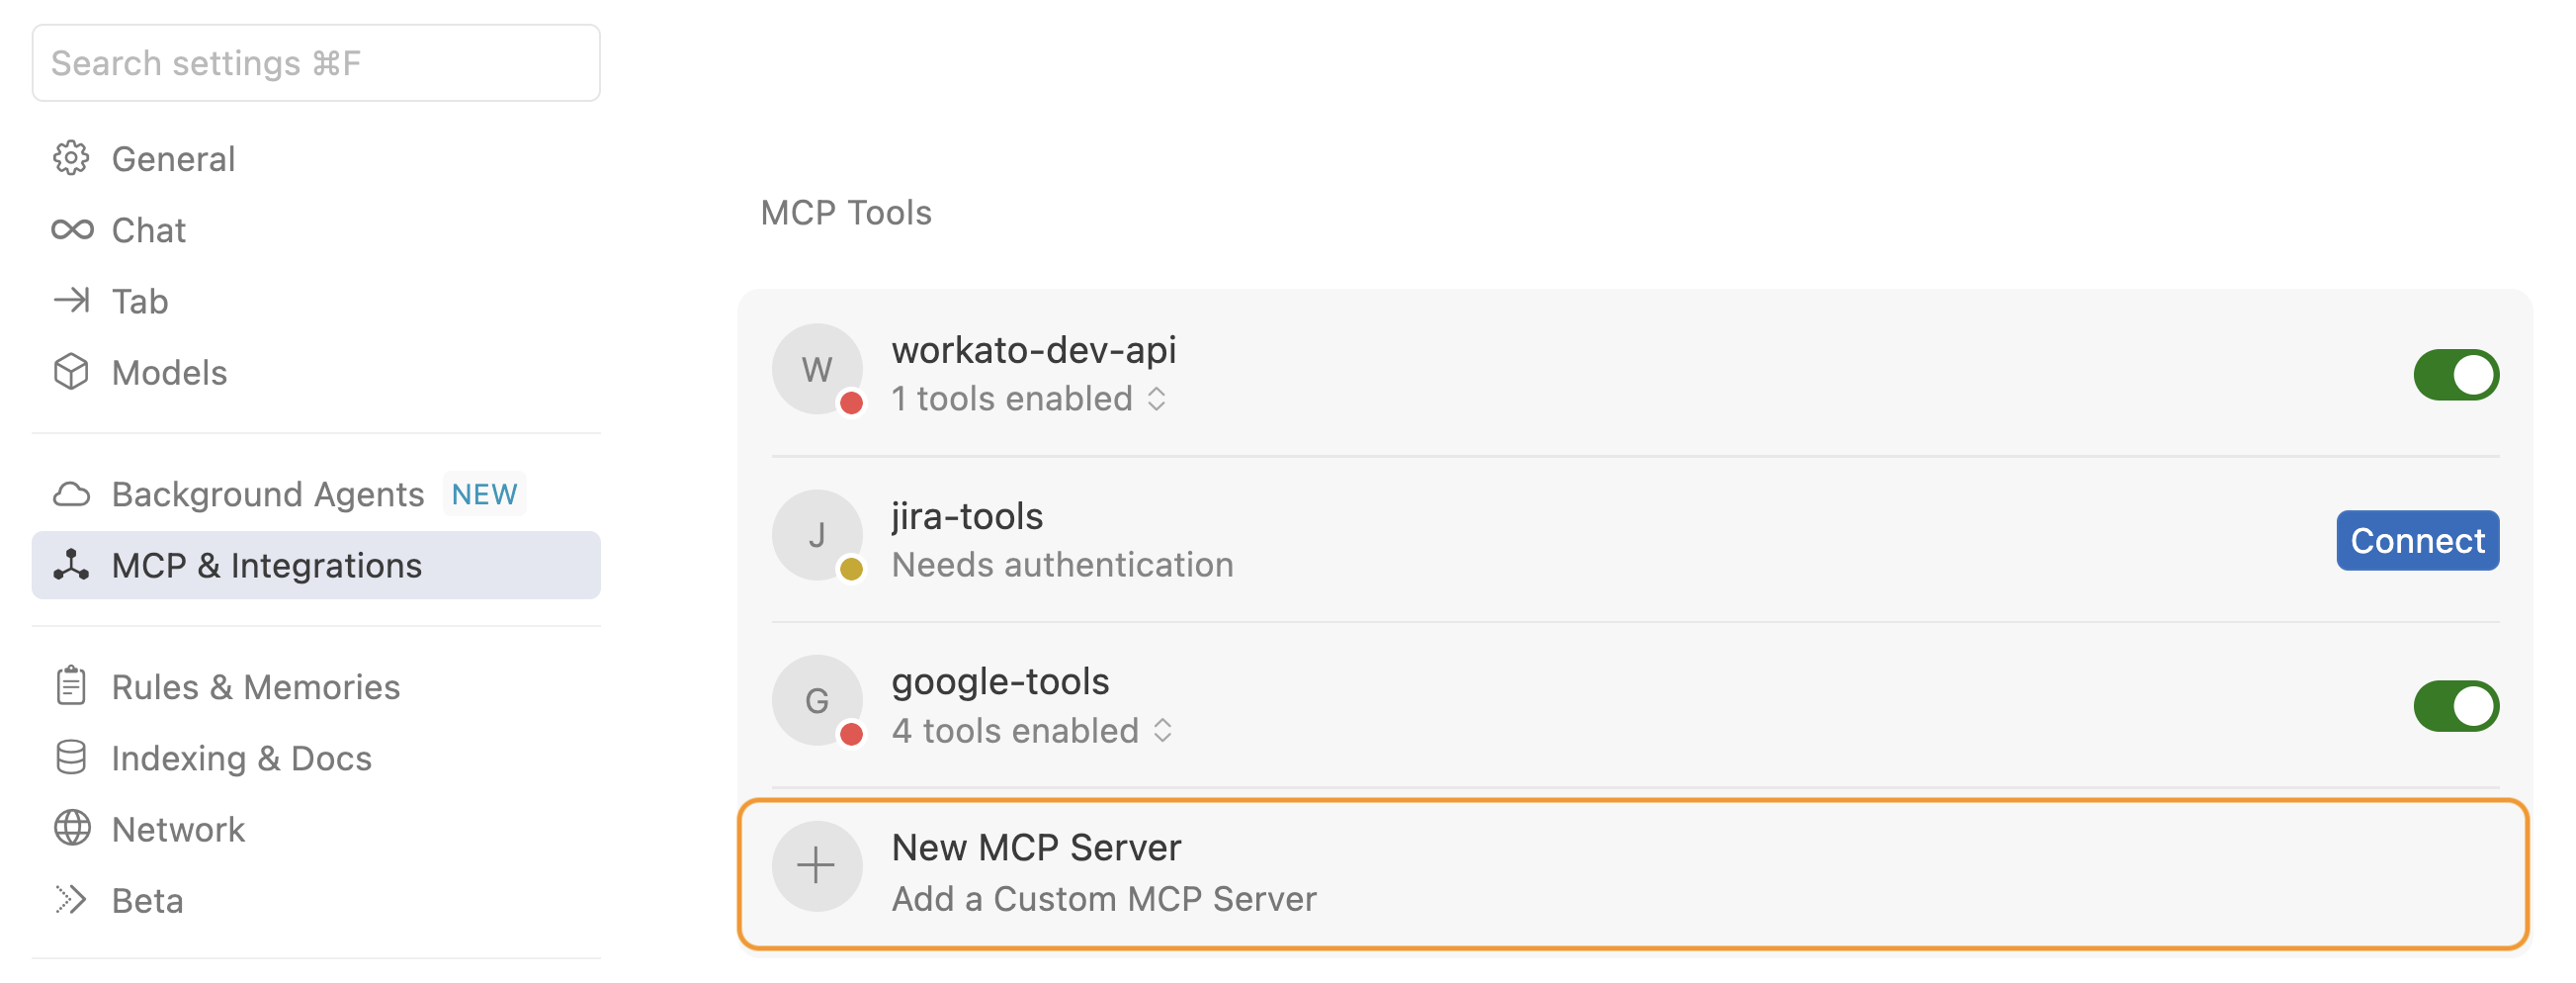 Click + New MCP Server
Update the configuration to use the MCP URL and token you copied in the preceding steps. For example:
{
  "mcpServers": {
    "snowflake-tools": {
      "url": "https://2255.apim.mcp.workato.com?wkt_token=YOUR_API_TOKEN"
    },
    "github-tools": {
      "url": "https://387.apim.mcp.workato.com/abc247/example-collection-name-v1?wkt_token=YOUR_API_TOKEN"
    }
  }
}Save your changes.
Create a new chat with your Cursor agent to use your MCP tools.
You must start a new chat with your agent. Cursor agents only have access to the tools and capabilities available when a chat begins. Agents can't detect or use new MCP configurations, servers, or tools added after starting a chat.
Test your MCP tool in your LLM.
 Cursor example chat
Last updated: