GitHubインタラクティブ画像MCPアプリ
このユースケースでは、MCPサーバーにカスタムGitHubファイル取得ツールを追加し、LLMチャット内でGitHubリポジトリのパンおよびズーム可能な画像をLLMが直接レンダリングできるようにする手順を説明します。
このMCPアプリの機能
このMCPアプリを使用すると、ChatGPT、Claude、CursorなどのLLMでGitHubリポジトリの画像を直接表示、パン、ズームできます。
MCPアプリの作成
ChatGPT、Claude、CursorなどのLLMでGitHubリポジトリの画像を直接表示、パン、ズームできるMCPアプリを構築するには、次の手順を実行します。
ユースケースは例示のみを目的としています
このユースケースは一例です。このレシピをワークフローに合わせて調整するには、ツール設定、MCPサーバーコネクション、または条件付きロジックの変更が必要になる場合があります。このユースケースはChatGPT、Claude、およびCursorでテストされています。 MCPアプリの設定と利用状況は、他のLLMによって異なる場合があります。
Workatoアカウントにサインインします。
GitHubコネクションを作成します。
GitHubコネクションの作成
次のいずれかの認証方法を使用して、WorkatoでGitHubに接続します:
- OAuth認証。 Workatoレシピがユーザーの代理で動作します。
- GitHub Apps。 Workatoレシピがアプリとして動作します。 GitHub App認証を参照してください。
- personal access token
詳細については、GitHubドキュメントを参照してください。
OAuth認証
OAuth認証手順を表示
OAuth認証を使用してGitHubをWorkatoに接続するには、次の手順を実行します:
Workatoアカウントにサインインし、GitHubコネクションを追加する予定のプロジェクトに移動します。
作成 > コネクションをクリックするか(またはCを2回押す)、GitHubをコネクションとして選択します。
Workatoが接続されているGitHubインスタンスを識別するコネクション名を指定します。
ロケーションドロップダウンメニューを使用して、コネクションを保存するプロジェクトを選択します。
Authentication type(認証タイプ)ドロップダウンメニューを使用し、OAuth Appを選択します。
任意。 Advanced configurationをクリックして、Host nameフィールドを表示します。
任意。 Host nameを入力します。これはGitHub Enterprise Serverを使用する場合に適用されます。 GitHubサブドメインを入力します。たとえば、ホストURLがhttps://github.example-organisation.comの場合、サブドメインはgithub.example-organisation.comです。
接続をクリックします。 WorkatoはユーザーをGitHubにリダイレクトします。 OAuth AppがGitHubアカウントへのアクセス許可をリクエストします。
GitHub App認証
まずGitHubアカウントでアプリを登録し、GitHub Appを使用してGitHubに接続するための資格情報を取得する必要があります。
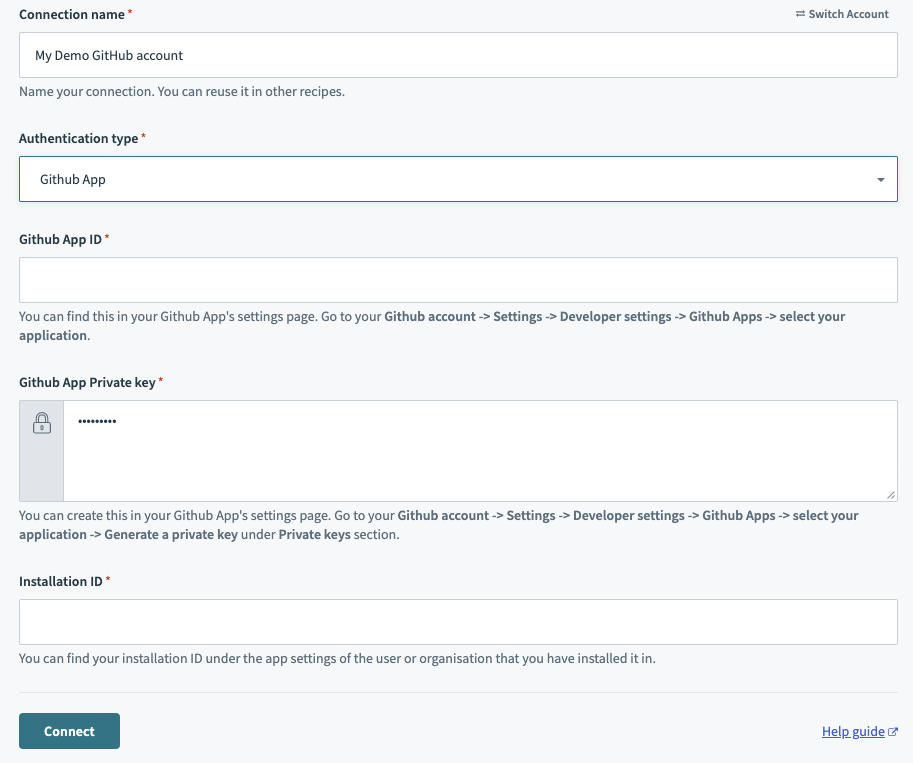 Authentication typeとしてGitHub appを選択し、GitHub Appから詳細を収集します
GitHub Appを登録
GitHub Appを登録する手順を表示
GitHub Appを登録し、Workatoに接続するために必要な認証情報を取得するには、次の手順を実行します:
GitHubドキュメントの手順を完了して、GitHub Appを登録します。
GitHub AppのGeneral設定ページでGitHub App IDを取得します。
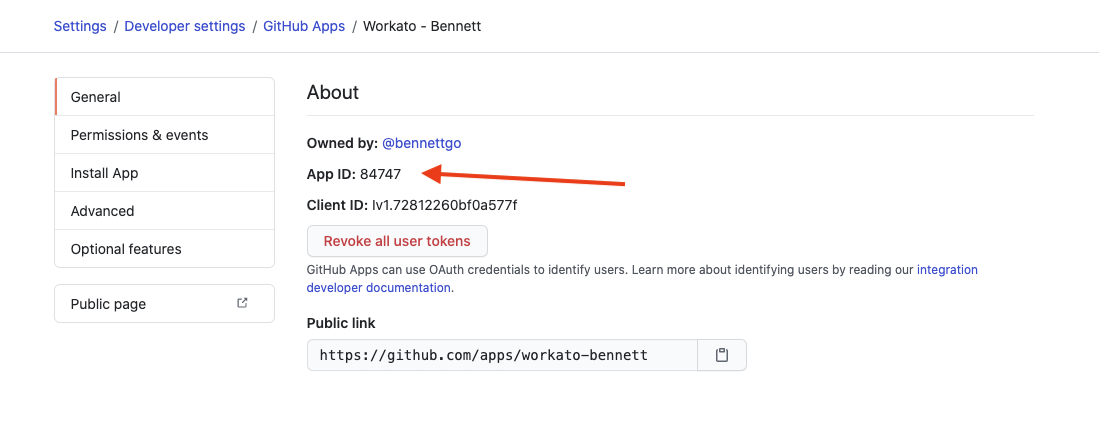 このApp IDを保存し、コネクションに入力します
同じページでPrivate keyを生成します。 GitHubはこの.pemファイルをマシンに自動的にダウンロードします。
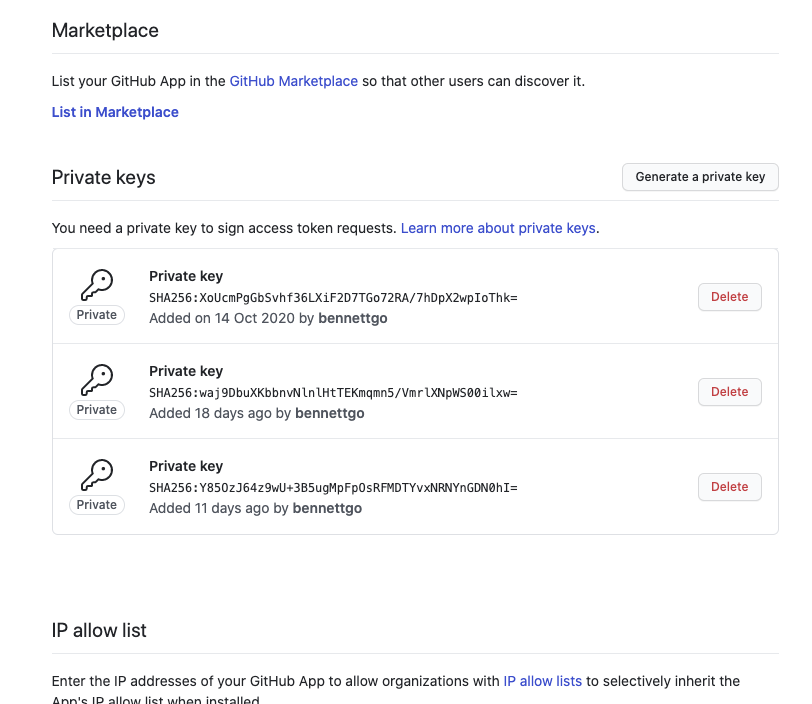 秘密鍵を生成します
.pemファイルをテキストエディターで開きます。ファイルは次のようになります:
-----BEGIN RSA PRIVATE KEY-----
MIIEpAIBAAKCAQEAyL/wuiSaWoH0pyf366G5E7dbzzmON1qMMrWvls8RtZtgOLjb
FBxj6gO2aUfoGbMCMqOYRV6xCn6tK118sGYMd5U/kCFu3IRPr/2GoEtcrf0TecQG
ON+27ijH0Vpn62o8NzGejdy0AWujrtAl6F8xGZeze0PzrGvW6h/GnAdZO1gJnp8t
wmEqEMXqAsPOQ0hkY+r+pE8RKQVsJCe+PIanBKp7RKWDi9usPFZQdQ==
-----END RSA PRIVATE KEY-----秘密鍵全体をコピーします。-----BEGIN RSA PRIVATE KEY-----と-----END RSA PRIVATE KEY-----を含めてください。 Workatoでコネクションを設定するときに、この秘密鍵を使用します。
Installation IDを、GitHub Appをインストールした組織またはユーザーから取得します:
- ユーザーアカウント: Settings > Applications > Your GitHub App > Configureに移動します。
- 組織: 組織のGitHubホームページに移動します。 Settings > Installed GitHub Apps > Configureをクリックします。
インストールIDはURLに表示されます。たとえば、URLがhttps://github.com/settings/installations/13876669の場合、インストールIDは13876669です。
インストールIDを保存します。 WorkatoでGitHub Appコネクションを作成するときに、このIDを入力します。
GitHub App認証を設定
GitHub Appを認証する手順を表示
Workatoが接続されているGitHubインスタンスを識別するコネクション名を指定します。
ロケーションドロップダウンメニューを使用して、コネクションを保存するプロジェクトを選択します。
認証タイプドロップダウンメニューを使用し、GitHub Appを選択します。
GitHub App IDを入力します。
Github App Private keyを入力します。
Installation IDを入力します。
任意。 Advanced configurationをクリックして、Host nameフィールドを表示します。
任意。 GitHub Enterprise Serverを使用している場合は、Host nameを入力します。 GitHubサブドメインを使用します。たとえば、ホストURLがhttps://github.example-organisation.comの場合、サブドメインはgithub.example-organisation.comです。
任意。 Custom OAuth profileを入力します。この選択により、アプリへのすべてのリクエストで指定したプロファイルが使用されます。
接続をクリックします。
Personal access token認証
personal access tokenを使用してGitHubアカウントをWorkatoに接続するには、GitHubからpersonal access tokenを取得します:
GitHub personal access tokenを取得する手順を表示
Github account > Settings > Developer settings > Personal access tokens > Generate new tokenに移動します。
Generate new token(新しいトークンを生成)をクリックします。
トークンをコピーします。コネクションを認証するには、このトークンをWorkatoに入力します。
Workatoでセットアップを完了する
Workatoでセットアップを完了する手順を表示
パーソナルアクセストークンを使用してGitHubコネクションを設定するには、次の手順を実行します:
Workatoアカウントにサインインし、GitHubコネクションを追加する予定のプロジェクトに移動します。
作成 > コネクションをクリックするか(またはCを2回押す)、GitHubをコネクションとして選択します。
Workatoが接続されているGitHubインスタンスを識別するコネクション名を指定します。
ロケーションドロップダウンメニューを使用して、コネクションを保存するプロジェクトを選択します。
Authentication typeドロップダウンメニューを使用して、Personal Access Tokenを選択します。
任意。 Advanced configurationをクリックして、Host nameフィールドを表示します。
任意。 Host nameを入力します。これはGitHub Enterprise Serverを使用する場合に適用されます。 GitHubサブドメインを入力します。たとえば、ホストURLがhttps://github.example-organisation.comの場合、サブドメインはgithub.example-organisation.comです。
Personal Access Tokenを入力します。
任意。 Custom OAuth profileを入力します。これにより、アプリへのすべてのリクエストで指定したプロファイルが使用されます。
接続をクリックします。
GitHubファイル取得ツールを作成します。
GitHubスキルの作成
このセクションでは、MCPサーバーに追加できるGitHub画像取得スキルを作成および設定する手順を説明します。
スキルを作成し、トリガーを設定します。
スキルの作成とトリガーの設定
このステップでは、MCPサーバーがレシピを呼び出す方法と、想定するパラメーターを定義するトリガーを持つスキルを作成します。
スキルを作成してトリガーを設定するには、次の手順を実行します。
プロジェクトに移動し、作成 > スキルをクリックします。
スキル名フィールドにスキルの名前を入力します。
場所ドロップダウンメニューを使用して、スキルを保存するプロジェクトを選択します。
ビルドを開始をクリックします。
レシピエディターが開き、ワークフローを開始トリガーと応答を返すアクションが自動的に選択されます。
このスキルをいつ実行しますか?フィールドに、スキルワークフローの次の説明を入力します。この説明により、LLMはGitHubリポジトリからファイルを取得するタイミングと、ユーザーが一般的な質問をしているタイミングを区別できます。
Fetch a file (such as PNG, JPG, SVG, or other binary/text file) from a GitHub repository. Returns the file contents (base64-encoded for binary files) along with metadata like size, encoding, and download URL.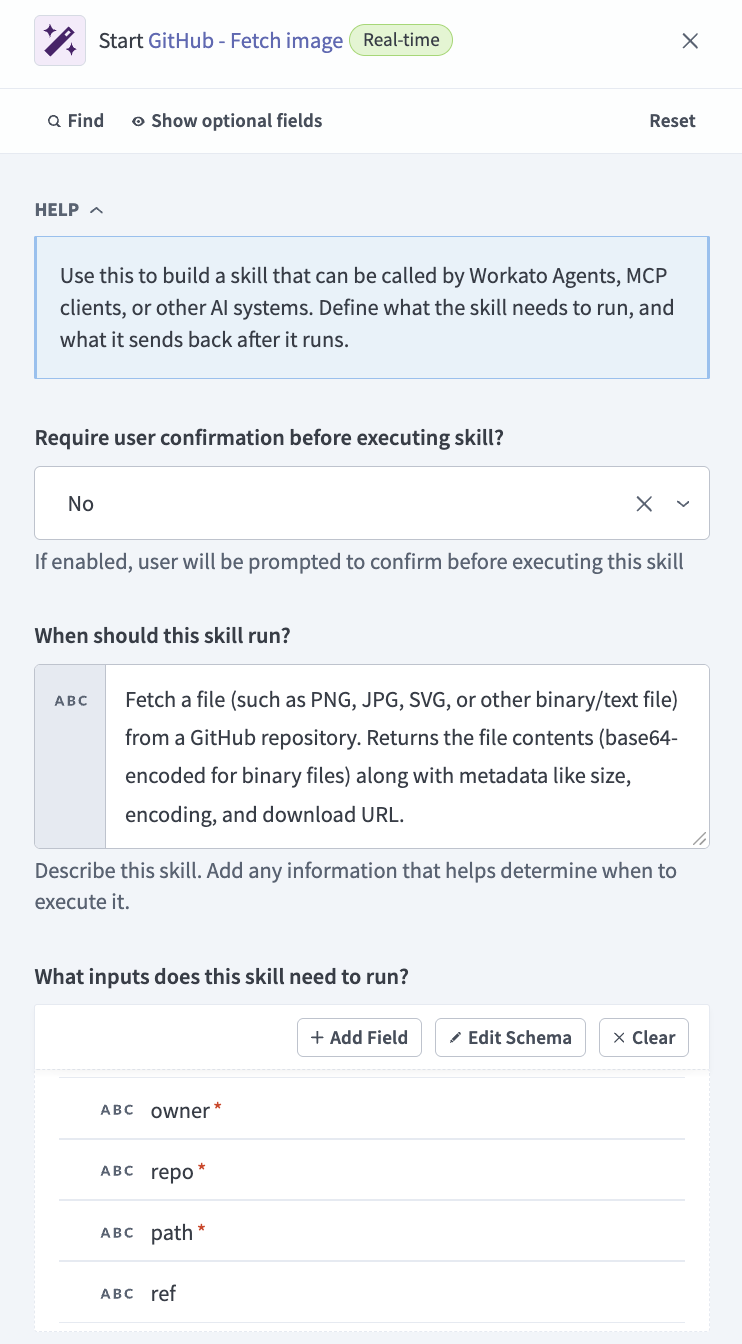 スキルの説明を入力
このスキルを実行するにはどの入力が必要ですか?セクションに移動し、JSONを使用をクリックします。
次のJSONスキーマをコピーして貼り付け、スキーマのレシピパラメーターの説明を指定します。
[
  {
    "name": "owner",
    "type": "string",
    "optional": false,
    "control_type": "text",
    "hint": "Repository owner (user or organization), such as 'octocat'"
  },
  {
    "name": "repo",
    "type": "string",
    "optional": false,
    "control_type": "text",
    "hint": "Repository name, such as 'Hello-World'"
  },
  {
    "name": "path",
    "type": "string",
    "optional": false,
    "control_type": "text",
    "hint": "File path within the repository, such as 'images/logo.png'"
  },
  {
    "name": "ref",
    "type": "string",
    "optional": true,
    "control_type": "text",
    "hint": "Optional branch name, tag, or commit SHA. Defaults to the repository's default branch."
  }
]このスキルはどの情報を返しますか?セクションに移動し、JSONを使用をクリックします。
次のJSONスキーマをコピーして貼り付け、スキル出力を定義します。
[
  {
    "name": "name",
    "type": "string",
    "optional": true,
    "control_type": "text"
  },
  {
    "name": "path",
    "type": "string",
    "optional": true,
    "control_type": "text"
  },
  {
    "name": "sha",
    "type": "string",
    "optional": true,
    "control_type": "text"
  },
  {
    "name": "size",
    "type": "integer",
    "optional": true,
    "control_type": "number"
  },
  {
    "name": "type",
    "type": "string",
    "optional": true,
    "control_type": "text"
  },
  {
    "name": "encoding",
    "type": "string",
    "optional": true,
    "control_type": "text"
  },
  {
    "name": "content",
    "type": "string",
    "optional": true,
    "control_type": "text",
    "hint": "File contents. Base64-encoded for binary files (PNG/JPG/SVG/etc.)."
  },
  {
    "name": "download_url",
    "type": "string",
    "optional": true,
    "control_type": "text"
  },
  {
    "name": "html_url",
    "type": "string",
    "optional": true,
    "control_type": "text"
  },
  {
    "name": "git_url",
    "type": "string",
    "optional": true,
    "control_type": "text"
  },
  {
    "name": "url",
    "type": "string",
    "optional": true,
    "control_type": "text"
  },
  {
    "name": "error",
    "type": "string",
    "optional": true,
    "control_type": "text"
  }
]保存をクリックします。
GitHub画像取得アクションを作成します。
GitHub画像取得アクションの作成
このステップでは、GitHubリポジトリにクエリを実行し、画像コンテンツを返します。
GitHubアクションを作成するには、次の手順を実行します。
+ Add stepをクリックし、Action in appを選択します。
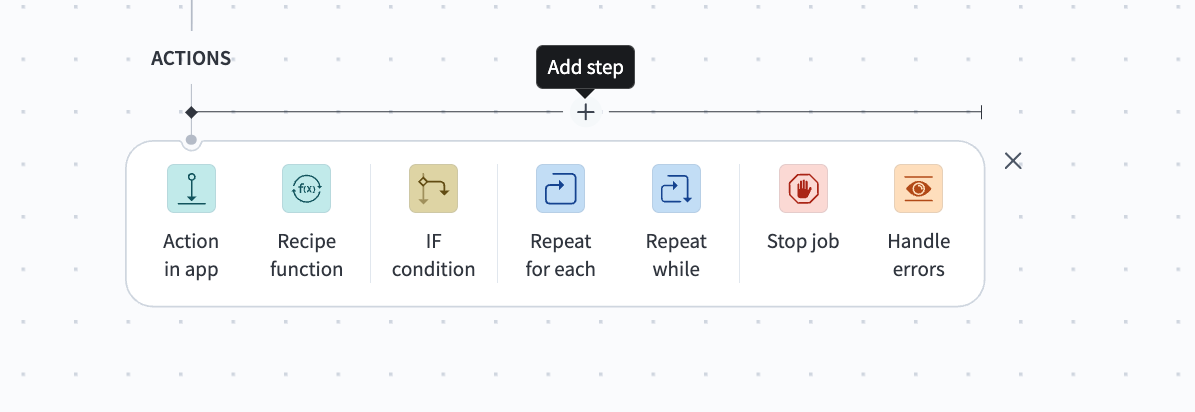 ステップを追加 > アプリ内のアクションをクリック
GitHubを検索し、アプリとして選択します。
カスタムアクションを選択します。
ガイド付きセットアップを使用しないでください
このユースケースの手順では、ガイド付きセットアップオプションを使用しません。ガイド付きセットアップの手順は、このユースケースで説明する手順とは異なります。
アクション名フィールドに名前を入力します。例: Get repository image contents。
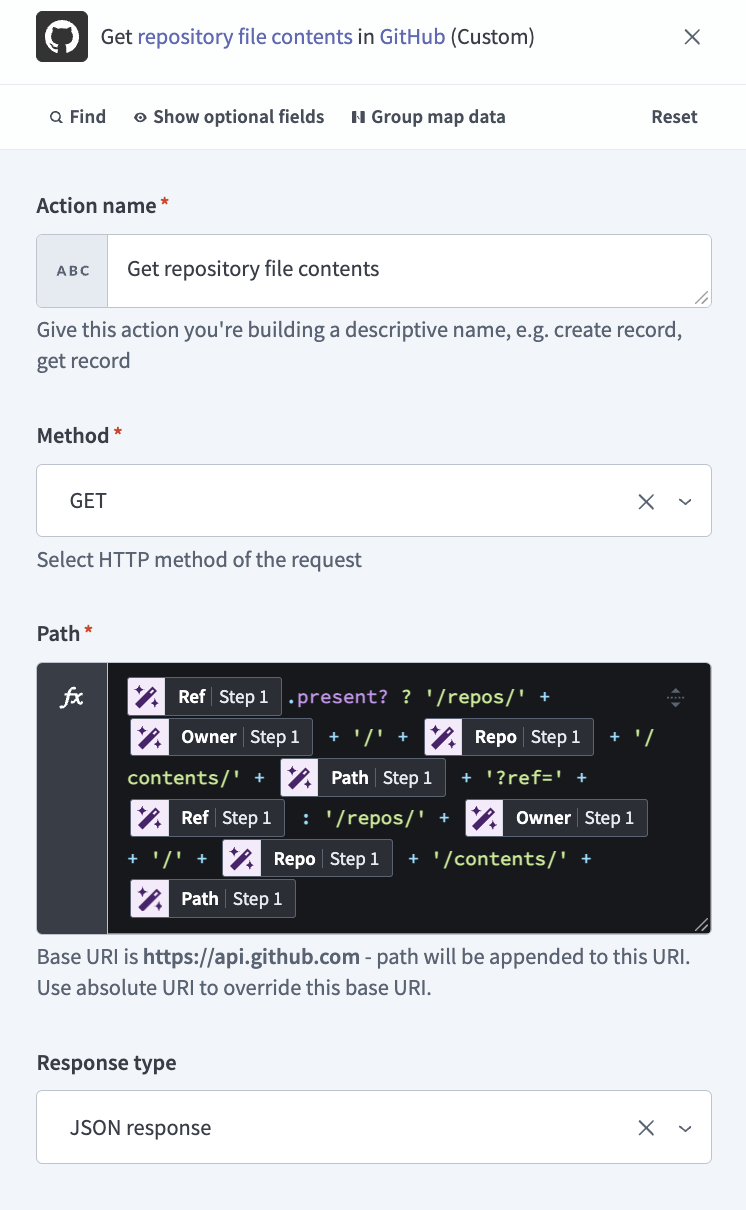 アクションを設定
メソッドドロップダウンメニューを使用して、GETを選択します。
Pathフィールドに移動し、Formulaモードに切り替えます。
次のFormulaをPathフィールドにコピーして貼り付け、<RefStep 1 datapill>、<OwnerStep 1 datapill>、<RepoStep 1 datapill>、<PathStep 1 datapill>などの各データピルプレースホルダーを、レシピデータパネルの対応するデータピルをマッピングして置き換えます。
<RefStep 1 datapill>.present? ? '/repos/' + <OwnerStep 1 datapill> + '/' + <RepoStep 1 datapill> + '/contents/' + <PathStep 1 datapill> + '?ref=' + <RefStep 1 datapill> : '/repos/' + <OwnerStep 1 datapill> + '/' + <RepoStep 1 datapill> + '/contents/' + <PathStep 1 datapill>結果のFormulaは次のようになります。
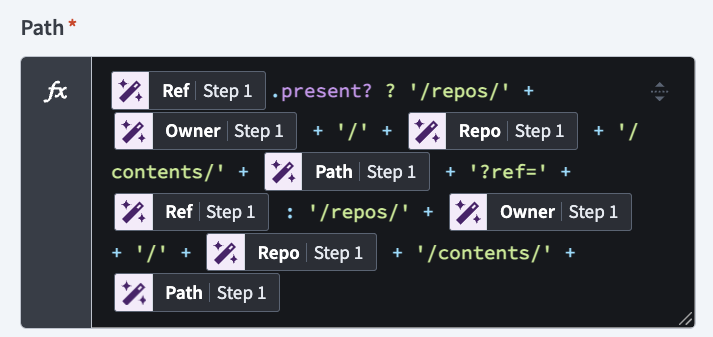 Path Formula
レスポンスタイプがJSONレスポンスに設定されていることを確認します。
リクエストヘッダーセクションを展開し、ヘッダーを追加をクリックします。
名前フィールドにAcceptを入力し、値フィールドにapplication/vnd.github+jsonを入力します。
レスポンス本文セクションに移動し、JSONを使用をクリックします。
次のスキーマをフィールドにコピーして貼り付けます。
[
  {
    "control_type": "text",
    "name": "name",
    "type": "string"
  },
  {
    "control_type": "text",
    "name": "path",
    "type": "string"
  },
  {
    "control_type": "text",
    "name": "sha",
    "type": "string"
  },
  {
    "control_type": "integer",
    "name": "size",
    "type": "integer"
  },
  {
    "control_type": "text",
    "name": "type",
    "type": "string"
  },
  {
    "control_type": "text",
    "name": "encoding",
    "type": "string"
  },
  {
    "control_type": "text",
    "name": "content",
    "type": "string"
  },
  {
    "control_type": "text",
    "name": "download_url",
    "type": "string"
  },
  {
    "control_type": "text",
    "name": "html_url",
    "type": "string"
  },
  {
    "control_type": "text",
    "name": "git_url",
    "type": "string"
  },
  {
    "control_type": "text",
    "name": "url",
    "type": "string"
  }
]保存をクリックします。
RETURN responseを設定します。
RETURN responseの設定
このステップでは、スキルが返すレスポンスを定義します。
RETURN responseを設定するには、次の手順を実行します。
レシピエディターでRETURN responseステップをクリックします。
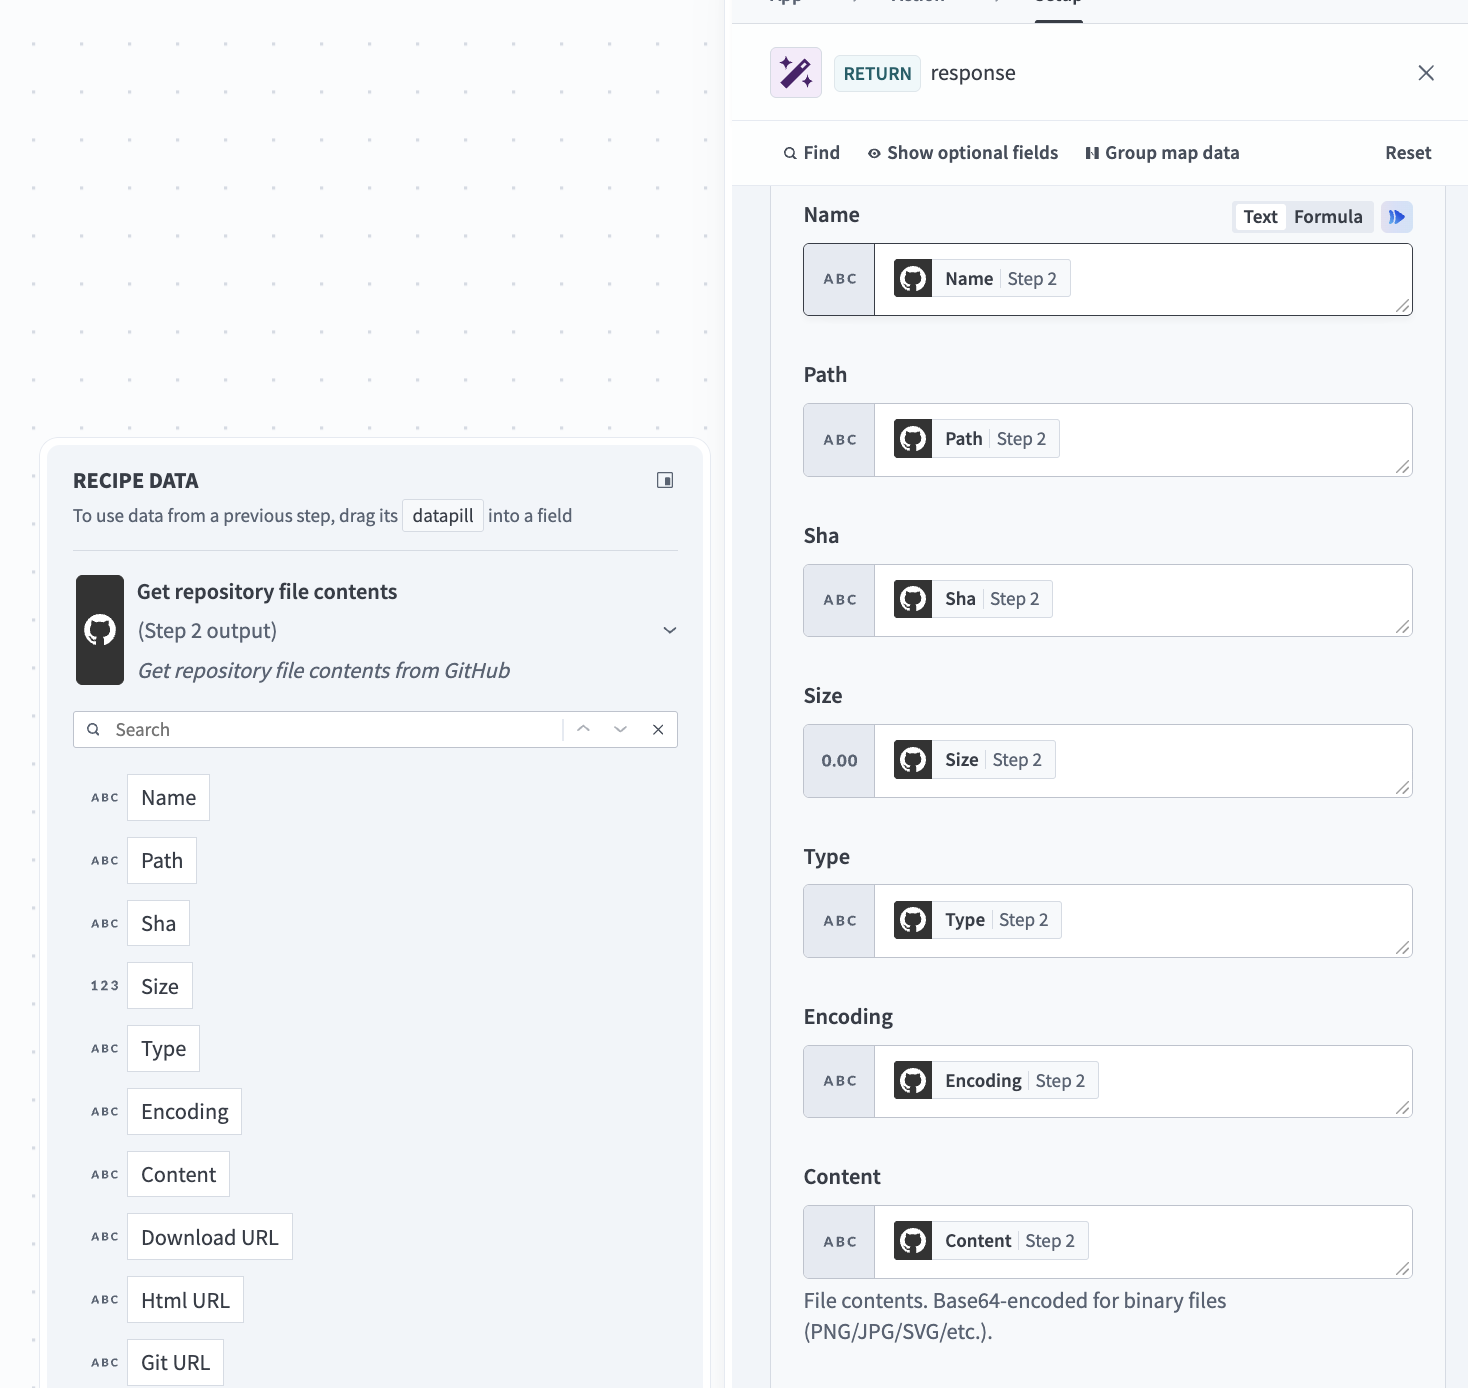 RETURN responseの対応するデータピルをマッピング
保存をクリックします。
AI Hub > Enterprise MCP > Custom servers に移動し、+ Create an MCP server をクリックします。
MCPサーバーを作成します。
MCPサーバーを作成する
このステップでは、MCPサーバーを作成し、スキルを追加します。 MCPサーバーに追加したスキルは、LLMで使用できるツールになります。
MCPサーバーを作成するには、次の手順を実行します:
最初から開始セクションに移動し、新規MCPサーバーをクリックします。 GitHubの構築済みMCPサーバーテンプレートを使用する予定の場合は、GitHub MCPサーバーを参照してください。
ツールソースとしてプロジェクトアセットを選択します。
プロジェクトドロップダウンメニューを使用して、MCPサーバーを保存する予定のプロジェクトを選択します。
前の手順で構築したツールを選択します。
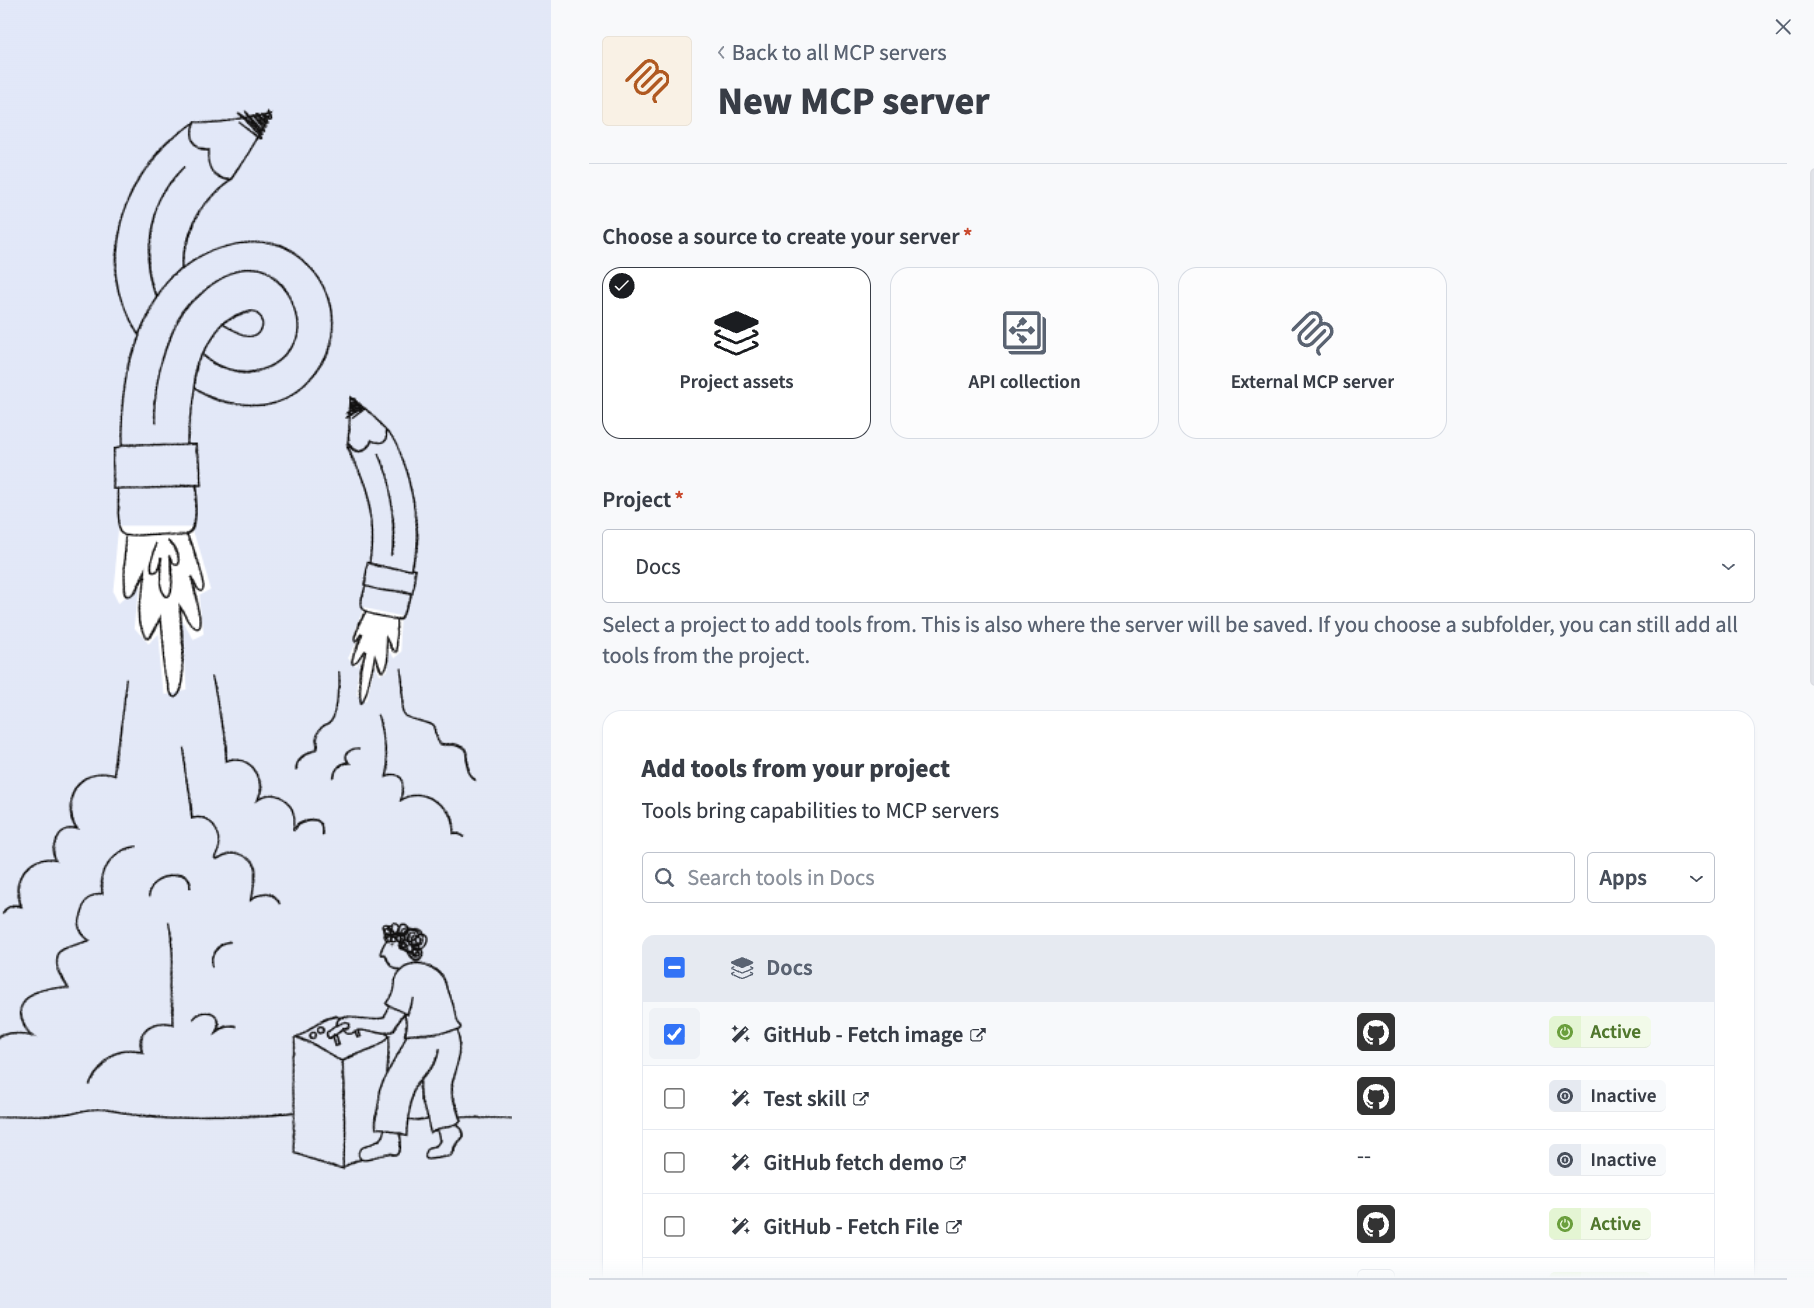 前の手順で構築したツールを選択
Server nameフィールドにMCPサーバーの名前を入力します。
任意。 LLMがMCPサーバーの目的と目標を理解できるように、サーバー指示フィールドに指示を入力します。
ビルドを開始をクリックします。 MCPサーバーのツール、説明、リモートMCP URL、および追加のサーバー情報が Details タブに表示されます。
MCPアプリを作成します。
MCPアプリの作成
このステップでは、GitHubリポジトリから画像をレンダリングできるGitHub画像取得ツール用のMCPアプリを作成します。 LLMチャット内で画像を直接パンおよびズームできます。
GitHubツール用のMCPアプリを作成するには、次の手順を実行します。
AI Hub > Enterprise MCP > Custom servers に移動します。
MCPアプリを追加する予定のMCPサーバーを選択します。
サーバー機能セクションに移動し、アプリタブを選択します。
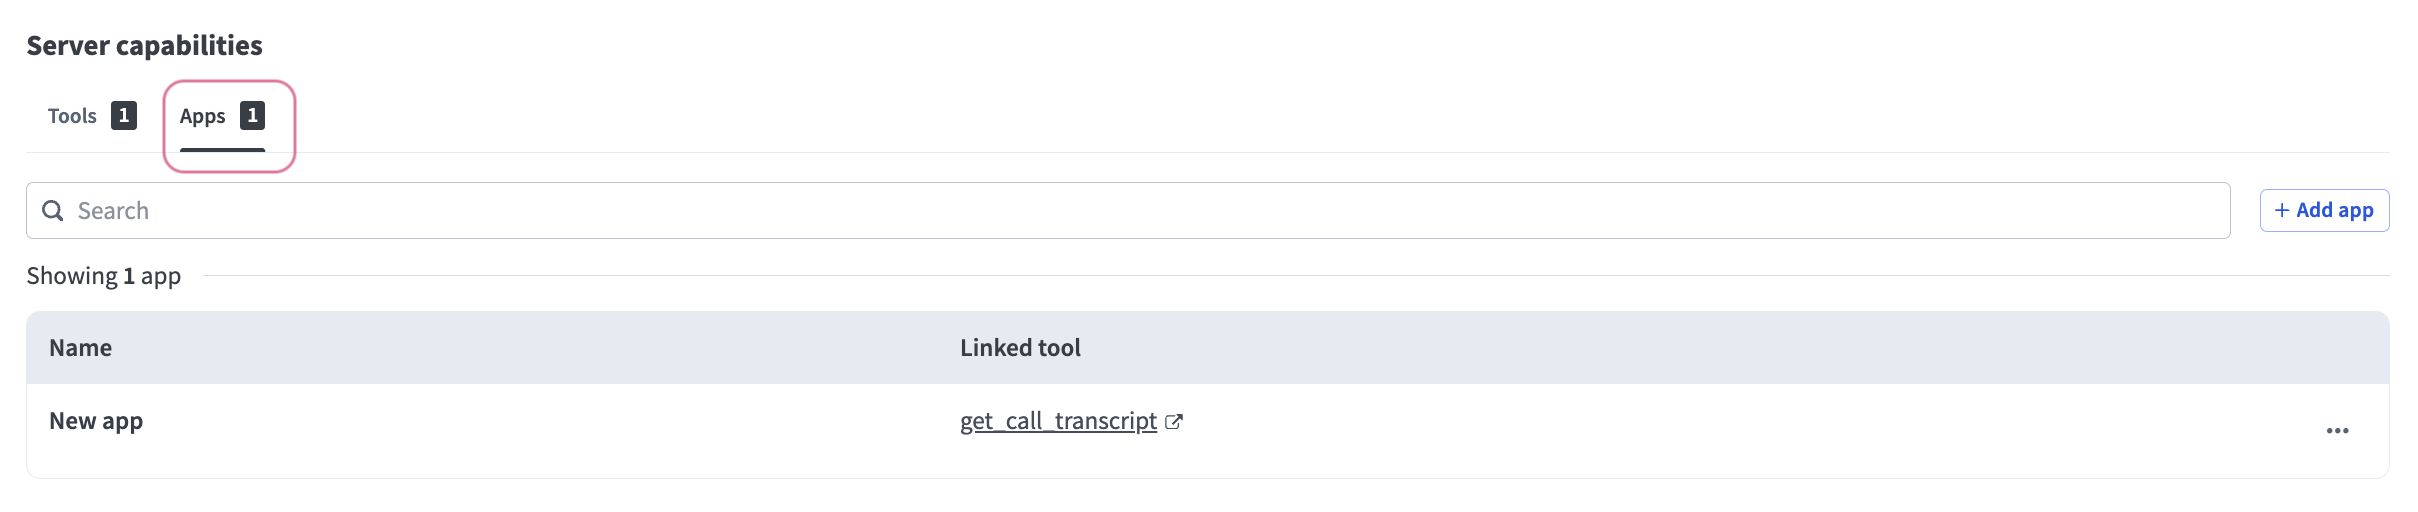 アプリタブを選択
+アプリを追加をクリックします。
名前フィールドにMCPアプリの名前を入力します。
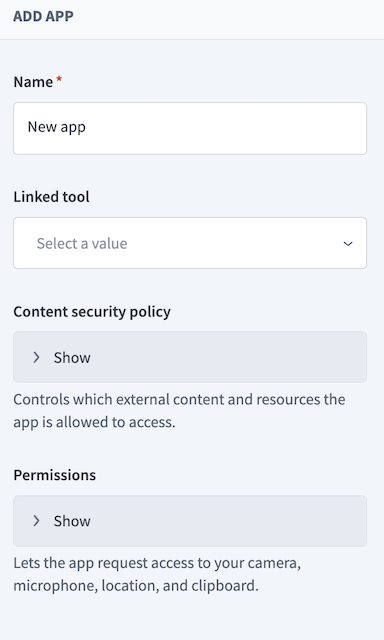 MCPアプリを設定
リンク済みツールドロップダウンメニューを使用して、前の手順で作成したツールを選択します。
コンテンツセキュリティポリシーセクションを展開し、MCPアプリがアクセスを許可される次の外部コンテンツとリソースを選択します。
接続ドメインセクションに移動し、次のドメインを追加します。
https://api.github.comhttps://*.githubusercontent.com
リソースドメインセクションに移動し、次のドメインを追加します。
https://cdn.jsdelivr.netraw.githubusercontent.comhttps://*.githubusercontent.com
フレームドメインセクションに移動し、次のドメインを追加します。
-https://github.com
ゼロから開始を選択します。
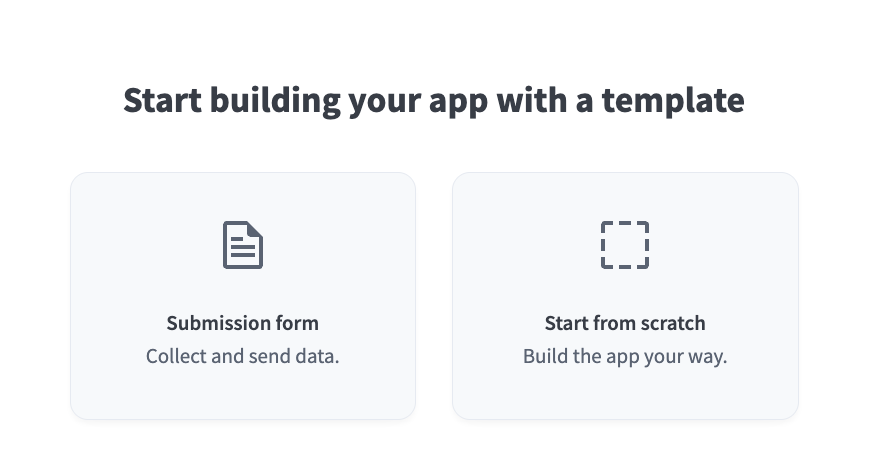 ゼロから開始を選択
次のコードをコードエディターにコピーして貼り付けます。
<!DOCTYPE html>
<html lang="en">
<head>
  <meta charset="UTF-8" />
  <style>
    body { margin: 0; font-family: system-ui, sans-serif; background: #0d1117; }
    #status { padding: 8px 12px; color: #8b949e; font-size: 13px; word-break: break-all; }
    #viewport {
      overflow: hidden;
      width: 100%;
      height: 80vh;
      min-height: 420px;
      background: #0d1117;
      cursor: grab;
      touch-action: none;
      position: relative;
    }
    #viewport.grabbing { cursor: grabbing; }
    #img {
      max-width: 100%;
      display: block;
      transform-origin: 0 0;
      user-select: none;
      -webkit-user-drag: none;
    }
    .controls {
      position: absolute; top: 8px; right: 8px; z-index: 2;
      display: flex; gap: 6px;
    }
    .controls button {
      background: #21262d; color: #c9d1d9; border: 1px solid #30363d;
      border-radius: 6px; padding: 6px 10px; cursor: pointer; font-size: 13px;
      min-width: 34px;
    }
    .controls button:hover { background: #30363d; }
  </style>
</head>
<body>
  <div id="status">接続中…</div>
  <div id="viewport">
    <div class="controls">
      <button id="zoomout" title="Zoom out">−</button>
      <button id="zoomin" title="Zoom in">+</button>
      <button id="reset">リセット</button>
      <button id="expand">⤢ 拡大表示</button>
    </div>
    <img id="img" alt="" draggable="false" />
  </div>

  <script type="module">
    import { App } from 'https://cdn.jsdelivr.net/npm/@modelcontextprotocol/[email protected]/dist/src/app-with-deps.js';

    const app = new App({ name: 'GitHub Image Viewer', version: '1.0.0' });

    // NOTE: this host does not send the `ui/notifications/tool-input`
    // notification (it's optional in the MCP Apps spec), so `ontoolinput`
    // never fires here reliably. `ontoolresult` DOES fire — but it can
    // fire more than once per turn, e.g. if the model made an earlier
    // exploratory call (like reading README.md) before the actual image
    // fetch. So we don't latch onto the *first* result — we inspect every
    // result that arrives and only render the ones that actually look
    // like image data. Non-image results still update our "last known
    // context" (owner/repo/path), which we use as a fallback if nothing
    // image-shaped ever arrives on its own.
    const TOOL_NAME = 'GitHub_Fetch_File';   // AI Hub > Tools で正確な名前を確認してください

    let lastContext = {};
    let imageRendered = false;

    function mimeFromPath(p) {
      const ext = (p.split('.').pop() || '').toLowerCase();
      return ({
        png: 'image/png', jpg: 'image/jpeg', jpeg: 'image/jpeg',
        gif: 'image/gif', webp: 'image/webp', svg: 'image/svg+xml',
        bmp: 'image/bmp', ico: 'image/x-icon'
      })[ext] || 'application/octet-stream';
    }

    function isImageData(data) {
      const p = data?.path || data?.download_url || data?.name || '';
      return mimeFromPath(p).startsWith('image/');
    }

    function extractData(raw) {
      let parsed = raw && raw.structuredContent;
      if (!parsed) {
        const text = raw?.content?.[0]?.text;
        try { parsed = text ? JSON.parse(text) : raw; } catch { parsed = raw; }
      }
      return parsed?.result ? parsed.result : parsed;
    }

    function renderImage(data, fallbackPath) {
      if (data?.download_url) {
        img.src = data.download_url;
        return true;
      }
      if (data?.content && data?.encoding === 'base64') {
        const clean = data.content.replace(/\s/g, '');
        img.src = `data:${mimeFromPath(data.path || fallbackPath || '')};base64,${clean}`;
        return true;
      }
      return false;
    }

    app.ontoolinput = (params) => {
      Object.assign(lastContext, params?.arguments || {});
    };

    app.ontoolresult = (result) => {
      const data = extractData(result);
      if (!data) return;
      if (data.error) {
        status.textContent = 'Tool error: ' + (typeof data.error === 'string' ? data.error : JSON.stringify(data.error));
        return;
      }
      // Remember context even from non-image results (e.g. an earlier lookup).
      if (data.owner) lastContext.owner = data.owner;
      if (data.repo) lastContext.repo = data.repo;
      if (data.path) lastContext.path = data.path;
      if (data.ref) lastContext.ref = data.ref;

      if (isImageData(data)) {
        imageRendered = renderImage(data, data.path);
      }
    };

    const status = document.getElementById('status');
    const vp = document.getElementById('viewport');
    const img = document.getElementById('img');

    img.addEventListener('error', () => {
      status.textContent = '画像の読み込みに失敗しました: ' + (img.src || '(empty src)');
    });
    img.addEventListener('load', () => {
      status.textContent = `画像を読み込みました ✓ (${img.naturalWidth}×${img.naturalHeight})`;
    });

    async function callTool(name, args) {
      const raw = await app.callServerTool({ name, arguments: args });
      return extractData(raw);
    }

    await app.connect();

    // Give the host a few seconds to deliver an actual image result via
    // ontoolresult on its own. If nothing image-shaped has shown up yet,
    // but we've picked up enough context (owner/repo/path) from whatever
    // did arrive, make an explicit fetch call ourselves as a fallback.
    setTimeout(async () => {
      if (imageRendered) return;
      const FILE = {
        owner: lastContext.owner,
        repo: lastContext.repo,
        path: lastContext.path,
        ref: lastContext.ref || 'main'
      };
      if (!FILE.owner || !FILE.repo || !FILE.path) {
        status.textContent = '画像データを待機中です。最後に取得したコンテキスト: ' + JSON.stringify(lastContext);
        return;
      }
      try {
        const data = await callTool(TOOL_NAME, FILE);
        if (data?.error) {
          status.textContent = 'Tool error: ' + (typeof data.error === 'string' ? data.error : JSON.stringify(data.error));
        } else if (!renderImage(data, FILE.path)) {
          status.textContent = '画像データが返されませんでした。キー: ' + Object.keys(data || {}).join(', ');
        }
      } catch (e) {
        status.textContent = 'エラー: ' + e.message;
      }
    }, 4000);

    // ---- Pan / zoom state ----
    let scale = 1, x = 0, y = 0, dragging = false, sx = 0, sy = 0;
    const MIN = 0.2, MAX = 10;
    const apply = () => { img.style.transform = `translate(${x}px,${y}px) scale(${scale})`; };

    // Zoom toward a point (cx, cy) in viewport coordinates so the content
    // under the cursor / center stays put. Buttons pass the viewport center.
    function zoomAt(factor, cx, cy) {
      const newScale = Math.min(Math.max(scale * factor, MIN), MAX);
      const ratio = newScale / scale;
      x = cx - (cx - x) * ratio;
      y = cy - (cy - y) * ratio;
      scale = newScale;
      apply();
    }

    function zoomCenter(factor) {
      const r = vp.getBoundingClientRect();
      zoomAt(factor, r.width / 2, r.height / 2);
    }

    // Wheel zoom toward the cursor.
    vp.addEventListener('wheel', e => {
      e.preventDefault();
      const r = vp.getBoundingClientRect();
      zoomAt(e.deltaY < 0 ? 1.1 : 0.9, e.clientX - r.left, e.clientY - r.top);
    }, { passive: false });

    // Drag to pan.
    vp.addEventListener('pointerdown', e => {
      if (e.target.tagName === 'BUTTON') return;
      dragging = true; sx = e.clientX - x; sy = e.clientY - y;
      vp.classList.add('grabbing'); vp.setPointerCapture(e.pointerId);
    });
    vp.addEventListener('pointerup', () => { dragging = false; vp.classList.remove('grabbing'); });
    vp.addEventListener('pointermove', e => {
      if (!dragging) return;
      x = e.clientX - sx; y = e.clientY - sy; apply();
    });

    // ---- Controls ----
    document.getElementById('zoomin').addEventListener('click', () => zoomCenter(1.25));
    document.getElementById('zoomout').addEventListener('click', () => zoomCenter(0.8));
    document.getElementById('reset').addEventListener('click', () => {
      scale = 1; x = 0; y = 0; apply();
    });
    let expanded = false;
    document.getElementById('expand').addEventListener('click', () => {
      expanded = !expanded;
      vp.style.height = expanded ? '100vh' : '80vh';
    });
  </script>
</body>
</html>保存をクリックします。
MCP連携を作成する予定のLLMに移動し、次の設定手順を実行します。
ChatGPT用にMCP連携を設定します。
ChatGPT MCP設定
このステップでは、OpenAIアカウントに新しいMCPサーバーコネクターを設定します。
ChatGPTアカウントに移動します。
設定>アプリとコネクター>詳細設定に移動し、開発者モードトグルを有効にします。
設定 > アプリとコネクタに移動します。
Createをクリックします。このボタンは、開発者モードトグルが有効になっている場合にのみ表示されます。
NameフィールドにMCPコネクターの名前を入力します。
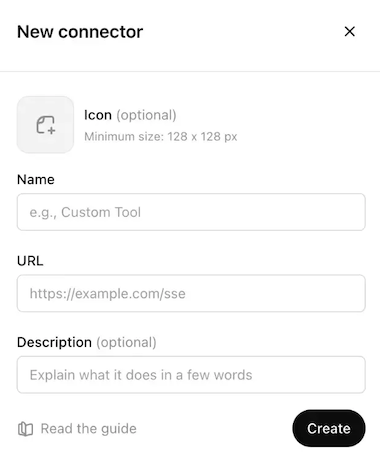 ChatGPT MCPコネクターの設定
MCP URLとトークンをURLフィールドに貼り付けます。
任意。 Descriptionフィールドに説明を入力します。
認証ドロップダウンメニューを使用して、認証なしを選択します。
チェックボックスを選択して、カスタムMCPサーバーを追加するリスクを受け入れます。
Createをクリックします。
MCPツールを使用するには、ChatGPTで新しいチャットを作成します。
Claude用のMCPインテグレーションを設定します。
Claude MCP設定
このステップでは、Anthropicアカウントに新しいMCPサーバーコネクターを設定します。
Settings > Connectorsに移動します。
+ Add new connectorをクリックします。
NameフィールドにMCPコネクターの名前を入力します。
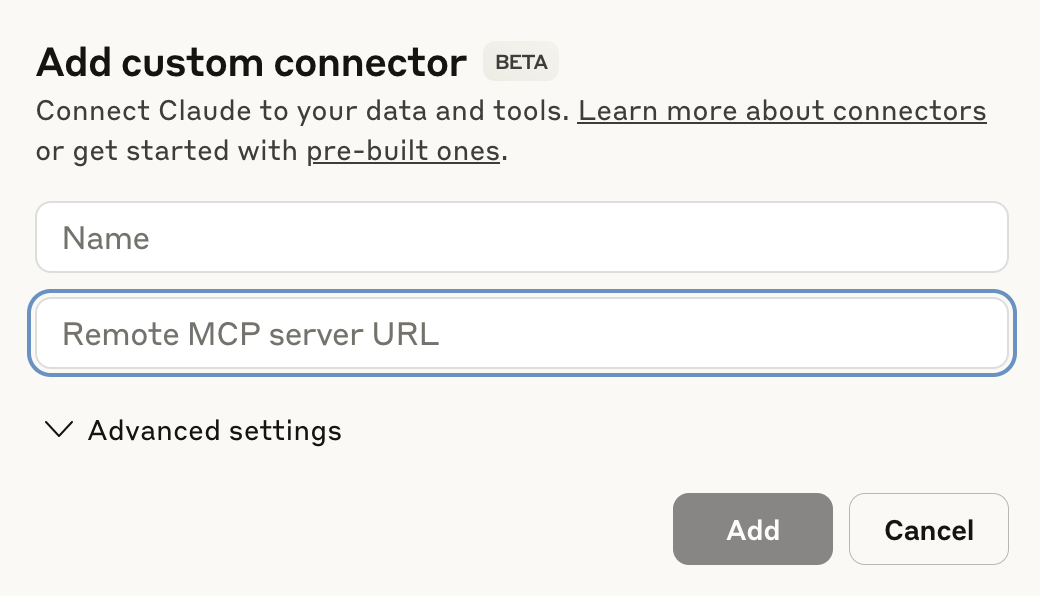 Claude MCPコネクターを設定
MCP URLとトークンをRemote MCP server URLフィールドに貼り付けます。
Addをクリックします。新しく作成されたMCPコネクターがコネクターのリストに表示されます。
Configureをクリックします。
権限のドロップダウンメニューを使用して、Always ask permissionまたはAllow unsupervisedを選択します。デフォルトではAlways ask permissionが選択されています。
MCPツールを使用するには、Claudeで新しいチャットを作成してください。
Cursor用にMCP連携を設定します。
Cursor MCP設定
このステップでは、Cursorアカウントに新しいMCPサーバーコネクターを設定します。
Settings > Cursor settingsに移動します。
サイドバーでMCP & Integrationsをクリックします。
+ New MCP Serverをクリックして、mcp.jsonファイルを開きます。
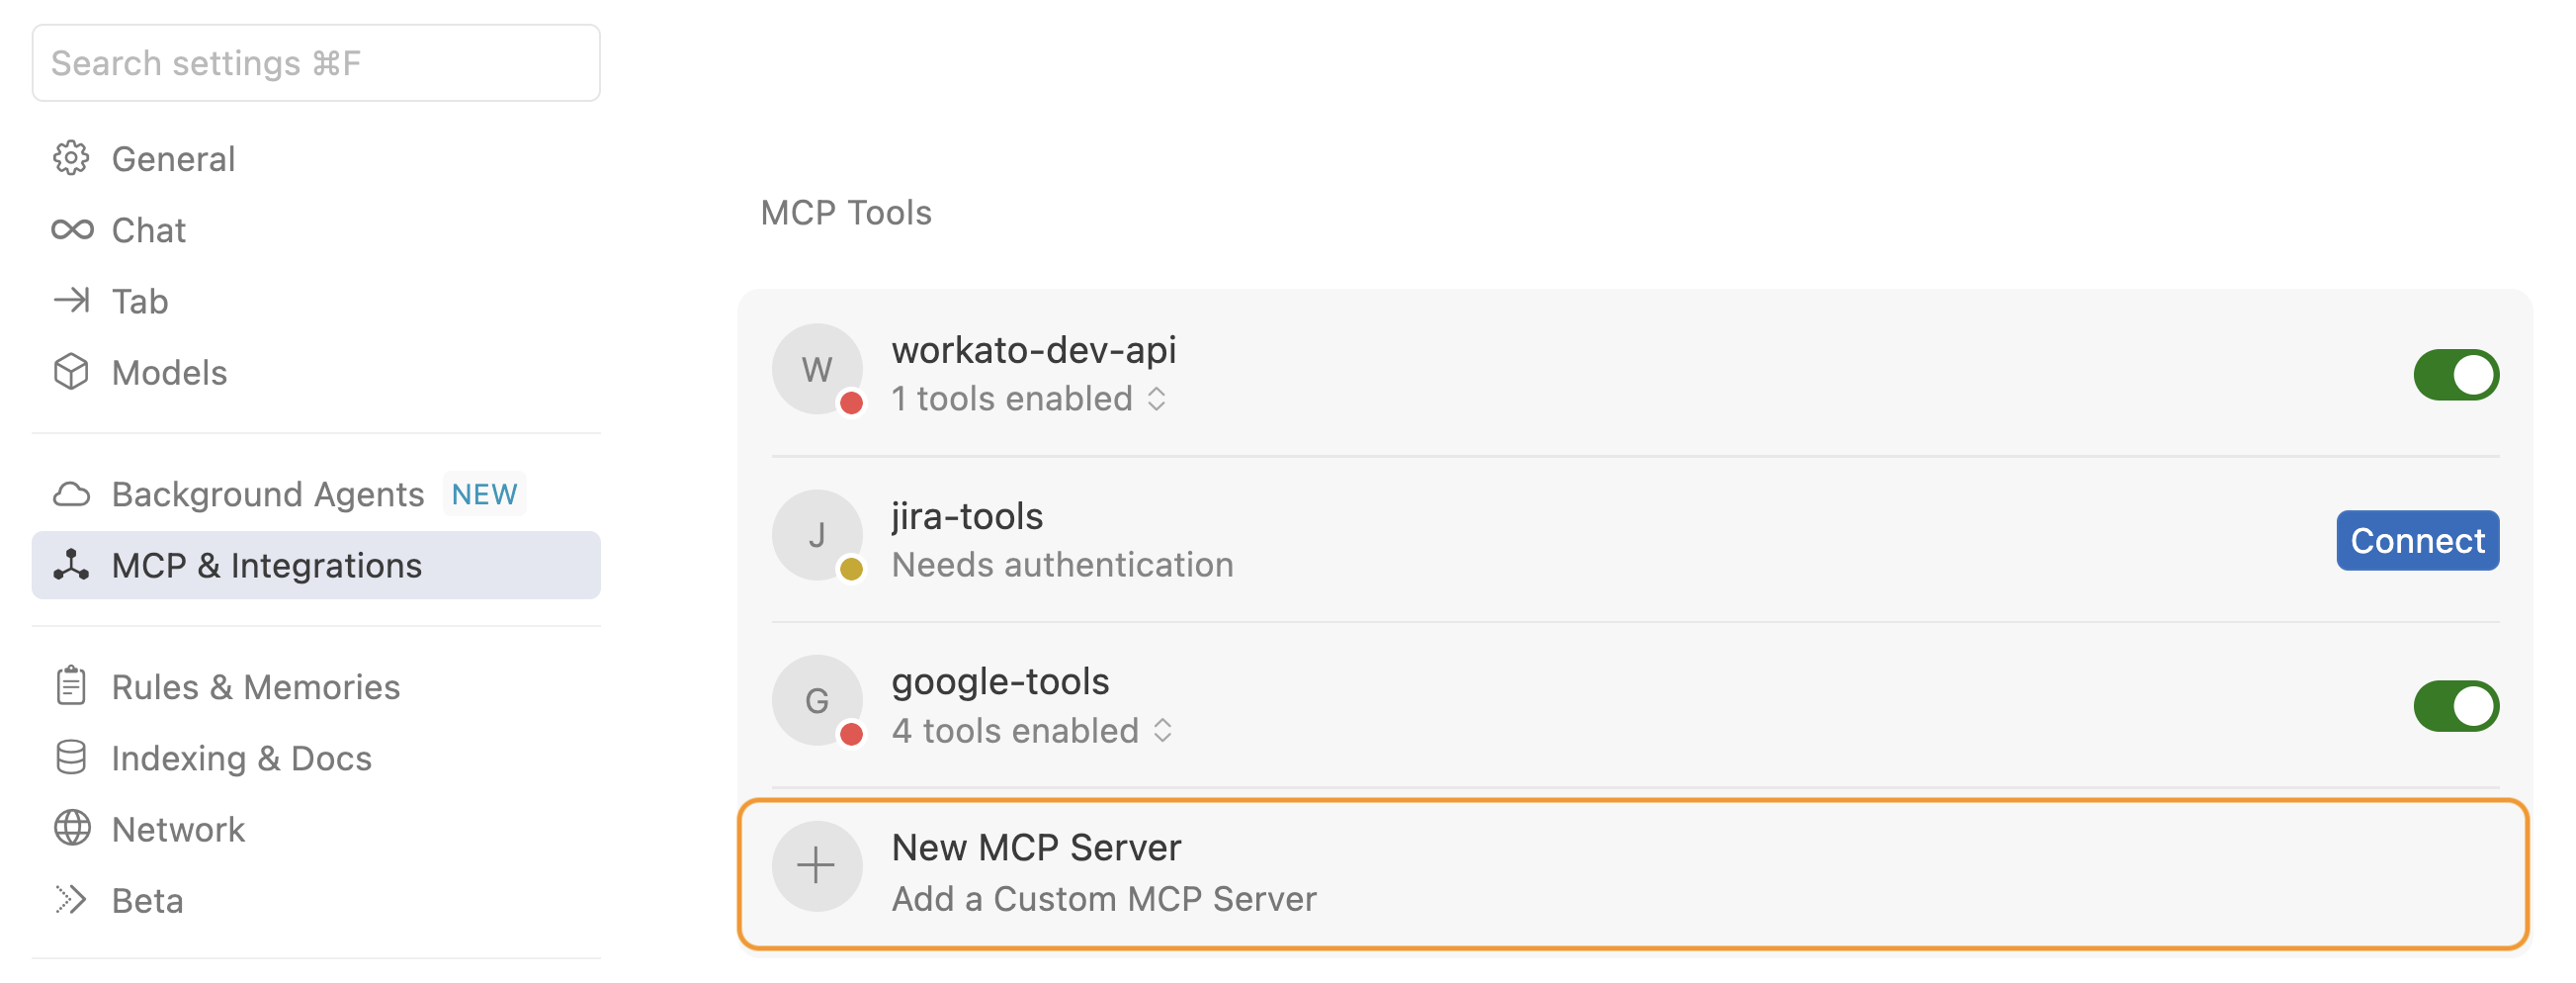 + New MCP Serverをクリック
前の手順でコピーしたMCP URLとトークンを使用するように設定を更新します。例:
{
  "mcpServers": {
    "snowflake-tools": {
      "url": "https://2255.apim.mcp.workato.com?wkt_token=YOUR_API_TOKEN"
    },
    "github-tools": {
      "url": "https://387.apim.mcp.workato.com/abc247/example-collection-name-v1?wkt_token=YOUR_API_TOKEN"
    }
  }
}変更を保存します。
MCPツールを使用するには、Cursorエージェントで新しいチャットを作成します。
エージェントで新しいチャットを開始する必要があります。 Cursorエージェントは、チャット開始時点で利用可能なツールと機能にのみアクセスできます。エージェントは、チャットの開始後に追加された新しいMCP設定、サーバー、ツールを検出または使用できません。
LLMでMCPツールをテストします。
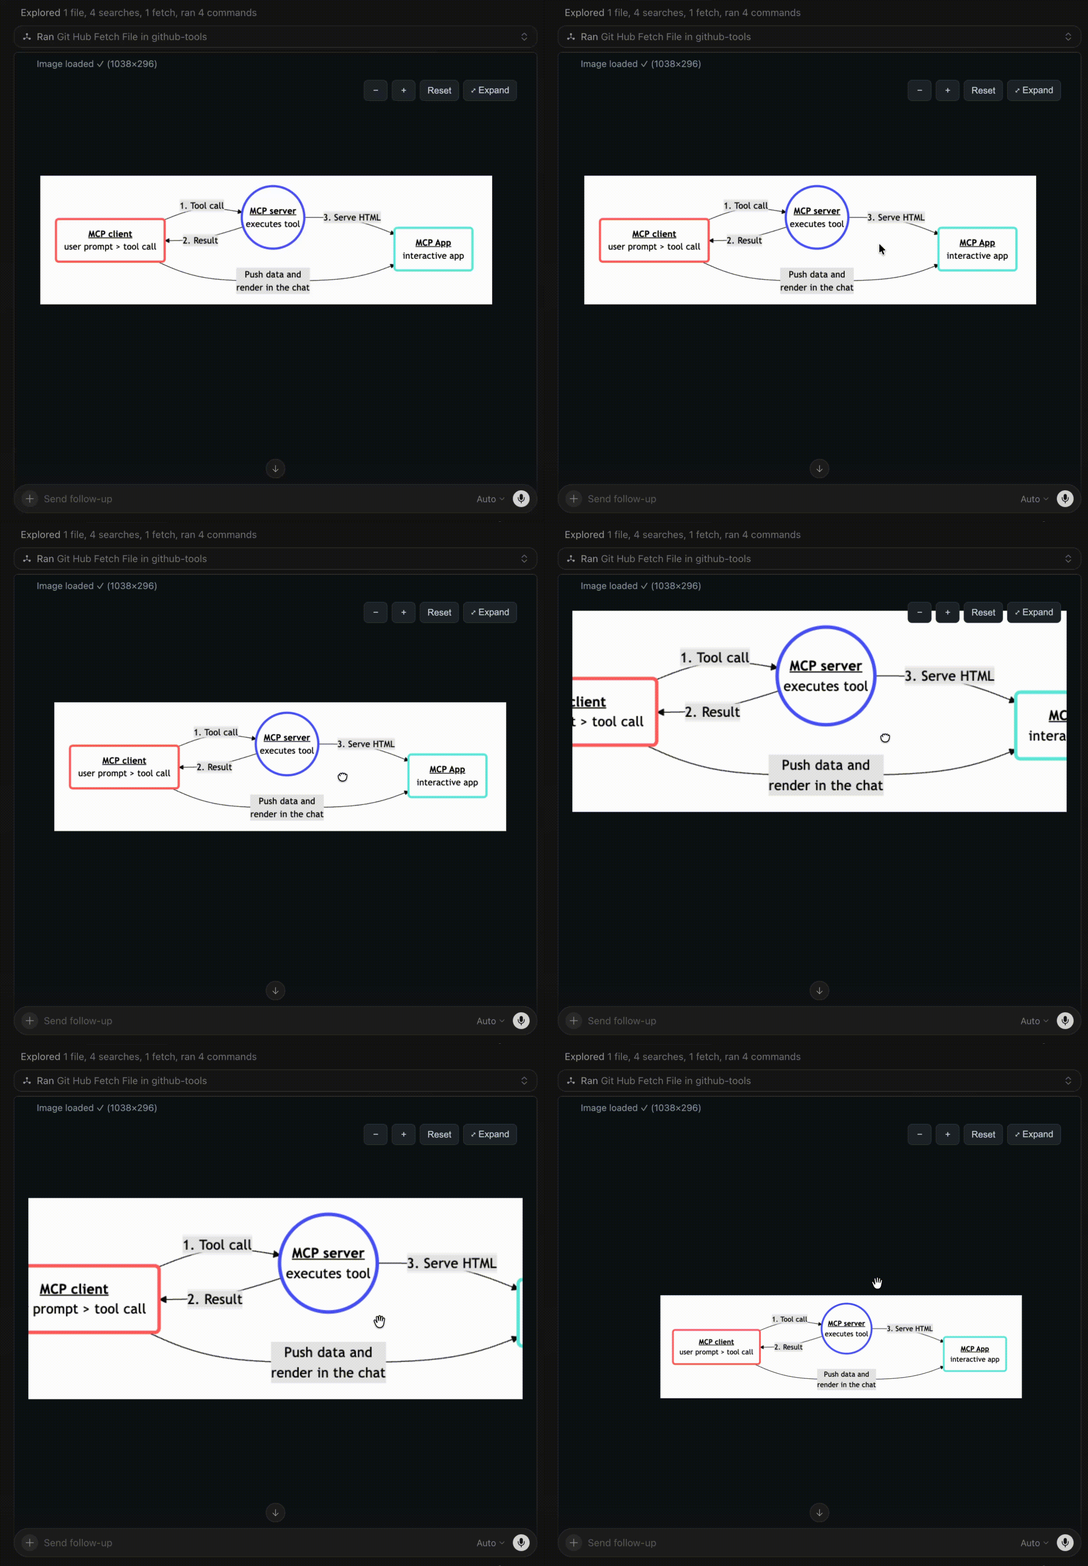 Cursorのチャット例
最終更新日: