Snowflake Data Explorer MCP server
The Snowflake Data Explorer MCP server enables LLMs to discover, understand, and retrieve data from Snowflake through governed, read-only access. It provides tools to navigate databases, schemas, tables, and views, inspect schema metadata, sample data, and execute read-only SQL within configured safety and access boundaries. The server doesn't modify data, run administrative or DDL operations, or perform AI inference such as Snowflake Cortex functions.
Uses
Use the Snowflake Data Explorer MCP server to perform the following actions:
- List Snowflake databases accessible within configured allowlists
- Explore schemas within specific databases
- Discover tables and views within schemas
- Search for tables and views by name-oriented criteria when the exact location is unknown
- Retrieve column names, data types, and available descriptions for tables or views
- Sample bounded sets of rows from tables or views to inspect values and formats
- Execute governed, read-only SQL queries with enforced row quotas, timeouts, and object allowlists
Example prompts
Use the following example prompts to invoke Snowflake Data Explorer MCP server tools:
What databases are available in Snowflake?List the schemas in the SALES_DATA database.Show me tables in the CUSTOMER_ANALYTICS schema.Show me views in the CUSTOMER_ANALYTICS schema.Find tables related to subscriptions.Find views related to subscriptions.What columns are in the CUSTOMER_EVENTS table?Show me a sample of data from the activity logs table.Query the top 100 customers by revenue from last quarter.
Snowflake Data Explorer MCP server tools
The Snowflake Data Explorer MCP server provides the following tools:
| Tool | Description |
|---|---|
| list_databases | Lists Snowflake databases accessible within the server's configured allowlists. |
| list_schemas | Lists schemas in a specified database to navigate the Snowflake object hierarchy. |
| list_tables | Lists tables in a specified schema with metadata suitable for discovery. |
| list_views | Lists views in a specified schema with metadata suitable for discovery. |
| search_tables | Searches for tables by name-oriented criteria when the exact location is unknown. |
| search_views | Searches for views by name-oriented criteria when the exact location is unknown. |
| get_table_schema | Retrieves column names, data types, and available descriptions for a specified table or view. |
| get_table_sample | Returns a bounded sample of rows from a table or view to inspect values and formats before running full queries. |
| execute_query | Executes a read-only SQL query against Snowflake using the configured warehouse, subject to row quotas, timeouts, and access restrictions. |
Install the Snowflake Data Explorer MCP server
Complete the following steps to install a prebuilt MCP server to your project:
Sign in to your Workato account.
Go to AI Hub > Enterprise MCP > Custom servers.
Click + Create MCP server.
Go to the Start with pre-built MCP Servers using your connected apps section and select the prebuilt MCP server you plan to use.
Click Use this server.
Provide a name for your MCP server in the Server name field.
Use the Location drop-down menu to select the project for the MCP server.
Go to the Connections section and connect to your app account.
Select the connection type you plan to use for the MCP server template.
- User's connection: MCP server tools perform actions based on the identity and permissions of the user who connects to the application. Users authenticate with their own credentials to execute the skill.
- Your connection: This option uses the connection established by the recipe builder and follows the same principles as normal app connections.
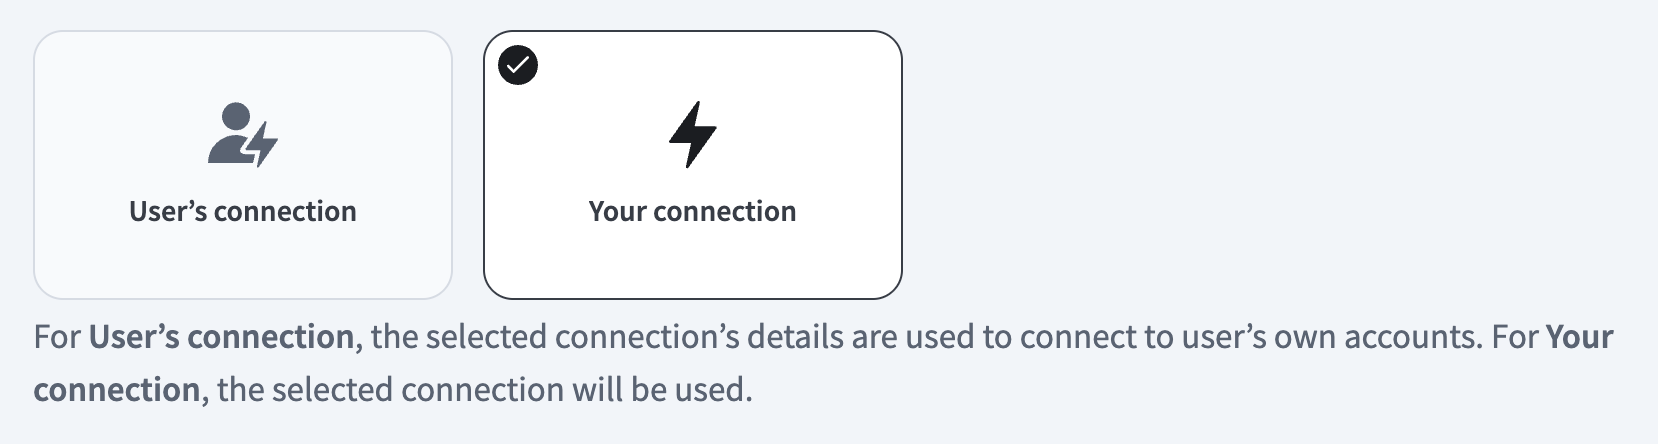 Select your connection type
VERIFIED USER ACCESS AUTHENTICATION REQUIREMENTS
Only app connections that use OAuth 2.0 authorization code grant are available for user's connection. Refer to Verified user access for more information.
Complete the app-specific connection setup steps in the following section.
Snowflake connection setup
View Snowflake connection setup steps
Workato supports the following authentication methods for Snowflake connections:
Configure OAuth 2.0 authentication
View Configure OAuth 2.0 authentication steps
You must create a custom integration and generate a client ID and secret in Snowflake to use OAuth 2.0 authentication.
Snowflake setup for OAuth 2.0 authentication
Complete the following steps to create a custom integration and retrieve client credentials in Snowflake:
Run the following SQL command in Snowflake to register a custom OAuth integration:
CREATE SECURITY INTEGRATION WORKATO_OAUTH
  TYPE = OAUTH
  ENABLED = TRUE
  OAUTH_CLIENT = CUSTOM
  OAUTH_CLIENT_TYPE = CONFIDENTIAL
  OAUTH_REDIRECT_URI = 'https://www.workato.com/oauth/callback'
  OAUTH_ISSUE_REFRESH_TOKENS = TRUE;
REQUIRED PRIVILEGE
Use the ACCOUNTADMIN role or a role with the global CREATE INTEGRATION privilege to run this command.
Run the following command to retrieve your client credentials:
SELECT SYSTEM$SHOW_OAUTH_CLIENT_SECRETS('WORKATO_OAUTH');Refer to the Snowflake Configure Snowflake OAuth for custom clients guide for more information.
Copy and save the Client ID and Client secret for use in Workato.
Connect to Snowflake with OAuth 2.0 authentication
Complete the following steps to set up an OAuth 2.0 authentication connection to Snowflake Data Explorer in Workato:
Click Create > Connection or press C twice.
Search for Snowflake and select it as your app.
Enter a name for your connection in the Connection name field.
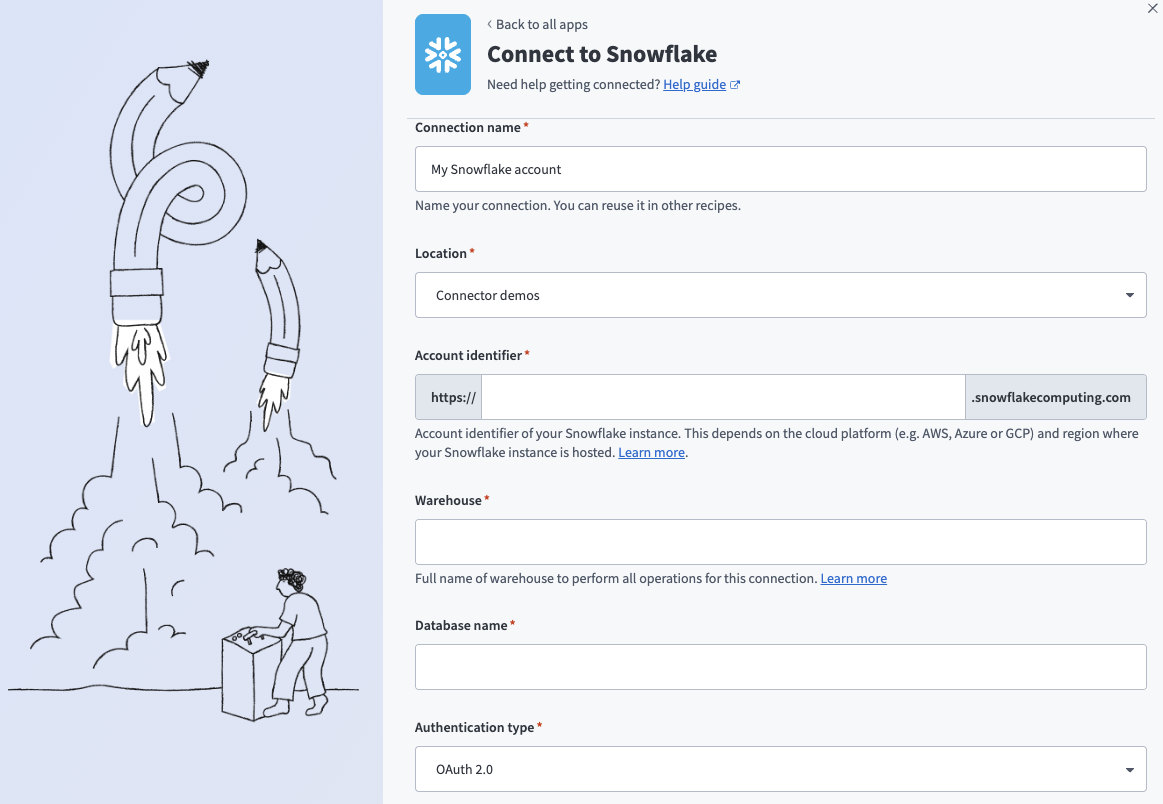 Snowflake OAuth 2.0 connection
Use the Location drop-down menu to select the project where you plan to store the connection.
Enter the Snowflake instance Account identifier in one of the supported formats:
- Account name:
https://{org_name}-{account_name} - Connection name:
https://{org_name}-{connection_name} - Account locator:
https://{account_locator}.{region}.{cloud}
Refer to the Snowflake Connecting to your accounts guide for more information.
ACCOUNT LOCATOR FORMAT
Certain locations require you to include the {region} and {cloud} in your account locator URL. For example:
- AWS US West (Oregon):
your-account-locator - AWS US East (Ohio):
your-account-locator.us-east-2 - Azure West Europe:
your-account-locator.west-europe.azure
Refer to the Snowflake Using an account locator as an identifier guide for more information.
Enter the Warehouse name to define the compute resources for this connection. Refer to Warehouse considerations for more information.
Enter the Database name for the target Snowflake database.
Use the Authentication type drop-down menu to select OAuth 2.0.
Enter the Client ID and Client secret. Refer to Snowflake setup for OAuth 2.0 authentication for information on how to retrieve these credentials.
Optional. Specify a Role for authentication. This role must be an existing role assigned to the user. If left blank, Snowflake uses the default role assigned to the user.
Optional. Enter the Schema. If left blank, the default schema is public.
Optional. Set the Use improved datetime handling (Recommended) to Yes to ensure correct timezone handling for timestamps.
Optional. Define the Database timezone to apply to timestamps without an assigned timezone. Defaults to your workspace's timezone if left blank.
Click Connect.
Click Allow to provision access to Workato.
Configure key-pair authentication
View Configure key-pair authentication steps
Use key-pair authentication to connect to Snowflake without a password. This method uses a client-generated RSA key pair and provides strong security. You must use a command-line tool to generate the key pair.
Snowflake setup for key-pair authentication
Complete the following steps to create a key pair in Snowflake:
Run one of the following commands in a terminal to generate a private key.
PRIVATE KEY PASSPHRASE
If you generate an encrypted private key, you must enter the Private key passphrase when you configure the connection in Workato.
Copy and save the PRIVATE KEY for use in Workato. Copy everything from -----BEGIN PRIVATE KEY----- to -----END PRIVATE KEY-----.
Run the following command to create a public key from the private key. OpenSSL prompts you for the passphrase if you generated an encrypted private key.
openssl rsa -in rsa_key.p8 -pubout -out rsa_key.pubCopy and save the PUBLIC KEY for use in the next step.
Refer to the Snowflake Key-pair authentication and key-pair rotation guide for more information.
Run the following SQL command in a Snowflake worksheet to assign the public key to your Snowflake user:
ALTER USER <USERNAME> SET RSA_PUBLIC_KEY='<PUBLIC_KEY>';Replace <USERNAME> with your Snowflake user and <PUBLIC_KEY> with the key content. Exclude the -----BEGIN PUBLIC KEY----- and -----END PUBLIC KEY----- lines.
ROLE REQUIREMENT
You must have the SYSADMIN or SECURITYADMIN role to run this command.
Connect to Snowflake with key-pair authentication
Complete the following steps to set up a key-pair authentication connection to Snowflake Data Explorer in Workato:
Click Create > Connection or press C twice.
Search for Snowflake and select it as your app.
Enter a name for your connection in the Connection name field.
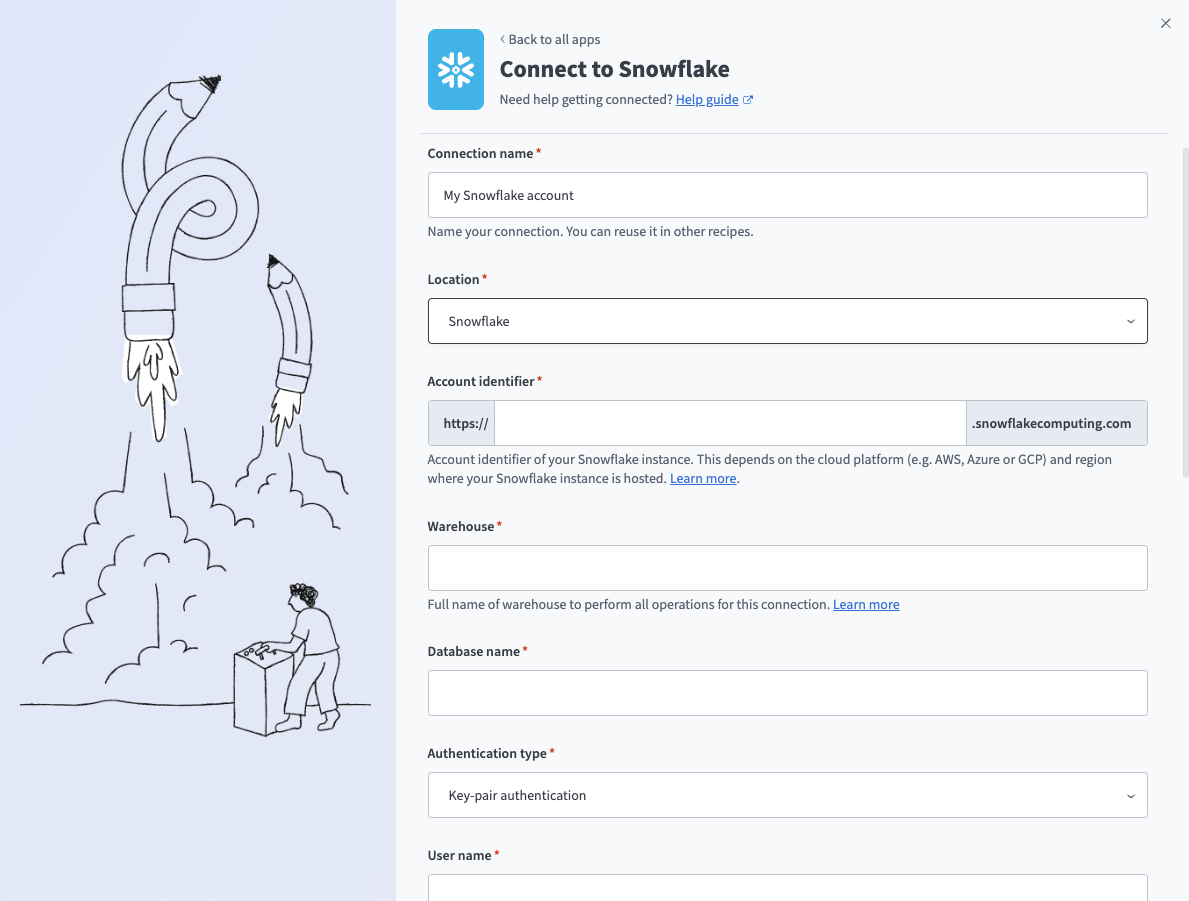 Snowflake key-pair connection
Use the Location drop-down menu to select the project where you plan to store the connection.
Enter the Snowflake instance Account identifier in one of the supported formats:
- Account name:
https://{org_name}-{account_name} - Connection name:
https://{org_name}-{connection_name} - Account locator:
https://{account_locator}.{region}.{cloud}
Refer to the Snowflake Connecting to your accounts guide for more information.
ACCOUNT LOCATOR FORMAT
Certain locations require you to include the {region} and {cloud} in your account locator URL. For example:
- AWS US West (Oregon):
your-account-locator - AWS US East (Ohio):
your-account-locator.us-east-2 - Azure West Europe:
your-account-locator.west-europe.azure
Refer to the Snowflake Using an account locator as an identifier guide for more information.
Enter the Warehouse name to define the compute resources for this connection. Refer to Warehouse considerations for more information.
Enter the Database name for the target Snowflake database.
Use the Authentication type drop-down menu to select Key-pair authentication.
Enter the User name and Private key. Refer to Snowflake setup for key-pair authentication for information on how to retrieve these credentials.
Optional. Enter the Private key passphrase if you generated an encrypted private key.
Optional. Specify a Role for authentication. This role must be an existing role assigned to the user. If left blank, Snowflake uses the default role assigned to the user.
Optional. Enter the Schema. If left blank, the default schema is public.
Optional. Set the Use improved datetime handling (Recommended) to Yes to ensure correct timezone handling for timestamps.
Optional. Define the Database timezone to apply to timestamps without an assigned timezone. Defaults to your workspace's timezone if left blank.
Click Connect.
How to use Snowflake Data Explorer MCP server tools
Refer to the following sections for detailed information on available tools:
list_databases tool
The list_databases tool lists Snowflake databases accessible within the server's configured allowlists. Your LLM uses this tool to discover available databases or begin navigating the Snowflake structure.
Try asking:
What databases are available in Snowflake?Show me all accessible databases.List the databases I can query.What data groupings exist in Snowflake?
list_schemas tool
The list_schemas tool lists schemas in a database you specify to navigate the Snowflake object hierarchy. Your LLM uses this tool to explore schemas within a known database.
Try asking:
List the schemas in the SALES_DATA database.What schemas exist in the ANALYTICS database?Show me available schemas in CUSTOMER_DATA.What namespaces are in this database?
list_tables tool
The list_tables tool lists tables in a schema you specify, with metadata suitable for discovery. Your LLM uses this tool to discover tables within a known schema.
Try asking:
Show me tables in the CUSTOMER_ANALYTICS schema.List all tables in the SALES schema.What tables can I query in MARKETING.CAMPAIGNS?Display available tables in this schema.
list_views tool
The list_views tool lists views in a schema you specify, with metadata suitable for discovery. Your LLM uses this tool to discover views within a known schema.
Try asking:
Show me views in the CUSTOMER_ANALYTICS schema.List all views in the SALES schema.What views can I query in MARKETING.CAMPAIGNS?Display available views in this schema.
search_tables tool
The search_tables tool searches for tables by name-oriented criteria when the exact location is unknown. Your LLM uses this tool to locate tables by topic or keyword rather than exact name.
Try asking:
Find tables related to subscriptions.Search for tables containing customer activity data.Look for tables about support tickets.Find any tables with 'revenue' in the name.
search_views tool
The search_views tool searches for views by name-oriented criteria when the exact location is unknown. Your LLM uses this tool to locate views by topic or keyword rather than exact name.
Try asking:
Find views related to subscriptions.Search for views containing customer activity data.Look for views about support tickets.Find any views with 'revenue' in the name.
get_table_schema tool
The get_table_schema tool retrieves column names, data types, and available descriptions for a specified table or view. Your LLM uses this tool to understand table structure before constructing a query.
Try asking:
What columns are in the CUSTOMER_EVENTS table?Show me the schema for SALES.TRANSACTIONS.What's the structure of the activity logs table?Get column definitions for the subscription data table.
get_table_sample tool
The get_table_sample tool returns a bounded sample of rows from a table or view to inspect values and formats before running full queries. Your LLM uses this tool to validate assumptions about data content.
Try asking:
Show me a sample of data from the activity logs table.Get some example rows from the customer events table.What does the data in the transactions table look like?Display a few sample records from subscriptions.
execute_query tool
The execute_query tool executes a read-only SQL query against Snowflake using the configured warehouse, subject to row quotas, timeouts, and access restrictions. Your LLM uses this tool to retrieve data using SQL, including filters, joins, and aggregations.
Try asking:
Query the top 100 customers by revenue from last quarter.Get all active subscriptions created in the last 30 days.Show me support tickets opened this week by priority.Find the total sales by region for January 2026.
Getting started
View and manage your MCP server tools in the Details tab Tools section. Tool management provides the following capabilities:
TOOLS MUST BE STARTED
Your LLM can only access active tools in your MCP server connector.
Last updated: