Microsoft Graph API
Microsoft Graph API is a powerful unified endpoint that allows organizations to access and interact with Microsoft 365 services and other Microsoft cloud-based resources. It enables developers to integrate and automate various application actions, such as managing users, groups, mail, calendars, tasks, and security insights.
With Microsoft Graph API, organizations can enhance security, streamline user management, and enable seamless single sign-on experiences across different applications. It provides access to:
- External resources, such as Microsoft 365, the Azure portal, and thousands of other SaaS applications.
- Internal resources, such as apps on your corporate network, intranet, and any cloud apps developed by your organization.
Install Microsoft Graph API from the community library
Complete the following steps to install the Microsoft Graph API connector from the community library:
Open the recipe editor and search for a connector. Alternatively, you can search for a connector in the community library.
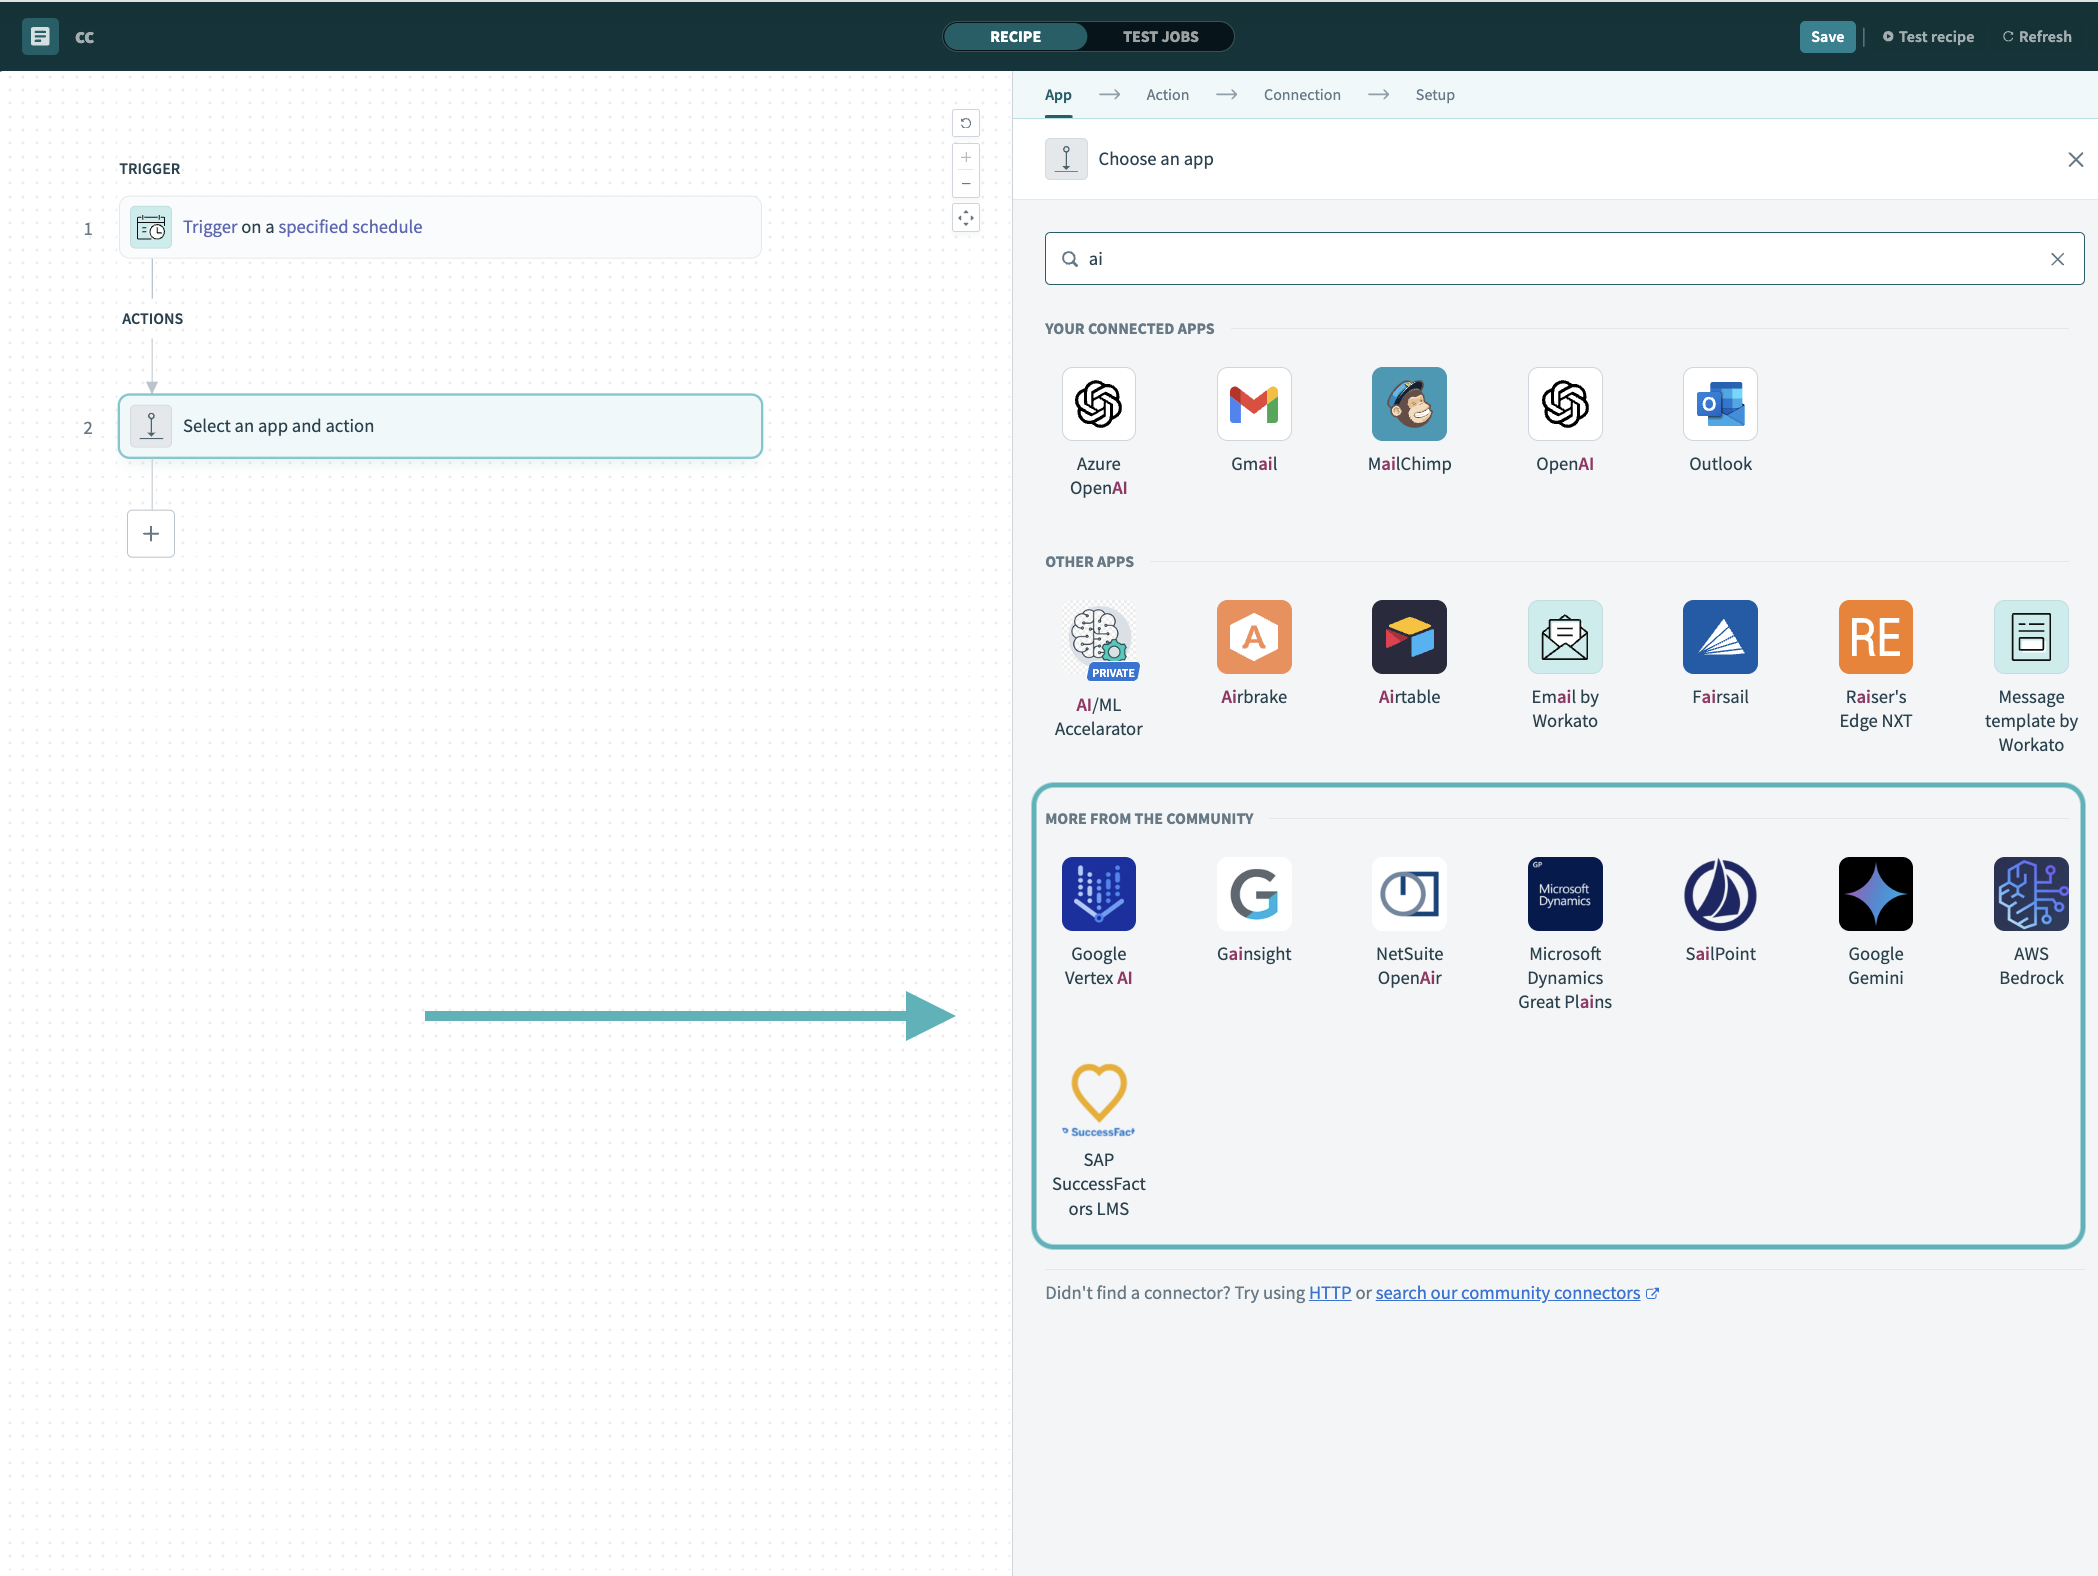 Search for community connectors in the recipe editor
Select the community connector you plan to install.
Click Install to install the connector from the community library.
 Click Install
Select Release connector. Alternatively, select Review code to review and modify the connector code before releasing it to the workspace.
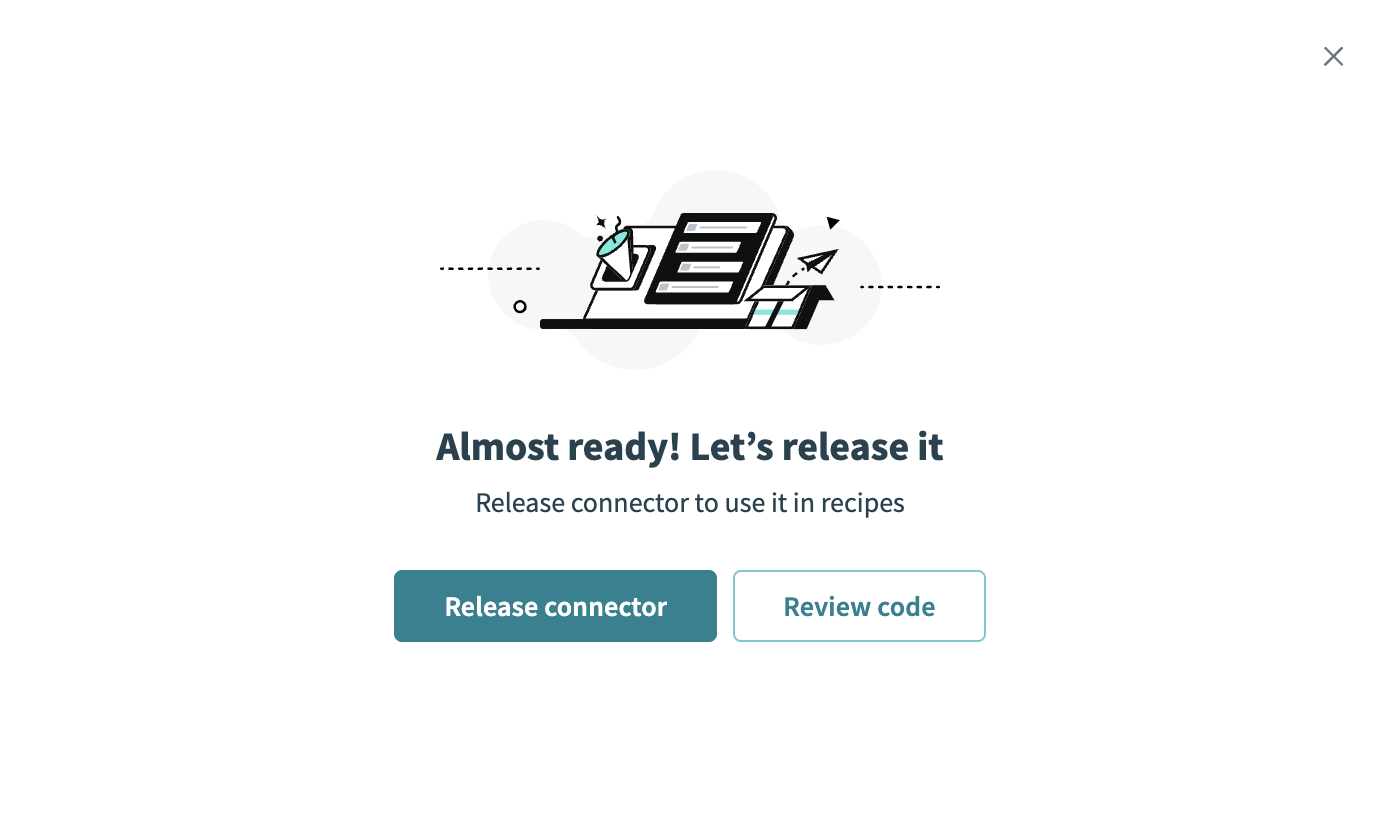 Release the connector
Summarize any changes you made to the connector, then click Release to allow workspace collaborators to use the connector in recipes.
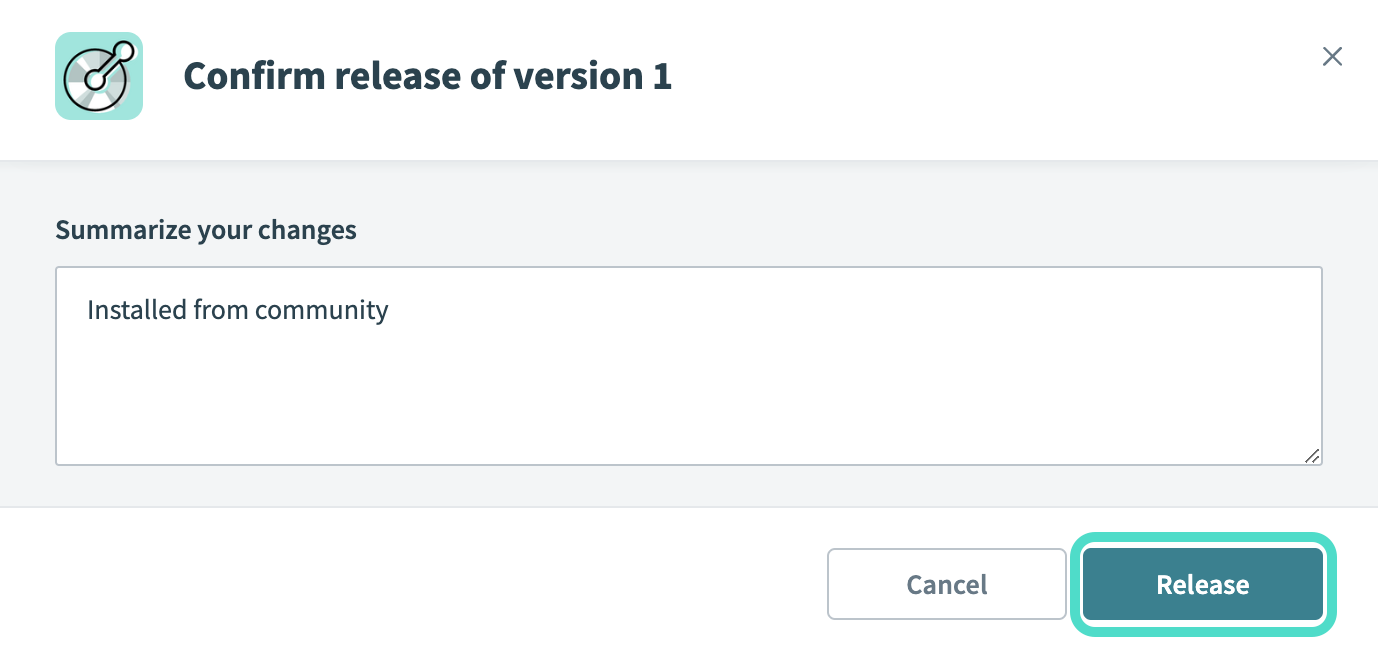 The Confirm release dialog
Connection setup
The Microsoft Graph API connector supports the following authentication types:
- Authorization code grant authentication (OAuth 2.0)
- Client credentials-based authentication (OAuth 2.0)
MICROSOFT MFA ENFORCEMENT
Microsoft is rolling out mandatory multifactor authentication (MFA) gradually to different applications and accounts in phases. This enforcement continues throughout 2025 and beyond. Refer to the Microsoft Mandatory multifactor authentication for Azure and admin portals documentation for more information.
We strongly recommend enabling MFA now for all Microsoft accounts used with Workato to avoid service disruptions from short-notice enforcement changes.
Complete the following steps to maintain uninterrupted service:
Enable MFA for your Microsoft organization following the Microsoft MFA setup guide. Refer to Set up multifactor authentication for Microsoft 365 for more information.
Reconnect your Microsoft connection in Workato.
Complete the OAuth flow with MFA when prompted.
Test your recipes to ensure they work with the updated connection.
Authorization code grant authentication (OAuth 2.0)
Authorization code grant authentication signs in as a specific user and uses Delegated permissions.
This authentication type requires the following values:
- Client ID
- Client secret
- Tenant ID (required for single tenant)
Minimum and default scopes
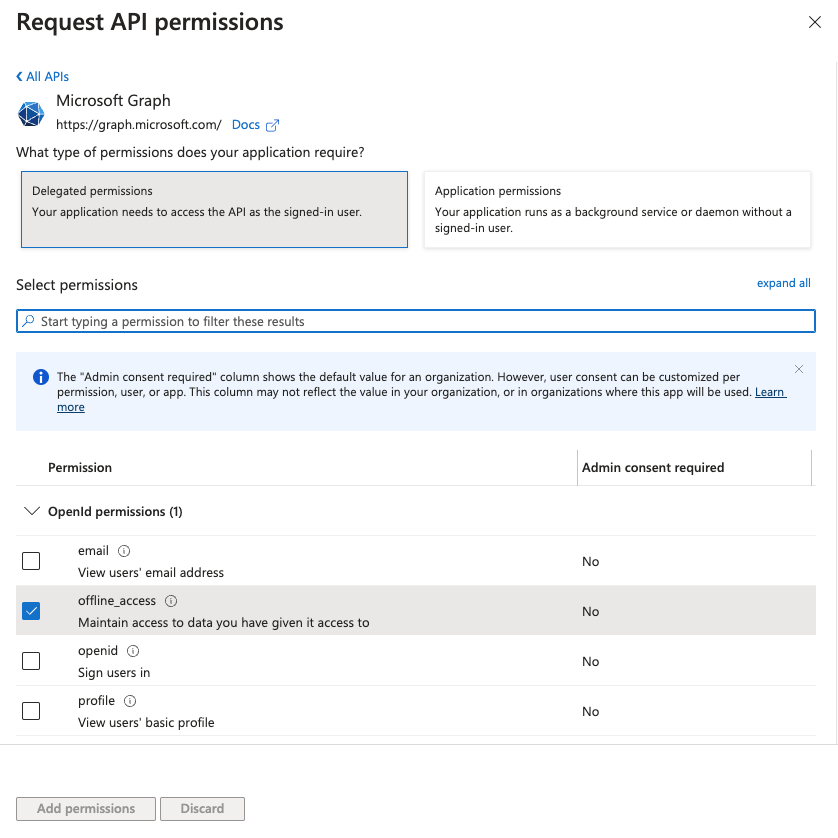
When no scopes are provided in the Scopes input field, the Microsoft Graph API connector requests the following scopes for authorization code grant connections by default. These scopes are necessary to use all of the connector's triggers and actions. You must assign these permissions to the Workato app as Delegated permissions in the Azure portal.
offline_accessopenidprofileUser.ReadUser.Read.AllUser.ReadBasic.AllUser.ReadWriteUser.ReadWrite.AllDirectory.Read.AllDirectory.ReadWrite.AllFiles.ReadWrite.AllMail.ReadBasicMail.ReadMail.ReadWriteMail.SendMailboxFolder.ReadMailboxFolder.ReadWriteCalendars.ReadCalendars.ReadBasicCalendars.ReadWriteOnlineMeetings.ReadOnlineMeetings.ReadWriteOnlineMeetingArtifact.Read.AllOnlineMeetingTranscript.Read.AllOnlineMeetingRecording.Read.All
The following scopes are not requested by default. Add them through the Scopes input field when you create a connection if your use case requires them:
DeviceManagementManagedDevices.Read.AllDeviceManagementManagedDevices.ReadWrite.All
The following minimum scopes are required to establish a connection to Microsoft Graph API using authorization code grant authentication:
User.Readoffline_access
Microsoft Graph API setup for authorization code grant authentication
Complete the following steps to set up the Microsoft Graph API connector for authorization code grant authentication:
- Register the Workato app in the Azure portal
- Assign permissions to your app
- Generate a client secret
- Obtain the Application (client) ID and Directory (tenant) ID from the Azure portal
Register the Workato app in the Azure portal
View register the Workato app in the Azure portal steps
Complete the following steps to register the Workato app in the Azure portal:
Sign in to the Azure portal.
Select App registrations > + New registration.
Enter a unique name for the application.
Use the Supported account types drop-down menu to select an account type.
Select Web from the Select a platform drop-down menu.
Use the following URI for the Redirect URI:
https://www.workato.com/oauth/callbackSelect Register.
Assign permissions to your app
View assign permissions to your app steps
Complete the following steps to assign permissions to your app:
Go to your newly registered app and select Manage > API permissions.
Click + Add a permission and select Microsoft Graph.
Select Delegated permissions as the permission type, since your application requires a user to sign in.
 Add permissions
Add the required permissions. Refer to Minimum and default scopes for the scopes to assign.
Click Add permissions.
Admin consent is required for specific permissions. Refer to Connect Microsoft Entra ID to the Microsoft Graph API connector to learn more.
Generate a client secret
View generate a client secret steps
Complete the following steps to generate a client secret:
Go to Manage > Certificates & Secrets > Client secrets.
Click + New client secret.
Provide a Description for the client secret and specify an Expires date.
Click Add.
Copy and save the client secret Value—not the Secret ID—for use in Workato.
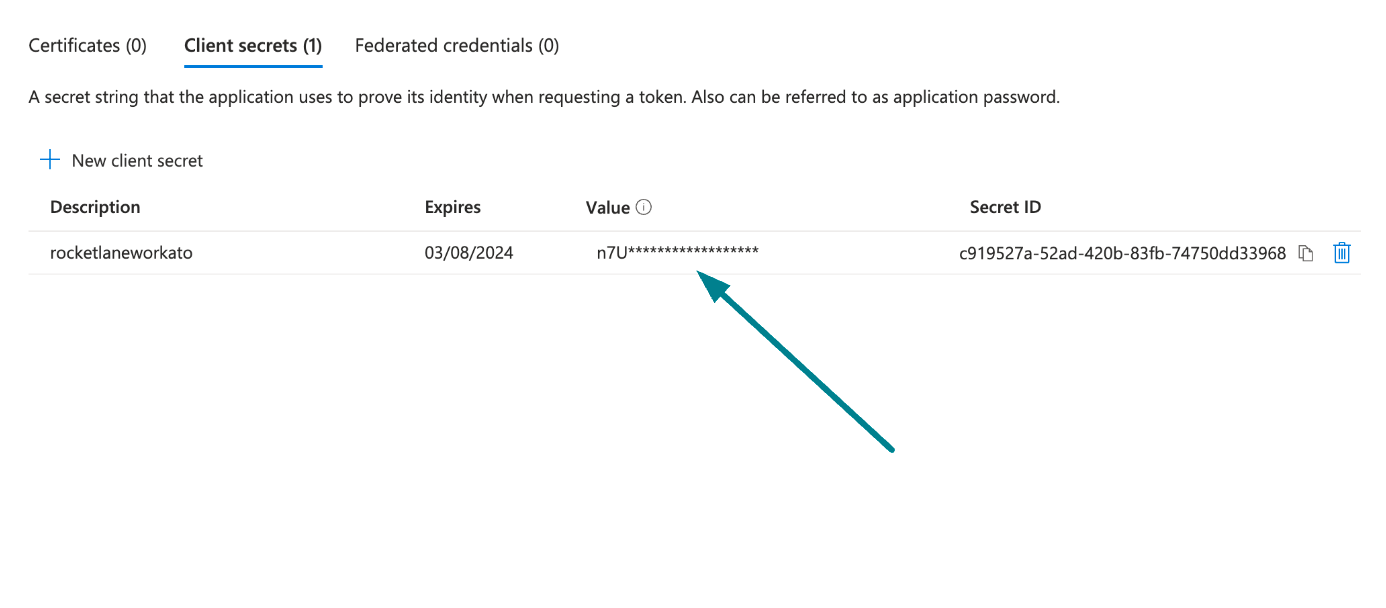 Copy and save the client secret value
Obtain the Application (client) ID and Directory (tenant) ID from the Azure portal
View obtain the Application (client) ID and Directory (tenant) ID from the Azure portal steps
Complete the following steps to obtain the Application (client) ID and Directory (tenant) ID from the Azure portal:
Go to the Overview > Essentials section.
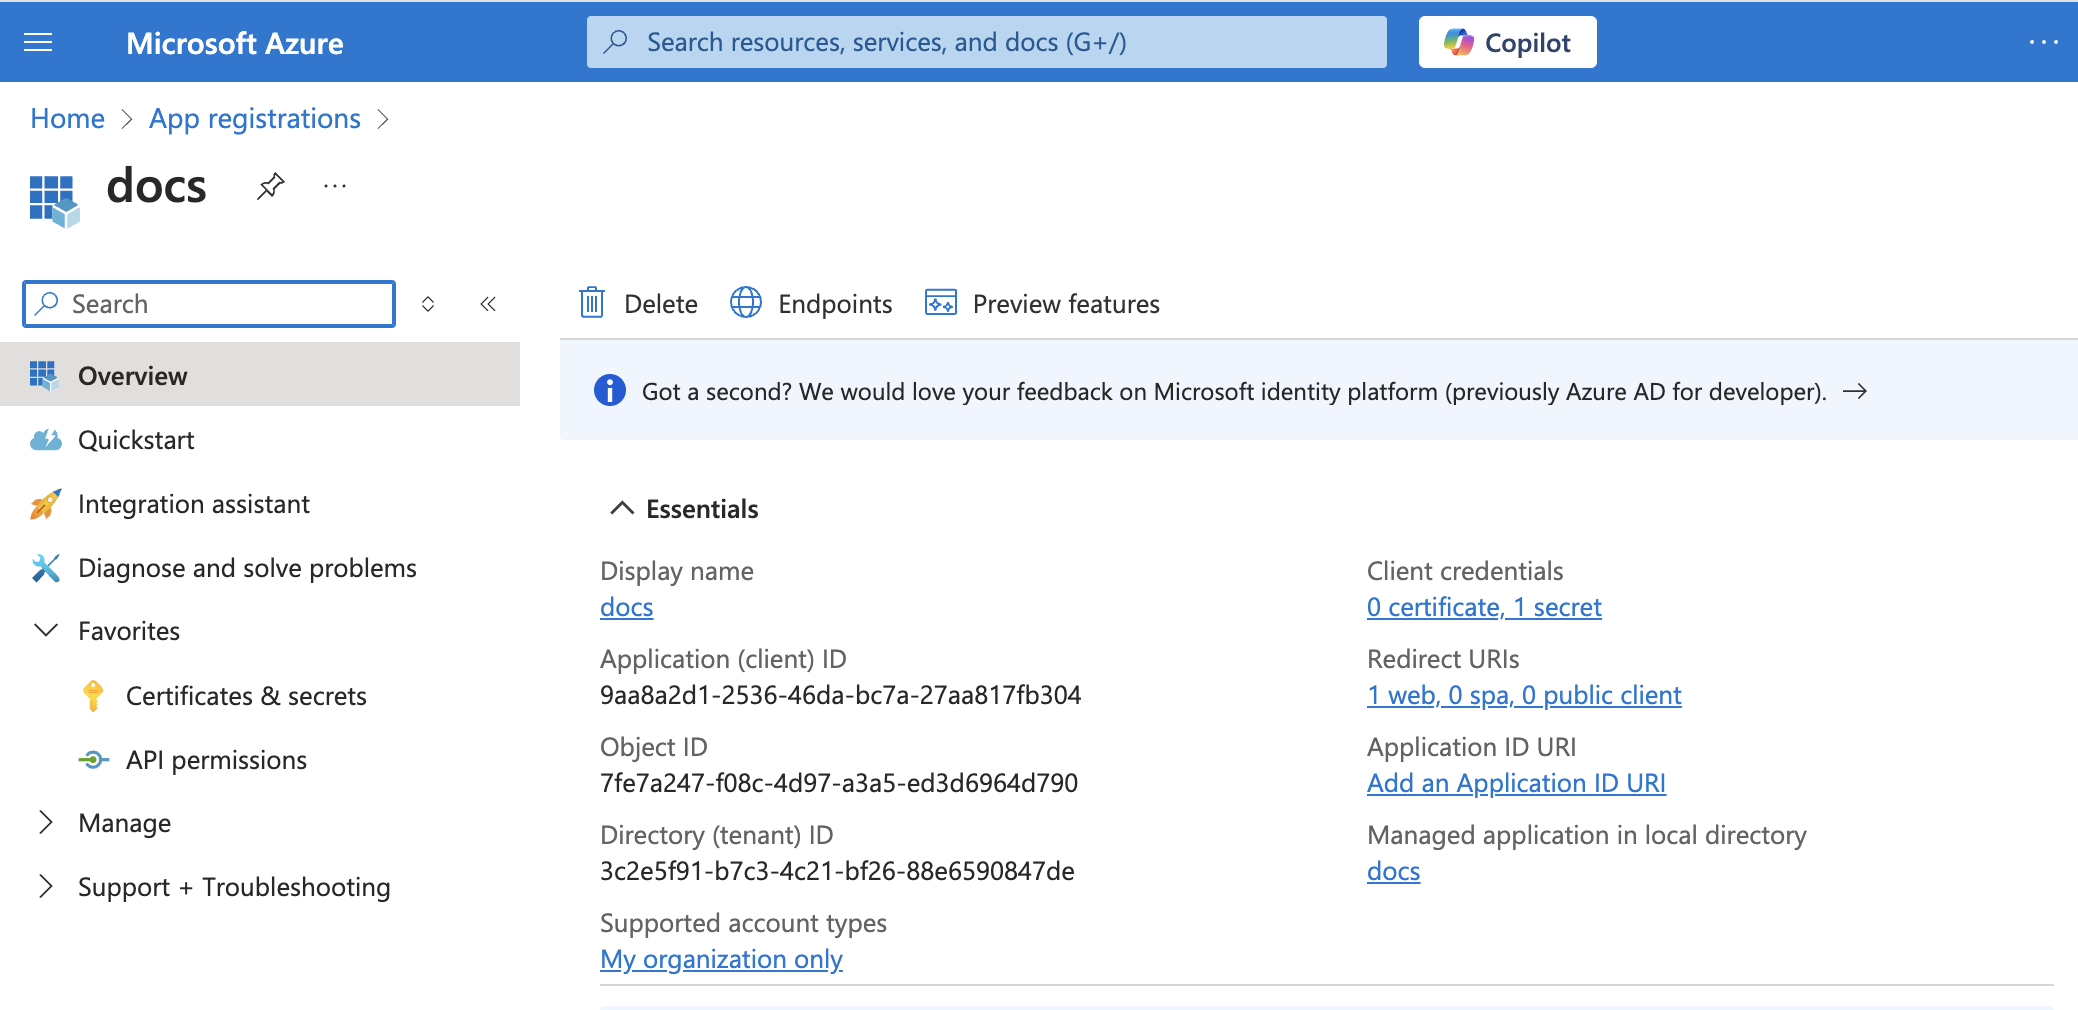 App details
Copy and save the Application (client) ID and Directory (tenant) ID for use in Workato.
Connect to Microsoft Graph API with authorization code grant authentication
Complete the following steps to establish an authorization code grant connection to Microsoft Graph API in Workato:
Click Create > Connection or press C twice.
Search for Microsoft Graph API and select it as your app.
Provide a name for your connection in the Connection name field.
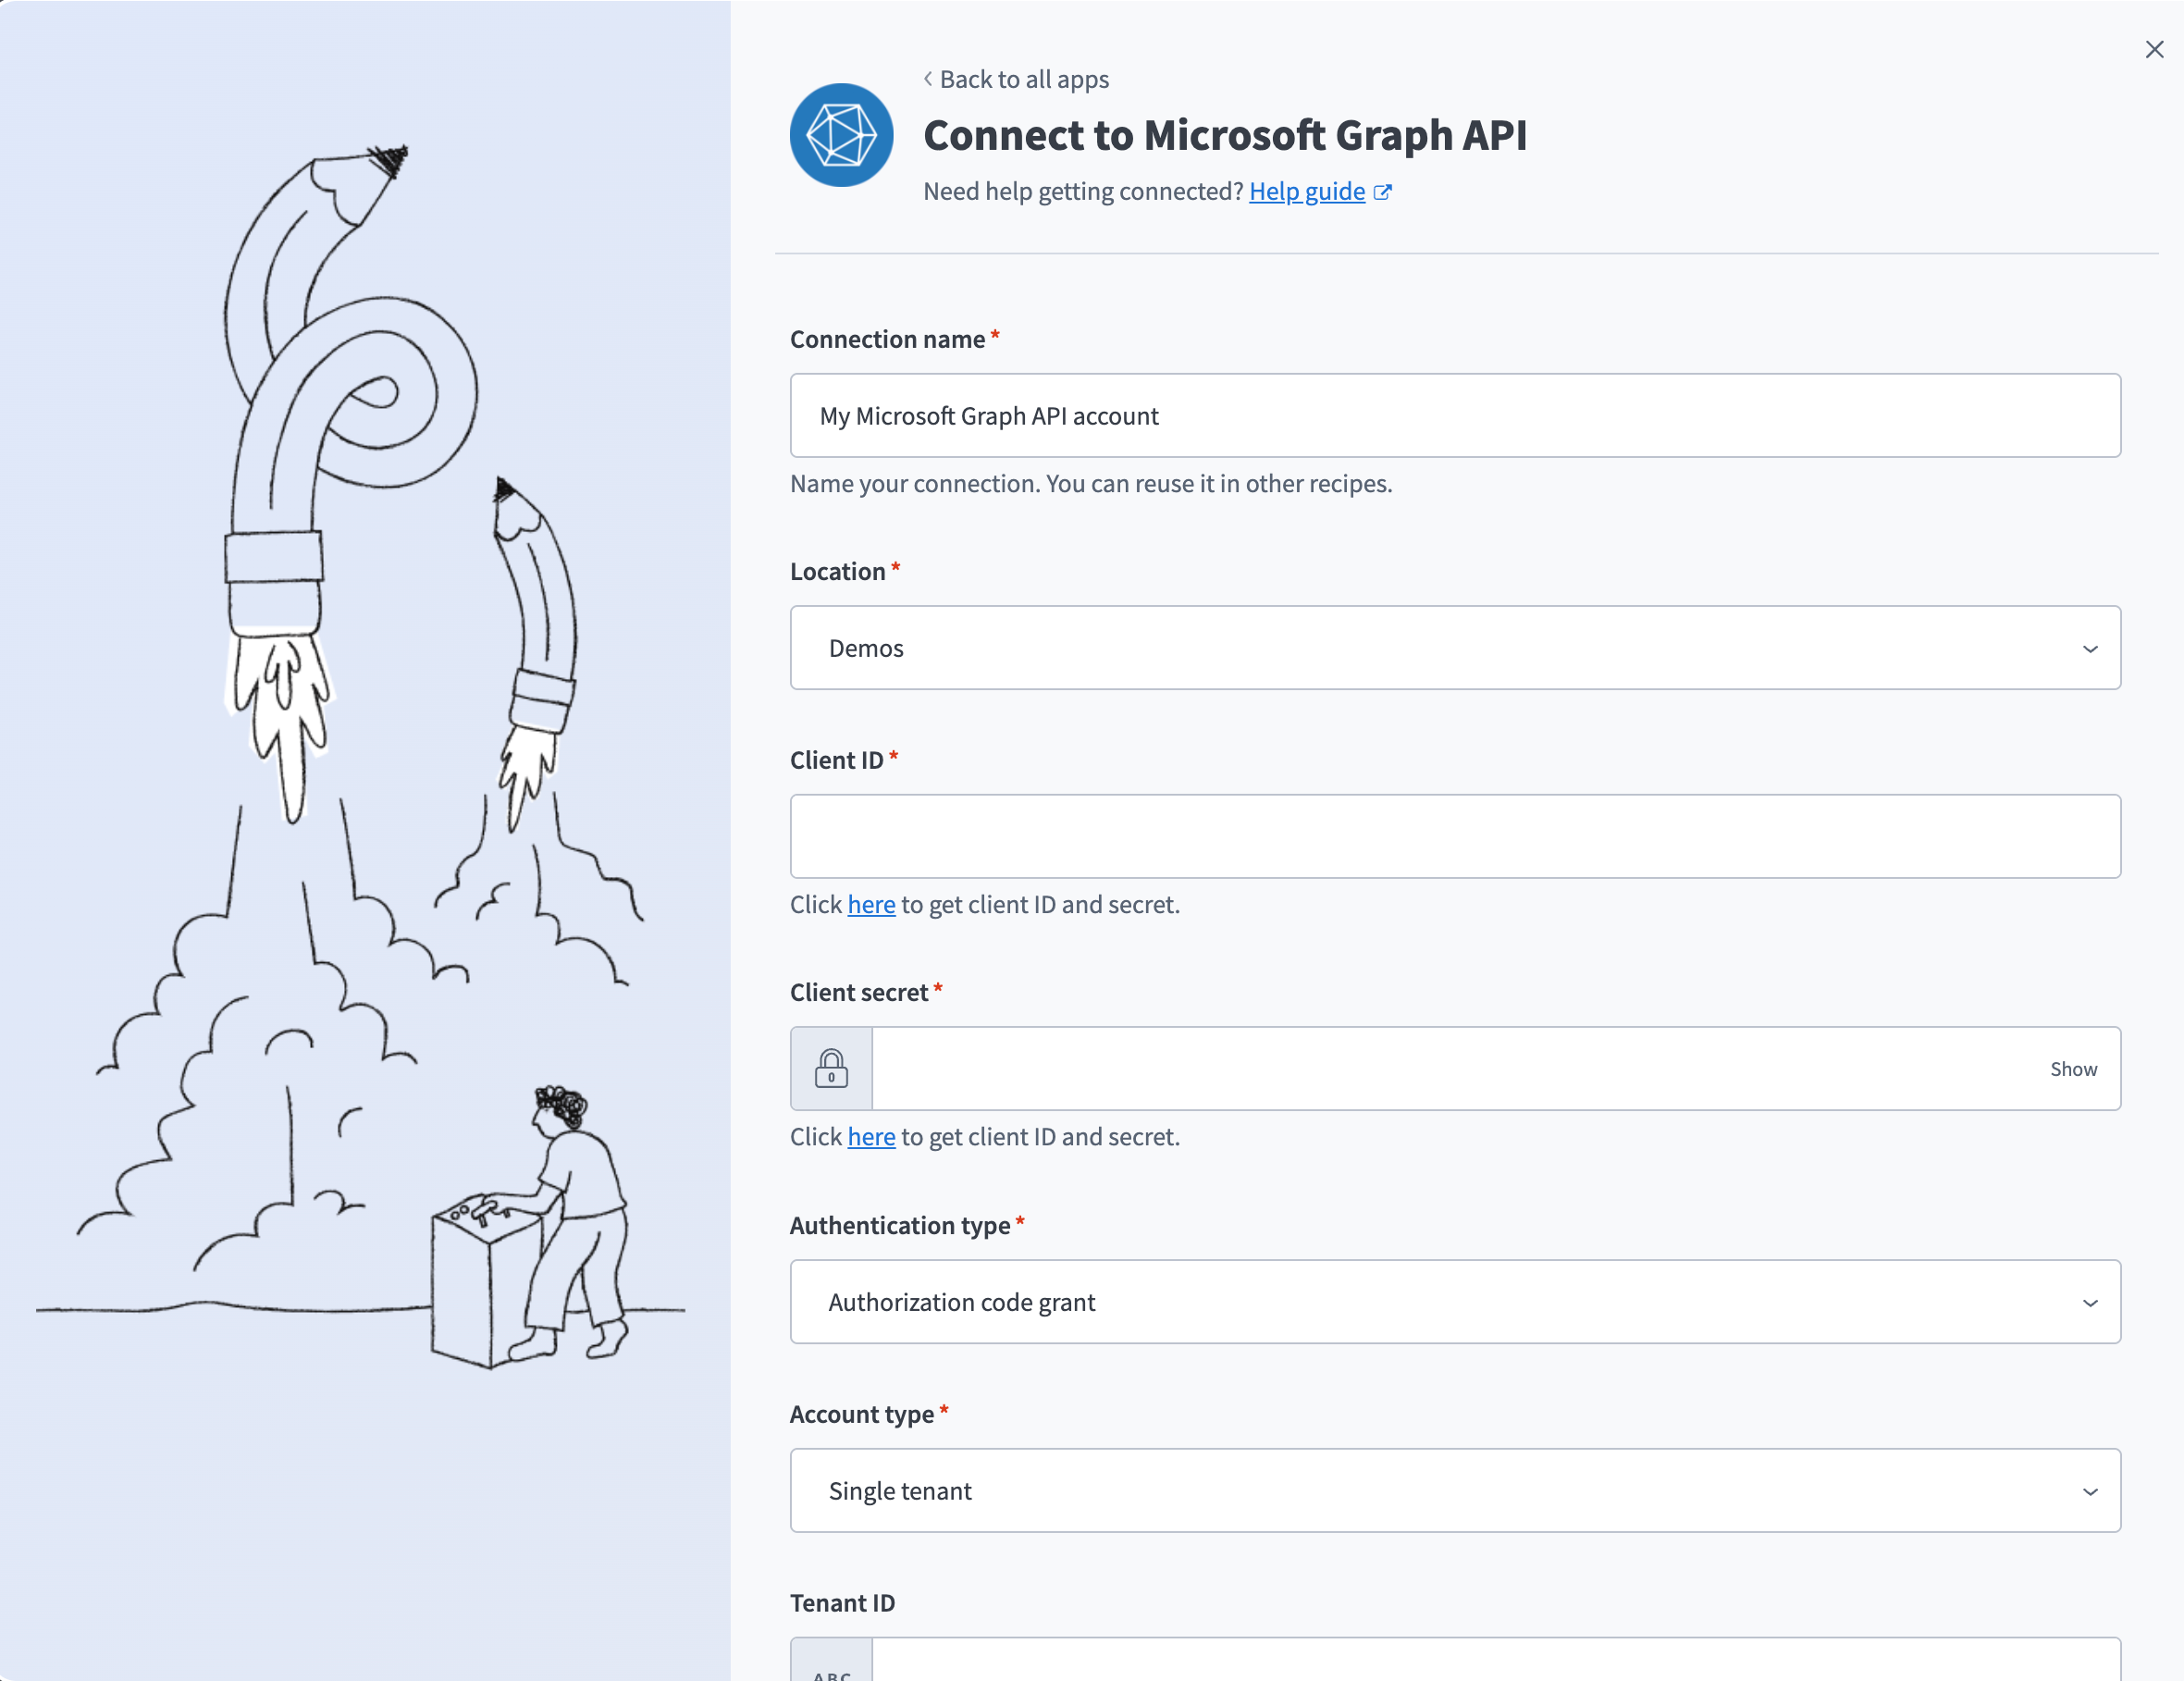 Connect to Microsoft Graph API with authorization code grant authentication
Use the Location drop-down menu to select the project where you plan to store the connection.
Enter the Application (client) ID from the Azure portal in the Client ID field.
Enter your client secret in the Client secret field.
Select Authorization code grant from the Authentication type drop-down menu.
Select an option from the Account type drop-down menu. Options include Single tenant, Multitenant, and Active directory multitenant.
Enter the Directory (tenant) ID in the Tenant ID field. This field is required if you select Single tenant as the Account type.
Optional. Select the scopes you need from the Scope drop-down menu. By default, the connector requests the scopes listed in Minimum and default scopes, which cover all of its triggers and actions.
Click Connect.
Client credentials-based authentication (OAuth 2.0)
Client credentials-based authentication connects as the application and uses Application permissions.
This authentication type requires the following values:
- Client ID
- Client secret
- Tenant ID
Minimum and recommended scopes
For client credentials connections, the connector uses the Application permissions consented for the app in the Azure portal. We recommend assigning the following permissions to support common operations across the connector's triggers and actions. Some operations may require additional Application permissions.
User.Read.AllFiles.ReadWrite.AllMail.ReadMail.ReadWriteMail.Send
The following minimum scope is required to establish a connection to Microsoft Graph API using client credentials authentication:
User.Read.All
Microsoft Graph API setup for client credentials-based authentication
Complete the following steps to set up the Microsoft Graph API connector for client credentials-based authentication:
- Register the Workato app in the Azure portal
- Assign permissions to your app
- Generate a client secret
- Obtain the Application (client) ID and Directory (tenant) ID from the Azure portal
Register the Workato app in the Azure portal
View register the Workato app in the Azure portal steps
Complete the following steps to register the Workato app in the Azure portal:
Sign in to the Azure portal.
Select App registrations > + New registration.
Enter a unique name for the application.
Use the Supported account types drop-down menu to select an account type.
Select Web from the Select a platform drop-down menu.
Use the following URI for the Redirect URI:
https://www.workato.com/oauth/callbackSelect Register.
Assign permissions to your app
View assign permissions to your app steps
Complete the following steps to assign permissions to your app:
Go to your newly registered app and select Manage > API permissions.
Click + Add a permission and select Microsoft Graph.
Select Application permissions as the permission type, since your application doesn't require a user to sign in.
Add permissions
Add the required permissions. Refer to Minimum and recommended scopes for the scopes to assign.
Click Add permissions.
Admin consent is required for specific permissions. Refer to Connect Microsoft Entra ID to the Microsoft Graph API connector to learn more.
Generate a client secret
View generate a client secret steps
Complete the following steps to generate a client secret:
Go to Manage > Certificates & Secrets > Client secrets.
Click + New client secret.
Provide a Description for the client secret and specify an Expires date.
Click Add.
Copy and save the client secret Value—not the Secret ID—for use in Workato.
Copy and save the client secret value
Obtain the Application (client) ID and Directory (tenant) ID from the Azure portal
View obtain the Application (client) ID and Directory (tenant) ID from the Azure portal steps
Complete the following steps to obtain the Application (client) ID and Directory (tenant) ID from the Azure portal:
Go to the Overview > Essentials section.
App details
Copy and save the Application (client) ID and Directory (tenant) ID for use in Workato.
Connect to Microsoft Graph API with client credentials-based authentication
Complete the following steps to establish a client credentials-based connection to Microsoft Graph API in Workato:
Click Create > Connection or press C twice.
Search for Microsoft Graph API and select it as your app.
Provide a name for your connection in the Connection name field.
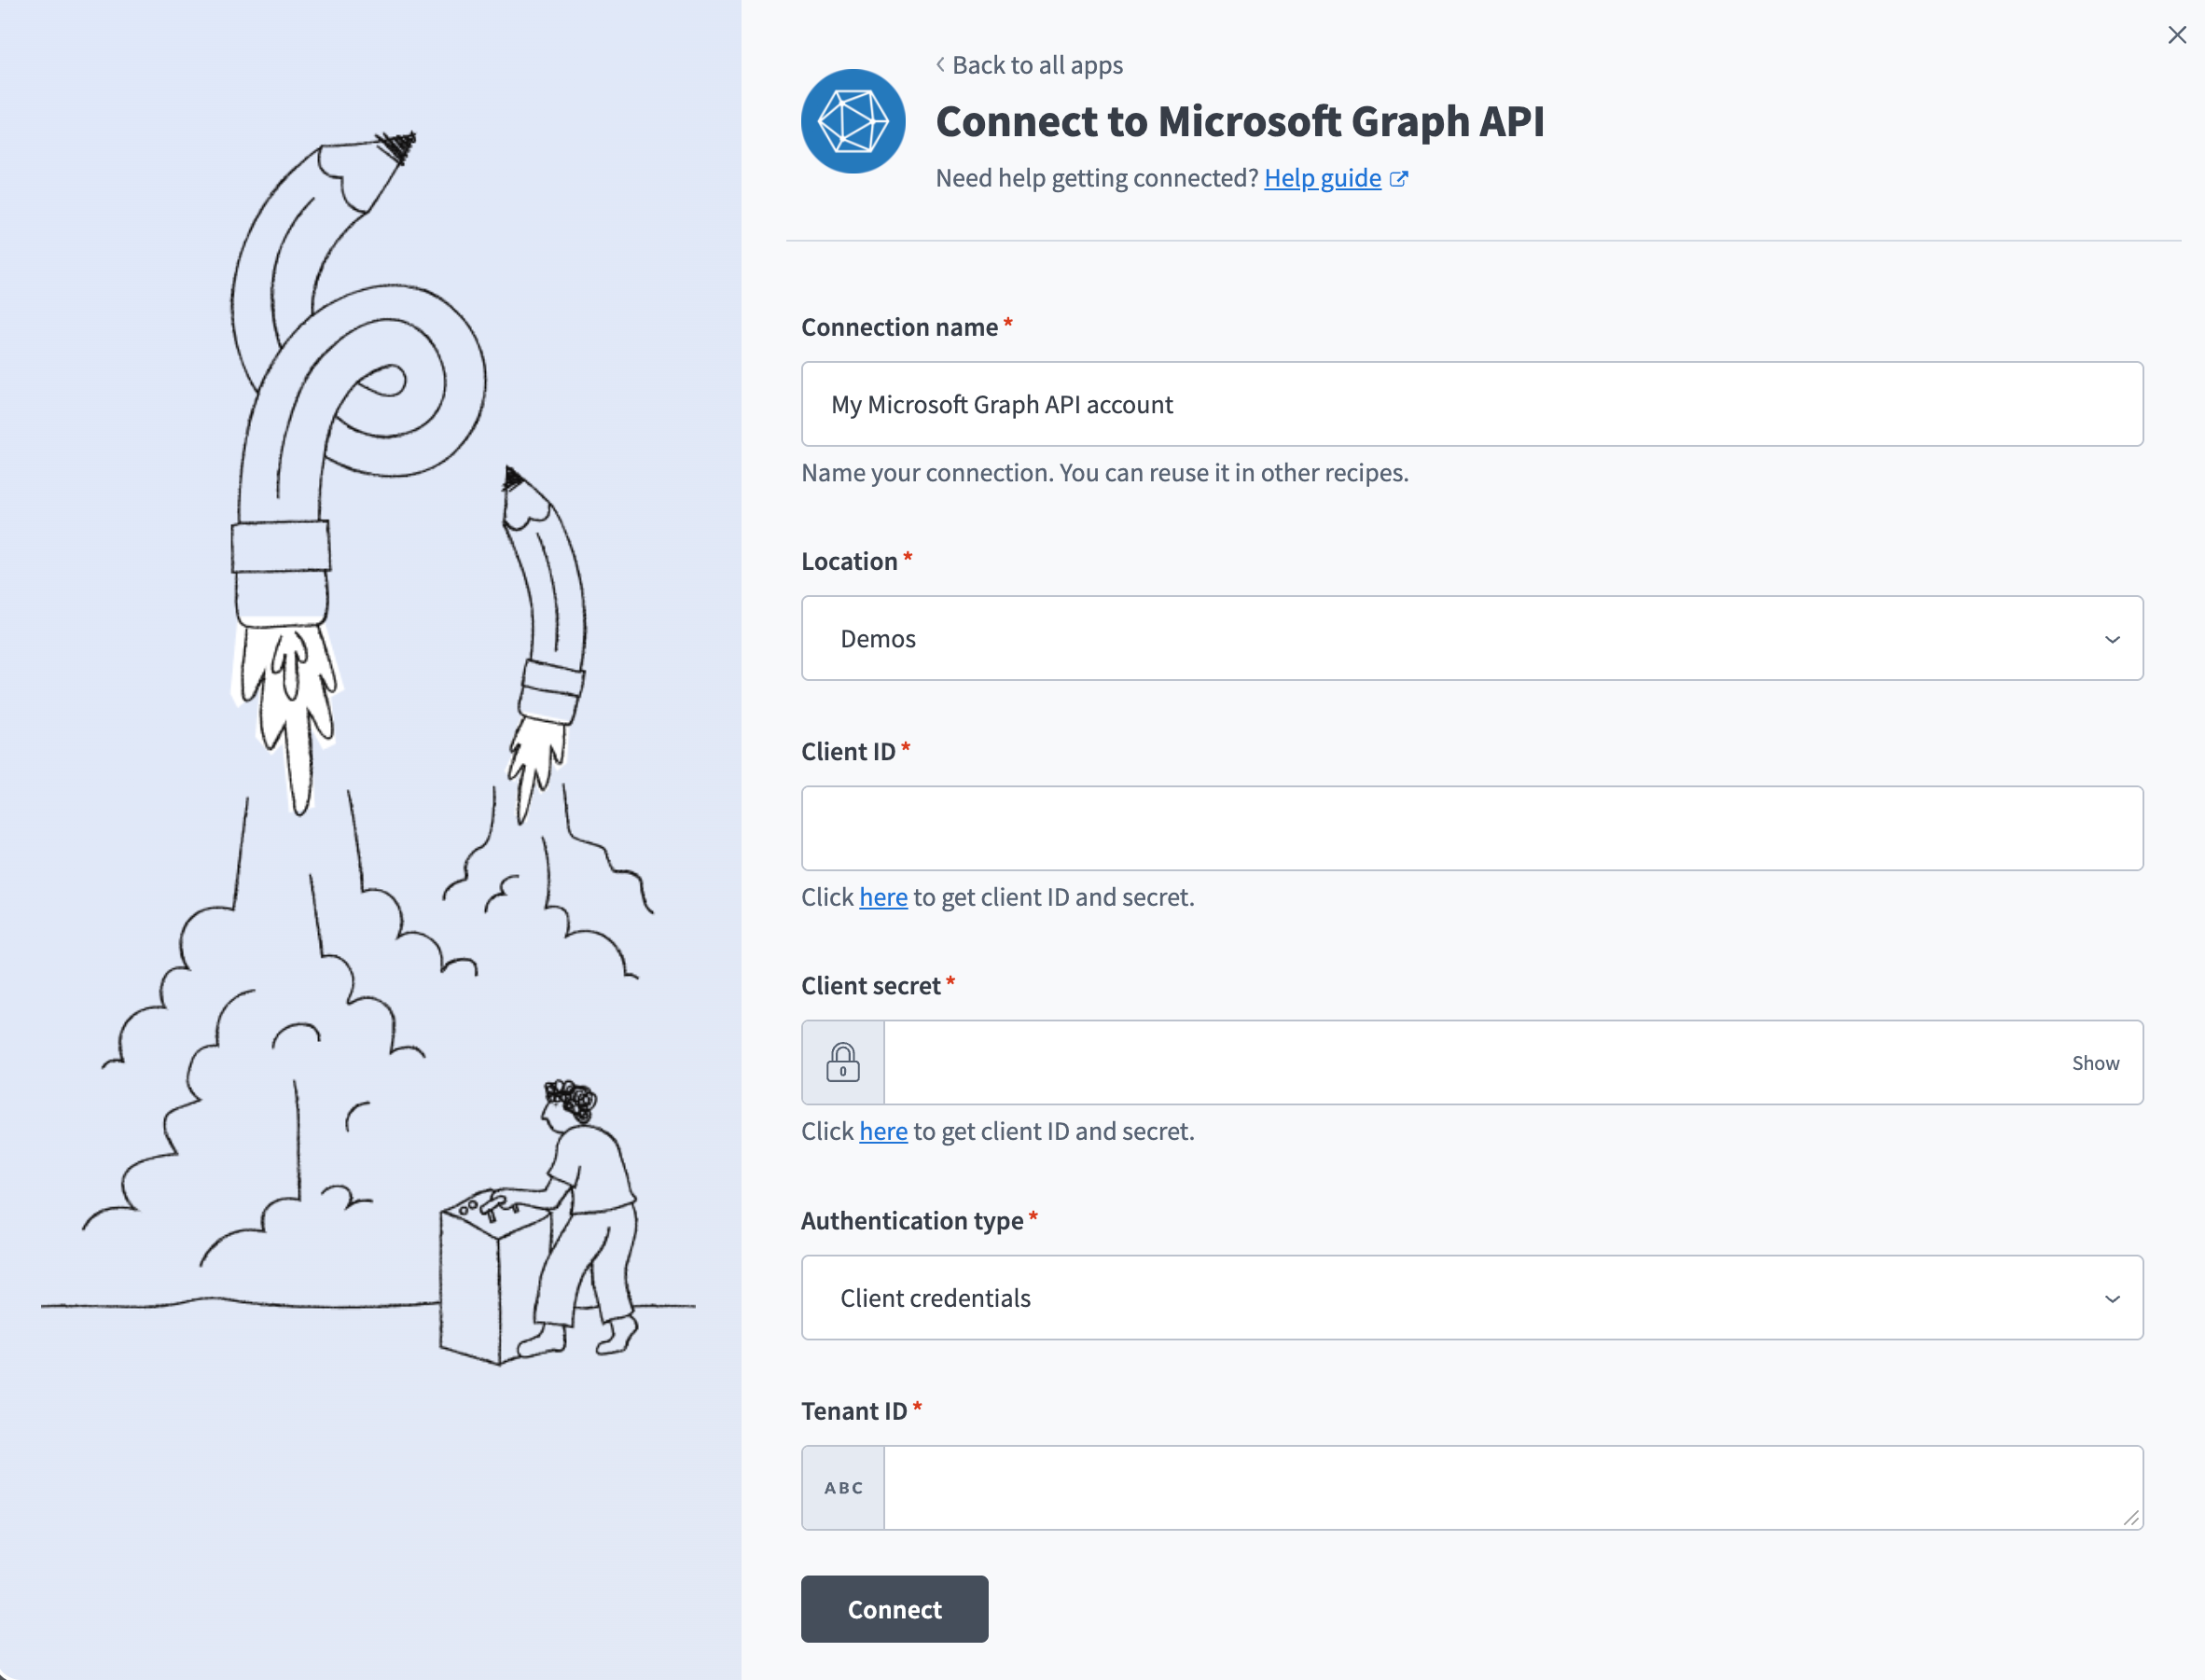 Connect to Microsoft Graph API with client credentials-based authentication
Use the Location drop-down menu to select the project where you plan to store the connection.
Enter the Application (client) ID from the Azure portal in the Client ID field.
Enter your client secret in the Client secret field.
Select Client credentials from the Authentication type drop-down menu.
Enter the Directory (tenant) ID in the Tenant ID field.
Click Connect.
Connect Microsoft Entra ID to the Microsoft Graph API connector
View connect Microsoft Entra ID to the Microsoft Graph API connector steps
To connect to the Microsoft Graph API connector using a Microsoft Entra ID account, ensure that all the consent requests are granted by admins.
Complete the following steps to grant admin consent using an admin account:
Sign in to your Azure portal and navigate to Enterprise Applications > Activity > Admin consent requests.
Approve the necessary consent requests.
Last updated: