Access Provisioning MCP server
The Access Provisioning MCP server enables LLMs to interact with Okta, Google Workspace, and Workbot for Slack for employee self-service access requests through natural conversation. It provides tools to request application access, follow up on a submitted request, and manage Google Group membership.
Uses
Use the Access Provisioning MCP server to perform the following actions:
- Request access to an application in Okta or Google Workspace, with a business reason
- Follow up on a previously submitted request to see its approval and provisioning status
- Join a Google Group or distribution list
- Leave a Google Group or distribution list
- Look up who is a member of a Google Group
Example prompts
Use the following example prompts to invoke Access Provisioning MCP server tools:
Can you get me access to Salesforce?Get me access to Workday.What happened to my Workday request from Tuesday?Is req_a1b2c3 done yet?Add me to the Marketing Google Group.Remove me from the eng-oncall group.Take me off the Marketing Google Group.Who's in the eng-oncall group?I need access to NetSuite for the Q3 close.
Access Provisioning MCP server tools
The Access Provisioning MCP server provides the following tools:
| Tool | Description |
|---|---|
| provision_app_access | Requests application access for an employee and routes the request for approval before provisioning. |
| get_request_status | Looks up an access request by request_id and returns approval and provisioning status. |
| add_user_to_group | Adds an employee to a Google Group. |
| remove_user_from_group | Removes an employee from a Google Group. |
| list_group_members | Lists current members of a Google Group (read-only). |
Install the Access Provisioning MCP server
Complete the following steps to install a prebuilt MCP server to your project:
Sign in to your Workato account.
Go to AI Hub > Enterprise MCP.
Click + Create MCP server.
Go to the Start with pre-built MCP Servers using your connected apps section and select the prebuilt MCP server you plan to use.
Click Use this server.
Provide a name for your MCP server in the Server name field.
Use the Location drop-down menu to select the project for the MCP server.
Go to the Connections section and connect to your app account.
Select the connection type you plan to use for the MCP server template.
- User's connection: MCP server tools perform actions based on the identity and permissions of the user who connects to the application. Users authenticate with their own credentials to execute the skill.
- Your connection: This option uses the connection established by the recipe builder and follows the same principles as normal app connections.
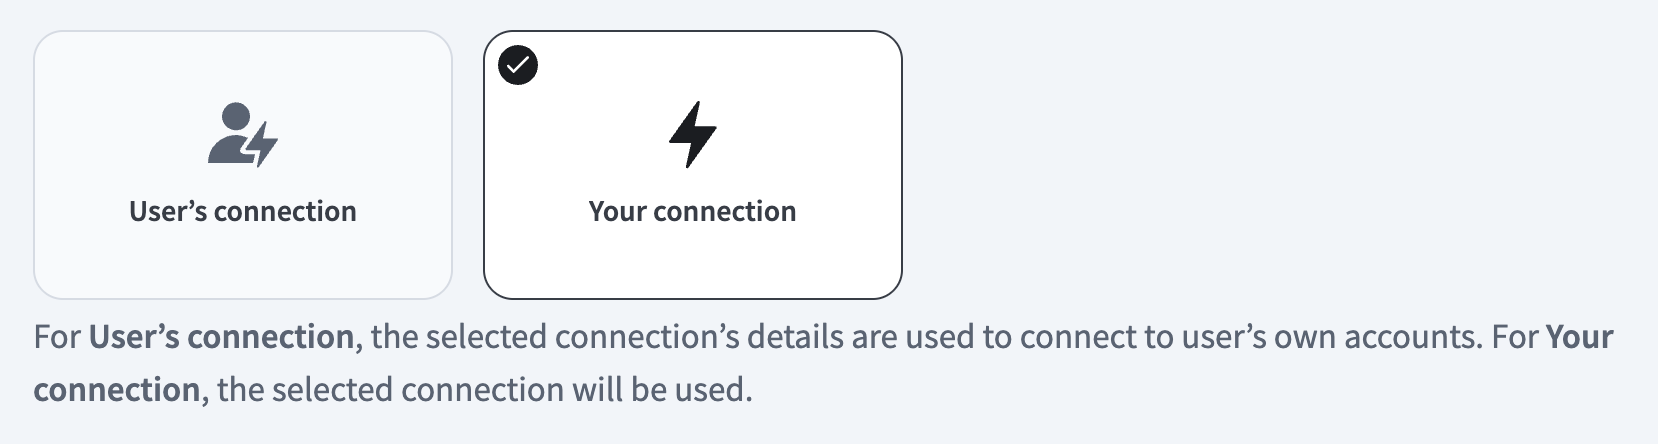 Select your connection type
VERIFIED USER ACCESS AUTHENTICATION REQUIREMENTS
Only app connections that use OAuth 2.0 authorization code grant are available for user's connection. Refer to Verified user access for more information.
Complete the app-specific connection setup steps in the following section.
Access Provisioning connection setup
Configure the following connections to set up the Access Provisioning MCP server:
- Okta: Required if
deployment.enabled_systemsincludesokta. - Google Workspace: Required if
deployment.enabled_systemsincludesgoogle, or to enable the Google Group membership tools. - Workbot for Slack: Required. Dispatches approval cards and resolves approver identities.
Access Provisioning role requirements
Each tool's availability depends on the permissions its connected account holds. Calling a tool without the required permission returns a permission_denied outcome rather than a partial result.
Okta requires an API token generated by an Organization Administrator or Super Administrator. The token inherits that administrator's full permissions, since Okta API tokens don't support granular scopes. Refer to Create an API token for more information.
Google Workspace requires the scopes following at a minimum:
- A service account with domain-wide delegation
- The
admin.directory.groupscope - The
admin.directory.group.memberscope
Refer to the Google Workspace Admin SDK authorization guide for the complete list of scopes.
- Workbot for Slack requires the scopes following at a minimum:
chat:writeto post approval cardsusers:readto resolve approver identities
Refer to the Workbot for Slack permissions reference for the complete list of scopes.
Okta connection setup steps
View Okta connection setup steps
This deployment uses Okta's API key authentication method (an Okta API token). The token inherits the permissions of the administrator who generates it, since Okta API tokens don't support granular OAuth scopes the way Okta's authorization code grant and client credentials methods do.
Generate an API key
API KEY PRIVILEGES AND LIMITATIONS
You must have administrator privileges in Okta to create an API key. Ensure that you're logged in as an administrator before you proceed.
Workato requires that the user and API key used in the connection have Organization Administrator or Super Administrator permissions. API keys inherit all permissions from the administrator who created them and can't be restricted to specific resources or operations.
Refer to Create an API token for more information.
Complete the following steps to generate an API key in Okta:
Sign in to Okta.
Go to Security > API > Token.
Click Create token to generate an API key. The key inherits the permissions of the administrator who created it.
Connect to Okta using API key-based authentication
Complete the following steps to create an API key connection to Okta in Workato:
Click Create > Connection or press C twice.
Search for and select Okta as your connection on the New connection page.
Provide a unique name for the connection in the Connection name field.
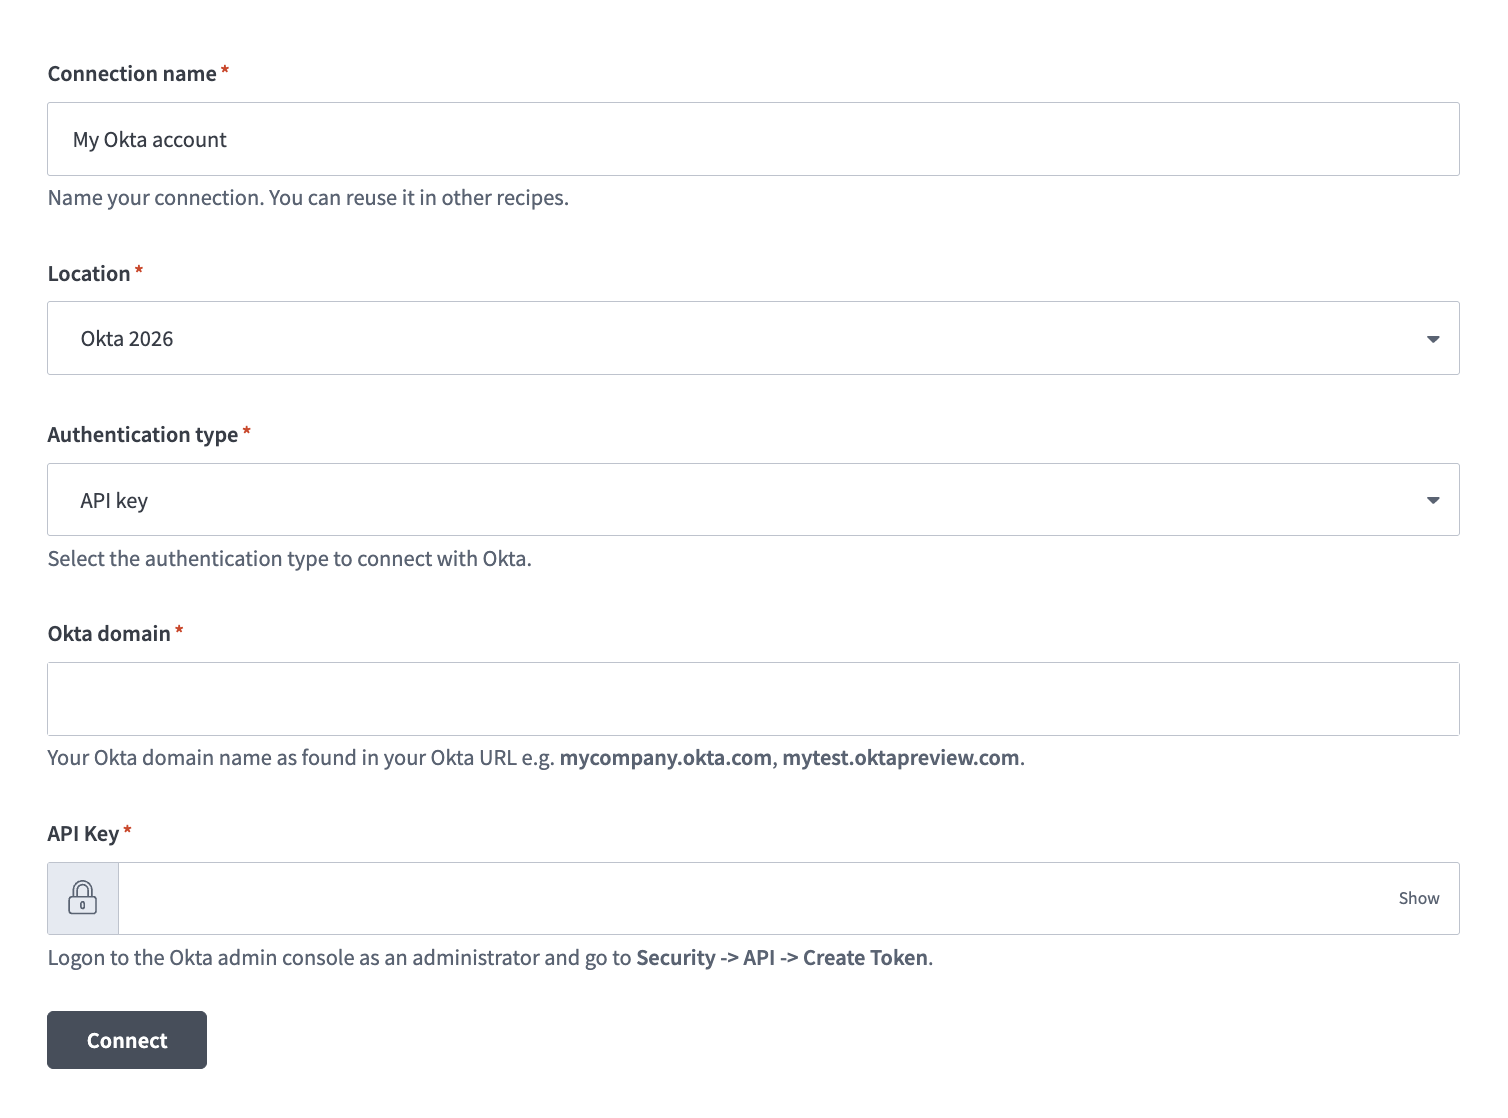 Okta API key connection setup
Use the Authentication type drop-down menu to select API key.
Enter your Okta domain name in the Okta domain field. For example, mycompany.okta.com or mytest.oktapreview.com. Ensure that the domain name you enter doesn't include -admin, such as mycompany-admin.okta.com, as this URL is used to access the Okta admin console from the UI and isn't an OAuth endpoint.
Enter the API key generated in your Okta instance.
Click Connect.
Google Workspace connection setup steps
View Google Workspace connection setup steps
This deployment requires service account authentication. The Google Workspace connector's OAuth 2.0 authentication method ties the connection to one employee's own Google identity, which can't write group membership changes on behalf of other employees.
You must enable the Google Workspace API to complete the connection setup.
REQUIRED SCOPES FOR SERVICE ACCOUNT AUTHENTICATION
Ensure that you have the following required permissions to successfully connect to Google Workspace using a service account:
admin.directory.groupadmin.directory.group.member
The service account impersonates the user based on the email address you provide during the connection setup after authentication is complete.
Set up a Google service account
View Google service account setup steps
A Google service account is a specialized Google account associated with a Google Cloud Project (GCP) that can run API requests on your behalf.
Service accounts provide the following benefits:
- Continuous operation: Service accounts ensure that operations continue even if individual user permissions change.
- Dedicated permissions: Service accounts can only access projects that you share with them.
- Dedicated API quotas: You can manage a service account's API quotas through GCP and request quota increases directly from Google.
Refer to the Google service account documentation to learn more about service accounts.
Complete the following steps to set up a Google service account:
Create a service account in your GCP project.
Go to IAM & Admin > Service accounts. Ensure your dashboard is scoped to the project that contains your service account.
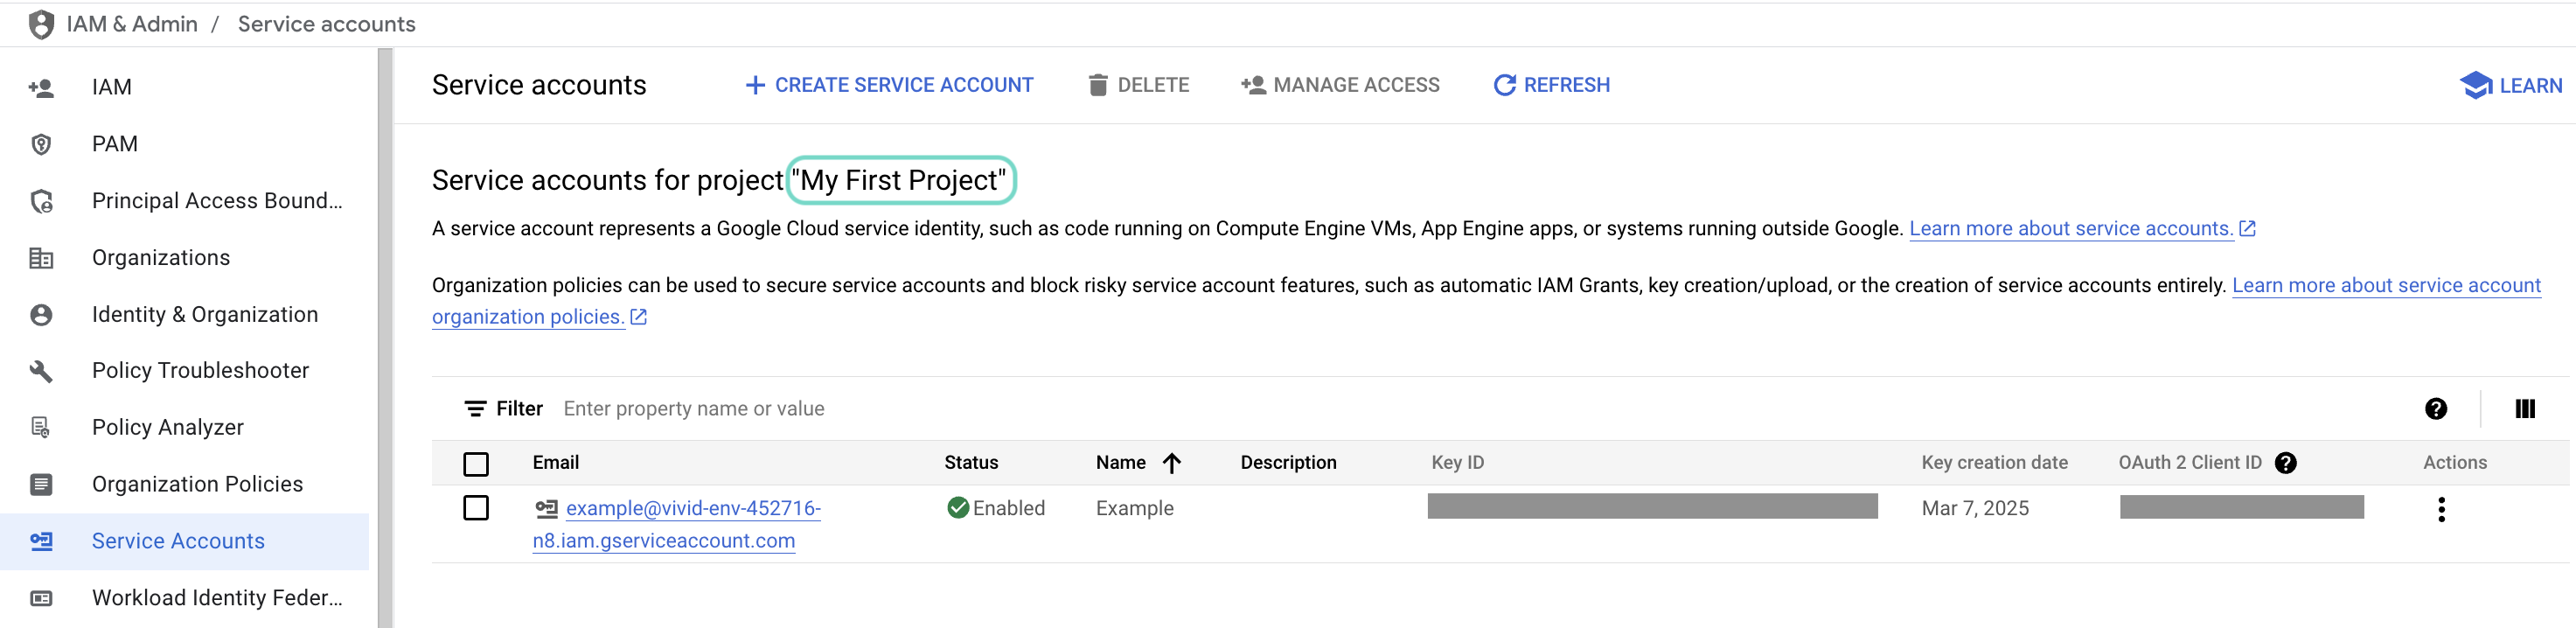 Check the scope of your dashboard.
Click the Email of the service account you intend to use.
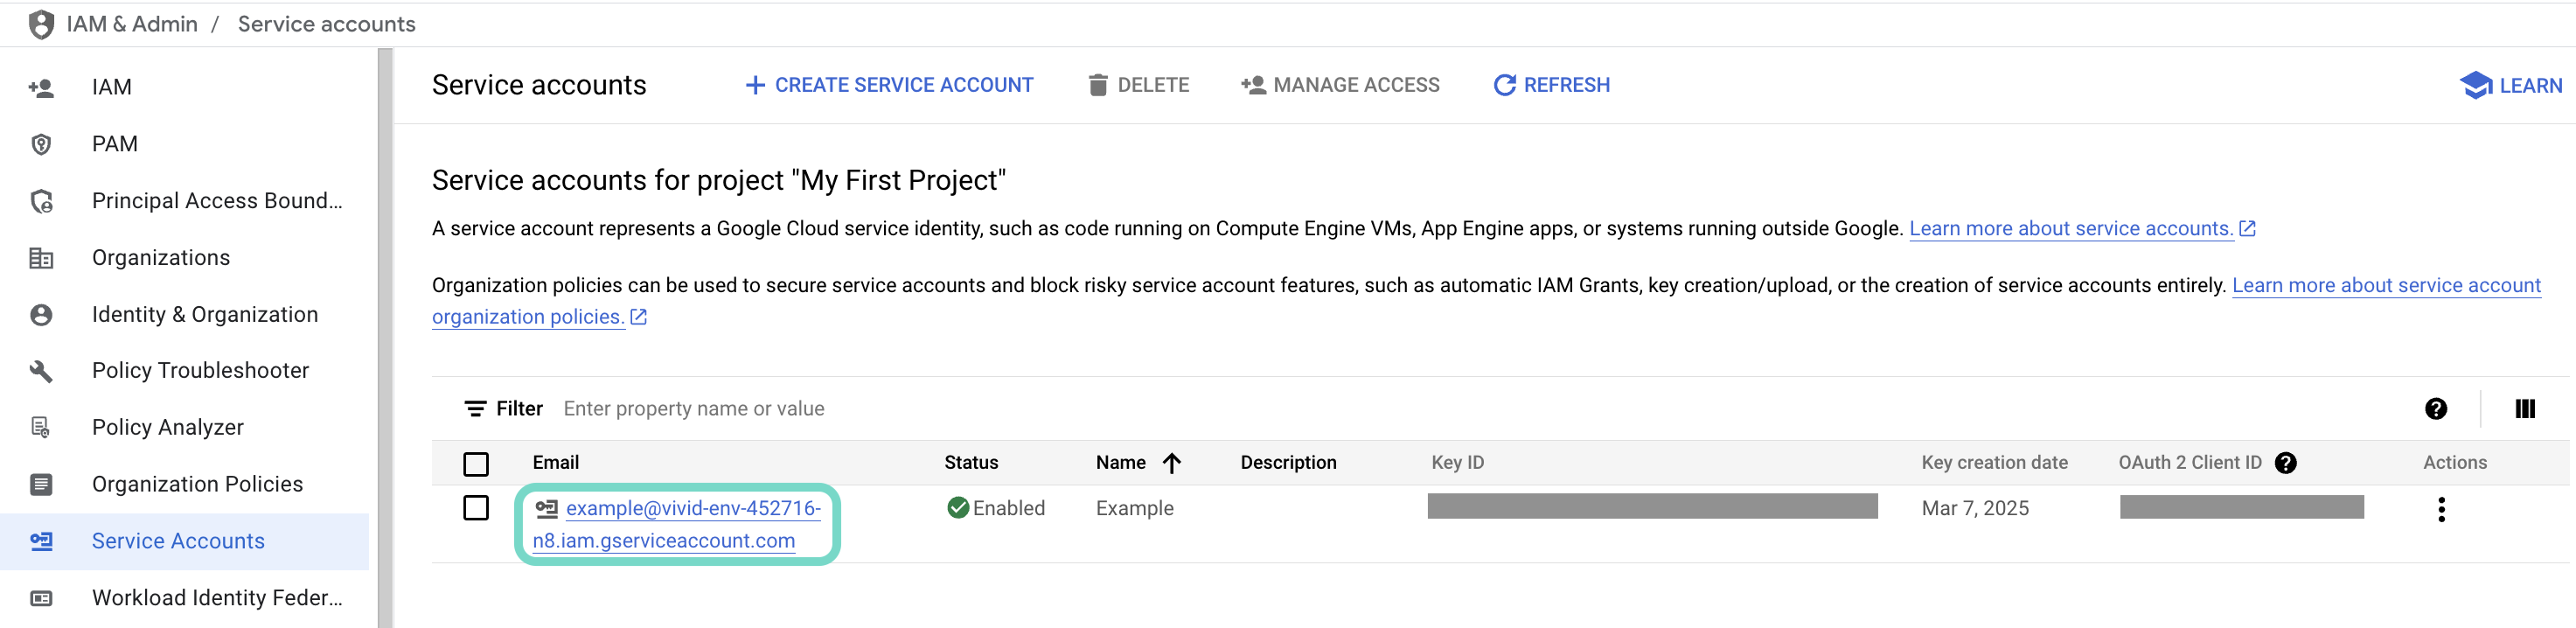 Click the Email of the service account you intend to use.
Copy the service account's Email and save it to configure your connection later.
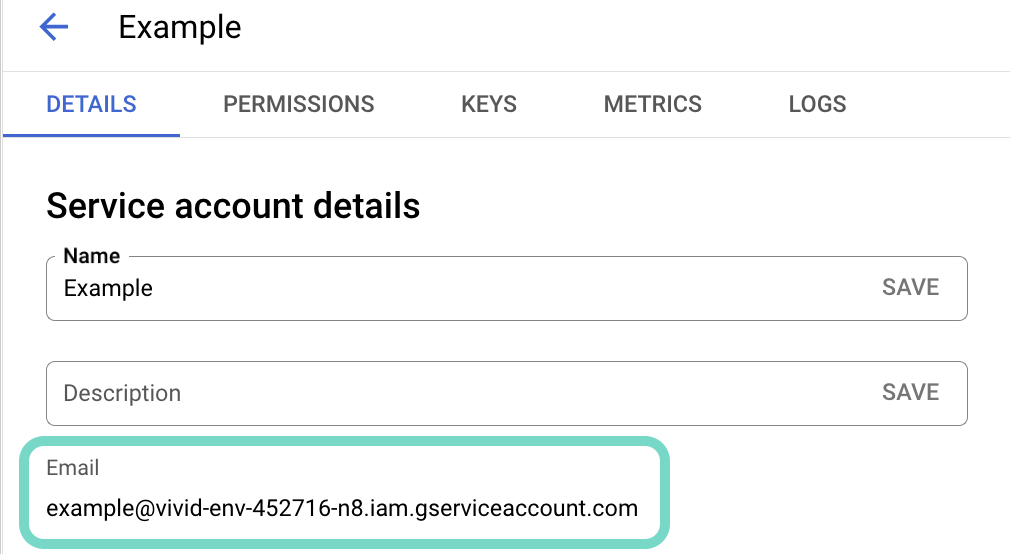 Copy the account's Email.
Go to the KEYS tab.
Generate a private key and download it in JSON format. You can only download the key once.
Open the JSON file, then copy the entire private key from -----BEGIN PRIVATE KEY----- to -----END PRIVATE KEY-----\n (inclusive) and save it to configure your connection later.
Connect to Google Workspace with a service account
View Google Workspace service account connection steps
Service account authentication requires the following prerequisites:
Click Create > Connection or press C twice.
Search for and select Google Workspace as your connection.
Provide a unique name for the connection in the Connection name field.
Use the Location drop-down menu to select the project where you plan to store the connection.
Use the Authentication type drop-down menu to select Service account.
Enter the service account's email address in the GCP project service account email field.
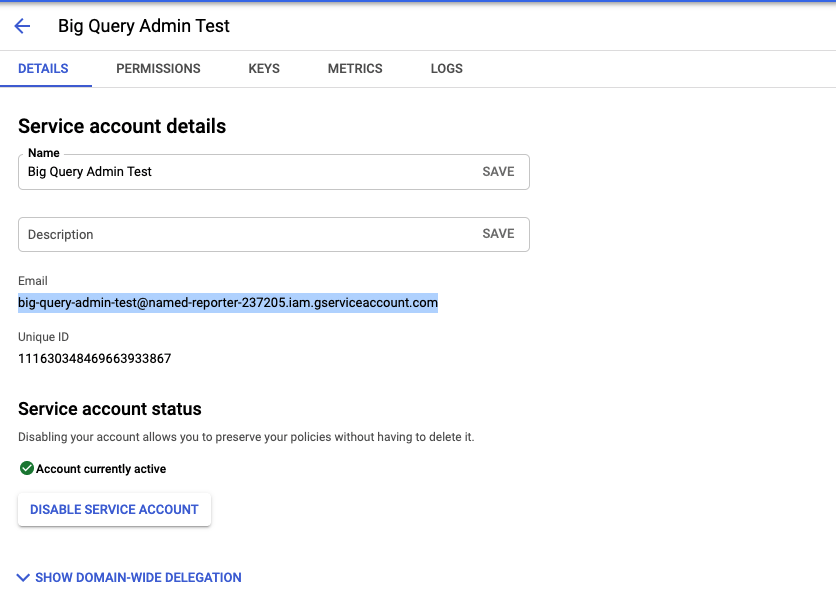 Retrieve your GCP Project service account email
Enter the Private key and User email. Retrieve the private key from the downloadable JSON. Include both the -----BEGIN PRIVATE KEY----- to -----END PRIVATE KEY-----\n.
Click Sign in with Google.
Workbot for Slack connection setup steps
View Workbot for Slack connection setup steps
Workbot for Slack posts the approval card with Approve and Deny buttons to the configured approver, using Slack's block kit for the interactive elements. Refer to Set up Workbot for Slack for the full setup guide, including the Slack app scopes, event subscriptions, and channel invitations Workbot needs before you create this connection.
Create a Workbot for Slack connection.
Create a Workbot for Slack connection
This step creates a connection between Workato and your Workbot for Slack account.
Click Create > Connection or press C twice.
Search for and select Workbot for Slack on the New connection page.
Provide a name for your connection in the Name field.
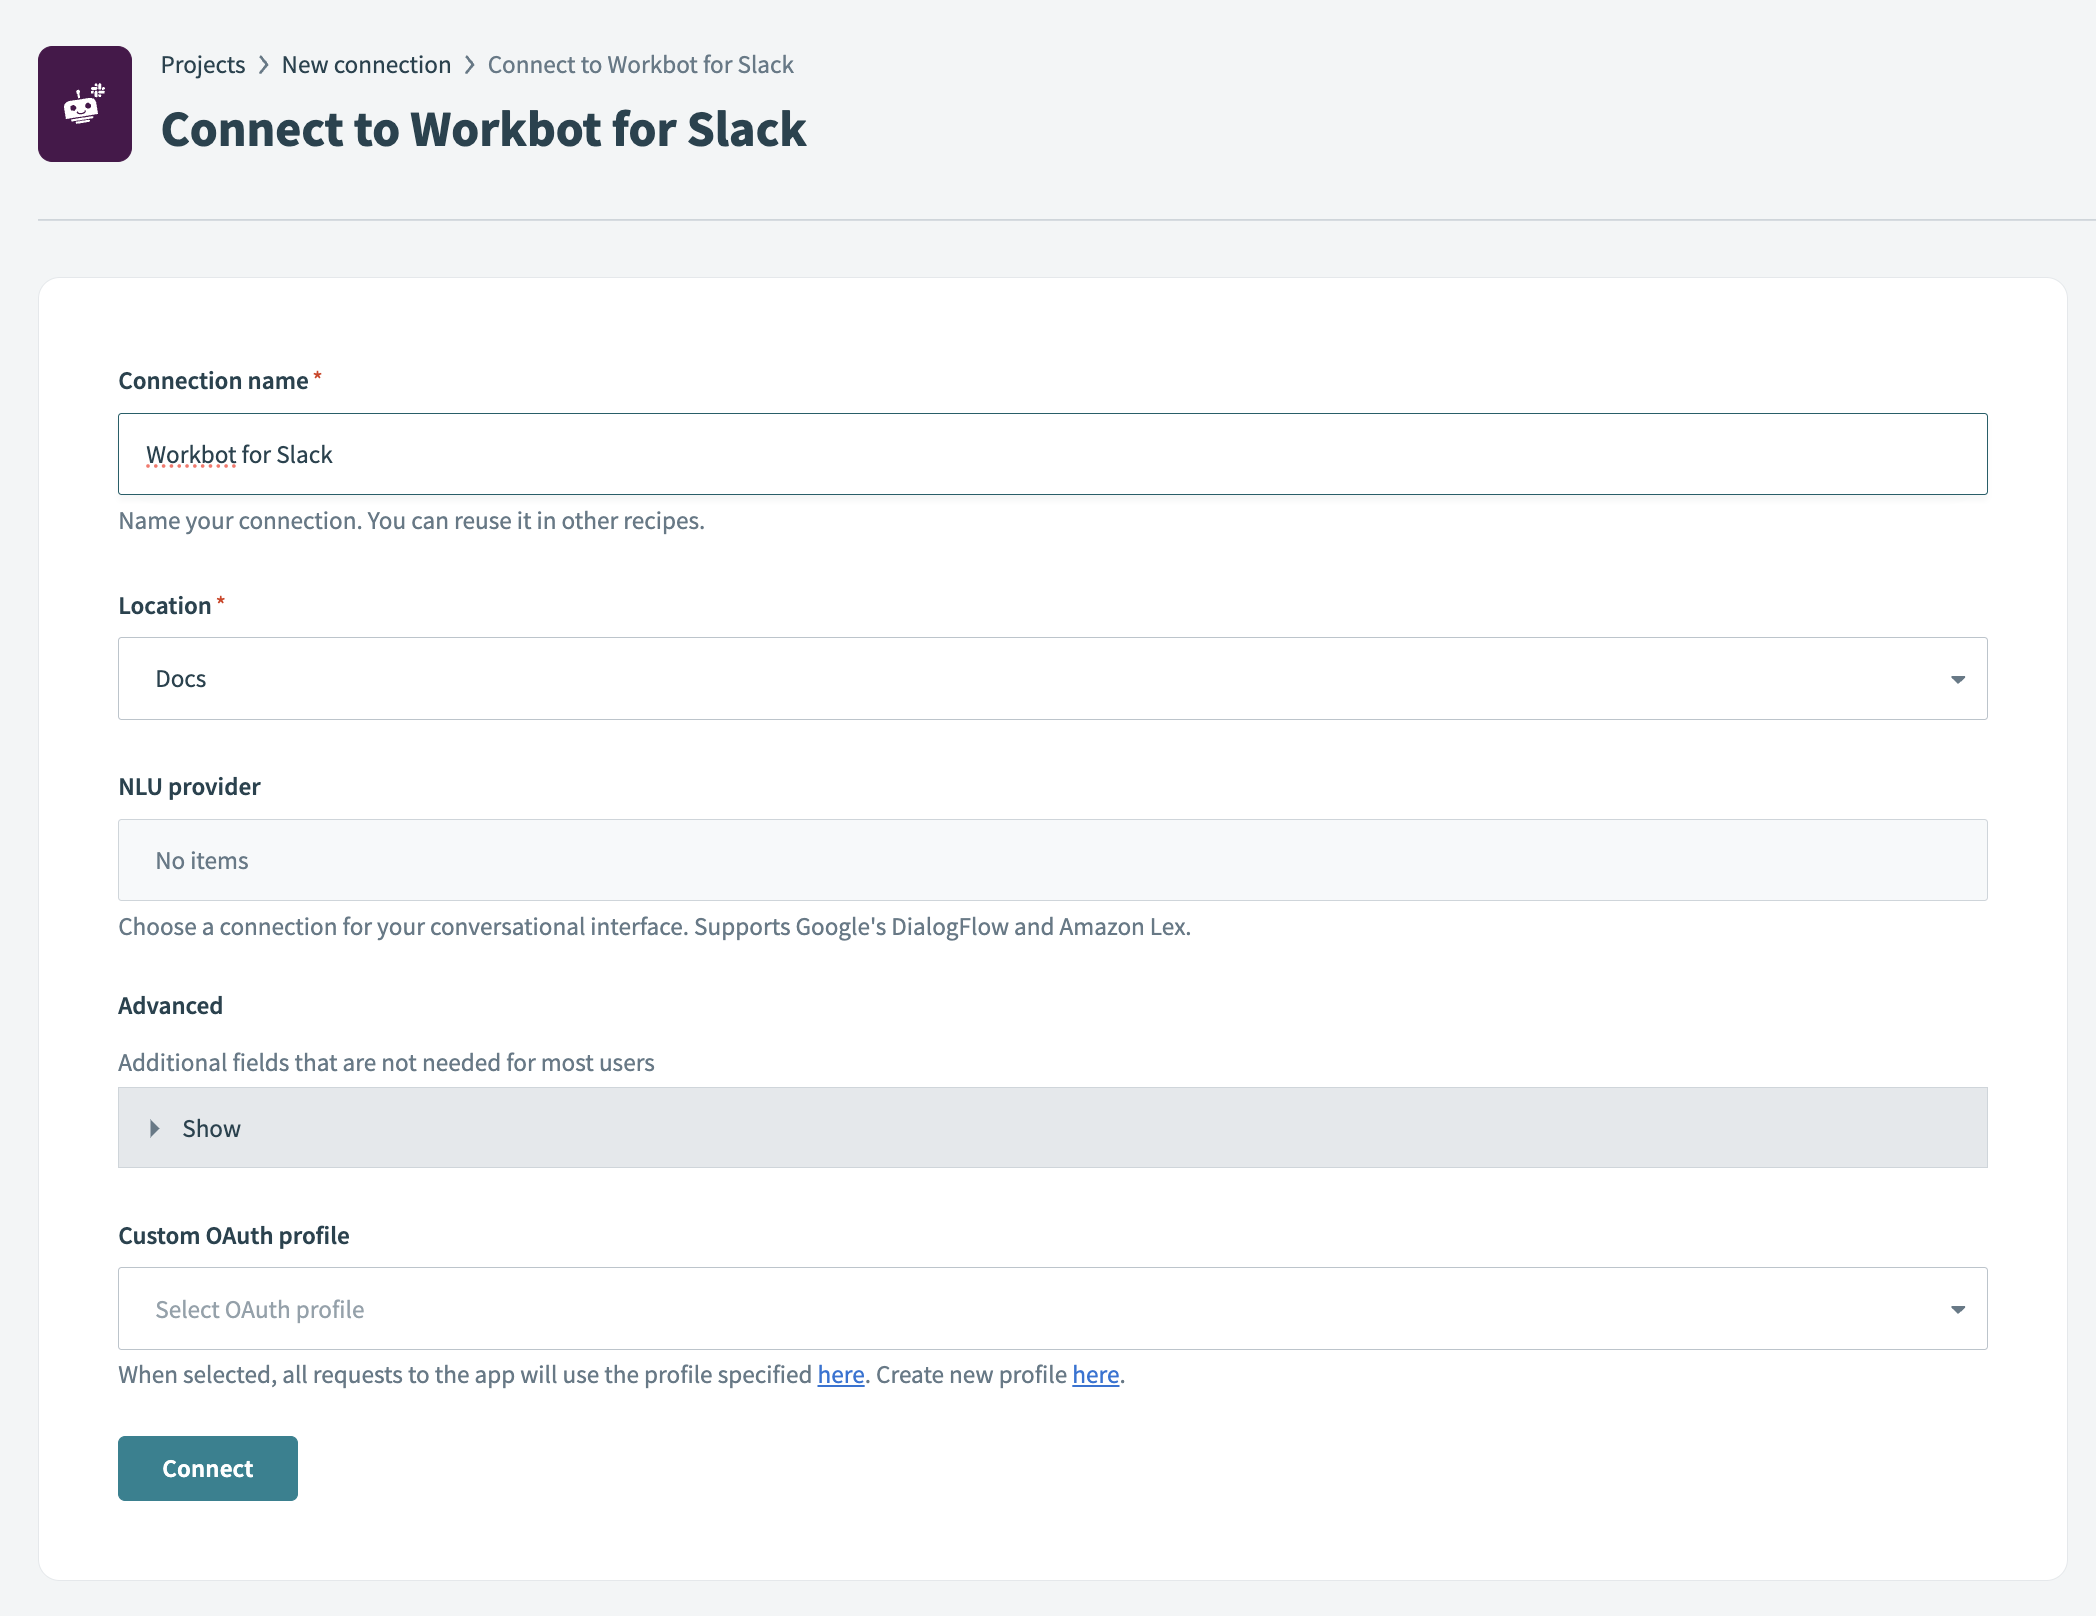 Workbot for Slack connection setup
Use the Location drop-down menu to select the project where you plan to store the connection.
Optional. Select the NLU provider you plan to use, such as DialogFlow or Amazon Lex NLU. You must connect to the NLU provider for it to appear in the drop-down menu.
Optional. Click Advanced to configure Slash commands verification tokens, custom help content, your Slack app status (classic or not), and your Custom OAuth profile.
Click Connect, sign in to your Slack workspace when prompted, and click Continue to verify the connection.
Project property configuration
The Access Provisioning MCP server supports the following project-level properties to control behavior and defaults:
| Project-level property | Description |
|---|---|
deployment.enabled_systems | Choose which identity systems this deployment provisions app access against. Select okta, google, or both. |
deployment.group_directory_enabled | Configure whether this deployment exposes the Google Group membership tools (add_user_to_group, remove_user_from_group, list_group_members). Defaults to true if a Google Workspace connection exists. |
approval.app_sensitivity_tiers | Map each application to a sensitivity tier (tier1, tier2, or tier3) that determines whether provision_app_access requires human approval. Defaults to tier2 for unmapped apps. |
approval.group_sensitivity_tiers | Map each Google Group to a sensitivity tier that determines whether add_user_to_group and remove_user_from_group require human approval. Defaults to tier2. |
approval.per_app_approver_map / approval.per_group_approver_map | Map specific applications or groups to an approver identity. Defaults to approval.default_approver. |
approval.default_approver | Enter the default approver email or Slack handle for any application or group without a specific mapping. |
approval.escalation_timers_hours | Enter the number of hours before a pending approval sends a reminder, escalates to a secondary approver, or automatically denies the request. Defaults to 24 for reminders, 48 for escalations, and 72 for automatic denials. |
system_auto_detection.map | Map each application name to the identity system (okta or google) it resolves to. The server uses this mapping whenever provision_app_access doesn't name a system explicitly. |
audit.log_retention_days | Enter how many days to retain records in the Request Lifecycle Table. Defaults to 365. |
server_limits.max_justification_chars | Enter the maximum number of characters a justification or reason field accepts. Defaults to 500. |
server_limits.rate_limit_calls_per_minute | Enter the maximum number of calls this deployment can make each minute, per calling AI client. Defaults to 20. |
View project-level property configuration steps
Complete the following steps to configure your project-level properties:
Sign in to your Workato account and go to Projects.
Go to the project that contains your MCP server.
Click the Settings tab.
 Click the Settings tab.
Select Project properties.
Go to the project property you plan to update and click the Edit (pencil) icon.
Go to the Value field and make your changes. For example, set deployment.group_directory_enabled to false or audit.log_retention_days to 90.
How to use Access Provisioning MCP server tools
Refer to the following sections for detailed information on available tools.
provision_app_access tool
The provision_app_access tool requests application access for an employee with the business reason you specify, then routes the request for approval. Your LLM uses this tool when you ask for access to an app. The tool resolves the identity system automatically if you don't specify one. It doesn't grant access itself; approval and provisioning happen separately.
Try asking:
Can you get me access to Salesforce?I need Tableau access for the Q3 close.Get me access to Workday.I need access to NetSuite for the finance close.
get_request_status tool
The get_request_status tool looks up an access request by request_id and returns its approval and provisioning status. Your LLM uses this tool when you ask about a request you already submitted.
Try asking:
What happened to my Workday request from Tuesday?Is req_a1b2c3 done yet?Check the status of my Salesforce request.
add_user_to_group tool
The add_user_to_group tool adds an employee to a Google Workspace group. Your LLM uses this tool when you ask to join a group.
Try asking:
Add me to the Marketing Google Group.I need to join the eng-oncall group.Request access to the finance-reports distribution list.
remove_user_from_group tool
The remove_user_from_group tool removes an employee from a Google Workspace group. Your LLM uses this tool when you ask to leave a group.
Try asking:
Remove me from the eng-oncall group.Take me off the Marketing Google Group.I'd like to leave the finance-reports distribution list.
list_group_members tool
The list_group_members tool lists current members of a Google Workspace group. Your LLM uses this tool when you ask who is in a specific group. This tool is read-only.
Try asking:
Who's in the eng-oncall group?Show me the members of the Marketing Google Group.Is Dana in the finance-reports distribution list?
Getting started
View and manage your MCP server tools in the Overview page Tools section. Tool management provides the following capabilities:
TOOLS MUST BE STARTED
Your LLM can only access active tools in your MCP server connector.
Last updated: