Employee Offboarding Process MCP server
The Employee Offboarding Process MCP server enables LLMs to interact with Workday, Okta, Google Workspace, Slack, Zoom, ServiceNow, Salesforce, and GitHub for cross-system access revocation when an employee leaves your organization, through natural conversation. It provides tools to resolve the departing employee, preview the full revocation plan, execute the plan after explicit confirmation, track per-system progress, retry failed steps, and cancel work that's still in progress.
Uses
Use the Employee Offboarding Process MCP server to perform the following actions:
- Resolve a departing employee by name, work email, or Worker ID and review their pending Workday termination events
- Preview the full cross-system revocation plan bound to an approved Workday termination event, without committing changes
- Revoke Okta sessions and OAuth tokens, then suspend the Okta account
- Suspend the employee's Google Workspace account through the Directory
- Deactivate the employee's Slack and Zoom accounts, and Salesforce and GitHub when your deployment enables them
- Create ServiceNow tickets for the work outside automated scope, including device return, mail-forwarding follow-up, and personal access token audits
- Flag the Workday termination event for final payroll and notify the departing employee's manager
- Schedule revocation for a future access cutoff during a notice period, or revoke immediately for an involuntary termination
- Track per-system progress, retry failed non-critical steps, and cancel scheduled or in-progress offboardings
Additionally, use the server's built-in Employee Offboarding Process MCP apps to review a plan before you confirm it and to track execution afterward.
Example prompts
Use the following example prompts to invoke Employee Offboarding Process MCP server tools:
Offboard Dan Chen. The approved Workday termination event is TERM-4821.Look up Ariel Miller's pending termination events.Offboard this employee immediately. The termination is effective today.Show me the revocation plan before anything gets cut.What's the status of offboarding off_a1b2c3?Which systems failed on Jade's offboarding?Retry the Zoom deactivation step.Cancel the scheduled offboarding for Worker 100294.Show me every offboarding in flight.List the offboardings I started in the last two weeks.
Employee Offboarding Process MCP server tools
The Employee Offboarding Process MCP server provides the following tools:
| Tool | Description |
|---|---|
| find_employee | Resolves an employee from a name, email, or Worker ID and returns their identity, manager, and pending Workday termination events. |
| execute_offboarding | Returns a revocation plan with a plan_id when confirm is false, and executes that specific plan when confirm is true. |
| get_offboarding_status | Returns per-system status for an offboarding, including criticality and retry availability. |
| retry_offboarding_step | Retries a single failed step after a preview, without re-running earlier or later steps. |
| cancel_offboarding | Cancels an offboarding according to its current state, without reactivating any suspended account. |
| list_offboardings | Lists offboardings by status, initiator, employee, or date range. |
EVERY COMMIT NEEDS ITS OWN APPROVAL
execute_offboarding, retry_offboarding_step, and cancel_offboarding each run in two stages. Your LLM calls the tool with confirm set to false to return a preview, then calls it again with confirm set to true only after you explicitly approve that preview.
Approval never carries over. A confirm=true call is bound to the plan_id from the preview that immediately precedes it, and the server rejects a plan that has expired or whose underlying state has moved.
Install the Employee Offboarding Process MCP server
Complete the following steps to install a prebuilt MCP server to your project:
Sign in to your Workato account.
Go to AI Hub > Enterprise MCP.
Click + Create MCP server.
Go to the Start with pre-built MCP Servers using your connected apps section and select the prebuilt MCP server you plan to use.
Click Use this server.
Provide a name for your MCP server in the Server name field.
Use the Location drop-down menu to select the project for the MCP server.
Go to the Connections section and connect to your app account.
Select the connection type you plan to use for the MCP server template.
- User's connection: MCP server tools perform actions based on the identity and permissions of the user who connects to the application. Users authenticate with their own credentials to execute the skill.
- Your connection: This option uses the connection established by the recipe builder and follows the same principles as normal app connections.
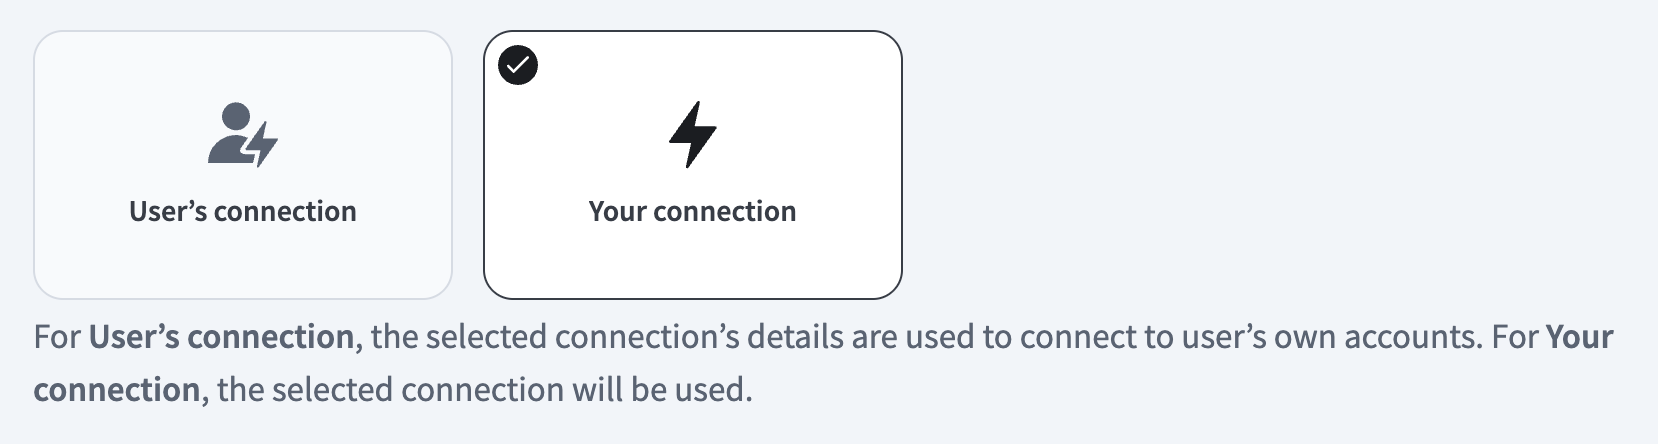 Select your connection type
VERIFIED USER ACCESS AUTHENTICATION REQUIREMENTS
Only app connections that use OAuth 2.0 authorization code grant are available for user's connection. Refer to Verified user access for more information.
Complete the app-specific connection setup steps in the following section.
Employee Offboarding Process connection setup
Configure the following connections to set up the Employee Offboarding Process MCP server:
- Workday: Required. Supplies the approved termination event and receives the final payroll flag.
- Okta: Required. Revokes sessions and OAuth tokens, then suspends the account.
- Google Workspace: Required. Suspends the employee's Directory user.
- Slack: Required. Resets sessions and deactivates the user.
- Zoom: Required. Deactivates the user.
- ServiceNow: Required. Creates the device-return, mail-forwarding, and token-audit tickets, and records the manager notification.
- Salesforce: Required.
- GitHub: Required.
OKTA SSO IS A DEPLOYMENT PREREQUISITE
Enforce Okta SSO on every SaaS application you plan to use before you deploy this MCP server. The MCP server doesn't check for SSO enforcement at runtime.
Employee Offboarding Process role requirements
Each tool's availability depends on the permissions of the connected account. Calling a tool without the required permission returns a permission_denied outcome rather than a partial result.
The MCP server separates the two identities on every audit record. The authenticated caller is recorded as initiating_actor and must hold the HR offboarding permission. The per-deployment service credential that performs each downstream administrative operation is recorded as execution_identity. HR business partners never hold the service credentials.
Workday: Requires an integration user with permission to read the termination event and to run the business process action you name in
workday.payroll_flag_action.Okta: Requires an admin API token with session management, token management, and user lifecycle management scopes.
Google Workspace: Requires a service account with domain-wide delegation and the
admin.directory.userscope, granted to an account holding the User Management admin role. Gmail API access isn't required, because the server only suspends the Directory user.Slack: Requires a Business+ or Enterprise plan for SCIM deactivation. The individual session-reset method requires Enterprise.
Zoom: Requires a Business plan or above.
ServiceNow: Requires write scope on the incident and request tables you configure.
Salesforce: Requires Enterprise Edition or above and the Manage Users permission.
GitHub: Requires GitHub Enterprise Cloud, with either SCIM provisioning through Enterprise Managed Users (EMU) or SAML SSO on member accounts.
Workday connection setup steps
View Workday REST connection setup steps
The Workato Workday connector is categorized into three distinct types: the main Workday connector, the Workday Web Services connector, and the Workday REST connector. Each type follows a similar authentication pattern but differs slightly in support capabilities and functionalities.
Workday doesn't support outbound webhooks, so the Workato Workday connector consumes termination events by polling, on a five to fifteen minute interval by default. This sets a threshold on how quickly a newly approved event becomes visible to find_employee. It doesn't affect the offboarding itself, which you initiate once you have the event ID.
The Workday REST API requires authentication through an OAuth client setup.
API CLIENTS FOR INTEGRATION NOT SUPPORTED
Register a standard Workday API client to complete this connection. Workday API clients for Integration aren't supported in the Employee Offboarding Process MCP server.
Register a new API client in Workday
View API client setup steps
The Employee Offboarding Process MCP server authenticates each user individually through their own Workday login. The server doesn't use an Integration System User (ISU) like the Workday connector.
Register a new API client
Complete the following steps to register an API client in Workday REST:
Sign in to your Workday REST account.
Enter Register API Client to locate the Register API Client task.
Enter a name for your API client in the Client Name field.
Go to the Client Grant Type section and select Authorization Code Grant.
Go to the Access Token Type section and select Bearer.
Enter https:www.workato.com/oauth/callback in the Redirection URI field.
Enter 30 in the Refresh Token Timeout (in days) field.
Enter the scopes for the connection in the Scope (Functional Areas) field. Refer to Workday End User MCP server Minimum permissions if you're connecting to the Workday End User MCP server.
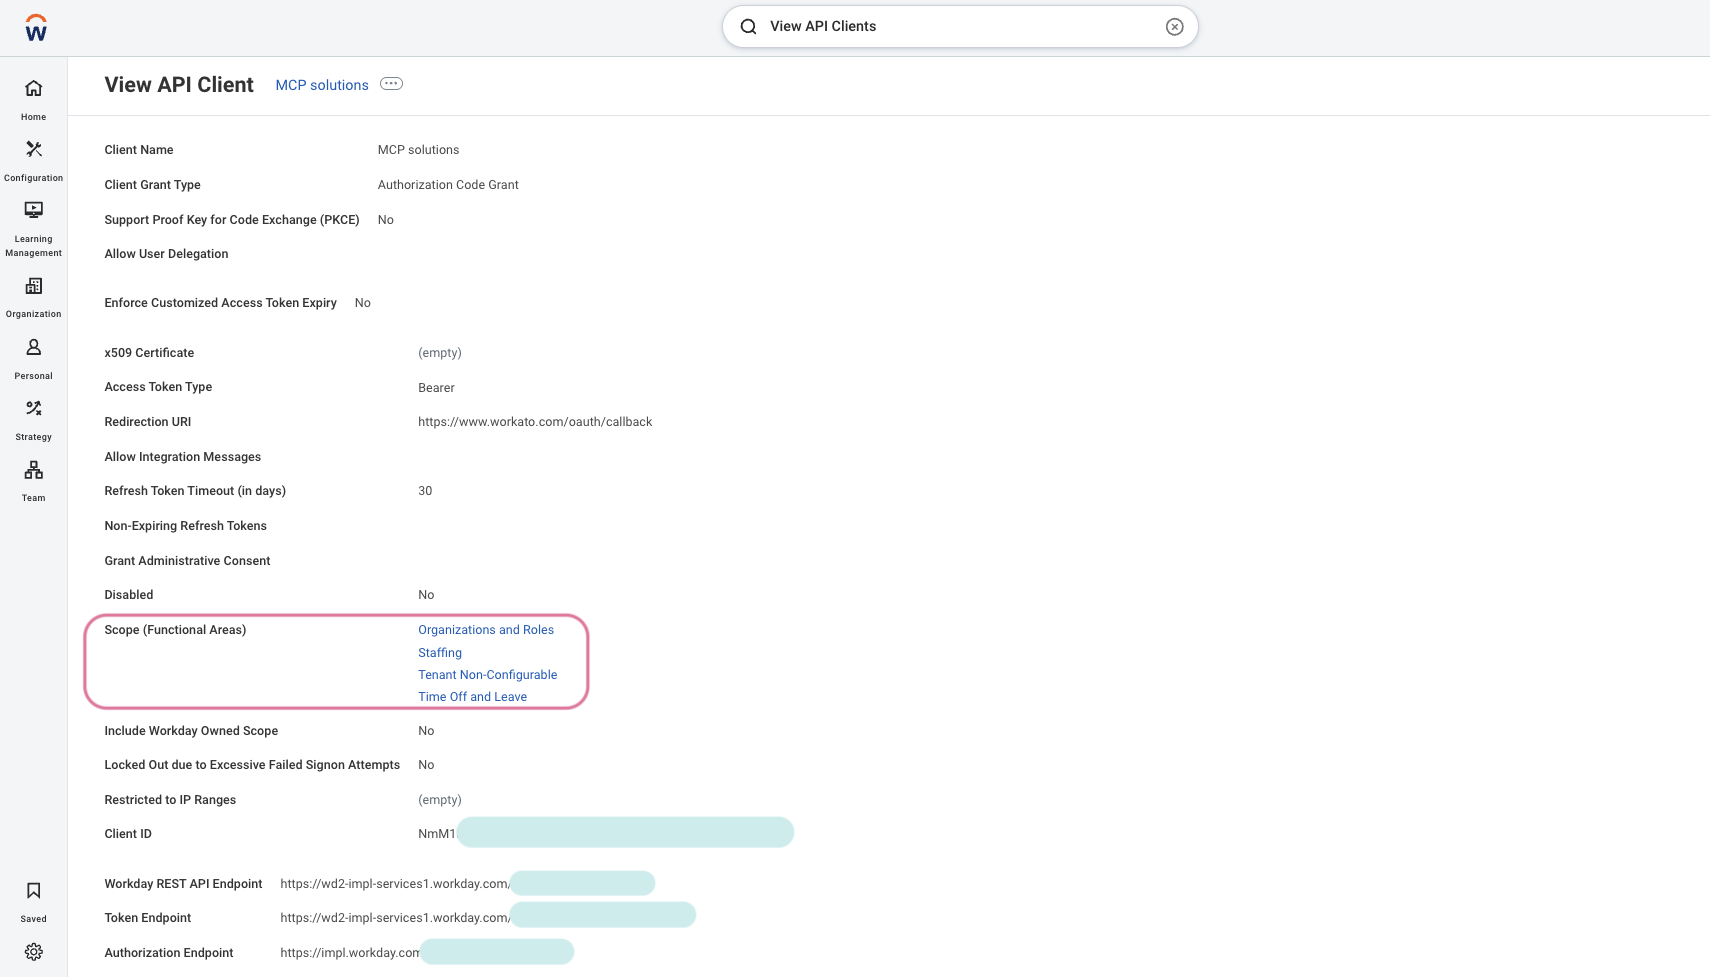 Enter the scopes for the connection in the Scope (Functional Areas) field
Enter your client ID in the Client ID field.
Enter your REST API endpoint in the Workday REST API Endpoint field. You can find this endpoint in your API client details page in Workday. For example: https://wd2-impl-services1.workday.com/xxx/api/v1/example
Enter your token endpoint in the Token Endpoint field. You can find this endpoint in your API client details page in Workday. For example: https://wd2-impl-services1.workday.com/xxx/oauth2/example/token
Enter your authorization endpoint in the Authorization Endpoint field. You can find this endpoint in your API client details page in Workday. For example: https://impl.workday.com/example/authorize
Click Done.
Find your token endpoint URL
Complete the following steps to find your token endpoint URL in Workday:
Enter View API Clients into the search field in Workday.
Access the View API Clients report from the search results.
Save the URLs listed in the Token Endpoint and Authorization Endpoint fields. These URLs are required for the OAuth 2.0 connection.
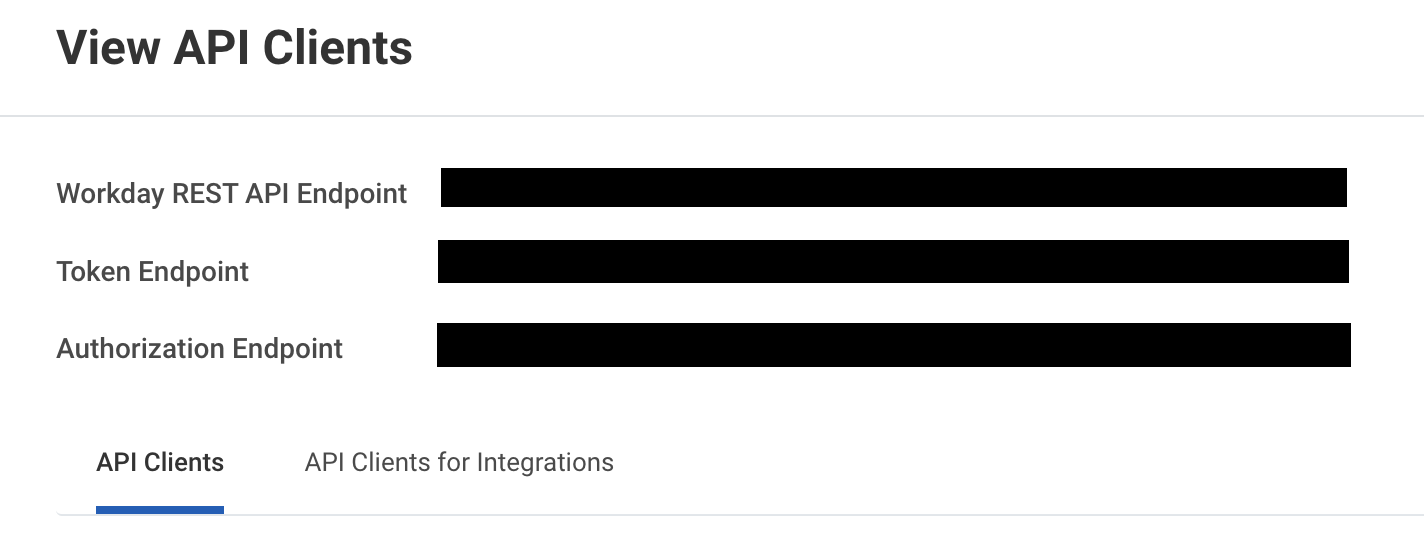 Save the token endpoint and authorization endpoint URLs
Complete setup in Workato
Complete the following steps to configure your Workday connection in Workato using OAuth 2.0 authentication:
View OAuth 2.0 authentication steps
Enter a unique Connection name to identify your Workday account in Workato.
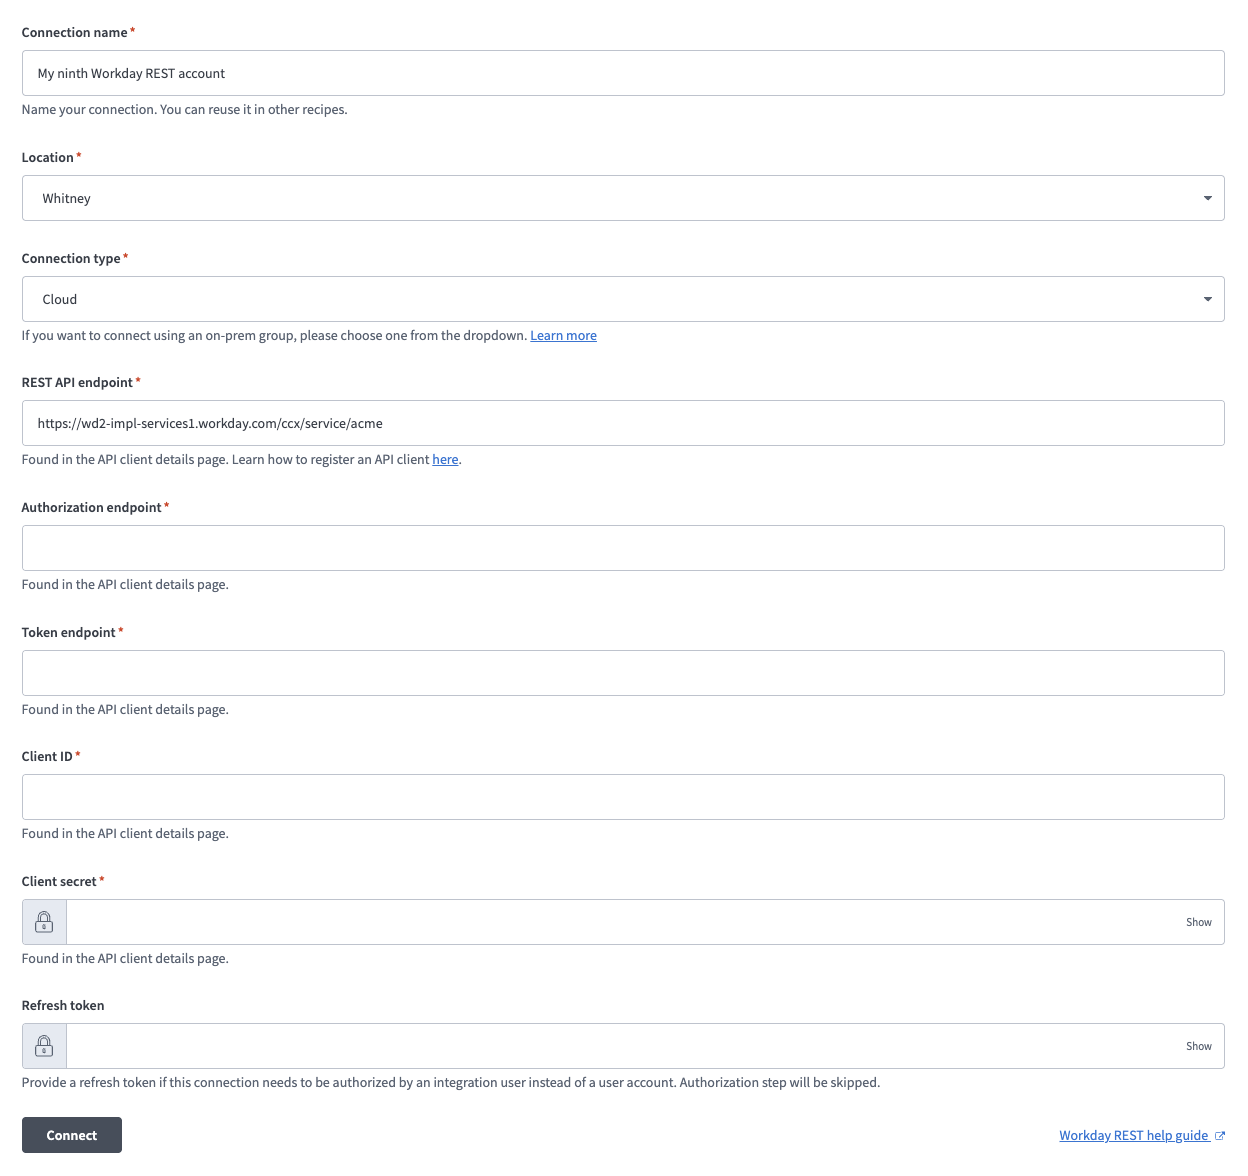 Set up your connection
Use the Location drop-down to select the project or folder to store this connection.
Use the Connection type drop-down menu to select Cloud.
Enter your REST API endpoint in the REST API endpoint field. You can find this endpoint in your API client details page in Workday. For example: https://wd2-impl-services1.workday.com/xxx/api/v1/example
Enter your authorization endpoint in the Authorization endpoint field. You can find this value in your Workday API client details. For example: https://impl.workday.com/example/authorize
Enter your token endpoint in the Token endpoint field. You can find this endpoint in your API client details page in Workday. For example: https://wd2-impl-services1.workday.com/xxx/oauth2/example/token
Enter your client ID in the Client ID field.
Enter your client secret in the Client Secret field.
Enter your refresh token in the Refresh token field.
DON'T PROVIDE A REFRESH TOKEN FOR MCP SERVERS
Don't provide a refresh token if you're connecting Workday to an MCP server.
Click Connect.
Okta connection setup steps
View Okta connection setup steps
This deployment uses Okta's API key authentication method (an Okta API token). The token inherits the permissions of the administrator who generates it, since Okta API tokens don't support granular OAuth scopes the way Okta's authorization code grant and client credentials methods do.
Generate an API key
API KEY PRIVILEGES AND LIMITATIONS
You must have administrator privileges in Okta to create an API key. Ensure that you're logged in as an administrator before you proceed.
Workato requires that the user and API key used in the connection have Organization Administrator or Super Administrator permissions. API keys inherit all permissions from the administrator who created them and can't be restricted to specific resources or operations.
Refer to Create an API token for more information.
Complete the following steps to generate an API key in Okta:
Sign in to Okta.
Go to Security > API > Token.
Click Create token to generate an API key. The key inherits the permissions of the administrator who created it.
Connect to Okta using API key-based authentication
Complete the following steps to create an API key connection to Okta in Workato:
Click Create > Connection or press C twice.
Search for and select Okta as your connection on the New connection page.
Provide a unique name for the connection in the Connection name field.
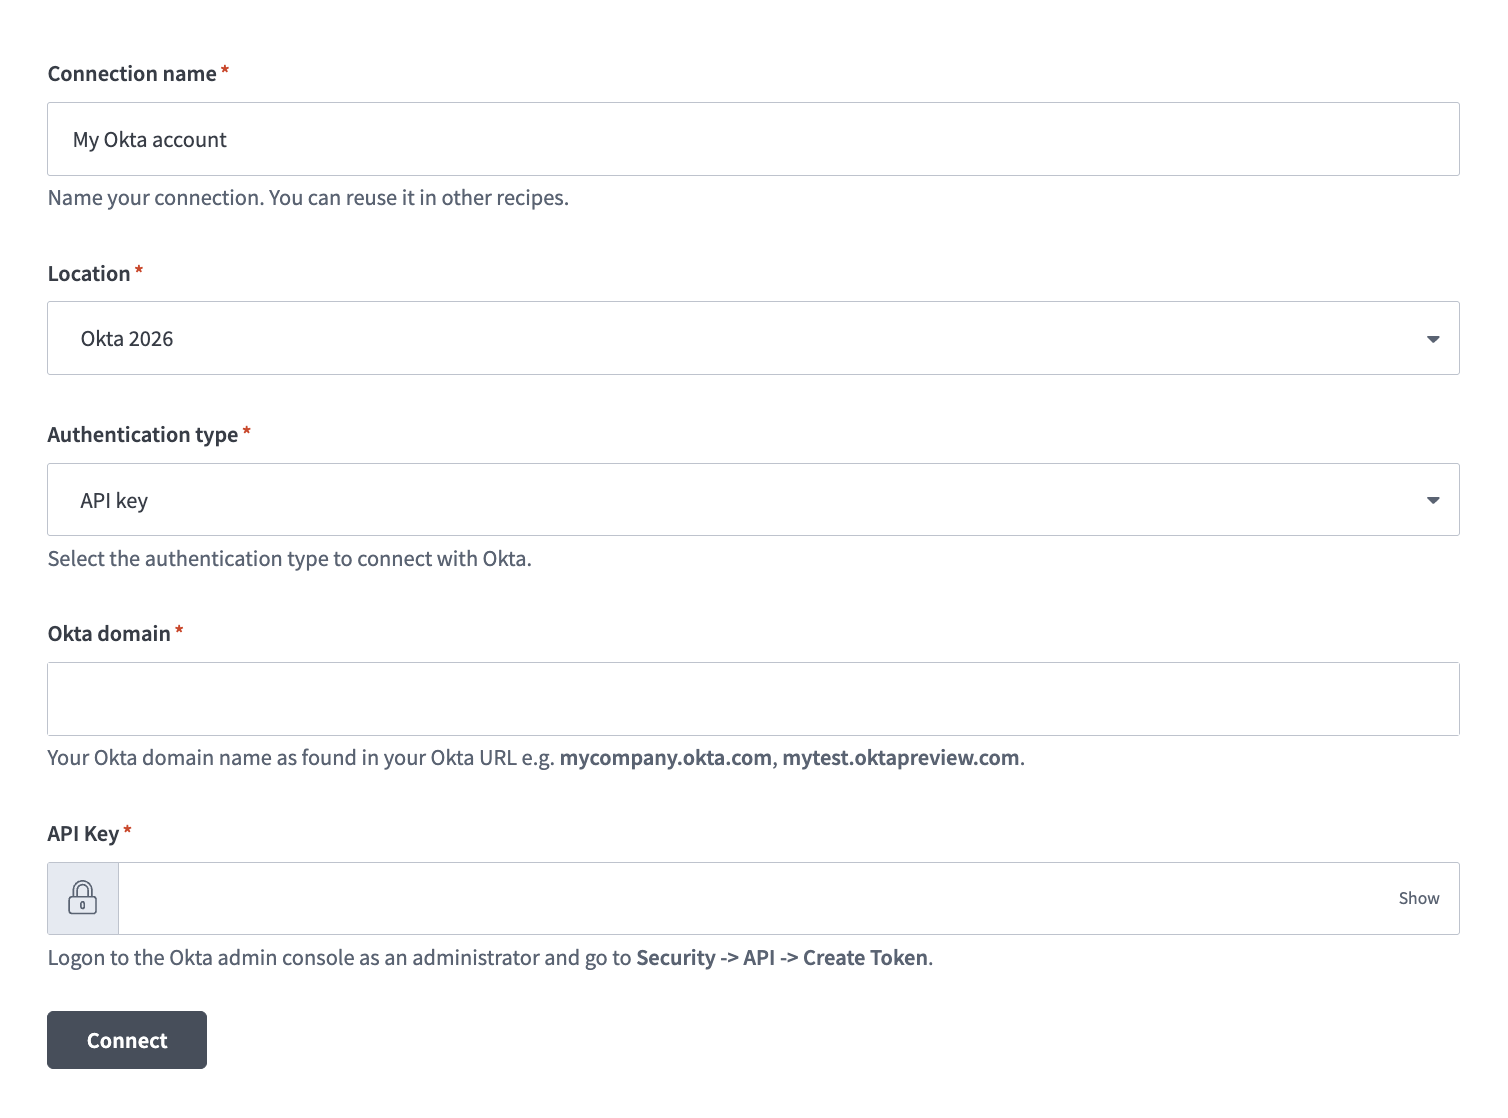 Okta API key connection setup
Use the Authentication type drop-down menu to select API key.
Enter your Okta domain name in the Okta domain field. For example, mycompany.okta.com or mytest.oktapreview.com. Ensure that the domain name you enter doesn't include -admin, such as mycompany-admin.okta.com, as this URL is used to access the Okta admin console from the UI and isn't an OAuth endpoint.
Enter the API key generated in your Okta instance.
Click Connect.
Google Workspace connection setup steps
View Google Workspace connection setup steps
This deployment requires service account authentication. The Google Workspace connector's OAuth 2.0 authentication method ties the connection to one employee's own Google identity, which can't suspend another employee's account.
You must enable the Google Workspace API to complete the connection setup.
REQUIRED SCOPE FOR SERVICE ACCOUNT AUTHENTICATION
Ensure that you have the admin.directory.user scope to successfully suspend Directory users.
The service account impersonates the user based on the email address you provide during the connection setup after authentication is complete.
You must enable the Google Workspace API to complete the connection setup.
REQUIRED SCOPES FOR SERVICE ACCOUNT AUTHENTICATION
Ensure that you have the following required permissions to successfully connect to Google Workspace using a service account:
admin.directory.useradmin.directory.orgunitadmin.directory.domainadmin.directory.groupadmin.directory.group.memberadmin.datatransferadmin.directory.device.mobile.actionadmin.directory.userschemaadmin.reports.audit.readonlyadmin.reports.usage.readonlyadmin.directory.rolemanagementadmin.directory.user.security
The service account impersonates the user based on the email address you provide during the connection setup after authentication is complete.
Complete the following steps to connect to Google Workspace using service account authentication:
Service account authentication requires the following prerequisites:
Click Create > Connection or press C twice.
Search for and select Google Workspace as your connection.
Provide a unique name for the connection in the Connection name field.
Use the Location drop-down menu to select the project where you plan to store the connection.
Use the Authentication type drop-down menu to select Service account.
Enter the service account's email address in the GCP project service account email field.
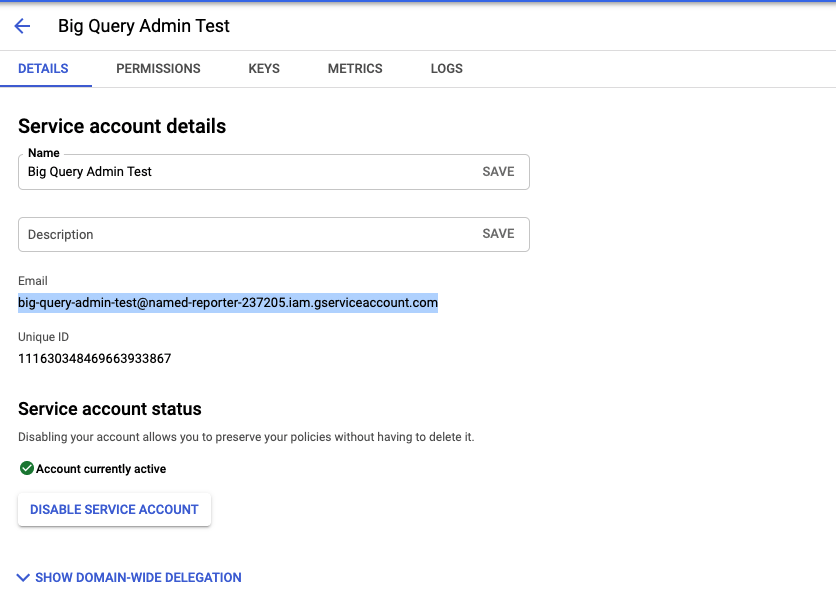 Retrieve your GCP Project service account email
Enter the Private key and User email. Retrieve the private key from the downloadable JSON. Include both the -----BEGIN PRIVATE KEY----- to -----END PRIVATE KEY-----\n.
Click Sign in with Google.
Slack connection setup steps
View Slack connection setup steps
Slack deactivation and session reset each depend on your Slack plan:
| Slack plan | Deactivate through SCIM | Reset sessions |
|---|---|---|
| Enterprise Grid | Supported | Supported |
| Business+ | Supported | Not available |
| Pro and Free | Not available | Not available |
The Slack step returns skipped_plan_unsupported when your plan doesn't support an operation.
You must authorize Workato to access your Slack organization using the OAuth 2.0 standard.
Complete the following steps to connect to Slack in Workato:
Click Create > Connection or press C twice.
Search for Slack and select it as your app.
Enter a name for your connection in the Connection name field.
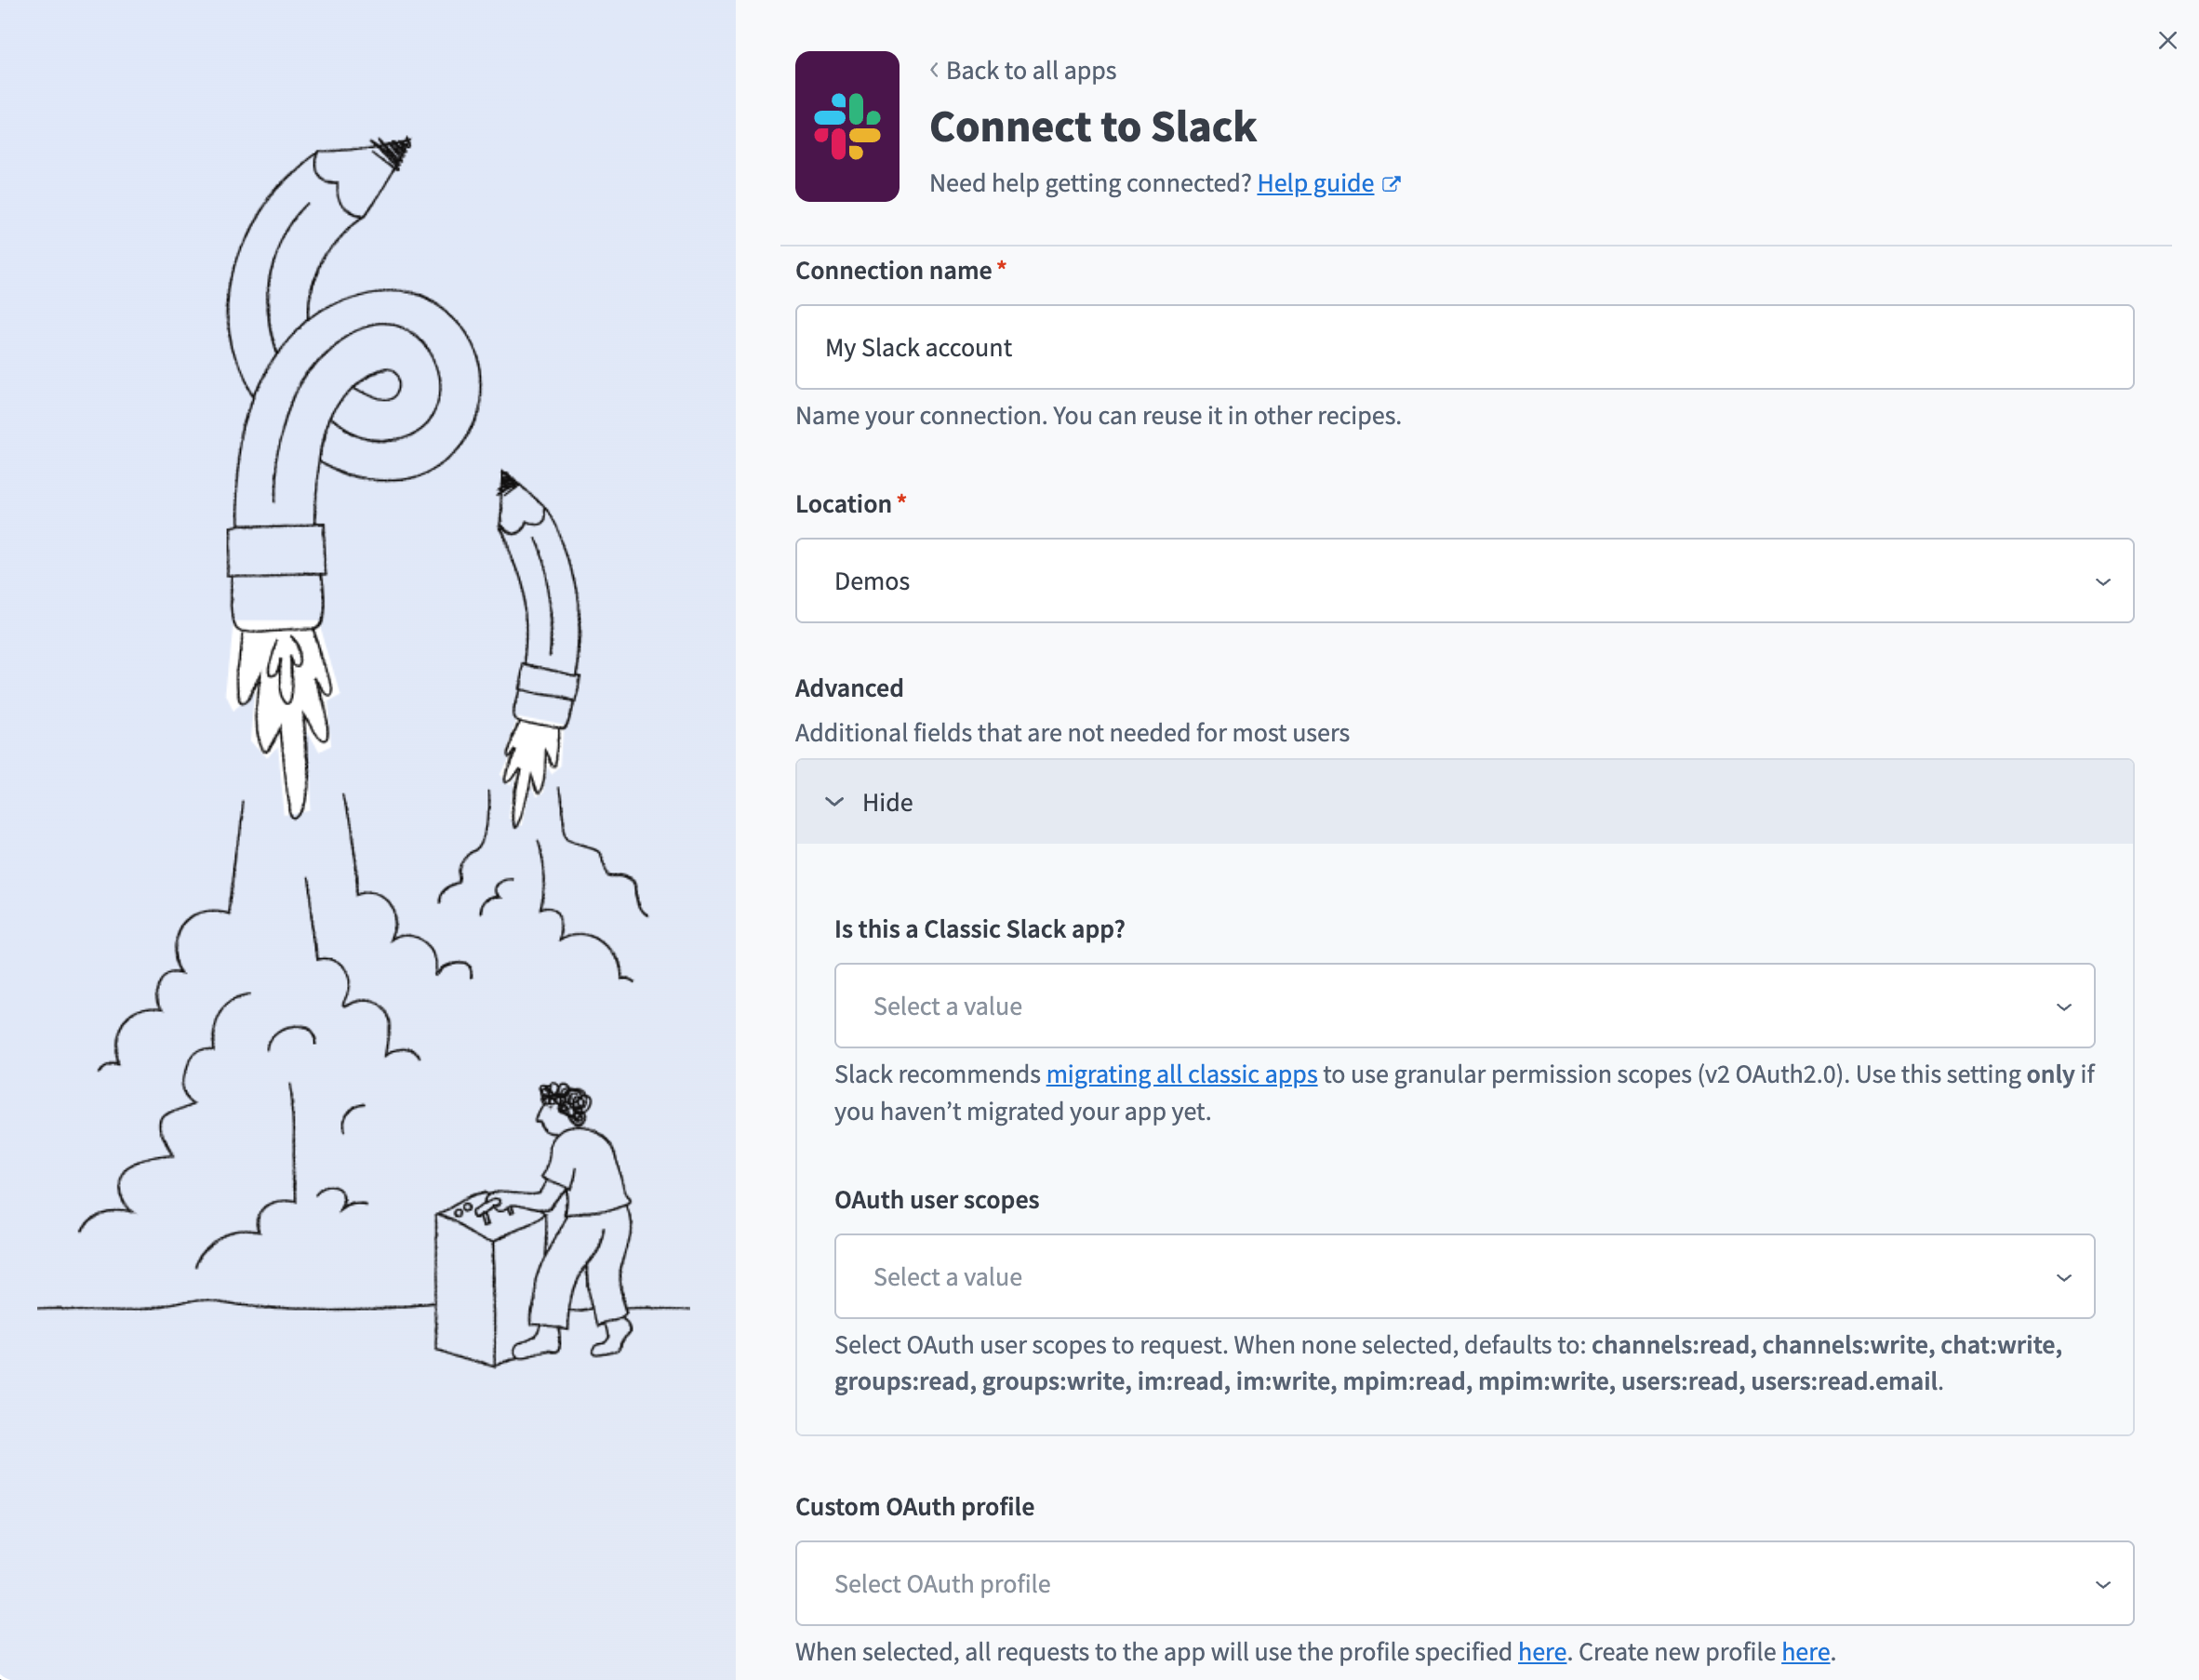 Slack connection
Use the Location drop-down menu to select the project where you plan to store the connection.
Optional. Expand Advanced and use the Is this a Classic Slack app? drop-down menu to select Yes or No. Select Yes only if you haven't migrated your Slack app to granular permission scopes. Refer to Moving to granular permission scopes for more information.
Optional. Use the OAuth user scopes drop-down menu to select the OAuth user scopes to request for your connection. Leave this field empty to request the default scopes.
Optional. Use the Custom OAuth profile drop-down menu to select a custom OAuth profile for your connection. Refer to Custom OAuth profiles for Slack for more information.
Click Connect.
Click Allow to grant Workato permission to access your account.
Zoom connection setup steps
View Zoom connection setup steps
The Zoom connector uses OAuth 2.0 authentication.
Complete the following steps to connect to Zoom in Workato with OAuth 2.0 authentication:
RECOMMENDED SETUP
We recommend that you set up a dedicated API user account in Zoom or create a custom OAuth profile to authorize Workato. This allows you to assign the API user to a role with only the necessary permissions.
Alternatively, you can use an existing Zoom owner or admin account if it has the required permissions. Some admin accounts may have restricted access based on their configuration.
Add an API user
View add an API user steps
Complete the following steps to set up a provisioned API user for Workato:
Sign into your Zoom account.
Go to Admin > User Management > Users.
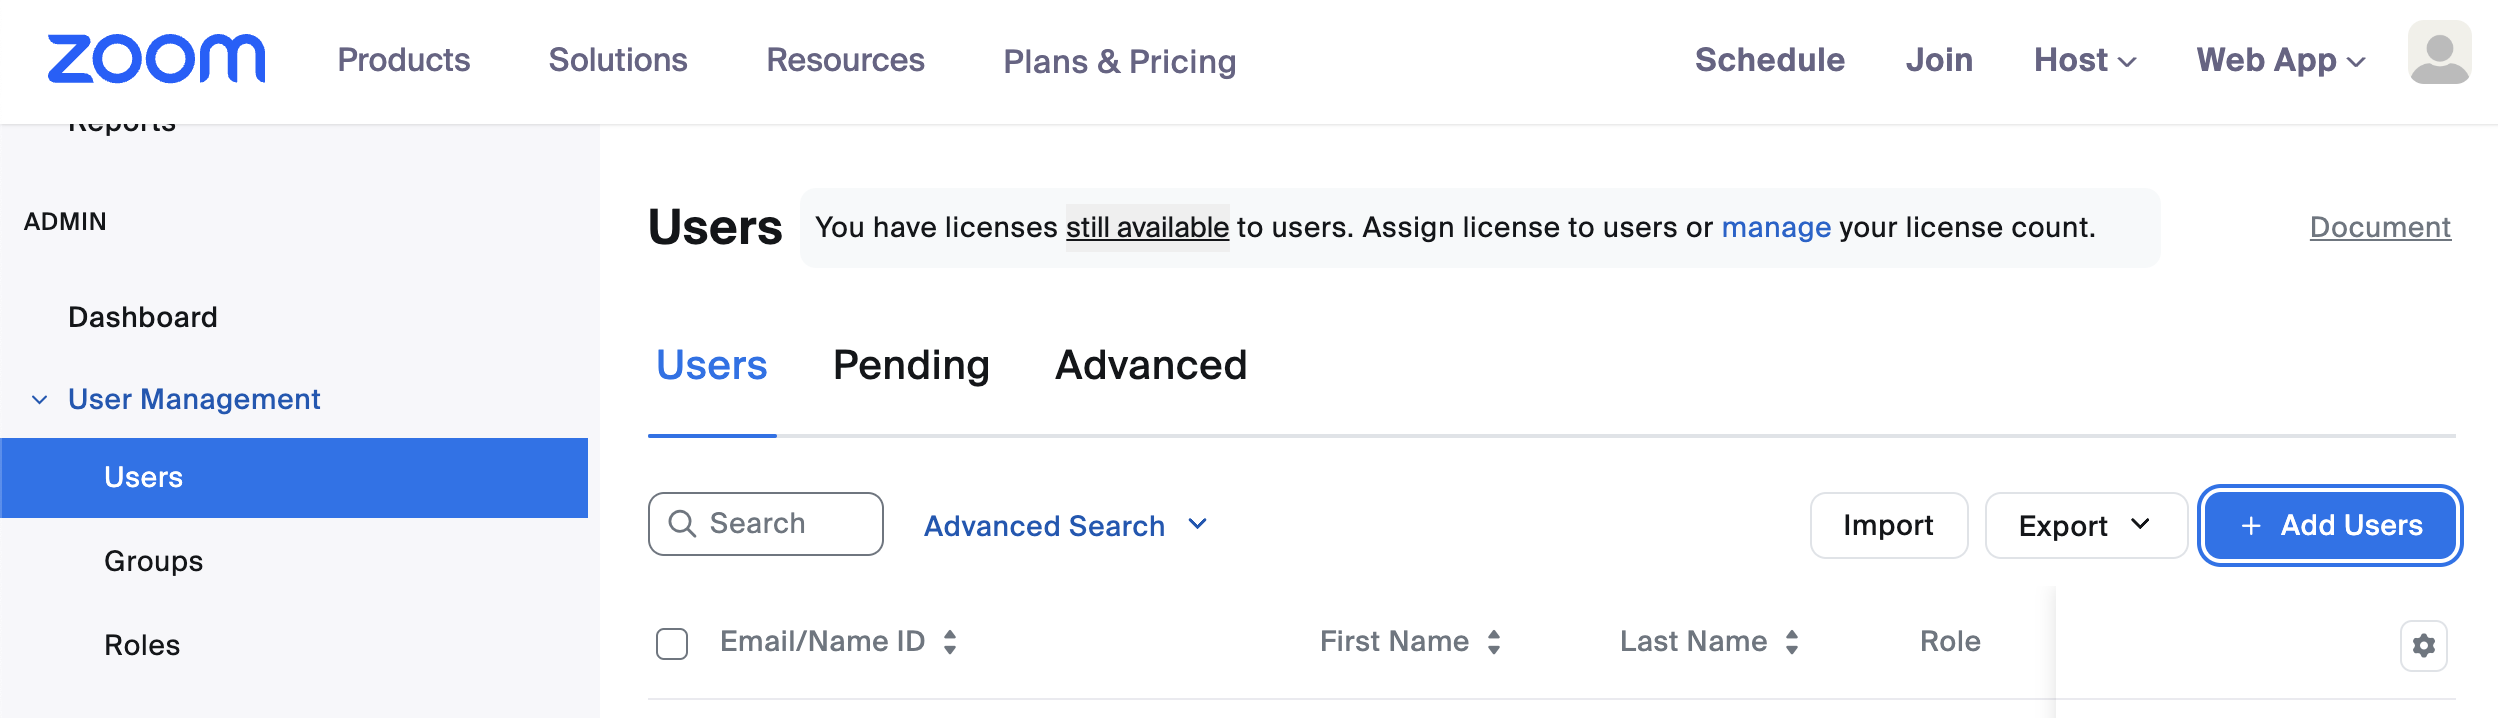 Add users
Click Add Users.
Enter an appropriate email for the API user. We recommend an IT admin alias.
Enter N/A or make selections based on your requirements for the following fields: Department, Manager, Job Title, Location, and User Groups.
Click Add.
Go to Admin > Roles.
Select Add Role.
Provide a Role Name and Description.
Click Add.
Go to Roles > Roles Settings and add the following permissions to your Zoom role. Role permissions are required to allow the Workato Zoom connector to perform account-level actions, such as scheduling meetings or webinars on behalf of other Zoom users.
Users: View and EditRole management: View and EditGroups: View and EditRecording management: View and EditZoom rooms: View and EditMeetings: ViewWebinars: ViewUsage reports: ViewSchedule tracking fields: View and Edit
Click Save Changes.
Go to User Management > Users and locate the user you created in the preceding steps.
Click Edit and use the User Role drop-down menu to select the role you created.
Click Save.
Create a custom OAuth profile
View create a custom OAuth profile steps
Complete the following steps to create a custom OAuth profile for Workato:
Go to Tools > Custom OAuth profiles in Workato.
Click + New custom profile.
Search for Zoom and select it as your app.
Enter a name for your custom OAuth profile in the Name field.
Click Create new app.
Go to the Zoom App Marketplace and sign in to your Zoom account if you're not signed in already.
Click Develop > Build App.
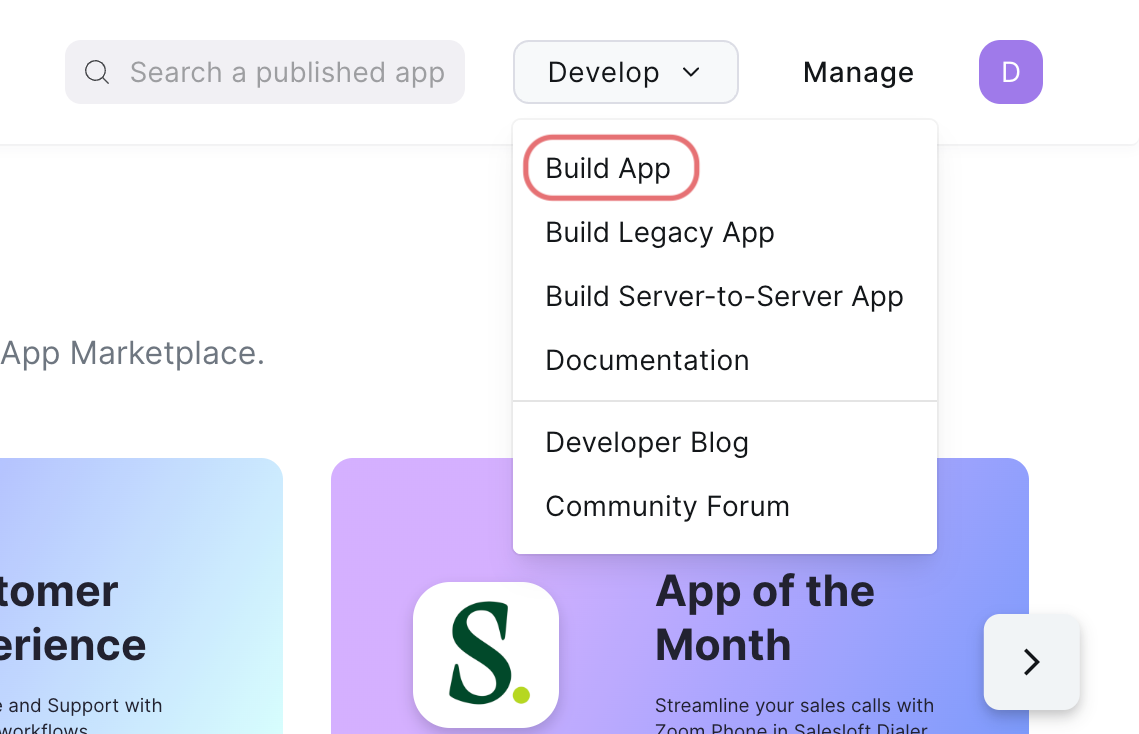 Build app
Choose the kind of app to create from the following options: General App, Server to Server OAuth App, or Webhook Only App. If you can't select the options, you must enable the Zoom for developers role. Refer to the Zoom Select general app features page to learn how to enable the Zoom for developers role.
Click Create.
Enter a name for your app and select how the app is managed. Refer to the Zoom Step 2: Maintain basic information page for more information.
Copy and save the Client ID and Client Secret for use in Workato.
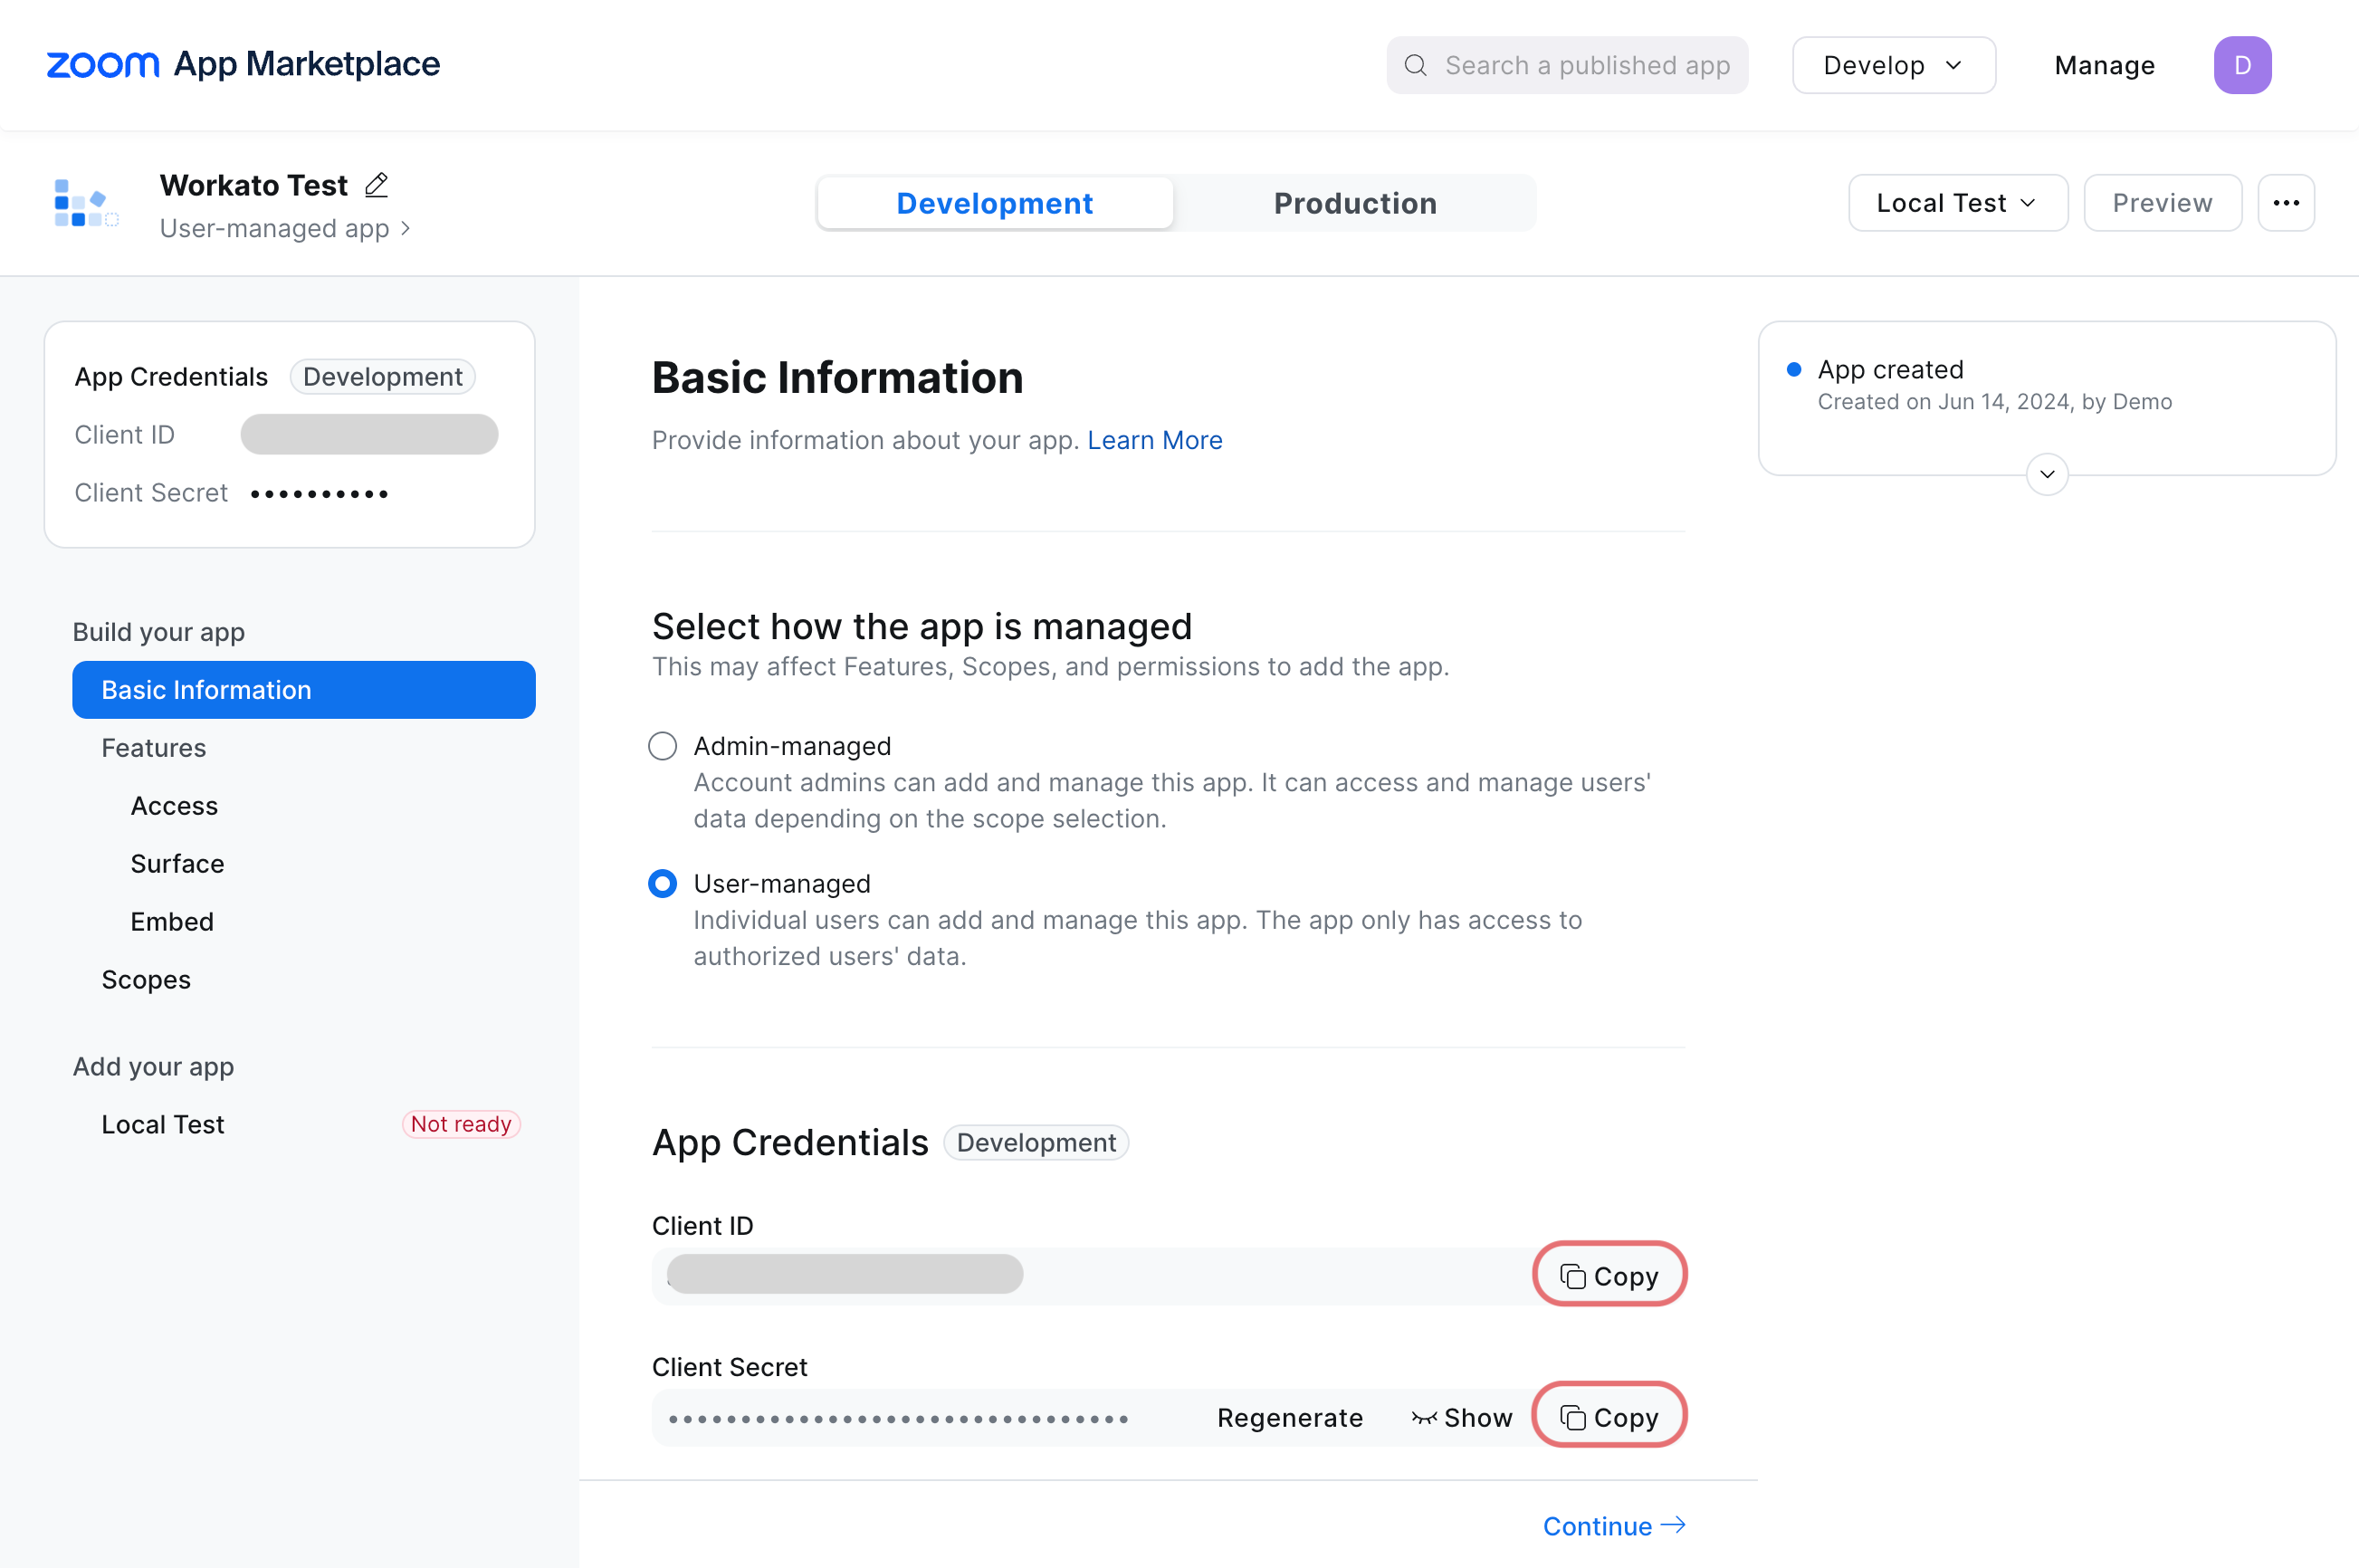 Copy the Client ID and Client Secret
Enter https://www.workato.com/oauth/callback in the OAuth Redirect URL field.
Optional. Configure settings in the Access, Surface, and Embed tabs as required.
Go to Scopes and click + Add Scopes to add the required scopes.
Search for and select the required scopes for your connection.
Click Done.
Go to the Local Test tab and select Preview your app listing page to ensure your settings are properly configured.
Return to the New custom profile page in Workato and paste the Client ID and Client secret into their respective fields.
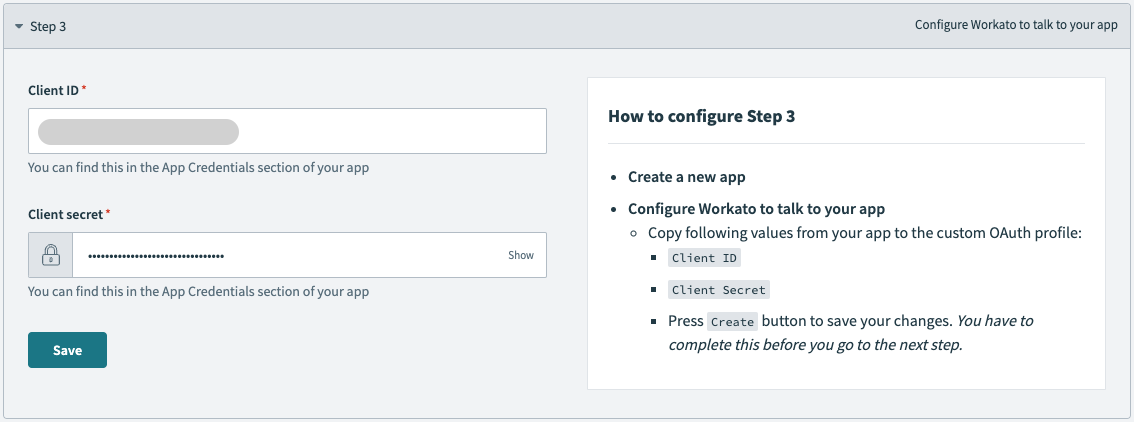 Paste the client ID and client secret
Click Save.
Connect to Zoom with OAuth 2.0 authentication
View connect to Zoom with OAuth 2.0 authentication steps
Complete the following steps to connect to Zoom in Workato:
Click Create > Connection.
Search for Zoom and select it as your app.
Enter a name for your connection in the Connection name field.
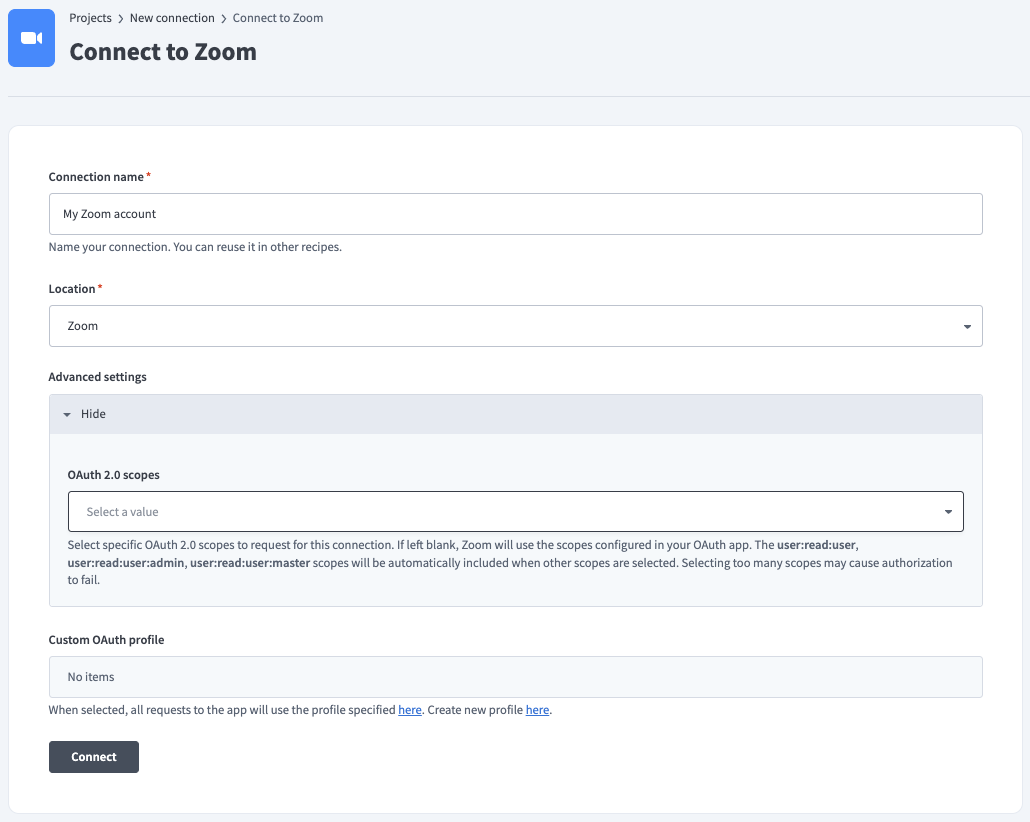 Name your connection
Optional. Expand the Advanced settings section and use the OAuth 2.0 scopes drop-down menu to specify OAuth scopes to request for your connection.
Optional. Use the Custom OAuth profile drop-down menu to select a custom OAuth profile to use for the connection.
Click Connect.
Sign in to your Zoom account.
ServiceNow connection setup steps
View ServiceNow ITSM connection setup steps
The ServiceNow connector supports the following authentication types:
Username and password
View Username and password authentication steps
Select Username/Password authentication type to connect to your ServiceNow instance with your login credentials.
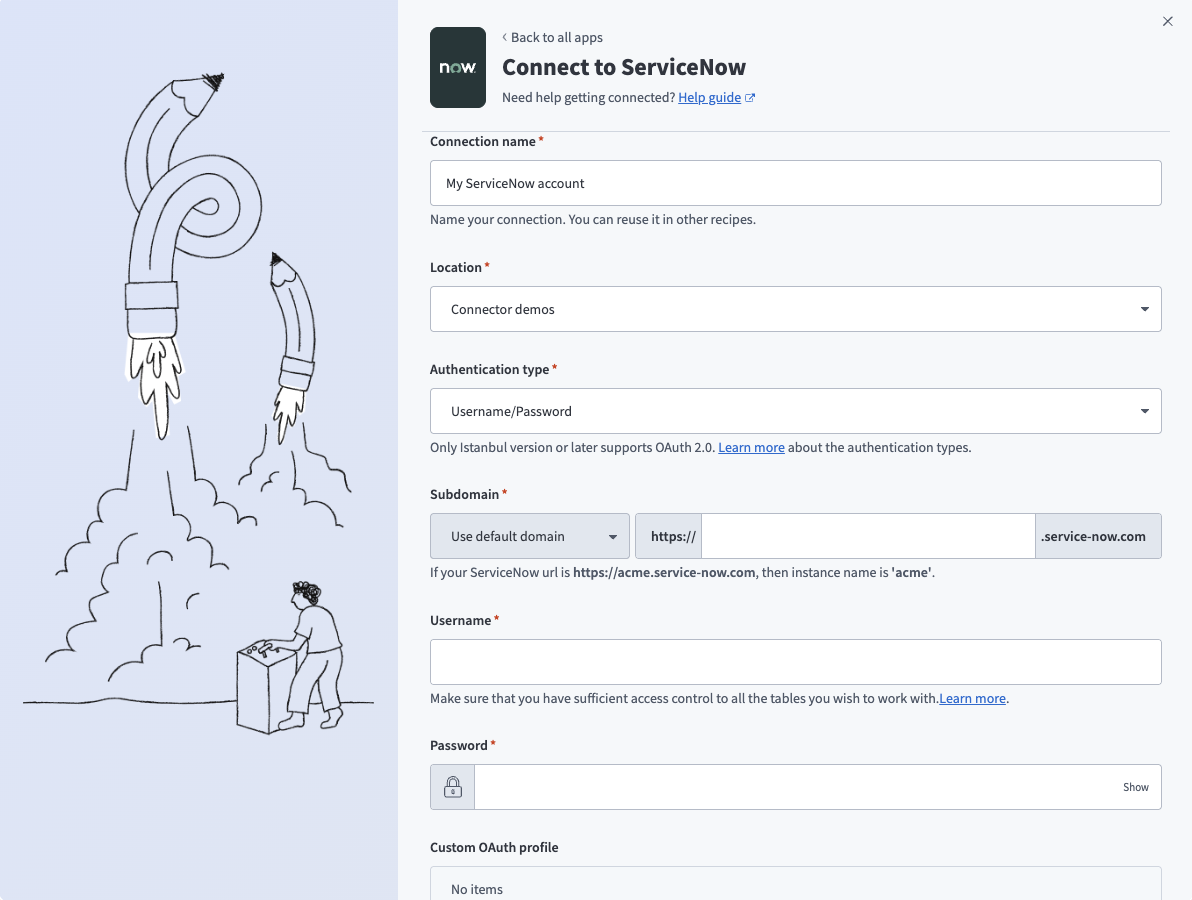 Username/Password connection
| Field | Description |
|---|---|
| Connection name | Enter a unique name that identifies which ServiceNow instance it is connected to. |
| Authentication type | Choose an authentication type for this ServiceNow connection. The ServiceNow connector supports Username/Password (Basic) authentication, OAuth 2.0 using the authorization code grant, and Password grant authentication. |
| Instance name | Provide the name of your instance. For example, if your ServiceNow URL is https://acme.service-now.com, the instance name is acme. |
| Username | Provide the username you plan to use to connect to ServiceNow. |
| Password | Provide the password you plan to use to connect to ServiceNow. |
| Custom OAuth profile | Optional. Select a custom OAuth profile for this connection. |
OAuth 2.0
View OAuth 2.0 authentication steps
Set up an OAuth 2.0 client
Complete the following steps with a ServiceNow admin role to configure an OAuth 2.0 client:
Activate the OAuth 2.0 (com.snc.platform.security.oauth) plugin. Refer to the ServiceNow documentation for more information on how to activate OAuth 2.0.
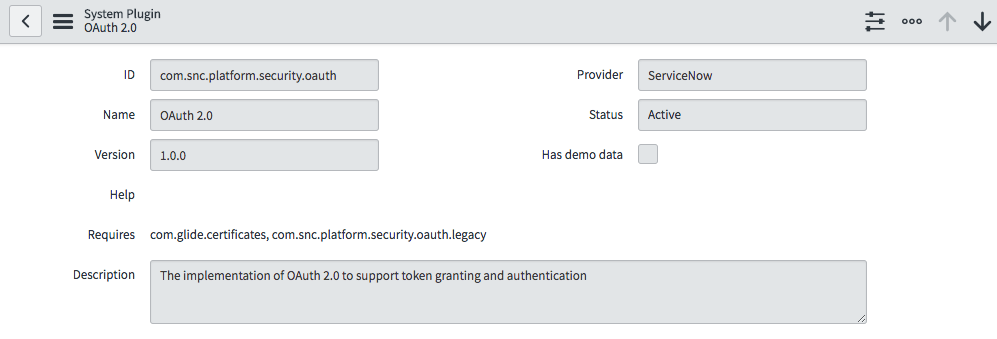 Activate OAuth plugin
Create an endpoint for a client application to gain access to your ServiceNow instance. Use https://www.workato.com/oauth/callback as the Redirect URL. Refer to the ServiceNow documentation for more information on how to create an endpoint for external clients.
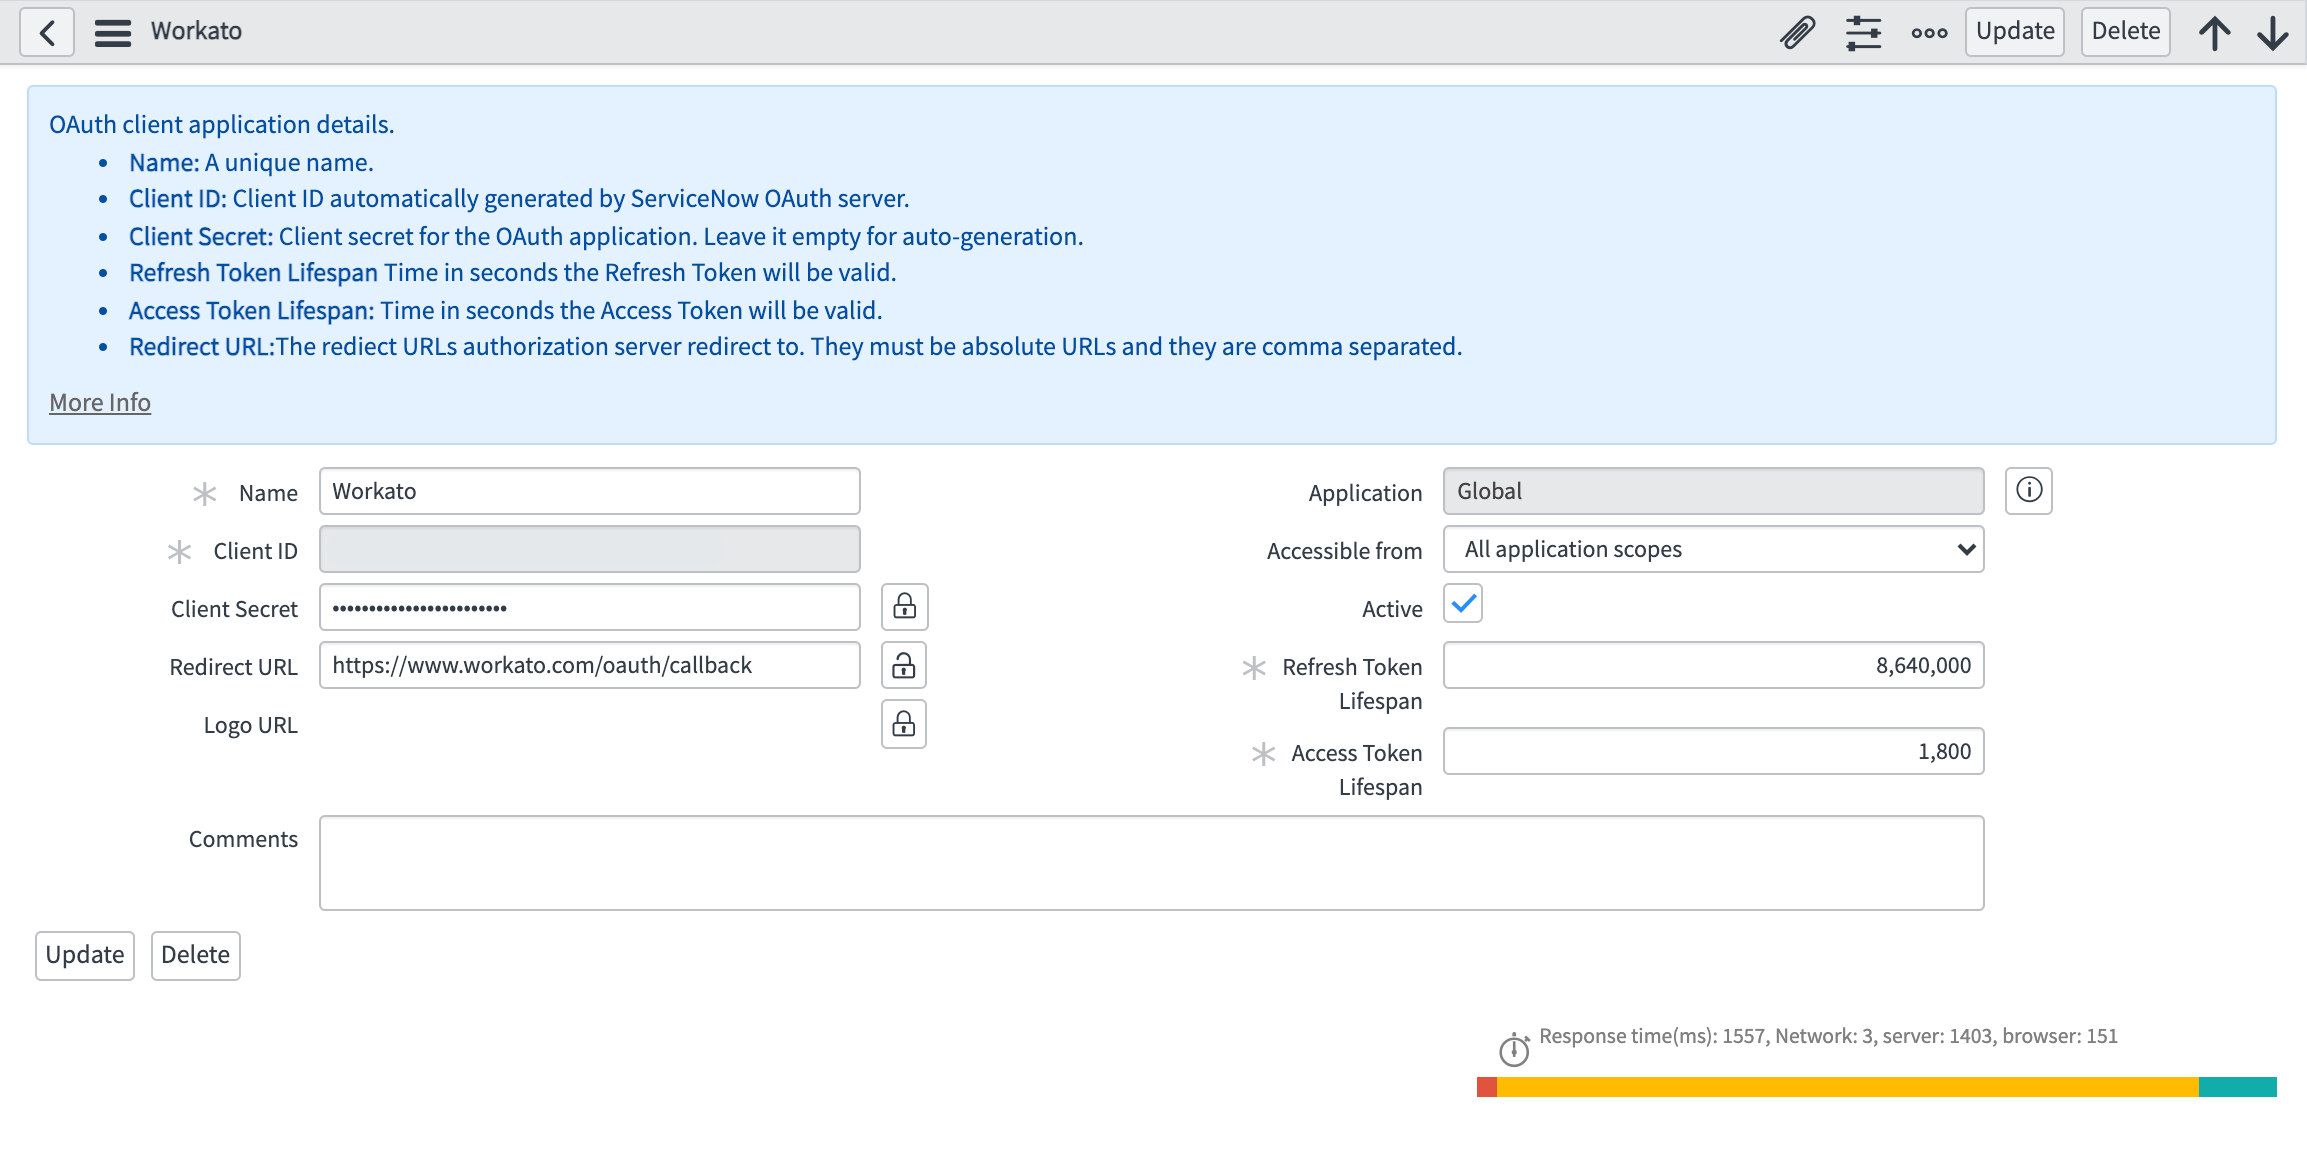 OAuth 2.0 client
Use the Client ID and Client secret to create a ServiceNow connection in Workato. This triggers an OAuth authorization code grant flow that opens a new browser window requesting authorization.
Complete setup in Workato
Select the OAuth 2.0 authentication type to connect to your ServiceNow instance without using your login credentials. This authentication type allows you to grant access to Workato by obtaining a token rather than disclosing your login credentials.
ServiceNow Istanbul and later releases support OAuth 2.0 connections that use the authorization code grant. Ensure that your ServiceNow version supports this when selecting this authentication type.
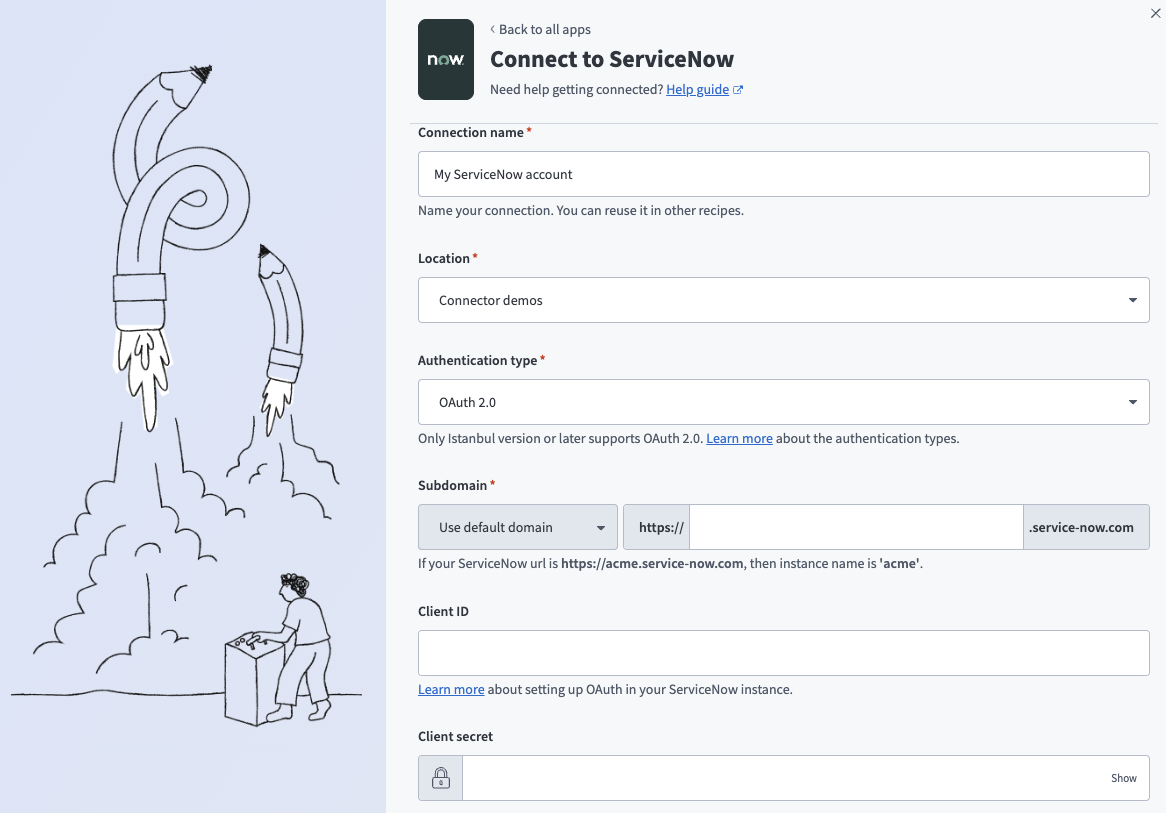 OAuth 2.0 connection
| Field | Description |
|---|---|
| Connection name | Enter a unique name that identifies which ServiceNow instance it is connected to. |
| Authentication type | Choose an authentication type for this ServiceNow connection. The ServiceNow connector supports Username/Password (Basic) authentication, OAuth 2.0 using the authorization code grant, and Password grant authentication. |
| Instance name | Provide the name of your instance. For example, if your ServiceNow URL is https://acme.service-now.com, the instance name is acme. |
| Client ID | Provide the Client ID for your connection to use for authorization. Refer to the Set up an OAuth 2.0 client section for more information on how to set up Application Registry for an OAuth client. |
| Client secret | Provide the Client secret for this OAuth application. Click Toggle Password Visibility (lock icon) to reveal the secret. |
| Custom OAuth profile | Optional. Select a custom OAuth profile for this connection. |
INVALID REFRESH TOKEN ERROR
You may receive an invalid_request or invalid refresh token error after your ServiceNow OAuth 2.0 connection expires. This behavior occurs because ServiceNow limits how long a refresh token remains valid. You must reauthenticate the connection when the token expires.
You can adjust the Refresh Token Lifetime in your ServiceNow OAuth client configuration. Go to your ServiceNow instance, click System OAuth > Application Registry, open your Workato OAuth client, and review the Refresh Token Lifetime value. The default refresh token lifetime is 100 days.
Refer to the ServiceNow external client documentation for more information.
Password grant
View Password grant authentication steps
Select the Password grant authentication type to connect to your ServiceNow instance. This authentication type allows you to grant Workato access by providing your login credentials, which are used to obtain an access token.
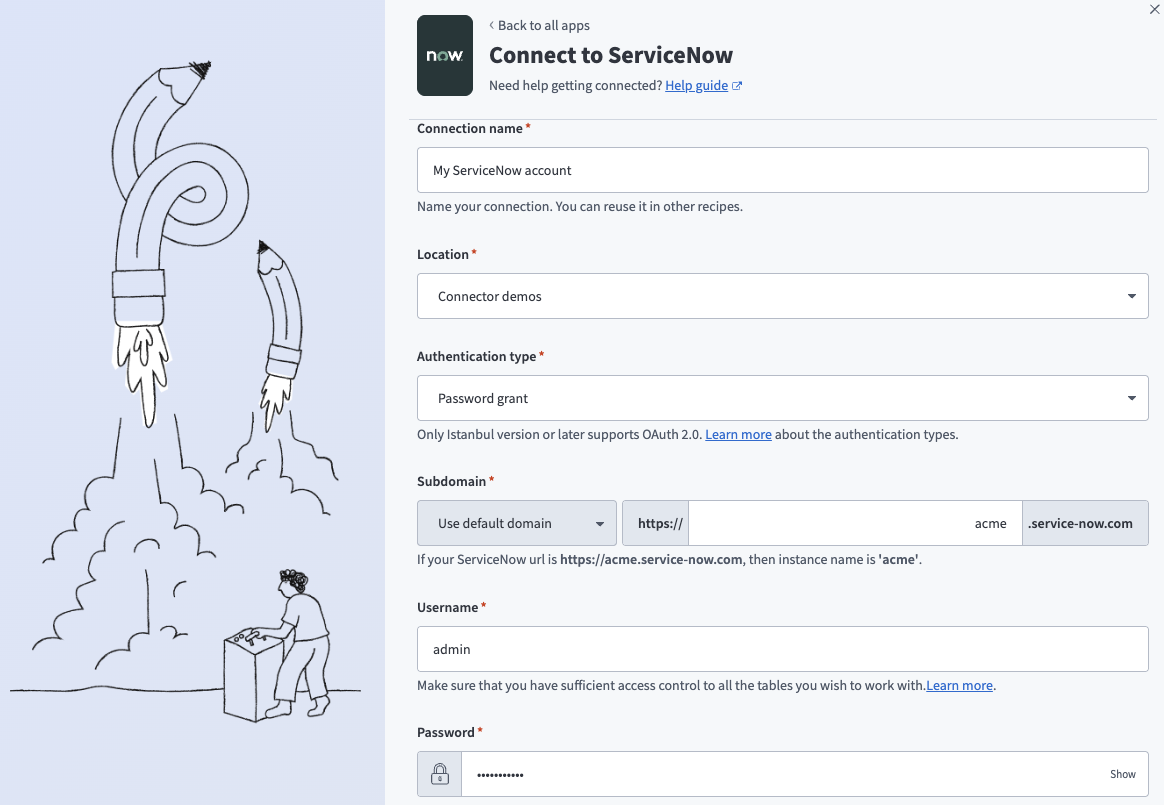 Password grant connection
| Field | Description |
|---|---|
| Connection name | Enter a unique name that identifies which ServiceNow instance it is connected to. |
| Authentication type | Choose an authentication type for this ServiceNow connection. The ServiceNow connector supports Username/Password (Basic) authentication, OAuth 2.0 using the authorization code grant, and Password grant authentication. |
| Instance name | Provide the name of your instance. For example, if your ServiceNow URL is https://acme.service-now.com, the instance name is acme. |
| Username | Provide the username you plan to use to connect to ServiceNow. |
| Password | Provide the password you plan to use to connect to ServiceNow. |
| Client ID | Provide the Client ID for the connection to use for authorization. Refer to the Set up an OAuth 2.0 client section for more information on how to set up Application Registry for an OAuth client. |
| Client secret | Provide the Client secret for this OAuth application. Click Toggle Password Visibility (lock icon) to reveal the secret. |
| Custom OAuth profile | Optional. Select a custom OAuth profile for this connection. |
Salesforce connection setup steps
View Salesforce connection setup steps
Workato supports OAuth 2.0 authentication and JWT bearer authentication connections for Salesforce.
Salesforce OAuth 2.0 authentication
View OAuth 2.0 authentication steps
Connect to Salesforce using OAuth 2.0 (Authorization Code Grant)
Complete the following steps to set up an OAuth 2.0 (Authorization Code Grant) connection to Salesforce in Workato:
OAUTH RESTRICTIONS
As of early September 2025, Salesforce restricts the use of uninstalled Salesforce Connected Apps. Refer to OAuth restrictions for required actions if you encounter errors when you create a new connection. These steps are required for all new Salesforce connections starting September 17, 2025.
Click Create > Connection or press C twice.
Search for Salesforce and select it as your app.
Enter a name in the Connection name field.
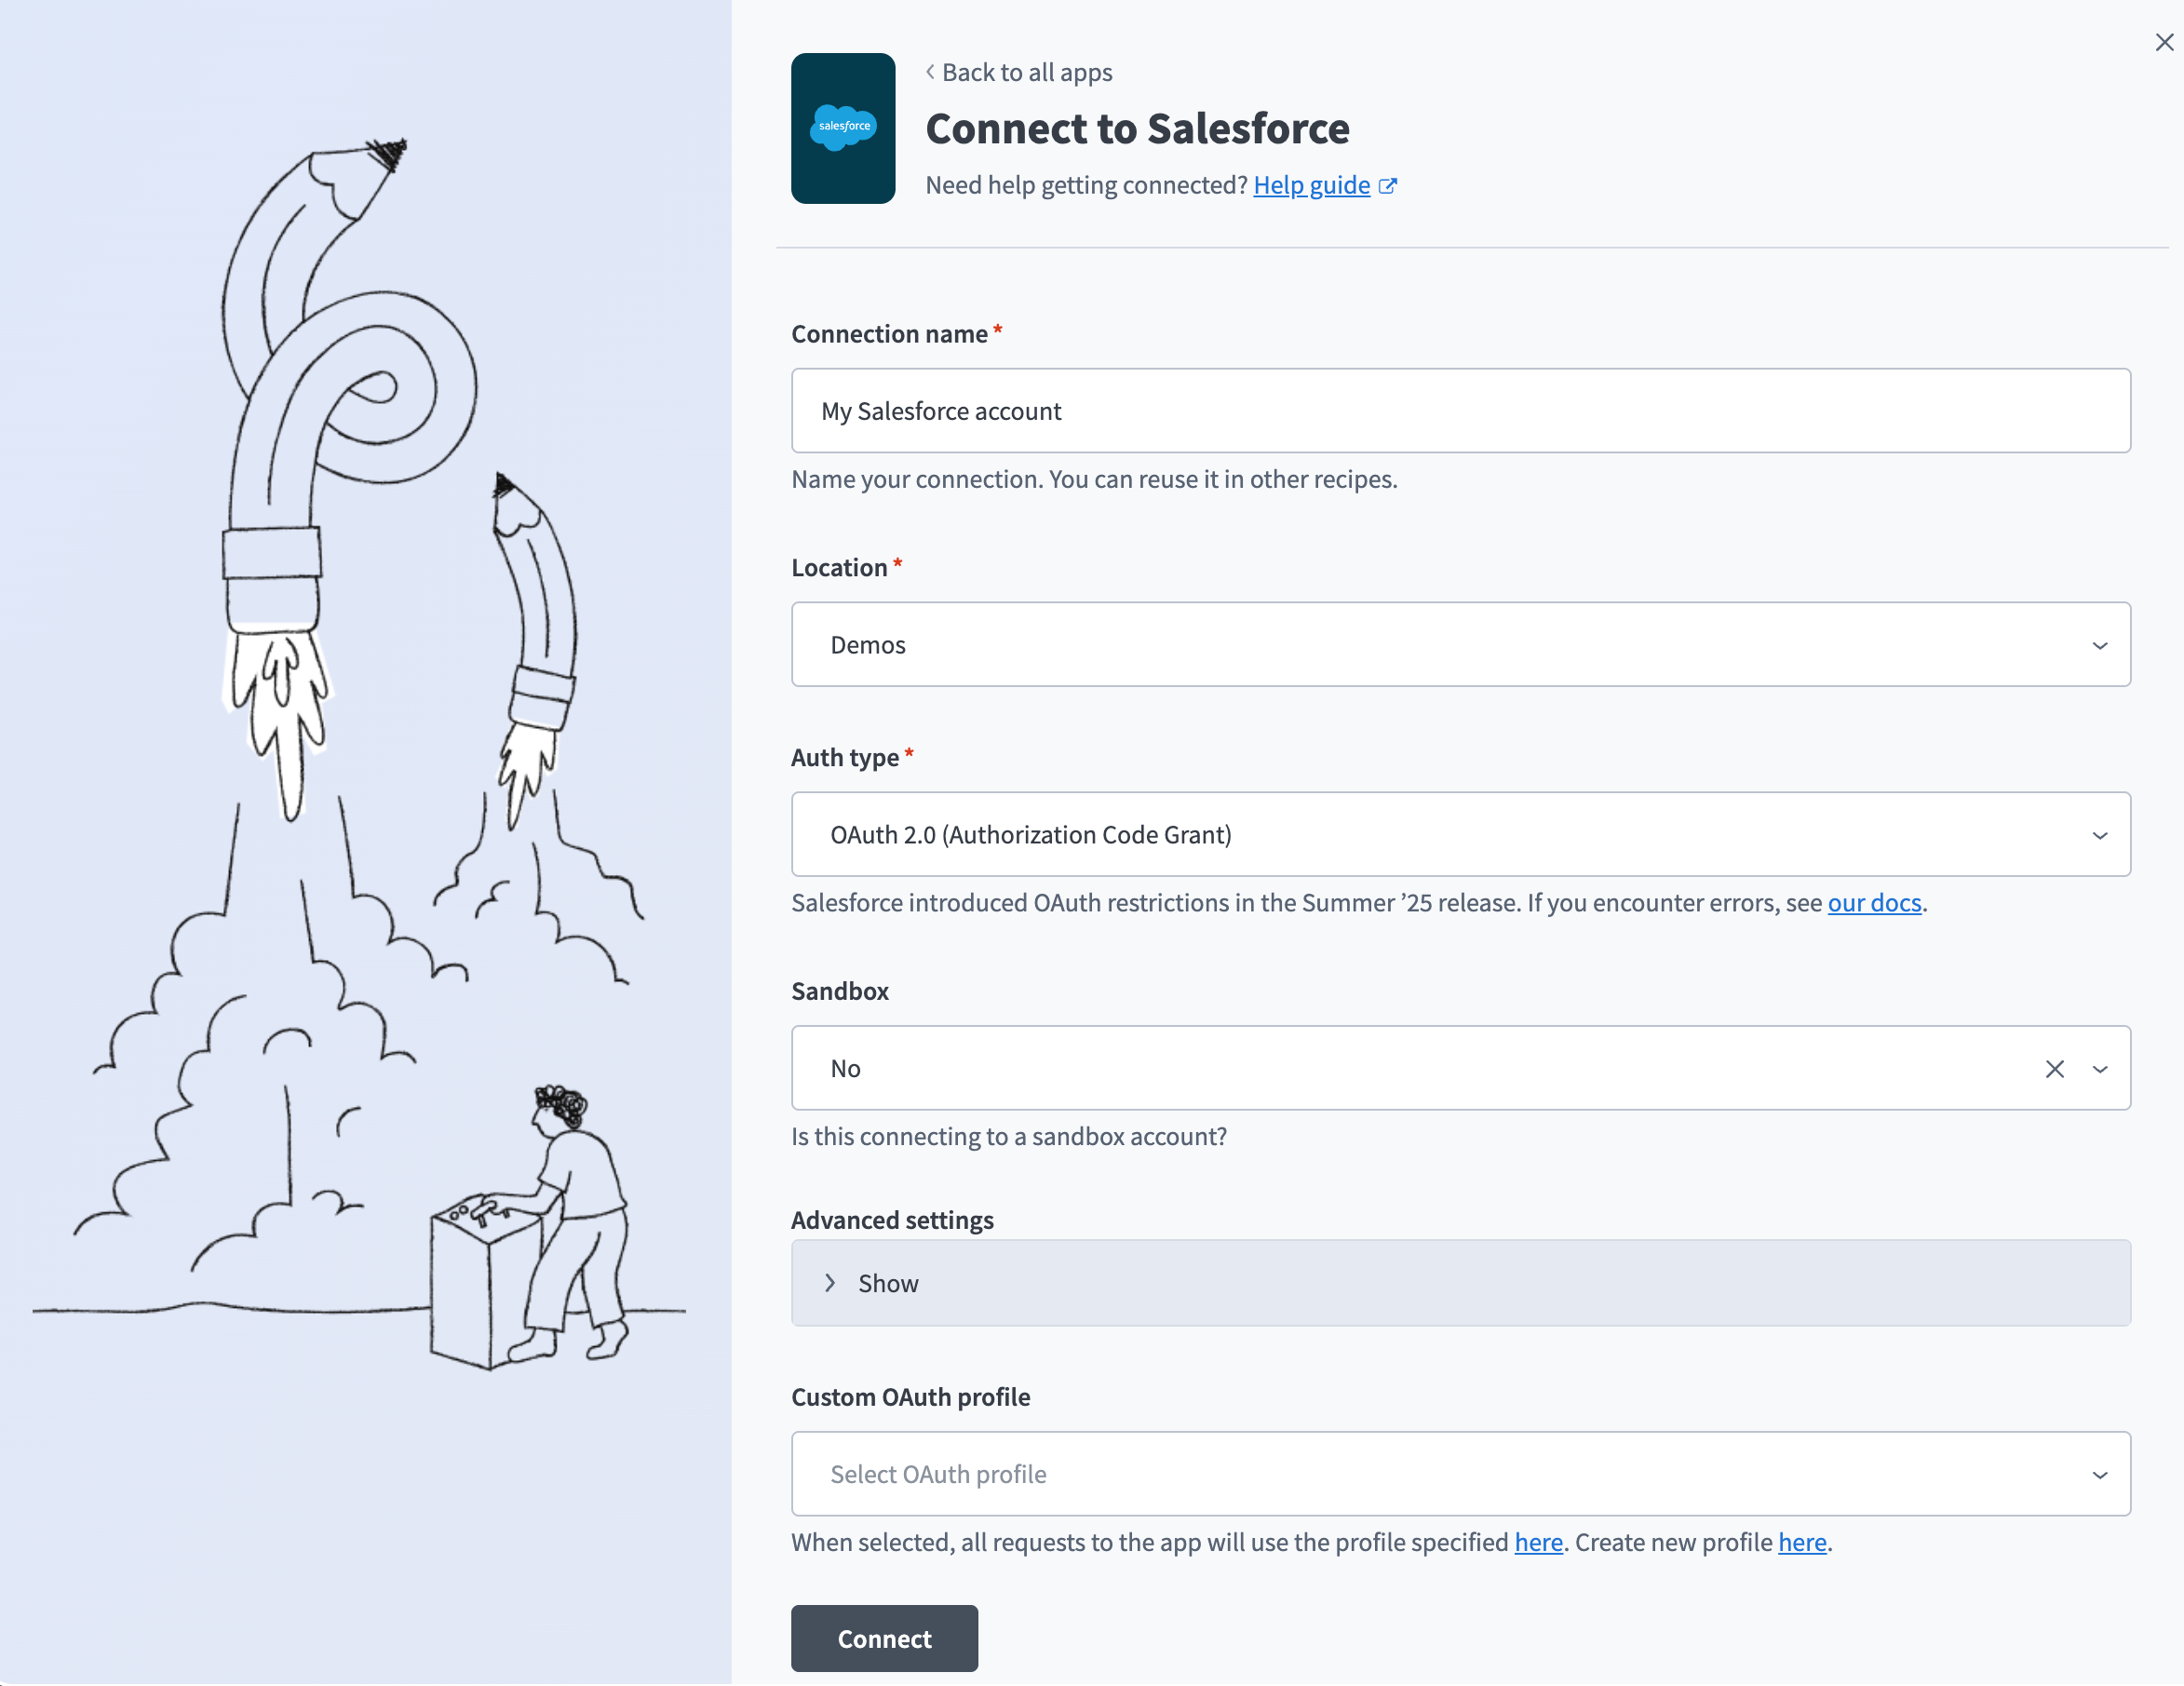 OAuth2.0 Salesforce connection setup
Use the Location drop-down menu to select the project where you plan to store the connection.
Use the Auth type drop-down menu to select OAuth 2.0 (Authorization Code Grant).
Use the Sandbox drop-down menu to specify whether the Salesforce account is a sandbox account.
Optional. Expand Advanced settings to configure the following options:
Advanced settings
- Organization/community custom domain URL: Enter the URL to your Salesforce community's custom domain. Required for community connections with unique domains.
- Requested permissions: Select permissions to request for this connection. Refer to Minimum and default scopes for the scopes Workato requests by default.
- Verified user access configuration: Configure custom auth for personal connections. Refer to Runtime user connections for more information.
REFRESH TOKEN SCOPE IS REQUIRED
The Perform requests at any time scope is one of Workato's minimum scopes for OAuth 2.0 connections, but whether Salesforce actually grants this scope depends on the Connected App's own OAuth policies, not on the Workato connection's settings. Refer to Salesforce connection disconnects repeatedly if your connection later disconnects when the access token expires. A Refresh Token Policy or IP Relaxation setting can cause the same symptom.
Optional. Use the Custom OAuth profile drop-down menu to select a custom OAuth profile for your connection. Refer to Create a custom OAuth profile for Salesforce for more information.
Click Connect.
Optional. If your Salesforce organization or community uses a custom domain, complete the following in the sign-in modal:
- Click Use Custom Domain.
- Enter your Custom domain, then click Continue.
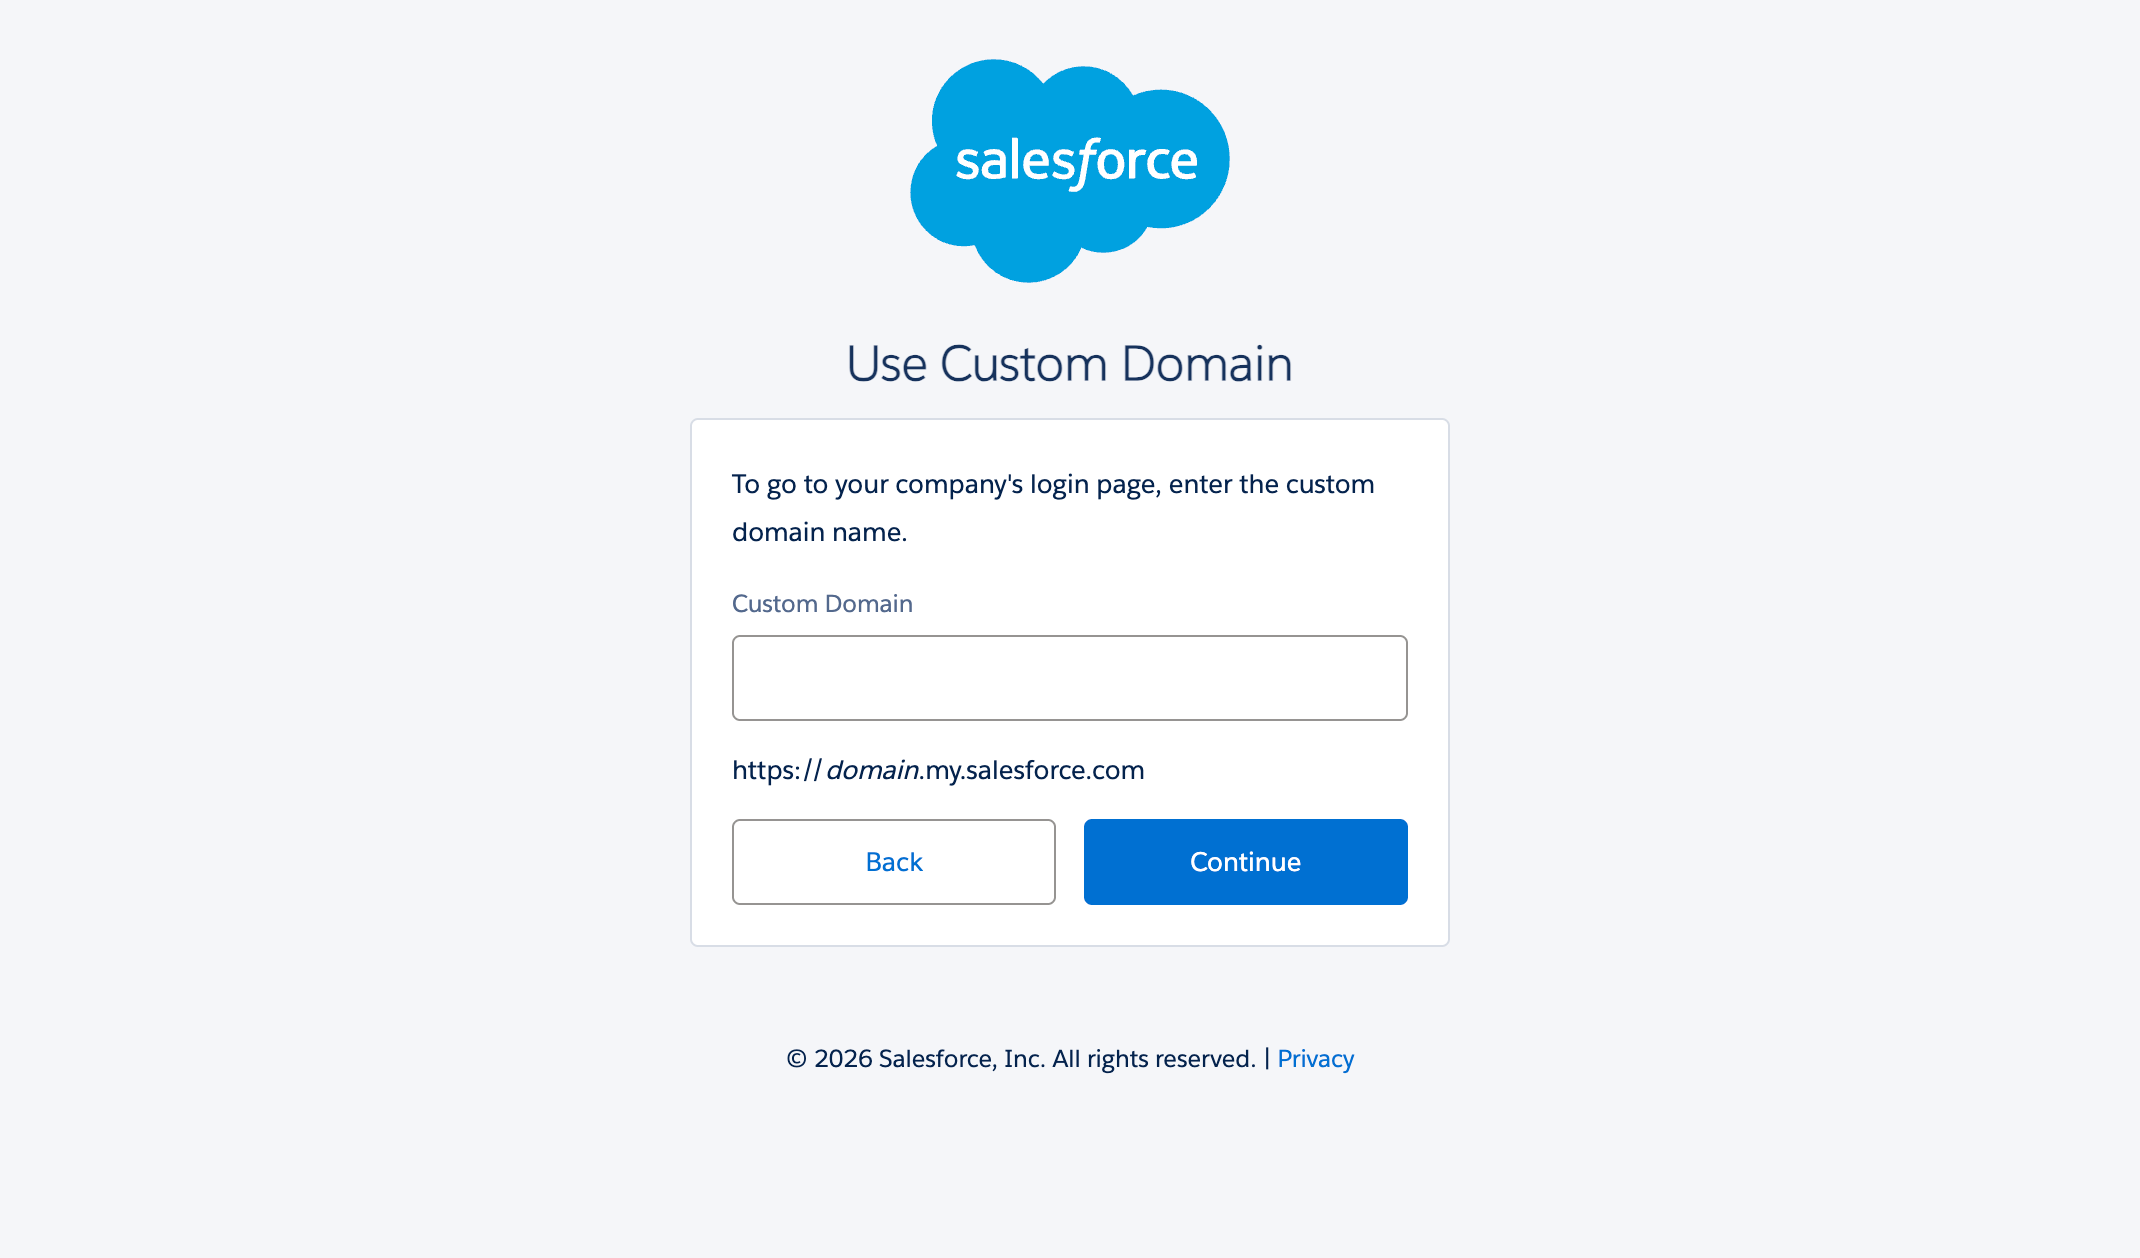 Enter your Custom domain.
Enter your Salesforce Username and Password.
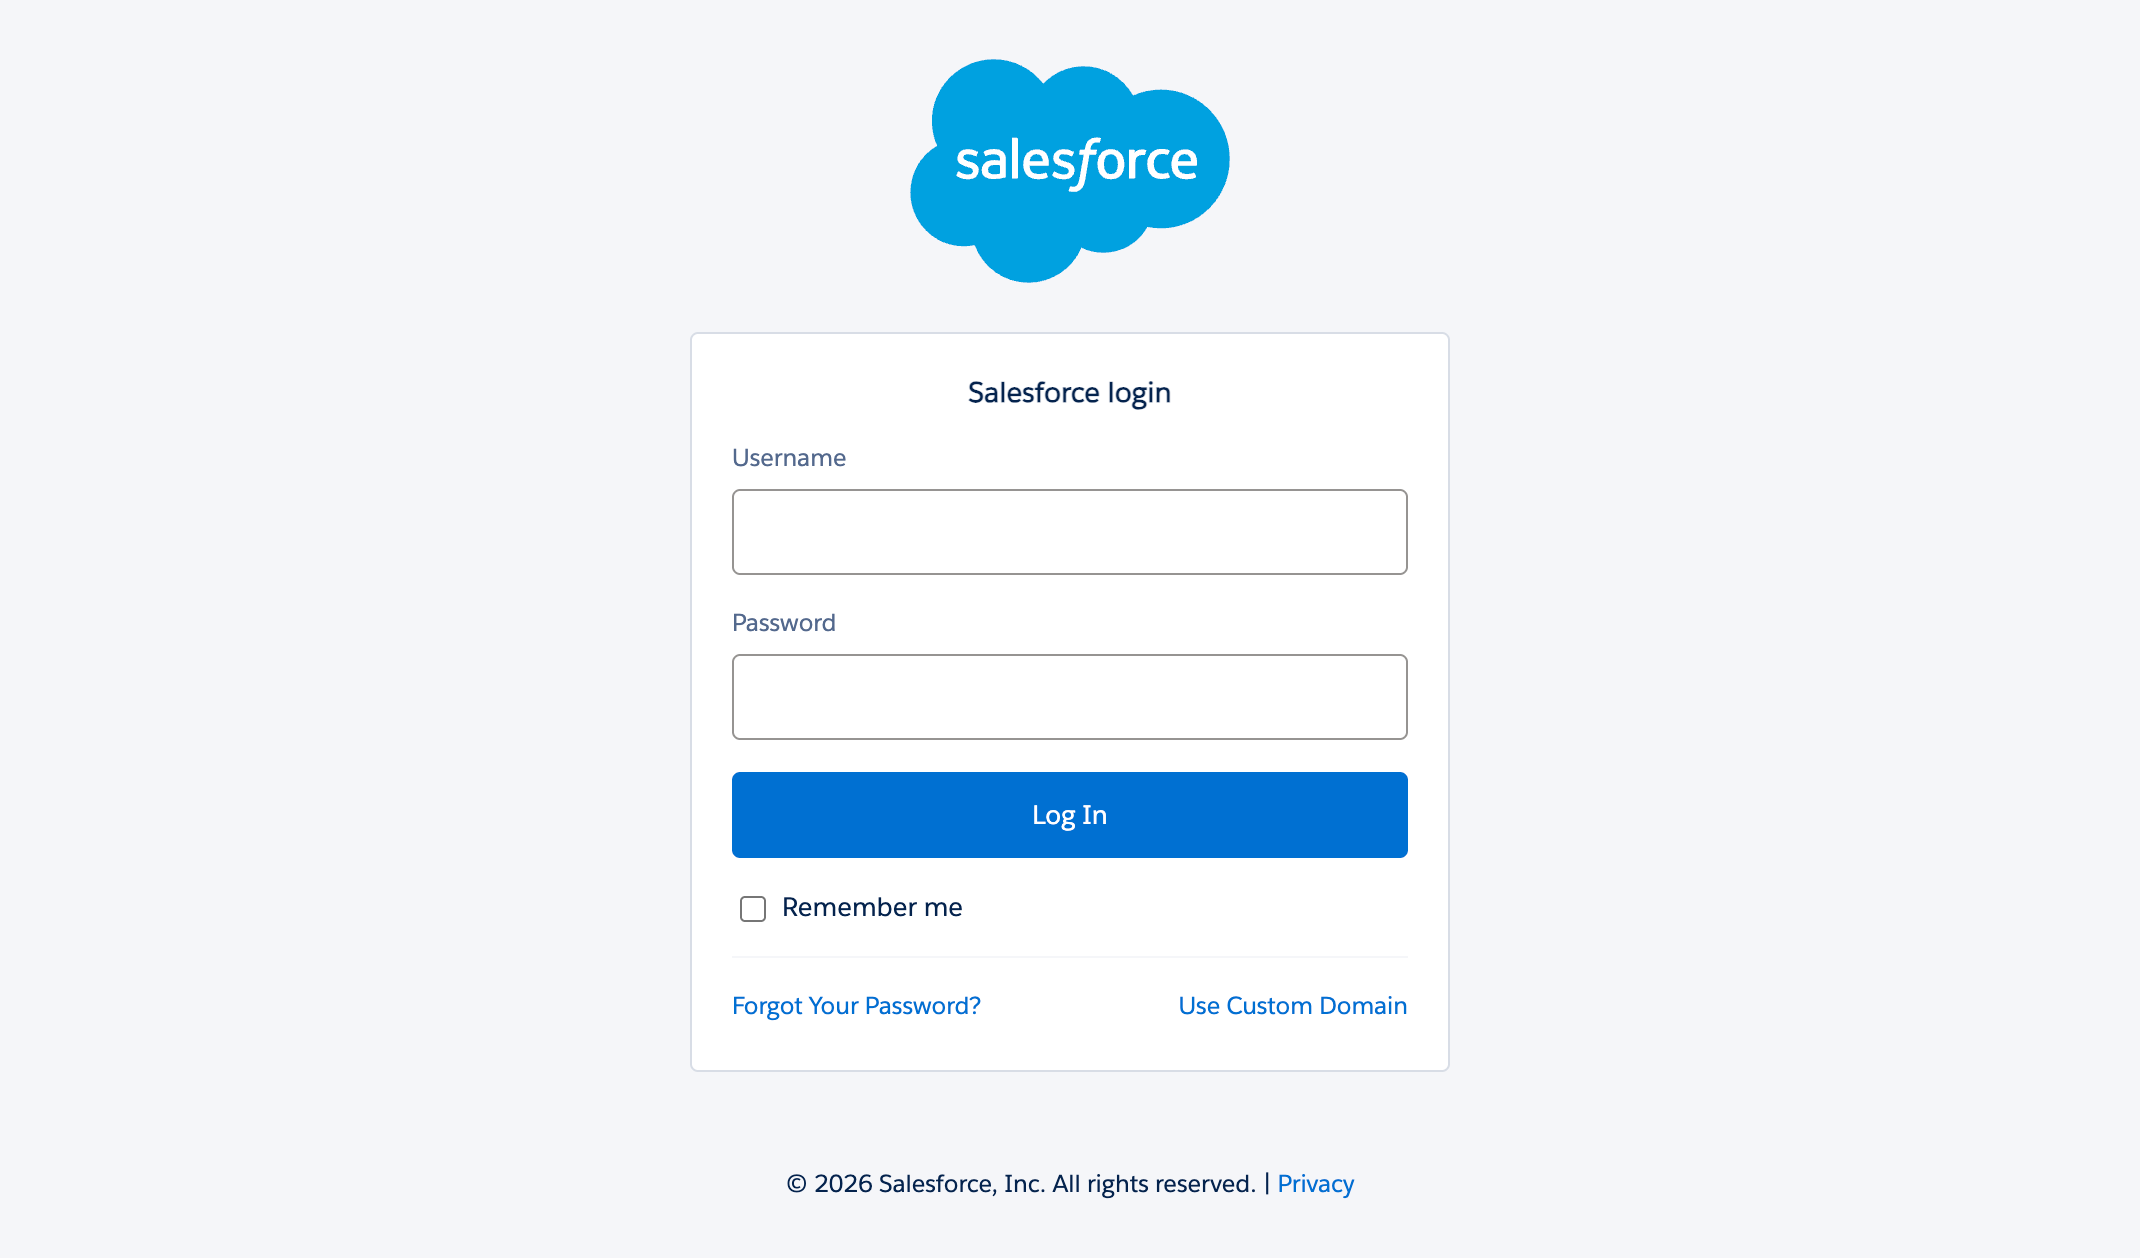 Log in to your Salesforce account
Click Log In to complete the setup.
OAUTH_APPROVAL_ERROR_GENERIC
If you see this error, Salesforce is restricting the Workato app because it isn't installed. A Salesforce admin must install the app in Connected Apps OAuth Usage or assign the Salesforce permissions. Refer to OAuth restrictions for details.
Salesforce JWT bearer authentication
View JWT bearer authentication steps
ACTIONS ON BEHALF OF USER
JWT connections can perform actions on behalf of a user you specify using the On-behalf-of-user email field. Contact your Workato Customer Success Manager to enable this feature.
How it works
JWT bearer authentication connects using a digital certificate that signs a JWT request. Workato sends a JWT to the Salesforce OAuth token endpoint, where Salesforce processes the JWT and issues an access token based on prior approval of Workato in Salesforce.
Although JWT bearer skips interactive sign-in, Salesforce still evaluates every request against the permissions of the user specified in the connection and attributes any changes to that user. Use a dedicated integration user rather than a personal account.
Refer to Required roles and permissions for the Salesforce permissions the connected user needs.
Generate a private key and certificate
JWT bearer authentication requires a private key and a certificate. The following command generates both using OpenSSL. Replace the -subj values with your own:
openssl req -x509 -sha256 -nodes -newkey rsa:2048 \
  -keyout server.key \
  -out server.crt \
  -days 365 \
  -subj "/CN=Your App Name/O=Your Organization/C=US"
This generates two files:
| File | Description |
|---|---|
server.key | Your private key for Workato. Keep this secret. |
server.crt | Your public certificate for Salesforce. |
Refer to Salesforce's documentation for more information:
- OAuth 2.0 JWT Bearer Flow for Server-to-Server Integration: Details on how Salesforce uses this certificate to sign and validate JWTs.
- Create a Private Key and Self-Signed Digital Certificate: Other ways to generate a private key and certificate.
Create an external client app for JWT bearer
JWT bearer authentication also requires a registered external client app in Salesforce. Complete the following steps before creating your connection in Workato. Refer to Salesforce's Create an External Client App documentation for more information.
Sign in to Salesforce.
Go to Setup > Apps > External Client Apps > External Client App Manager.
Click New External Client App.
Enter a name in the External Client App Name field, such as Workato.
Enter a name in the API Name field that meets the following requirements:
- Contains only underscores and alphanumeric characters.
- Is unique.
- Starts with a letter.
- Doesn't include spaces.
- Doesn't end with an underscore.
- Doesn't contain consecutive underscores.
Enter the contact email address for your app in the Contact Email field.
Use the Distribution State drop-down menu to select either Local or Packaged.
Expand API (Enable OAuth Settings) and select the Enable OAuth checkbox. Refer to Salesforce's Configure the External Client App OAuth Settings documentation for more information.
Enter https://www.workato.com/oauth/callback in the Callback URL field.
Select your OAuth scopes in the OAuth Scopes field based on the actions and triggers you plan to use, then click the Move selection to Selected OAuth Scopes arrow to apply them.
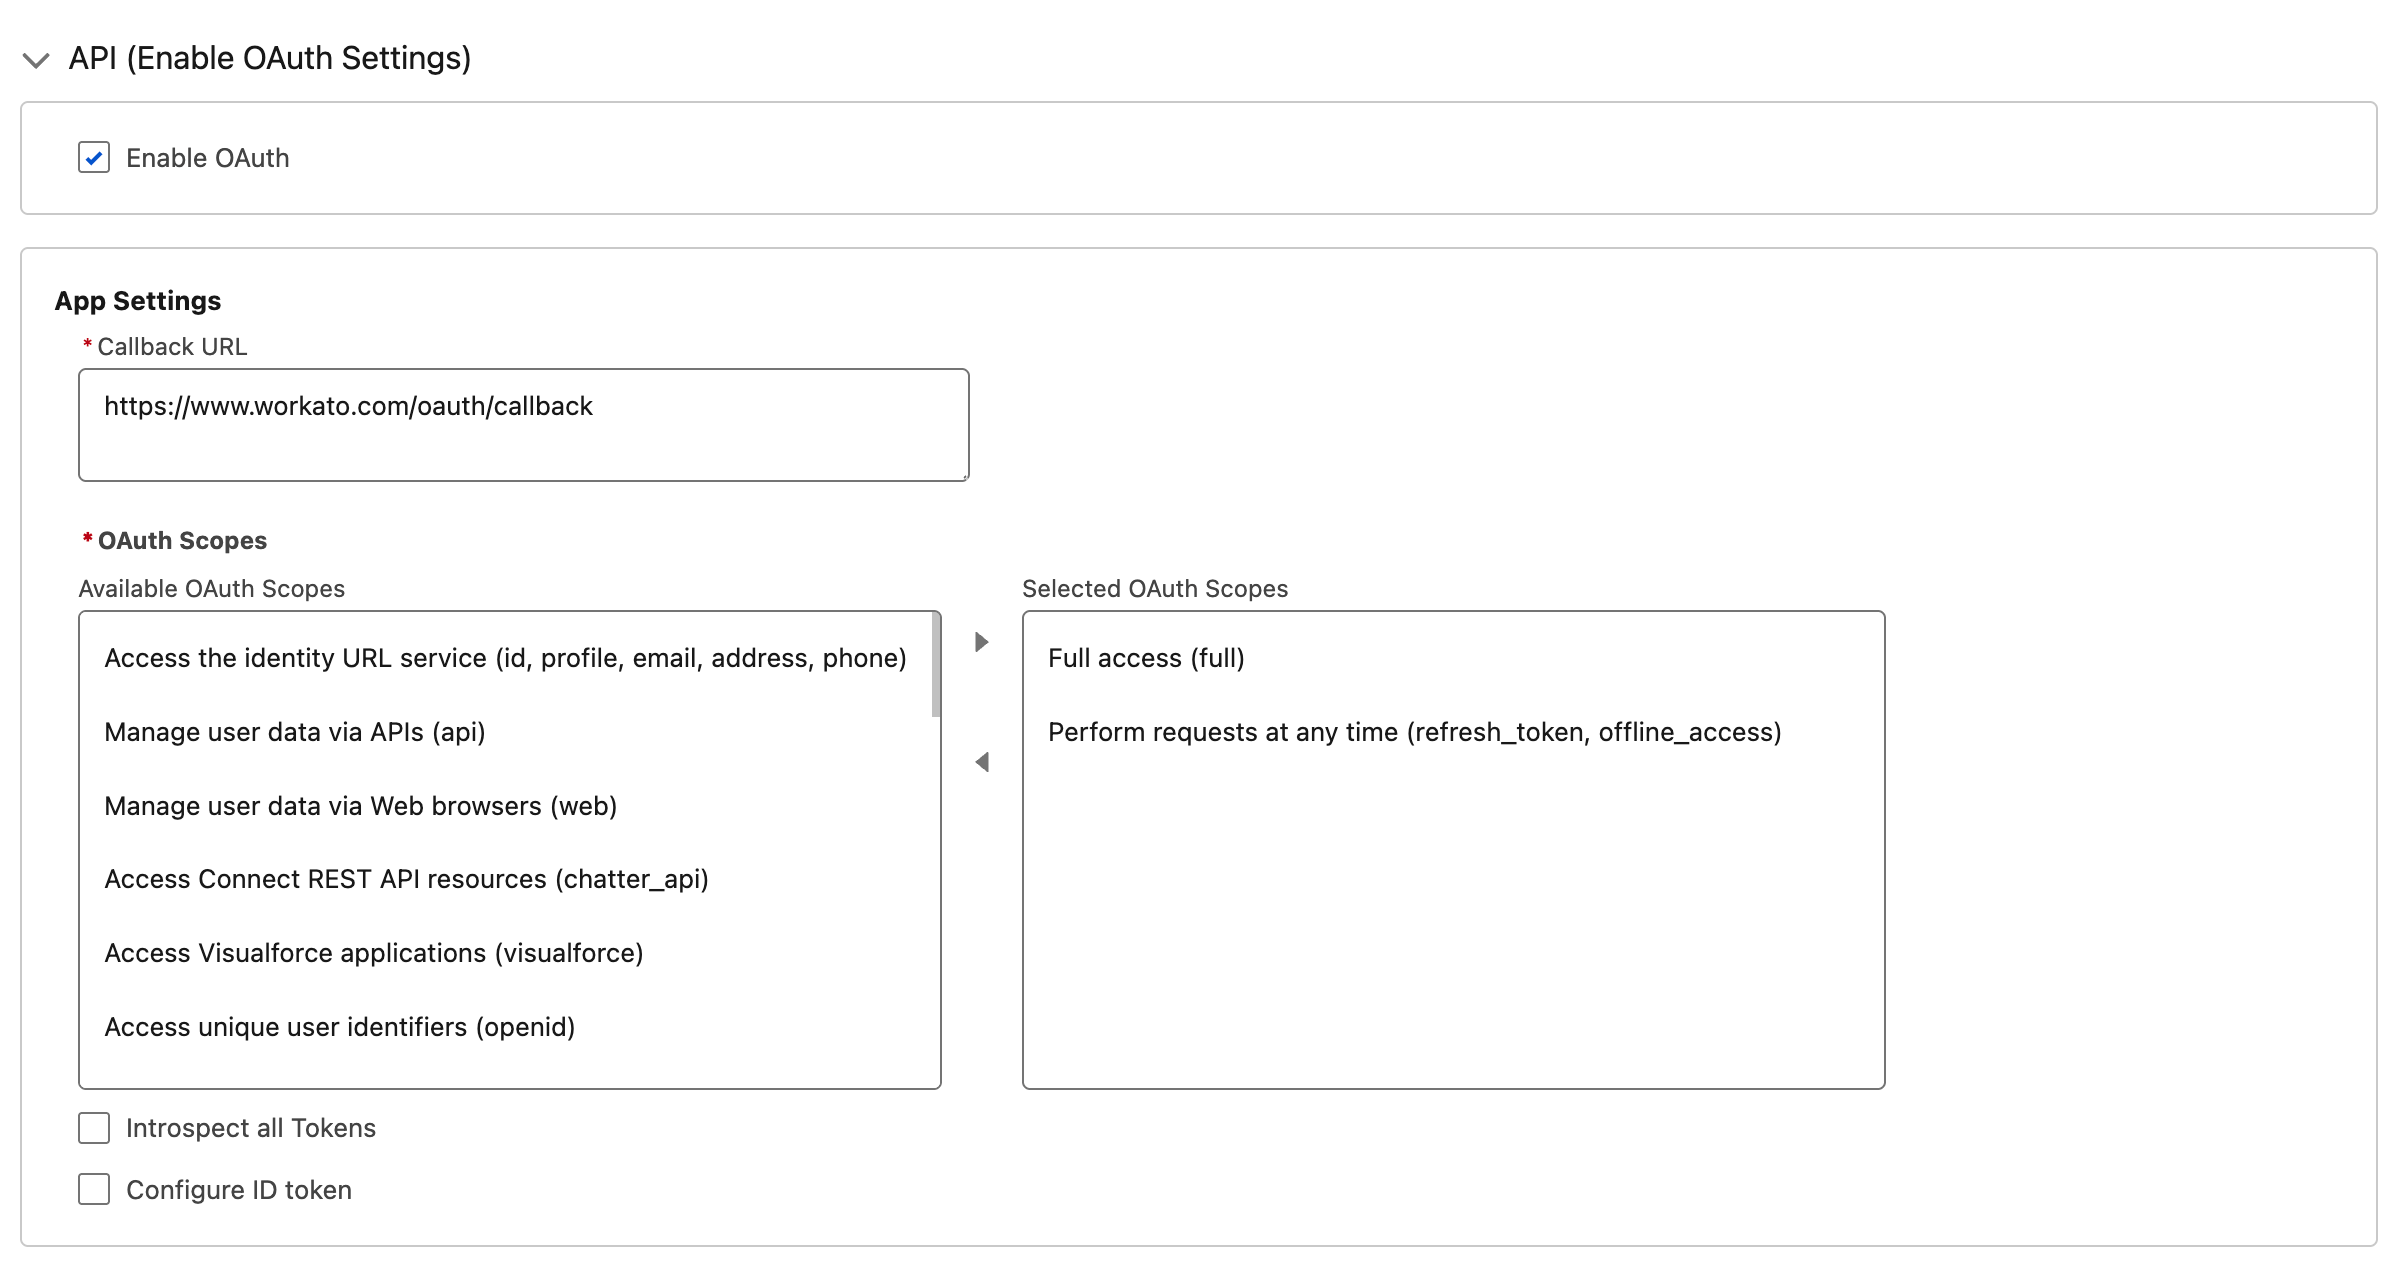 Configure scopes for your external client app
REFRESH_TOKEN SCOPE IS REQUIRED
If you see the error refresh_token scope is required and the connected app should be installed and preauthorized, add Perform requests at any time (refresh_token, offline_access) to your OAuth scopes. If you then see an invalid session error, also add Manage user data via APIs (api).
Select Enable JWT Bearer Flow in the Flow Enablement section. Refer to Salesforce's Configure a JWT Bearer Flow documentation for more information.
Upload server.crt as the digital certificate.
Click Create.
Click the Policies tab, then click Edit.
Expand the OAuth Policies section and set Permitted Users to Admin approved users are pre-authorized.
USER HASN'T APPROVED THIS CONSUMER
If you see this error when connecting, this step was likely missed.
Locate the App Policies section. Add either the profile or permission set assigned to the Salesforce user Workato connects as to the Select Profiles or Select Permission Sets list. Refer to Salesforce's Preauthorize User App Access Through External Client App Policies documentation for more information.
USER IS NOT ADMIN APPROVED TO ACCESS THIS APP
If you see this error when connecting, this step was likely missed.
Click Save.
Click the Settings tab for your external client app.
Expand the OAuth Settings section.
Click Consumer Key and Secret.
Verify your identity when prompted.
Copy the Consumer Key. You'll enter this as the Issuer when connecting in Workato.
Connect to Salesforce using JWT bearer
Complete the following steps to connect to Salesforce using JWT bearer authentication:
Click Create > Connection or press C twice.
Search for Salesforce and select it as your app.
Enter a name in the Connection name field.
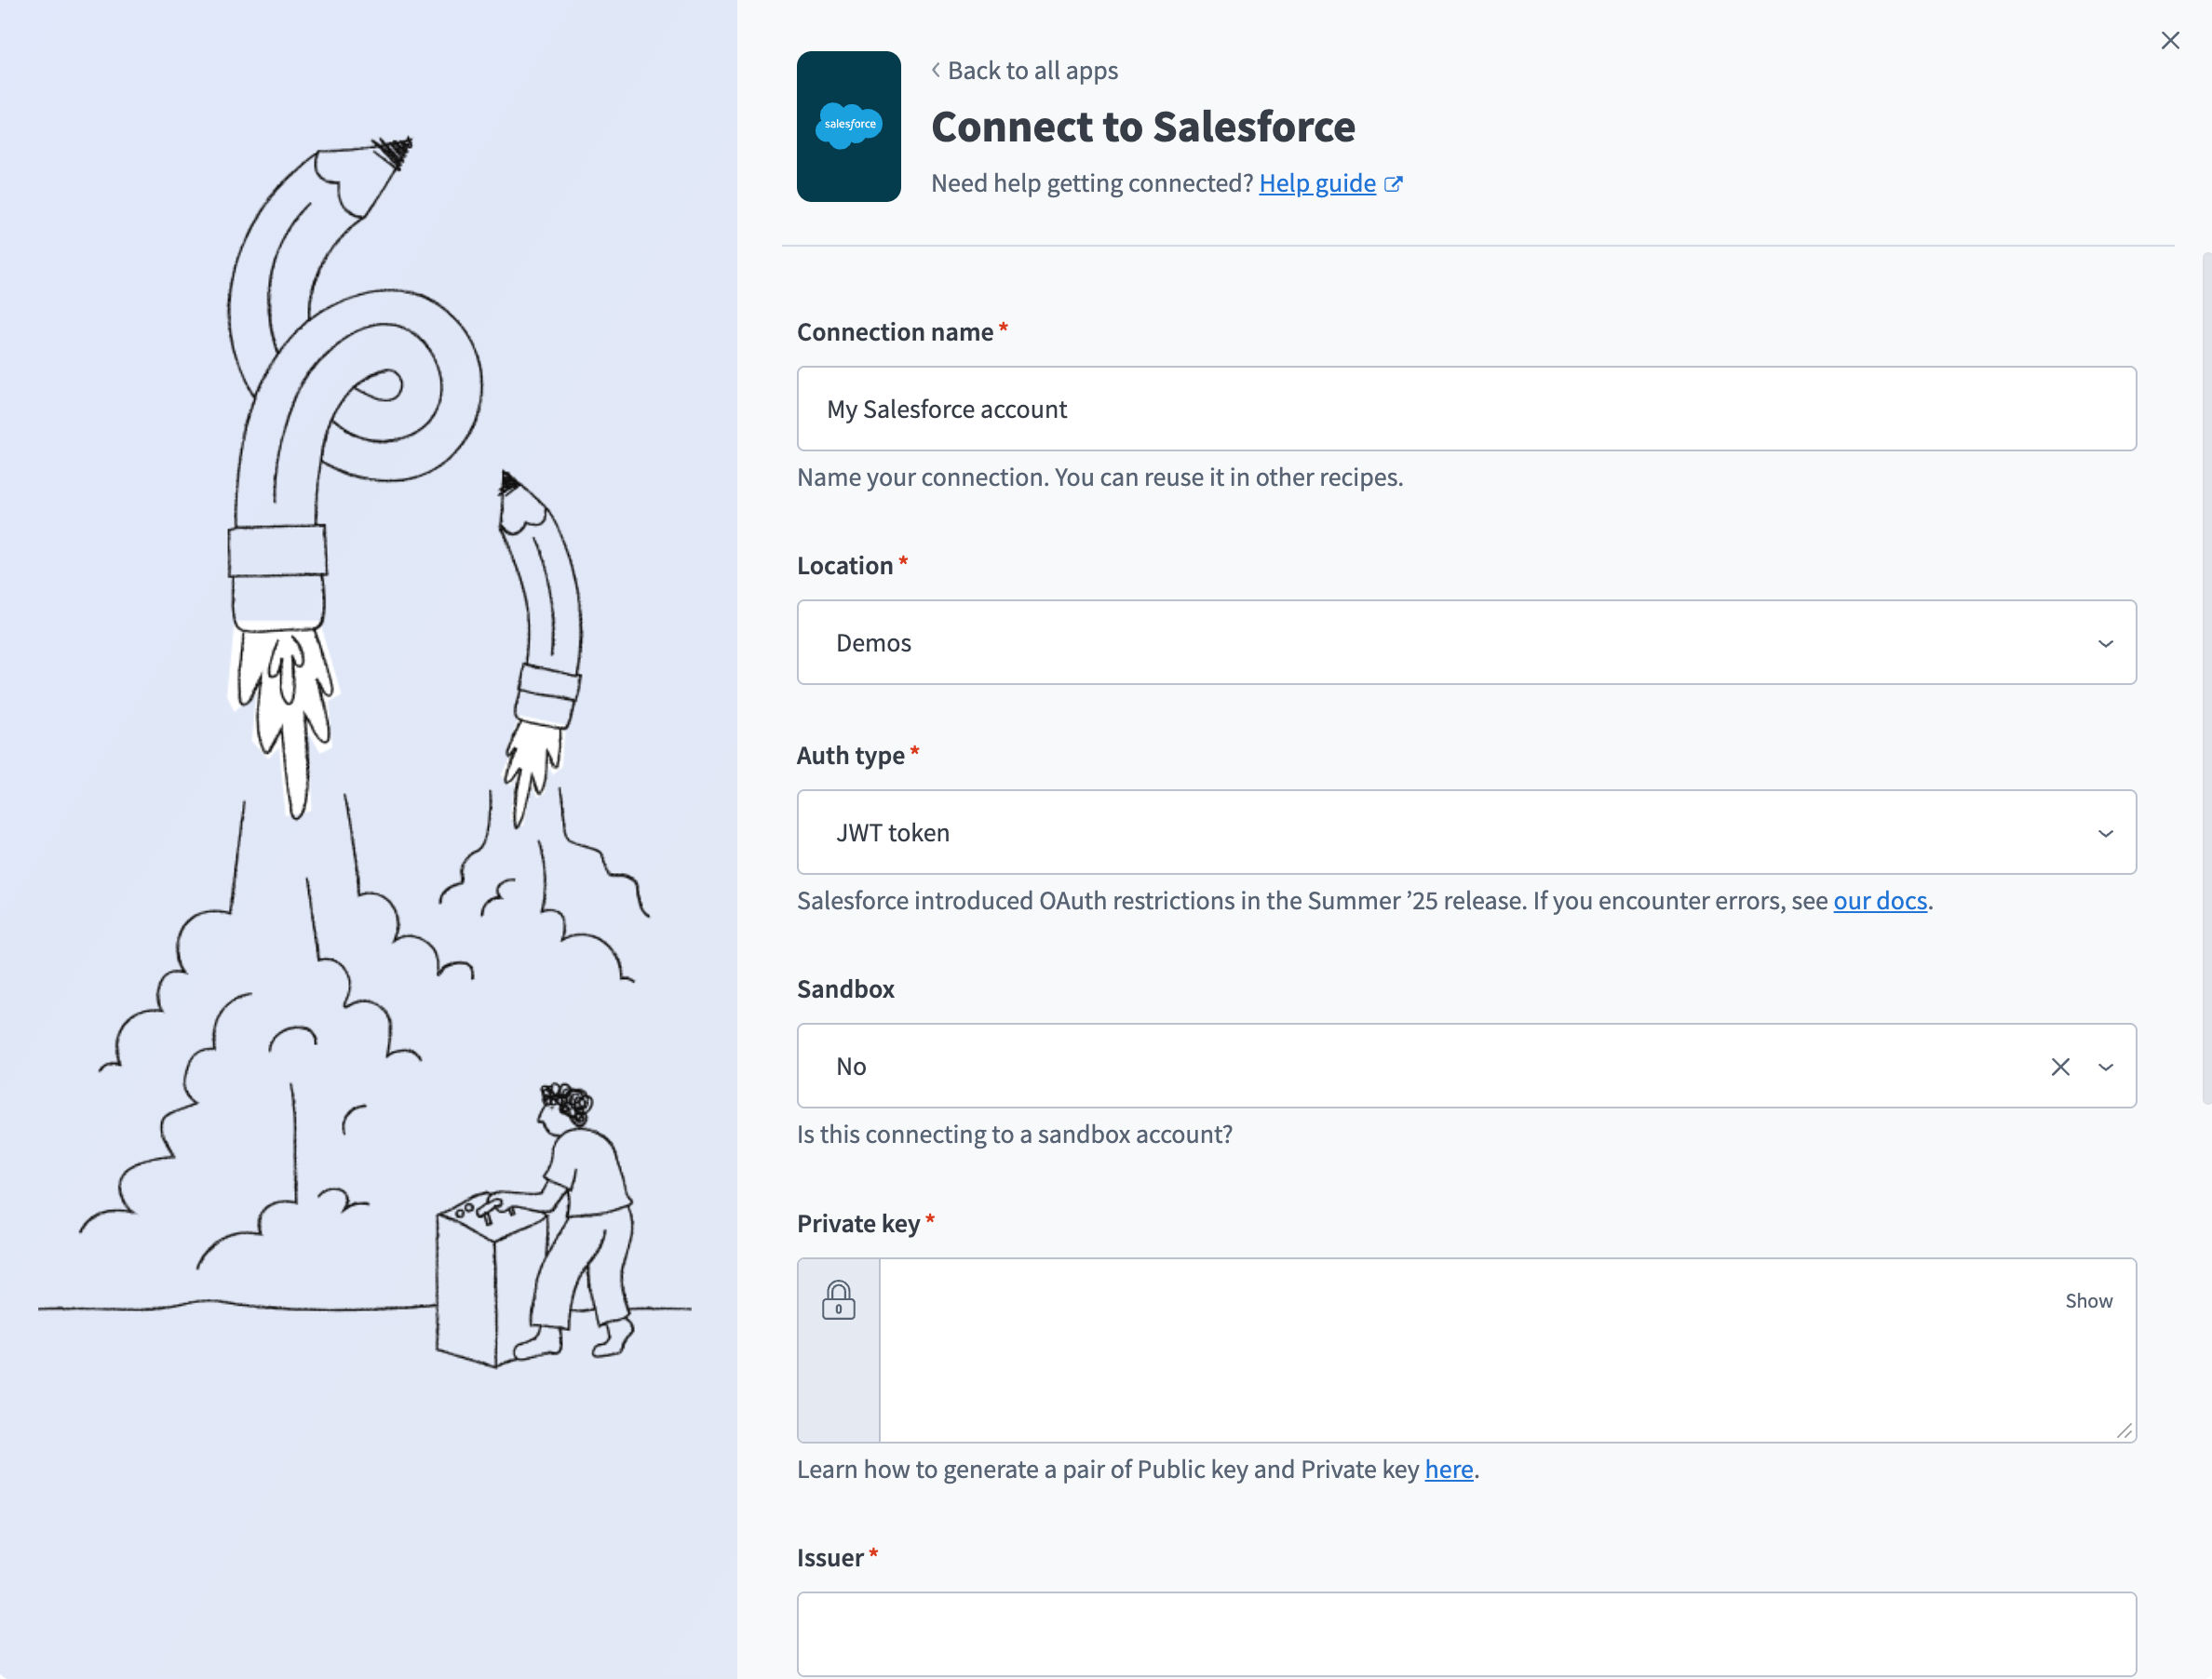 Configure Salesforce JWT Bearer connection
Use the Location drop-down menu to select the project where you plan to store the connection.
Use the Auth type drop-down menu to select JWT token.
Use the Sandbox drop-down menu to specify whether the Salesforce account is a sandbox account.
Paste the full contents of server.key in the Private key field, including the -----BEGIN PRIVATE KEY----- and -----END PRIVATE KEY----- lines.
Enter the Consumer Key from your external client app in the Issuer field.
Enter the Subject for the JWT connection. This is the username of the Salesforce user you want Workato to authenticate as, or a valid Experience Cloud username if you're connecting to an Experience Cloud site. You can use principal (prn) in place of subject (sub) for backward compatibility. If you specify both, Workato uses prn.
Enter your Salesforce Subdomain. For example, if your Salesforce URL is yourInstance.salesforce.com, the subdomain is yourInstance.
Optional. Use the Custom OAuth profile drop-down menu to select a custom OAuth profile for your connection. Refer to Create a custom OAuth profile for Salesforce for more information.
Click Connect.
GitHub connection setup steps
View GitHub connection setup steps
GitHub offboarding differs across account models. Declare which model applies to your organization during deployment, so the server removes membership through the correct path and records the model in the audit record.
| GitHub account model | How the server deprovisions |
|---|---|
| Enterprise Managed Users (EMU) | SCIM deprovision, which also revokes personal access tokens |
| Organization or enterprise membership with SAML SSO | Membership removal and SAML credential authorization revocation |
View GitHub authentication methods
Connect to GitHub on Workato using one of the following authentication methods:
- OAuth authentication. Workato recipes act on your behalf.
- GitHub Apps. Workato recipes act as the app. Refer to GitHub App authentication .
- A personal access token
Refer to the GitHub documentation for more information.
OAuth authentication
View OAuth authentication steps
Complete the following steps to connect your GitHub to Workato using OAuth authentication:
Sign in to your Workato account and go to the project where you plan to add your GitHub connection.
Click Create > Connection (or press C twice), then select GitHub as your connection.
Provide a Connection name that identifies which GitHub instance Workato is connected to.
Use the Location drop-down menu to select the project where you plan to store the connection.
Use the Authentication type drop-down menu and select OAuth App.
Optional. Click Advanced configuration to display the Host name field.
Optional. Enter a Host name. This is applicable when using Github Enterprise Server. Enter your Github subdomain. For example, if your host URL is https://github.example-organisation.com, the subdomain is github.example-organisation.com.
Click Connect. Workato redirects you to GitHub. The OAuth App requests authorization to access your GitHub account.
GitHub App authentication
You must first register the app in your GitHub account and retrieve the credentials to connect to GitHub using a GitHub App.
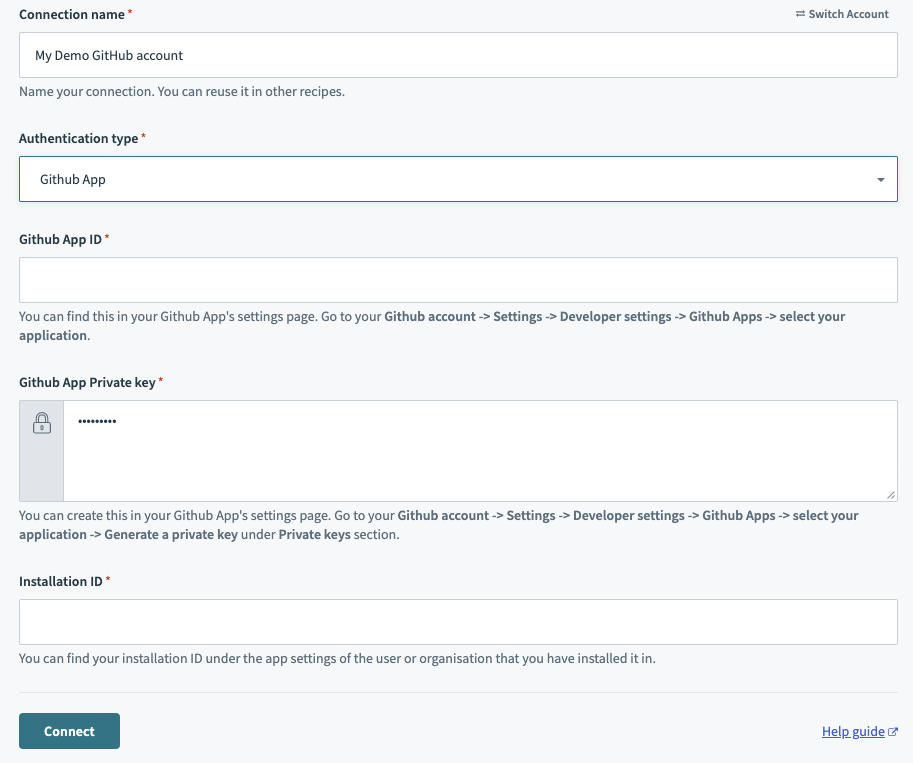 Select Authentication type as GitHub app and collect details from your GitHub App!
Register your GitHub app
View step to register your GitHub App
Complete the following steps to register your GitHub App and retrieve the credentials required to connect it to Workato:
Complete the steps in the GitHub documentation to register your GitHub App.
Retrieve your GitHub App ID in the General settings page of your GitHub app.
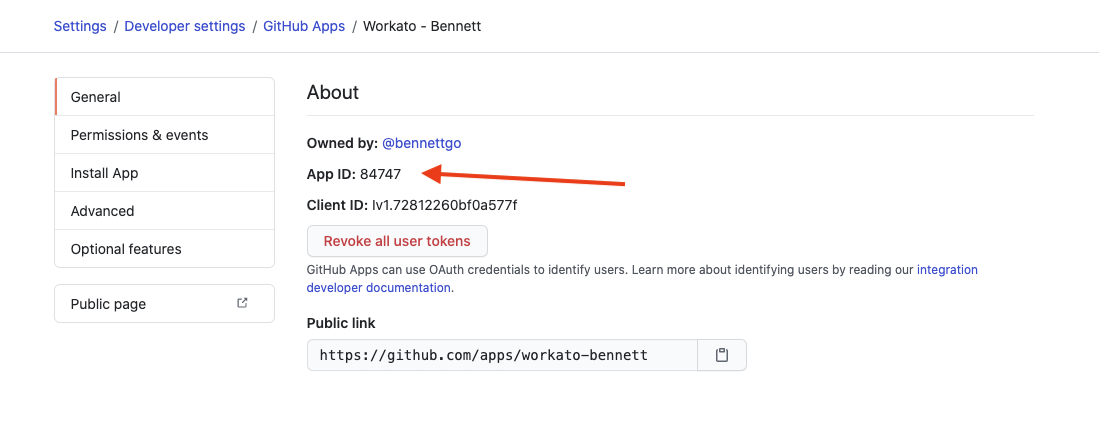 Save this App ID and place it into your connection
Generate a Private key on the same page. GitHub automatically downloads this .pem file to your machine.
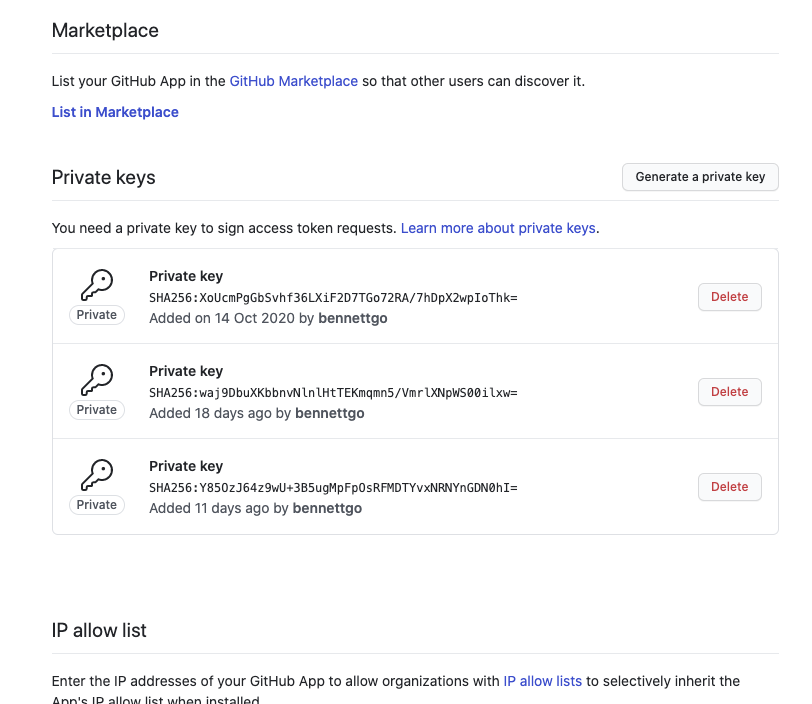 Generate the private key
Open the .pem file in a text editor. The file should look similar to the following:
-----BEGIN RSA PRIVATE KEY-----
MIIEpAIBAAKCAQEAyL/wuiSaWoH0pyf366G5E7dbzzmON1qMMrWvls8RtZtgOLjb
FBxj6gO2aUfoGbMCMqOYRV6xCn6tK118sGYMd5U/kCFu3IRPr/2GoEtcrf0TecQG
ON+27ijH0Vpn62o8NzGejdy0AWujrtAl6F8xGZeze0PzrGvW6h/GnAdZO1gJnp8t
wmEqEMXqAsPOQ0hkY+r+pE8RKQVsJCe+PIanBKp7RKWDi9usPFZQdQ==
-----END RSA PRIVATE KEY-----Copy the entire private key, including the -----BEGIN RSA PRIVATE KEY----- and -----END RSA PRIVATE KEY-----. Use this private key when you set up the connection in Workato.
Retrieve your Installation ID from the organization or user where you installed your GitHub App:
- Users accounts: Go to Settings > Applications > Your GitHub App > Configure.
- Organizations: Go to your organization's GitHub homepage. Click Settings > Installed GitHub Apps > Configure.
The installation ID appears in the URL. For example, if the URL is https://github.com/settings/installations/13876669, the installation ID is 13876669.
Save the installation ID. Enter this ID when creating the GitHub App connection in Workato.
Configure GitHub app authentication
View steps to authenticate your GitHub app
Provide a Connection name that identifies which GitHub instance Workato is connected to.
Use the Location drop-down menu to select the project where you plan to store the connection.
Use the Authentication type drop-down menu and select GitHub App.
Enter your GitHub App ID.
Enter your Github App Private key.
Enter your Installation ID.
Optional. Click Advanced configuration to display the Host name field.
Optional. Enter a Host name if using GitHub Enterprise Server. Use your GitHub subdomain. For example, if your host URL is https://github.example-organisation.com, the subdomain is github.example-organisation.com.
Optional. Enter a Custom OAuth profile. This selection ensures that all requests to the app use the specified profile.
Click Connect.
Personal access token authentication
Retrieve your personal access token from GitHub to connect your GitHub account to Workato using a personal access token:
View steps to retrieve your GitHub personal access token
Go to Github account > Settings > Developer settings > Personal access tokens > Generate new token.
Click Generate new token.
Copy the token. Enter this token in Workato to authenticate the connection.
Complete setup in Workato
View Complete setup in Workato steps
Complete the following steps to set up your GitHub connection using a personal access token:
Sign in to your Workato account and go to the project where you plan to add your GitHub connection.
Click Create > Connection (or press C twice), then select GitHub as your connection.
Provide a Connection name that identifies which GitHub instance Workato is connected to.
Use the Location drop-down menu to select the project where you plan to store the connection.
Use the Authentication type drop-down menu and select Personal Access Token.
Optional. Click Advanced configuration to display the Host name field.
Optional. Enter a Host name. This is applicable when using Github Enterprise Server. Enter your Github subdomain. For example, if your host URL is https://github.example-organisation.com, your subdomain is github.example-organisation.com.
Enter your Personal Access Token.
Optional. Enter a Custom OAuth profile. This ensures all requests to the app use the specified profile.
Click Connect.
Project property configuration
The Employee Offboarding Process MCP server supports the following project-level properties to control behavior and defaults:
| Project-level property | Description |
|---|---|
deployment.enabled_list | Choose which optional applications this deployment deprovisions. Select salesforce, github, or both. The server skips an application that isn't on this list entirely, and doesn't create a follow-up ticket for it. |
workday.payroll_flag_action | Enter the Workday business process action or step that flags a termination event for final payroll. Workday doesn't have a canonical operation for this, so the value depends on your tenant's termination business process configuration. Verify it with your Workday administrator before you deploy. A value the server can't run returns payroll_action_misconfigured. |
notifications.channel | Choose the channel the server uses to send the manager notification. |
github.account_model | Declare which GitHub account model applies to your organization, so the server deprovisions through the correct path. Applies only when deployment.enabled_list includes github. |
escalation.critical_failure_target | Enter the identity the Status App surfaces when a critical step fails. |
View project-level property configuration steps
Complete the following steps to configure your project-level properties:
Sign in to your Workato account and go to Projects.
Go to the project that contains your MCP server.
Click the Settings tab.
 Click the Settings tab.
Select Project properties.
Go to the project property you plan to update and click the Edit (pencil) icon.
Go to the Value field and make your changes. For example, set deployment.enabled_list to salesforce, github or notifications.channel to your HR notification channel.
How to use Employee Offboarding Process MCP server tools
Refer to the following sections for detailed information on available tools.
find_employee tool
The find_employee tool resolves an employee from a name, work email, or Worker ID and returns their identity, manager, and pending Workday termination events. Your LLM uses this tool when you name an employee to offboard, or when you ask about someone's termination events.
Try asking:
Look up Ariel Miller.Find the employee with Worker ID 100294.Does Dan Chen have an approved termination event?Show me [email protected], including terminated employees.
execute_offboarding tool
The execute_offboarding tool returns a revocation plan when you call it in preview, and executes that plan when you confirm it. Your LLM uses this tool when you ask to offboard an employee.
Try asking:
Offboard Dan Chen. The approved Workday termination event is TERM-4821.Offboard this employee immediately, effective now.Show me the plan for Worker 100294's offboarding before anything is cut.Resume the offboarding that needs attention for Ariel Okafor.
get_offboarding_status tool
The get_offboarding_status tool returns per-system status for an offboarding. Your LLM uses this tool when you ask how an offboarding is progressing, and immediately after you confirm a plan to report initial progress.
Try asking:
What's the status of offboarding off_a1b2c3?How far along is Dan Chen's offboarding?Which systems failed on Jade's offboarding?Show me the audit records for this offboarding.
retry_offboarding_step tool
The retry_offboarding_step tool retries a single failed step. Your LLM uses this tool when you ask to retry a step that failed, and it previews the retry before running it.
Try asking:
Retry the Zoom deactivation step.The Slack step failed. Can you try it again?Show me what retrying step 4 would do.Retry the failed ServiceNow ticket for this offboarding.
cancel_offboarding tool
The cancel_offboarding tool cancels an offboarding according to its current state. Your LLM uses this tool when you ask to cancel, and it previews the cancellation first so you can see what can and can't be undone.
Try asking:
Cancel the scheduled offboarding for Worker 100294.Stop the offboarding for Dan Chen.What would canceling off_a1b2c3 actually undo?Cancel the remaining steps. The termination was rescinded.
list_offboardings tool
The list_offboardings tool lists offboardings by status, initiator, employee, or date range. Your LLM uses this tool when you ask what's in progress, when you ask about recent offboardings, or when it needs to find an offboarding ID.
Try asking:
Show me every offboarding in progress.List the offboardings I started in the last two weeks.Which offboardings completed with failures this month?Find the offboarding for Worker 100294.
Employee Offboarding Process MCP apps
The Employee Offboarding Process MCP server includes two MCP apps that open at the two points where a structured view reduces error. Neither app adds a confirmation step or skips a preview. Refer to MCP Apps for more information.
Plan Review App
The Plan Review App opens after execute_offboarding returns a preview. It shows the employee's identity alongside the Workday event that grounds the offboarding, including the event ID, type, approval timestamp, approver, termination reason category, and position time zone, so you can catch a plan built on the wrong event.
The app groups the planned actions by criticality, such as access revocation, SaaS deactivations, ServiceNow tickets, and payroll and notification. Each application appears with the exact action the server takes. The tickets the MCP server creates for out-of-scope work appear explicitly.
A countdown shows how long the plan remains valid. Confirming in the app calls execute_offboarding with your confirmation and the plan's ID.
Status App
The Status App opens after you confirm a plan. It shows each system as a row in a timeline, with the action, a criticality badge, a status pill, and a timestamp. Rows update as the app polls get_offboarding_status, and each completed step shows an audit record ID, with links to the ServiceNow tickets the server created.
A critical step failure raises a banner naming your configured escalation target and pauses the steps that depend on it. A failed non-critical row offers a retry that opens an inline preview panel first, and canceling the remaining steps opens a cancellation preview panel the same way.
Getting started
View and manage your MCP server tools in the Overview page Tools section. Tool management provides the following capabilities:
TOOLS MUST BE STARTED
Your LLM can only access active tools in your MCP server connector.
Last updated: