OneDrive MCP server
The OneDrive MCP server enables LLMs to work with files and folders stored in Microsoft OneDrive for Business through natural conversation. It provides tools to discover files, retrieve metadata and content, organize folders, manage sharing and access, and handle the lifecycle of OneDrive artifacts without requiring direct interaction with the OneDrive interface.
NOT COMPATIBLE WITH POWERPOINT OR WORD
The OneDrive MCP server doesn't support actions for Microsoft PowerPoint or Microsoft Word.
Uses
Use the OneDrive MCP server to perform the following actions:
- Search for files and folders using name keywords, file type, owner, or time filters
- List contents of specific folders with pagination support
- Get metadata and permission information for files and folders
- Retrieve readable text content from files
- Create new folders and organize folder structures
- Copy files to create duplicates or templates
- Upload and save files to OneDrive
- Move files and folders to different locations
- Rename files and folders
- Delete files and folders
- Review sharing and access permissions
- Share files and folders with specific users or groups
- Modify or remove existing permissions
Example prompts
You can use the following prompts to invoke OneDrive MCP server tools:
Find all PowerPoint presentations modified in the last week.List what's in my Project Alpha folder.Get the metadata for this quarterly report file.Read the contents of the meeting notes document.Create a new folder called Q1 2026 Reports.Copy the proposal template to my current project folder.Save this document to my OneDrive.Move these files to the Archive folder.Rename this file to include the date.Who has access to the budget spreadsheet?Share the project plan with Jade and give her edit access.Change Alex to read-only access on this document.
OneDrive MCP server tools
The OneDrive MCP server provides the following tools:
| Tool | Description |
|---|---|
| find_files | Searches for files and folders in OneDrive using name keywords, file type, owner, time filters, and optional content search. |
| list_folder_items | Lists the immediate contents of a OneDrive folder you specify with pagination support. |
| get_file_metadata | Returns metadata and permission information for a OneDrive file or folder by its unique ID. |
| get_file_content | Retrieves readable text content from a OneDrive file you specify. |
| create_folder | Creates a new folder in OneDrive at a parent location you specify. |
| copy_file | Creates a copy of an existing OneDrive file, optionally with a new name and destination folder. |
| create_upload_session | Initiates an upload session for storing an externally produced file artifact in OneDrive. |
| finalize_upload | Completes a previously initiated upload session and returns the resulting OneDrive file details. |
| move_item | Moves a file or folder to a different folder within OneDrive. |
| rename_item | Renames a file or folder in OneDrive. |
| delete_item | Deletes a file or folder, moving it to the OneDrive recycle bin. |
| get_permissions | Retrieves the current sharing and access information for a OneDrive file or folder you specify. |
| share_item | Grants access to a OneDrive file or folder you specify for one or more users or groups. |
| modify_permission | Updates the access role for an existing permission entry or removes an existing permission entry entirely. |
Install the OneDrive MCP server
Complete the following steps to install a prebuilt MCP server to your project:
Sign in to your Workato account.
Go to AI Hub > MCP servers.
Click + Create MCP server.
Go to the Start with pre-built MCP Servers using your connected apps section and select the prebuilt MCP server you plan to use.
Click Use this server.
Provide a name for your MCP server in the Server name field.
Use the Location drop-down menu to select the project for the MCP server.
Go to the Connections section and connect to your app account.
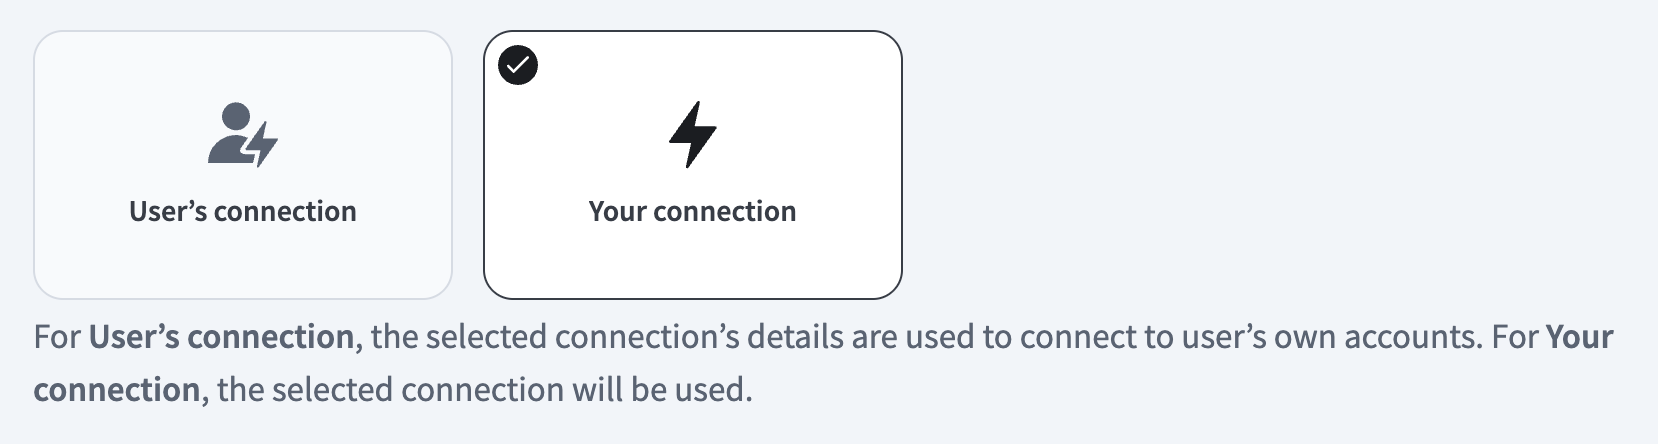
Select the connection type you plan to use for the MCP server template.
- User's connection: MCP server tools perform actions based on the identity and permissions of the user who connects to the application. Users authenticate with their own credentials to execute the skill.
- Your connection: This option uses the connection established by the recipe builder and follows the same principles as normal app connections.
 Select your connection type
VERIFIED USER ACCESS AUTHENTICATION REQUIREMENTS
Only app connections that use OAuth 2.0 authorization code grant are available for user's connection. Refer to Verified user access for more information.
Complete the app-specific connection setup steps in the following section.
OneDrive connection setup
View OneDrive connection setup steps
The OneDrive connector supports the following authentication types:
- Authorization code grant authentication (OAuth 2.0)
- Client credentials-based authentication (OAuth 2.0)
MICROSOFT MFA ENFORCEMENT
Microsoft is rolling out mandatory multifactor authentication (MFA) gradually to different applications and accounts in phases. This enforcement continues throughout 2025 and beyond. Refer to the Microsoft Mandatory multifactor authentication for Azure and admin portals documentation for more information.
We strongly recommend enabling MFA now for all Microsoft accounts used with Workato to avoid service disruptions from short-notice enforcement changes.
Complete the following steps to maintain uninterrupted service:
Enable MFA for your Microsoft organization following the Microsoft MFA setup guide. Refer to Set up multifactor authentication for Microsoft 365 for more information.
Reconnect your Microsoft connection in Workato.
Complete the OAuth flow with MFA when prompted.
Test your recipes to ensure they work with the updated connection.
Authorization code grant authentication (OAuth 2.0)
View authorization code grant authentication steps
Use the Tenant ID/Domain value with tenant-specific account types.
Minimum and default scopes
View minimum and default scopes
The OneDrive connector requests the following scopes by default. These scopes support all triggers and actions. You must assign these as Delegated permissions in the Azure portal:
Files.ReadWriteGroup.Read.AllFiles.Readoffline_access
You must add the following minimum scopes to establish a connection to OneDrive with authorization code grant authentication:
Files.Readoffline_access
OneDrive setup for authorization code grant authentication
Complete the following steps to set up OneDrive for authorization code grant authentication:
Register the Workato App in Azure portal
View register the Workato app in the Azure portal steps
Complete the following steps to register the Workato app in the Azure portal:
Sign in to the Azure portal.
Select App registrations > + New registration.
Enter a unique name for the application.
Use the Supported account types drop-down menu to select an account type.
Select Web from the Select a platform drop-down menu.
Use the following URI for the Redirect URI:
https://www.workato.com/oauth/callbackSelect Register.
Assign permissions to your app
View assign permissions to your app steps
Complete the following steps to assign permissions to your app:
Go to your newly registered app and select Manage > API permissions in the navigation sidebar.
Click + Add a permission and select Microsoft Graph APIs.
Add the required permissions. Depending on your connection type, you must assign Application or Delegated permissions.
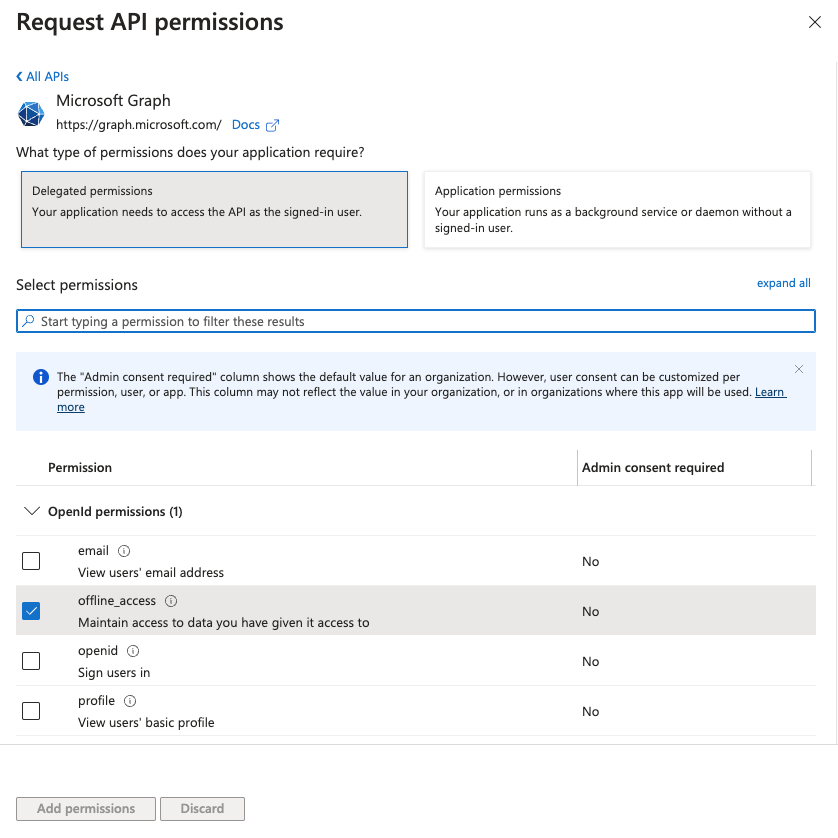 Add permissions
Click Add permissions. If specific permissions require admin consent, refer to Connect Microsoft Entra ID to the Outlook connector to learn more.
Obtain the Directory (tenant) ID from the Azure portal
View obtain the Directory (tenant) ID from the Azure portal steps
Complete the following steps to obtain the Directory (tenant) ID from the Azure portal:
Go to the Overview > Essentials section.
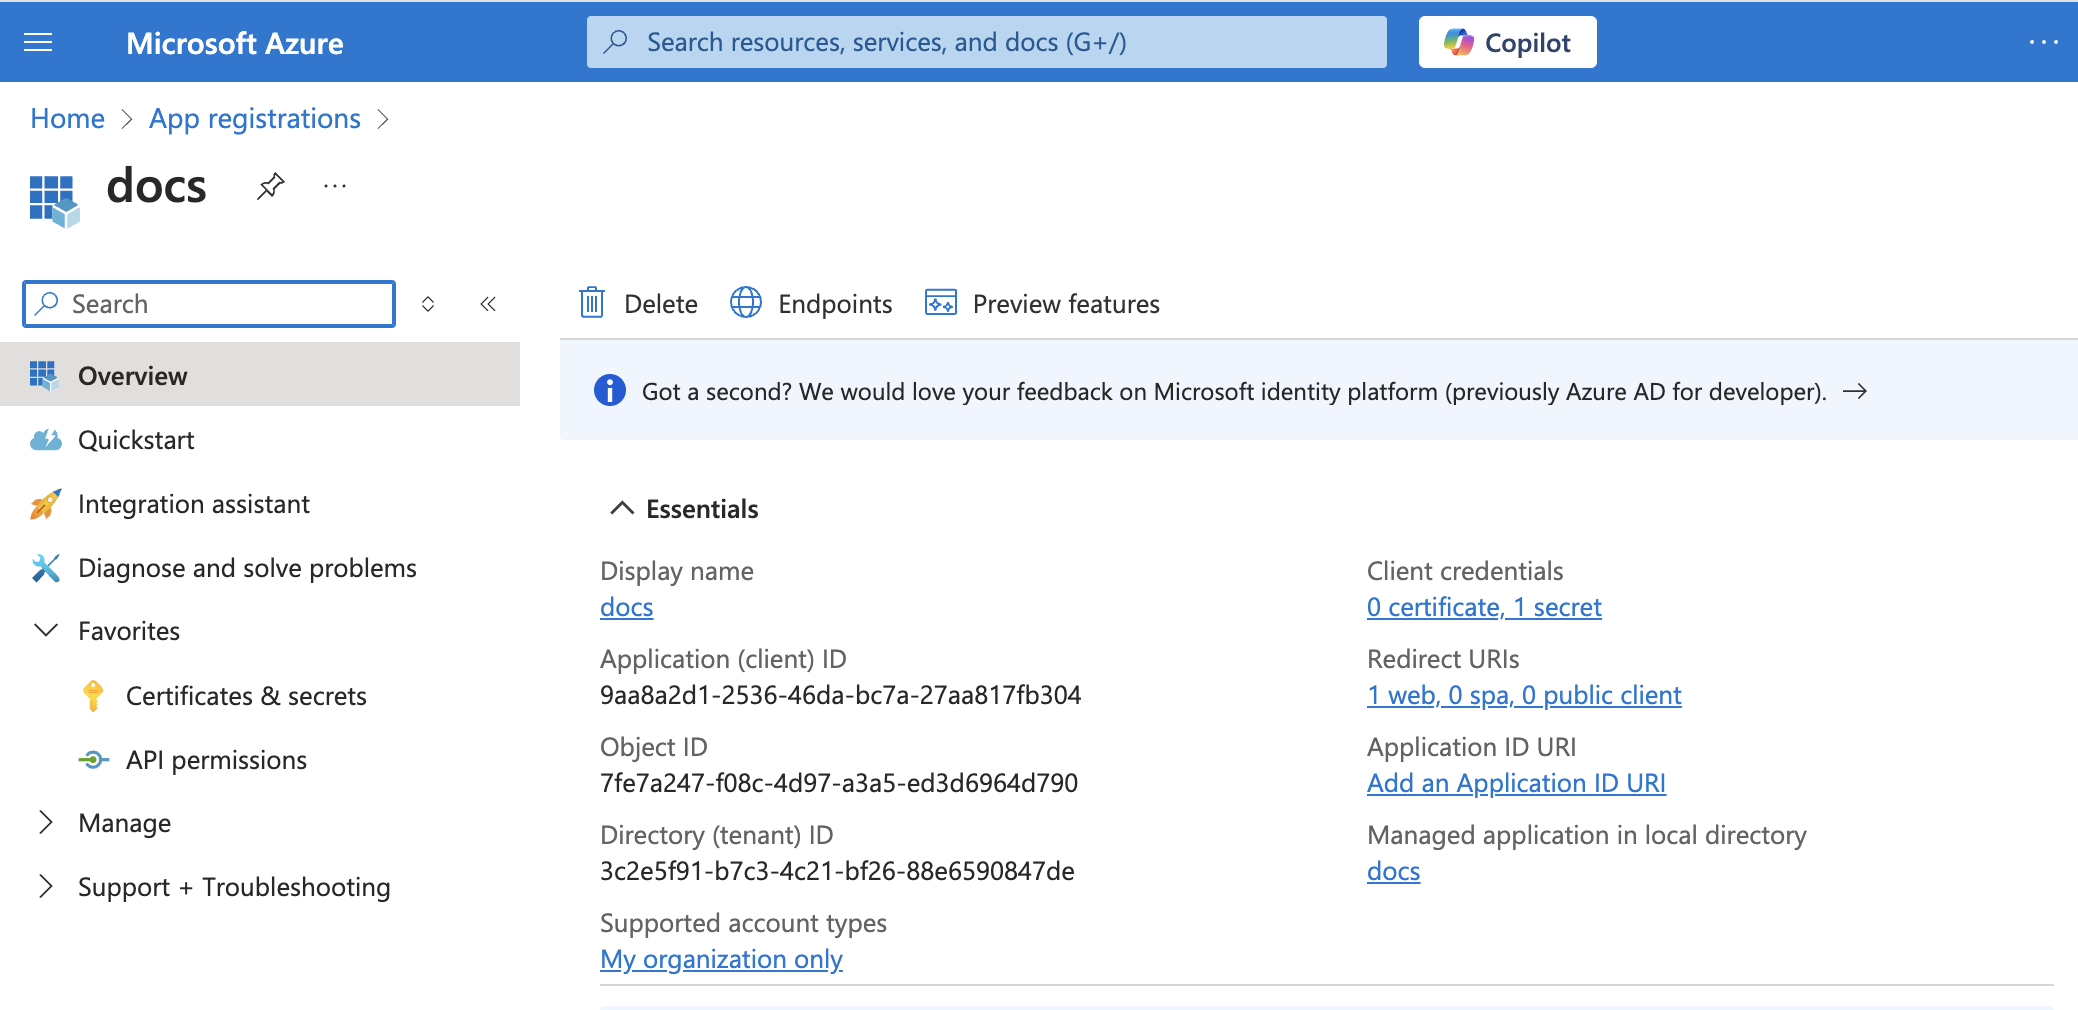 App details
Copy and save the Directory (tenant) ID for use in Workato.
Connect to OneDrive with authorization code grant authentication
View connect to OneDrive with authorization code grant authentication steps
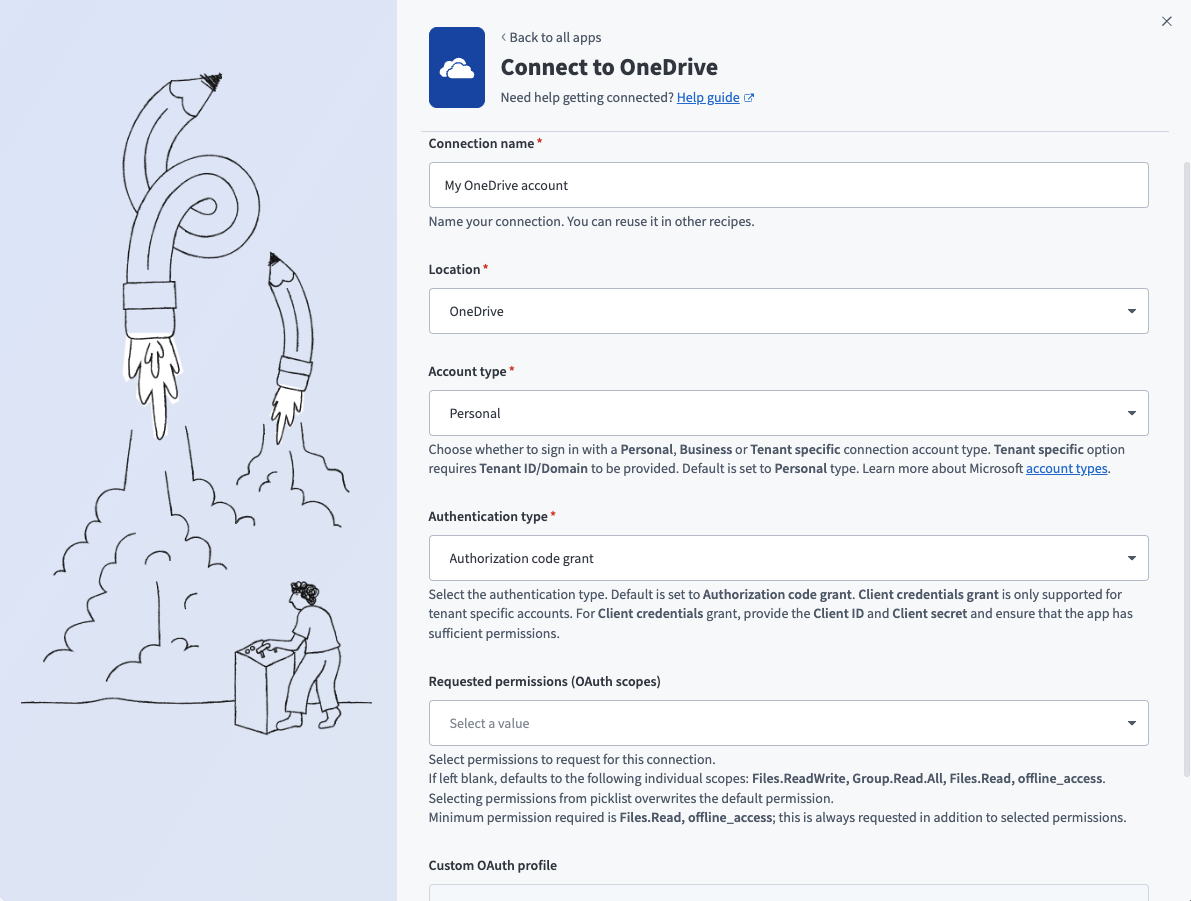
Complete the following steps to set up a authorization code grant connection to OneDrive in Workato:
Click Create > Connection.
Search for OneDrive and select it as your app.
Enter a name for your connection in the Connection name field.
Use the Location drop-down menu to select the project where you plan to store the connection.
Use the Connection account type drop-down menu to select the type of account you plan to use. The available choices are Personal, Business, and Tenant-specific.
 Personal connections
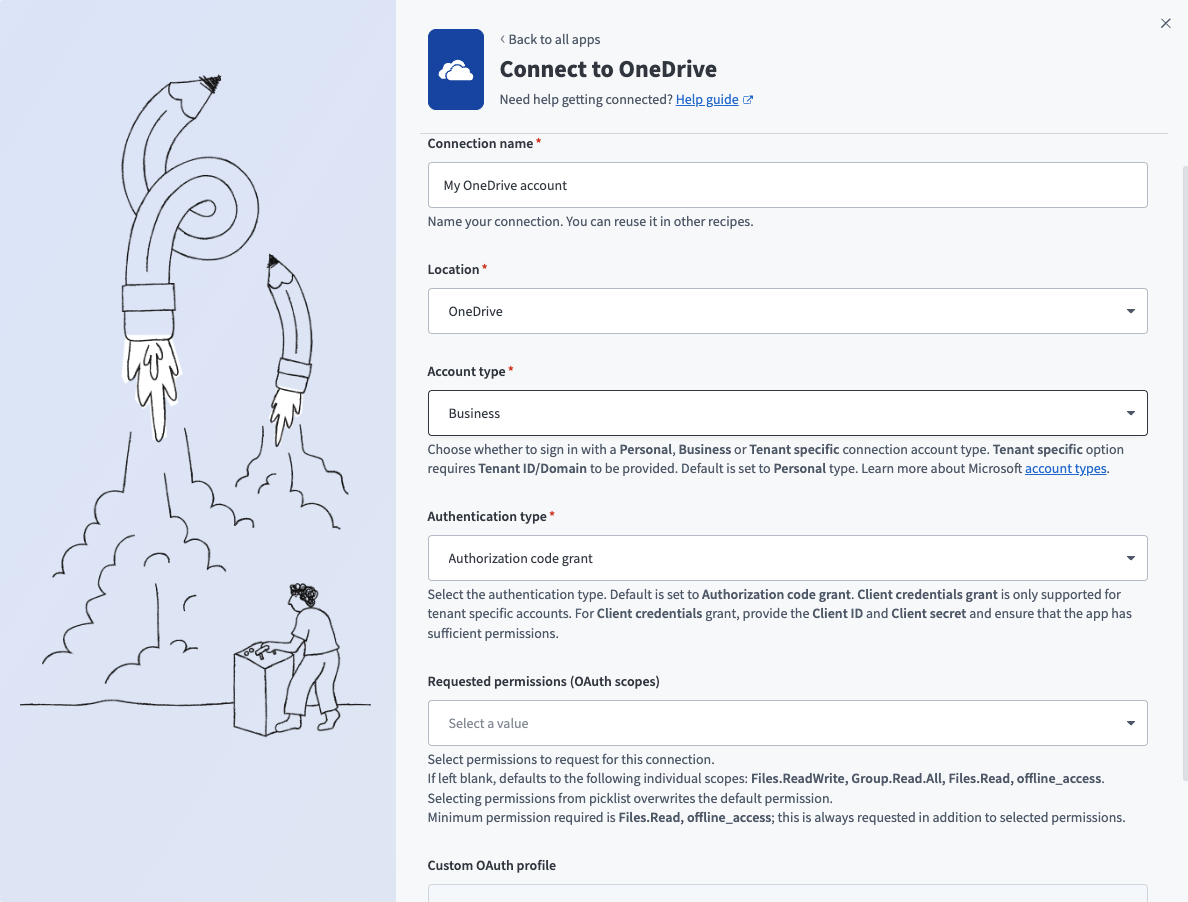 Business connections
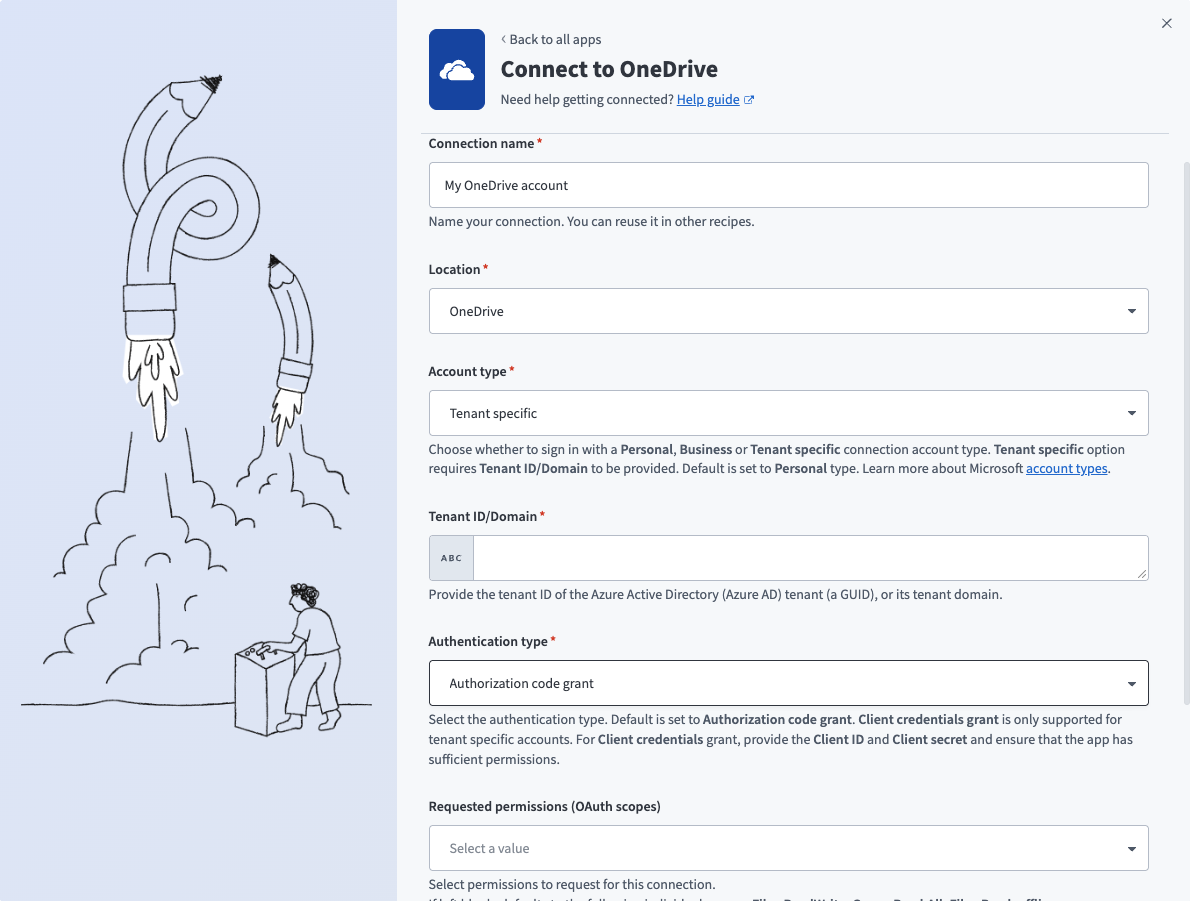 Tenant specific connections
Use the Authentication type drop-down menu to select Authorization code grant.
Optional. Go to the Advanced settings section to manually select the permissions. The minimum permissions required to establish a connection are Files.Read and offline_access. Workato always requests these permissions regardless of the permissions you select. Refer to Minimum and default scopes for more information.
Optional. Use the Custom OAuth profile drop-down menu to select a custom OAuth profile for your connection.
Click Sign in with Microsoft.
Client credentials-based authentication (OAuth 2.0)
This authentication type requires the following values:
- Tenant ID/Domain
- User ID
- Client ID
- Client secret
Minimum and default scopes
View minimum and default scopes
We recommend the following scopes for client credentials-based connections. These scopes support all triggers and actions. You must assign these as Application permissions in the Azure portal:
Files.Read.AllFiles.ReadWrite.AllGroup.Read.AllSites.ReadWrite.All
You must add the following minimum scopes to establish a connection to OneDrive with client credentials-based authentication:
Files.Read.All
OneDrive setup for client credentials-based authentication
Complete the following steps to set up OneDrive for client credentials-based authentication:
- Register the Workato app in the Azure portal
- Assign permissions to your app
- Generate a client secret
- Obtain the Application (client) ID, Object ID, and Directory (tenant) ID from the Azure portal
- Obtain the User ID from the Azure portal
Register the Workato App in the Azure portal
View register the Workato app in the Azure portal steps
Complete the following steps to register the Workato app in the Azure portal:
Sign in to the Azure portal.
Select App registrations > + New registration.
Enter a unique name for the application.
Use the Supported account types drop-down menu to select an account type.
Select Web from the Select a platform drop-down menu.
Use the following URI for the Redirect URI:
https://www.workato.com/oauth/callbackSelect Register.
Assign permissions to your app
View assign permissions to your app steps
Complete the following steps to assign permissions to your app:
Go to your newly registered app and select Manage > API permissions in the navigation sidebar.
Click + Add a permission and select Microsoft Graph APIs.
Add the required permissions. Depending on your connection type, you must assign Application or Delegated permissions.
Add permissions
Click Add permissions. If specific permissions require admin consent, refer to Connect Microsoft Entra ID to the Outlook connector to learn more.
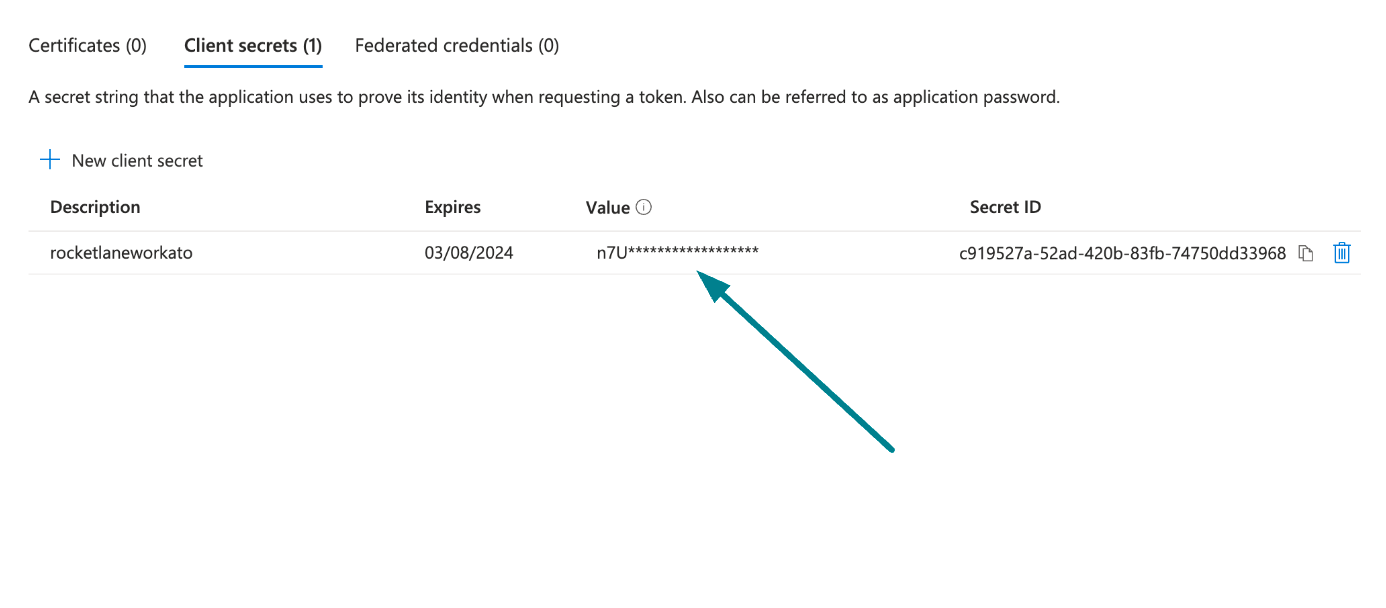
Generate a client secret
View generate a client secret steps
Complete the following steps to generate a client secret:
Go to Manage > Certificates & Secrets > Client secrets.
Click + New client secret.
Provide a Description for the client secret and specify an Expires date.
Click Add.
Copy and save the client secret Value—not the Secret ID—for use in Workato.
 Copy and save the client secret value
Obtain the Application (client) ID, Object ID, and Directory (tenant) ID from the Azure portal
View obtain the Application (client) ID, Object ID, and Directory (tenant) ID from the Azure portal steps
Complete the following steps to obtain the Application ID, Object ID, and Directory (tenant) ID from the Azure portal:
Go to the Overview > Essentials section.
App details
Copy and save the Application (client) ID, Object ID, and Directory (tenant) ID for use in Workato.
Obtain the User ID from the Azure portal
View obtain the User ID from the Azure portal steps
Complete the following steps to obtain the User ID from the Azure portal:
Go to Home > Users to obtain the User ID.
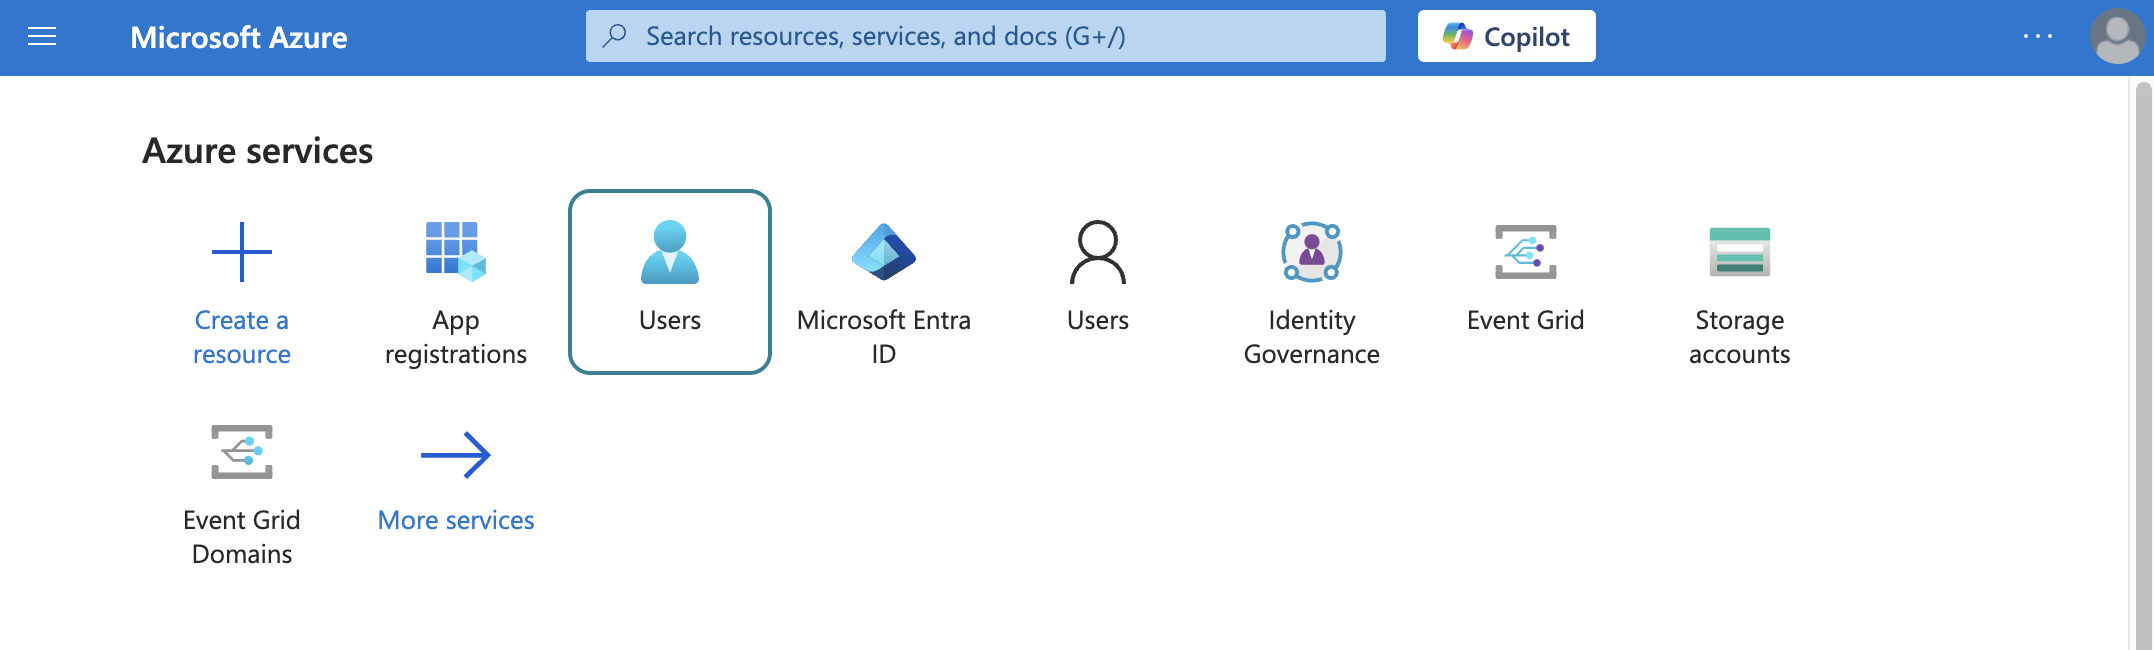 Select users
Search for and select the default user you plan to use to perform operations. This user doesn't establish the connection but is required for performing certain operations that an app can't perform. It's also required in picklists to pull user data. For example, the folder picklist populates folders belonging to the default user.
Copy and save the User principal name. Use this value as the User ID in Workato.
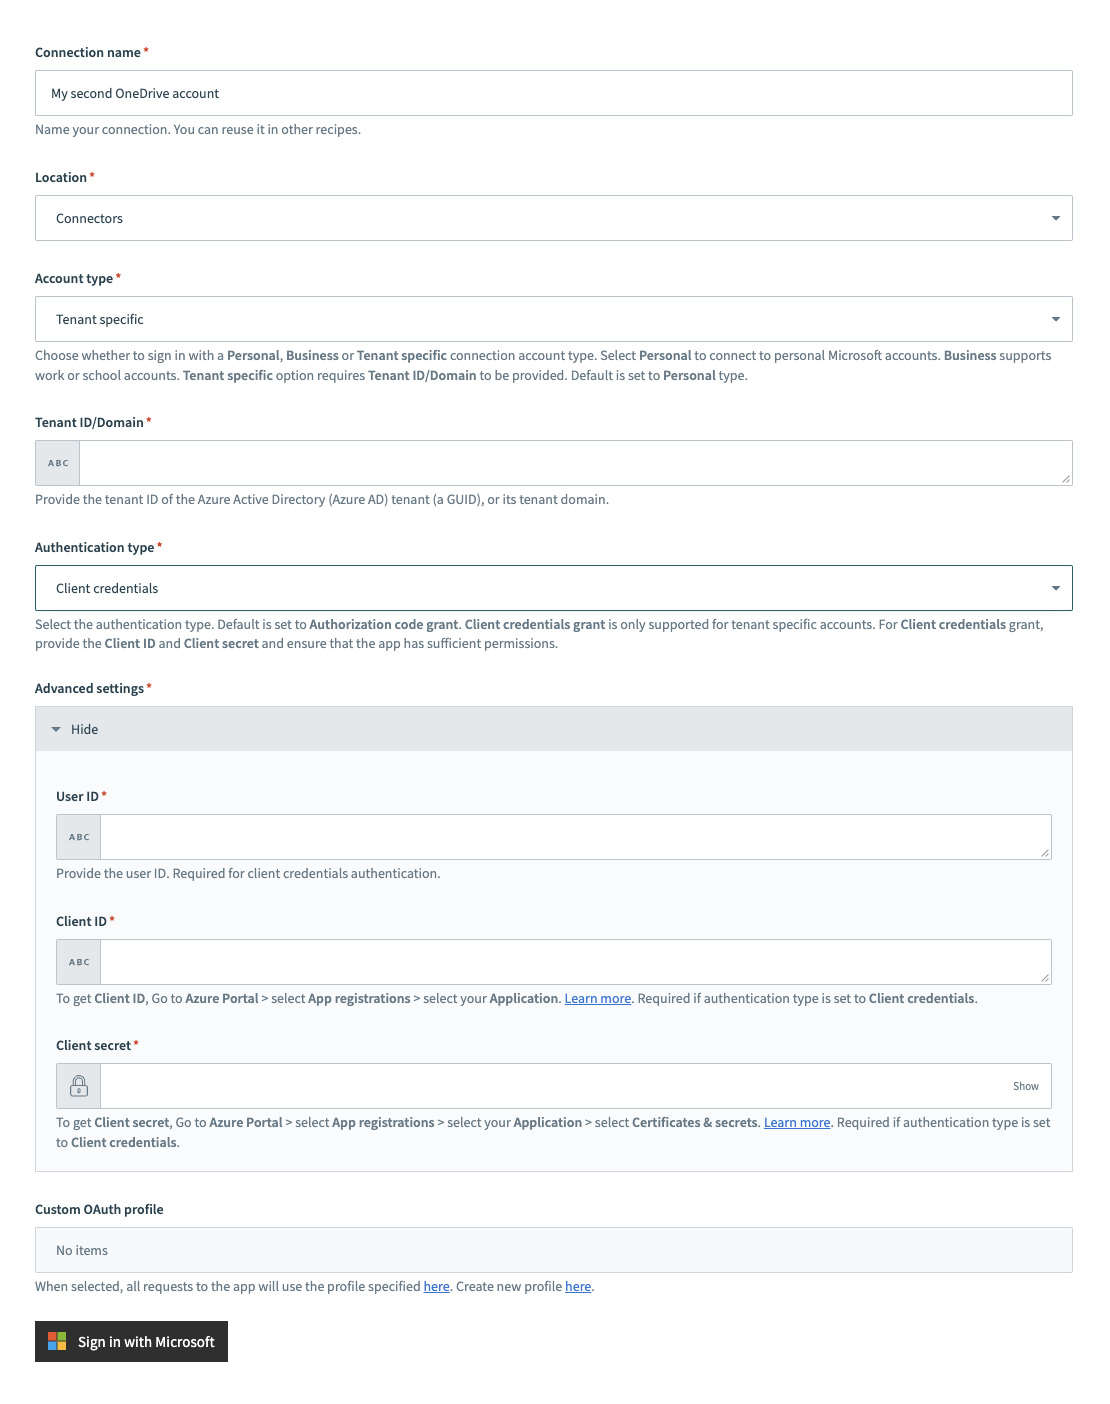
Connect to OneDrive with client credentials-based authentication
View connect to OneDrive with client credential-based authentication steps
Complete the following steps to set up a client credentials-based connection to OneDrive in Workato:
Click Create > Connection.
Search for OneDrive and select it as your app.
Enter a name for your connection in the Connection name field.
Use the Location drop-down menu to select the project where you plan to store the connection.
Select Tenant specific as the Connection account type. This option supports accounts tied to a specific organization (tenant).
 Tenant specific account connection type
Provide your Tenant ID/Domain. This is the Directory (tenant) ID for your app. Refer to Obtain the Application (client) ID, Object ID, and Directory (tenant) ID from the Azure portal for more information.
Use the Authentication type drop-down menu to select Client credentials.
Provide the User ID, Client ID, and Client secret for your app. Refer to Obtain the Application (client) ID, Object ID, and Directory (tenant) ID from the Azure portal and Generate a client secret for more information.
Optional. Use the Custom OAuth profile drop-down menu to select a custom OAuth profile for your connection.
Click Sign in with Microsoft.
How to use OneDrive MCP server tools
Refer to the following sections for detailed information on available tools:
find_files tool
The find_files tool searches for files and folders in OneDrive using name keywords, file type, owner, time filters, and optional content search. Your LLM uses this tool to find, search, or locate files or folders without knowing the exact folder location.
Try asking:
Find all PowerPoint presentations modified in the last week.Search for files containing 'budget' in the name.Locate documents owned by Mei from last month.Find Excel files with 'Q4' in the filename.
list_folder_items tool
The list_folder_items tool lists the immediate contents of a OneDrive folder you specify with pagination support for large folders. Your LLM uses this tool to list what's in a folder or browse a known location.
Try asking:
List what's in my Project Alpha folder.Show me the contents of the Marketing folder.What files are in my Documents folder?Browse the Q1 2026 Reports folder.
get_file_metadata tool
The get_file_metadata tool returns metadata and permission information for a OneDrive file or folder by its unique ID. Your LLM uses this tool to inspect an identified file or folder before taking action, confirm who has access, or verify ownership or sharing.
Try asking:
Get the metadata for this quarterly report file.Show me the details for this document.When was this file last modified?Who owns this folder?
get_file_content tool
The get_file_content tool retrieves readable text content from a OneDrive file you specify using Microsoft Graph export when necessary. Your LLM uses this tool to read, review, summarize, or extract information from a OneDrive file, or when a file is needed as input to a downstream task.
CONTENT LIMITATIONS
The get_file_content tool doesn't support binary file content.
Try asking:
Read the contents of the meeting notes document.Show me what's in the proposal file.Summarize the quarterly report.Extract the key points from this document.
create_folder tool
The create_folder tool creates a new folder in OneDrive at a parent location you specify. Your LLM uses this tool to create a new folder, set up folder structure for a project, or prepare a location to store files.
Try asking:
Create a new folder called Q1 2026 Reports.Set up a Project Beta folder in my Documents.Make a new Archive folder.Create a folder for client presentations.
copy_file tool
The copy_file tool creates a copy of an existing OneDrive file, optionally with a new name and destination folder. Your LLM uses this tool to copy or duplicate a file, or create a new document from a template.
Try asking:
Copy the proposal template to my current project folder.Duplicate this document and rename it 'Version 2'.Create a copy of the budget spreadsheet for Q2.Copy this presentation to the Archive folder.
create_upload_session tool
The create_upload_session tool initiates an upload session for storing an externally produced file artifact in OneDrive. Your LLM uses this tool as the first step to save, store, or upload a file to OneDrive.
Try asking:
Start an upload session to save this document.Prepare to upload this file to my OneDrive.Initialize upload for the new report.Begin upload session for this presentation.
finalize_upload tool
The finalize_upload tool completes a previously initiated upload session and returns the resulting OneDrive file details. Your LLM uses this tool to complete an upload initiated by create_upload_session.
Try asking:
Complete the upload session for this document.Finalize the file upload.Finish uploading the report to OneDrive.Complete the upload and save the file.
move_item tool
The move_item tool moves a file or folder to a different folder within OneDrive. Your LLM uses this tool to move a file or folder to another location, file documents into a project folder, or reorganize content.
Try asking:
Move these files to the Archive folder.File this document into the Q1 Reports folder.Reorganize by moving the presentations to the Marketing folder.Move the budget spreadsheet to Project Alpha.
rename_item tool
The rename_item tool renames a file or folder in OneDrive. Your LLM uses this tool to rename a file or folder, apply naming conventions, or correct a file name.
Try asking:
Rename this file to include the date.Change the folder name to 'Q1 2026 Archive'.Update this document's name to 'Final Proposal'.Correct the filename to match our naming convention.
delete_item tool
The delete_item tool deletes a file or folder, moving it to the OneDrive recycle bin. Your LLM uses this tool when you explicitly ask to delete a file or folder.
Try asking:
Delete this outdated report.Remove the draft folder.Delete these old presentation files.Clear out the temporary documents.
get_permissions tool
The get_permissions tool retrieves the current sharing and access information for a OneDrive file or folder you specify. Your LLM uses this tool to view who has access to a file or folder, confirm whether specific stakeholders have access, troubleshoot access issues, or validate sharing state.
Try asking:
Who has access to the budget spreadsheet?Show me the sharing permissions for this folder.Does Marco have access to this document?Check who can view the project plan.
share_item tool
The share_item tool grants access to a OneDrive file or folder you specify for one or more users or groups. Your LLM uses this tool to share a file or folder with people you specify, grant review or edit access, or ensure stakeholders have access.
Try asking:
Share the project plan with Jade and give her edit access.Grant Alex read access to this document.Share this folder with the Marketing team.Give Josh review access to the proposal.
modify_permission tool
The modify_permission tool updates the access role for an existing permission entry on a OneDrive file or folder, or removes an existing permission entry entirely. Your LLM uses this tool to change someone's access level or remove someone's access.
Try asking:
Change Alex to read-only access on this document.Make Mei an editor on the budget file.Remove Josh's access to this folder.Revoke Marco's permissions on this file.
Getting started
View and manage your MCP server tools in the Overview page Tools section. Tool management provides the following capabilities:
TOOLS MUST BE STARTED
Your LLM can only access active tools in your MCP server connector.
Last updated: