Enforce SAML-based SSO for Workflow apps with Microsoft Entra ID
This guide demonstrates how to set up SAML-based SSO authentication for Workflow apps using Microsoft Entra ID. It includes instructions for enabling user group syncing between Workflow apps and Microsoft Entra ID, allowing you to manage access to specific Workflow apps through your Identity Provider (IdP).
Setup involves retrieving values from your Workflow apps portal, creating an enterprise application in Microsoft Entra ID, syncing your user groups, and completing the configuration in Workato.
NOT FOR WORKATO IDENTITY SAML-BASED SSO
This documentation is specific to Workflow apps. Refer to Workato Identity SAML-based SSO to configure SAML authentication for Workato Identity features, such as Agent Studio, Workato GO, and MCP.
DEFAULT SESSION DURATION
The default session duration is seven days when you authenticate using SAML-based SSO without group syncing enabled. When group syncing is enabled, the default session timeout is one day.
You can use a Conditional Access sign-in frequency policy to control how often users must reauthenticate with Microsoft Entra ID.
Prerequisites
To complete the steps in this guide, you must have the following:
In Workato:
- One of the following, depending on your workspace's permission model:
- Legacy roles: the Admin or Analyst system role.
- RBAC 2.0: an environment role that grants the Apps portal > Settings privilege, such as Environment admin or Environment manager.
- Access to Workflow apps.
In Microsoft Entra ID:
- Privileges that enable you to add, edit, and manage an enterprise application.
- Privileges that enable you to create users and groups, assign users to groups, and assign users and groups to applications.
Retrieve values from Workato
You need the Single Sign-On URL and Service provider (SP) entity ID from your Workflow apps portal to configure Microsoft Entra ID. These values appear after you set the portal's authentication method to SAML-based SSO.
Sign in to Workato.
Go to Platform > Workflow apps portal > Portal settings > Security.
Select SAML based SSO in the Authentication method field. The portal displays the Single Sign-On URL and Service provider (SP) entity ID.
Copy the Single Sign-On URL and Service provider (SP) entity ID.
URL FORMATS VARY
The Single Sign-On URL and Service provider (SP) entity ID are unique to your Workflow apps portal subdomain or custom domain and the data center your account is located in. They follow these formats, where {subdomain} is your portal's subdomain and {custom-domain} is your custom domain name:
- Single Sign-On URL
- Default domain:
https://{subdomain}.workato.app/portal/sso/saml/acs - Custom domain:
https://{custom-domain}/portal/sso/saml/acs
- Default domain:
- Service provider (SP) entity ID
- Default domain:
https://{subdomain}.workato.app/portal/sso/saml/metadata - Custom domain:
https://{custom-domain}/portal/sso/saml/metadata
- Default domain:
Create an enterprise application
Complete the following steps to register an enterprise application in Microsoft Entra ID and configure SAML-based SSO for your Workflow apps portal:
Sign in to the Microsoft Entra admin center.
Go to Entra ID > Enterprise apps > All applications and click New application.
Click Create your own application.
Provide a unique name for the app in the What's the name of your app? field. For example, Workflow apps.
Select Integrate any other application you don't find in the gallery (Non-gallery) and click Create.
Go to Manage > Single sign-on and select SAML as the single sign-on method.
Go to the Basic SAML Configuration section and click Edit.
Enter the values you retrieved from Workato:
| Workato value | Microsoft Entra ID field |
|---|---|
| Service provider (SP) entity ID | Identifier (Entity ID) |
| Single Sign-On URL | Reply URL (Assertion Consumer Service URL) |
Click Save.
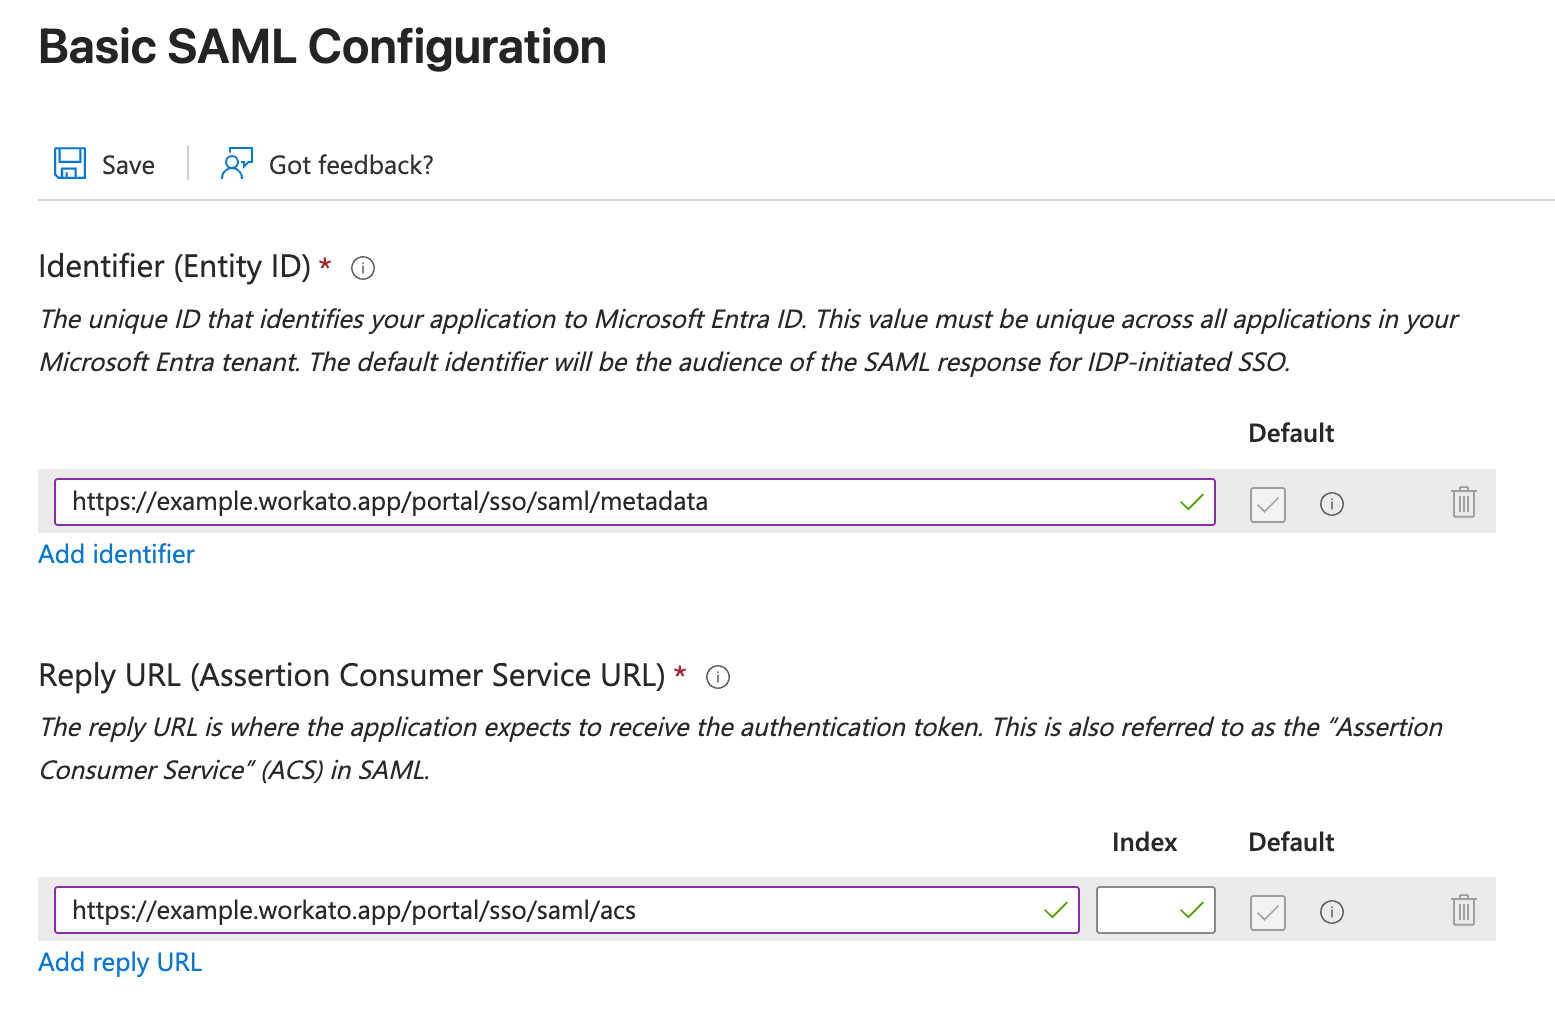 Basic SAML Configuration in Microsoft Entra ID
Go to the Attributes & Claims section and click Edit.
Click + Add new claim, add the following attribute, and click Save:
| Name | Source attribute |
|---|---|
workato_app_user_name | user.displayname |
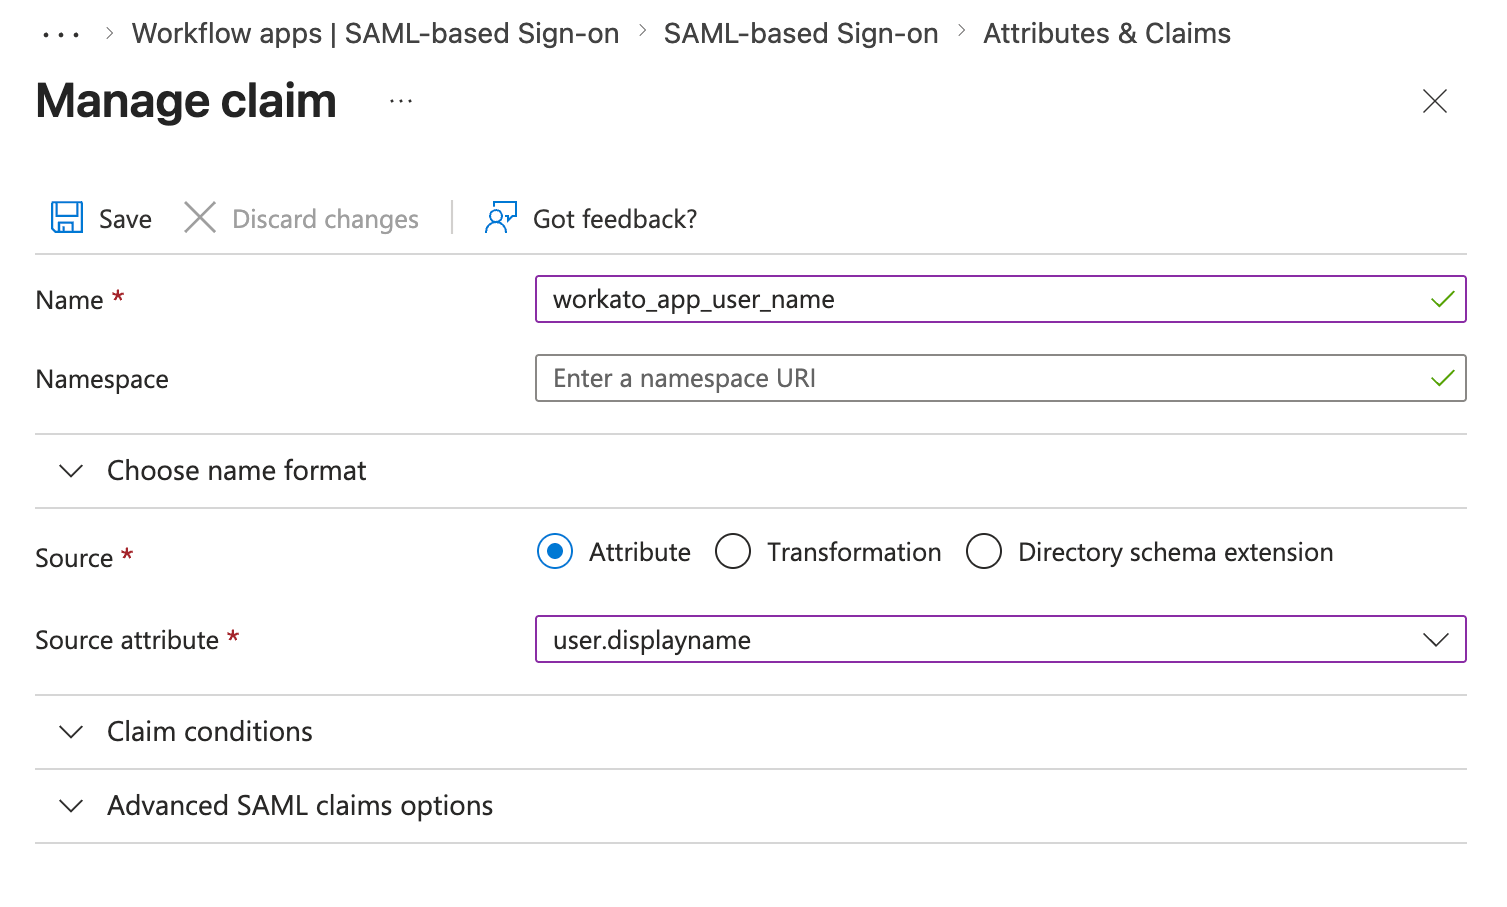 The user name claim in Microsoft Entra ID
Optional. Sync user group assignments between Microsoft Entra ID and the Workflow apps portal. Skip this step if you don't plan to manage user groups through Microsoft Entra ID.
Click + Add a group claim, configure the following settings, and click Save:
| Setting | Value |
|---|---|
| Which groups associated with the user should be returned in the claim? | Groups assigned to the application |
| Source attribute | Cloud-only group display names |
| Customize the name of the group claim | Enabled |
| Name | workato_app_user_groups |
| Namespace | Leave empty |
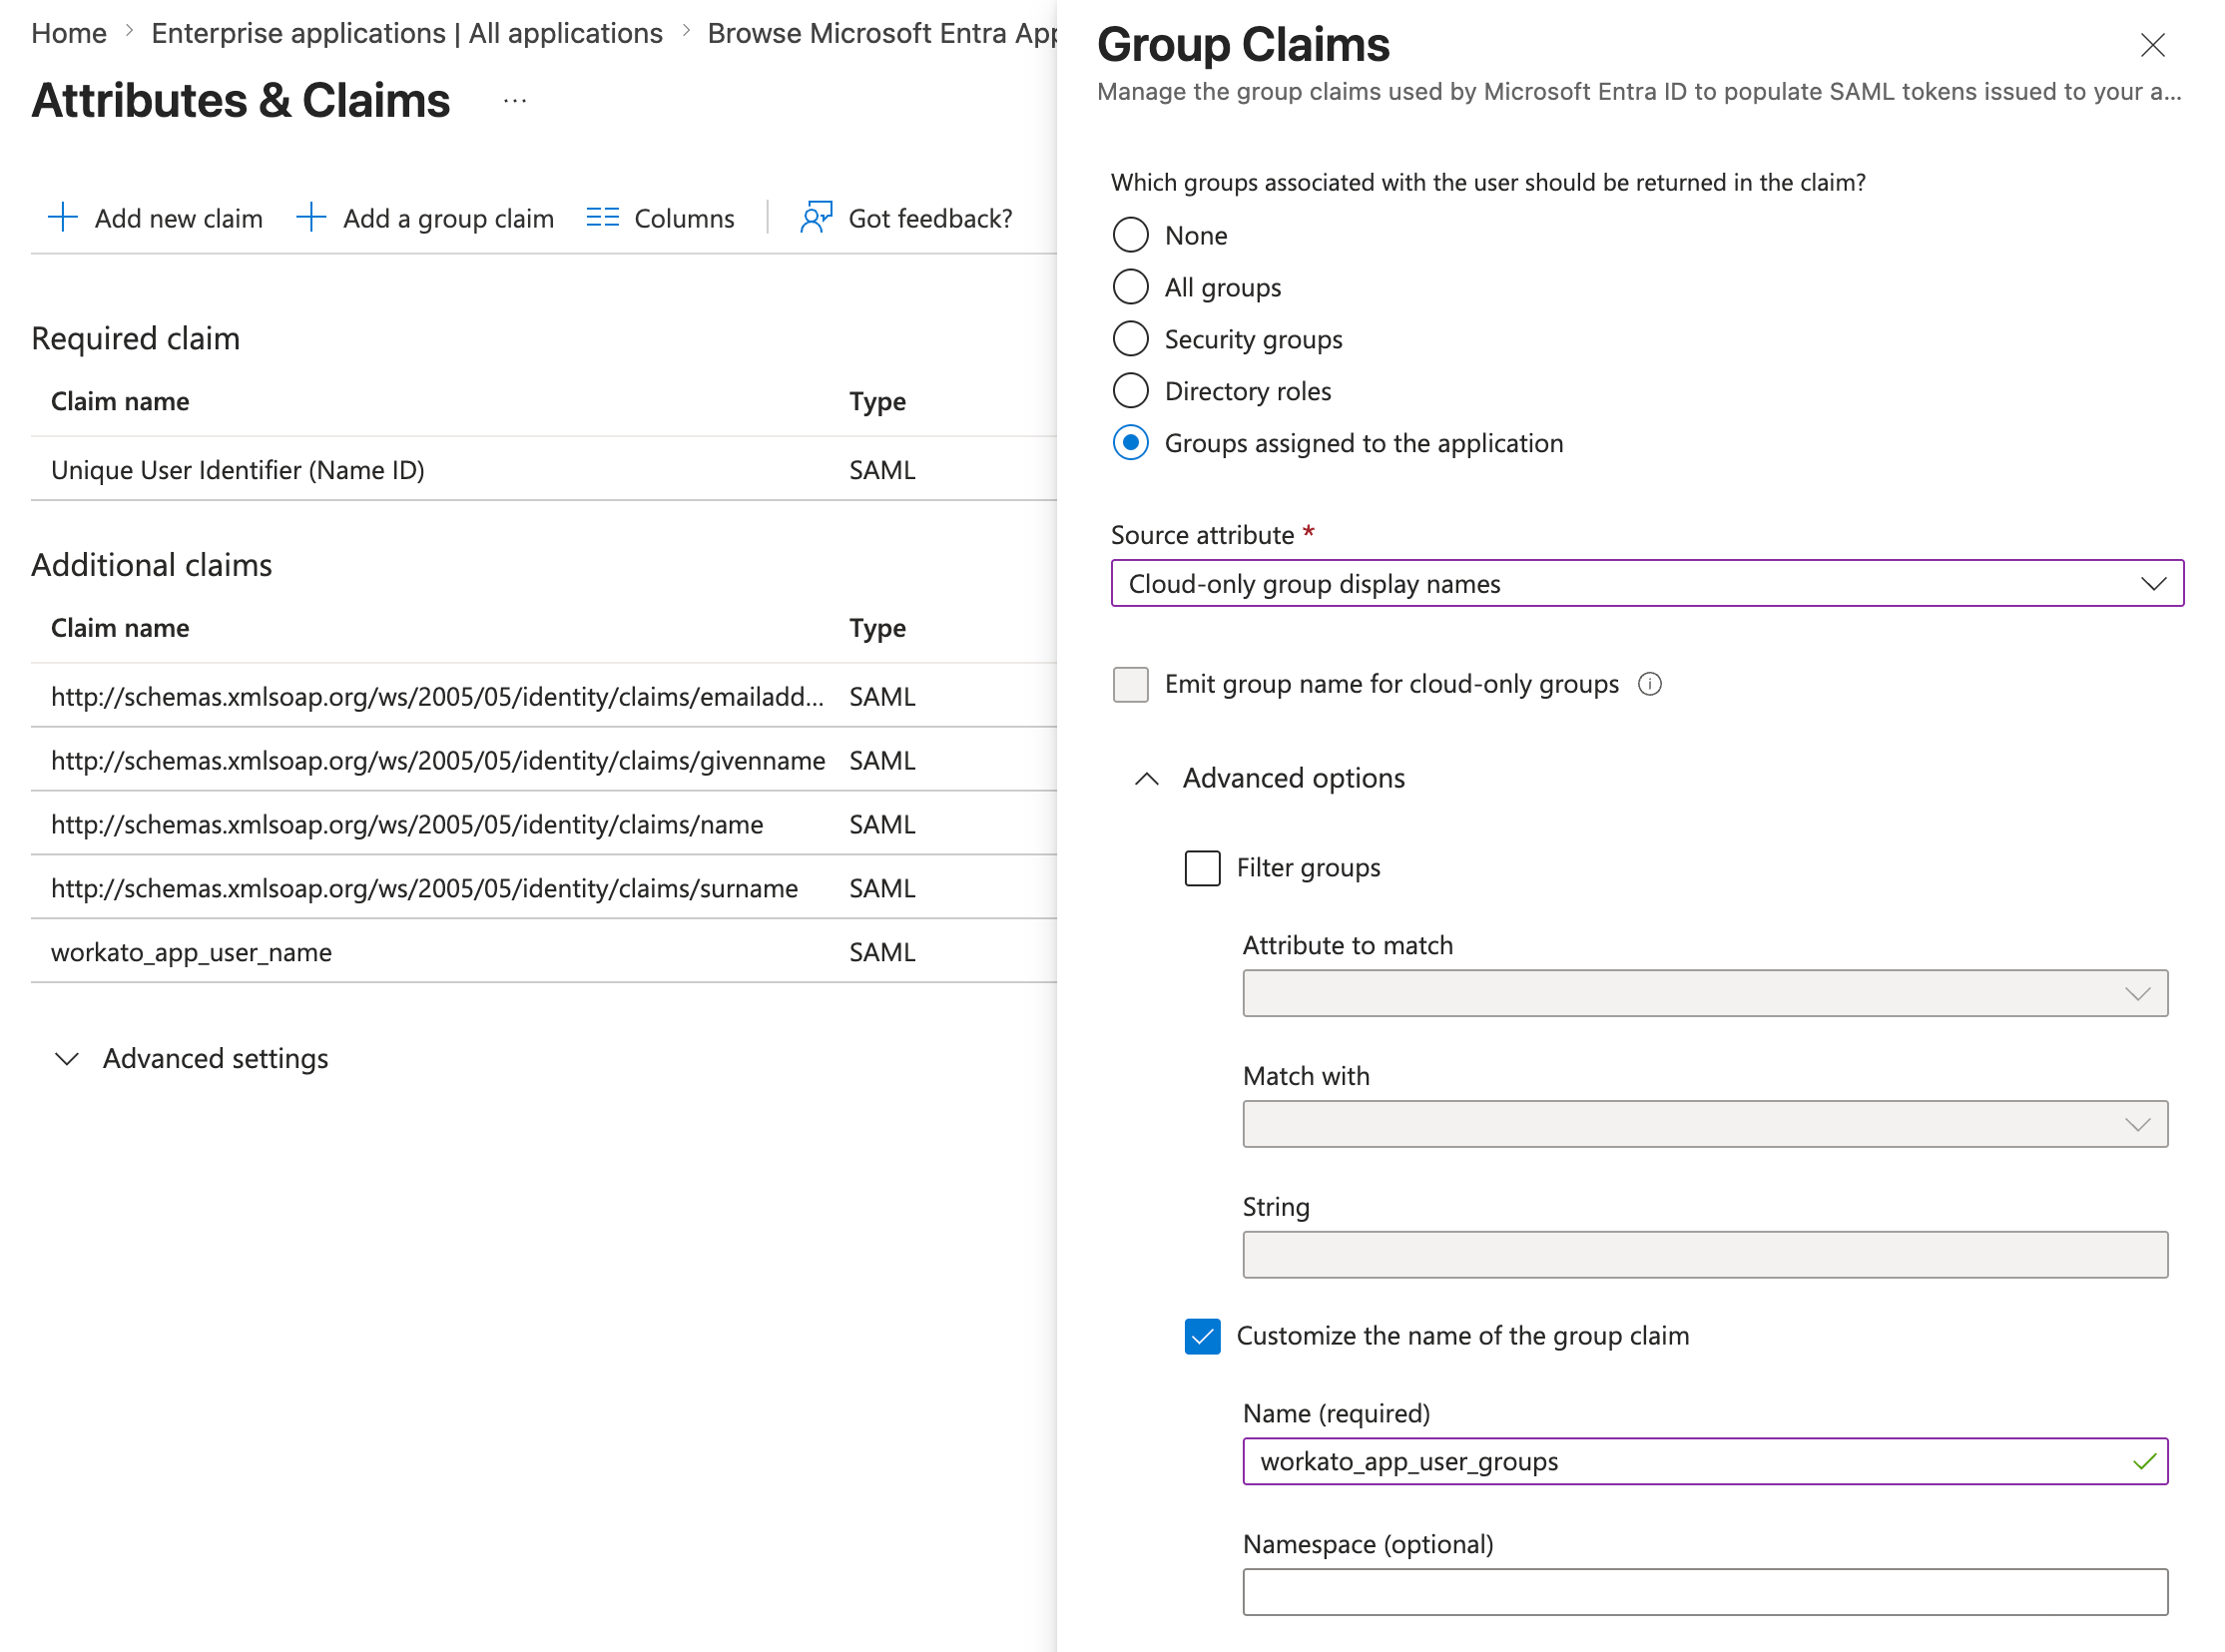 The group claim in Microsoft Entra ID
Go back to Manage > Single sign-on, scroll to the SAML Certificates section, and copy the App Federation Metadata URL. You paste this value into Workato in Complete setup in Workato.
VIRTUAL PRIVATE WORKATO (VPW) CUSTOMERS
This feature requires configuration steps that are specific to your Virtual Private Workato (VPW) instance. If you are a VPW customer, refer to your VPW private documentation for the configuration details for your instances.
Configure Microsoft Entra ID SAML user group sync
You can sync user group assignments between Microsoft Entra ID and the Workflow apps portal. This section is only necessary if you manage user groups through Microsoft Entra ID. After you add the group claim in Create an enterprise application, assign groups and users to your application to complete the sync.
GROUP NAMES MUST MATCH
The user group name in your Workflow apps portal must exactly match the group display name in Microsoft Entra ID. If the names don't match, group assignments don't sync and users don't receive the intended app access.
This process involves the following tasks:
Assign groups to your application
Complete the following steps to assign your Microsoft Entra ID groups to your application:
Sign in to the Microsoft Entra admin center and open your application.
Go to Manage > Users and groups.
Click + Add user/group.
Select one or more groups whose display names match the user group names in your Workflow apps portal.
Click Assign.
Assign users to your application
Complete the following steps to grant users access to your application:
Add users to the Microsoft Entra ID groups you assigned to your application. Users receive the same access granted to the matching user group in your Workflow apps portal.
Provide the Workflow apps portal URL to your users so that they can sign in and access your Workflow apps.
Complete setup in Workato
Return to Workato to provide the metadata from Microsoft Entra ID and enforce SAML-based SSO. Complete the following steps:
Sign in to Workato.
Go to Platform > Workflow apps portal > Portal settings > Security.
Ensure the Authentication method field is set to SAML based SSO.
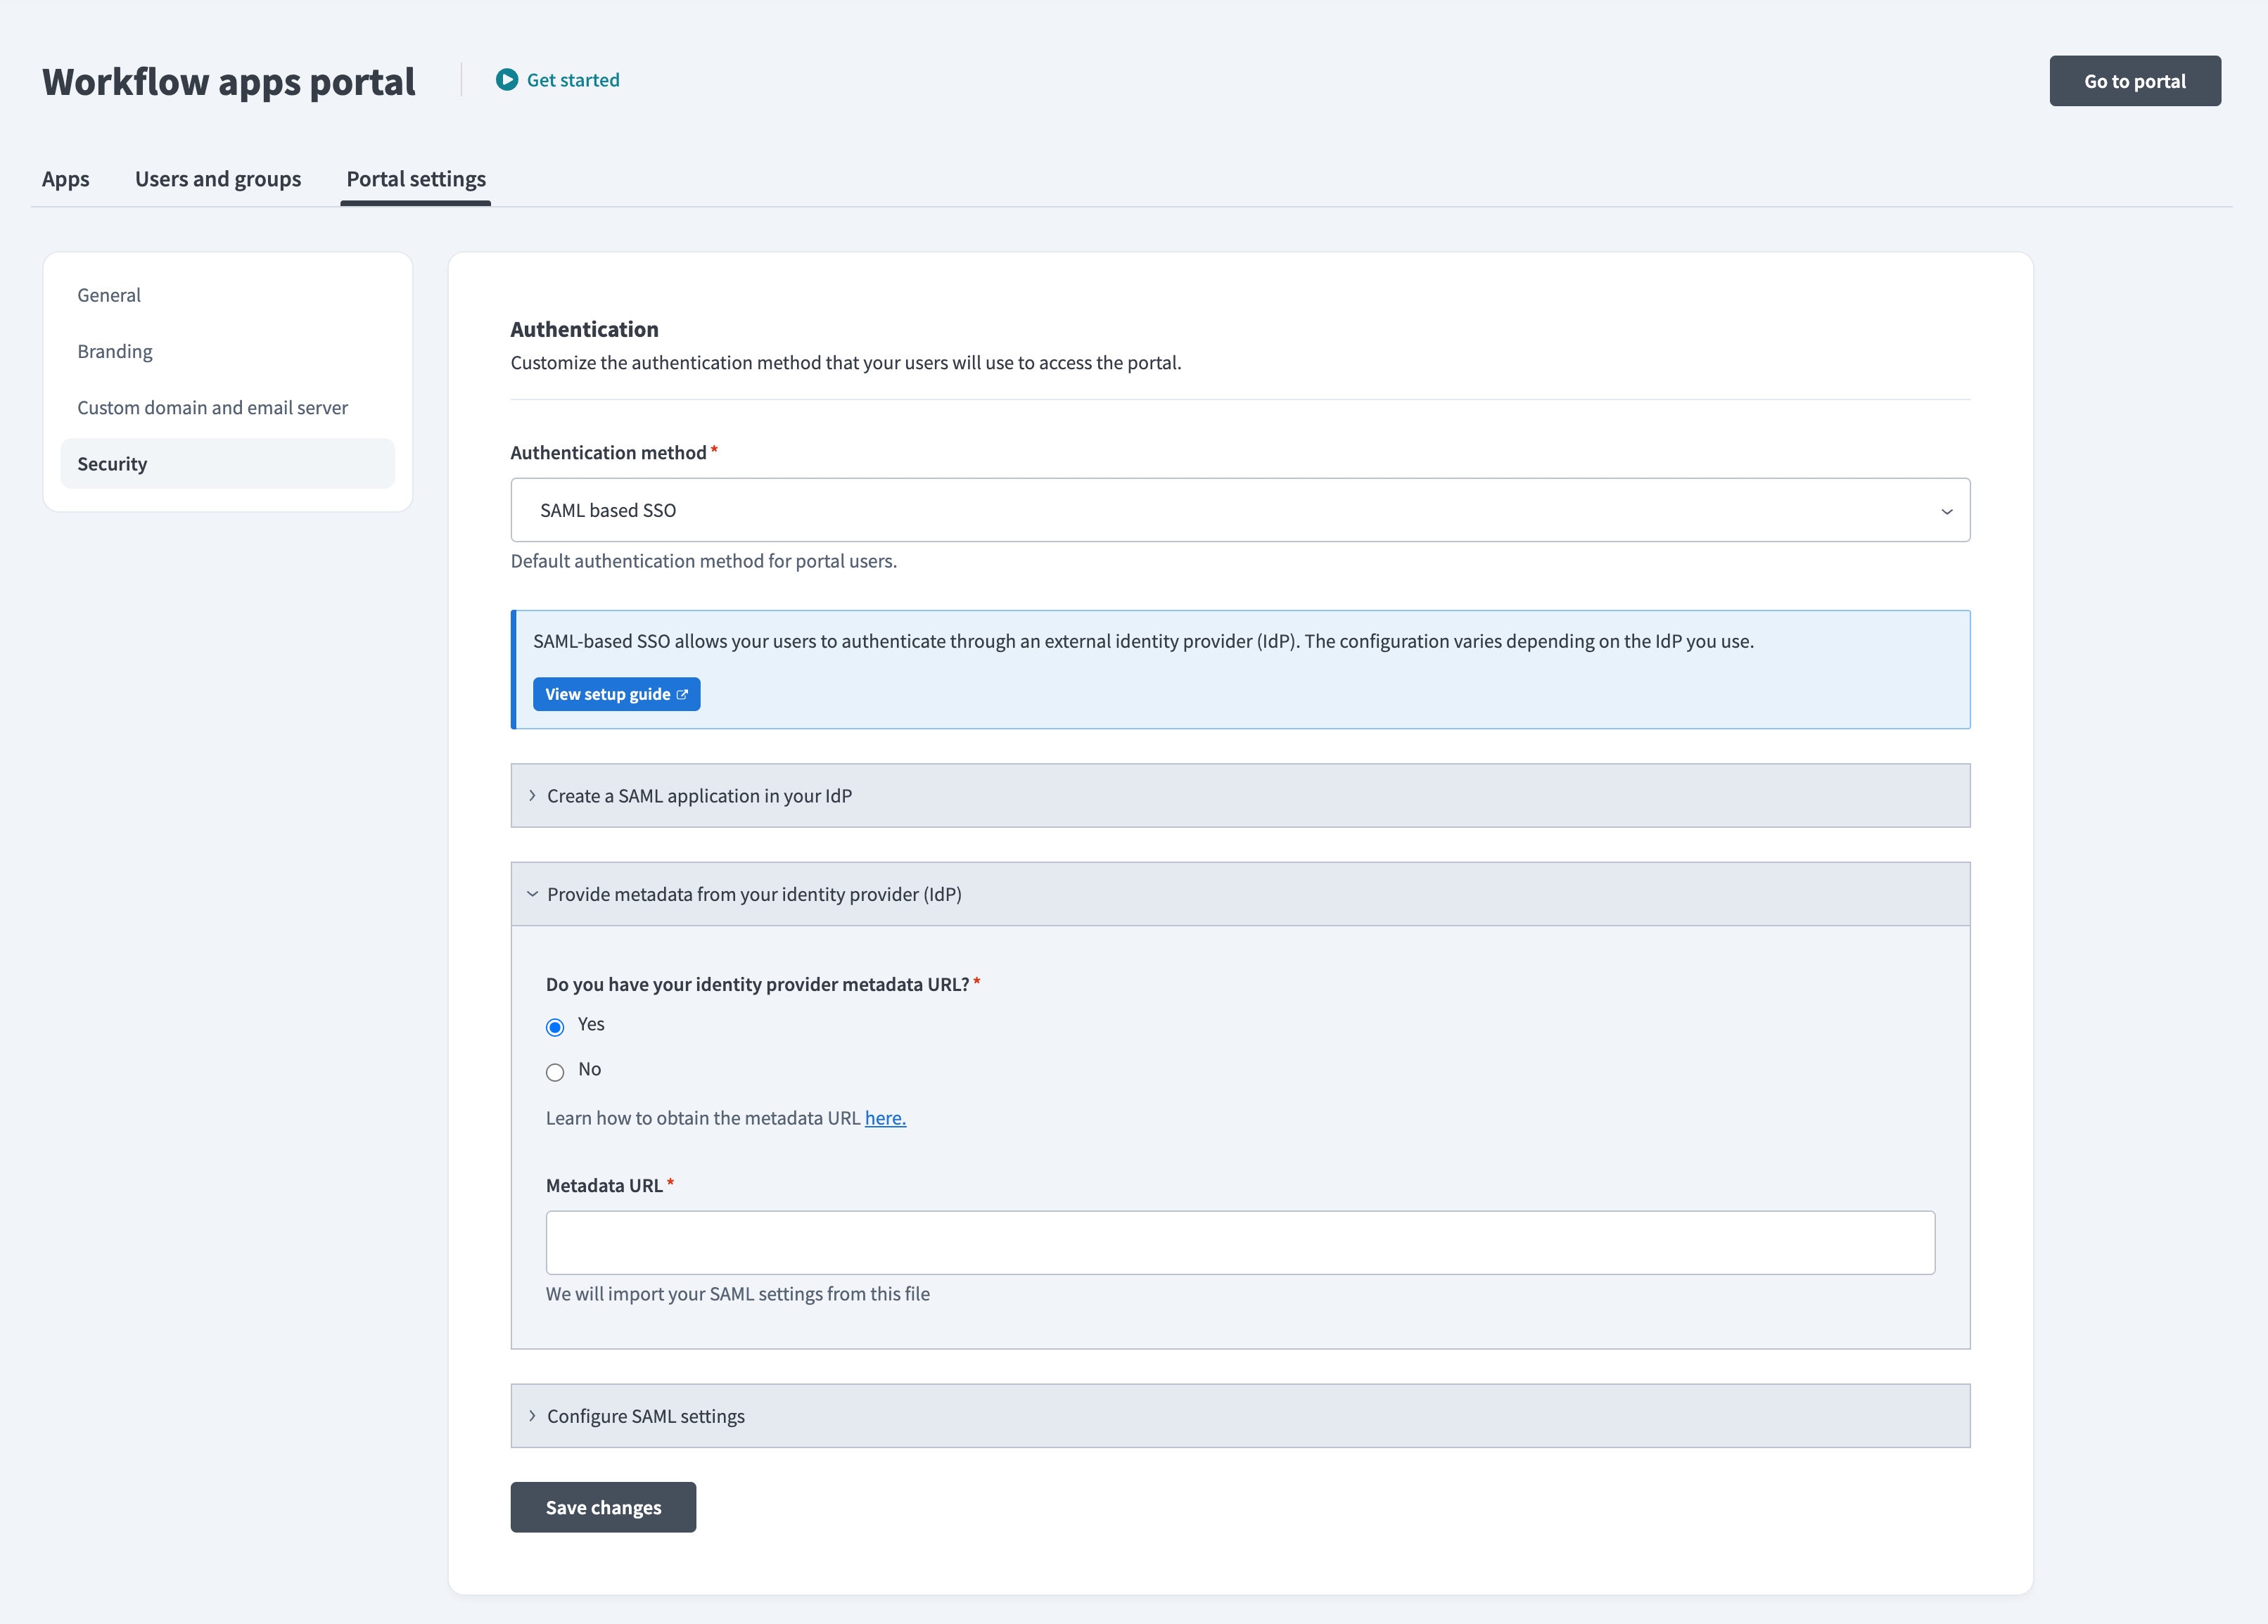 Workato SAML setup
Select Yes in the Do you have your identity provider metadata URL field and paste the App Federation Metadata URL you copied from Microsoft Entra ID.
Use the Enforce SAML authentication for field to specify whether SAML authentication applies to all Workflow apps users or only users in specific domains. Users outside the specified domains can sign in with password authentication.
Optional. Click Enable JIT (Just-In-Time) provisioning to automatically add users to the portal the first time they sign in through SSO.
Click Enable user groups syncing to sync user groups from Microsoft Entra ID. This step is mandatory if you plan to manage user groups through Microsoft Entra ID.
GROUP SYNCING TIMING
User group syncing doesn't take effect immediately. It's enforced each time a user signs into the portal through Microsoft Entra ID.
The SAML attributes required for group syncing are configured in Create an enterprise application. If you completed that section, no further setup is needed here.
Click Save changes.
Last updated: