SAP Concur
SAP Concur is a cloud-based travel and expense management platform that helps businesses manage travel bookings, expense reporting, and invoice processing.
API version
The SAP Concur connector uses the following SAP Concur APIs:
- Expense Group Configurations v3
- Expenses v4
- Identity v4
- Image v1.0 and Image v3
- Invoice v3
- List v4
- List Item v4
- Payment Batches v1.1
- Reports v3 and Reports v4
- Submit v1.1
- Travel Extension v4
- User Provisioning v4
- Vendor v3.1
Refer to the Required scopes by trigger and action section for details on how these APIs relate to specific triggers and actions.
Connection setup
The SAP Concur connector supports the following OAuth 2.0 authentication types:
REQUIRED SCOPE
You must add the EXPRPT scope when connecting to SAP Concur. SAP Concur returns a Forbidden Request error without this scope.
Create an OAuth 2.0 application
All authentication methods require an OAuth 2.0 application in your SAP Concur instance. Complete the following steps to create a OAuth 2.0 application, or refer to the OAuth 2.0 Application Management Tool documentation:
Sign in to your SAP Concur instance with administrator credentials.
Go to Administration > Company > Authentication Admin.
Select OAuth 2.0 Application Management from the menu.
Click Create new app.
Enter a descriptive name for your application in the App Name field, such as Workato Integration.
Enter a description for your application in the App Description field.
Select your environment in the App Stage field. Choose Development, Test, or Production.
Select your application type in the Application Type field. Choose Web Services (WS) Client or Integration with Concur Solutions (ICS) Client.
Select the grants your integration requires in the Allowed Grants field. Select password and refresh_token for password grant or refresh token grant authentication, or authorization_code for authorization code grant authentication.
Enter https://www.workato.com/oauth/callback in the Redirect URIs field for authorization code grant authentication. This field appears only when you select authorization_code.
Configure the allowed scopes for your integration. You must include EXPRPT at minimum. Refer to the Required scopes by trigger and action section to identify additional scopes required by the triggers and actions you plan to use.
Alternatively, you can click Enter Manually and copy and paste the following scopes to enable full connector functionality:
ATTEND
CONFIG
expense.report.read
expense.report.readwrite
EXPRPT
identity.user.core.read
identity.user.coreenterprise.writeonly
identity.user.coresensitive.read
identity.user.enterprise.read
identity.user.externalID.writeonly
identity.user.ids.read
identity.user.sap.read
IMAGE
INVPMT
INVVEN
LIST
openid
spend.list.read
spend.list.write
spend.listitem.delete
spend.listitem.read
spend.listitem.write
spend.user.general.read
spend.user.general.writeonly
travel.user.general.read
travel.user.private.read
user.provision.read
user.provision.write
user.read
user.writeClick Submit.
Record your Client ID and Client Secret in a secure location. These values are required to establish the connection in Workato.
SAVE YOUR CREDENTIALS
The client secret is only displayed once. You must regenerate the client secret or create a new application if you lose it.
Refresh token grant
Use the refresh token grant authentication method for production instances. Contact your Concur account manager to receive refresh token credentials.
Generate a company request token
A company request token is a temporary, one-time authentication password used by administrators to connect external apps to the SAP Concur.
Complete the following steps to generate a company request token:
Go to the SAP Concur admin panel, and click Administration > Company > Authentication Admin.
Select Company Request Token from the menu.
Enter your App ID (Client ID) from the OAuth application you created in the previous section.
Click Submit.
Record the following information displayed in the success dialog:
- Company UUID: Your company's unique identifier.
- Company Request Token: A temporary token that expires in 24 hours.
TOKEN EXPIRATION
The company request token expires after 24 hours. You must regenerate the token if you don't complete the next steps within 24 hours.
Click OK to close the dialog.
Obtain a refresh token
Complete the following steps to obtain a refresh token using your company request token:
Open an API client of your choice, such as Postman or cURL.
Create a POST request to the SAP Concur OAuth2 token resource using the endpoint that matches your SAP Concur environment:
- Production:
https://us.api.concursolutions.com/oauth2/v0/token - Implementation (Test):
https://us-impl.api.concursolutions.com/oauth2/v0/token
Configure the request body with the following parameters in x-www-form-urlencoded format:
- client_id: Your Client ID from the OAuth application
- client_secret: Your Client Secret from the OAuth application
- username: Your Company UUID from the Company Request Token step
- password: Your Company Request Token from the Company Request Token step
- grant_type:
password - credtype:
authtoken
Example Postman configuration:
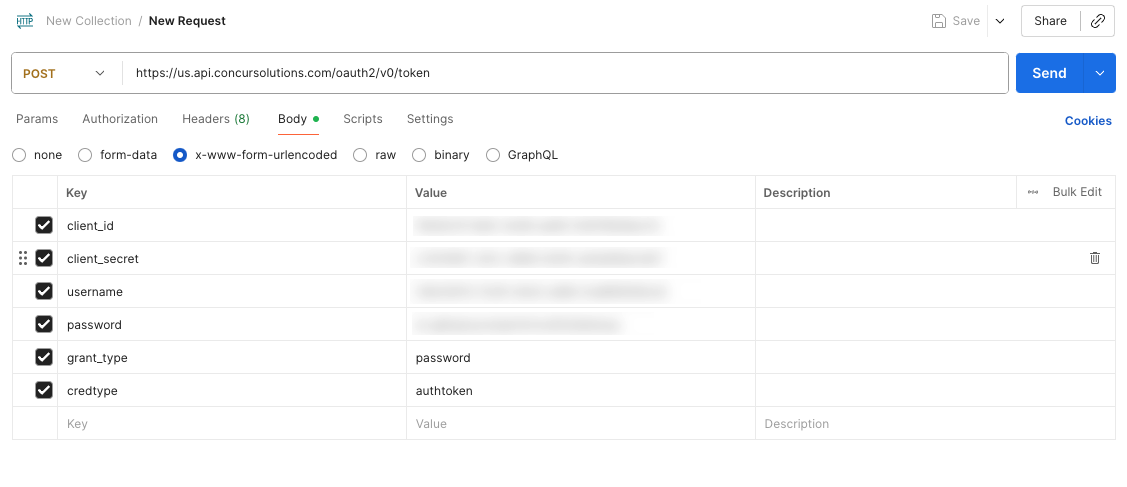 Postman configuration
Send the request.
Record the refresh_token value in a secure location. This value is required to establish the SAP Concur connection in Workato.
Connect to SAP Concur using refresh token grant
Complete the following steps to connect to SAP Concur using refresh token grant authentication:
Click Create > Connection or press C twice.
Search for SAP Concur and select it as your app.
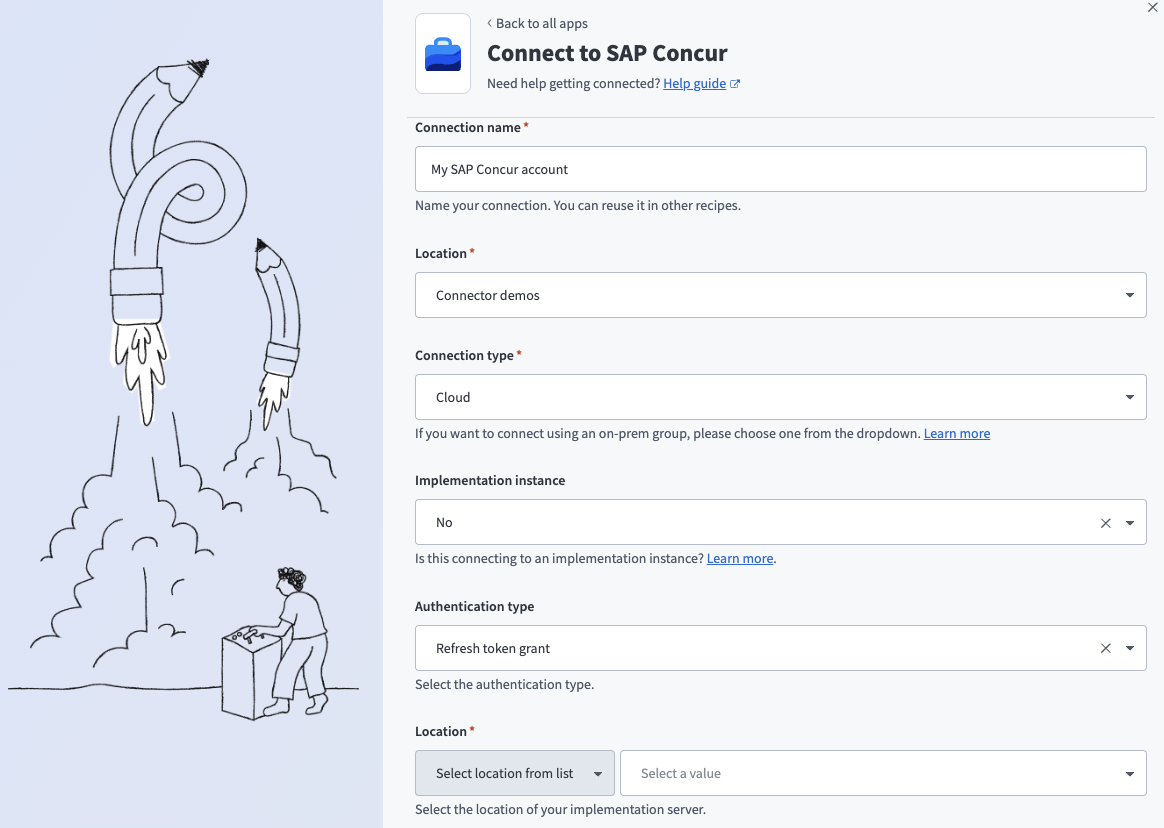
Enter a name for your connection in the Connection name field. Give this connection a unique name that identifies which SAP Concur instance it's connected to.
 Connect to SAP Concur
Use the first Location drop-down menu to select the project or folder to store your connection.
Use the Implementation instance drop-down menu to select whether you're connecting to a Concur implementation server. Select Yes if connecting to an implementation server. Defaults to No for existing connections.
Use the Authentication type drop-down menu to select Refresh token grant.
Use the second Location drop-down menu to select the location of your Concur implementation server.
Enter the client ID from your application in the Client ID field.
Enter the client secret from your application in the Client secret field.
Enter the refresh token from your application in the Refresh token field.
Click Connect.
Password grant
Use the password grant authentication method for sandbox instances.
Connect to SAP Concur using password grant
Complete the following steps to connect to SAP Concur using password grant authentication:
Click Create > Connection or press C twice.
Search for SAP Concur and select it as your app.
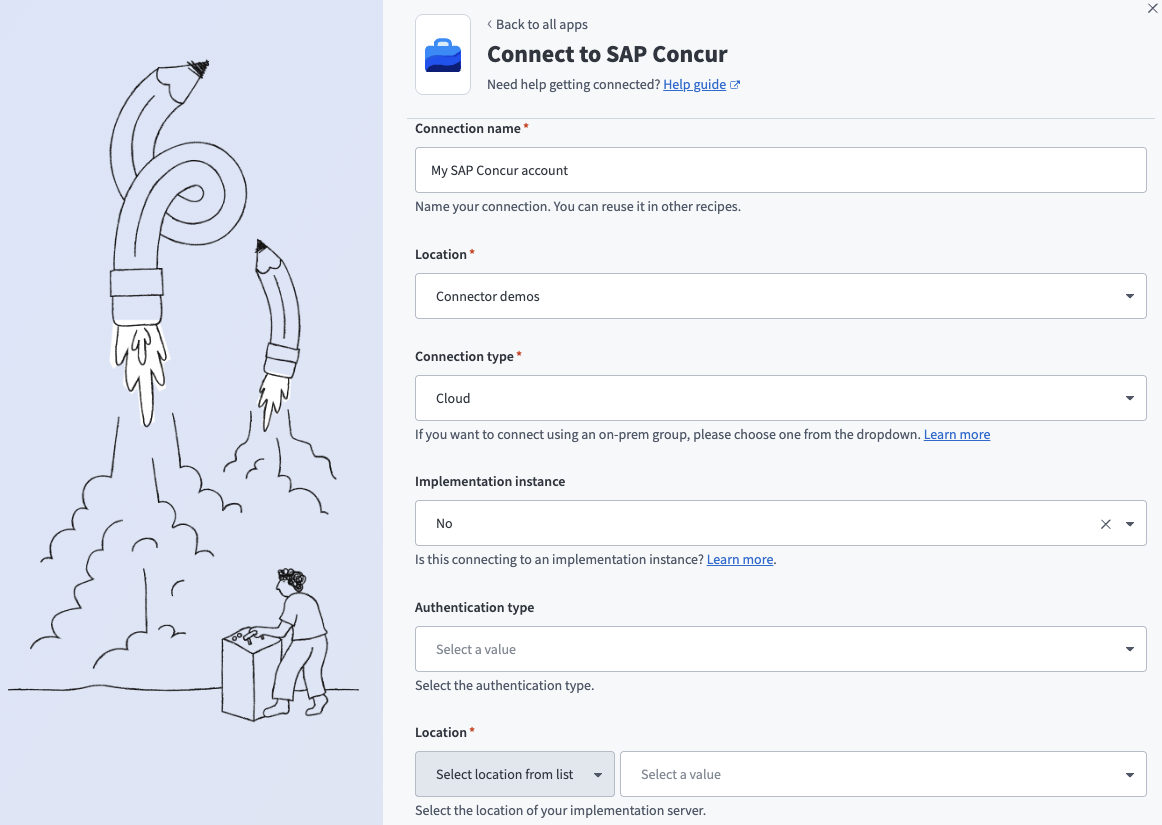
Enter a name for your connection in the Connection name field. Give this connection a unique name that identifies which SAP Concur instance it's connected to.
 Connect to SAP Concur
Use the first Location drop-down menu to select the project or folder to store your connection.
Use the Implementation instance drop-down menu to select whether you're connecting to a Concur implementation server. Select Yes if connecting to an implementation server. Defaults to No for existing connections.
Use the Authentication type drop-down menu to select Password grant.
Enter your SAP Concur Username.
Enter your SAP Concur Password.
Use the second Location drop-down menu to select the location of your Concur implementation server.
Enter the Client ID from your application.
Enter the Client secret from your application.
Click Connect.
Authorization code grant
Use the authorization code grant authentication method to authenticate with SAP Concur using an interactive OAuth login flow.
Authorization code grant authentication is required if you plan to use Verified User Access (VUA). VUA isn't compatible with other grant types, including API keys, basic auth, and other OAuth 2.0 flows.
This option requires a custom OAuth profile configured with your SAP Concur client credentials.
Set up a custom OAuth profile
Authorization code grant authentication requires a custom OAuth profile in Workato. The profile stores your SAP Concur client credentials and is required to complete the connection. Workato returns an error if you select authorization code grant without a custom OAuth profile, or if the profile is missing a client ID or client secret.
Complete the following steps to create a custom OAuth profile:
Go to Tools > Custom OAuth profiles.
Click + New custom profile.
Search for SAP Concur and select it as your app.
Enter a name for the profile.
Enter the Client ID and Client secret from the OAuth application you created.
Click Save.
Minimum and default scopes
Ensure your SAP Concur OAuth app has every scope you request in the connection settings. The connection fails with a 400 Bad Request error if a requested scope isn't enabled in your OAuth app.
The minimum required scopes are openid, user.read, and EXPRPT. Ensure your OAuth app has these minimum scopes configured. Workato requests the following default scopes if you leave the Scopes field blank:
openiduser.readuser.writeEXPRPTexpense.report.readexpense.report.readwriteLISTspend.list.readspend.list.writespend.listitem.readspend.listitem.writespend.listitem.deleteIMAGEATTENDCONFIGINVPMTINVVENidentity.user.core.readidentity.user.coresensitive.readidentity.user.enterprise.readidentity.user.coreenterprise.writeonlyidentity.user.externalID.writeonlyidentity.user.ids.readuser.provision.readuser.provision.writespend.user.general.readspend.user.general.writeonlytravel.user.general.read
Connect to SAP Concur using authorization code grant
Complete the following steps to connect to SAP Concur using authorization code grant:
Click Create > Connection or press C twice.
Search for SAP Concur and select it as your app.
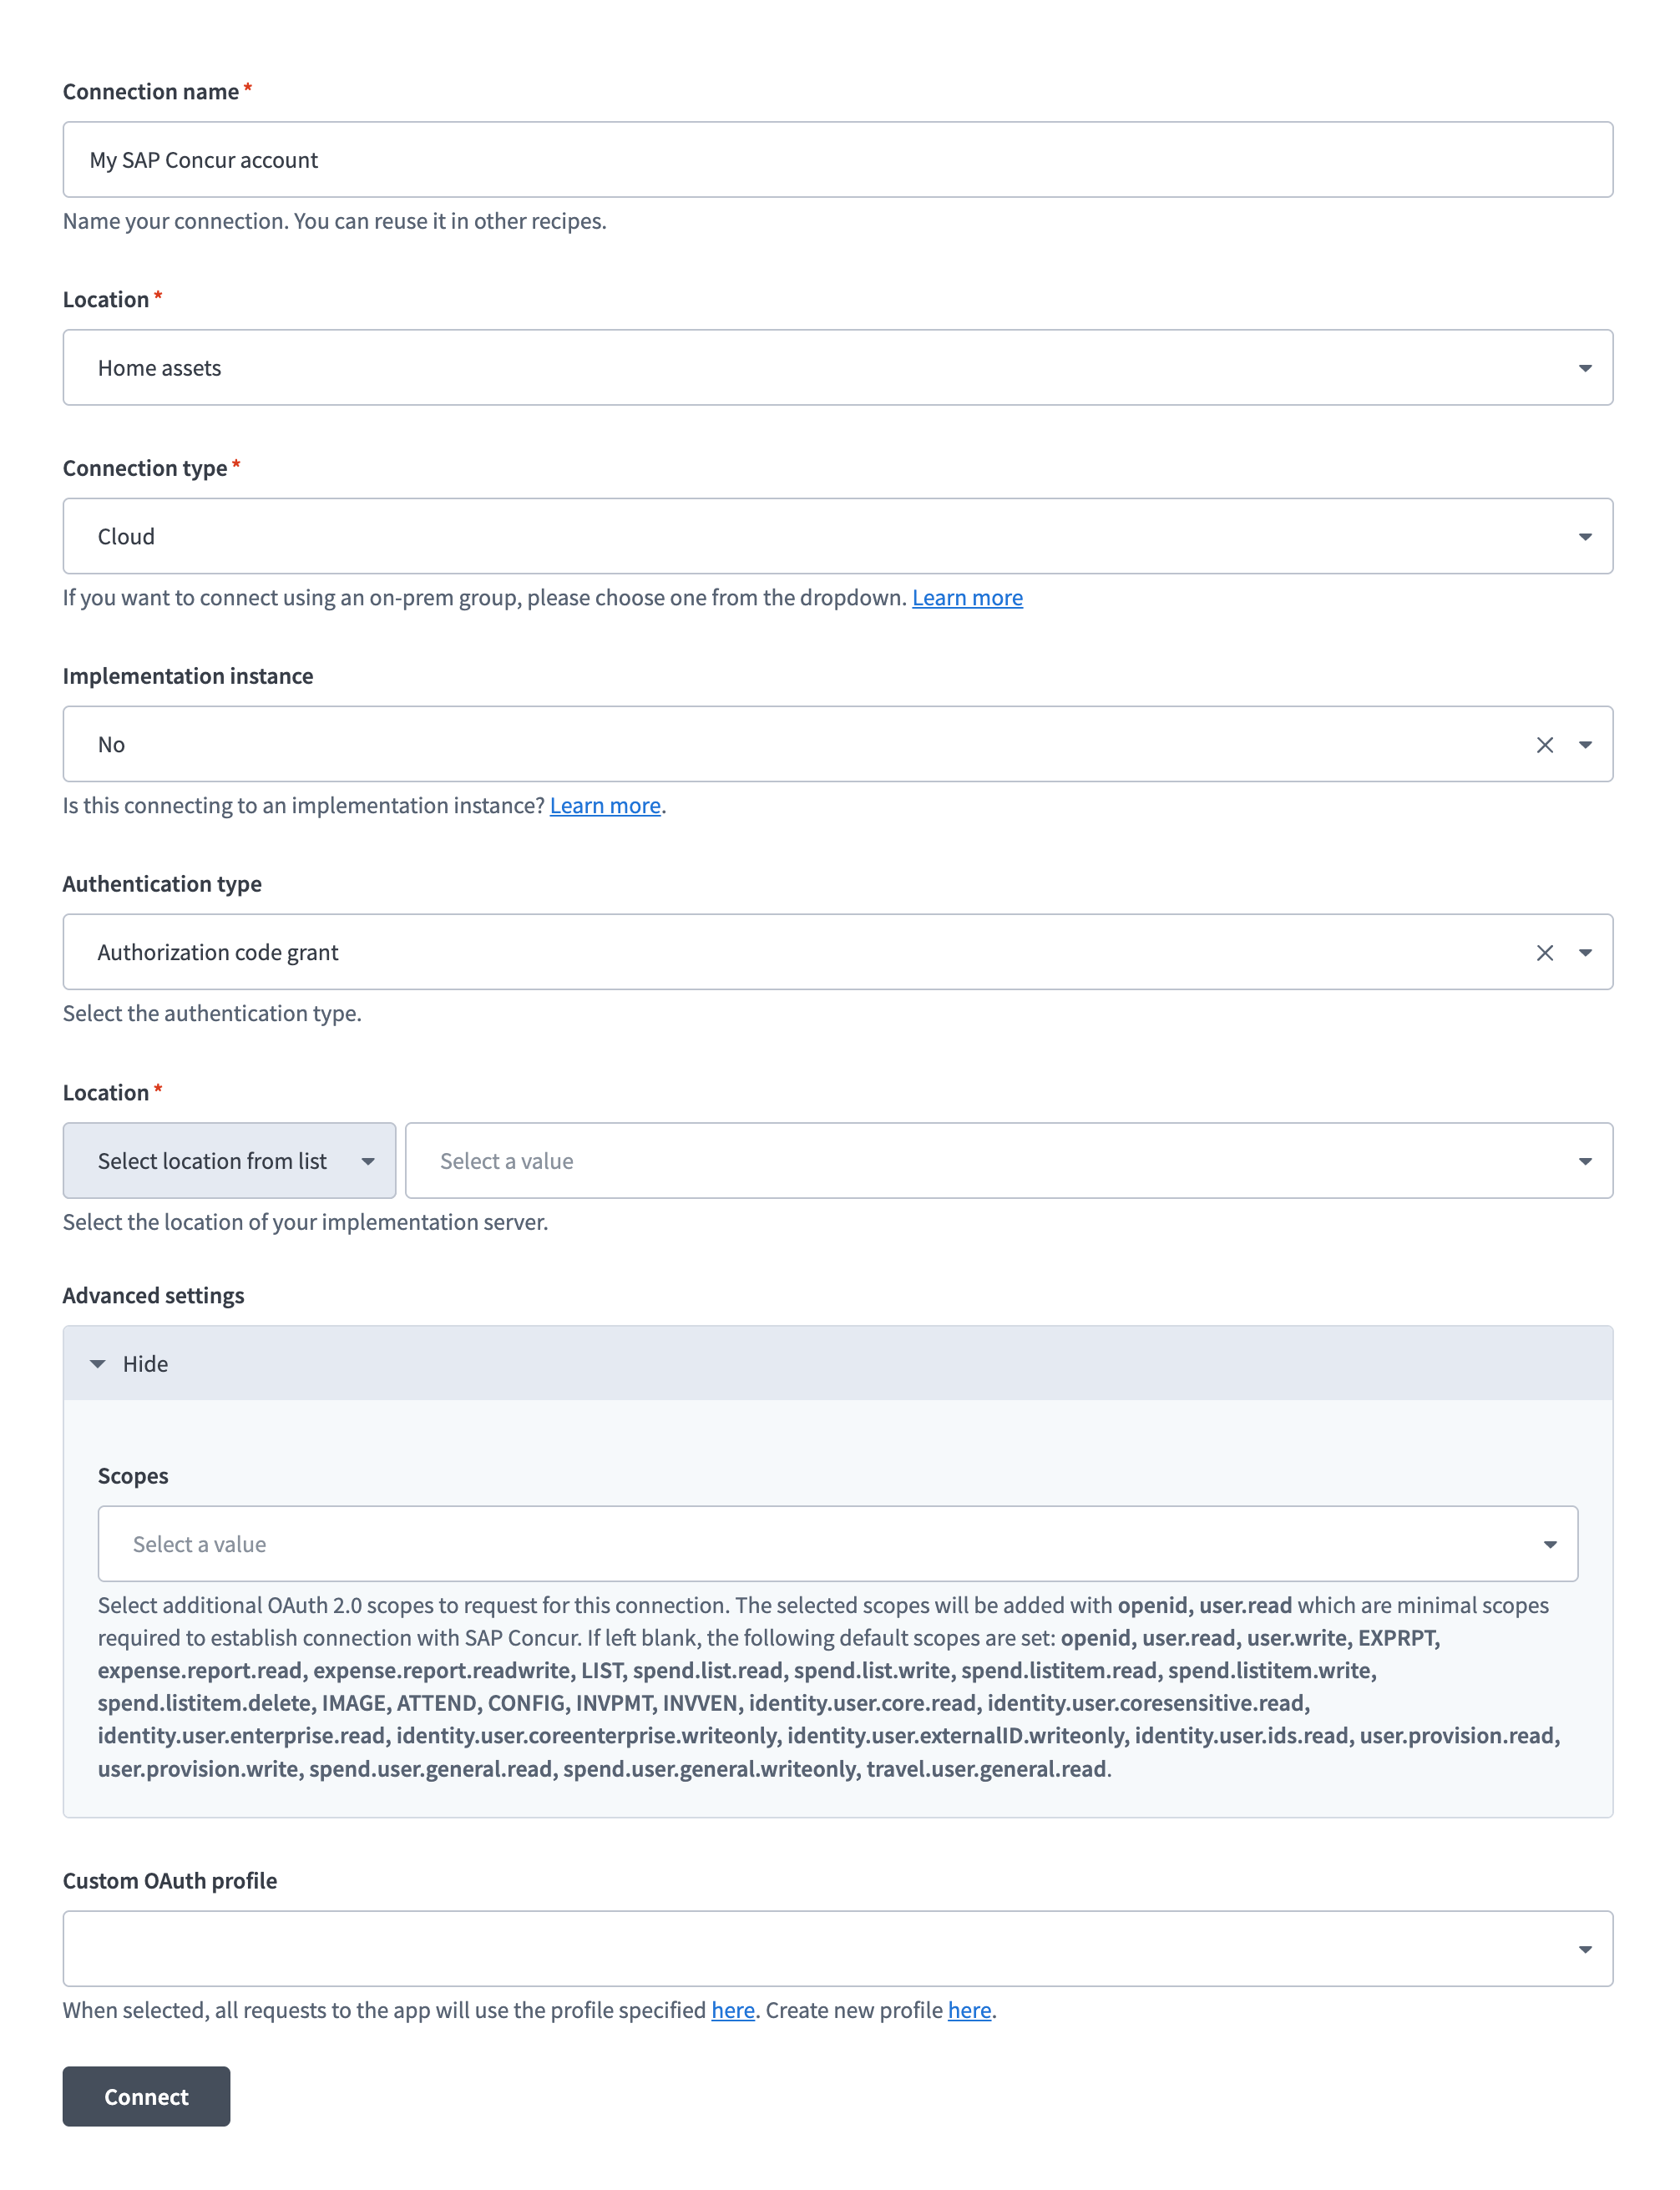
Enter a name for your connection in the Connection name field.
 Connect to SAP Concur
Use the first Location drop-down menu to select the project or folder to store your connection.
Use the Connection type drop-down menu to specify whether this is a cloud or on-prem connection.
Use the Implementation instance drop-down menu to specify whether you're connecting to a Concur implementation server. Select Yes if connecting to an implementation server. Defaults to No.
Use the Authentication type drop-down menu to select Authorization code grant.
Use the second Location drop-down menu to select the location of your Concur implementation server.
Optional. Expand Advanced settings and use the Scopes drop-down menu to select OAuth 2.0 scopes. Refer to Minimum and default scopes for requirements.
Use the Custom OAuth profile drop-down menu to select the custom OAuth profile configured with your SAP Concur client credentials.
Click Connect. You are redirected to SAP Concur to sign in and authorize access.
Required scopes by trigger and action
The credentials you use to set up the SAP Concur connection must have access to certain scopes depending on the triggers and actions you plan to use.
REQUIRED SCOPE
The EXPRPT scope is required for connection setup.
Each trigger and action in the connector uses a specific API version due to SAP Concur's granular versioning approach.
The following table lists:
- The scopes required for each trigger and action
- The API name and version associated with each trigger and action
Refer to the SAP Concur API Reference documentation for more information.
| Name | Scopes | API group | API name and version |
|---|---|---|---|
| New expense report trigger | EXPRPT | Expense | Reports v3 |
| New expense report submission trigger | EXPRPT | Expense | Reports v3 |
| New or updated expense report trigger | EXPRPT | Expense | Reports v3 |
| New or updated invoice trigger | INVPMT | Invoice | Invoice v3 |
| New or updated user trigger | identity.user.ids.read, identity.user.core.read, identity.user.coresensitive.read, identity.user.enterprise.read, identity.user.sap.read | User | Identity v4 |
| Create list item action | spend.listitem.write, LIST | Common | List Item v4 |
| Create user action | user.provision.write, identity.user.coreenterprise.writeonly, identity.user.externalID.writeonly, spend.user.general.writeonly | User | User Provisioning v4 |
| Create users action (batch) | user.provision.write, identity.user.coreenterprise.writeonly, identity.user.externalID.writeonly, spend.user.general.writeonly | User | User Provisioning v4 |
| Create vendors action (batch) | INVVEN | Invoice | Vendor v3.1 |
| Delete list item action | spend.listitem.delete | Common | List Item v4 |
| Get all attendee types action (batch) | CONFIG | Expense | Expense Group Configurations v3 |
| Get all expense group configurations action (batch) | CONFIG | Expense | Expense Group Configurations v3 |
| Get all expense types action (batch) | CONFIG | Expense | Expense Group Configurations v3 |
| Get all list item action (batch) | spend.list.read | Common | List Item v4 |
| Get all lists action | spend.list.read | Common | List v4 |
| Get all payment types action (batch) | CONFIG | Expense | Expense Group Configurations v3 |
| Get expense report details action | expense.report.read | Expense | Reports v4 |
| Get invoice details action | INVPMT | Invoice | Invoice v3 |
| Get itemizations of specific expense action | expense.report.read | Expense | Expenses v4 |
| Get user action | travel.user.general.read, travel.user.private.read, spend.user.general.read, user.provision.read | User | Travel Extension v4, User Provisioning v4 |
| Get user provisioning status details action | user.provision.read | User | User Provisioning v4 |
| Retrieve children of list item action | spend.listitem.read | Common | List Item v4 |
| Search expense reports action (batch) | EXPRPT | Expense | Reports v3 |
| Search users action (batch) | identity.user.ids.read, identity.user.core.read, identity.user.coresensitive.read, identity.user.enterprise.read, identity.user.sap.read | User | Identity v4 |
| Search vendors action (batch) | INVVEN | Invoice | Vendor v3.1 |
| Submit an expense report through a workflow action | EXPRPT | Expense | Submit v1.1 |
| Update user action | user.provision.write, identity.user.coreenterprise.writeonly, identity.user.externalID.writeonly, spend.user.general.writeonly | User | User Provisioning v4 |
| Update user action (batch) | user.provision.write, identity.user.coreenterprise.writeonly, identity.user.externalID.writeonly, spend.user.general.writeonly | User | User Provisioning v4 |
| Update vendors action (batch) | INVVEN | Invoice | Vendor v3.1 |
| Upload receipt image action | IMAGE | Receipt Image | Image v3 |
| Get entry image URL action | IMAGE | Receipt Image | Image v1.0 |
| Get expense report details action (deprecated) | expense.report.read | Expense | Expenses v4 |
| Get payment batch list action (deprecated) | PAYBAT | Expense | Payment Batches v1.1 |
Last updated: