# Microsoft Dynamics Finance and Operations
Microsoft Dynamics Finance and Operations (opens new window) (MDSFO) is one of Microsoft's enterprise resource planning software products. It is part of the Microsoft Dynamics app suite.
# Connector comparison
Workato offers two connectors for Microsoft Dynamics 365, each designed for a different set of applications within the Dynamics ecosystem:
- Microsoft Dynamics 365 (CRM apps)
- Microsoft Dynamics Finance and Operations (ERP apps)
Use the following table to determine which connector aligns with your organization's integration needs:
| Microsoft Dynamics 365 | Microsoft Dynamics Finance and Operations | |
|---|---|---|
| Recommended for |
|
|
| Connector type | Platform | Community |
| Required permission | user.impersonation (Minimum scope) | AX.FullAccess (Recommended scope) |
| Authentication method | OAuth 2.0 with Microsoft Dataverse | OAuth 2.0 with Azure AD |
| API documentation reference | Dataverse Web API (opens new window) | OData API (opens new window) |
| Authentication reference | Dataverse OAuth (opens new window) | OData OAuth (opens new window) |
# Prerequisites
To establish a connection to MDSFO you must have an active sandbox or general instance.
MICROSOFT MFA ENFORCEMENT
Microsoft is rolling out mandatory multi-factor authentication (MFA) (opens new window) gradually to different applications and accounts in phases. This enforcement will continue throughout 2025 and beyond.
We strongly recommend enabling MFA now for all Microsoft accounts used with Workato to avoid service disruptions from short-notice enforcement changes.
Complete the following steps to maintain uninterrupted service:
Enable MFA for your Microsoft organization following Microsoft's MFA setup guide (opens new window).
Reconnect your Microsoft connection in Workato.
Complete the OAuth flow with MFA when prompted.
Test your recipes to ensure they work with the updated connection.
# Set up an MDSFO sandbox instance
Complete the following step to obtain a sandbox instance of MDSFO. If you already have an instance, you can skip these steps.
Visit the Microsoft free trial page (opens new window) to create a free trial instance.
Select Finance and Operations.
Enter your account details.
Microsoft redirects you to a page that states your instance is being prepared. This typically takes 15-20 minutes. Microsoft sends you an email notification when the instance is ready.
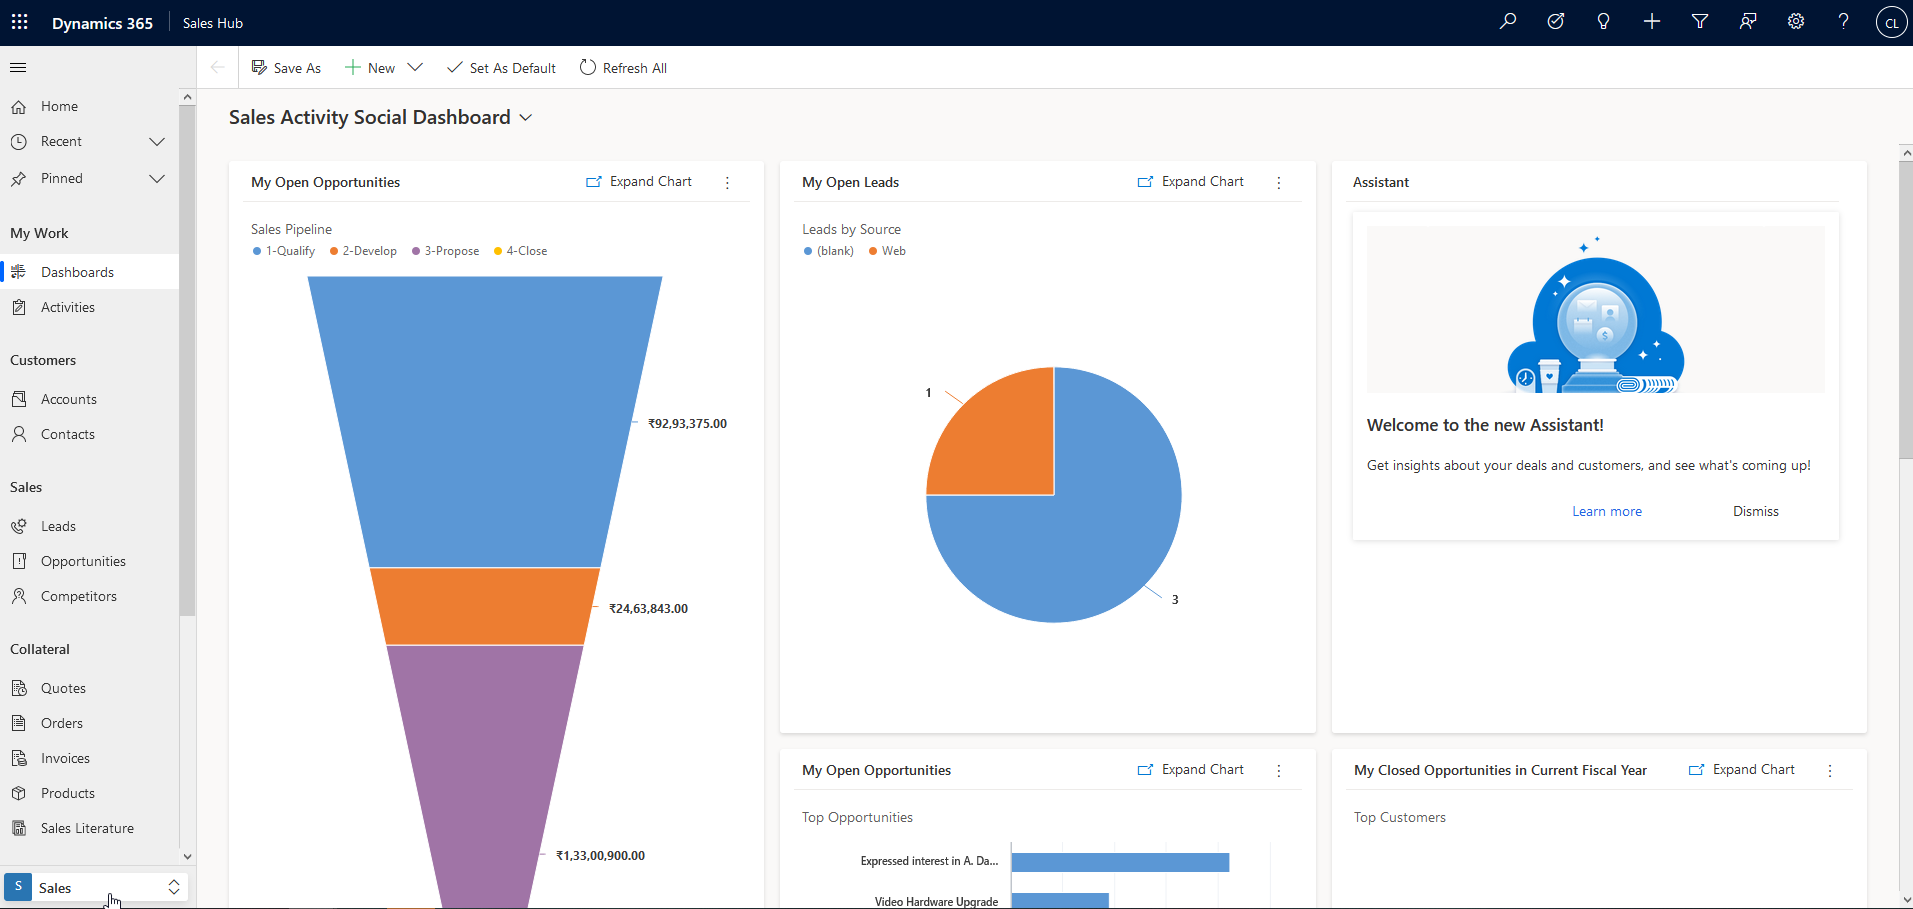 Example instance
If this does not work, you can set up your Microsoft account as a standard Dynamics Customer Engagement Trial (opens new window).
# Connection setup
Complete the following steps to establish a connection to MDSFO in Workato:
- Register the Workato App in the Azure portal
- Set up the application, user, roles, and privileges
- Complete setup in Workato
# Register the Workato App in the Azure portal (Microsoft Entra ID)
To connect to MDSFO on Workato, you must obtain the connection credentials by creating an application through Azure portal with the appropriate permissions.
Sign in to the Azure portal by using an account with administrator permission. You must use an account that belongs to the same Office 365 subscription (tenant) where you plan to register the app. For example, [email protected].
Register the Workato app in the Azure Portal
If you already have an application, use your existing application. Otherwise, complete the following steps to create a new app registration.
Sign in to the Azure portal (opens new window).
Select App registrations > + New registration, under Azure services.

Enter a unique name for the application and select a Supported account type.
Select Web from the Select a platform drop-down menu.
Enter https://www.workato.com/oauth/callback as the Redirect URI and select Register.
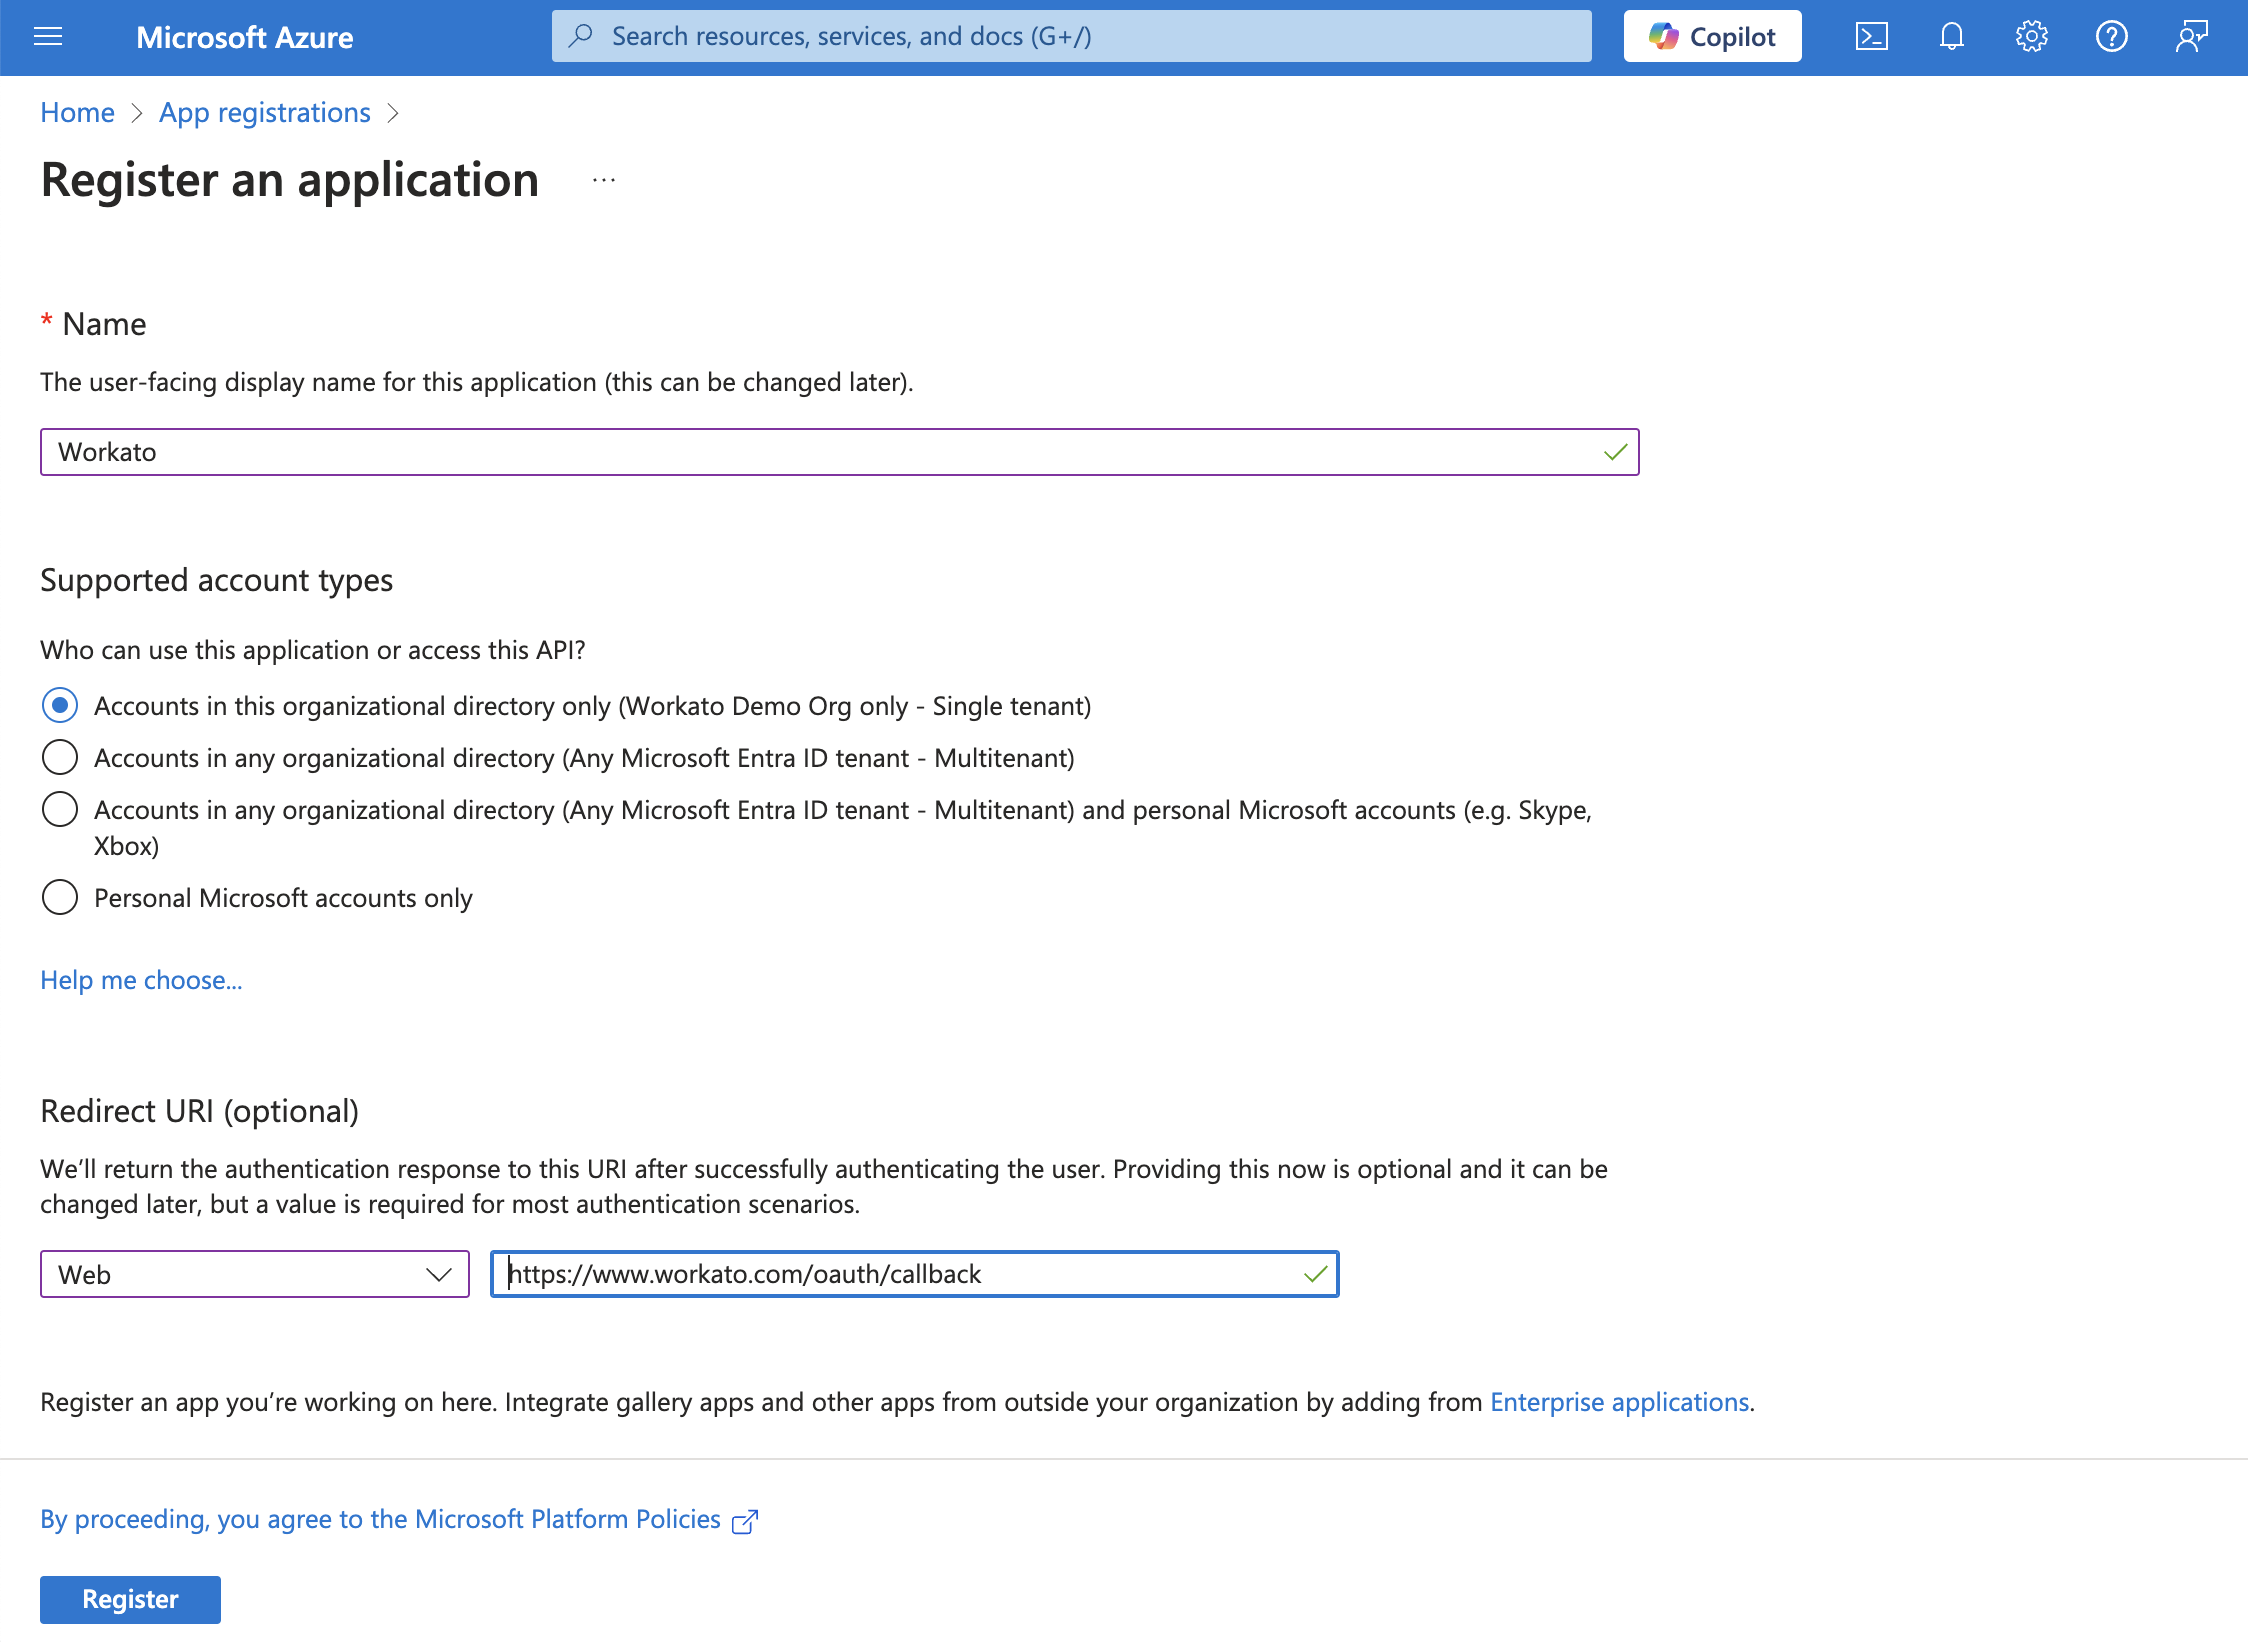 Register an app
Assign permissions to your app
In the navigation sidebar, select Manage > API permissions.
Click + Add a permission and select Dynamics ERP API.
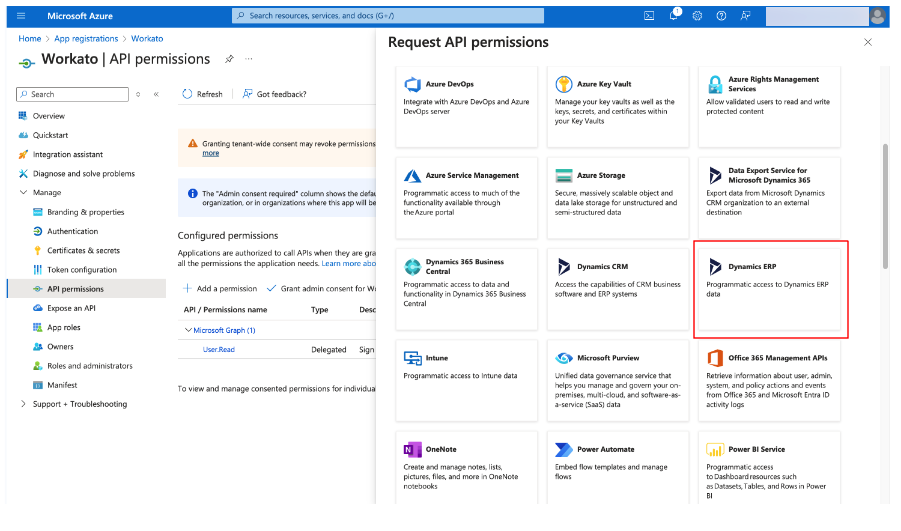 Dynamic ERP
Select Delegated permissions, then check the permissions required. At minimum, the following permission is required to connect:
AX.FullAccess
Add additional permissions as required, according to your use case.
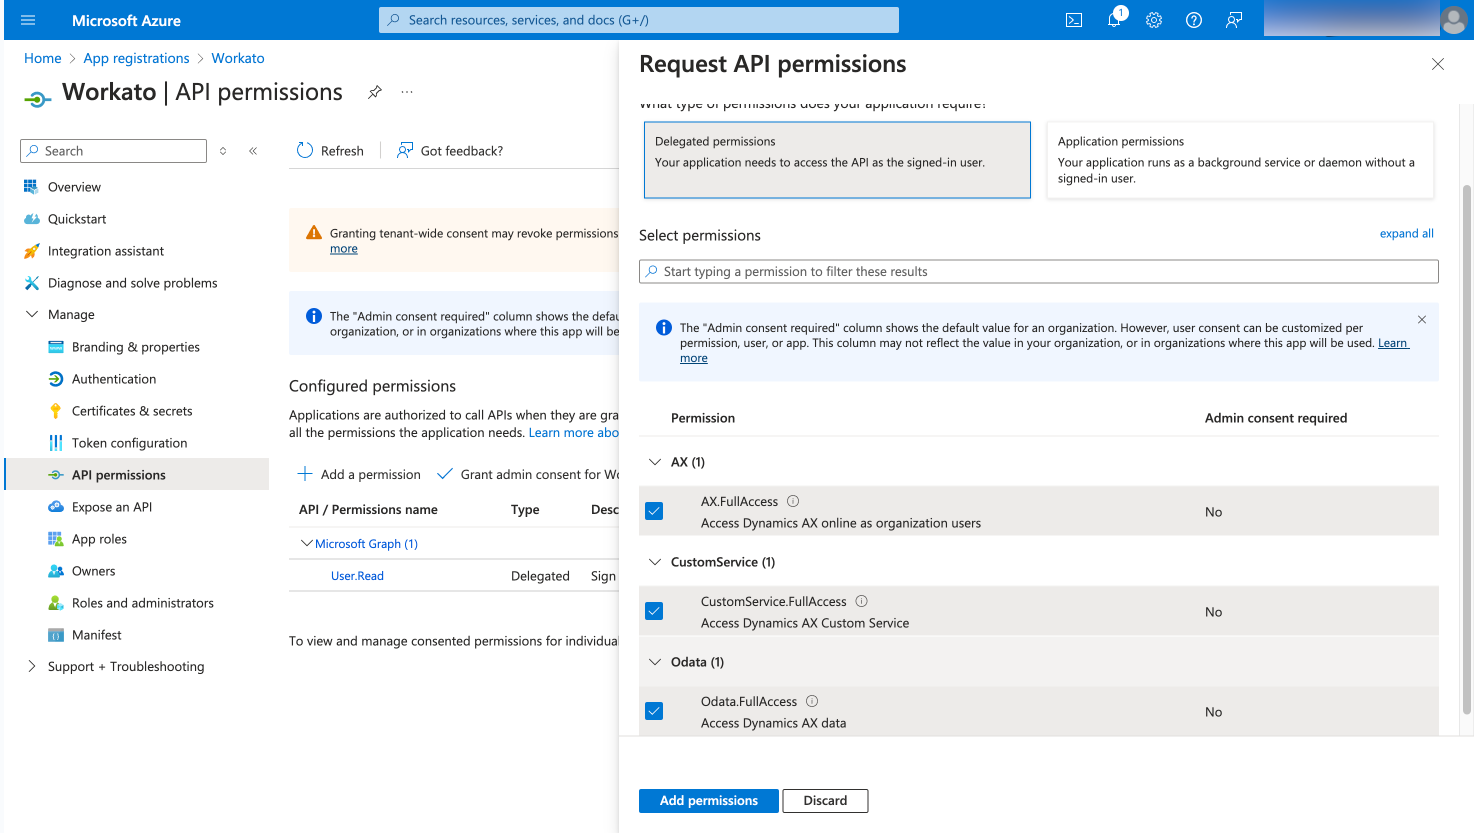 AX-full-access
Click Add permissions.
Generate a client secret
This step is only required for Authorization code grant connections. You can skip this step if you plan to authenticate using client credentials.
Go to Manage > Certificates & Secrets > Client secrets.
Click + New client secret.
Provide a Description for the client secret and specify an expiry date.
Click Add.
Copy and save the client secret Value—not the Secret ID—for use in Workato.
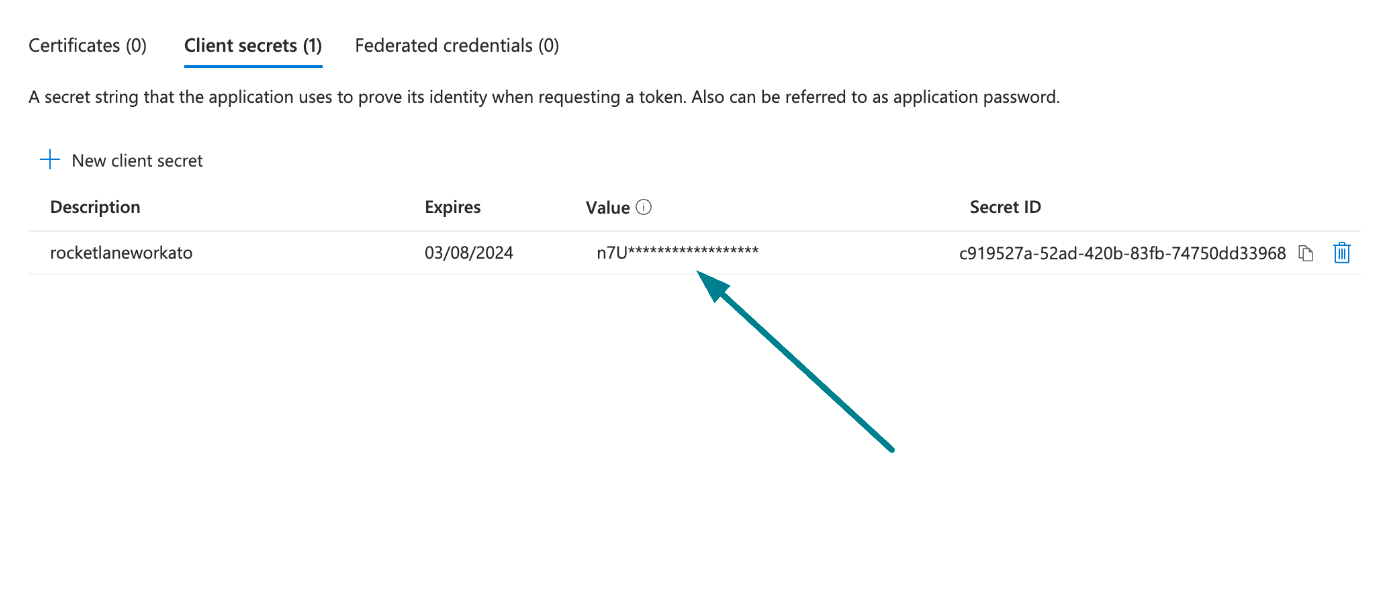 Copy and save the client secret value
Obtain the Application (client ID) from the Azure portal
This step is only required for Authorization code grant connections. You can skip this step if you plan to authenticate using client credentials.
In the Azure portal (opens new window), go to App registrations > Overview.
Copy the Application (client ID) for use in Workato.
Obtain the Directory (tenant) ID from the Azure portal
This step is only required for Authorization code grant connections. You can skip this step if you plan to authenticate using client credentials.
Go to the Overview > Essentials section.
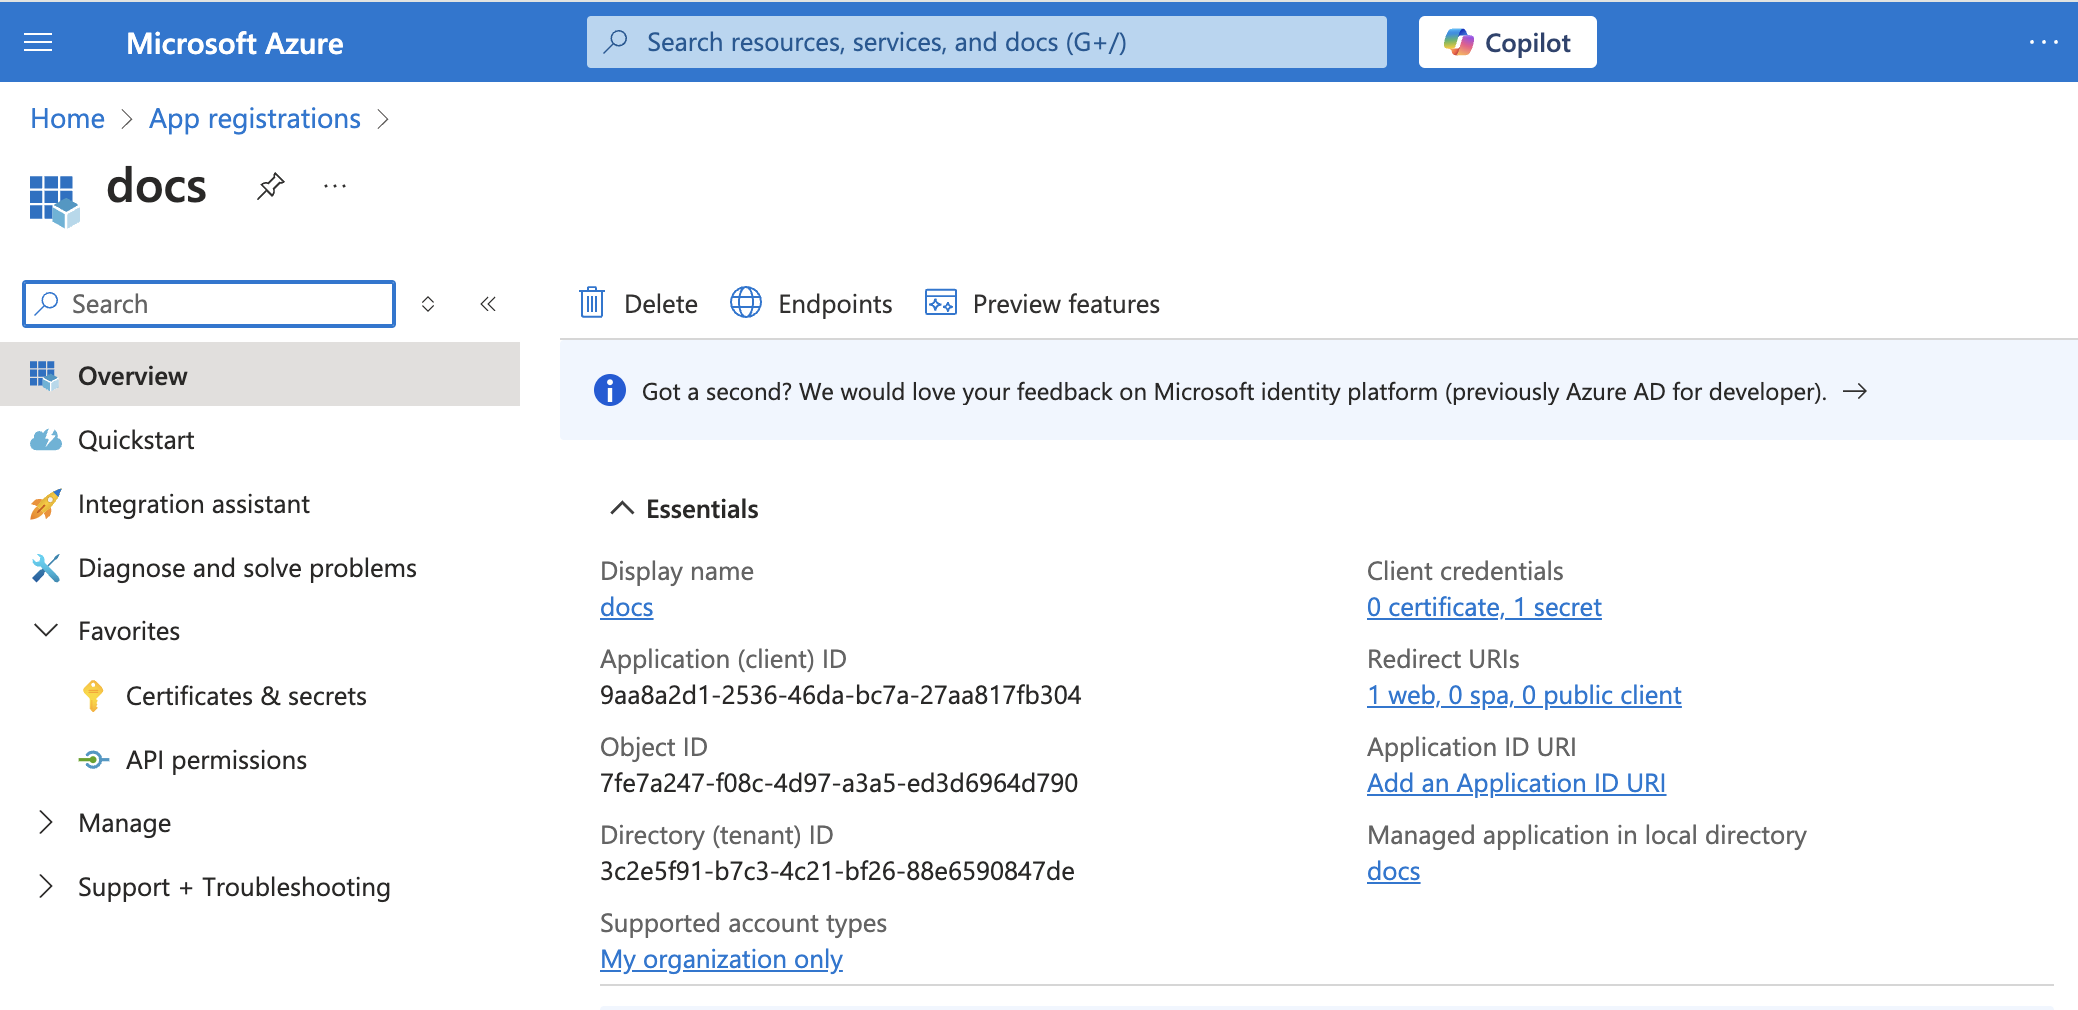 App details
Copy the Directory (tenant) ID for use in Workato.
# Set up the application, user, roles, and privileges
Completer the following steps to set up the application, user, roles and privileges in MDSFO.
Set up the application registered in Azure
Click Modules and navigate to System administration > setup. Select Microsoft Entra ID applications.
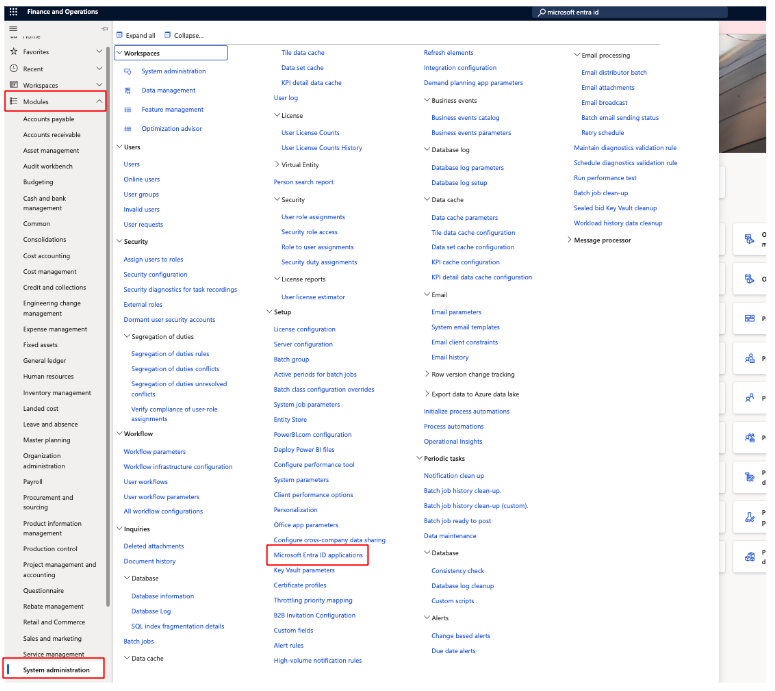 Entra ID applications
Select New and paste the Client ID, which you can copy from the application registration in Azure.
Assign a Name, and add the User ID. This user should have the necessary roles and privileges for the entities that you need to access.
Click Save.
 Standard view
Create a new user and assign roles and privileges for entities
Click Modules and go to System administration. Select Users and click New.
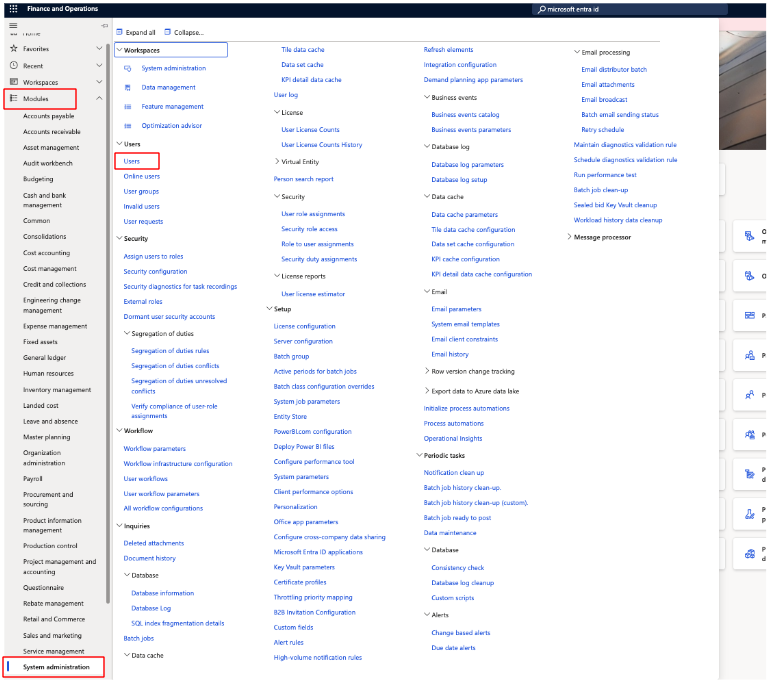 Users
Users
Add the details, including the roles you plan to assign and click Save.
 New record
Provide access and privileges to a specific entity
Complete the following steps to create a new role and assign it privileges. This is useful in situations where you don't plan to use prebuilt roles like Admin.
Click Modules from the left side. Go to Security configuration and click the Roles.
Click Create new and enter the new role name. Click OK.
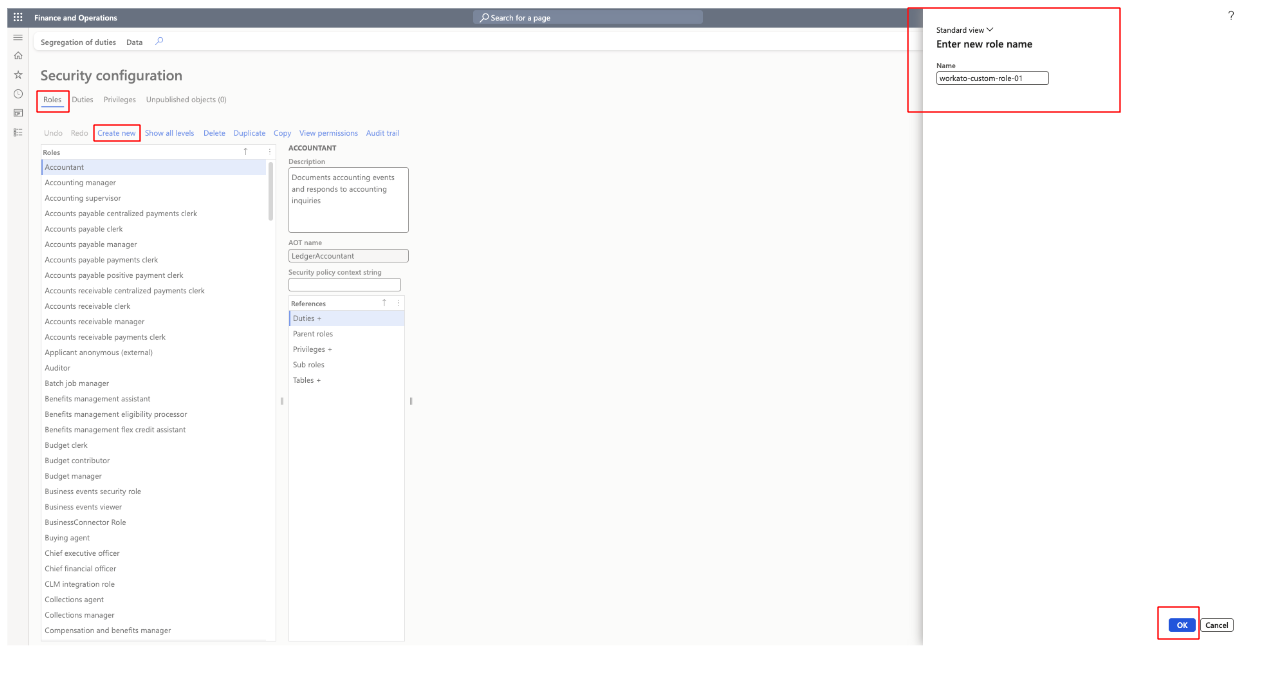 New role name
Select the new role from the Roles list.
Click Privileges and select Add references. Search for the particular privileges and select the privilege.
Click OK.
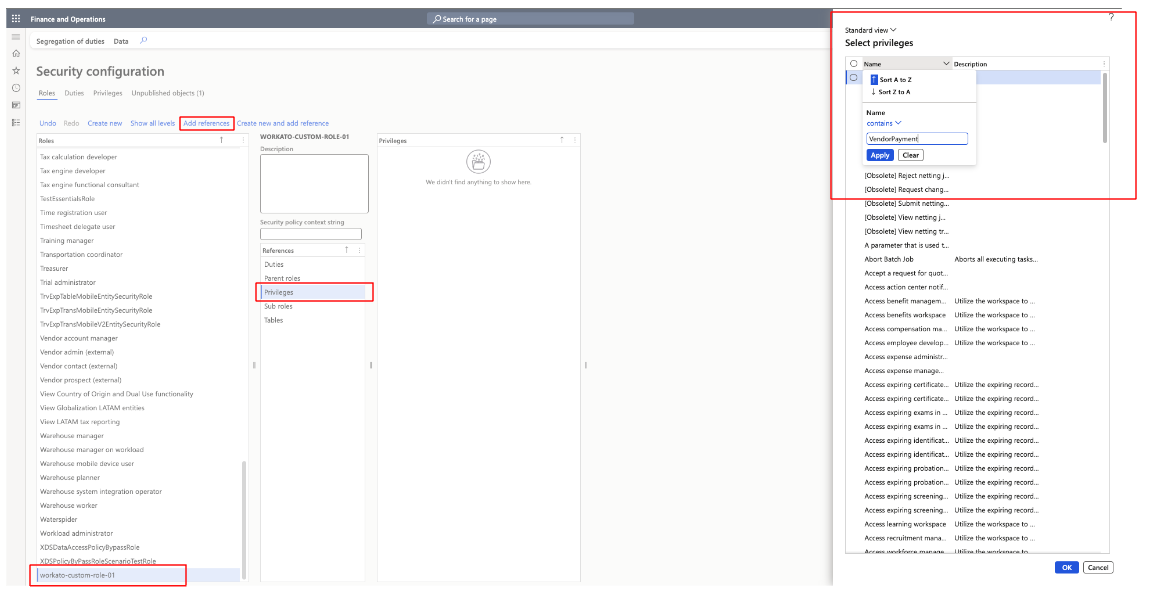 Select privileges
Similarly, you can add whichever privileges you need by clicking on Add references.
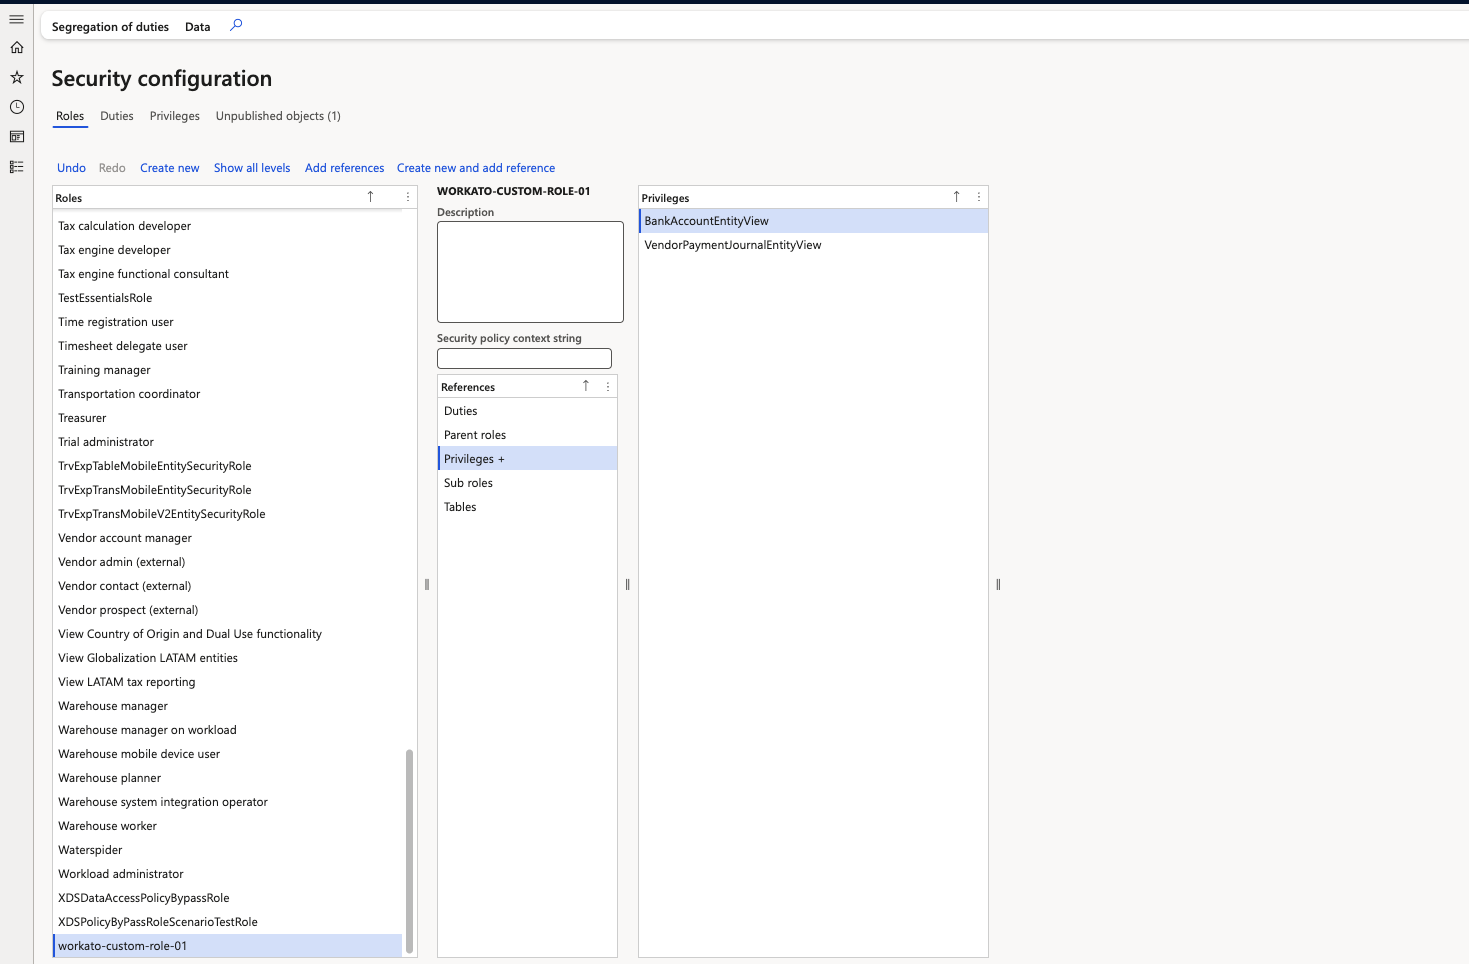 Add references
After adding the privileges, you must publish the privileges.
Click Unpublished objects and select the Role from the Object type list and click Publish all.
 Publish objects
Add the role to your newly-created user
Go to Modules and select System administration.
Select Users then select the specific user from the User list.
Click on Assign roles and select one or more roles you plan to assign to the user from the Roles list and then click OK.
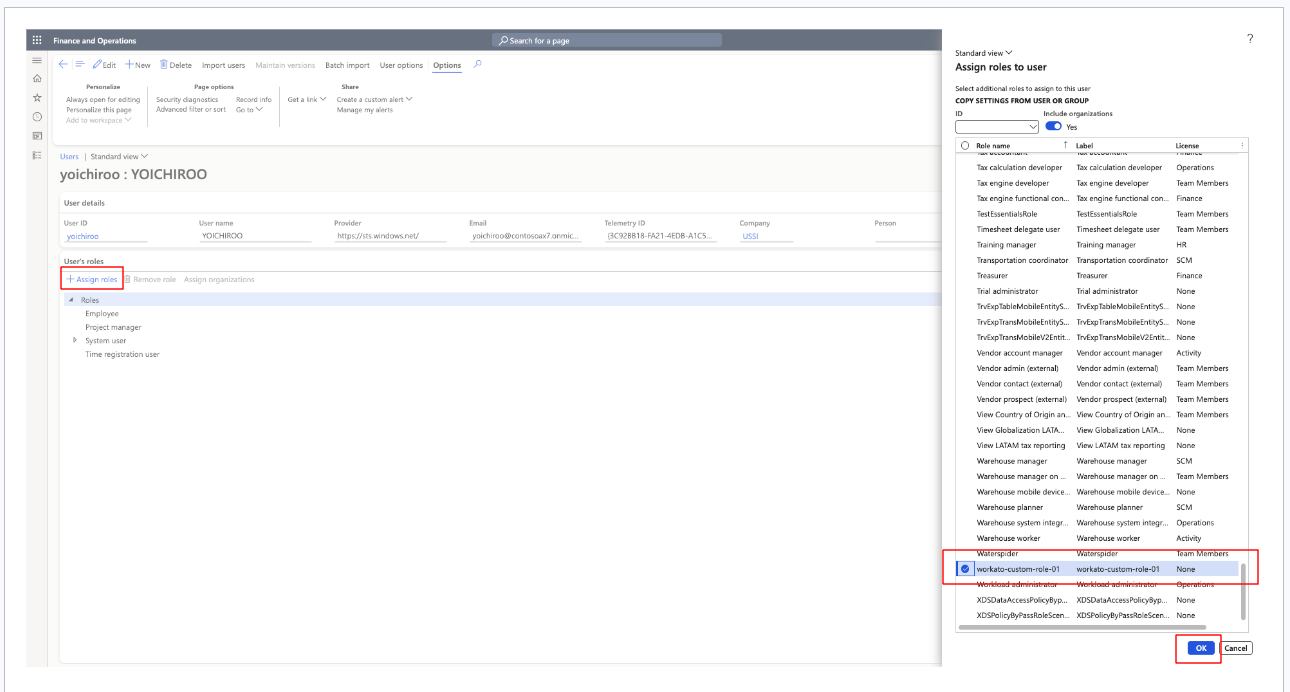 Role assignment
# Complete setup in Workato
Workato supports the following types of connections to MDSFO:
- Authorization code grant authentication (OAuth 2.0)
- Client credentials-based authentication (OAuth 2.0)
# Authorization code grant authentication (OAuth 2.0)
Complete the following steps to establish your MDSFO connection in Workato using authorization code grant authentication.
Install the MDSFO connector from the community library
Complete the following steps to install the MDSFO connector from the community library (opens new window):
Open the recipe editor and search for a connector. Alternatively, you can search for a connector in the community library (opens new window).
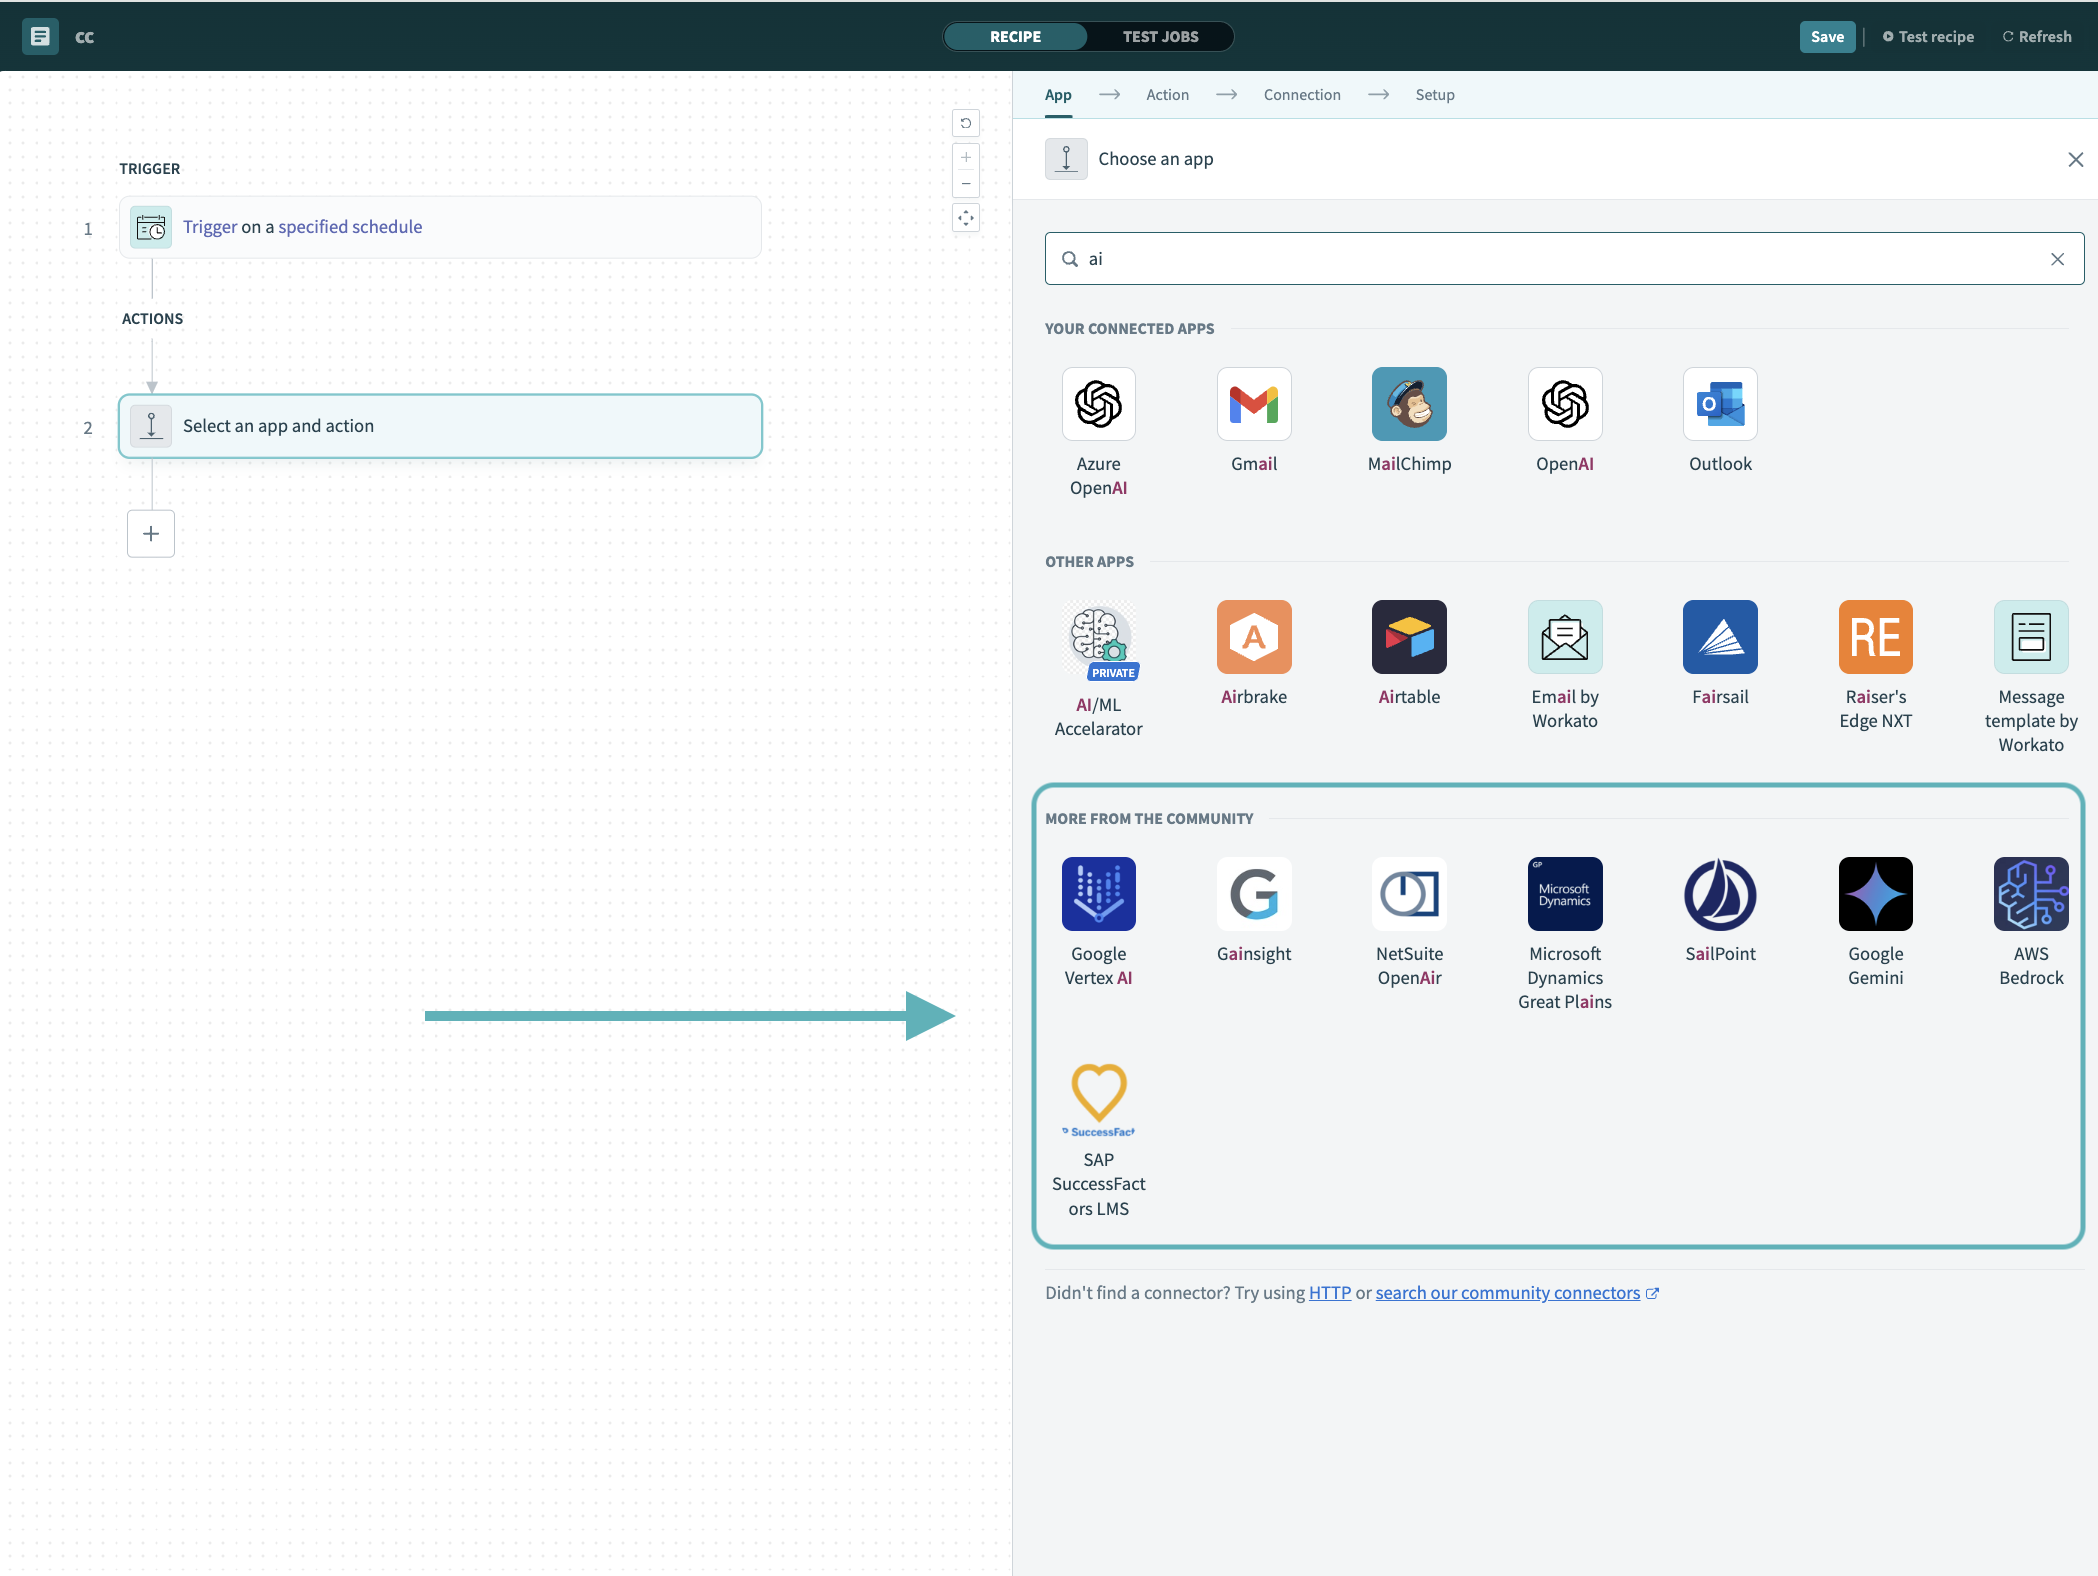 Search for community connectors in the recipe editor
Select the community connector you plan to install.
Click Install to install the connector from the community library.
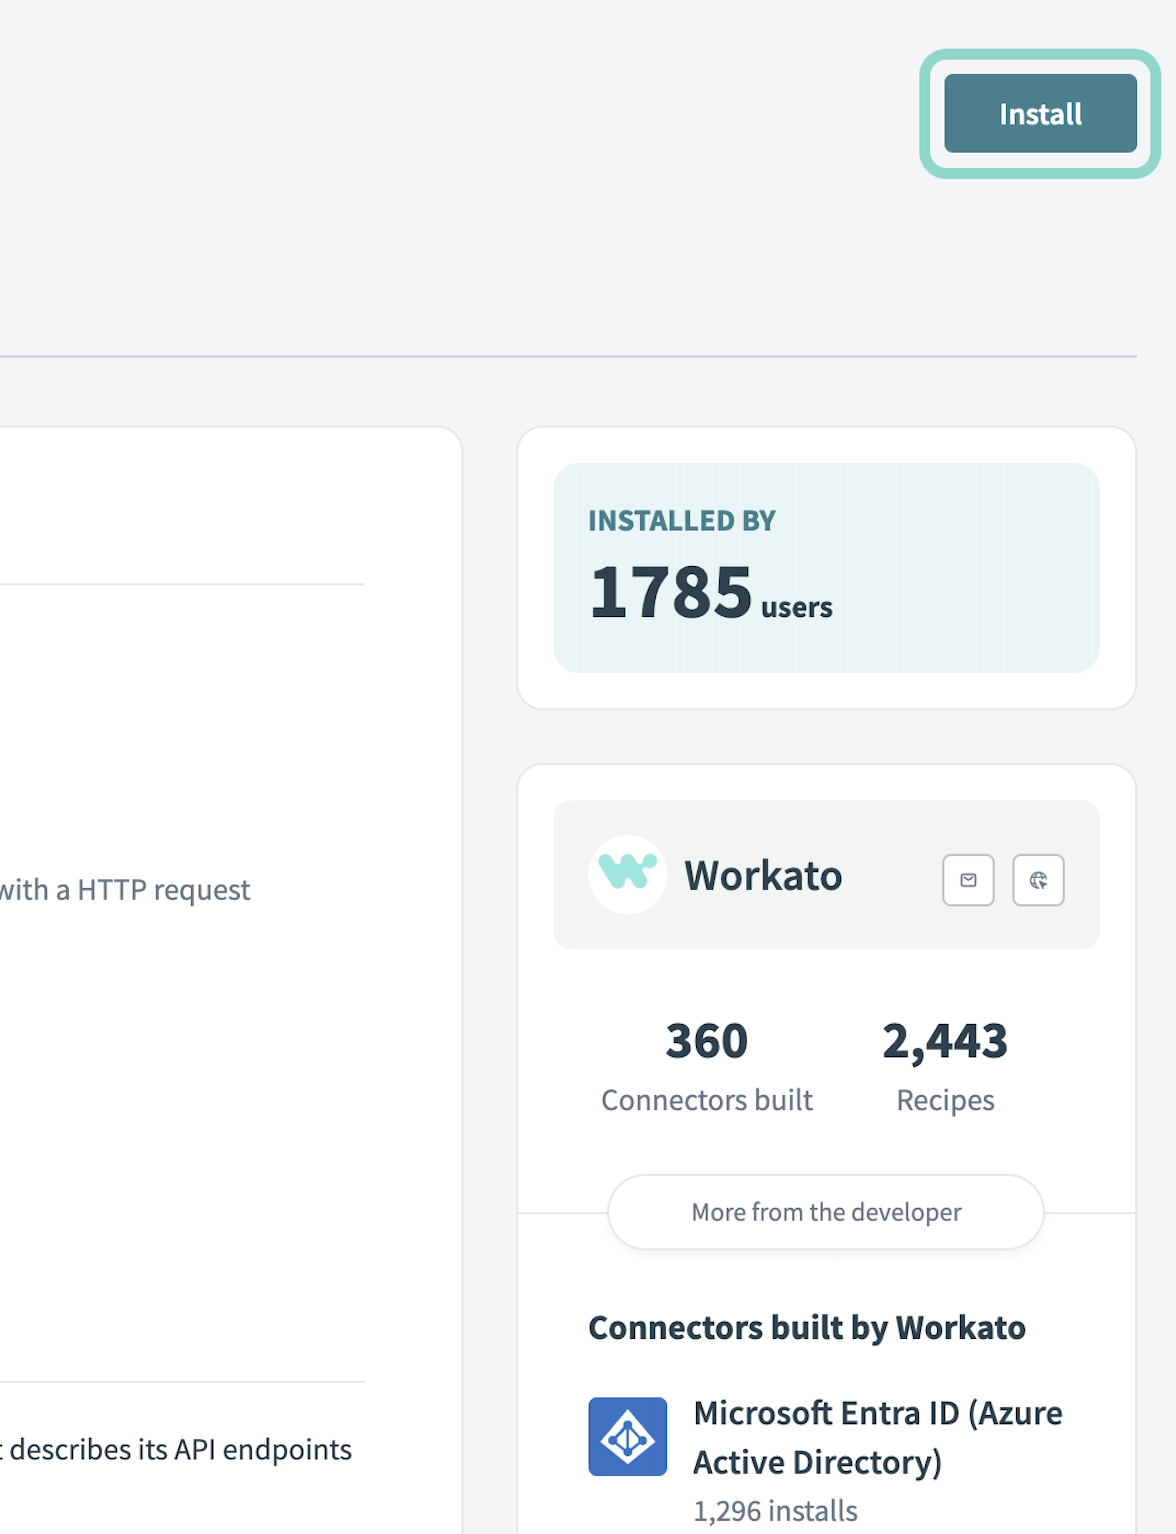 Click Install
Select Release connector. Alternatively, select Review code to review and modify the connector code before releasing it to the workspace.
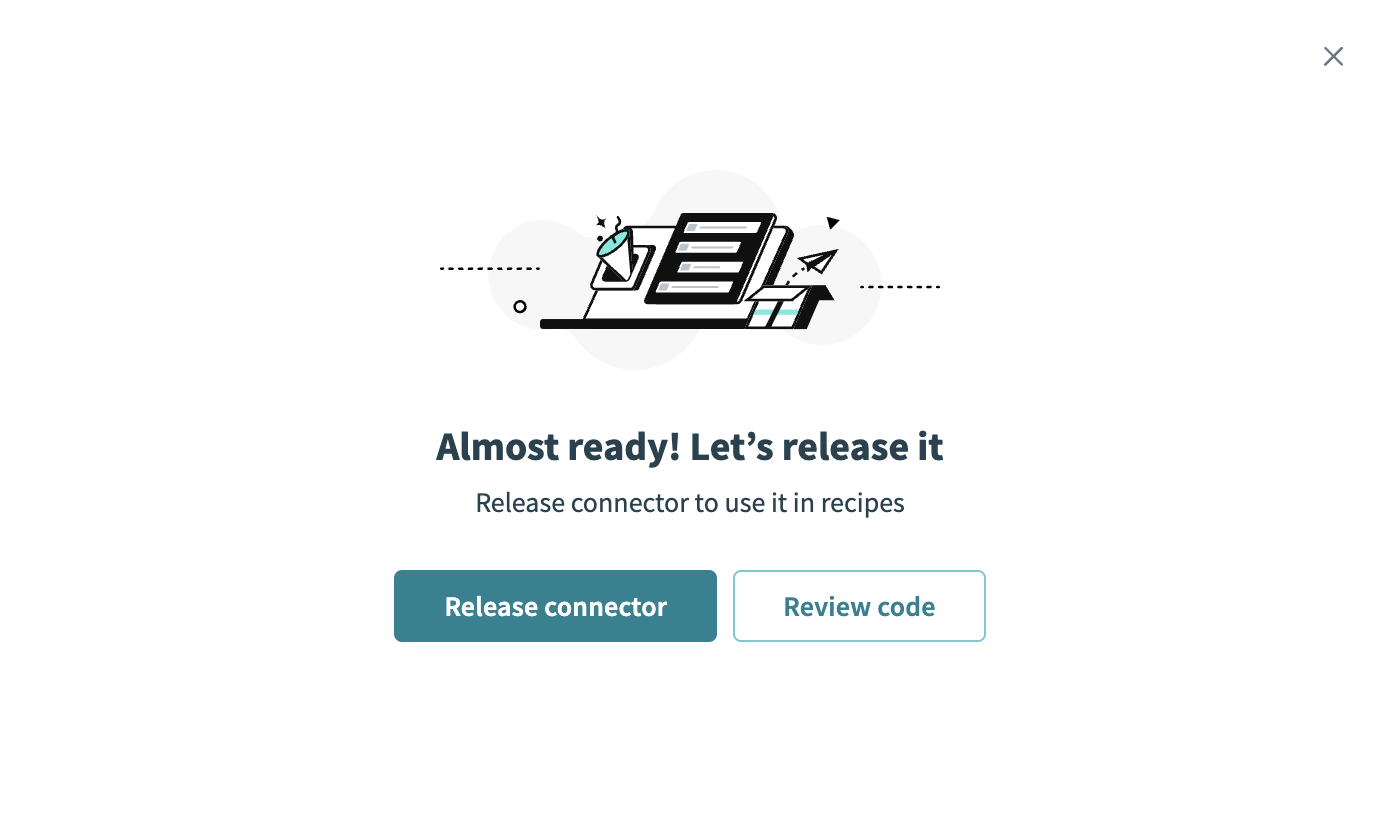 Release the connector
Summarize any changes you made to the connector, then click Release to allow workspace collaborators to use the connector in recipes.
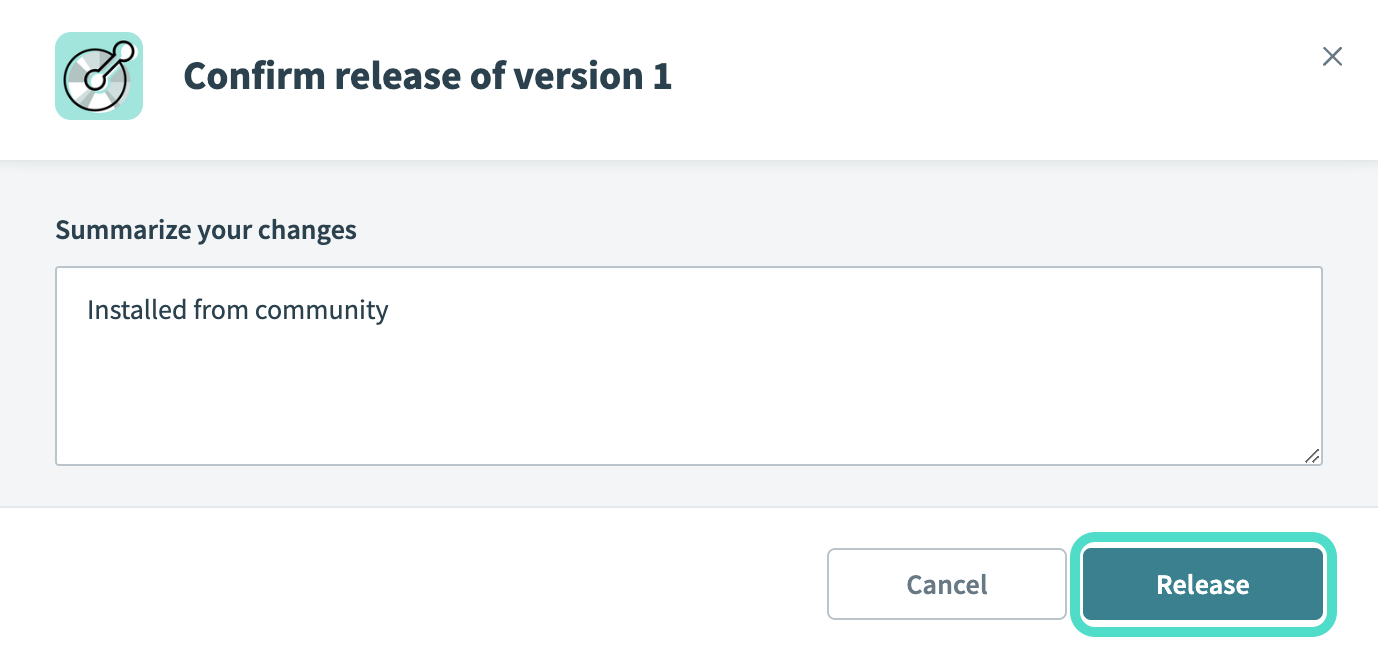 The Confirm release dialog
Click Create > Connection.
Search for and select Microsoft Dynamics Finance and Operations as your connection in the New connection page.
Provide a name for your connection in the Connection name field.
Use the Location drop-down menu to select the project where you plan to store the connection.
Select the Connection type you plan to use. Select Cloud for direct connections, or an on-prem group from the drop-down.
In the OAuth 2.0 grant type field select Authorization code as the connection type.
Provide your AD domain name. Your subdomain is provided by your MDSFO application administrator. If your Dynamics URL is https://abc.crm.dynamics.com/adfs, the subdomain is abc.crm.dynamics.com (opens new window). This step is mandatory for on-prem connections and optional for cloud connections.
Supply the Client ID and Client secretfor your app. Refer to the Register an app in Azure section to learn more.
Click Connect.
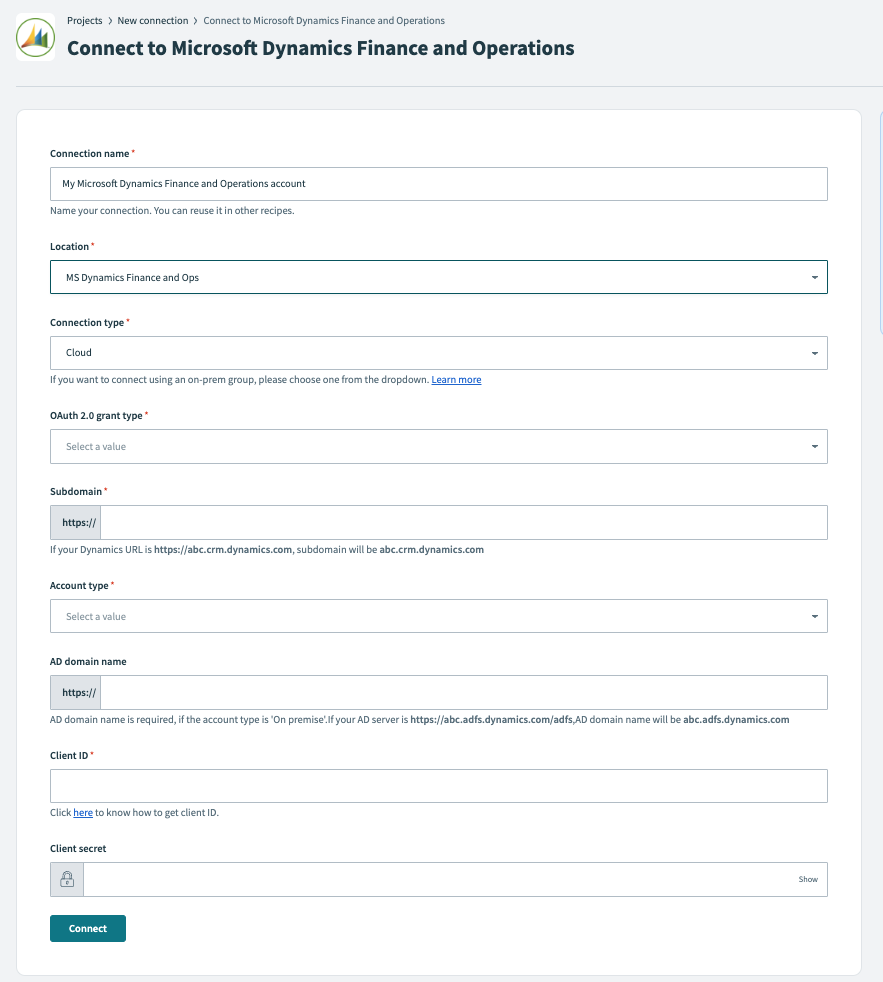 Connect MDSFO
# Client credentials-based authentication OAuth 2.0
Complete the following steps to establish your MDSFO connection in Workato using client credentials authentication.
Install the MDSFO connector from the community library
Complete the following steps to install the MDSFO connector from the community library (opens new window):
Open the recipe editor and search for a connector. Alternatively, you can search for a connector in the community library (opens new window).
 Search for community connectors in the recipe editor
Select the community connector you plan to install.
Click Install to install the connector from the community library.
 Click Install
Select Release connector. Alternatively, select Review code to review and modify the connector code before releasing it to the workspace.
 Release the connector
Summarize any changes you made to the connector, then click Release to allow workspace collaborators to use the connector in recipes.
 The Confirm release dialog
Click Create > Connection.
Search for and select Microsoft Dynamics Finance and Operations as your connection in the New connection page.
Provide a name for your connection in the Connection name field.
Use the Location drop-down menu to select the project where you plan to store the connection.
Select the Connection type you plan to use. Select Cloud for direct connections, or an on-prem group from the drop-down.
In the OAuth 2.0 grant type field select Client credentials as the connection type.
Provide your AD domain name. Your subdomain is provided by your MDSFO application administrator. If your Dynamics URL is https://abc.crm.dynamics.com/adfs, the subdomain is abc.crm.dynamics.com. This step is mandatory for on-prem connections and optional for cloud connections.
Supply the Client ID and Client secret for your app into their corresponding fields in Workato. Refer to the Register an app in Azure section to learn more.
Supply the Directory (tenant) ID for your app into its corresponding field in Workato. Refer to the Register an app in Azure section to learn more.
Click Connect.
 Connect MDSFO
# Supported resources
The MDSFO connector supports all the entities present in your instance.
Last updated: 9/29/2025, 7:36:35 PM