Connect to NetSuite REST on Workato
The NetSuite REST connector supports the following OAuth 2.0 authentication types:
- Client credentials (machine-to-machine)
- Authorization code grant (user-based authentication)
Select the authentication type based on your use case. Use client credentials for backend integrations. Use authorization code grant when actions require user-level access.
Prerequisites
Ensure you have the following to connect to NetSuite in Workato:
- The privilege to create connections in Workato.
- Access to a NetSuite Admin account.
- An understanding of the required NetSuite permissions.
Create an integration record in NetSuite
Complete the following steps to create a new integration record. The integration record represents an app, platform, or tool you plan to integrate with NetSuite.
Go to Setup > Integration > Manage Integrations > New.
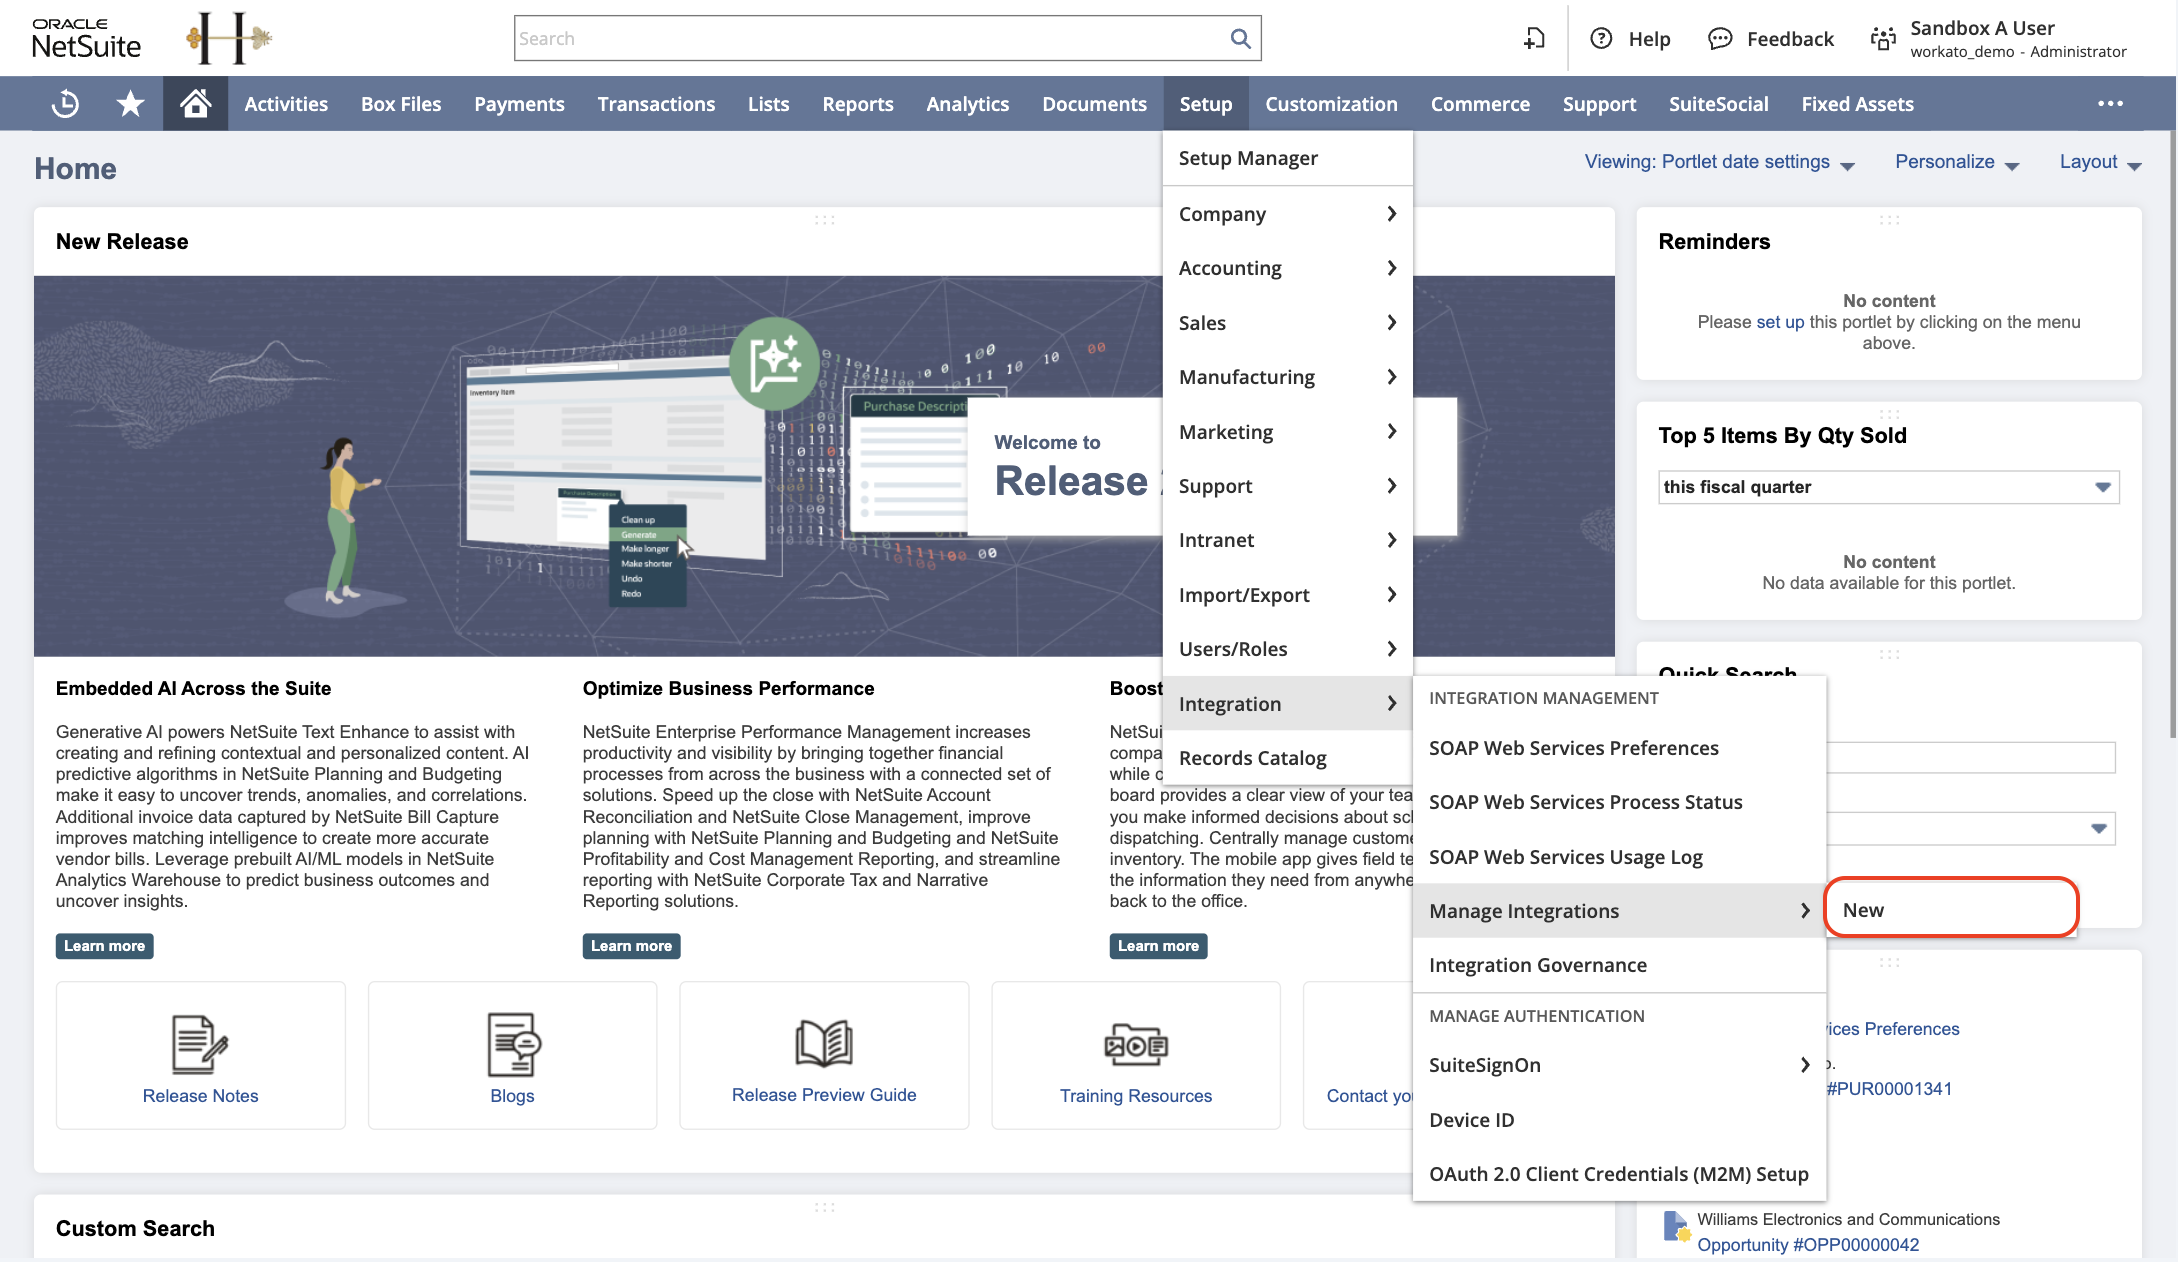 Go to Setup > Integration > Manage Integrations > New
Provide a name for the integration record in the Name field.
Select the authentication flow based on your use case:
- Select Client credentials (machine to machine) grant to use client credentials (machine-to-machine).
- Select Authorization code grant to use user-based authentication.
You can enable one or both authentication methods depending on your integration requirements.
Select the following scopes:
- RESTlets
- REST Web Services
- SuiteAnalytics Connect
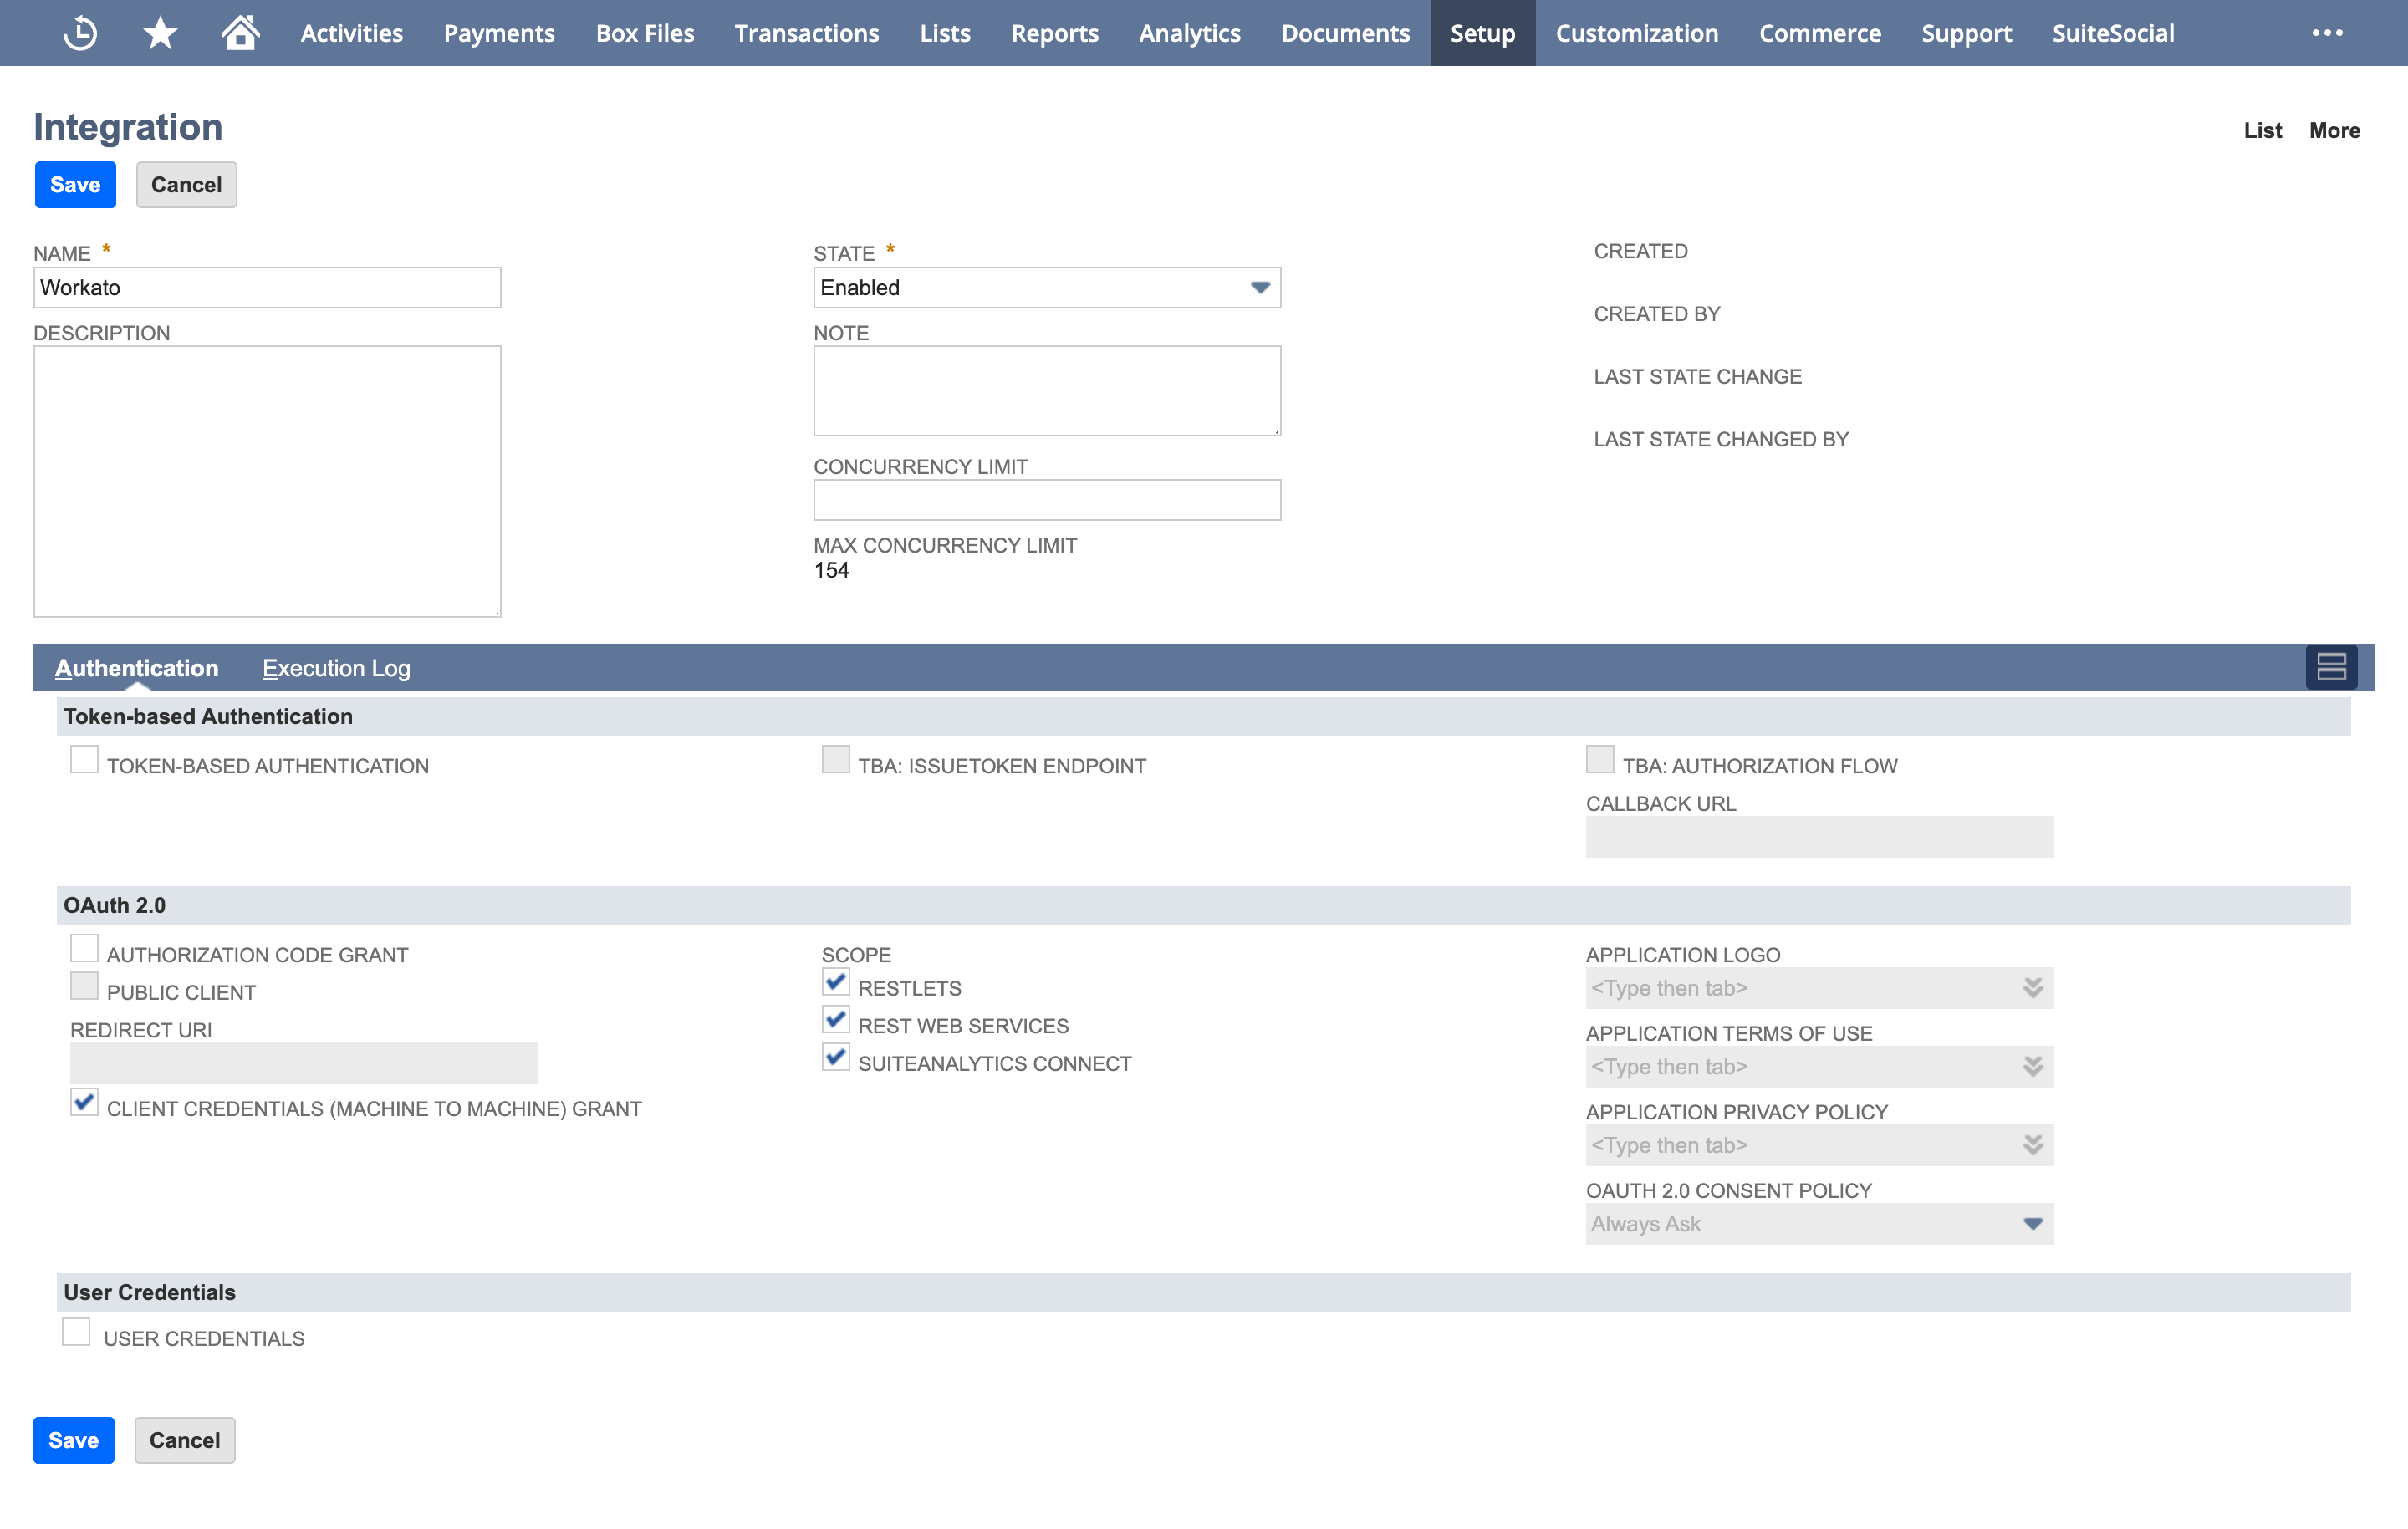 Create an integration record in NetSuite
Click Save.
Copy the Consumer key / Client ID and Consumer secret / Client secret and store both values securely.
- Client credentials authentication requires an EC private key and certificate.
- Authorization code grant requires a client ID and client secret configured in a custom OAuth profile.
Use the Client ID for client credentials authentication. Use the Client ID and Client secret for authorization code grant.
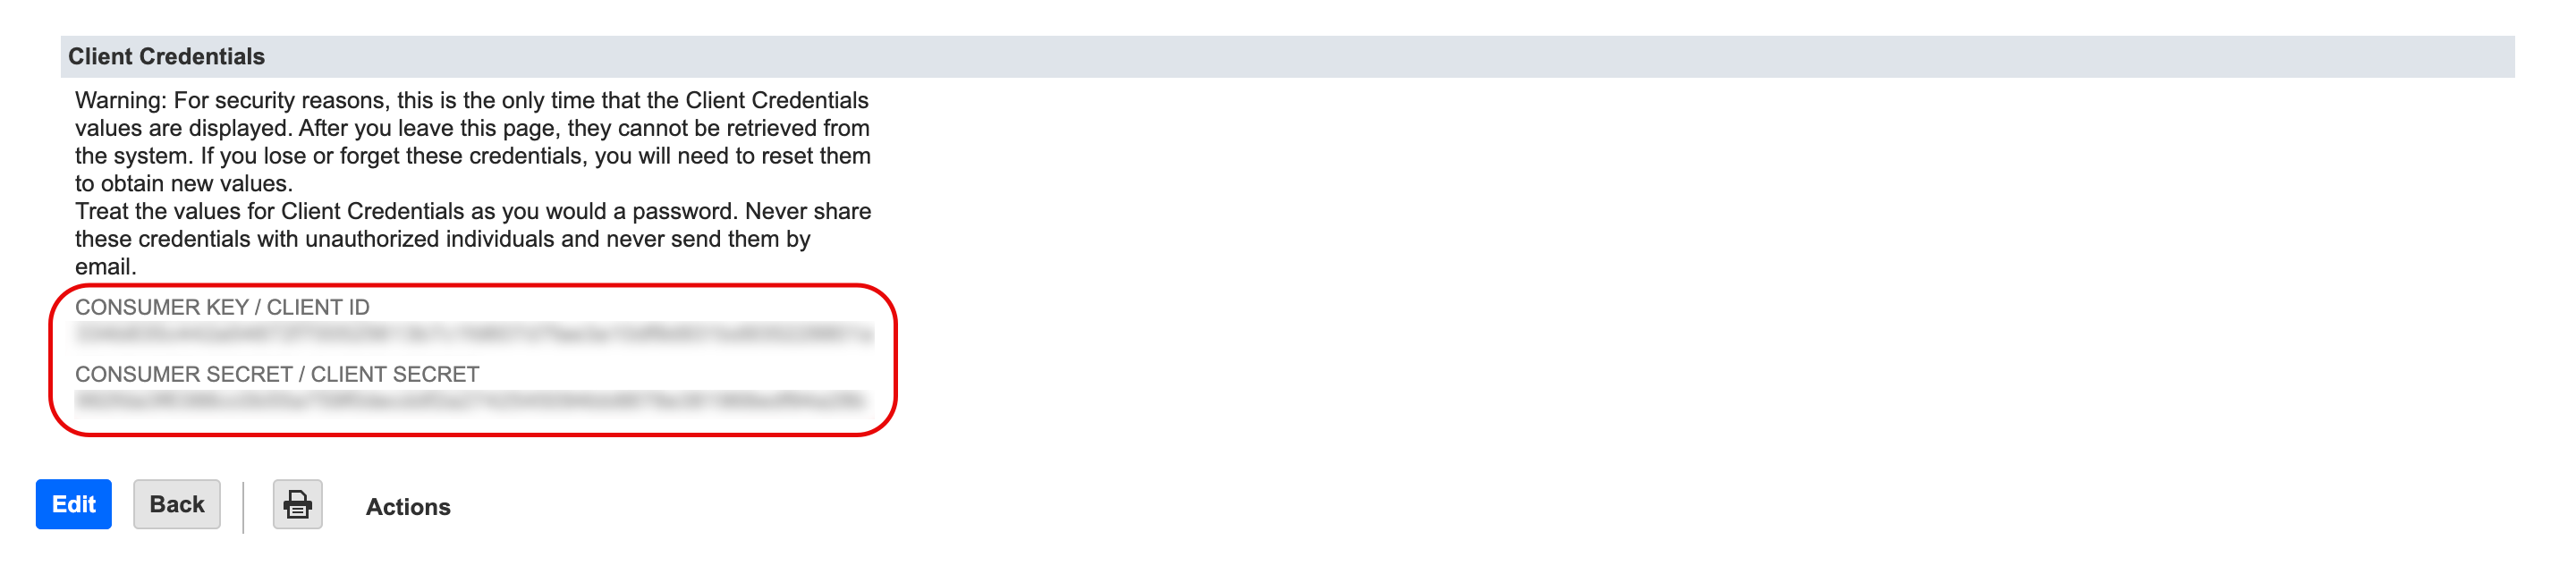 Copy the client credentials
Create a custom OAuth profile in Workato
Authorization code grant requires a custom OAuth profile with a valid client ID and client secret. Ensure your integration record in NetSuite supports authorization code grant and includes the required OAuth scopes. Use the following redirect URL when configuring the custom OAuth profile in Workato:
https://www.workato.com/oauth/callback
Complete the following steps to create a custom OAuth profile:
Go to Tools > Custom OAuth profiles in Workato.
Click + New custom profile.
Select NetSuite REST in the Application field.
Enter a name for the custom OAuth profile in the Name field.
Copy the Client ID and Client secret from the integration record you created in NetSuite.
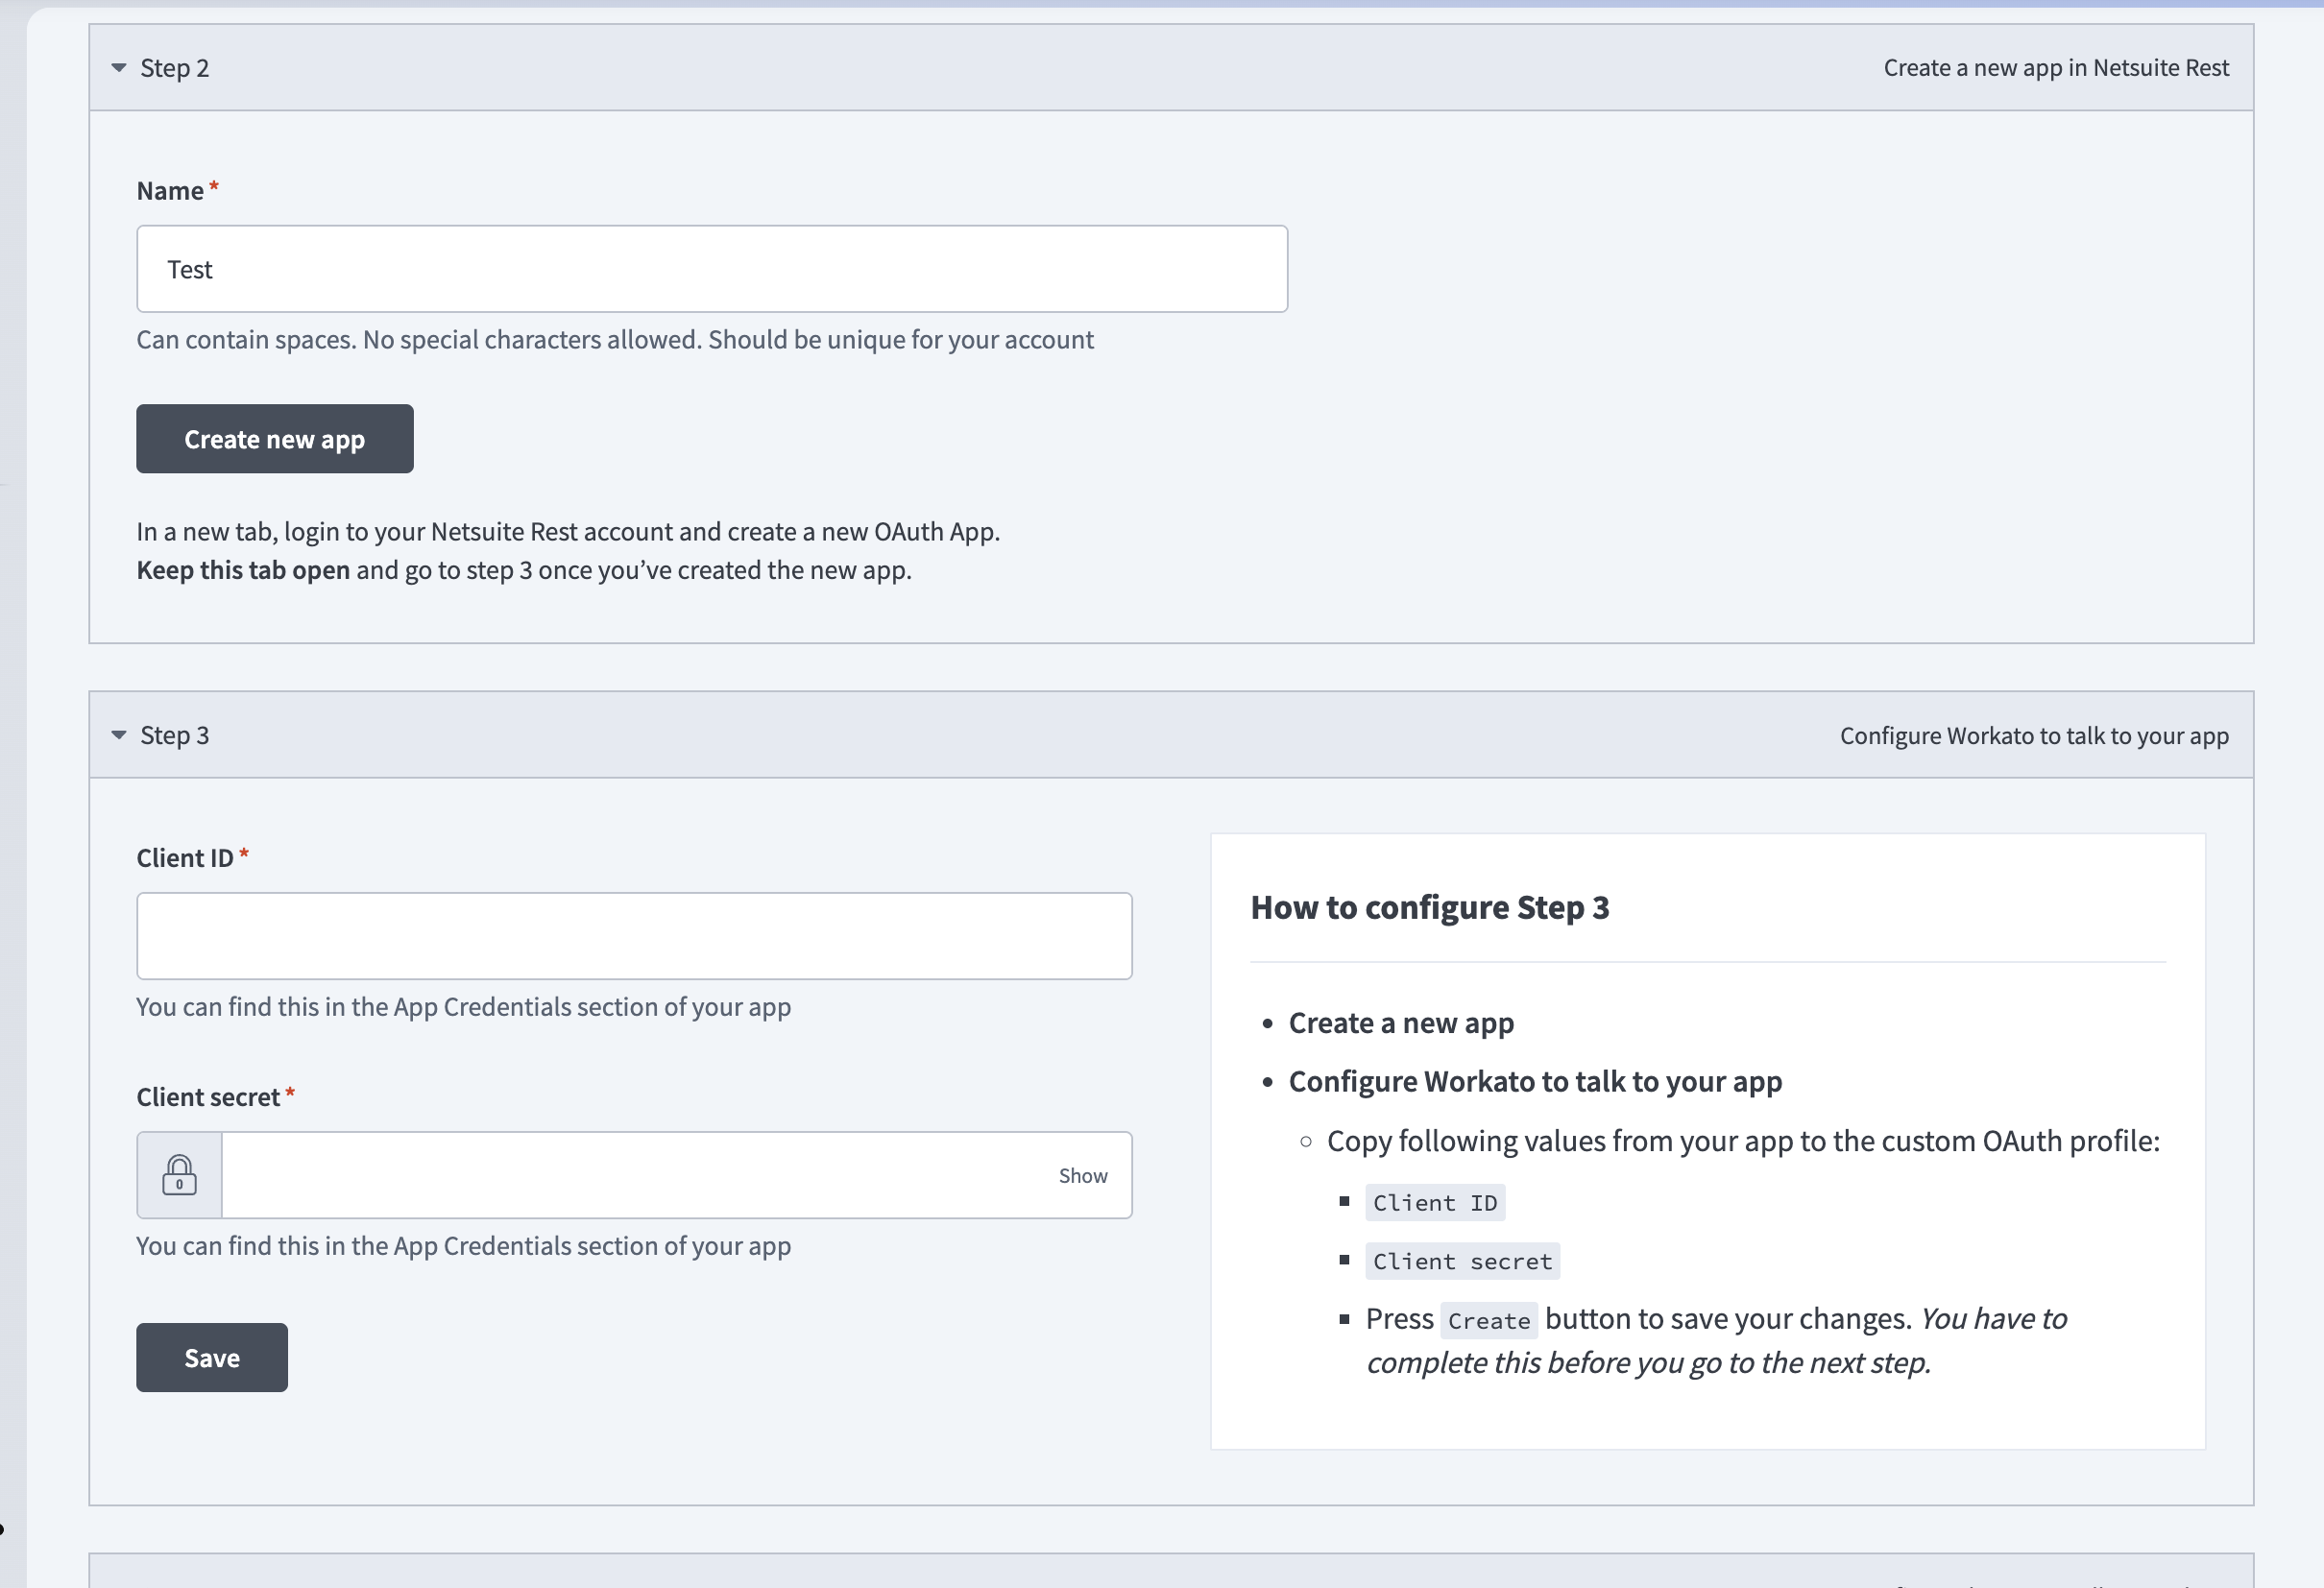 Create a custom OAuth profile
Paste the Client ID and Client secret into their respective fields.
Click Save.
Create key and certificate files
Complete the following steps to generate key and certificate files:
Open a new terminal window and run the following command to list available elliptic curves and algorithms:
openssl ecparam -list_curvesGenerate a private key using the prime256v1 elliptic curve:
openssl ecparam -name prime256v1 -genkey -noout -out private-key.pemGenerate the corresponding public key from the private key:
openssl ec -in private-key.pem -pubout -out public-key.pemSelf-sign the private key and generate a PEM certificate:
openssl req -new -x509 -key private-key.pem -out cert.pem -days 365CLIENT CREDENTIALS ONLY
This step applies only to client credentials (machine-to-machine) authentication. Skip this step if you use authorization code grant.
Create a machine-to-machine certificate in NetSuite
Complete the following steps to create a machine-to-machine certificate in NetSuite:
Go to Setup > Integration > OAuth 2.0 Client Credentials (M2M) Setup.
Click Create New. The Create a New Client Credentials Mapping dialog appears.
Configure the following fields:
- Entity
- Select the entity that uses the client credentials. Refer to the NetSuite SOAP connector documentation to learn how to set up an integration user.
- Role
- Choose the role that defines the permissions for the entity. Ensure the selected role has the necessary permissions for the integration. Refer to the NetSuite SOAP connector documentation to learn how to create an integration role.
- Application
- Select the integration record you created previously.
- Certificate
- Upload the certificate you created previously. The file should be saved on your computer as
cert.pem.
CONFIGURATION FOR RECORD SEARCH
You must configure the following prerequisites in NetSuite to use the Search records action:
- Your account must have the SuiteAnalytics Workbook feature enabled.
- Your role must have the SuiteAnalytics Workbook (View) permission.
Refer to the NetSuite Prerequisites and Setup for REST Web Services guide for more information about the features and permissions required for REST Web Services.
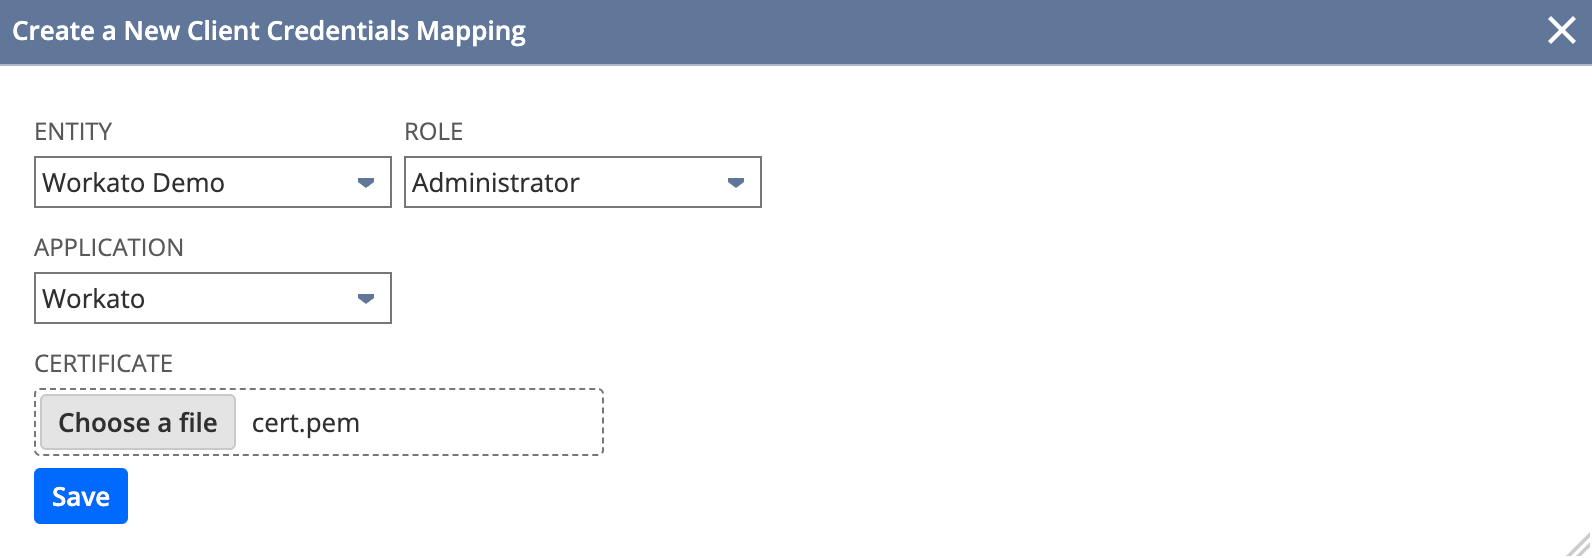 Create a new client credentials mapping
Click Save.
Copy the Certificate ID and store it in a secure location. Workato requires this value to establish the NetSuite REST connection.
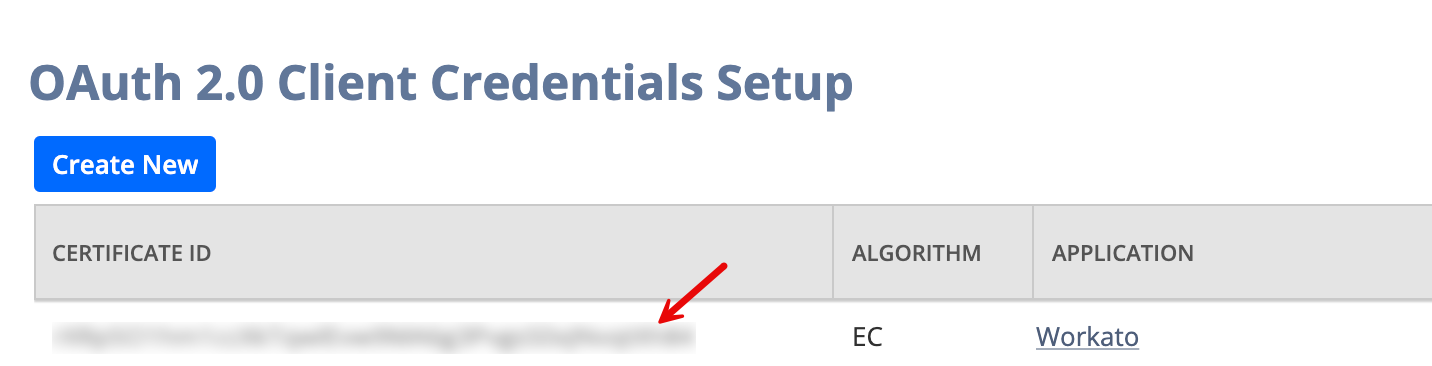 Copy the Certificate ID
CLIENT CREDENTIALS ONLY
This step applies only to client credentials authentication.
Configure the Workato NetSuite REST connector
Select the authentication type based on your setup:
Client credentials (machine-to-machine)
Complete the following steps to establish a connection using client credentials:
Enter a name for your NetSuite connection in the Connection name field.
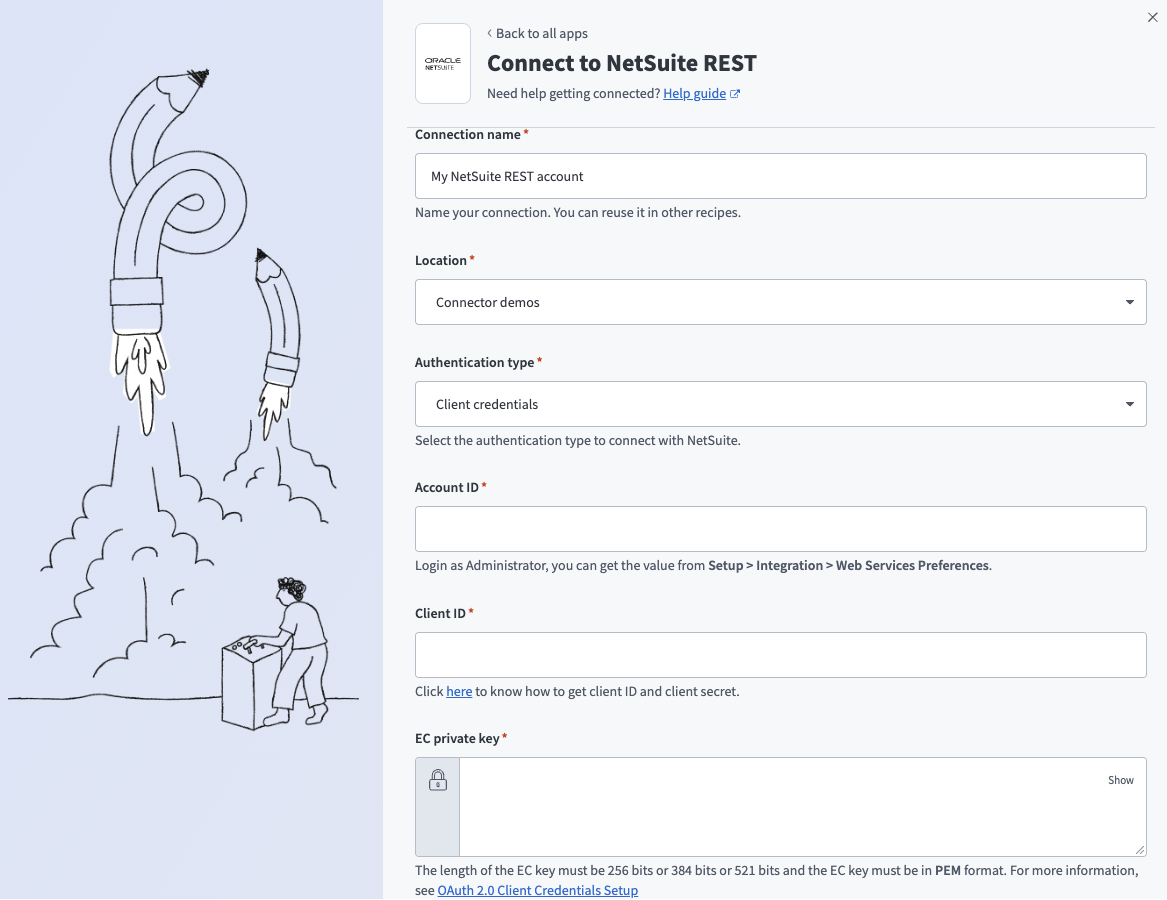 Connect to NetSuite REST using client credentials
Enter the folder or project where you plan to store your NetSuite connection in the Location field.
Use the Authentication type drop-down menu to select Client credentials.
Enter your Account ID.
Sign in to NetSuite as an Administrator and go to Setup > Company > Company Information to find your Account ID.
You can also find it at the beginning of the NetSuite URL. For example, if the URL is https://1234567.app.netsuite.com/, your Account ID is 1234567.
SANDBOX ACCOUNT ID FORMAT
You must replace underscores (_) with a hyphen (-) and capitalize letters if you are using a sandbox account. For example, 1234567_sb1 must be updated to 1234567-SB1.
Enter the client ID you saved when you created your NetSuite integration record into the Client ID field.
Enter the private key you generated into the EC Private Key field. Ensure the key is in PEM format and has a length of 256, 384, or 521 bits.
To extract the key, open the private-key.pem file and copy the text, starting from -----BEGIN EC PRIVATE KEY----- and ending with -----END EC PRIVATE KEY-----.
Enter the certificate ID from the machine-to-machine certificate you created in NetSuite into the Certificate ID field.
Optional. Click Advanced settings > OAuth 2.0 scopes and select a value.
- Select OAuth 2.0 scopes and add them along with REST Web Services to define the minimum scope required for a NetSuite REST connection. You must enable the selected scopes in the corresponding integration record.
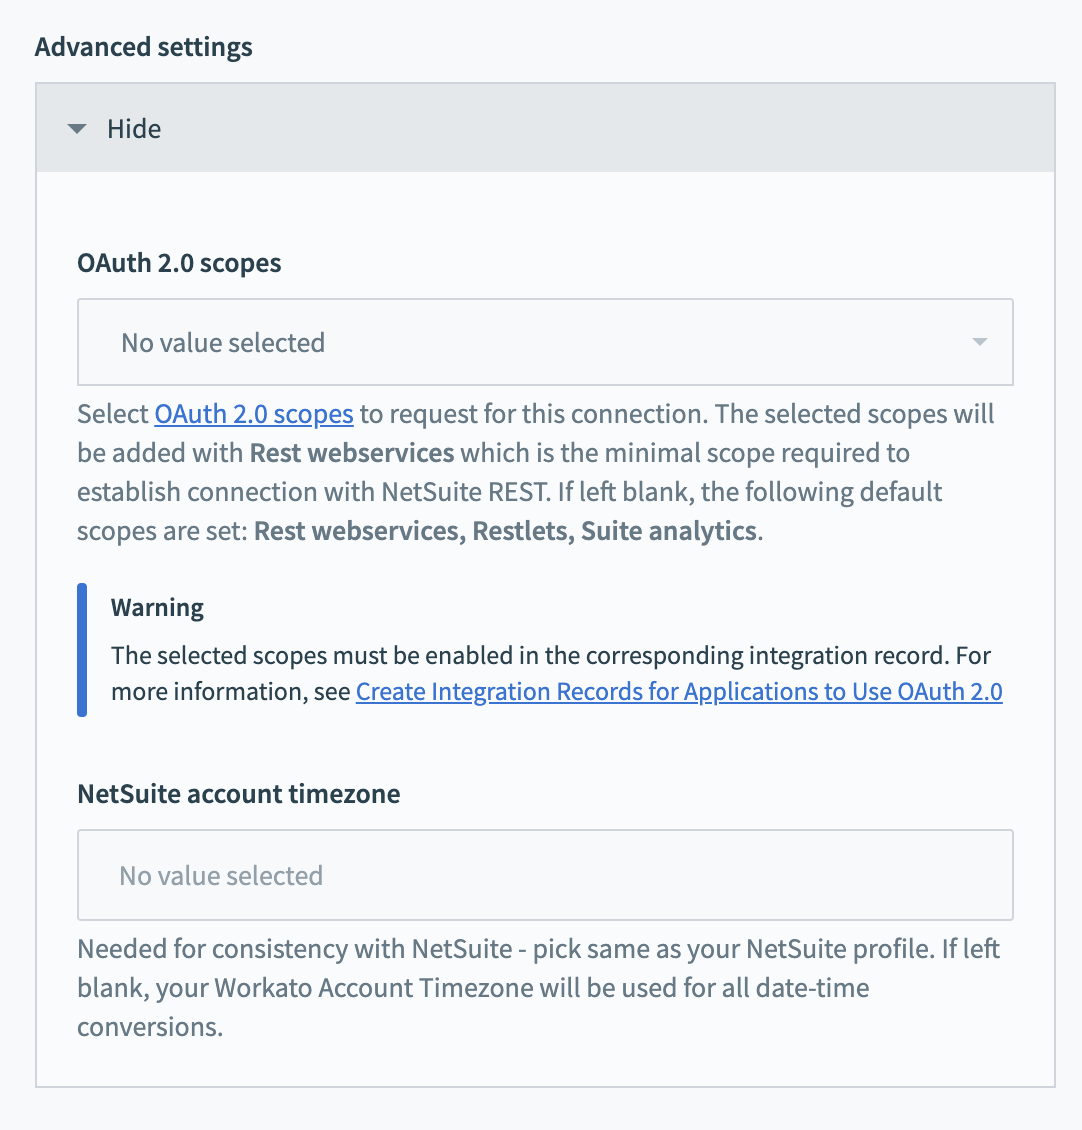 Optional OAuth 2.0 scope settings
Click Connect.
Authorization code grant (user-based authentication)
Complete the following steps to establish a connection using authorization code grant:
Enter a name for your NetSuite connection in the Connection name field.
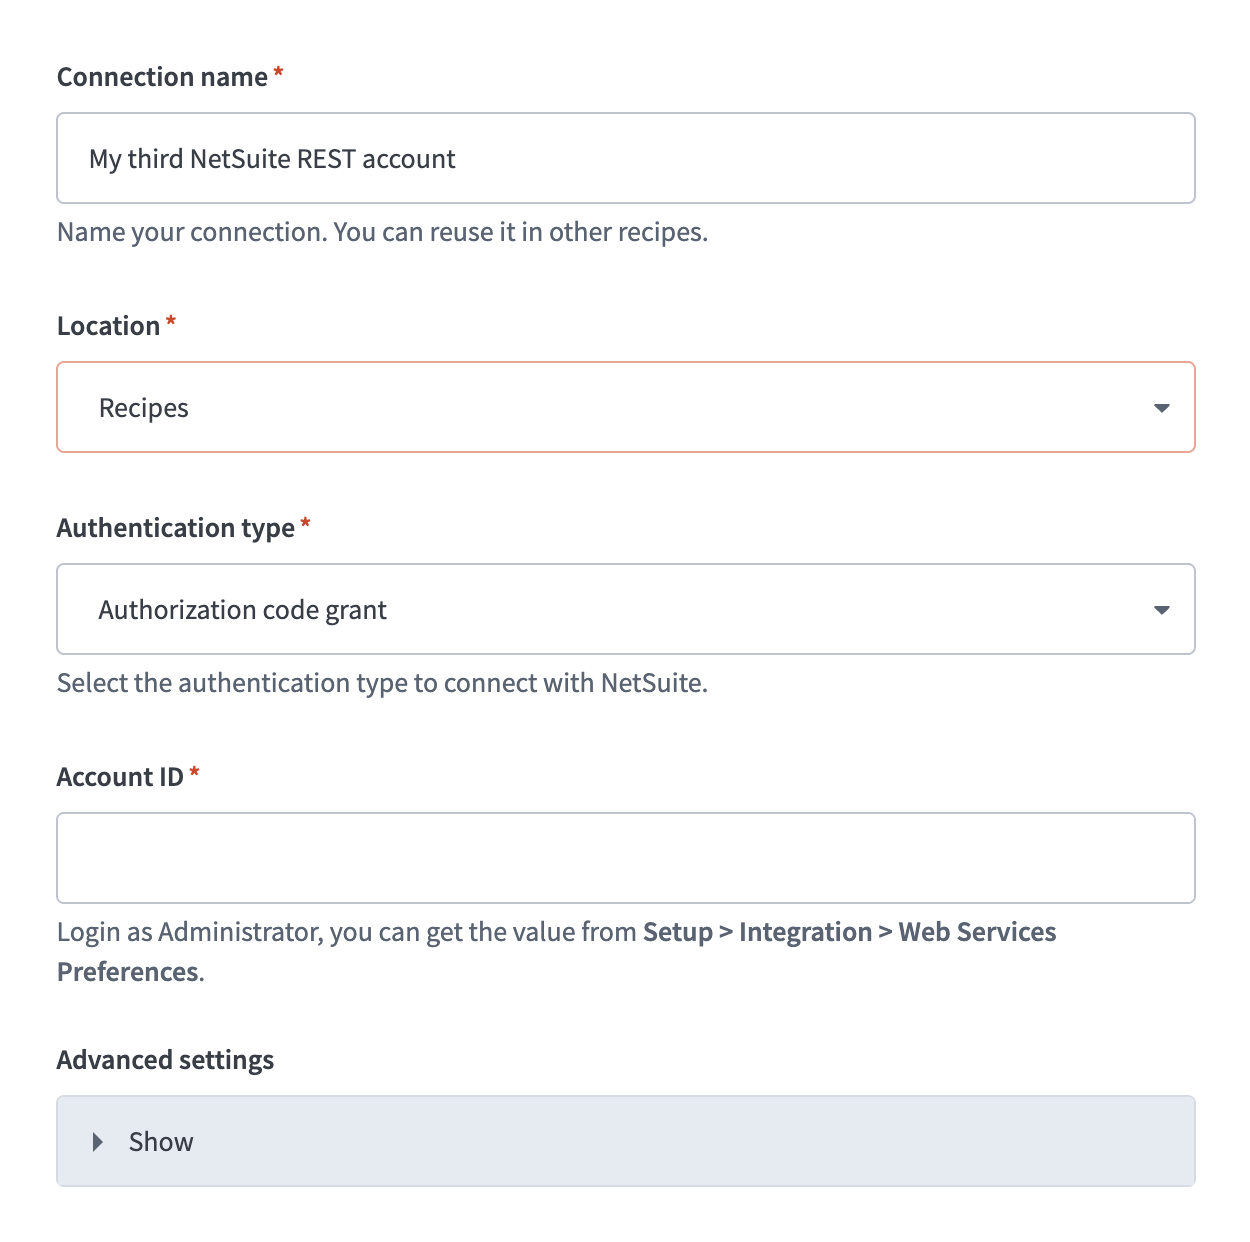 Connect to NetSuite REST using authorization code grant
Enter the folder or project where you plan to store your NetSuite connection in the Location field.
Use the Authentication type drop-down menu to select Authorization code grant.
Enter your Account ID.
Sign in to NetSuite as an Administrator and go to Setup > Company > Company Information to find your Account ID.
You can also find it at the beginning of the NetSuite URL. For example, if the URL is https://1234567.app.netsuite.com/, your Account ID is 1234567.
SANDBOX ACCOUNT ID FORMAT
You must replace underscores (_) with a hyphen (-) and capitalize letters if you are using a sandbox account. For example, 1234567_sb1 must be updated to 1234567-SB1.
Optional. Expand Advanced settings and configure OAuth 2.0 scopes and the NetSuite account timezone.
Select your custom OAuth profile in the Custom OAuth profile field.
Click Connect.
Sign in to NetSuite and authorize access when prompted.
Last updated: