# SharePoint
SharePoint (opens new window) is a web-based collaboration, document management and storage system integrated with Microsoft Office. It is primarily used for document management and storage but is highly configurable and usage varies substantially among organizations.
Workato's SharePoint connector enables you to build integrations and automations around SharePoint and other third-party applications.
# API version
The SharePoint connector uses the SharePoint REST API v1 (opens new window).
# How to connect to SharePoint
MICROSOFT MFA ENFORCEMENT
Microsoft is rolling out mandatory multi-factor authentication (MFA) (opens new window) gradually to different applications and accounts in phases. This enforcement will continue throughout 2025 and beyond.
We strongly recommend enabling MFA now for all Microsoft accounts used with Workato to avoid service disruptions from short-notice enforcement changes.
Complete the following steps to maintain uninterrupted service:
Enable MFA for your Microsoft organization following Microsoft's MFA setup guide (opens new window).
Reconnect your Microsoft connection in Workato.
Complete the OAuth flow with MFA when prompted.
Test your recipes to ensure they work with the updated connection.
To connect SharePoint to Workato, you must have an Azure account. Workato supports the following authentication methods:
# Authorization code grant connection
This method requires the following fields:
- Subdomain
- Client ID (optional)
- Client Secret (optional)
# Register the Workato app in the Azure Portal
Complete the following steps to register the Workato app and generate a client ID and secret for authorization code grant connections.
Register the Workato app in the Azure Portal
Sign in to the Azure portal (opens new window).
Select App registrations > + New registration, under Azure services.

Enter a unique name for the application and select a Supported account type.
Select Web from the Select a platform drop-down menu.
Enter https://www.workato.com/oauth/callback as the Redirect URI and select Register.
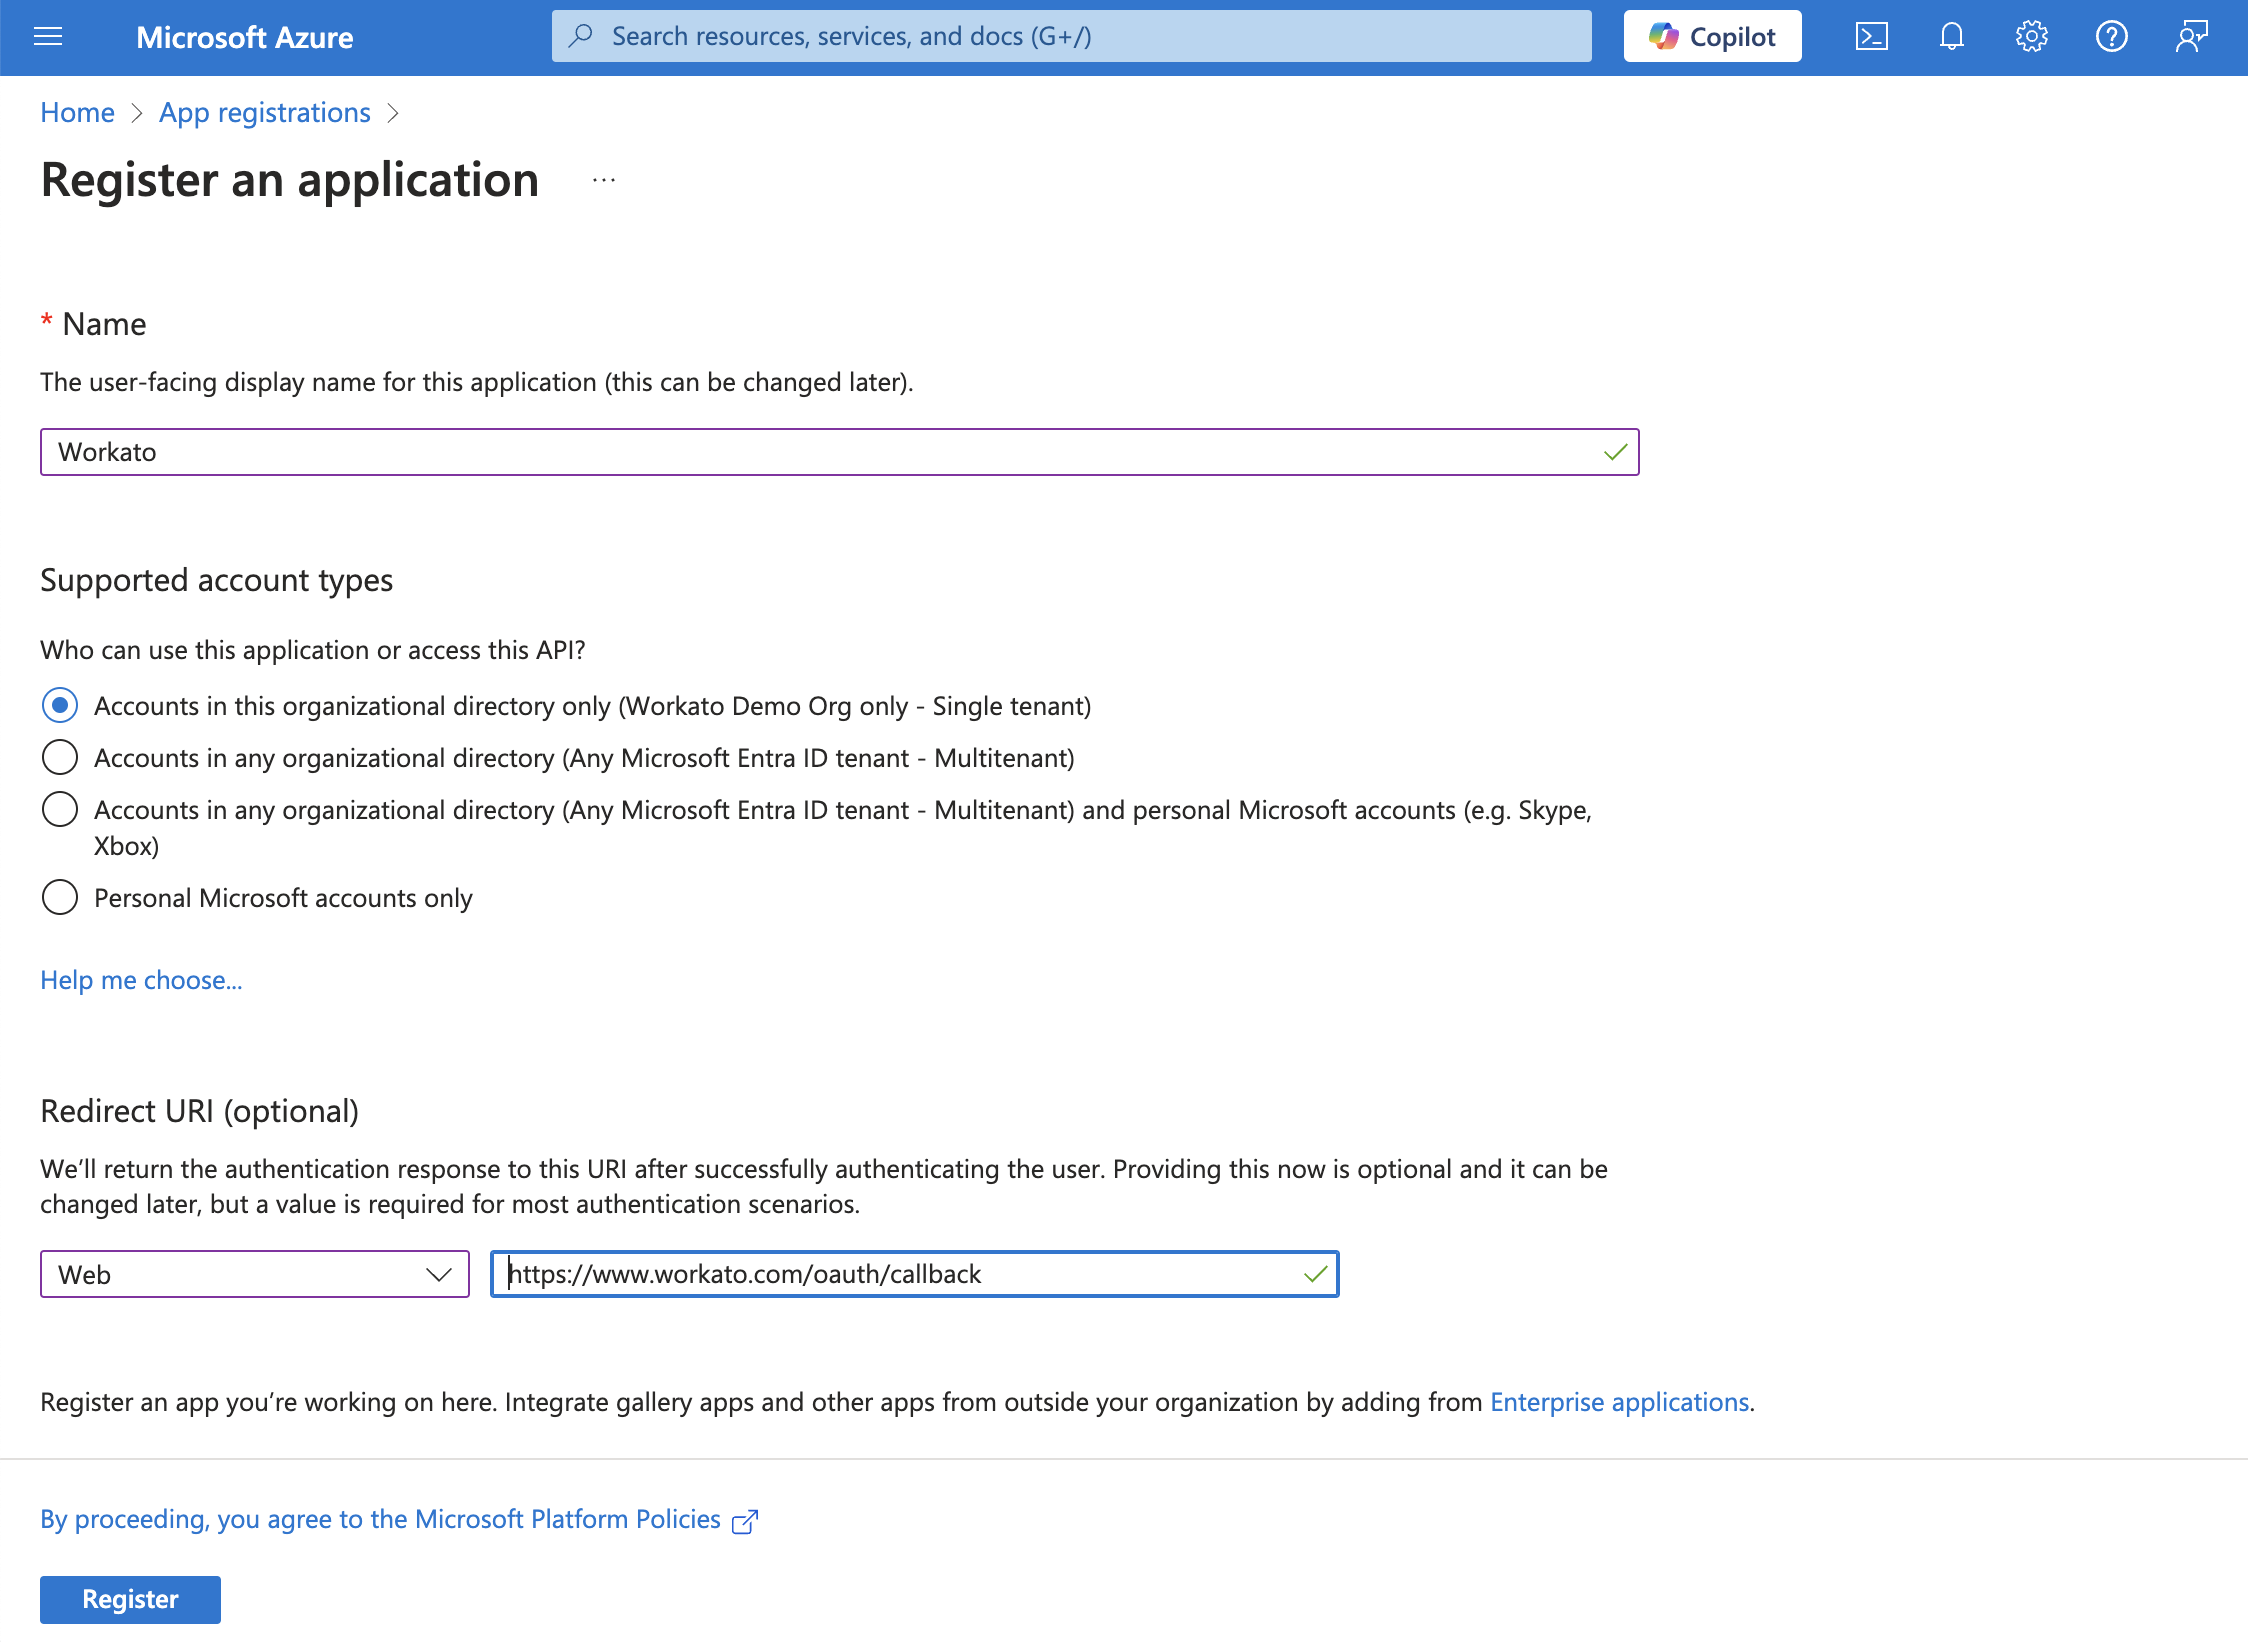 Register an app
Assign permissions to your app
Go to Manage > API permissions in the navigation sidebar.
Click + Add a permission and select Microsoft Graph APIs.
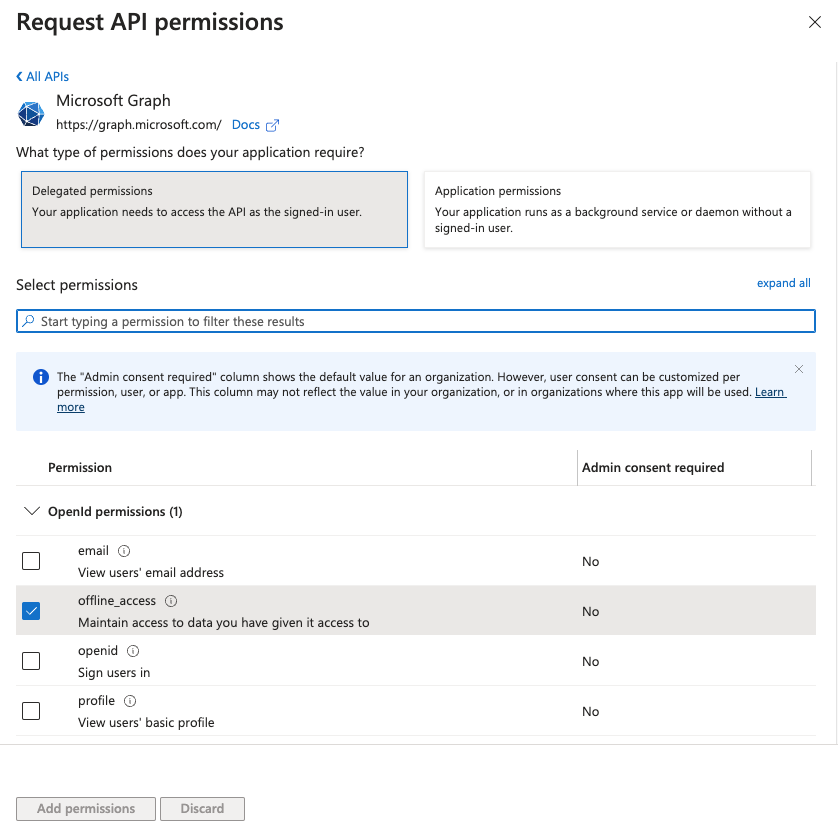 Add permissions
Add the required permissions listed in the Permissions required to connect section. Assign Application or Delegated permissions based on your connection type.
 Add permissions
Click Add permissions.
Admin consent is required for specific permissions. Refer to the Granting admin consent section to learn more.
Generate a client secret
Go to Manage > Certificates & Secrets > Client secrets.
Click + New client secret.
Provide a Description for the client secret and specify an expiry date.
Click Add.
Copy and save the client secret Value—not the Secret ID—for use in Workato.
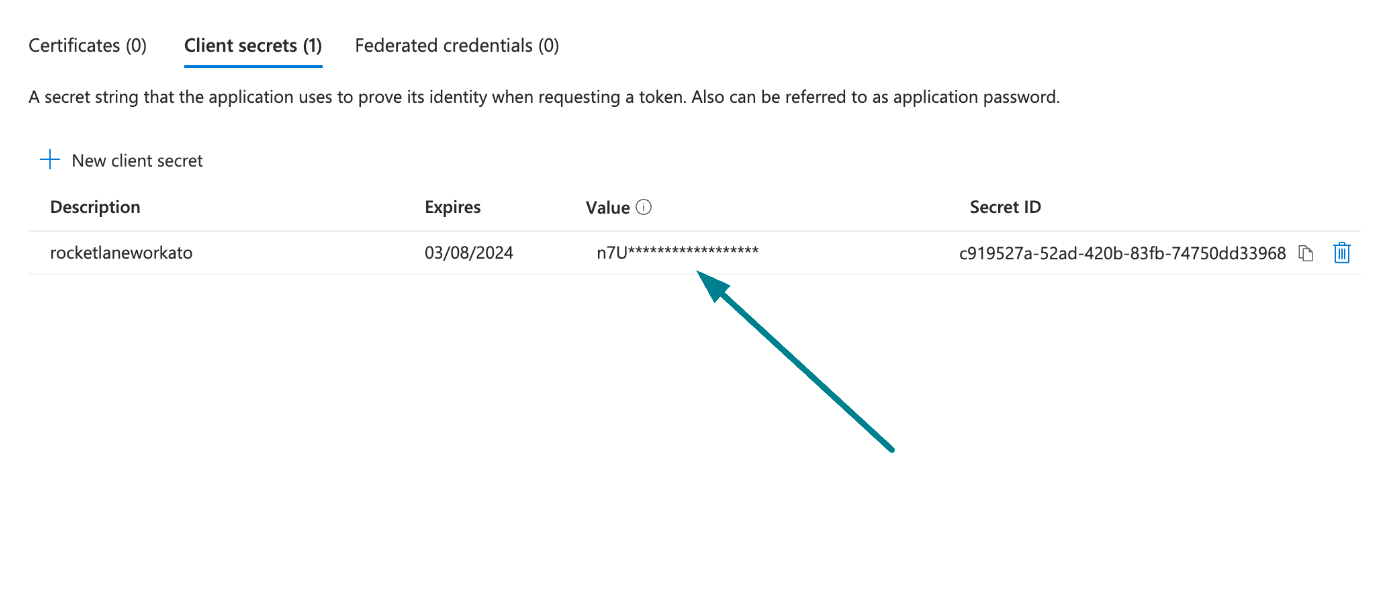 Copy and save the client secret value
Obtain the Application (client) ID from the Azure Portal
Go to the Overview > Essentials section.
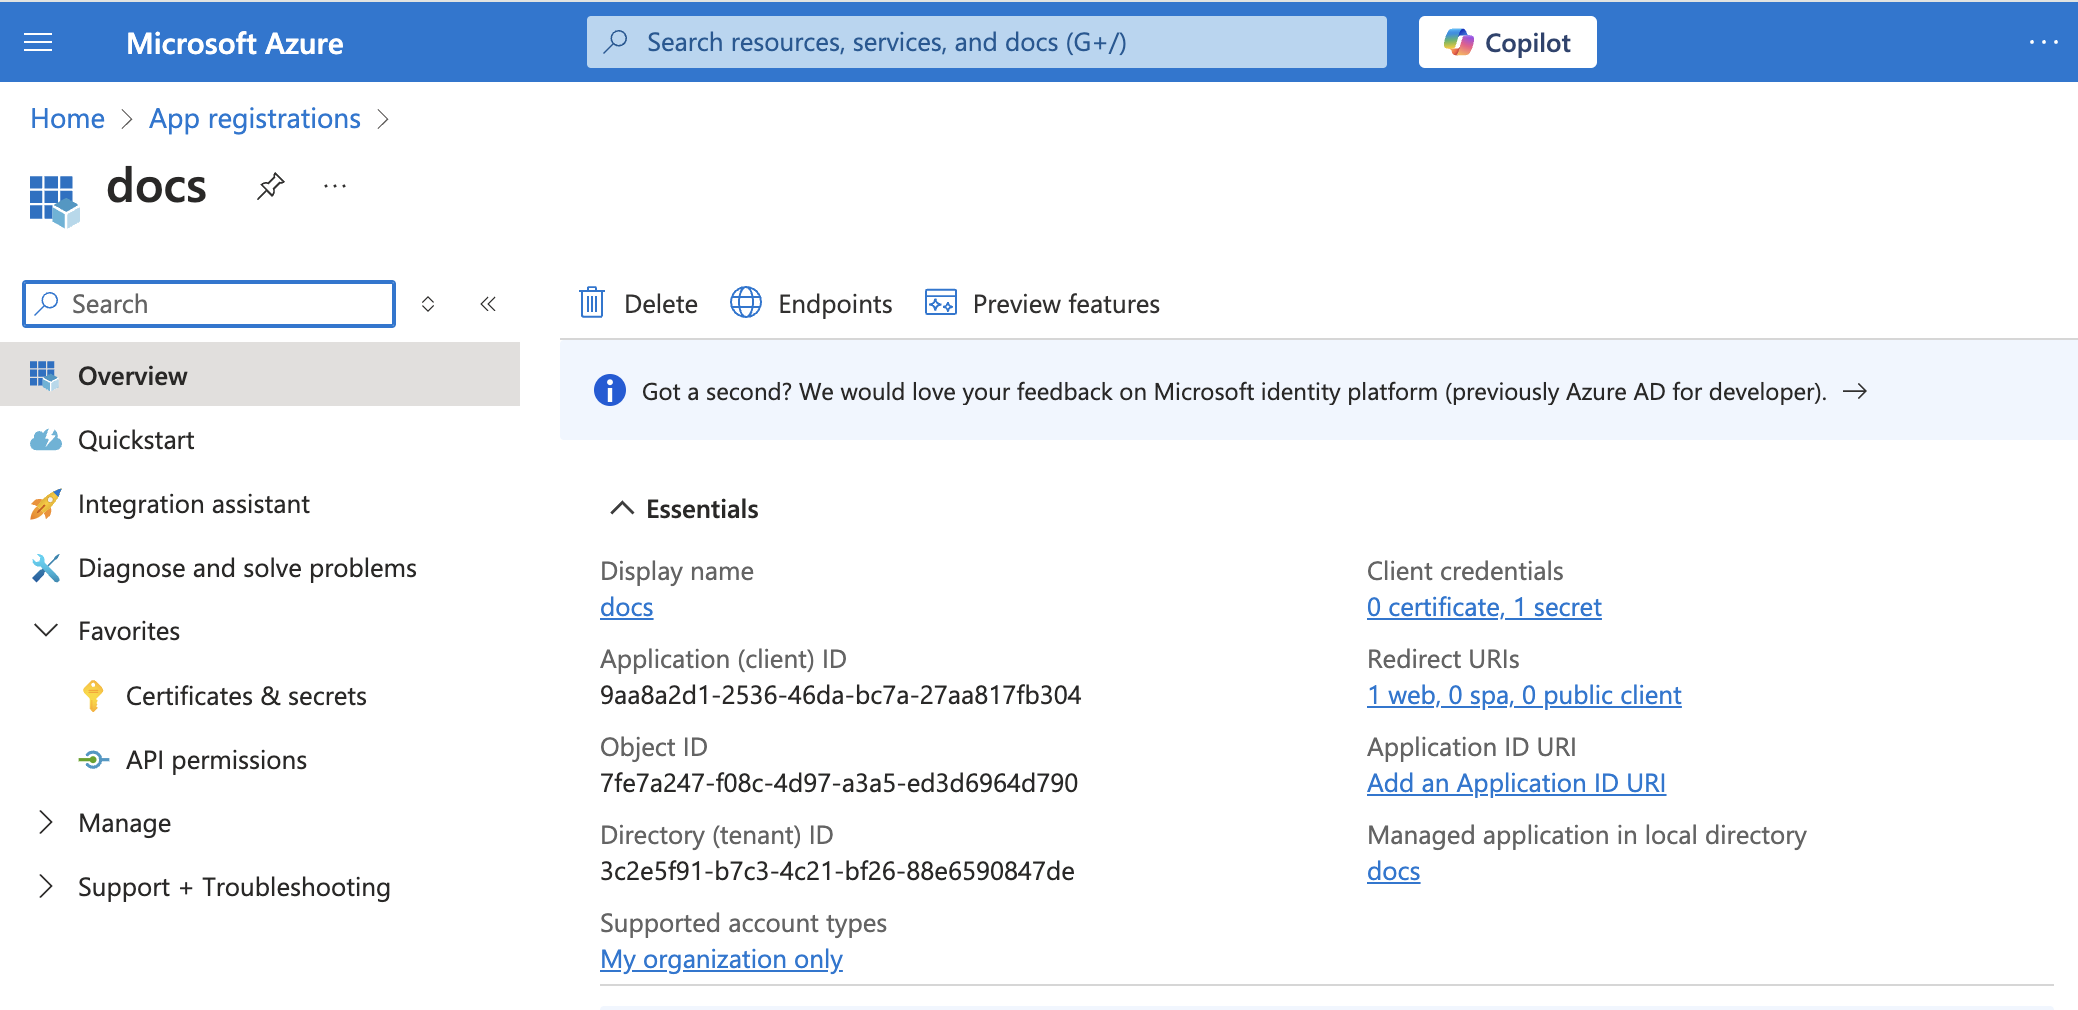 App details
Copy the Application (client) ID for use in Workato.
After you complete these steps, configure the SharePoint connection in Workato using the API permissions you set up in the Azure portal.
# Complete setup in Workato
Sign in to Workato.
Select the project where you plan to store the connection.
Click Create > Connection.
Search for and select SharePoint as your connection on the New connection page.
Provide a name for your connection in the Connection name field.
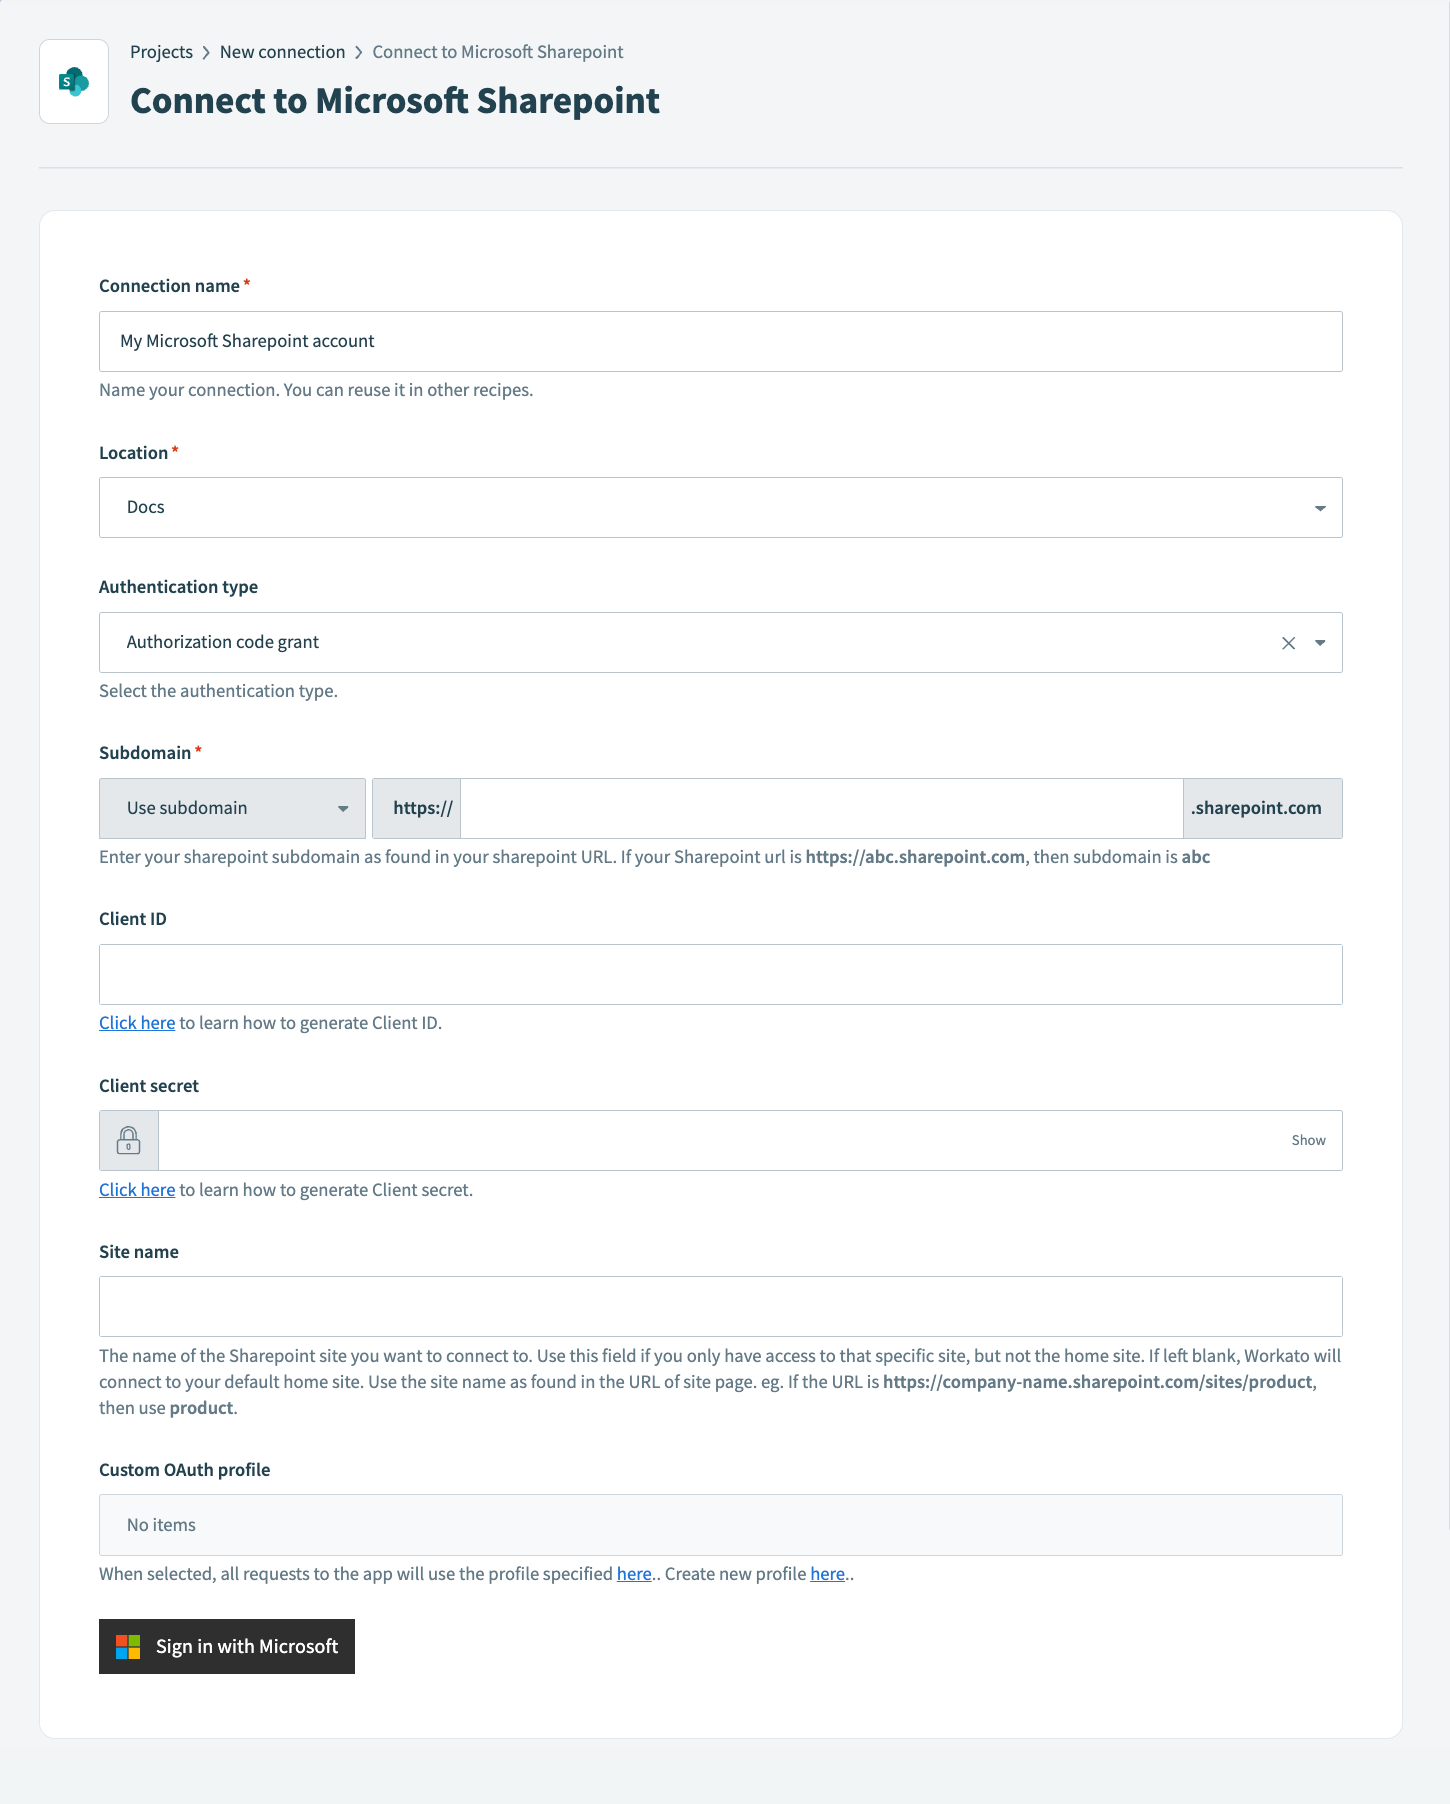 Connect to SharePoint
Use the Location drop-down menu to select the project where you plan to store the connection.
Select the Authorization code grant option from the Authentication type drop-down menu.
Enter your SharePoint Subdomain. You can find it in your SharePoint URL. For example, if your SharePoint URL is https://abc.sharepoint.com, the subdomain is abc.
Provide the Client ID generated in SharePoint.
Provide the Client secret generated in SharePoint.
Provide the name of your SharePoint site in the Site name field. Enter the name as it appears in the site URL. For example, if the URL is https://company-name.sharepoint.com/sites/product, the site name is product. If left blank, Workato connects to your default home site.
Click Sign in with Microsoft.
# Client credentials grant connection
This method requires the following values:
- Subdomain
- Tenant ID
- Client ID
- Certificate
- Private Key
# Register the Workato app in the Azure Portal
Complete the following steps to register the Workato app and obtain the required values for client credentials grant connections.
Register the Workato app in the Azure Portal
Sign in to the Azure portal (opens new window).
Select App registrations > + New registration, under Azure services.

Enter a unique name for the application and select a Supported account type.
Select Web from the Select a platform drop-down menu.
Enter https://www.workato.com/oauth/callback as the Redirect URI and select Register.
 Register an app
Assign permissions to your app
Go to Manage > API permissions in the navigation sidebar.
Click + Add a permission and select Microsoft Graph APIs.
 Add permissions
Add the required permissions listed in the Permissions required to connect section. Assign Application or Delegated permissions based on your connection type.
 Add permissions
Click Add permissions.
Admin consent is required for specific permissions. Refer to the Granting admin consent section to learn more.
Obtain the Application (client) ID and Directory (tenant) ID from the Azure Portal
Go to the Overview > Essentials section.
 App details
Copy the Application (client) ID and Directory (tenant) ID for use in Workato.
Generate a certificate and private key
You need a certificate and private key to authenticate using client credentials. You can generate these locally using OpenSSL or PowerShell.
Complete the following steps to generate a self-signed certificate with OpenSSL:
Open terminal, or another CLI (command-line interface) tool.
Create a password-protected, 2048-bit RSA private key named domain.key:
openssl genrsa -out domain.key 2048
Create a Certificate Signing Request (CSR) domain.csr from the private key. Provide values for the required fields when prompted:
openssl req -key domain.key -new -out domain.csr
Create a self-signed certificate named domain.crt with your private key and CSR:
openssl x509 -signkey domain.key -in domain.csr -req -days 365 -out domain.crt
Open domain.crt and copy the entire certificate string, including the -----BEGIN CERTIFICATE----- and -----END CERTIFICATE----- lines. Use this as your Certificate value in Workato.
Open domain.key and copy the entire private key string, including the -----BEGIN PRIVATE KEY----- and -----END PRIVATE KEY----- lines. Use this as your Private key value in Workato.
Go to Manage > Certificates & secrets > Certificates in the Azure Portal.
Click Upload certificate and select the domain.crt file.
Provide a description for the certificate.
Click Add.
Return to Workato to finish setting up your connection.
# Complete setup in Workato
Complete the following steps to create a SharePoint connection in Workato after you configure your app in the Azure Portal:
Sign in to Workato.
Select the project where you plan to store the connection.
Click Create > Connection.
Search for and select SharePoint as your connection on the New connection page.
Provide a name for your connection in the Connection name field.
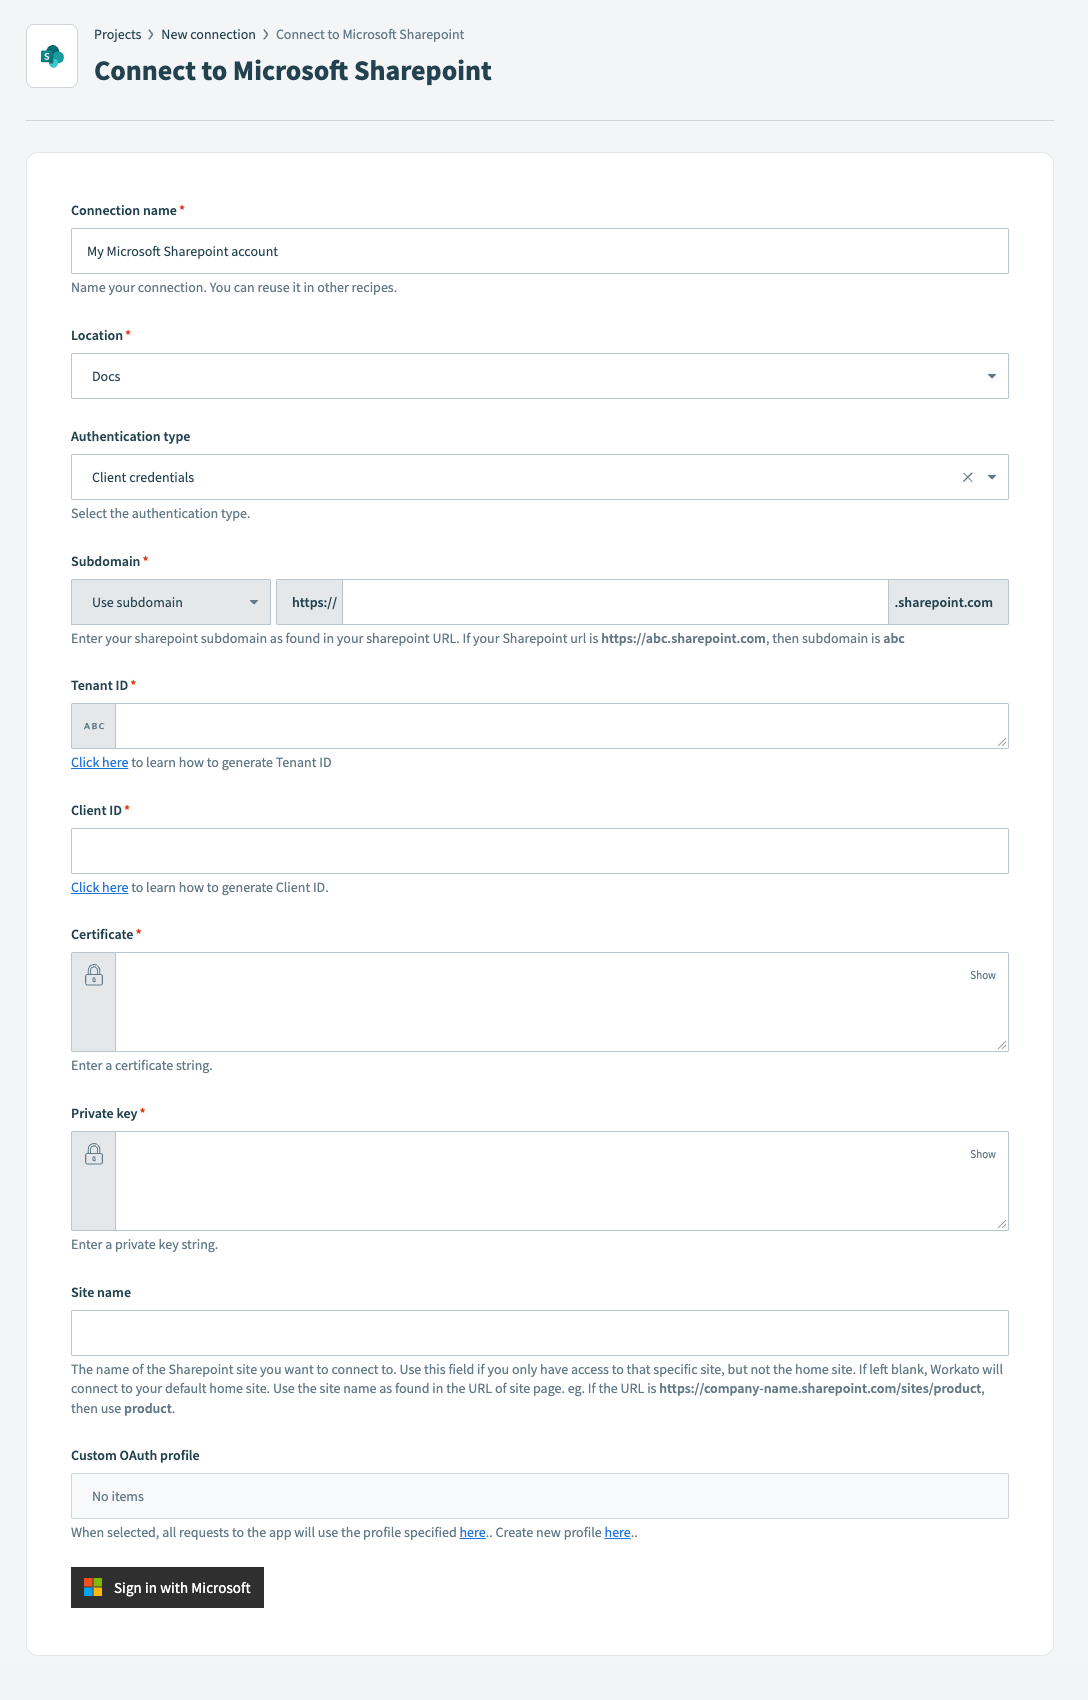 Connect to SharePoint
Use the Location drop-down menu to select the project where you plan to store the connection.
Select the Client credentials option from the Authentication type drop-down menu.
Enter your SharePoint Subdomain. You can find it in your SharePoint URL. For example, if your SharePoint URL is https://abc.sharepoint.com, the subdomain is abc.
Provide the Tenant ID generated in SharePoint.
Provide the Client ID generated in SharePoint.
Provide the Certificate generated in SharePoint.
Provide the Private key string generated in SharePoint.
Provide the name of your SharePoint site in the Site name field. Enter the name as it appears in the site URL. For example, if the URL is https://company-name.sharepoint.com/sites/product, the site name is product. If left blank, Workato connects to your default home site.
Click Sign in with Microsoft.
# Permissions required to connect
You must assign the correct Microsoft Graph API permissions to the Workato app in the Azure Portal before you can create a connection. The required scopes vary by authentication type.
# Minimum scopes for authorization code grant connections
The following minimum scope is required to establish a connection to SharePoint using authorization code grant authentication:
AllSites.Read
# Recommended scopes for authorization code grant connections
We recommend the following scope for authorization code grant connections. This scope is necessary to use all of this connector's triggers and actions. Additionally, you must assign this permission to the Workato app as a Delegated permission in the Azure Portal:
Files.ReadWrite.All
# Minimum scopes for client credentials grant connections
The following minimum scope is required to establish a connection to SharePoint using client credentials grant authentication:
Sites.Read.All
# Recommended scopes for client credentials grant connections
We recommend the following scope for client credentials connections. This scope is necessary to use all of this connector's triggers and actions. Additionally, you must assign this permission to the Workato app as a Application permission in the Azure Portal:
Sites.ReadWrite.All
# Connect Microsoft Entra ID to the SharePoint connector
To connect to the SharePoint connector using a Microsoft Entra ID account, ensure that all the consent requests are granted by admins.
Complete the following steps to grant admin consent using an admin account:
Sign in to your Azure portal and navigate to Enterprise Applications > Activity > Admin consent requests.
Approve the necessary consent requests.
Last updated: 1/21/2026, 10:53:50 PM