How-to guides - Static Webhook Trigger
A static webhook trigger is one that requires manual registration. This usually involves a user creating a webhook subscription in the application's UI with a provided webhook URL.
WARNING
When you define a static webhook trigger for your connector, take note that you will not be able to define a dynamic webhook trigger. Only one type of webhook trigger is allowed in a single connector. You may have both a polling trigger and one type of webhook trigger in your connector.
Sample connector - Greenhouse
{
  title: 'My Greenhouse connector',

  # More connector code here
  webhook_keys: lambda do |params, headers, payload|
    "#{params['org_id']}@#{payload['action']}"
  end,

  triggers: {
    new_event: {
      title: 'New Candidate Event',

      subtitle: "Triggers when a Candidate event is received " \
      "from Greenhouse",

      description: lambda do |input, picklist_label|
        "New <span class='provider'>candidate event</span> " \
        "in <span class='provider'>Greenhouse</span>"
      end,

      help: lambda do |input, picklist_label, connection, webhook_base_url|
        next unless webhook_base_url.present?
        <<~HTML
        Creates an job when an event is received from Greenhouse. To set this webhook up,
        you will need to register the webhook below in Greenhouse under "settings" => "webhooks" => "new". <br>
        <b>Webhook endpoint URL</b>
        <b class="tips__highlight">#{webhook_base_url}?org_id=#{connection['org_id']}</b>
        HTML
      end,

      input_fields: lambda do |object_definitions|
        [
          {
            name: 'event_type',
            label: 'Event',
            control_type: 'select',
            pick_list: 'events',
            optional: false,
            hint: 'Select specific event.'
          }
        ]
      end,

      webhook_key: lambda do |connection, input|
        "#{connection['org_id']}@#{input['event_type']}"
      end,

      webhook_notification: lambda do |input, payload, extended_input_schema, extended_output_schema, headers, params|
        payload.dig('payload', 'candidate')
      end,

      dedup: lambda do |record|
        record['id']
      end,

      output_fields: lambda do |object_definitions|
        [
          {
            name: 'id'
          },
          {
            name: 'rejected_at'
          },
          {
            name: 'prospect'
          },
          {
            name: 'prospect_detail',
            type: 'object',
            properties: [
              {
                name: 'prospect_pool',
                type: 'object',
                properties: [
                  {
                    name: 'id',
                    type: 'integer',
                    control_type: 'integer'
                  },
                  {
                    name: 'name'
                  }
                ]
              },
            ]
          }
         ]
        end,

        sample_output: lambda do |connection, input|
          if input['event_type'] == "candidate_stage_change"
            get("v1/applications?per_page=1")&.dig(0) || {}
          else
            get("v1/#{input['object']&.pluralize}?per_page=1")&.dig(0) || {}
          end
        end
    }
  },

  pick_lists: {
    events: lambda do |connection|
      [
        ["Candidate Updated", "update_candidate"],
        ["Candidate Stage Changed", "candidate_stage_change"]
      ]
    end
  }
  # More connector code here
}
Steps:
Step 1 - Set up the webhook_keys attribute and retrieve your connector static webhook URL
webhook_keys is a top level key (connector-wide definition). This lambda function is called for each webhook your connector receives via its assigned webhook URL and allows you to define a routing key for each incoming webhook. For example:
- With this definition
    webhook_keys: lambda do |params, headers, payload|
      "#{params['org_id']}@#{payload['action']}"
end,- and an incoming webhook with the following shortened body from Greenhouse
URL: https://www.workato.com/user/123/connector/abc?org_id=555
{
  "action": "candidate_stage_change",
  "payload": {
    "application": {
      "id": 265277,
      "rejected_at": null,
      "prospect": false,
      "status": "active",
      "applied_at": "2013-03-22T00:00:00Z",
      "last_activity_at": "2015-02-09T16:38:36Z",
      "url": "https://app.greenhouse.io/people/265772?application_id=265277",
      "source": {
        "id": 31,
        "name": "Agency"
      },
  # More information here
}
The resultant webhook_keys output for this webhook payload should be 555@candidate_stage_change. This key is used to route these events to the proper triggers as you may have multiple static webhook triggers.
To retrieve your connector's static webhook URL, head to the Test code tab under Connector SDK > Source code. You will find the static webhook URL in an expandable section labeled Static webhook URI.
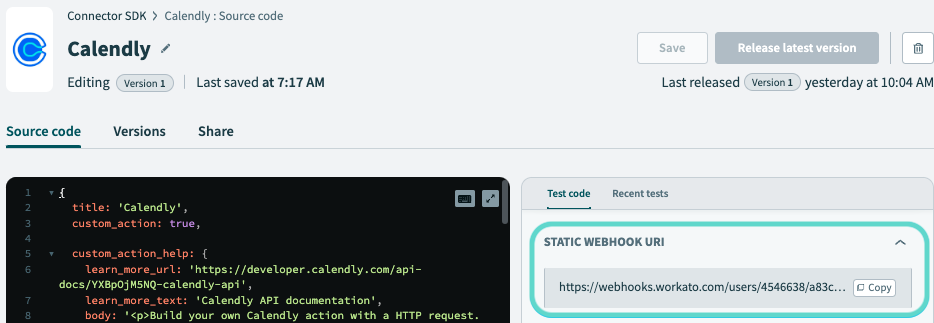 Static webhook URL in Test code environment
Step 2 - Trigger title, subtitle and description
The first step to making a good trigger is to properly communicate what the trigger does and to provide additional help to users. To do so, Workato allows you to define the title, description, and provide hints for an action. Quite simply, the title is the title of an action and the subtitle provides further details of the action. The description of the action then contains specifications and explanation on what the action accomplishes and in the context of the application it connects to.
To know more about this step, take a look at our SDK reference
Step 3 - Define your help with your static webhook url
Another important part of building a static webhook trigger is displaying the webhook url prominently so users can take this and register it. To do this, you can utilize the help lambda that allows you to display your connector's static webhook url. Additionally, you may add query parameters in the displayed webhook URL which can be utilized in conjunction with webhook_key and webhook_keys to route events to specific recipes.
      help: lambda do |input, picklist_label, connection, webhook_base_url|
        next unless webhook_base_url.present?
        <<~HTML
        Creates an job when an event is received from Greenhouse. To set this webhook up,
        you will need to register the webhook below in Greenhouse under "settings" => "webhooks" => "new". <br>
        <b>Webhook endpoint URL</b>
        <b class="tips__highlight">#{webhook_base_url}?org_id=#{connection['org_id']}</b>
        HTML
      end,
In our case, we have used an input gained from the connection called org_id which represents the specific Greenhouse organization for the connection used in this recipe. This will be important to route this webhook to the correct recipes when there are multiple connections.
To know more about the help, take a look at our SDK reference.
Step 4 - Define input fields
This component tells Workato what fields to show to a user configuring this trigger. In this case, we want a simple input field that allows a user to pick the type of Candidate event. This will be used in our trigger code later on create the trigger's personal webhook key.
input_fields: lambda do |object_definitions|
[
{
name: 'event_type',
label: 'Event',
control_type: 'select',
pick_list: 'events',
optional: false,
hint: 'Select specific event.'
}
]
end,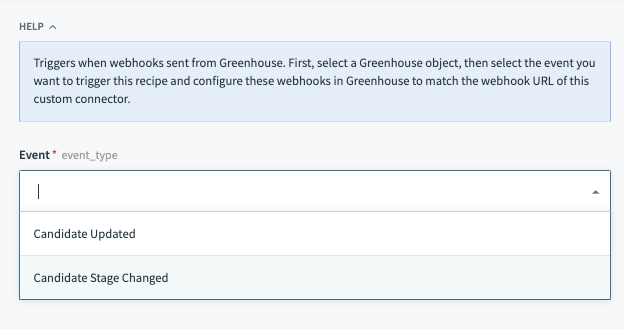 New event input fields
Various other key value pairs exist for input/output fields other than the ones defined above. Refer to Input fields for more information.
Object definitions
Note that object_definitions is passed in as an argument. Workato allows connector builders to supply the definitions of an object separately in the "object_definitions" key. This key is used when the definitions of an object are large and/or can be dynamically obtained.
To know more about this, take a look at our SDK reference
Step 5 - Defining the trigger webhook key
After defining the inputs from the end user, we can now move on to define the connector's webhook_key lambda function. This lambda function receives two arguments for the user's connection values as well as inputs from the input_fields of this trigger. This allows you to create a string that is a key that is specific to your webhook trigger.
With this webhook_key and webhook_keys in step 1, you now have 2 unique strings generated. When an incoming webhook is received to your connector's webhook URL, the resultant output string from the webhook_keys lambda function is matched against strings generated from webhook_key lambda functions within each trigger. If there is a match, the webhook is routed to this trigger (and all others that match).
    webhook_key: lambda do |connection, input|
      "#{connection['org_id']}@#{input['event_type']}"
    end,
In our webhook example from step 1, you can see that the webhook_keys output string would be 555@candidate_stage_change. If the output of webhook_key which utilizes the connection['org_id'] and input['event_type'] match, an event would be routed to this trigger.
Step 6 - Defining how to handle the webhook
The webhook_notification lambda function describes what your connector should do with all webhooks routed to it. You have numerous arguments available which represent both the user's inputs to the trigger as well as the webhook itself. To send the payload of the webhook as a job, you can simply pass on the payload argument. You may also add on attributes from the headers if required. In the case of Greenhouse, we have stripped away some irrelevant details from the payload described in the Greenhouse webhooks documentation.
    webhook_notification: lambda do |input, payload, extended_input_schema, extended_output_schema, headers, params|
      payload.dig('payload', 'application')
    end,
Webhook Validations
- Workato performs validations on JSON based webhooks - denoted by the webhook's
Content-Typeheader, to ensure that the payload is valid JSON. Otherwise, Workato responds with 400 bad request. - Incoming webhook payloads are expected to be UTF-8 compatible and Workato responds with 400 bad request if UTF-8 incompatible characters are found.
To know more about the webhook_key and webhook_notification key, take a look at our SDK reference
Step 7 - Defining output fields and dedup
This section tells us what datapills to show as the output of the trigger as well as how to prevent duplicate records to create duplicate jobs. To prevent a job from being repeated (this might happen when a webhook is sent twice), use the dedup key which tells your connector how to create a unique signature for each record. This signature is stored for each recipe and if a record with the same signature is found, no job will be created.
For datapills, use the output_fields key. The name attributes of each datapill should match the keys of a single webhook payload.
dedup: lambda do |record|
record['id']
end,
output_fields: lambda do |object_definitions|
[
{
name: 'id'
},
{
name: 'rejected_at'
},
{
name: 'prospect'
},
{
name: 'prospect_detail',
type: 'object',
properties: [
{
name: 'prospect_pool',
type: 'object',
properties: [
{
name: 'id',
type: 'integer',
control_type: 'integer'
},
{
name: 'name'
}
]
},
]
}
]
end,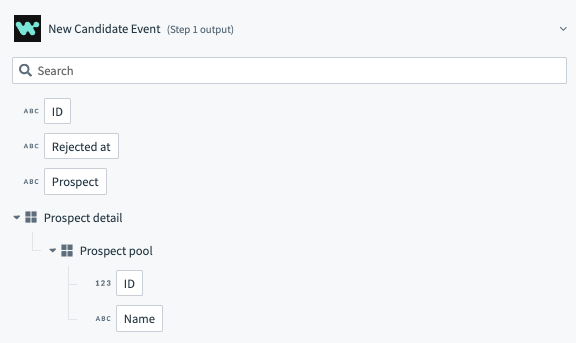 New event output fields
  # Sample output of the webhook_notification: lambda function
  {
    "id": "a1241",
    "rejected_at": "2020-01-12 10:57:03",
    "prospect": true,
    "prospect_detail": {
      "id": 12491,
      "name": "John Doe"
    }
  }
To know more about the output fields key, take a look at our SDK reference
Object definitions
Note that object_definitions is passed in as an argument. Workato allows connector builders to supply the definitions of an object separately in the "object_definitions" key. This key is used when the definitions of an object are large and/or can be dynamically obtained.
To know more about this, take a look at our SDK reference
Step 8 - Defining sample output
A optional supplementary component to the trigger, the sample output key nonetheless greatly improves a user's experience by giving him/her some context to what the datapill's value could be. This allows users to build recipes more quickly.
    sample_output: lambda do |connection, input|
      if input['event_type'] == "candidate_stage_change"
        get("v1/applications?per_page=1")&.dig(0) || {}
      else
        get("v1/#{input['object']&.pluralize}?per_page=1")&.dig(0) || {}
      end
    end
To know more about the sample output key, take a look at our SDK reference
Step 9 - Secure your webhook events
Now that you're receiving webhooks, you can now consider adding additional checks to verify the authenticity of incoming webhook events.
Rate limits
This trigger is subject to our webhook gateway's limits.
Last updated: