The AIRO MCP server exposes Workato AIRO's full platform capabilities to MCP-compatible AI clients, including Claude Code, Claude Desktop, Cursor, ChatGPT, and Codex CLI. This enables you to build recipes, manage Genies, create MCP servers, and manage data table schema directly from your AI development environment using natural language.
The AIRO MCP server supports two authentication methods:
OAuth 2.0: Recommended for interactive clients. Your MCP client opens a browser window the first time you connect. The window displays Workato's authorization screen, which lists the permissions requested by the client. Click Authorize to complete the connection. Refer to Connect using OAuth 2.0 for the setup steps.
API token: Recommended for headless or configuration-driven setups. Pass a Workato API token as a bearer header. Refer to Connect using an API token for the setup steps.
The server exposes tools organized into the following categories:
Category
What you can do
Recipes
Create, edit, search, and manage recipes, including step-level operations, field mapping, conditions, and connections
Skills and MCP
Convert recipes to skills and create or manage MCP servers
Custom connectors
Build, edit, and save custom connector SDK code
Genies and knowledge bases
Create and configure Genies, manage knowledge bases, and assign knowledge sources
Blueprints and assets
Work with blueprints, asset maps, and asset metadata
Data
Create and manage data table schema
Jobs and tests
Inspect job history and manage test cases
Use the help tool within your MCP client to get detailed information about any specific tool, including input schemas and usage guidance.
The AIRO MCP server respects your Workato account permissions for OAuth 2.0 connections, or the permissions of the API client role for API token connections. All actions performed through the MCP server follow the same access controls as actions performed in the Workato platform.
The activity audit log attributes actions that the AIRO MCP server takes on your behalf to your user account with a (via AIRO) label.
You must have the following before you configure the AIRO MCP server:
A Workato account with AIRO access
An MCP-compatible client installed, such as Claude Code, Claude Desktop, Cursor, ChatGPT, or Codex CLI
Some MCP client configurations use npx. These configurations require Node.js to be installed and available in your PATH. Run node -v in your terminal to verify your installation.
API token authentication also requires a Workato API token. Refer to Generate an API token for instructions.
The AIRO MCP server URL depends on the data center where your Workato workspace is hosted. Developer Sandbox workspaces always use the trial URL. Use the server URL that matches your workspace region:
This page provides general guidance for all Workato users. If you're a Virtual Private Workato (VPW) customer, refer to your private documentation for detailed configuration guidance specific to your instances.
Complete the following steps to connect the AIRO MCP server to your MCP client using OAuth 2.0:
WORKSPACE AND ENVIRONMENT SCOPE
OAuth 2.0 scopes each AIRO MCP server connection to the Workato workspace and environment active in your browser session. Sign in to the target workspace and environment before you start authorization. Repeat the authorization steps for a different workspace or environment, or create a separate connection for each workspace and environment you need to access at the same time.
For example, on the US data center, the URL is https://app.workato.com/airo_mcp.
4
Save your changes, restart Claude Desktop, and start a new chat.
5
Complete Workato authentication in the browser window that opens, then click Authorize. Check the MCP server status under Settings > Developer if the connection fails.
6
Confirm the server responds by prompting Claude. For example, List my Workato projects.
1
Open your Cursor MCP configuration file. Edit it directly for all projects, or use .cursor/mcp.json in a project root to scope the server to that project.
Mac and Linux: ~/.cursor/mcp.json
Windows: %USERPROFILE%\.cursor\mcp.json
You can also open the file from the Customize page in the Cursor desktop app by selecting MCPs > + New MCP Server.
For example, on the US data center, the URL is https://app.workato.com/airo_mcp.
3
Save your changes.
4
Start a new chat with the Cursor agent.
START A NEW CHAT
Start a new chat with your agent after saving changes. Cursor agents only have access to the tools and capabilities available when a chat begins. Agents can't detect or use MCP configurations, servers, or tools added after a chat starts.
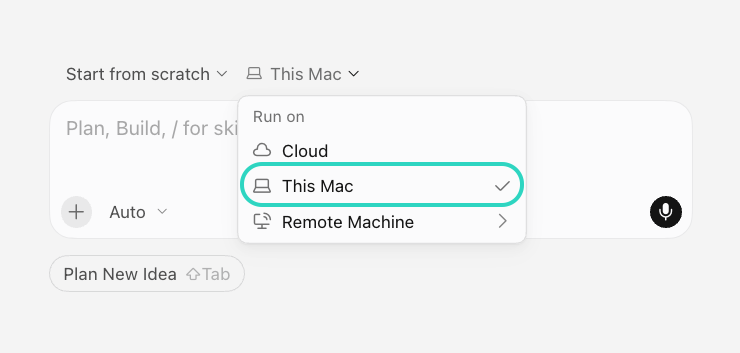
RUN THE AGENT ON YOUR COMPUTER
Select the option for your own computer, such as This Mac, instead of Cloud in the Run on menu.
Select This Mac in the menu that sets where the agent runs
This configuration runs a local npx command on your computer, which Cloud agents on a remote virtual machine can't use. The agent fails silently and can't discover the AIRO tools when Cloud is selected.
5
Complete Workato authentication in the browser window that opens, then click Authorize.
6
Verify the connection. On the Customize page, select MCPs and confirm that the server appears with its tools and resources.
7
Prompt your Cursor agent to confirm that the server responds. For example, List my Workato projects.
ChatGPT requires Developer mode to connect to remote MCP servers. Developer mode grants ChatGPT read and write access to your AIRO tools. OpenAI classifies developer mode as an advanced feature with elevated risk, so refer to their developer mode guide for details before you enable it.
1
Sign in to ChatGPT on the web with a Pro, Plus, Business, Enterprise, or Education account. Developer mode isn't available in the desktop or mobile apps.
2
Go to Settings > Security and login > Developer mode and enable the Developer mode toggle.
3
Go to ChatGPT Plugins and click + to add a new plugin. This button appears after you turn on developer mode.
4
Enter workato-airo-mcp-server in the Name field.
5
Optional. Enter a description for your MCP server in the Description field.
6
Set the server URL to the following value in the Connection field, using the URL for your data center:
text
https://YOUR_DATA_CENTER/airo_mcp
For example, on the US data center, the URL is https://app.workato.com/airo_mcp.
7
Use the Authentication drop-down menu to select OAuth.
8
Select the I understand and want to continue checkbox, then click Create.
9
Click Sign in with workato-airo-mcp-server in the dialog that appears.
10
Complete Workato authentication in the browser window that opens, then click Authorize.
11
Verify the connection by trying the app in a new conversation.
1
Open a new chat in ChatGPT.
2
Click the + button near the message composer, then select your app from the list of available tools to add it to the conversation context.
3
Prompt the model to use the app. For example, List my Workato projects.
For example, on the US data center, the URL is https://app.workato.com/airo_mcp.
Use single quotes around the header. This stores the literal ${WORKATO_API_TOKEN} reference in your configuration, and Claude Code expands it when it connects.
5
Run the following command to start a new Claude Code session and open the /mcp panel:
bash
claude /mcp
workato-airo-mcp-server should appear with a connected status.
6
Confirm the server responds by prompting Claude Code. For example, List my Workato projects.
For example, on the US data center, the URL is https://app.workato.com/airo_mcp.
4
Save your changes.
5
Restart Claude Desktop and start a new chat. Check the MCP server status under Settings > Developer if the connection fails.
6
Confirm the server responds by prompting Claude. For example, List my Workato projects.
1
Open your Cursor MCP configuration file. Edit it directly for all projects, or use .cursor/mcp.json in a project root to scope the server to that project.
Mac and Linux: ~/.cursor/mcp.json
Windows: %USERPROFILE%\.cursor\mcp.json
You can also open the file from the Customize page in the Cursor desktop app by selecting MCPs > + New MCP Server.
2
Add the following configuration, using the URL for your data center and replacing <YOUR_API_TOKEN> with the token you generated:
For example, on the US data center, the URL is https://app.workato.com/airo_mcp.
3
Save your changes.
4
Verify the connection. On the Customize page, select MCPs and confirm that the server appears with its tools and resources.
5
Start a new chat and prompt your Cursor agent to confirm that the server responds. For example, List my Workato projects.
START A NEW CHAT
Start a new chat with your agent after saving changes. Cursor agents only have access to the tools and capabilities available when a chat begins. Agents can't detect or use MCP configurations, servers, or tools added after a chat starts.
RUN THE AGENT ON YOUR COMPUTER
Select the option for your own computer, such as This Mac, instead of Cloud in the Run on menu.
Select This Mac in the menu that sets where the agent runs
This configuration is saved in your local mcp.json file, which Cloud agents on a remote virtual machine can't access. The agent fails silently and can't discover the AIRO tools when Cloud is selected.
Cloud agents use servers added in the MCP drop-down menu at cursor.com/agents, or under Plugins & MCPs in the Cursor Team Dashboard. Refer to the Cursor MCP tools documentation for more information.
ChatGPT requires Developer mode to connect to remote MCP servers. Developer mode grants ChatGPT read and write access to your AIRO tools. OpenAI classifies developer mode as an advanced feature with elevated risk, so refer to their developer mode guide for details before you enable it.
1
Sign in to ChatGPT on the web with a Pro, Plus, Business, Enterprise, or Education account. Developer mode isn't available in the desktop or mobile apps.
2
Go to Settings > Security and login > Developer mode and enable the Developer mode toggle.
3
Go to ChatGPT Plugins and click + to add a new plugin. This button appears after you turn on developer mode.
4
Enter workato-airo-mcp-server in the Name field.
5
Optional. Enter a description for your MCP server in the Description field.
6
Set the server URL to the following value in the Connection field, using the URL for your data center:
text
https://YOUR_DATA_CENTER/airo_mcp
For example, on the US data center, the URL is https://app.workato.com/airo_mcp.
7
Use the Authentication drop-down menu to select Access token / API key.
8
Use the Header scheme drop-down menu to select Bearer.
9
Select the I understand and want to continue checkbox, then click Create.
10
Enter your API token in the Enter access token or API key field, then click Connect.
11
Verify the connection by trying the app in a new conversation.
1
Open a new chat in ChatGPT.
2
Click the + button near the message composer, then select your app from the list of available tools to add it to the conversation context.
3
Prompt the model to use the app. For example, List my Workato projects.
1
Open your terminal.
2
Add the following line to your shell profile (~/.zshrc, ~/.bashrc, ~/.bash_profile, or equivalent), replacing <YOUR_API_TOKEN> with your Workato API token:
bash
export WORKATO_API_TOKEN="<YOUR_API_TOKEN>"
3
Reload your shell profile:
bash
source ~/.zshrc # Replace with the profile file you edited
4
Optional. Confirm that the environment variable is available without displaying the token:
bash
test -n "$WORKATO_API_TOKEN" && echo "WORKATO_API_TOKEN is set"
5
Add the AIRO MCP server, using the URL for your data center and referencing the environment variable that contains the bearer token:
You can connect to multiple Workato workspaces or environments by adding a separate server entry to your MCP configuration for each connection. Use a unique server name and API token for every entry.
Each API client is assigned to one environment in workspaces with environments enabled. Its API token works only with that environment.
For example, the following Claude Desktop configuration uses the URL for your data center to connect to the Development and Production environments in the same workspace:
Use AIRO to create a multi-step recipe from a natural language description, then save and test it without leaving your development environment.
Create a recipe that syncs new Salesforce opportunities to Jira issues.Add an OpenAI step to summarize the opportunity before creating the Jira issue.Save the recipe and show me the test cases.
Build a connector for an API that isn't available as a platform connector, using your own development environment instead of the Workato SDK editor.
Build a connector for the National Weather Service API at https://www.weather.gov/documentation/services-web-api.Add an action that retrieves active weather alerts for a state or territory.
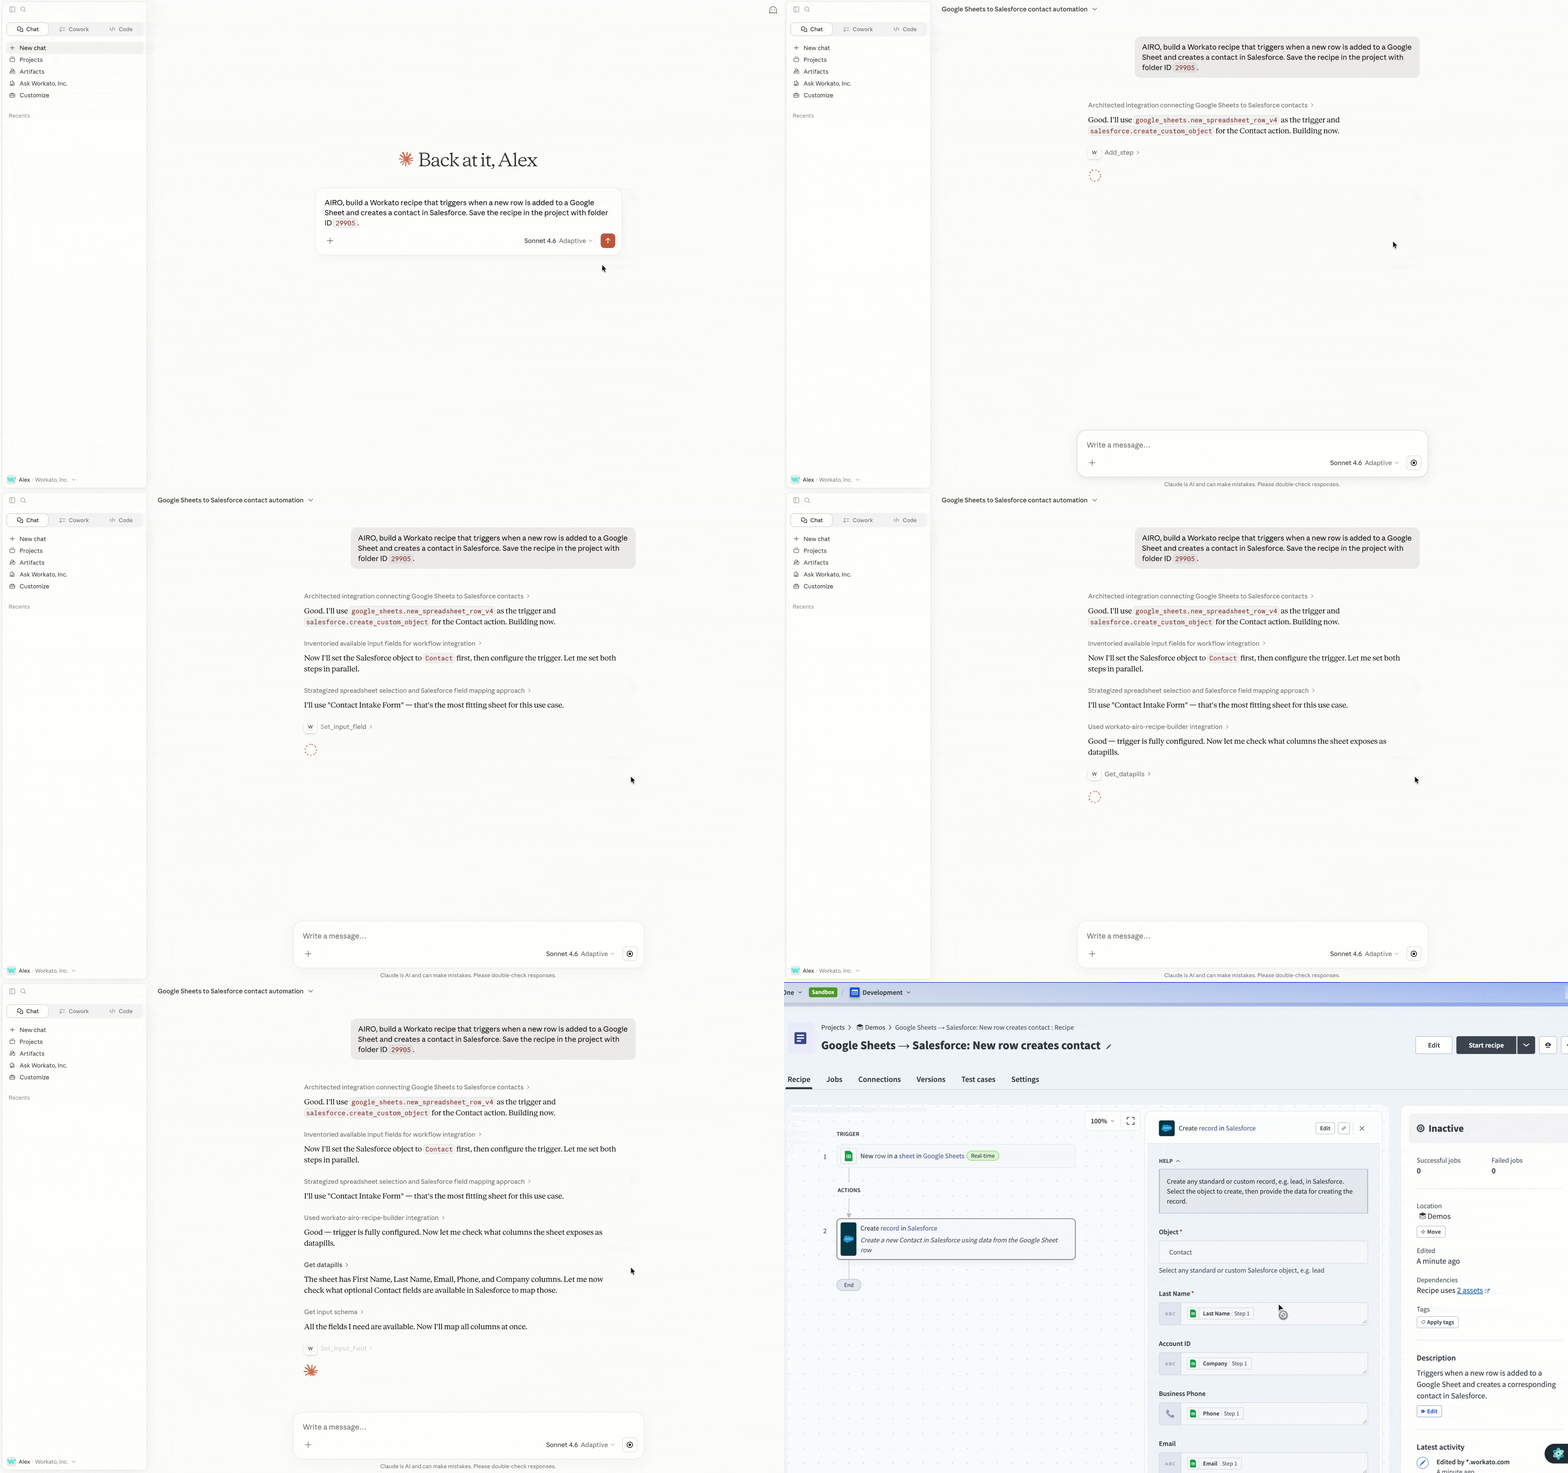 AIRO as an MCP server
 Select This Mac in the menu that sets where the agent runs
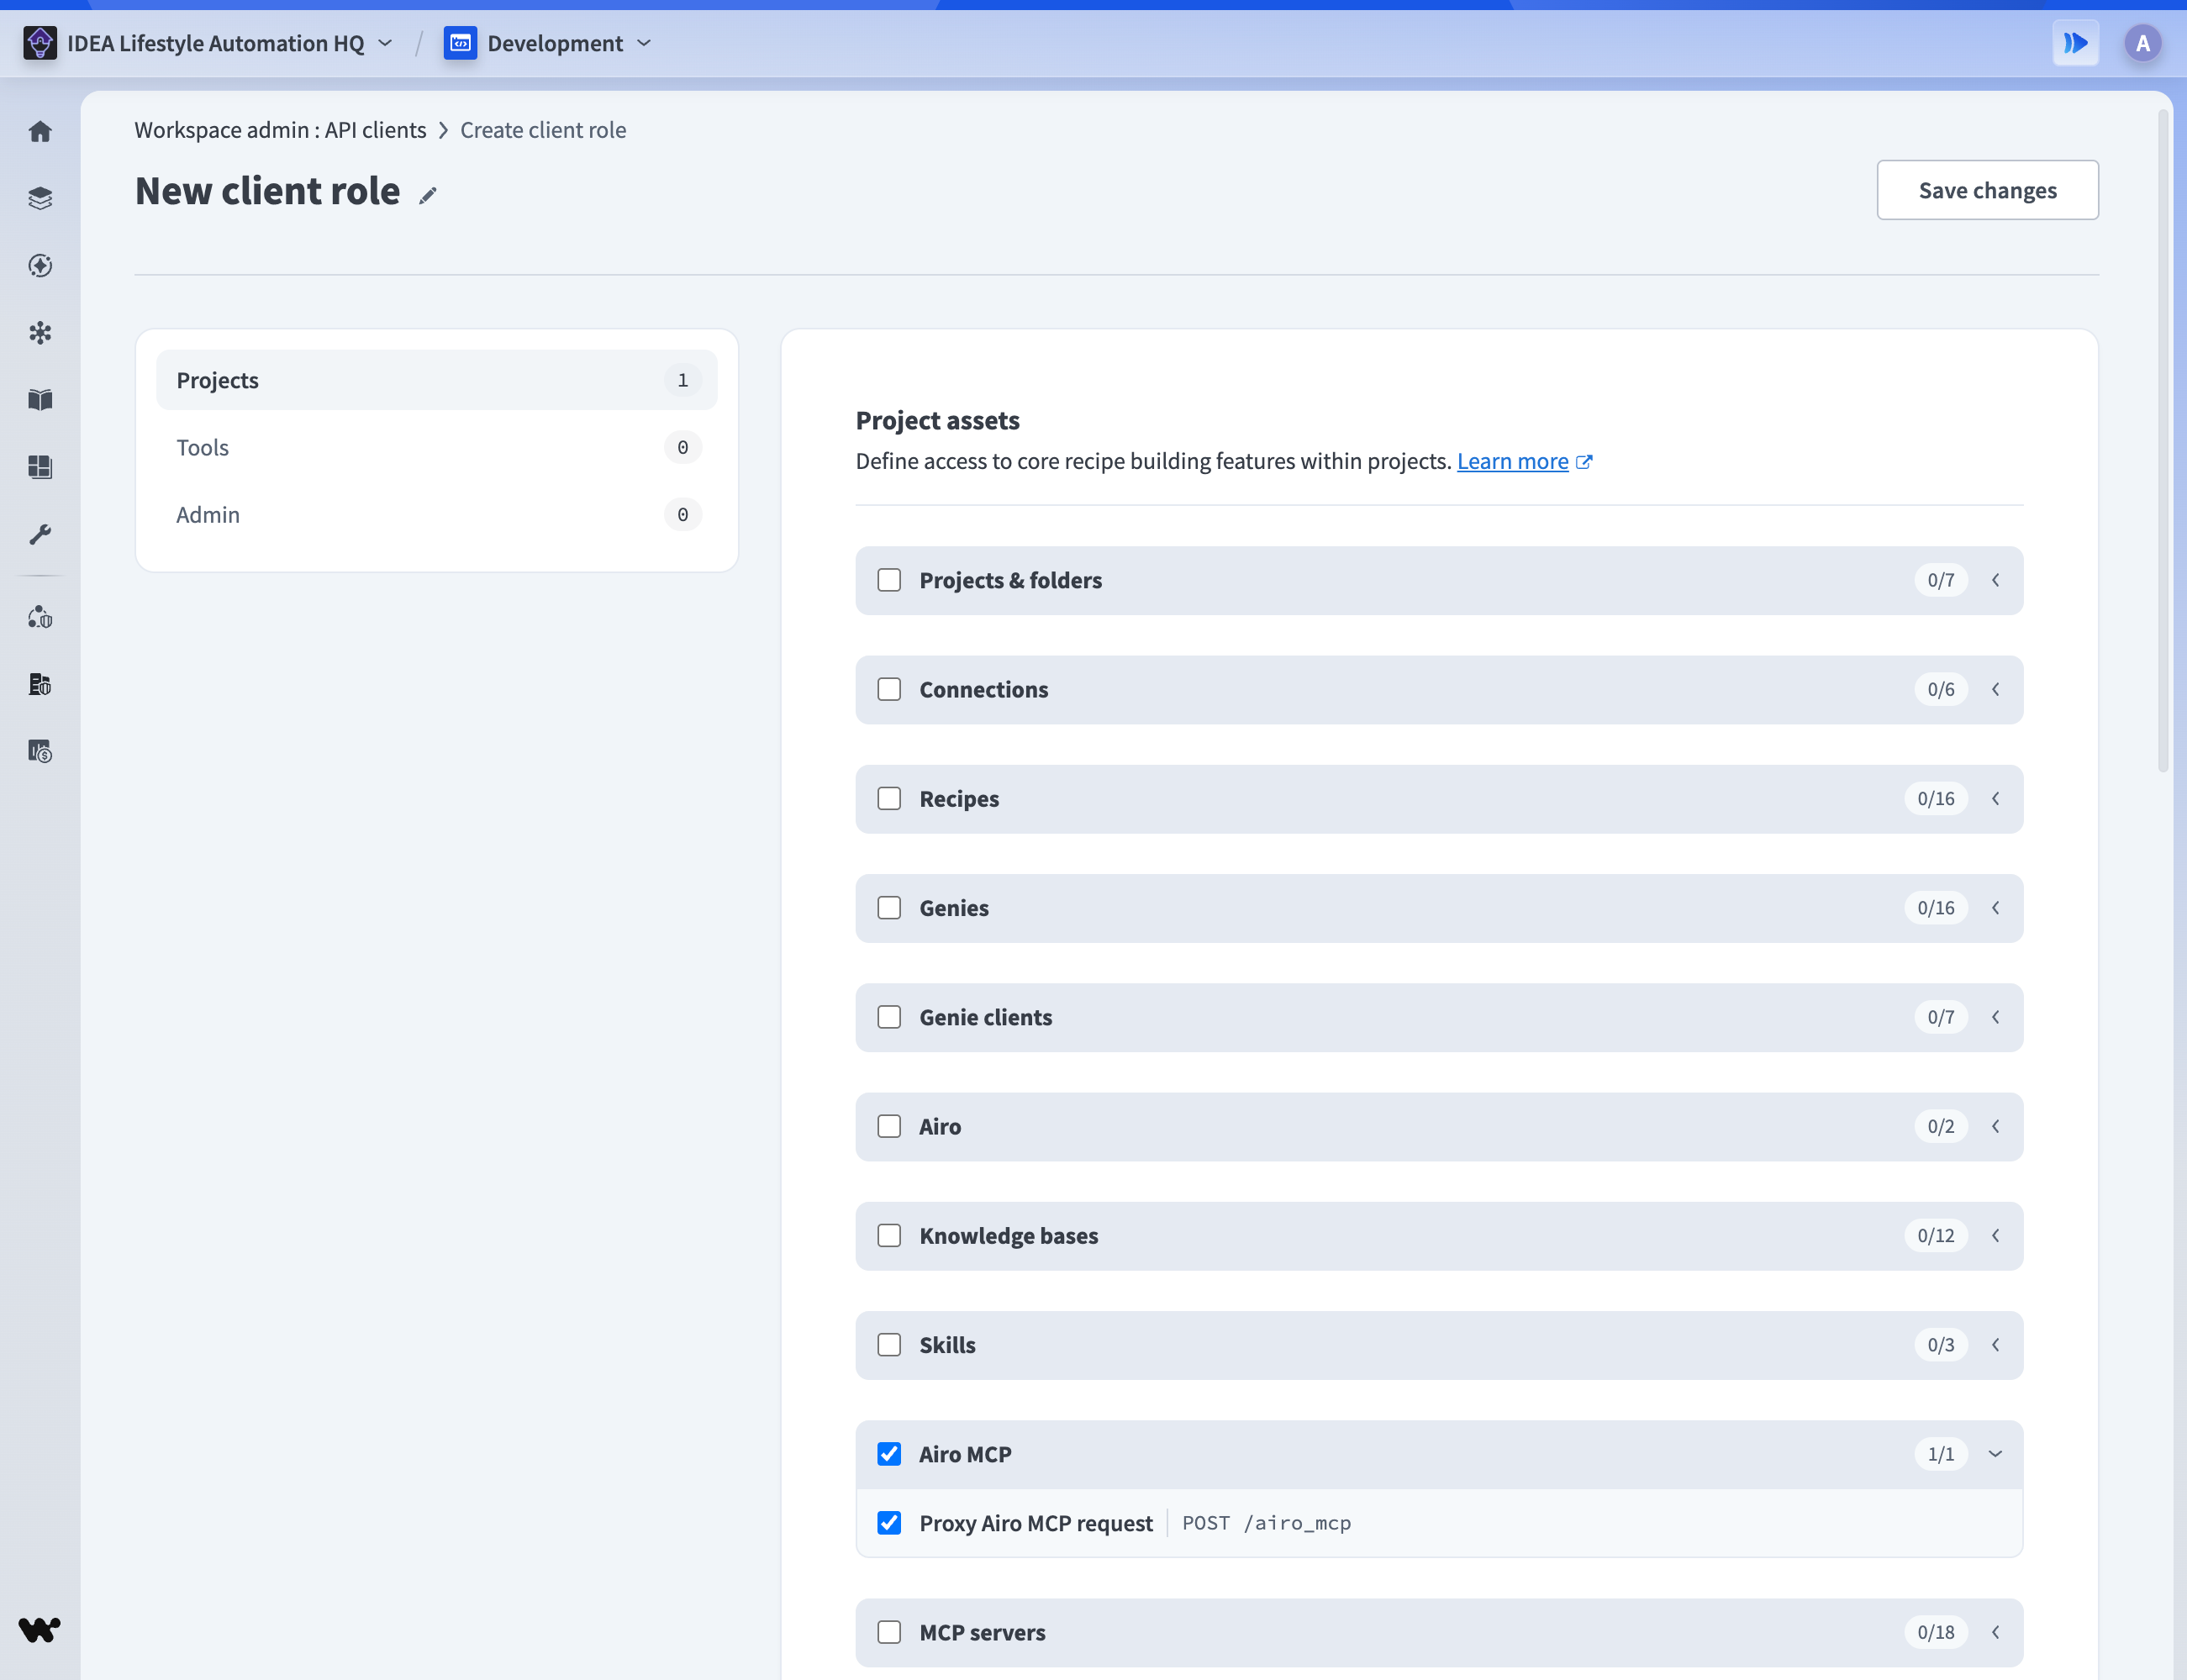 Enable the AIRO MCP feature for the client role