Configure Workday RaaS as a data pipeline source
Set up Workday RaaS to extract custom report data from your Workday tenant and sync to your destination. Use this guide to register a custom report as a pipeline object, configure incremental sync through report prompts, and understand known limitations.
Features supported
The following features are supported when you use Workday RaaS as a pipeline source:
- Authentication: Inherits the Workday connection authentication type. OAuth 2.0 is required to work with custom objects and Workday Query Language (WQL). Refer to Supported connection types for more information.
- Object selection: Register Workday custom reports as pipeline objects by providing the report URL. Refer to Configure the pipeline for more information.
- Full refresh and incremental sync: Supports full refresh and incremental sync modes. Incremental sync uses date prompts configured on the custom report. Refer to Sync modes for more information.
- Field-level selection: Include or exclude individual report columns from the sync after you register the report as a pipeline object.
- Schema drift detection and handling: Detect and apply schema changes automatically with Auto-sync new fields, or keep the schema fixed with Block new fields.
- Configurable sync frequency: Schedule syncs on a time-based interval or with a custom cron expression. The minimum supported interval is 15 minutes.
Prerequisites
Complete the following requirements before you configure Workday RaaS as a data pipeline source:
- A configured Workday data pipeline source connection. Refer to the Connect to Workday section for connection setup steps.
- An Advanced type custom report in your Workday tenant that is enabled as a web service. Only Advanced custom reports can be exposed through RaaS.
- The Integration System User (ISU) configured on your Workday connection must have permission to run the custom report and access the data sources the report uses.
- For incremental sync, the custom report must include two date prompts (a start date prompt and an end date prompt) and corresponding filter conditions on a date field. Refer to Configure date prompts and filters for setup steps.
Supported connection types
Workday pipelines support cloud and on-prem connections, with OAuth 2.0 or basic authentication.
Connection type
Workato reaches your Workday tenant through one of the following routes:
- Cloud: Connect directly from Workato's cloud to your Workday tenant.
- On-prem group: Connect through an on-prem group when network or security policy requires it.
Authentication type
The authentication type determines whether the pipeline can access custom objects and Workday Query Language (WQL) data, and how the connection authenticates against your tenant.
- OAuth 2.0: Authenticate through a registered API client for integrations in Workday using a non-expiring refresh token. OAuth 2.0 is required to work with custom objects and WQL.
- Basic authentication: Authenticate with the ISU login name and password. Custom objects and WQL aren't available with this type.
Connect to Workday
Complete the following steps to connect Workday as a data pipeline source. Select the tab that matches the authentication type you plan to use.
Connect to Workday
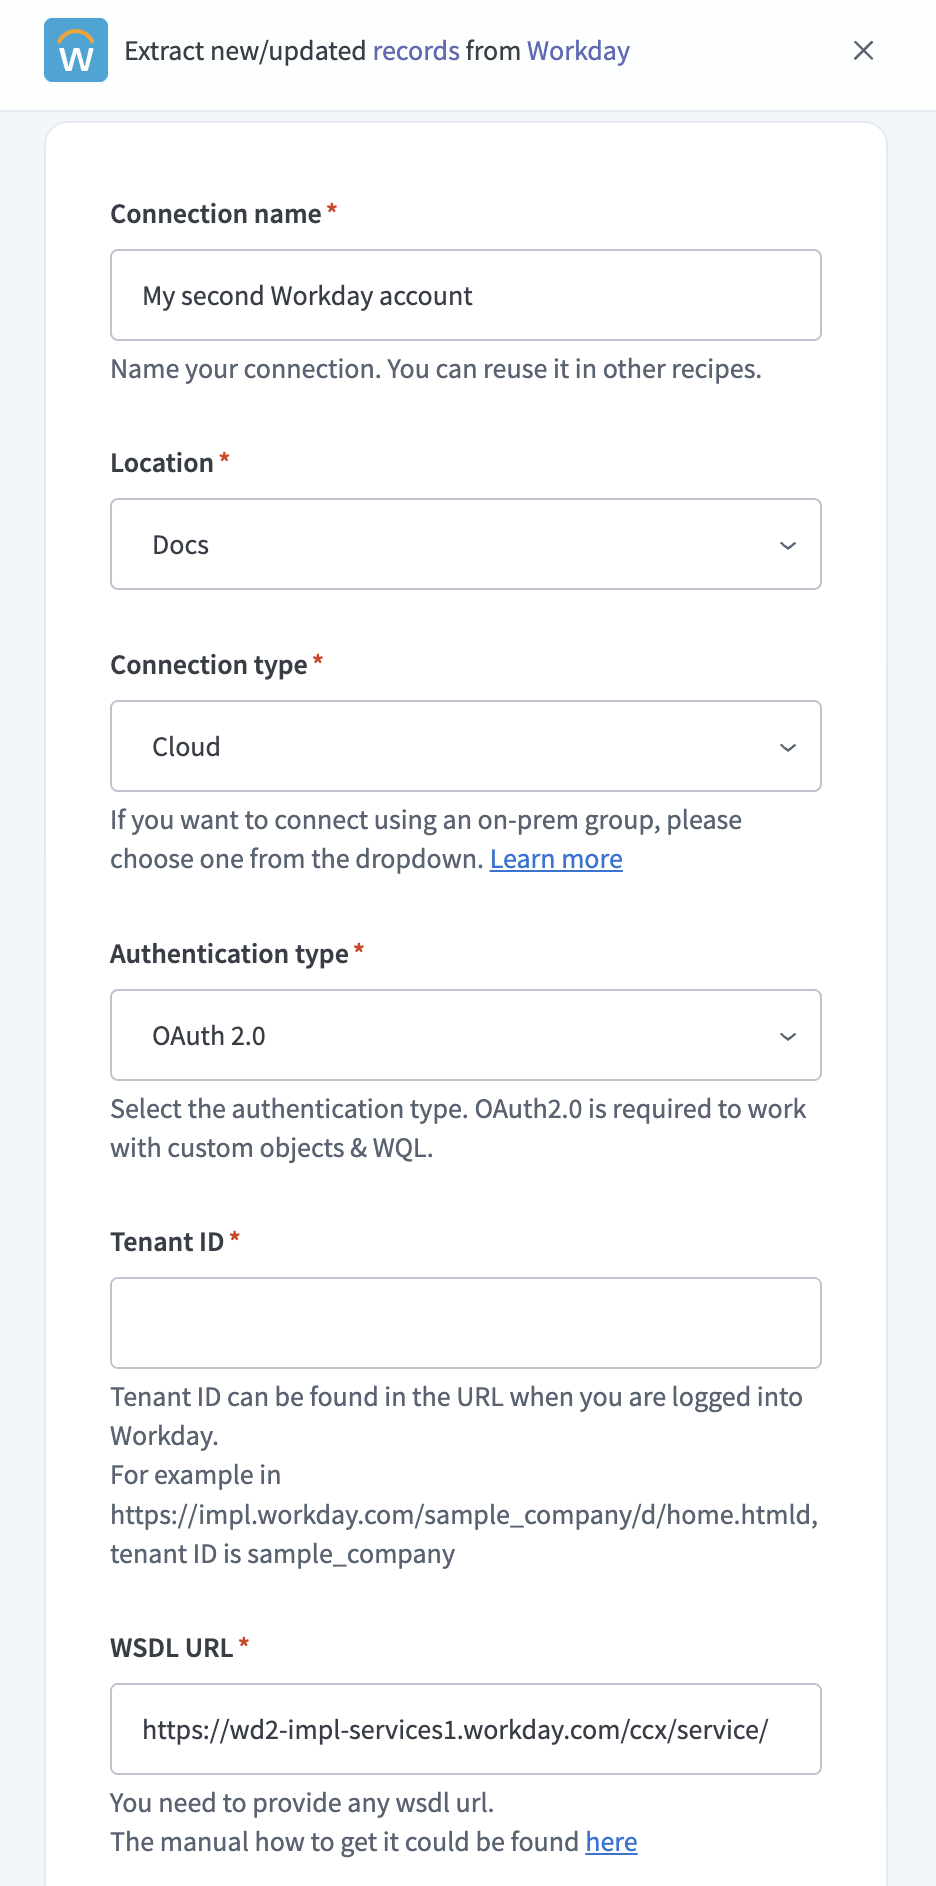 Configure your Workday connection
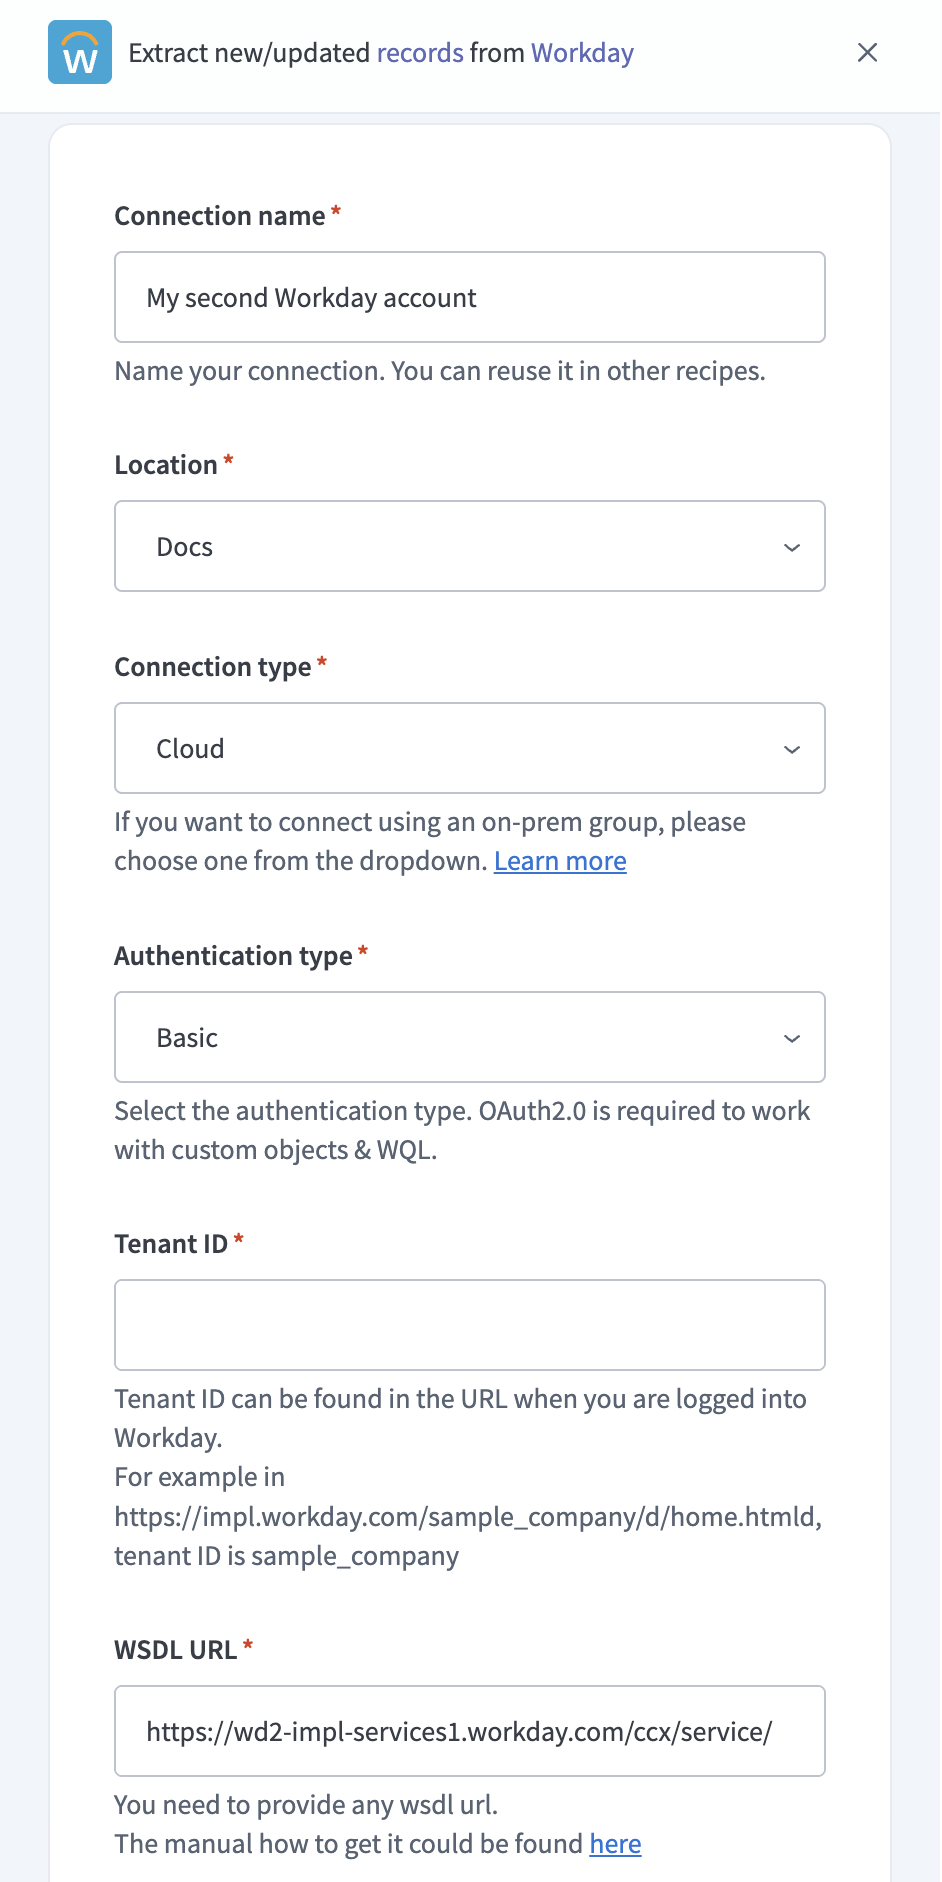 Configure your Workday connection
Configure date prompts and filters
Configure two date prompts and two filter conditions on your custom report to support incremental sync.
INCREMENTAL SYNC IS OPTIONAL
Workday RaaS pipelines use full refresh by default. Incremental sync is an optional feature you can use to fetch data in chunks rather than reloading the entire report on every run. It's most useful for large reports where a full refresh on each sync isn't practical. You design the report prompts and filters that drive the date range. Skip this section if you only plan to use full refresh.
How incremental sync works
Workday custom reports accept parameters through prompts. Each prompt is a named slot the report exposes through its web service URL. Filter conditions reference these prompts to limit the records the report returns. Incremental sync uses two prompts on the same date field to define a date range, paired with two filter conditions that apply the range.
Workato passes the following values on each incremental sync run:
- Prompt #1 receives the timestamp of the last successful sync, or the historical start date on the first run.
- Prompt #2 receives the current timestamp at the start of the sync run.
The XML alias you set on each prompt is the parameter name Workato sends in the report URL. You must enter the same alias values in the Start date prompt and End date prompt fields when you register the report as a pipeline object in Workato.
Set the Comparison Type on both filter conditions to Prompt the user for the value and ignore the filter condition if the value is blank. This setting lets the report return all records when prompt values aren't provided, which supports full refresh sync without removing the filters.
Configure the report
Complete the following steps in Workday. Edit an existing custom report or create a new one. The configuration is the same in both cases.
Open the custom report. If you're editing an existing report, select Actions > Custom Report > Edit. If you're creating a new report, complete the report creation flow in Workday and continue with the next step once you're on the Edit Custom Report screen.
Confirm that Report Type is set to Advanced and that Enable As Web Service is selected.
Select the Columns tab and confirm that the date field you plan to filter on, such as Last Functionally Updated, is included as a column. Add the column if it isn't present.
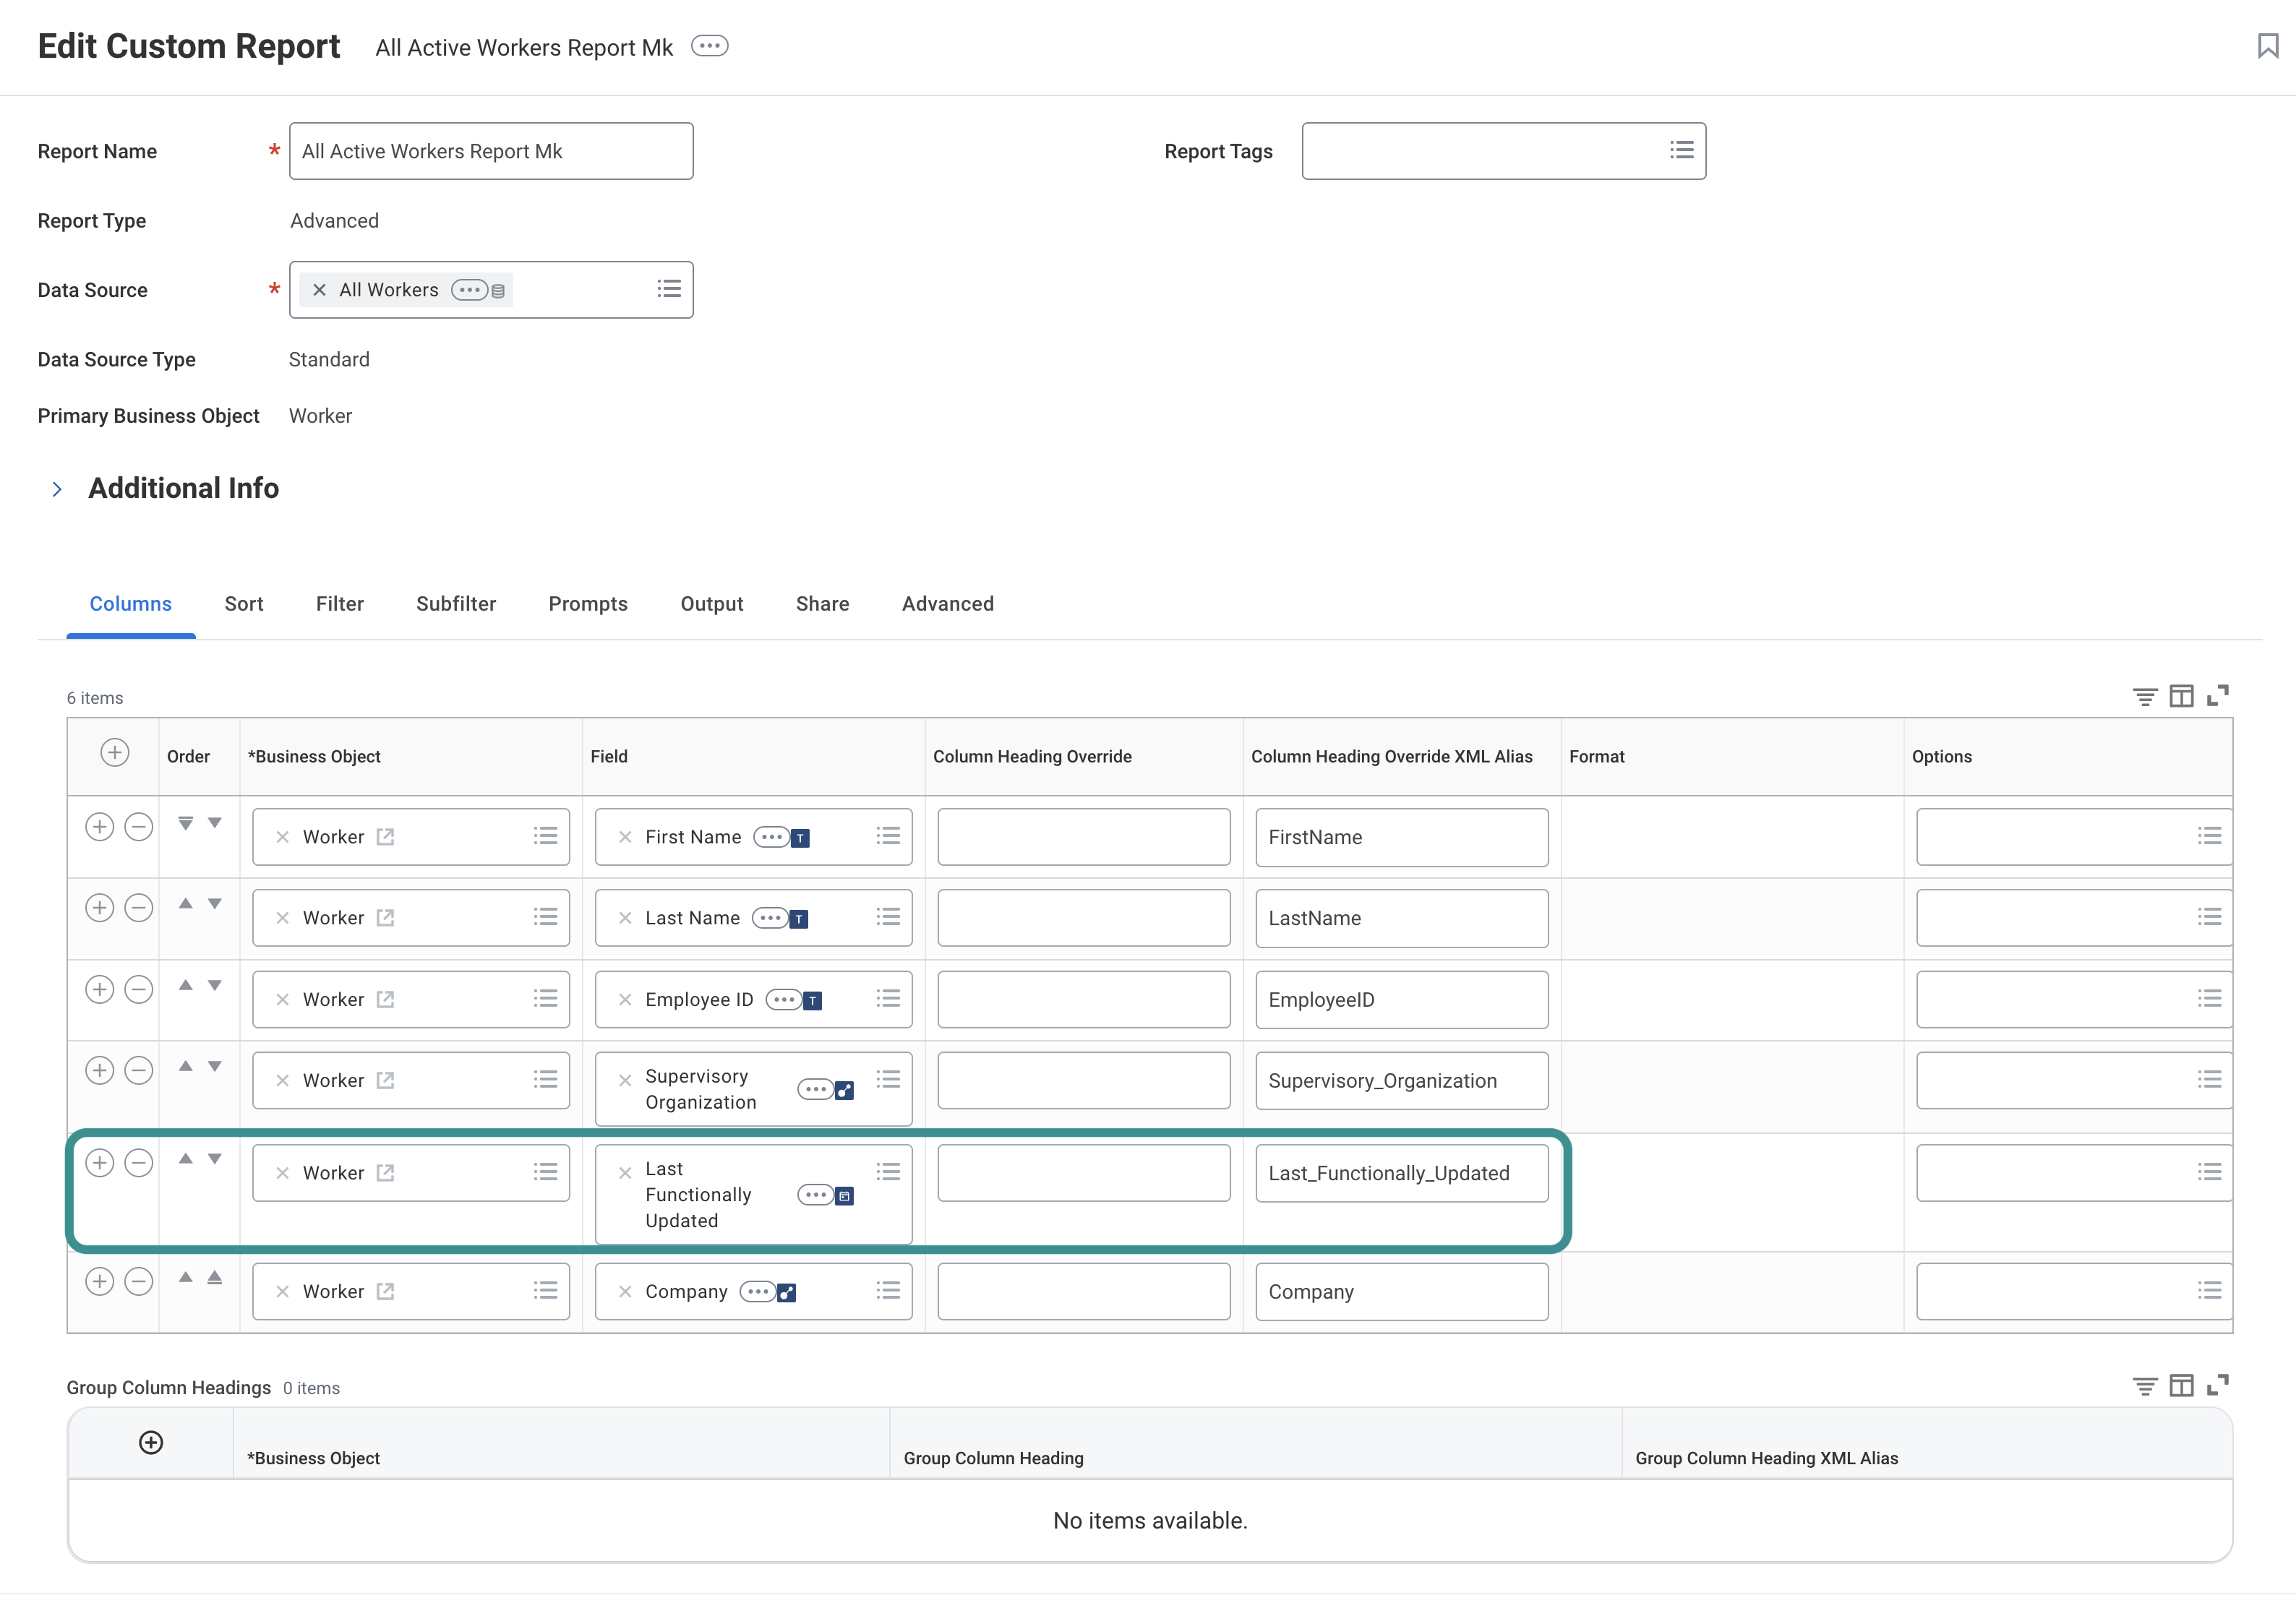 Add column
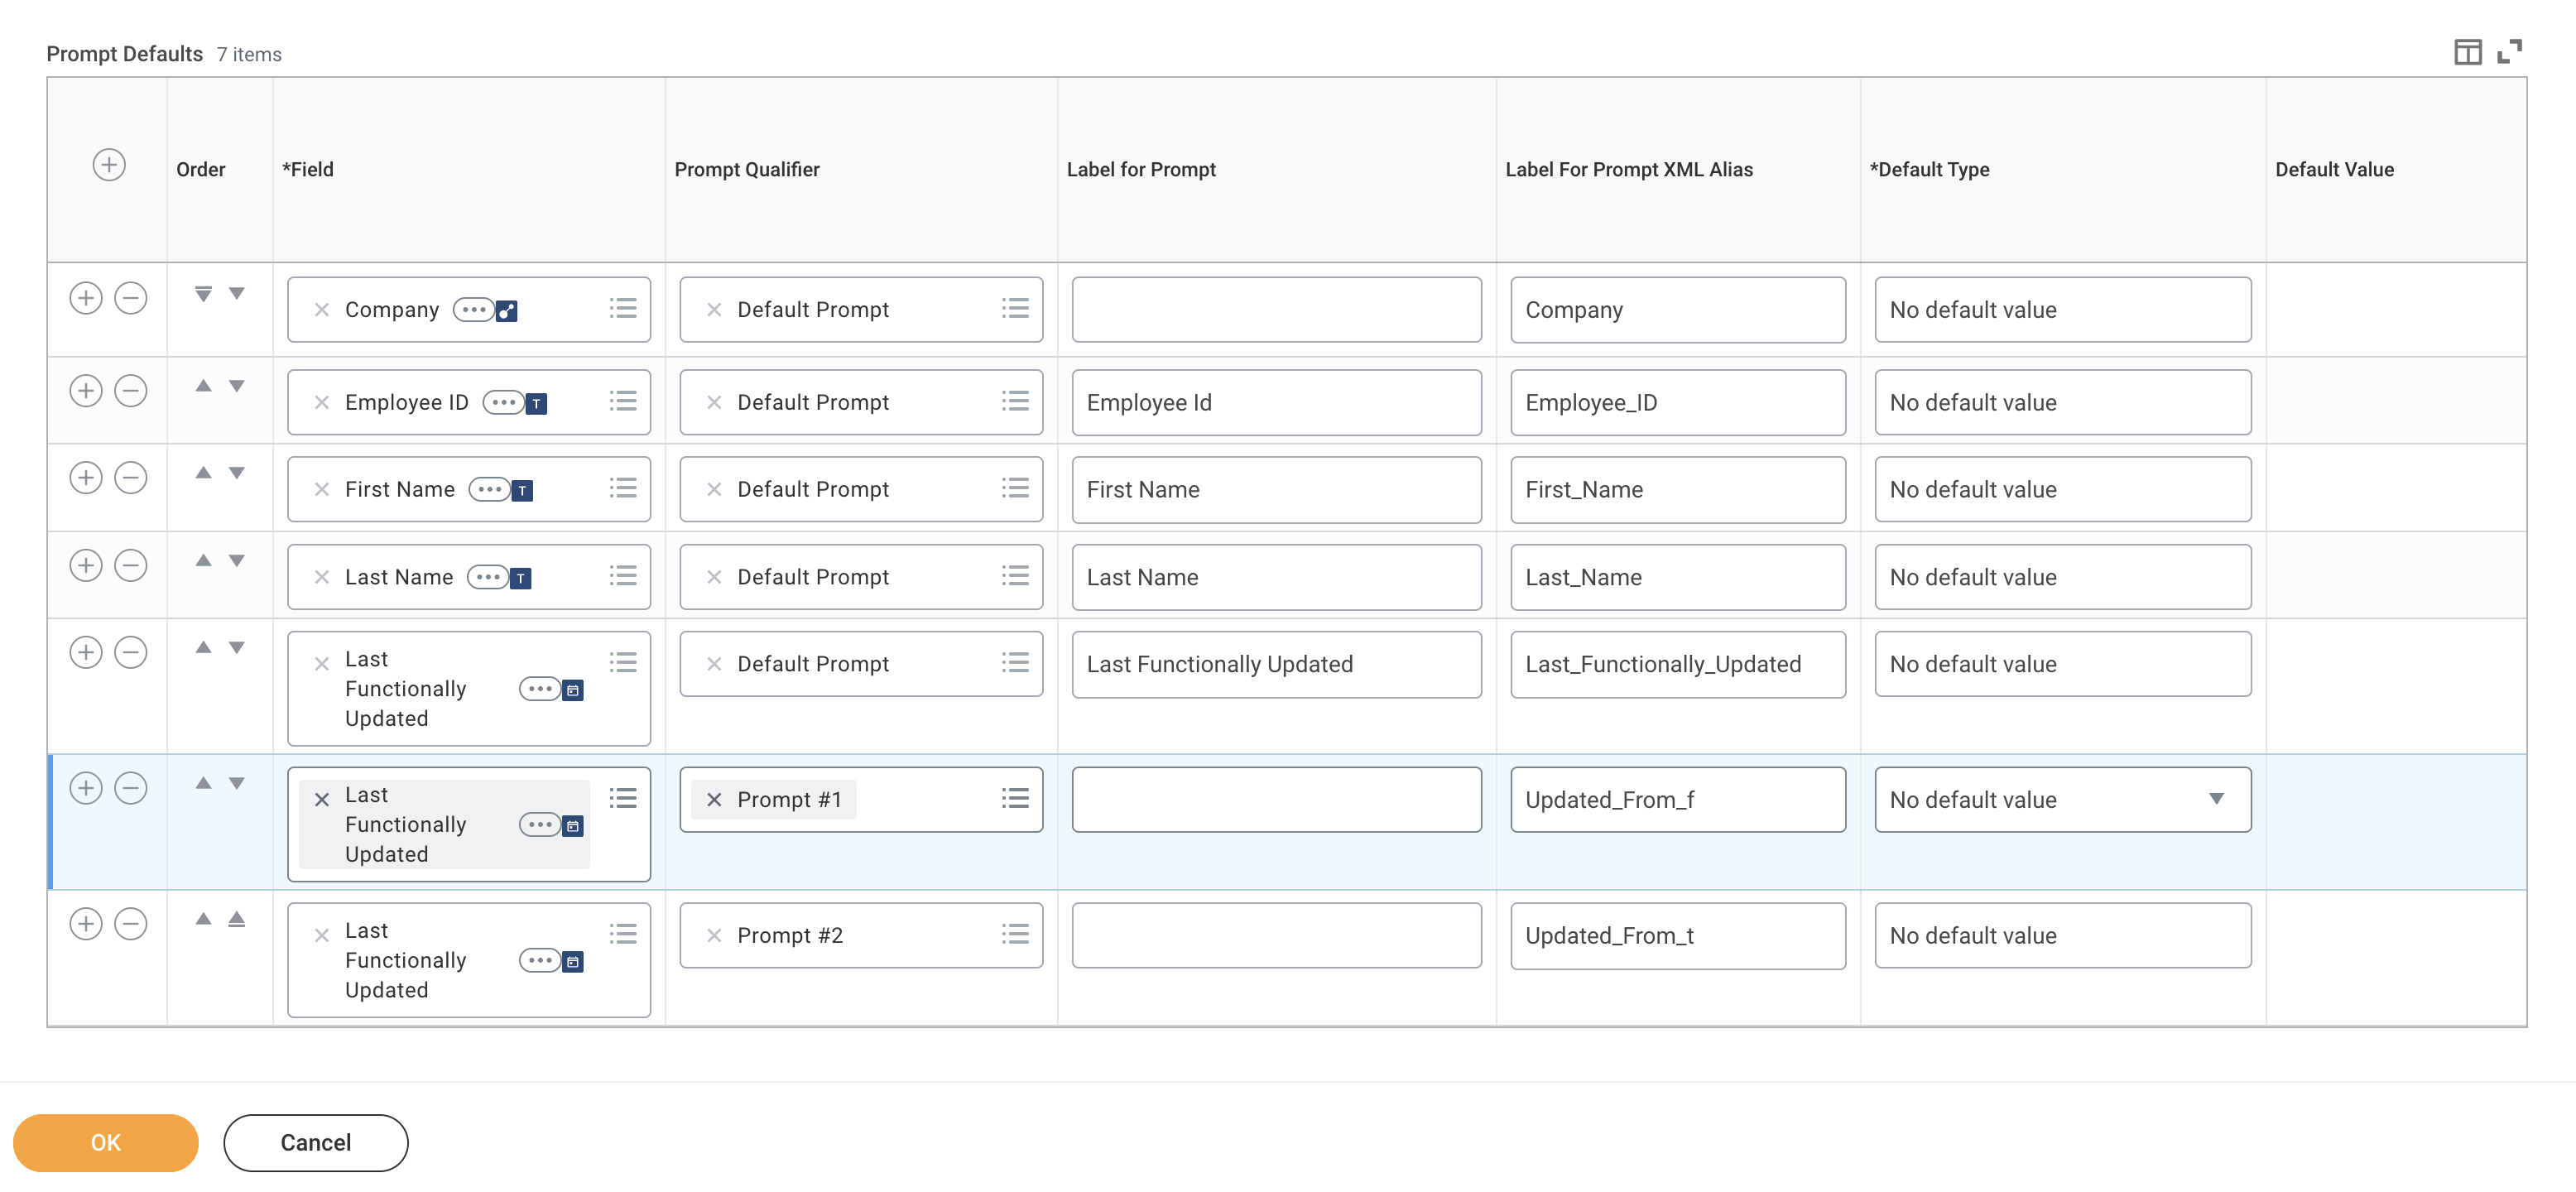
Select the Prompts tab and locate the Prompt Defaults table.
Add a prompt for the start of the incremental date range:
Select the + icon to add a new row to the Prompt Defaults table.
Select the date field, such as Last Functionally Updated, in the Field column.
Use the Prompt Qualifier drop-down menu to select Prompt #1.
Enter an XML alias, such as Updated_From_f, in the Label For Prompt XML Alias column. Record this value. You must enter the same alias in the Workato Start date prompt field.
Use the Default Type drop-down menu to select No default value.
Add a prompt for the end of the incremental date range:
Select the + icon to add another row to the Prompt Defaults table.
Select the same date field in the Field column.
Use the Prompt Qualifier drop-down menu to select Prompt #2.
Enter an XML alias, such as Updated_From_t, in the Label For Prompt XML Alias column. Record this value. You must enter the same alias in the Workato End date prompt field.
Use the Default Type drop-down menu to select No default value.
 Configure date prompts
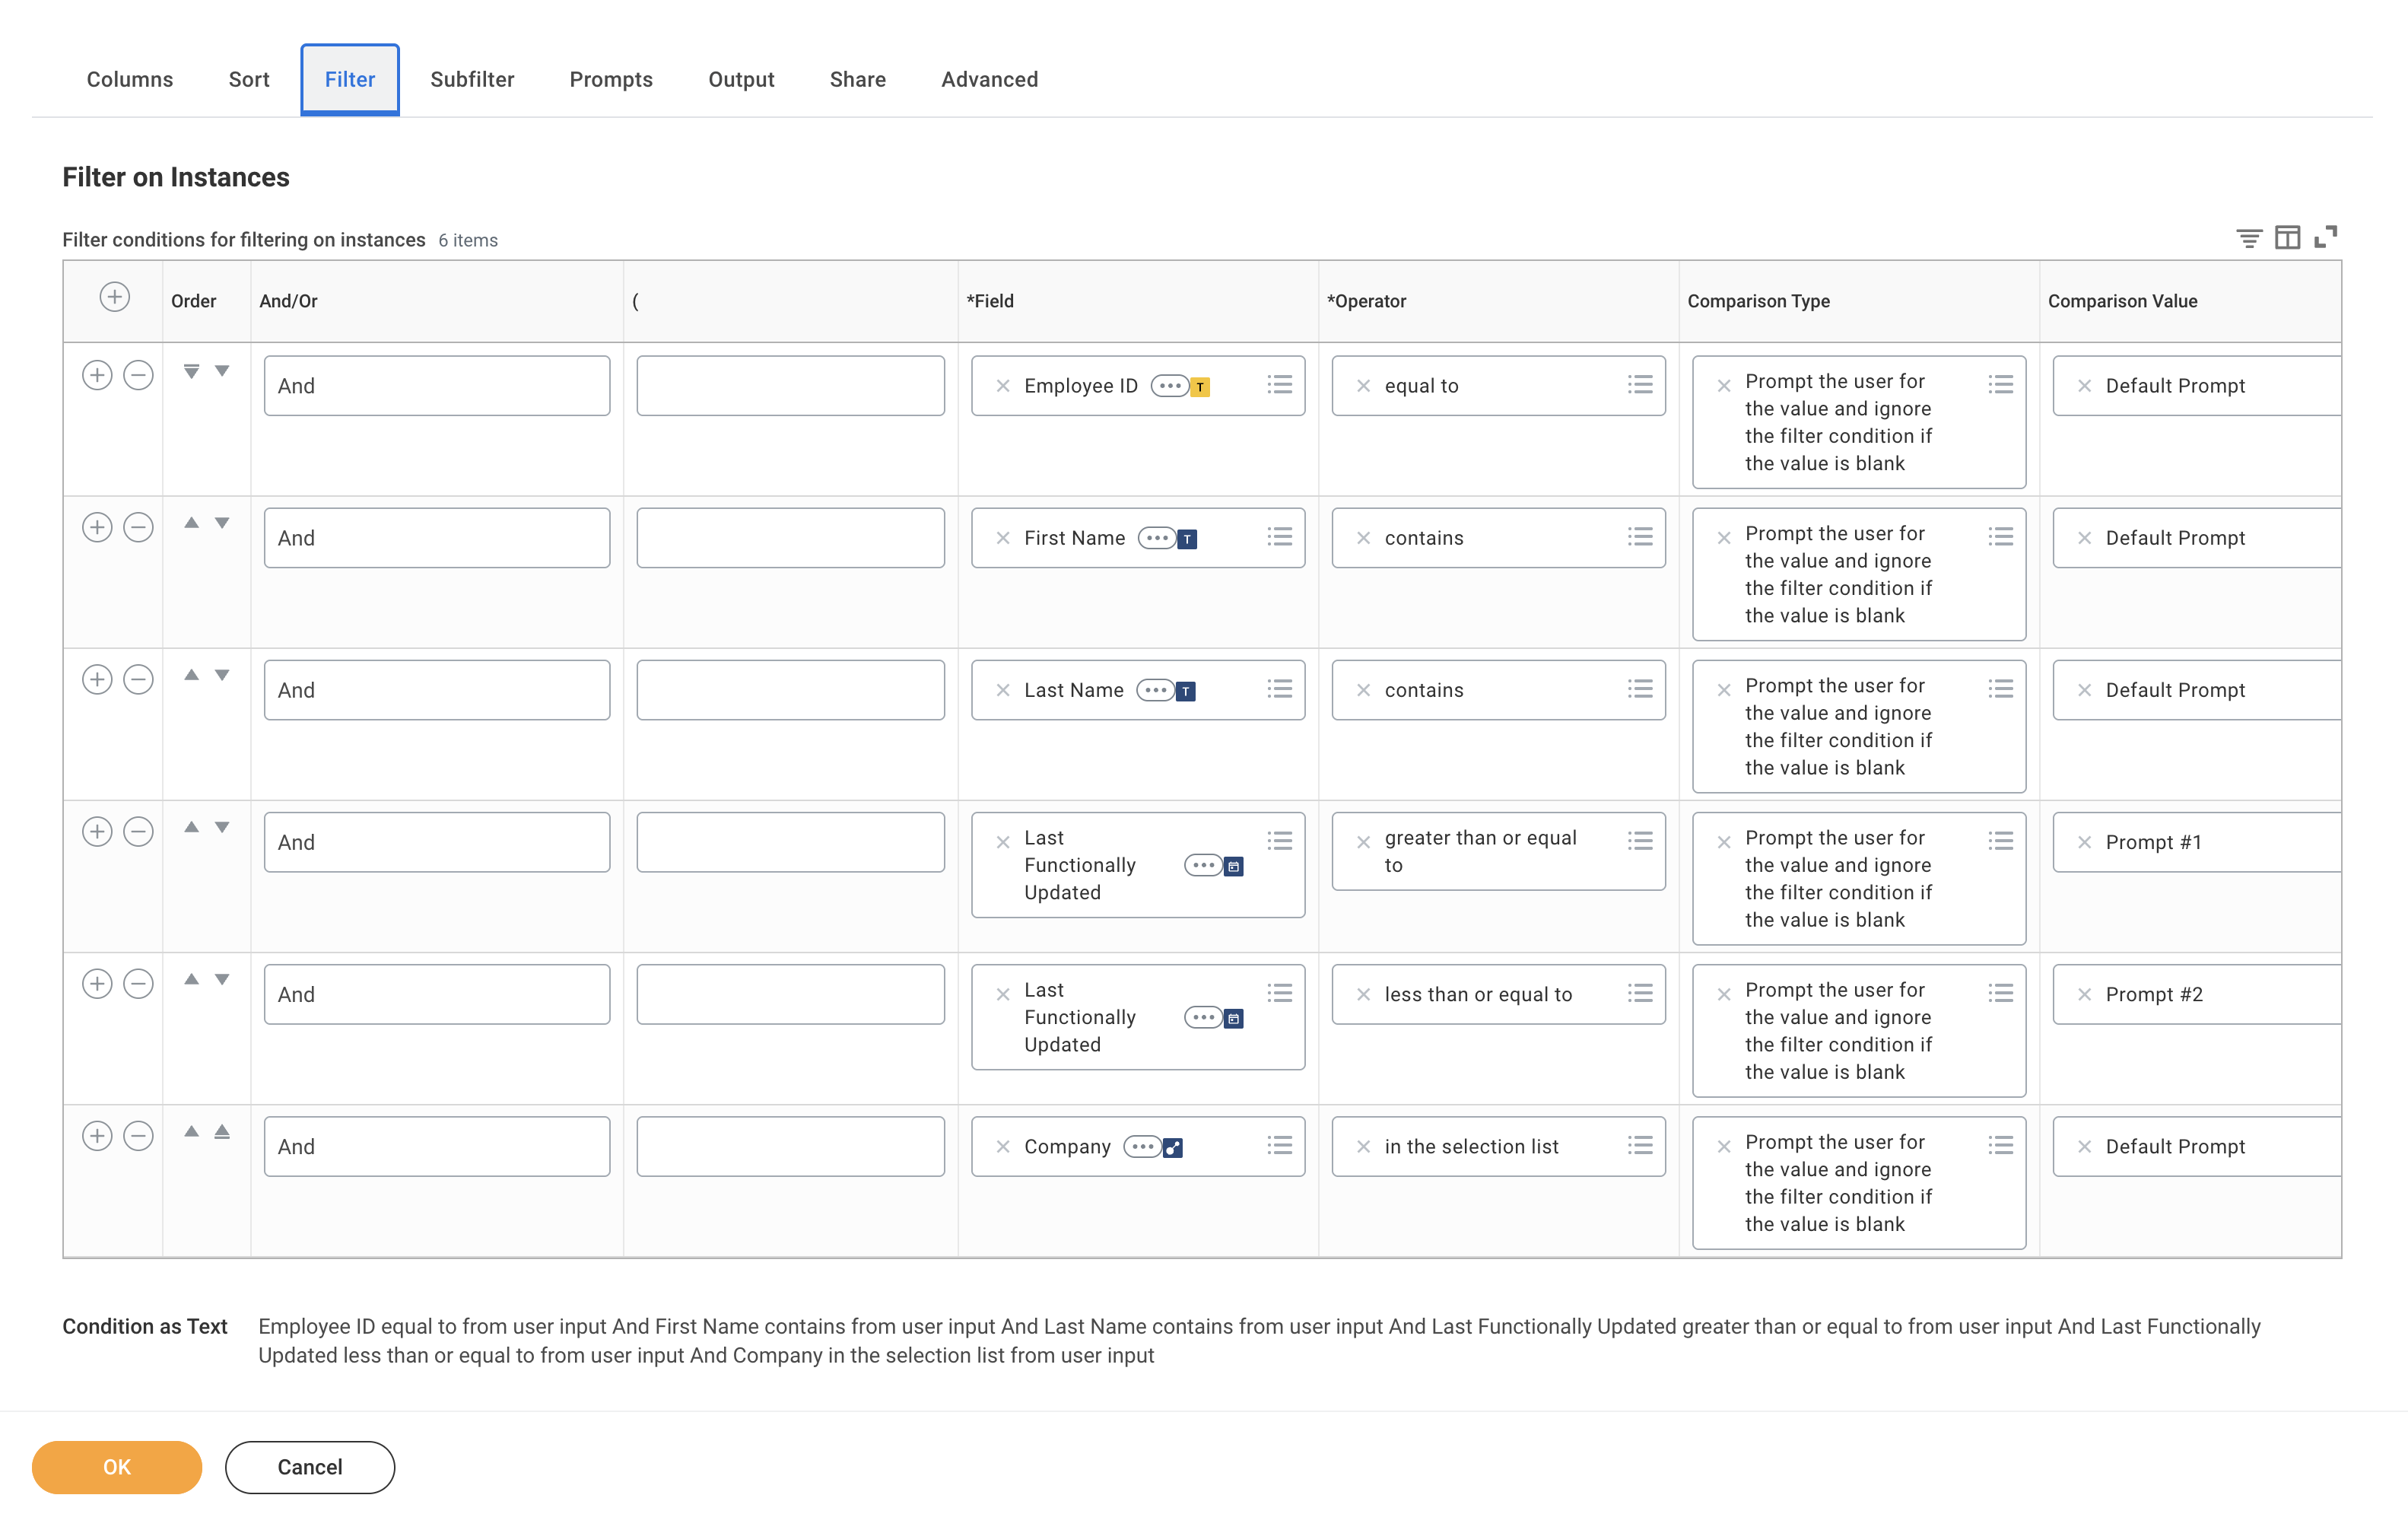
Select the Filter tab and locate the Filter on Instances table.
Add a filter condition for the start of the date range:
Select the + icon to add a new filter condition.
Select the date field, such as Last Functionally Updated, in the Field column.
Use the Operator drop-down menu to select greater than or equal to.
Use the Comparison Type drop-down menu to select Prompt the user for the value and ignore the filter condition if the value is blank.
Use the Comparison Value drop-down menu to select Prompt #1.
Add a filter condition for the end of the date range:
Select the + icon to add another filter condition.
Select the same date field in the Field column.
Use the Operator drop-down menu to select less than or equal to.
Use the Comparison Type drop-down menu to select Prompt the user for the value and ignore the filter condition if the value is blank.
Use the Comparison Value drop-down menu to select Prompt #2.
 Configure filters
Select OK to save the report.
REPORT URL
Locate the base report URL after you save the report. Select Actions > Web Service > View URLs, then copy the JSON endpoint URL. Strip any query parameters from the URL before you paste it into Workato. You must enter this URL when you register the report as a pipeline object in Workato. Refer to Configure the pipeline.
Configure the pipeline
Complete the following steps to configure Workday RaaS as your data pipeline source:
Select Create > Data pipeline or press C+I.
Enter a name for the data pipeline in the Data pipeline name field.
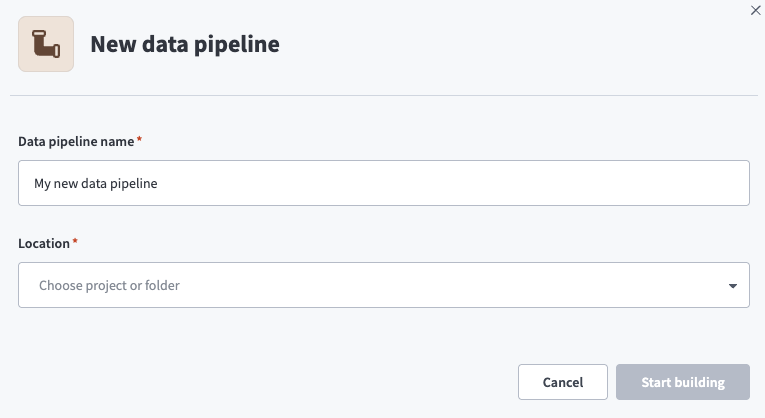 Data pipeline setup
Use the Location drop-down menu to select the project where you plan to store the data pipeline.
Click Start building.
Click the Extract new/updated records from source app trigger. This trigger defines how the pipeline retrieves data from Workday RaaS.
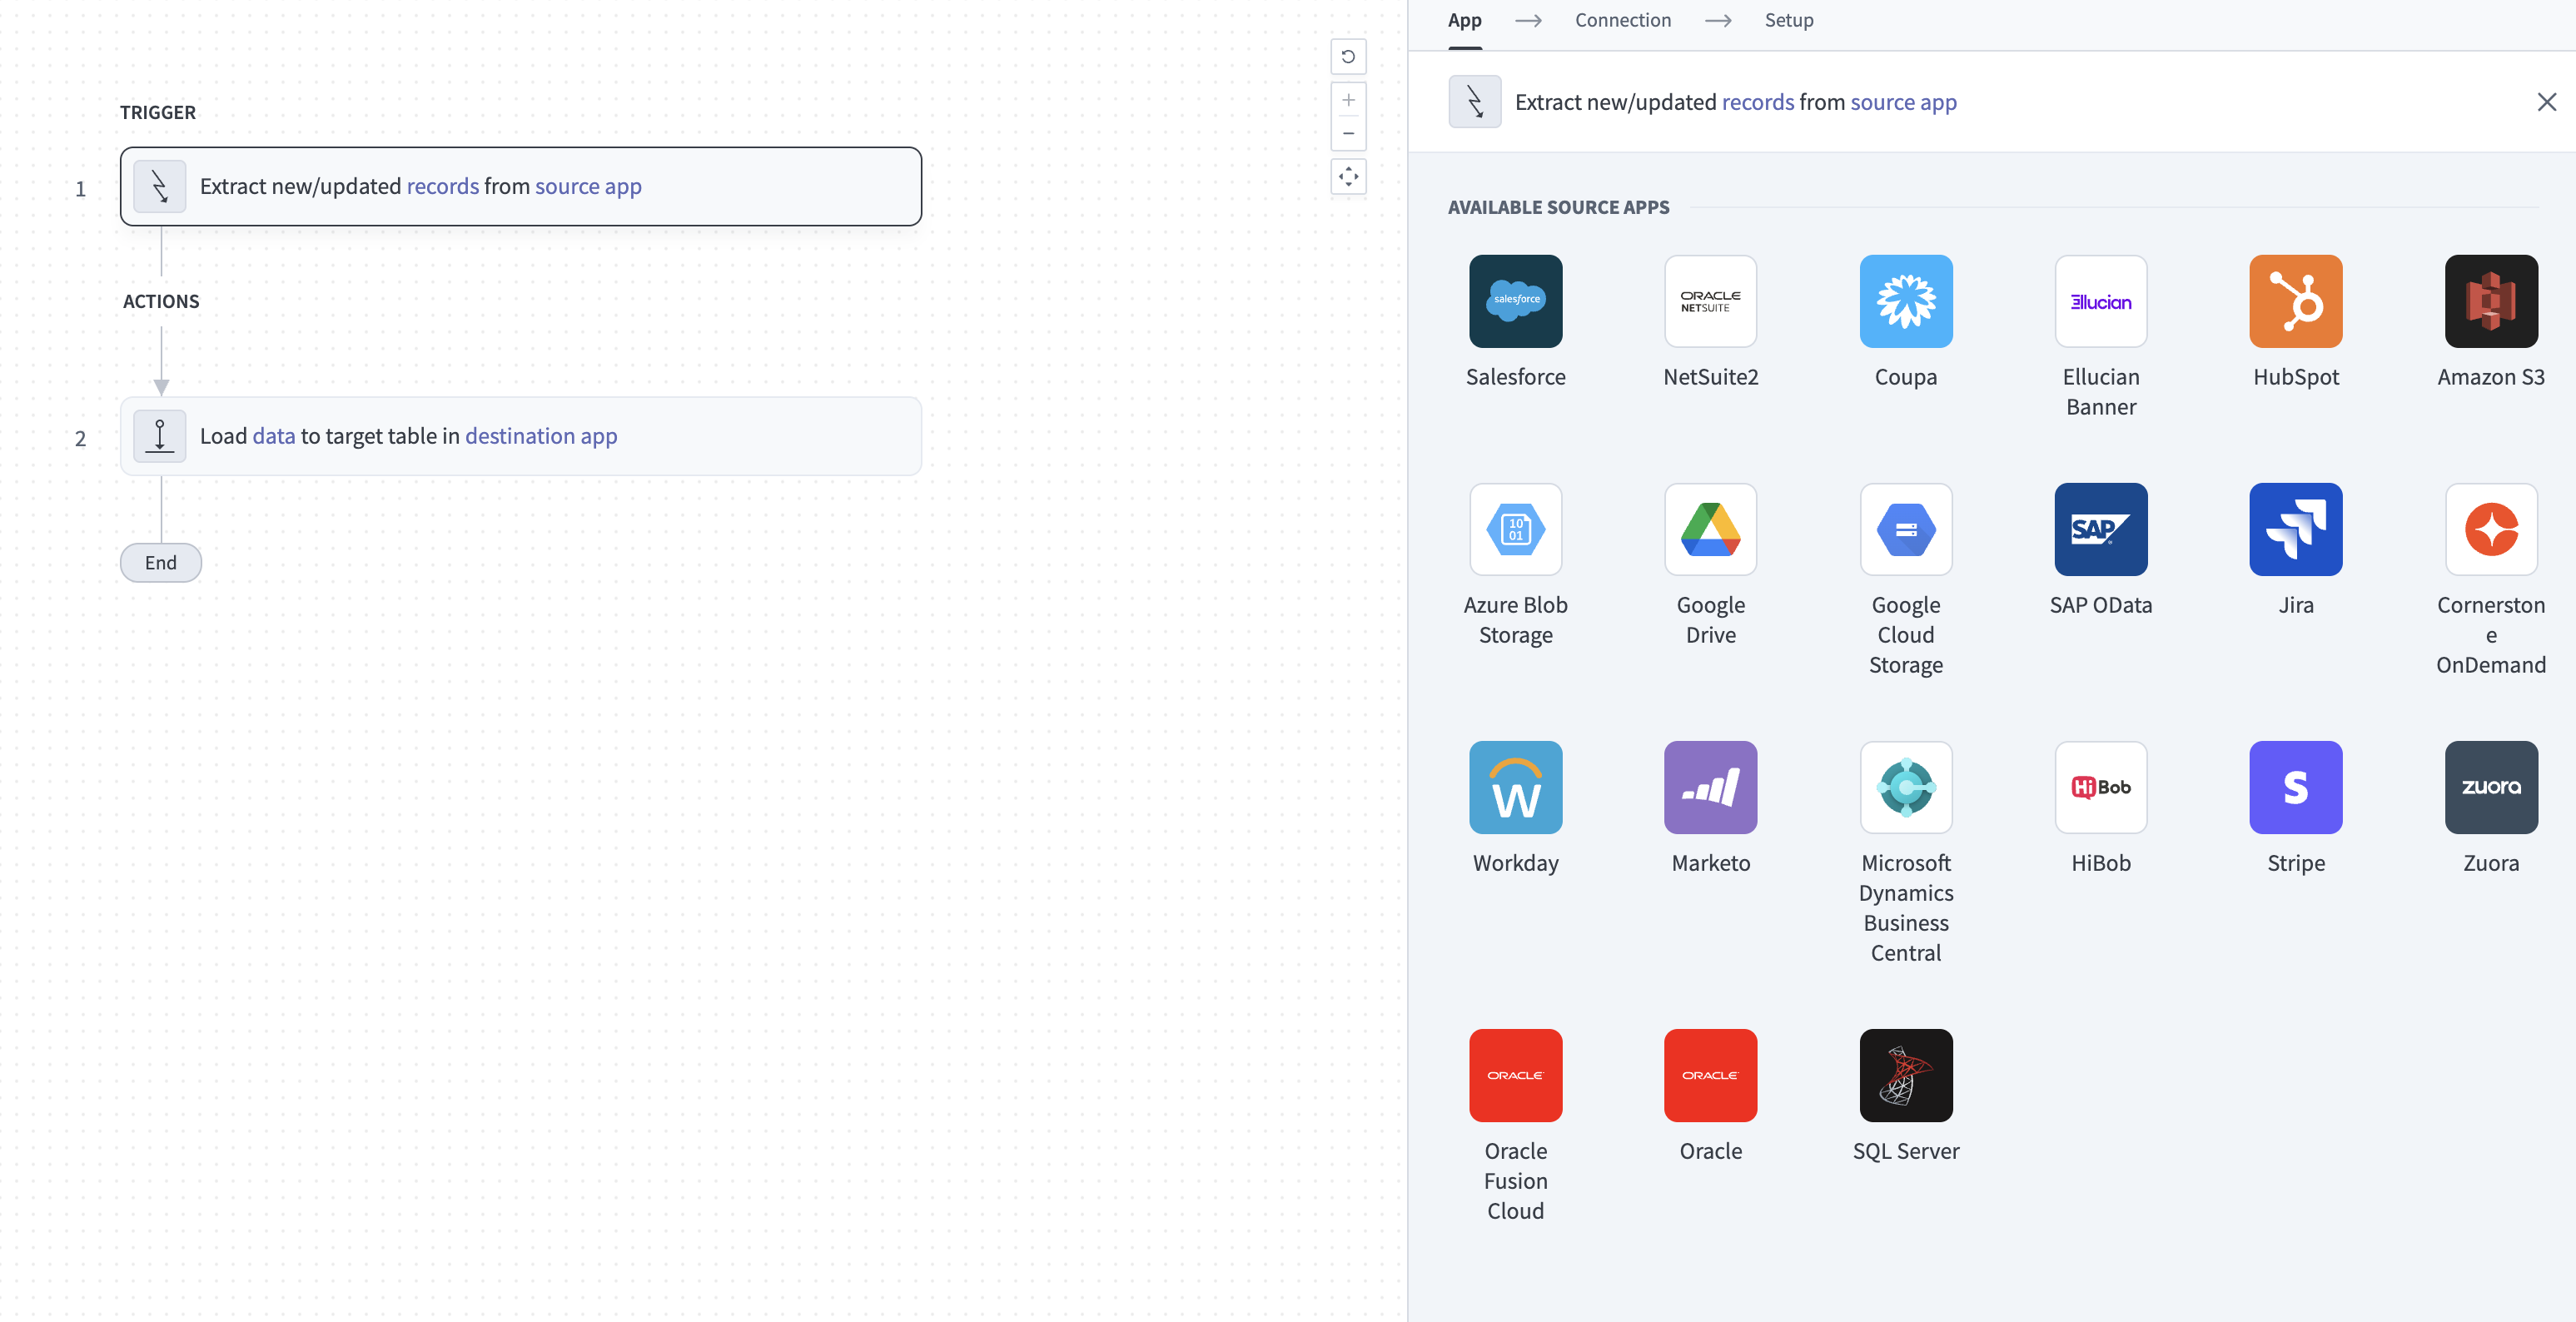 Configure the Extract new/updated records from source app trigger
Select Workday RaaS from the list of available source apps.
Choose the Workday connection you plan to use for this pipeline. Alternatively, click + New connection to create a new connection.
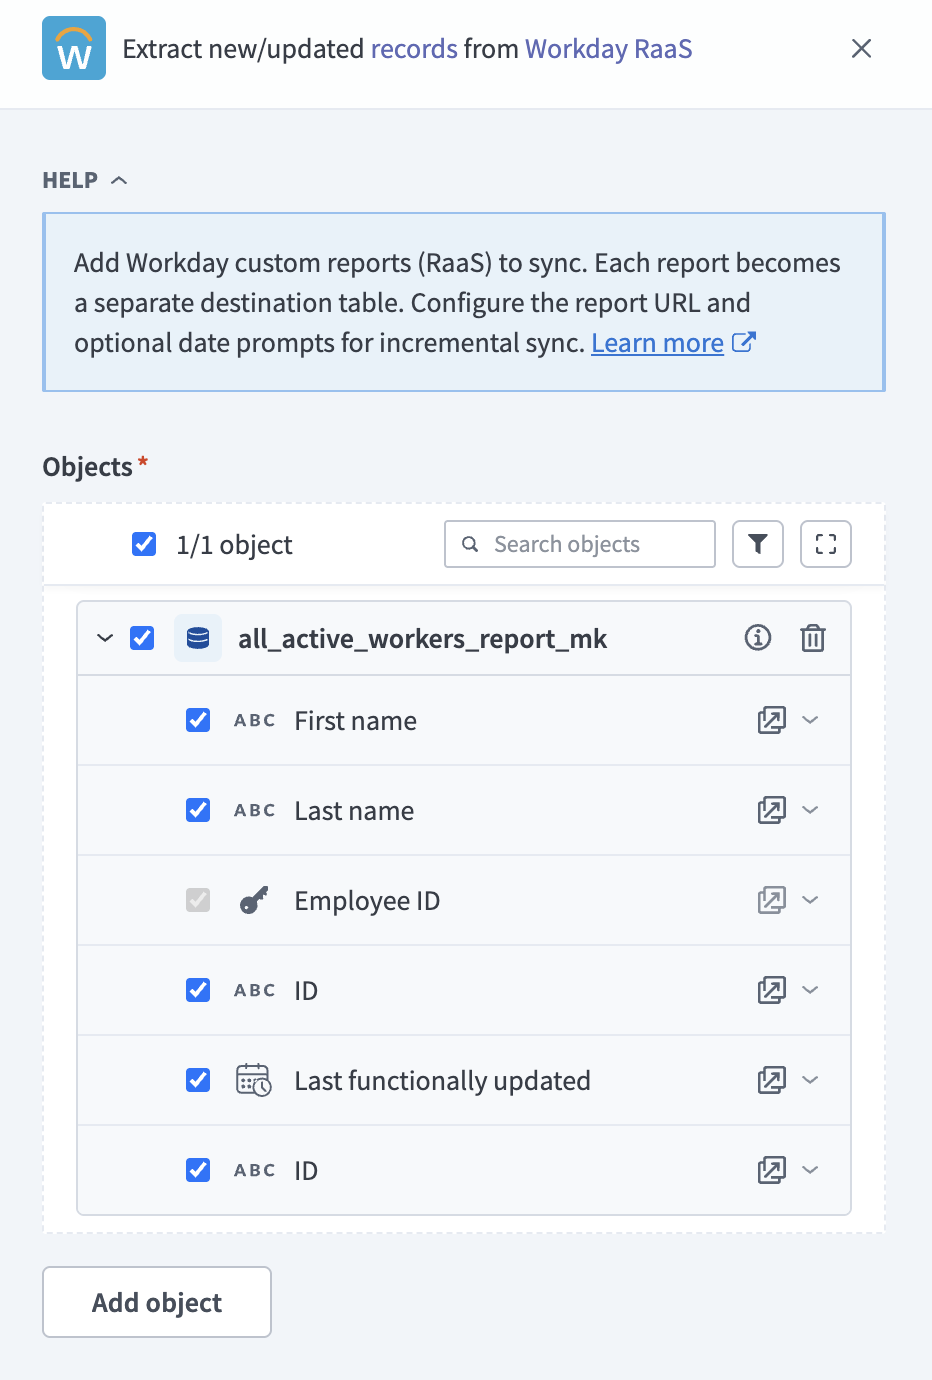
Click Add object to open the New object panel and start on the Configure report step.
Enter the base report URL in the Report URL field. Paste the URL without query parameters. For example:
https://{domain}/ccx/service/customreport2/{tenant}/{owner}/{report_name} Configure report
Optional. Enter a destination table name in the Object name field. Workato derives the name from the report URL if you leave this field blank. Use lowercase characters and underscores only.
Click Fetch schema to retrieve the report column list from Workday and continue to the Review schema step.
Review the discovered columns. Each column from the custom report appears in the schema list with its data type. Deselect any column you don't want to include in the sync.
Use the Primary key drop-down menu to select up to five columns to use as the primary key for the destination table. Select columns that uniquely identify each record and don't change between syncs, such as Employee ID. Avoid selecting columns that change frequently, such as timestamps, because Workato treats each changed value as a new row in the destination.
Optional. Select + Add prompt under Additional prompts to pass fixed values to other report prompts. Enter the prompt name and the static value to send on every sync run. Skip this step if your report doesn't have additional prompts to configure.
Optional. Select Enable incremental sync and enter the XML alias values you recorded when you configured the custom report in Workday. Refer to Configure date prompts and filters if you haven't configured the report yet.
- Enter the start date prompt XML alias, such as
Updated_From_f, in the Start date prompt field. - Enter the end date prompt XML alias, such as
Updated_From_t, in the End date prompt field.
Both prompts are required when Enable incremental sync is selected. Workato displays a configuration error and disables the Review object button if either field is blank.
 Enable incremental sync and enter prompt aliases
Click Review object to continue to the Review object step.
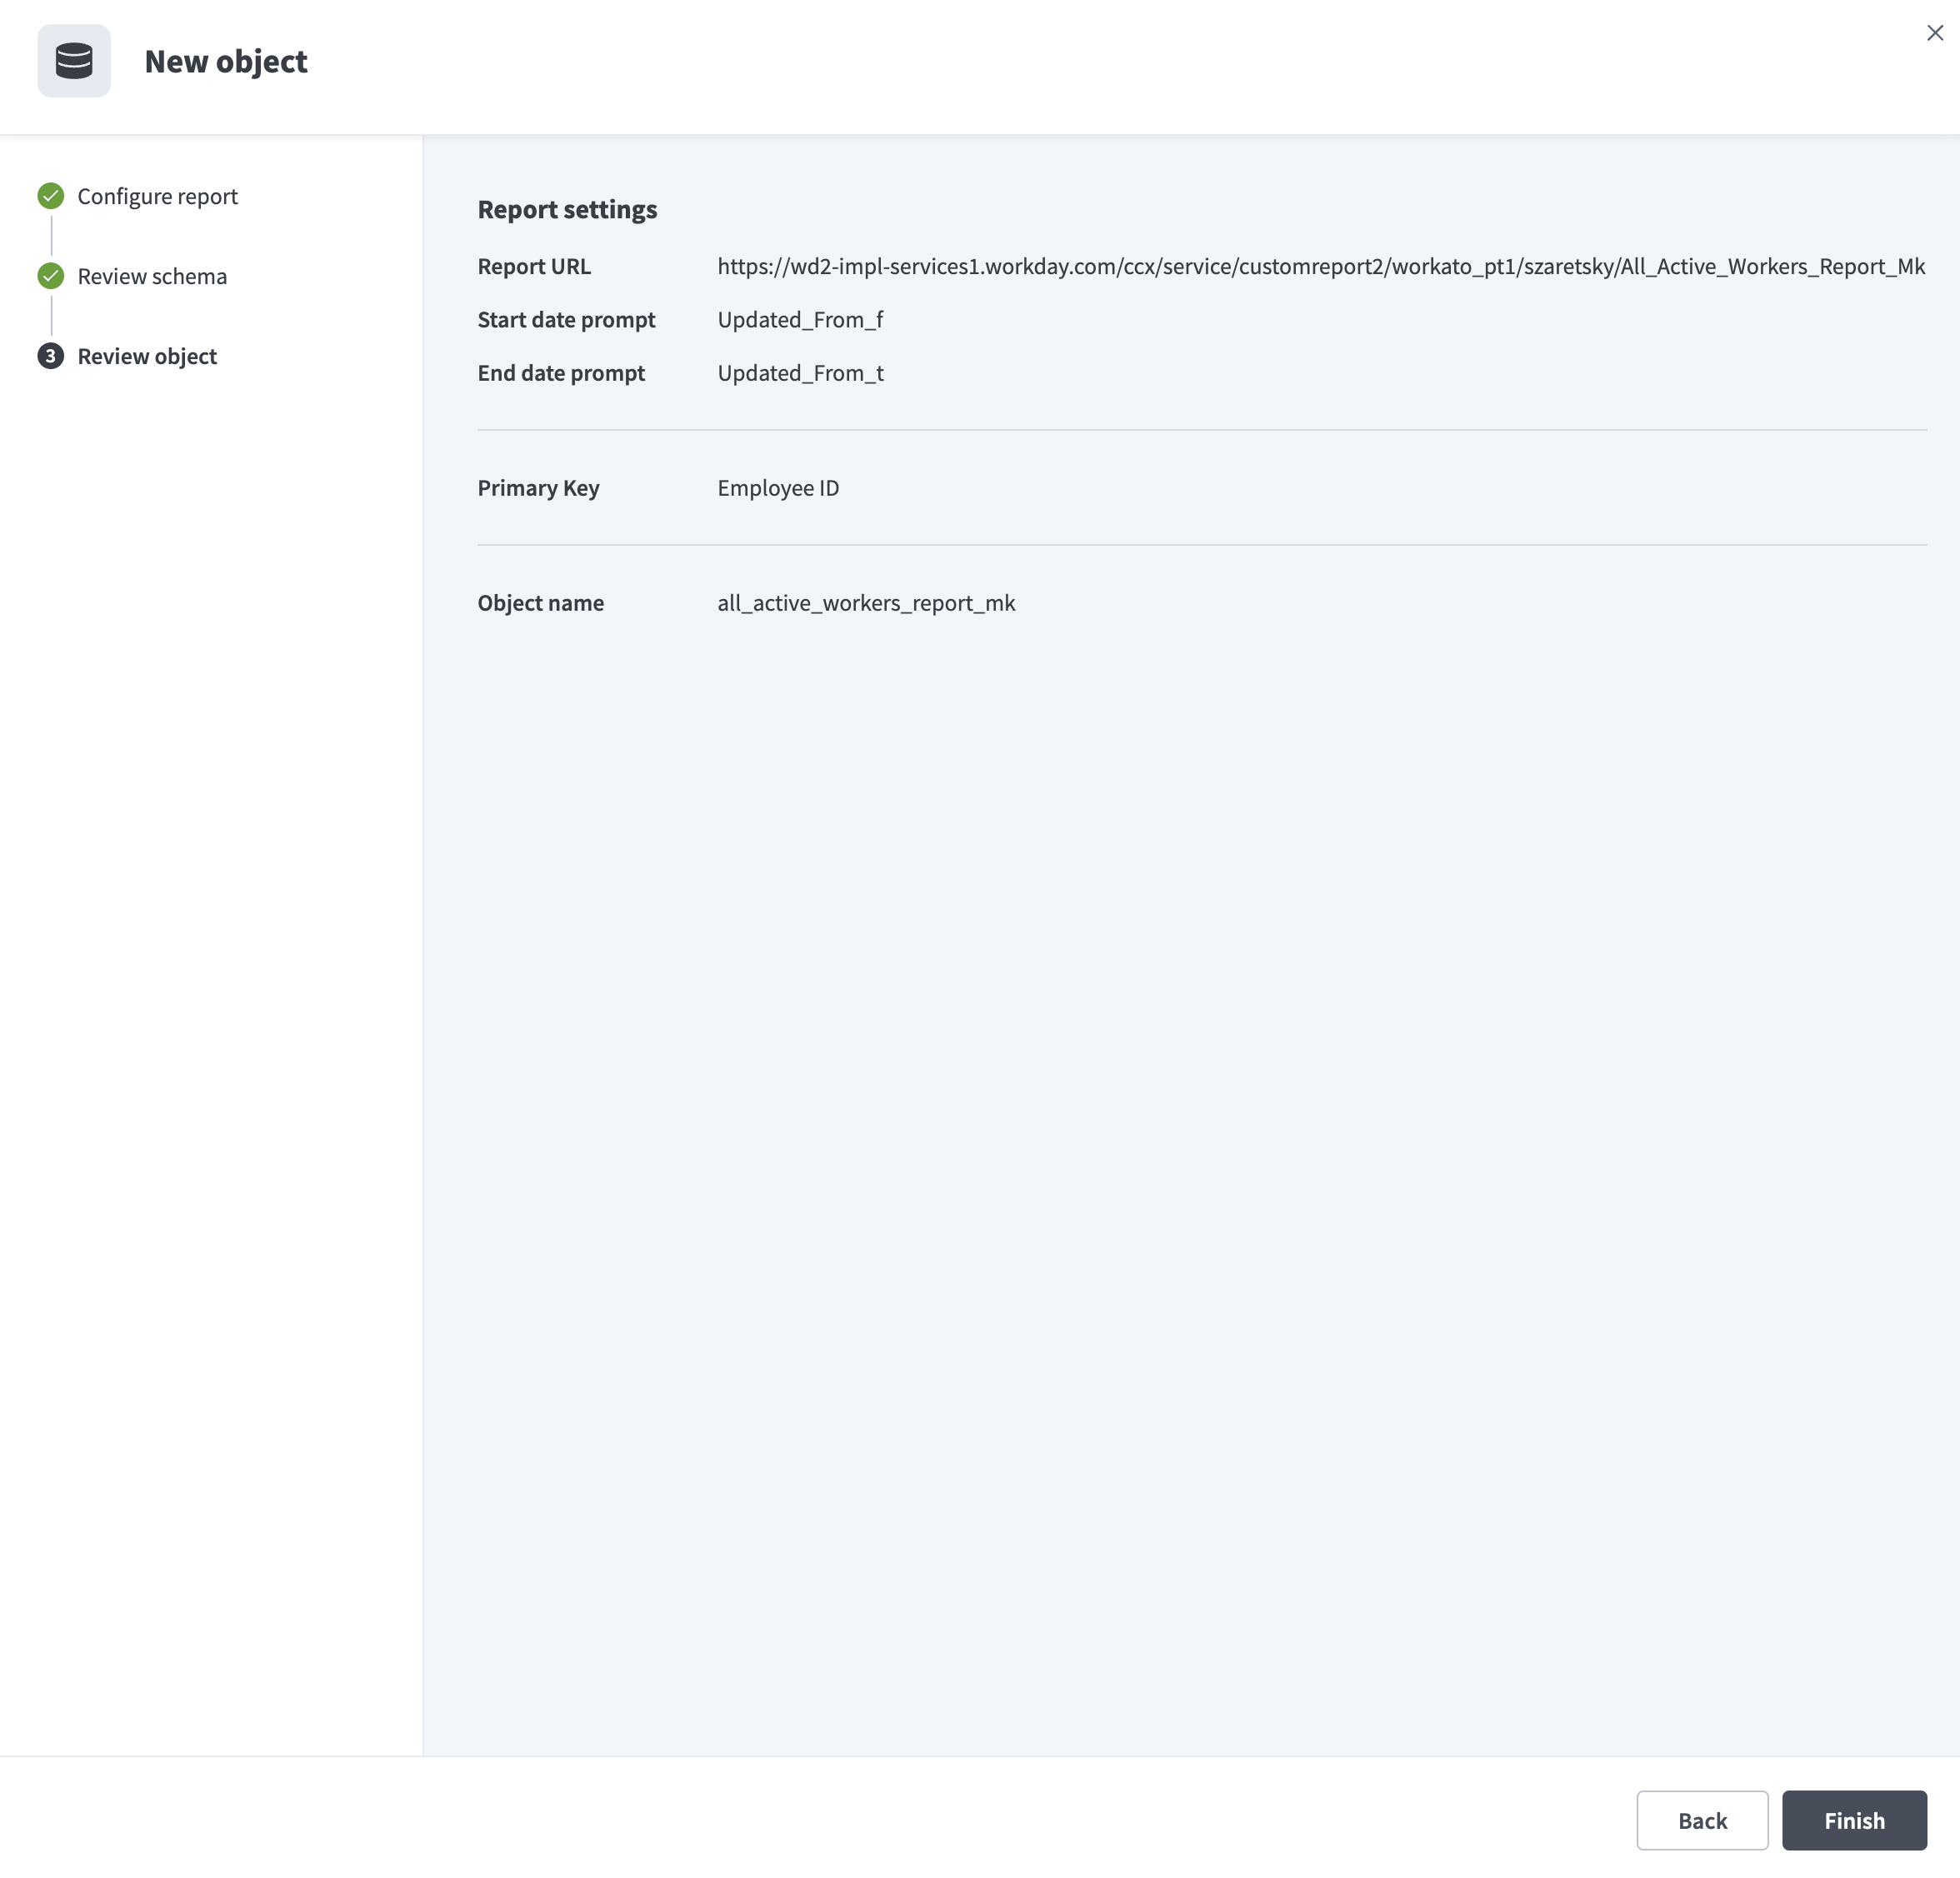 Review object
Confirm the report settings on the Review object step. The summary includes the report URL, the primary key, the object name, and the start and end date prompt aliases when incremental sync is configured. Click Back to revise any setting, or click Finish to register the report as a pipeline object.
Review and customize the schema for each selected object. When you select an object, the pipeline automatically fetches its schema to ensure the destination matches the source.
 Review schema
Expand any object to view its fields. Keep all fields selected to extract all available data, or deselect specific fields to exclude them from data extraction and schema replication.
Optional. Configure field-level data protection by expanding an object and choosing how to handle each field:
- Replicate as is: Data values at the source replicate identically to the destination.
- Hash: Hash sensitive data values in the field before syncing to your destination.
Workato recommends hashing personally identifiable information (PII) and other sensitive fields.
Click Add object again to add more reports. Repeat the preceding steps to include additional Workday custom reports in your pipeline.
Use the Choose how to handle schema changes drop-down menu to select a schema drift handling option:
- Auto-sync new fields: Automatically detects and syncs new fields added in the source.
- Block new fields: Keeps the schema fixed after the pipeline starts. You must add new fields manually.
Configure how often the pipeline syncs data from Workday RaaS to the destination in the Frequency field. Choose either a standard time-based schedule or define a custom cron expression.
Workato uses full refresh when Enable incremental sync is unchecked on the Review schema step.
Sync modes
Workday RaaS pipelines support full refresh and incremental sync. The sync mode is set per object on the Review schema step of the New object panel.
Full refresh
A full refresh sync runs the report without start and end date prompt values and overwrites the destination on every pipeline run. Use full refresh when you need a complete snapshot of the report on each sync, or when the report doesn't include date prompts.
Workato uses full refresh when Enable incremental sync is unchecked on the Review schema step.
Incremental sync
An incremental sync runs the report with a date range and fetches only records updated within that range. Workato passes the following values to the date prompts you configured on the report:
- Start date prompt: The timestamp of the last successful sync run. On the first run, Workato uses the historical start date set in the When first started, this pipeline should pick up records from field on the pipeline frequency configuration, or fetches all records if that field is blank.
- End date prompt: The current date and time at the start of the sync run.
Incremental sync requires the following configuration:
- The custom report must include two date prompts and two matching filter conditions. Refer to Configure date prompts and filters for setup steps.
- Enable incremental sync must be selected on the Review schema step.
- Both the Start date prompt and End date prompt fields must contain the XML aliases that match the prompts on the custom report.
If you enable incremental sync but the report doesn't include matching filter conditions, the report returns all records on every run instead of filtering by the date range.
Schema and data type handling
Workato fetches the report schema from Workday when you register the report as an object. Each report column becomes a column in the destination table. Workato detects the data type for each column from the report schema. Date and timestamp columns appear with a calendar icon in the schema list.
After you register the report as a pipeline object, you can include or exclude individual columns from the sync in the pipeline's source trigger. Deselect a column's checkbox to remove it from the destination table.
Limitations
The following limitations apply when you use Workday RaaS as a data pipeline source.
Advanced report type required
Only Advanced custom reports can be enabled as web services and registered as pipeline objects. Simple type reports aren't supported.
Report size limit
Workday enforces a 2 GB size limit for advanced custom reports that are enabled as web services. Refer to Workday's documentation on custom reports for integrations for more information.
Incremental sync requires report configuration
Incremental sync depends on date prompts and matching filter conditions configured on the custom report in Workday. Workato uses full refresh when Enable incremental sync is unchecked. When Enable incremental sync is checked but the report doesn't include matching filter conditions, the report returns all records on every run instead of filtering by the date range.
Minimum sync frequency
The minimum supported sync interval is 15 minutes. You can't trigger syncs more frequently than this.
Last updated: