Vendor Onboarding MCP server
The Vendor Onboarding MCP server enables LLMs to onboard new vendors across Coupa, DocuSign, and NetSuite through natural conversation. It provides tools to capture vendor intake and check for duplicates, send and track tax and insurance documentation through DocuSign, confirm banking submission and approval status in Coupa, and create and activate the vendor master record in Coupa and NetSuite, without requiring direct interaction with the Coupa, DocuSign, and NetSuite interfaces. Onboarding a vendor can span days to weeks while you wait on the vendor and approvers, so the server tracks progress and lets you pick up an in-flight onboarding in any later conversation.
Uses
Use the Vendor Onboarding MCP server to perform the following actions:
- Check a new vendor's legal name against existing Coupa suppliers before creating a record
- Send tax forms and insurance documentation to a vendor for signature through DocuSign
- Check whether a vendor has completed and returned requested documents
- Import a completed DocuSign envelope's signer-entered data into the vendor's Coupa record
- Check whether a vendor has submitted banking details through Coupa's Supplier Portal
- Submit a vendor for approval through Coupa's configured approval chain
- Create the vendor master record in Coupa and NetSuite
- Activate a vendor for transactions
- List in-flight vendor onboardings and see what each one is waiting on
Example prompts
Use the following example prompts to invoke Vendor Onboarding MCP server tools:
Onboard Acme Corp as a new vendor.What's the status of the Acme onboarding?Which vendor onboardings are stuck waiting on the vendor?Check whether Acme's banking has come in yet.Send the tax and insurance forms to Acme Corp.Has Acme signed and returned their documents yet?Import Acme's signed form data into their Coupa record.Submit Acme's onboarding for approval.Create the vendor master record for Acme now that it's approved.Activate Acme for transactions.
Vendor Onboarding MCP server tools
The Vendor Onboarding MCP server provides the following tools:
| Tool | Description |
|---|---|
| initiate_vendor_request | Captures new-vendor intake and checks for duplicates against existing Coupa suppliers. |
| send_vendor_onboarding_documents | Sends a single composite DocuSign envelope with tax forms and supporting-document requests to the vendor. |
| check_vendor_document_status | Returns DocuSign envelope status and follows up with form data and document metadata. |
| import_vendor_form_data | Downloads completed documents and writes validated form data into the Coupa Supplier Information Management (SIM) record. |
| check_vendor_bank_details | Checks whether the vendor has submitted banking through Coupa's native SIM flow. |
| submit_vendor_for_approval | Submits the vendor's Easy Form Response(s) for approval into Coupa's configured chain. |
| create_vendor_master_netsuite | Finalizes the existing Coupa supplier and creates the NetSuite vendor record. |
| activate_vendor_for_transactions | Activates the vendor in both Coupa and the ERP, making it payment-ready. |
| list_pending_vendor_onboardings | Returns a paginated list of in-flight onboardings you initiated. |
| get_vendor_onboarding_status | Returns the status of a vendor onboarding across every system. |
| get_vendor_write_policy | Returns the field mapping, sensitivity flags, and forbidden-field list for writing vendor data. |
Install the Vendor Onboarding MCP server
Complete the following steps to install a prebuilt MCP server to your project:
Sign in to your Workato account.
Go to AI Hub > Enterprise MCP.
Click + Create MCP server.
Go to the Start with pre-built MCP Servers using your connected apps section and select the prebuilt MCP server you plan to use.
Click Use this server.
Provide a name for your MCP server in the Server name field.
Use the Location drop-down menu to select the project for the MCP server.
Go to the Connections section and connect to your app account.
Select the connection type you plan to use for the MCP server template.
- User's connection: MCP server tools perform actions based on the identity and permissions of the user who connects to the application. Users authenticate with their own credentials to execute the skill.
- Your connection: This option uses the connection established by the recipe builder and follows the same principles as normal app connections.
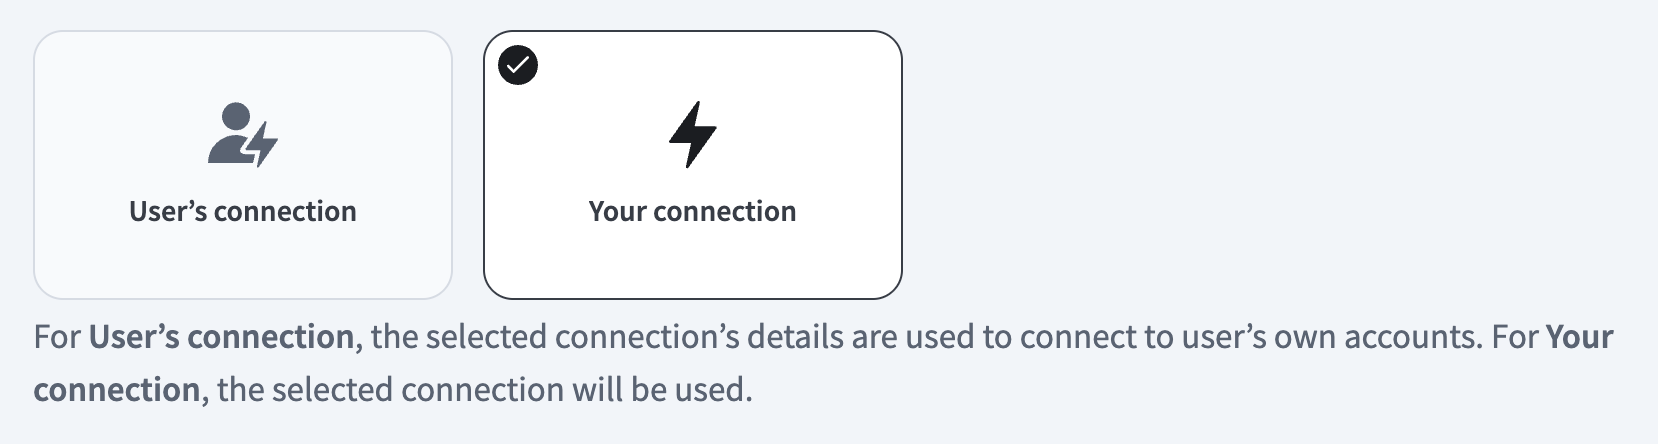 Select your connection type
VERIFIED USER ACCESS AUTHENTICATION REQUIREMENTS
Only app connections that use OAuth 2.0 authorization code grant are available for user's connection. Refer to Verified user access for more information.
Complete the app-specific connection setup steps in the following section.
Vendor Onboarding connection setup
The following connections are required to use the Vendor Onboarding MCP server:
Role requirements
Each tool's availability depends on the scopes and permissions granted to the relevant connection. A request made without the required permission returns a permission-denied outcome rather than a partial result.
- Coupa: Requires the following permissions at minimum: - Supplier Information (read, write) - Suppliers (read, write) - Easy Form Responses (read, write, approval submission) - Approvals (read) - Attachments (read, write)
- DocuSign: Requires the following: -
impersonationscope (JWT Grant) or equivalent send-on-behalf-of access (OAuth 2.0) to send envelopes - NetSuite: Requires the following: - RESTlets and REST Web Services scopes - A NetSuite role with permission to create and edit Vendor records
Coupa connection setup steps
View Coupa connection setup steps
Complete the following steps to configure Coupa for a client credentials connection to Workato:
CLIENT CREDENTIALS REQUIRED
The Vendor Onboarding MCP server requires an OAuth 2.0 client credentials connection to Coupa. Other authentication methods aren't supported.
Sign in to your Coupa instance, for example https://[your-instance-name].coupacloud.com/oauth2/clients.
Click Create to create a new OAuth client.
Use the Grant type drop-down menu to select Authorization Code or Client Credentials. You must select the same option in Workato for the Authentication type.
Provide a name in the Name field. For example: Workato Coupa OAuth connection.
Enter the redirect URIs you plan to use in the Redirect URIs field. Add the link https://www.workato.com/oauth/callback if you plan to use Authorization code.
Select the scopes you plan to provide to Workato. Include all objects and features you plan to automate with the Coupa connector. The scopes you select must match the scopes you configure in Workato. You must include the core.common.read and offline_access scopes at a minimum to establish a connection.
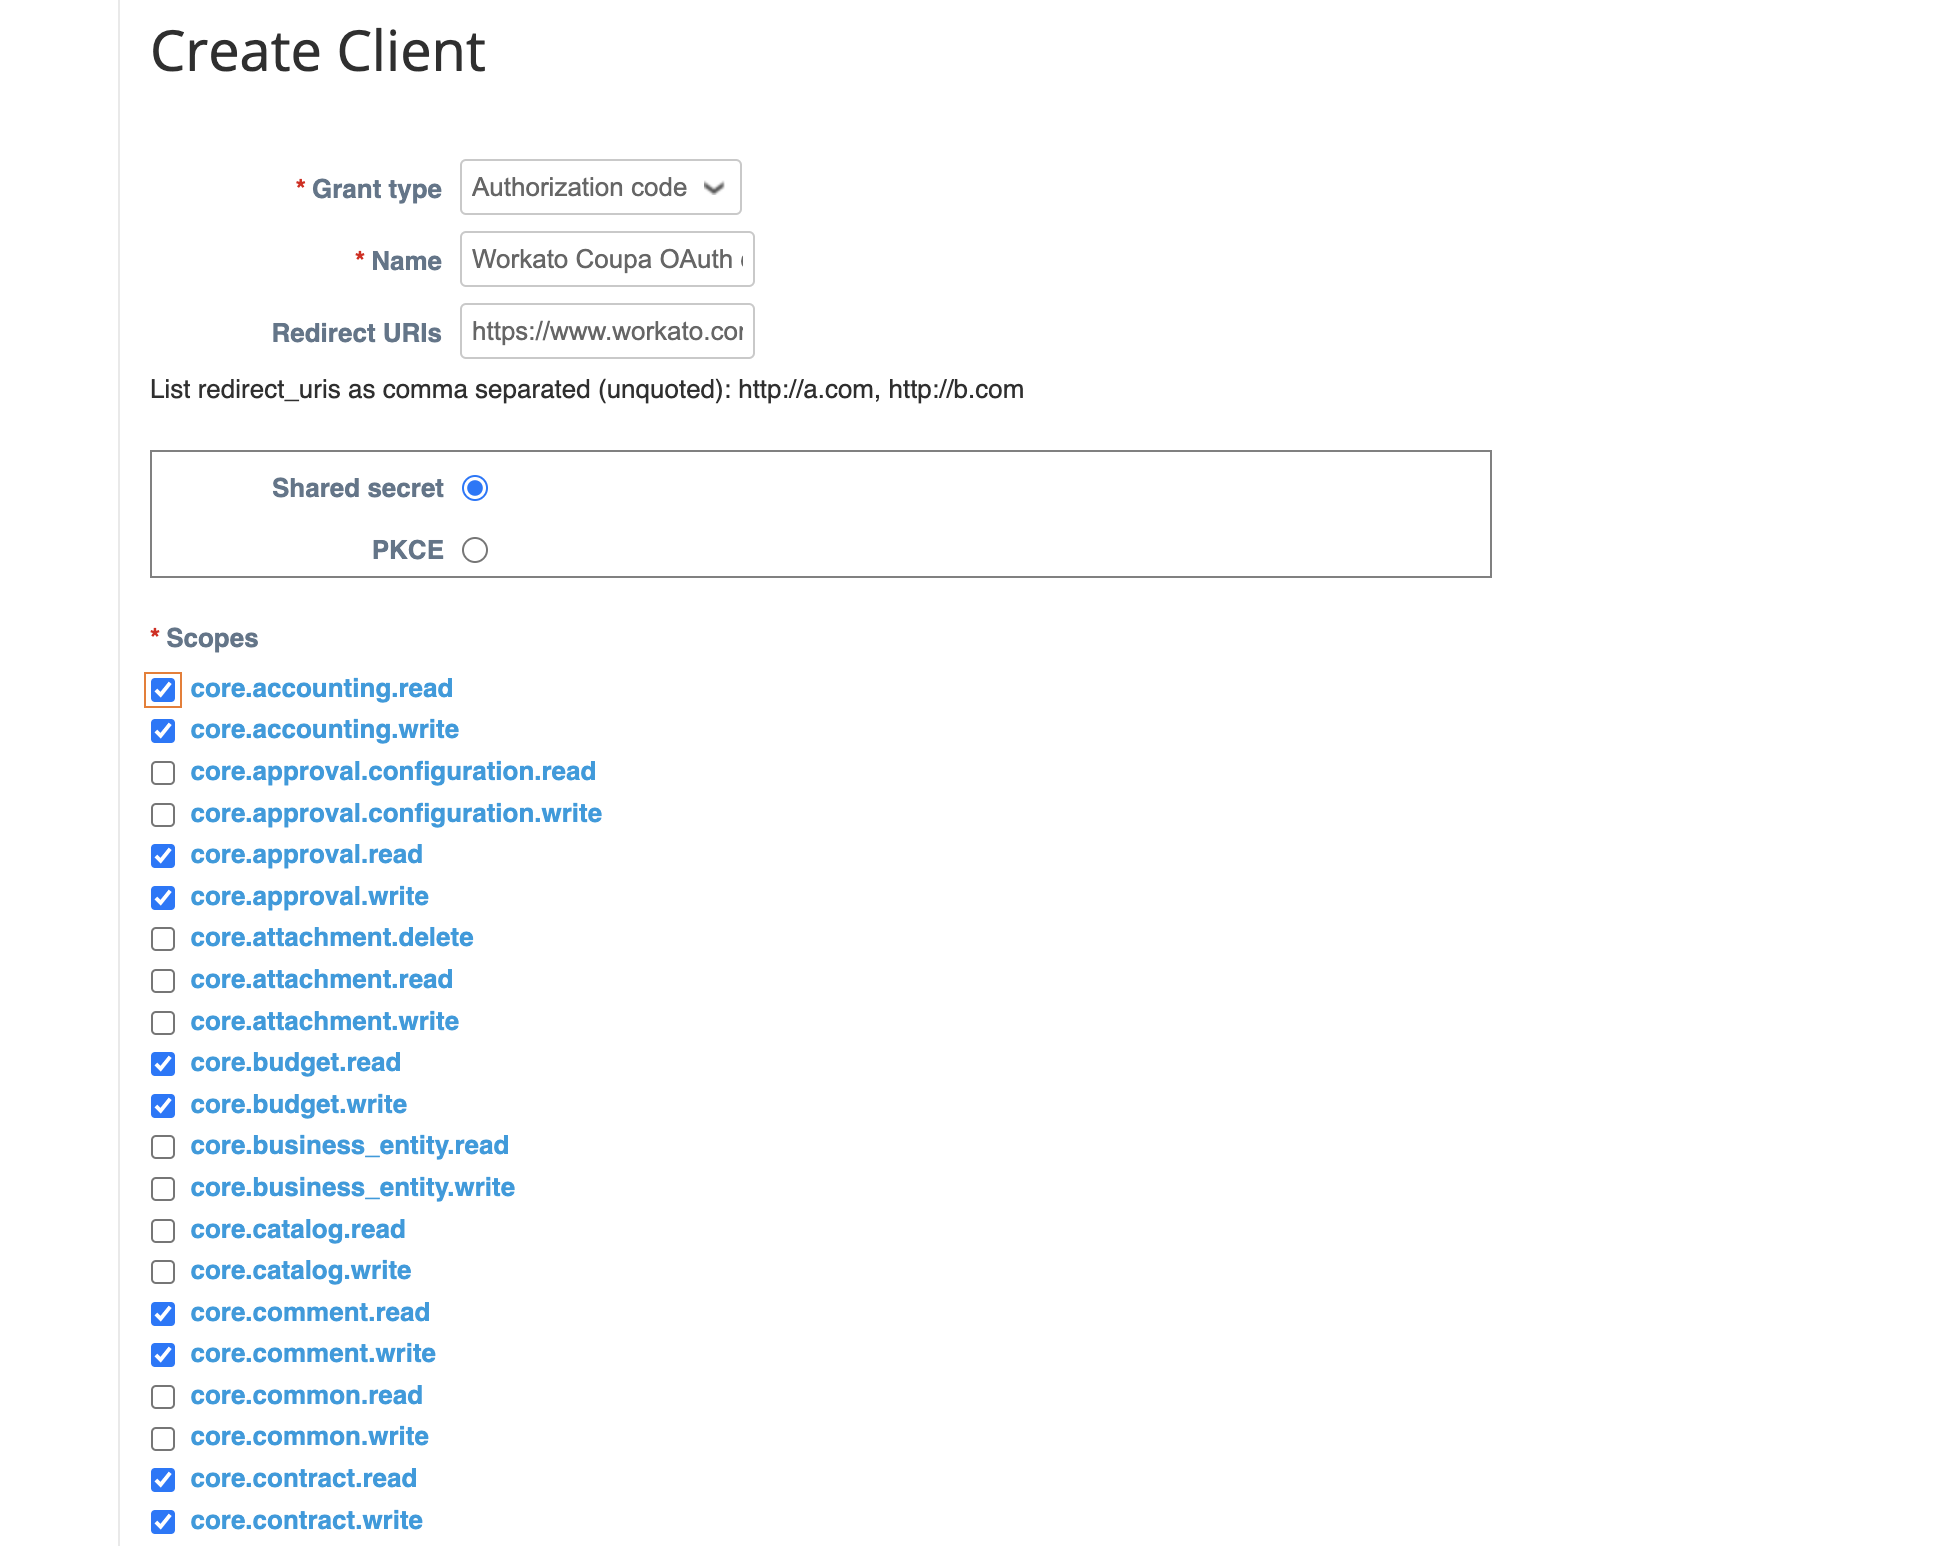 Create a new client
Click Save.
Copy and store the Identifier and the Secret for use in Workato.
Return to your Workato account and go to the project where you plan to add your connection.
Click Create > Connection or press C twice.
Search for and select Coupa as your connection on the New connection page.
Provide a unique name for the connection in the Connection name field.
Use the Location drop-down menu to select the project where you plan to store the connection.
Use the Authentication drop-down to select the Grant type provided in Coupa.
Enter the Client ID and Client secret.
Enter the Coupa URL for your instance in the Host field. For example, enter acme if your URL is http://acme.coupacloud.com.
Use the Scopes drop-down menu to select the same scopes you configured in Coupa. Include the required scopes core.common.read and offline_access to connect successfully.
Click Connect.
DocuSign connection setup steps
View DocuSign connection setup steps
The Coupa, DocuSign, and NetSuite connector supports the following authentication types:
AUTHENTICATION AND SENDING
JWT Grant authentication uses the Docusign impersonation scope to send documents from the email address of the user you connect with, without requiring that user to sign in. The impersonated user, or their account admin, must grant consent before you can connect.
OAuth 2.0 (Authorization Code Grant) sends all documents from the email address of the user who signs in to authorize the connection.
ROLES AND PERMISSIONS
Users who can sign in to Docusign can connect it to Workato. Users have the same permissions and capabilities to view, manage, and send envelopes on Workato as in Docusign. Refer to the Docusign Permission Profiles documentation for more information.
The Coupa, DocuSign, and NetSuite connector works with the following Docusign plans:
- Personal
- Standard
- Business Pro
DocuSign JWT Grant authentication
View JWT Grant authentication steps
Use JWT Grant authentication to connect to Coupa, DocuSign, and NetSuite with a private key for server-to-server authentication. This method sends documents from the email address of the User ID you connect with, using the Docusign user impersonation. That user, or their account admin, must grant consent before you can connect. Refer to Retrieve your User ID for more information.
Complete the following to set up JWT Grant authentication:
- Retrieve your User ID
- Create an integration key
- Generate an RSA keypair
- Add the redirect URI
- Optional: Obtain consent for user impersonation
Retrieve your User ID
View retrieve your User ID steps
Complete the following steps to retrieve your User ID in Coupa, DocuSign, and NetSuite:
Sign in to Coupa, DocuSign, and NetSuite.
Go to Admin > Apps and Keys.
Copy and save the User ID for use in Workato.
Generate an integration key
View generate an integration key steps
You must create an app to generate an integration key.
Complete the following steps to generate an integration key in Coupa, DocuSign, and NetSuite:
Go to the Apps and Keys page and click Add App and Integration Key.
Enter a name for your application, such as Workato Integration.
Click Create App.
Copy and save the Integration Key (also known as the Client ID) for use in Workato.
Generate an RSA keypair
View generate an RSA keypair steps
Complete the following steps to generate an RSA keypair in Coupa, DocuSign, and NetSuite:
Go to the Service Integration section in your newly created app settings.
Click Generate RSA to create a new RSA keypair.
Copy the Private Key and save it in a secure location. This value is required to establish the connection in Workato.
SAVE YOUR PRIVATE KEY
The private key is only displayed once. After you close this dialog, you won't be able to retrieve it again. If you lose it, you must generate a new keypair.
Click Close to save the keypair to your integration.
Add the redirect URI
View add the redirect URI steps
Complete the following steps to add the redirect URI in Coupa, DocuSign, and NetSuite:
Go to the Additional settings > Redirect URIs section in your newly created app settings.
Click + Add URI.
Enter https://www.workato.com/oauth/callback in the Redirect URIs field.
Click Save.
Obtain consent for user impersonation
JWT Grant authentication sends envelopes from the email address of the user you connect with, using Docusign's user impersonation. Connecting as that user requires consent, which comes in two forms:
- Admin consent for the JWT app (one-time setup for the organization)
- Individual user consent for the user you connect as
View obtain admin consent steps
Use the Docusign Admin panel to grant consent to your JWT app on behalf of all users within your organization's claimed domains. This authorization grants app access to all domain users, with access limited by the permissions you specify. This is a one-time configuration.
PREREQUISITES FOR ADMIN CONSENT
- Your organization must have the Docusign Admin feature enabled.
- Your organization must have at least one claimed domain. Refer to the Docusign Claim a domain documentation.
- You must have created an integration key for your app.
Complete the following steps to obtain admin consent:
Sign in to Coupa, DocuSign, and NetSuite as an organization administrator.
Open your Organization home page in Docusign Admin.
Select Connected Apps from the navigation pane.
Select Authorize Application and choose your application from the drop-down menu. This menu lists every integration key by name (for example, Workato Integration).
Enter signature impersonation in the Permissions field of the Add New Application dialog.
These permissions apply to every user who's a member of the organization's claimed domains.
Click Add to confirm and authorize the application.
Refer to the Docusign How to obtain admin consent for internal applications documentation for more information.
View obtain individual user consent steps
Each user you plan to connect as must grant individual consent to your JWT app. This allows the app to act on their behalf when sending envelopes.
INTEGRATION KEY AND REDIRECT URI
Ensure you complete the integration key and redirect URI steps from the JWT Grant setup section before you set up individual consent.
Complete the following steps to obtain individual user consent:
CONSENT DURING CONNECTION
Docusign prompts you to grant consent when you connect with JWT Grant authentication. This grants individual consent for the user who authenticates the connection. You only need to follow the steps above to pre-authorize consent for users who won't personally set up the connection, for example, so an admin can grant consent ahead of time for another user's connection.
Refer to the Docusign How to obtain individual consent documentation for more information.
Connect to DocuSign with JWT Grant authentication
View connect to DocuSign with JWT Grant authentication steps
Complete the following steps to set up a JWT Grant connection to Coupa, DocuSign, and NetSuite in Workato:
Click Create > Connection.
Search for Coupa, DocuSign, and NetSuite and select it as your app.
Enter a name for your connection in the Connection name field.
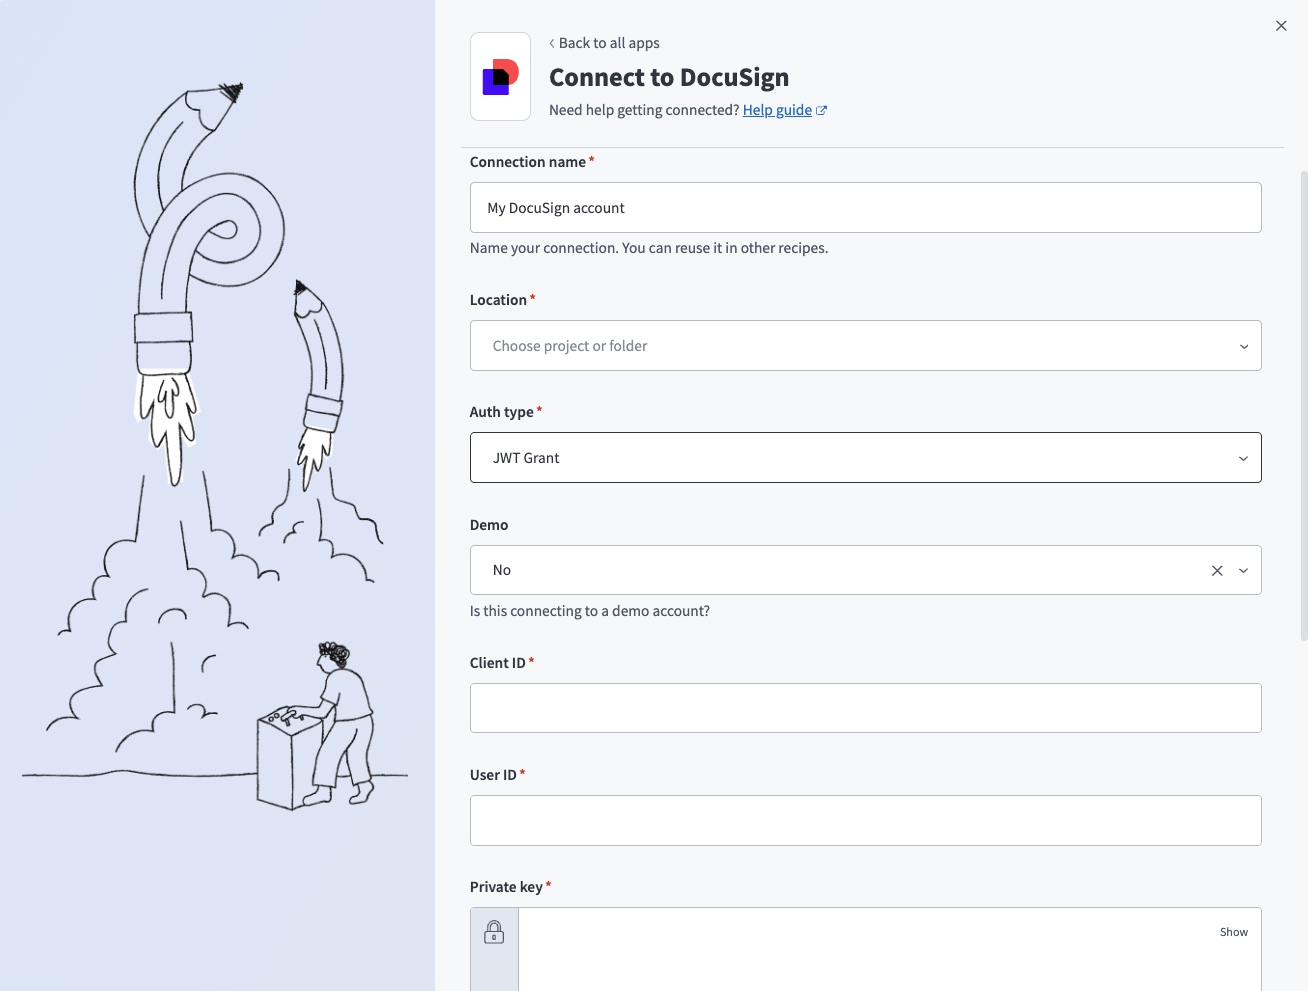 Docusign JWT Grant connection
Use the Location drop-down menu to select the project or folder where you plan to store your connection.
Use the Auth type drop-down menu to select JWT Grant.
Use the Demo drop-down menu to indicate if this is a demo Docusign account. Select Yes for demo/sandbox accounts or No for production accounts.
Enter the integration key from your Docusign application in the Client ID field.
Enter the User ID from the JWT Grant setup steps in the User ID field.
Enter the RSA private key from the JWT Grant setup steps in the Private key field. Enter the complete private key including the -----BEGIN RSA PRIVATE KEY----- and -----END RSA PRIVATE KEY----- headers.
Optional. Enter the Account ID to specify a Docusign account when you have multiple accounts. You can find the account ID by navigating to Admin > Apps and Keys > API Account ID. The connection selects your first Docusign account by default.
Optional. Enter the Connect key in the Connect key field to validate your webhook requests. Refer to the Docusign Add HMAC keys for your app documentation for more information.
Optional. Use the Custom OAuth profile drop-down menu to select a custom OAuth profile for your connection.
Click Connect. Workato redirects you to Docusign to authorize the connection.
Click Allow Access to grant the Workato integration permission to access your account.
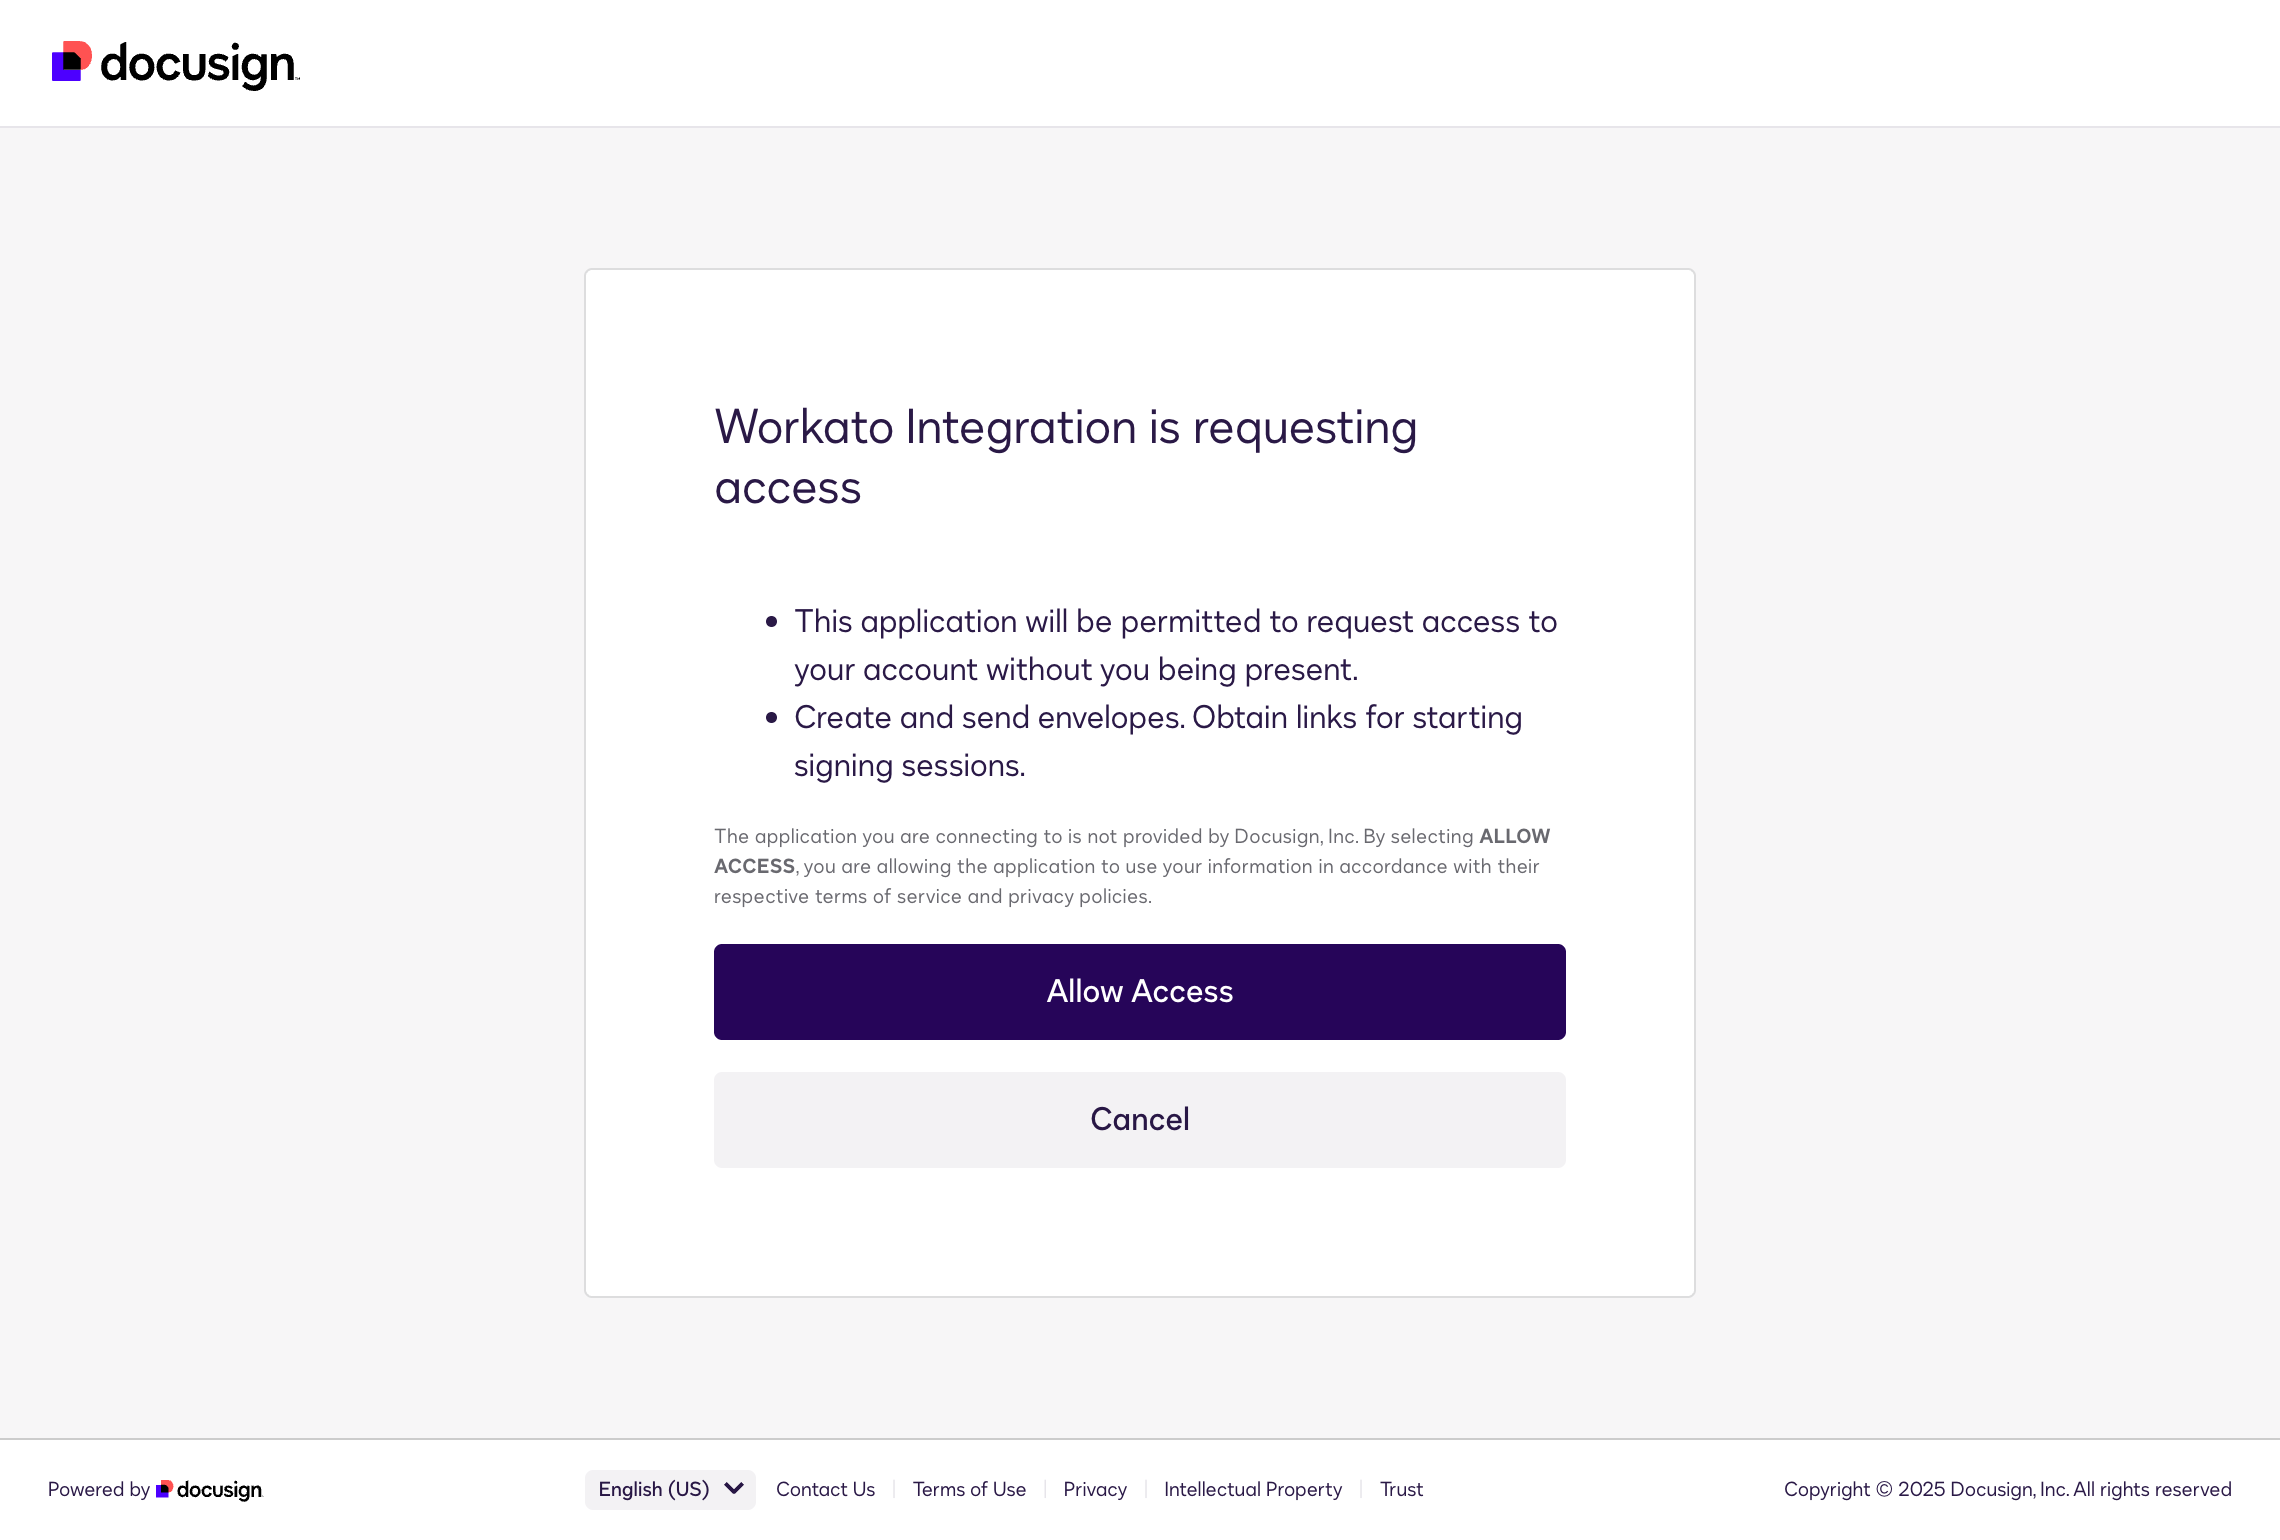 JWT consent screen
DocuSign OAuth 2.0 (Authorization Code Grant) authentication
View OAuth 2.0 (Authorization Code Grant) setup steps
Use OAuth 2.0 (Authorization Code Grant) to connect to Coupa, DocuSign, and NetSuite by signing in and granting access through Coupa, DocuSign, and NetSuite's authorization flow. All documents are sent from the email address of the user who authorized the connection.
Complete the following steps to set up an OAuth 2.0 authentication connection to Coupa, DocuSign, and NetSuite in Workato:
Click Create > Connection.
Search for Coupa, DocuSign, and NetSuite and select it as your app.
Enter a name for your connection in the Connection name field.
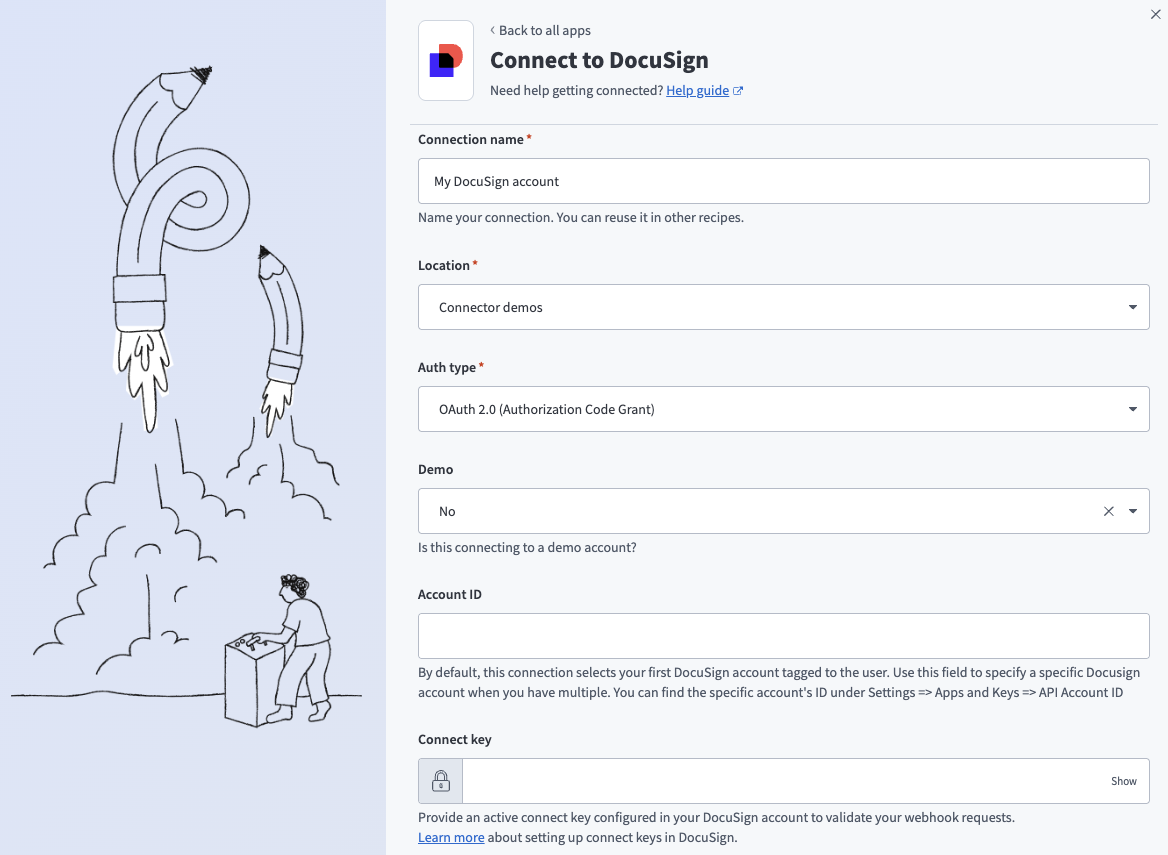 Docusign OAuth 2.0 (Authorization Code Grant) connection
Use the Location drop-down menu to select the project or folder where you plan to store your connection.
Use the Auth type drop-down menu to select OAuth 2.0 (Authorization Code Grant).
Use the Demo drop-down menu to indicate if this is a demo Docusign account. Select Yes for demo/sandbox accounts or No for production accounts.
Optional. Enter the Account ID to specify a Docusign account when you have multiple accounts. You can find the account ID by navigating to Admin > Apps and Keys > API Account ID. The connection selects your first Docusign account by default.
Optional. Enter the Connect key in the Connect key field to validate your webhook requests. Refer to the Docusign Add HMAC keys for your app documentation for more information.
Optional. Use the Custom OAuth profile drop-down menu to select a custom OAuth profile for your connection.
Click Connect.
NetSuite REST connection setup steps
View NetSuite REST connection setup steps
The NetSuite REST connector supports the following OAuth 2.0 authentication types:
- Client credentials (machine-to-machine)
- Authorization code grant (user-based authentication)
Select the authentication type based on your use case. Use client credentials for backend integrations. Use authorization code grant when actions require user-level access.
Prerequisites
Ensure you have the following to connect to NetSuite in Workato:
- The privilege to create connections in Workato.
- Access to a NetSuite Admin account.
- An understanding of the required NetSuite permissions.
Create an integration record in NetSuite
Complete the following steps to create a new integration record. The integration record represents an app, platform, or tool you plan to integrate with NetSuite.
Go to Setup > Integration > Manage Integrations > New.
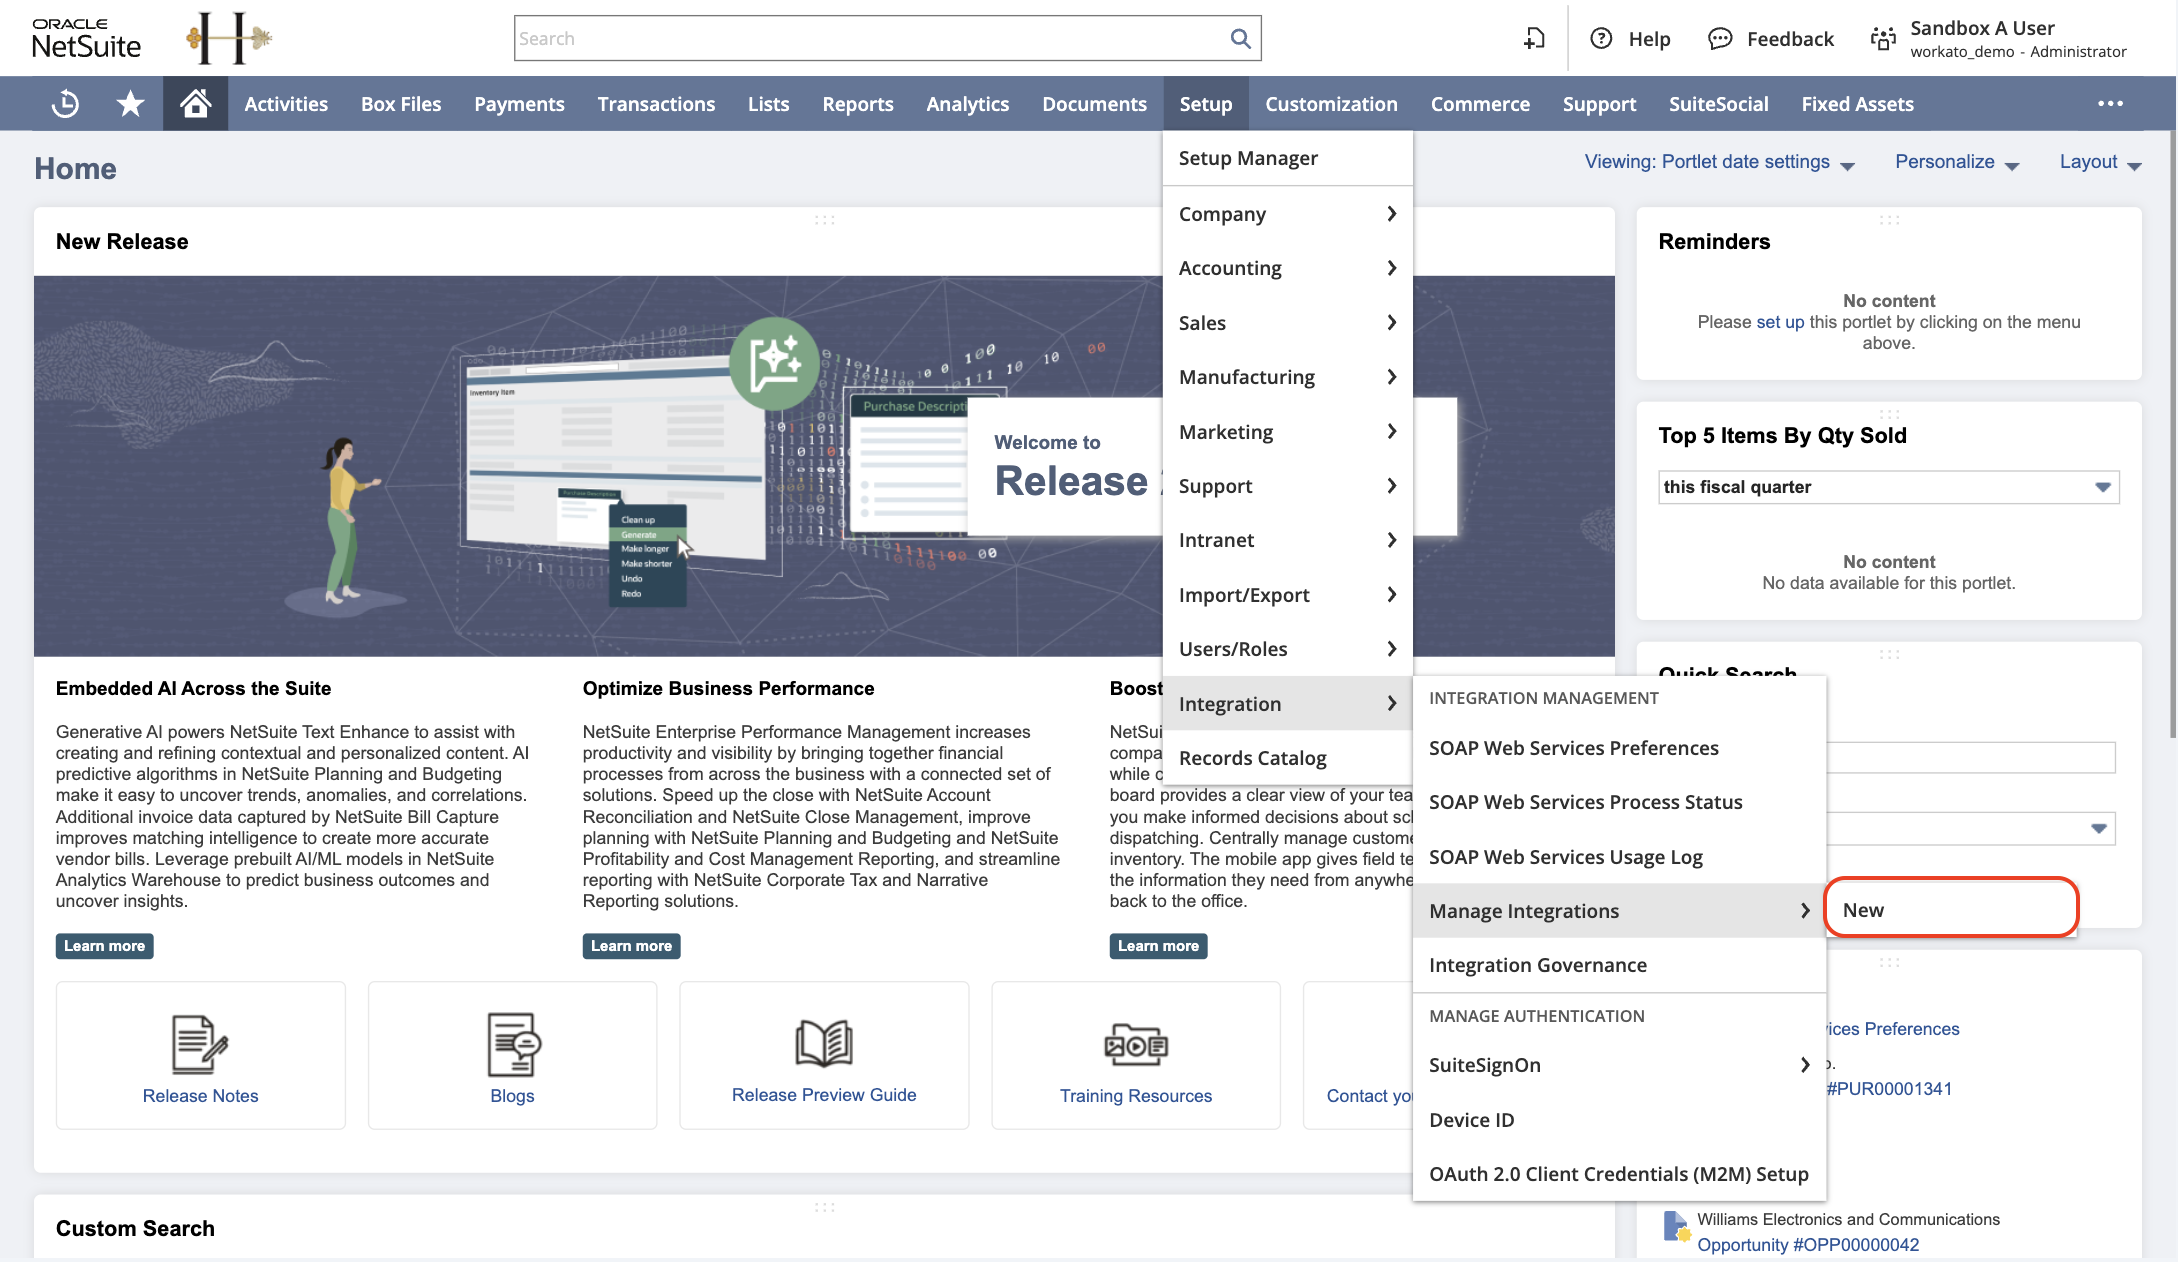 Go to Setup > Integration > Manage Integrations > New
Provide a name for the integration record in the Name field.
Select the authentication flow based on your use case:
- Select Client credentials (machine to machine) grant to use client credentials (machine-to-machine).
- Select Authorization code grant to use user-based authentication.
You can enable one or both authentication methods depending on your integration requirements.
Select the following scopes:
- RESTlets
- REST Web Services
- SuiteAnalytics Connect
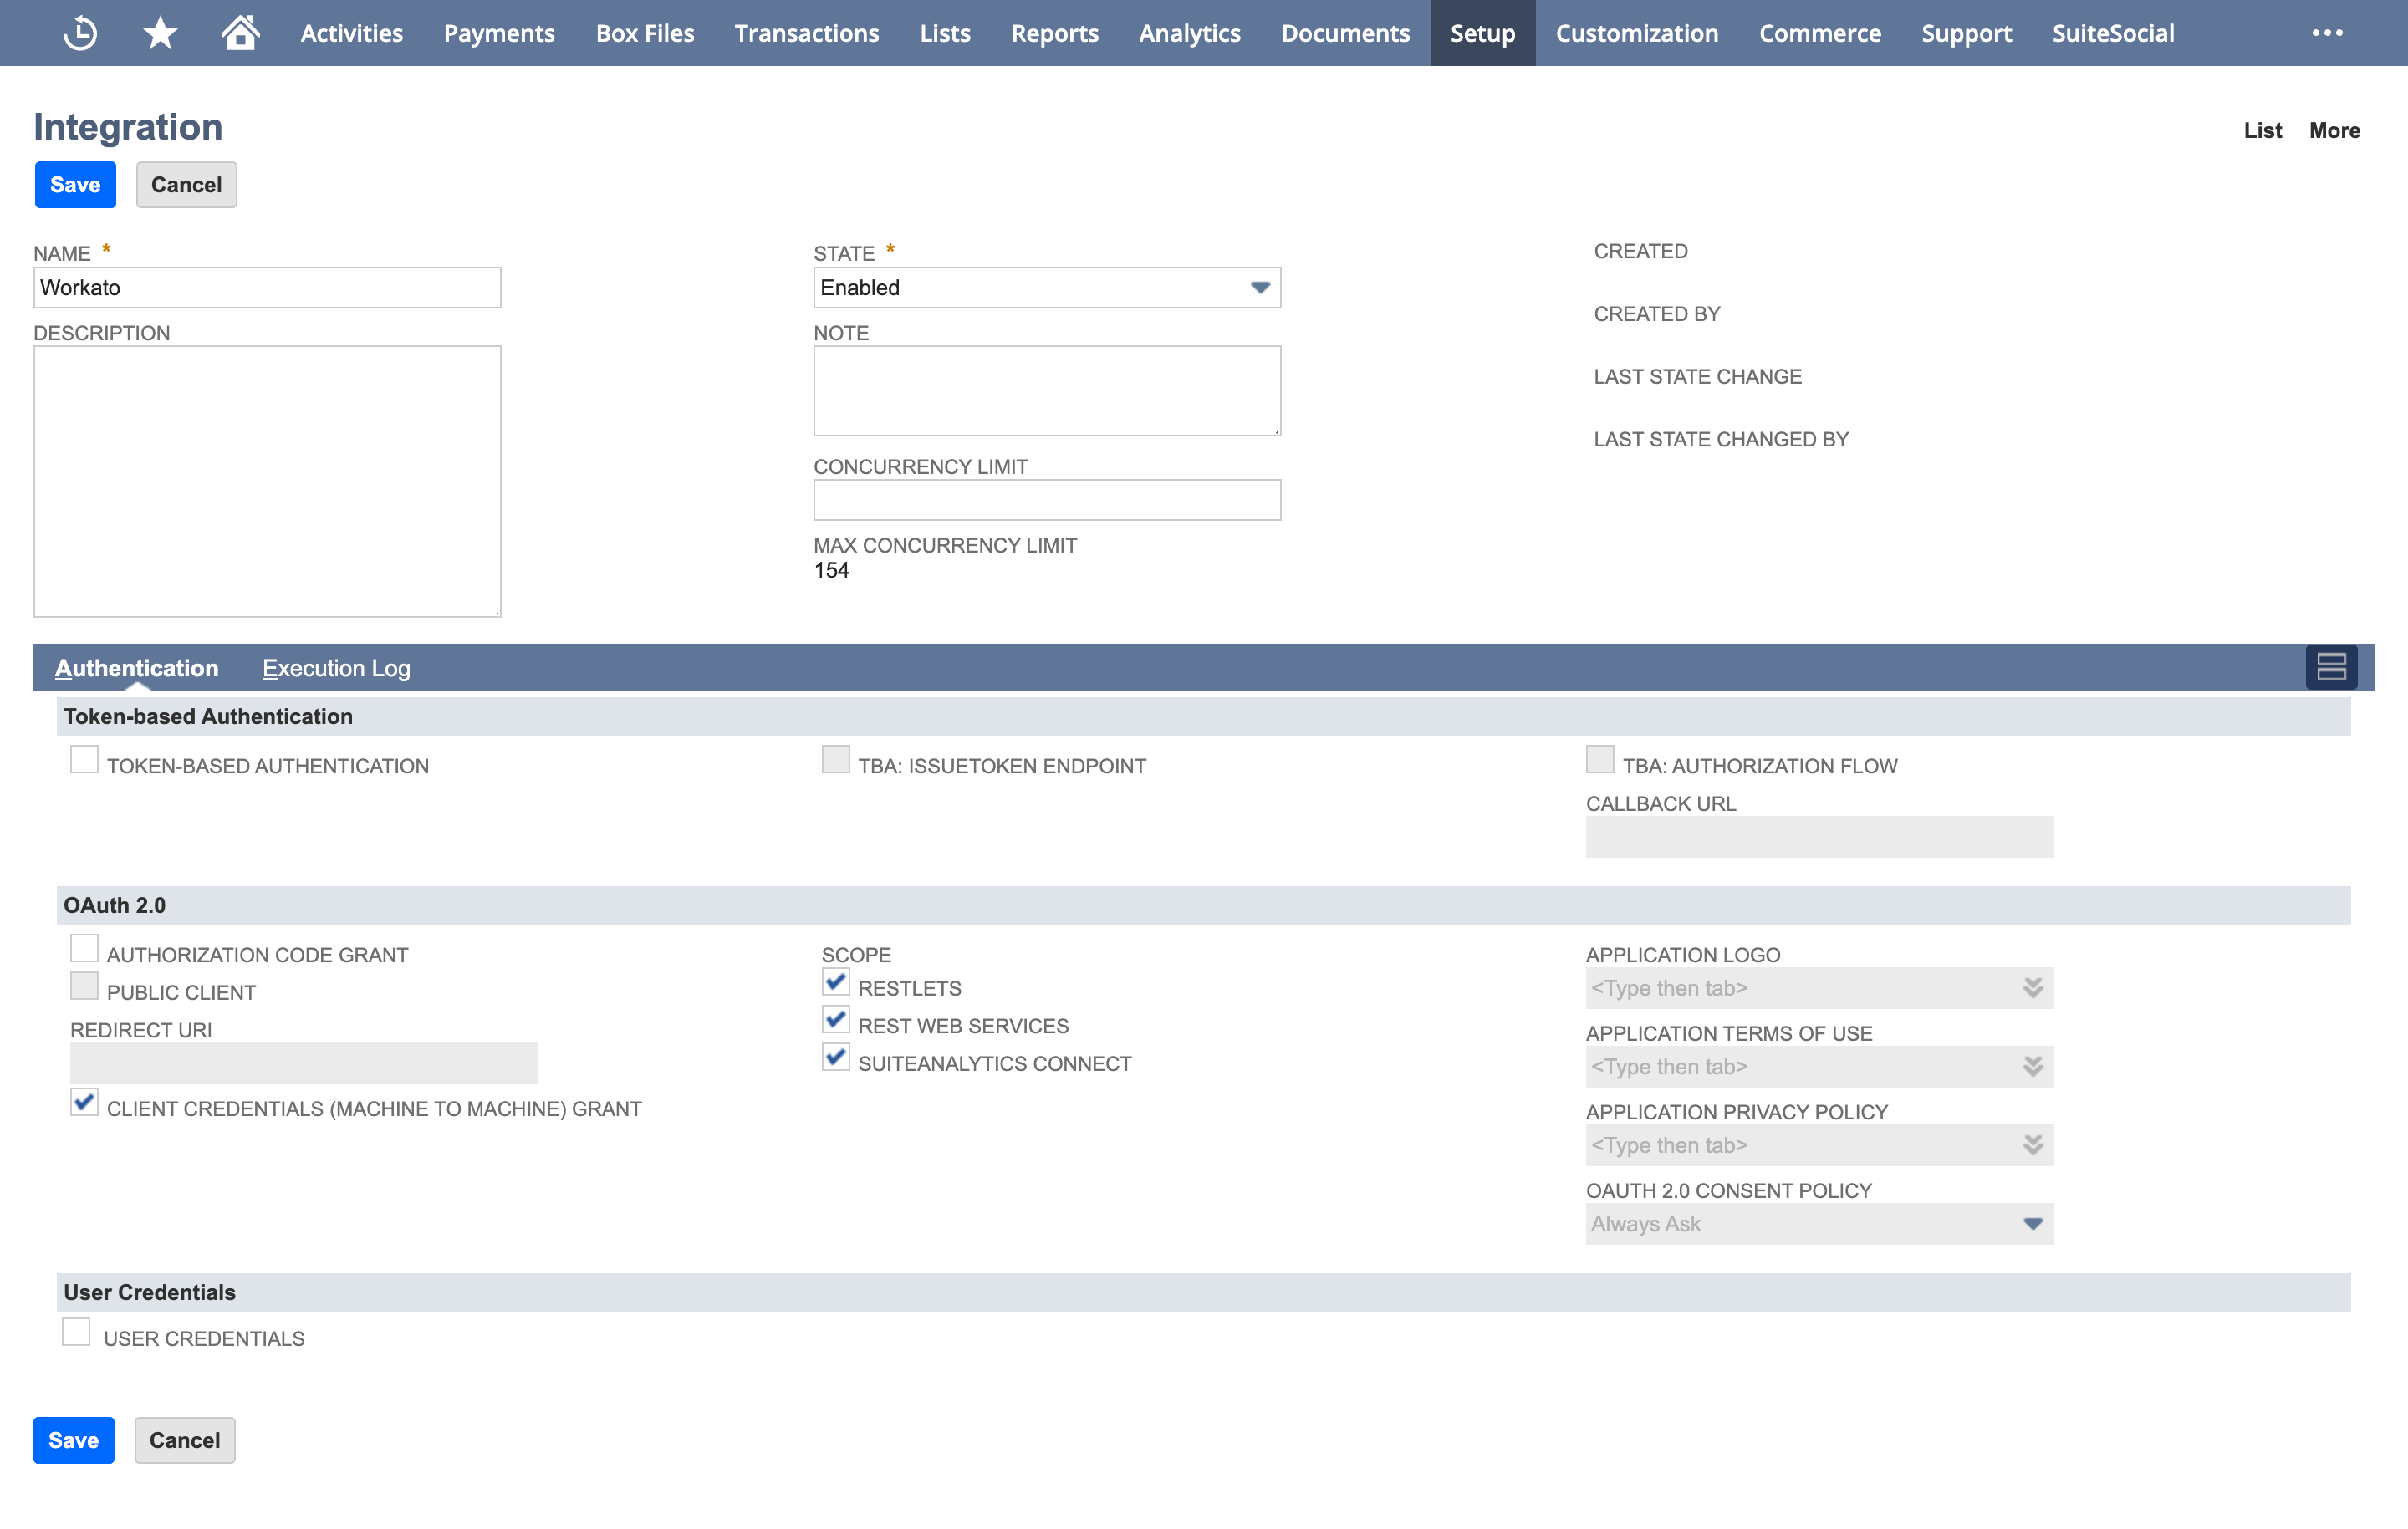 Create an integration record in NetSuite
Click Save.
Copy the Consumer key / Client ID and Consumer secret / Client secret and store both values securely.
- Client credentials authentication requires an EC private key and certificate.
- Authorization code grant requires a client ID and client secret configured in a custom OAuth profile.
Use the Client ID for client credentials authentication. Use the Client ID and Client secret for authorization code grant.
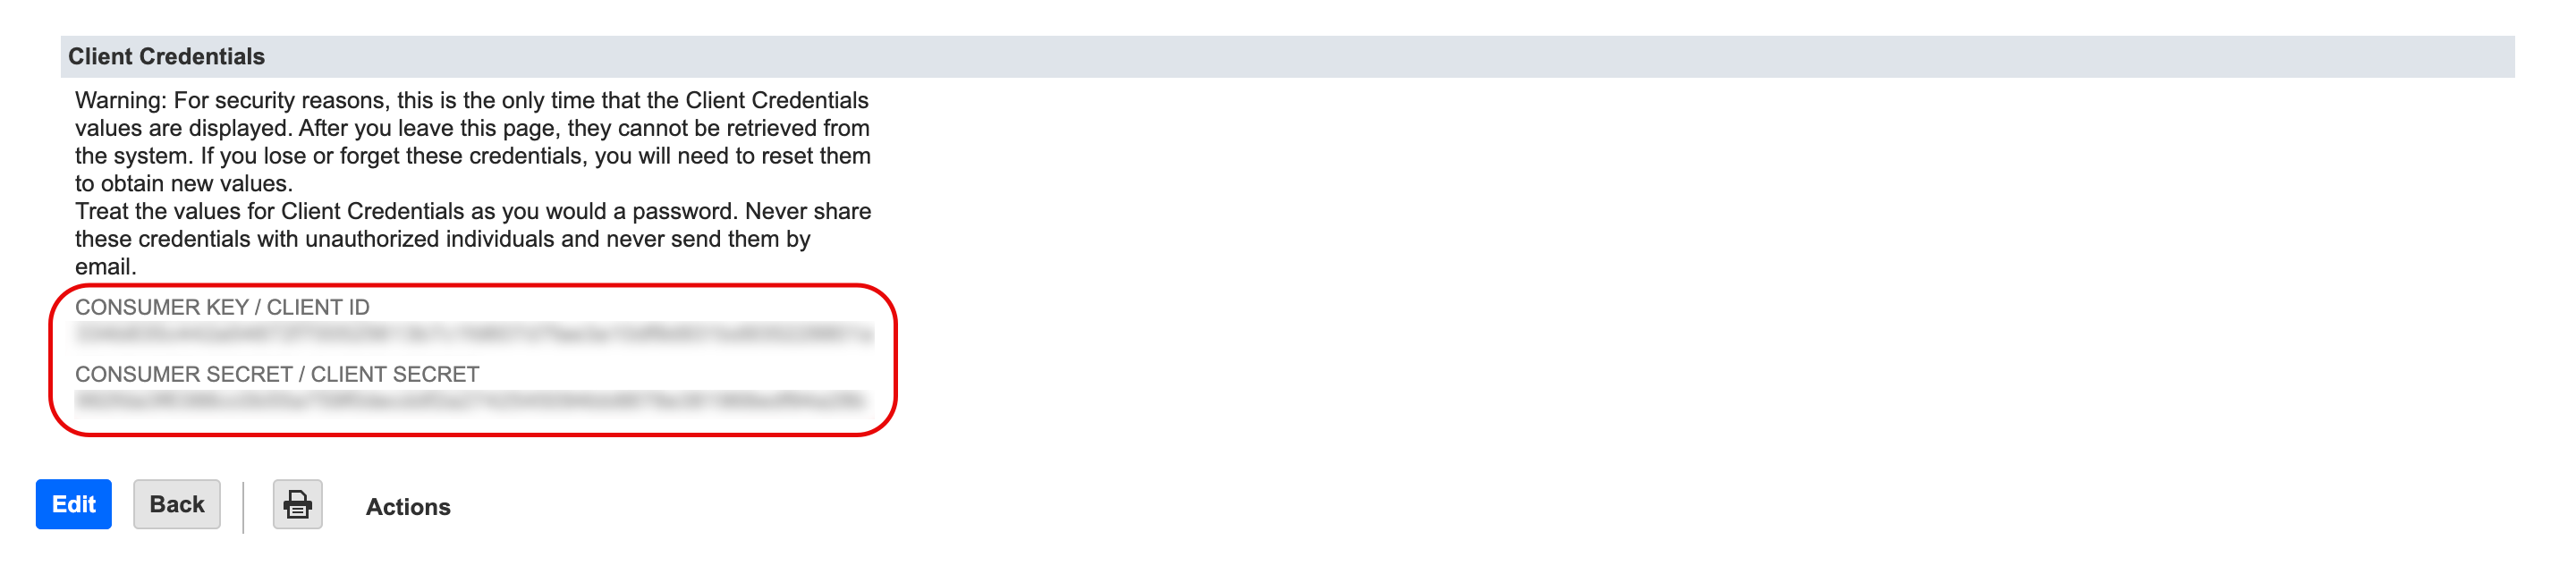 Copy the client credentials
NetSuite client credentials authentication
View client credentials setup steps
Create key and certificate files
View create key and certificate files steps
Complete the following steps to generate key and certificate files:
Open a new terminal window and run the following command to list available elliptic curves and algorithms:
openssl ecparam -list_curvesGenerate a private key using the prime256v1 elliptic curve:
openssl ecparam -name prime256v1 -genkey -noout -out private-key.pemGenerate the corresponding public key from the private key:
openssl ec -in private-key.pem -pubout -out public-key.pemSelf-sign the private key and generate a PEM certificate:
openssl req -new -x509 -key private-key.pem -out cert.pem -days 365Create a machine-to-machine certificate in NetSuite
View create a machine-to-machine certificate steps
Complete the following steps to create a machine-to-machine certificate in NetSuite:
Go to Setup > Integration > OAuth 2.0 Client Credentials (M2M) Setup.
Click Create New. The Create a New Client Credentials Mapping dialog appears.
Configure the following fields:
- Entity
- Select the entity that uses the client credentials. Refer to the NetSuite SOAP connector documentation to learn how to set up an integration user.
- Role
- Choose the role that defines the permissions for the entity. Ensure the selected role has the necessary permissions for the integration. Refer to the NetSuite SOAP connector documentation to learn how to create an integration role.
- Application
- Select the integration record you created previously.
- Certificate
- Upload the certificate you created previously. The file should be saved on your computer as
cert.pem.
CONFIGURATION FOR RECORD SEARCH
You must configure the following prerequisites in NetSuite to use the Search records action:
- Your account must have the SuiteAnalytics Workbook feature enabled.
- Your role must have the SuiteAnalytics Workbook (View) permission.
Refer to the NetSuite Prerequisites and Setup for REST Web Services guide for more information about the features and permissions required for REST Web Services.
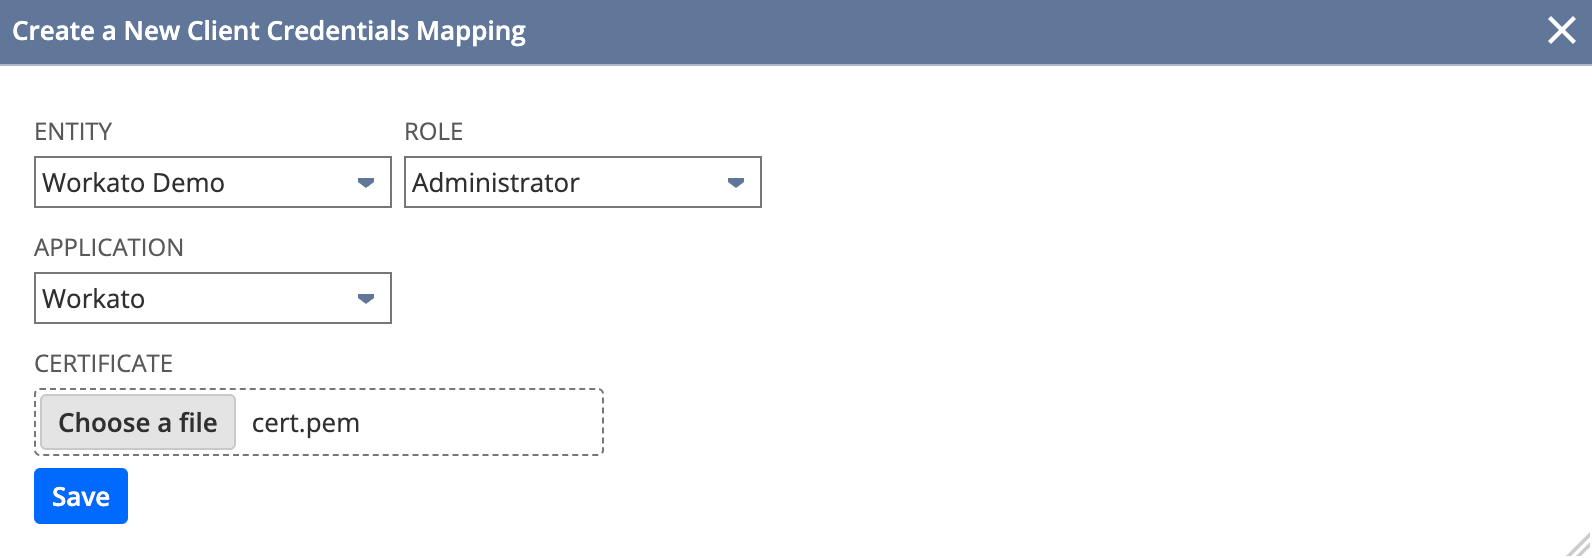 Create a new client credentials mapping
Click Save.
Copy the Certificate ID and store it in a secure location. Workato requires this value to establish the NetSuite REST connection.
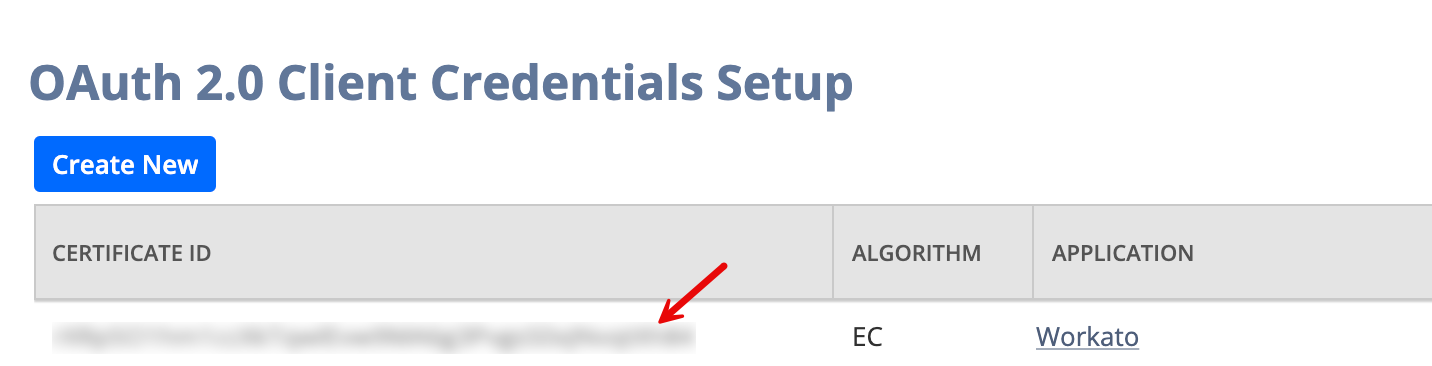 Copy the Certificate ID
Connect to NetSuite REST with client credentials
View connect with client credentials steps
Complete the following steps to establish a connection using client credentials:
Enter a name for your NetSuite connection in the Connection name field.
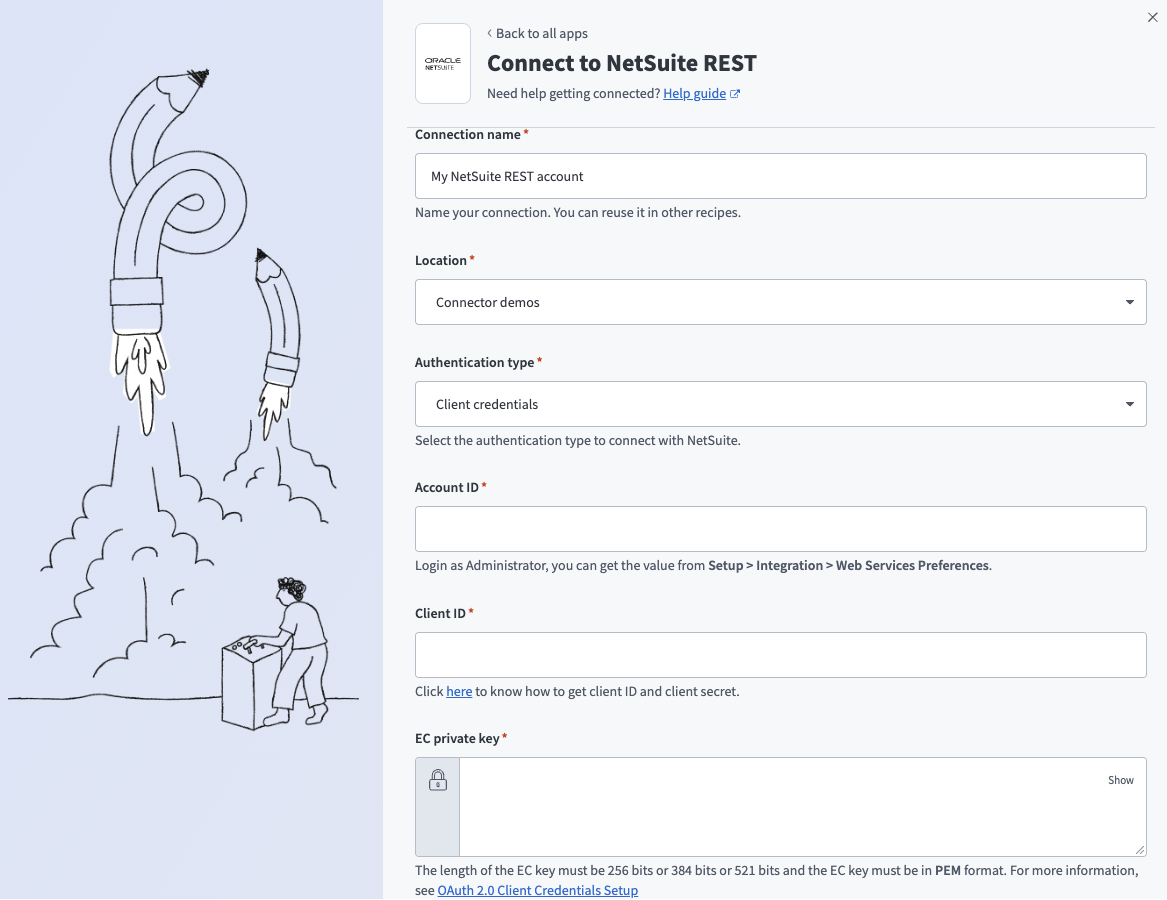 Connect to NetSuite REST using client credentials
Enter the folder or project where you plan to store your NetSuite connection in the Location field.
Use the Authentication type drop-down menu to select Client credentials.
Enter your Account ID.
Sign in to NetSuite as an Administrator and go to Setup > Company > Company Information to find your Account ID.
You can also find it at the beginning of the NetSuite URL. For example, if the URL is https://1234567.app.netsuite.com/, your Account ID is 1234567.
SANDBOX ACCOUNT ID FORMAT
You must replace underscores (_) with a hyphen (-) and capitalize letters if you are using a sandbox account. For example, 1234567_sb1 must be updated to 1234567-SB1.
Enter the client ID you saved when you created your NetSuite integration record into the Client ID field.
Enter the private key you generated into the EC Private Key field. Ensure the key is in PEM format and has a length of 256, 384, or 521 bits.
To extract the key, open the private-key.pem file and copy the text, starting from -----BEGIN EC PRIVATE KEY----- and ending with -----END EC PRIVATE KEY-----.
Enter the certificate ID from the machine-to-machine certificate you created in NetSuite into the Certificate ID field.
Optional. Click Advanced settings > OAuth 2.0 scopes and select a value.
- Select OAuth 2.0 scopes and add them along with REST Web Services to define the minimum scope required for a NetSuite REST connection. You must enable the selected scopes in the corresponding integration record.
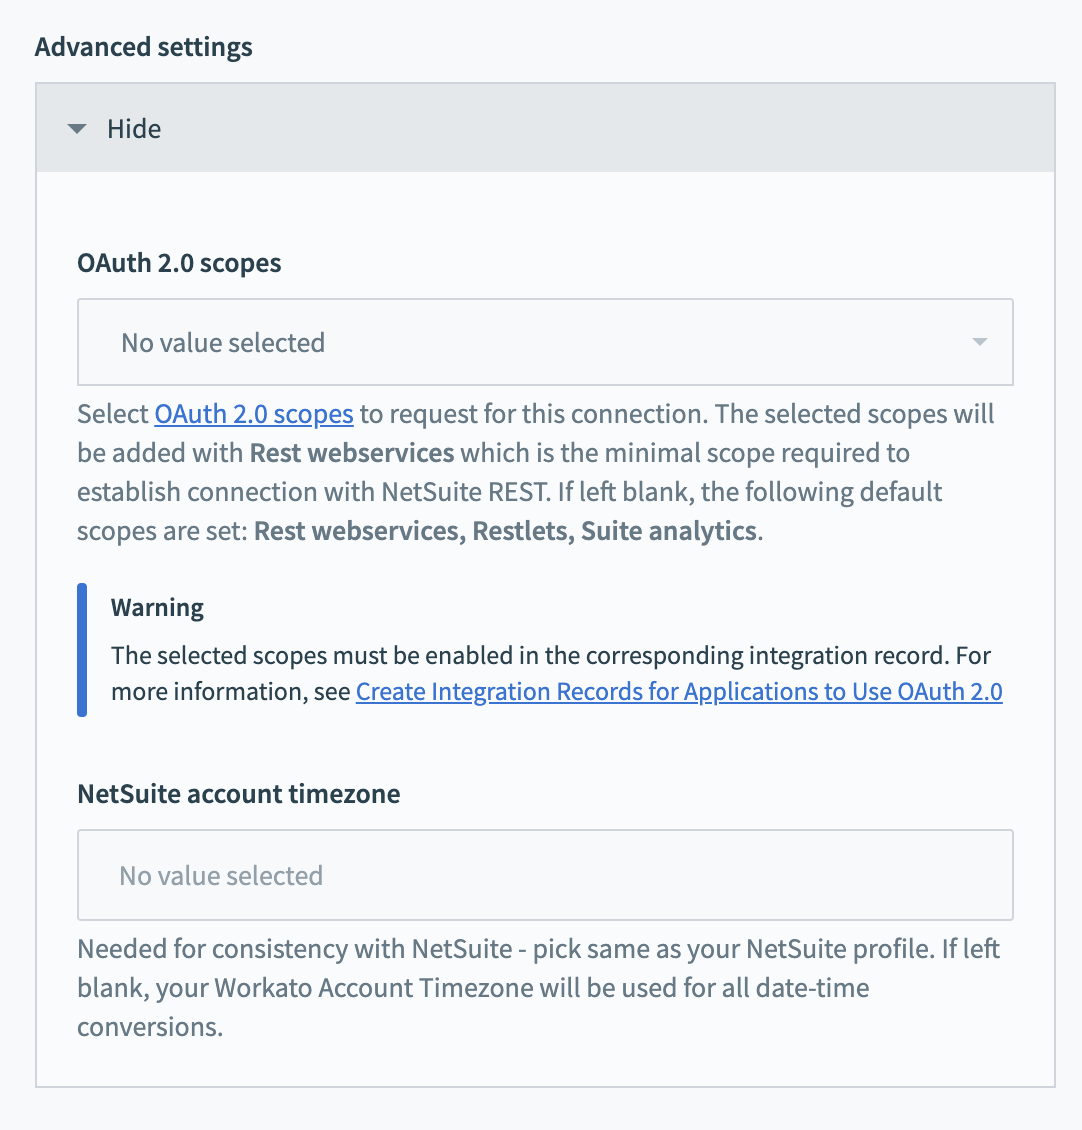 Optional OAuth 2.0 scope settings
Click Connect.
NetSuite authorization code grant authentication
View authorization code grant setup steps
Create a custom OAuth profile in Workato
View create a custom OAuth profile steps
Authorization code grant requires a custom OAuth profile with a valid client ID and client secret. Ensure your integration record in NetSuite supports authorization code grant and includes the required OAuth scopes. Use the following redirect URL when configuring the custom OAuth profile in Workato:
https://www.workato.com/oauth/callback
Complete the following steps to create a custom OAuth profile:
Go to Tools > Custom OAuth profiles in Workato.
Click + New custom profile.
Select NetSuite REST in the Application field.
Enter a name for the custom OAuth profile in the Name field.
Copy the Client ID and Client secret from the integration record you created in NetSuite.
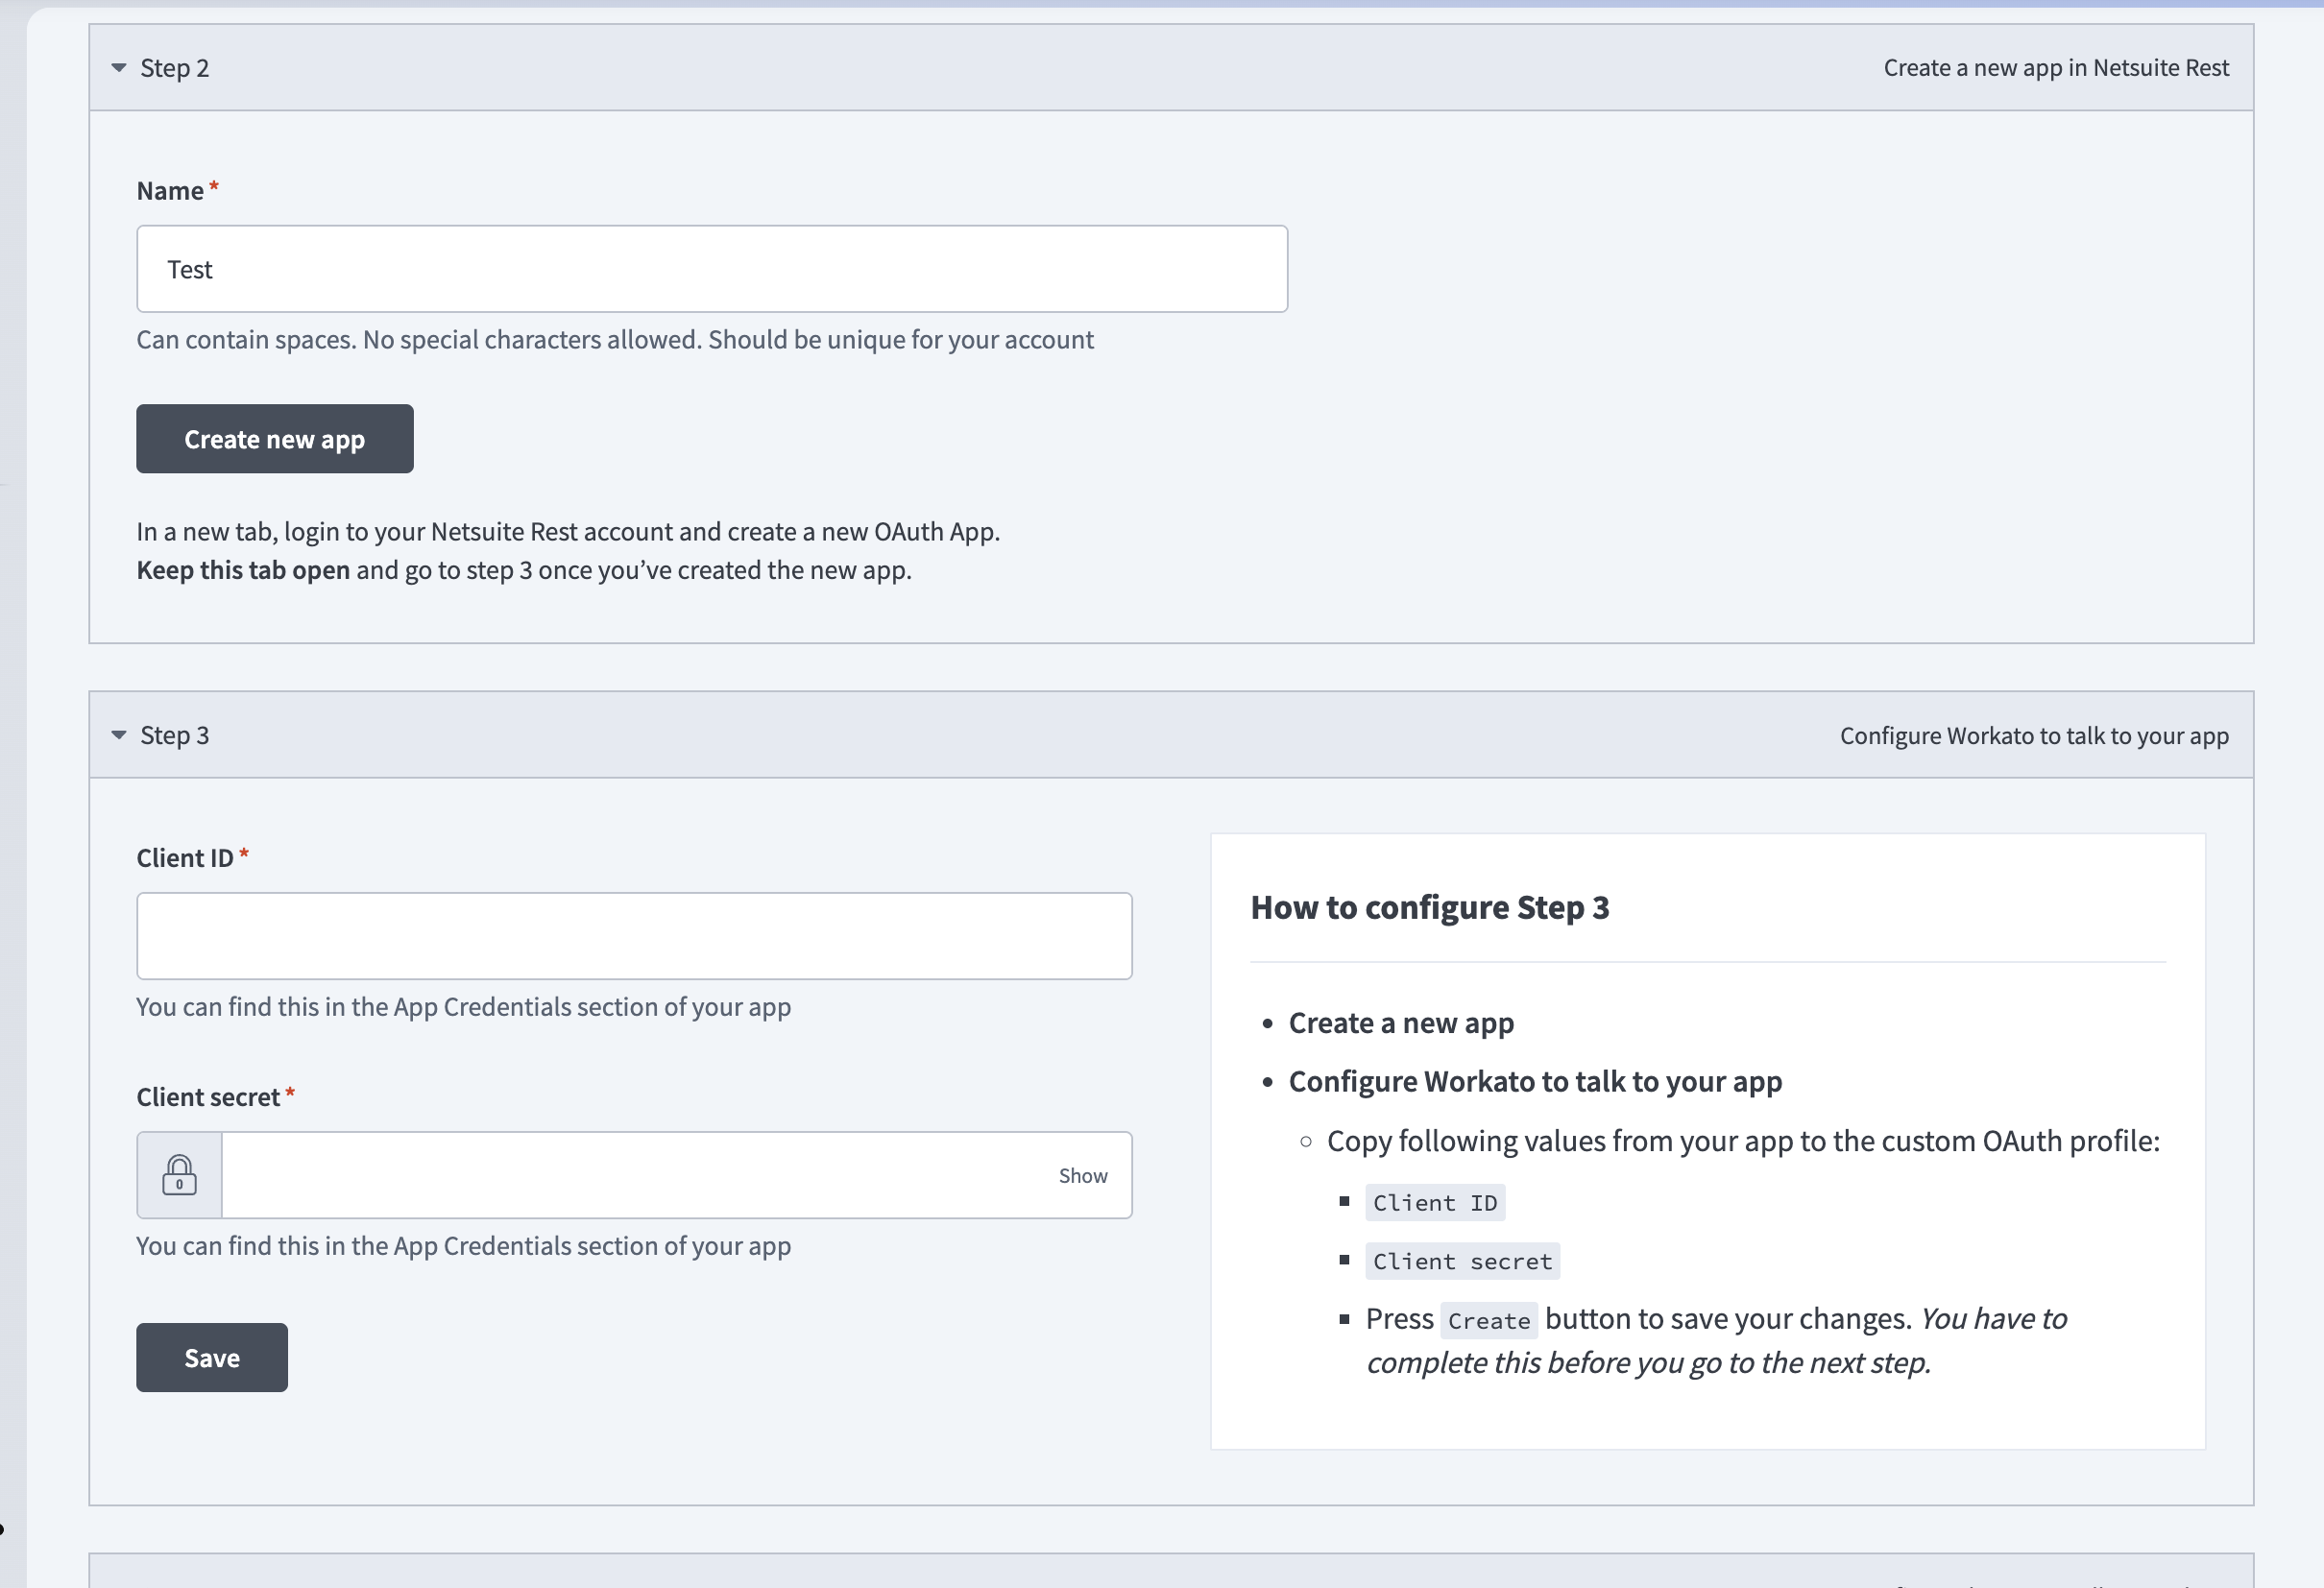 Create a custom OAuth profile
Paste the Client ID and Client secret into their respective fields.
Click Save.
Connect to NetSuite REST with authorization code grant
View connect with authorization code grant steps
Complete the following steps to establish a connection using authorization code grant:
Enter a name for your NetSuite connection in the Connection name field.
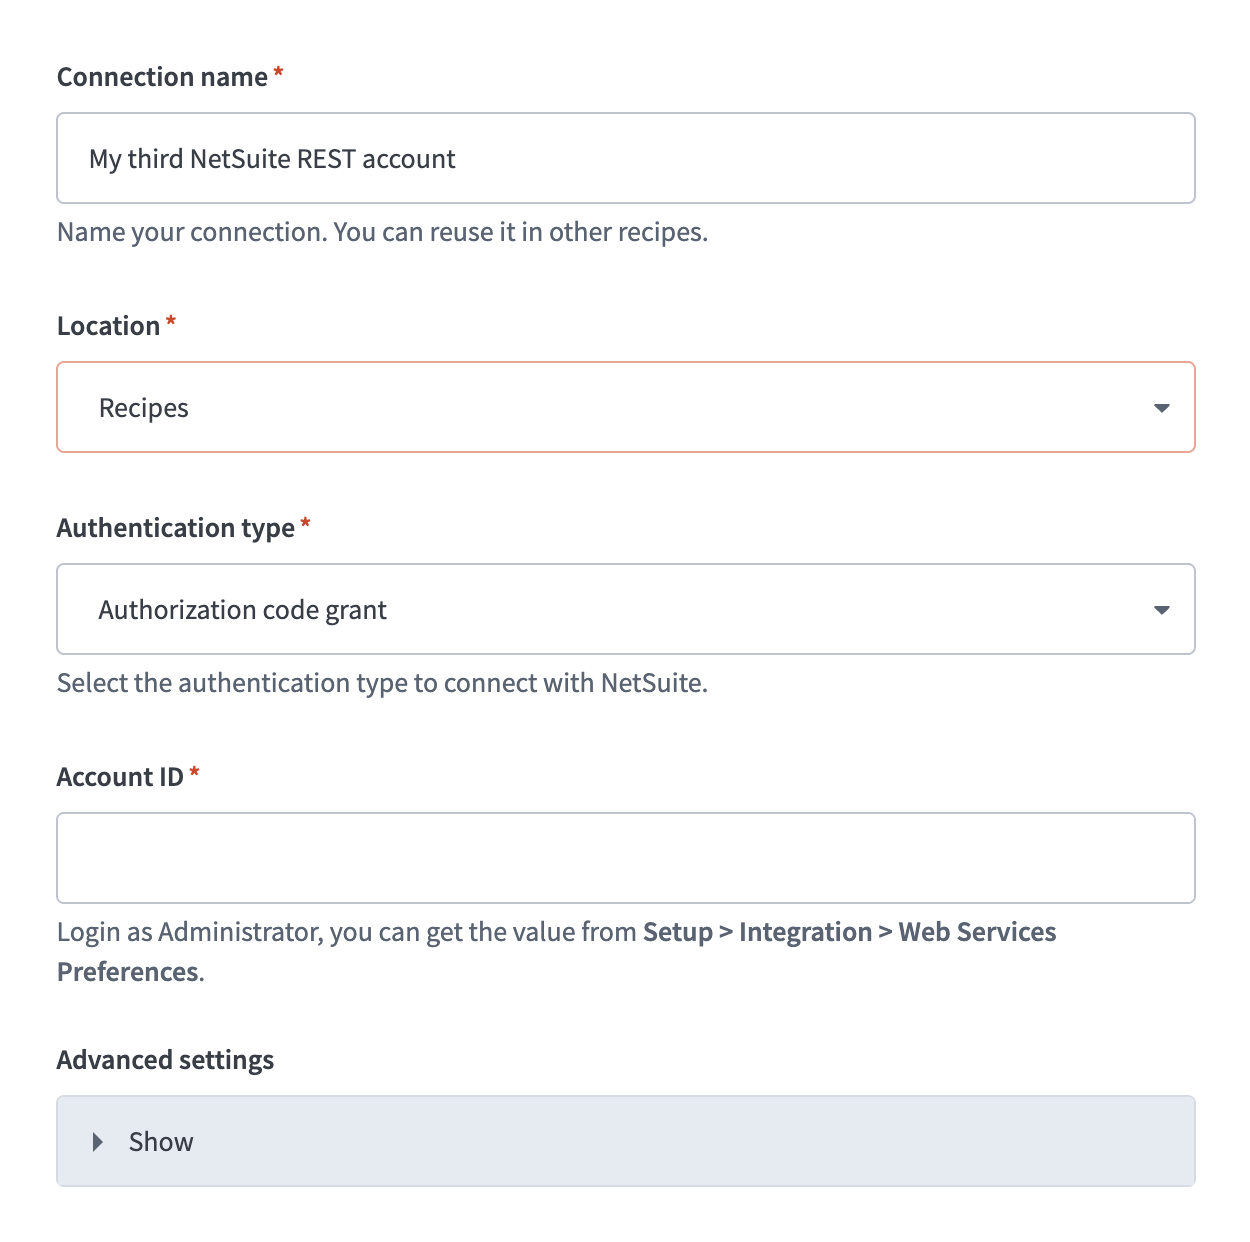 Connect to NetSuite REST using authorization code grant
Enter the folder or project where you plan to store your NetSuite connection in the Location field.
Use the Authentication type drop-down menu to select Authorization code grant.
Enter your Account ID.
Sign in to NetSuite as an Administrator and go to Setup > Company > Company Information to find your Account ID.
You can also find it at the beginning of the NetSuite URL. For example, if the URL is https://1234567.app.netsuite.com/, your Account ID is 1234567.
SANDBOX ACCOUNT ID FORMAT
You must replace underscores (_) with a hyphen (-) and capitalize letters if you are using a sandbox account. For example, 1234567_sb1 must be updated to 1234567-SB1.
Optional. Expand Advanced settings and configure OAuth 2.0 scopes and the NetSuite account timezone.
Select your custom OAuth profile in the Custom OAuth profile field.
Click Connect.
Sign in to NetSuite and authorize access when prompted.
Project property configuration
The Vendor Onboarding MCP server supports the following project-level properties to control behavior and defaults:
| Project-level property | Description |
|---|---|
coupa.spend_currency | Set the currency to use for estimated annual spend in Coupa. Defaults to USD. |
coupa.tax_easy_form_id | Enter the Easy Form ID for the tax/general SIM form used for approval submission. |
coupa.banking_easy_form_id | Enter the Easy Form ID for the banking form if your deployment configures banking as a separate form from tax. |
dedupe.name_normalization_rules | Control how vendor names are normalized before duplicate matching, such as stripping legal suffixes, collapsing whitespace, casefolding, and stripping punctuation. |
dedupe.candidate_query_strategy | Choose which query strategies, such as exact match, starts with, or contains, run when searching Coupa for duplicate candidates. |
dedupe.max_candidates_per_query | Cap the number of duplicate candidates each query retrieves. Defaults to 20. |
docusign.composite_template_ids | List the DocuSign template IDs combined into the single composite envelope sent to the vendor. |
docusign.recipient_role_name | Set the DocuSign recipient role name shared across all composite templates. Defaults to Vendor. |
docusign.envelope_expiration_days | Set the number of days before a sent DocuSign envelope expires. Defaults to 30. |
docusign.form_data_mapping | Map DocuSign form field labels to Coupa SIM field names, their types, and whether each is sensitive. |
erp.field_mapping | Map Coupa supplier fields to NetSuite vendor fields beyond the specific keys below. |
erp.netsuite.is_oneworld | Indicate whether the target NetSuite account is OneWorld. Defaults to true. |
erp.netsuite.subsidiary_id | Enter the internal ID of the target subsidiary for new vendors. Required when is_oneworld is true. |
erp.netsuite.currency_map | Map Coupa currency codes to NetSuite currency internal IDs. |
erp.netsuite.payment_terms_map | Map Coupa payment term strings to NetSuite payment term internal IDs. |
erp.netsuite.vendor_category_map | Map Coupa category strings to NetSuite vendor category internal IDs. |
erp.netsuite.default_vendor_category_id | Set a fallback NetSuite vendor category internal ID for when the Coupa category isn't in vendor_category_map. |
erp.netsuite.default_1099_eligible_rule | Choose the rule for setting is1099Eligible on the NetSuite vendor record. Defaults to deriving it from Coupa's tax classification field. |
erp.netsuite.tax_id_field | Set the NetSuite field name for the vendor's federal tax ID. Defaults to taxIdNum. |
erp.netsuite.custom_field_mapping | Map Coupa SIM field names to NetSuite custom field IDs for customer-specific extensions. |
erp.netsuite.initial_inactive | Set whether new NetSuite vendor records are created inactive until activation. Defaults to true. |
server_limits.max_pending_lookback_days | Set how many days back list_pending_vendor_onboardings looks for in-flight onboardings. Defaults to 90. |
server_limits.rate_limit_calls_per_minute | Set a local rate-limit cap for calls this server makes. Defaults to 20. |
server_limits.plan_token_ttl_seconds | Set how long a previewed plan stays valid before it expires and requires re-review. Defaults to 900 (15 minutes). |
View project-level property configuration steps
Complete the following steps to configure your project-level properties:
Sign in to your Workato account and go to Projects.
Go to the project that contains your MCP server.
Click the Settings tab.
 Click the Settings tab.
Select Project properties.
Go to the project property you plan to update and click the Edit (pencil) icon.
Go to the Value field and make your changes. For example, set docusign.envelope_expiration_days to 15 or server_limits.rate_limit_calls_per_minute to 10.
How to use Vendor Onboarding MCP server tools
Refer to the following sections for detailed information on available tools:
initiate_vendor_request tool
The initiate_vendor_request tool captures new-vendor intake details, checks for duplicates against existing Coupa suppliers, presents a preview for your approval, then creates the Supplier Information Management (SIM) record. Your LLM calls this tool once to capture the vendor's details, then calls it again after receiving your approval to create the SIM record.
Try asking:
Onboard Acme Corp as a new vendor.Set up Acme Industries LLC as a new supplier — annual spend is around $500,000 in IT services.Register this vendor even though a similar name already exists — it's a different company.
send_vendor_onboarding_documents tool
The send_vendor_onboarding_documents tool assembles a single composite DocuSign envelope combining tax forms (W-9/W-8) and supporting-document requests, presents a preview for your approval, then sends it to the vendor's contact. Your LLM calls this tool once to display the preview, then calls it again after receiving your approval to send the envelope.
Try asking:
Send the tax and insurance forms to Acme Corp.Send Acme their onboarding documents now.What documents will Acme receive, and when do they expire?
check_vendor_document_status tool
The check_vendor_document_status tool returns the DocuSign envelope's current status and, after the vendor completes it, the extracted form data and a document manifest. Your LLM uses this tool to check whether a vendor has signed and returned their documents. This tool is read-only.
Try asking:
Has Acme signed and returned their documents yet?Check the status of Acme's DocuSign envelope.What did Acme submit on their tax form?
import_vendor_form_data tool
The import_vendor_form_data tool downloads the vendor's completed documents from DocuSign, prepares the signer-entered form data for the Coupa SIM record, presents a preview with sensitive values masked, then writes the data and attaches the downloaded documents. Your LLM uses this tool in the following four call workflow:
- check_vendor_document_status reports an envelope is complete.
- get_vendor_write_policy maps the fields into a Coupa SIM write payload.
- import_vendor_form_data displays a preview of the payload.
- import_vendor_form_data commits the import after receiving your approval.
A signed envelope can return more fields than the deployment's mapping covers. The tool drops a field without a mapping entry instead of blocking the import, so confirm get_vendor_write_policy covers every field you need, especially sensitive fields.
Try asking:
Import Acme's signed form data into their Coupa record.Write Acme's completed tax form into their vendor record.Show me what will be written to Acme's record before you import it.
check_vendor_bank_details tool
The check_vendor_bank_details tool checks whether the vendor has submitted banking details through Coupa's native Supplier Portal flow and returns masked account and routing numbers. Your LLM uses this tool to check on banking before submitting a vendor for approval. The tool is read-only and doesn't send a banking request to the vendor.
This tool reads a legacy SIM Easy Form Response. The server may not recognize a submission made through Coupa's newer Coupa Pay Payment Methods flow.
Try asking:
Check whether Acme's banking has come in yet.Has Acme submitted their bank details?Show me what banking information Acme has submitted so far.
submit_vendor_for_approval tool
The submit_vendor_for_approval tool identifies the vendor's Easy Form Response(s), presents a preview of the responses and spend amount for your approval, then submits them into Coupa's configured spend-based approval chain. Your LLM calls this tool once to display the preview, then calls it again after receiving your approval to submit. Coupa determines the approver from its own configured chain at submission time, so the preview doesn't name the approver.
Try asking:
Submit Acme's onboarding for approval.Send Acme's vendor record through Coupa approval.What spend amount will be submitted for Acme's approval?
create_vendor_master_netsuite tool
The create_vendor_master_netsuite tool prepares the fields needed to finalize the existing Coupa supplier and create the corresponding NetSuite vendor record, presents a preview for your approval, then writes to both systems, creating the vendor inactive in NetSuite until activation. Your LLM calls this tool once, after approval is complete, to display the preview, then calls it again after receiving your approval to commit the write. If a probable duplicate turns up at this stage, your LLM presents it and asks you how to proceed.
Try asking:
Create the vendor master record for Acme now that it's approved.What fields will be written to Coupa and NetSuite for Acme?Finalize Acme's supplier record and create their NetSuite vendor.
activate_vendor_for_transactions tool
The activate_vendor_for_transactions tool previews the status change for each system, including inactive to active in Coupa and NetSuite, and then activates the vendor in both apps. This makes the vendor eligible for transactions and payments. Your LLM calls this tool once, after the vendor master is created, to display the preview, then calls it again after receiving your approval to activate.
Try asking:
Activate Acme for transactions.Turn on Acme so we can start transacting with them.What changes when I activate Acme in Coupa and NetSuite?
list_pending_vendor_onboardings tool
The list_pending_vendor_onboardings tool returns a paginated list of the in-flight vendor onboardings you initiated, grouped by why each vendor onboarding is stalled. Your LLM uses this tool when you ask what's outstanding or which vendors are stuck. This tool is read-only.
Try asking:
Which vendor onboardings are stuck waiting on the vendor?Show me what's outstanding in my vendor onboarding queue.List onboardings that are waiting on approval.
get_vendor_onboarding_status tool
The get_vendor_onboarding_status tool returns the full status of a vendor's onboarding across Coupa, DocuSign, and NetSuite, including the current blocker, if any, and who owes the next action. Your LLM uses this tool when you ask about a specific vendor's progress. This tool is read-only.
Try asking:
What's the status of the Acme onboarding?What's holding up Acme's onboarding?Who still needs to act on Acme's vendor approval?
get_vendor_write_policy tool
The get_vendor_write_policy tool returns the deployment's configured docusign.form_data_mapping project property, which contains the field mapping, types, and sensitivity flags. The tool also returns a fixed list of fields import_vendor_form_data always rejects, regardless of configuration. Your LLM calls this tool before writing using the import_vendor_form_data tool. This tool is read-only.
Try asking:
What fields will be written when I import Acme's documents?Which of Acme's submitted fields are treated as sensitive?Show me the write policy this server uses for importing vendor data.
Getting started
View and manage your MCP server tools in the Overview page Tools section. Tool management provides the following capabilities:
TOOLS MUST BE STARTED
Your LLM can only access active tools in your MCP server connector.
Last updated: