Post Meeting Actions MCP server
The Post Meeting Actions MCP server enables LLMs to interact with Salesforce, Gong, Zoom, Gmail, and Outlook for processing a completed sales call end-to-end through natural conversation. It provides tools to retrieve the Salesforce record and call transcript, generate a summary in your configured sales methodology, and write it to Salesforce, with resource lookup and a follow-up email available on request. Each deployment implements only the tools for its configured transcript source and configured email platform.
Uses
Use the Post Meeting Actions MCP server to perform the following actions:
- Process a completed sales call end-to-end: Find the Salesforce record, retrieve the call transcript, generate a summary, and write it to Salesforce
- Find the Salesforce Opportunity related to a call or meeting
- Retrieve a call transcript from Gong or Zoom
- Search within a call's transcript for a specific mention or topic without regenerating the whole summary
- Generate a call summary structured to your org's configured sales methodology
- Check which sales methodology and Salesforce fields this deployment is configured to write to
- Write a summary to Salesforce as Opportunity fields and a Task
- Retrieve relevant customer stories or product resources to support a follow-up
- Draft and send a follow-up email to a prospect through Gmail or Outlook
- Check which of your calls have outstanding summarization, writing, or follow-up steps
Example prompts
Use the following example prompts to invoke Post Meeting Actions MCP server tools:
Process my call with Acme.Update Salesforce based on my latest call with Acme.Find my last call with Acme.Search my call with Acme for any mention of budget.Format my call notes using our sales methodology.What competitors were mentioned in my call with Acme?Draft a follow-up email for my call with Acme, including relevant case studies.Send the follow-up email once I approve it.Pull my calls with pending follow-up actions.What have I not finished processing yet?
Post Meeting Actions MCP server tools
The Post Meeting Actions MCP server provides the following tools:
| Tool | Description |
|---|---|
| find_target_record | Finds the Salesforce Opportunity related to a meeting. |
| search_call_activities | Finds Salesforce activity history for logged calls or meetings for a specific account and a date range. |
| retrieve_call_transcript_gong | Retrieves transcript and metadata for a Gong-sourced call. |
| retrieve_call_transcript_zoom | Retrieves transcript and metadata for a Zoom-sourced call. |
| generate_meeting_summary | Produces a summary mapped to the configured sales methodology. |
| get_salesforce_write_policy | Returns the configured sales methodology and the Salesforce fields allowed for post-meeting writes. |
| write_summary_to_system_of_record | Writes the confirmed summary to Salesforce as Opportunity fields and a Task, with an optional linked Note. |
| retrieve_kb_resources | Retrieves supporting customer stories or product resources. |
| search_transcript_chunks | Retrieves chunked transcript documents for a call, or runs a semantic search across transcript chunks. |
| draft_followup_email_gmail | Drafts a follow-up email to a prospect through Gmail, optionally with supporting resources. |
| draft_followup_email_outlook | Drafts a follow-up email to a prospect through Outlook, optionally with supporting resources. |
| send_followup_email_gmail | Sends an approved follow-up email through Gmail. |
| send_followup_email_outlook | Sends an approved follow-up email through Outlook. |
| list_pending_meetings | Lists meetings this server has started processing but hasn't finished. |
Install the Post Meeting Actions MCP server
Complete the following steps to install a prebuilt MCP server to your project:
Sign in to your Workato account.
Go to AI Hub > Enterprise MCP > Custom servers.
Click + Create MCP server.
Go to the Start with pre-built MCP Servers using your connected apps section and select the prebuilt MCP server you plan to use.
Click Use this server.
Provide a name for your MCP server in the Server name field.
Use the Location drop-down menu to select the project for the MCP server.
Go to the Connections section and connect to your app account.
Select the connection type you plan to use for the MCP server template.
- User's connection: MCP server tools perform actions based on the identity and permissions of the user who connects to the application. Users authenticate with their own credentials to execute the skill.
- Your connection: This option uses the connection established by the recipe builder and follows the same principles as normal app connections.
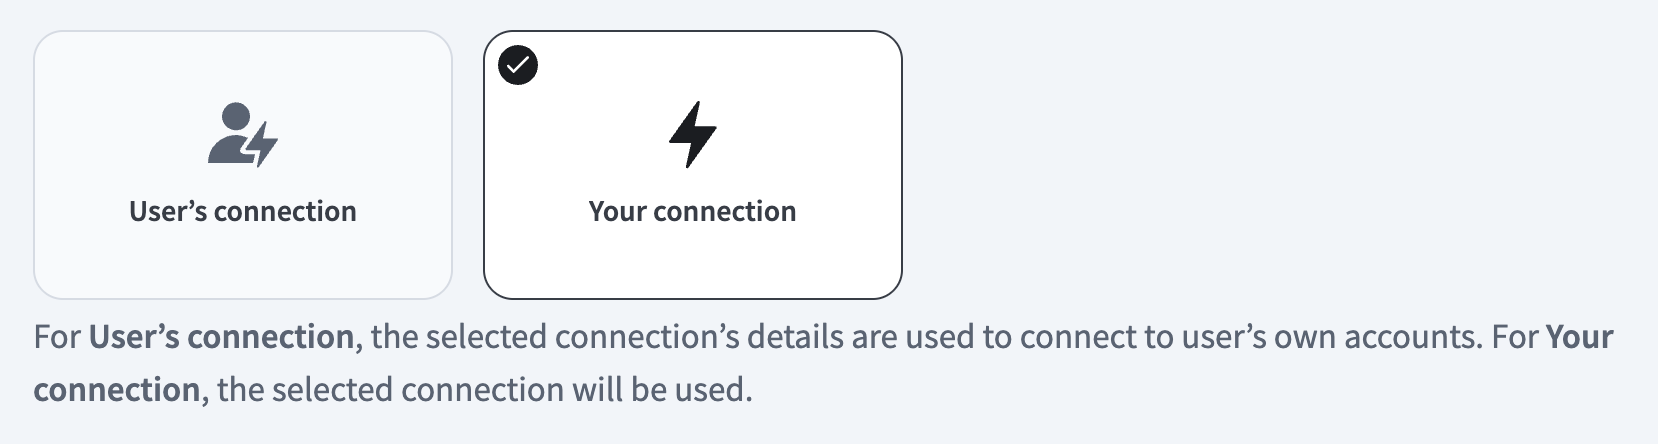 Select your connection type
VERIFIED USER ACCESS AUTHENTICATION REQUIREMENTS
Only app connections that use OAuth 2.0 authorization code grant are available for user's connection. Refer to Verified user access for more information.
Complete the app-specific connection setup steps in the following section.
Post Meeting Actions connection setup
Configure the following connections to set up the Post Meeting Actions MCP server:
- Salesforce: Required.
- Gong: Optional. Connect to Gong to retrieve Gong-sourced call transcripts.
- Zoom: Optional. Connect to Zoom to retrieve Zoom-sourced call transcripts.
- Gmail: Optional. Connect to Gmail to draft and send follow-up emails through Gmail.
- Outlook: Optional. Connect to Outlook to draft and send follow-up emails through Outlook.
Post Meeting Actions role requirements
Each tool's availability depends on the permissions granted to its connected account:
- Salesforce: Requires write access to the
Taskobject and to each field listed insalesforce_fields_allowed_to_update, and create access toContentVersionwhenwrite_content_noteis enabled. A missing permission returns apermission_deniedoutcome rather than a partial result. - Gong: Requires access to basic call metadata and the transcript body. A connection missing the transcript scope still returns call metadata and Gong's own summary.
- Zoom: Requires access to transcripts and AI-generated meeting summaries. A connection missing the summary scope still returns the transcript.
- Gmail and Outlook: Requires access to draft and send email on behalf of the connected mailbox.
Salesforce connection setup steps
View Salesforce connection setup steps
Workato supports OAuth 2.0 authentication and JWT bearer authentication connections for Salesforce.
Salesforce OAuth 2.0 authentication
View OAuth 2.0 authentication steps
Connect to Salesforce using OAuth 2.0 (Authorization Code Grant)
Complete the following steps to set up an OAuth 2.0 (Authorization Code Grant) connection to Salesforce in Workato:
OAUTH RESTRICTIONS
As of early September 2025, Salesforce restricts the use of uninstalled Salesforce Connected Apps. Refer to OAuth restrictions for required actions if you encounter errors when you create a new connection. These steps are required for all new Salesforce connections starting September 17, 2025.
Click Create > Connection or press C twice.
Search for Salesforce and select it as your app.
Enter a name in the Connection name field.
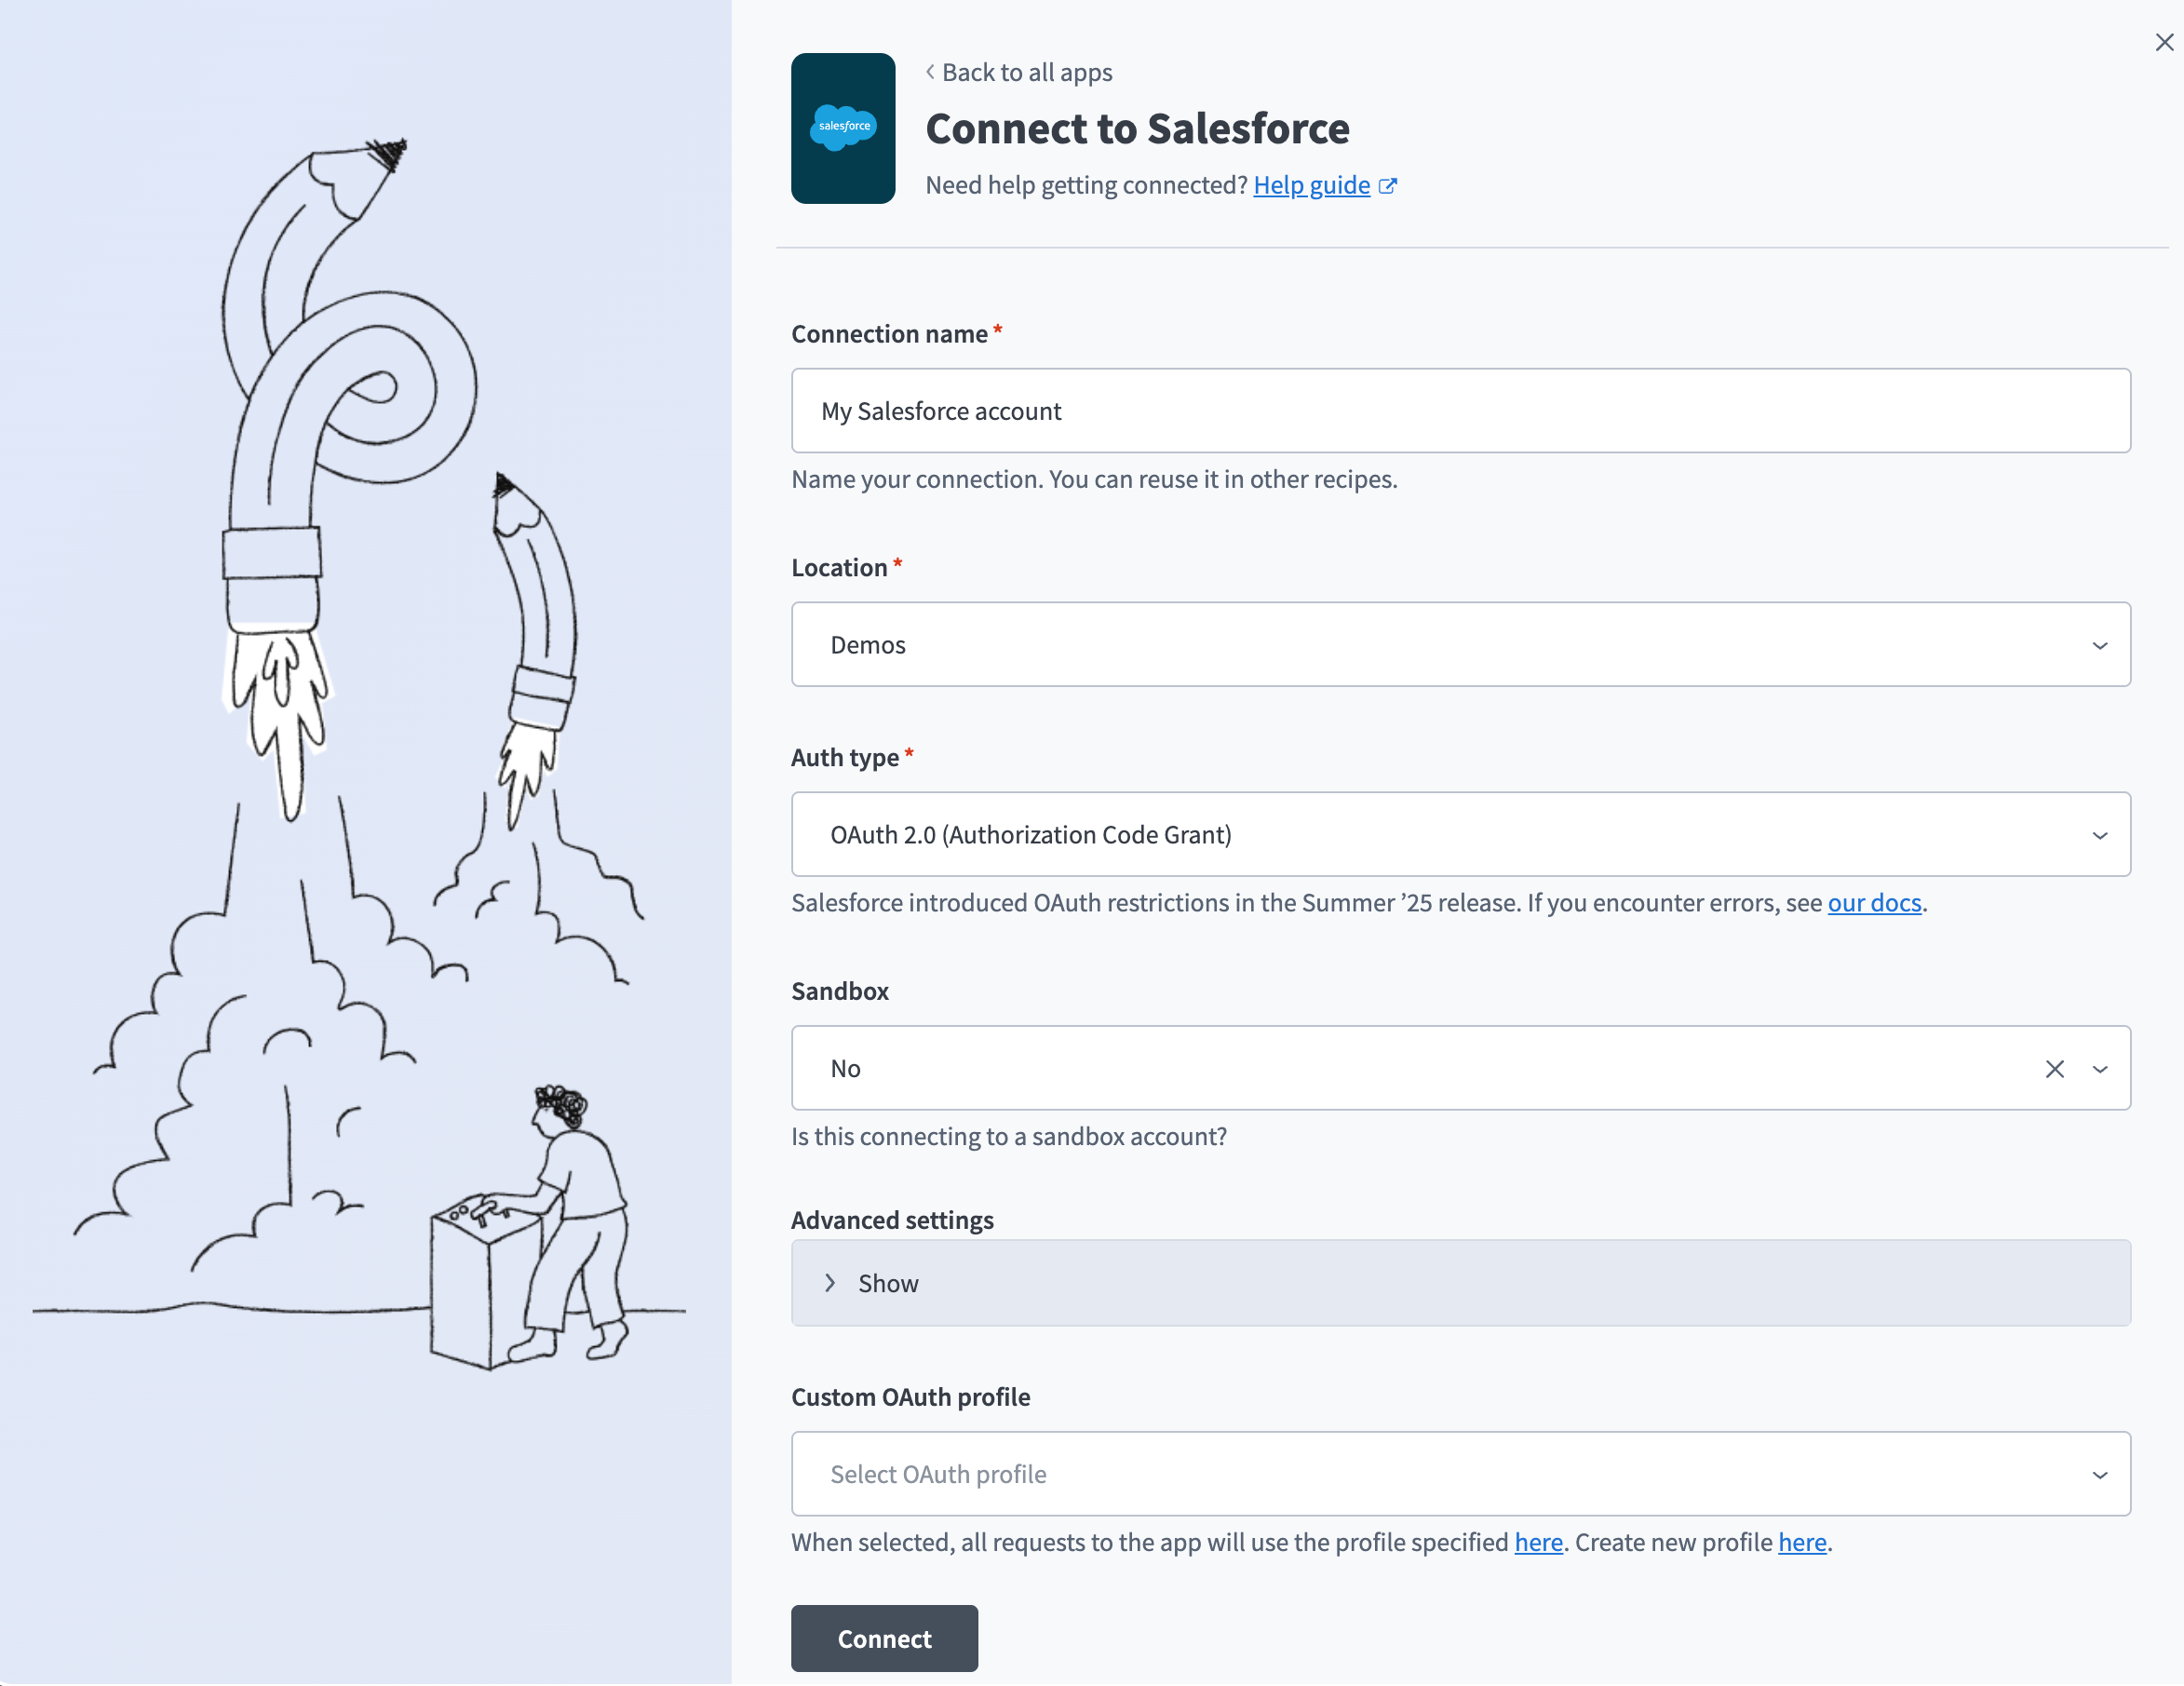 OAuth2.0 Salesforce connection setup
Use the Location drop-down menu to select the project where you plan to store the connection.
Use the Auth type drop-down menu to select OAuth 2.0 (Authorization Code Grant).
Use the Sandbox drop-down menu to specify whether the Salesforce account is a sandbox account.
Optional. Expand Advanced settings to configure the following options:
Advanced settings
- Organization/community custom domain URL: Enter the URL to your Salesforce community's custom domain. Required for community connections with unique domains.
- Requested permissions: Select permissions to request for this connection. Refer to Minimum and default scopes for the scopes Workato requests by default.
- Verified user access configuration: Configure custom auth for personal connections. Refer to Runtime user connections for more information.
REFRESH TOKEN SCOPE IS REQUIRED
The Perform requests at any time scope is one of Workato's minimum scopes for OAuth 2.0 connections, but whether Salesforce actually grants this scope depends on the Connected App's own OAuth policies, not on the Workato connection's settings. Refer to Salesforce connection disconnects repeatedly if your connection later disconnects when the access token expires. A Refresh Token Policy or IP Relaxation setting can cause the same symptom.
Optional. Use the Custom OAuth profile drop-down menu to select a custom OAuth profile for your connection. Refer to Create a custom OAuth profile for Salesforce for more information.
Click Connect.
Optional. If your Salesforce organization or community uses a custom domain, complete the following in the sign-in modal:
- Click Use Custom Domain.
- Enter your Custom domain, then click Continue.
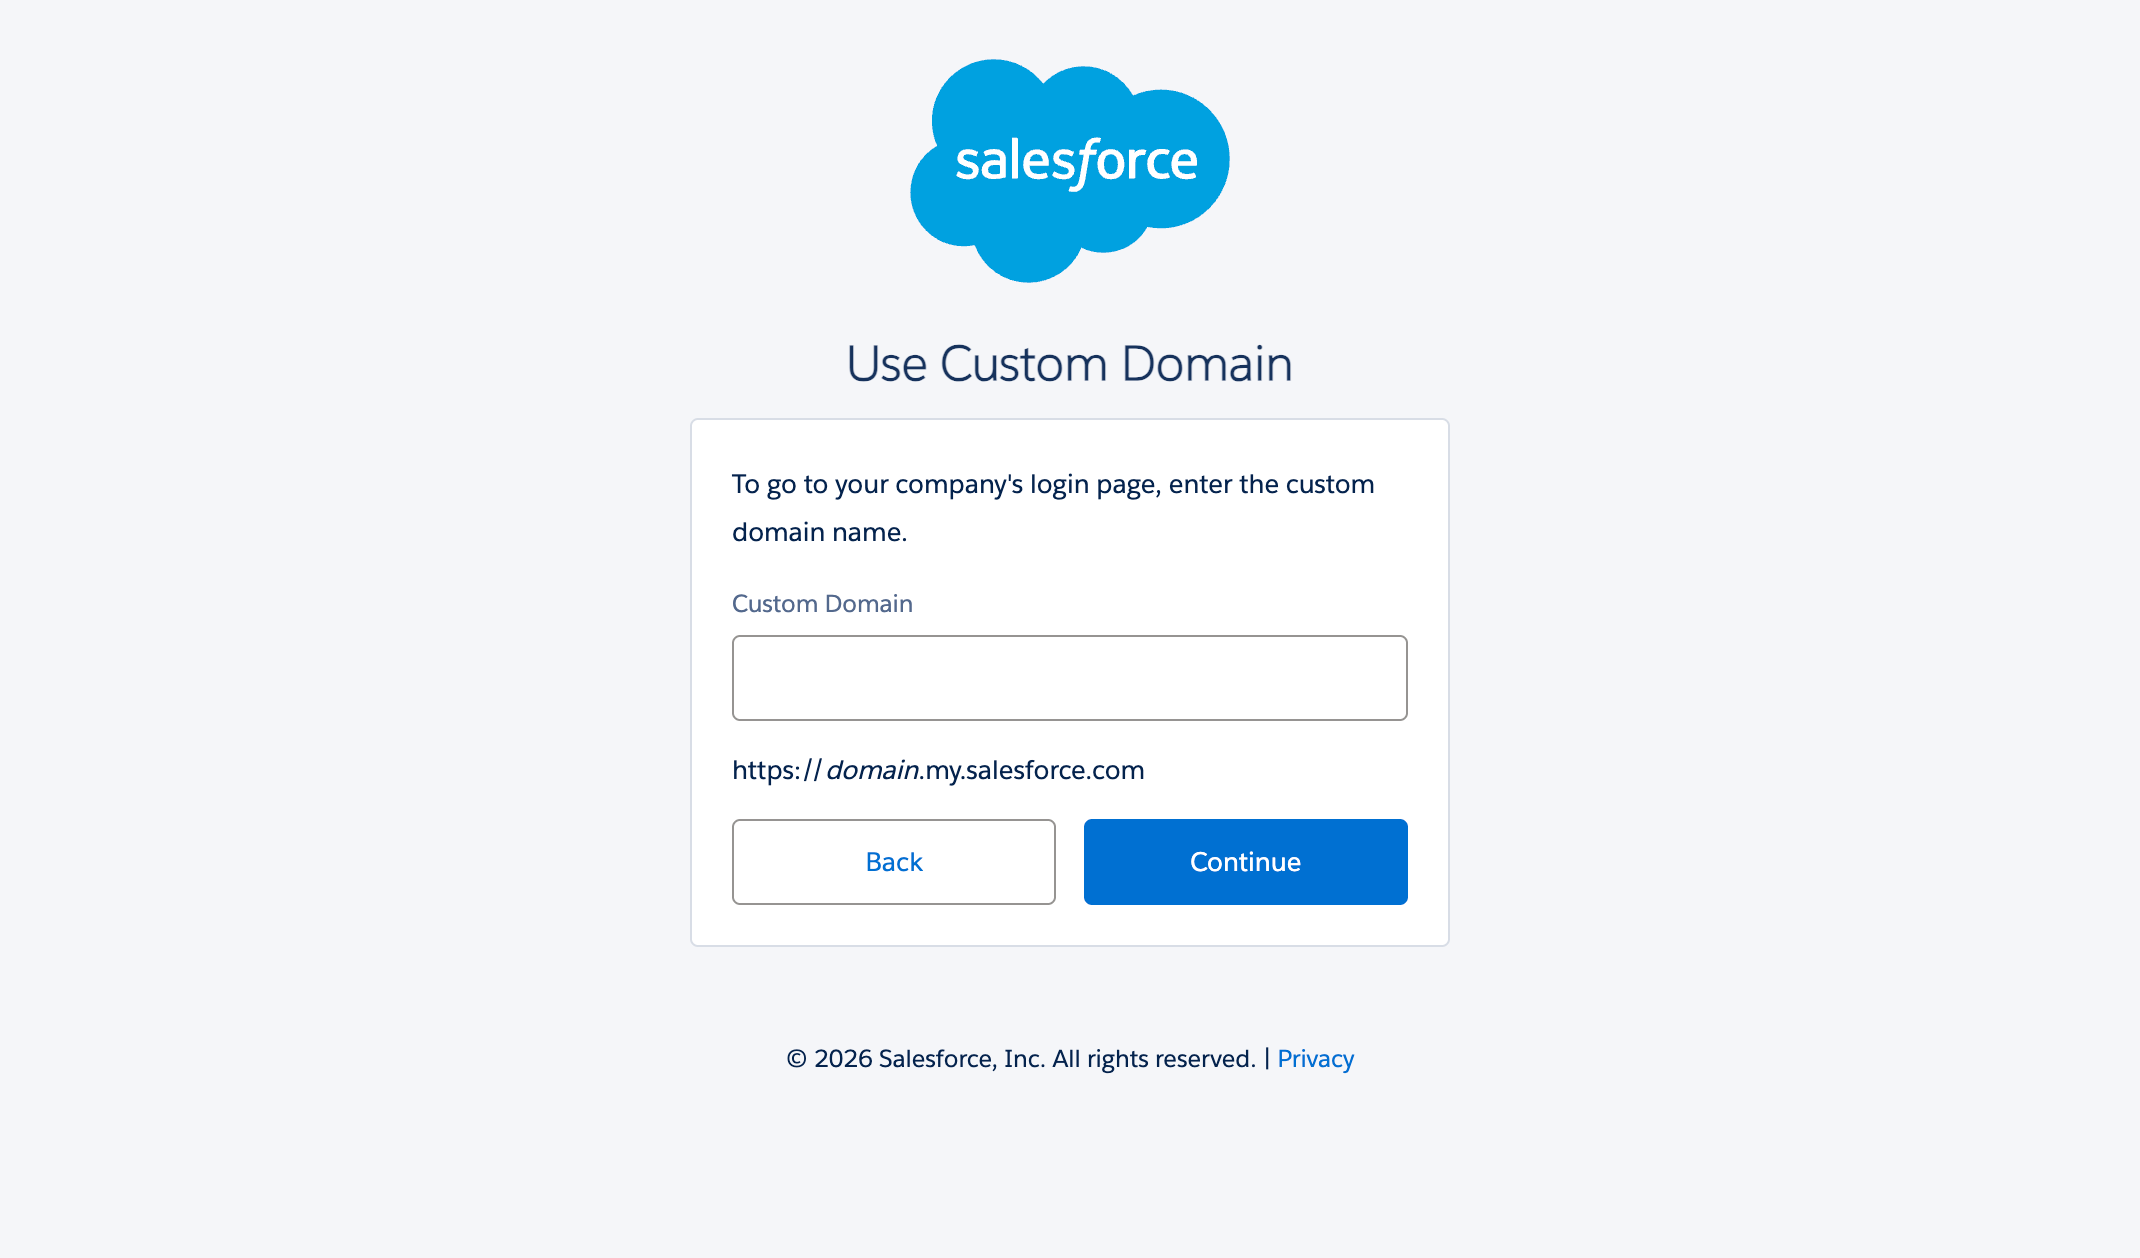 Enter your Custom domain.
Enter your Salesforce Username and Password.
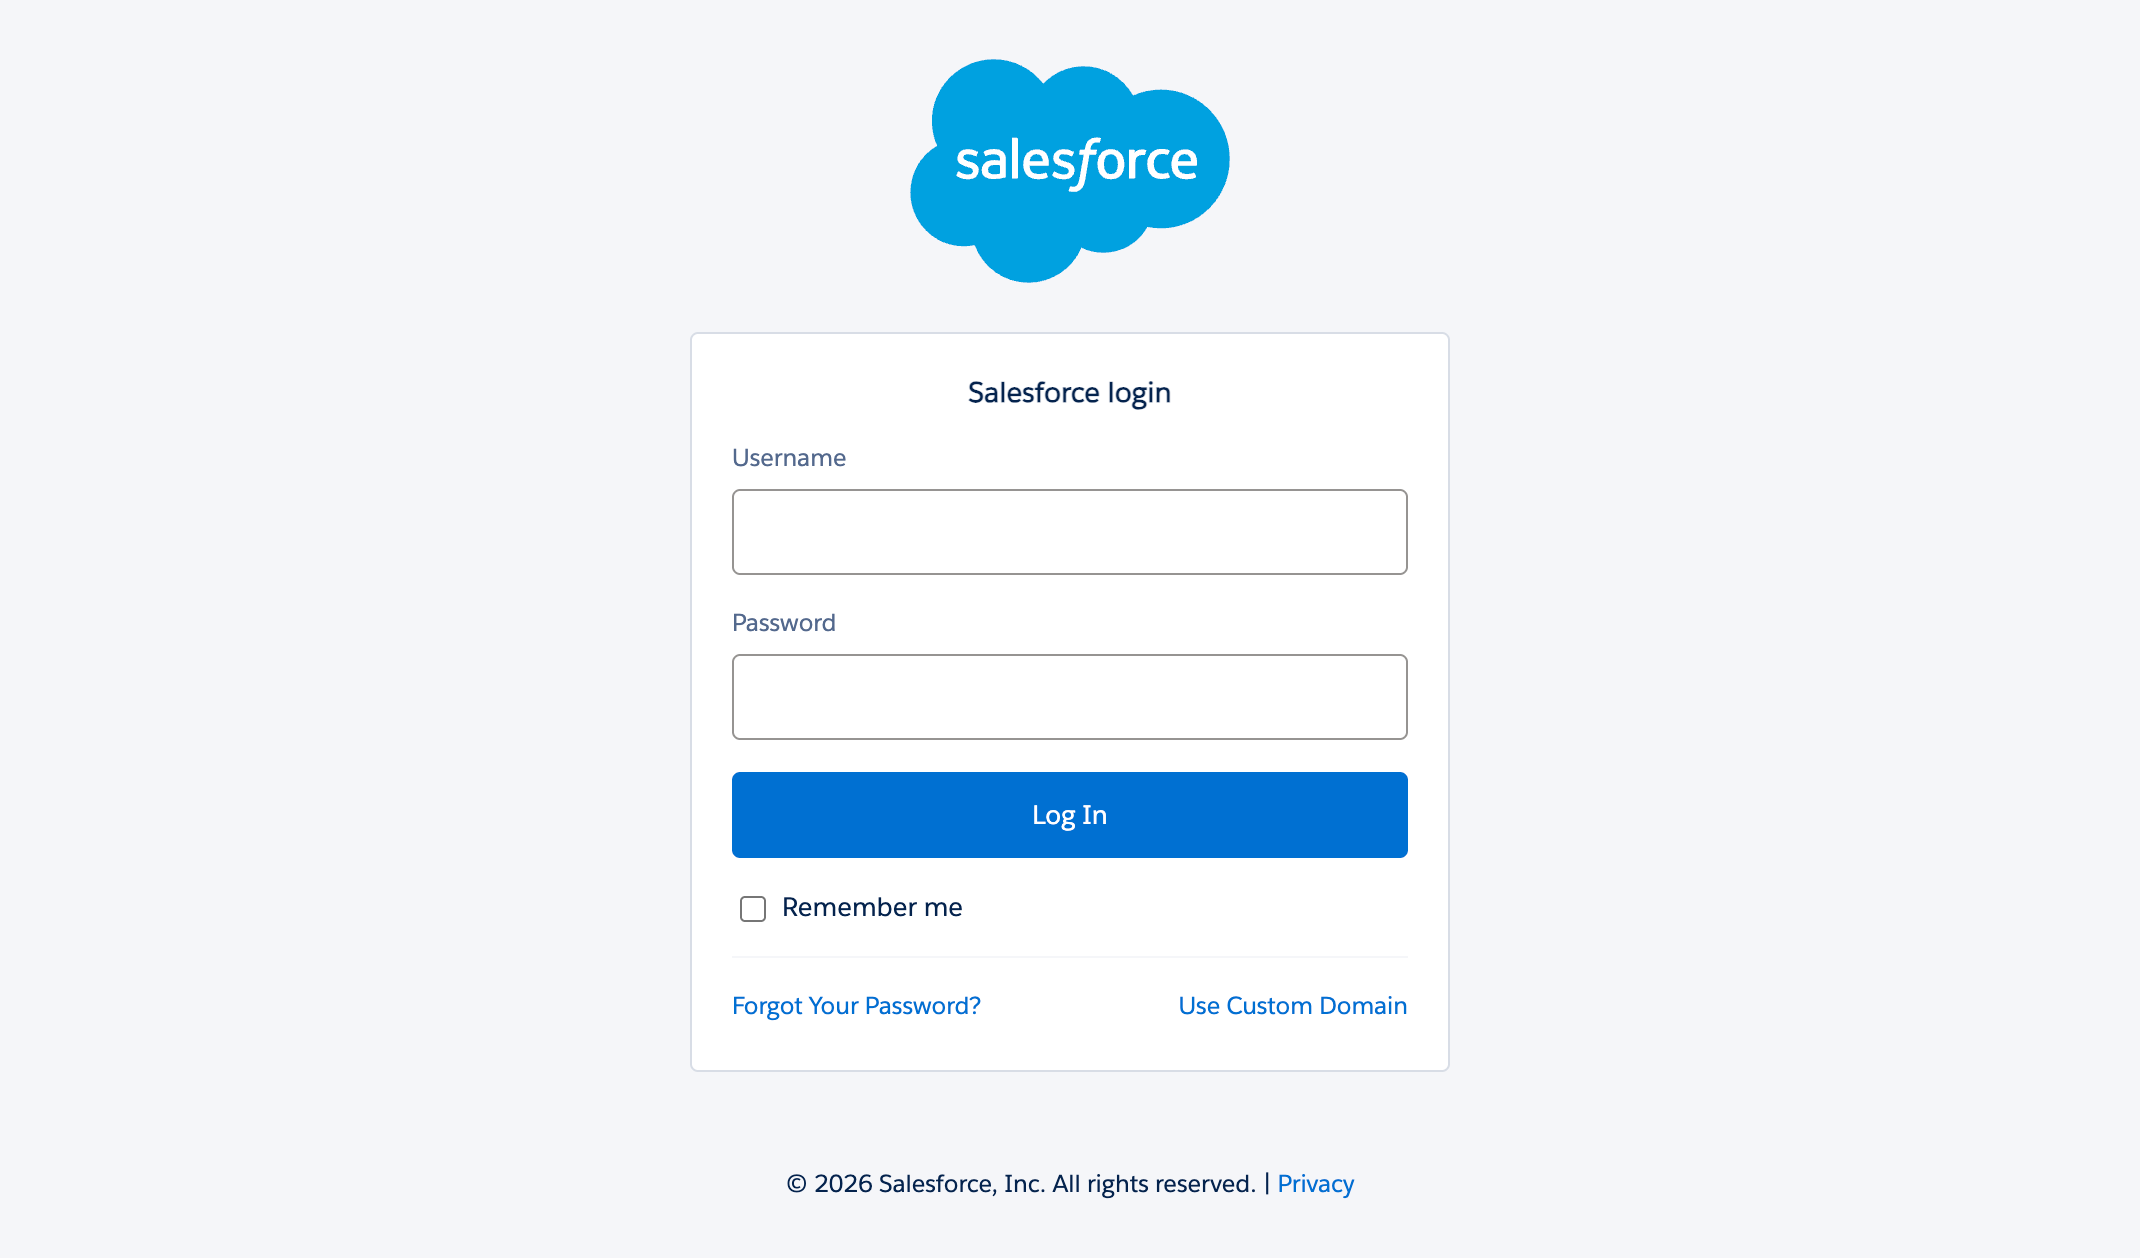 Log in to your Salesforce account
Click Log In to complete the setup.
OAUTH_APPROVAL_ERROR_GENERIC
If you see this error, Salesforce is restricting the Workato app because it isn't installed. A Salesforce admin must install the app in Connected Apps OAuth Usage or assign the Salesforce permissions. Refer to OAuth restrictions for details.
Salesforce JWT bearer authentication
View JWT bearer authentication steps
ACTIONS ON BEHALF OF USER
JWT connections can perform actions on behalf of a user you specify using the On-behalf-of-user email field. Contact your Workato Customer Success Manager to enable this feature.
How it works
JWT bearer authentication connects using a digital certificate that signs a JWT request. Workato sends a JWT to the Salesforce OAuth token endpoint, where Salesforce processes the JWT and issues an access token based on prior approval of Workato in Salesforce.
Although JWT bearer skips interactive sign-in, Salesforce still evaluates every request against the permissions of the user specified in the connection and attributes any changes to that user. Use a dedicated integration user rather than a personal account.
Refer to Required roles and permissions for the Salesforce permissions the connected user needs.
Generate a private key and certificate
JWT bearer authentication requires a private key and a certificate. The following command generates both using OpenSSL. Replace the -subj values with your own:
openssl req -x509 -sha256 -nodes -newkey rsa:2048 \
  -keyout server.key \
  -out server.crt \
  -days 365 \
  -subj "/CN=Your App Name/O=Your Organization/C=US"
This generates two files:
| File | Description |
|---|---|
server.key | Your private key for Workato. Keep this secret. |
server.crt | Your public certificate for Salesforce. |
Refer to Salesforce's documentation for more information:
- OAuth 2.0 JWT Bearer Flow for Server-to-Server Integration: Details on how Salesforce uses this certificate to sign and validate JWTs.
- Create a Private Key and Self-Signed Digital Certificate: Other ways to generate a private key and certificate.
Create an external client app for JWT bearer
JWT bearer authentication also requires a registered external client app in Salesforce. Complete the following steps before creating your connection in Workato. Refer to Salesforce's Create an External Client App documentation for more information.
Sign in to Salesforce.
Go to Setup > Apps > External Client Apps > External Client App Manager.
Click New External Client App.
Enter a name in the External Client App Name field, such as Workato.
Enter a name in the API Name field that meets the following requirements:
- Contains only underscores and alphanumeric characters.
- Is unique.
- Starts with a letter.
- Doesn't include spaces.
- Doesn't end with an underscore.
- Doesn't contain consecutive underscores.
Enter the contact email address for your app in the Contact Email field.
Use the Distribution State drop-down menu to select either Local or Packaged.
Expand API (Enable OAuth Settings) and select the Enable OAuth checkbox. Refer to Salesforce's Configure the External Client App OAuth Settings documentation for more information.
Enter https://www.workato.com/oauth/callback in the Callback URL field.
Select your OAuth scopes in the OAuth Scopes field based on the actions and triggers you plan to use, then click the Move selection to Selected OAuth Scopes arrow to apply them.
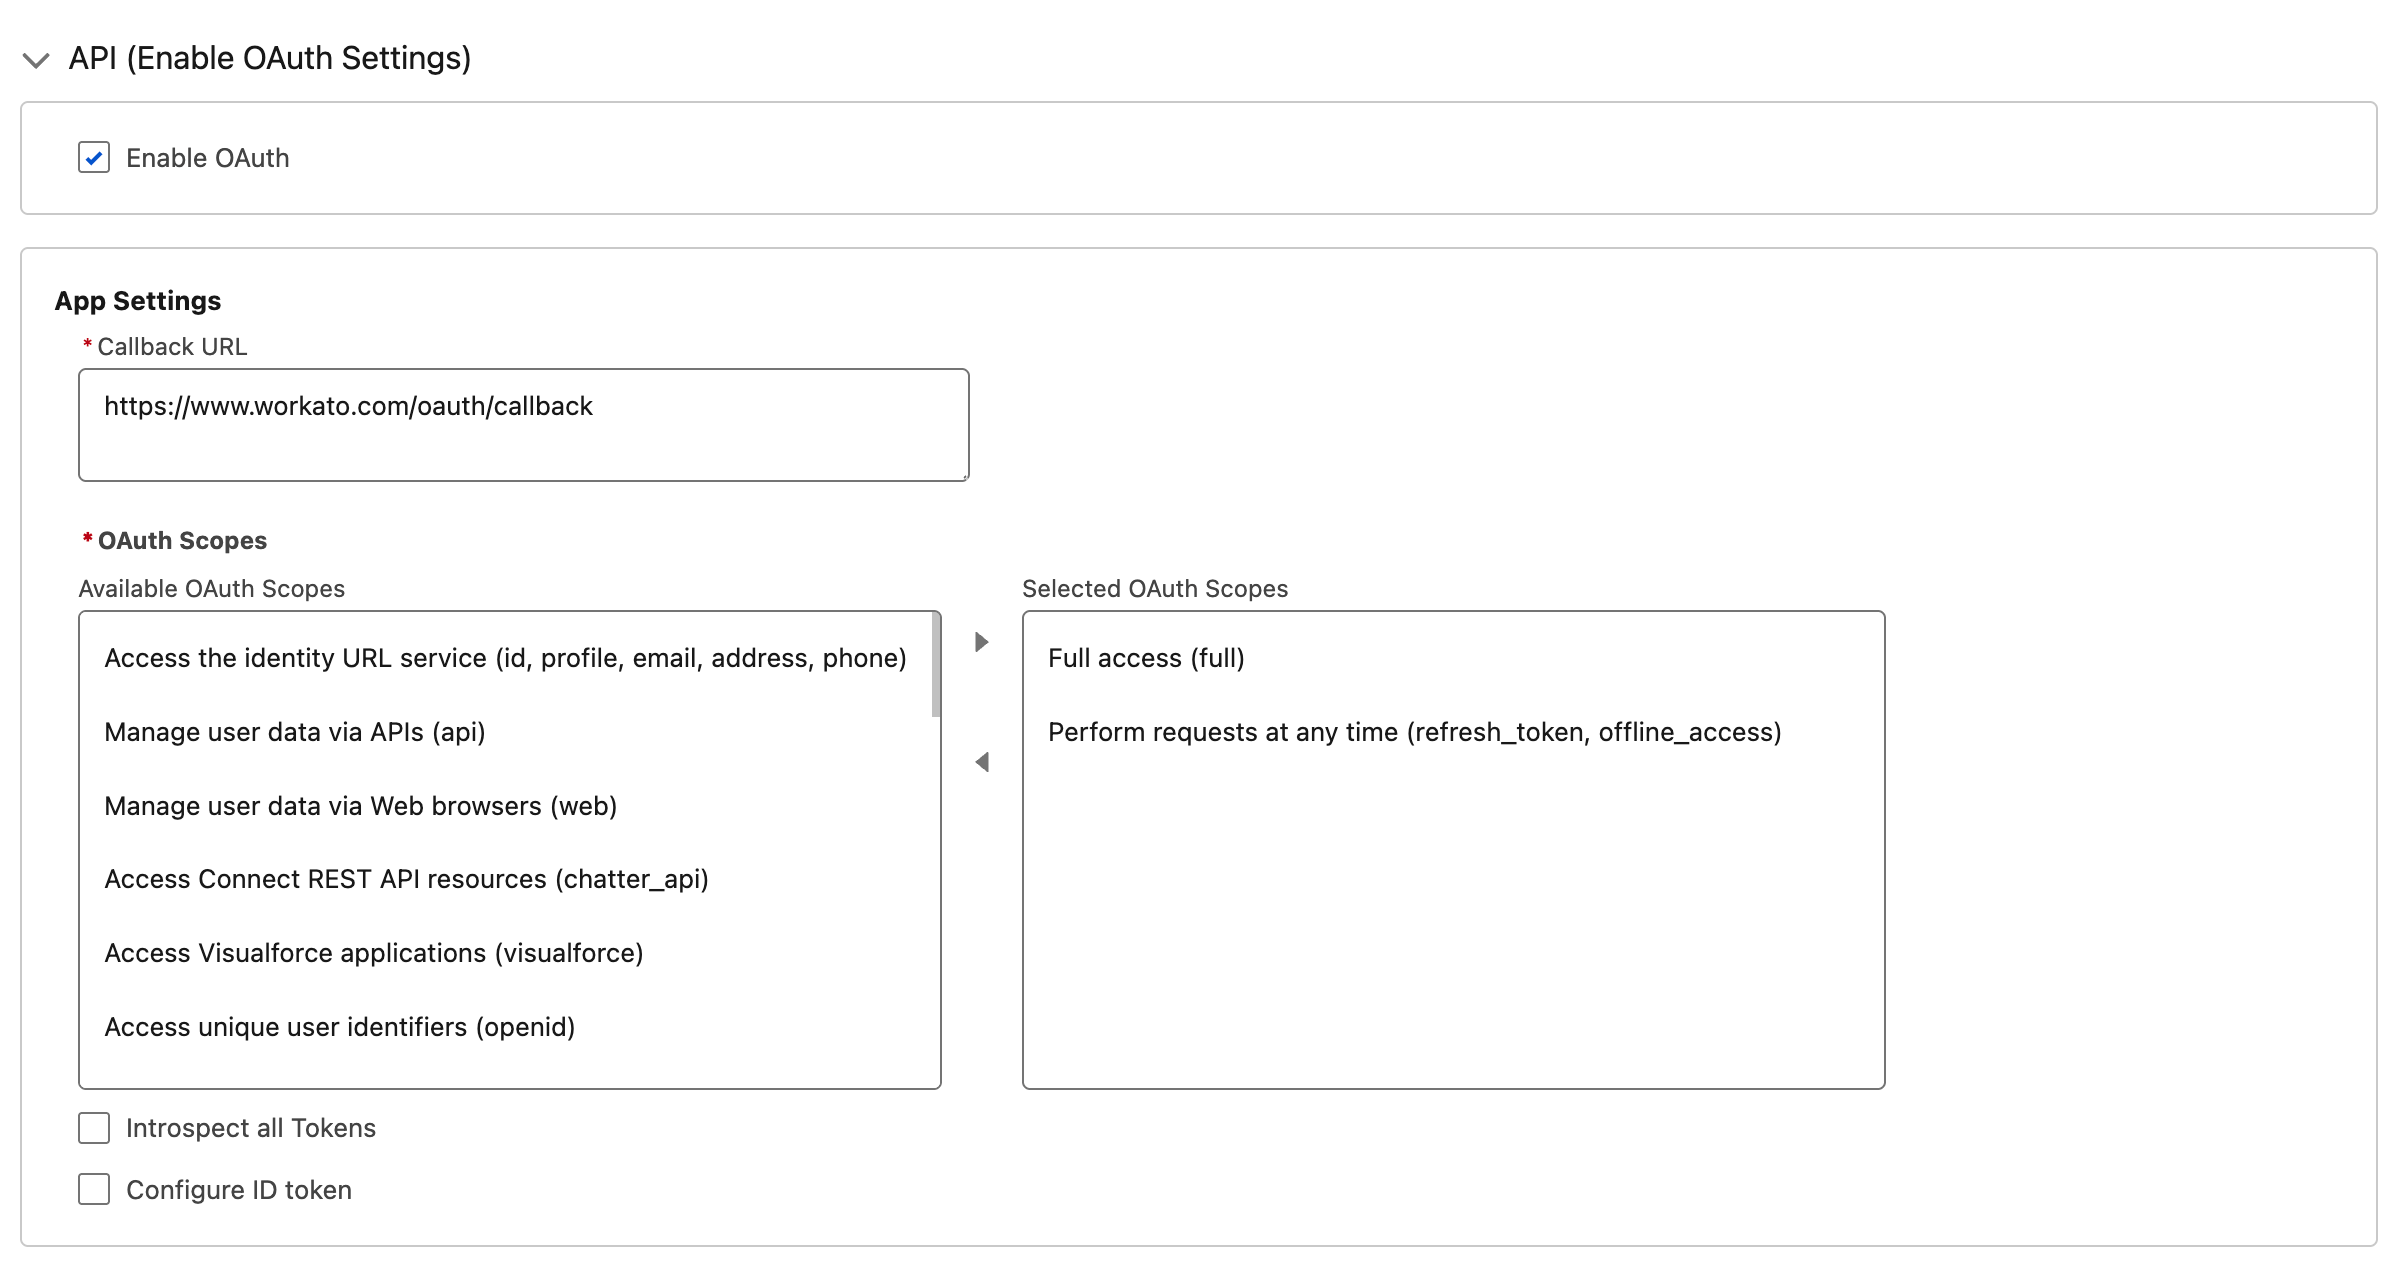 Configure scopes for your external client app
REFRESH_TOKEN SCOPE IS REQUIRED
If you see the error refresh_token scope is required and the connected app should be installed and preauthorized, add Perform requests at any time (refresh_token, offline_access) to your OAuth scopes. If you then see an invalid session error, also add Manage user data via APIs (api).
Select Enable JWT Bearer Flow in the Flow Enablement section. Refer to Salesforce's Configure a JWT Bearer Flow documentation for more information.
Upload server.crt as the digital certificate.
Click Create.
Click the Policies tab, then click Edit.
Expand the OAuth Policies section and set Permitted Users to Admin approved users are pre-authorized.
USER HASN'T APPROVED THIS CONSUMER
If you see this error when connecting, this step was likely missed.
Locate the App Policies section. Add either the profile or permission set assigned to the Salesforce user Workato connects as to the Select Profiles or Select Permission Sets list. Refer to Salesforce's Preauthorize User App Access Through External Client App Policies documentation for more information.
USER IS NOT ADMIN APPROVED TO ACCESS THIS APP
If you see this error when connecting, this step was likely missed.
Click Save.
Click the Settings tab for your external client app.
Expand the OAuth Settings section.
Click Consumer Key and Secret.
Verify your identity when prompted.
Copy the Consumer Key. You'll enter this as the Issuer when connecting in Workato.
Connect to Salesforce using JWT bearer
Complete the following steps to connect to Salesforce using JWT bearer authentication:
Click Create > Connection or press C twice.
Search for Salesforce and select it as your app.
Enter a name in the Connection name field.
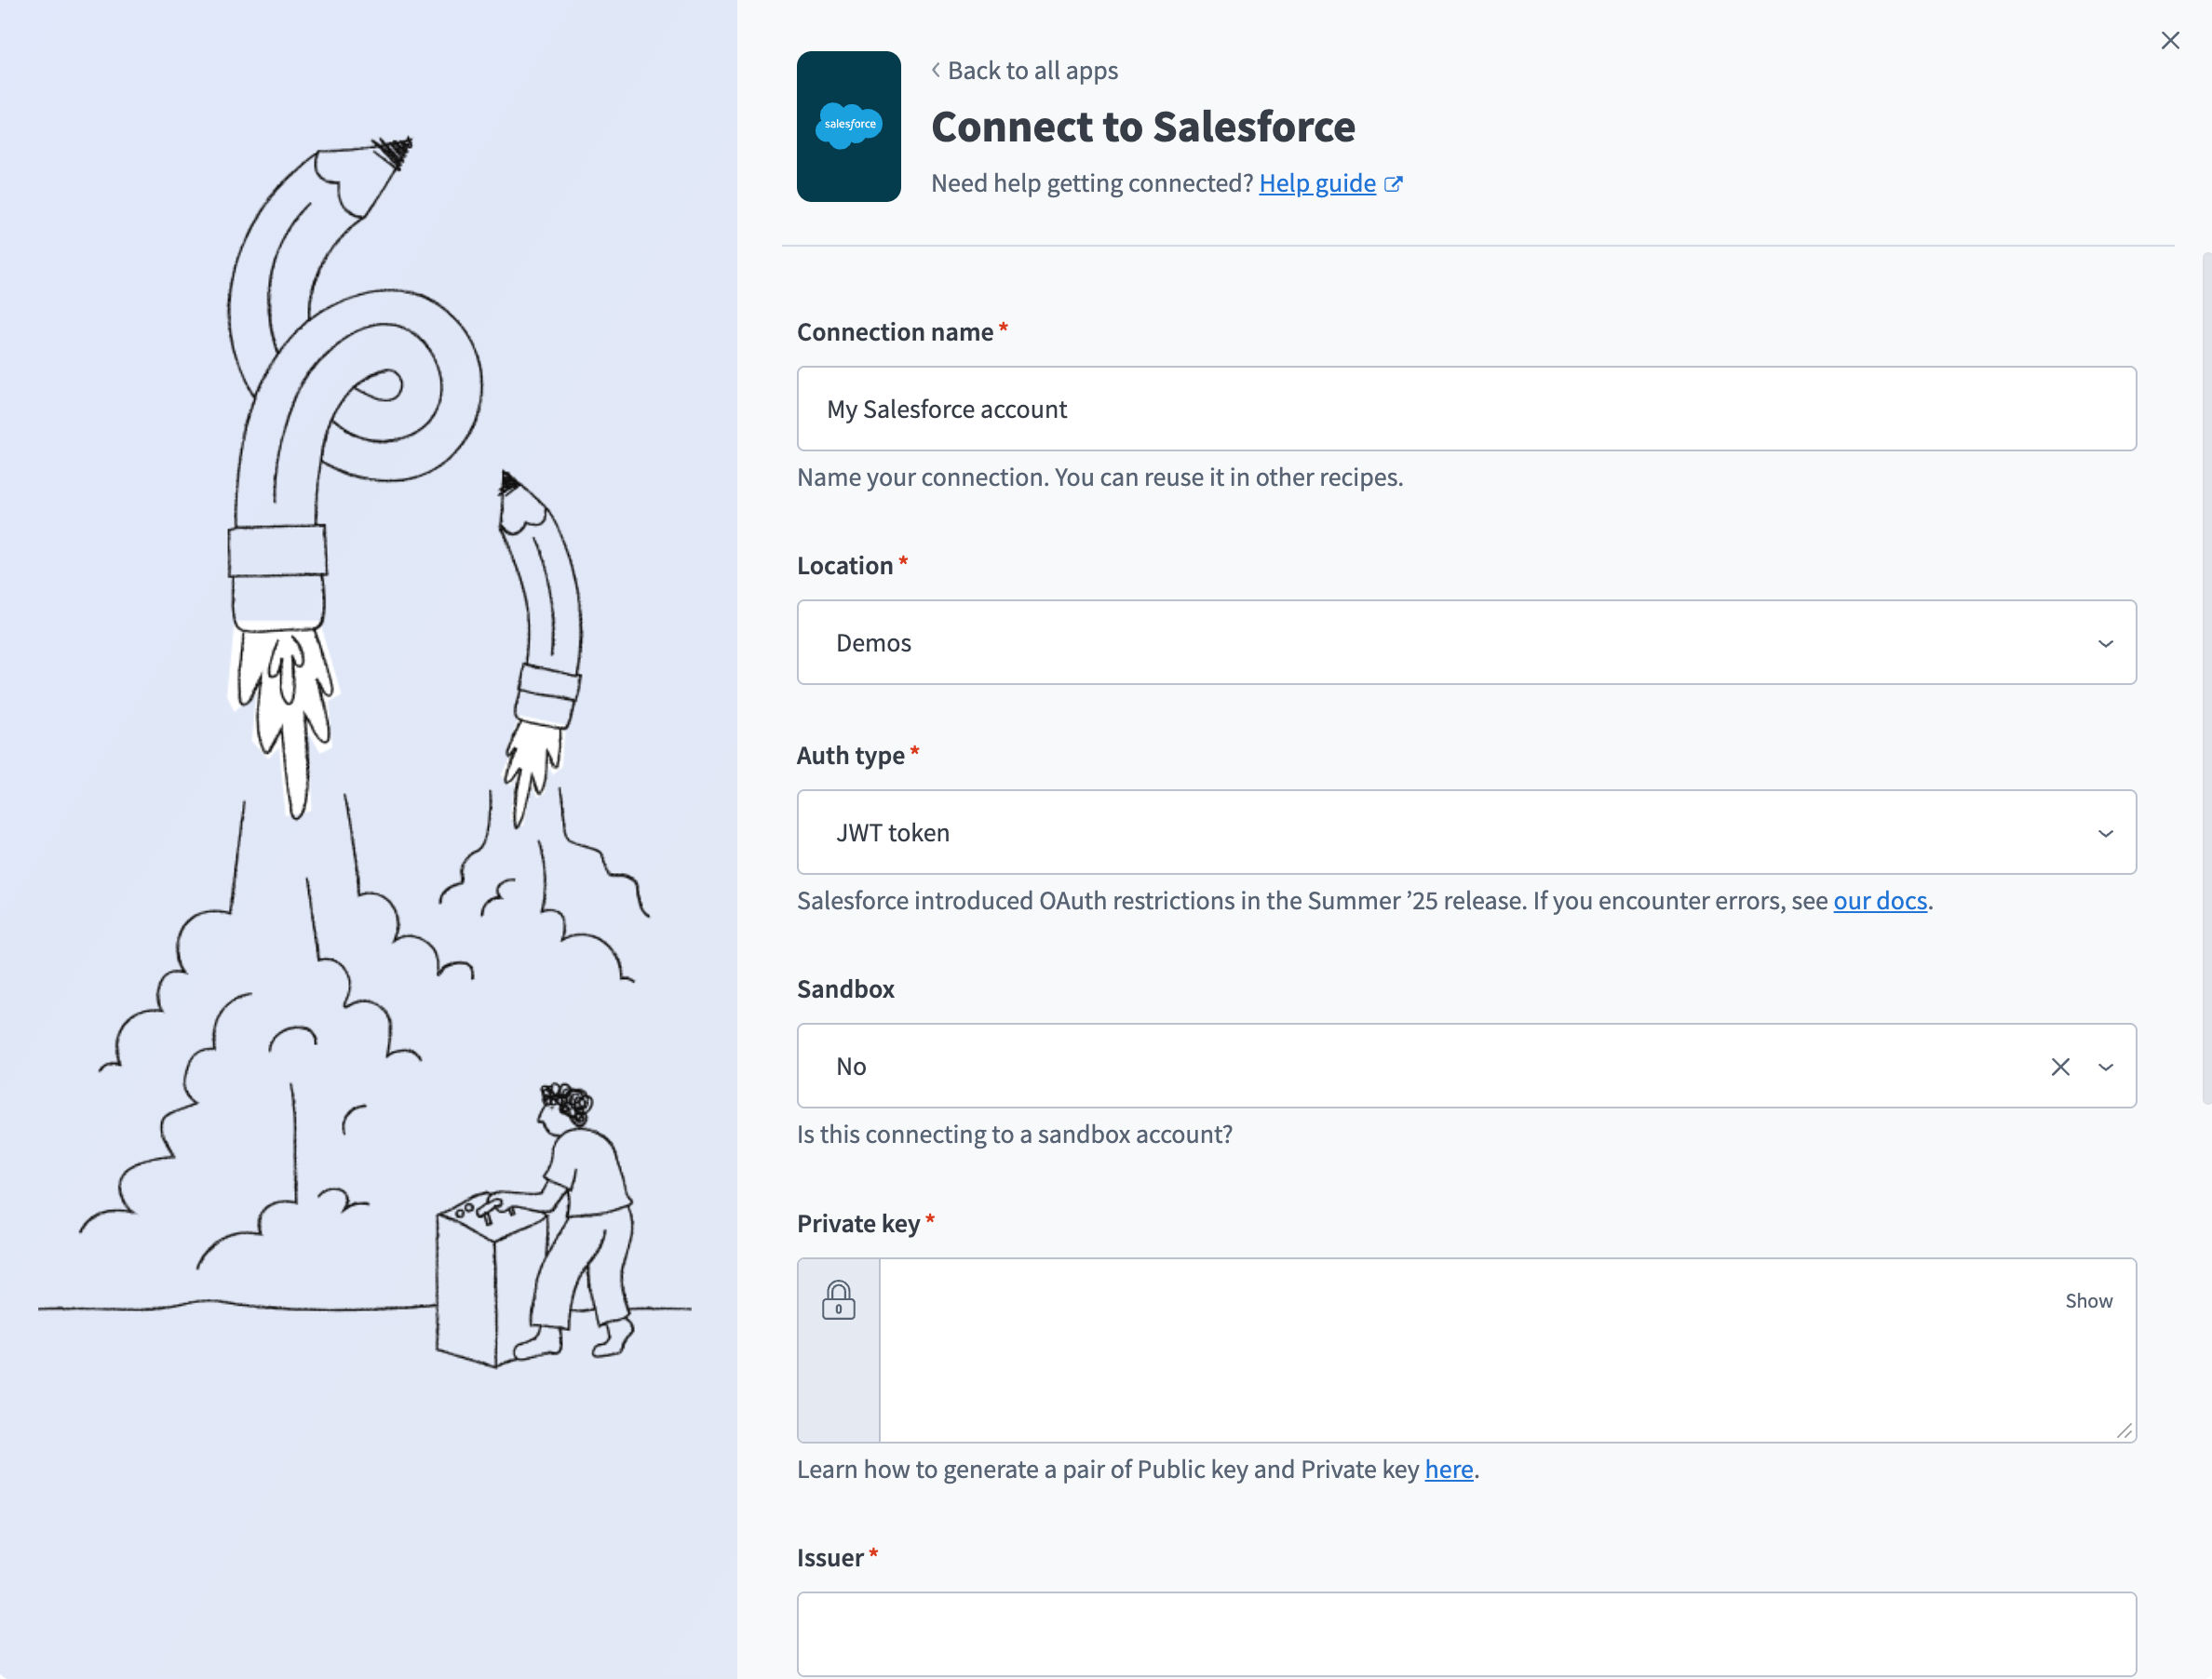 Configure Salesforce JWT Bearer connection
Use the Location drop-down menu to select the project where you plan to store the connection.
Use the Auth type drop-down menu to select JWT token.
Use the Sandbox drop-down menu to specify whether the Salesforce account is a sandbox account.
Paste the full contents of server.key in the Private key field, including the -----BEGIN PRIVATE KEY----- and -----END PRIVATE KEY----- lines.
Enter the Consumer Key from your external client app in the Issuer field.
Enter the Subject for the JWT connection. This is the username of the Salesforce user you want Workato to authenticate as, or a valid Experience Cloud username if you're connecting to an Experience Cloud site. You can use principal (prn) in place of subject (sub) for backward compatibility. If you specify both, Workato uses prn.
Enter your Salesforce Subdomain. For example, if your Salesforce URL is yourInstance.salesforce.com, the subdomain is yourInstance.
Optional. Use the Custom OAuth profile drop-down menu to select a custom OAuth profile for your connection. Refer to Create a custom OAuth profile for Salesforce for more information.
Click Connect.
Gong connection setup steps (optional)
View Gong connection setup steps
REQUIRED CONFIGURATION
Set enabled_sources to gong in the server configuration to retrieve Gong-sourced call transcripts.
The Gong connector uses OAuth 2.0 authentication.
Gong minimum and default scopes
Workato requires the api:users:read scope. Refer to the Gong API documentation for more detailed information about the available scopes.
Gong setup
Complete the following steps in Gong to generate credentials:
Sign in to your Gong developer instance. Refer to Request a developer instance for more information.
Go to Admin center.
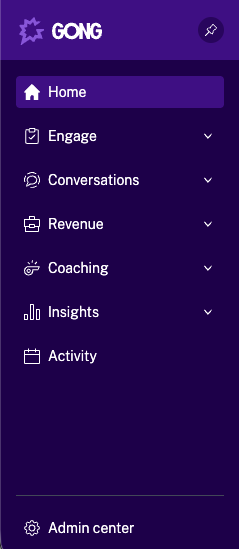 Admin center
Click API in the Ecosystem section.
Click CREATE INTEGRATIONS in the INTEGRATIONS tab.
Complete the CREATE YOUR GONG INTEGRATION page, including name, description, and required authorization scopes. Refer to Submit your integration details to Gong for more information.
SELF-SERVICE (WORKATO FREE, WORKATO PRO, OR DEVELOPER SANDBOX) WORKSPACES
If you created your workspace as a Self-service user, use https://app.trial.workato.com/oauth/callback as the redirect URI or callback URL when you configure the OAuth integration.
Click Save. Your integration information appears as a new row in the list of integrations.
Copy and save the CLIENT ID and CLIENT SECRET for use in Workato.
Connect to Gong with OAuth 2.0
Complete the following steps to connect to Gong in Workato:
Click Create > Connection or press C twice.
Search for Gong.io and select it as your app.
Enter a name for your connection in the Connection name field.
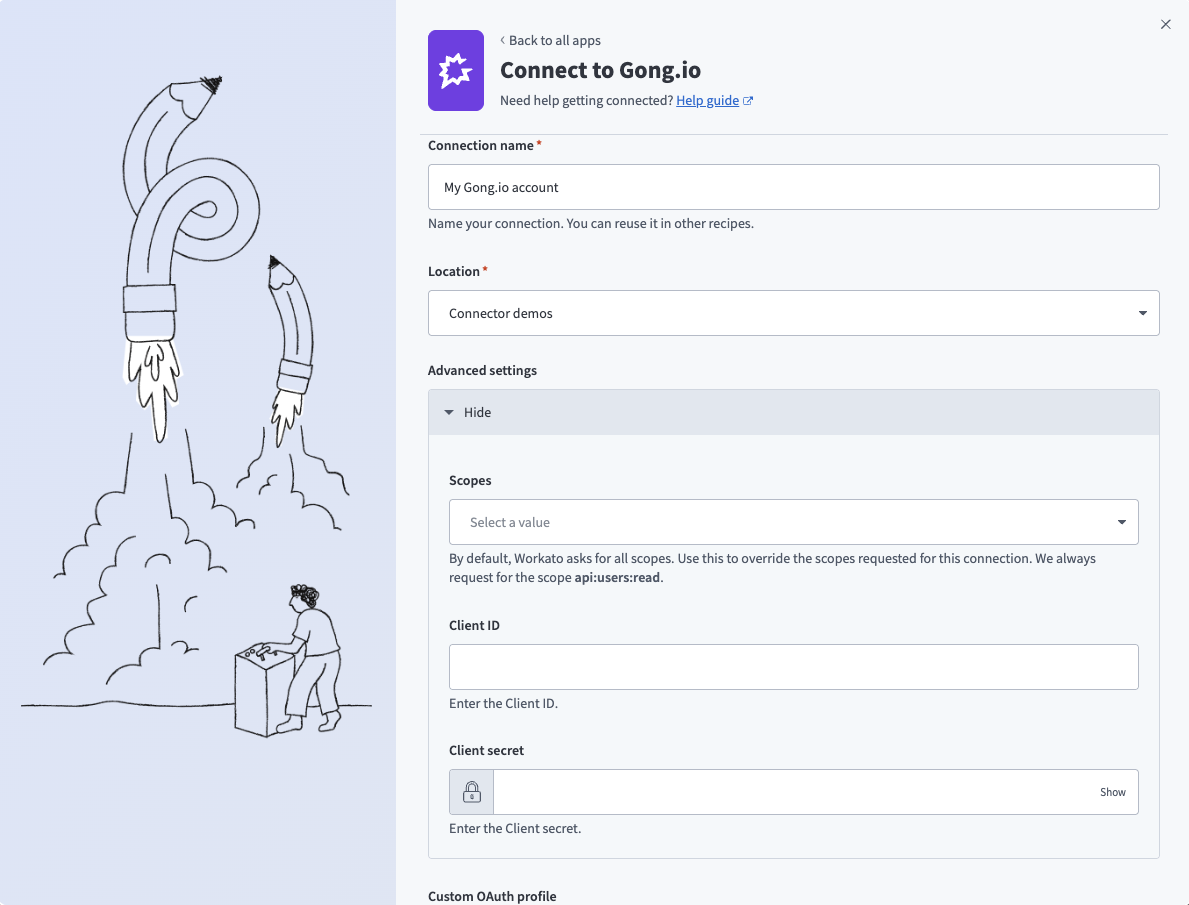 Connect to Gong
Use the Location drop-down menu to select the project where you plan to store the connection.
Expand the Advanced settings section to configure Scopes for your connection. Workato requests all available scopes by default. You can select granular scopes from the multi-select list to limit access.
Enter the Client ID and Client secret. Refer to Gong setup for more information.
Optional. Use the Custom OAuth profile drop-down menu to select a custom OAuth profile for your connection.
Click Connect.
Sign in to Gong using your credentials when prompted.
Click Allow to provision access to Workato.
Zoom connection setup steps (optional)
View Zoom connection setup steps
REQUIRED CONFIGURATION
Set enabled_sources to zoom in the server configuration to retrieve Zoom-sourced call transcripts.
The Zoom connector uses OAuth 2.0 authentication.
Complete the following steps to connect to Zoom in Workato with OAuth 2.0 authentication:
RECOMMENDED SETUP
We recommend that you set up a dedicated API user account in Zoom or create a custom OAuth profile to authorize Workato. This allows you to assign the API user to a role with only the necessary permissions.
Alternatively, you can use an existing Zoom owner or admin account if it has the required permissions. Some admin accounts may have restricted access based on their configuration.
Add an API user
View add an API user steps
Complete the following steps to set up a provisioned API user for Workato:
Sign into your Zoom account.
Go to Admin > User Management > Users.
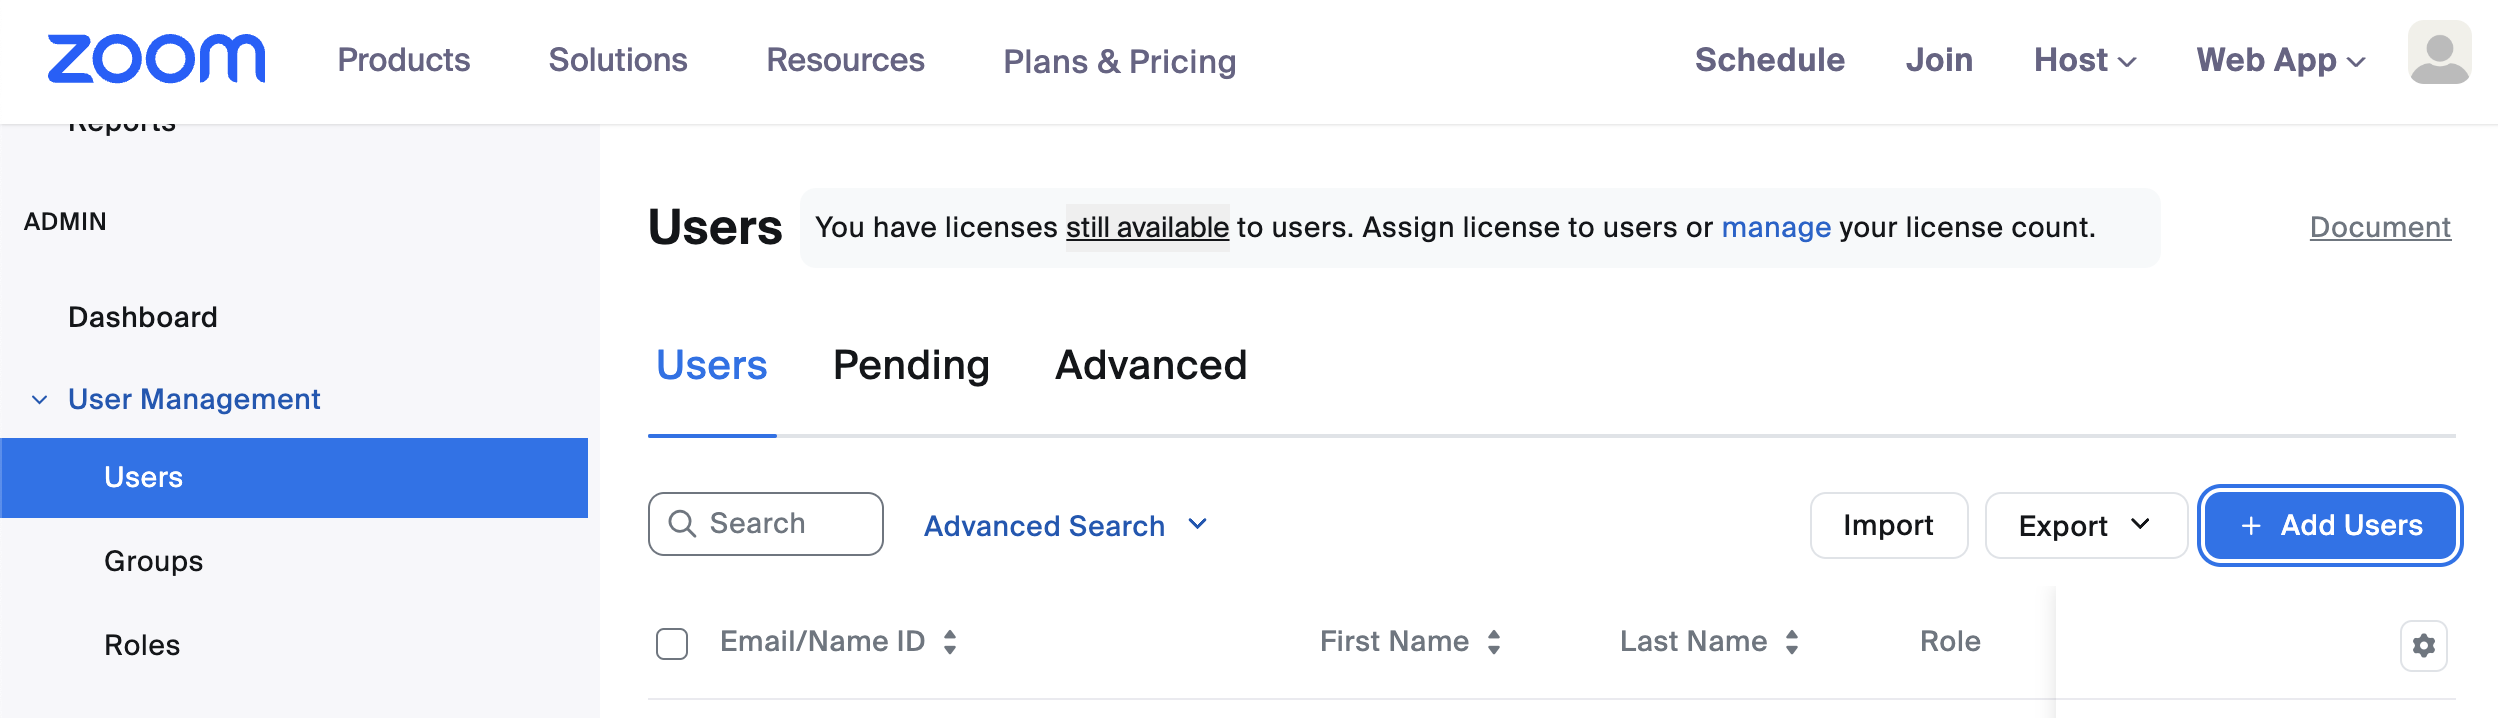 Add users
Click Add Users.
Enter an appropriate email for the API user. We recommend an IT admin alias.
Enter N/A or make selections based on your requirements for the following fields: Department, Manager, Job Title, Location, and User Groups.
Click Add.
Go to Admin > Roles.
Select Add Role.
Provide a Role Name and Description.
Click Add.
Go to Roles > Roles Settings and add the following permissions to your Zoom role. Role permissions are required to allow the Workato Zoom connector to perform account-level actions, such as scheduling meetings or webinars on behalf of other Zoom users.
Users: View and EditRole management: View and EditGroups: View and EditRecording management: View and EditZoom rooms: View and EditMeetings: ViewWebinars: ViewUsage reports: ViewSchedule tracking fields: View and Edit
Click Save Changes.
Go to User Management > Users and locate the user you created in the preceding steps.
Click Edit and use the User Role drop-down menu to select the role you created.
Click Save.
Create a custom OAuth profile
View create a custom OAuth profile steps
Complete the following steps to create a custom OAuth profile for Workato:
Go to Tools > Custom OAuth profiles in Workato.
Click + New custom profile.
Search for Zoom and select it as your app.
Enter a name for your custom OAuth profile in the Name field.
Click Create new app.
Go to the Zoom App Marketplace and sign in to your Zoom account if you're not signed in already.
Click Develop > Build App.
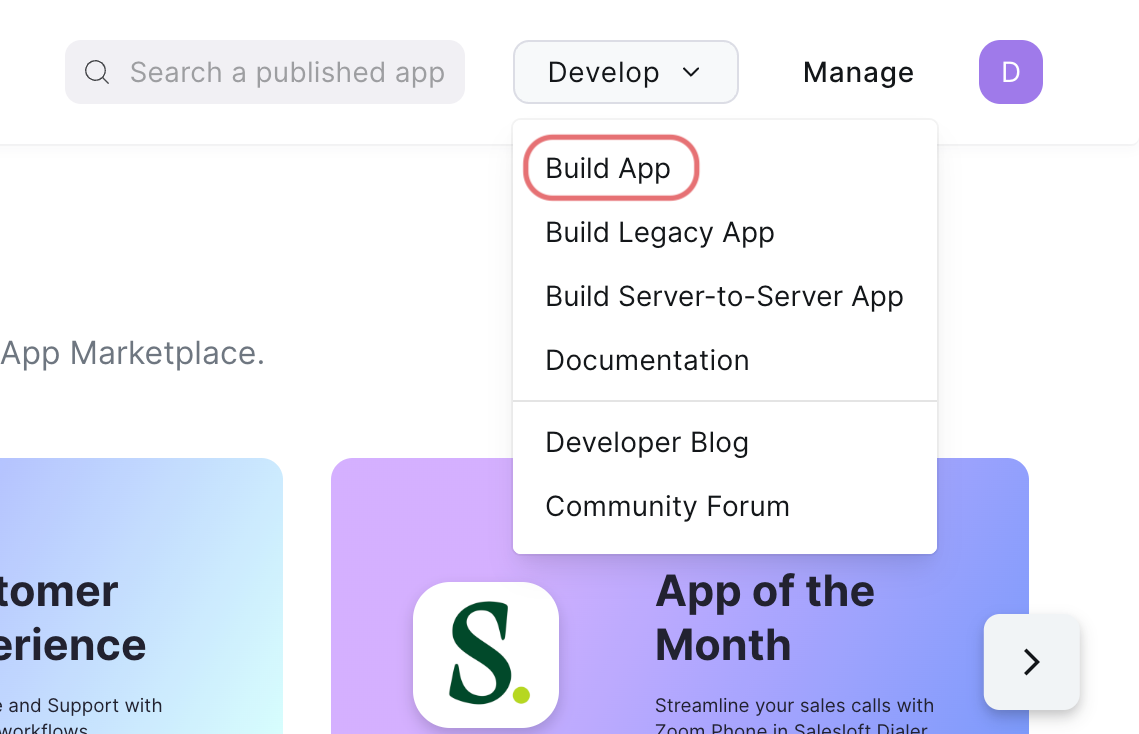 Build app
Choose the kind of app to create from the following options: General App, Server to Server OAuth App, or Webhook Only App. If you can't select the options, you must enable the Zoom for developers role. Refer to the Zoom Select general app features page to learn how to enable the Zoom for developers role.
Click Create.
Enter a name for your app and select how the app is managed. Refer to the Zoom Step 2: Maintain basic information page for more information.
Copy and save the Client ID and Client Secret for use in Workato.
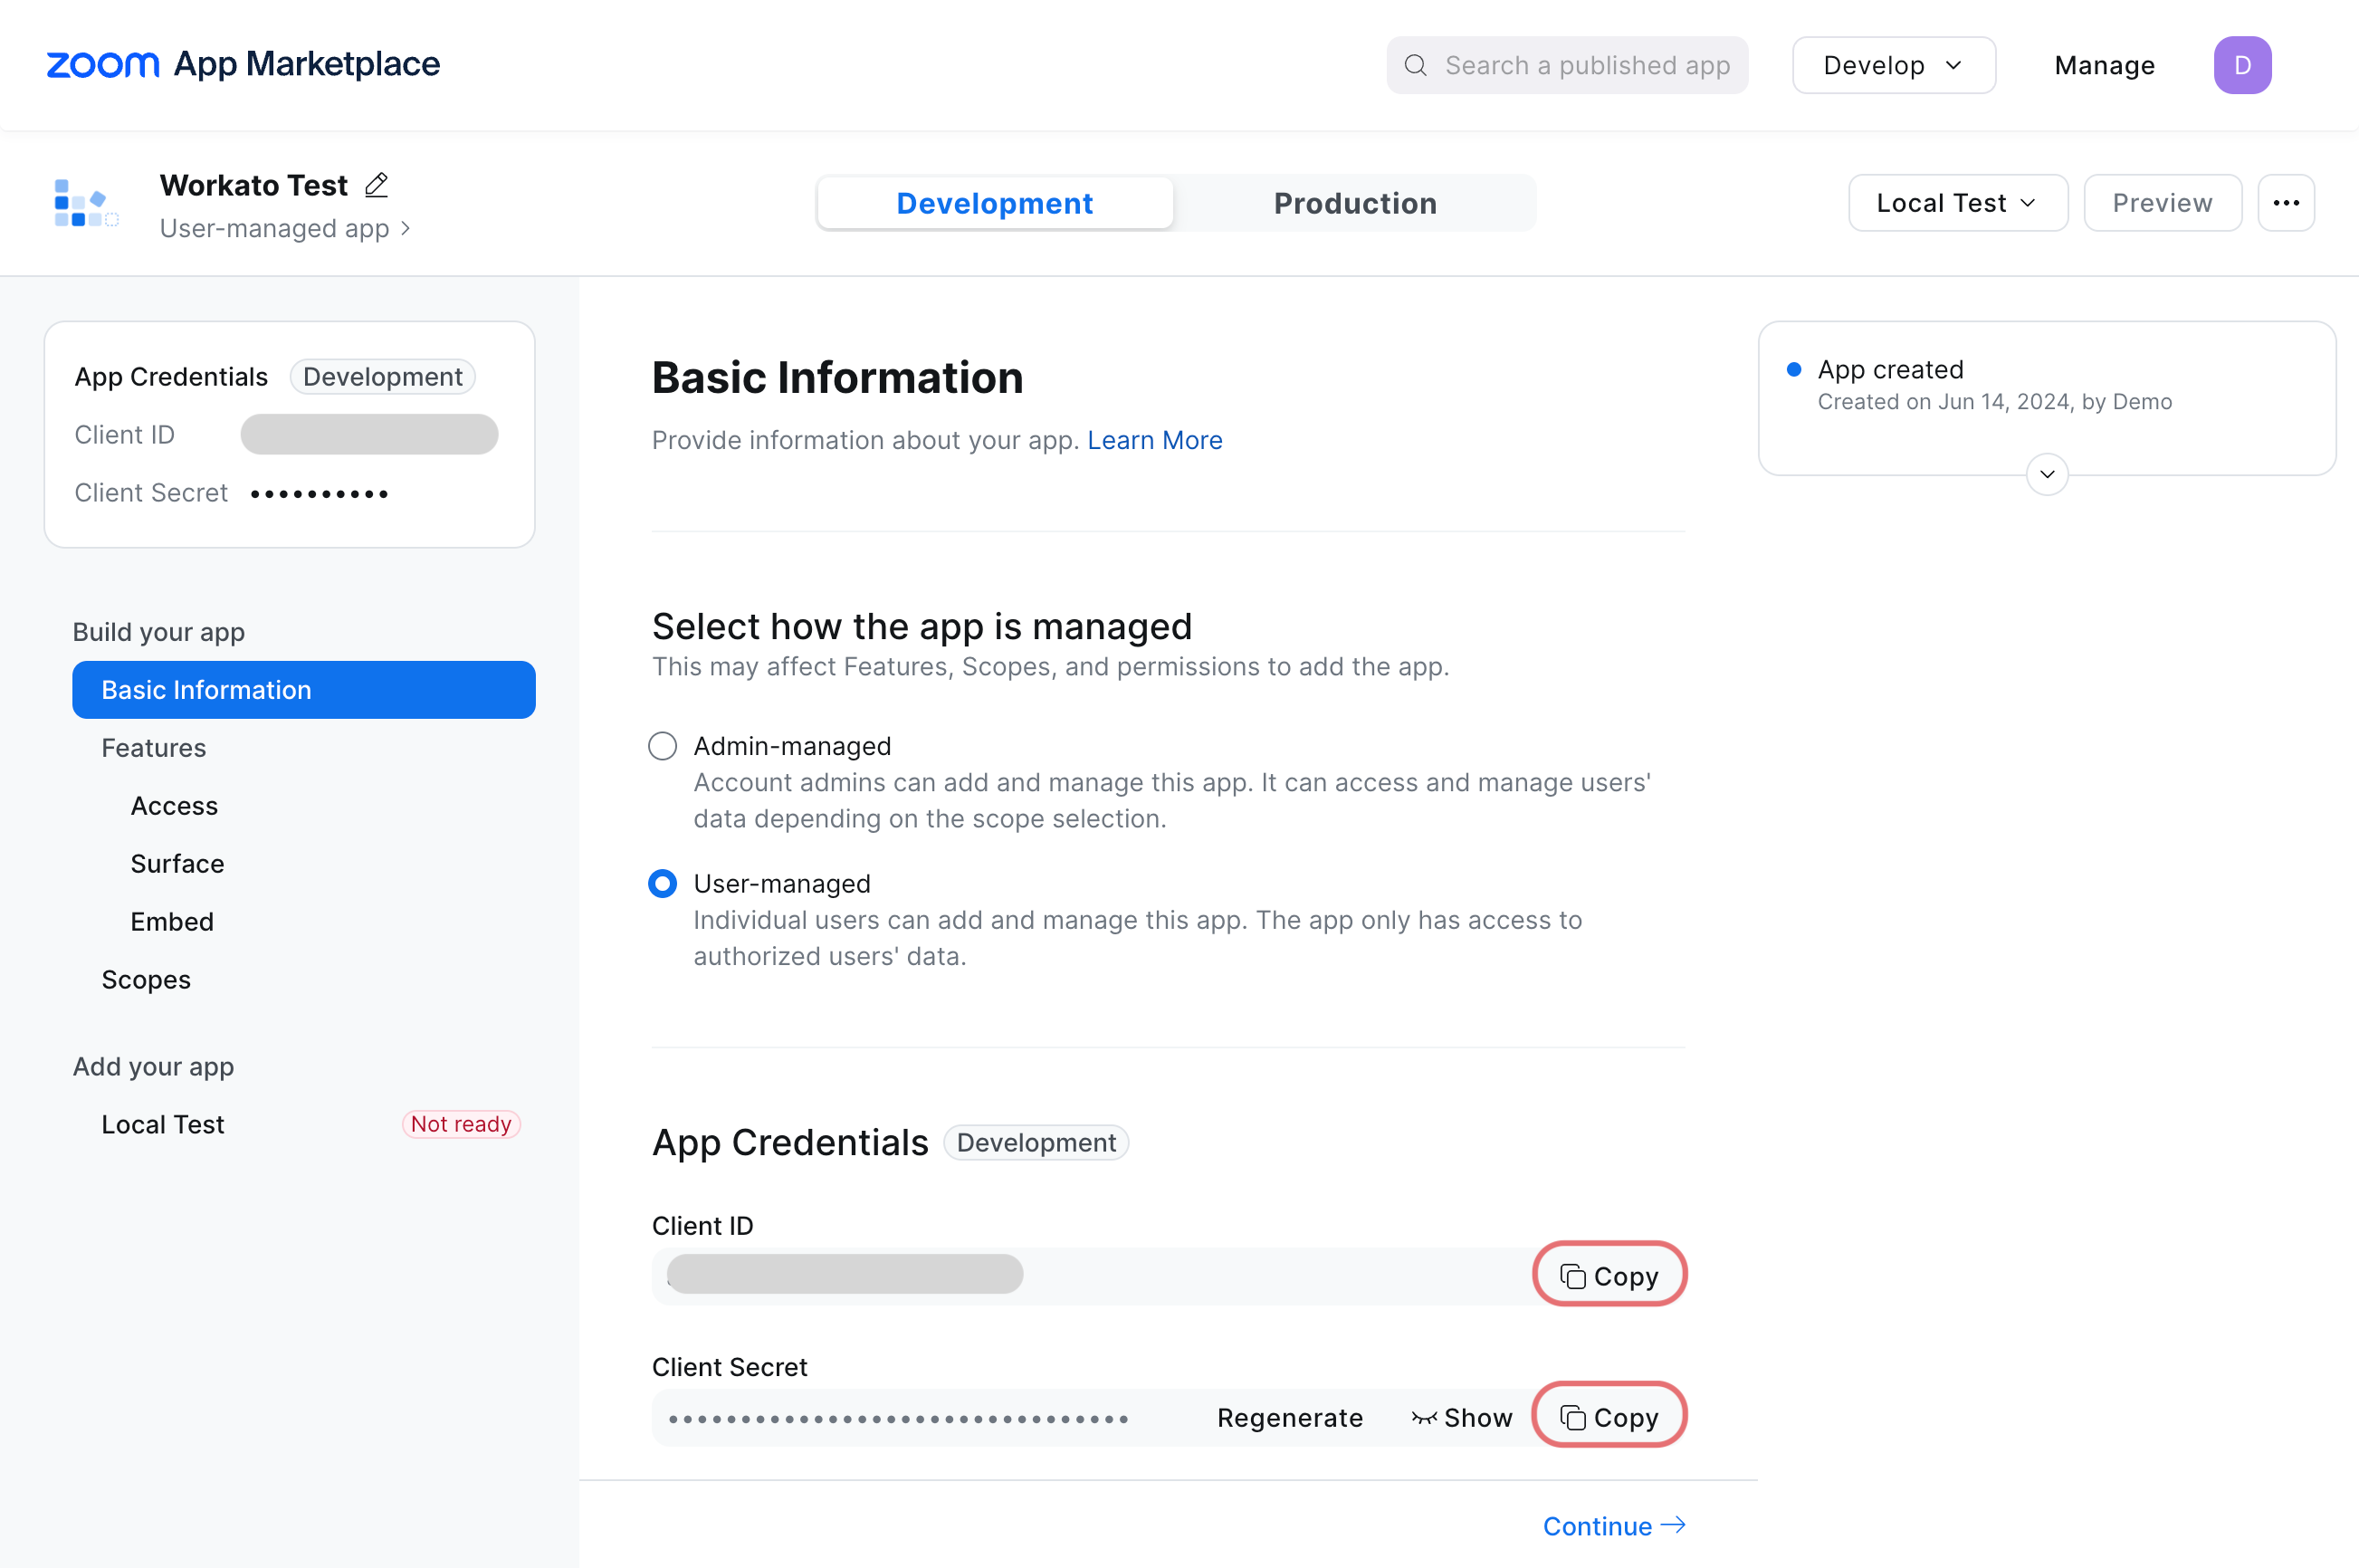 Copy the Client ID and Client Secret
Enter https://www.workato.com/oauth/callback in the OAuth Redirect URL field.
Optional. Configure settings in the Access, Surface, and Embed tabs as required.
Go to Scopes and click + Add Scopes to add the required scopes.
Search for and select the required scopes for your connection.
Click Done.
Go to the Local Test tab and select Preview your app listing page to ensure your settings are properly configured.
Return to the New custom profile page in Workato and paste the Client ID and Client secret into their respective fields.
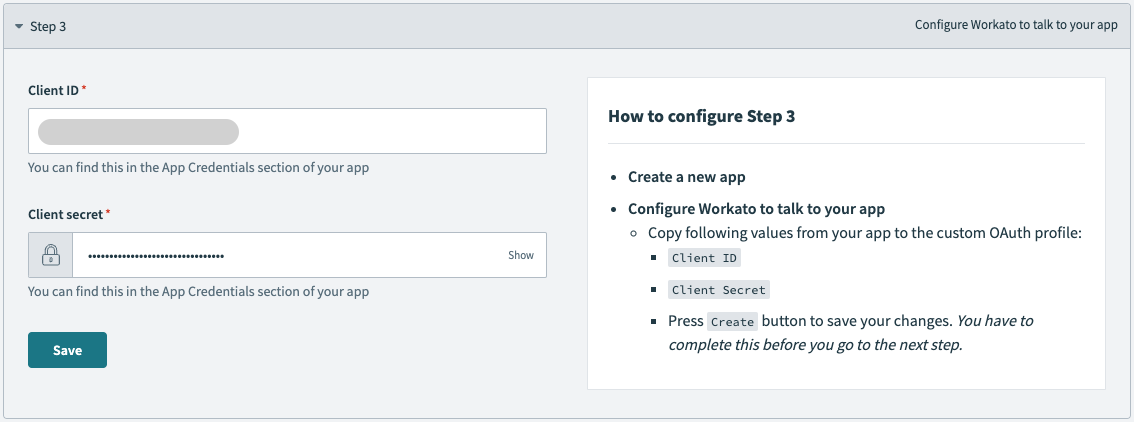 Paste the client ID and client secret
Click Save.
Connect to Zoom with OAuth 2.0 authentication
View connect to Zoom with OAuth 2.0 authentication steps
Complete the following steps to connect to Zoom in Workato:
Click Create > Connection.
Search for Zoom and select it as your app.
Enter a name for your connection in the Connection name field.
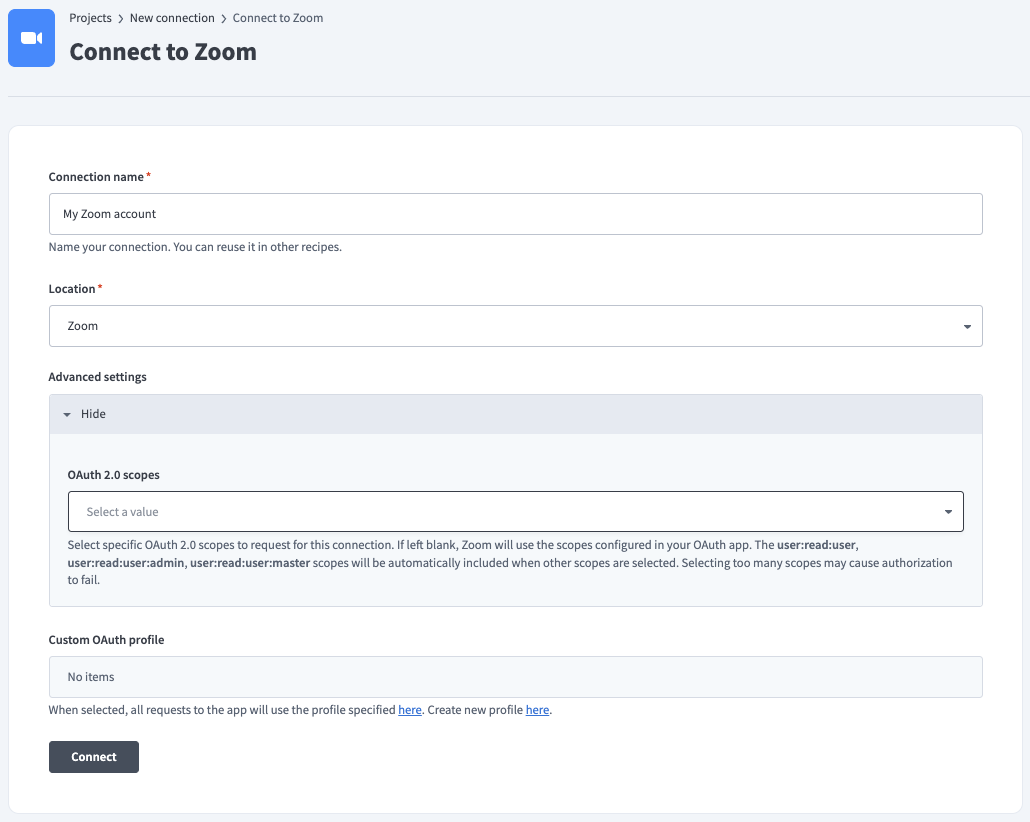 Name your connection
Optional. Expand the Advanced settings section and use the OAuth 2.0 scopes drop-down menu to specify OAuth scopes to request for your connection.
Optional. Use the Custom OAuth profile drop-down menu to select a custom OAuth profile to use for the connection.
Click Connect.
Sign in to your Zoom account.
Gmail connection setup steps (optional)
View Gmail connection setup steps
REQUIRED CONFIGURATION
Set enabled_platforms to gmail in the server configuration to draft and send follow-up emails through Gmail.
Workato supports OAuth 2.0 authentication and Service account authentication for Gmail.
Gmail minimum and default scopes
The See your primary Google Account email address scope is required to establish a connection at a minimum.
Workato requests the following scopes by default if you don't request specific scopes:
- See your primary Google Account email address
- See and edit your email labels
- Send email on your behalf
- View your email messages and settings
- Read, compose, and send emails from your Gmail account
Ensure your Google Workspace Admin grants domain-wide authority delegation to your service account if you plan to use a service account to connect to Gmail. This allows it to impersonate the user email entered during connection setup, with the necessary scopes and permissions.
Gmail OAuth 2.0 authentication
View OAuth 2.0 authentication steps
Complete the following steps to set up an OAuth 2.0 connection:
Sign in to your Workato account and navigate to the project where you plan to add your Gmail connection.
Click Create > Connection (or press C twice), then select Gmail as your connection.
Provide a Connection name that uniquely identifies the Gmail connection instance.
Click the Authentication type menu and select OAuth 2.0.
Optional. Click Advanced settings and select additional OAuth 2.0 scopes. If left blank, the following scopes are requested:
- See your primary Google Account email address
- See and edit your email labels
- Send email on your behalf
- View your email messages and settings
- Read, compose, and send emails from your Gmail account
Optional. Use the Custom OAuth profile drop-down menu to select a custom OAuth profile for your connection.
Click Sign in with Google and sign in to your Google account to complete the setup.
Gmail service account authentication
View Service account authentication steps
A Google service account is a specialized Google account associated with a Google Cloud Project (GCP) that can run API requests on your behalf.
Service accounts provide the following benefits:
- Continuous operation: Service accounts ensure that operations continue even if individual user permissions change.
- Dedicated permissions: Service accounts can only access projects that you share with them.
- Dedicated API quotas: You can manage a service account's API quotas through GCP and request quota increases directly from Google.
Refer to the Google service account documentation to learn more about service accounts.
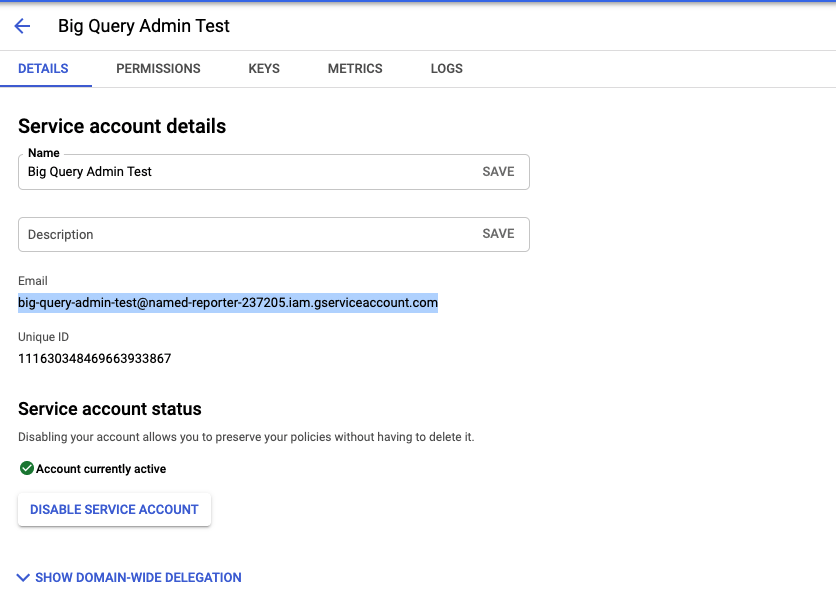 Obtain a GCP Project service account email
Set up a Google service account
View Google service account setup steps
Complete the following steps to set up a Google service account:
Create a service account in your GCP project.
Go to IAM & Admin > Service accounts. Ensure your dashboard is scoped to the project that contains your service account.
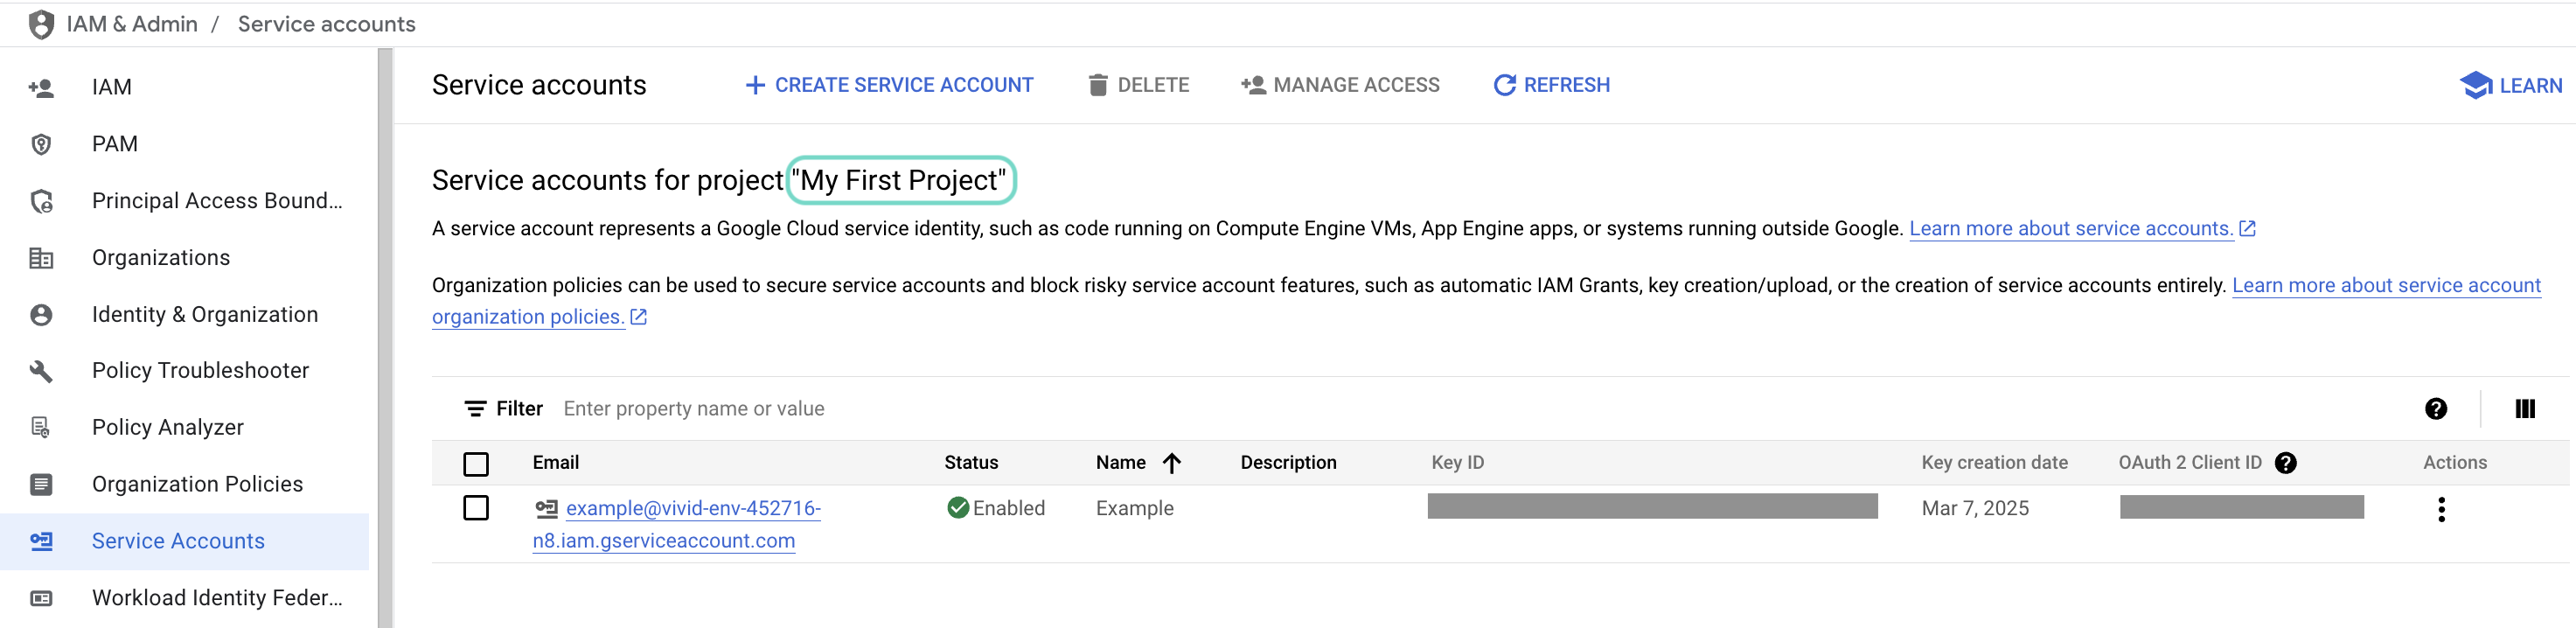 Check the scope of your dashboard.
Click the Email of the service account you intend to use.
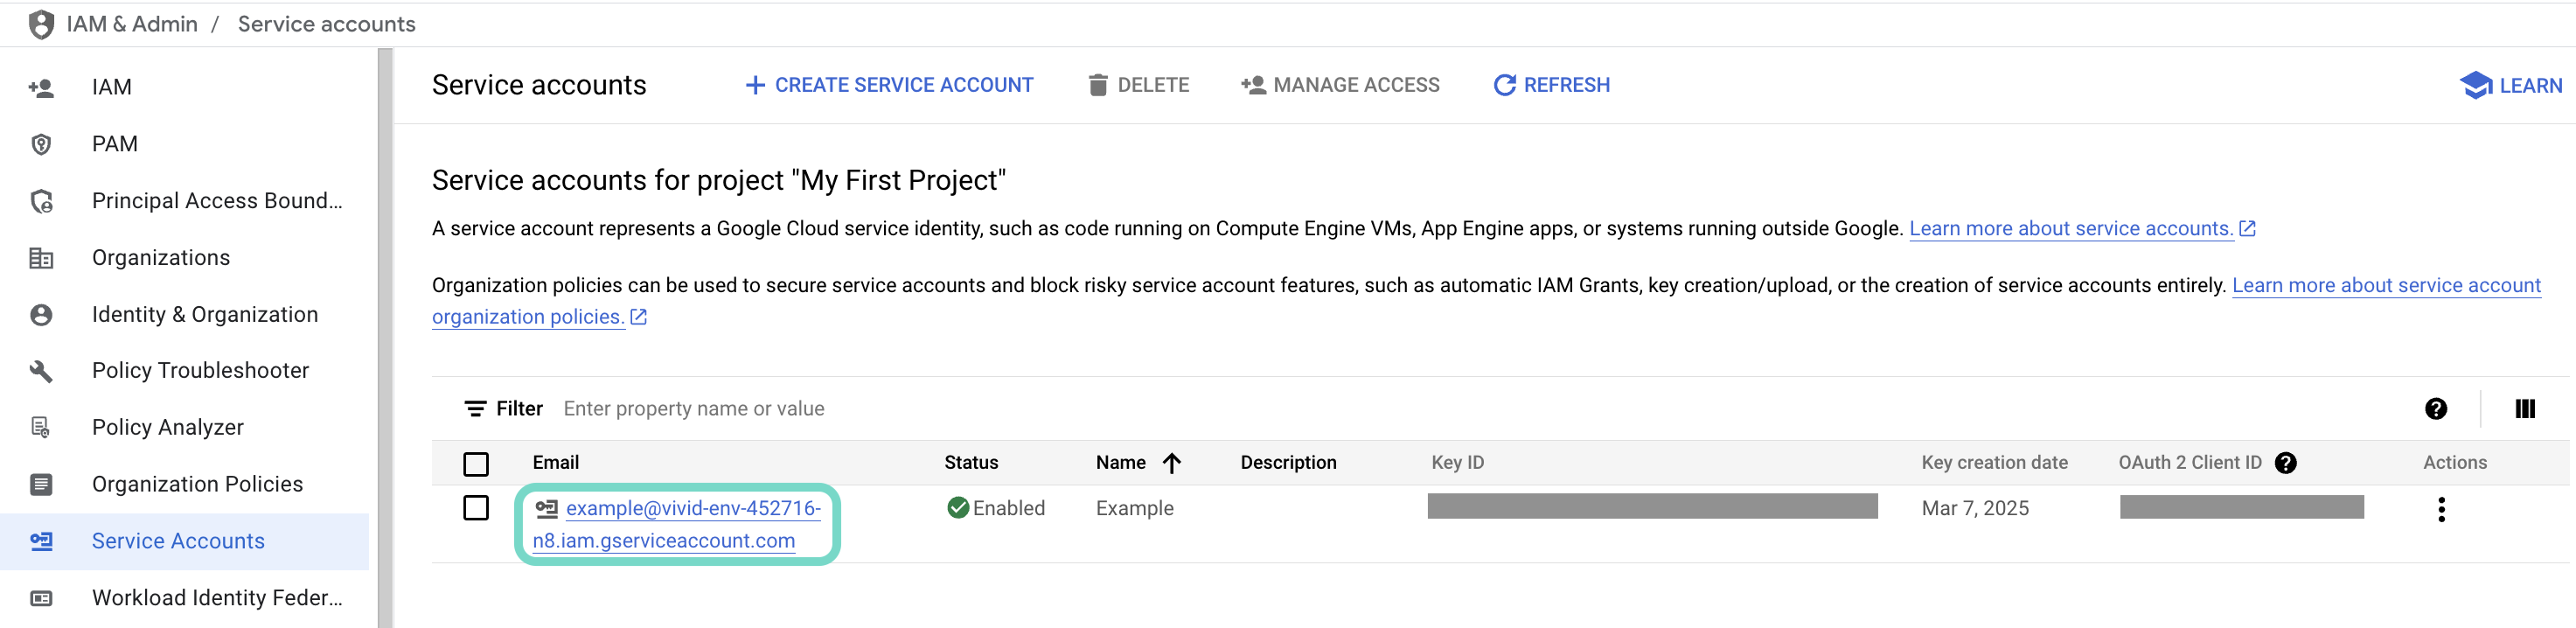 Click the Email of the service account you intend to use.
Copy the service account's Email and save it to configure your connection later.
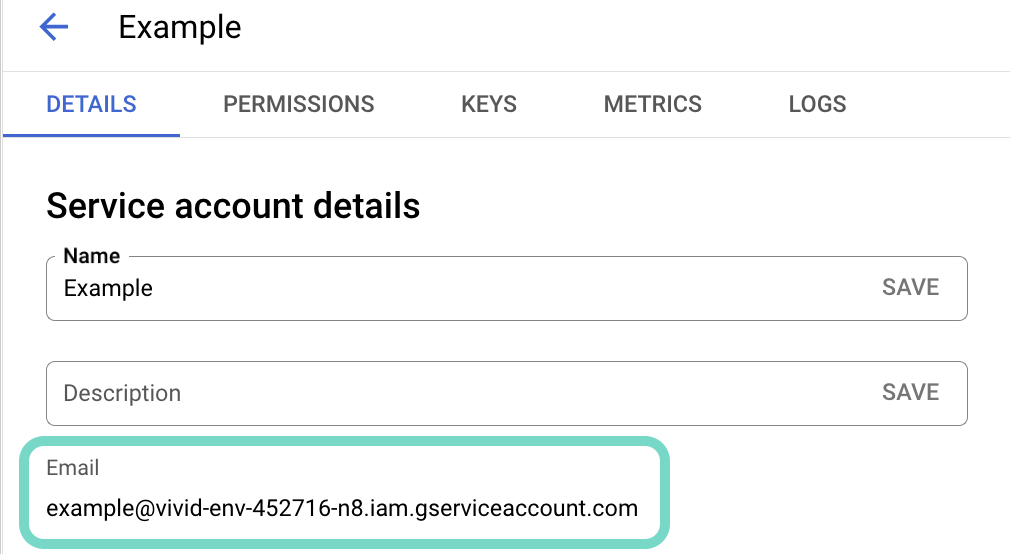 Copy the account's Email.
Go to the KEYS tab.
Generate a private key and download it in JSON format. You can only download the key once.
Open the JSON file, then copy the entire private key from -----BEGIN PRIVATE KEY----- to -----END PRIVATE KEY-----\n (inclusive) and save it to configure your connection later.
Connect to a Gmail service account in Workato
View Connect to a service account in Workato steps
Complete the following steps to set up a service account connection:
Sign in to your Workato account and navigate to the project where you plan to add your Gmail connection.
Click Create > Connection (or press C twice), then select Gmail as your connection.
Select the Authentication type drop-down menu.
Click Sign in with Google and sign in to your Google account to complete the setup.
Outlook connection setup steps (optional)
View Outlook connection setup steps
REQUIRED CONFIGURATION
Set enabled_platforms to outlook in the server configuration to draft and send follow-up emails through Outlook.
The Outlook connector supports the following authentication types:
- Authorization code grant authentication (OAuth 2.0)
- Client credentials-based authentication (OAuth 2.0): Only available for tenant-specific connections
MICROSOFT MFA ENFORCEMENT
Microsoft is rolling out mandatory multifactor authentication (MFA) gradually to different applications and accounts in phases. This enforcement continues throughout 2025 and beyond. Refer to the Microsoft Mandatory multifactor authentication for Azure and admin portals documentation for more information.
We strongly recommend enabling MFA now for all Microsoft accounts used with Workato to avoid service disruptions from short-notice enforcement changes.
Complete the following steps to maintain uninterrupted service:
Enable MFA for your Microsoft organization following the Microsoft MFA setup guide. Refer to Set up multifactor authentication for Microsoft 365 for more information.
Reconnect your Microsoft connection in Workato.
Complete the OAuth flow with MFA when prompted.
Test your recipes to ensure they work with the updated connection.
Authorization code grant authentication (OAuth 2.0)
View authorization code grant authentication steps
This authentication method requires the following value for tenant-specific account types:
- Tenant ID/Domain
Outlook minimum and default scopes (authorization code grant)
View minimum and default scopes
The Salesforce, Gong, Zoom, Gmail, and Outlook connector requests the following scopes for authorization code grant connections by default. These scopes are necessary to use all of the connector's triggers and actions. Additionally, you must assign these permissions to the Workato app as Delegated permissions in the Azure portal.
Mail.SendMail.ReadWriteMail.ReadWrite.SharedCalendars.ReadWriteCalendars.ReadWrite.SharedUser.Readoffline_access
The following minimum scopes are required to establish a connection to Salesforce, Gong, Zoom, Gmail, and Outlook using authorization code grant authentication:
User.Readoffline_access
Outlook setup for authorization code grant authentication
Complete the following steps to set up Outlook for authorization code grant authentication:
- Register the Workato App in Azure portal
- Assign permissions to your app
- Obtain the Directory (tenant) ID from the Azure portal
Register the Workato app in the Azure portal
View register the Workato app in the Azure portal steps
Complete the following steps to register the Workato app in the Azure portal:
Sign in to the Azure portal.
Select App registrations > + New registration.
Enter a unique name for the application.
Use the Supported account types drop-down menu to select an account type.
Select Web from the Select a platform drop-down menu.
Use the following URI for the Redirect URI:
https://www.workato.com/oauth/callbackSelect Register.
Assign permissions to your app
View assign permissions to your app steps
Complete the following steps to assign permissions to your app:
Go to your newly registered app and select Manage > API permissions.
Click + Add a permission and select Microsoft Graph.
Add the required permissions as outlined in Minimum and default scopes. Depending on your connection type, you must assign Application or Delegated permissions.
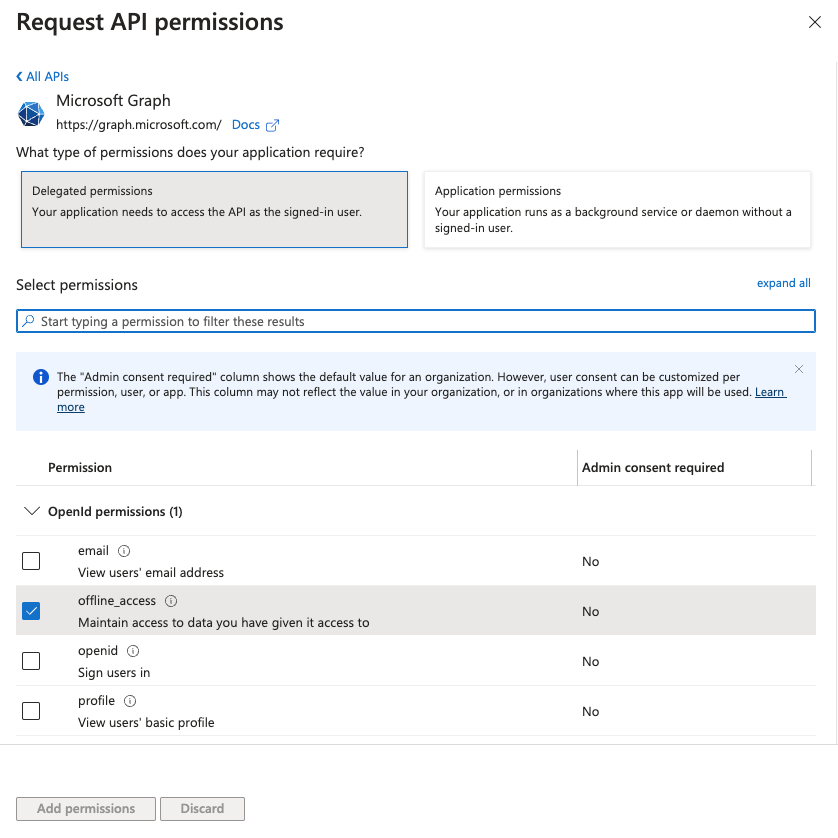 Add permissions
Click Add permissions.
Admin consent is required for specific permissions. Refer to Connect Microsoft Entra ID to the Outlook connector to learn more.
Obtain the Directory (tenant) ID from the Azure portal
View obtain the Directory (tenant) ID from the Azure portal steps
This step is required if you plan to use a tenant-specific account. You can skip this step if you plan to use a common, consumer, or organization account type for your connection.
Complete the following steps to obtain the Directory (tenant) ID from the Azure portal:
Go to the Overview > Essentials section.
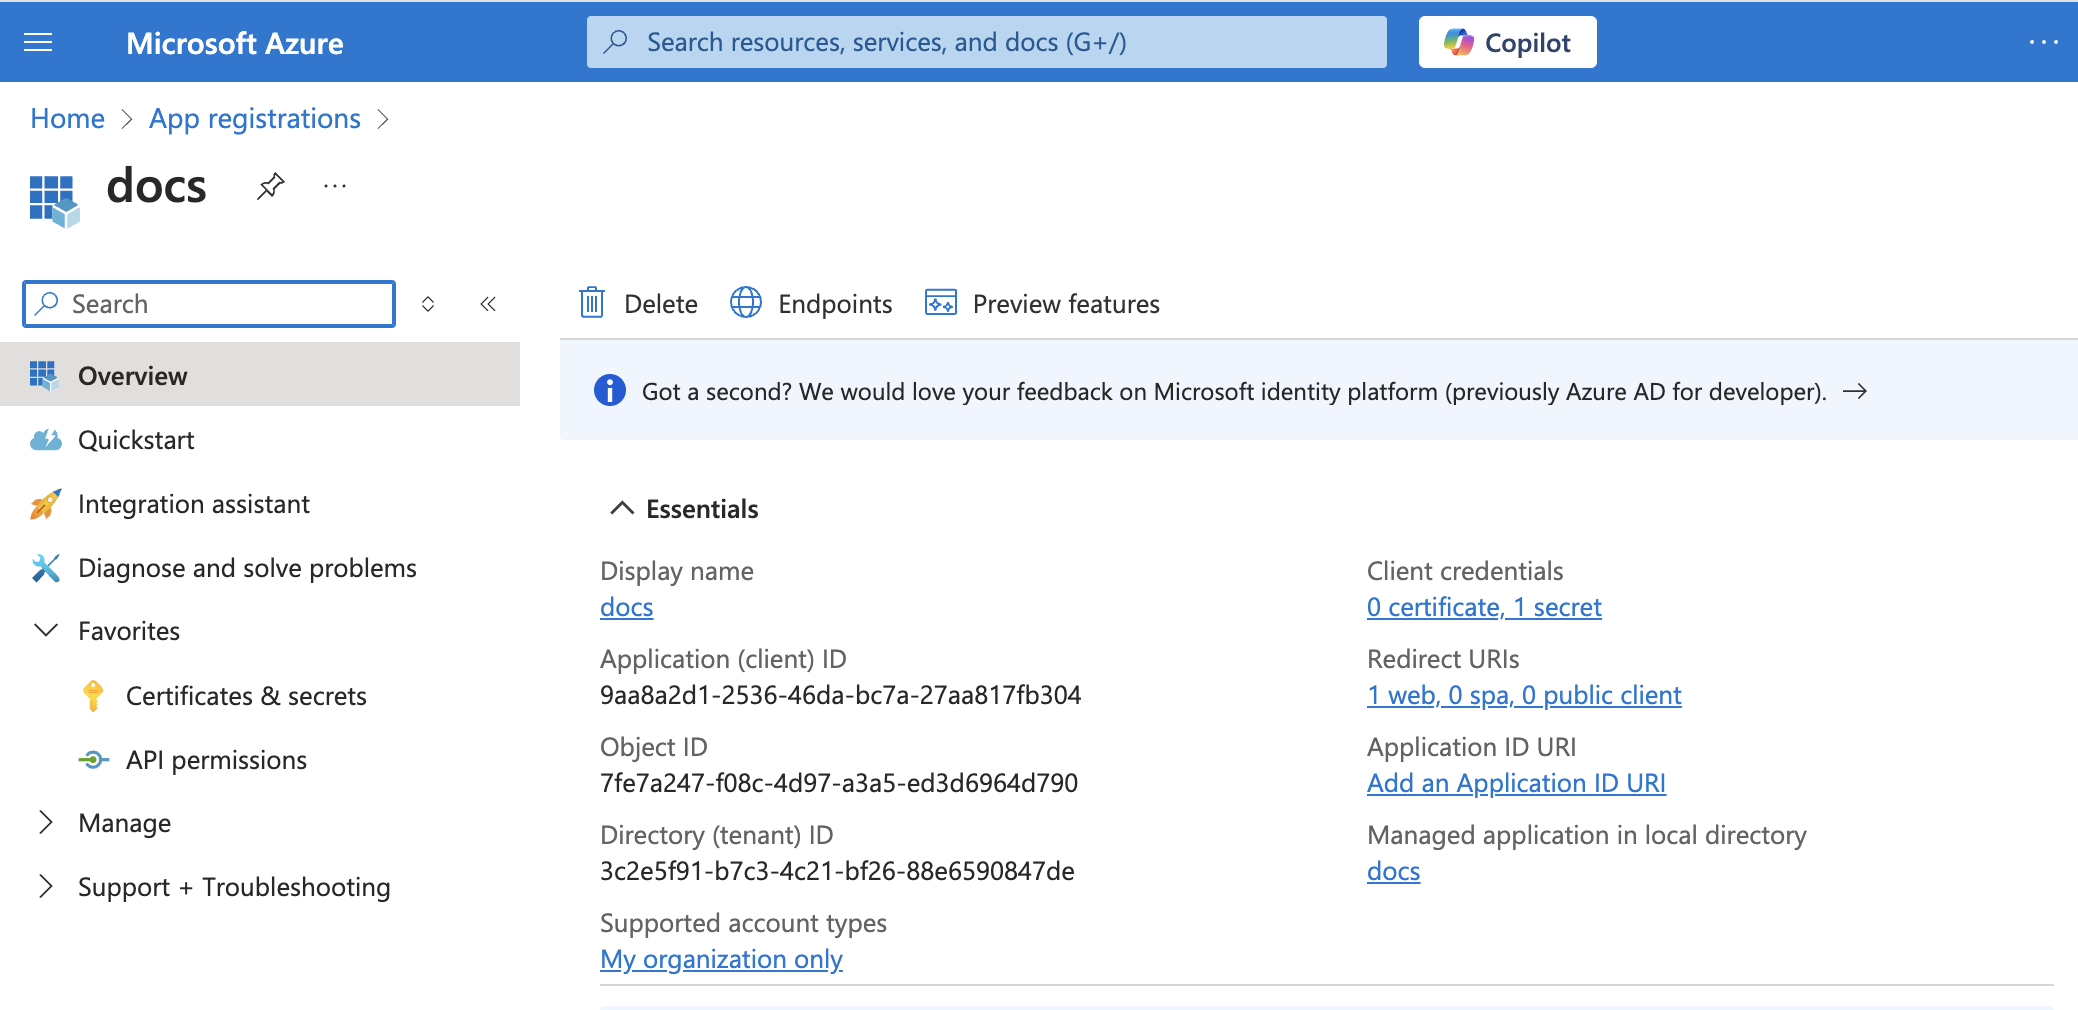 App details
Copy and save the Directory (tenant) ID for use in Workato.
Connect to Outlook with authorization code grant authentication
View connect to Outlook with authorization code grant authentication steps
Complete the following steps to set up an authorization code grant connection to Outlook in Workato:
Click Create > Connection or press C twice.
Search for Outlook and select it as your app.
Enter a name for your connection in the Connection name field.
Use the Location drop-down menu to select the project where you plan to store the connection.
Use the Connection account type drop-down menu to select the type of account you plan to use. The available choices are Common, Tenant-specific, Consumer, and Organization.
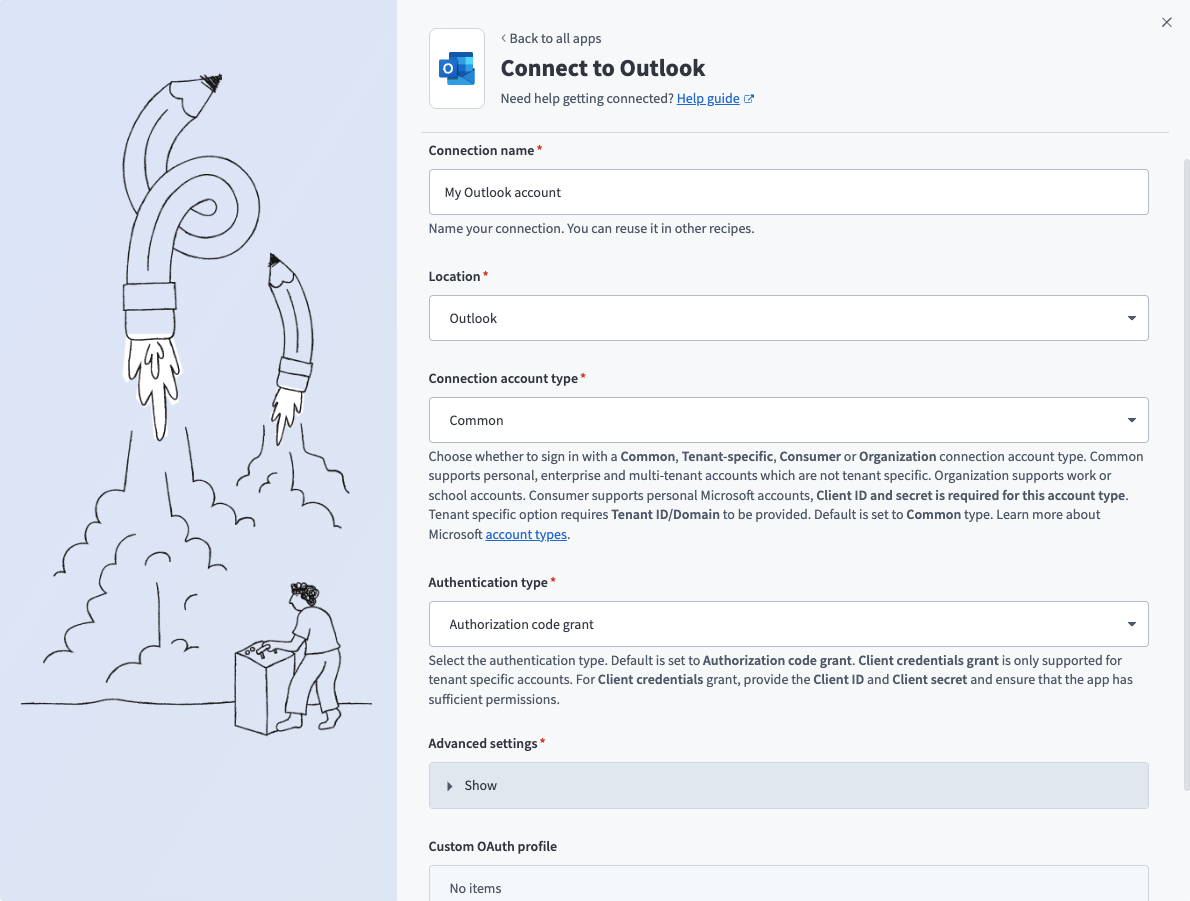 Common connections
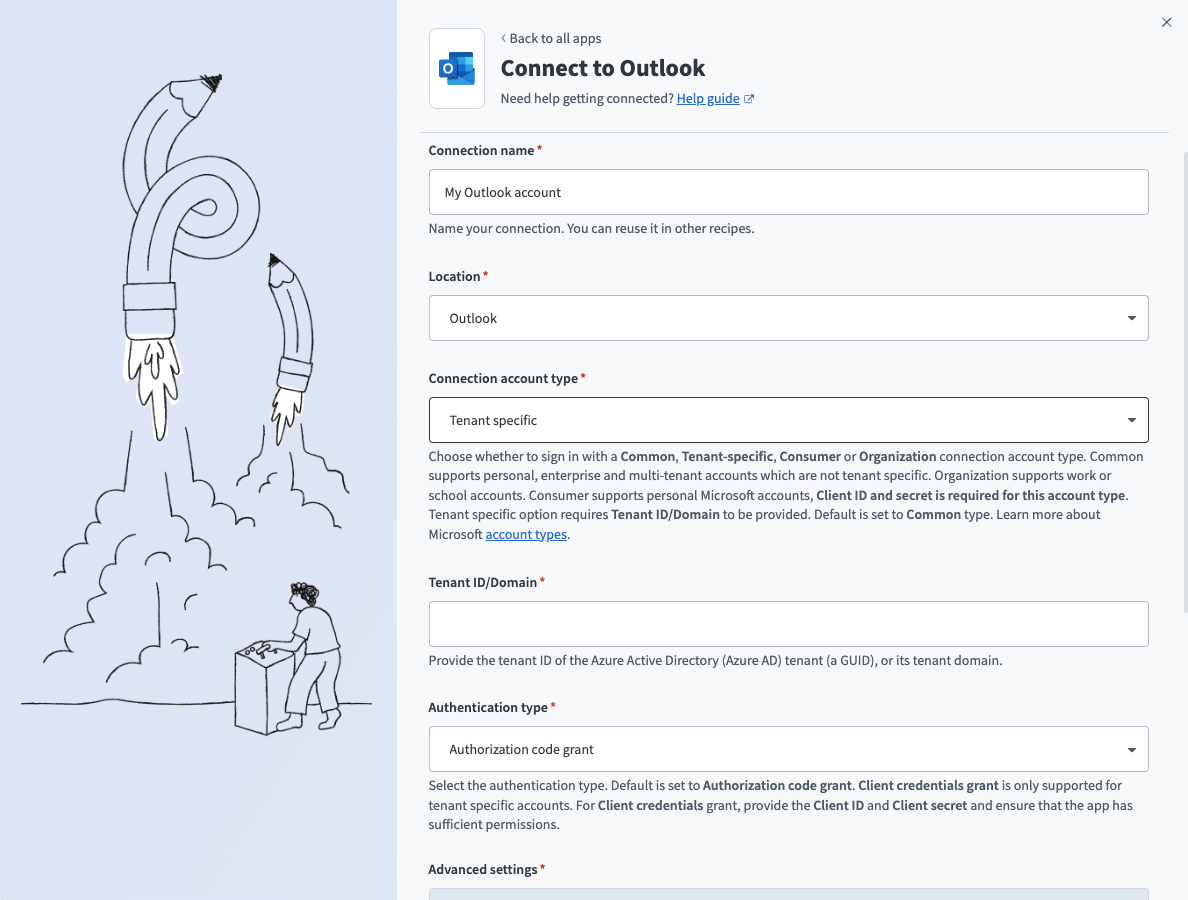 Tenant specific connections
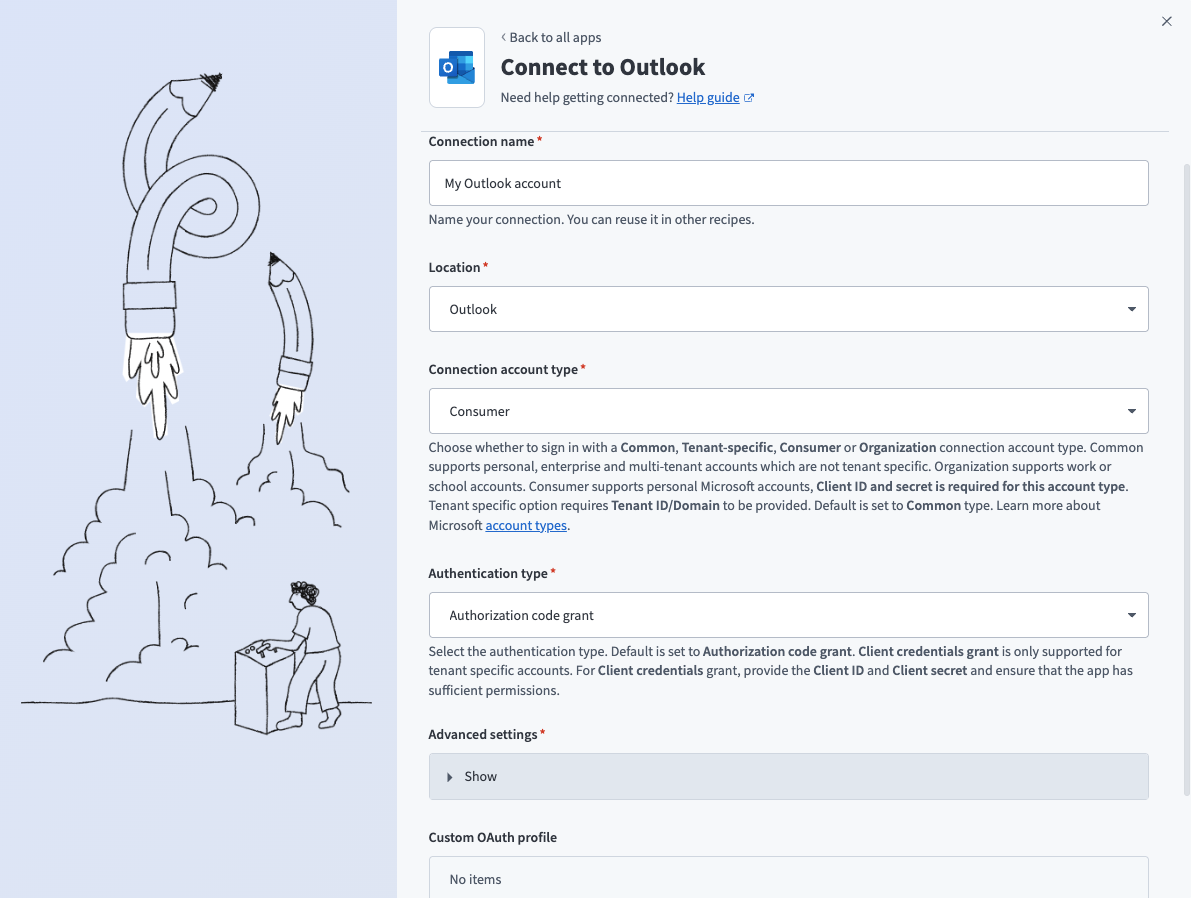 Consumer connections
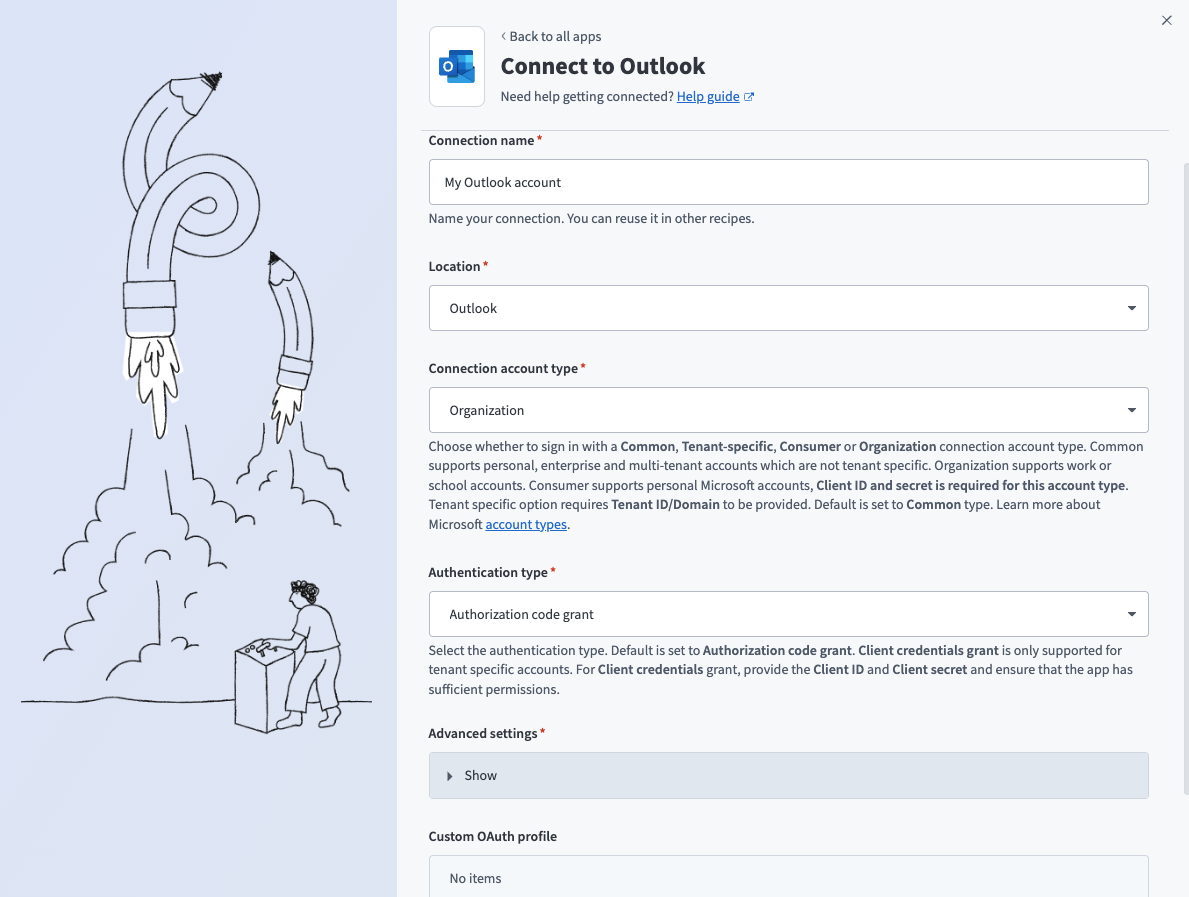 Organization connections
Use the Authentication type drop-down menu to select Authorization code grant.
Optional. The connector requests a set of scopes necessary for all triggers and actions to function properly by default. Go to the Advanced settings section to manually select the permissions instead. The minimum permissions required to establish a connection are User.Read and offline_access. Workato always requests these permissions regardless of the permissions you select. Refer to Minimum and default scopes for more information.
Optional. Use the Custom OAuth profile drop-down menu to select a custom OAuth profile for your connection. Refer to Outlook custom OAuth for more information.
Click Sign in with Microsoft.
Client credentials-based authentication (OAuth 2.0)
View client credentials-based authentication steps
Outlook minimum and default scopes (client credentials)
View minimum and default scopes
We recommend the following scopes for client credentials connections. These scopes are necessary to use all of this connector's triggers and actions. Additionally, you must assign these permissions to the Workato app as Application permissions in the Azure portal.
Calendars.ReadCalendars.ReadWriteContacts.ReadContacts.ReadWriteMail.ReadMail.ReadWriteMail.Send
The following minimum scopes are required to establish a connection to Salesforce, Gong, Zoom, Gmail, and Outlook with client credentials-based authentication:
Mail.Read
Outlook setup for client credentials-based authentication
Complete the following steps to set up Outlook for client credentials-based authentication:
- Register the Workato app in the Azure portal
- Assign permissions to your app
- Generate a client secret
- Obtain the Application (client) ID, Object ID, and Directory (tenant) ID from the Azure portal
- Obtain the User ID from the Azure portal
COMPATIBLE AUTHENTICATION
Client credentials-based authentication is only compatible with tenant-specific connections.
Register the Workato app in the Azure portal
View Register the Workato app in the Azure portal steps
Complete the following steps to register the Workato app in the Azure portal:
Sign in to the Azure portal.
Select App registrations > + New registration.
Enter a unique name for the application.
Use the Supported account types drop-down menu to select an account type.
Select Web from the Select a platform drop-down menu.
Use the following URI for the Redirect URI:
https://www.workato.com/oauth/callbackSelect Register.
Assign permissions to your app
View assign permissions to your app steps
Complete the following steps to assign permissions to your app:
Go to your newly registered app and select Manage > API permissions.
Click + Add a permission and select Microsoft Graph.
Add the required permissions as outlined in Minimum and default scopes. Depending on your connection type, you must assign Application or Delegated permissions.
Add permissions
Click Add permissions.
Admin consent is required for specific permissions. Refer to Connect Microsoft Entra ID to the Outlook connector to learn more.
Generate a client secret
View generate a client secret steps
Complete the following steps to generate a client secret:
Go to Manage > Certificates & Secrets > Client secrets.
Click + New client secret.
Provide a Description for the client secret and specify an Expires date.
Click Add.
Copy and save the client secret Value—not the Secret ID—for use in Workato.
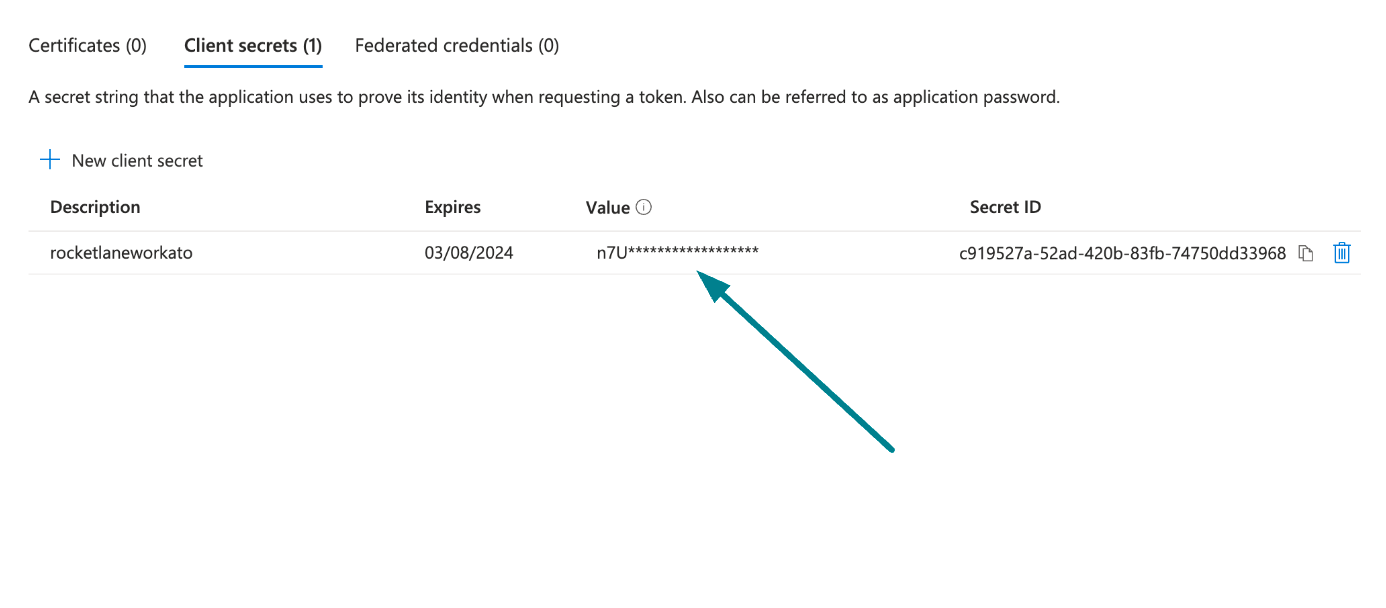 Copy and save the client secret value
Obtain the Application (client) ID, Object ID, and Directory (tenant) ID from the Azure portal
View obtain the Application (client) ID, Object ID, and Directory (tenant) ID from the Azure portal steps
Complete the following steps to obtain the Application ID, Object ID, and Directory (tenant) ID from the Azure portal:
Go to the Overview > Essentials section.
App details
Copy and save the Application (client) ID, Object ID, and Directory (tenant) ID for use in Workato.
Obtain the User ID from the Azure portal
View obtain the User ID from the Azure portal steps
Complete the following steps to obtain the User ID from the Azure portal:
Go to Home > Users to obtain the User ID.
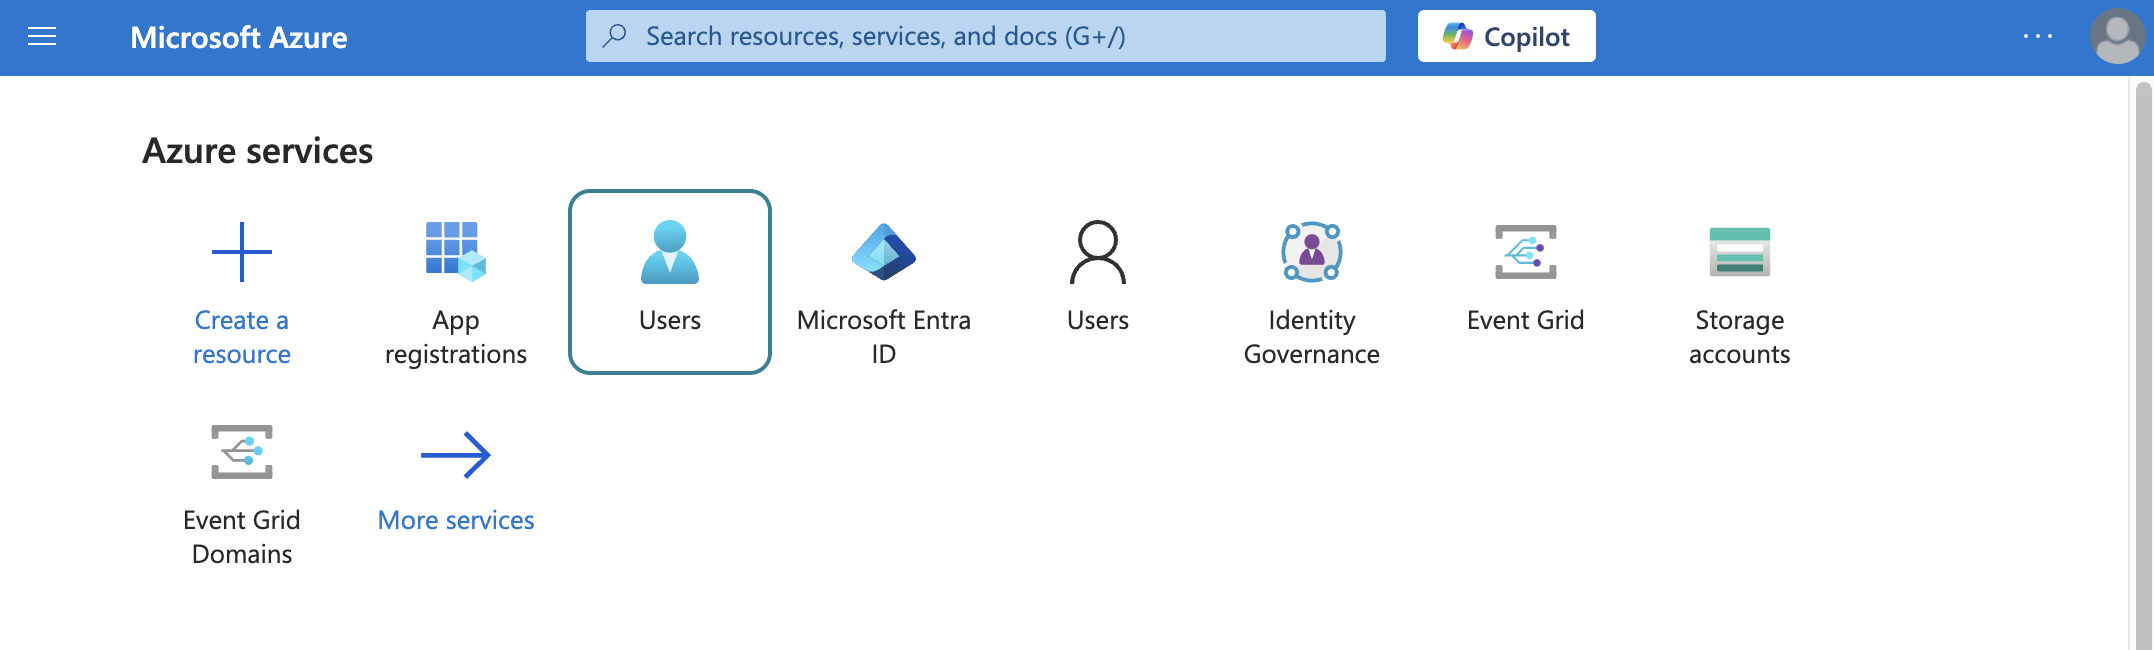 Select users
Search for and select the default user you plan to use to perform operations. This user doesn't establish the connection but is required for performing certain operations that an app can't perform. It's also required in picklists to pull user data. For example, the folder picklist populates folders belonging to the default user.
Copy and save the User principal name. Use this value as the User ID in Workato.
Connect to Outlook with client credentials-based authentication
View connect to Outlook with client credential-based authentication steps
Complete the following steps to set up a client credentials-based connection to Outlook in Workato:
Click Create > Connection or press C twice.
Search for Outlook and select it as your app.
Enter a name for your connection in the Connection name field.
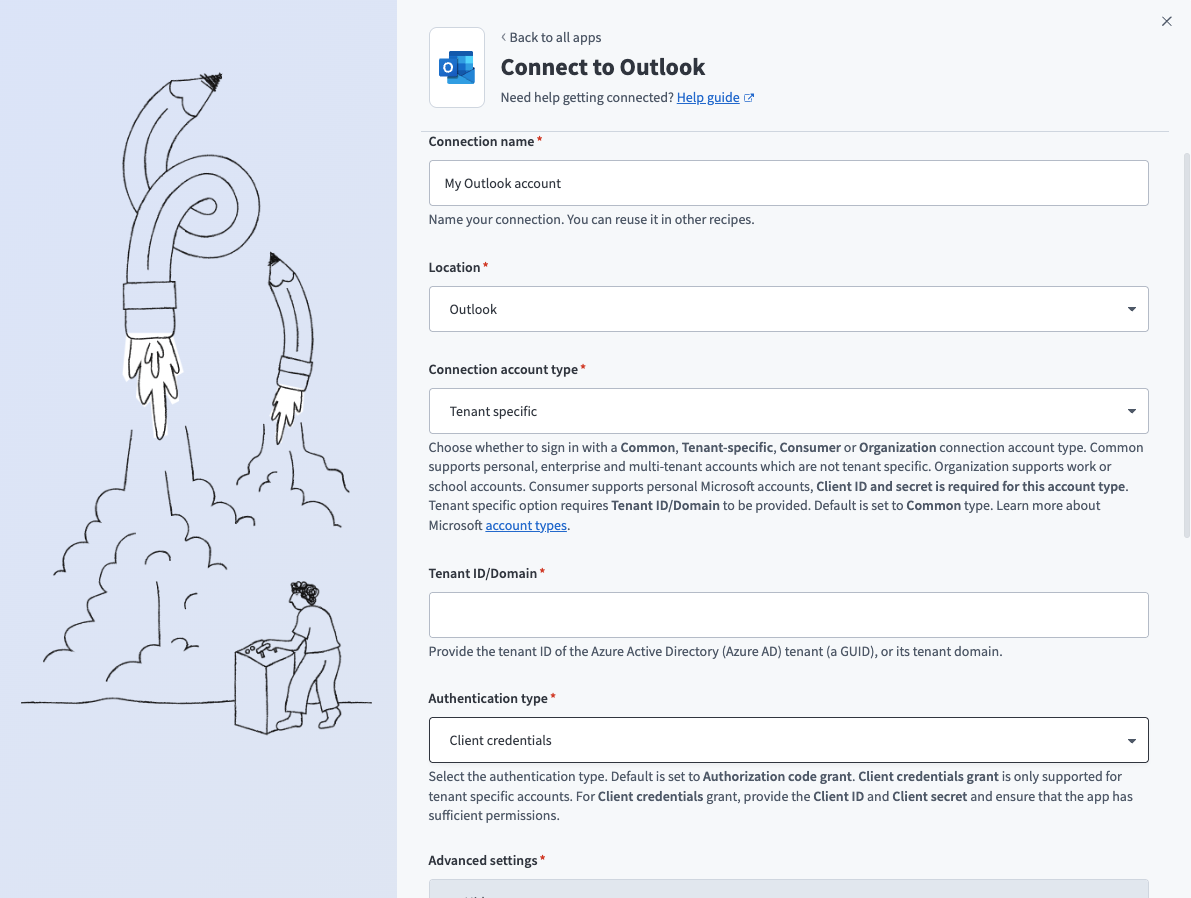 Client credentials connection
Use the Location drop-down menu to select the project where you plan to store the connection.
Select Tenant specific as the Connection account type. This option is specifically designed for users who belong to a particular organization (tenant).
Provide your Tenant ID/Domain. This is the Directory (tenant) ID for your app. Refer to Register an app in Azure for more information.
Use the Authentication type drop-down menu to select Client credentials.
Supply the User ID, Client ID, and Client secret for your app. Refer to Register an app in Azure for more information.
Click Sign in with Microsoft.
Server configuration
Edit the Server Configuration recipe function in the project folder to control this deployment's enabled integrations, Salesforce write permissions, and operational limits:
| Key | Description |
|---|---|
enabled_sources | Choose the transcript source this deployment retrieves calls from: gong or zoom. A deployment can't enable both. |
enabled_platforms | Choose the follow-up email platform this deployment sends through: gmail or outlook. A deployment can't enable both. |
methodology_label | Enter a human-readable label for your organization's sales methodology, such as MEDDIC/MEDDPICC or Value Selling, used for documentation and LLM phrasing. |
write_content_note | Configure whether to create a linked content note when the server writes a Salesforce summary. |
salesforce_fields_allowed_to_update | Enter the allowlist of Salesforce Object.FieldApiName pairs write_summary_to_system_of_record is permitted to write, for example Opportunity.NextStep, Opportunity.Description, and Task.Subject. The LLM must use these exact field names. |
max_schedule_days_out | Enter the bound on how far ahead you can schedule an action. Defaults to 14. |
max_transcript_chars | Enter the maximum number of transcript characters processed in each call. Defaults to 200,000. |
max_activity_lookback_days | Enter the maximum number of days search_call_activities looks back. Defaults to 90. |
data_retention_days | Enter the number of days to retain Workflow State and Audit Log records before a scheduled cleanup job deletes them. Defaults to 60. |
View server configuration steps
Complete the following steps to configure the Post Meeting Actions MCP server:
Sign in to your Workato account and go to Projects.
Go to the project that contains your MCP server.
Open the Server Configuration recipe.
Edit the value in the step for the setting you plan to change. For example, increase max_transcript_chars from 200,000 to 300,000.
Save and start the recipe for the new value to take effect.
How to use Post Meeting Actions MCP server tools
Refer to the following sections for detailed information on available tools.
TOOL CONFIGURATION
A deployed MCP server only exposes the tools for its enabled_sources and enabled_platforms server configuration values. For example, a deployment configured with gong and gmail exposes retrieve_call_transcript_gong and the Gmail follow-up tools, not the Zoom or Outlook variants.
find_target_record tool
The find_target_record tool finds the Salesforce Opportunity related to a meeting. Your LLM uses this tool to match a company or account name to a specific Opportunity. The tool uses search_call_activities or a transcript tool to find the company if you don't name it directly.
Try asking:
What's the Opportunity for my call with Acme?Which account does this call belong to?Find the record for my call with Acme.
search_call_activities tool
The search_call_activities tool finds Salesforce activity history for logged calls or meetings tied to an account within a date range. Your LLM uses this tool to find calls you reference.
Try asking:
Find my last call with Acme.Show me my calls with Acme last month.What calls do I have logged with Acme in the past 30 days?Find the most recent call logged against this Opportunity.
retrieve_call_transcript_gong tool
The retrieve_call_transcript_gong tool retrieves transcript and metadata for a Gong-sourced call by its ID. Your LLM uses this tool to retrieve a transcript after search_call_activities identifies a specific call. The tool resumes any prior progress on the call instead of starting over.
Try asking:
Pull the transcript from my Gong call with Acme.Get the Gong recording for this call.Summarize what was said on my last Gong call with Acme.
retrieve_call_transcript_zoom tool
The retrieve_call_transcript_zoom tool retrieves transcript and metadata for a Zoom-sourced call. Your LLM uses this tool to retrieve a transcript after search_call_activities identifies a specific call.
Try asking:
Pull the transcript from my Zoom call with Acme.Get the Zoom recording summary for this meeting.What was discussed on my Zoom call with Acme?
generate_meeting_summary tool
The generate_meeting_summary tool produces a summary mapped to the configured sales methodology. Your LLM uses this tool to generate a summary after retrieving a transcript, and only passes a different methodology if you explicitly ask for one.
Try asking:
Format my call notes using our sales methodology.Summarize this call using MEDDIC/MEDDPICC.What competitors were mentioned in my call with Acme?Regenerate the summary for this call.
get_salesforce_write_policy tool
The get_salesforce_write_policy tool returns the configured sales methodology and the Salesforce fields allowed for post-meeting writes. Your LLM uses this tool to confirm the configured methodology and fields before generating or writing a summary.
Try asking:
What sales methodology is this deployment using?Which Salesforce fields can this write to?Show me the write policy for this deployment.
write_summary_to_system_of_record tool
The write_summary_to_system_of_record tool writes a summary to Salesforce as Opportunity fields and a Task, with an optional linked Note. Your LLM uses this tool to commit a summary after showing you a preview and receiving your confirmation.
Try asking:
Update Salesforce based on my call with Acme.Change the next step to "Schedule an executive sponsor call" before you save it.Show me what will be written before you save it.Go ahead and save this summary to Salesforce.
retrieve_kb_resources tool
The retrieve_kb_resources tool retrieves supporting customer stories or product resources. Your LLM uses this tool to pull in supporting resources when you ask for a resourced follow-up. This doesn't retrieve a full call transcript.
Try asking:
Find relevant case studies for this call.Pull product resources related to this summary.What customer stories match the objections raised in this call?
search_transcript_chunks tool
The search_transcript_chunks tool retrieves chunked transcript documents for a call, or runs a semantic search across transcript chunks. Your LLM uses this tool to find a specific mention or topic within a call without regenerating the whole summary.
Try asking:
Search my call with Acme for any mention of budget.Find where the customer talked about renewal timing in this call.Pull the transcript chunks that mention our top competitor.
draft_followup_email_gmail tool
The draft_followup_email_gmail tool drafts a follow-up email to a prospect through Gmail, optionally with supporting resources. Your LLM uses this tool to draft an email and show you the draft for approval before calling the matching send tool.
Try asking:
Draft a follow-up email for my call with Acme.Draft a follow-up in Gmail including relevant case studies.Write a follow-up email to [email protected] about this call.Redraft the follow-up email in a more formal tone.
draft_followup_email_outlook tool
The draft_followup_email_outlook tool drafts a follow-up email to a prospect through Outlook, optionally with supporting resources. Your LLM uses this tool to draft an email and show you the draft for approval before calling the matching send tool.
Try asking:
Draft a follow-up email for my call with Acme in Outlook.Write an Outlook follow-up including the case studies you found.Draft a follow-up to [email protected] about this call.Redraft the Outlook follow-up in a more formal tone.
send_followup_email_gmail tool
The send_followup_email_gmail tool sends an approved follow-up email through Gmail. Your LLM uses this tool to send an email you approved. Sends are immediate. This tool doesn't support scheduling.
Try asking:
Send the follow-up email.Go ahead and send the Gmail draft.Send this email now that I've approved it.
send_followup_email_outlook tool
The send_followup_email_outlook tool sends an approved follow-up email through Outlook. Your LLM uses this tool to send an email you approved. Sends are immediate. This tool doesn't support scheduling.
Try asking:
Send the follow-up email.Go ahead and send the Outlook draft.Send this email now that I've approved it.
list_pending_meetings tool
The list_pending_meetings tool lists meetings being processed by this server. Your LLM uses this tool to surface what you still owe follow-up on, without requiring you to name a specific meeting.
Try asking:
What calls do I still owe follow-up on?Show me my pending meetings from the last two weeks.What have I not finished processing yet?
Getting started
View and manage your MCP server tools in the Details tab Tools section. Tool management provides the following capabilities:
TOOLS MUST BE STARTED
Your LLM can only access active tools in your MCP server connector.
Last updated: