Excel MCP server
The Excel MCP server enables LLMs to read, update, and structurally modify Microsoft Excel workbooks stored in Microsoft 365 through natural conversation. It provides tools to access tabular data, append and update rows, manage worksheets, and perform atomic multi-step updates without requiring direct interaction with the Excel interface.
Uses
Use the Excel MCP server to perform the following actions:
- Retrieve workbook metadata including worksheet names and Excel Tables
- Read cell data, formulas, and table contents from worksheets
- Append new rows to trackers or data tables
- Update specific cell values or formulas in ranges
- Perform atomic multi-step updates that must succeed or fail together
- Add new worksheets to workbooks
- Rename existing worksheets
- Delete worksheets when explicitly requested
- Access named ranges and Excel Table definitions
Example prompts
What worksheets are in my Sales Tracker workbook?Read the data from the Q1 Revenue sheet.Add these three deals to my Pipeline tracker.Update the status column to 'Closed Won' for the Acme Corp row.Create a new January 2026 tab and add headers.Rename Sheet1 to 'Sales Pipeline'.Get the current session ID for this workbook.Show me the data in the Revenue table.
Excel MCP server tools
The Excel MCP server provides the following tools:
| Tool | Description |
|---|---|
| get_workbook_info | Retrieves worksheet names, named ranges, Excel Table definitions, and session metadata for a workbook. |
| get_workbook_content | Retrieves bounded cell data, formulas, and table contents from ranges or worksheets you specify. |
| append_rows | Appends one or more rows of data to an existing worksheet or Excel Table. |
| update_range_values | Updates values or formulas in a range or Excel Table you specify. |
| batch_update | Applies multiple workbook updates as a single atomic change. |
| add_worksheet | Adds a new worksheet (tab) to an existing workbook. |
| rename_worksheet | Renames an existing worksheet (tab) in a workbook. |
| delete_worksheet | Deletes an existing worksheet (tab) from a workbook. |
Install the Excel MCP server
Complete the following steps to install a prebuilt MCP server to your project:
Sign in to your Workato account.
Go to AI Hub > MCP servers.
Click + Create MCP server.
Go to the Start with pre-built MCP Servers using your connected apps section and select the prebuilt MCP server you plan to use.
Click Use this server.
Provide a name for your MCP server in the Server name field.
Use the Location drop-down menu to select the project for the MCP server.
Go to the Connections section and connect to your app account.
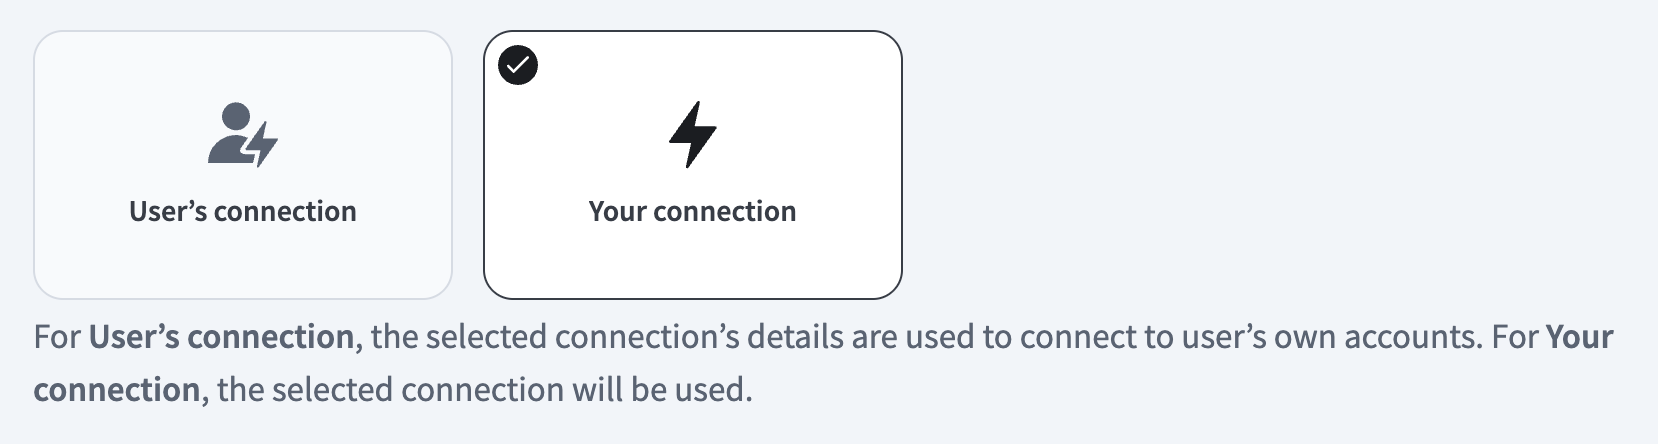
Select the connection type you plan to use for the MCP server template.
- User's connection: MCP server tools perform actions based on the identity and permissions of the user who connects to the application. Users authenticate with their own credentials to execute the skill.
- Your connection: This option uses the connection established by the recipe builder and follows the same principles as normal app connections.
 Select your connection type
VERIFIED USER ACCESS AUTHENTICATION REQUIREMENTS
Only app connections that use OAuth 2.0 authorization code grant are available for user's connection. Refer to Verified user access for more information.
Complete the app-specific connection setup steps in the following section.
Excel connection setup
View Excel connection setup steps
Workato supports the following types of connections to Excel:
- Authorization code grant authentication (OAuth 2.0)
- Client credentials-based authentication (OAuth 2.0): Only available for tenant-specific connections
View Microsoft MFA enforcement steps
MICROSOFT MFA ENFORCEMENT
Microsoft is rolling out mandatory multifactor authentication (MFA) gradually to different applications and accounts in phases. This enforcement continues throughout 2025 and beyond. Refer to the Microsoft Mandatory multifactor authentication for Azure and admin portals documentation for more information.
We strongly recommend enabling MFA now for all Microsoft accounts used with Workato to avoid service disruptions from short-notice enforcement changes.
Complete the following steps to maintain uninterrupted service:
Enable MFA for your Microsoft organization following the Microsoft MFA setup guide. Refer to Set up multifactor authentication for Microsoft 365 for more information.
Reconnect your Microsoft connection in Workato.
Complete the OAuth flow with MFA when prompted.
Test your recipes to ensure they work with the updated connection.
Authorization code grant authentication (OAuth 2.0)
View authorization code grant authentication steps
This authentication method requires the following value for tenant-specific account types:
- Tenant ID/Domain
Minimum and default scopes
View minimum and default scopes
The Excel connector requests the following scopes for authorization code grant connections by default. These scopes are necessary to use all of this connector's triggers and actions. Additionally, you must assign these permissions to the Workato app as Delegated permissions in the Azure portal.
| Permission | Description | Relevant action or trigger |
|---|---|---|
Files.Read | Allows the app to read the signed-in user's files. | Get cells, Get rows, List tables, List worksheets, and Search workbooks |
Files.ReadWrite | Allows the app to read and write to the signed-in user's files. | All actions in Files.Read and Add a table, Add a worksheet, Add rows in batch, Delete row, and Update row. |
Group.Read.All | Allows the app to read files for all groups the signed-in user can access. | Get cells, Get rows, List tables, List worksheets, and Search workbooks |
Sites.Read.All | Allows the app to read documents in all SharePoint site collections on behalf of the signed-in user. | Get cells, Get rows, List tables, List worksheets, and Search workbooks |
Sites.ReadWrite.All | Allows the app to read and write to documents in all SharePoint site collections on behalf of the signed-in user. On the consent page, this scope appears as the Maintain access to data you have given it access to permission. | All actions in Sites.Read.All and Add a table, Add a worksheet, Add rows in batch, Delete row, and Update row. Add this permission for all actions to preserve the connection's validity. |
User.Read | Allows the app to sign in and read the profile of signed-in users. | Add this permission for all actions. |
offline_access | Allows the app to access Microsoft Graph data after the user has signed out or the session has expired. | You must add this permission to establish a connection. |
You must add the following minimum scopes to establish a connection to Excel with authorization code grant authentication:
Files.Readoffline_access
Excel setup for authorization code grant authentication
Complete the following steps to set up Excel for authorization code grant authentication:
- Register the Workato App in the Azure portal
- Assign permissions to your app
- Obtain the Directory (tenant) ID from the Azure portal
Register the Workato app in the Azure portal
View register the Workato app in the Azure portal steps
Complete the following steps to register the Workato app in the Azure portal:
Sign in to the Azure portal.
Select App registrations > + New registration.
Enter a unique name for the application.
Use the Supported account types drop-down menu to select an account type.
Select Web from the Select a platform drop-down menu.
Use the following URI for the Redirect URI:
https://www.workato.com/oauth/callbackSelect Register.
Assign permissions to your app
View assign permissions to your app steps
Complete the following steps to assign permissions to your app:
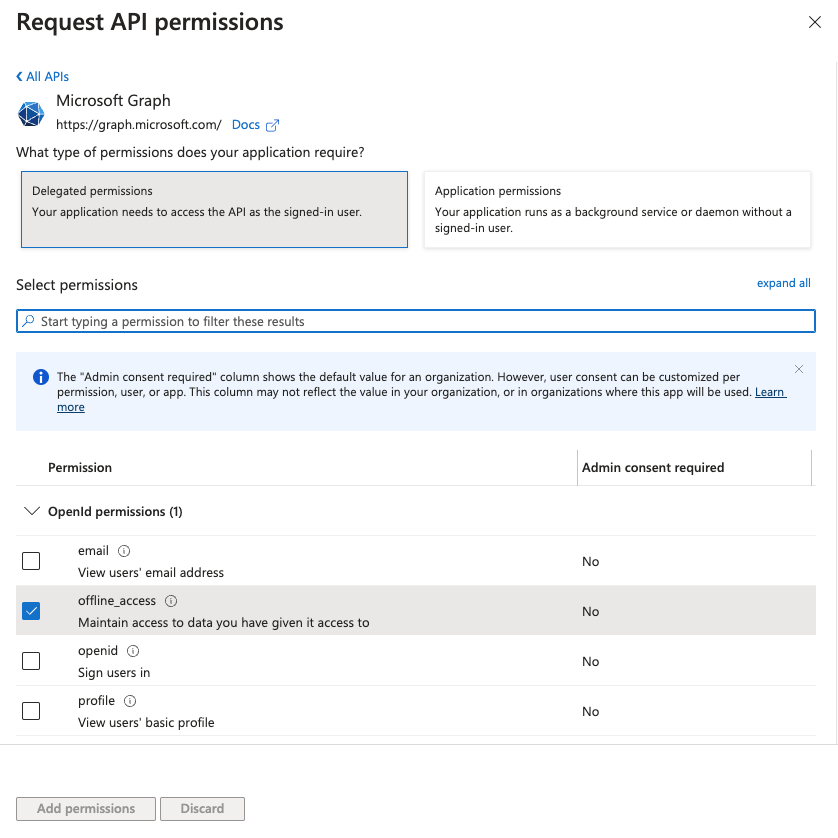
In the navigation sidebar, select Manage > API permissions.
Click + Add a permission and select Microsoft Graph APIs.
 Add permissions
Add the required permissions. Depending on your connection type, you must assign Application or Delegated permissions.
Add permissions
Click Add permissions.
Admin consent is required for specific permissions. Refer to the Connect Microsoft Entra ID to the Excel connector to learn more.
Obtain the Directory (tenant) ID from the Azure portal
View obtain the Directory (tenant ID) from the Azure portal steps
Complete the following steps to obtain the Directory (tenant) ID from the Azure portal:
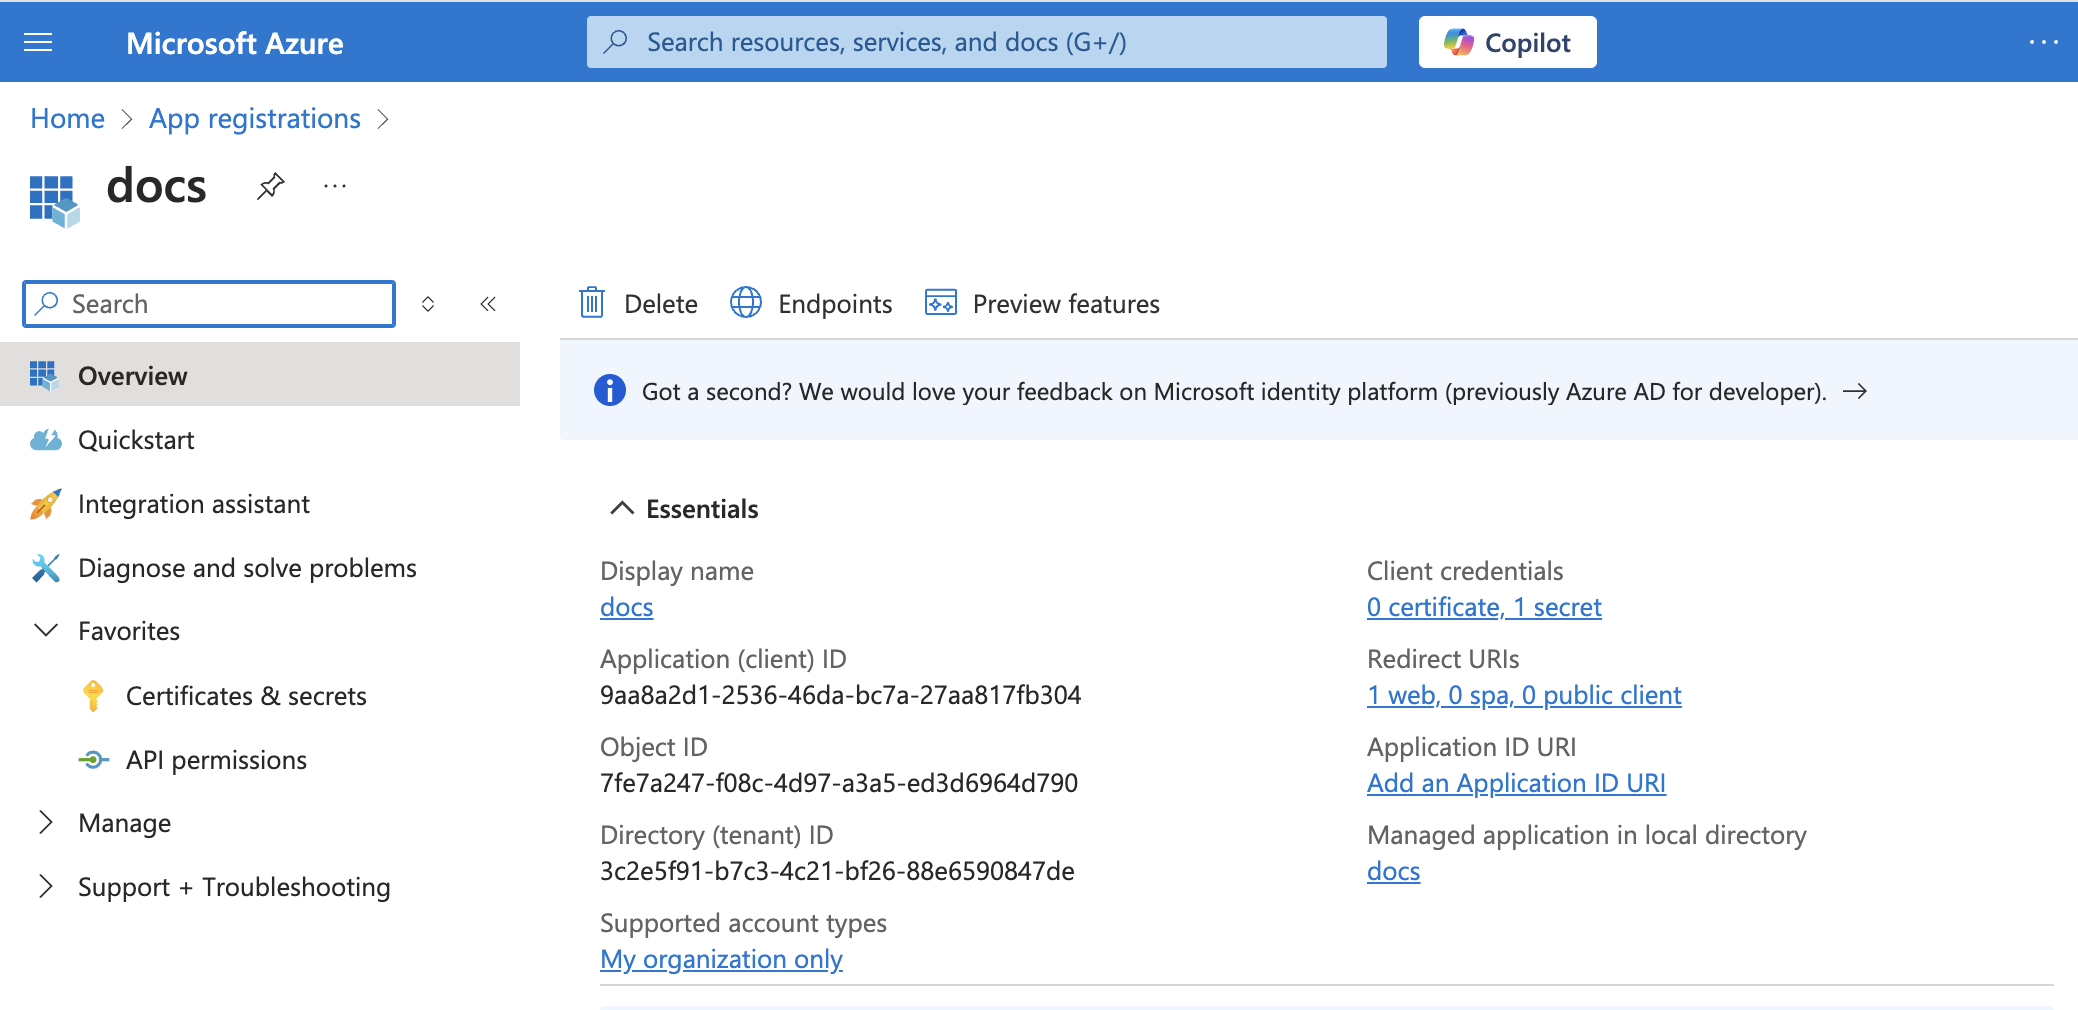
Go to the Overview > Essentials section.
 App details
Copy and save the Directory (tenant) ID for use in Workato.
Connect to Excel with authorization code grant authentication
View connect to Excel with authorization code grant authentication steps
Complete the following steps to set up an authorization code grant connection to Excel in Workato:
Click Create > Connection.
Search for Excel and select it as your app.
Enter a name for your connection in the Connection name field.
Use the Location drop-down menu to select the project where you plan to store the connection.
Use the Connection account type drop-down menu to select the type of account you plan to use. The available choices are Common and Tenant-specific.
 Common connections
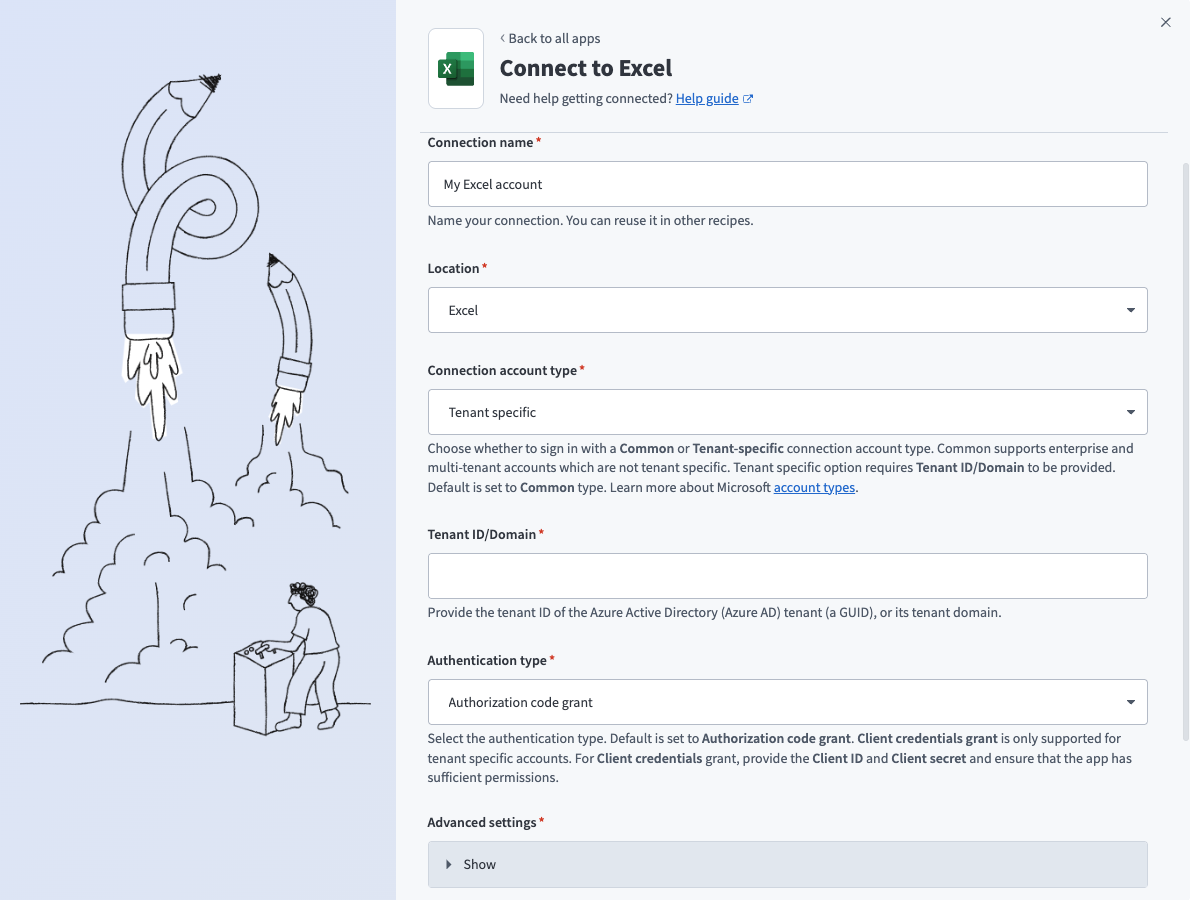 Tenant specific connections
Use the Authentication type drop-down menu to select Authorization code grant.
Optional. The connector requests a set of scopes necessary for all triggers and actions to function properly by default. Go to the Advanced settings section to manually select the permissions instead. The minimum permissions required to establish a connection are Files.Read and offline_access. Workato always requests these permissions regardless of the permissions you select. Refer to Minimum and default scopes for more information.
Optional. Use the Custom OAuth profile drop-down menu to select a custom OAuth profile for your connection.
Click Sign in with Microsoft.
Client credentials-based authentication (OAuth 2.0)
View client credentials-based authentication steps
This method requires the following fields:
- Tenant ID/Domain
- User ID
- Client ID
- Client Secret
COMPATIBLE AUTHENTICATION
Client credentials-based authentication is only compatible with tenant-specific connections.
Minimum and default scopes
View minimum and default scopes
The Excel connector requests the following scopes for client credentials-based connections by default. These scopes are necessary to use all of this connector's triggers and actions. Additionally, you must assign these permissions to the Workato app as Application permissions in the Azure portal.
| Permission | Description | Relevant action or trigger |
|---|---|---|
Files.Read.All | Allows the app to read the signed-in user's files. | Get cells, Get rows, List tables, List worksheets, and Search workbooks |
Files.ReadWrite.All | Allows the app to read and write to the signed-in user's files. | All actions in Files.Read and Add a table, Add a worksheet, Add rows in batch, Delete row, and Update row. |
Sites.Read.All | Allows the app to read documents in all SharePoint site collections on behalf of the signed-in user. | Get cells, Get rows, List tables, List worksheets, and Search workbooks |
Sites.ReadWrite.All | Allows the app to read and write to documents in all SharePoint site collections on behalf of the signed-in user. On the consent page, this scope appears as the Maintain access to data you have given it access to permission. | All actions in Sites.Read.All and Add a table, Add a worksheet, Add rows in batch, Delete row, and Update row. This permission is recommended for all actions to preserve the connection's validity. |
User.Read.All | Allows the app to sign in and read the profile of signed-in users. | This permission is recommended for all actions. |
You must add the following minimum scopes to establish a connection to Excel with client credentials-based authentication:
Files.Read.AllUser.Read.All
Excel setup for client credentials-based authentication (OAuth 2.0)
Complete the following steps to set up Excel for client credentials-based authentication:
- Register the Workato App in the Azure portal
- Assign permissions to your app
- Obtain the Application (client) ID, Object ID, and Directory (tenant) ID from the Azure portal
- Obtain the User ID from the Azure portal
Register the Workato app in the Azure portal
View register the Workato app in the Azure portal steps
Complete the following steps to register the Workato app in the Azure portal:
Sign in to the Azure portal.
Select App registrations > + New registration.
Enter a unique name for the application.
Use the Supported account types drop-down menu to select an account type.
Select Web from the Select a platform drop-down menu.
Use the following URI for the Redirect URI:
https://www.workato.com/oauth/callbackSelect Register.
Assign permissions to your app
View assign permissions to your app steps
Complete the following steps to assign permissions to your app:
In the navigation sidebar, select Manage > API permissions.
Click + Add a permission and select Microsoft Graph APIs.
Add permissions
Add the required permissions. Depending on your connection type, you must assign Application or Delegated permissions.
Add permissions
Click Add permissions.
Admin consent is required for specific permissions. Refer to the Connect Microsoft Entra ID to the Excel connector to learn more.
Generate a client secret
View generate a client secret steps
Complete the following steps to generate a client secret:
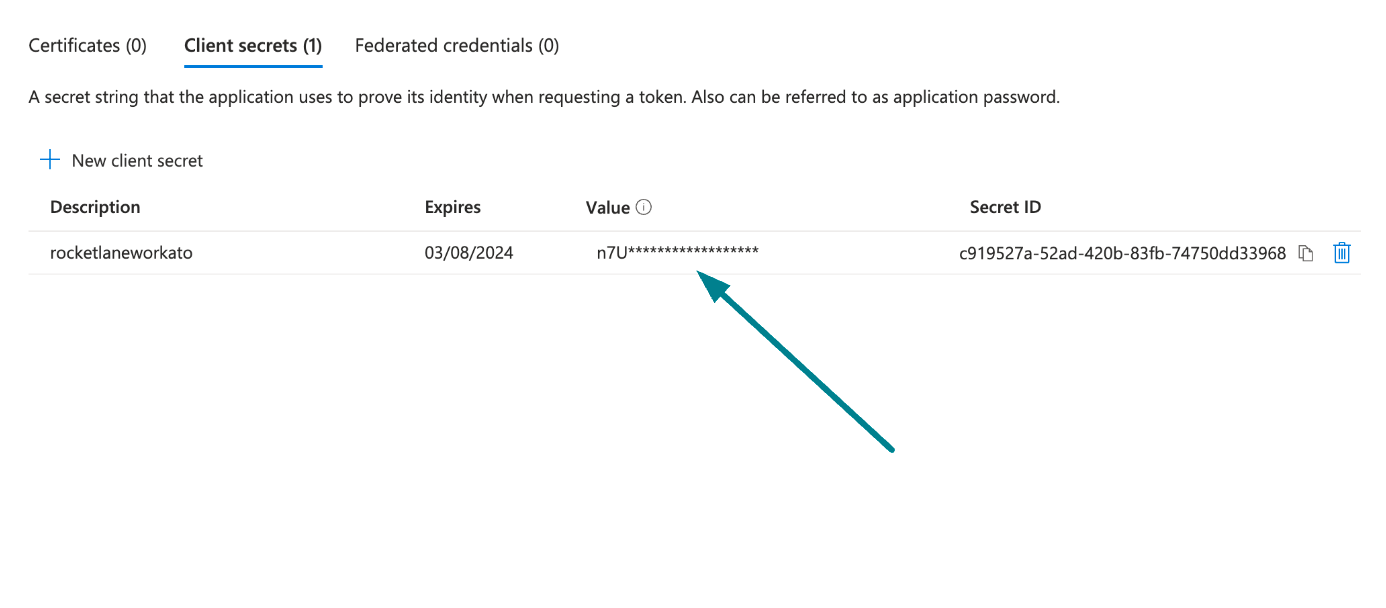
Go to Manage > Certificates & Secrets > Client secrets.
Click + New client secret.
Provide a Description for the client secret and specify an Expires date.
Click Add.
Copy and save the client secret Value—not the Secret ID—for use in Workato.
 Copy and save the client secret value
Obtain the Application (client) ID, Object ID, and Directory (tenant) ID from the Azure portal
View obtain the Application (client) ID, Object ID, and Directory (tenant) ID from the Azure Portal steps
Complete the following steps to obtain the Application ID, Object ID, and Directory (tenant) ID from the Azure portal:
Go to the Overview > Essentials section.
App details
Copy and save the Application (client) ID, Object ID, and Directory (tenant) ID for use in Workato.
Obtain the User ID from the Azure portal
View obtain the User ID from the Azure portal steps
Complete the following steps to obtain the User ID from the Azure portal:
Go to Home > Users to obtain the User ID.
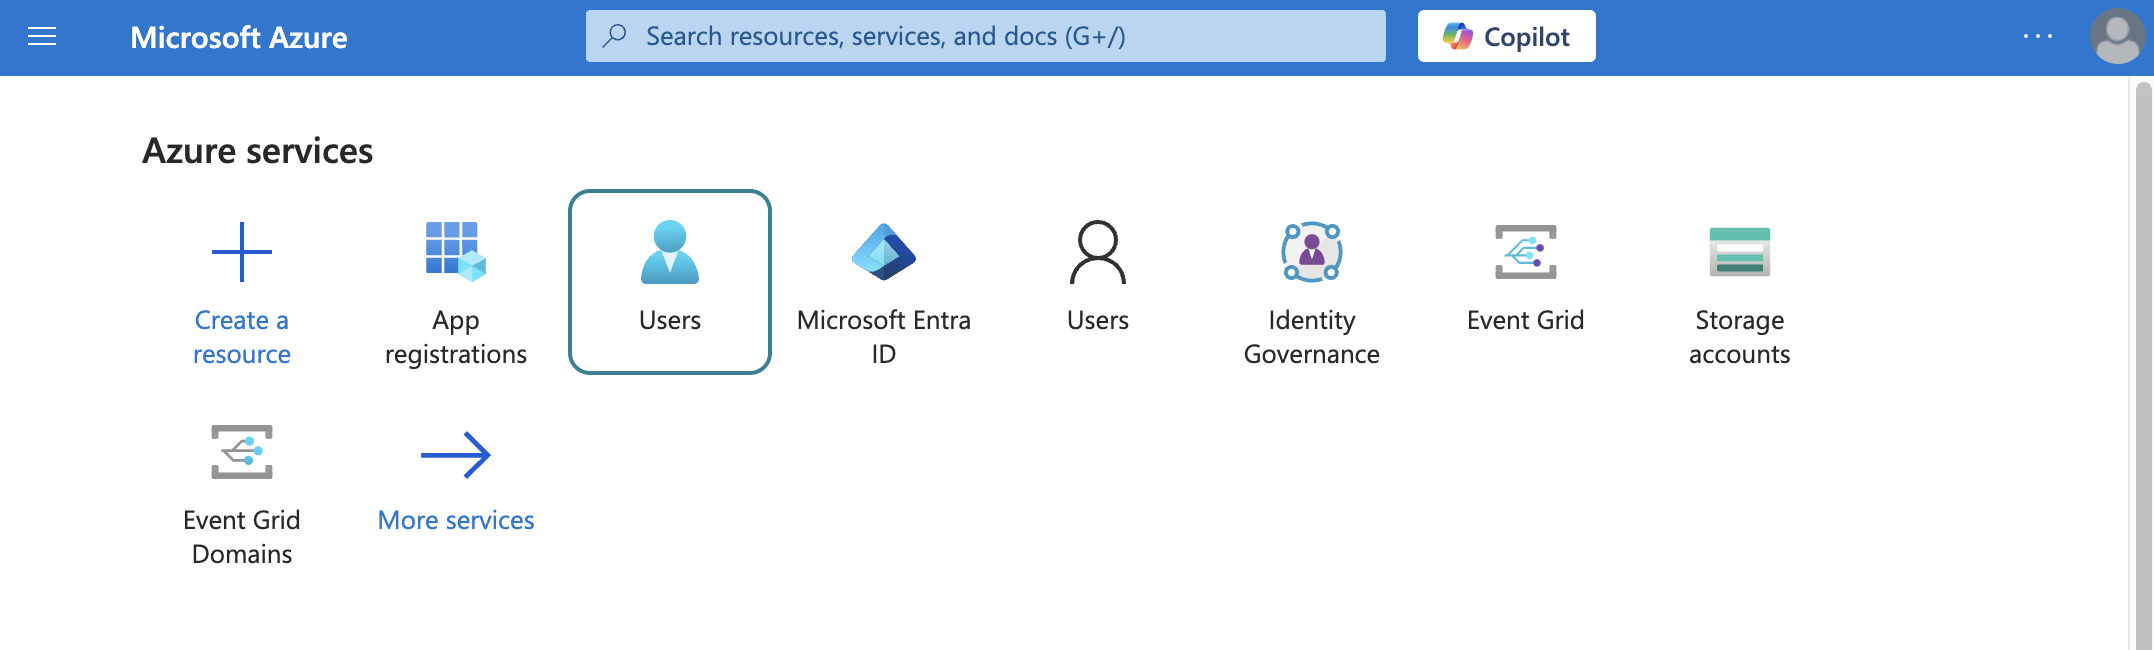 Select users
Search for and select the default user you plan to use to perform operations. This user doesn't establish the connection but is required for performing certain operations that an app can't perform. It's also required in picklists to pull user data. For example, the folder picklist populates folders belonging to the default user.
Copy and save the User principal name. Use this value as the User ID in Workato.
Connect to Excel with client credentials-based authentication
View connect to Excel with client credentials-based authentication steps
Complete the following steps to set up a client credentials-based connection to Excel in Workato:
Click Create > Connection.
Search for Excel and select it as your app.
Enter a name for your connection in the Connection name field.
Use the Location drop-down menu to select the project where you plan to store the connection.
Select Tenant specific as the Connection account type. This option is specifically designed for users who belong to a particular organization (tenant).
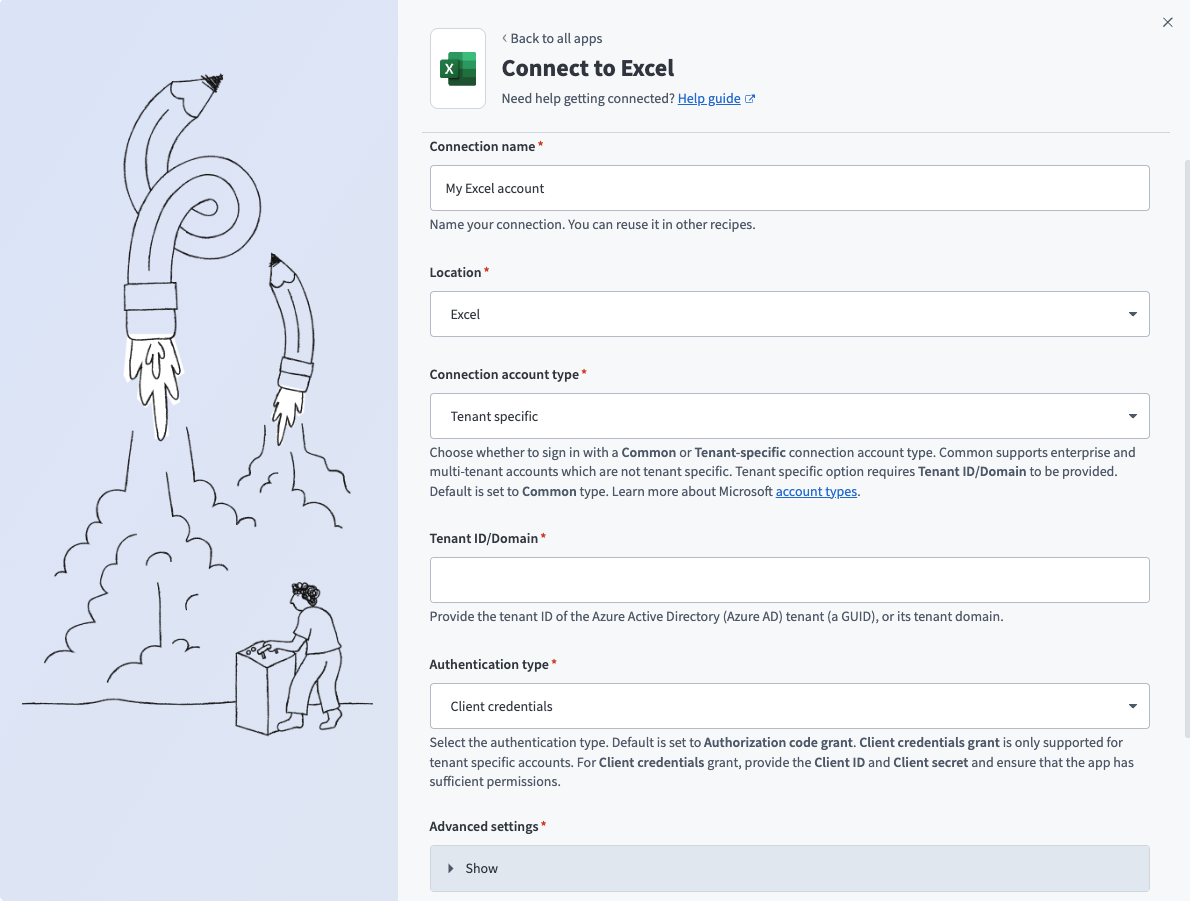 Tenant specific account connection type
Provide your Tenant ID/Domain. This is the Directory (tenant) ID for your app. Refer to Register an app in Azure for more information.
Use the Authentication type drop-down menu to select Client credentials.
Supply the User ID, Client ID, and Client secret for your app. Refer to Register an app in Azure for more information.
Optional. Use the Custom OAuth profile drop-down menu to select a custom OAuth profile for your connection.
Click Sign in with Microsoft.
Project property configuration
The Excel MCP server supports the following project-level properties to control behavior and defaults:
| Project-level property | Description |
|---|---|
DEFAULT_RANGE_COLUMNS | Applies per worksheet when no ranges are explicitly provided. Defaults to A:Z (26 columns) per worksheet. |
DEFAULT_RANGE_ROWS | Combines with DEFAULT_RANGE_COLUMNS. The default retrieval scope is A1:Z200 on the first visible worksheet by tab order. Defaults to 200 rows. |
DEFAULT_MAX_CELLS | Applies when the max_cells parameter is omitted. Defaults to 20,000 cells. |
HARD_MAX_CELLS | Absolute upper bound enforced regardless of requested parameters. Defaults to 100,000 cells. |
MAX_RANGES_PER_CALL | Maximum distinct ranges per call. Named ranges and Excel table names each count as one range toward this limit. Defaults to 20. |
MAX_OPERATIONS_PER_BATCH | Maximum operations in a single batch_update call. Defaults to 10. |
View project-level property configuration steps
Complete the following steps to configure your project-level properties:
Sign in to your Workato account and go to Projects.
Go to the project that contains your MCP server.
Click the Settings tab.
 Click the Settings tab.
Select Project properties.
Go to the project property you plan to update and click the Edit (pencil) icon.
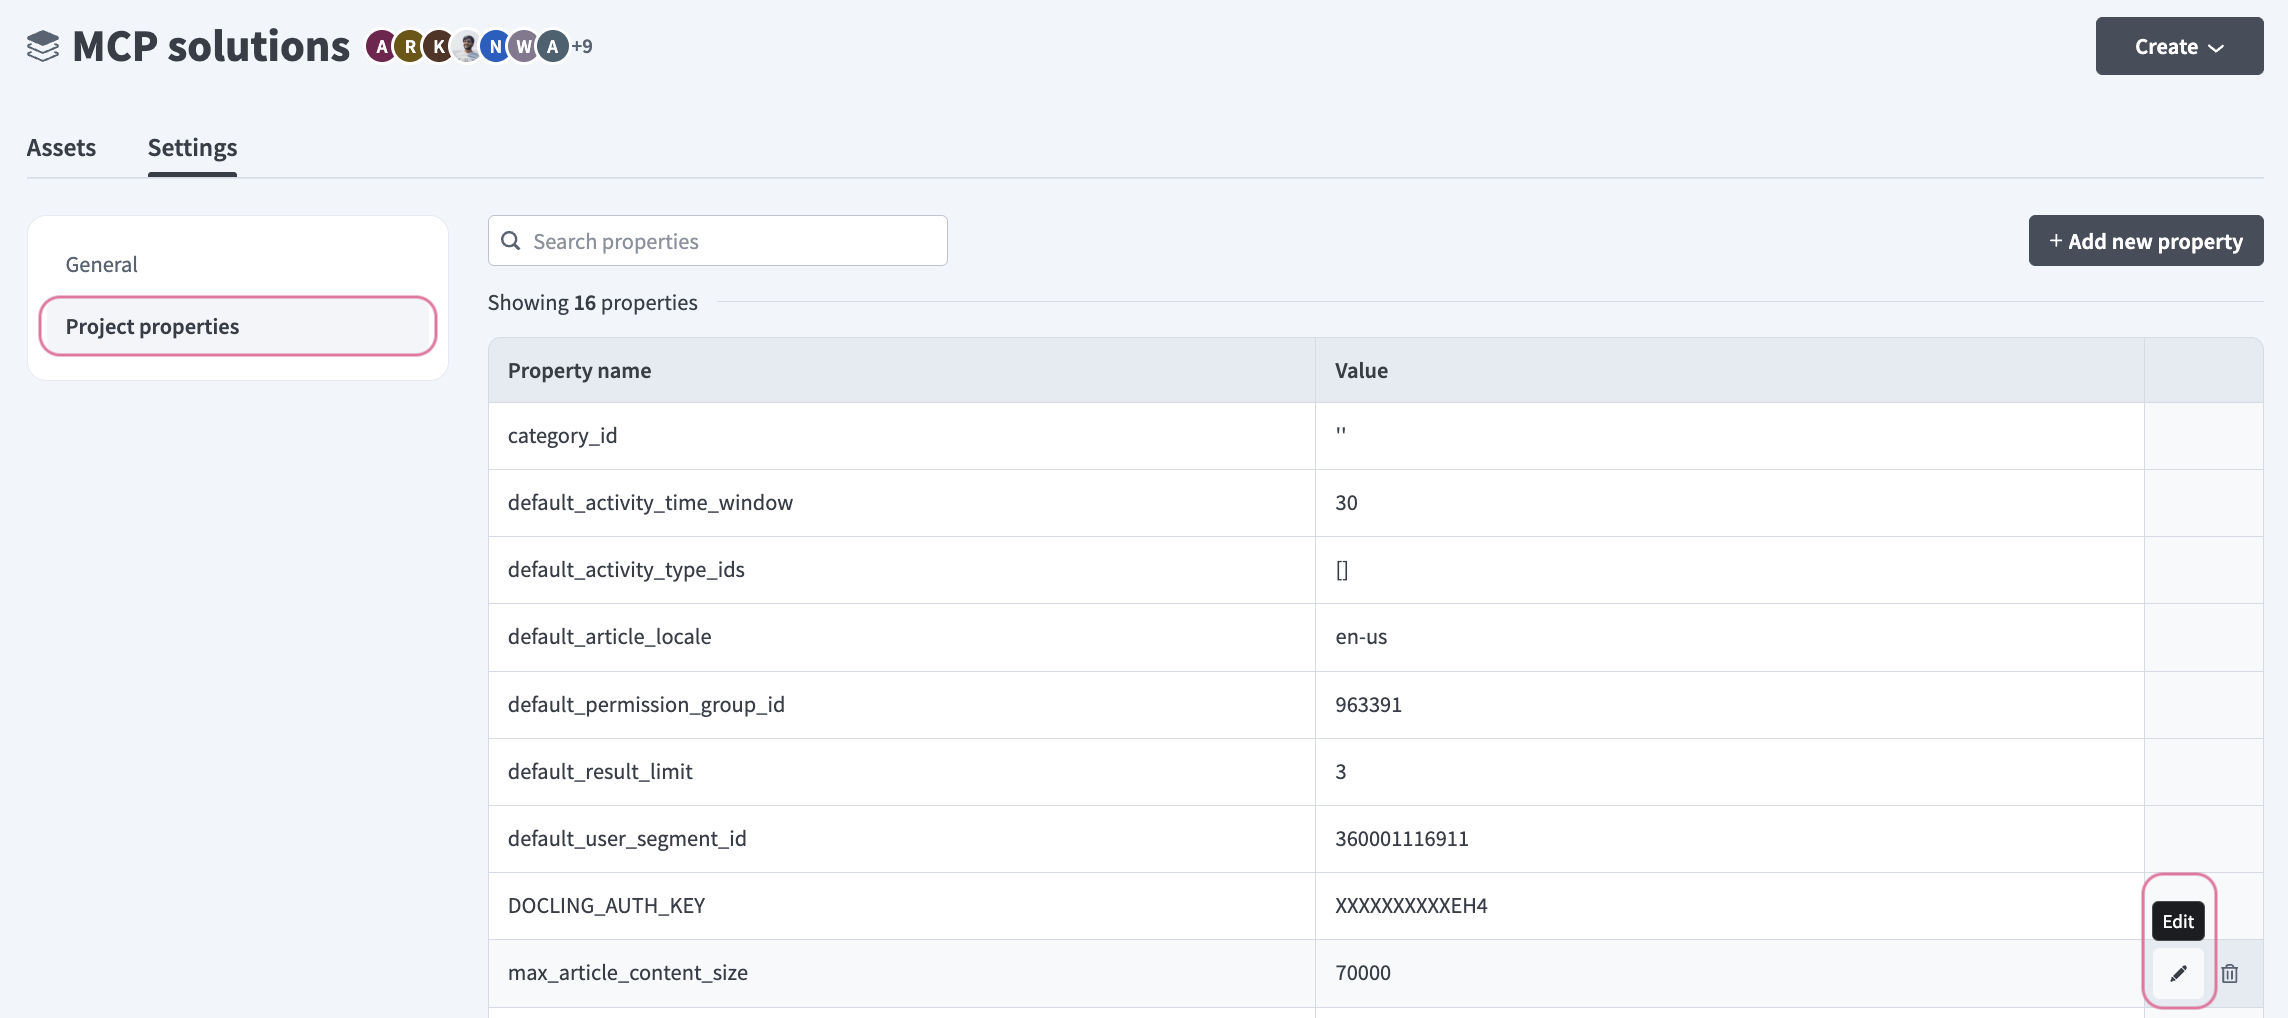 Click the Edit (pencil) icon.
Go to the Value field and make your changes. For example, set MAX_RANGES_PER_CALL to 15 or MAX_OPERATIONS_PER_BATCH to 5.
How to use Excel MCP server tools
Refer to the following sections for detailed information on available tools:
get_workbook_info tool
The get_workbook_info tool retrieves worksheet names, named ranges, Excel Table definitions, and session metadata for a workbook. Your LLM uses this tool to find worksheet names or identifiers, the current session_id before any write action, information about named ranges or Excel Tables, or confirmation of structure before planning updates.
Try asking:
What worksheets are in my Sales Tracker workbook?Show me the structure of the Q4 Planning workbook.What Excel Tables exist in this workbook?Get the session ID for my Pipeline tracker.
get_workbook_content tool
The get_workbook_content tool retrieves bounded cell data, formulas, and table contents from ranges or worksheets you specify. Your LLM uses this tool to read values or formulas, understand workbook contents, retrieve tables or ranges for analysis, or get current values before an update.
Try asking:
Read the data from the Q1 Revenue sheet.Show me the values in cells A1 through E10.Get the contents of the Pipeline table.What's in the Sales worksheet?
append_rows tool
The append_rows tool appends one or more rows of data to an existing worksheet or Excel Table. Your LLM uses this tool to add new entries to a tracker or table, log operational records over time, or reserve empty rows before population.
Try asking:
Add these three deals to my Pipeline tracker.Append today's sales data to the Revenue sheet.Log these customer records in the CRM table.Add a new row to the expense tracker with Date: 1/15/2026, Amount: $250.
update_range_values tool
The update_range_values tool updates values or formulas in a range or Excel Table you specify. Your LLM uses this tool to update specific values, correct or replace values in a range, write or update formulas, or populate previously appended empty rows.
Try asking:
Update the status column to 'Closed Won' for the Acme Corp row.Change the Q4 forecast in cell B12 to $450,000.Set the priority to 'High' for rows 5 through 8.Update the formula in cell D2 to calculate the total.
batch_update tool
The batch_update tool applies multiple workbook updates as a single atomic change. Your LLM uses this tool only when atomicity matters, such as appending rows and populating formulas where partial application would leave the workbook inconsistent, or creating a worksheet and initializing it with headers and values as one change.
Try asking:
Create a new January 2026 tab and add headers in one update.Append these entries and update the summary totals together.Add rows and calculate their totals in a single atomic change.Initialize the new sheet with headers and formulas at once.
add_worksheet tool
The add_worksheet tool adds a new worksheet (tab) to an existing workbook. Your LLM uses this tool to create a new tab or add a worksheet for a new reporting period or tracking category.
Try asking:
Add a new tab called 'January 2026' to my monthly tracker.Create a new worksheet named 'Archive'.Add a 'Completed Tasks' tab to the project tracker.Insert a new sheet for Q2 metrics.
rename_worksheet tool
The rename_worksheet tool renames an existing worksheet (tab) in a workbook. Your LLM uses this tool to rename a tab or standardize worksheet naming.
Try asking:
Rename Sheet1 to 'Sales Pipeline'.Change the 'January' tab name to 'January 2026'.Rename the 'Temp' sheet to 'Archive'.Update the sheet name from 'Data' to 'Q1 Revenue'.
delete_worksheet tool
The delete_worksheet tool deletes an existing worksheet (tab) from a workbook. Your LLM uses this tool to delete a worksheet.
Try asking:
Delete the 'Archive' tab from my tracker.Remove the 'Old Data' sheet from the workbook.Delete Sheet2 since we don't need it anymore.Remove the 'Scratch' worksheet.
Getting started
View and manage your MCP server tools in the Overview page Tools section. Tool management provides the following capabilities:
TOOLS MUST BE STARTED
Your LLM can only access active tools in your MCP server connector.
Last updated: