Microsoft Word MCP server
The Microsoft Word MCP server enables LLMs to create, read, update, and collaborate on Word documents through natural conversation. It provides tools to author content, apply edits, manage comments, surface tracked changes, and create documents from templates without requiring direct interaction with the Word interface.
Uses
Use the Microsoft Word MCP server to perform the following actions:
- Create new Word documents with optional titles and initial content
- Create documents from existing Word templates
- Retrieve document metadata and revision identifiers
- Get structured content and metadata from documents
- Find document blocks by text or structural criteria
- Apply block-level updates to documents with revision safety
- Add comments to documents and associate them with specific content blocks
- List comment threads with filtering and pagination
- Reply to existing comment threads
- Resolve or close comment threads
- List pending tracked changes with authorship information
Example prompts
Use the following example prompts to invoke Microsoft Word MCP server tools:
Create a new Word document for the project proposal.Make a document from the quarterly report template.What's in the marketing plan document?Find the Executive Summary section in this document.Update the budget section to reflect the new numbers.Add a comment to the intro paragraph about tone.What comments are on the proposal document?Reply to Jade's comment about the timeline.Resolve all comments from Marco.Show me the tracked changes in this document.
Microsoft Word MCP server tools
The Microsoft Word MCP server provides the following tools:
| Tool | Description |
|---|---|
| create_document | Creates a new Word document with an optional title and initial content. |
| create_document_from_template | Creates a new Word document pre-populated from an existing Word template file. |
| get_document_info | Retrieves Word document metadata and the current revision identifier without returning content. |
| get_document_content | Retrieves structured content and metadata for a Word document. |
| find_blocks | Finds document blocks by text or structural criteria and returns block identifiers for targeted edits. |
| update_document_content | Applies structured, block-level updates to a Word document with revision safety enforcement. |
| add_comment | Adds a new comment to a Word document, optionally associated with a specific content block. |
| list_comments | Lists comment threads in a Word document with filtering and pagination support. |
| reply_to_comment | Adds a reply to an existing comment thread in a Word document. |
| resolve_comment | Marks an existing comment thread as resolved in a Word document. |
| list_tracked_changes | Lists pending tracked changes in a Word document with authorship and location information. |
Install the Microsoft Word MCP server
Complete the following steps to install a prebuilt MCP server to your project:
Sign in to your Workato account.
Go to AI Hub > MCP servers.
Click + Create MCP server.
Go to the Start with pre-built MCP Servers using your connected apps section and select the prebuilt MCP server you plan to use.
Click Use this server.
Provide a name for your MCP server in the Server name field.
Use the Location drop-down menu to select the project for the MCP server.
Go to the Connections section and connect to your app account.
Select the connection type you plan to use for the MCP server template.
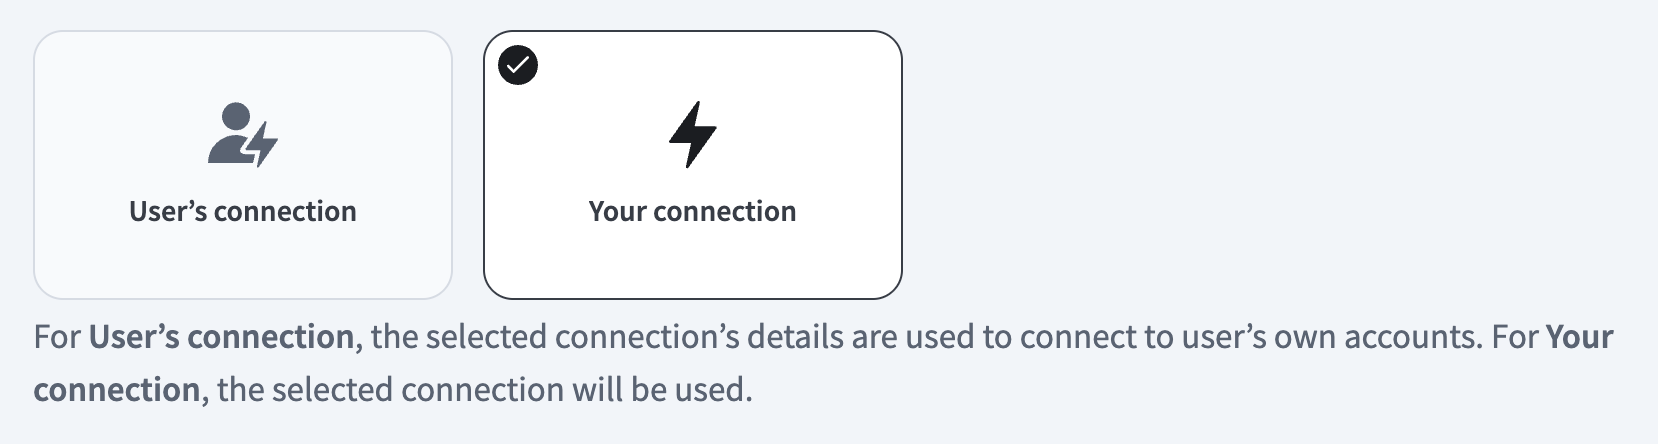
- User's connection: MCP server tools perform actions based on the identity and permissions of the user who connects to the application. Users authenticate with their own credentials to execute the skill.
- Your connection: This option uses the connection established by the recipe builder and follows the same principles as normal app connections.
 Select your connection type
VERIFIED USER ACCESS AUTHENTICATION REQUIREMENTS
Only app connections that use OAuth 2.0 authorization code grant are available for user's connection. Refer to Verified user access for more information.
Complete the app-specific connection setup steps in the following section.
Microsoft Word connection setup
View Microsoft Word connection setup steps
Microsoft Word MCP server connects to Workato using your OneDrive account.
Workato supports the following types of connections to Microsoft Word:
- Authorization code grant authentication (OAuth 2.0)
- Client credentials-based authentication (OAuth 2.0)
MICROSOFT MFA ENFORCEMENT
Microsoft is rolling out mandatory multifactor authentication (MFA) gradually to different applications and accounts in phases. This enforcement continues throughout 2025 and beyond. Refer to the Microsoft Mandatory multifactor authentication for Azure and admin portals documentation for more information.
We strongly recommend enabling MFA now for all Microsoft accounts used with Workato to avoid service disruptions from short-notice enforcement changes.
Complete the following steps to maintain uninterrupted service:
Enable MFA for your Microsoft organization following the Microsoft MFA setup guide. Refer to Set up multifactor authentication for Microsoft 365 for more information.
Reconnect your Microsoft connection in Workato.
Complete the OAuth flow with MFA when prompted.
Test your recipes to ensure they work with the updated connection.
Authorization code grant authentication (OAuth 2.0)
Authorization code grant authentication includes the following setup:
This authentication method requires the following value for tenant-specific account types:
- Tenant ID/Domain
Default scopes for authorization code grant connections
The OneDrive connector requests the following scopes for authorization code grant connections by default. These scopes are necessary to use the connector's triggers and actions. Additionally, you must assign these permissions to the Workato app as Delegated permissions in the Azure portal.
Files.ReadWriteGroup.Read.AllFiles.Readoffline_access
Minimum scopes for authorization code grant connections
The following minimum scopes are required to establish a connection to OneDrive using authorization code grant authentication:
Files.Readoffline_access
Register the Workato App in Azure portal
Complete the following steps to register the Workato app and assign it permissions for authorization code grant connections:
Register the Workato app in the Azure Portal
Complete the following steps to register the Workato app in the Azure portal:
Sign in to the Azure portal.
Select App registrations > + New registration.
Enter a unique name for the application.
Use the Supported account types drop-down menu to select an account type.
Select Web from the Select a platform drop-down menu.
Use the following URI for the Redirect URI:
https://www.workato.com/oauth/callbackSelect Register.
Assign permissions to your app
Complete the following steps to assign permissions to your app:
Go to your newly registered app and select Manage > API permissions in the navigation sidebar.
Click + Add a permission and select Microsoft Graph APIs.
Add the required permissions. Depending on your connection type, you must assign Application or Delegated permissions.
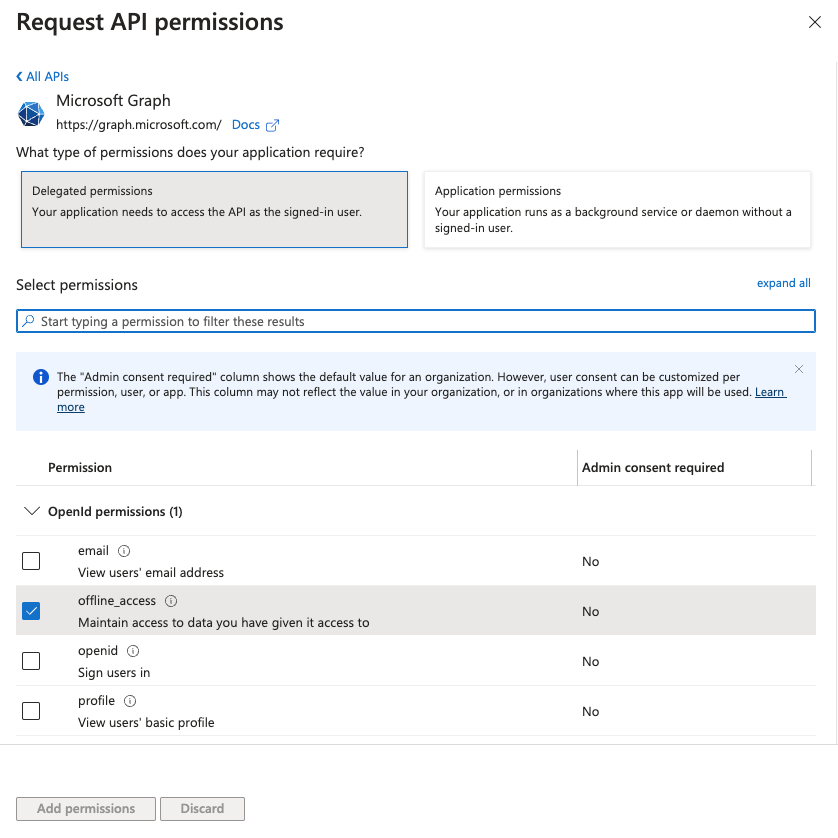 Add permissions
Click Add permissions. If specific permissions require admin consent, refer to Connect Microsoft Entra ID to the Outlook connector to learn more.
Obtain the Directory (tenant ID) from the Azure portal
Complete the following steps to obtain the Directory (tenant) ID from the Azure portal:
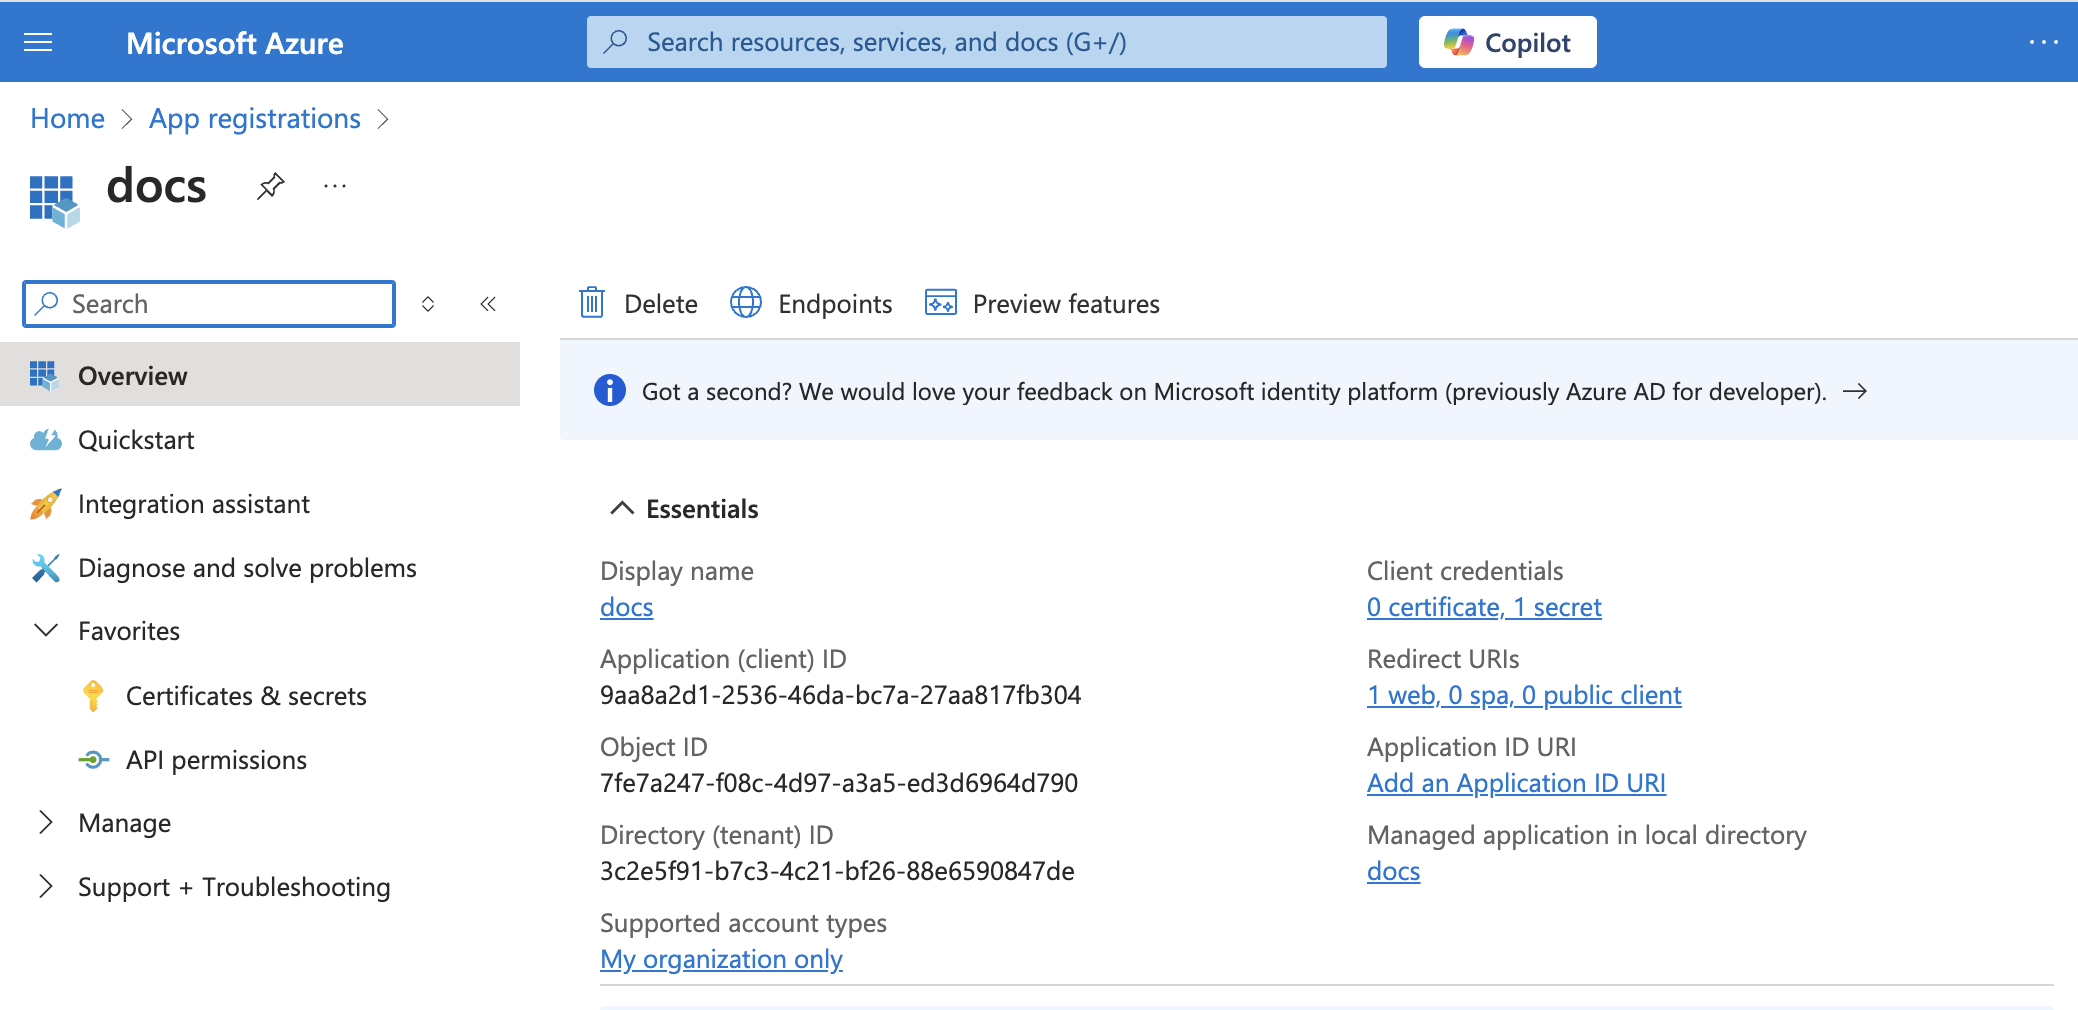
Go to the Overview > Essentials section.
 App details
Copy and save the Directory (tenant) ID for use in Workato.
Complete setup in Workato
Complete the following steps to set up a authorization code grant connection to Microsoft Word in Workato:
Click Create > Connection.
Search for OneDrive and select it as your app.
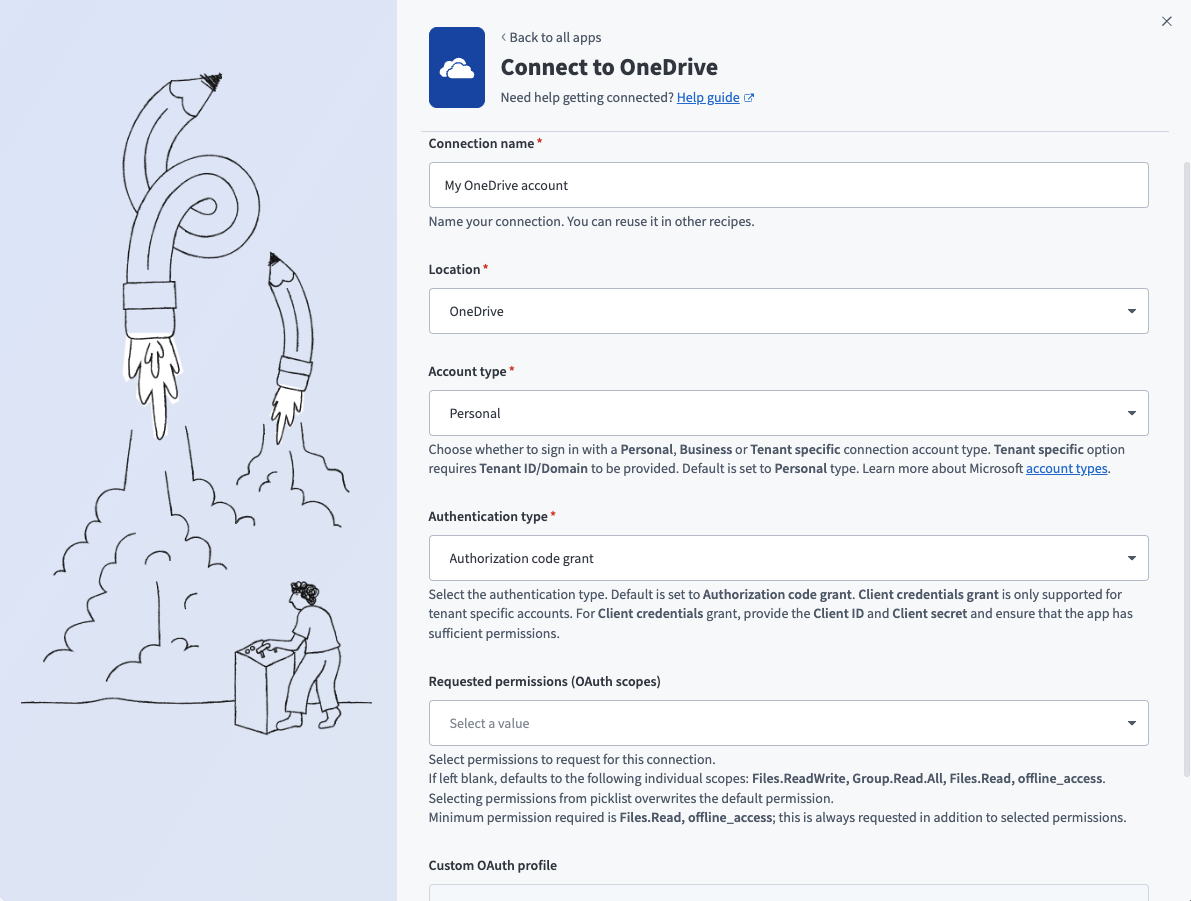
Enter a name for your connection in the Connection name field.
Use the Location drop-down menu to select the project where you plan to store the connection.
Use the Connection account type drop-down menu to select the type of account you plan to use. The available choices are Personal, Business, and Tenant-specific.
 Personal connections
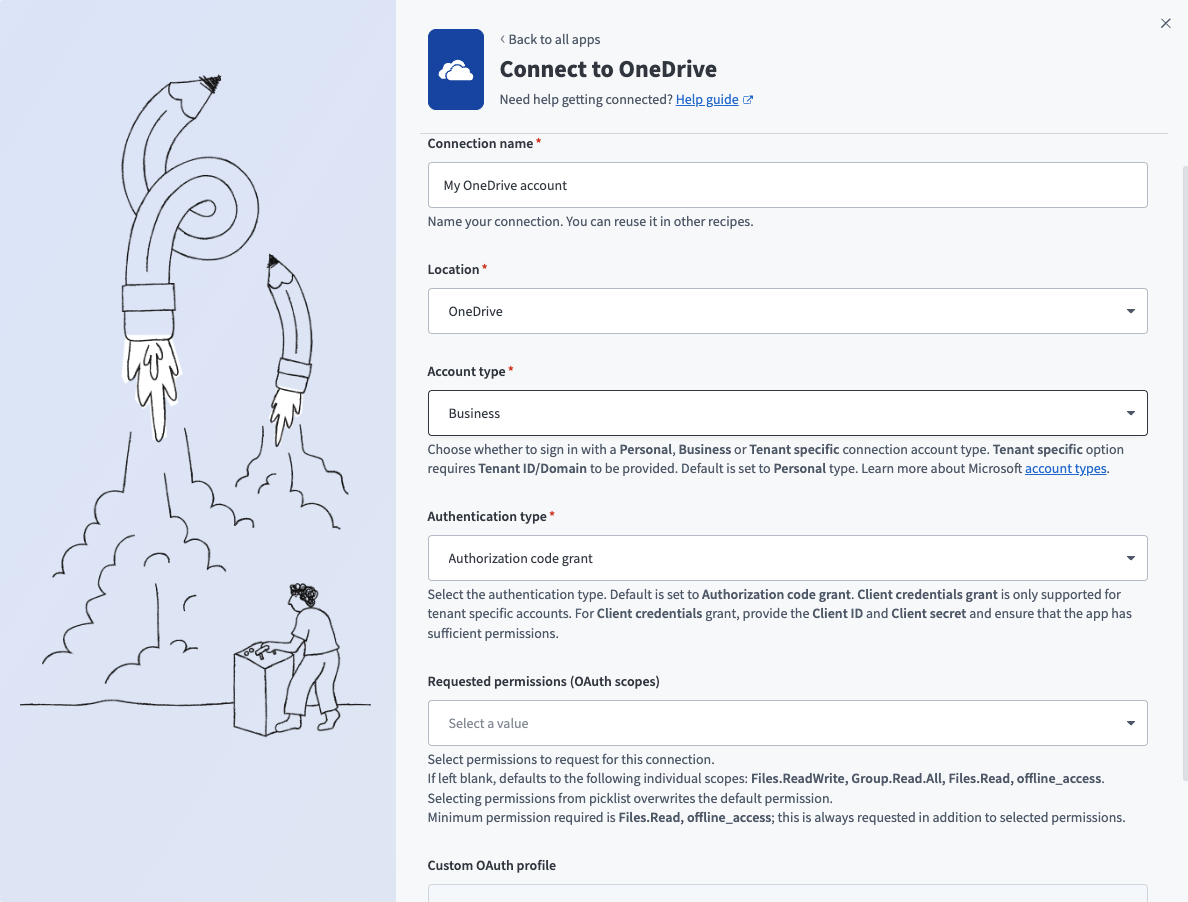 Business connections
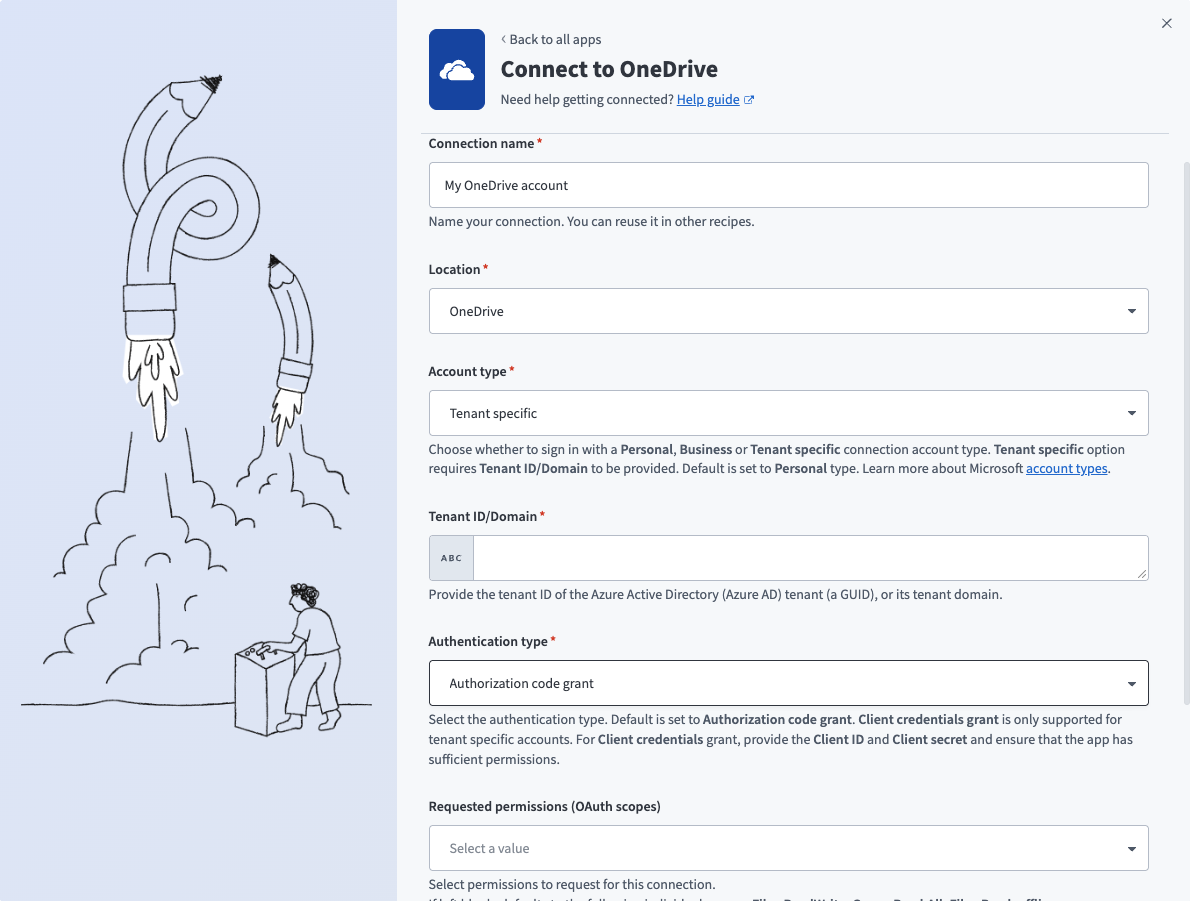 Tenant specific connections
Use the Authentication type drop-down menu to select Authorization code grant.
Optional. Go to the Advanced settings section to manually select the permissions. The minimum permissions required to establish a connection are Files.Read and offline_access. Workato always requests these permissions regardless of the permissions you select. Refer to Minimum and default scopes for more information.
Optional. Use the Custom OAuth profile drop-down menu to select a custom OAuth profile for your connection.
Click Sign in with Microsoft.
Client credentials-based authentication (OAuth 2.0)
This authentication method requires the following setup:
This method requires the following fields:
- Tenant ID/Domain
- User ID
- Client ID
- Client Secret
COMPATIBLE AUTHENTICATION
Client credentials-based authentication is only compatible with tenant-specific connections.
Default scopes for client credential connections
Workato recommends the following scopes for client credentials connections. These scopes enable full access to all triggers and actions in the OneDrive connector. You must assign these permissions as Application permissions in the Azure portal:
Files.Read.AllFiles.ReadWrite.AllGroup.Read.AllSites.ReadWrite.All
Minimum scopes for client credential connections
The following minimum scopes are required to establish a connection to OneDrive using client credentials-based authentication:
Files.Read.All
Register the Workato App in the Azure Portal
Complete the following steps to register the Workato app and assign it permissions for client credentials-based connections:
Register the Workato App in the Azure Portal
Complete the following steps to register the Workato app in the Azure portal:
Sign in to the Azure portal.
Select App registrations > + New registration.
Enter a unique name for the application.
Use the Supported account types drop-down menu to select an account type.
Select Web from the Select a platform drop-down menu.
Use the following URI for the Redirect URI:
https://www.workato.com/oauth/callbackSelect Register.
Assign permissions to your app
Complete the following steps to assign permissions to your app:
Go to your newly registered app and select Manage > API permissions in the navigation sidebar.
Click + Add a permission and select Microsoft Graph APIs.
Add the required permissions. Depending on your connection type, you must assign Application or Delegated permissions.
Add permissions
Click Add permissions. If specific permissions require admin consent, refer to Connect Microsoft Entra ID to the Outlook connector to learn more.
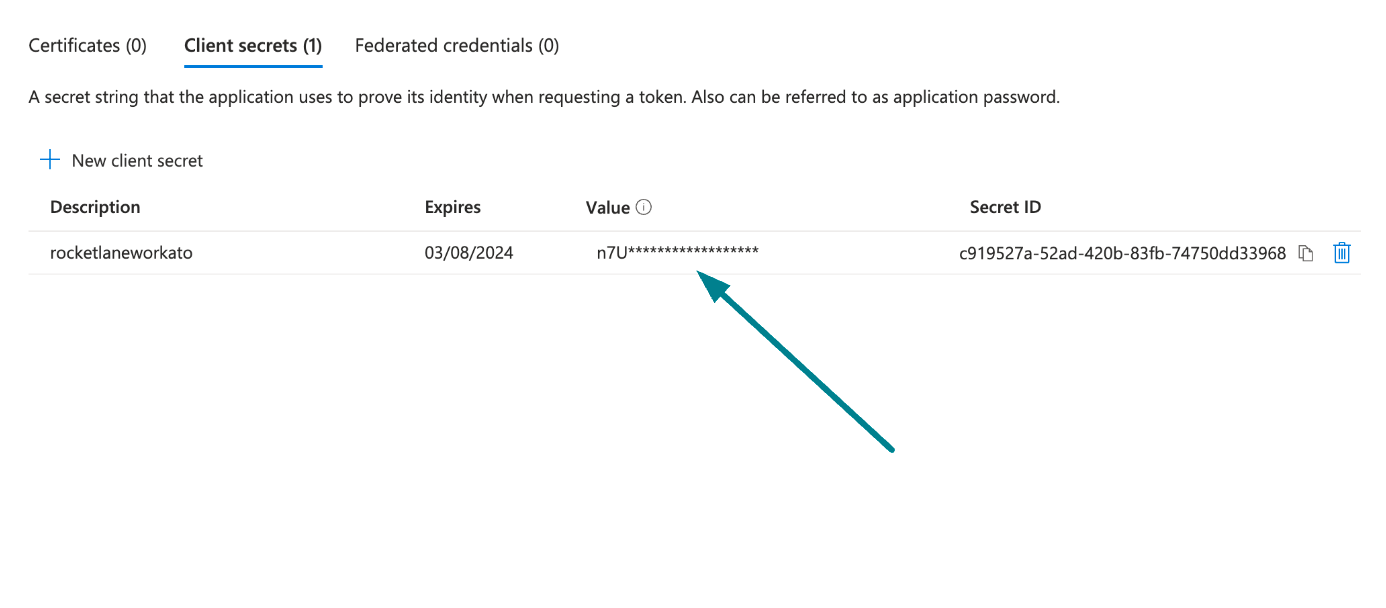
Generate a client secret
Complete the following steps to generate a client secret:
Go to Manage > Certificates & Secrets > Client secrets.
Click + New client secret.
Provide a Description for the client secret and specify an Expires date.
Click Add.
Copy and save the client secret Value—not the Secret ID—for use in Workato.
 Copy and save the client secret value
Obtain the Application (client) ID, Object ID, and Directory (tenant) ID from the Azure Portal
Complete the following steps to obtain the Application ID, Object ID, and Directory (tenant) ID from the Azure portal:
Go to the Overview > Essentials section.
App details
Copy and save the Application (client) ID, Object ID, and Directory (tenant) ID for use in Workato.
Obtain the User ID from the Azure Portal
Complete the following steps to obtain the User ID from the Azure portal:
Go to Home > Users to obtain the User ID.
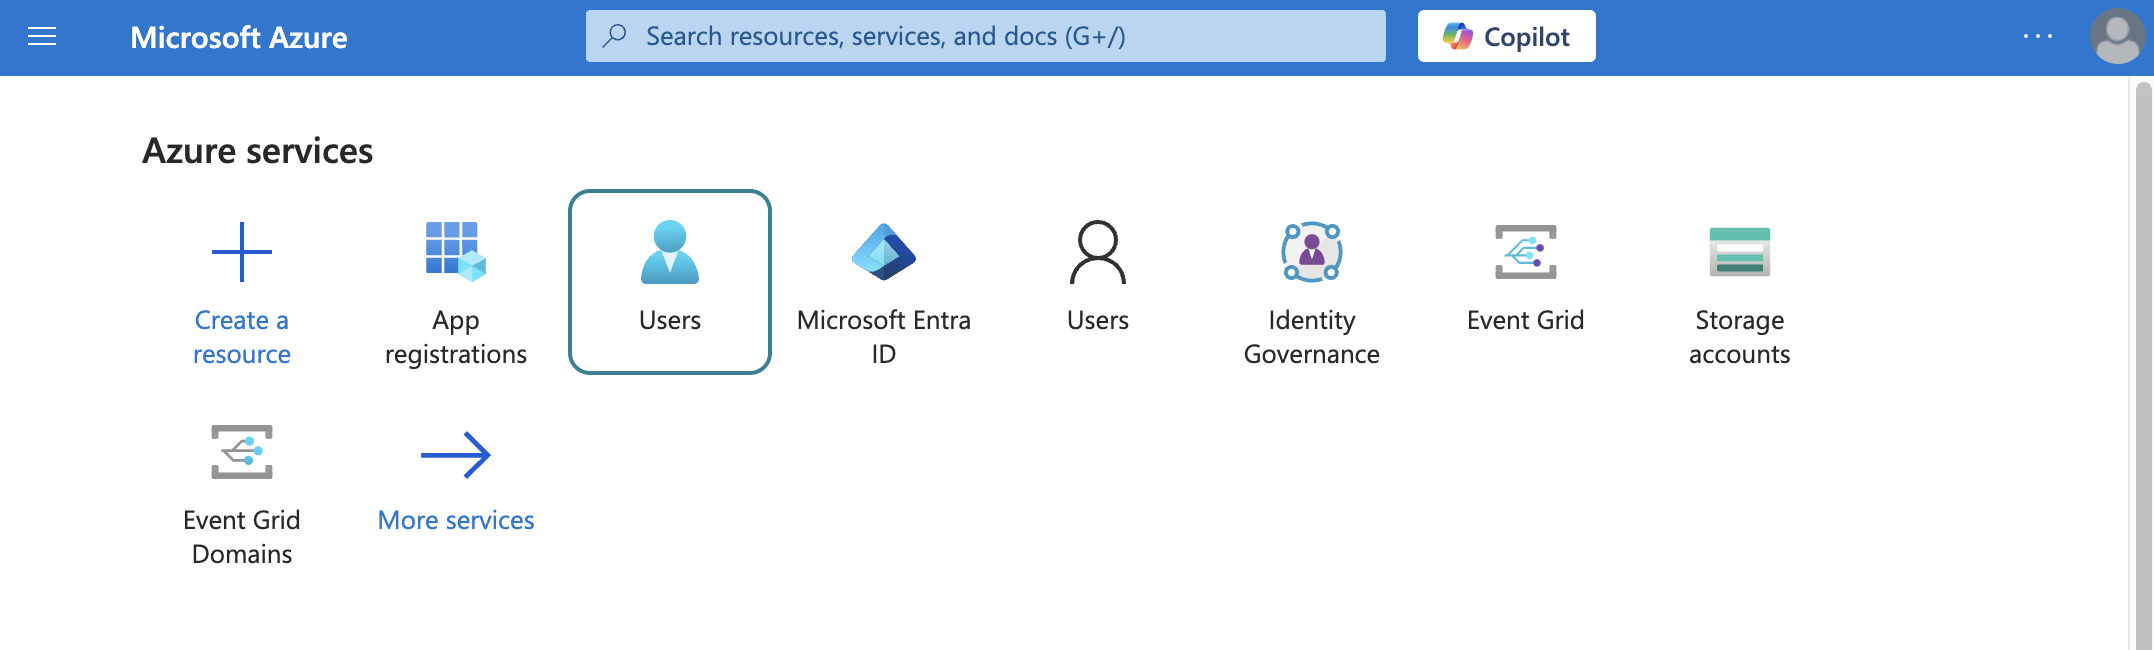 Select users
Search for and select the default user you plan to use to perform operations. This user doesn't establish the connection but is required for performing certain operations that an app can't perform. It's also required in picklists to pull user data. For example, the folder picklist populates folders belonging to the default user.
Copy and save the User principal name. Use this value as the User ID in Workato.
Complete setup in Workato
Complete the following steps to set up a client credentials-based connection to Microsoft Word in Workato:
Click Create > Connection.
Search for OneDrive and select it as your app.
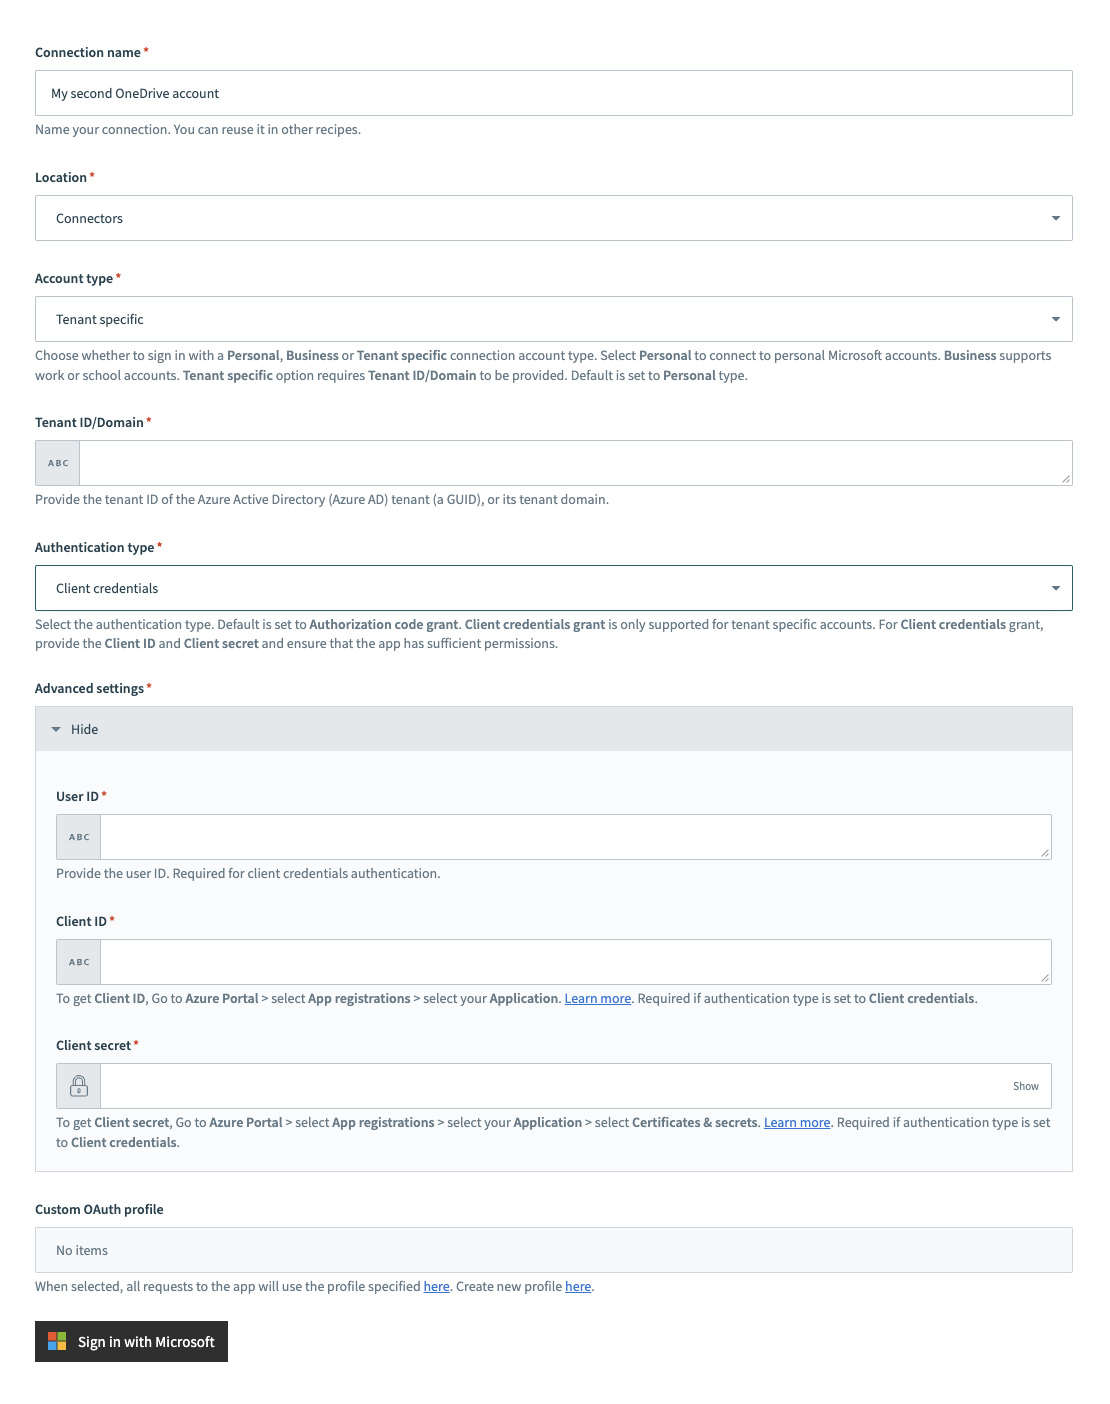
Enter a name for your connection in the Connection name field.
Use the Location drop-down menu to select the project where you plan to store the connection.
Select Tenant specific as the Connection account type. This option supports accounts tied to a specific organization (tenant).
 Tenant specific account connection type
Provide your Tenant ID/Domain. This is the Directory (tenant) ID for your app. Refer to Obtain the Application (client) ID, Object ID, and Directory (tenant) ID from the Azure portal for more information.
Use the Authentication type drop-down menu to select Client credentials.
Provide the User ID, Client ID, and Client secret for your app. Refer to Obtain the Application (client) ID, Object ID, and Directory (tenant) ID from the Azure portal and Generate a client secret for more information.
Optional. Use the Custom OAuth profile drop-down menu to select a custom OAuth profile for your connection.
Click Sign in with Microsoft.
How to use Microsoft Word MCP server tools
Refer to the following sections for detailed information on available tools:
create_document tool
The create_document tool creates a Word document with an optional title and initial content for the authenticated user. Your LLM uses this tool to create a new Word document or to turn a discussion, notes, or outline into a document.
Try asking:
Create a new Word document for the project proposal.Turn these meeting notes into a Word document.Make a new document titled 'Q1 Marketing Plan'.Create a Word doc from this outline.
create_document_from_template tool
The create_document_from_template tool creates a new Word document pre-populated from an existing Word template file. Your LLM uses this tool to create a document from a template.
Try asking:
Make a document from the quarterly report template.Create a new proposal using the standard template.Use the meeting notes template to create a document.Start a document from the project plan template.
get_document_info tool
The get_document_info tool retrieves Word document metadata and the current revision identifier without returning content. Your LLM uses this tool to get the current revision_id before attempting a write operation, or to confirm document access before retrieving content.
Try asking:
Get the metadata for this document.What's the current revision ID for the proposal?Check if I have access to this document.Show me the document info for the marketing plan.
get_document_content tool
The get_document_content tool retrieves structured content and metadata for a Word document using the Document Content Representation. Your LLM uses this tool to see what a document contains, reference a specific section, or get document content to perform edits or analysis.
Try asking:
What's in the marketing plan document?Show me the contents of the proposal.Read the project charter document.Get the full content of this Word doc.
find_blocks tool
The find_blocks tool finds document blocks by text or structural criteria and returns block identifiers for targeted edits. Your LLM uses this tool to locate specific blocks before calling update_document_content, especially when you refer to a named section, specific text, or a structural element that needs to be edited.
Try asking:
Find the Executive Summary section in this document.Locate the budget table in the proposal.Search for the paragraph about timeline.Find the heading that says 'Q1 Goals'.
update_document_content tool
The update_document_content tool applies structured, block-level updates to a Word document with revision safety enforcement. Your LLM uses this tool to edit, revise, update, or rewrite a section of a document.
Try asking:
Update the budget section to reflect the new numbers.Revise the Executive Summary to be more concise.Edit the timeline to push dates back two weeks.Rewrite the conclusion paragraph.
add_comment tool
The add_comment tool adds a new comment to a Word document and can associate it with a specific content block. Your LLM uses this tool to leave a comment, add a note, or flag a document. If you refer to a specific section or passage, your LLM will use find_blocks first to obtain the relevant block_id.
Try asking:
Add a comment to the intro paragraph about tone.Leave a note on the budget section asking for clarification.Flag this paragraph for review.Comment on the timeline that it seems aggressive.
list_comments tool
The list_comments tool lists comment threads in a Word document with filtering and pagination support. Your LLM uses this tool to see what comments exist, what feedback is outstanding, or who has commented on a document.
Try asking:
What comments are on the proposal document?Show me all unresolved comments.List feedback from Alex on this document.What comments has Mei left on the marketing plan?
reply_to_comment tool
The reply_to_comment tool adds a reply to an existing comment thread in a Word document. Your LLM uses this tool to reply to a comment, respond to feedback, or follow up on an existing thread. Your LLM uses list_comments first to identify the correct comment_id.
Try asking:
Reply to Jade's comment about the timeline.Respond to the feedback on the budget section.Answer Marco's question in the comments.Reply to the comment about the Executive Summary.
resolve_comment tool
The resolve_comment tool marks an existing comment thread as resolved in a Word document. Your LLM uses this tool to resolve, close, or mark a comment as addressed.
Try asking:
Resolve all comments from Marco.Mark Jade's comment as resolved.Close the comment thread about the budget.Resolve the feedback on the introduction.
list_tracked_changes tool
The list_tracked_changes tool lists pending tracked changes in a Word document with authorship and location information. Your LLM uses this tool to see what changes have been tracked, who made edits, or what revisions are pending in a document.
Try asking:
Show me the tracked changes in this document.What edits has Alex made to the proposal?List all pending revisions.What changes are tracked in the marketing plan?
Getting started
View and manage your MCP server tools in the Overview page Tools section. Tool management provides the following capabilities:
TOOLS MUST BE STARTED
Your LLM can only access active tools in your MCP server connector.
Last updated: