Manage workspace collaborators with the new role-based access control model
The Workato role-based access control (RBAC) system separates environment-level and project-level permissions. This model replaces legacy system roles (Admin, Analyst, Operator) with flexible role assignments that define access precisely and scale with your team's needs.
Environment roles manage high-level privileges across environments, while project roles control access and actions within specific projects. You can also define custom roles and use collaborator groups to grant project access to multiple users at once.
LEGACY ROLES
The new permissions model is generally available and is the default for all workspaces. Older workspaces that still use legacy system roles (Admin, Analyst, Operator) can continue using them until they migrate. Legacy collaborator roles will be deprecated at the end of August 2026.
We recommend that you migrate to environment roles and project roles to take full advantage of this new access control. You can migrate manually, using the built-in wizard, or at scale using APIs, depending on the number of custom roles in your workspace.
Refer to the Migrate to the new access control model guide for step-by-step instructions to upgrade before the deprecation deadline.
Prerequisites
Ensure the following before you enable the new permissions model:
- The home assets (root) folder must be empty. If your workspace still contains assets in the home assets folder, you must migrate them into a project. Refer to the Home assets project documentation for more information.
MIGRATION SUPPORT
Workato provides automatic migration that performs the following:
- Converts home assets into a standard project in each environment.
- Retains the same
folder_idandproject_id. - Prevents users from adding new assets to the root folder.
How the model works
Collaborators can hold one environment role per environment and one or more project roles per project. Environment roles don't grant access to project content, and project roles don't grant access to environment settings.
You can assign roles based on a collaborator's responsibilities. For example, you can allow an IT admin to manage security settings in all environments without viewing project content, or allow a developer to build recipes in one project without accessing other teams' work.
You can control privileges using the following:
- System environment roles: Predefined roles with environment-wide privileges
- System project roles: Predefined roles with project-level privileges
- Custom roles: Tailored privilege sets for specific needs
- Collaborator groups: Collections of collaborators that share the same project roles
Collaborators
Collaborators are individual workspace users. You can invite them, assign environment roles, and manage their project access from Workspace admin.
Go to the Collaborators tab to view a summary of each user's environment roles. These roles define their access level in each environment.
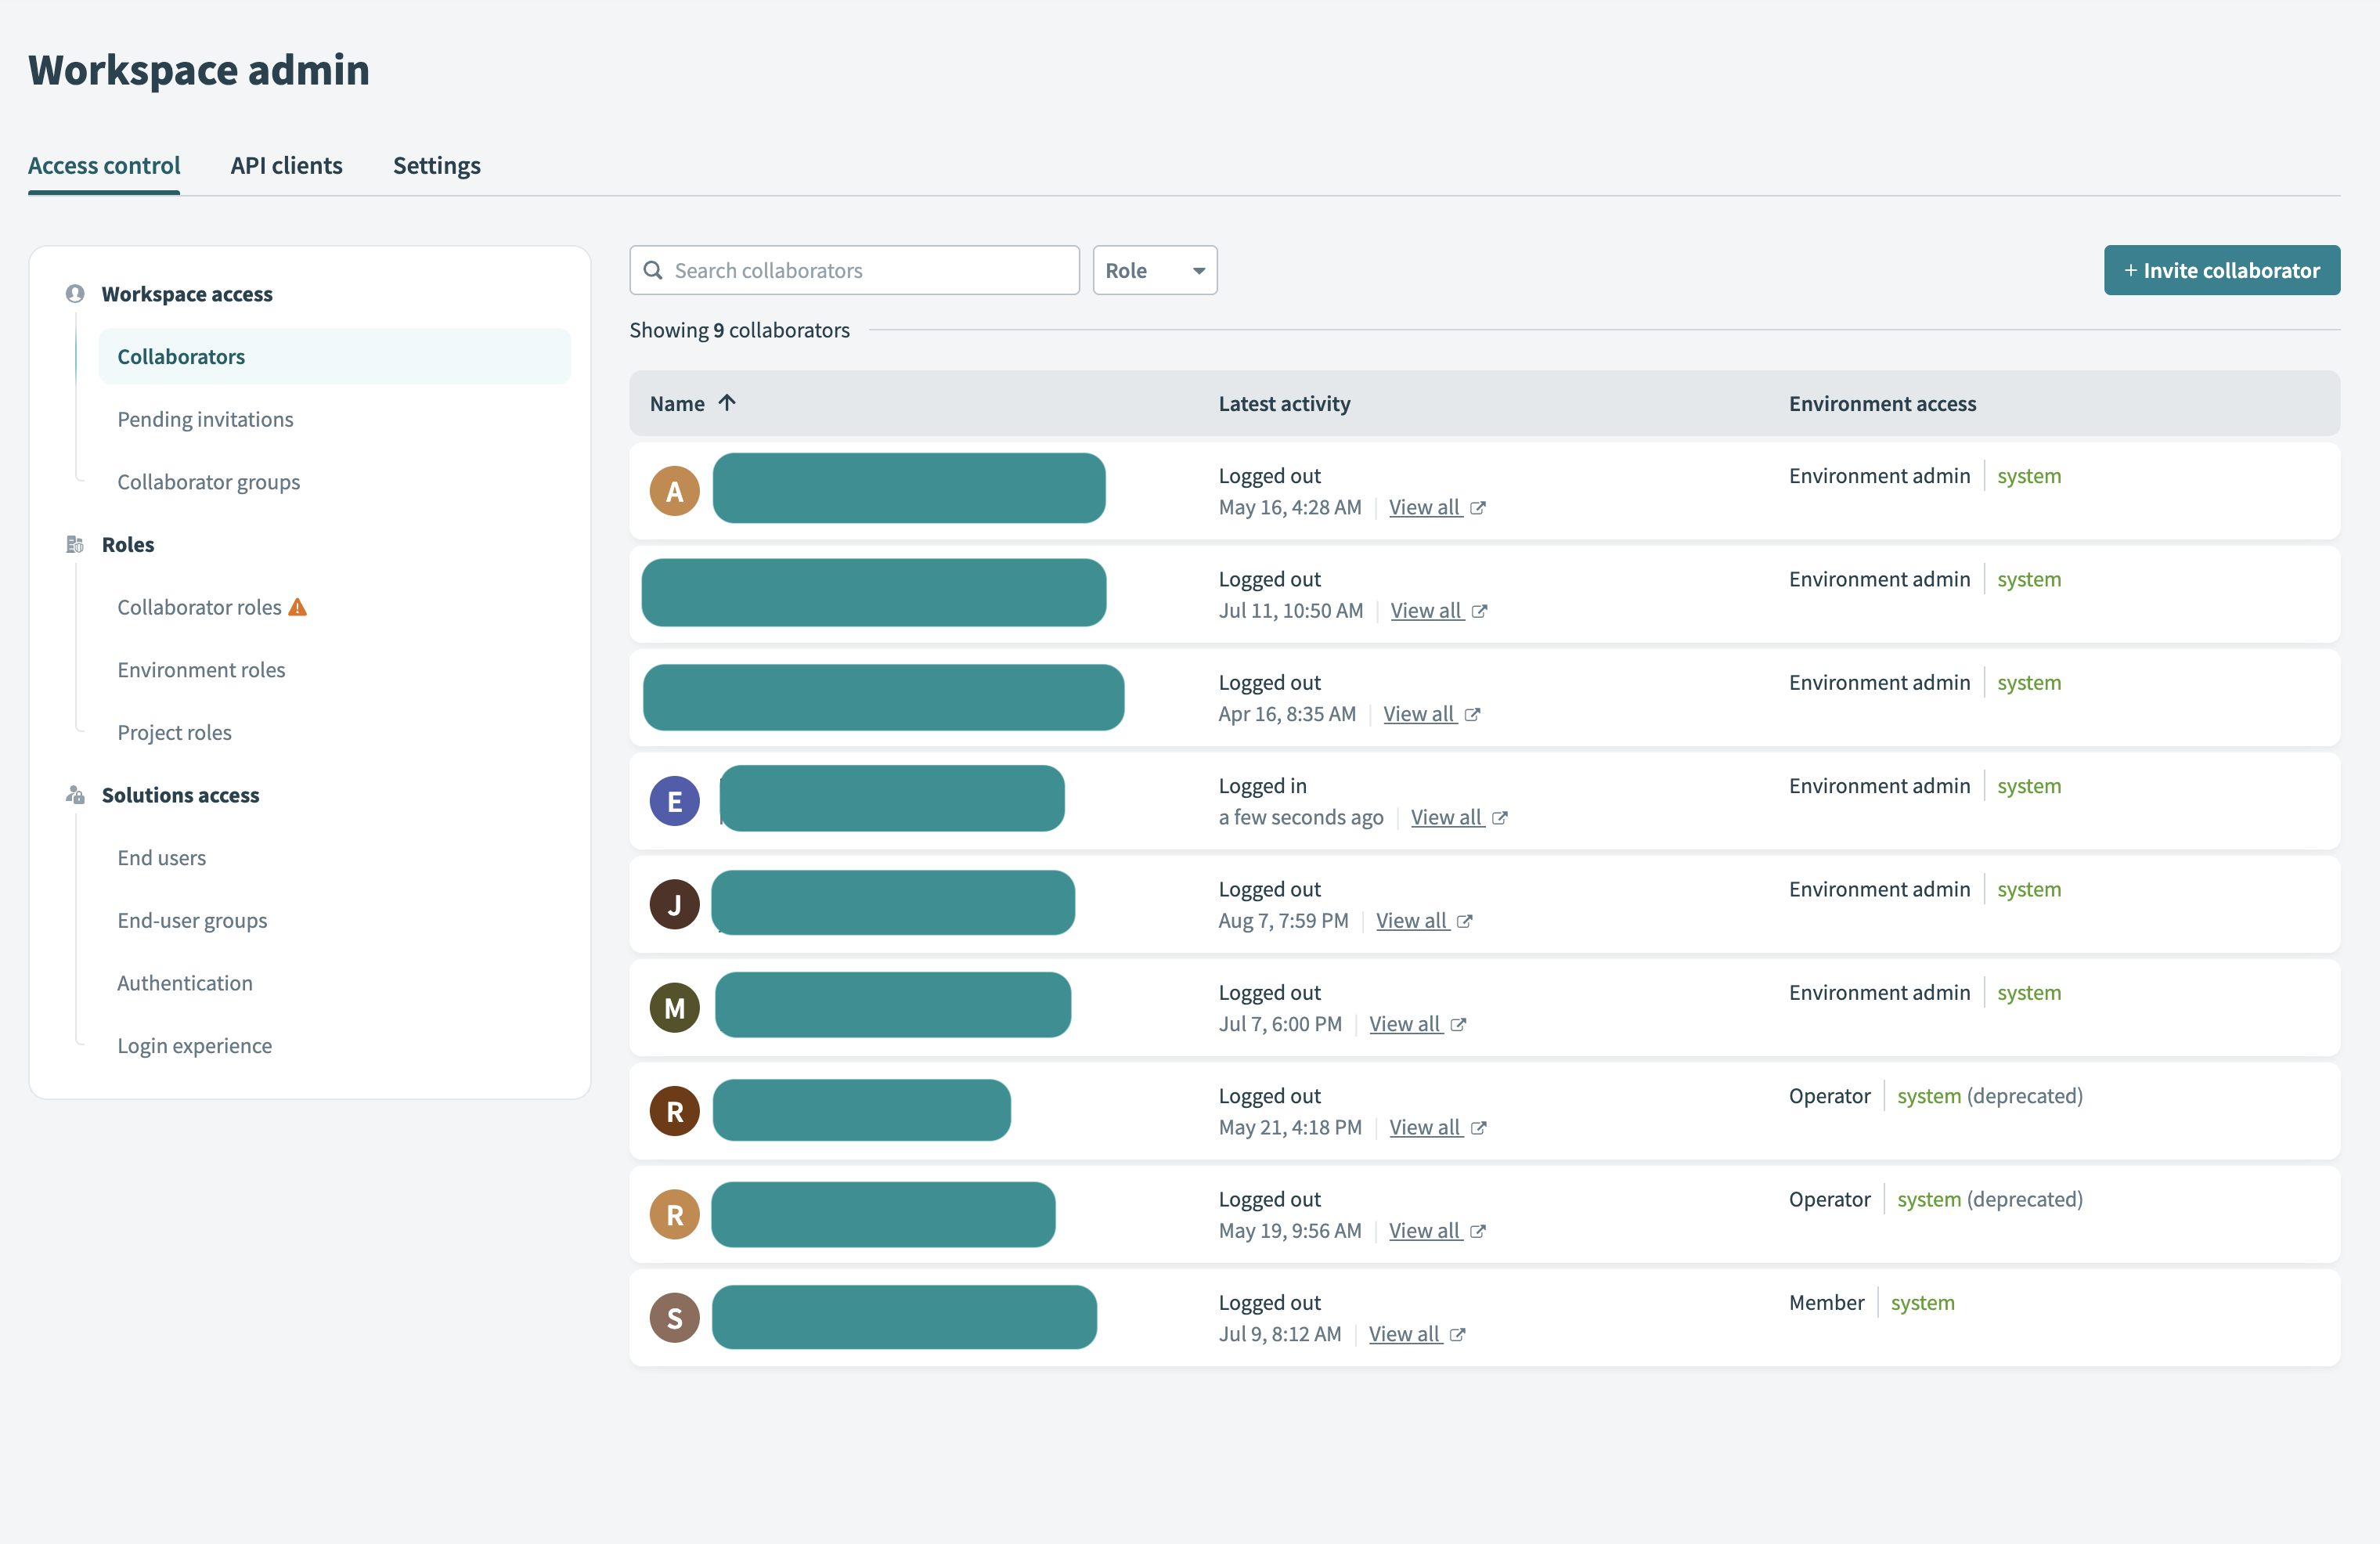 Collaborator view
Invite a collaborator
Complete the following steps to invite a collaborator and assign environment roles:
Go to Workspace admin > Access control > Collaborators.
Click + Invite collaborator.
Invite collaborator
Enter the collaborator's Name.
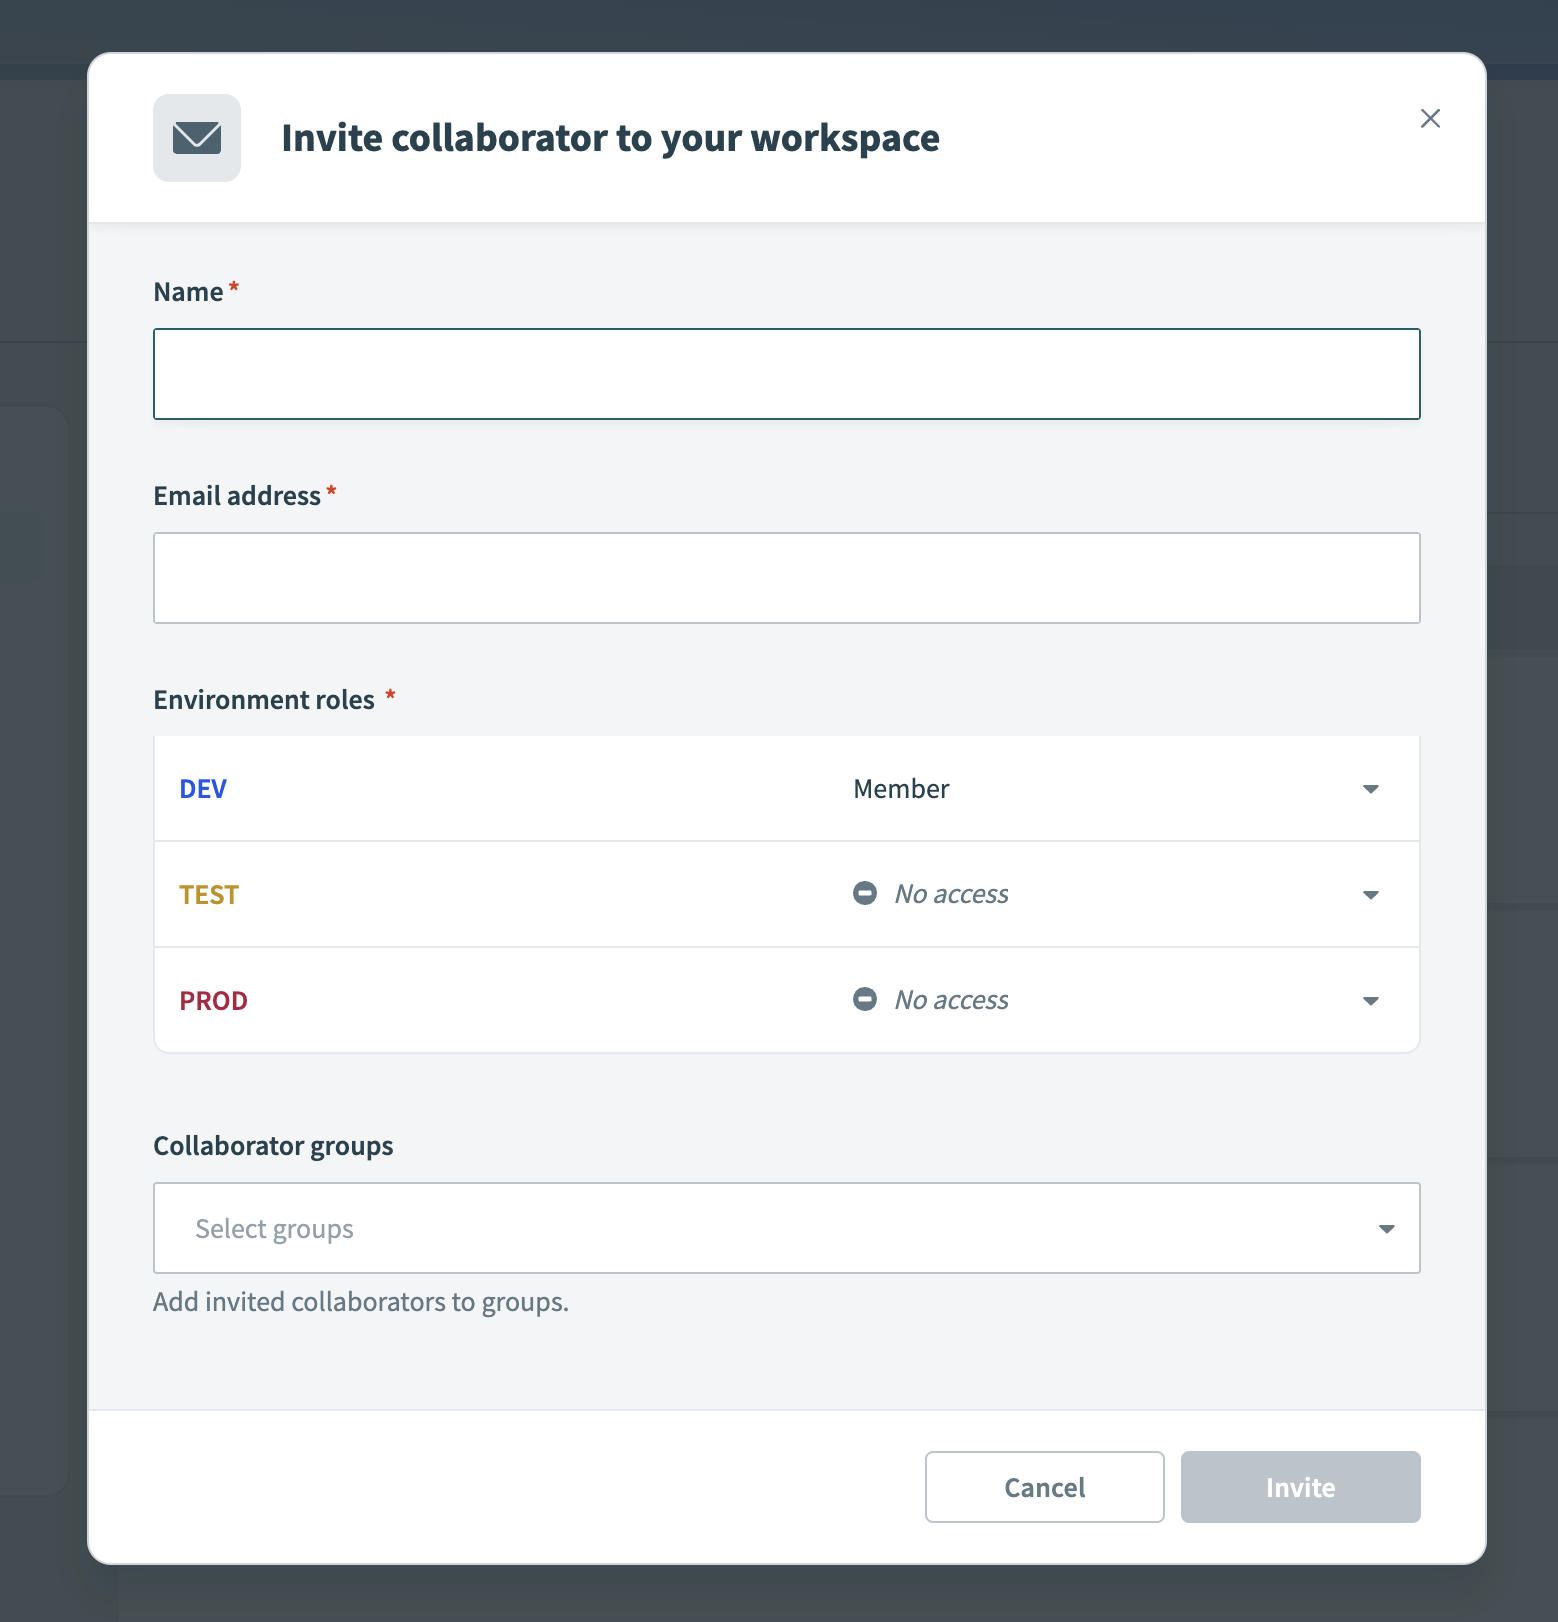 Enter the collaborator's name
Enter the collaborator's Email address.
Assign an Environment role for each environment. If the workspace has only one environment, assign a role to the default environment.
Optional. Add the collaborator to one or more Collaborator groups.
Click Send invitation.
Manage collaborator details
Click a collaborator's name to open their details page. You can update their environment roles and view project-level access from this page.
The Environment access section displays the collaborator's assigned role for each environment. The Project access section lists the projects the collaborator can access in each environment, along with their assigned project roles.
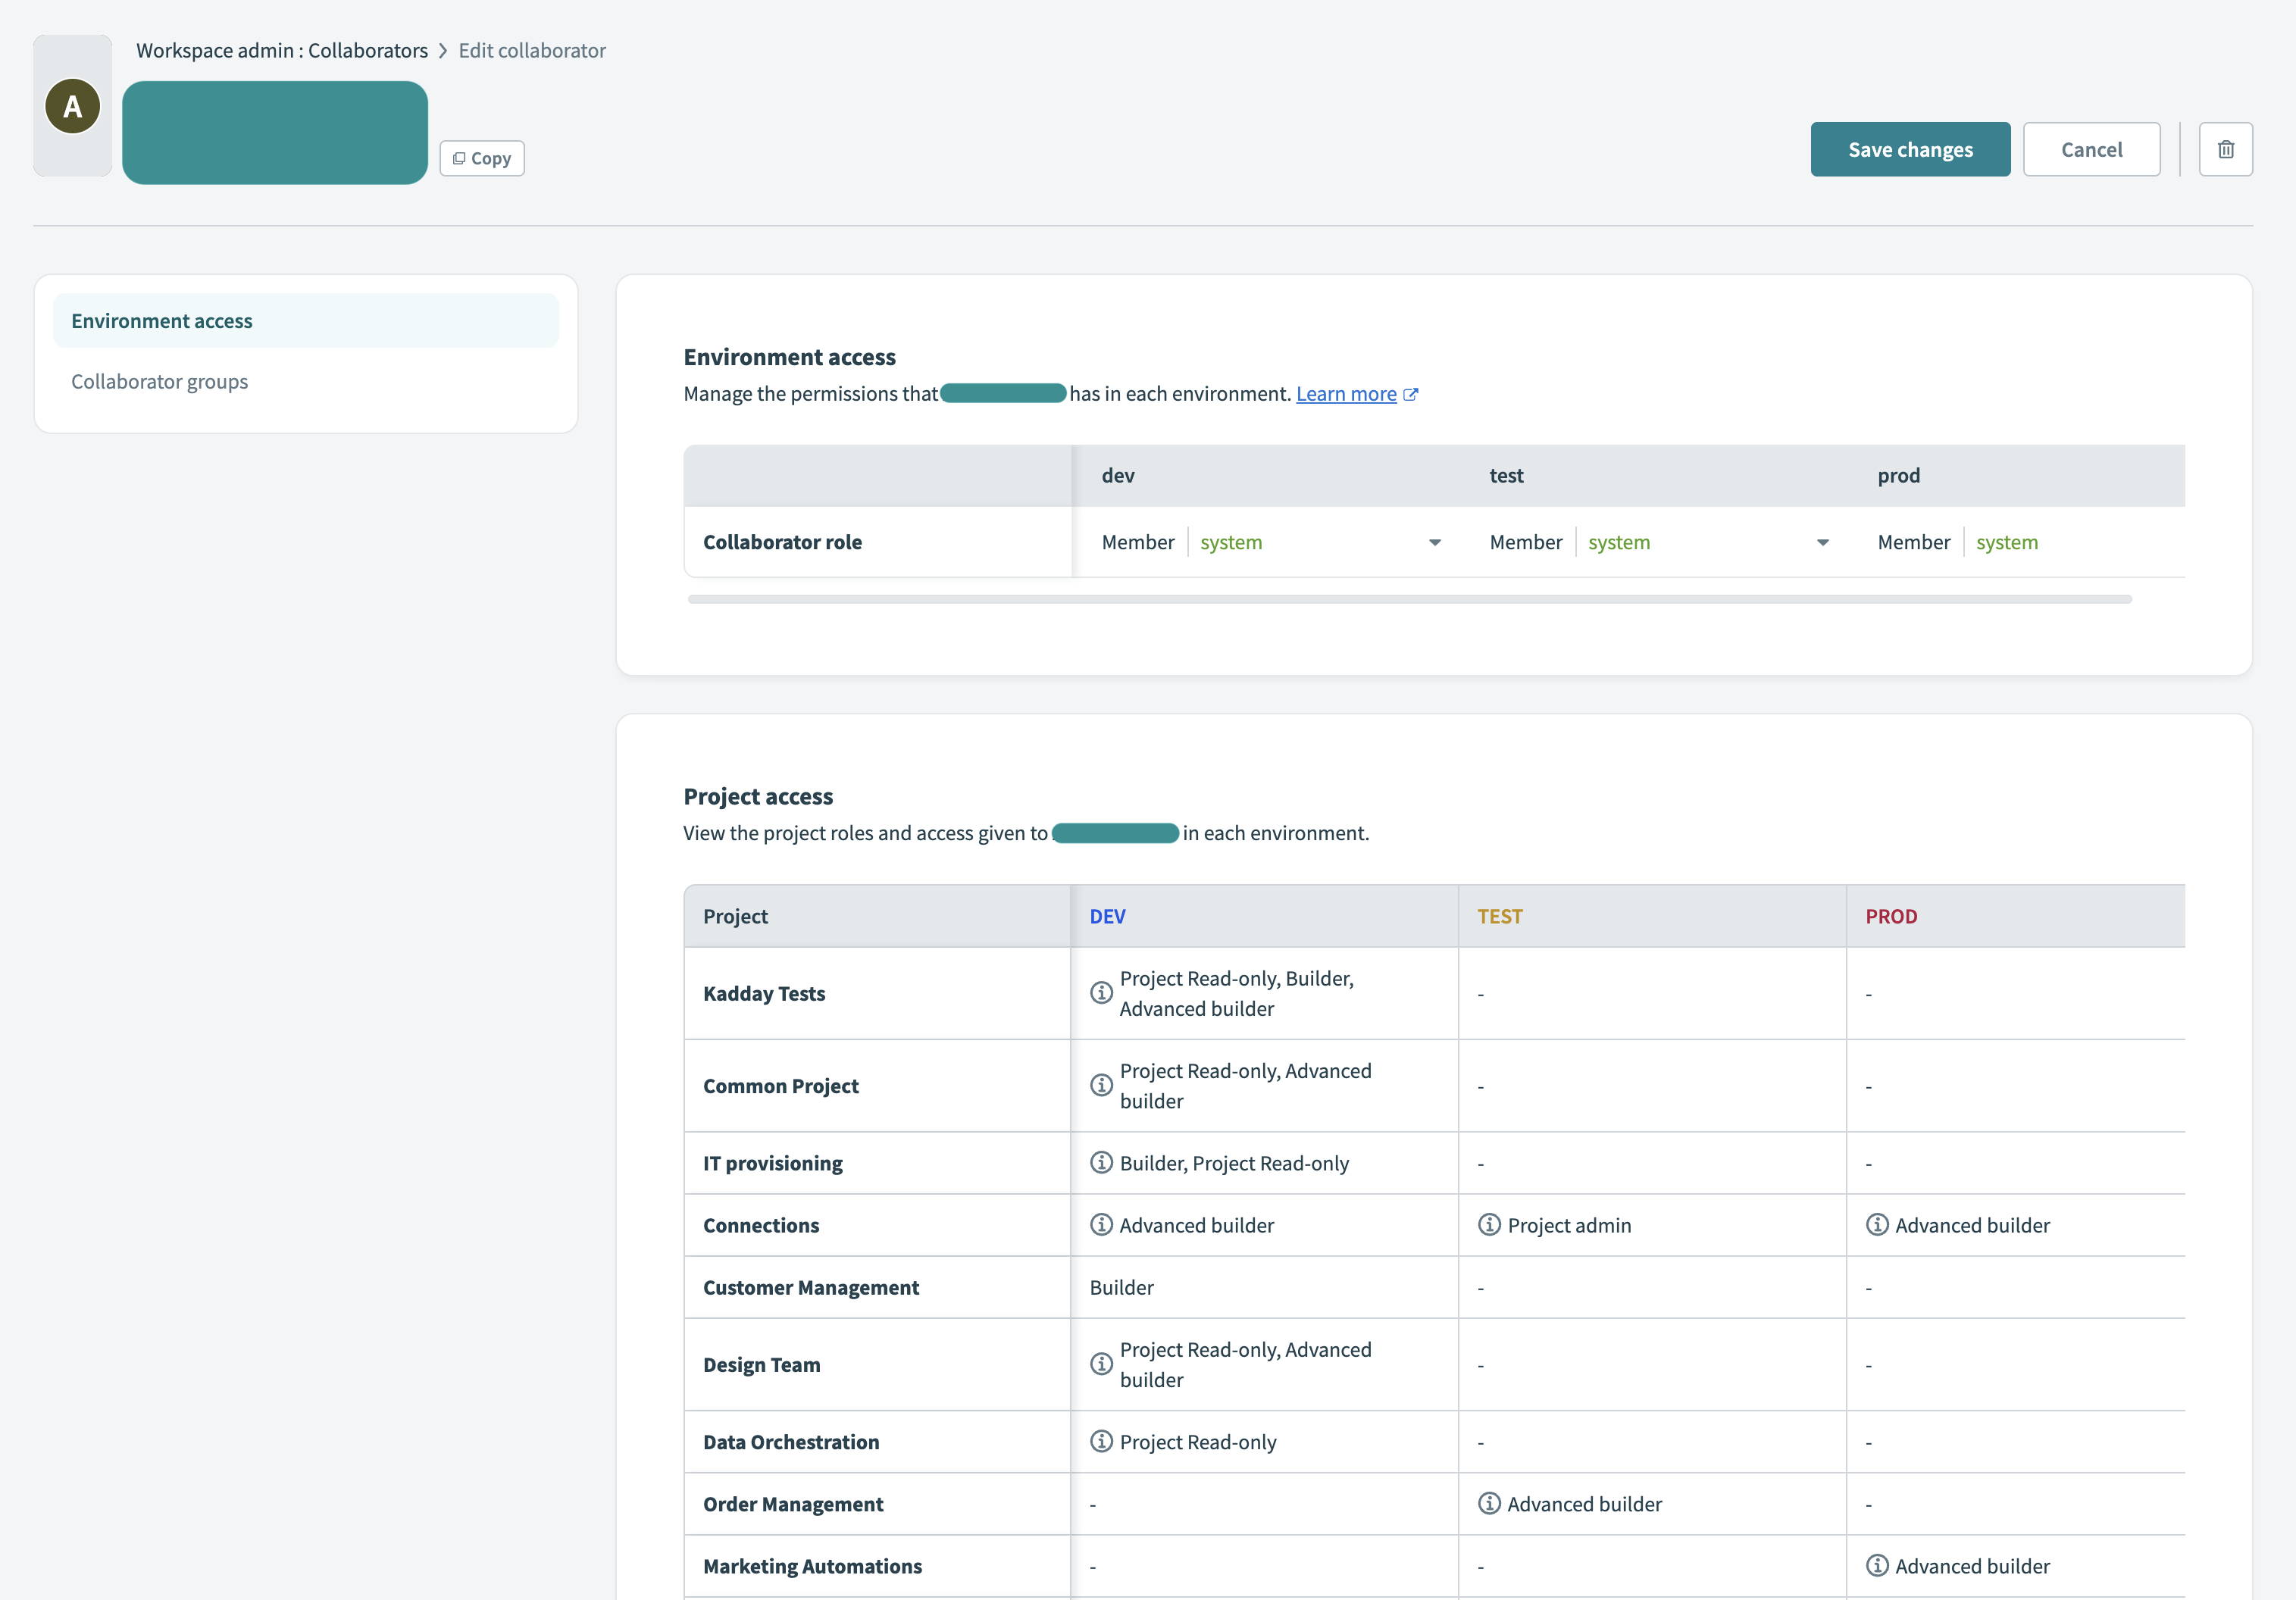 Manage collaborator details
You can also update the collaborator's Collaborator groups. Changes to group memberships take effect immediately.
 Manage collaborator group access
Key roles
Workato's role-based access control system includes the following role types:
- Environment roles define permissions to manage projects, configure environment settings, and control access across environments.
- Project roles define permissions to build, deploy, and manage content within specific projects.
Assign roles based on a user's responsibilities within an environment or project. For example, an IT admin can manage security settings across all environments without accessing project content, while a developer can build recipes in one project without viewing other teams' work in another project.
You can use custom roles to define more granular permissions based on your organization's needs. Use collaborator groups to scale access control as teams grow.
Environment roles
An environment role defines a collaborator's permissions in a specific environment. Workato provides the following system-defined environment roles:
- Environment admin: Full control over workspace-wide and environment settings.
- Environment manager: Full control over environment settings, but no workspace-wide permissions.
- Member: View-only access to environment settings.
You can assign different roles to a user in different environments based on their responsibilities.
Environment roles don't grant access to project content. Collaborators, including environment admins, need a project role to open a project and view, edit, or manage project assets.
Workato doesn't grant implicit access through environment roles. Assigning a project role makes access explicit and visible in the audit log, which is important for sensitive or restricted projects.
Refer to the system Environment roles page to learn more about the permissions included in each role.
PROJECT VISIBILITY
Only users with the Manage projects permission in their environment role can view a list of all projects in that environment and manage project access. While they don't need a project role to see project names, they can't open or edit project content without one. Other users can see project names only if they have direct access to those projects.
Assign environment roles to users
Collaborators with the Environment admin role can assign roles to individual users. A user can have different roles in each environment. For example, you can assign a DevOps engineer as an Environment admin in Development, a Member in Testing, and No access in Production.
Complete the following steps to assign or update environment roles:
Go to Workspace admin > Access control > Collaborators.
Collaborator view
Select a collaborator.
Assign environment roles in the Environment access section.
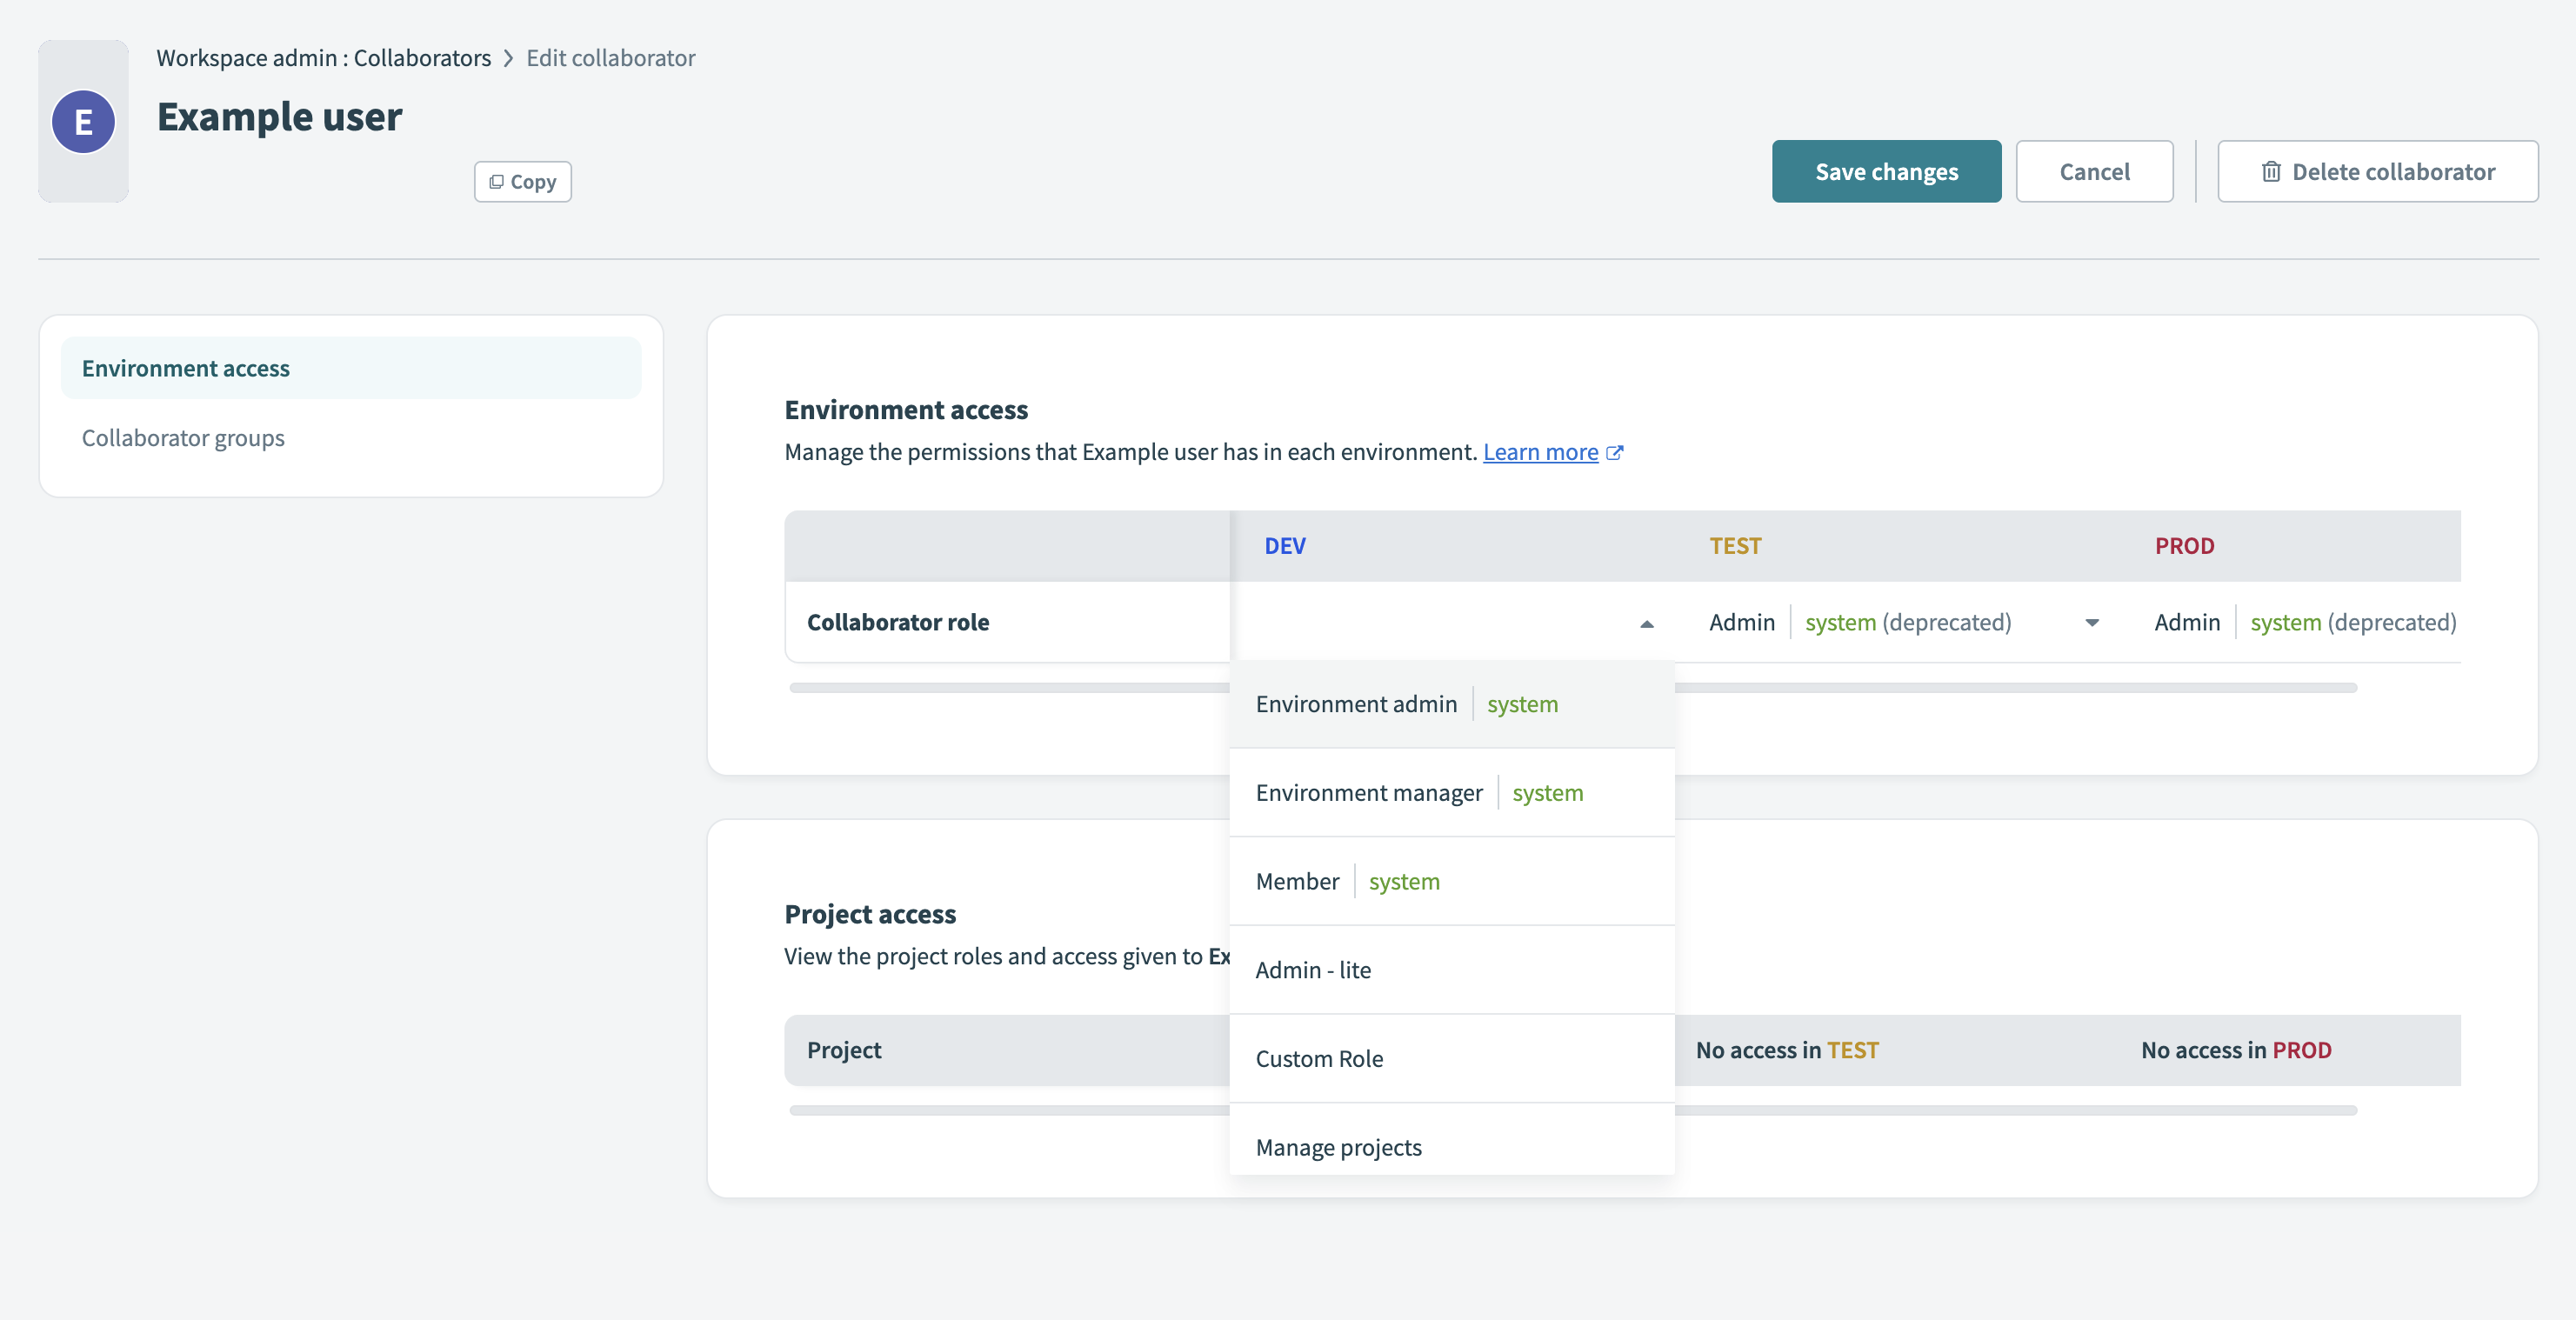 Assign environment roles
If multiple environments are enabled, assign the collaborator a role for each environment. If the workspace includes only one environment, choose a role from the available options.
Click Save to apply your changes.
Collaborator settings are updated immediately after you assign a role. The No access role removes the user's ability to view or switch into the environment.
ACCESS LOSS WHEN CHANGING YOUR OWN ROLE
You lose access to the Collaborators page and workspace settings if you assign yourself the No Access role or a role without admin privileges in the DEV environment.
Review your DEV environment role carefully before you save changes to your own access.
Project roles
Project roles control which actions a collaborator can perform in a project. These roles include permissions to build recipes, manage connections, deploy content, and view project assets.
Workato provides four system-defined project roles:
- Project admin: Full access to all project content and settings, including user management and deletion.
- Advanced builder: Full access to build and deploy, without access to manage settings or user permissions.
- Builder: Can build recipes and submit deployment requests when review and approval is enabled for the workspace. Builders can't review, approve, or deploy projects.
- Project operator: Can view all project content and run or stop recipes.
You can assign project roles to individuals or collaborator groups. Each project requires a separate role assignment. This separation allows teams to control access and responsibilities across projects. For example, a developer may be a Builder in one project and a Project operator in another.
Collaborators must have a project role to view or manage project content. Environment roles don't grant project access.
Refer to the system Project roles page to learn more about the permissions included in each role.
PROJECT CREATION
Users with an environment role that includes the Create project privilege automatically receive the Project admin role for any project they create. Other collaborators with the Manage projects permission can edit the creator's project role after the project is created.
Manage project access and roles
You can manage project access directly in each project's settings. To give collaborators or groups project access, explicitly assign them project roles. Alternatively, you can set default access for all workspace users.
Only a Project admin or users with environment roles that grant the Manage projects permission can manage project access.
Add users or groups to a project
Complete the following steps to assign project roles:
Open the project in Workato.
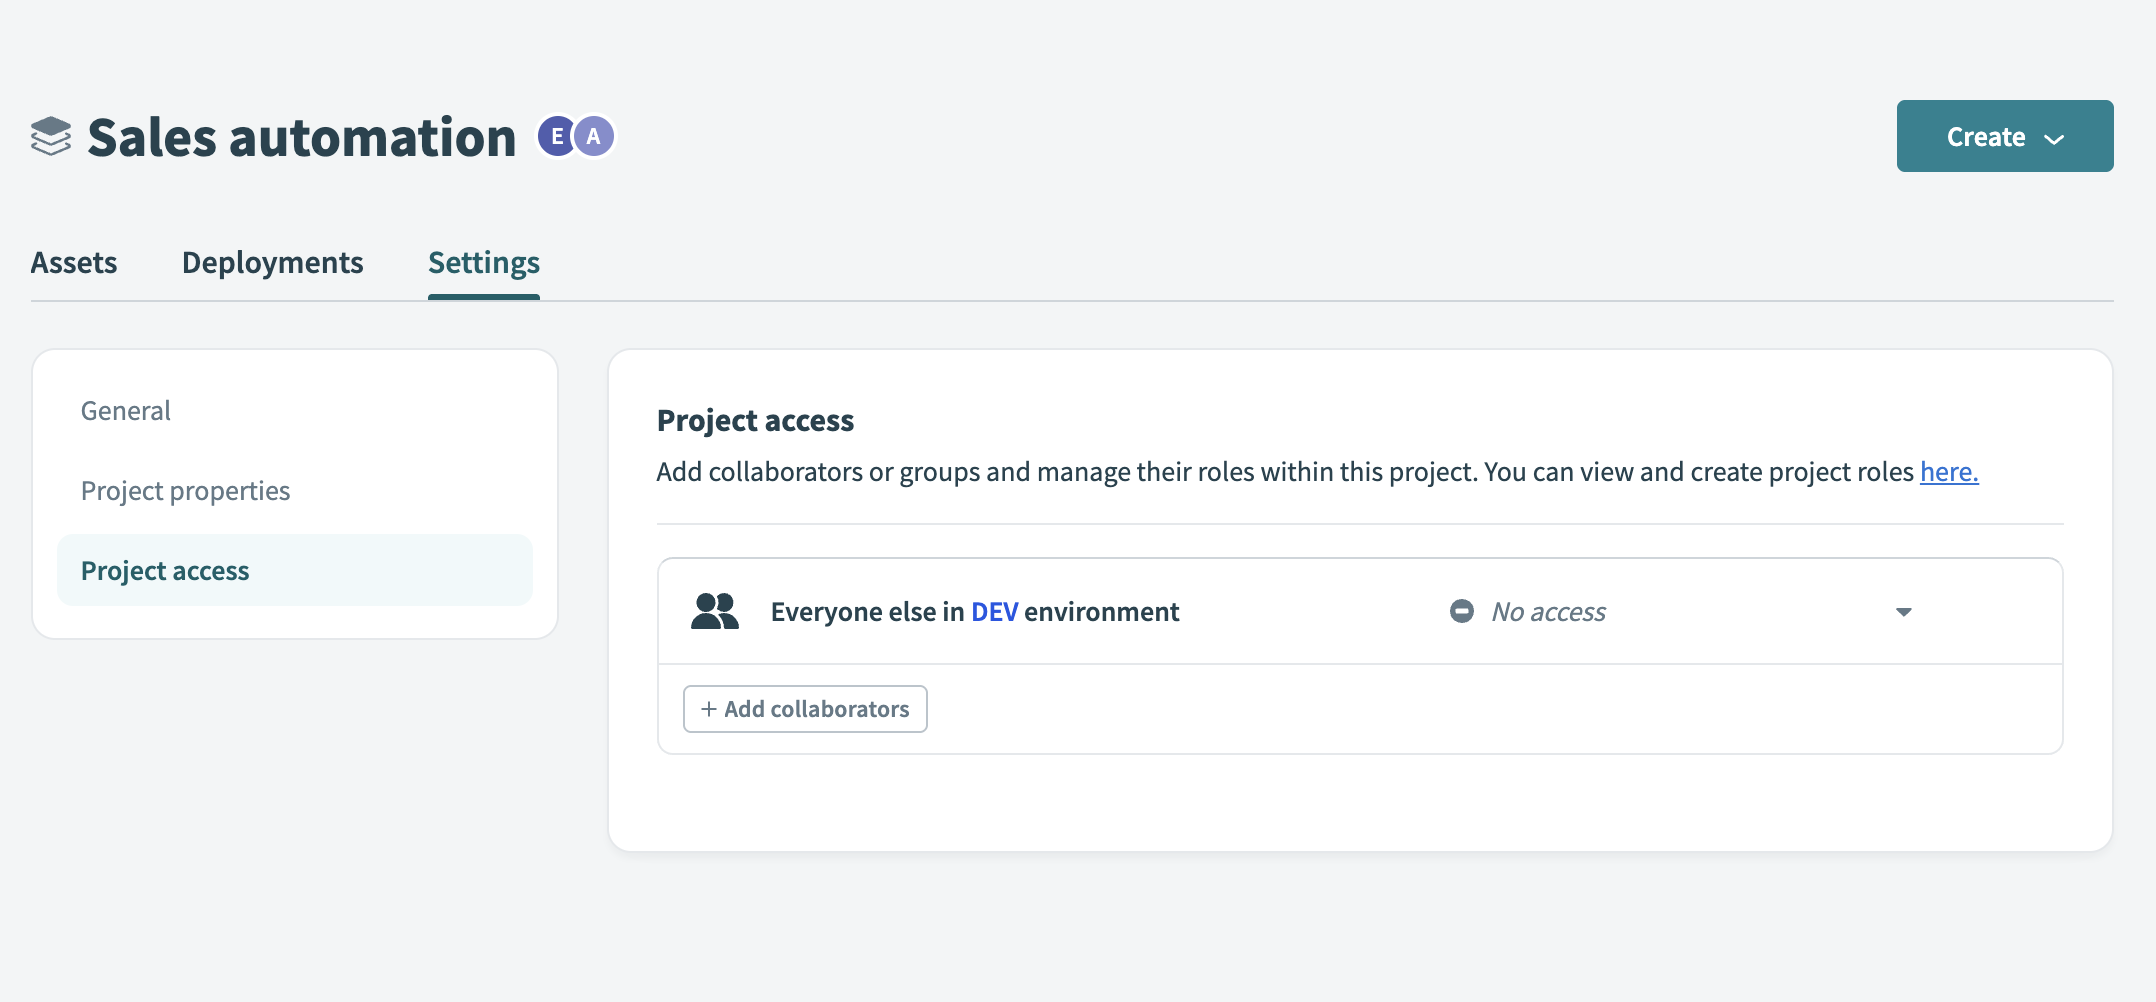
Go to Settings > Project access.
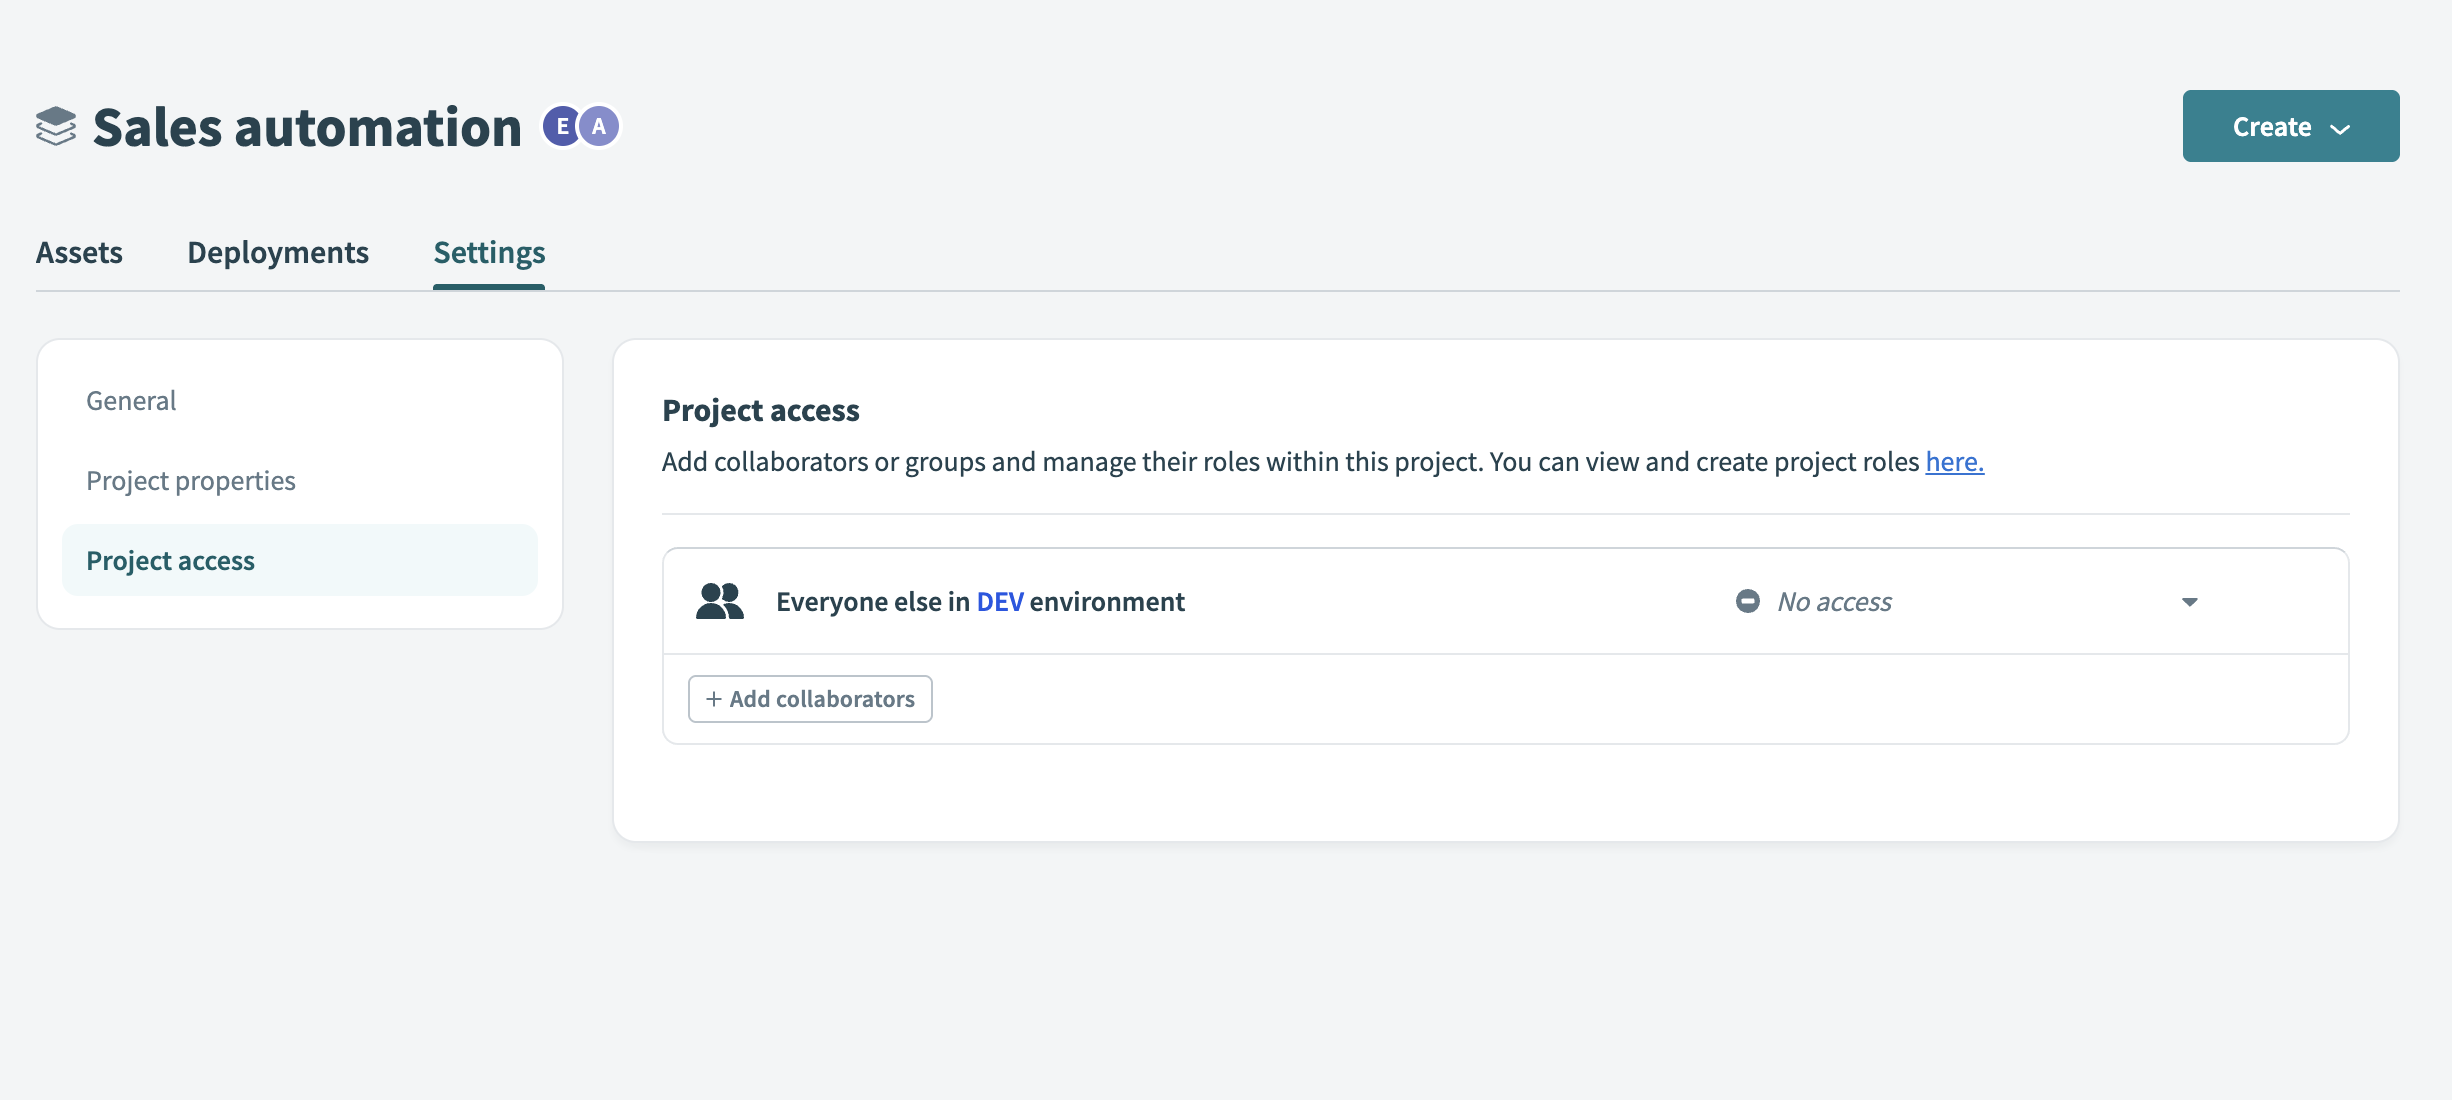 Go to project access
Click Add collaborators.
Choose a Project role for the collaborators or group.
Select one or more collaborators or groups to add.
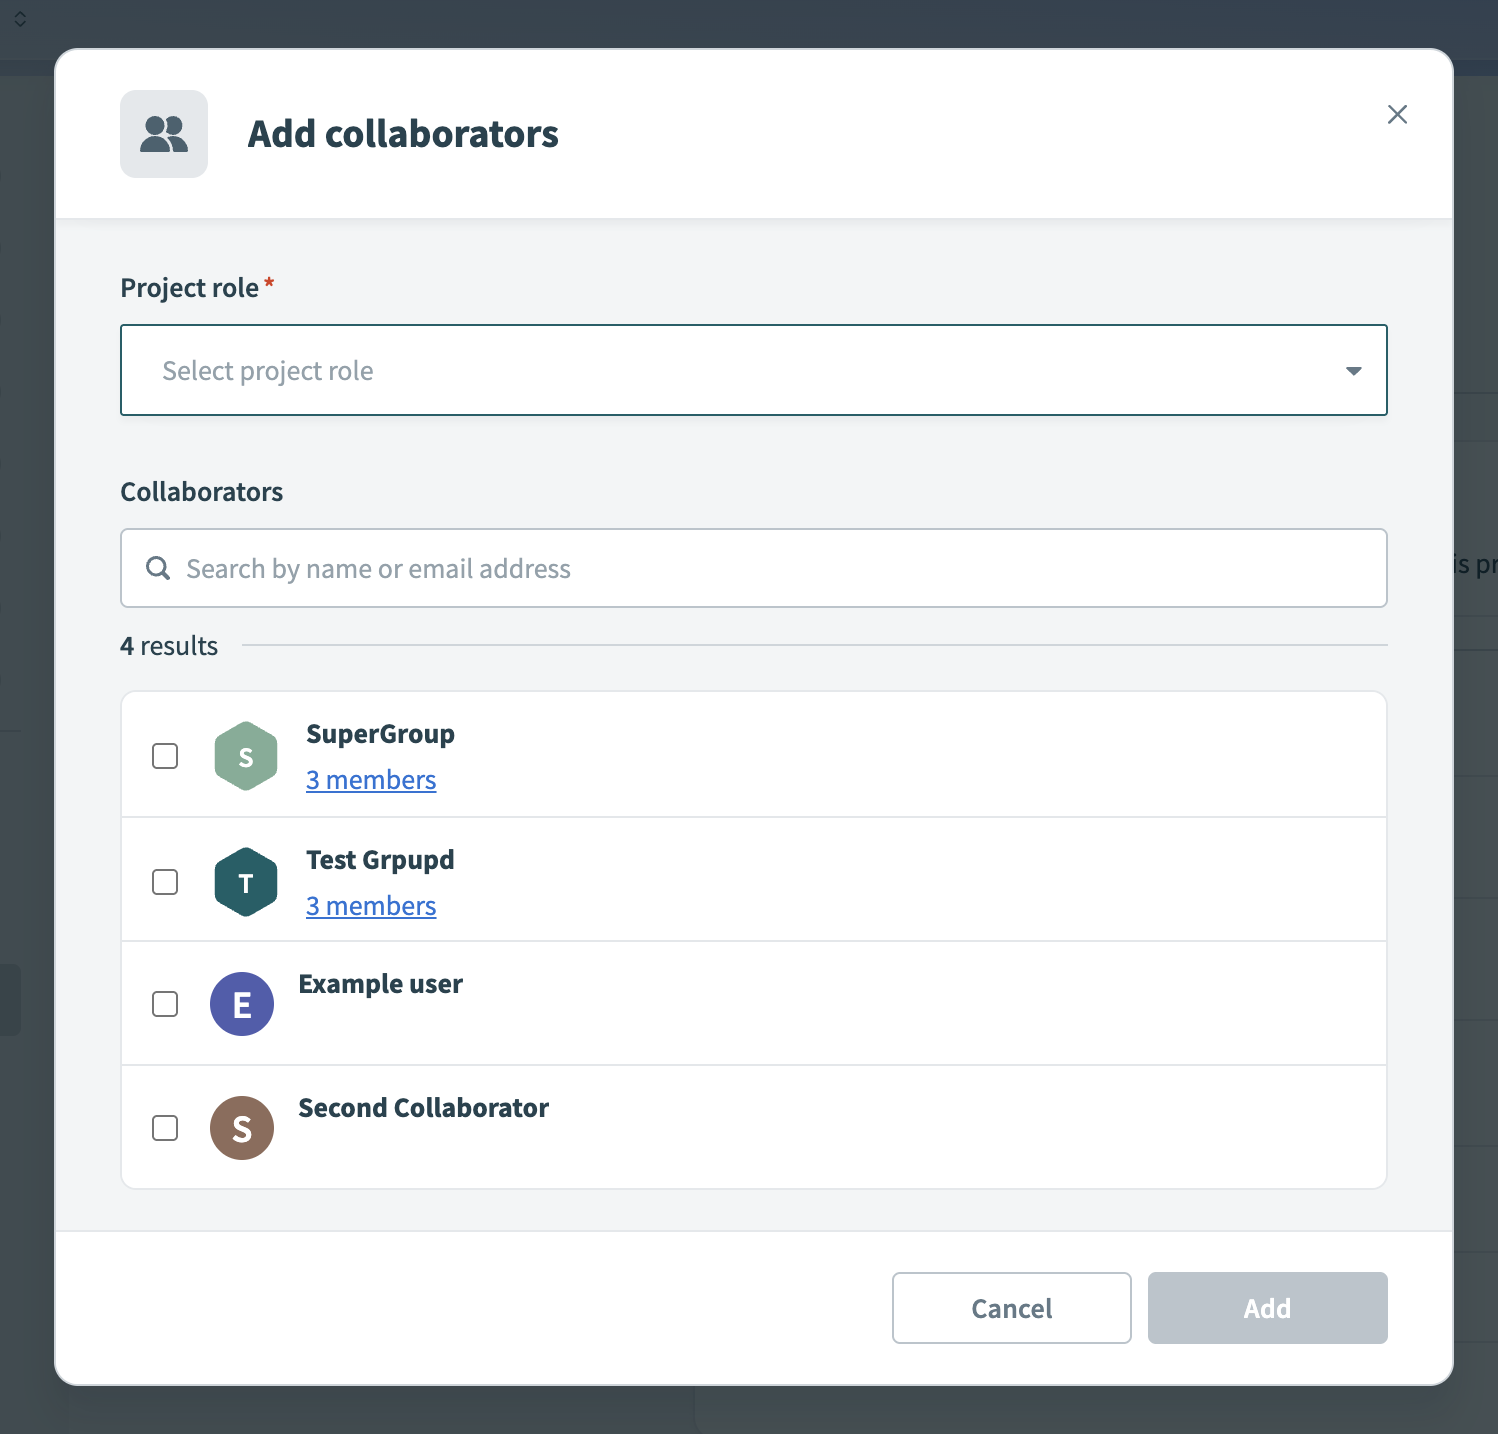 Add collaborators to project
Click Add. The user or group appears in the project access list with the assigned role.
When you assign a group to a project, its members receive access according to the group's role. For example, if you assign a data team group the Project operator role, each group member can view project content and run or stop recipes. You can assign multiple collaborators or groups to a project.
EFFECTIVE PERMISSIONS ACROSS GROUPS
If a user belongs to multiple groups, their effective permissions combine across all assigned roles. Refer to the How Workato resolves permission conflicts section for more information.
Remove collaborator access
Choose one of the following options to revoke project access:
- Set the collaborator's role to No access in the project access list. This blocks the collaborator from accessing the project content.
- Click the delete icon next to the collaborator's name to remove their project role assignment entirely.
Default access for all collaborators
The default access setting defines a project role for every workspace collaborator who doesn't have an explicit individual or group assignment. Workato applies the default access setting through the Everyone else entry on the Project access page. This setting applies separately to each project and environment.
 Default access setting
The default project access setting is No access. You can change this setting to any available project role, such as Project operator or Builder, to grant general access without assigning users individually.
For example, setting the default role to Project operator grants all collaborators view access and the ability to run or stop recipes in projects within the environment, unless they have a different role through an individual or group assignment.
Assign project roles during deployment
When a user deploys a project to a new environment for the first time and no project with the same name exists, Workato creates a new project in that environment. The user must have an environment role that includes the Create project permission in the target environment and the Deploy permission for the project in the source environment. Workato assigns the user the Project admin role in the newly created project. The Project admin can manage access for other collaborators in the new environment.
If a project with the same name already exists in the target environment, the user must have the Deploy permission in both the source and target environments to complete the deployment.
Workato also detects collaborators with project roles in the original environment and suggests assigning the same roles in the new environment. You can accept, modify, or reject the suggestions.
Custom roles
Workato supports custom roles at both the environment and project levels. Use custom roles when system-defined roles don't meet your access requirements. You can create these roles by selecting privileges from a predefined list.
Create a custom environment role
Custom environment roles define who can create projects, manage users, or configure environment settings:
Go to Workspace admin > Environment roles.
Click + Add environment role.
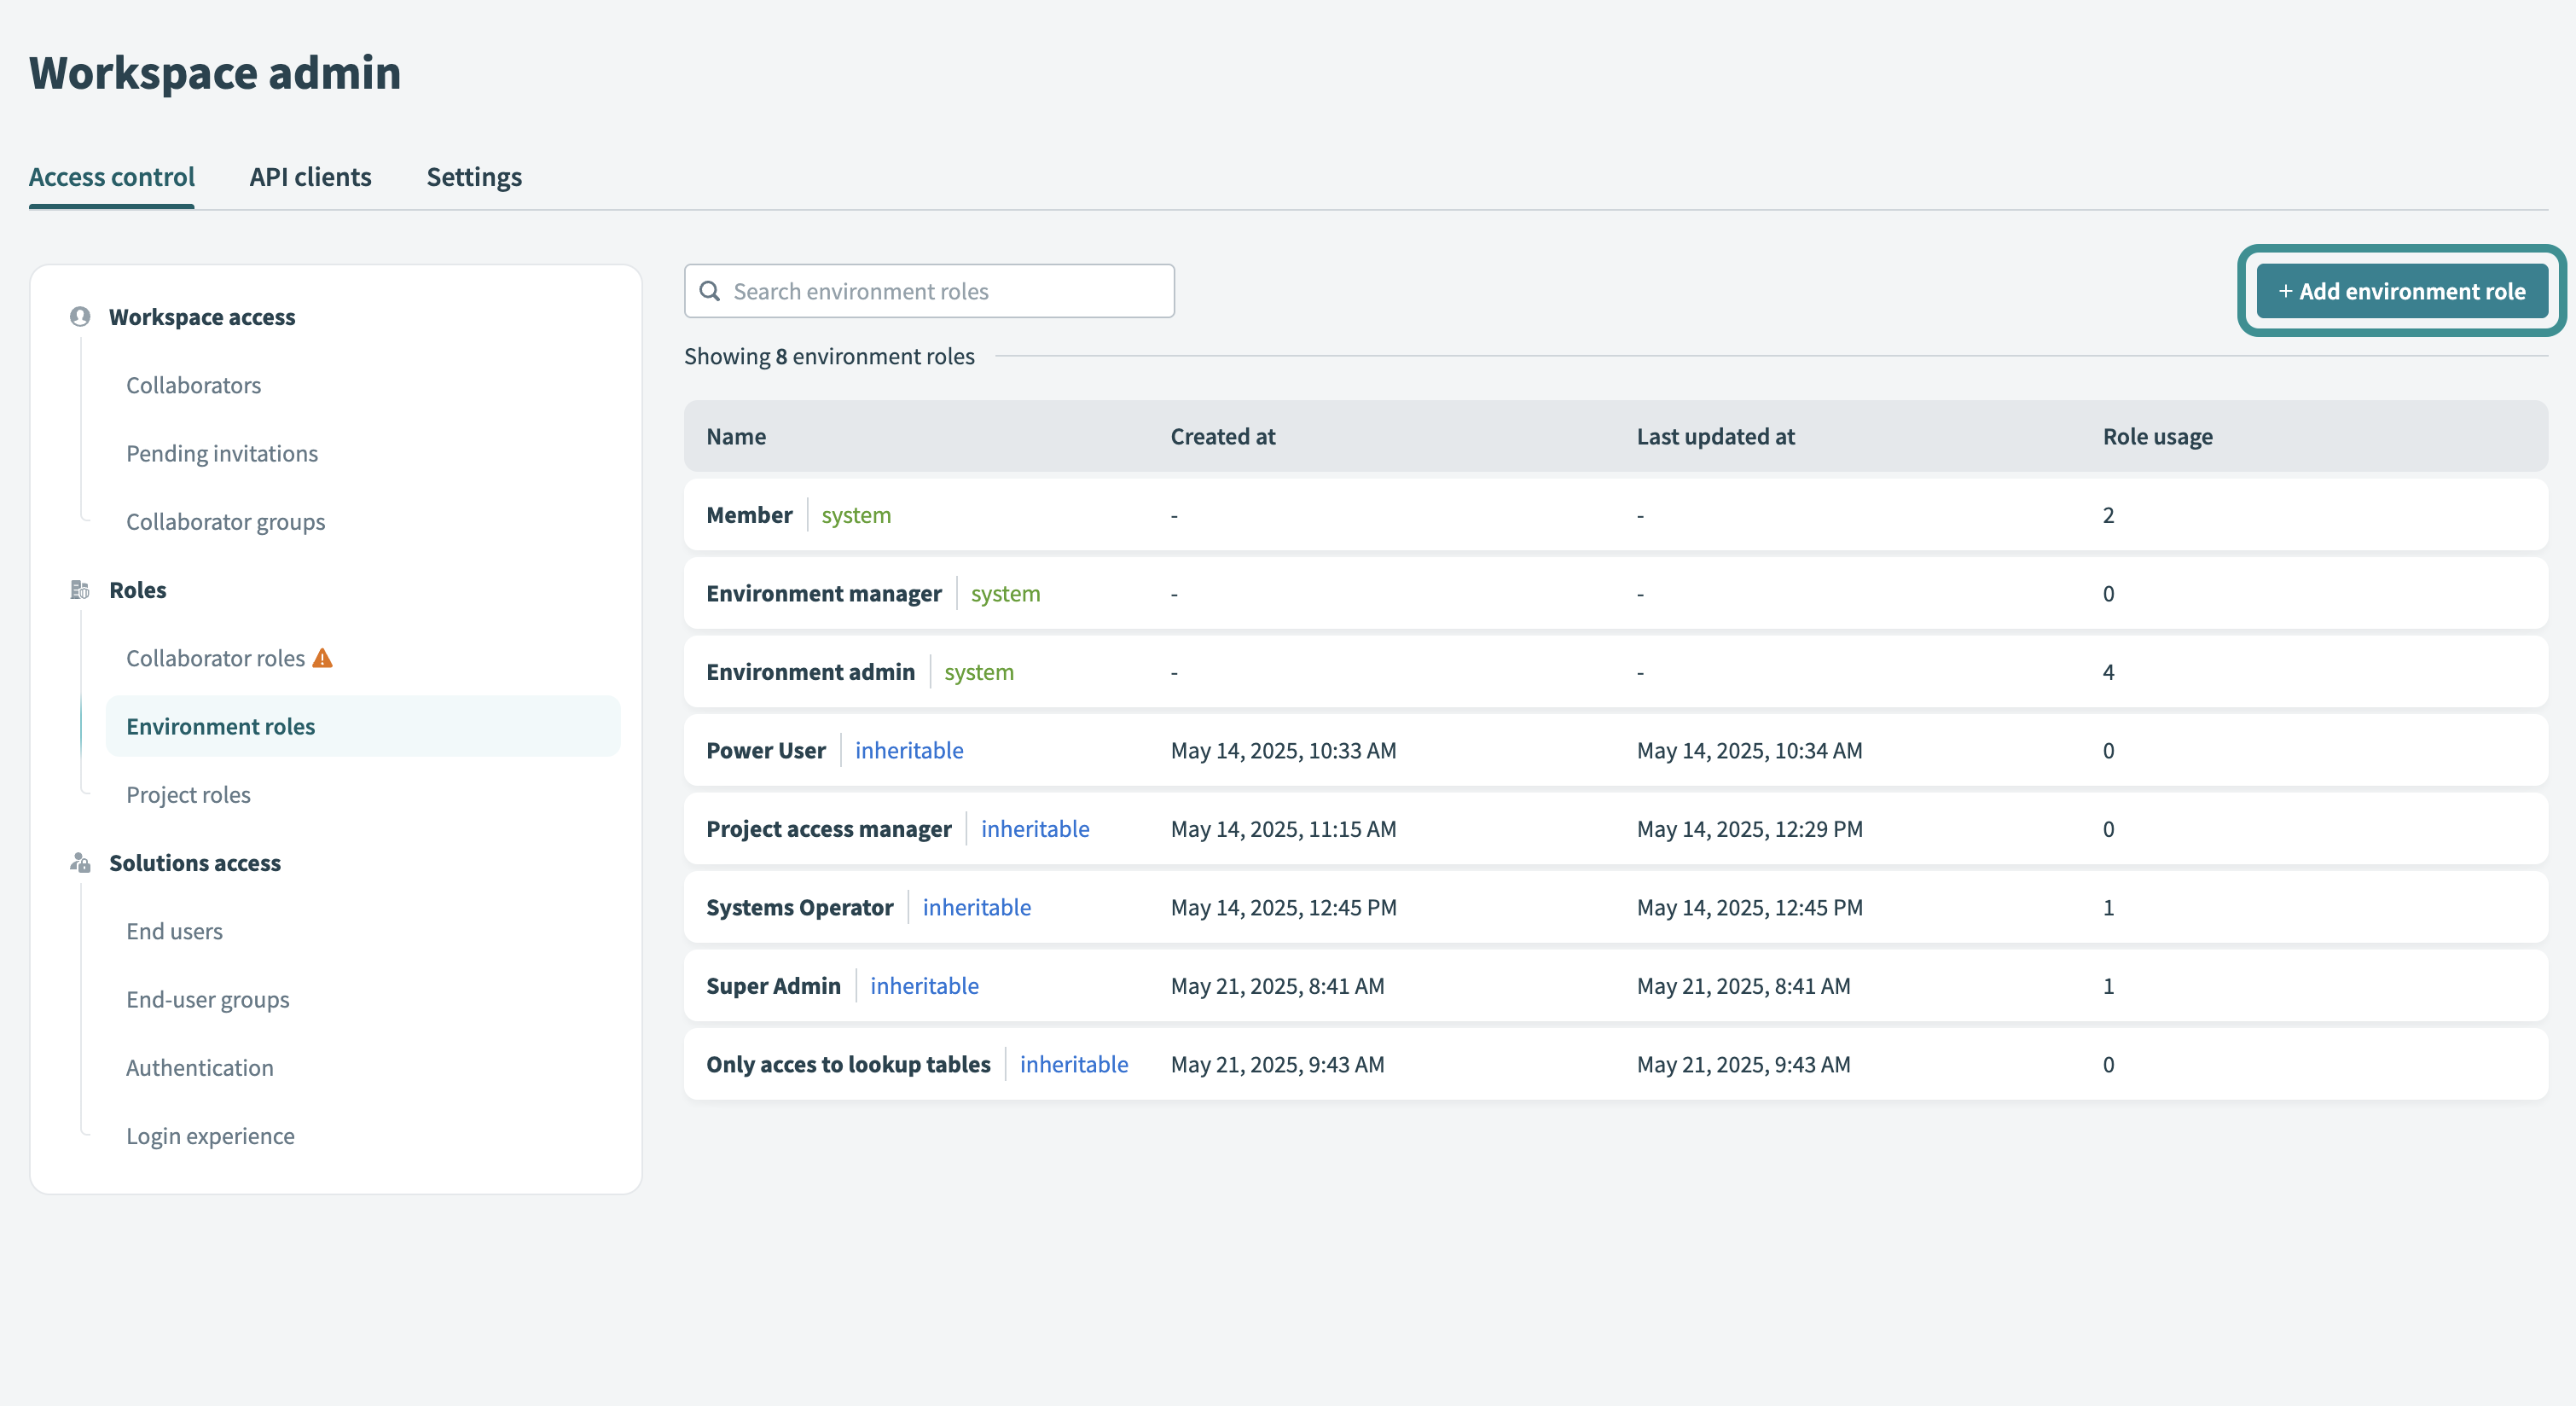 Add environment role
Select the required privileges and save the role.
Refer to the Environment privileges reference for a complete list of available privileges and their descriptions.
Create a custom project role
Custom project roles define who can build recipes, deploy content, or manage project assets:
Go to Workspace admin > Project roles
Click + Add project role to create a new role.
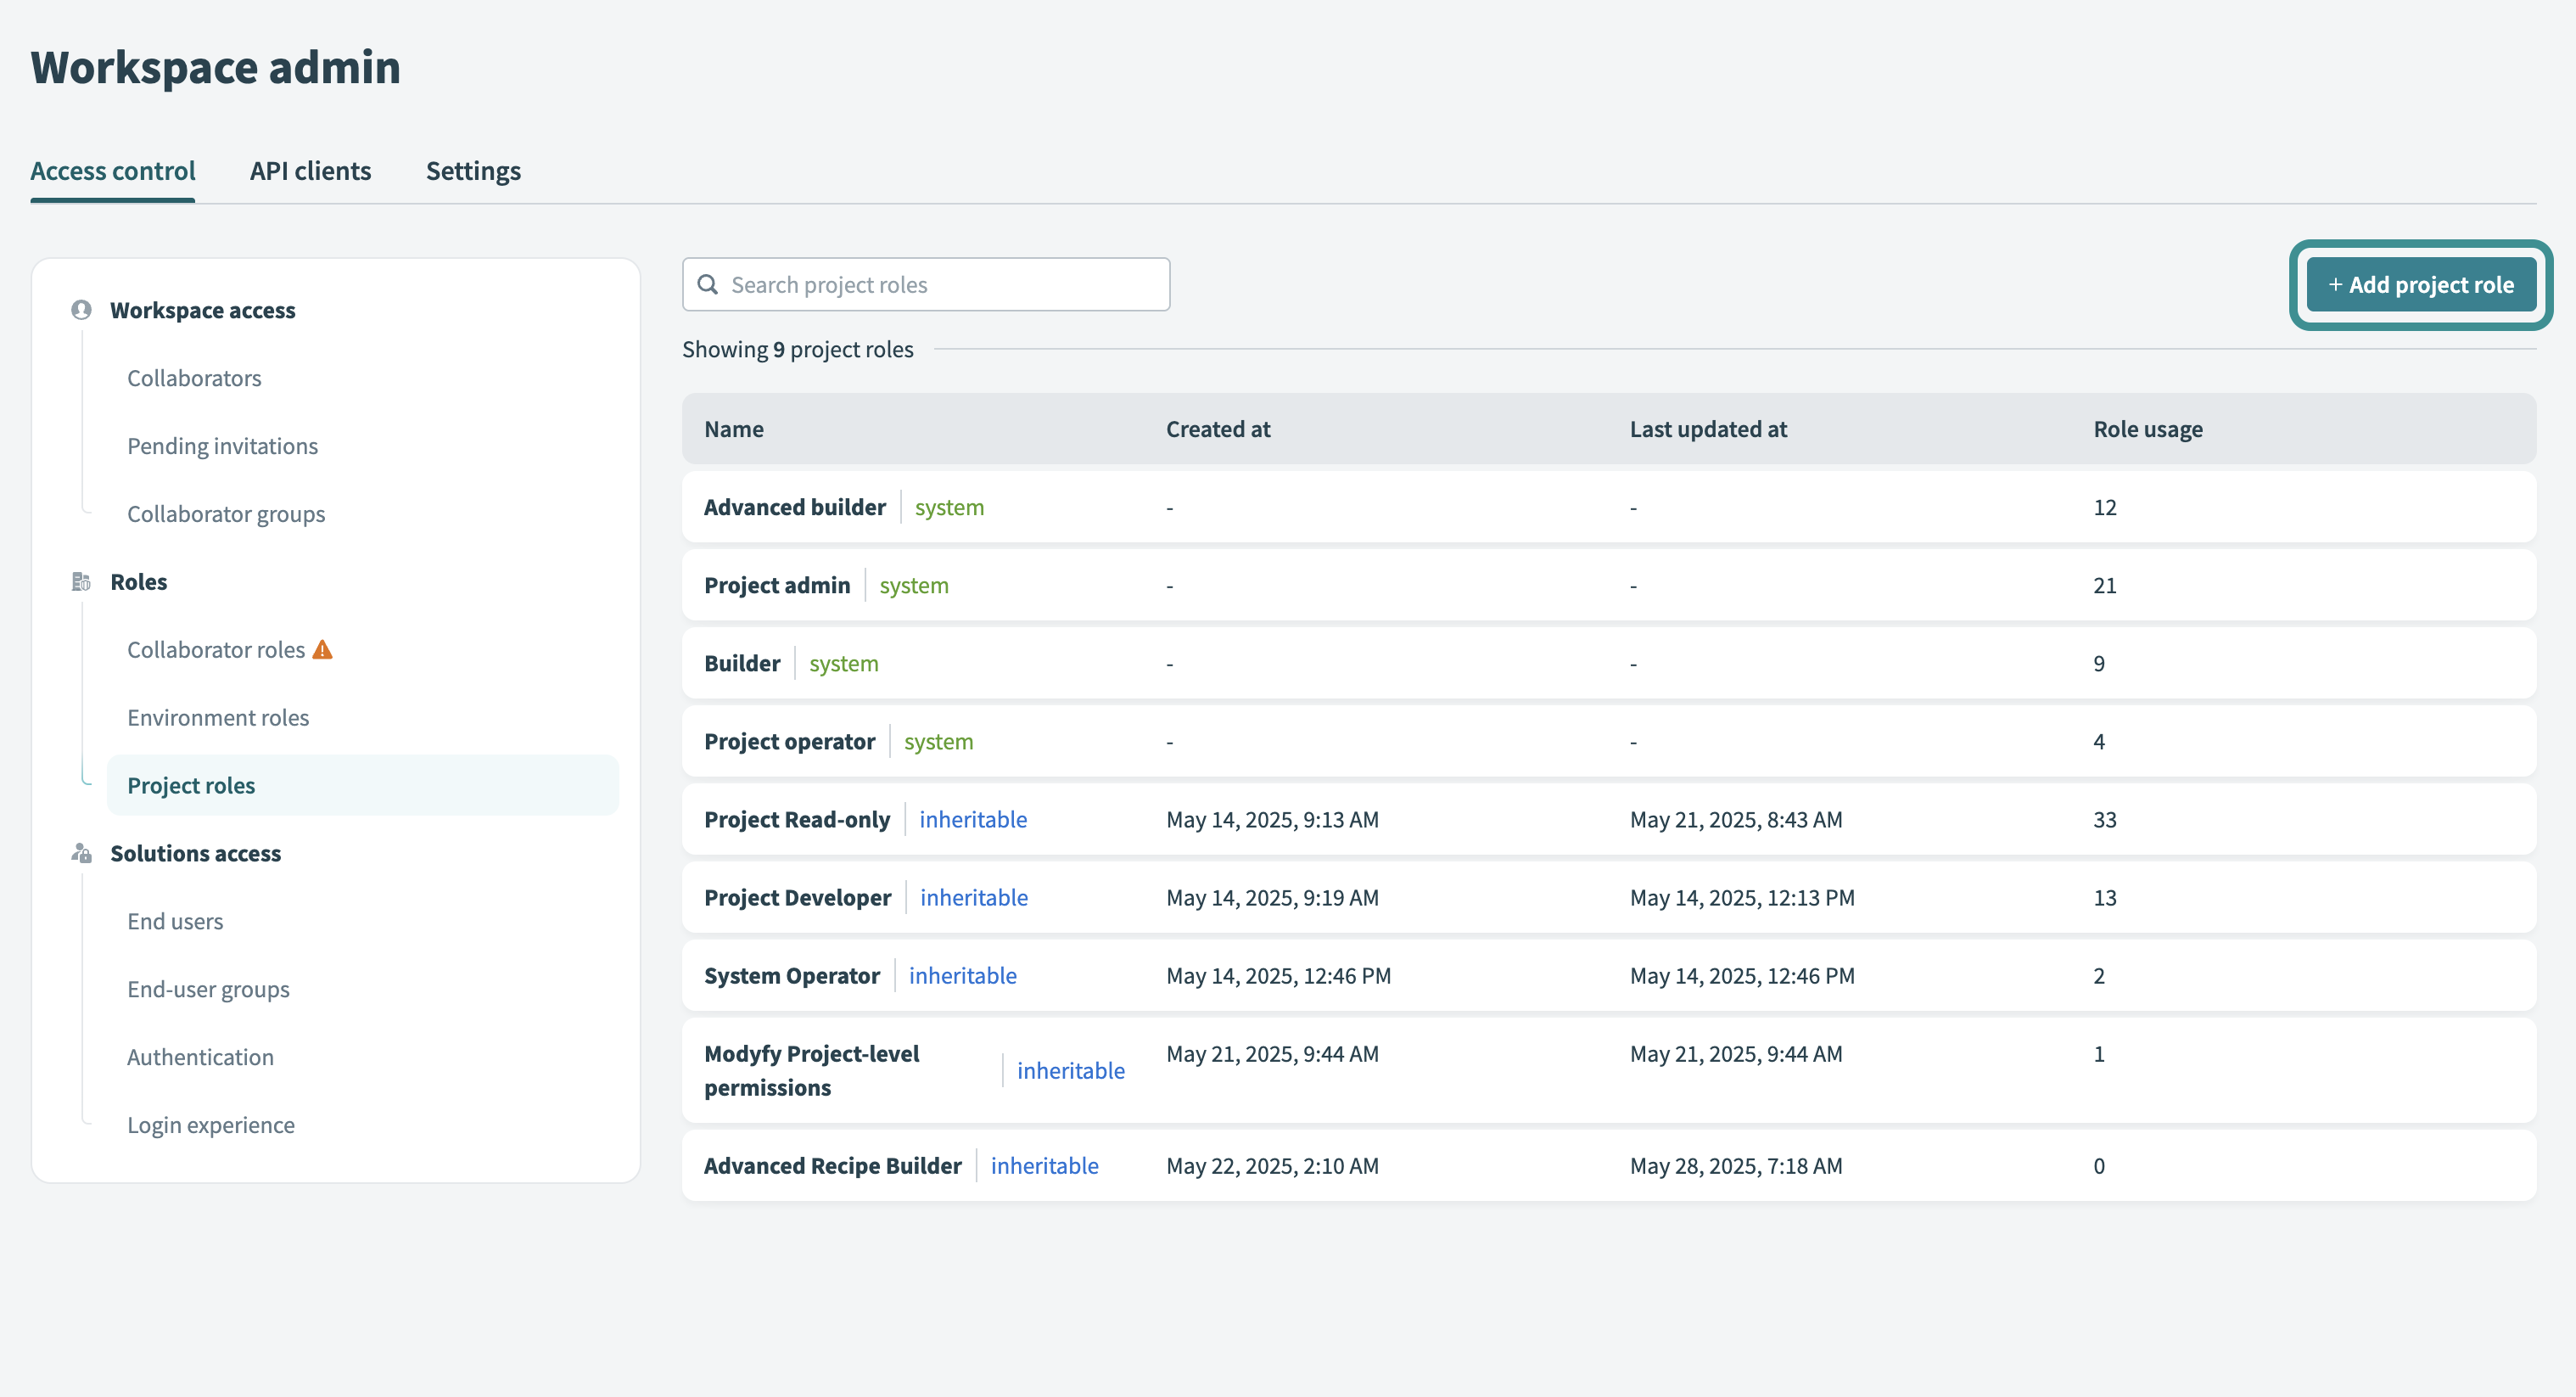 Add project role
Select the required privileges and save the role.
Refer to the Project privileges reference for a complete list of available privileges and their descriptions.
Collaborator groups
Collaborator groups simplify access management. Each group acts as a single unit that includes multiple users. You can assign a project role to the group to grant access to all members automatically.
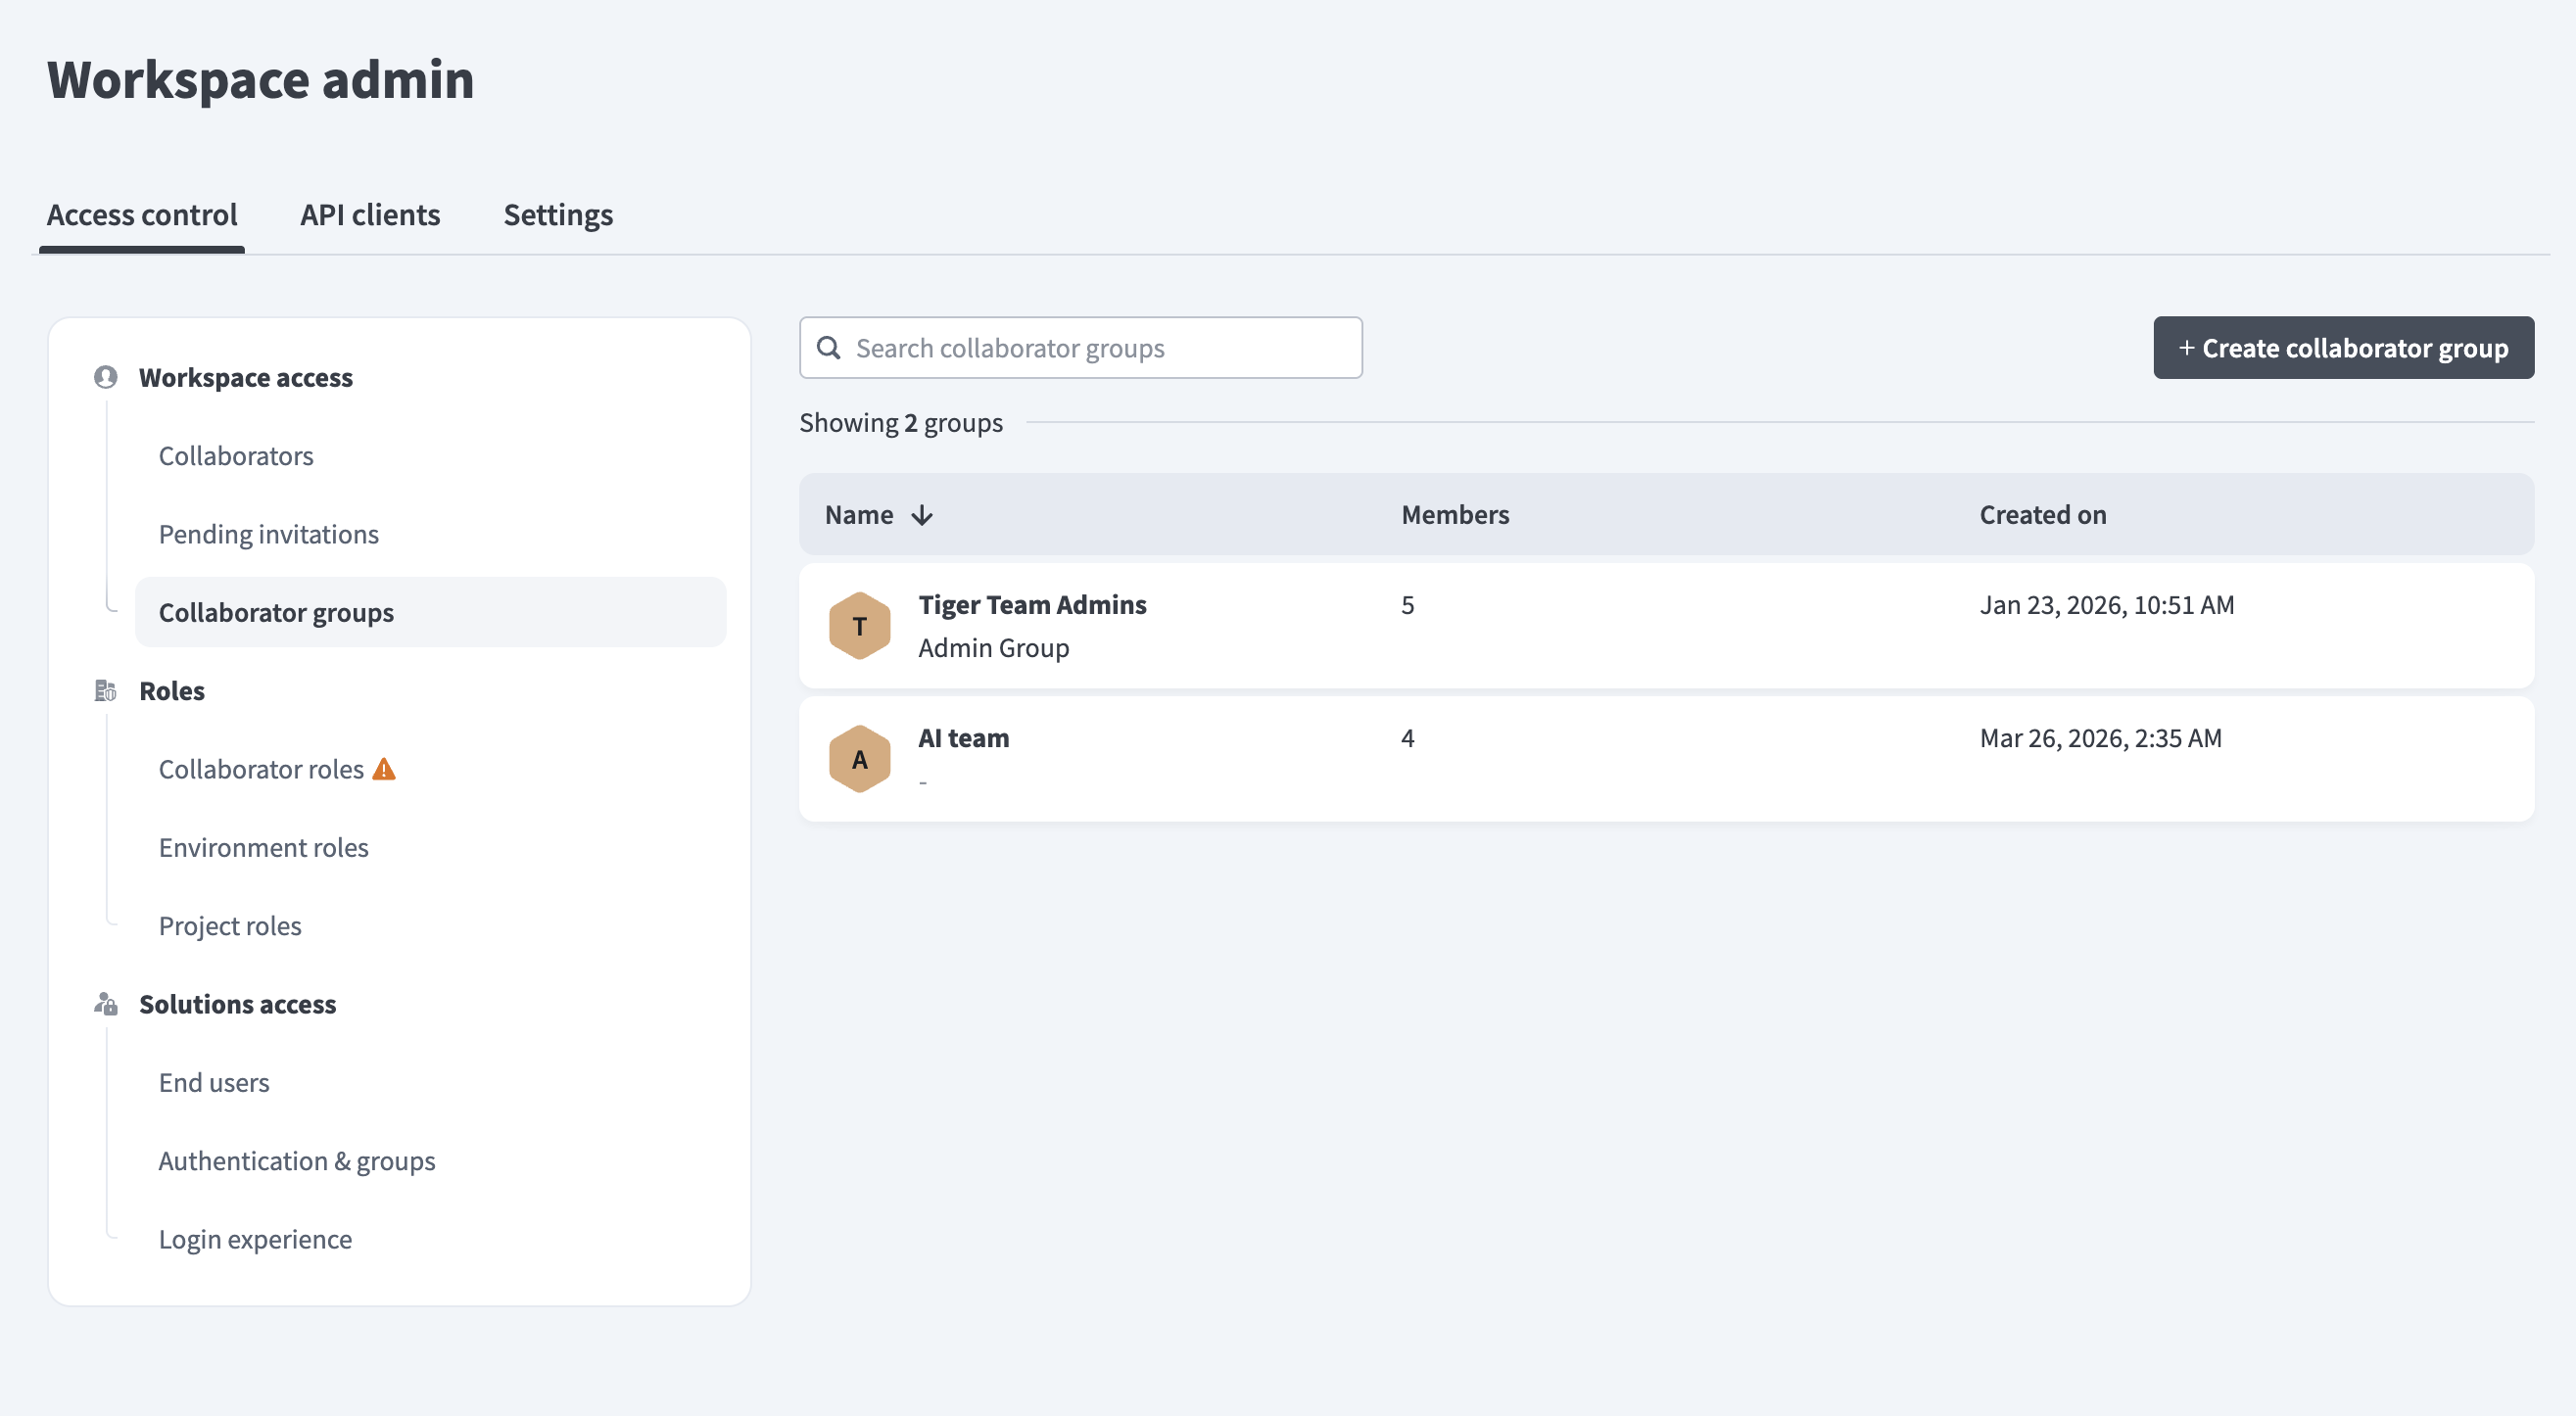 Collaborator groups
INDIVIDUAL ASSIGNMENT REQUIRED
You can't grant environment roles through collaborator groups. You must assign environment access to each user individually, even if they belong to a group.
Use collaborator groups to organize users by team or function, such as QA testers or marketing teams. Collaborators can belong to multiple groups, but group nesting isn't supported.
Refer to the Collaborator groups guide for more information.
AHQ moderators and OEM customer managers
Workato supports dedicated user accounts for AHQ moderators and OEM customer managers to support Embedded and managed workspaces. These users follow different access rules from standard collaborators.
Group membership
AHQ moderators and OEM customer managers aren't included in the default access setting that applies to standard workspace collaborators. You must assign and manage their access separately.
Role assignment
The new access control model requires workspace admins to assign both an environment role and a project role when they add a moderator or customer manager. This replaces the previous workflow where a single collaborator role controlled all access. The environment role applies across all environments, and the project role applies across all projects in the customer or managed workspace. Customer managers or moderators can't be added to any collaborator groups.
Inherited roles
AHQ admins and Embedded partners can create custom, inheritable roles. These roles automatically appear in all managed workspaces as non-editable roles. Inheritable roles apply across all managed workspaces without project scope restrictions.
How Workato resolves permission conflicts
Workato combines permissions when a user belongs to multiple collaborator groups that hold different roles in the same project.
The user receives all permissions granted by any of the assigned roles. Workato merges permission sets instead of prioritizing or overriding roles.
For example, if a user belongs to one group with the Project operator role and another group with the Builder role in the same project, Workato merges both sets of permissions. The user can view and build recipes. If any assigned role grants a permission, the user receives it.
Key limitations
Workato supports environment role assignment only at the individual user level. Collaborator groups control project roles but can't grant environment access. Admins should define all required environment roles in advance to prevent access issues during login.
Last updated: