Okta SAML role sync configuration
When using Okta as your identity provider, you can sync environment roles and collaborator groups through SAML.
MIGRATION TO THE NEW PERMISSIONS MODEL
If your organization is migrating from the legacy permissions model to the new permissions model, you must update your SAML and SCIM configurations in Okta. Workato doesn't automatically translate existing assignments. Update the following:
- Map SAML attributes such as
workato_roleand any environment-specific attributes (workato_role_prod,workato_role_test) to the new environment roles. - Configure the
workato_user_groupsSAML attribute if you use collaborator groups. Use direct attribute mappings for a small number of groups, or group attribute statements with regex for larger sets.
After you make these updates, test by assigning a user in Okta to the Workato app and verify in the Activity audit log that the correct role and group claims are passed.
Here, we configure role sync for basic Workato environments: DEV (default), PROD, and TEST.
Prerequisites
- Configure the SAML SSO for your Okta tenant.
- Enable just-in-time provisioning in the Workato UI.
- Enforce SAML SSO for your team or organization.
Add environment role attributes to the Workato app user profile in Okta
Complete the following steps to add a new workato_role attribute to the Workato user profile.
Repeat the following steps for each environment you use in Workato:
Go to Directory > Profile Editor > Workato App > + Add Attribute in Okta.
Set the Data type to string.
Set the Display name to the environment attribute. For example, enter workato_role for the DEV environment. If your organization uses multiple environments, configure attribute statements for each one. Add additional attributes such as workato_role_test for the TEST environment and workato_role_prod for the PROD environment. The default workato_role attribute maps to the DEV environment.
Enter a Description for the attribute.
Select the Define enumerated list of values checkbox.
Add environment role values under Attribute members:
| Display name | Value |
|---|---|
| Environment admin | Environment admin |
| Environment manager | Environment manager |
| Member | Member |
| NoAccess | NoAccess |
Values are case sensitive. If your workspace still uses the legacy permissions model, refer to the corresponding role values:
LEGACY ROLES VALUES
| Display name | Value |
|---|---|
| Admin | Admin |
| Operator | Operator |
| Analyst | Analyst |
| NoAccess | NoAccess |
Define the length parameters of the attribute in the Attribute length field.
Select Yes in the Attribute required field.
Select Personal in the Attribute type field.
Set the Mutability field to READ_WRITE.
Click Save Attribute.
Create Okta groups for environment roles
Create environment permission groups in Okta to map user access for each Workato environment.
Use the following naming convention:
WKT-ENV | <ENVIRONMENT> | <ROLE>For example:
WKT-ENV | DEV | Admin: Assignsworkato_roleto the Environment admin roleWKT-ENV | DEV | Manager: Assignsworkato_roleto the Manager roleWKT-ENV | DEV | Member: Assignsworkato_roleto the Member role
Repeat for each environment.
Assign groups to the Workato application
After creating your environment permission groups in Okta, assign them to the Workato application.
Go to Applications > Workato > Assignments > Groups in Okta.
Add all environment role groups you created for your Workato environments. For example, WKT-ENV | DEV | Admin or WKT-ENV | PROD | Operator. Environment groups map to the environment role attributes (workato_role, workato_role_test, workato_role_prod) that you configured in the user profile.
Users added to these Okta groups automatically receive the corresponding environment roles in Workato.
Configure collaborator group assignments
Workato supports two approaches to assign the workato_user_groups attribute through SAML. Choose the option that best fits the number of collaborator groups you manage:
Direct assignment: Use this method if your organization manages only a small number of collaborator groups (for example, fewer than 10). This approach pre-defines the list of groups in the Okta user profile.
Group-based assignment with regex: Use this method if your organization manages many collaborator groups. This approach uses Okta groups with a standardized naming convention and a group attribute statement that dynamically passes all matching group names.
Direct assignment
If your organization manages only a small number of collaborator groups, you can assign them directly to users by configuring the workato_user_groups attribute in Okta. Direct assignment is recommended when you manage a small, fixed set of collaborator groups.
Go to Directory > Profile Editor > Workato App > + Add Attribute in Okta.
Set the Data type to string.
Enter workato_user_groups as the Display name of the new attribute.
Optional. Enter a Description for the attribute.
Select the Define enumerated list of values checkbox.
Add collaborator group names under Attribute members. These names must exactly match the existing collaborator groups in Workato.
For example:
| Display name | Value |
|---|---|
| Analytics_Team | Analytics_Team |
| Engineering_Admins | Engineering_Admins |
| QA_Reviewers | QA_Reviewers |
| All collaborators | All collaborators |
ATTRIBUTE BEHAVIOR
The workato_user_groups attribute manages project-level access in workspaces using the new permissions model.
The behavior of workato_user_groups depends on the values you configure in your identity provider (IdP):
- Empty or omitted: The user's existing collaborator group memberships remain unchanged.
- All collaborators: Removes the user from all explicit collaborator groups. The user retains access only if they inherit it through default environment roles.
- Specific group names: Adds the user to the specified collaborator groups. The user inherits the project-level permissions configured for those groups in Workato.
Select Yes in the Attribute required field.
Select Personal in the Attribute type field.
Set the Mutability field to READ_WRITE.
Click Save Attribute.
Group-based assignment with regex
If your organization manages many collaborator groups, we recommend that you use Okta groups and a group attribute statement. This avoids having to predefine each group in the user profile. Group-based assignment is recommended if you have a large number of collaborator groups.
Create Okta groups for collaborator mapping
Use the following naming convention for collaborator groups:
WKT | <ROLE> | <TEAM>For example:
WKT | Admin | Finance
WKT | Builder | HR Operations
WKT | Admin | Sensitive Projects
WKT | Admin | Reusable Assets
These group names must match existing collaborator groups defined in Workato.
Next, configure the group attribute statement to pass these collaborator groups to Workato.
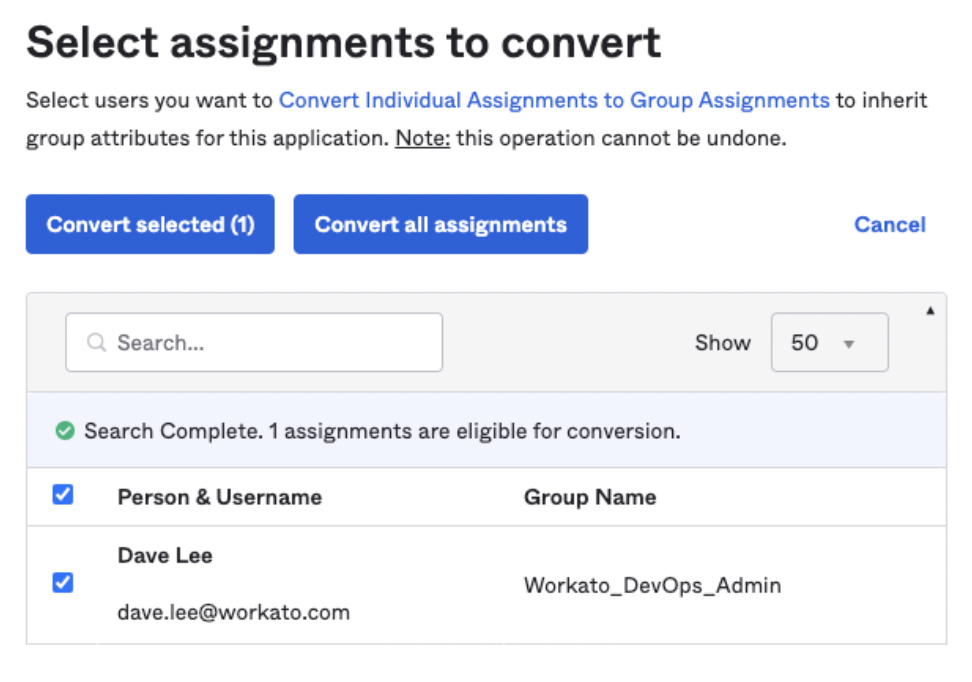
Convert existing user assignments to groups
If your organization previously assigned roles at the user level, you can convert them to group-level assignments:
Go to Applications > Workato > Assignments in Okta.
Select Convert Assignments.
Search for a user by name to verify if they are eligible for conversion.
Choose Convert selected to migrate individual users to group-based assignments, or click Convert all assignments for bulk conversion.
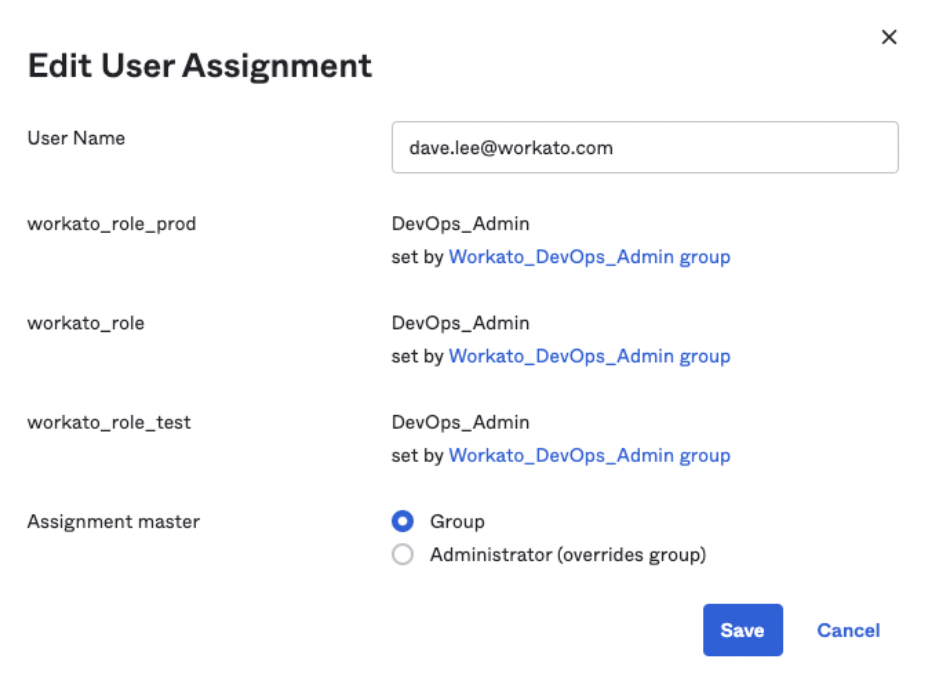
 Convert individual user assignments to group assignments
Confirm that the user's assignment is now managed by a group, then click Save.
 Verify app assignment management through groups
Configure SAML attribute statements for roles and groups
You must configure the SAML attribute statements to include workato_role and workato_user_groups attribute values each time a users signs into Workato through SAML SSO:
Go to Application > Workato > General > SAML Settings > Edit > Next > Configure SAML > Attribute Statement in Okta.
Add the following attributes and values:
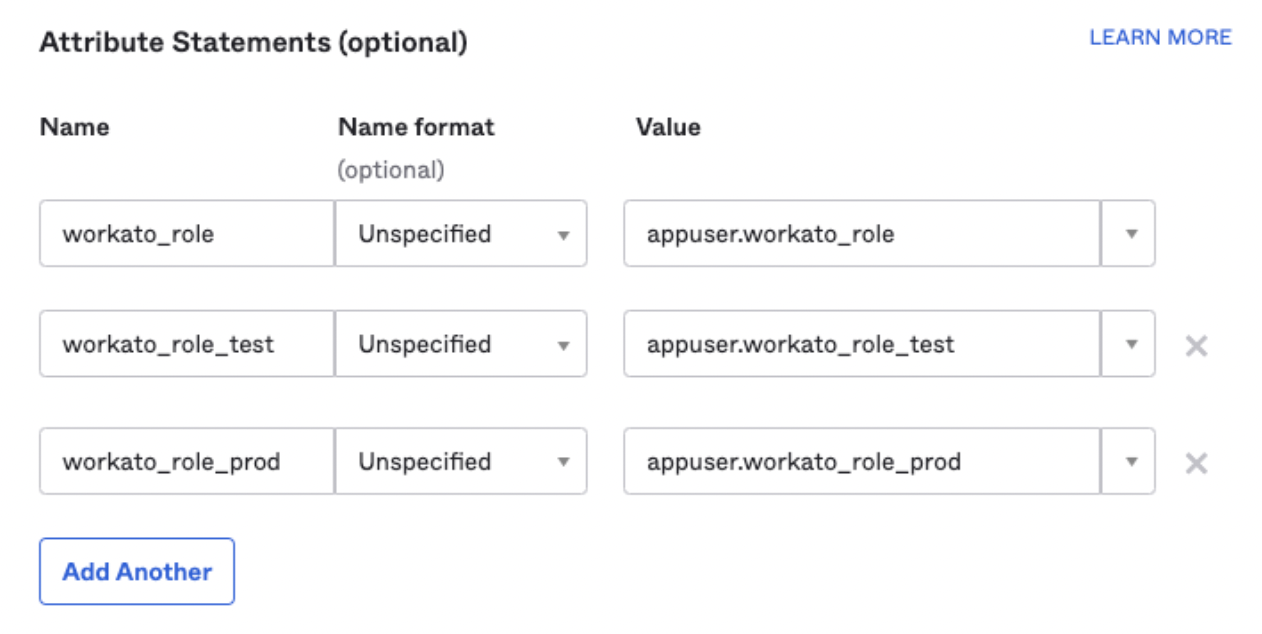 Attribute Statements for workato_role in Okta
Use the following Name and Value pairs. Note that the Name format field is optional.
- workato_role
- appuser.workato_role
- workato_role_test
- appuser.workato_role_test
- workato_role_prod
- appuser.workato_role_prod
Optional. Configure a group attribute statement for collaborator groups in addition to the environment role attributes:
- Name:
workato_user_groups - Name format: Unspecified
- Filter: Matches regex
- Regex:
^WKT \|.*
This passes any Okta group whose name starts with WKT | as a value in workato_user_groups.
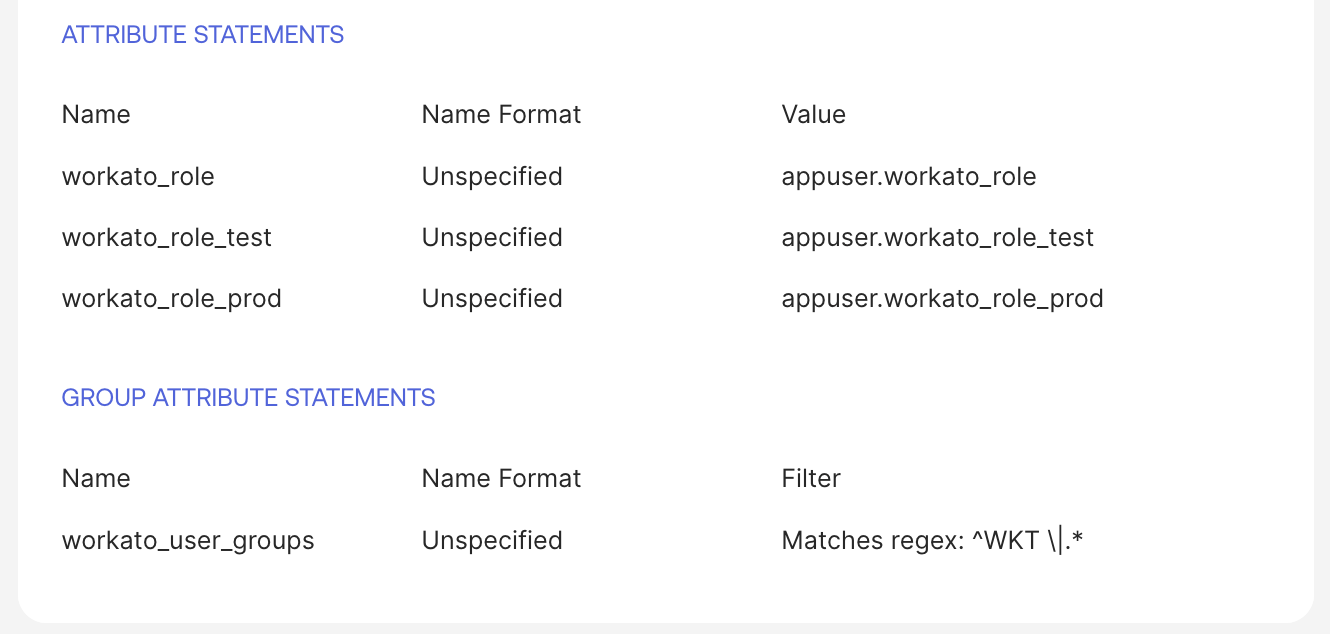 Configure group attribute statement for collaborator groups
GROUP ATTRIBUTE MAPPING
Use this regex-based group attribute statement if your organization manages many collaborator groups and has adopted the group-based assignment model. The regex function depends on the naming convention of your groups.
If you configured the workato_user_groups attribute directly in the user profile, you can skip this step.
Configure environment-specific Workato roles in Okta
If the Lifecycle Management feature is enabled in your Workato instance, you must configure environment-specific SAML attributes for each environment you use.
| Environment | SAML attribute |
|---|---|
| Dev (main) | workato_role |
| Test | workato_role_test |
| Prod | workato_role_prod |
| Sandbox | workato_role_sandbox |
| UAT | workato_role_uat |
| Stage | workato_role_stage |
| Pre-prod | workato_role_preprod |
Assign the application to a user
Complete the following steps to assign the Workato application to an individual user:
Go to Directory > Users > {Select User} > Assign Application > Workato in Okta.
Confirm the User Name (email) is correct.
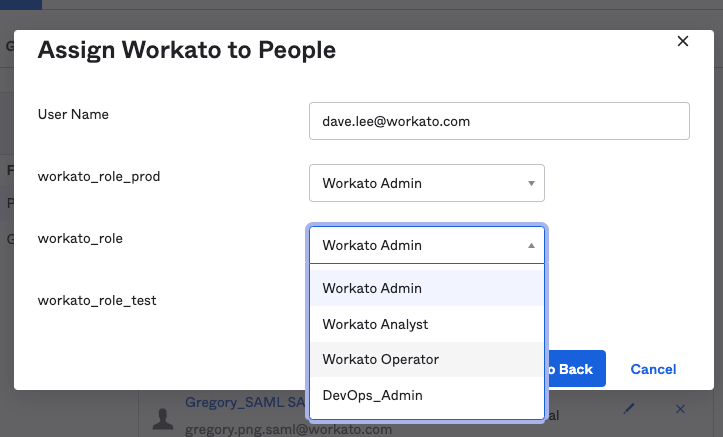 Assign the application to the user
Assign the workato_role_prod attribute to a PROD environment role for the user.
Assign the DEV (default) environment role using the workato_role attribute. The same role options apply as in the previous step.
Assign the TEST environment role using the workato_role_test attribute. The same role options apply as in the previous step.
Click Save.
Update the user role
To update a user's role, select a new value from the appropriate environment attribute (for example, workato_role, workato_role_prod, or workato_role_test), and then click Save.
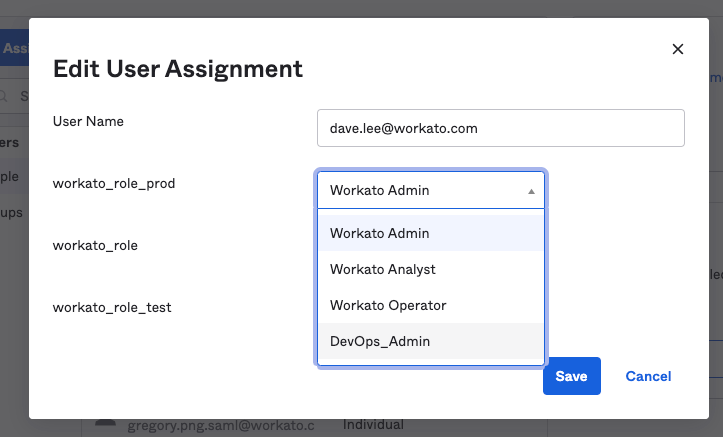 Change the user's role
For example, you can update the workato_role_prod value for the user dave.lee from Environment admin to a custom DevOps_Admin role.
Remove environment access
To remove access to a specific environment that you specified earlier, change the user's role for any environment attribute to NoAccess.
For example, you can restrict access to the production environment by setting the workato_role_prod attribute to NoAccess.
Verify role changes
If your organization uses Workato's Activity Audit Logs feature, you can verify the automatic role sync when the user logs in through SAML SSO.
Role changes triggered by SAML assertions appear under the Source attribute, with the value saml_auto_sync.
Manual role changes made in the Workato UI use the source user.
You can also see the New Role and Previous Role values.
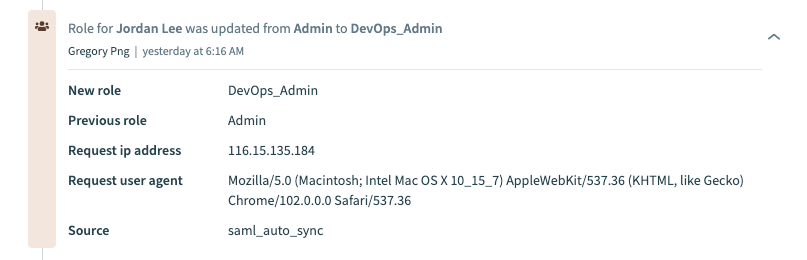 SAML roles sync activity audit log
Last updated: