Create an Enterprise Workbot using the Microsoft App Studio
To set up an Enterprise Bot, you need:
The following in Workato:
- Access to:
- Workbot. If you don't see the Platform > Workbot option in your account, contact your Customer Success Manager.
- Custom OAuth profiles. If you don't see the Tools > Custom OAuth Profiles option in your account, contact your Customer Success Manager.
- Privileges that allow you to:
- Create and configure Workbots.
- Create and configure connections.
- Create and configure Custom OAuth Profiles.
- Access to:
One of the following roles in your Microsoft organization:
- Application administrator
- Cloud application administrator
- Global administrator
- Privileged role administrator
Check your role assignments in Microsoft by navigating to Users > You (select your name) > Assigned roles.
MICROSOFT APP STUDIO IS DEPRECATED
As of January 1, 2022, Microsoft has deprecated App Studio. To create Enterprise Workbots, use the Microsoft Teams Developer Portal guide. We're retaining this guide for reference only.
Step 1: Create The Workbot In Workato
Sign in to your Workato account.
Go to Platform > Workbot.
Click the Custom bot tab, then + New custom bot.
In the Application field, select Workbot for Microsoft Teams.
In the Name field, enter a name for the bot.
Click Create new app.
Keep this page open - you'll need it to complete the setup for your bot.
Step 2: Create A Microsoft Teams App
- Step 2.1: Install Microsoft App Studio
- Step 2.2: Create and configure an app
- Step 2.3: Add a personal tab to your bot
- Step 2.4: Obtain bot credentials
Step 2.1: Install Microsoft App Studio
Complete the following steps to install Microsoft App Studio:
NOTE
If you already have App Studio installed, skip to the next step.
Sign in to your Microsoft Teams account.
From the left navigation menu, click the ellipsis (...) and search for App Studio.
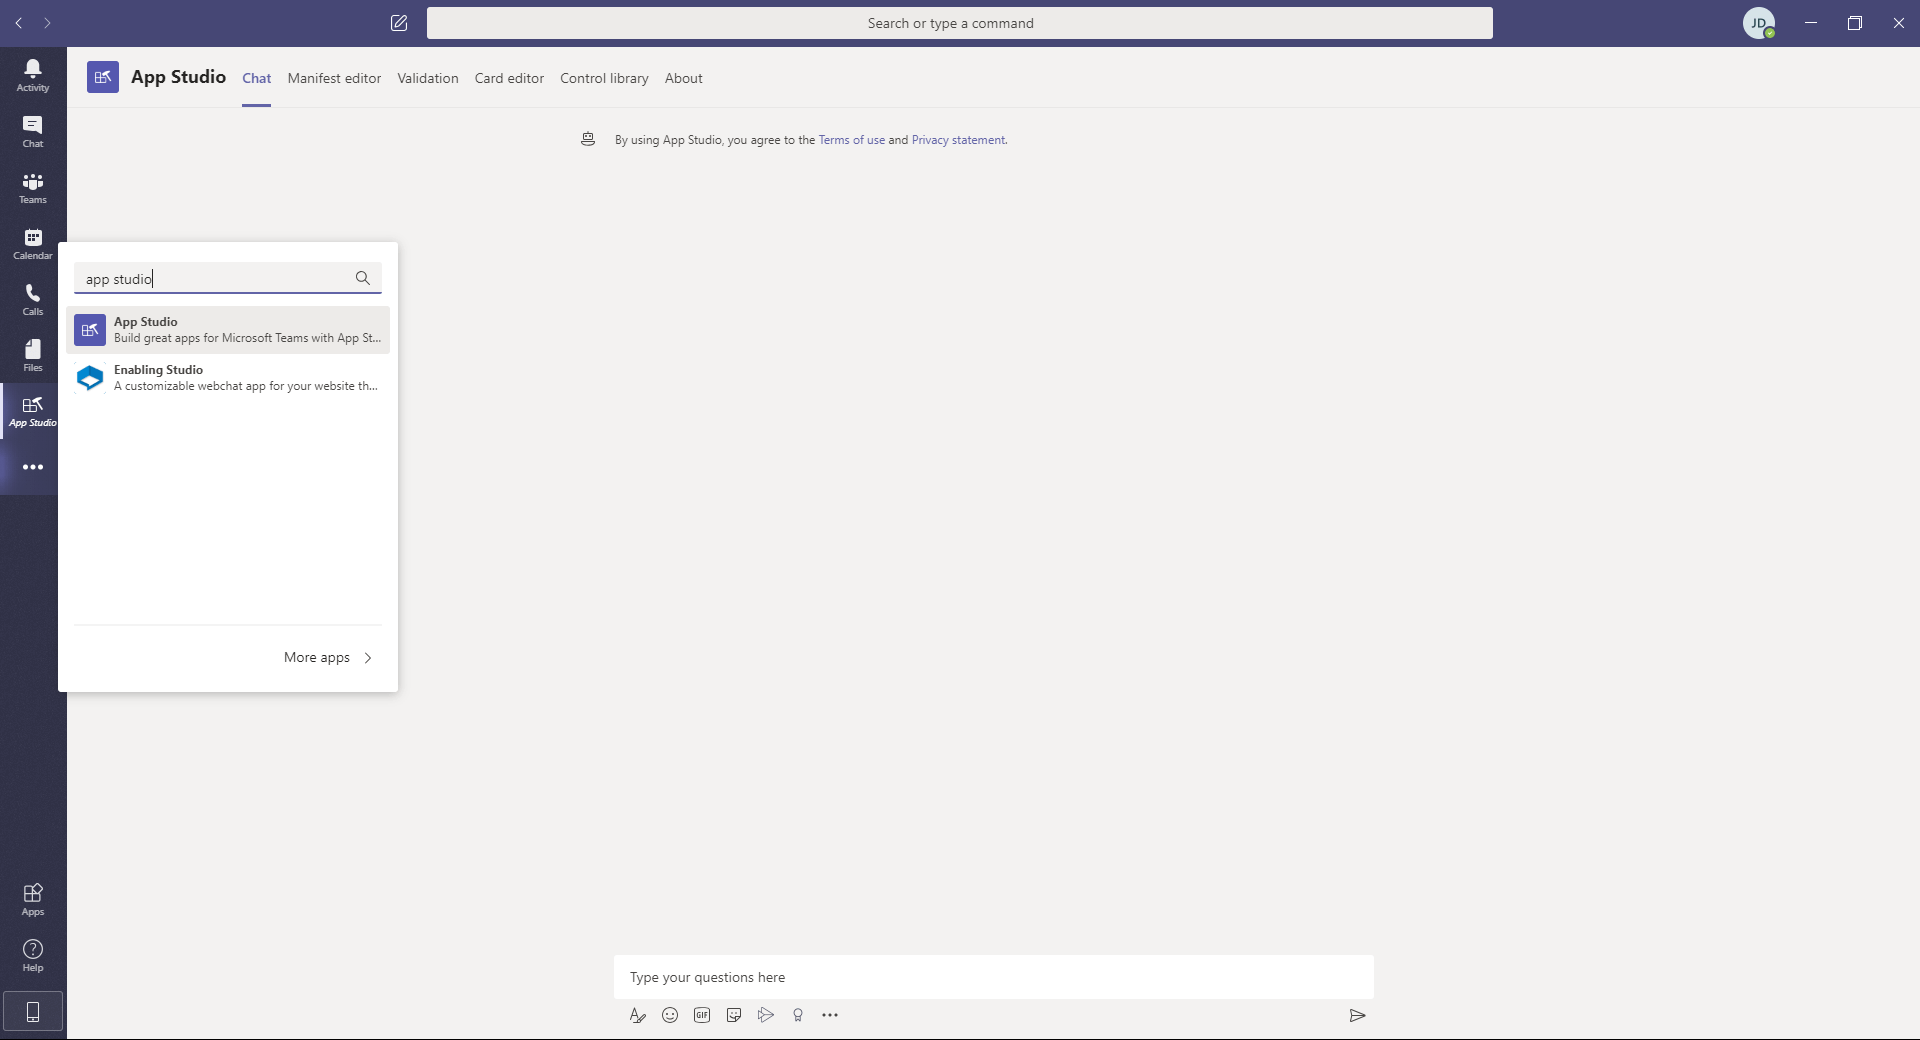
Click and install App Studio.
Step 2.2: Create And Configure An App
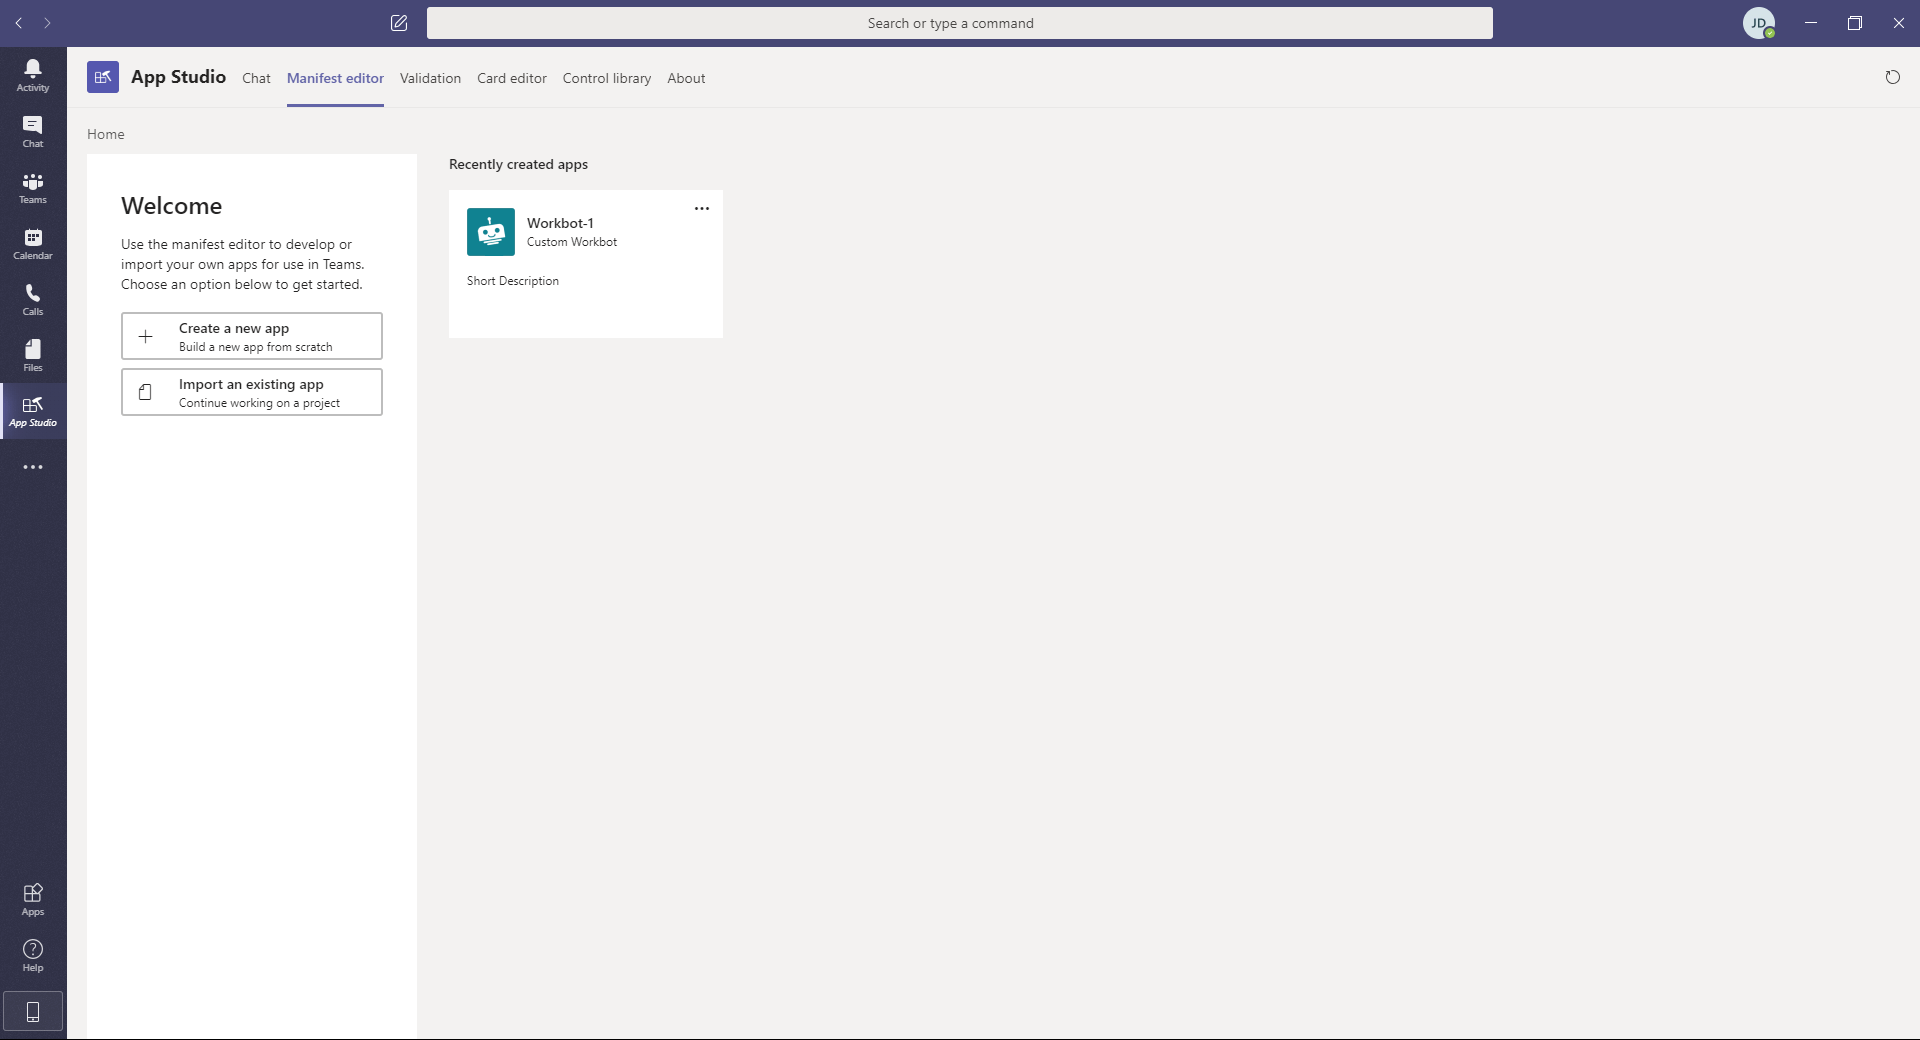
In App Studio, navigate to the Manifest editor tab.
Click Create new app.
On the page that displays, fill in the following:
Short name: A short name for your bot. For example:
OpsBotFull name: Optional. The full name of your bot. For example:
Opportunities BotApp ID: Click Generate to generate an App ID.
SAVE THIS INFO!
Keep the App ID handy - you'll need it to complete the bot setup in Workato.
Package name: Enter the package name in reverse domain format. For example:
com.workato.opsbotVersion: Enter the version of your bot. The version will typically be
1.0.0for a new bot.Short description: Enter a short description of your bot.
Full description: Enter a long description of your bot. Note: Microsoft will reject the full description if it contains the same text as the Short description.
Website: Enter
https://www.workato.comPrivacy statement: Enter
https://www.workato.com/legal/privacy-policyTerms of use: Enter
https://www.workato.com/legal/terms-of-serviceBranding: We recommend using your app's own icons, but the default Workbot icons can also be used. If using your own, verify that the icons meet Microsoft's size requirements.
To use the default Workbot icons, right-click and save the following:
Full color (192x192 pixels):

Transparent outline (32x32 pixels: The image looks blank, but it's there. Use
#108921as the accent color.
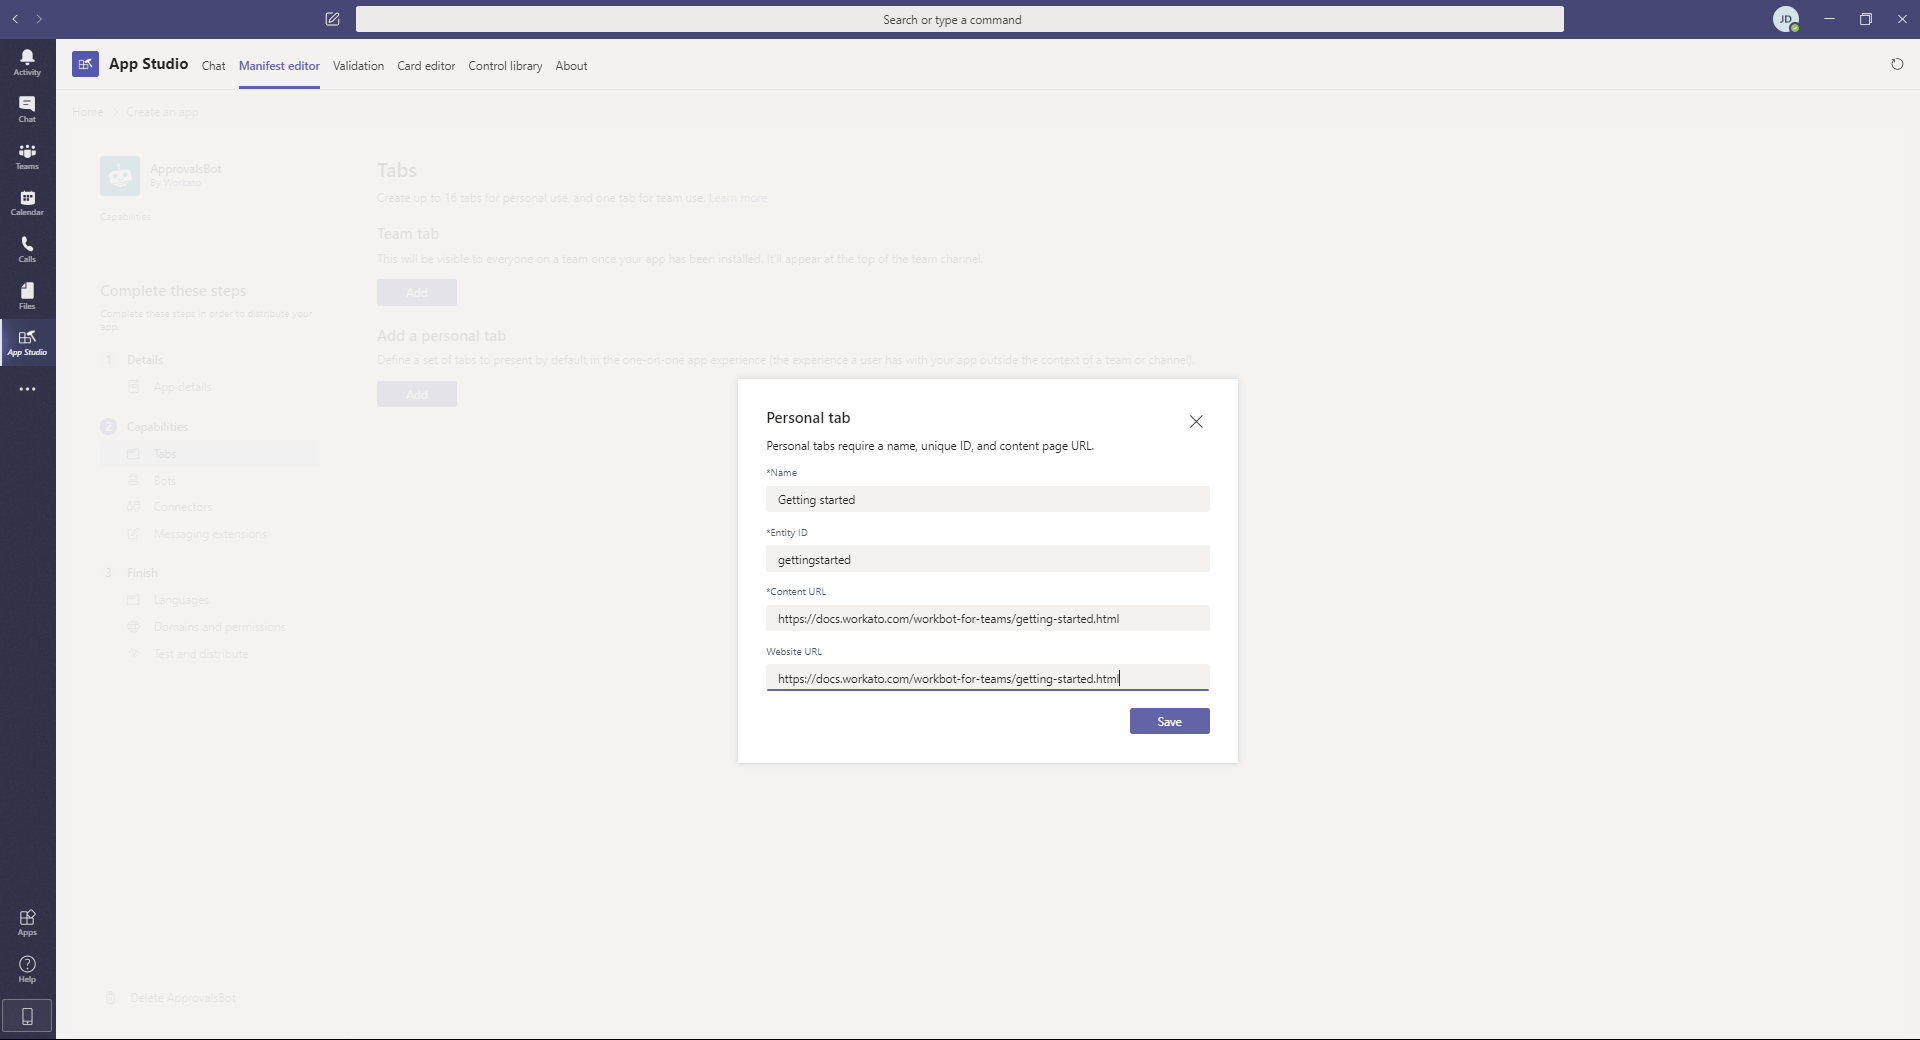
Step 2.3: Add a personal tab to tour bot
Complete the following steps to add a personal tab to your bot:
THIS STEP IS OPTIONAL
Skip to the next step if you don't want to add a personal tab to your bot.
Click Capabilities > Tabs.
Click Add a personal tab.
Fill in the following fields:
- Name: Enter
Getting started - Entity ID: Enter
gettingstarted - Content URL: Enter
https://docs.workato.com/workbot-for-teams/getting-started.html - Website URL: Enter
https://docs.workato.com/workbot-for-teams/getting-started.html
Click Save.
The page should look like the following when you're finished:
Step 2.4: Obtain Bot Credentials
Step 2.4.1: Obtain Client ID
In the left navigation bar, click Capabilities > Bots.
Click Set up.
Give your bot a name. For example: OpsBot
Under Scopes, select the following scopes:
- Personal
- Team
- Group Chat
After the bot has been created, locate the Bot ID under the bot's name. The Bot ID will be used as your bot's Client ID, so keep it handy - you'll need it to complete the setup in Workato.
Step 2.4.2: Obtain Client Secret
Under App passwords, select Generate new password.
The password will be used as your bot's Client Secret, so keep it handy - you'll need it to complete the setup in Workato.
Step 3: Configure Workato To Talk To The App
Navigate back to the Workato page from Step 1.
In the Step 3 section, fill in the following fields:
- Bot ID: The Bot ID you generated in the previous section.
- Client secret: The App password you generated in the previous section.
- App ID: The App ID you generated when you created the app.
Click Save.
Expand the Step 4 section and copy the bot endpoint address. It should look something like this:
https://app.workato.com/skype_webhooks/event?coak_id=42Keep this handy - you'll need it to complete the next step.
Step 4: Configure The App To Talk To Workato
- Step 4.1: Configure the bot's endpoint address
- Step 4.2: Add Workato's domain to allowlist
- Step 4.3: Download the bot manifest
- Step 4.4: Upload the manifest to your app store
- Step 4.5: Add the bot to a team or channel
- Step 4.6: Configure authentication redirect URLs
Step 4.1: Configure The Bot's Endpoint Address
Navigate back to Microsoft Teams App Studio.
Navigate to Manifest editor > Your bot > Capabilities > Bot.
In the Messaging endpoint section, paste the bot endpoint address from the previous section into the Bot endpoint address field.

Step 4.2: Add Workato's Domain to the Allowlist
In the left navigation bar, navigate to Finish > Domains and permissions.
In the Enter a valid domain field, enter *.workato.com.
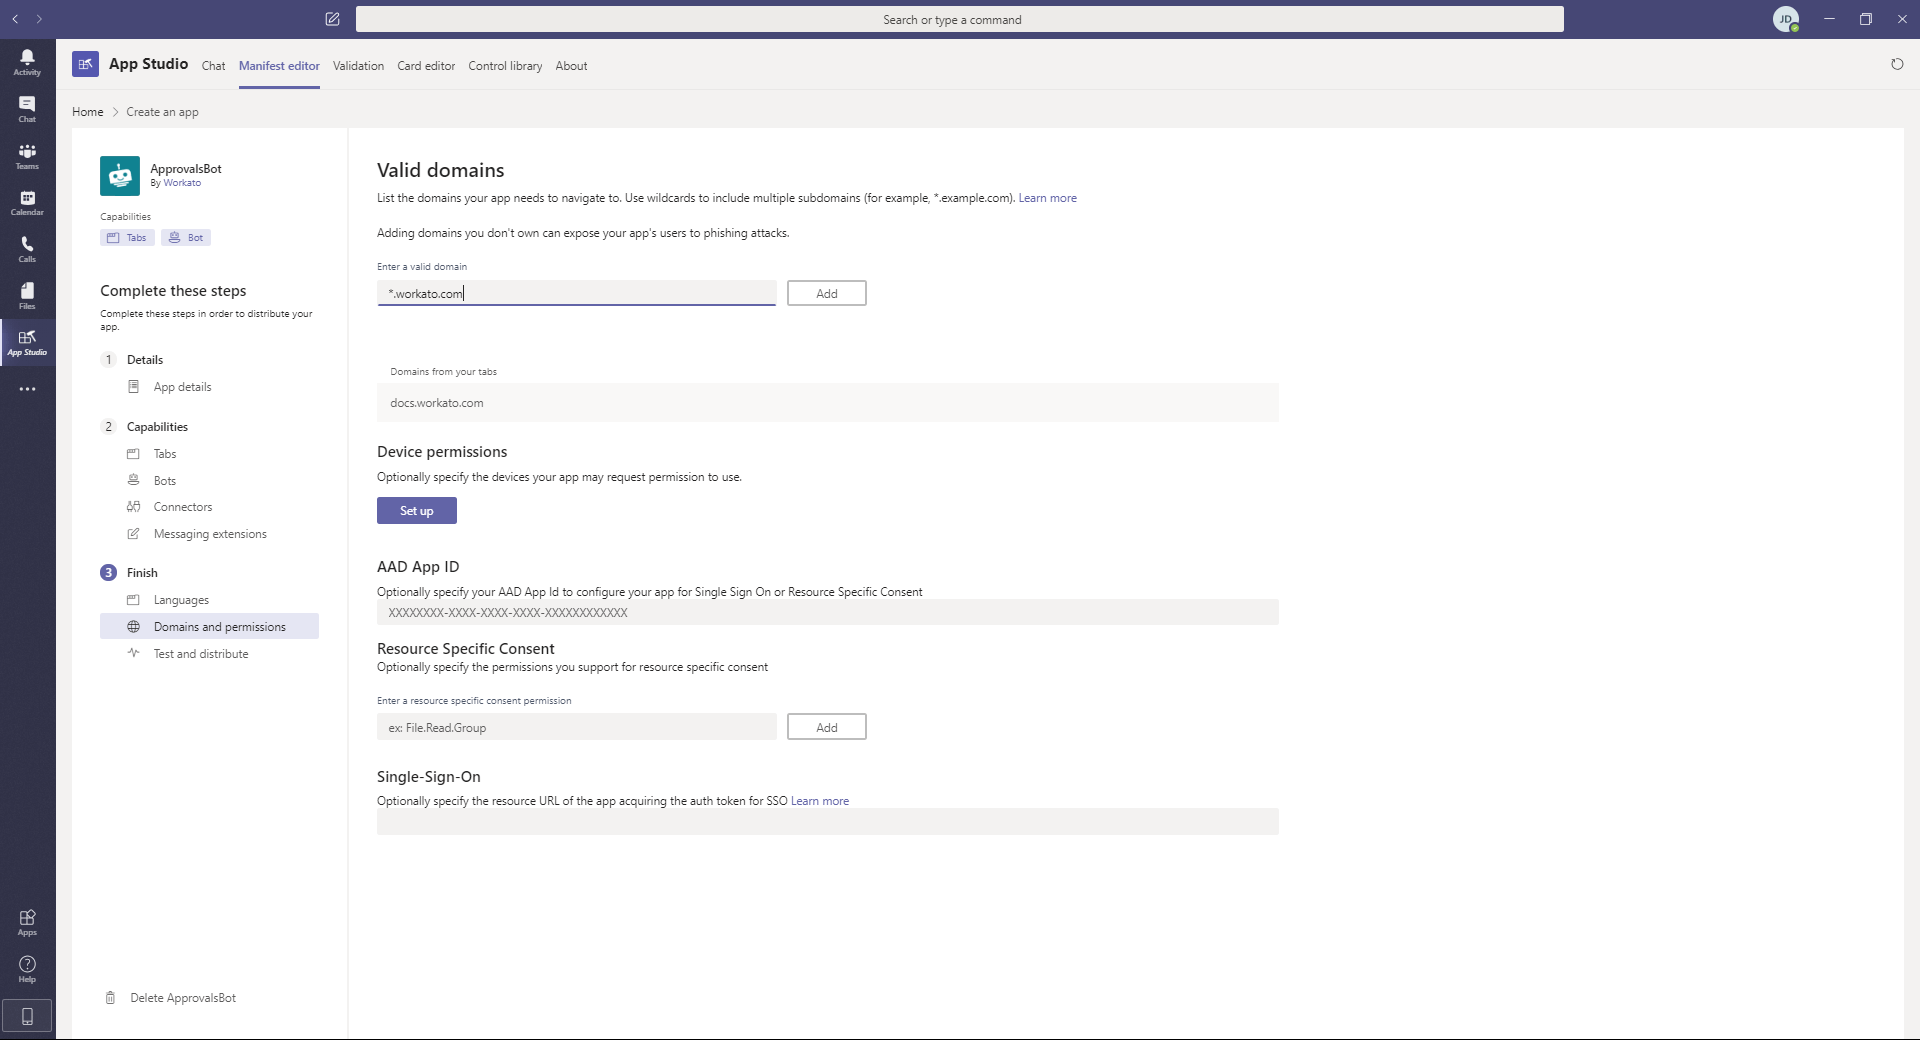
Click Add. The domain will be added to the Additional valid domains section.
Step 4.3: Download The Bot Manifest
In the left navigation bar, navigate to Finish > Test and distribute.
If there are any errors on the right side of the page, resolve them before proceeding. If left unresolved, you may run into issues with installation or downloading your app package (a.k.a. manifest). These issues are typically related to fields in Details > App details or Capabilities > Bots.
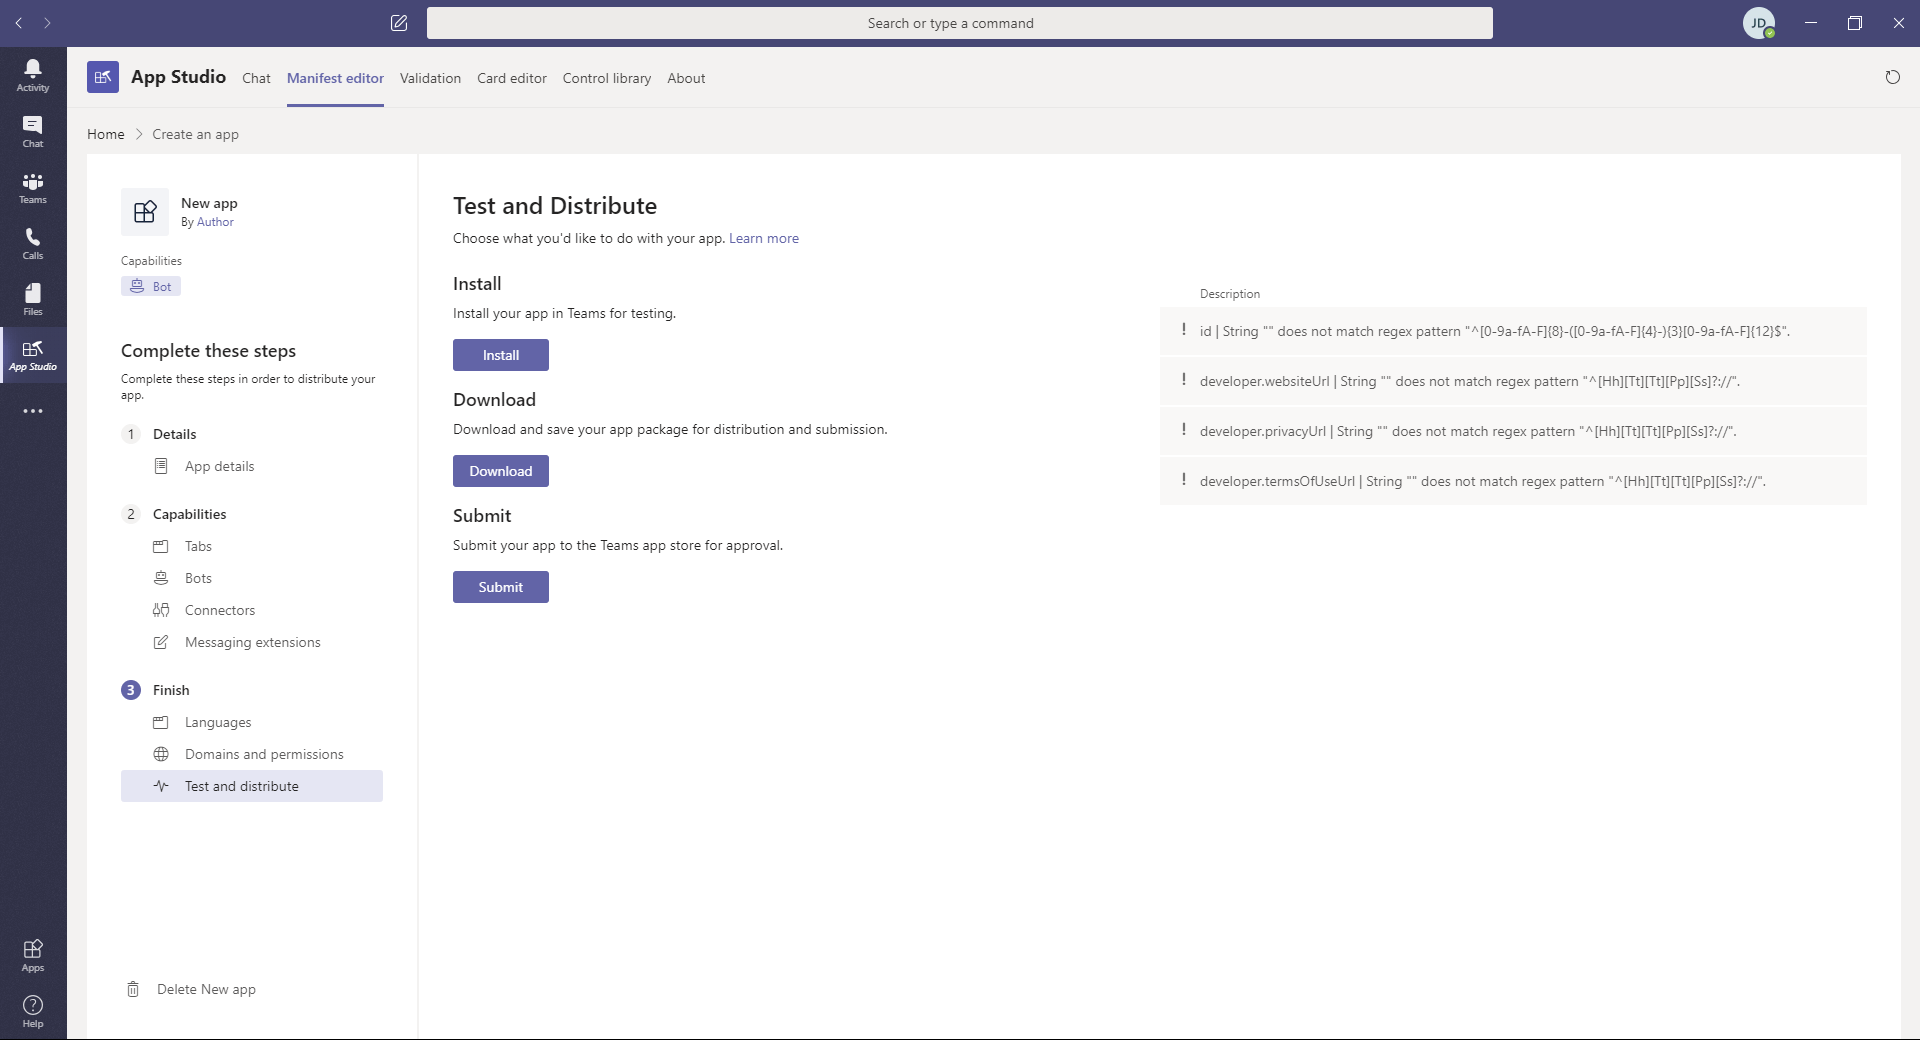
When resolved, proceed to the next step.
Click Download. Your app's manifest will be downloaded into your default download folder. Take note of the file's location - you'll need it to complete the next step.
Step 4.4: Upload The Manifest To Your App Store
Open a new browser tab and browse to the Microsoft Teams Admin Center.
In the left navigation bar, navigate to Teams apps > Manage apps.
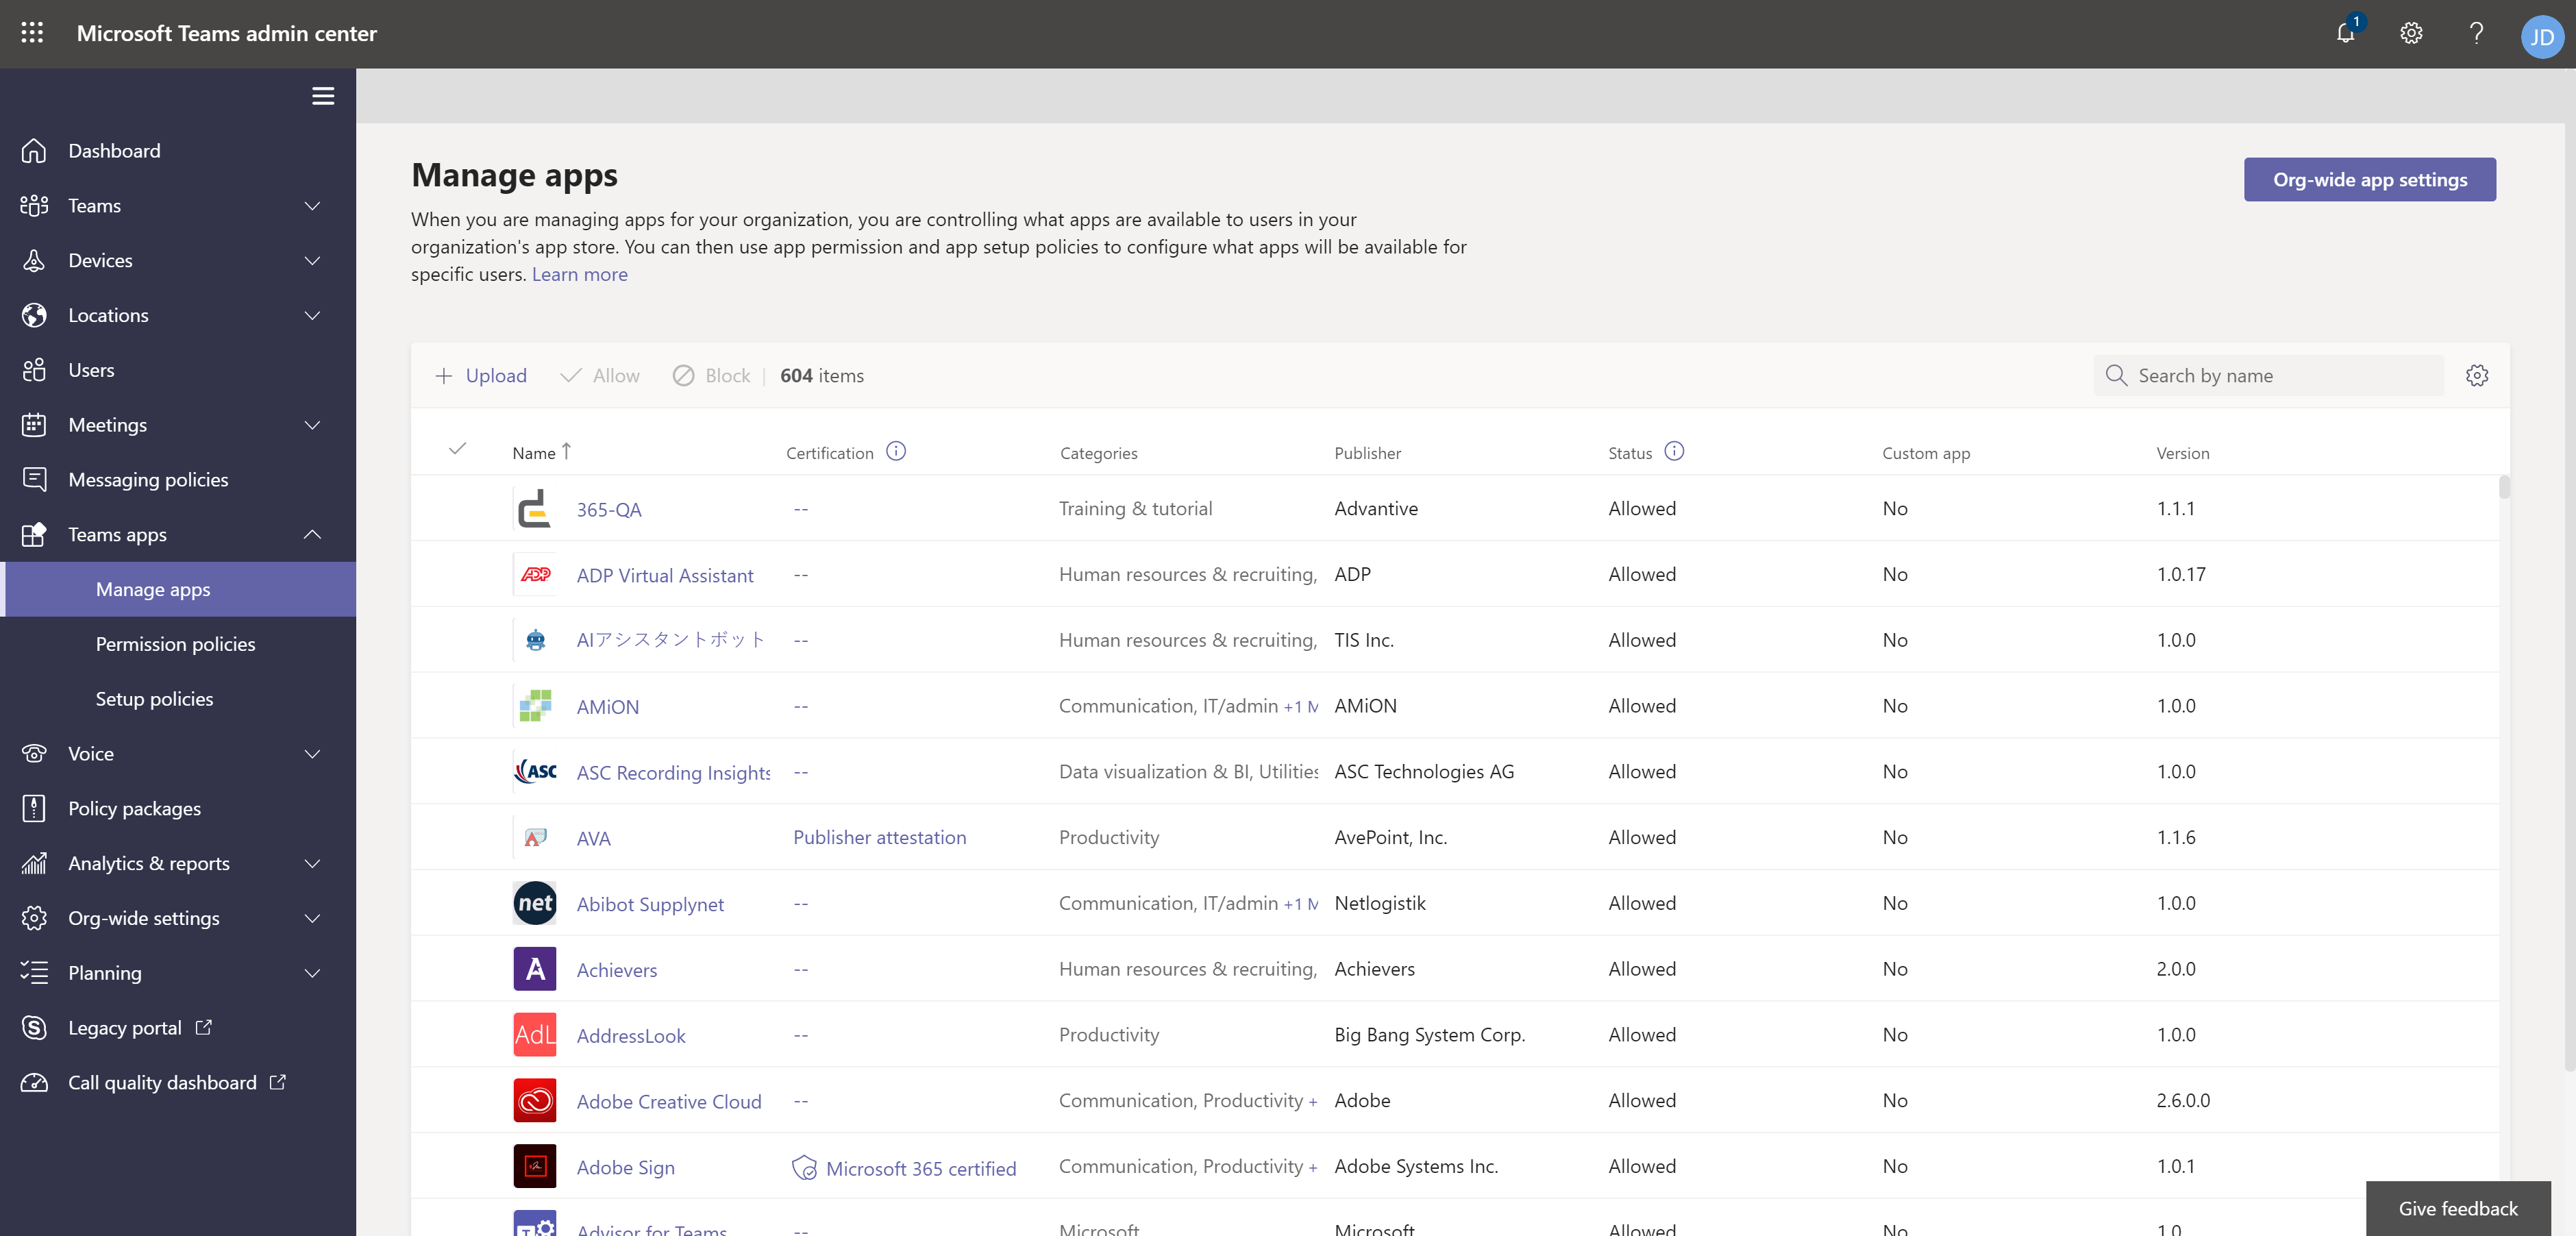
In the apps table, click + Upload.
Select and upload the manifest file you downloaded in the previous section. This will upload the bot to the Microsoft tenant app catalog.
Step 4.5: Add The Bot To A Team/Channel
Navigate to your Microsoft tenant app catalog.
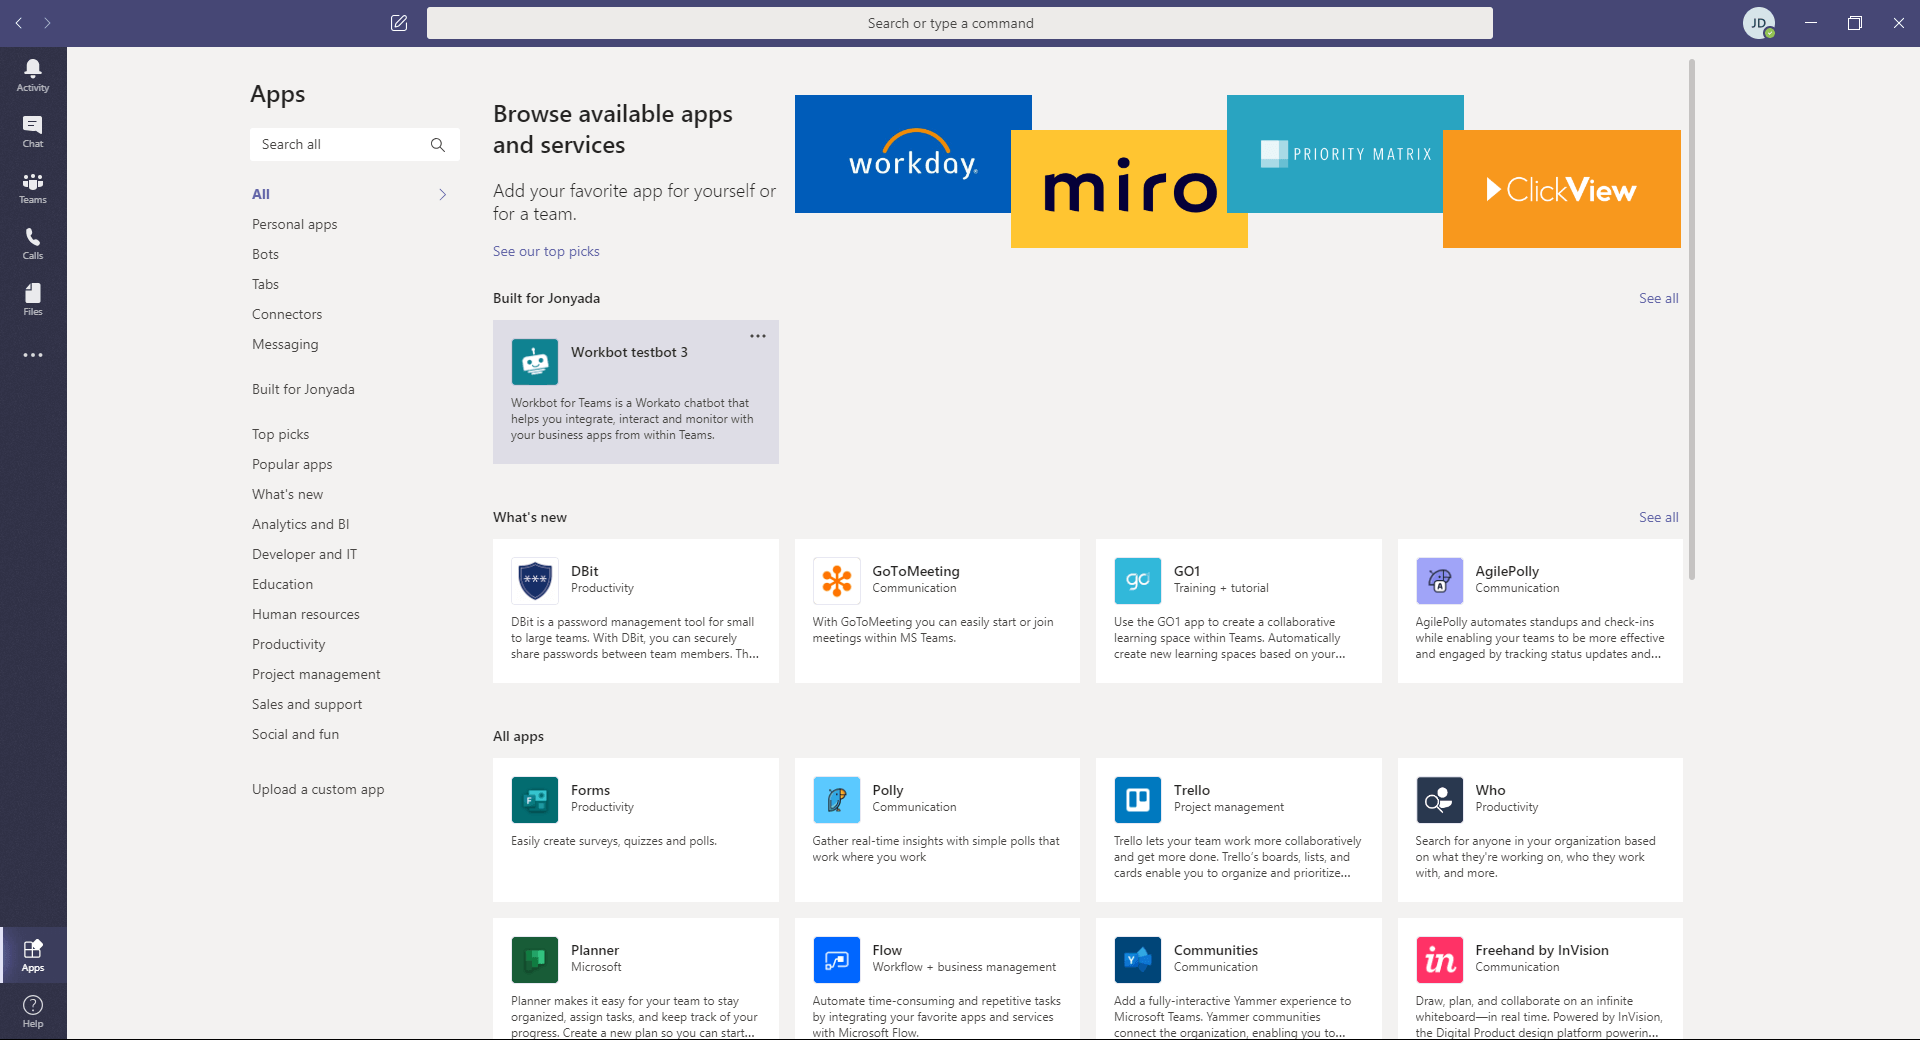
Find and select your app in the Build for <YOUR_NAME> section. If you don't see the app, sign out and back into Microsoft Teams again.
Click the arrow next to the Add button and select Add to team.
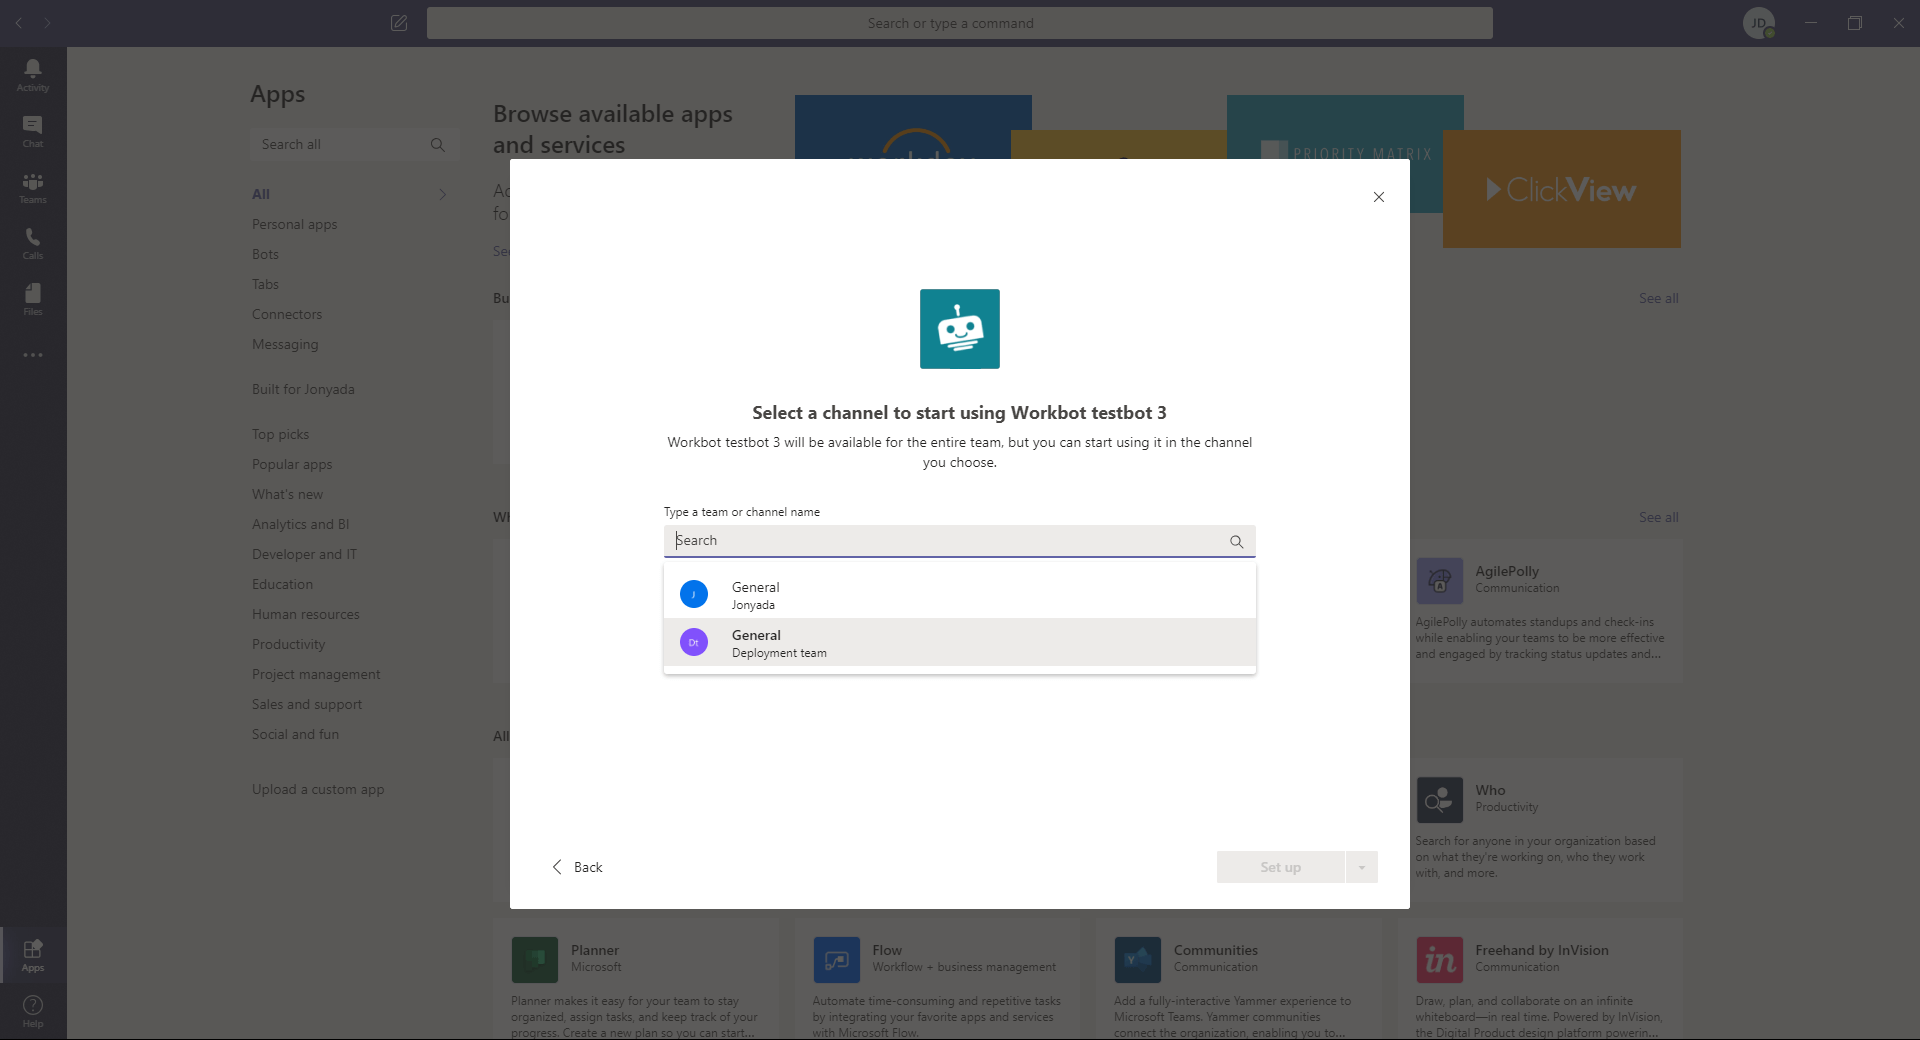
Enter a team or channel name.
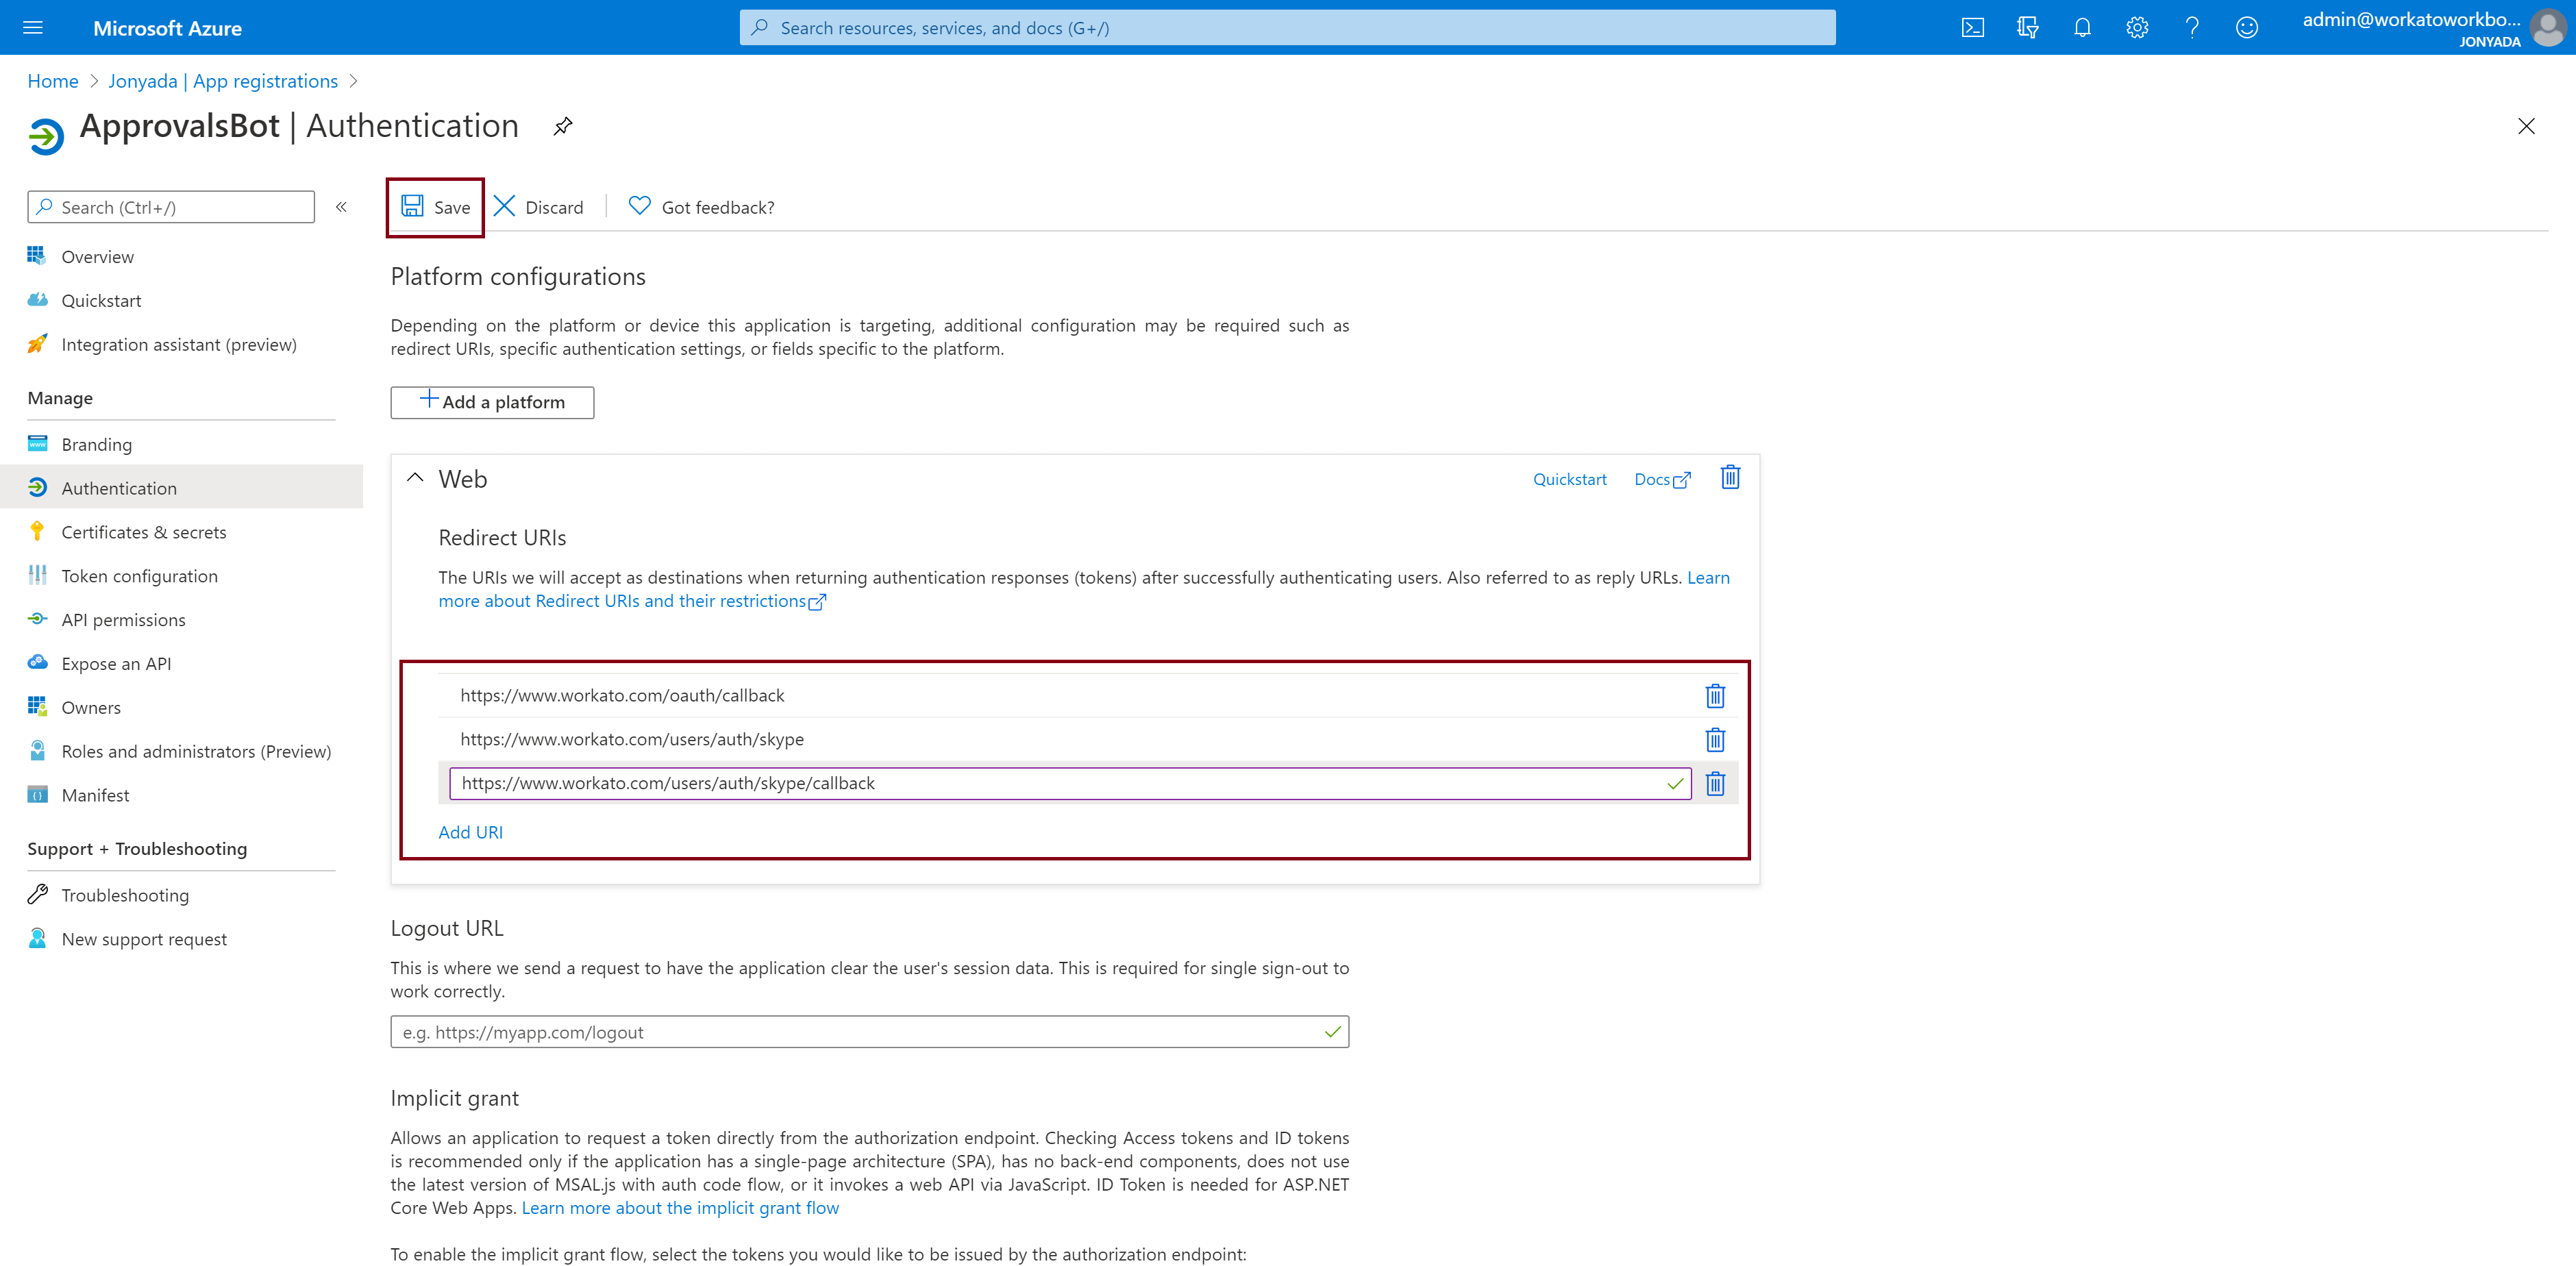
Step 4.6: Configure Authentication Redirect URLs
Navigate to your Azure portal.
In the search bar, enter App Registration and select the result.
On the page that displays, click on your bot.
From the left navigation bar, click Authentication.
Under Platform configurations, click +Add a platform/Web.
In the Redirect URIs section, add the following URIs:
https://www.workato.com/auth/skype/callbackhttps://www.workato.com/users/auth/skypehttps://www.workato.com/oauth/callback
Click Save, located near the top of the page:
Step 5: Establish A Workbot Connection
Open the browser tab with your Workato account.
Navigate to Connections.
Click Create connection.
Search for and click on Workbot for Microsoft Teams in the list of apps.
Fill in the following:
- Connection name: Enter a name for the connection.
- Location: Select a folder where the connection will be stored.
- Advanced settings: In API Scope(s), select the API scopes you want the bot to use. By default,
User.Read,User.Read.All, andGroup.Read.Allwill be requested. - Custom OAuth profile: Select the custom OAuth profile you want the bot to use.
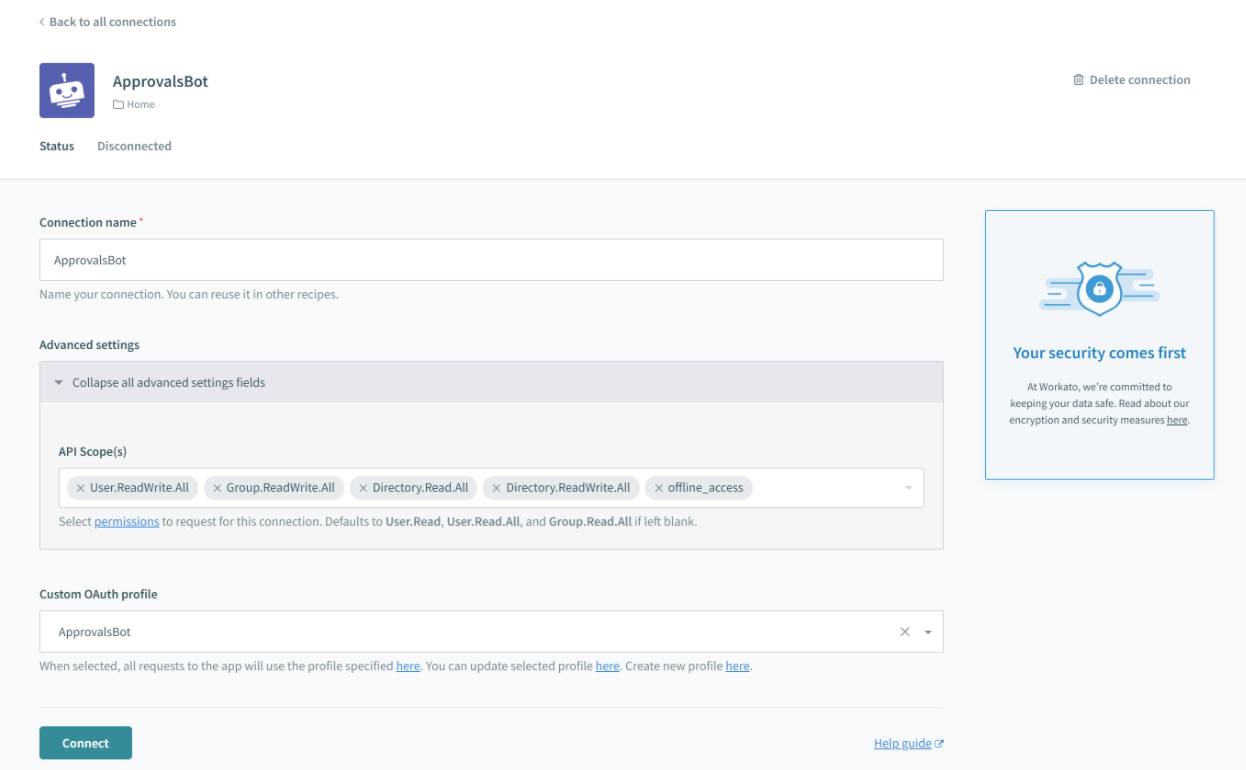
Click Connect. You'll be prompted to authenticate yourself in Microsoft Teams.
Authenticate yourself and authorize the bot's permissions when prompted.
Troubleshooting
If you encounter permissions issues during sideloading your app or authentication, check the following settings in the Microsoft Teams admin center:
Org-Wide App Settings
Navigate to Teams apps > Manage apps.
Click Org-wide app settings.
Under Third-party apps, verify that Allow third-party apps is set to On.
Under Custom apps, verify that Allow interaction with custom apps is set to On.
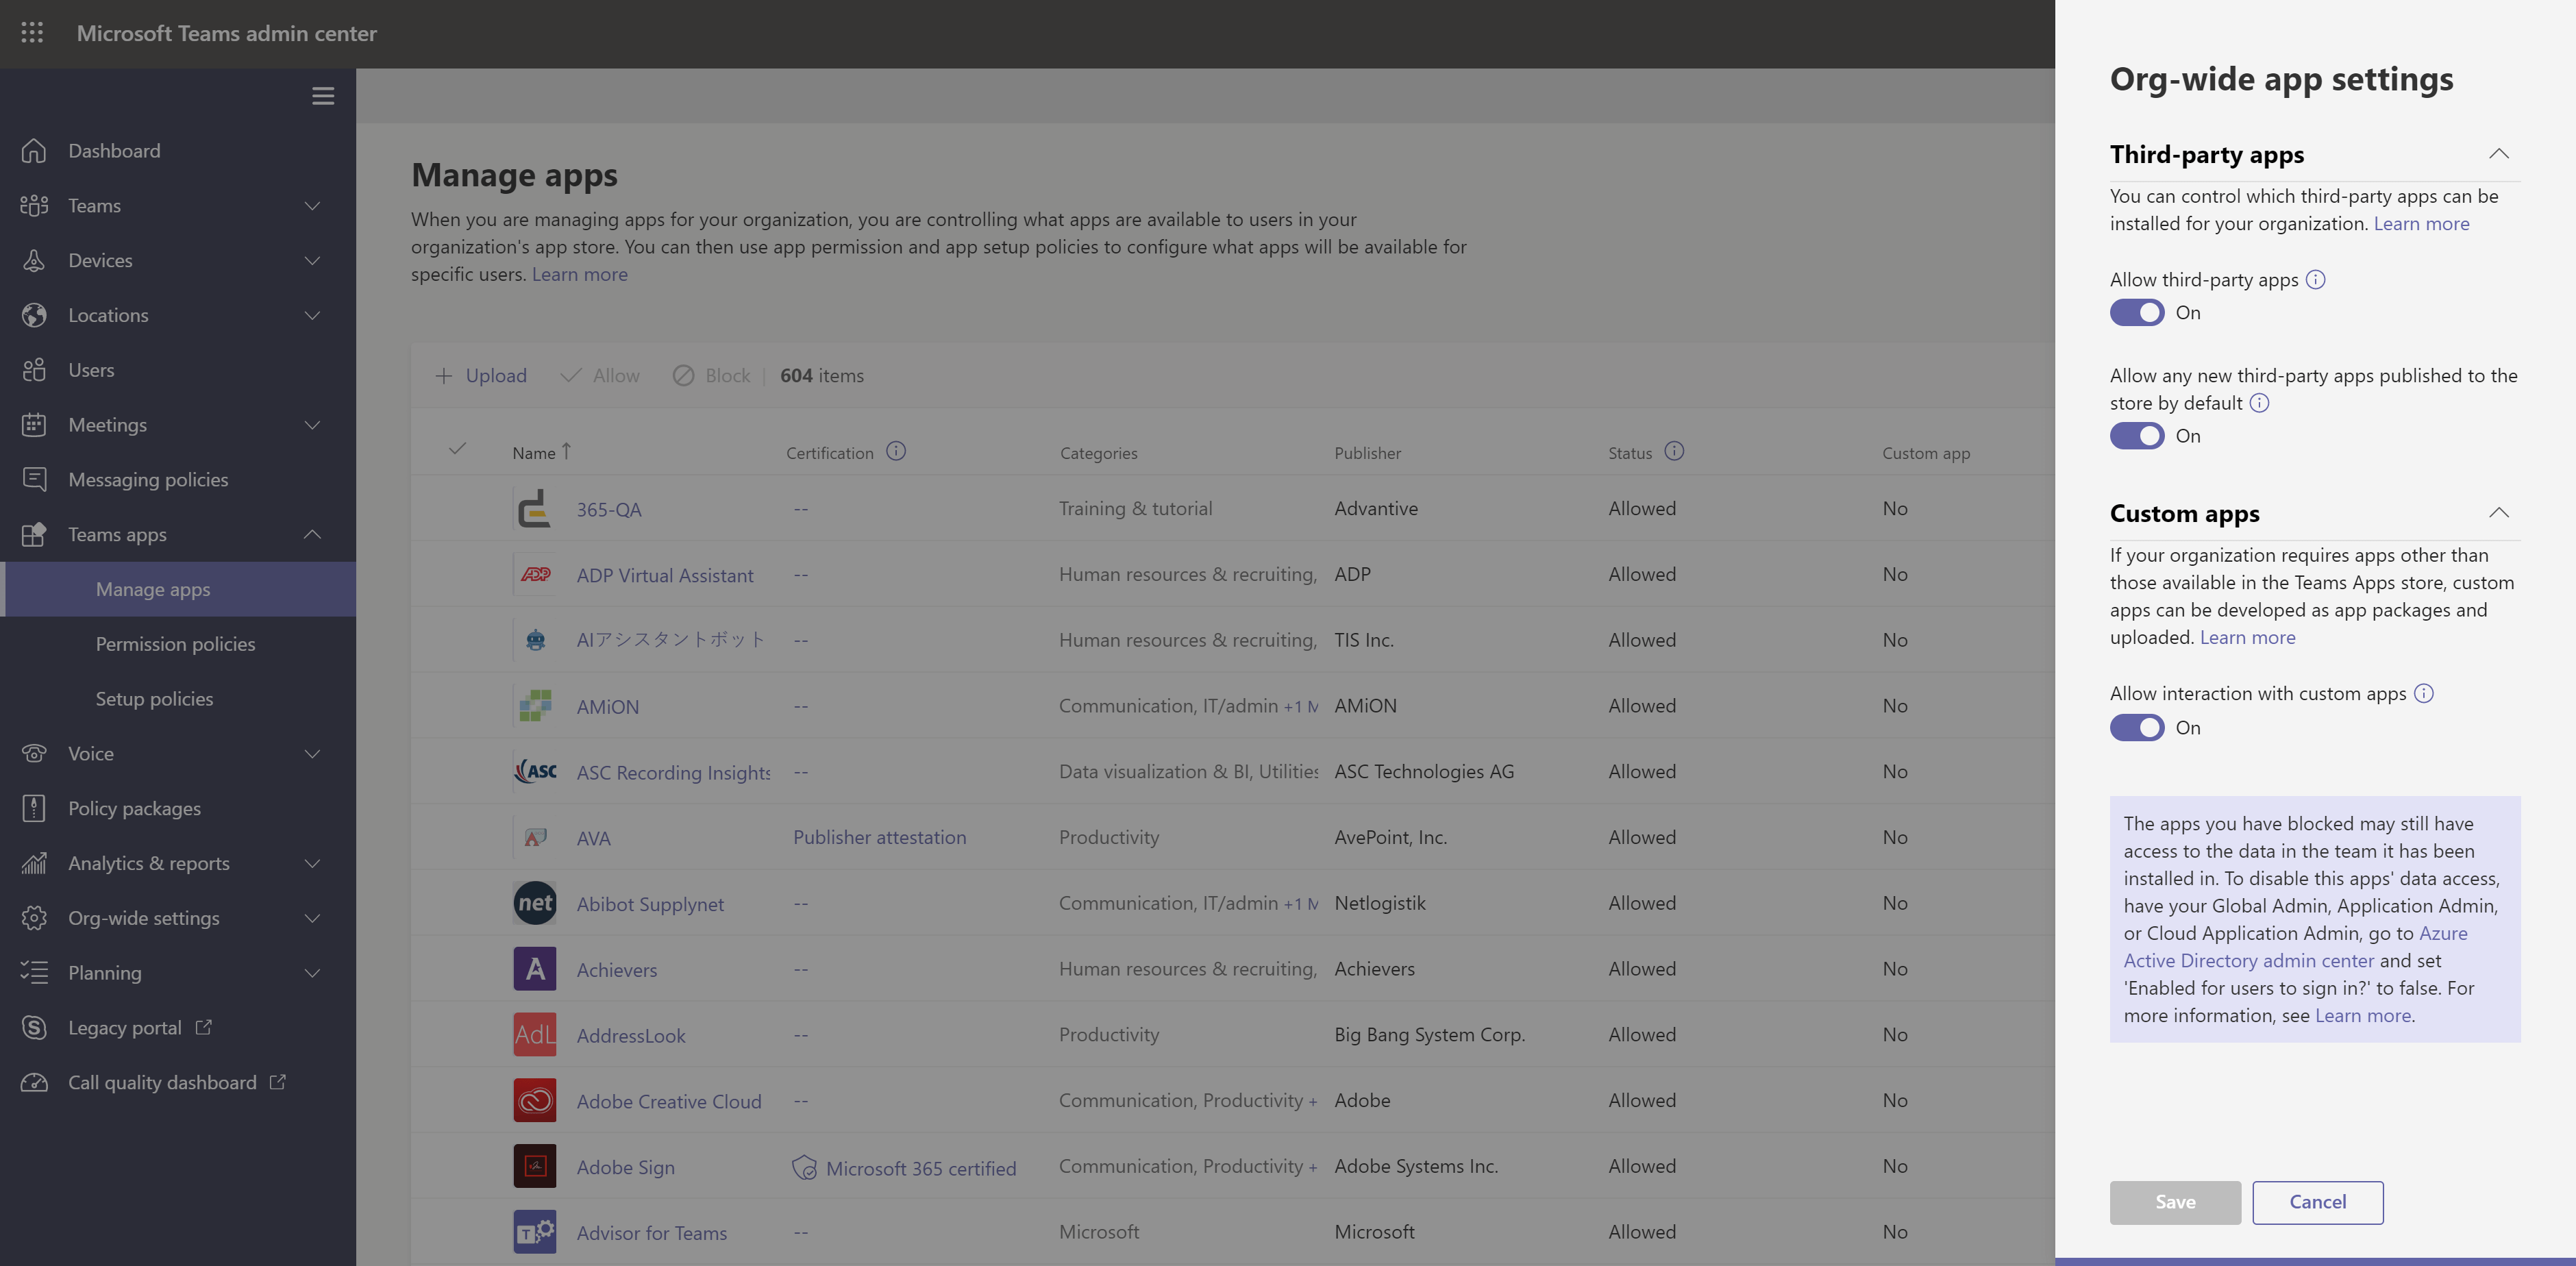
Click Save.
Permission Policies
Navigate to Teams apps > Permission policies.
Select your org-wide policy.
Under Third-party apps, verify that Allow all apps is set; alternatively, verify that your app has been allowed.
Under Custom apps, verify that Allow all apps is set; alternatively, verify that your app has been allowed.
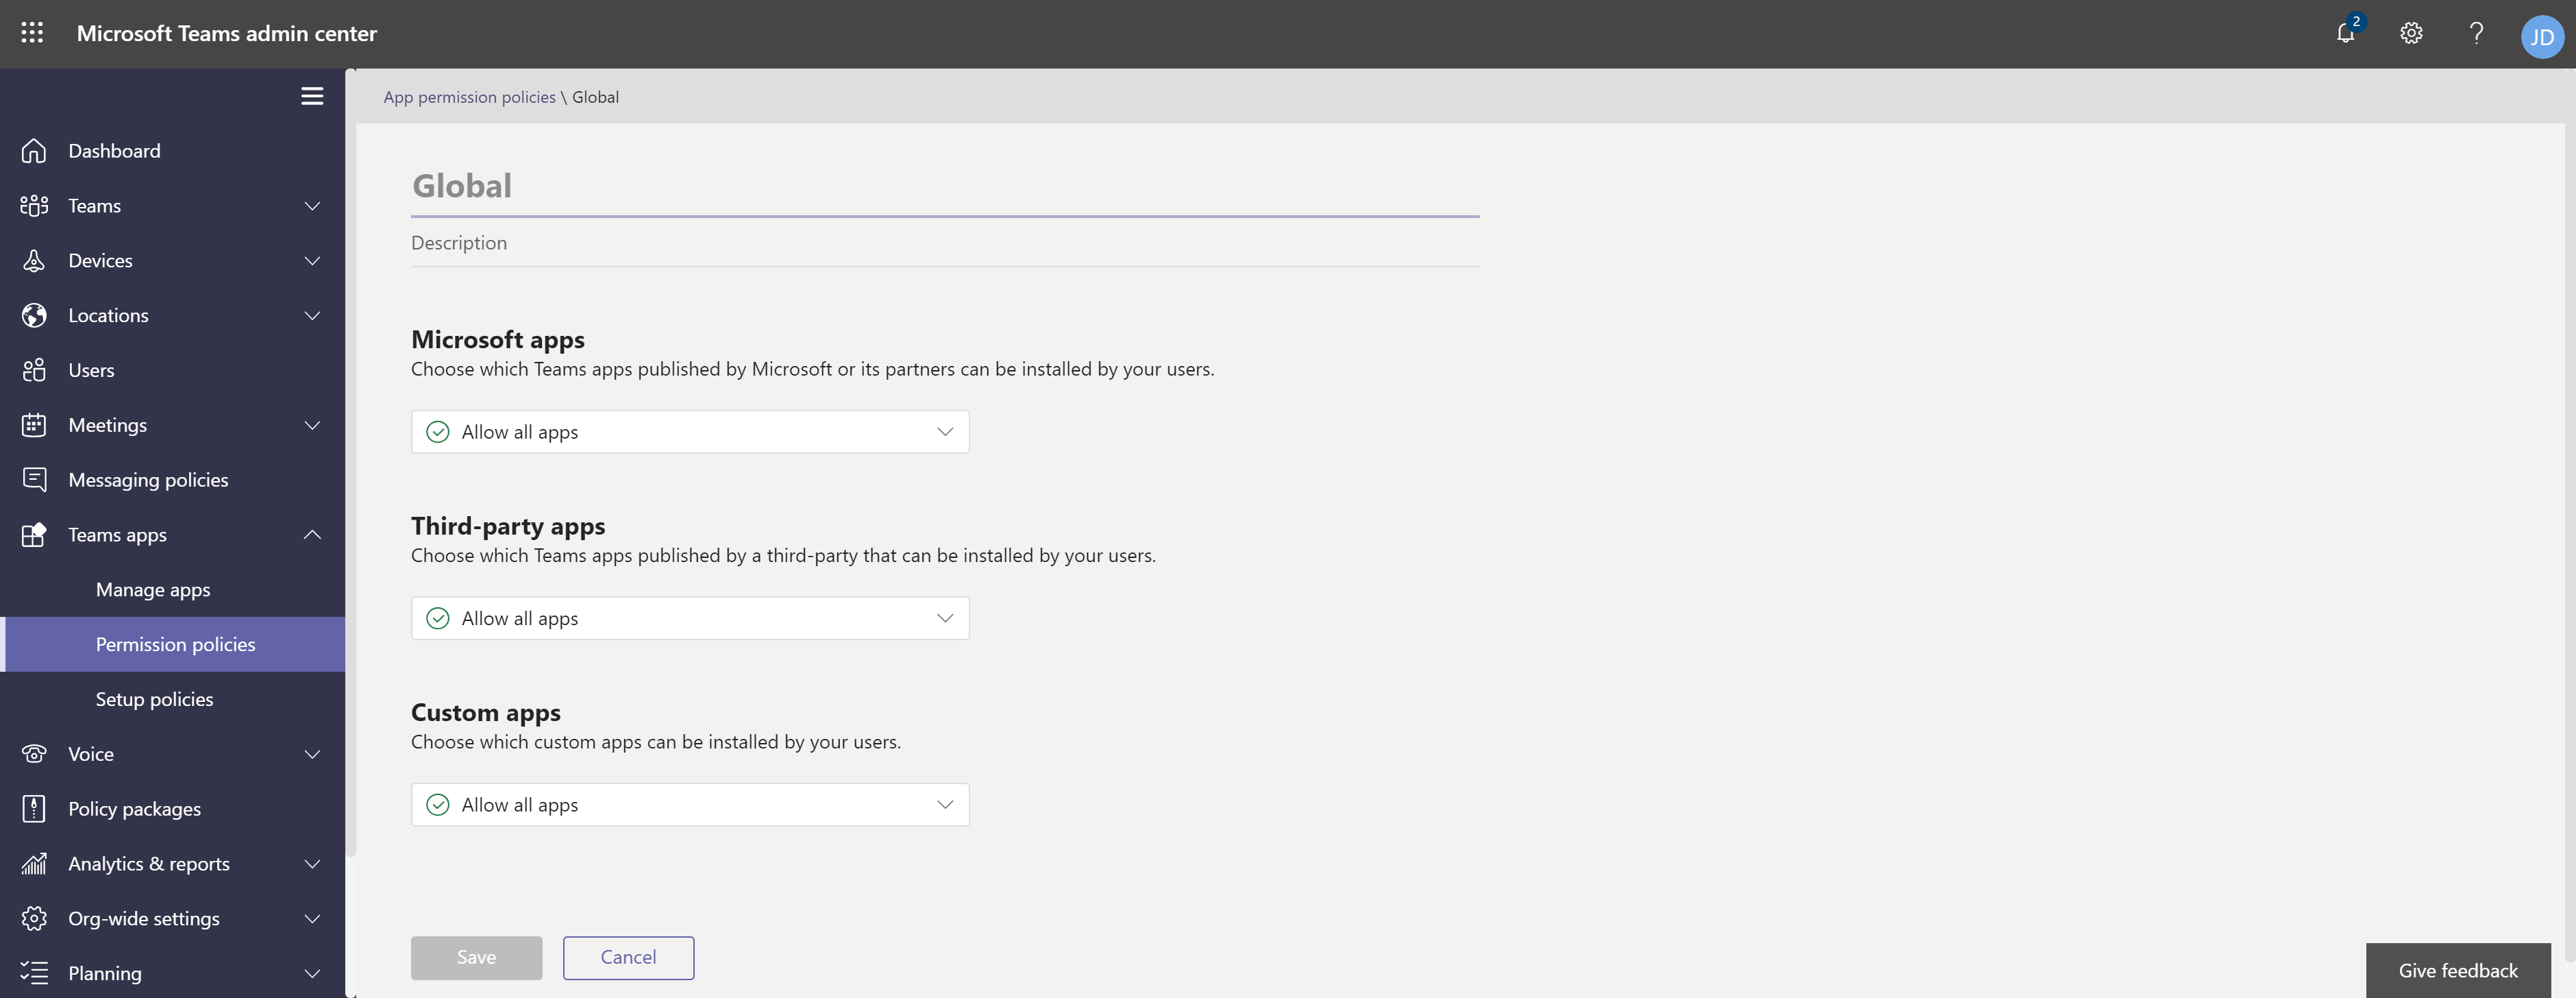
Click Save.
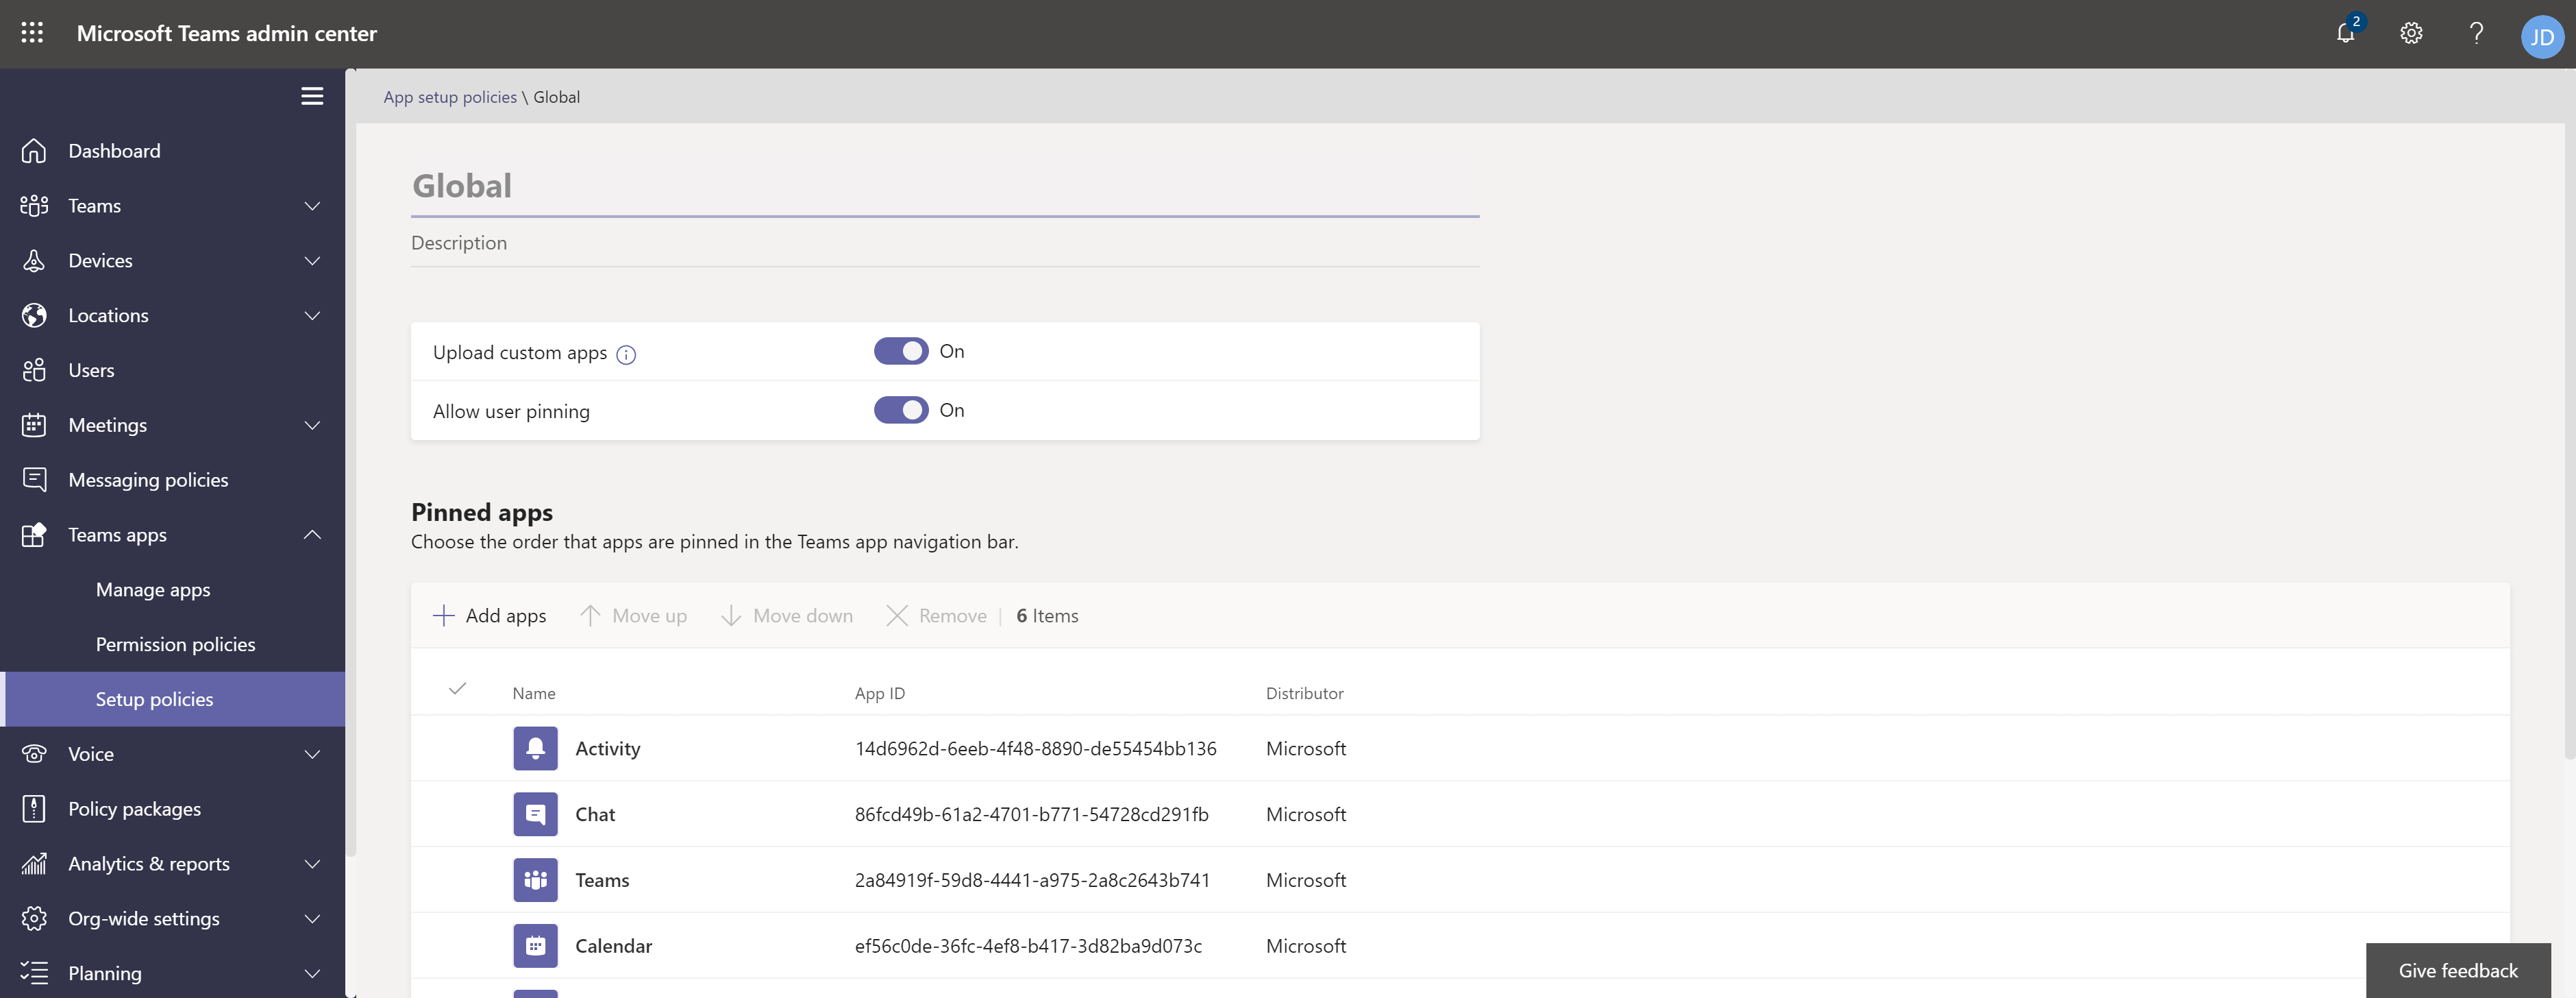
Setup Policies
Go to Teams apps > Setup policies.
Select your org-wide policy.
Verify that Upload custom apps is set to On.
Last updated: