# Workato actions for Slack
Workbot actions allow Workbot to post notifications into a specified channel when there are events to take note of, or respond to a command.
Workbot supports the following actions:
- Post command reply
- Post message
- Open/update or push modal view
- Publish app home view
- Update blocks by block ID
- Return menu options
- Post notifications
- Download attachment
- Delete message
- Post dialog
The following actions are deprecated and no longer available:
# Block kit compatibility
You can use blocks together with existing message attachments in the Post command reply and Post message.
For more information, see Block kit.
# Wait for user input/action
The Workbot recipe job can suspend until the user provides input. The job continues to the next action when it receives the input; it does not run a separate command as a distinct recipe trigger. This enables you to specify multiple steps of Workbot-user interaction in one recipe, streamlining logic, reducing the number of recipes, and avoiding artificial and unnecessary bot commands.
Wait for user action is a pattern used in modals and in messages. The following actions support waiting for user action:
Learn how to configure Wait for user action for Post command reply and Post message actions.
Additionally, the following modal supports waiting for user action:
# Post command reply
Post command reply allows you to customize how Workbot replies when an event is completed. This reply can be a simple message about the task completion, or a prompt for the user to take a subsequent action after the first is complete. For example, after retrieving data for a custom account in Salesforce, you can configure Workbot to ask if the user plans to copy that information across to another application.
# Blocks
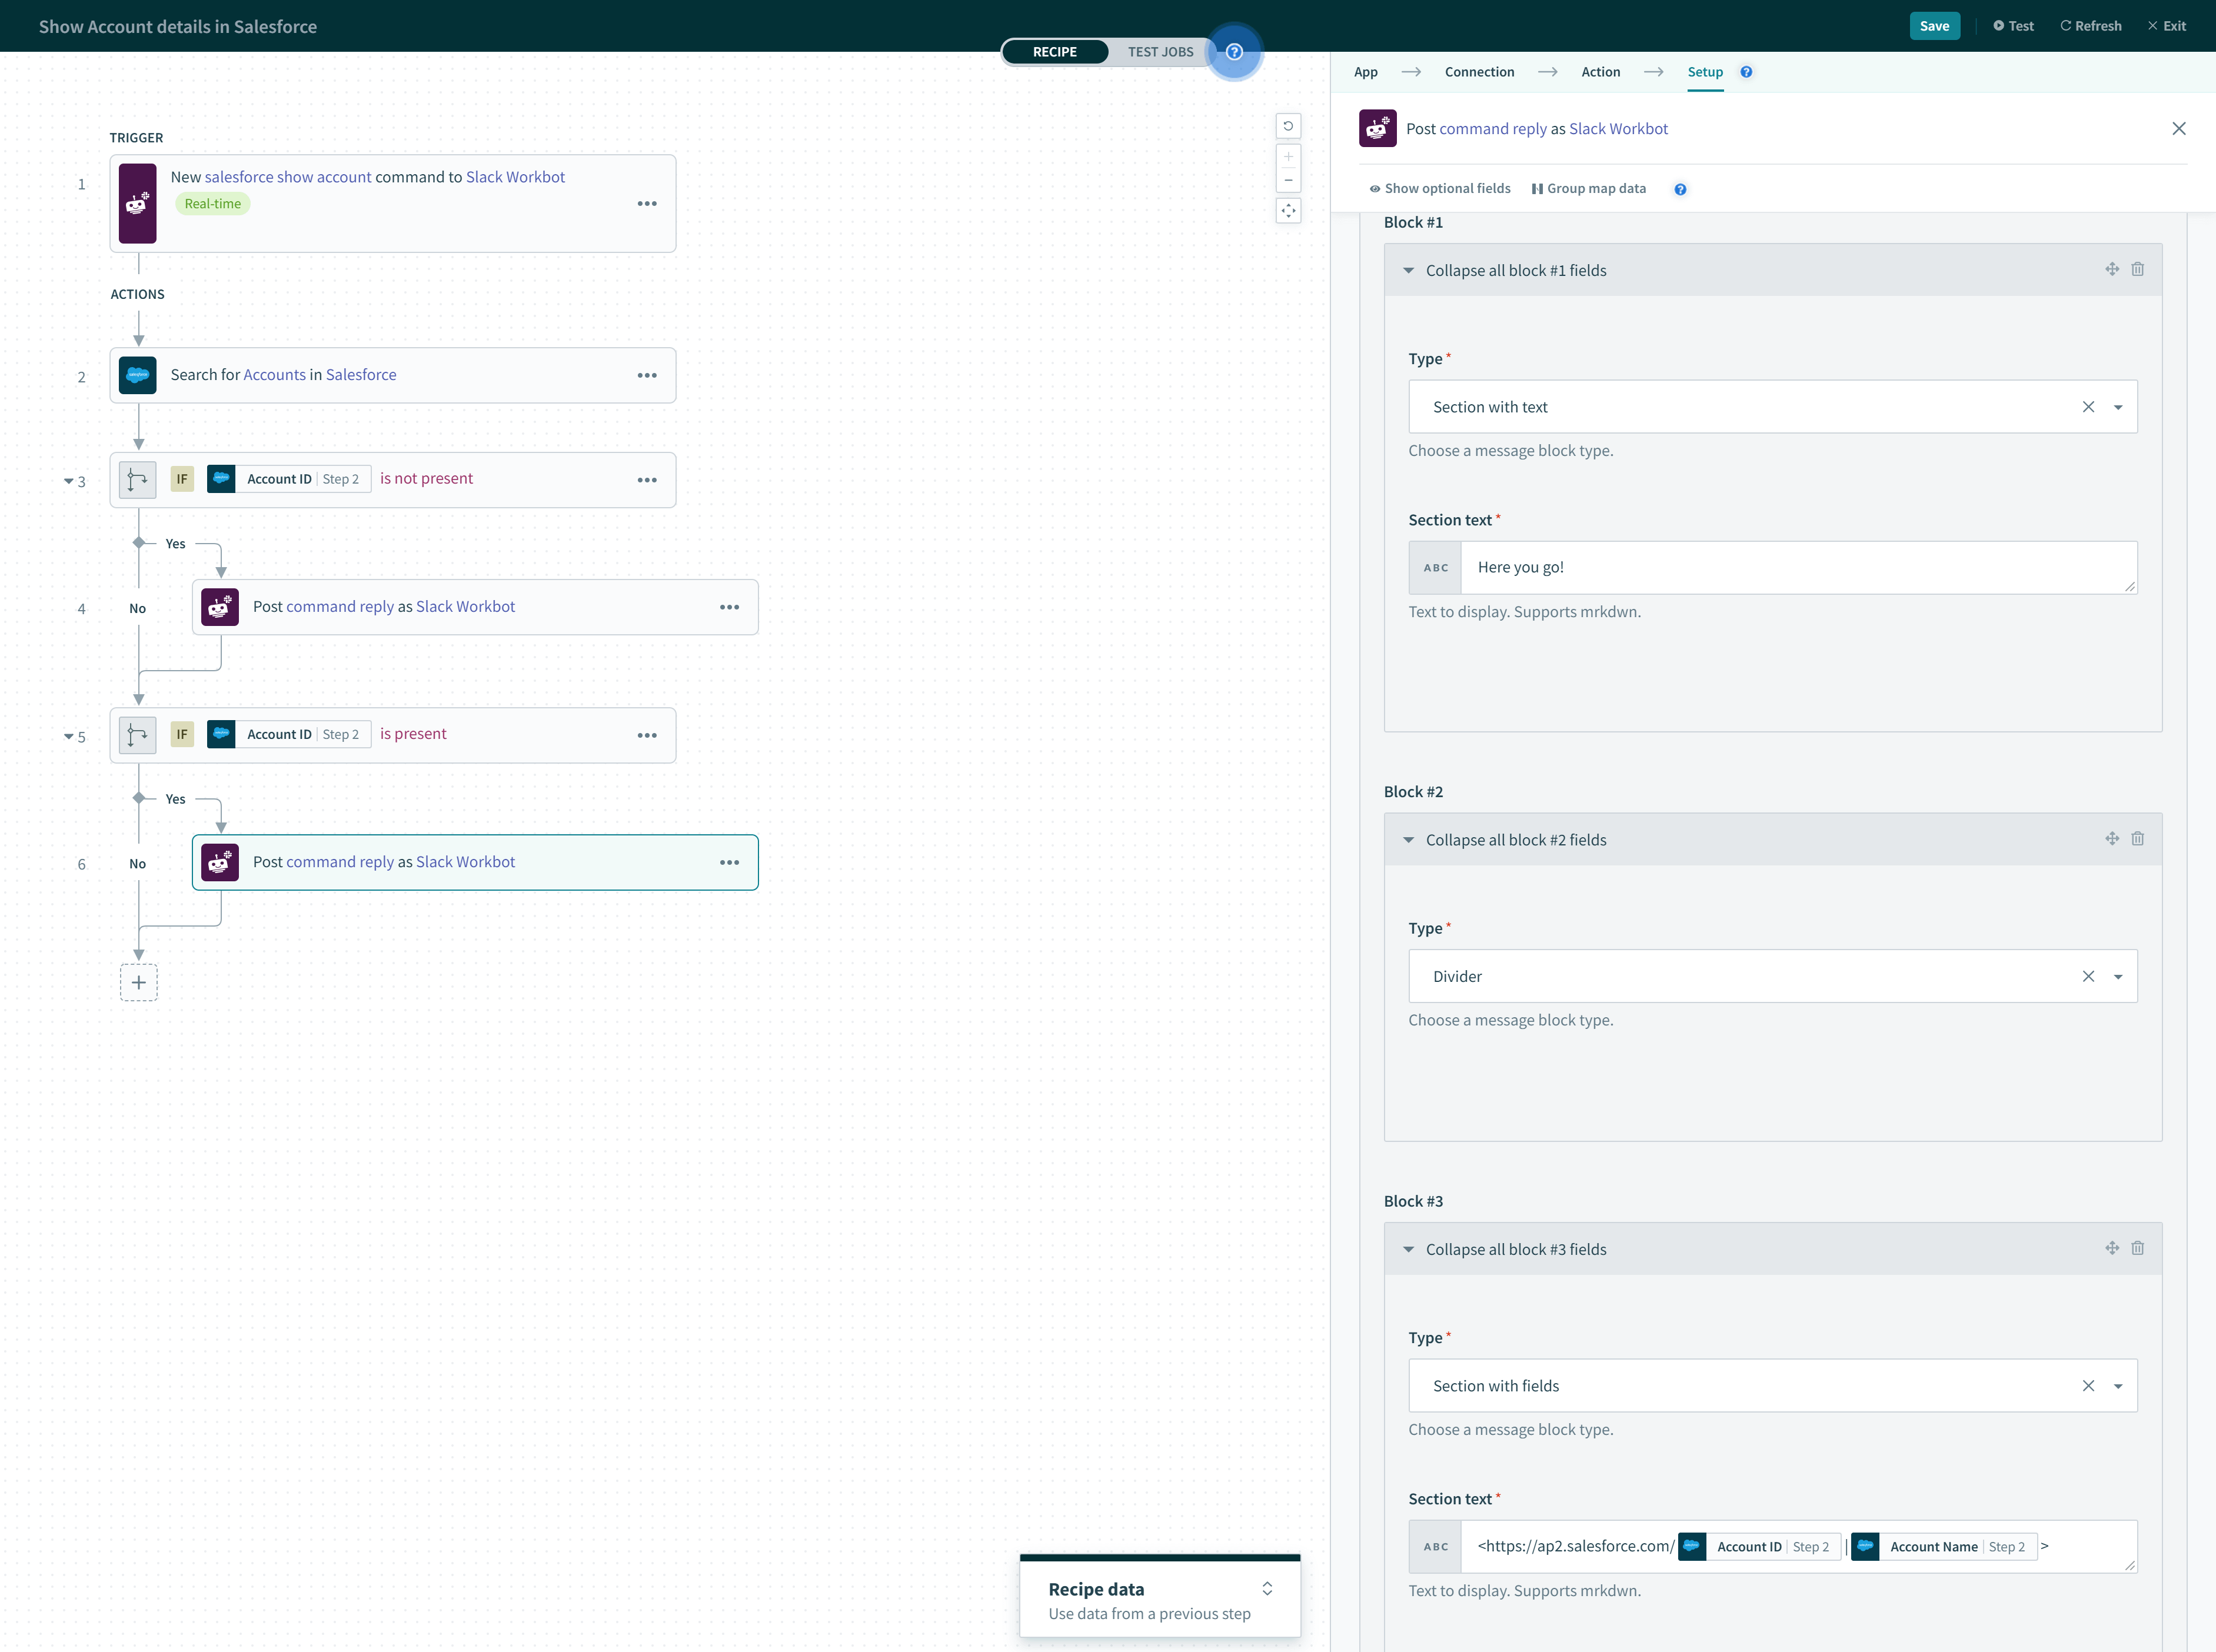
Design rich messages by adding blocks. You can stack block items and customize the order and appearance of each block, as well as the elements within each block.
See our Block kit article for a list of block types Workato supports.
# Compatibility with message attachments
Post message and post command reply previously used message attachments to construct messages. Blocks can be used together with message attachments.
You can optionally provide secondary attachments, which display following any defined blocks.
# Behavior of blocks when used with message attachments
When both blocks and message attachments are defined, blocks always appear above message attachments.
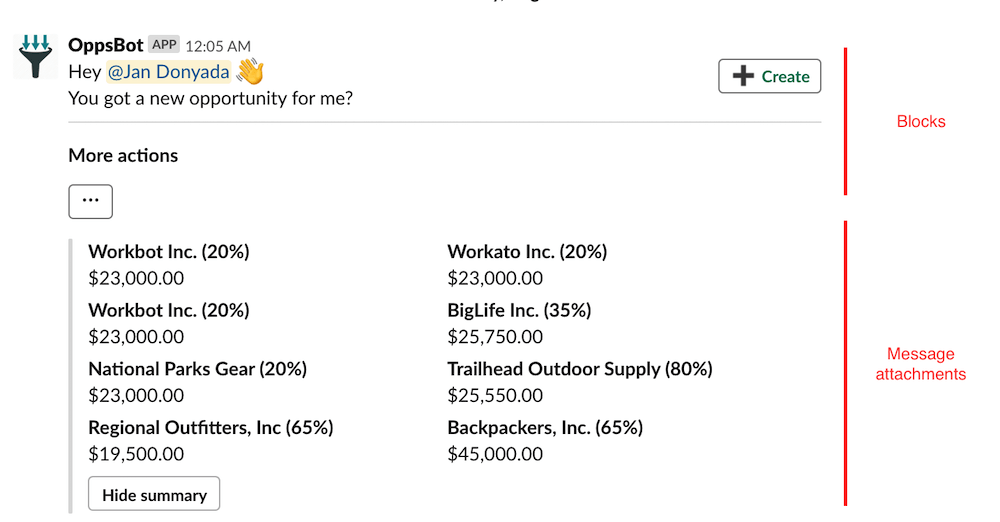
When any blocks are defined, any input in the Message text field is used as the Slack notification message.
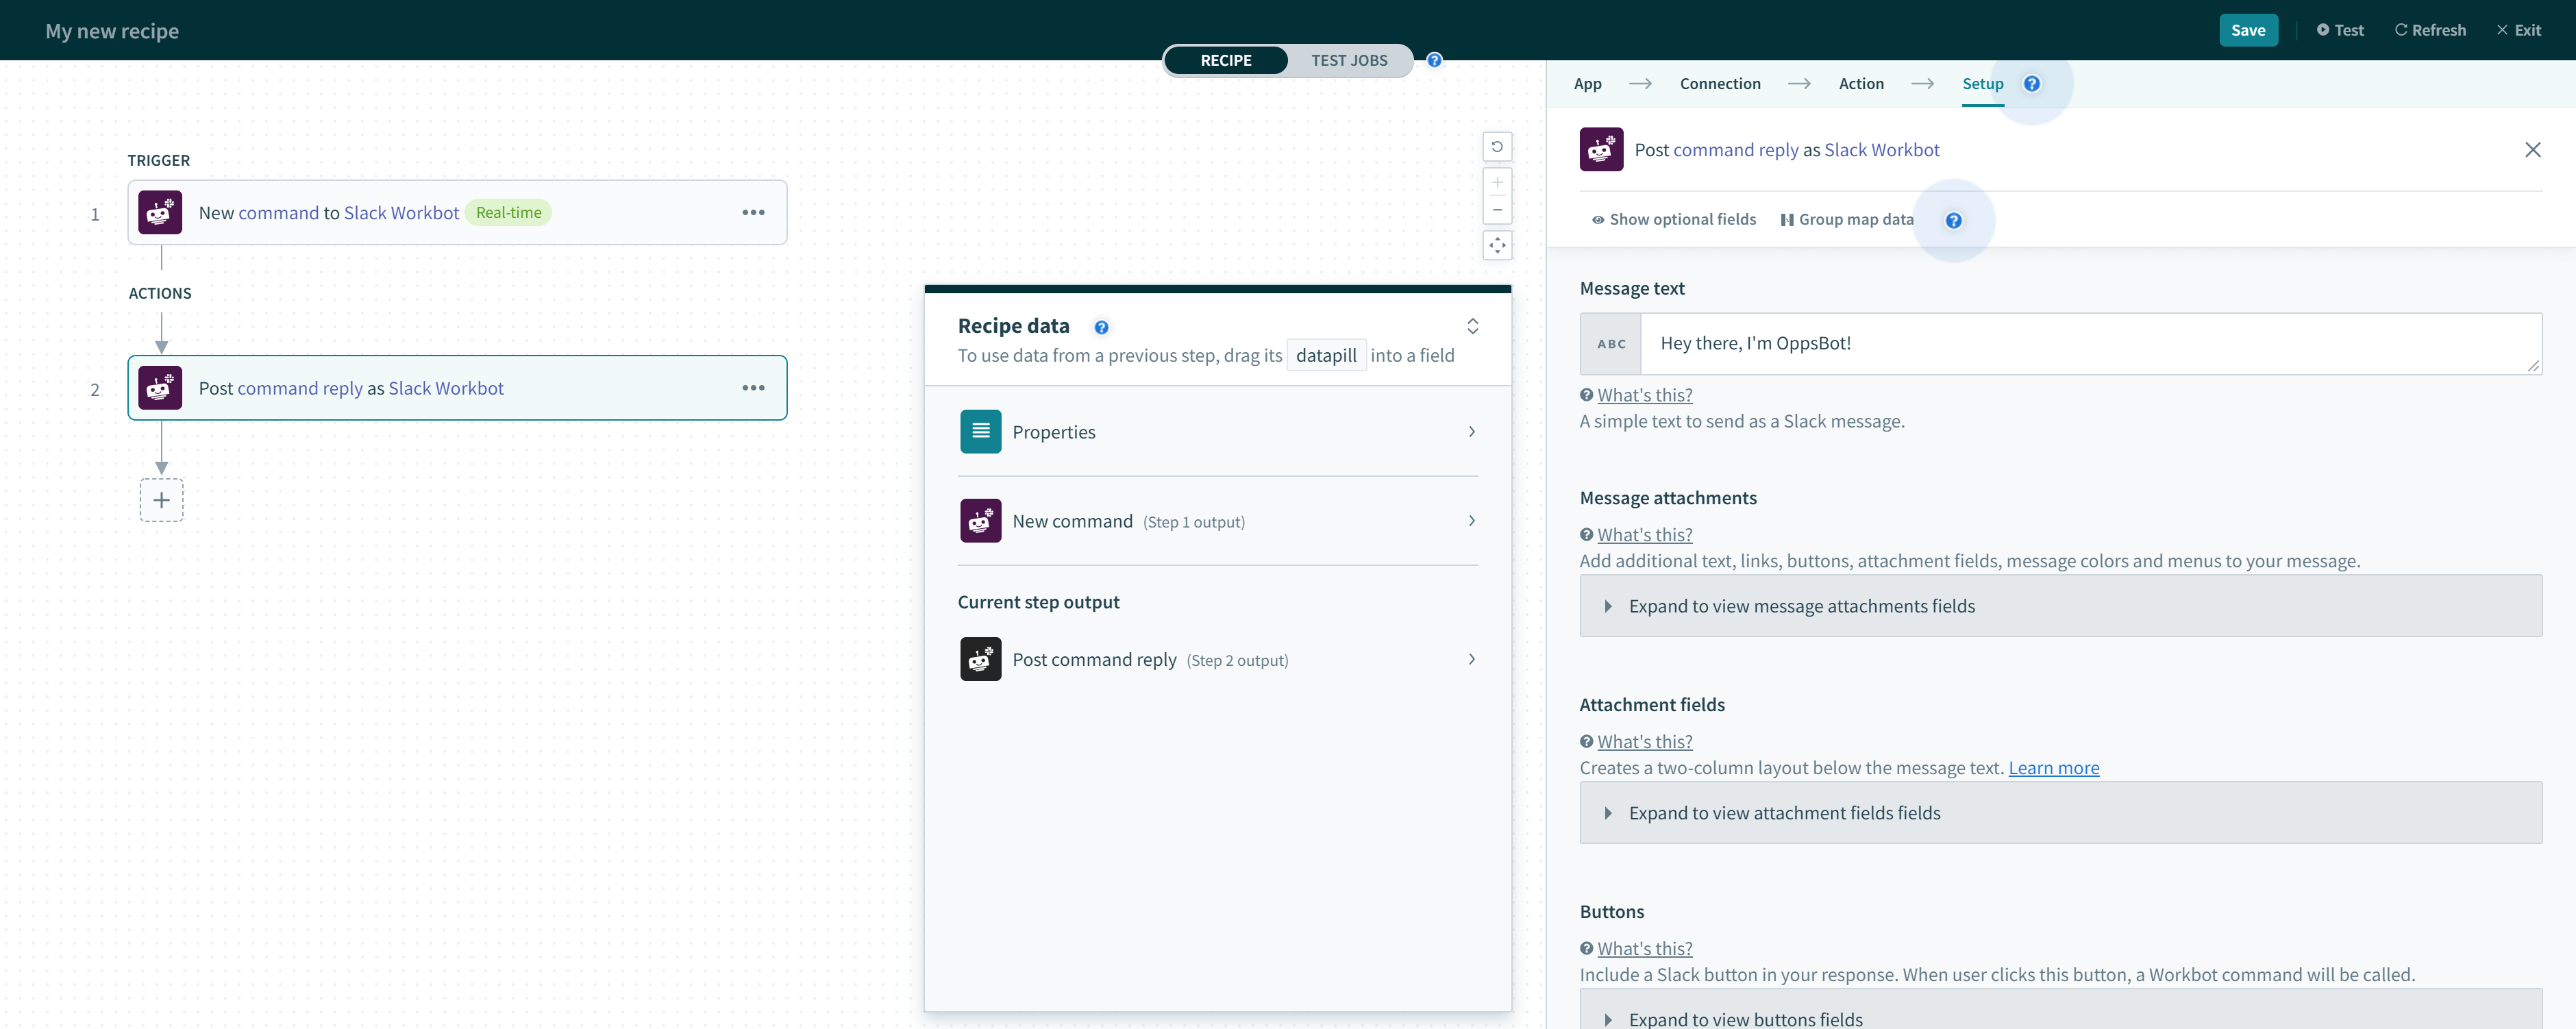
The following table lists the fields available in a Post command reply action.
| Field | Explanation | ||
|---|---|---|---|
| Blocks | Build a rich, interactive message using Slack's block kit. View the list of supported blocks. | ||
| Message text | When no blocks are defined, text in this field is displayed before any secondary attachments. When blocks are defined, text in this field is used as the Slack notification message. Supports Slack mrkdwn and emojis. | ||
| Multiple attachments | If set to Yes, allows you to dynamically generate an array of secondary attachments. This array is merged and posted as one single message. To use it, pass a list datapill into the Attachment source list field, then map the corresponding Message attachments, Attachment fields, Buttons, and Message menu fields with datapills of records from the same list. | ||
| Secondary attachments | Message attachments | Pretext | Text that appears above the message attachment block. |
| Author name | Small text used to display the author's name, displayed above the title. | ||
| Author link | A valid URL that hyperlinks the author_name text. This only works if author_name is present. | ||
| Author icon | A valid URL that displays a small 16px by 16px image to the left of the author_name text. This only works if Author name is present. | ||
| Title | Title of message. Supports Slack mrkdwn and emojis. | ||
| Title link | Allows you to embed a link in the title. Provide the public URL of a page you want the user to be brought to when clicking the link | ||
| Attachment text | Main body of the message. Supports Slack mrkdwn and emojis. | ||
| Attachment color | Color displayed with the message to indicate message's importance or type. Good = Green Warning = Amber Danger = Red | ||
| Image URL | URL of an image that displays below the main body of the message. | ||
| Thumb URL/Application | URL of an image that displays to the right of the main body of the message. | ||
| Footer | Some brief text to help contextualize and identify an attachment. Limited to 300 characters, and may be truncated further when displayed to users in environments with limited screen real estate. | ||
| Footer icon | A valid URL to an image file that displays beside the footer text. This only works if author_name is present. Workato renders the image at 16px by 16px. We recommend you use an image that is similarly sized. | ||
| Attachment fields | Name-value pairs displayed in a 2-column grid. | ||
| Buttons | Buttons display below the main body of the message. Buttons are primarily used to invoke a command, executing another bot command recipe. You can define the button label, the command to be executed, and parameters to pass when the button is clicked. | ||
| Message menu | A drop-down menu, displayed below the main body of the message. Each menu option can be used to invoke a command, executing another bot command recipe. You can define the display of each option, the command to be executed, and parameters to pass when the menu option is selected. | ||
| Send only to the user | Posts as an ephemeral message, viewable only to the user. | ||
| Replace original | Replaces the original message. If the original message was an ephemeral message, the replaced message is also ephemeral. Regular messages cannot be replaced with ephemeral messages. | ||
| Delete original | Deletes the original message. | ||
# Post message
This action posts a message response to a user who invokes a command. The Post message action is similar to that of the Post command reply, but has more features.
Use Post message if you:
Are not using a Workbot command trigger in your recipe.
Want to dynamically post the message to a member (user ID) or conversation (conversation ID)
Plan to use advanced features like updating a previous message or posting/updating messages in a thread.
# Channel name/DM
You can use the Channel name/DM field to post a message in a specified Slack channel, or post a direct message (DM). There are two ways to post your message:
Use the Channel/DM datapill from a Post command trigger
Message to update example
Add the Slack channel name, or add the Slack member ID to post a DM message, for example:
- Channel: #general
- Slack member ID: XYZ12345AB6
To find a member's Slack ID:
Open Slack and click the name of the person to open their profile.
Click the More menu, then click Copy member ID.
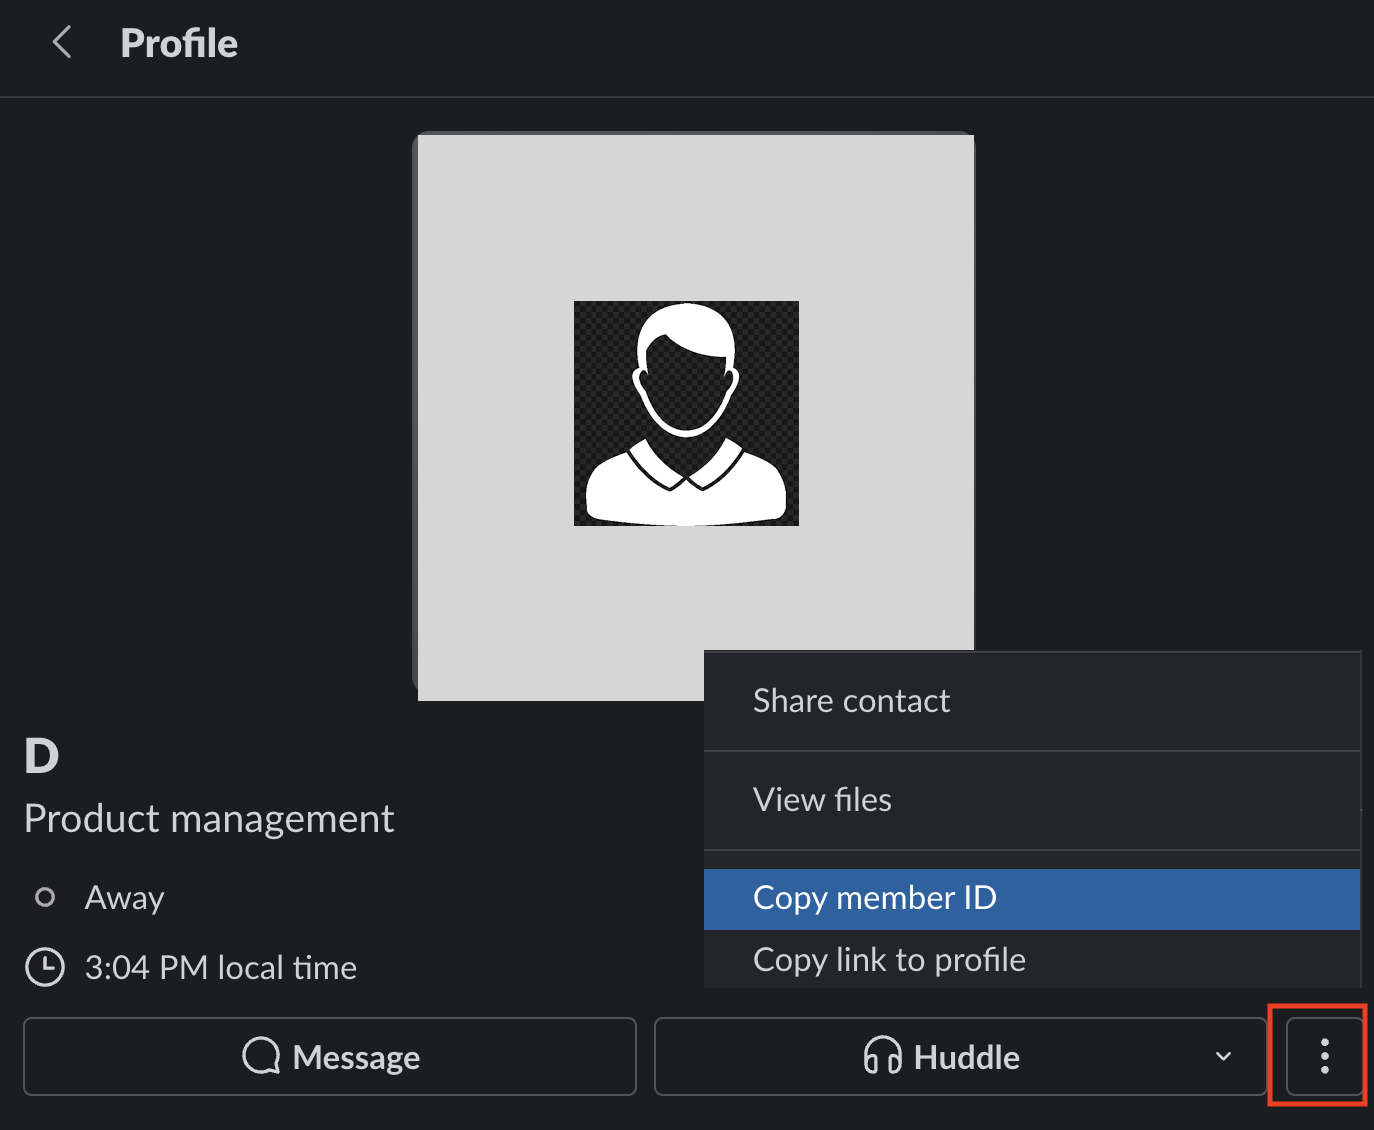 Copy Slack member ID
# Message blocks
Similar to Post command reply, Post message enables you to design rich messages by adding blocks. You can stack block items and customize the order and appearance of each block, as well as the elements within each block.
See our Block kit article for a complete list of message block types Workato supports.
# Advanced section
The advanced section has two fields:
Message to update and Thread ID.
# Message to update
Message to update allows you to overwrite a previously posted message from an earlier action step. Simply use the Message ID datapill from a Post command trigger, Post message action or Post notification output datatrees.
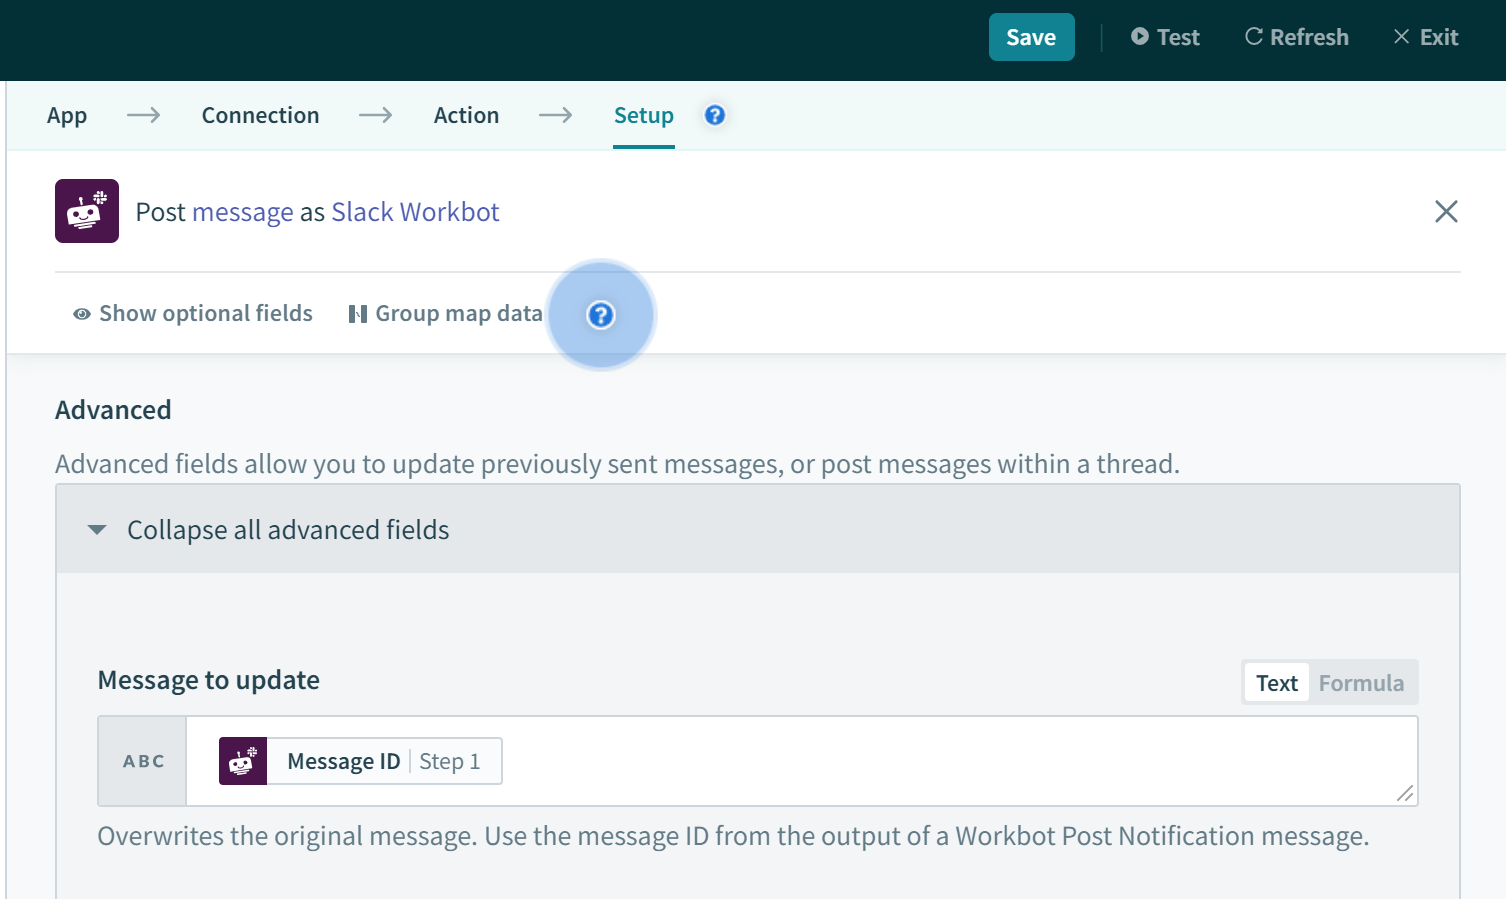 Message to update example
# Thread ID
Thread ID allows you to post a message within an existing thread in Slack. Simply use the Thread ID datapill from a Post message or Post notification output datatree.
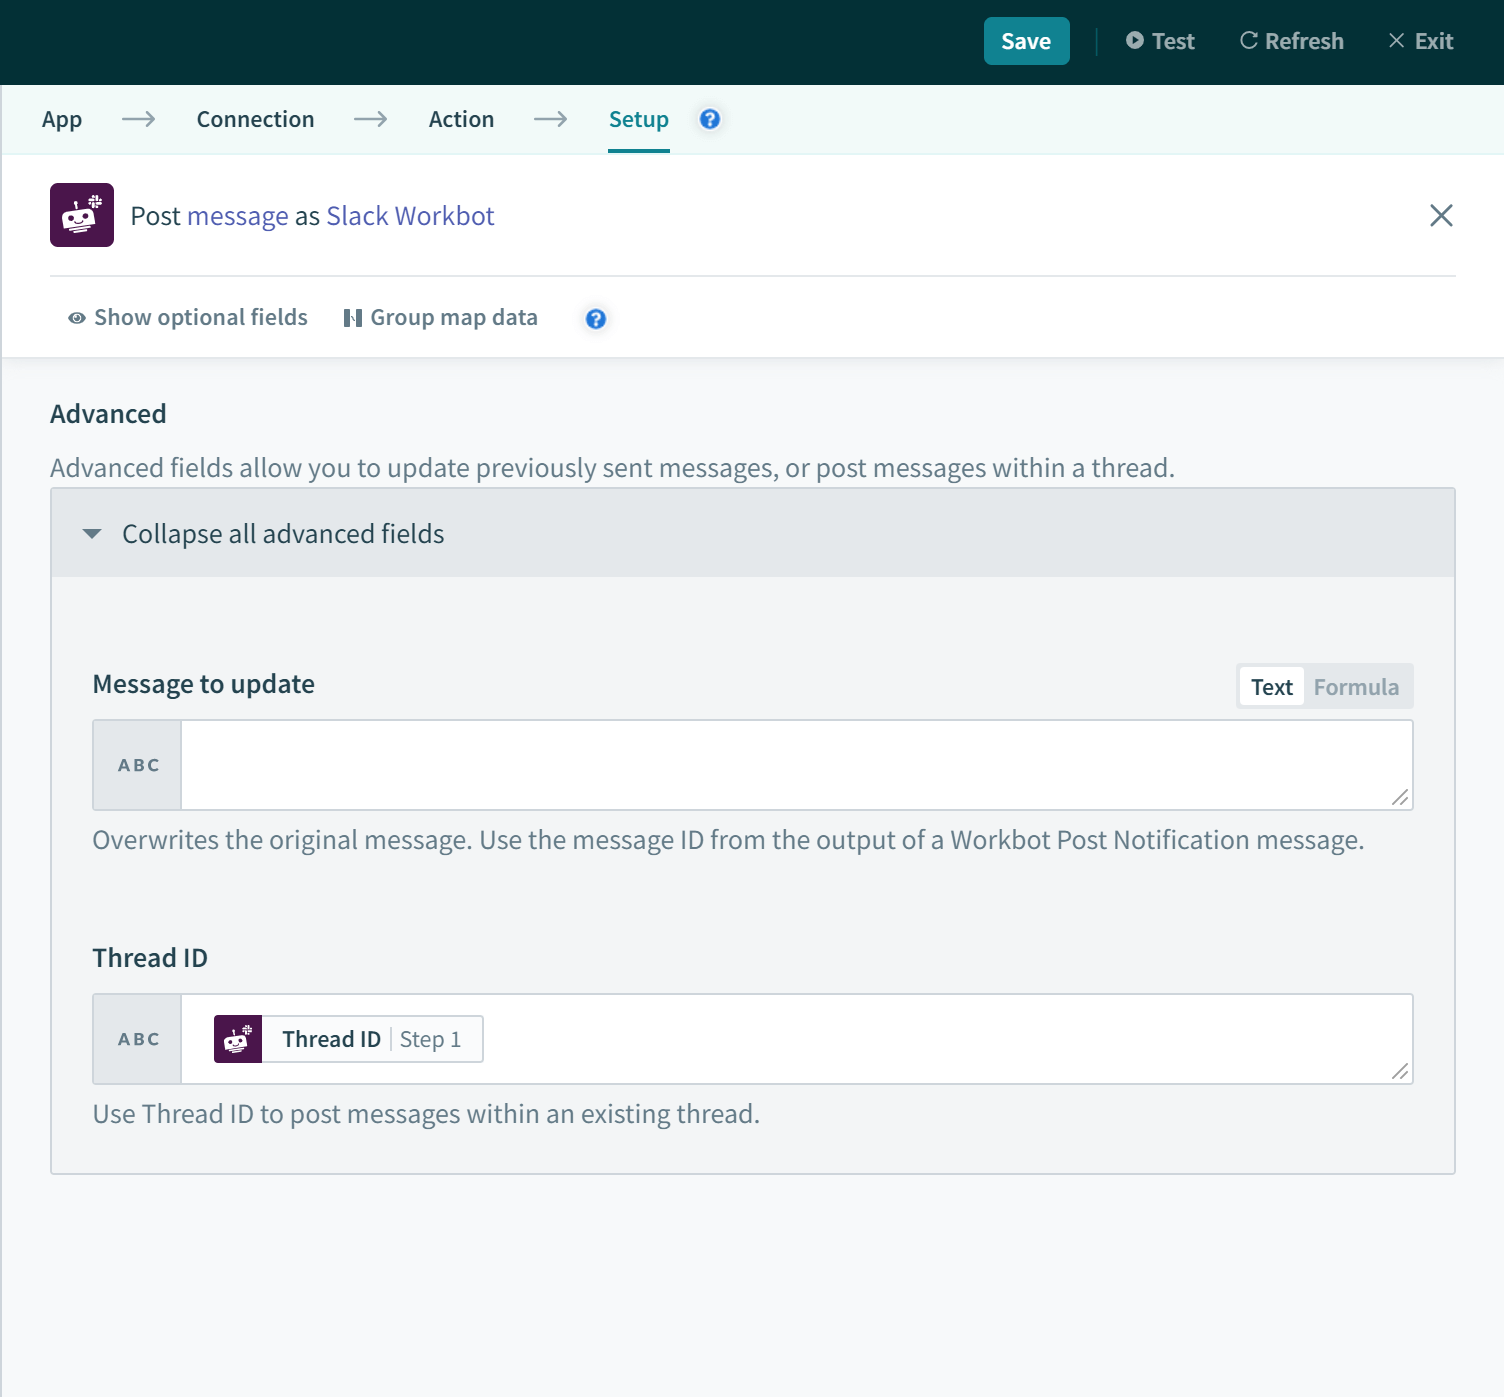 Thread ID example
If you don't see Thread ID, make sure it's checked in the 'Add/remove optional fields' section at the bottom of the post message action step:
# Post notifications
This action allows you to define which Slack channel to post customized notifications to. By default, Workbot posts direct messages only to the user who installed Workbot. Note, it is also possible to subscribe from a channel (where Workbot participates) to these notifications.
The fields available are similar to that of the Post command reply action, with all the typical fields you see in a Slack message. However, there is the addition of the field Notification filter. This field allows you to set parameters for filters, which acts like a trigger filter for sending out notifications (i.e. the notification is only sent when the set criteria is met).
# Download attachment
This action allows you to download attachments from Slack, received as input to New command trigger. Make sure command parameter for uploaded content has type file, for example, attachment type:file. Pass file URL from New command output into the URL field to get attachment content. Then you may further pass this file content to Dropbox, Box, or other connectors to upload them as files.
# Return menu options
This action allows you to dynamically generate menu options, then return them to a dynamic menu in a Slack dialog.
For Workbot command recipes that invoke dialogs, a select field can be defined with dynamic menu options.
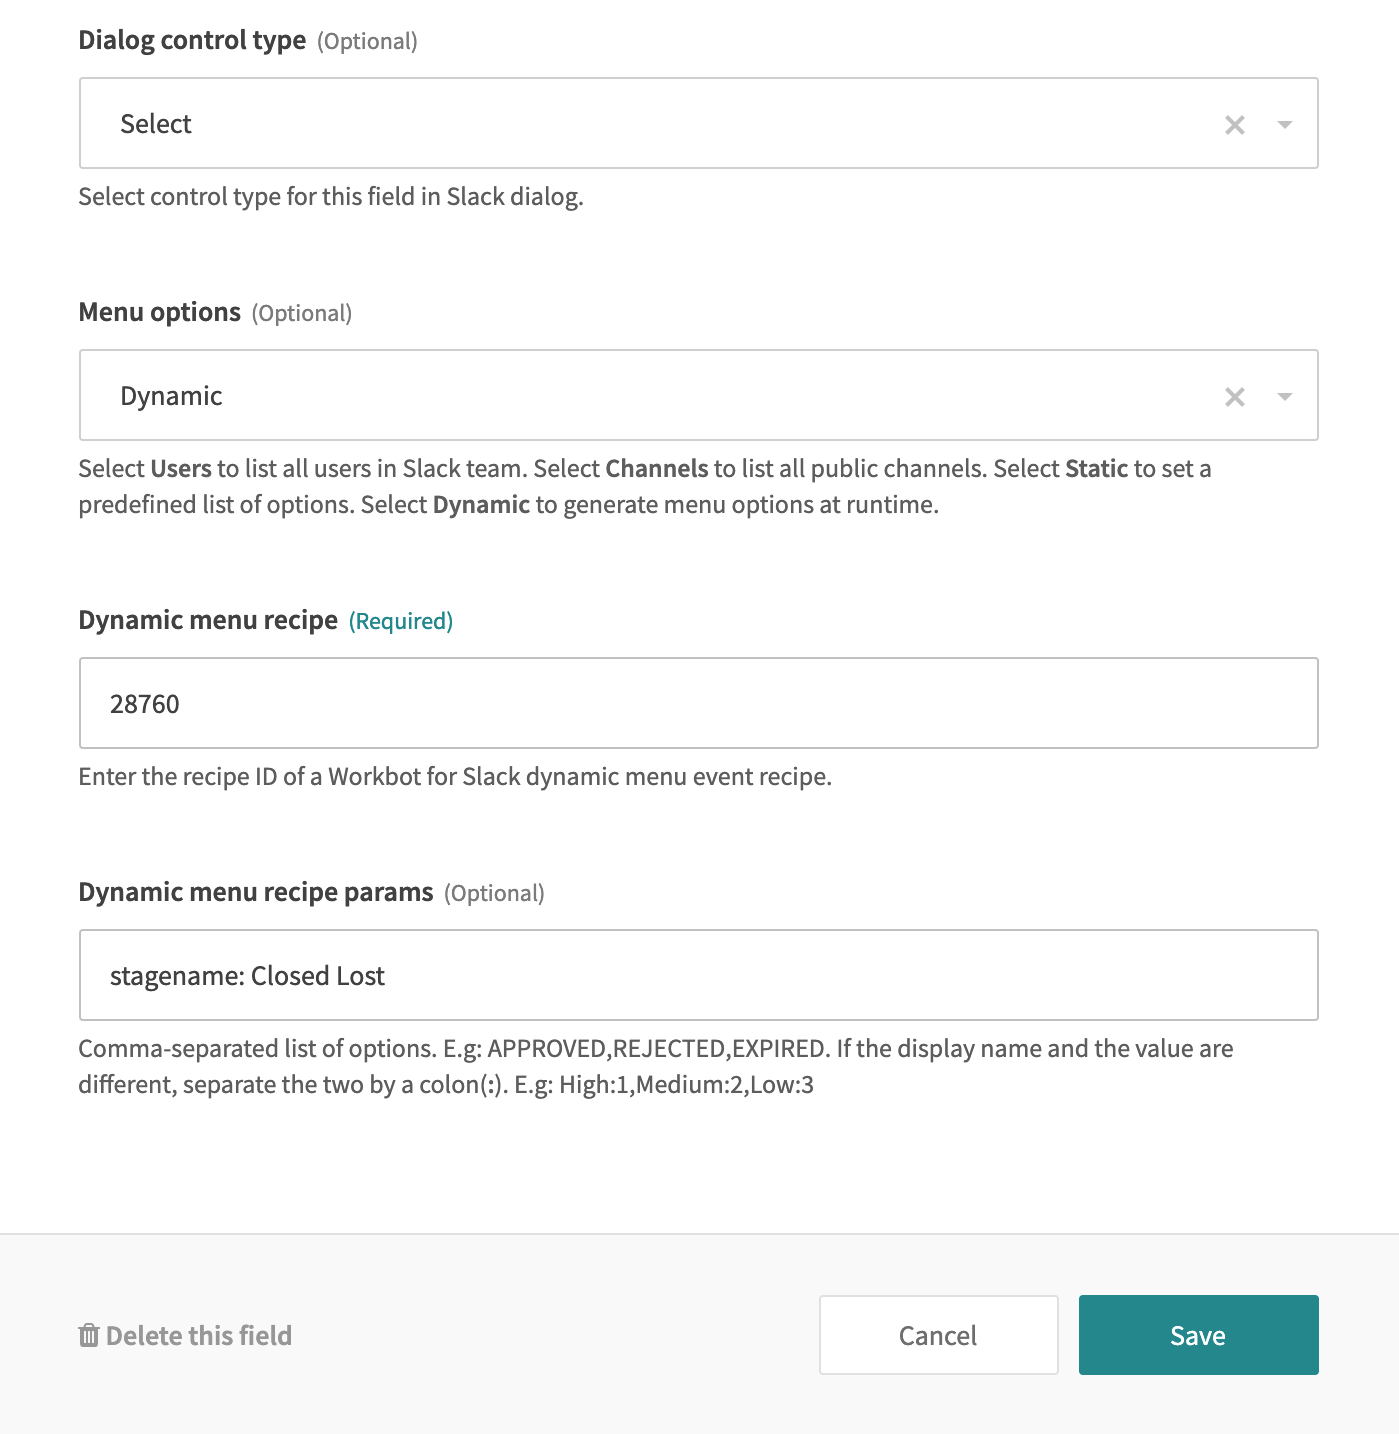 A Workbot command recipe with dynamic menu options
After retrieving a list of records from another app (for example, Salesforce), you can return them back to the dynamic menu by using the Return menu options action.
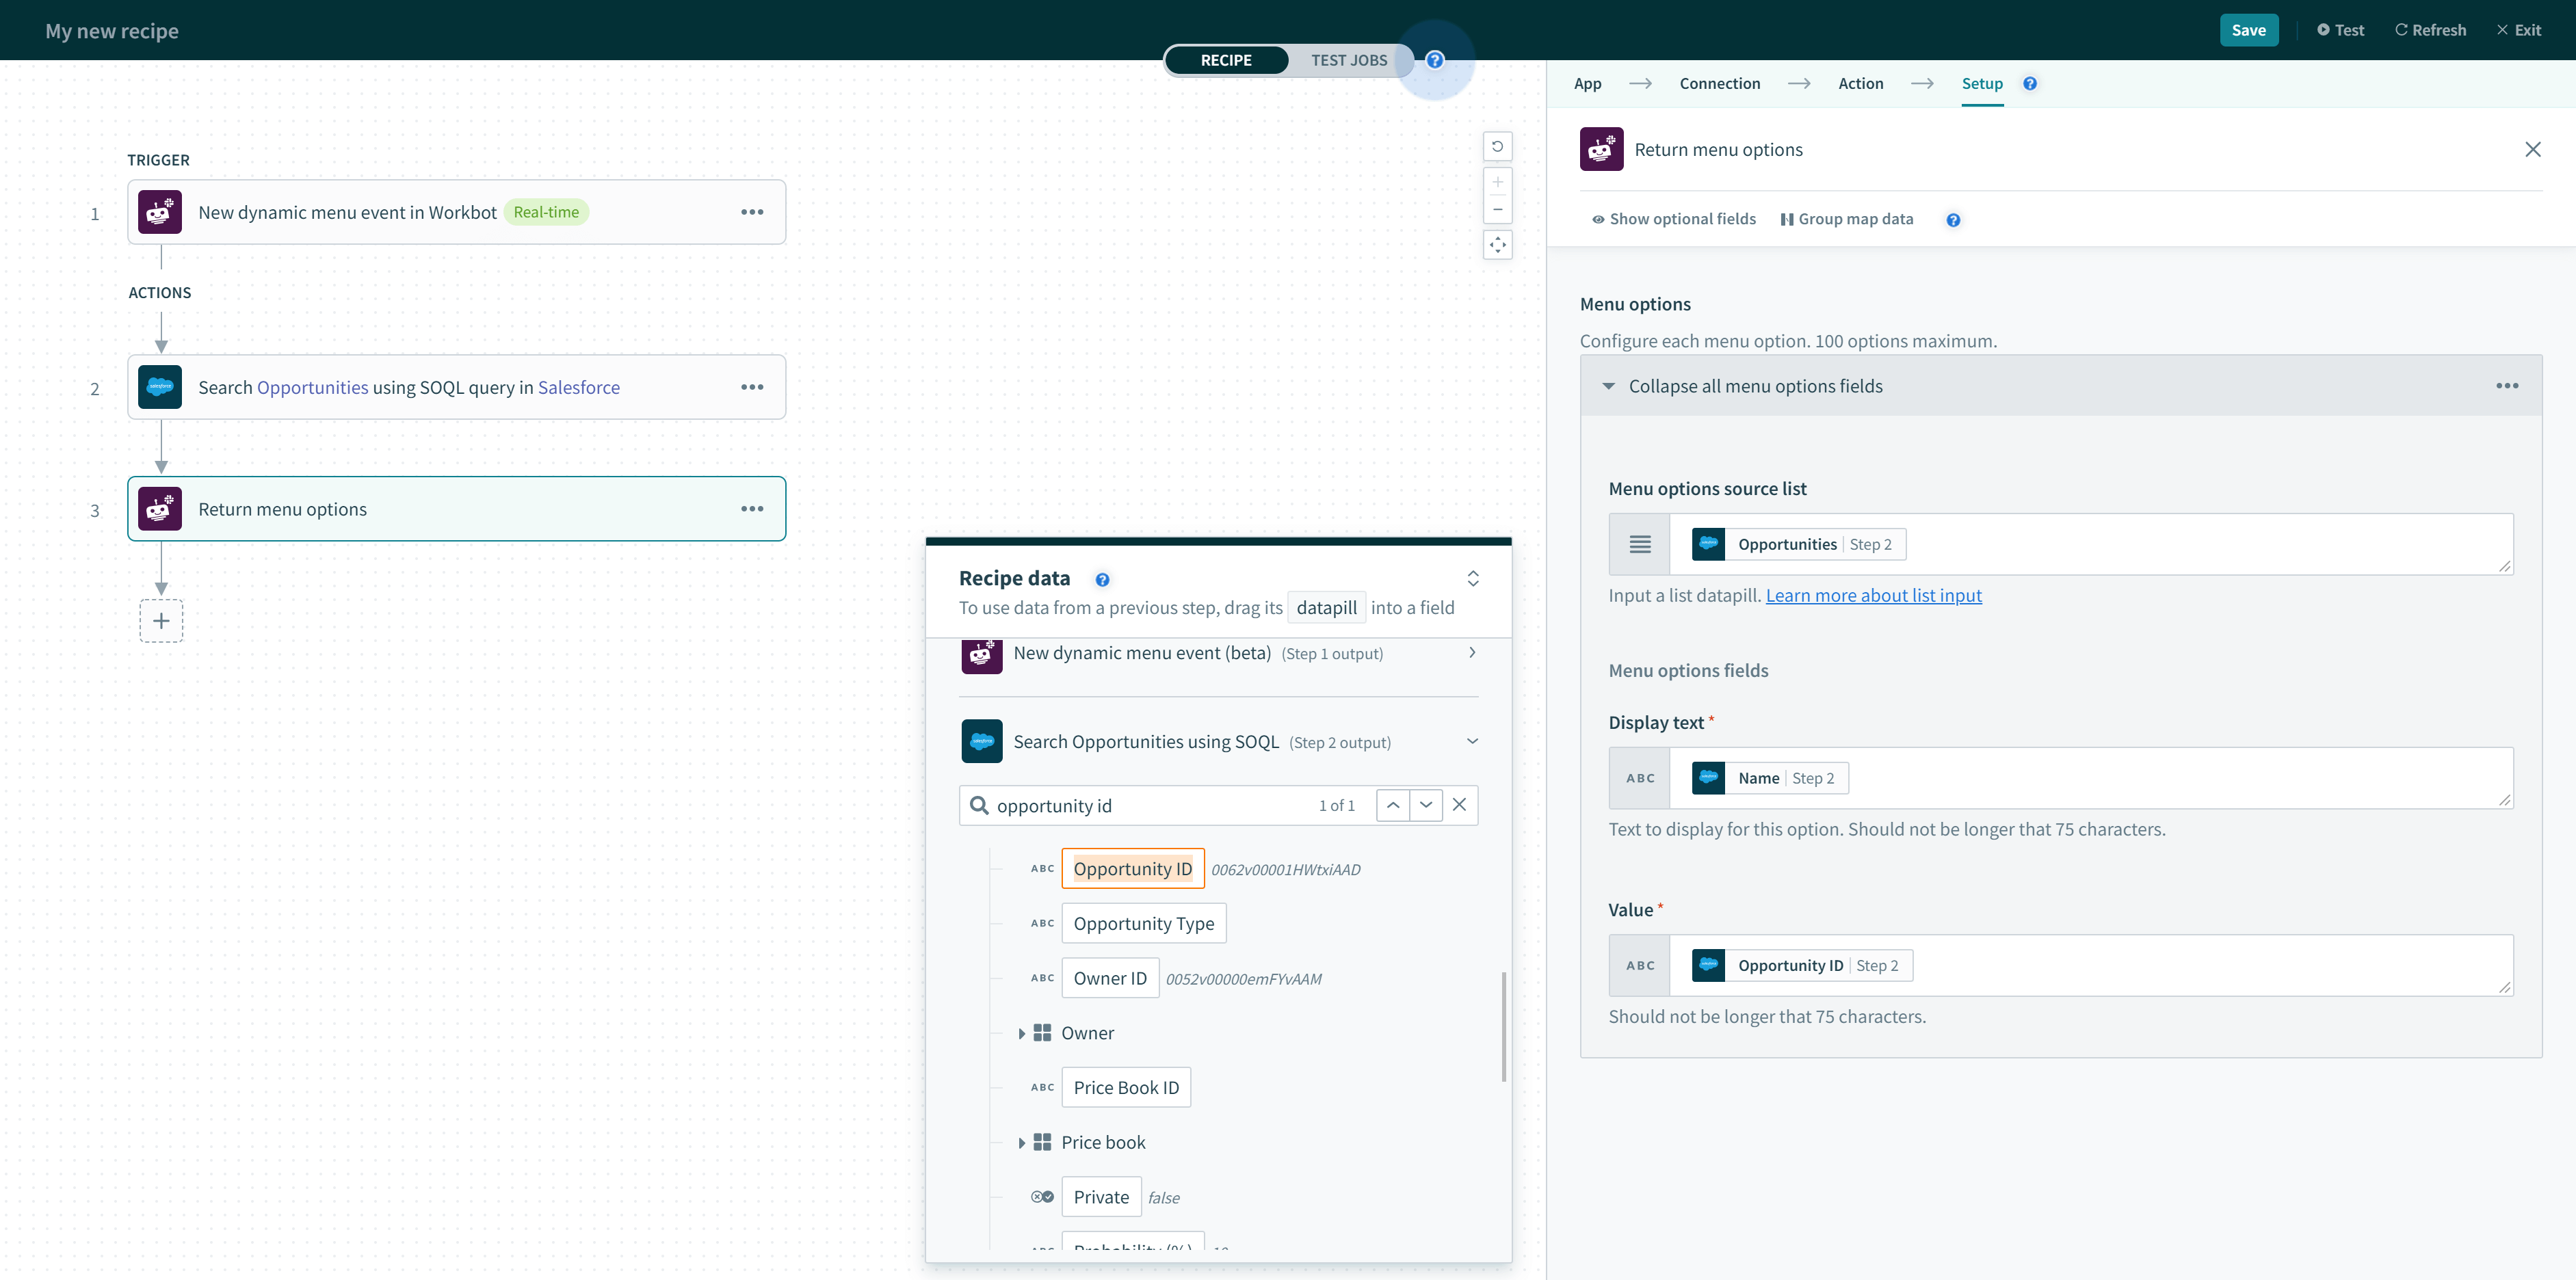 Retrieving Salesforce opportunities before returning them as menu options back to the Slack dialog with the dynamic menu
Hence, this action should always be paired with a New dynamic menu event trigger.
# Input
By default, you can specify a static list of menu options by adding menu options 1-by-1.
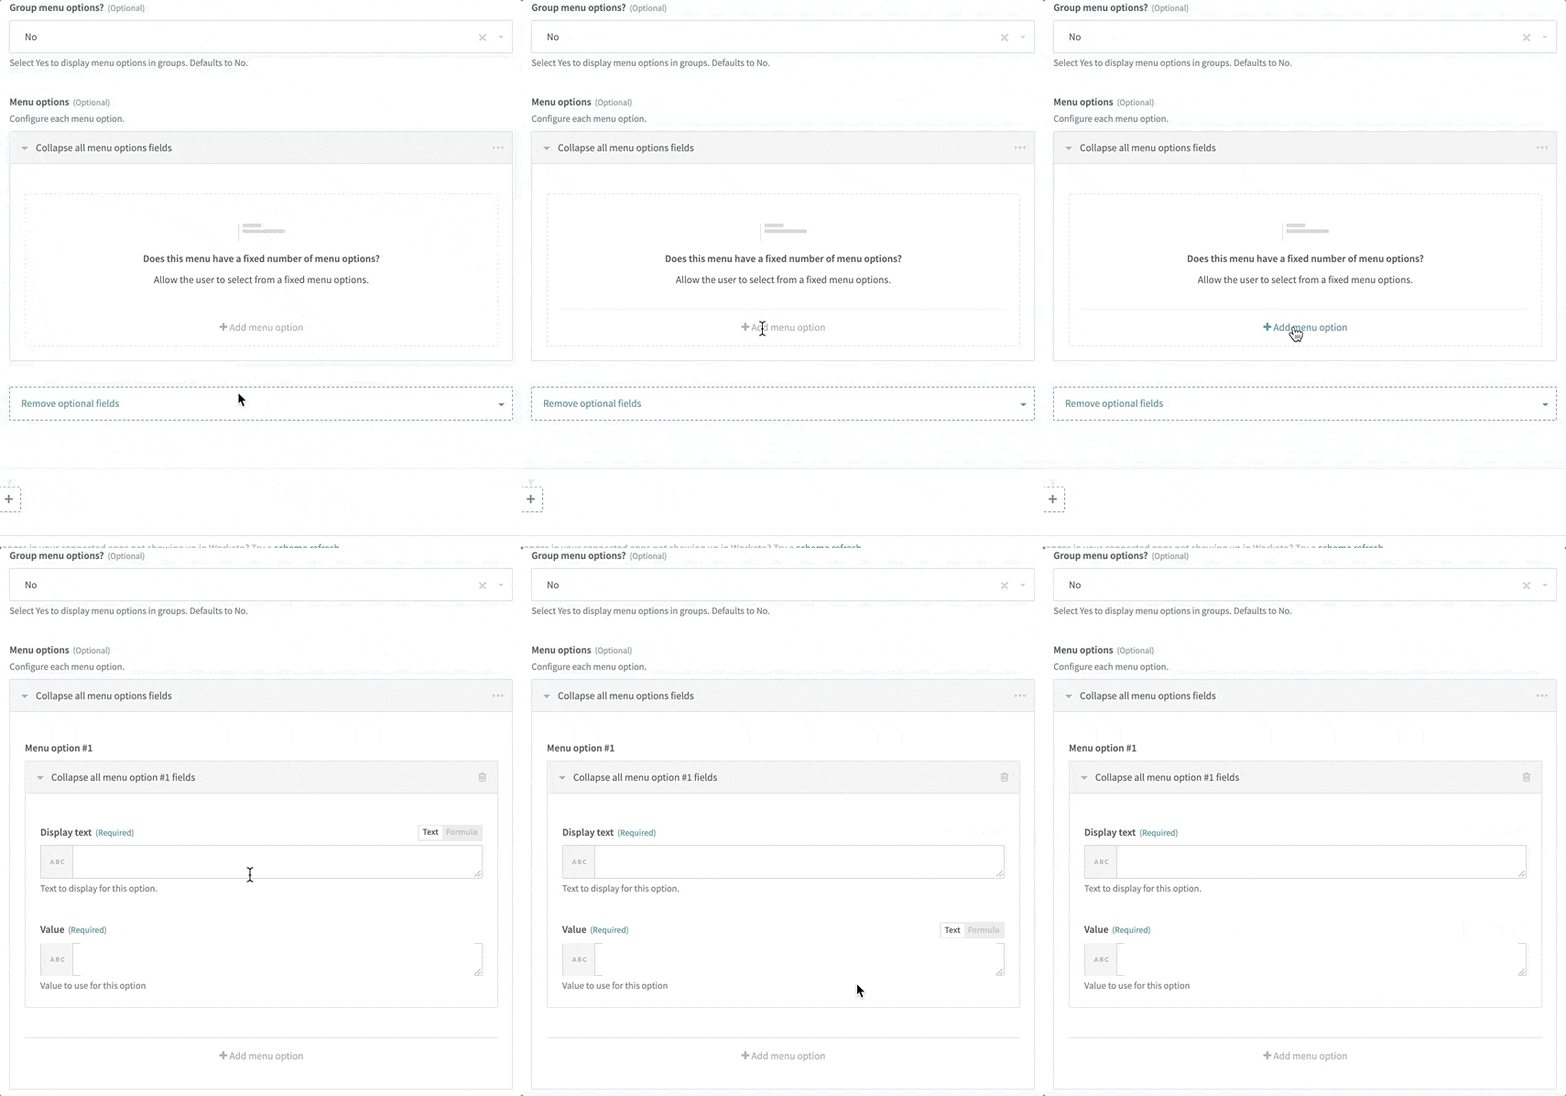 Adding static menu options 1-by-1
However, you can create a dynamic list by changing the input mode to dynamic. Simply pass a list datapill from the output of a previous action step.
 Configuring dynamic menu options
Returned menu options are in an ungrouped list by default.
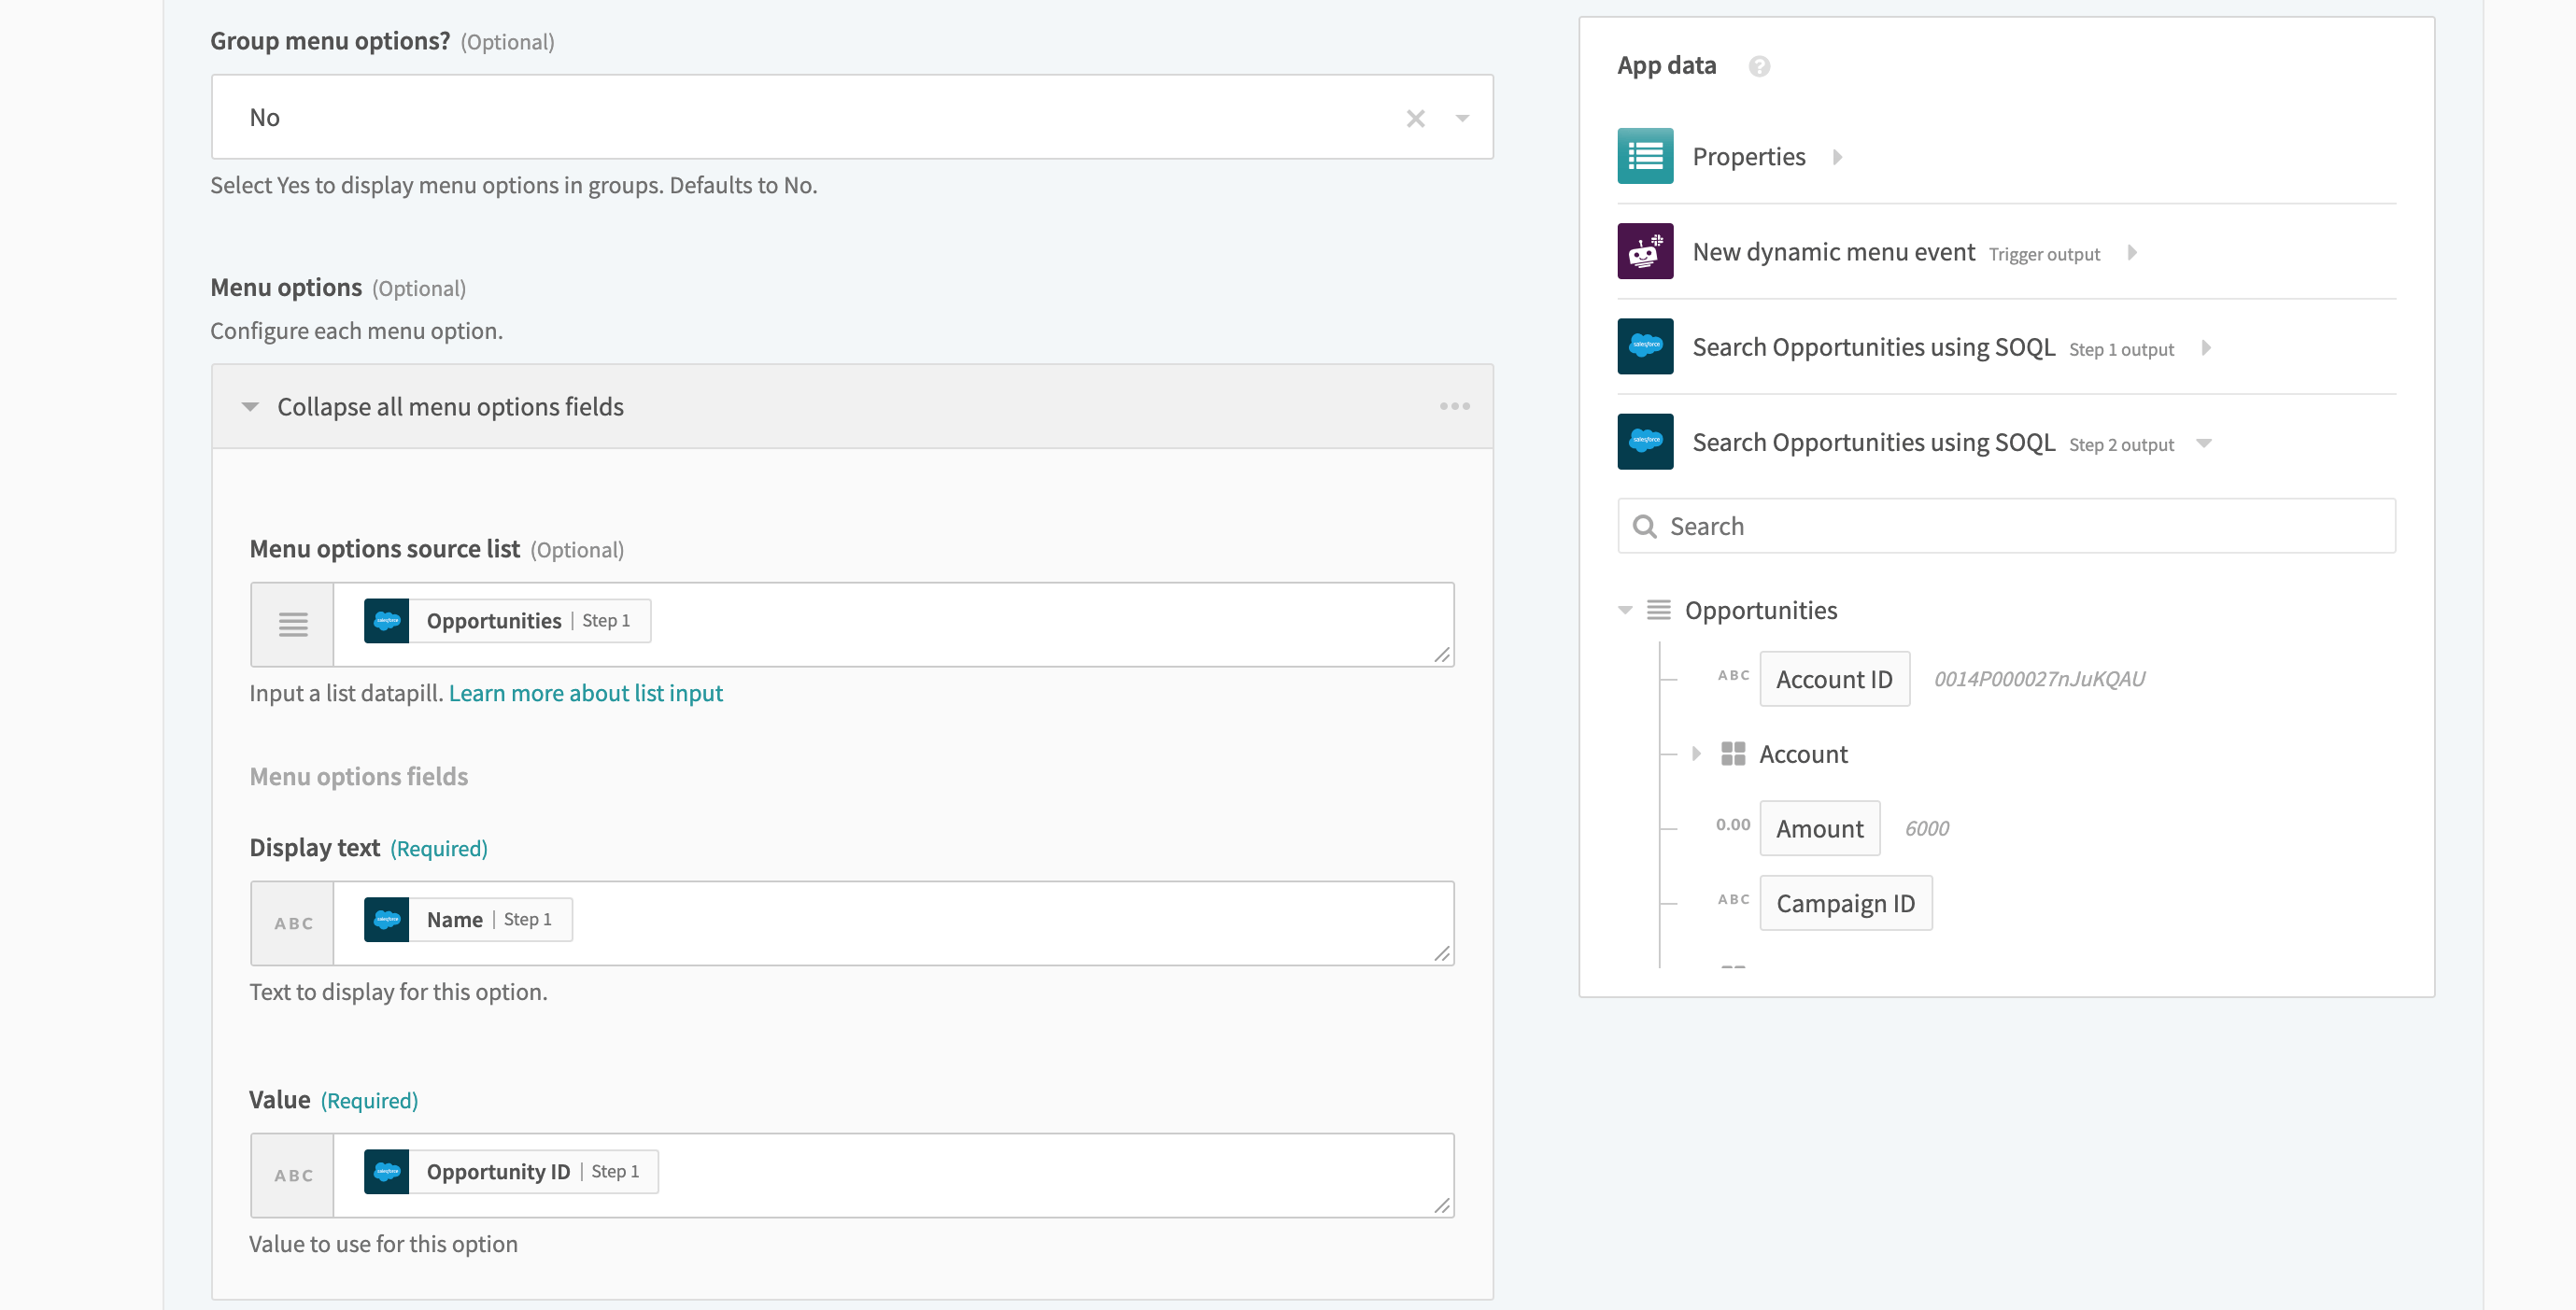 Ungrouped options in recipe
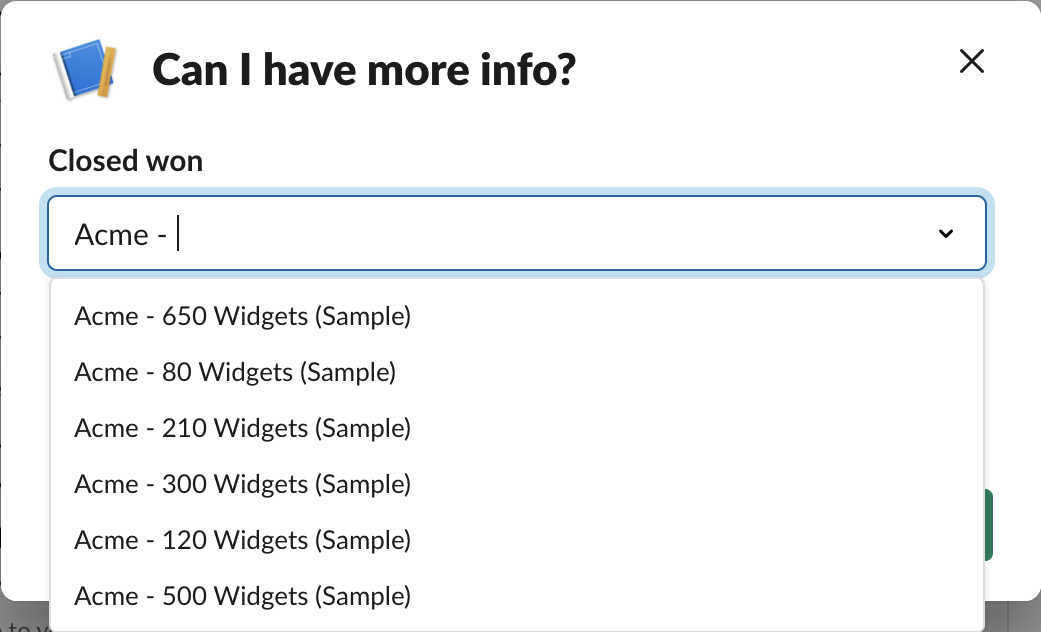 Ungrouped options in Slack
When returning menu options, you can group menu options together by setting Group menu options? to Yes. This requires you to specify Title of group for each group you add.
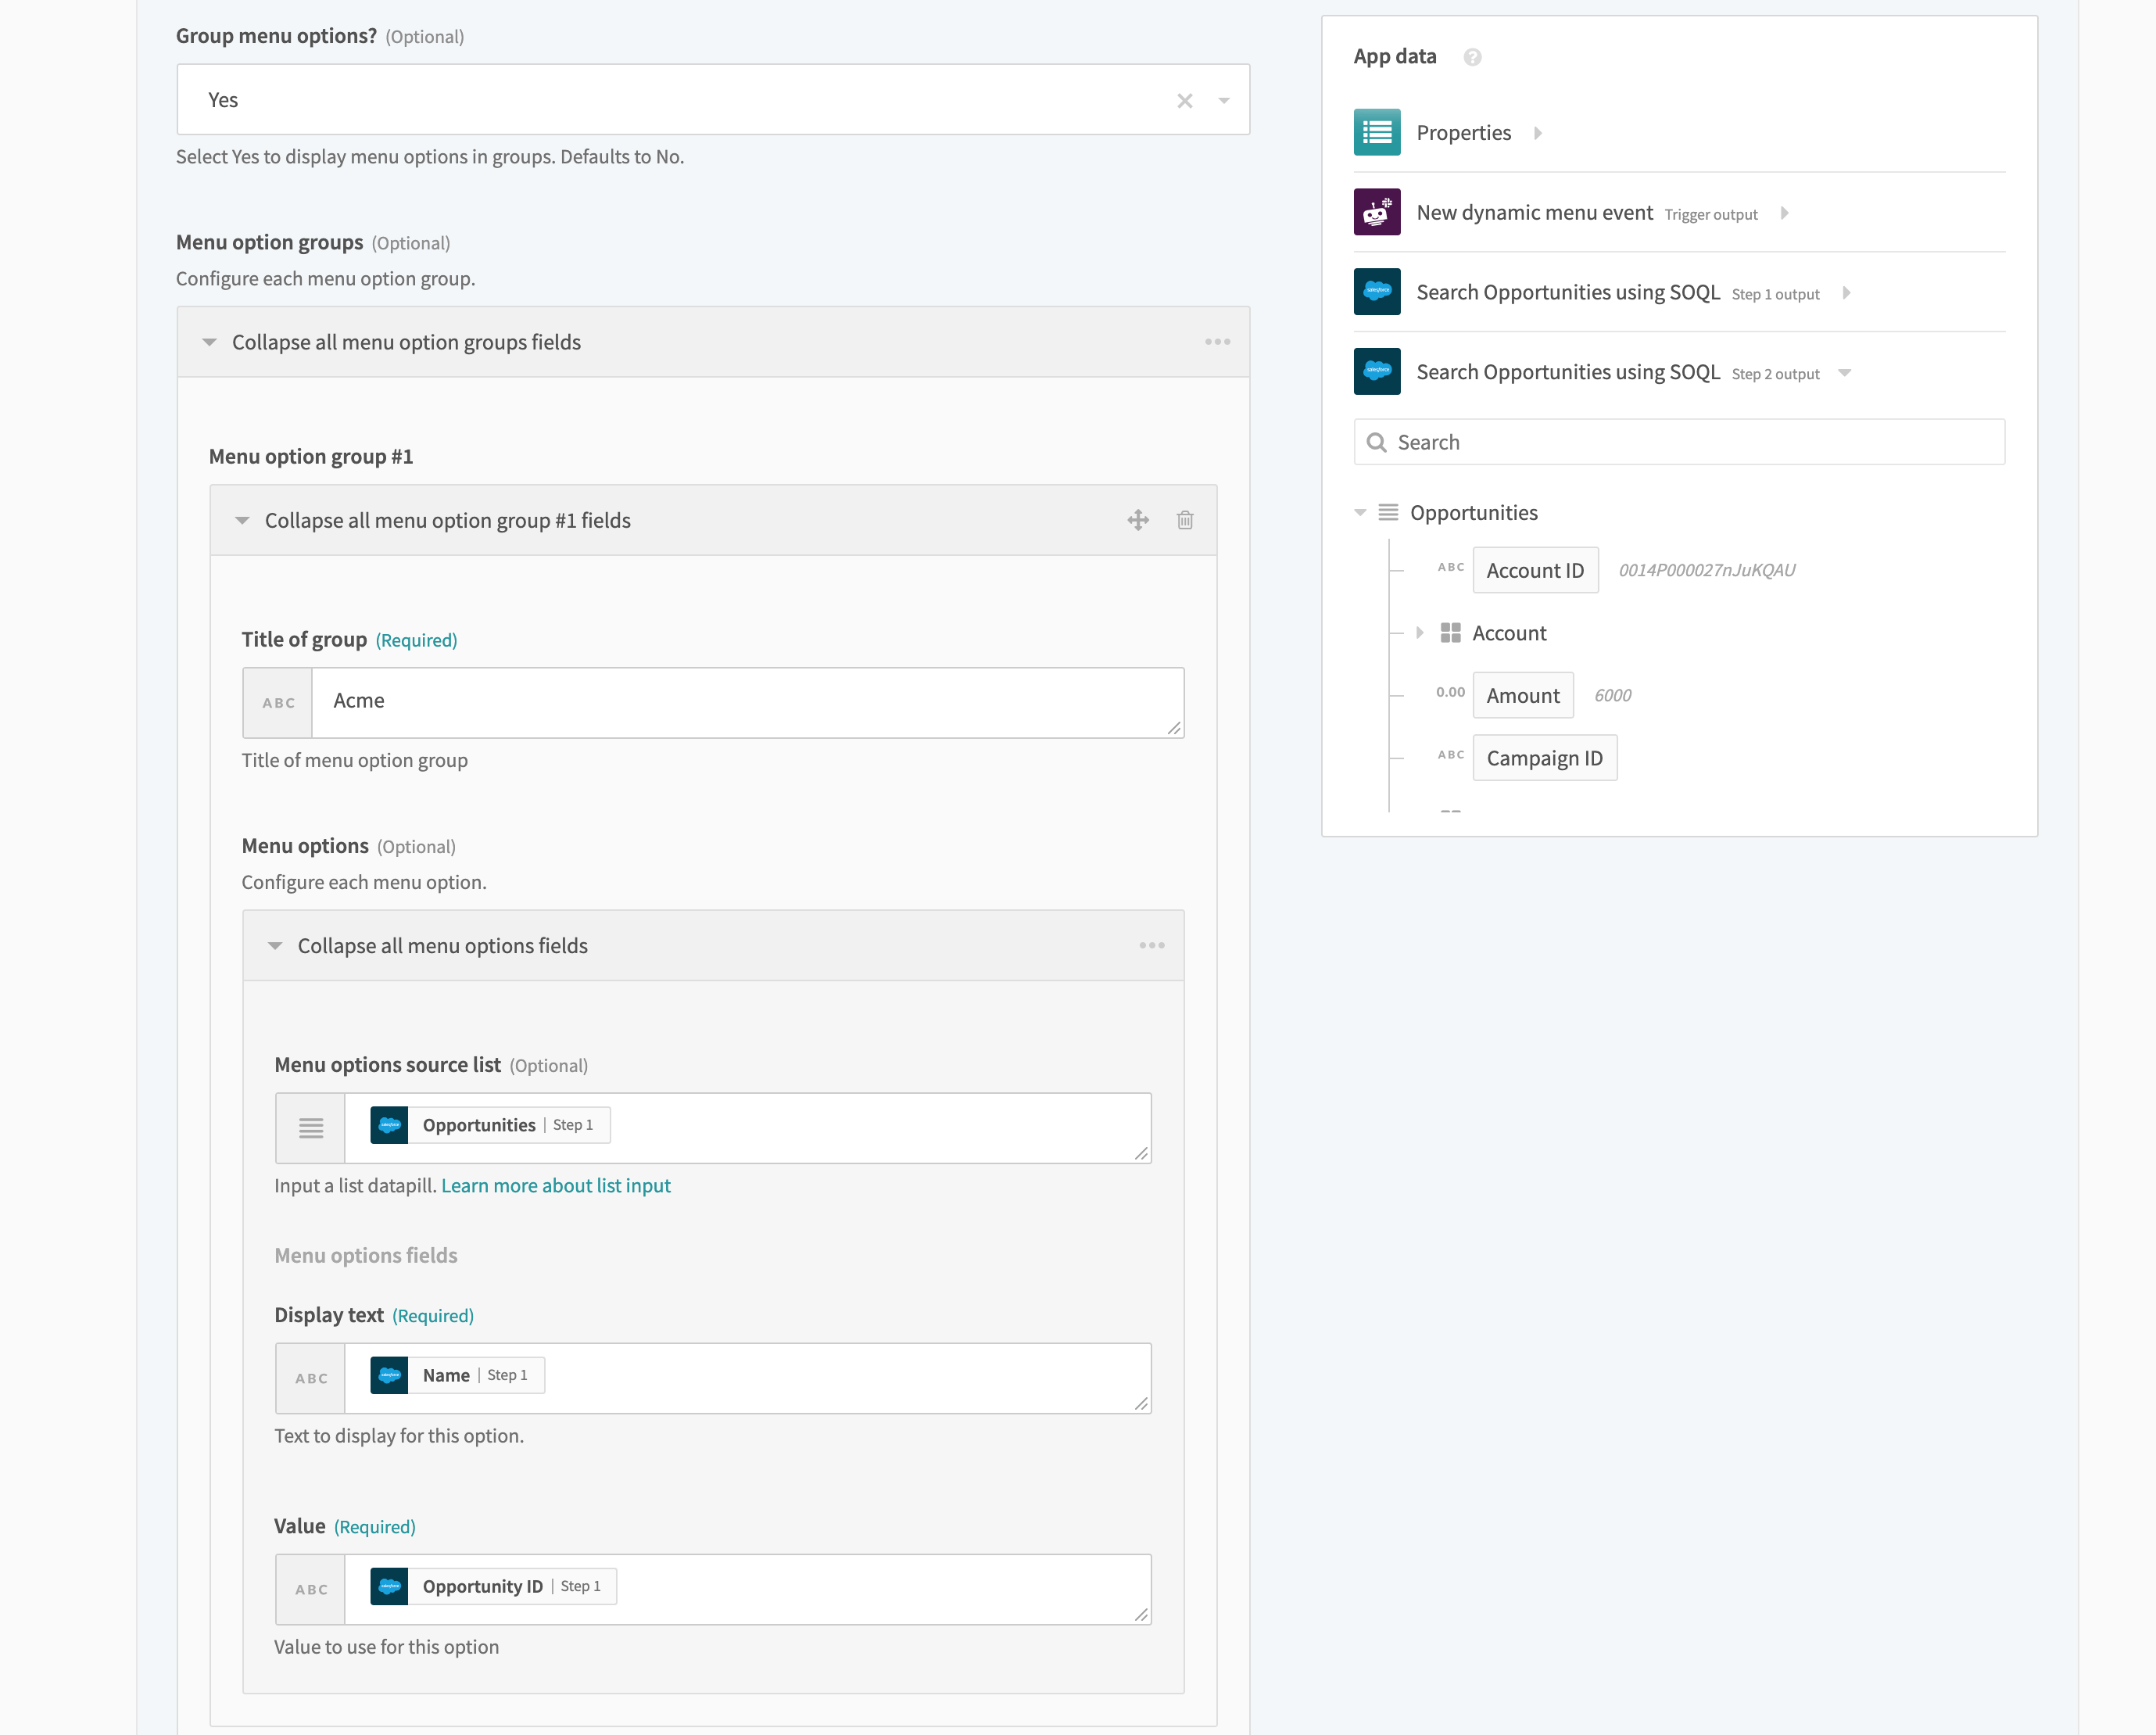 Groups options look in recipe
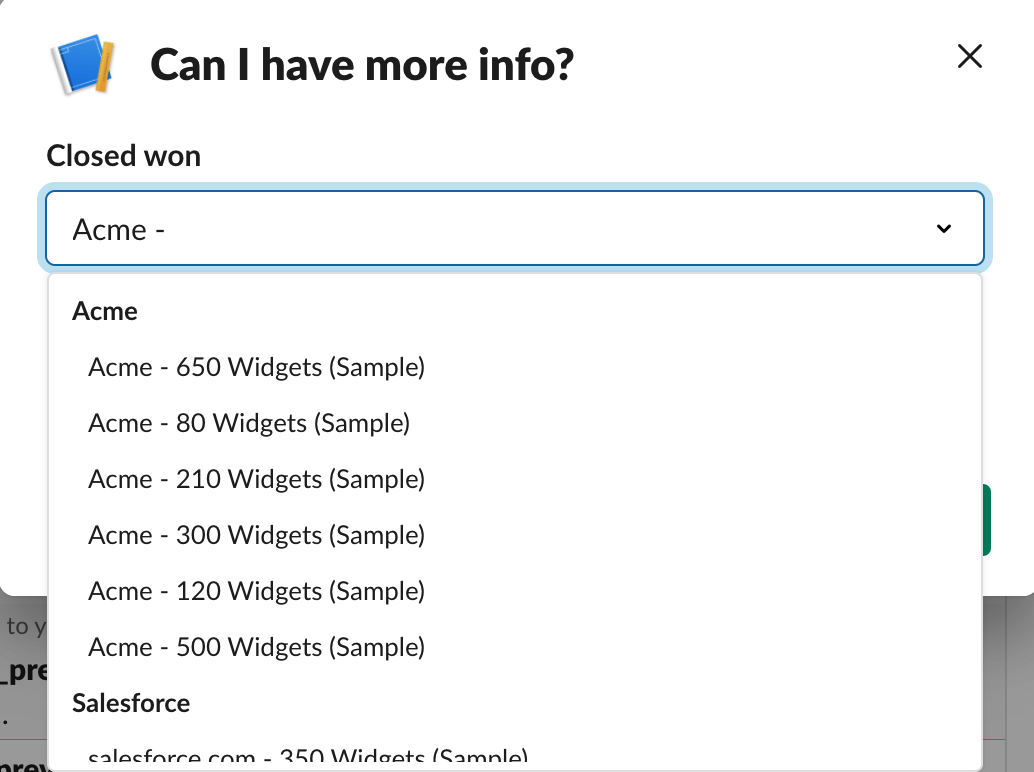 Grouped options in Slack
# Post attachment
The Post attachment action has been deprecated and removed from the platform.
# Open/update or push modal view action
This action enables you to build rich, interactive, and dynamic modal dialogs that collect information from users in a structured manner. You can build modal views using blocks.
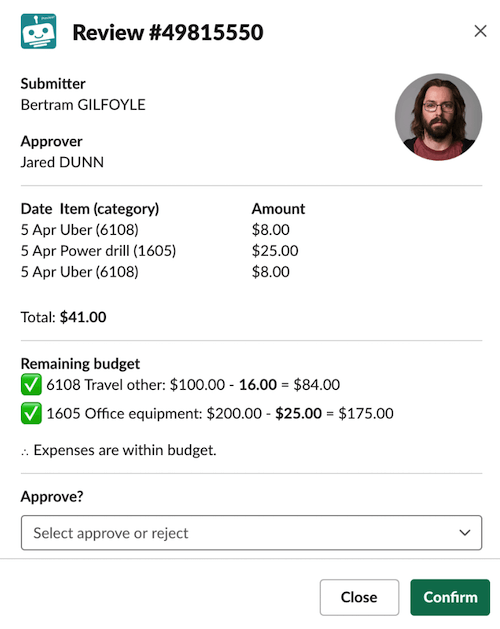
You can open a new modal view, update an existing view, or push a new view on top of an existing one by setting the Modal action type to Open, Update, or Push.
CHARACTER TYPE LIMITATION
The Open/update or push modal view action does not support CamelCase characters or comma-separated parameters as Command input values for Modal submissions. Use JSON to define these values. For example {"account_id": "12345"}. However, CamelCase parameters are supported within JSON, for example, {"AccountID": "12345"}. Command input values also support passing JSON arrays and objects as parameters. Learn more about modal views.
# Waiting for user input
If Wait for user input is Yes, the recipe job suspends until the user provides input and closes the modal. This enables you to specify multiple steps of Workbot-user interaction in one recipe, which streamlines the logic, reduces the number of recipes, and avoids unnecessary and artificial bot commands. We recommend to always handle user input in the same recipe.
All parameters defined in input fields of the dialog can be accessed for downstream actions under Parameters. Note also that if Notify on Close is Yes, the Modal Canceled field is available in output, so you can enable and handle cancellation; otherwise, the job just stops.
# TriggerID and ViewID
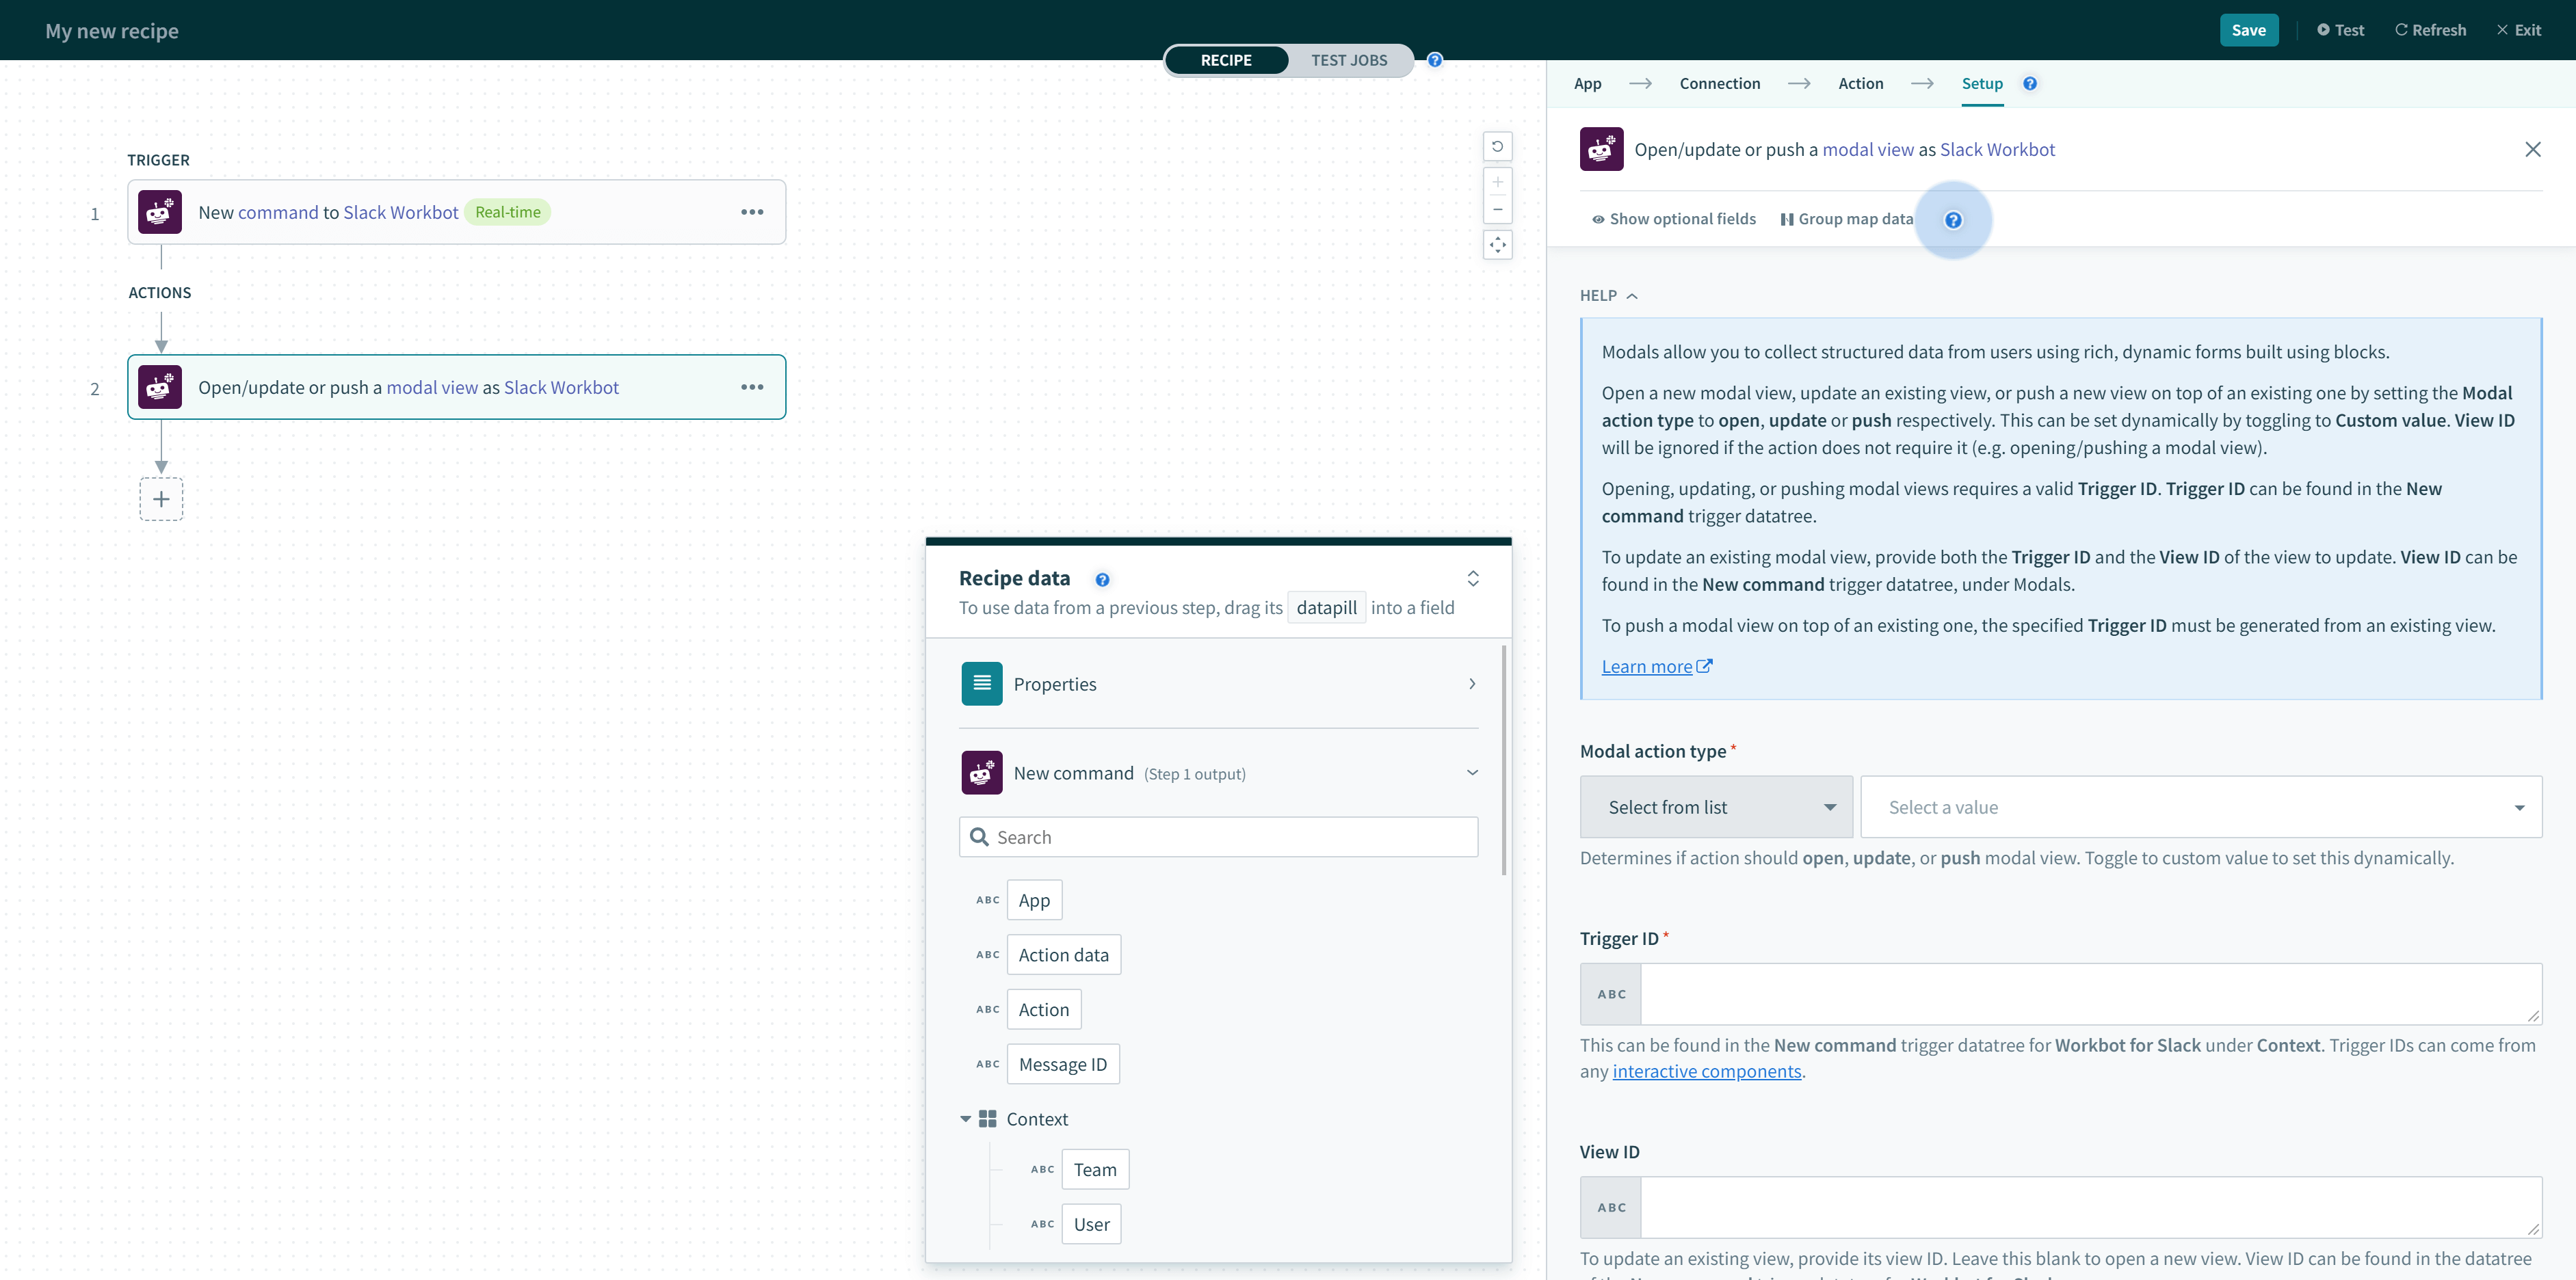
Slack requires that the Trigger ID appear in a modal. Slack generates trigger IDs that Workato uses automatically when users interact with the following components:
- buttons
- menus
- overflow
- select menus
- datepickers
- radio buttons
- shortcuts
- message actions
- slash commands
- modal view submissions
If the Open modal action runs immediately after the user types a text command, the trigger ID is not yet present. Recipe jobs like that fail. Workato recommends that you use one of the UI elements in the preceding list as a predecessor to showing a modal.
To update a modal view, specify the View ID of the view to update. This View ID is in the New command trigger datatree, under Modals.
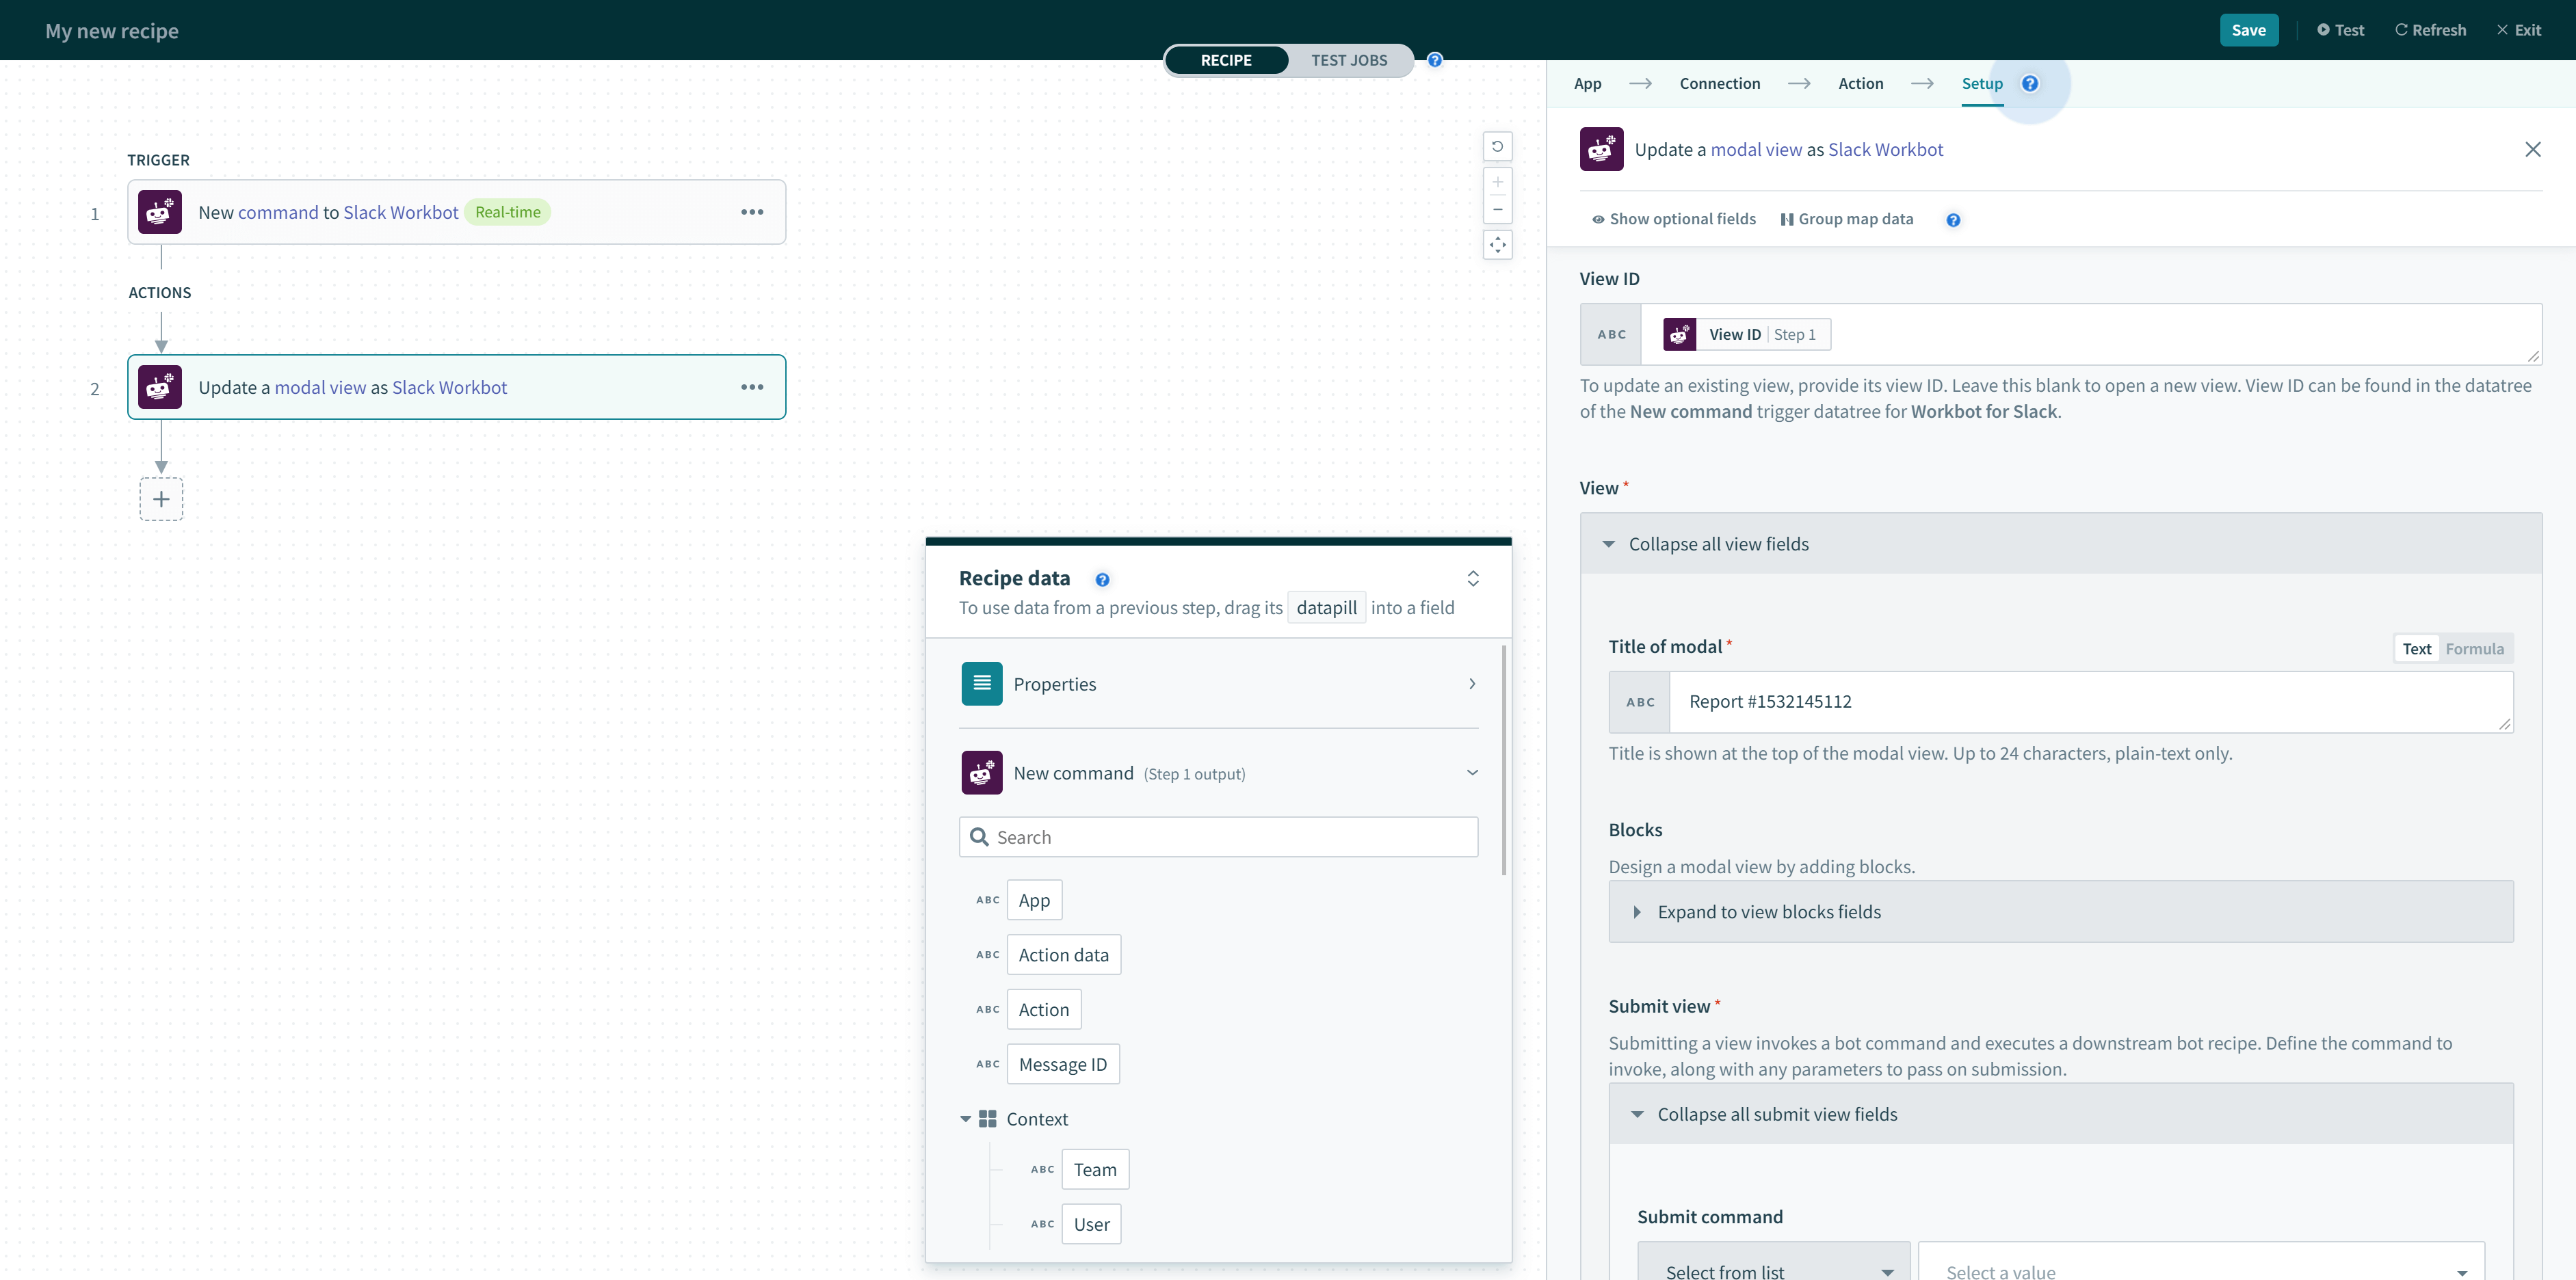 View ID (found in New command trigger) for updating modal views
To push a modal view on top of an existing view, use the Trigger ID that the existing view generates.
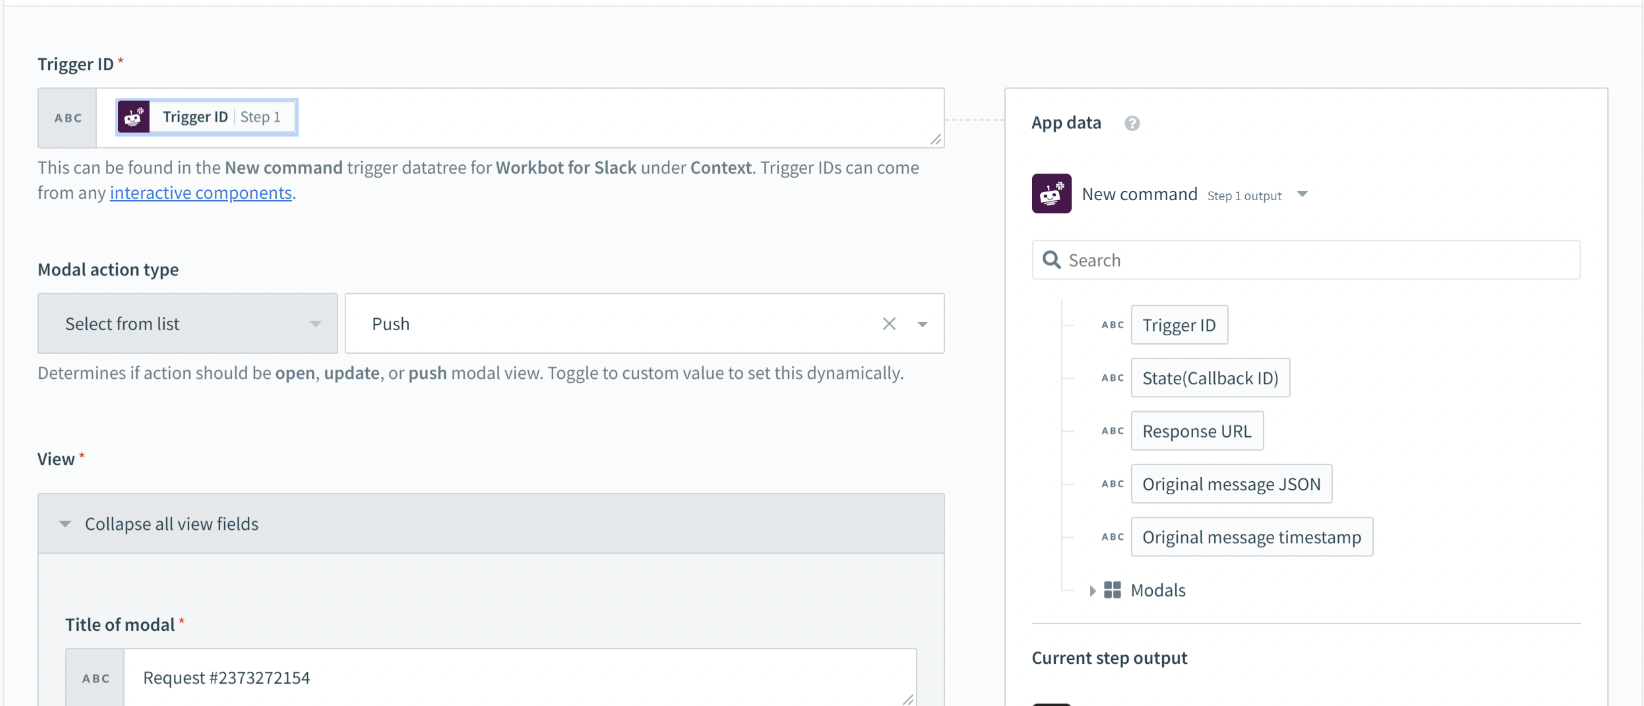 Trigger ID for pushing modal views (found in New command trigger)
# When to update modal views
Typically, bot commands update the active view they exist in (View ID).
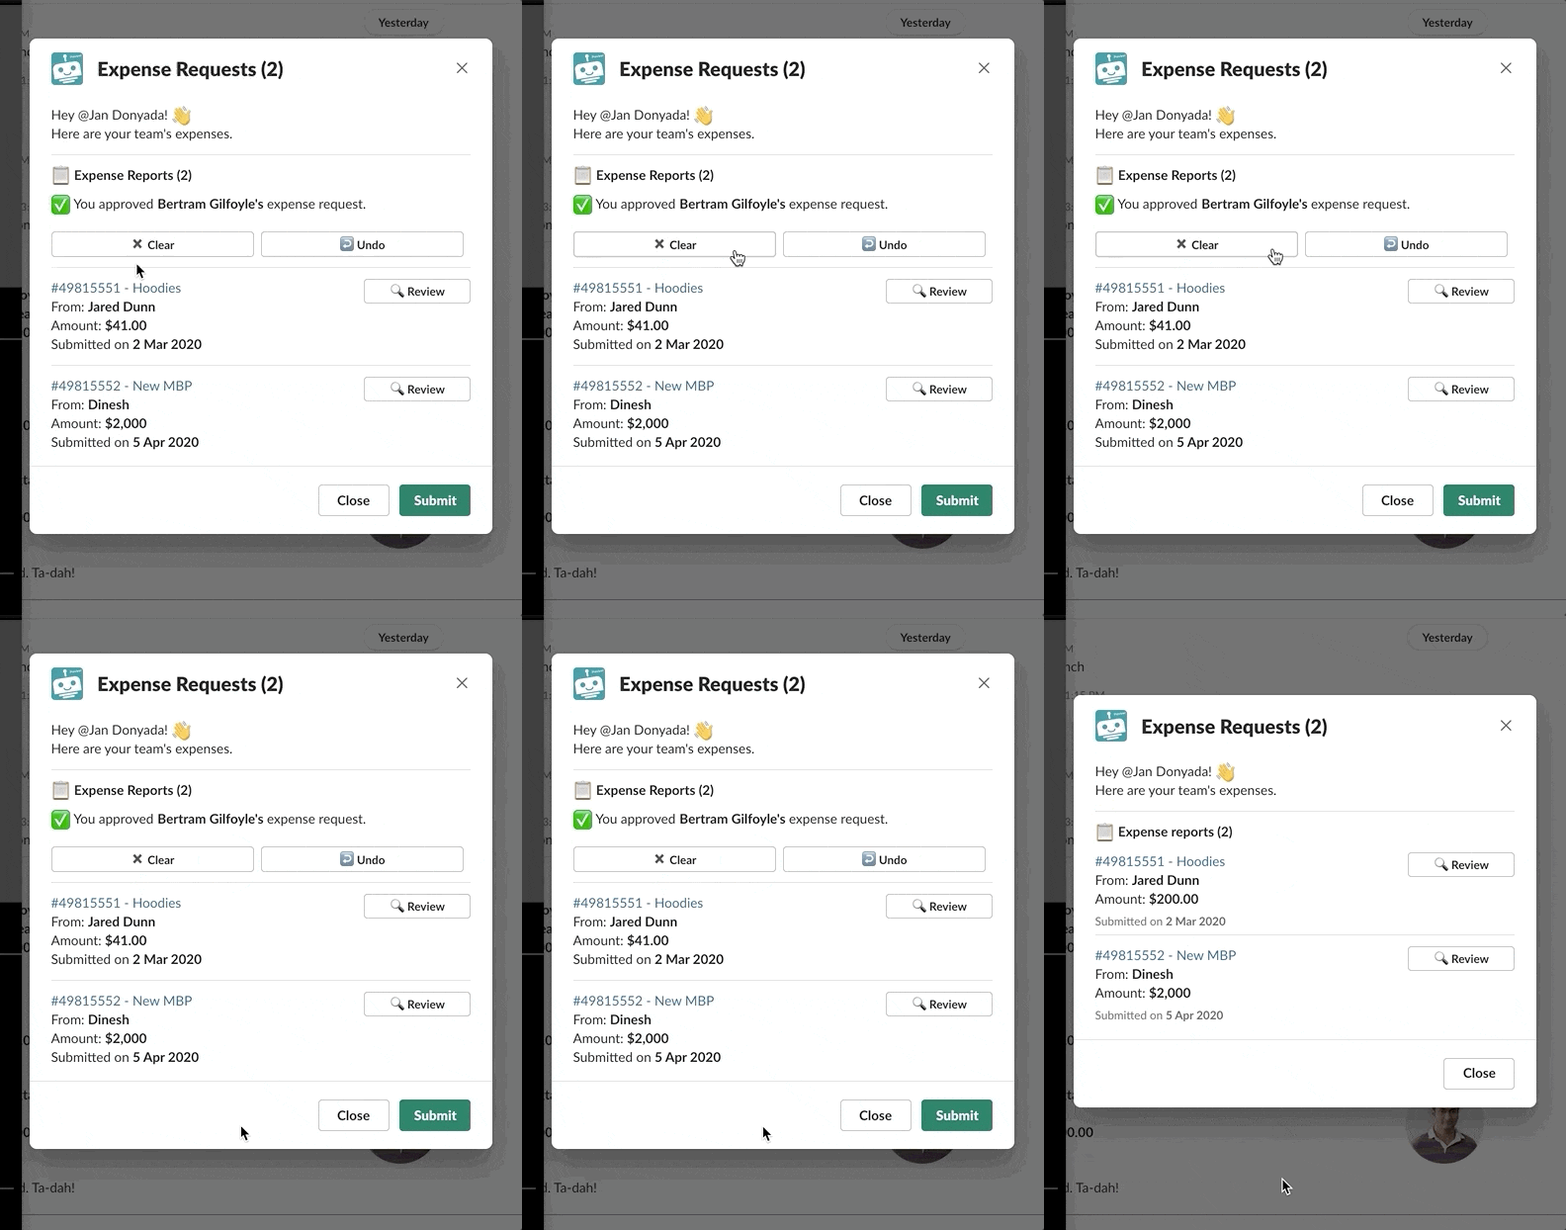 Making changes on the active view
In contrast, modal submissions usually update the root view (Root View ID) or the previous view (Previous View ID). These views can be found in the New command trigger datatree, under Modals.
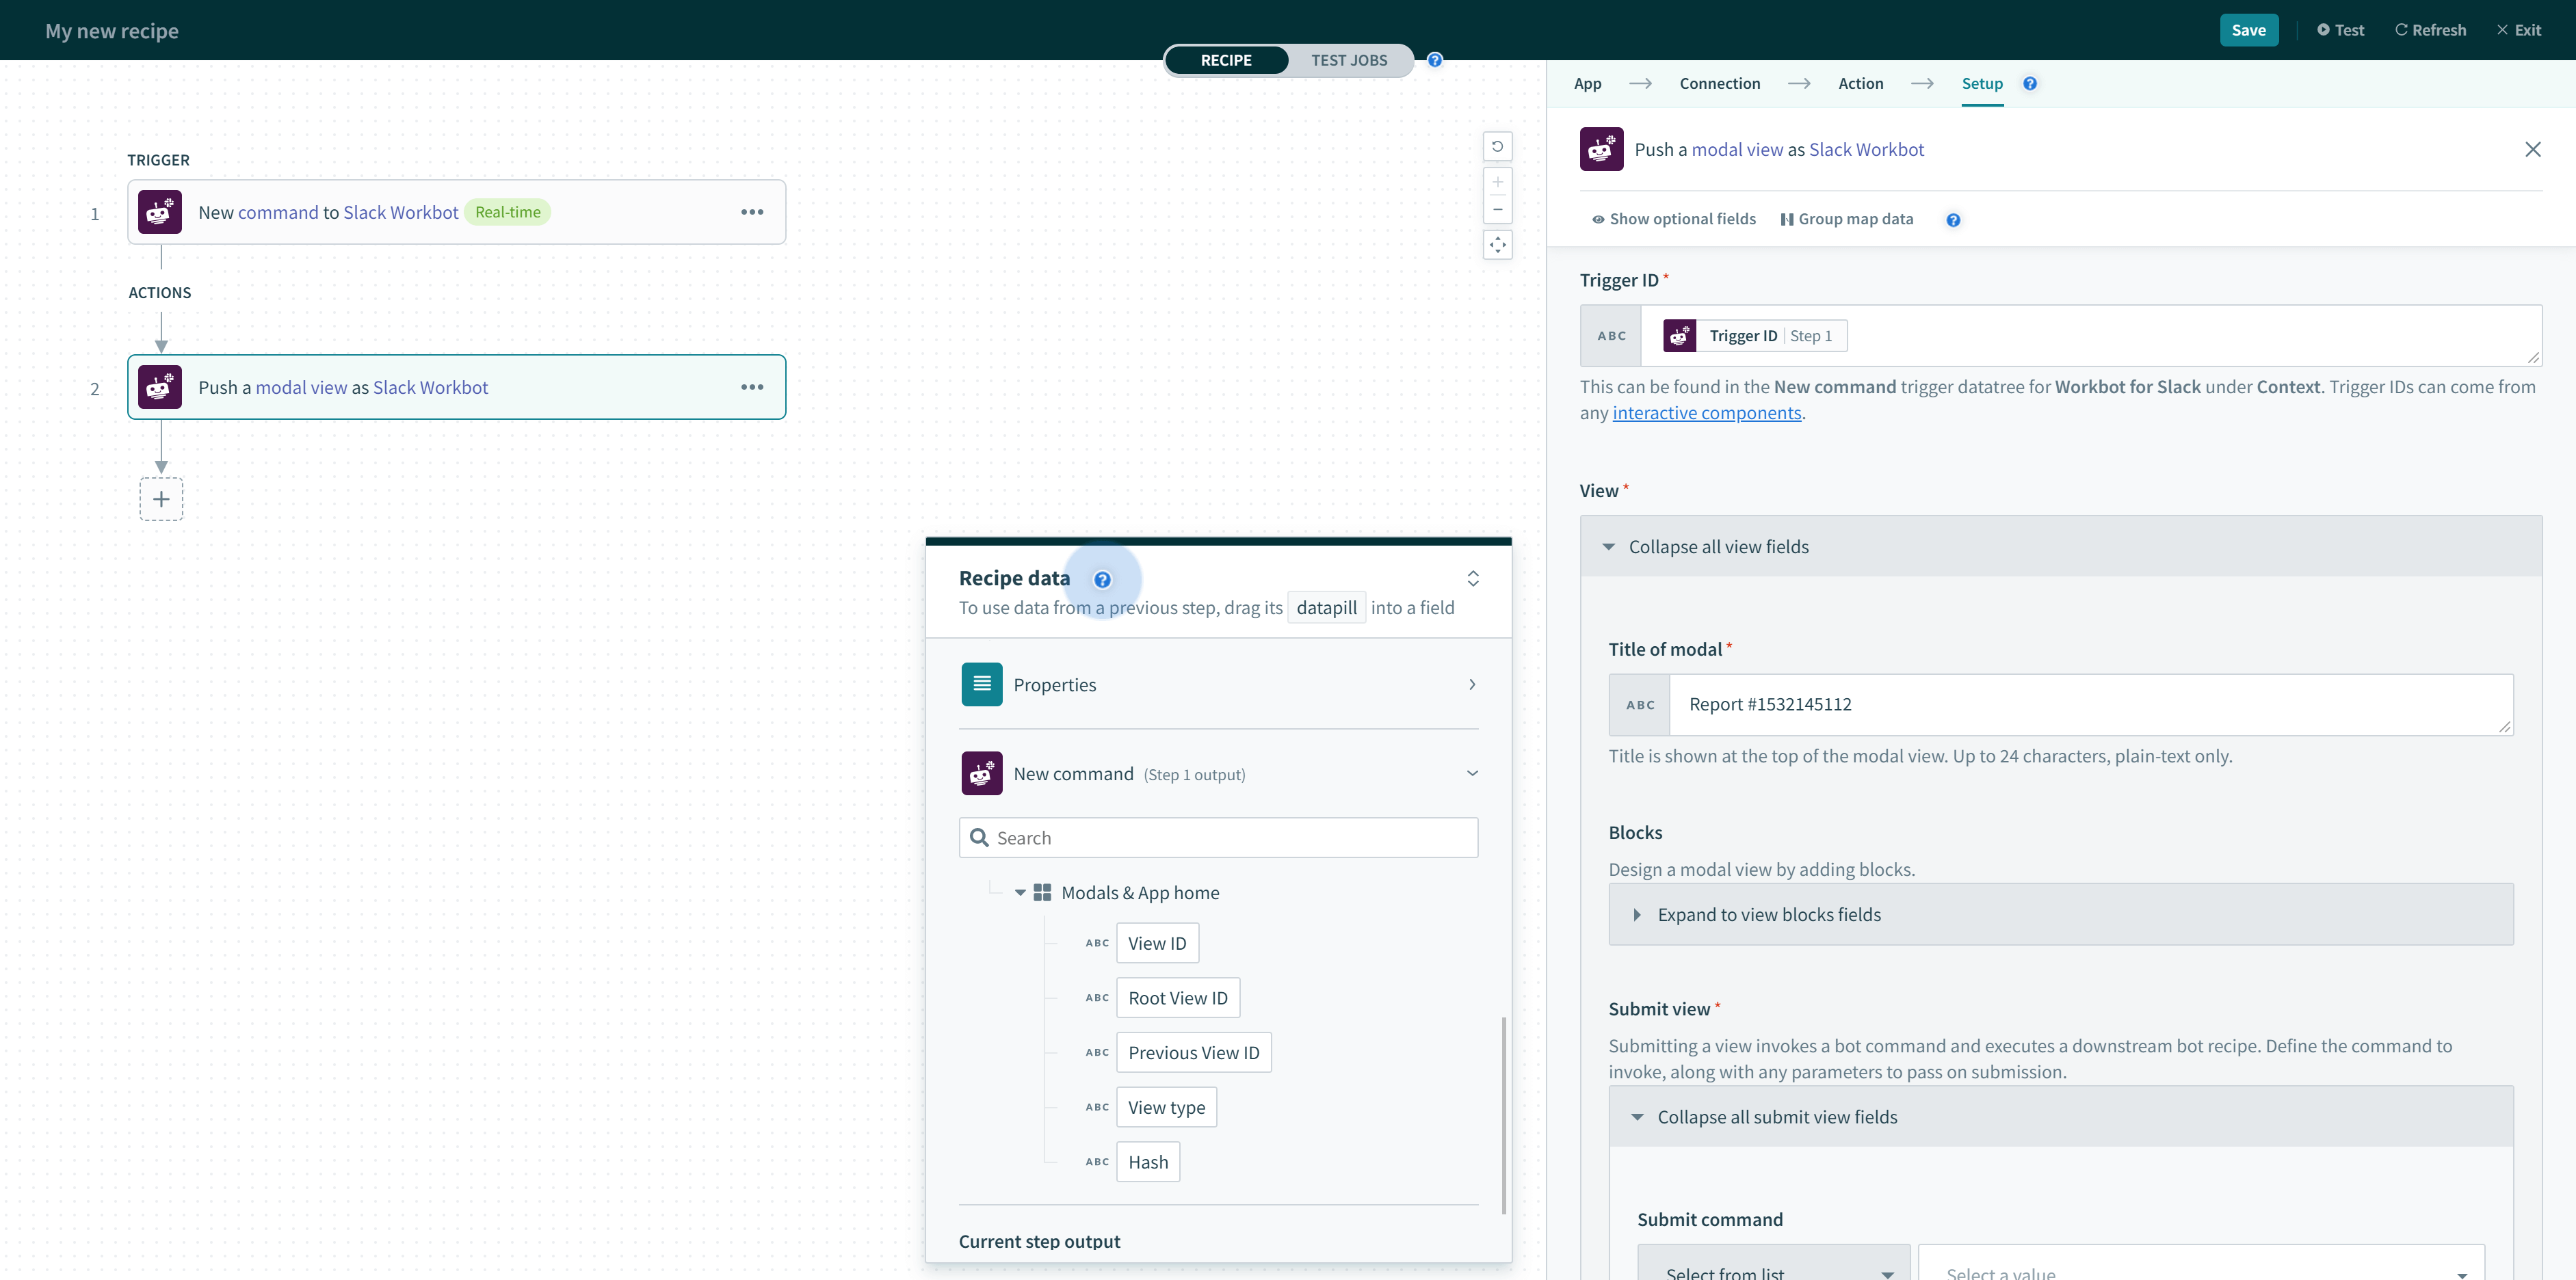 Root View ID and Previous View ID found in the New command trigger
WARNING
When a view is submitted, it closes by default. Use the correct View ID when updating views in response to view submissions.
# When to push modal views
Typically, bot commands push views on top of the active view they exist in (View ID). The View ID can be found in the New command trigger datatree, under Modals.
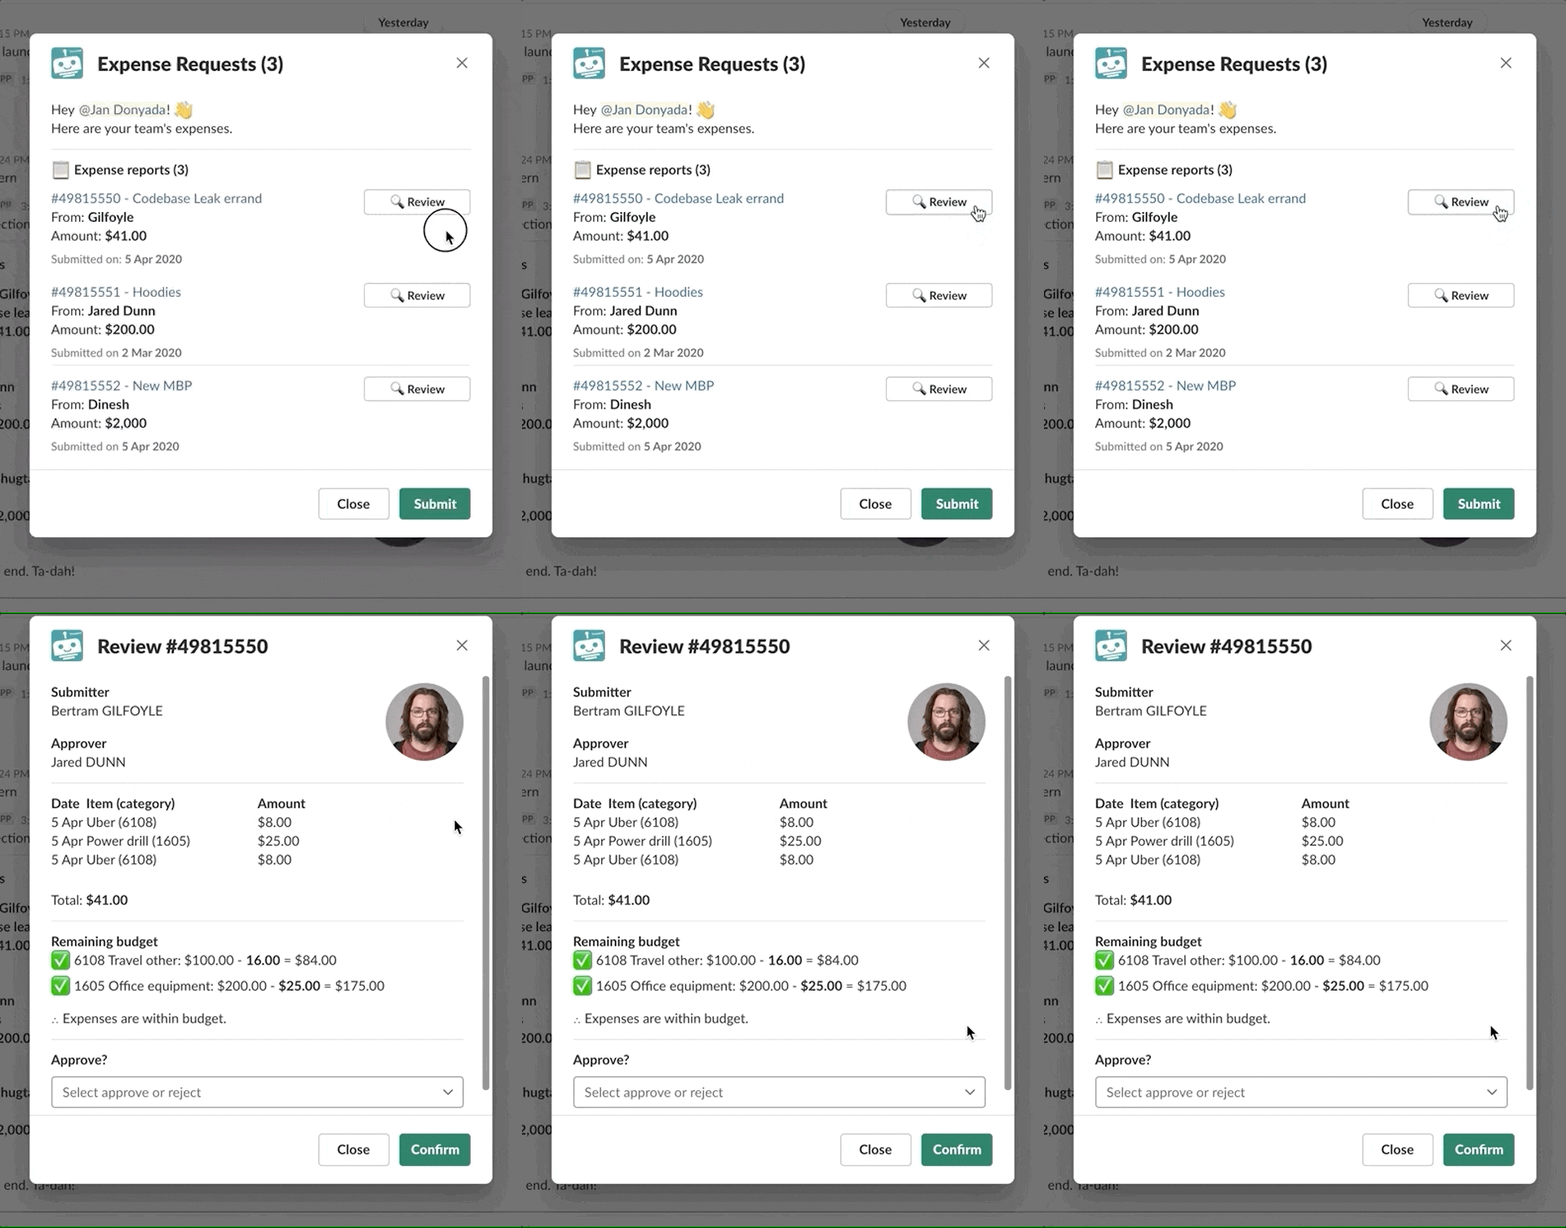 Making changes on the active view
 Root View ID and Previous View ID found in the New command trigger
WARNING
When a view is submitted, it closes by default. Take care to only push a modal view on top of an active view.
# Open/update or push modal view action input
The following table describes the configuration when working with Modals.
| Input | Description | ||
|---|---|---|---|
| Modal action type (required) | You can open a new modal view, update an existing view, or push a new view on top of an existing view by setting the Modal action type to open, update or push, respectively. This can be set dynamically by toggling to Custom value. View ID is ignored if the action does not require it; an example is opening or pushing a modal view. | ||
| Trigger ID (optional) | Modal views can be opened only by interactive components (like buttons & menus), modal submissions, message actions, shortcuts, and slash commands. When users interact with these features, the system generates a Trigger ID. Workato automatically picks the Trigger ID to show the modal. It also requires the Trigger ID to push a new modal on top of an existing modal. | ||
| View ID (optional) | To update an existing modal, specify the view ID of the view you want to update. This field is ignored when opening or pushing modal views. | ||
| View | Title of modal | Title of the modal view. Up to 24 characters only. | |
| Blocks | An array of blocks you can stack and rearrange. | ||
| Submit modal | Wait for user input | Whether the job suspends until the user provides input and closes the dialog, or to run a separate command | |
| Submit button label | Label of the submit button. Up to 24 characters only. | ||
| Close button label | Label of the close button. Up to 24 characters only. | ||
| Clear on close | Clicking on the close button clears all views in a modal and closes it. Defaults to false. | ||
| Notify on close |
Set to Yes to handle the cancellation event. If Wait for user input is Yes, the job execution continues when a user clicks Close, and Modal canceled field becomes available in action output. Otherwise, the system sends a view_closed event to the New event trigger. Default is No.
| ||
| Submit command (not recommended) | Command to invoke when users do a modal submission. Only valid if Wait for user input is No. | ||
| Command input values (not recommended) |
When users submit modals, pass parameters (such as user ID, opportunity ID) to the downstream recipe for context. Define these parameters in the New command trigger in the downstream recipe so it can receive them. The parameter names in both upstream and downstream recipes must match. You can pass parameters as either comma-separated name-value pairs (name: John Smith, user_id: AB12345), or in JSON {"opportunity_id": "OPP1234567"}. In JSON, you can add array or object parameters. It's important to ensure that the parameter names and data types match their upstream counterparts. For example, when you use opportunity_id as a single line input in the view of the modal (rendered in an upstream recipe), be sure to specify opportunity_id as a string parameter in the New command of the downstream recipe. Only valid if Wait for user input is No.
| ||
| Advanced | Private metadata | For advanced users. Used to pass sensitive data. This field is encrypted and hidden to users. Max length of 3000 characters. | |
| Callback ID | For advanced users. Used to reference the view submission event in downstream recipes. Max length of 255 characters. | ||
| Hash | A unique value you can optionally use when updating modals. When provided, the hash is validated such that only the most recent view is updated, ensuring the correct view is being updated when updates are happening asynchronously. This field is ignored when opening or pushing modal views. | ||
# Publish app home view
App homes are a great way for users to interact with your bot. Instead of relying on bot messages, slash commands, or shortcuts, you can provide users with a rich app home surface for engaging with your bot.
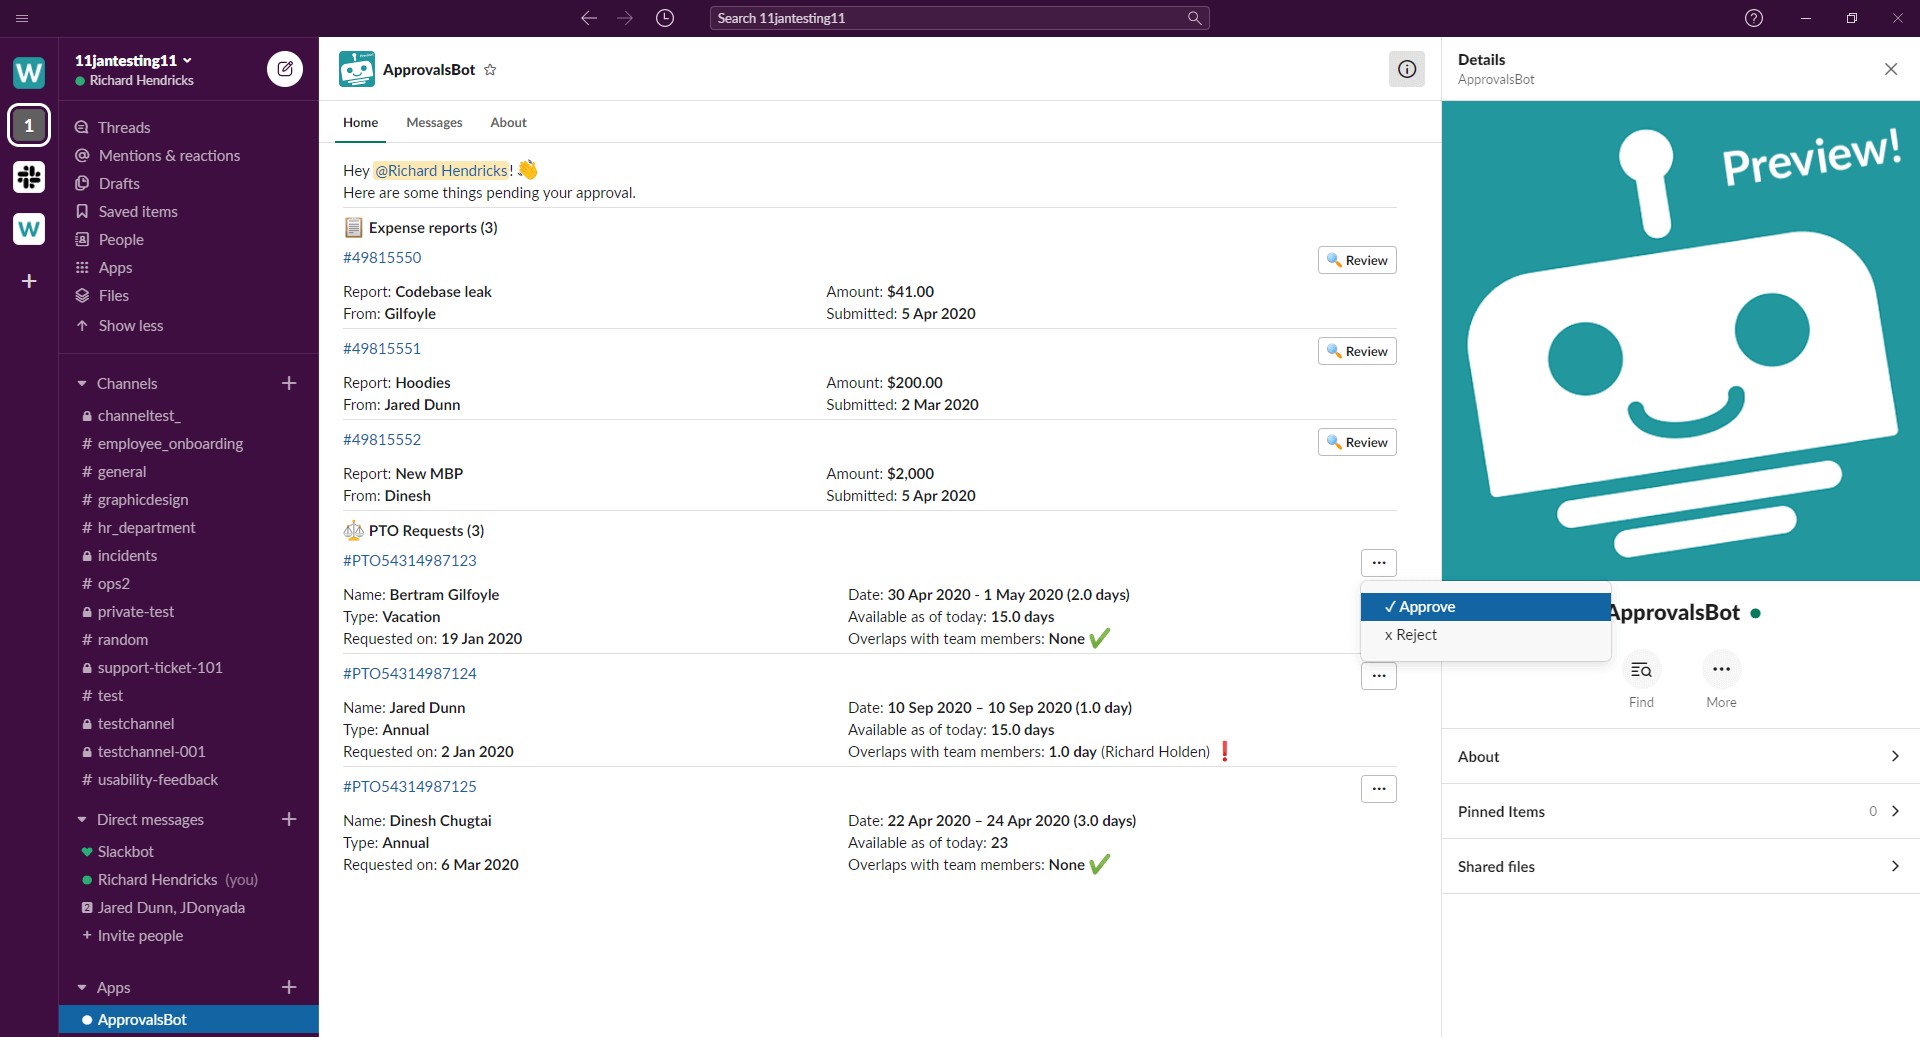 App home for ApprovalsBot
The Publish app home view action allows you to publish an app home view for your Enterprise bot using blocks.
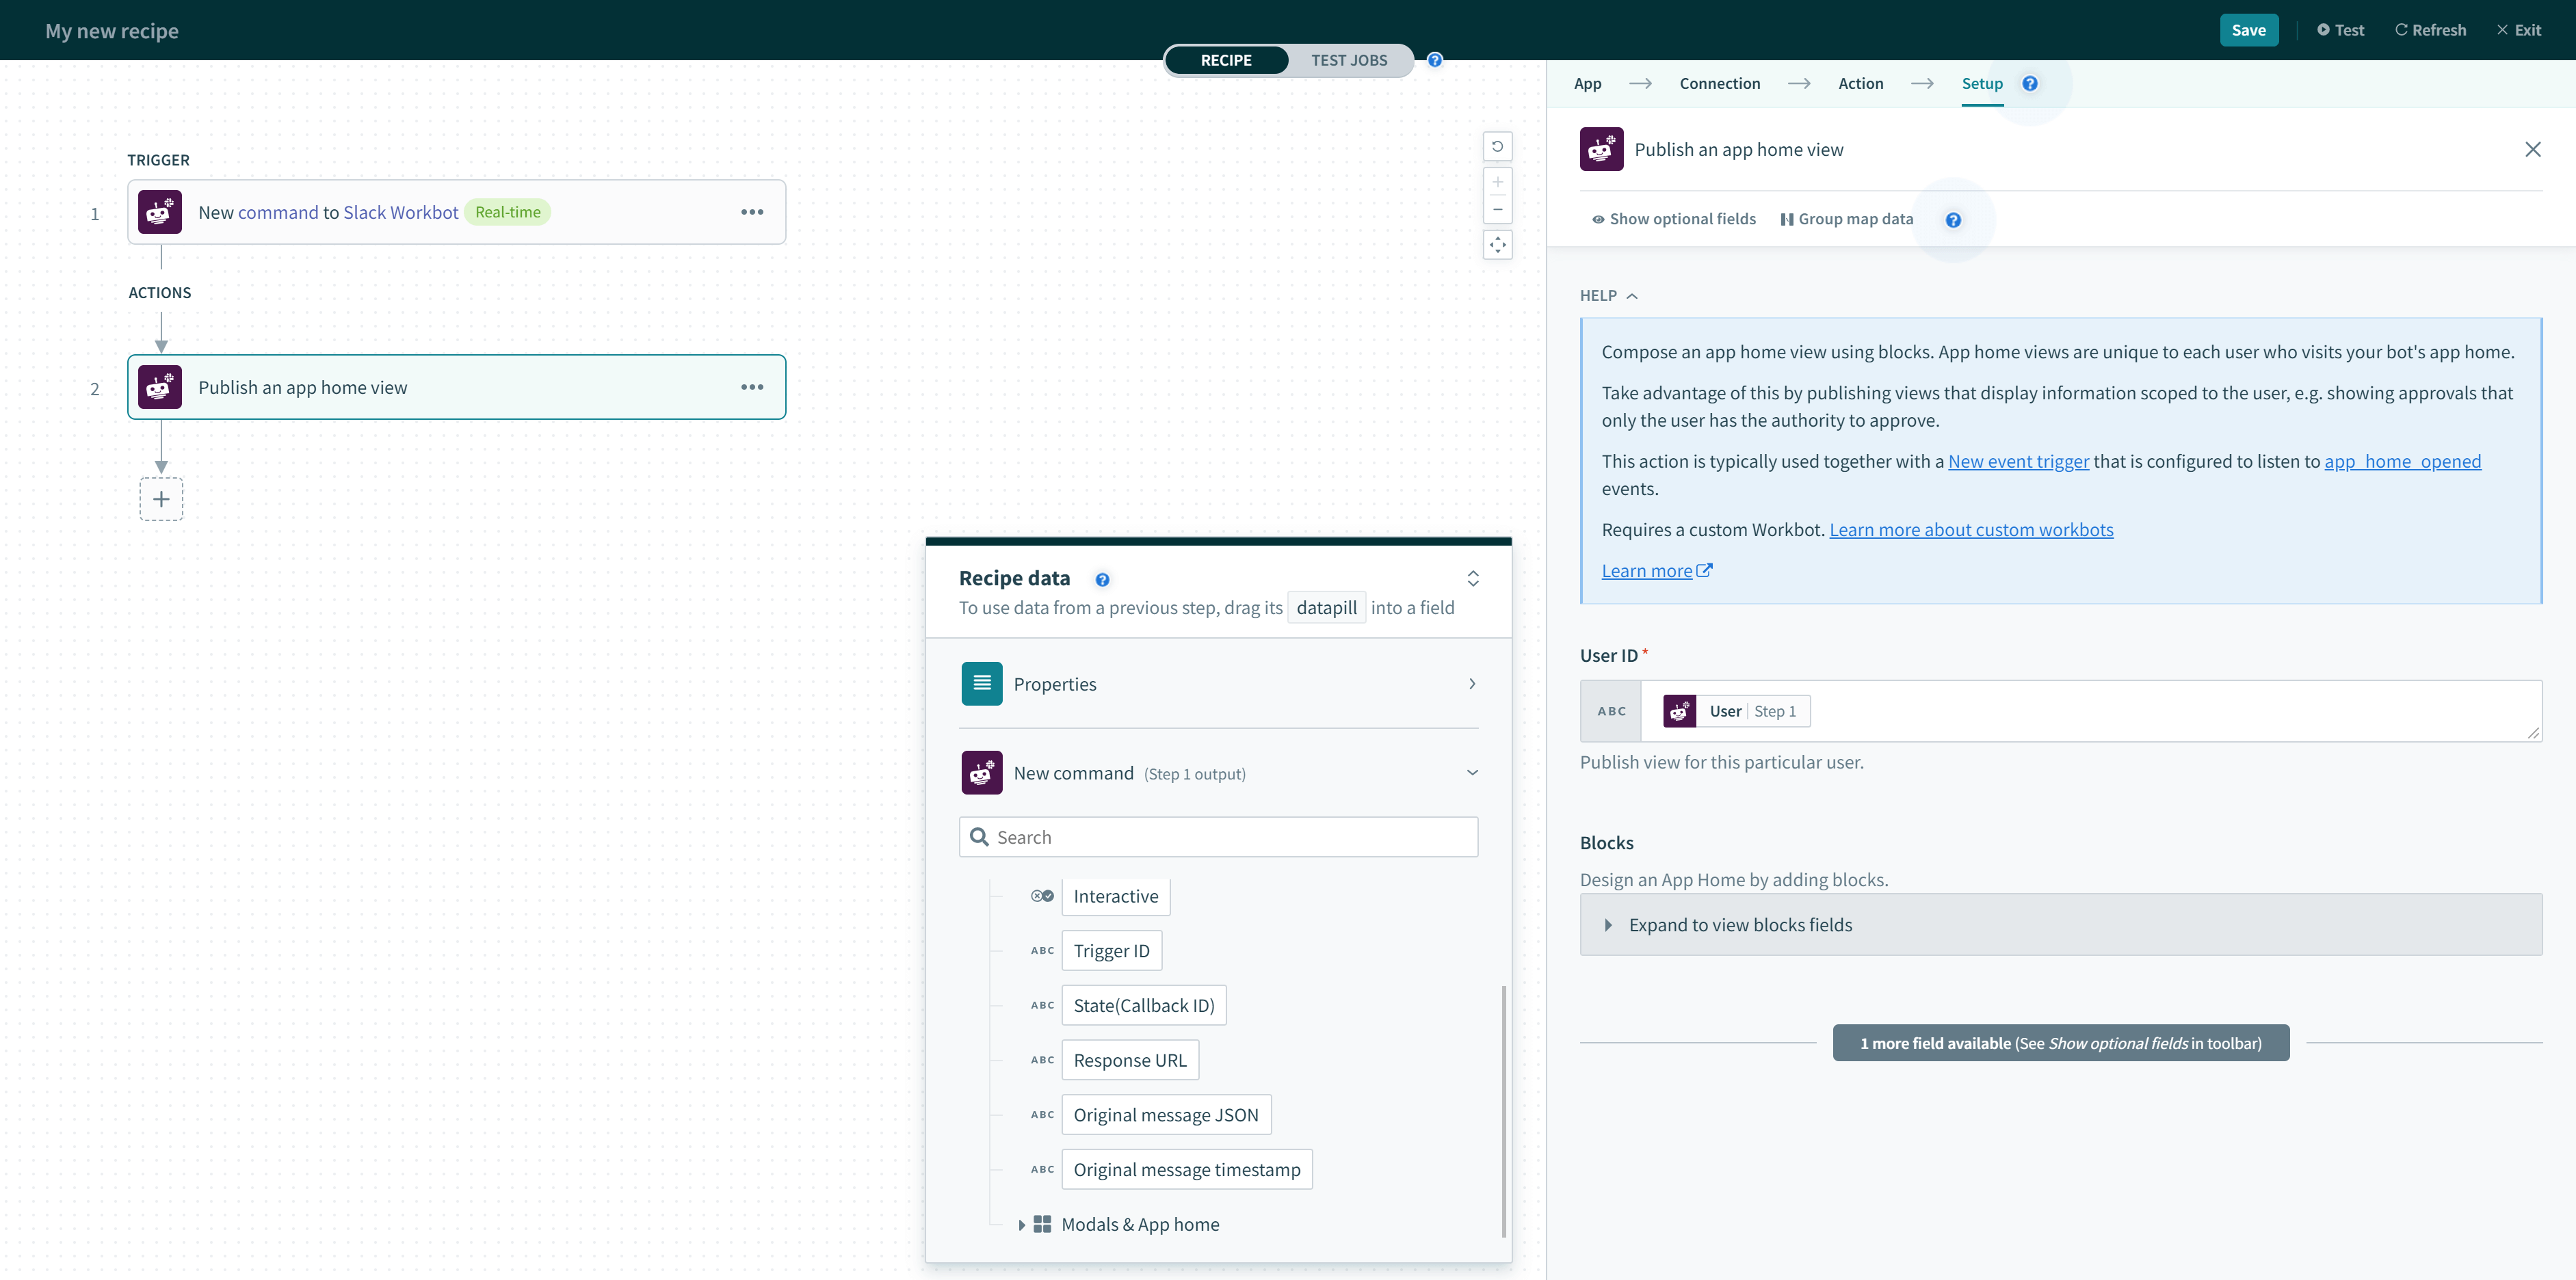 Publish app home view paired with New event trigger (app_home_opened event)
This action is typically used together with a New event trigger that is configured to listen for app_home_opened (opens new window) events.
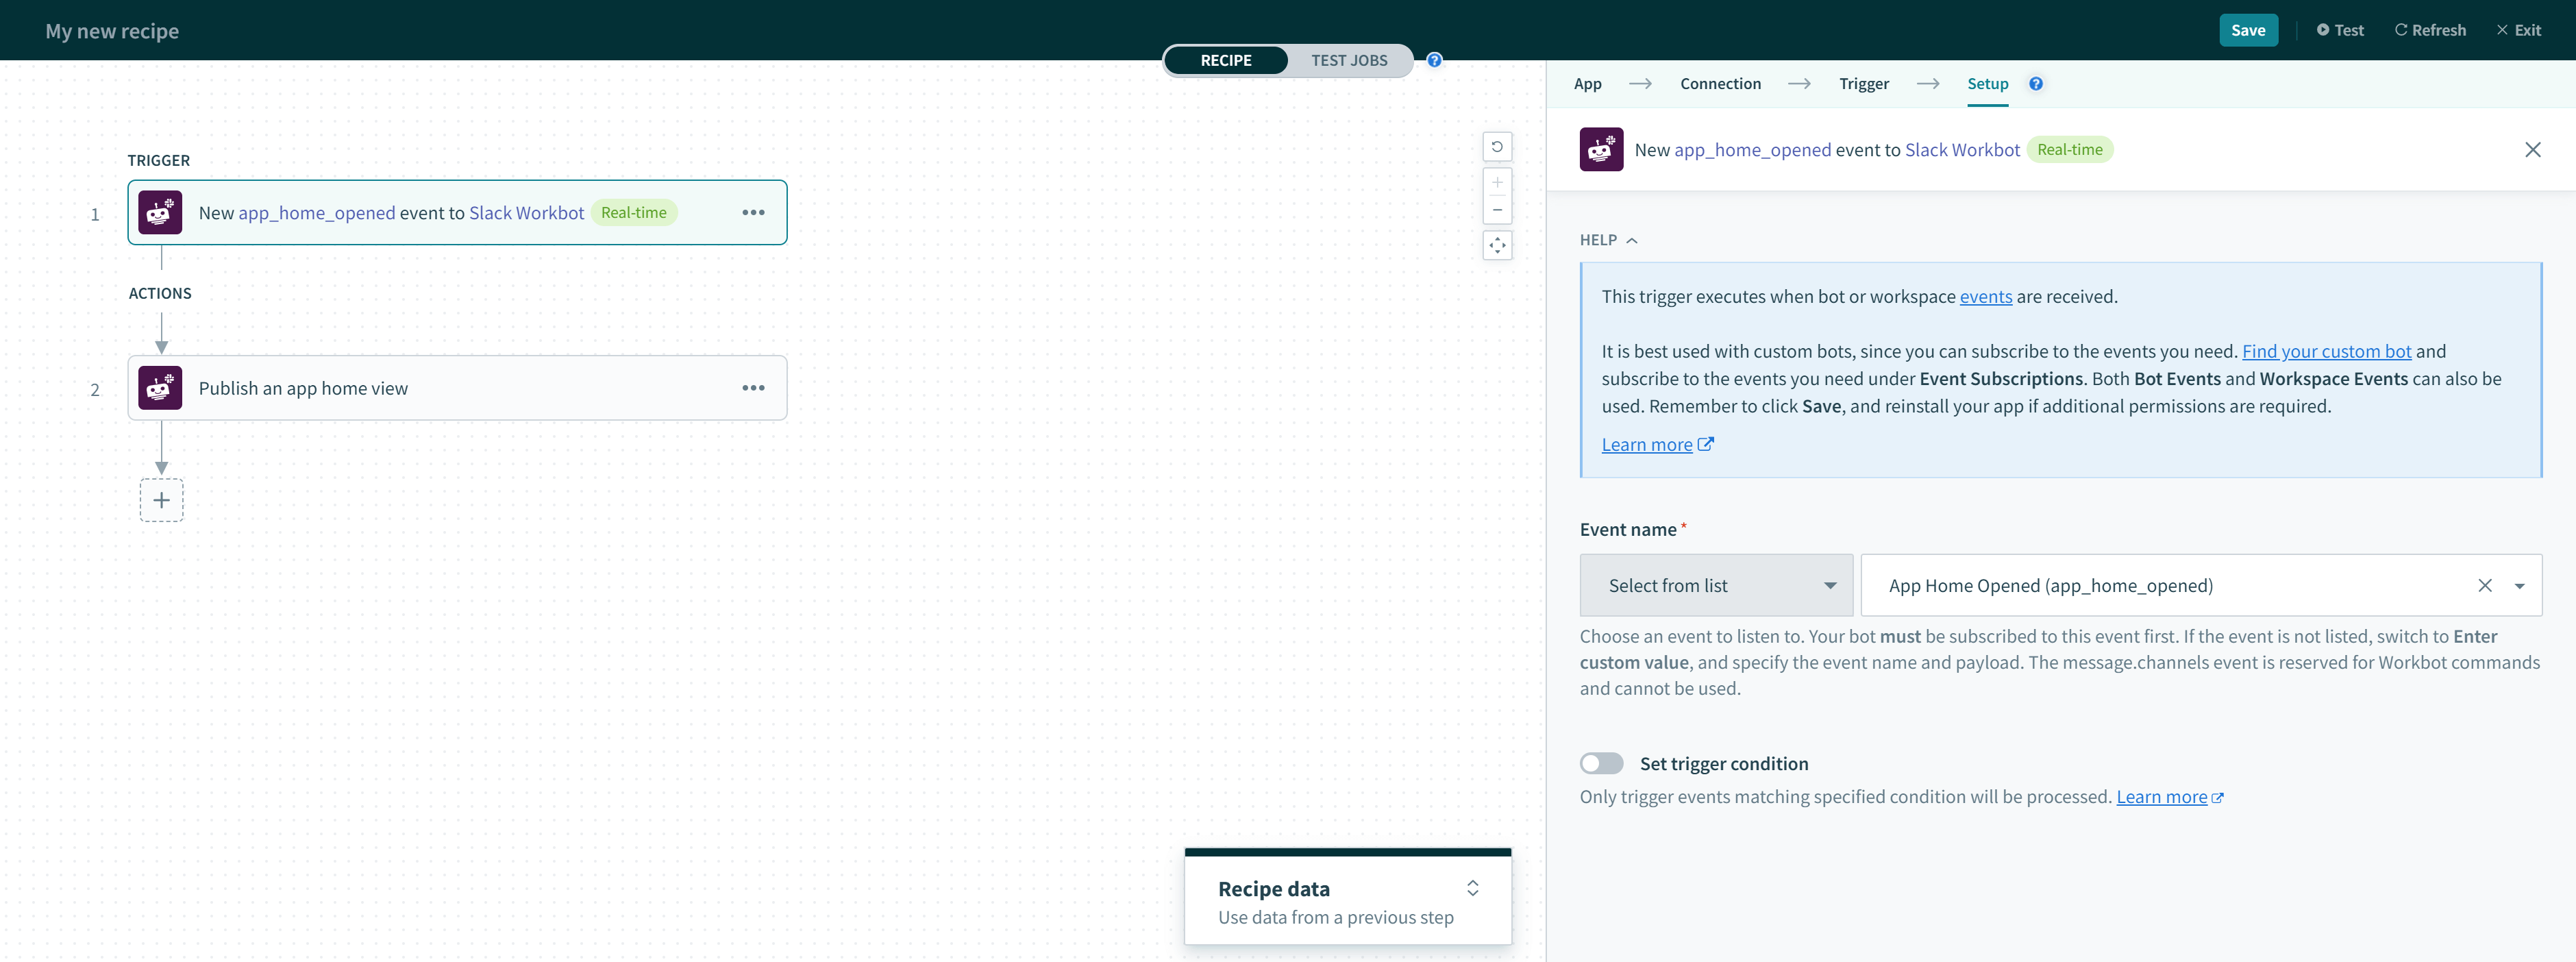
app_home_opened event example
App home views are unique to each user who visits your bot's app home, which is why the User ID field is required when publishing them. You can take advantage of this by publishing views with information scoped to the user. For example, showing approvals that only the user has authority to approve.
 App home greets and displays data scoped only to the specific user
Complete the following steps to make your bot's app home visible to users:
Open your Slack app configuration.
Go to Features > App Home > Show Tabs.
Enable the Home Tab toggle.
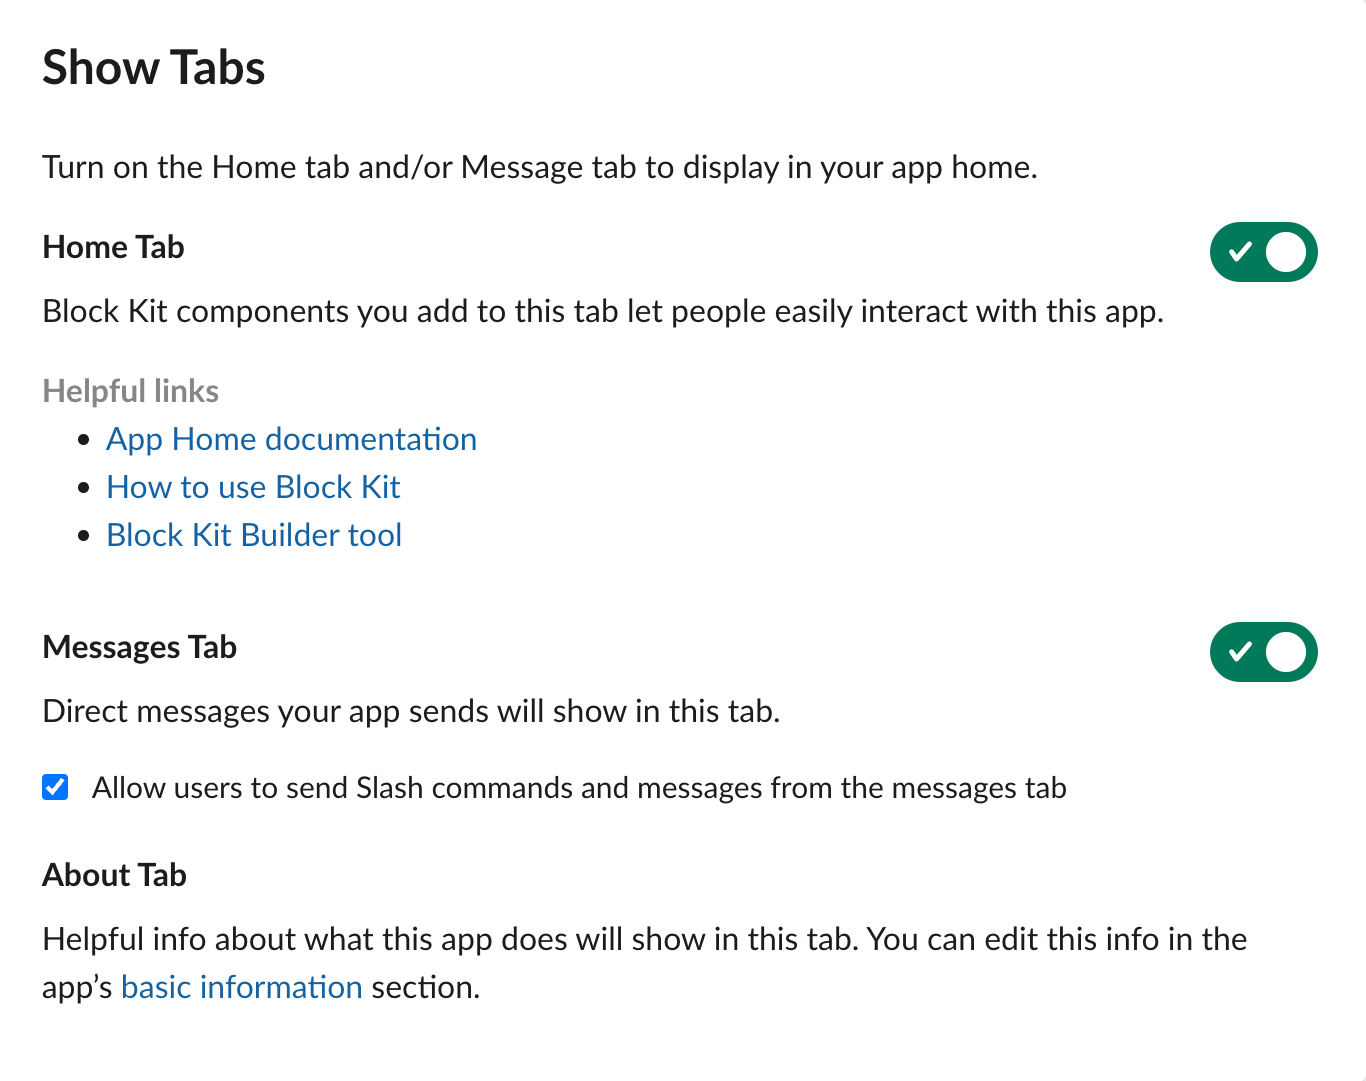
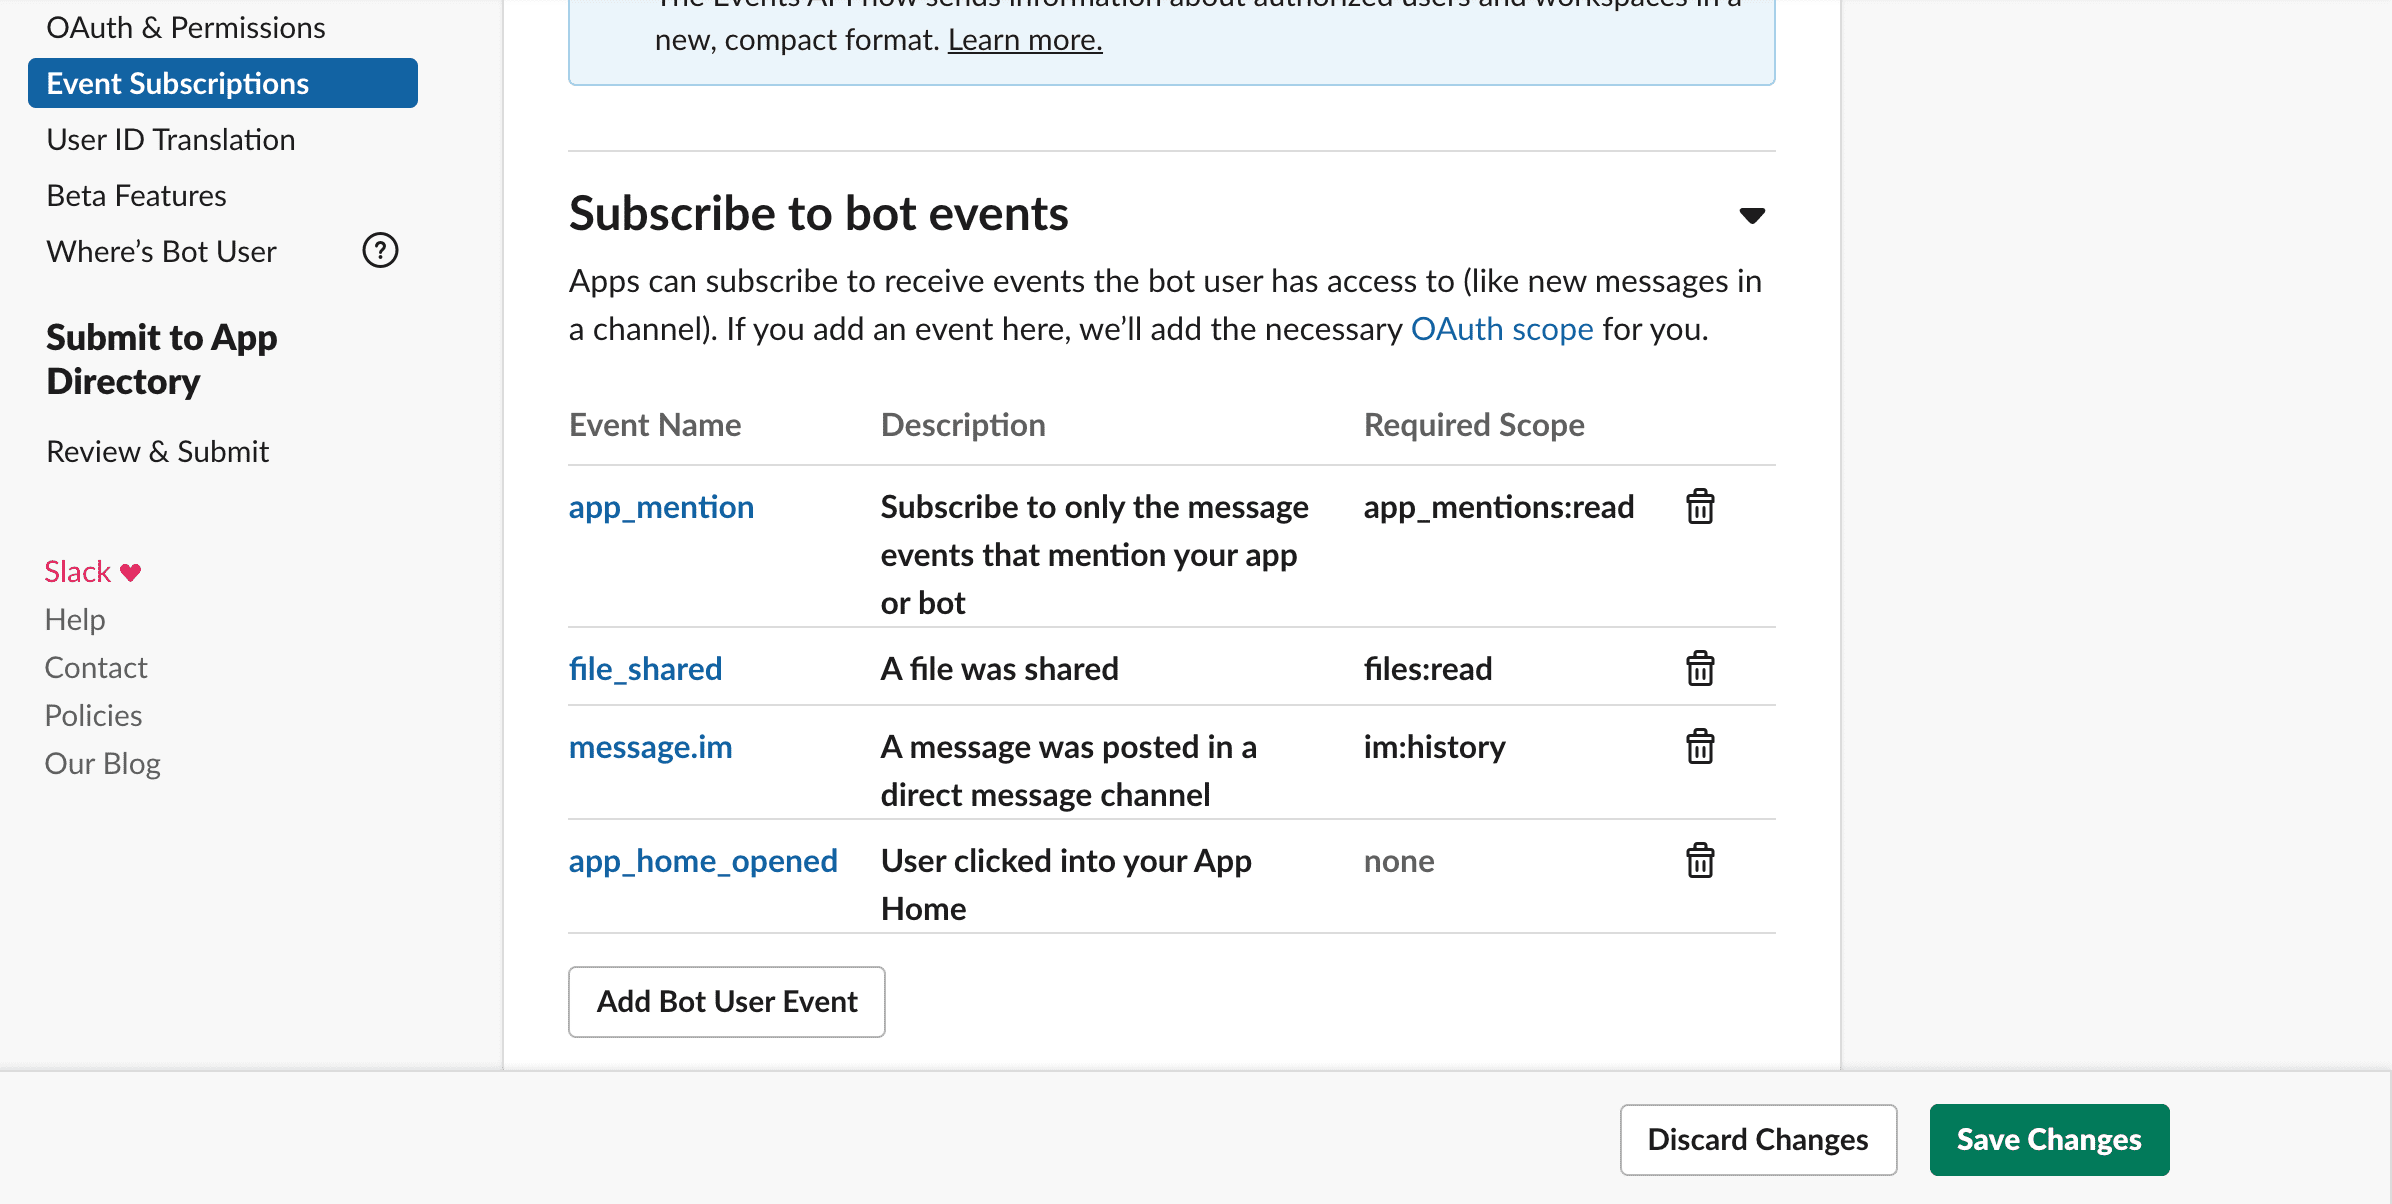
Additionally, ensure that your Slack app is subscribed to the app_home_opened event under Event Subscriptions. This lets your bot detect when a user opens the app home so it can update the app home content accordingly.
# Update blocks by block ID
This action allows you to update, replace or remove specific block(s) from views on any surface (messages, app homes, and modals) without recreating the entire view. Multiple blocks can be updated, replaced, or removed in one go. It is also possible to replace single blocks with multiple blocks.
TIP
Specifying block IDs is optional when posting messages, publishing app homes, or launching modals. But if certain blocks need to be updated in the future, give them a block ID.
To update blocks,
Specify the surface that the original block is in. Message, App home, and Modal surfaces are currently supported.
Pass the JSON of the original message or view.
For Messages, pass the Original message JSON datapill from the output of the New command trigger or the Message JSON datapill from the output of the Post message/Post command reply actions.
For App home, pass the View JSON datapill from the output of the New command trigger (under Modals & App home) or the app_home_opened event from the New event trigger.
For Modals, pass the View JSON datapill from the output of the New command trigger (under Modals & App home) or the View JSON datapill from the Open/update or push modal view action.
Add 1 or more block(s) to update.
Specify the block ID of each block to be updated/removed.
Should the block be removed? If so, set it to Yes. Otherwise, this defaults to No.
Define the replacement block(s).
Last updated: 9/24/2025, 5:30:45 PM