Microsoft Dynamics 365
Microsoft Dynamics 365 is a customer relationship management software package developed by Microsoft. It is built on the Microsoft Dynamics 365 platform, allowing users to easily extend and tailor the application for their business.
Connector comparison
Workato offers two connectors for Microsoft Dynamics 365, each designed for a different set of applications within the Dynamics ecosystem:
- Microsoft Dynamics 365 (CRM apps)
- Microsoft Dynamics Finance and Operations (ERP apps)
Use the following table to determine which connector aligns with your organization's integration needs:
| Microsoft Dynamics 365 | Microsoft Dynamics Finance and Operations | |
|---|---|---|
| Recommended for |
|
|
| Connector type | Platform | Community |
| Required permission | user.impersonation (Minimum scope) | AX.FullAccess (Recommended scope) |
| Authentication method | OAuth 2.0 with Microsoft Dataverse | OAuth 2.0 with Azure AD |
| API documentation reference | Dataverse Web API | OData API |
| Authentication reference | Dataverse OAuth | OData OAuth |
API version
The Microsoft Dynamics 365 connector uses the Microsoft Dynamics 365 API v8.0 and v9.0. Select your preferred version during connection setup.
How to connect to Microsoft Dynamics 365
MICROSOFT MFA ENFORCEMENT
Microsoft is rolling out mandatory multifactor authentication (MFA) gradually to different applications and accounts in phases. This enforcement continues throughout 2025 and beyond. Refer to the Microsoft Mandatory multifactor authentication for Azure and admin portals documentation for more information.
We strongly recommend enabling MFA now for all Microsoft accounts used with Workato to avoid service disruptions from short-notice enforcement changes.
Complete the following steps to maintain uninterrupted service:
Enable MFA for your Microsoft organization following the Microsoft MFA setup guide. Refer to Set up multifactor authentication for Microsoft 365 for more information.
Reconnect your Microsoft connection in Workato.
Complete the OAuth flow with MFA when prompted.
Test your recipes to ensure they work with the updated connection.
The Microsoft Dynamics 365 connector supports the following authentication methods:
- Authorization code grant authentication
- Client credentials authentication
- Resource owner password credentials grant authentication
Authorization code grant authentication
This authentication method requires the following values:
- Client ID
- Client secret
Register the Workato app in the Azure Portal
Complete the following steps to register the Workato app and assign it permissions for authorization code grant connections.
Register the Workato app in the Azure Portal
Complete the following steps to register the Workato app in the Azure portal:
Sign in to the Azure portal.
Select App registrations > + New registration.
Enter a unique name for the application.
Use the Supported account types drop-down menu to select an account type.
Select Web from the Select a platform drop-down menu.
Use the following URI for the Redirect URI:
https://www.workato.com/oauth/callbackSelect Register.
Assign permissions to your app
In the navigation sidebar, select Manage > API permissions.
Click + Add a permission and select Dynamics CRM.
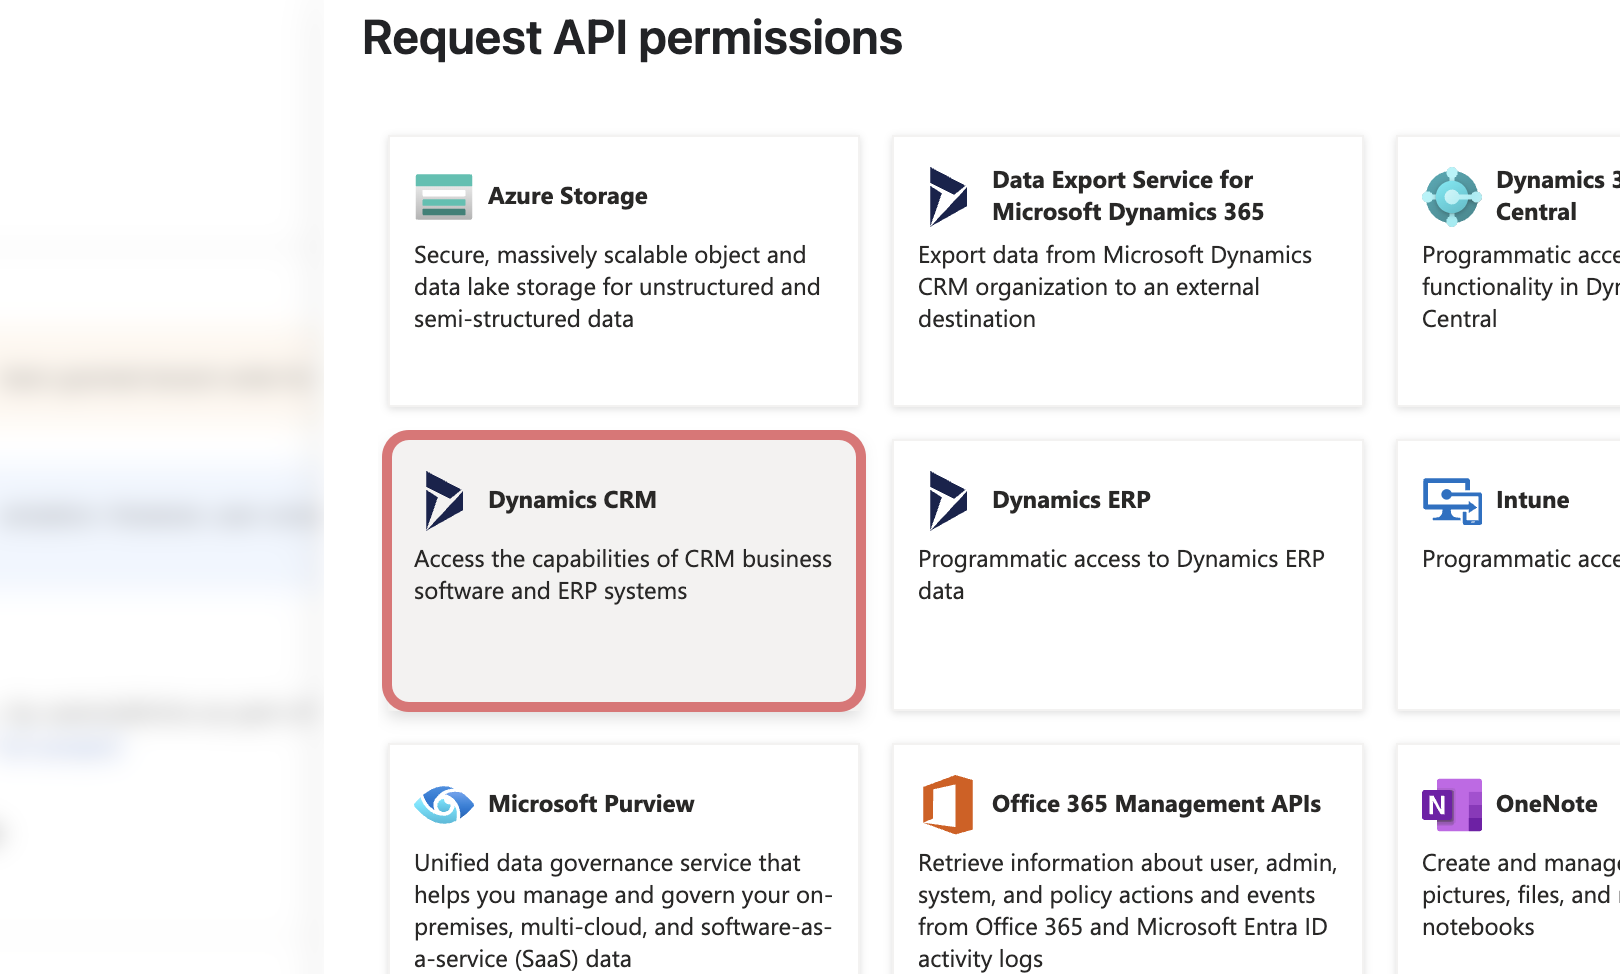 Select Dynamics CRM
Select Delegated permissions, then select the user_impersonation checkbox.
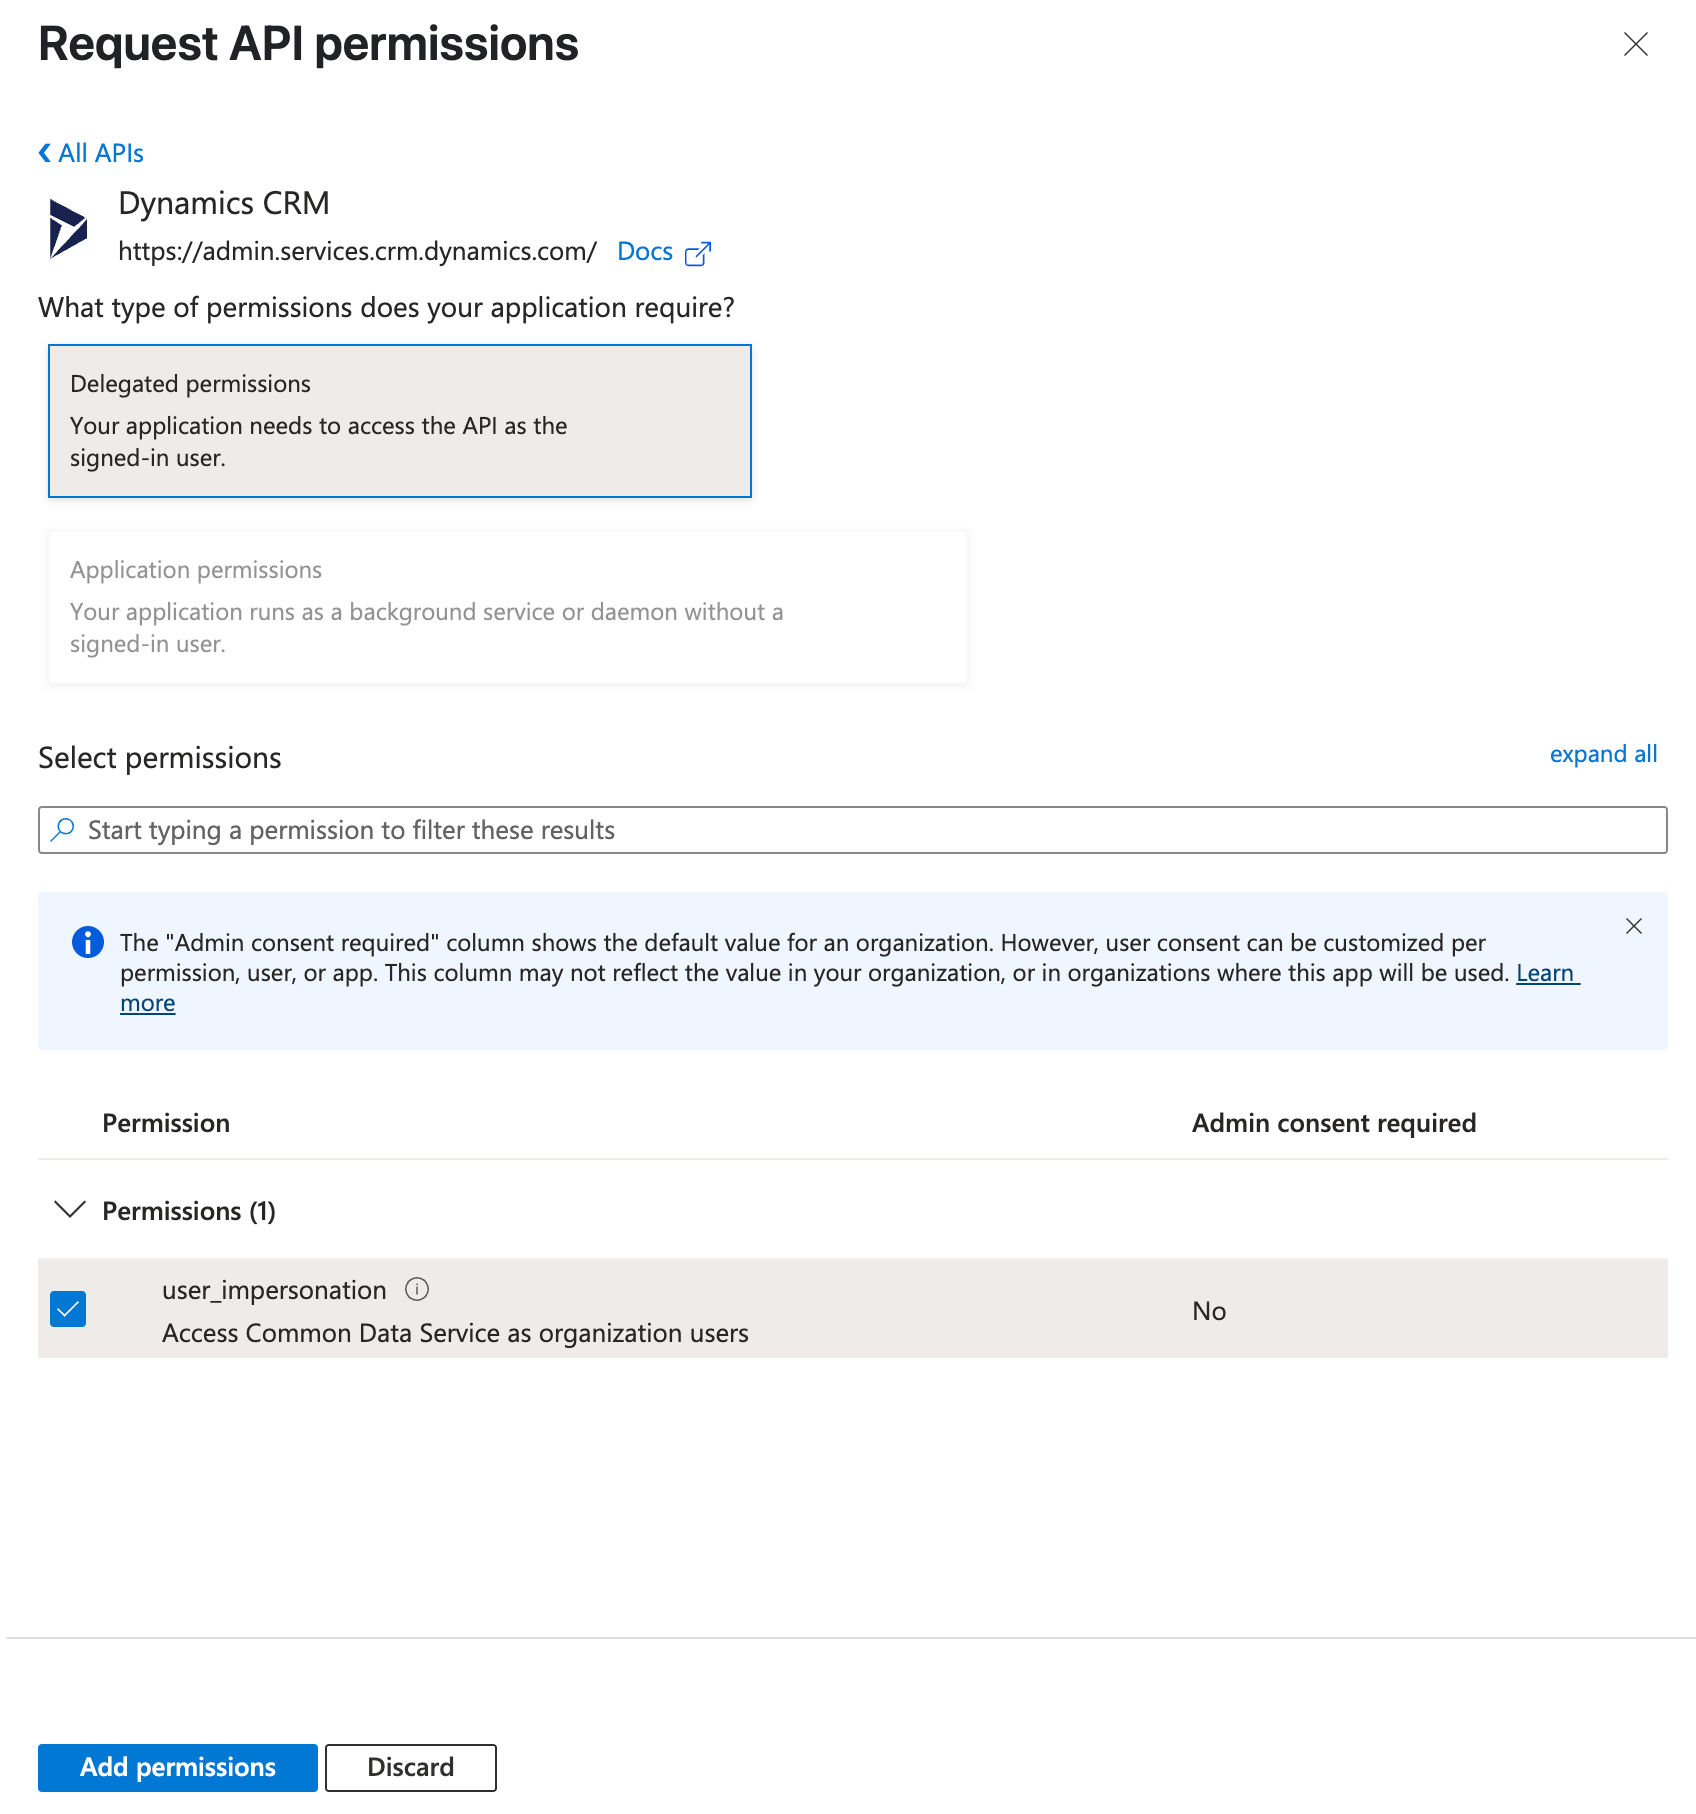 Select permissions
Click Add permissions.
Note: Admin consent is required for specific permissions. Refer to the Granting admin consent section to learn more.
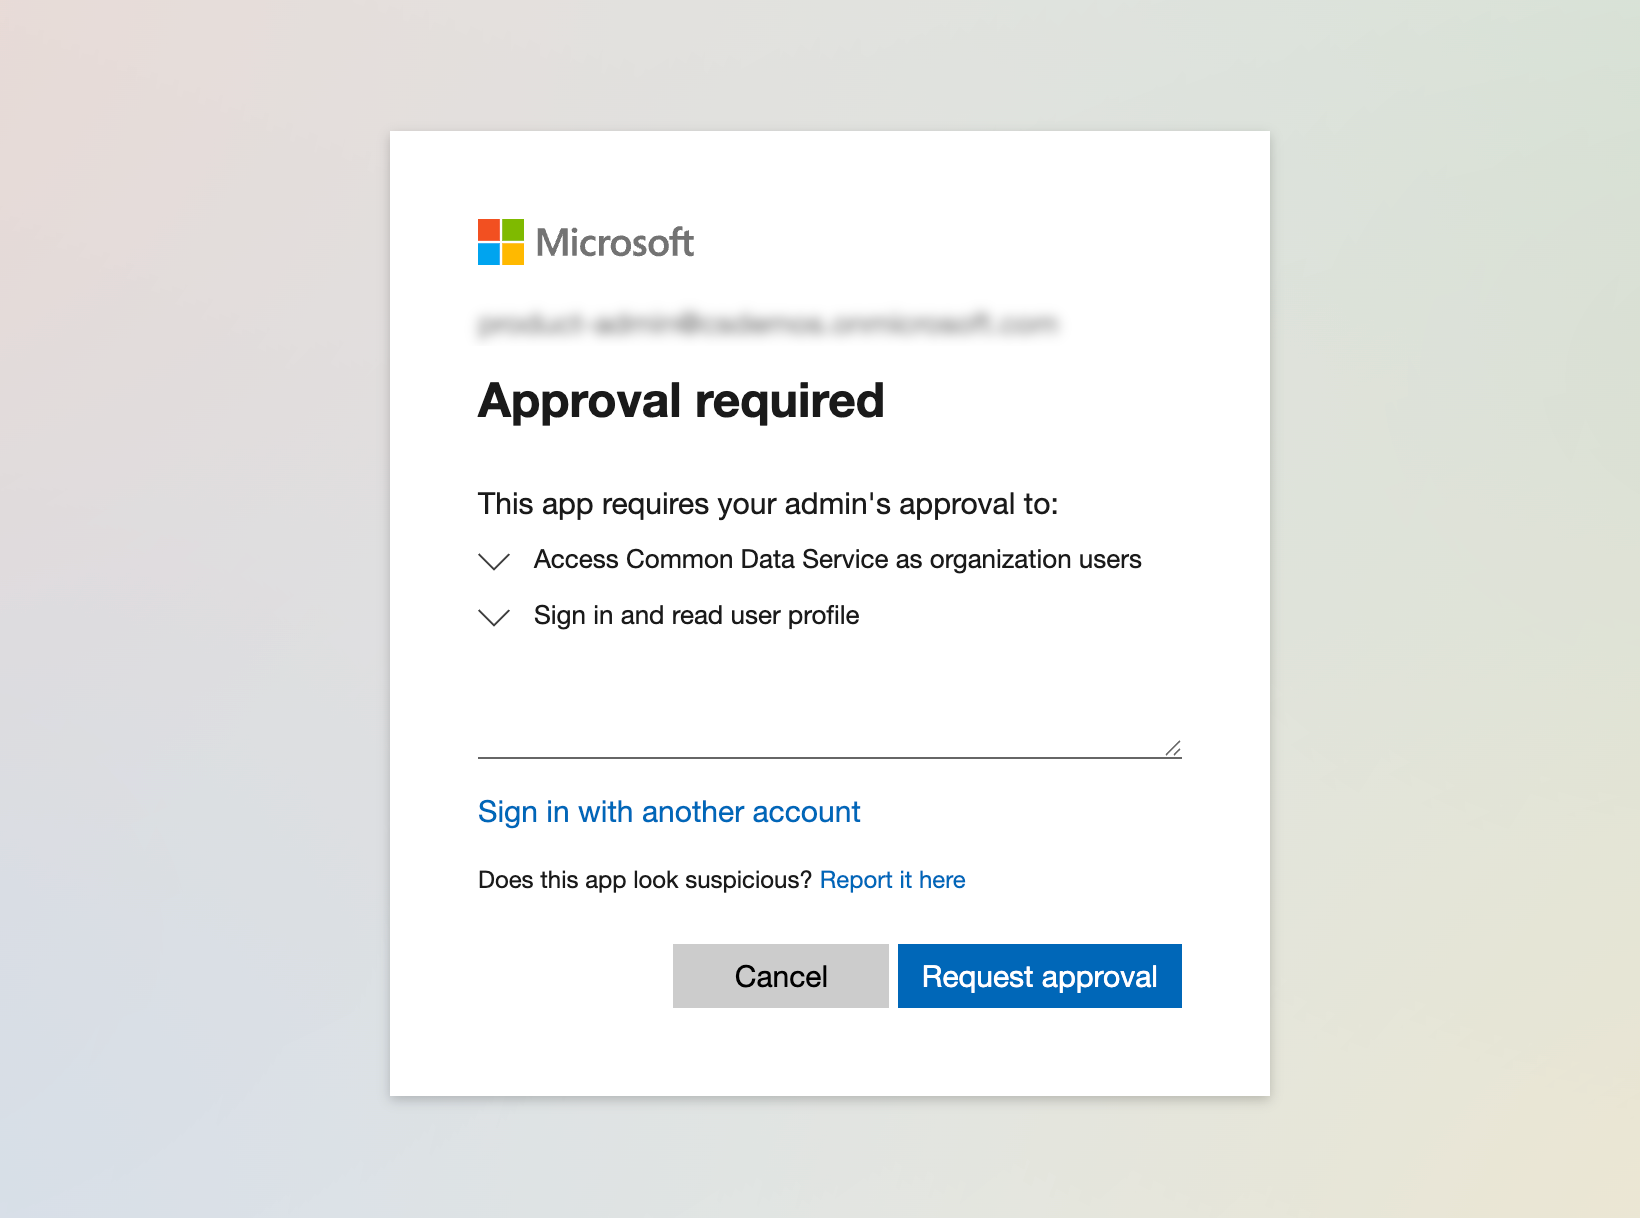 Admin consent screen
Obtain the Application (client) ID from the Azure Portal
Go to the Overview > Essentials section.
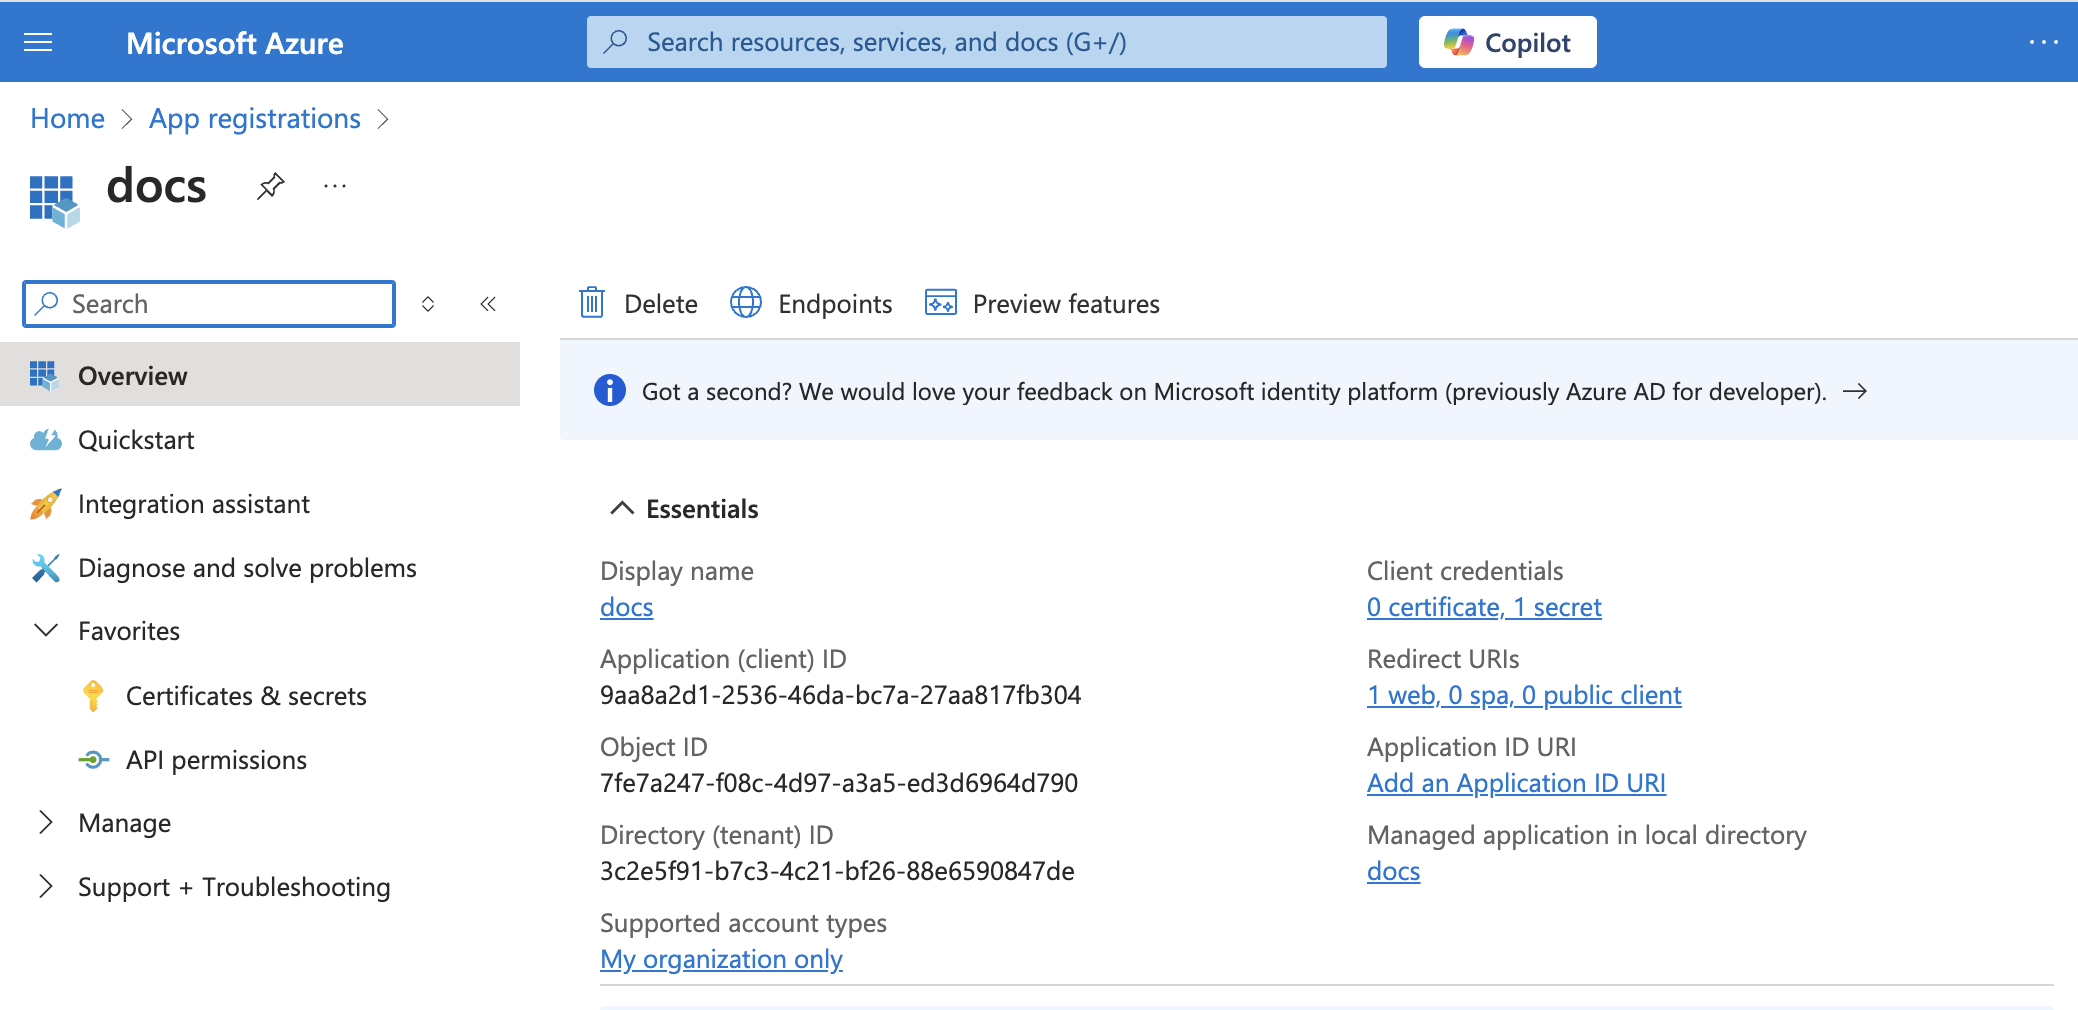 App details
Copy the Application (client) ID for use in Workato.
Generate a client secret
Complete the following steps to generate a client secret:
Go to Manage > Certificates & Secrets > Client secrets.
Click + New client secret.
Provide a Description for the client secret and specify an Expires date.
Click Add.
Copy and save the client secret Value—not the Secret ID—for use in Workato.
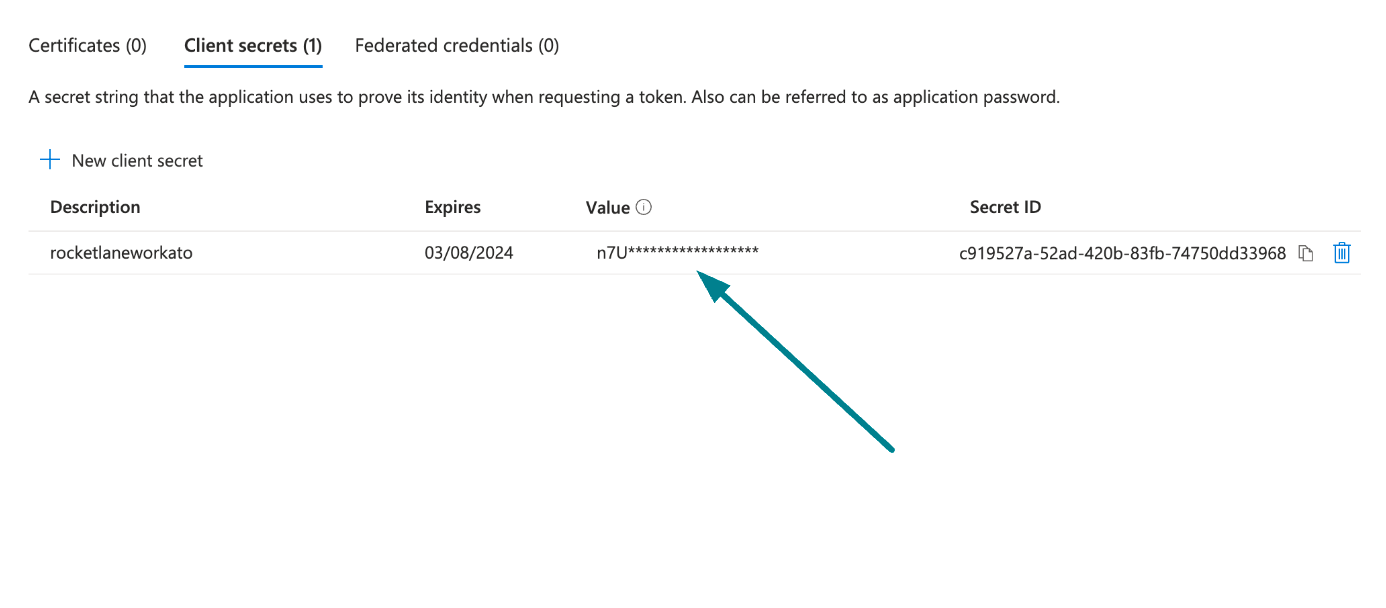 Copy and save the client secret value
Return to Workato to finish setting up your connection.
Complete setup in Workato
Complete the following steps to establish a Microsoft Dynamics 365 connection using authorization code grant authentication:
Click Create > Connection or press C twice.
Search for and select Microsoft Dynamics 365 as your connection on the New connection page.
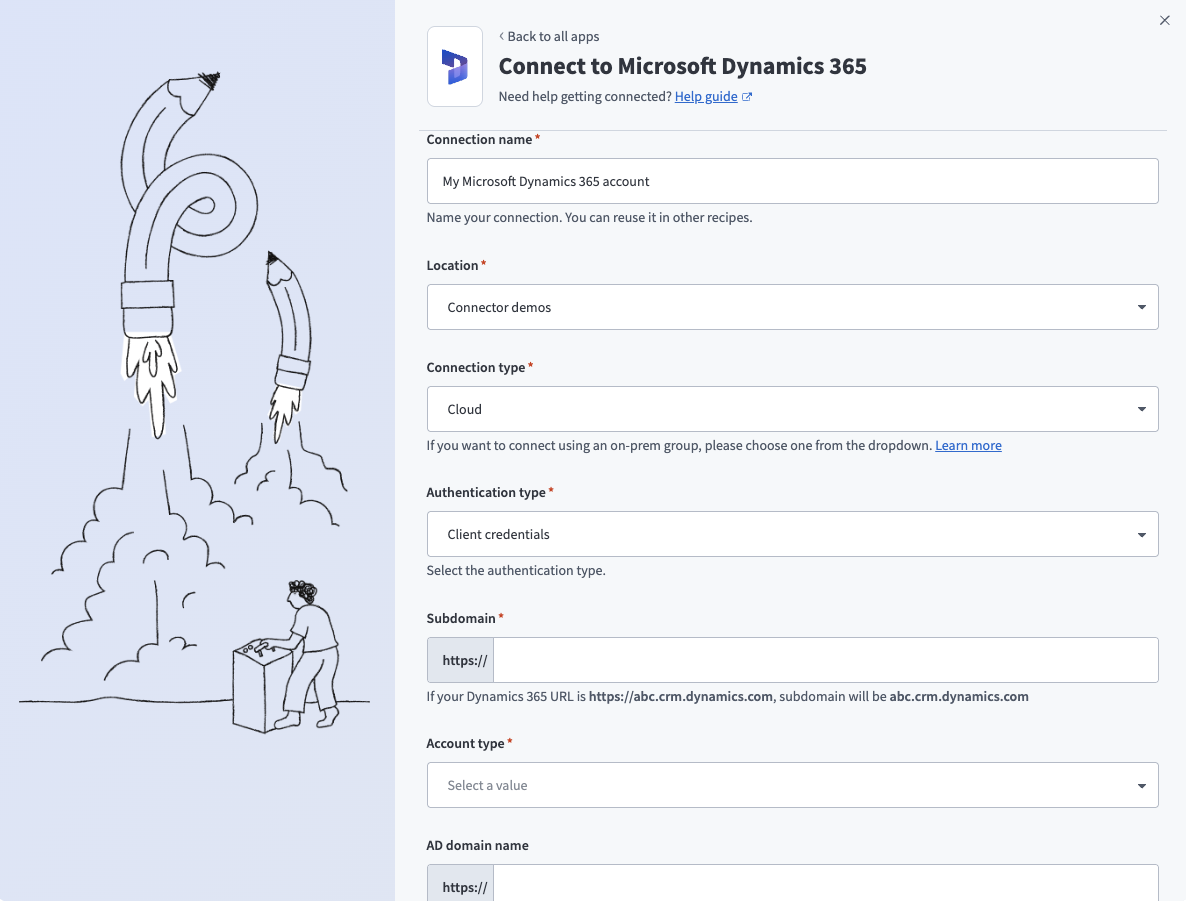
Enter a name for your connection in the Connection name field.
 Connect to Microsoft Dynamics 365
Use the Location drop-down menu to select the project where you plan to store the connection.
Use the Connection type to specify a cloud connection or select an on-prem group for the connection.
ON-PREM CONNECTIONS
If using an on-prem connection, you must obtain a client ID by registering your Microsoft Dynamics 365 app with the Active Directory Federation Service. Learn more.
Select Authorization code grant as the Authentication type.
Enter your Microsoft Dynamics 365 environment’s full domain, such as abc.crm.dynamics.com, in the Subdomain field.
Use the Account type drop-down menu to specify whether the account you're connecting to is hosted in the cloud or on-prem.
Fill in the AD domain name field. This field is required if you select On-premise as the Account type. For example, if your AD server is https://abc.adfs.dynamics.com/adfs, the AD domain name is abc.adfs.dynamics.com.
Enter your client ID in the Client ID field.
Enter your client secret in the Client secret field.
Optional. Use the Version drop-down menu to specify the API version you plan to use in your connection. Options include:
- Version 8
- Version 9
Optional. Expand the Advanced settings section to configure the Resource URI for which connection should be authorized. If left empty, all resources in the subdomain will be authorized. For example, https://abc.crm.dynamics.com/api/data/v9.0/.
Optional. Select a custom OAuth profile to use for the connection from the Custom OAuth profile drop-down menu.
Click Sign in with Microsoft.
Client credentials authentication
This authentication method requires the following values:
- Tenant ID
- Client ID
- Client secret
Register the Workato app in the Azure Portal
Complete the following steps to register the Workato app and assign it permissions for client credentials-based connections.
Register the Workato app in the Azure Portal
Complete the following steps to register the Workato app in the Azure portal:
Sign in to the Azure portal.
Select App registrations > + New registration.
Enter a unique name for the application.
Use the Supported account types drop-down menu to select an account type.
Select Web from the Select a platform drop-down menu.
Use the following URI for the Redirect URI:
https://www.workato.com/oauth/callbackSelect Register.
Assign permissions to your app
In the navigation sidebar, select Manage > API permissions.
Click + Add a permission and select Dynamics CRM.
Select Dynamics CRM
Select Delegated permissions, then select the user_impersonation checkbox.
Select permissions
Click Add permissions.
Note: Admin consent is required for specific permissions. Refer to the Granting admin consent section to learn more.
Admin consent screen
Generate a client secret
Complete the following steps to generate a client secret:
Go to Manage > Certificates & Secrets > Client secrets.
Click + New client secret.
Provide a Description for the client secret and specify an Expires date.
Click Add.
Copy and save the client secret Value—not the Secret ID—for use in Workato.
Copy and save the client secret value
Obtain the Application (client) ID and Directory (tenant) ID from the Azure Portal
Complete the following steps to obtain the Directory (tenant) ID from the Azure portal:
Go to the Overview > Essentials section.
App details
Copy and save the Directory (tenant) ID for use in Workato.
Create an application user
Sign in to the Power Platform admin center.
Select Manage in the navigation pane.
In the Manage pane, select Environments. Then, select an environment from the table.
 Select an environment
Select Settings.
Select Users + permissions, and then select Application users.
Select + New app user to open the Create a new app user page.
Select + Add an app to choose the registered Microsoft Entra application that was created for the selected user, and then select Add.
Select the Business Unit associated with the environment (subdomain) you plan to connect to in Workato.
The business unit you choose determines which environment your application user can access. For example, if your environment URL is https://abc.crm.dynamics.com, select the business unit associated with the abc environment.
Click the pencil icon next to Security roles to choose security roles to add to the new application user. You must select a role with at least the prvReadEntity privilege, such as the Basic User role.
Click Save, then click Create.
Return to Workato to finish setting up your connection.
Complete setup in Workato
Complete the following steps to establish a Microsoft Dynamics 365 connection using client credentials authentication:
Click Create > Connection or press C twice.
Search for and select Microsoft Dynamics 365 as your connection on the New connection page.
Enter a name for your connection in the Connection name field.
 Connect to Microsoft Dynamics 365
Use the Location drop-down menu to select the project where you plan to store the connection.
Use the Connection type to specify a cloud connection or select an on-prem group for the connection.
ON-PREM CONNECTIONS
If using an on-prem connection, you must obtain a client ID by registering your Microsoft Dynamics 365 app with the Active Directory Federation Service. Learn more.
Select Client credentials as the Authentication type.
Enter your Microsoft Dynamics 365 environment’s full domain, such as abc.crm.dynamics.com, in the Subdomain field.
Use the Account type drop-down menu to specify whether the account you're connecting to is hosted in the cloud or on-prem.
Fill in the AD domain name field. This field is required if you select On-premise as the Account type. For example, if your AD server is https://abc.adfs.dynamics.com/adfs, the AD domain name is abc.adfs.dynamics.com.
Enter your client ID in the Client ID field.
Enter your client secret in the Client secret field.
Enter your tenant ID in the Tenant ID field.
Optional. Use the Version drop-down menu to specify the API version you plan to use in your connection. Options include:
- Version 8
- Version 9
Optional. Expand the Advanced settings section to configure the Resource URI for which connection should be authorized. If left empty, all resources in the subdomain will be authorized. For example, https://abc.crm.dynamics.com/api/data/v9.0/.
Optional. Select a custom OAuth profile to use for the connection from the Custom OAuth profile drop-down menu.
Click Sign in with Microsoft.
Resource owner password credentials grant authentication
This authentication method requires the following values:
- Client ID
- Client secret
- Username
- Password
- Tenant ID
Register the Workato app in the Azure Portal
Complete the following steps to register the Workato app and assign it permissions for resource owner password credentials grant connections.
Register the Workato app in the Azure Portal
Complete the following steps to register the Workato app in the Azure portal:
Sign in to the Azure portal.
Select App registrations > + New registration.
Enter a unique name for the application.
Use the Supported account types drop-down menu to select an account type.
Select Web from the Select a platform drop-down menu.
Use the following URI for the Redirect URI:
https://www.workato.com/oauth/callbackSelect Register.
Assign permissions to your app
In the navigation sidebar, select Manage > API permissions.
Click + Add a permission and select Dynamics CRM.
Select Dynamics CRM
Select Delegated permissions, then select the user_impersonation checkbox.
Select permissions
Click Add permissions.
Note: Admin consent is required for specific permissions. Refer to the Granting admin consent section to learn more.
Admin consent screen
Generate a client secret
Complete the following steps to generate a client secret:
Go to Manage > Certificates & Secrets > Client secrets.
Click + New client secret.
Provide a Description for the client secret and specify an Expires date.
Click Add.
Copy and save the client secret Value—not the Secret ID—for use in Workato.
Copy and save the client secret value
Obtain the Application (client) ID and Directory (tenant) ID from the Azure Portal
Complete the following steps to obtain the Directory (tenant) ID from the Azure portal:
Go to the Overview > Essentials section.
App details
Copy and save the Directory (tenant) ID for use in Workato.
Create an application user
Sign in to the Power Platform admin center.
Select Manage in the navigation pane.
In the Manage pane, select Environments. Then, select an environment from the table.
Select an environment
Select Settings.
Select Users + permissions, and then select Application users.
Select + New app user to open the Create a new app user page.
Select + Add an app to choose the registered Microsoft Entra application that was created for the selected user, and then select Add.
Select the Business Unit associated with the environment (subdomain) you plan to connect to in Workato.
The business unit you choose determines which environment your application user can access. For example, if your environment URL is https://abc.crm.dynamics.com, select the business unit associated with the abc environment.
Click the pencil icon next to Security roles to choose security roles to add to the new application user. You must select a role with at least the prvReadEntity privilege, such as the Basic User role.
Click Save, then click Create.
Return to Workato to finish setting up your connection.
Complete setup in Workato
Complete the following steps to establish a Microsoft Dynamics 365 connection using resource owner password credentials grant authentication:
Click Create > Connection or press C twice.
Search for and select Microsoft Dynamics 365 as your connection on the New connection page.
Enter a name for your connection in the Connection name field.
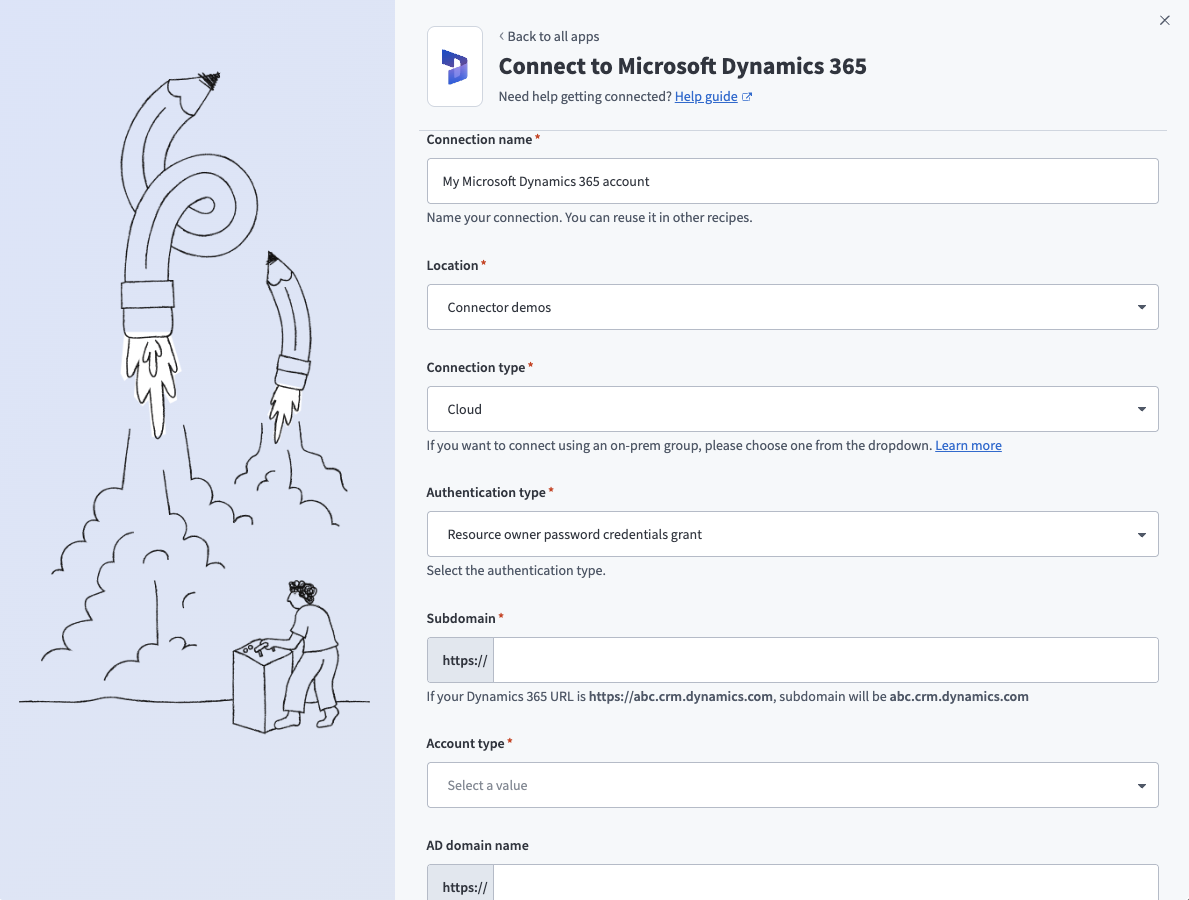 Connect to Microsoft Dynamics 365
Use the Location drop-down menu to select the project where you plan to store the connection.
Use the Connection type to specify a cloud connection or select an on-prem group for the connection.
ON-PREM CONNECTIONS
If using an on-prem connection, you must obtain a client ID by registering your Microsoft Dynamics 365 app with the Active Directory Federation Service. Learn more.
Select Resource owner password credentials grant as the Authentication type.
Enter your Microsoft Dynamics 365 environment’s full domain, such as abc.crm.dynamics.com, in the Subdomain field.
Use the Account type drop-down menu to specify whether the account you're connecting to is hosted in the cloud or on-prem.
Fill in the AD domain name field. This field is required if you select On-premise as the Account type. For example, if your AD server is https://abc.adfs.dynamics.com/adfs, the AD domain name is abc.adfs.dynamics.com.
Enter your client ID in the Client ID field.
Enter your client secret in the Client secret field.
Enter the username of the user who has access to Microsoft Dynamics 365 in the Username field. Ensure that multi-factor authentication isn't enabled for that user.
Provide password of the user who has access to Microsoft Dynamics 365 in the Password field.
Enter your tenant ID in the Tenant ID field.
Optional. Use the Version drop-down menu to specify the API version you plan to use in your connection. Options include:
- Version 8
- Version 9
Optional. Expand the Advanced settings section to configure the Resource URI for which connection should be authorized. If left empty, all resources in the subdomain will be authorized. For example, https://abc.crm.dynamics.com/api/data/v9.0/.
Optional. Select a custom OAuth profile to use for the connection from the Custom OAuth profile drop-down menu.
Click Sign in with Microsoft.
Connect Microsoft Entra ID to the Microsoft Dynamics 365 connector
To connect to the Microsoft Dynamics 365 connector using a Microsoft Entra ID account, ensure that all the consent requests are granted by admins.
Complete the following steps to grant admin consent using an admin account:
Sign in to your Azure portal and navigate to Enterprise Applications > Activity > Admin consent requests.
Approve the necessary consent requests.
Extend the refresh token expiration time
When you connect to a Microsoft Dynamics 365 app, Workato uses an access token to read and write to your Dynamics instance. This access token is valid until it expires. Workato receives an accompanying refresh token with the access token. When the access token expires, Workato uses the refresh token to request a new one. If the refresh token has also expired or been revoked, the connection becomes invalid and must be re-established.
To ensure your recipes run continuously without requiring intervention, extend your refresh token expiration time. You can apply and scope your token to an OAuth application instead of applying it to the entire organization.
Learn more about token lifetimes in the Microsoft documentation.
Last updated: