JDBC
The JDBC connector enables you to connect to any ANSI-compliant database using a JDBC driver and Workato's on-prem agent. You can use it to integrate with systems that support JDBC and SQL.
Supported databases
The JDBC connector supports any database that complies with ANSI SQL standards and provides a compatible JDBC driver. This includes databases such as Snowflake and SAP HANA. The database must support binding variables to use some actions such as INSERT.
How to connect to JDBC on Workato
You must use an on-prem agent to connect to a JDBC source in Workato. The agent enables secure communication between your local database and Workato.
Refer to the on-prem agent profile guide to learn how to connect to a JDBC-compliant database.
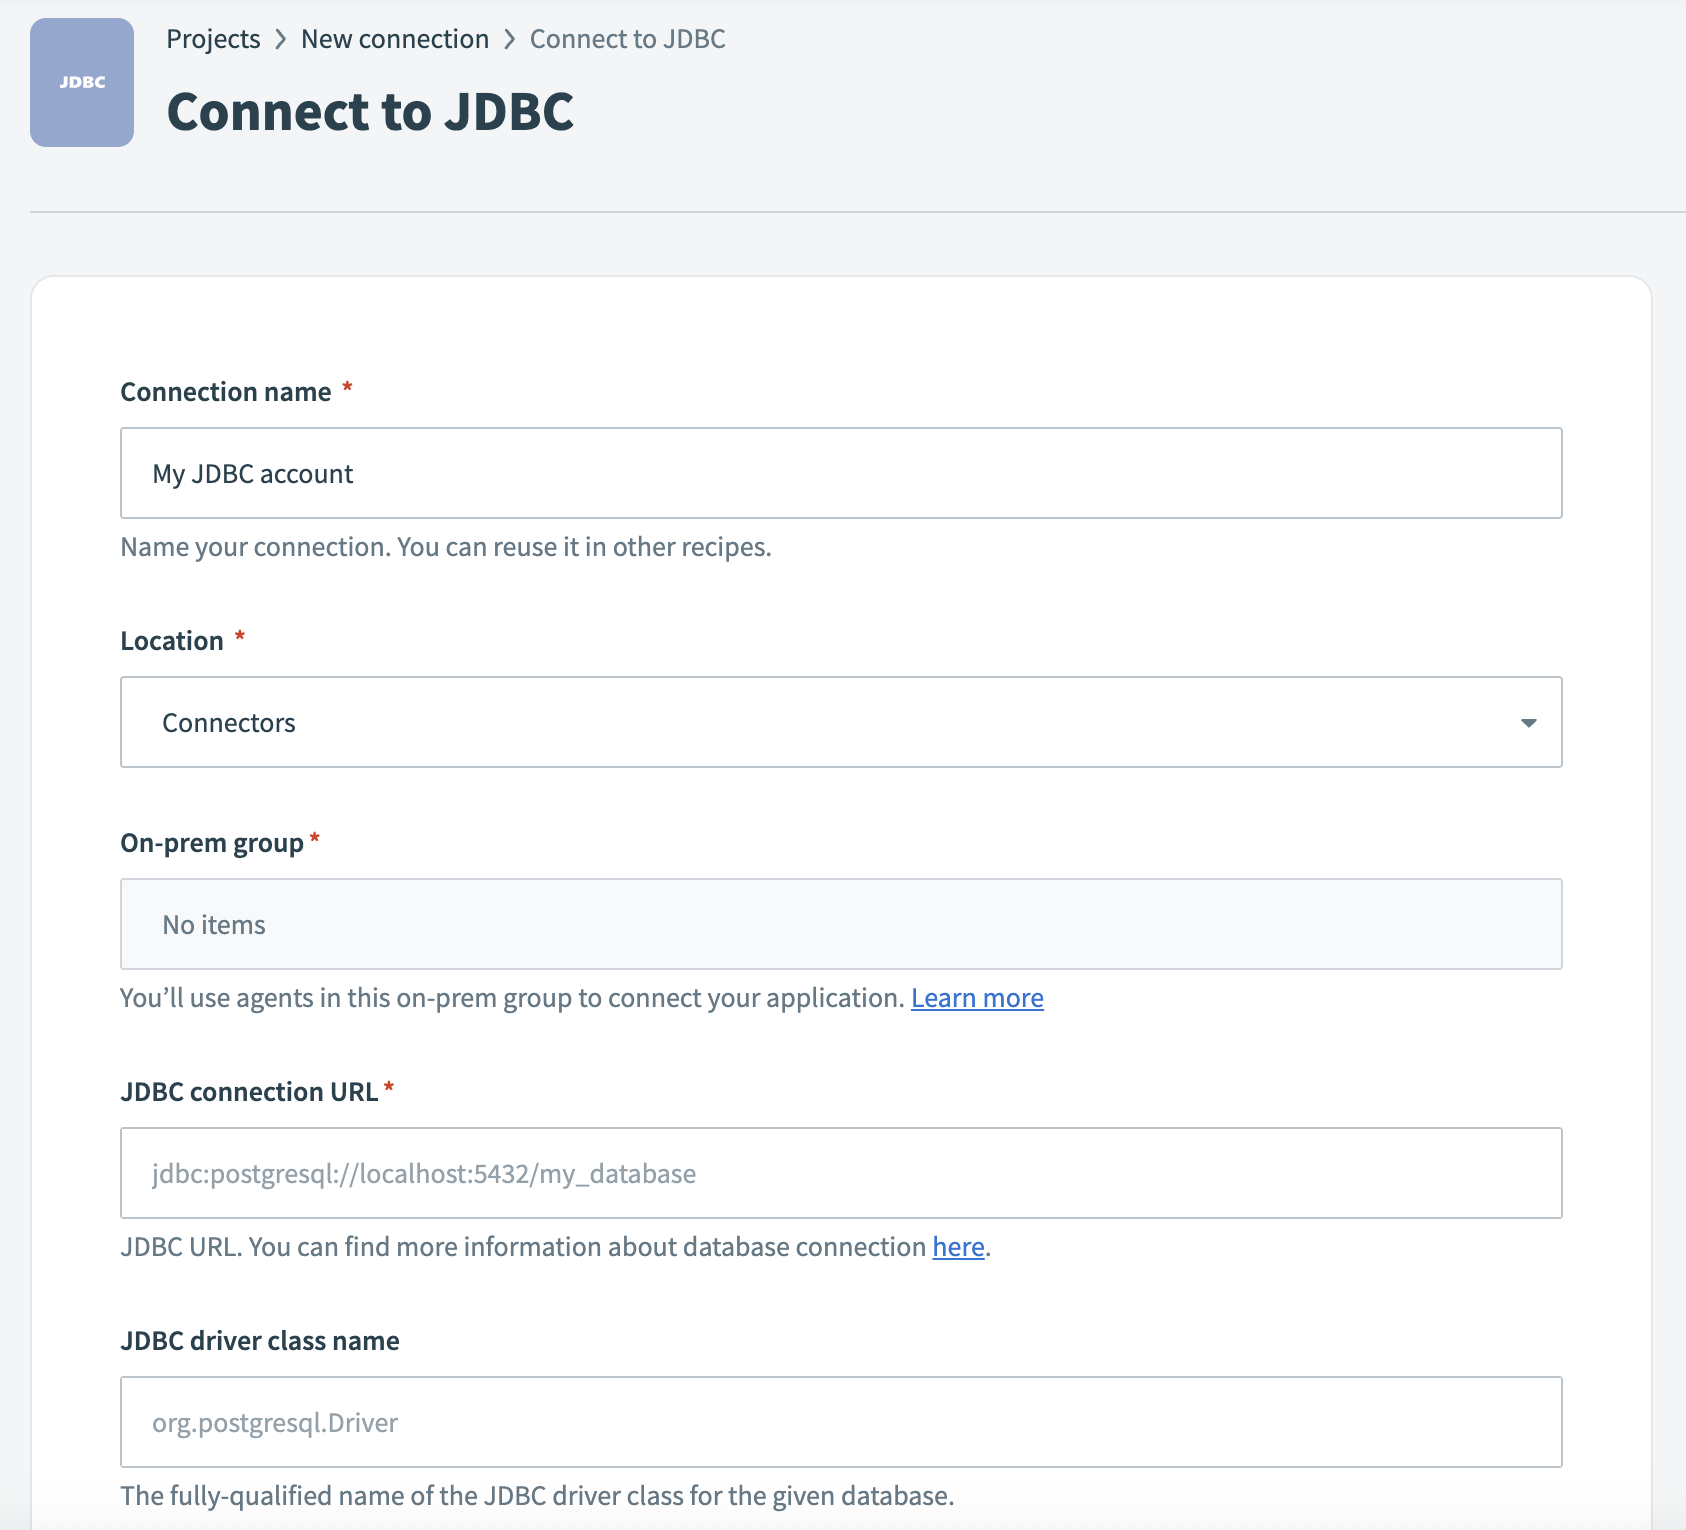
Complete the following steps to create a JDBC connection:
Provide a unique Connection name to identify your JDBC connection.
 Connect to JDBC
Use the Location drop-down menu to select the project where you plan to store the connection.
Use the On-prem group drop-down menu to select the connection profile you plan to use.
Enter your JDBC connection URL.
Enter the JDBC driver class name.
Enter your database username in the User name field.
Provide a Password if your database requires username/password authentication.
Configure Pooling settings to control the number of open connections to your database.
Enter the Schema if your JDBC driver or database requires a specific schema to access tables and views.
Expand the Additional properties for JDBC connection section to display the advanced configuration fields. Use this section to add authentication keys or other custom JDBC parameters.
Click Connect.
Snowflake connection using key-pair authentication
Use this method to connect to Snowflake through the JDBC connector using an on-prem agent and key pair authentication.
PREREQUISITES
You must complete the following tasks before you create a Snowflake JDBC connection using key pair authentication:
- Ensure the on-prem agent is installed and connected. Refer to the On-prem agent guide for more information.
- Register your private key with your Snowflake user. Refer to the Snowflake Configure private key authentication section for more information.
Complete the following steps to configure the JDBC connector with Snowflake key pair authentication:
Download the JDBC driver version 3.22.0 from the official Maven repository. This is the version currently supported by Workato for Snowflake connections.
Move the driver file to your on-prem agent's lib_ext/ folder.
Open a terminal and set the working directory to your on-prem agent folder.
Run the following command to restart the agent with the required Java options:
JAVA_OPTIONS="-Dnet.snowflake.jdbc.enableBouncyCastle=TRUE --add-opens=java.base/java.nio=ALL-UNNAMED" bin/run.shGo to Workato and select the recipe where you plan to connect to Snowflake through JDBC.
Search for and select JDBC on the New connection page.
Provide a name for your connection in the Connection name field.
Connect to JDBC
Use the Location drop-down menu to select the project where you plan to store the connection.
Use the On-prem group drop-down menu to select the connection profile you plan to use.
Enter the following in the JDBC connection URL field:
jdbc:snowflake://<your_domain>.snowflakecomputing.com/?warehouse=COMPUTE_WH&db=TESTING_DB&schema=PUBLIC&JDBC_QUERY_RESULT_FORMAT=JSONReplace <your_domain> with your Snowflake account domain. Note that the JDBC_QUERY_RESULT_FORMAT=JSON flag is required.
Replace COMPUTE_WH, TESTING_DB, and PUBLIC with your warehouse, database, and schema names.
Enter net.snowflake.client.jdbc.SnowflakeDriver in the JDBC driver class name field.
Enter your Snowflake username in the User name field.
Leave the Password field blank.
Expand the Additional properties for JDBC connection section.
Add the private_key_base64 connection property. This value is the base64-encoded content of your PKCS#8 private key file.
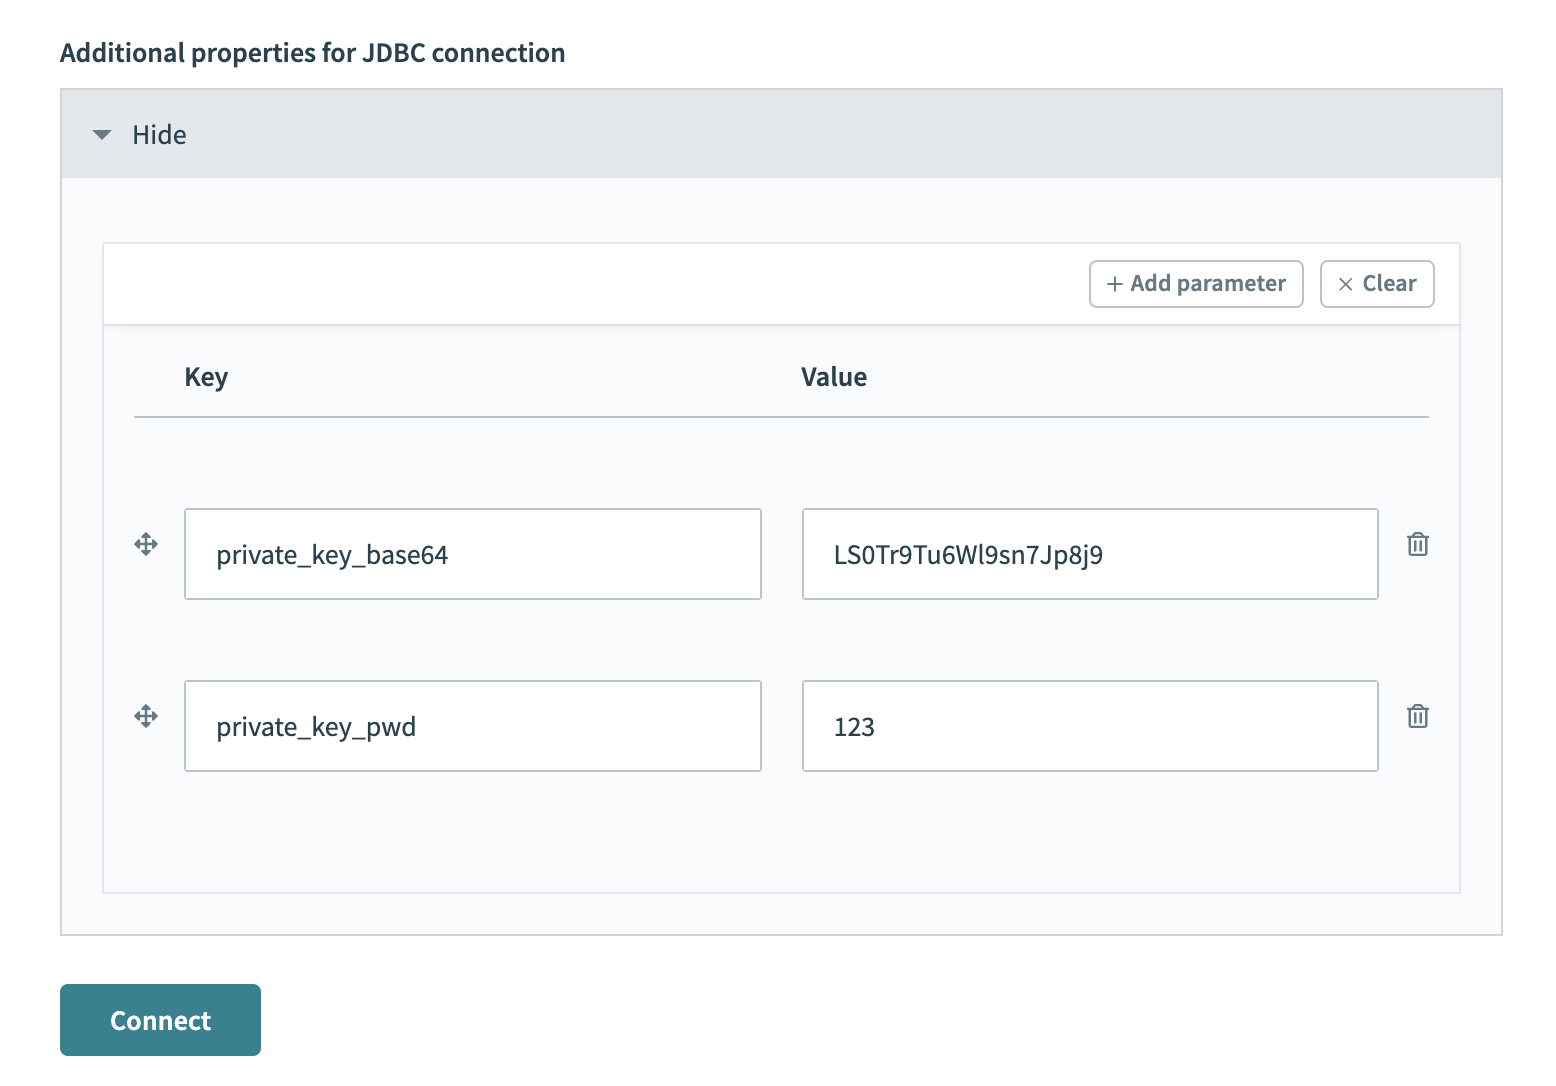 Add additional properties
You can generate it with the following command:
cat rsa_key.p8 | base64Add the private_key_pwd property if your private key is encrypted. Otherwise, omit this property.
Click Connect.
Working with the JDBC connector
Table and view
The JDBC connector works with all tables and views available to the credentials used to establish the connection. These are available in pick lists in each trigger/action, or you can provide the exact name.
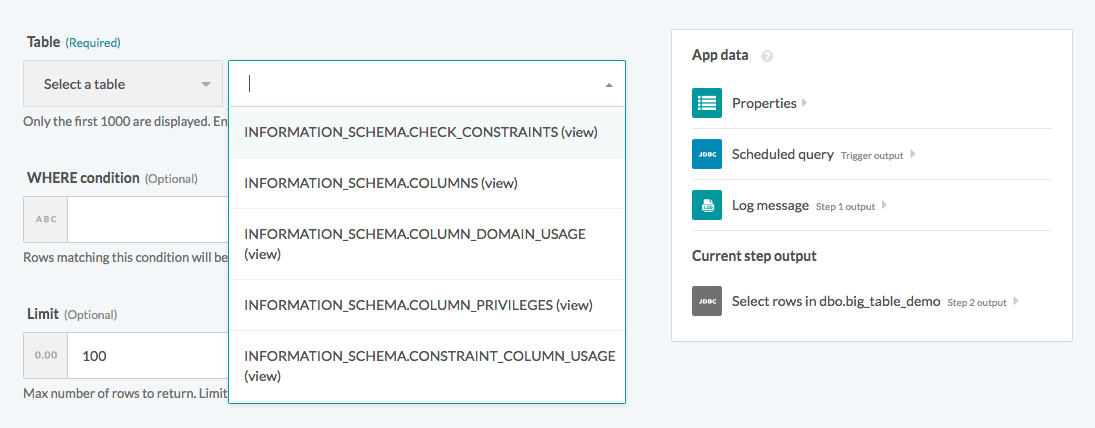 Select a table/view from the pick list
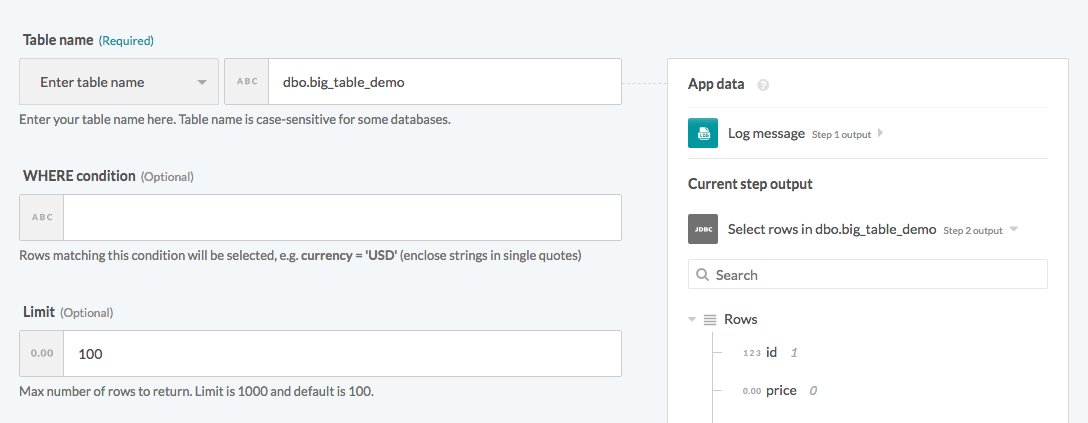 Provide the exact table/view name in a text field
The case sensitivity of the name of a table/view depends on your database implementation.
Single rows and batch rows
The JDBC connector can read or write to your database as a single row or in batches. When using batch triggers/actions, you must provide the batch size you wish to work with. The batch size can be any number between 1 and 100, with 100 being the maximum batch size.
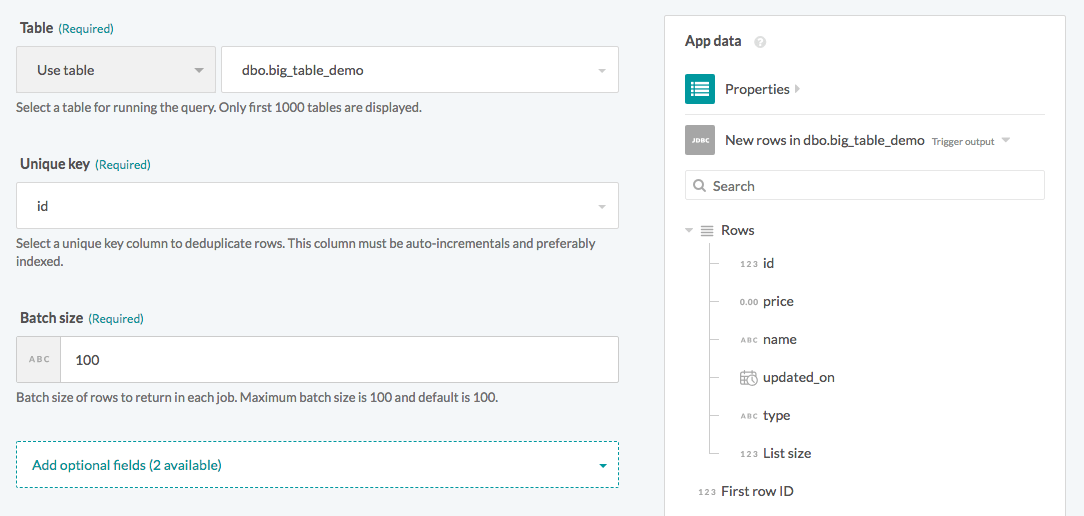 Batch trigger inputs
Besides the difference in input fields, there is also a difference between the outputs of these two types of operations. A trigger that processes rows one at a time has an output datatree that enables you to map data from that single row.
 Single row output
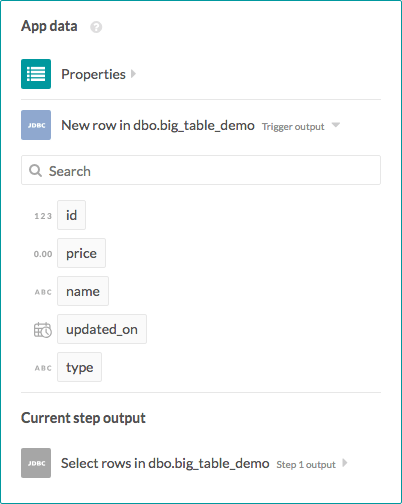
However, a trigger that processes rows in batches outputs them as an array of rows. The Rows datapill indicates that the output is a list containing data for each row in that batch.
 Batch trigger output
As a result, the output of batch triggers/actions must be handled differently. The output of the trigger can be used in actions with batch operations (like the Salesforce Create objects in bulk action) that requires mapping the Rows datapill into the source list. Learn how to work with lists in Workato.
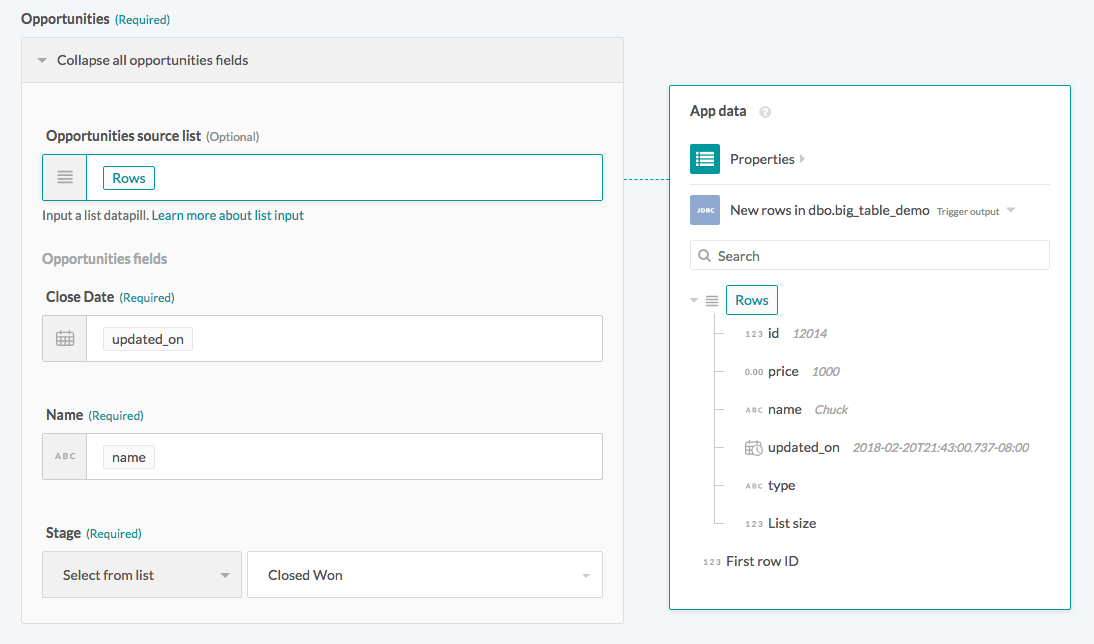 Using batch trigger output
WHERE condition
This input field filters and identifies rows to perform an action on. You can use the WHERE condition in multiple triggers and actions in the following ways:
- filter rows to be picked up in triggers
- filter rows in Select rows action
- filter rows to be deleted in Delete rows action
This clause is used as a WHERE statement in each request. It should follow basic SQL syntax.
Simple statements
Enclose string values in single quotes (''). Columns used must exist in the table/view.
A simple WHERE condition to filter rows based on values in a single column looks like this.
currency = 'USD'If used in a Select rows action, this WHERE condition returns all rows that have the value 'USD' in the currency column. Remember to wrap datapills with single quotes in your inputs.
 Using datapills in
 WHERE condition
Enclose column names with spaces in double quotes ("") or square brackets ([]). For example, to use currency code as an identifier, enclose it in brackets.
[currency code] = 'USD'
WHERE condition with enclosed identifier
Complex statements
Your WHERE condition can also contain subqueries. The following example selects inactive employees from the compensation table.
id in (select compensation_id from users where active = 0)When used in a Select rows action, this selects all rows in the compensation table related to users who are no longer active (active = 0).
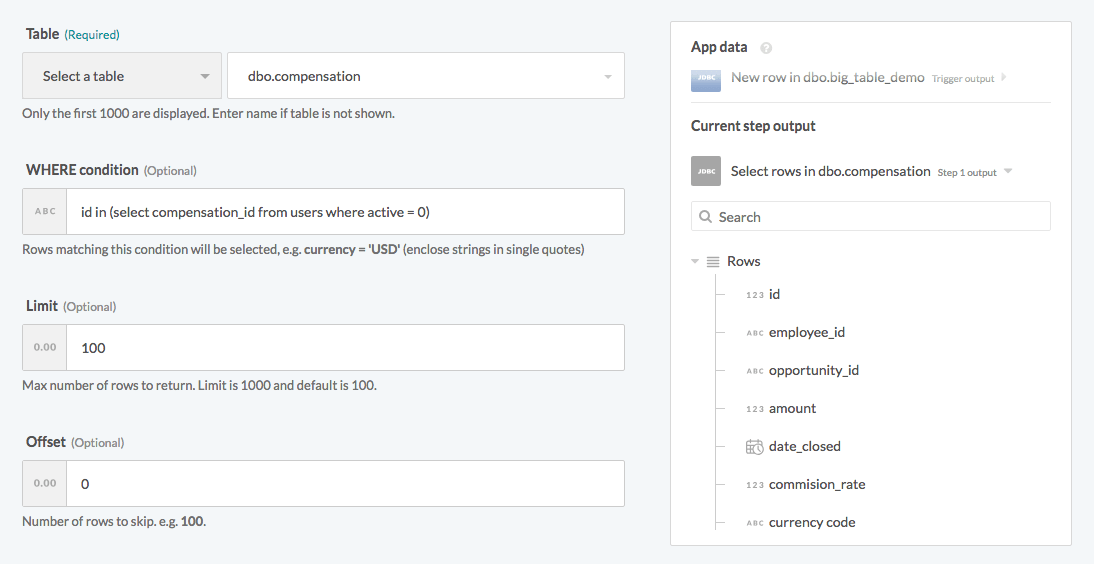 Using subquery in WHERE condition
Last updated: