Slack
Slack is a team collaboration platform that consolidates your team's communication and resources. Workato allows you to connect Slack with the enterprise and productivity apps used across your organization. Transform your team's conversations into automated tasks in those apps - all without leaving your Slack workspace.
SUMMARY
- The Slack connector integrates Slack with other apps, automating tasks within the Slack workspace.
- Workato supports both the Slack connector for workspace-level automation, and Workbot for Slack for complex chat interactions.
- The Slack connector uses the Slack Web API and works with both Slack for teams and Slack Enterprise Grid.
- Connection to Slack is through OAuth 2.0, with functionalities like posting messages or using Slack buttons.
FEATURE AVAILABILITY
The Slack connector isn't available to workspaces in the CN data center. This reflects local regulatory requirements and applies to our multi-tenant and Virtual Private Workato (VPW) offerings.
Slack connector or Workbot
Slack connector versus Workbot for Slack connector
Workato supports both the Slack connector and the Workbot for Slack connector.
With the Slack connector, a Slack administrator or team member can automate workflows on a workspace-level. You can also subscribe to workspace-level events and manage channels, groups, and more. For example, automate the creation, naming, purpose, and invitees of private Slack channels triggered by a ticket escalation in Jira.
Workbot for Slack allows you to use Slack's block kit to design complex chat interactions on any Slack surface, such as messages, modals, and app homes. Build rich, interactive chat flows with complete control over interactive elements such as buttons, select menus, radio buttons, date pickers, checkboxes, and more. These interactive elements can chain fluidly into one another, using Workbot commands. Easily build dynamically-rendered menus, buttons, and blocks using Workbot. Refer to Build your first Workbot for more information.
Refer to Slack connector VS Workbot for Slack connector for a comparison table.
API version
The Slack connector uses the Slack Web API v1 with the endpoint URL https://slack.com/api/METHOD.
Moving to granular permission scopes
On January 22, 2020, Slack released granular permissions, deprecating the umbrella bot scope in favor of individual scopes for bot users. Refer to Tokens for more information. Refer to Migrating classic apps for details on migrating to Slack apps.
Supported editions and versions
Workato connects to both Slack for teams (for single workspaces) and Slack Enterprise Grid (for multiple workspaces).
Connection setup
The Slack connector supports OAuth 2.0 authentication. You must log in to Slack and authorize the permissions that Workato requests.
Default scopes
You can customize the OAuth user scopes that Workato requests during connection setup. Workato requests the following default scopes unless you select your own in the OAuth user scopes field:
channels:readchannels:writechat:writegroups:readgroups:writeim:readim:writempim:readmpim:writeusers:readusers:read.email
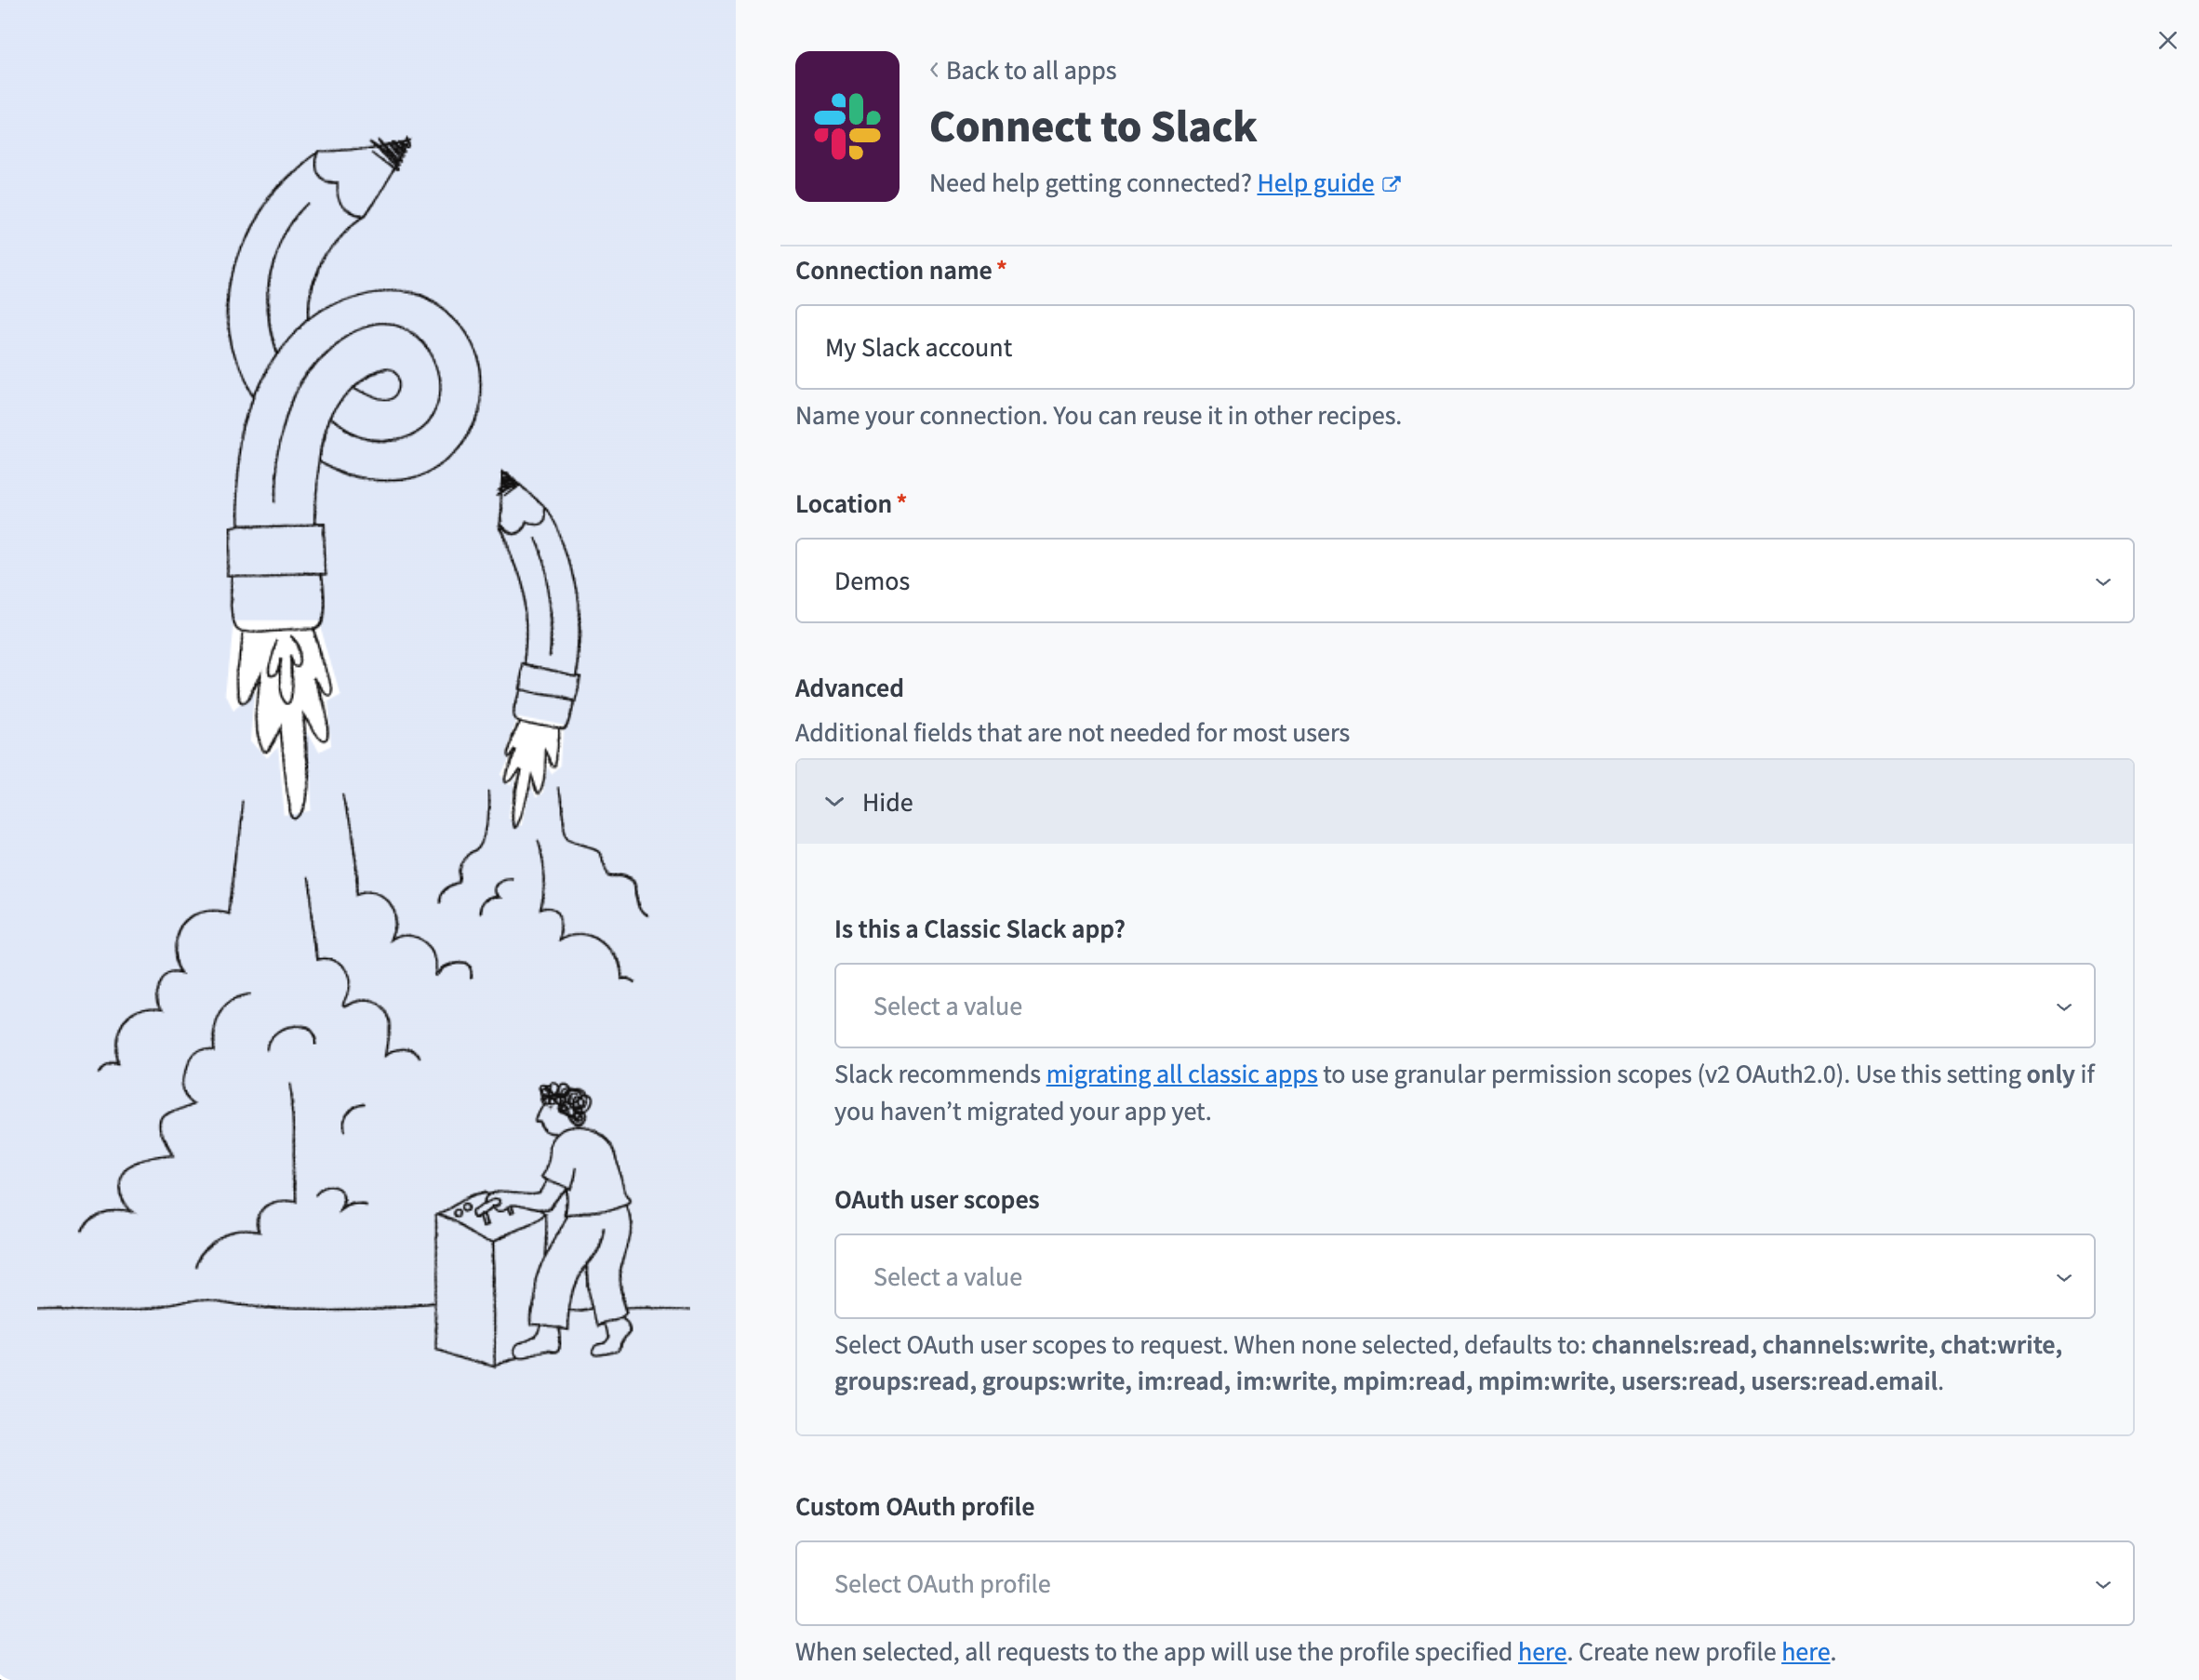
Connect to Slack using OAuth 2.0 authentication
Complete the following steps to connect to Slack in Workato:
Click Create > Connection or press C twice.
Search for Slack and select it as your app.
Enter a name for your connection in the Connection name field.
 Slack connection
Use the Location drop-down menu to select the project where you plan to store the connection.
Optional. Expand Advanced and use the Is this a Classic Slack app? drop-down menu to select Yes or No. Select Yes only if you haven't migrated your Slack app to granular permission scopes. Refer to Moving to granular permission scopes for more information.
Optional. Use the OAuth user scopes drop-down menu to select the OAuth user scopes to request for your connection. Leave this field empty to request the default scopes.
Optional. Use the Custom OAuth profile drop-down menu to select a custom OAuth profile for your connection. Refer to Custom OAuth profiles for Slack for more information.
Click Connect.
Click Allow to grant Workato permission to access your account.
Working with the Slack connector
Use the Slack connector to post messages, configure message buttons, and use threads.
Using the post message action
Use the Post message action to post a message to a channel or a direct message to a Slack user. By default, the message is posted as the authenticated user.
Example message with attachment
Learn how to format Slack messages in the following video.
Format Slack messages
The following example shows how a post message with an attachment appears in Slack:
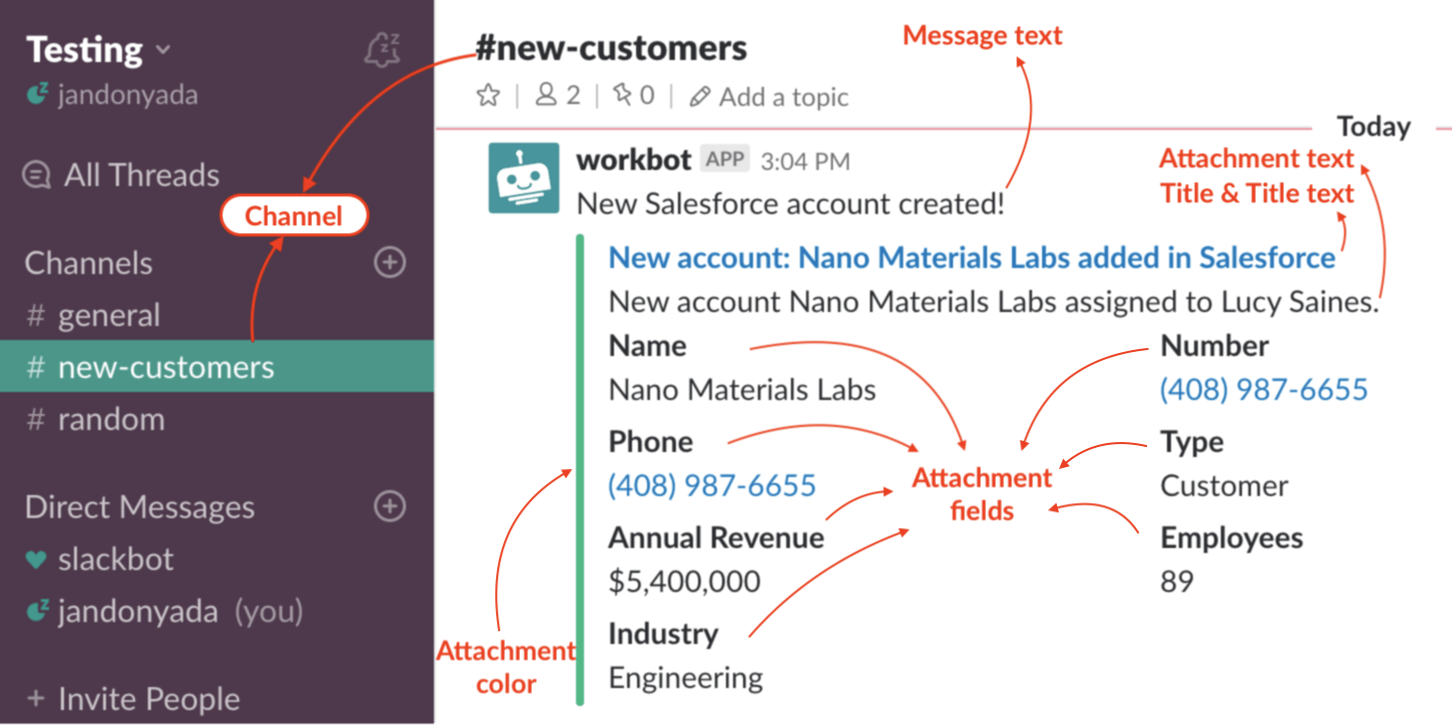 Basic example of the post message action with attachment
The following example shows the corresponding configuration for the action step, with the Message type set to Good (the attachment color is green). Refer to New Salesforce accounts post messages in Slack - message with attachment for an example recipe.
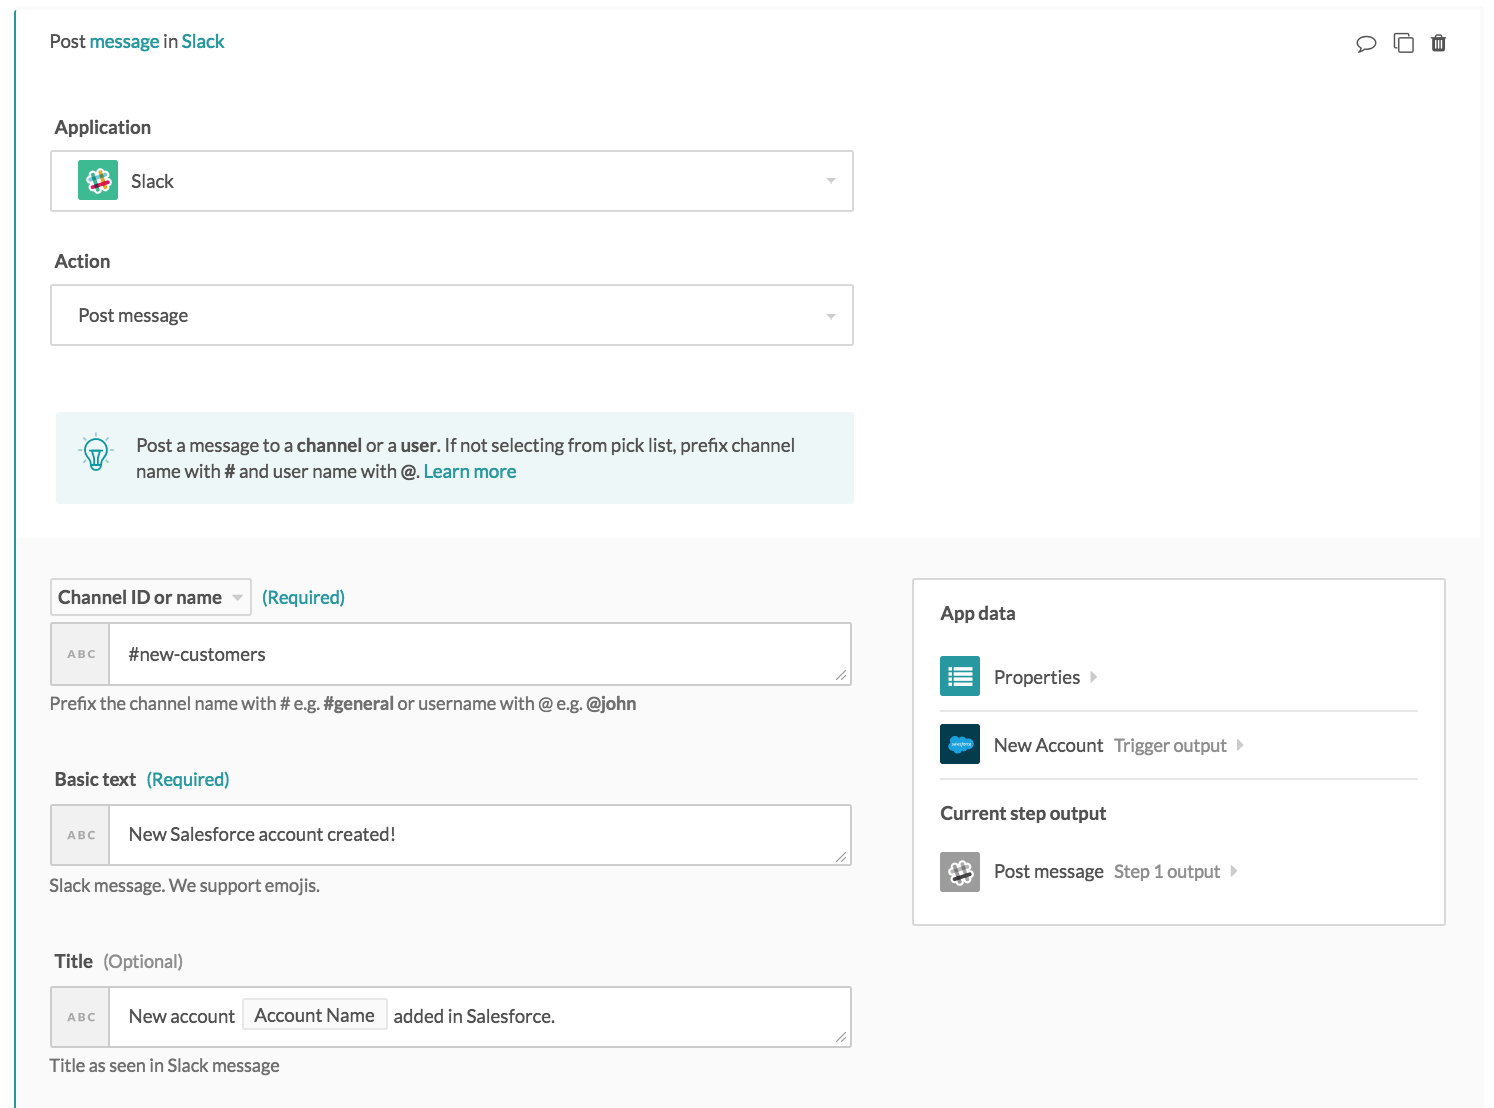
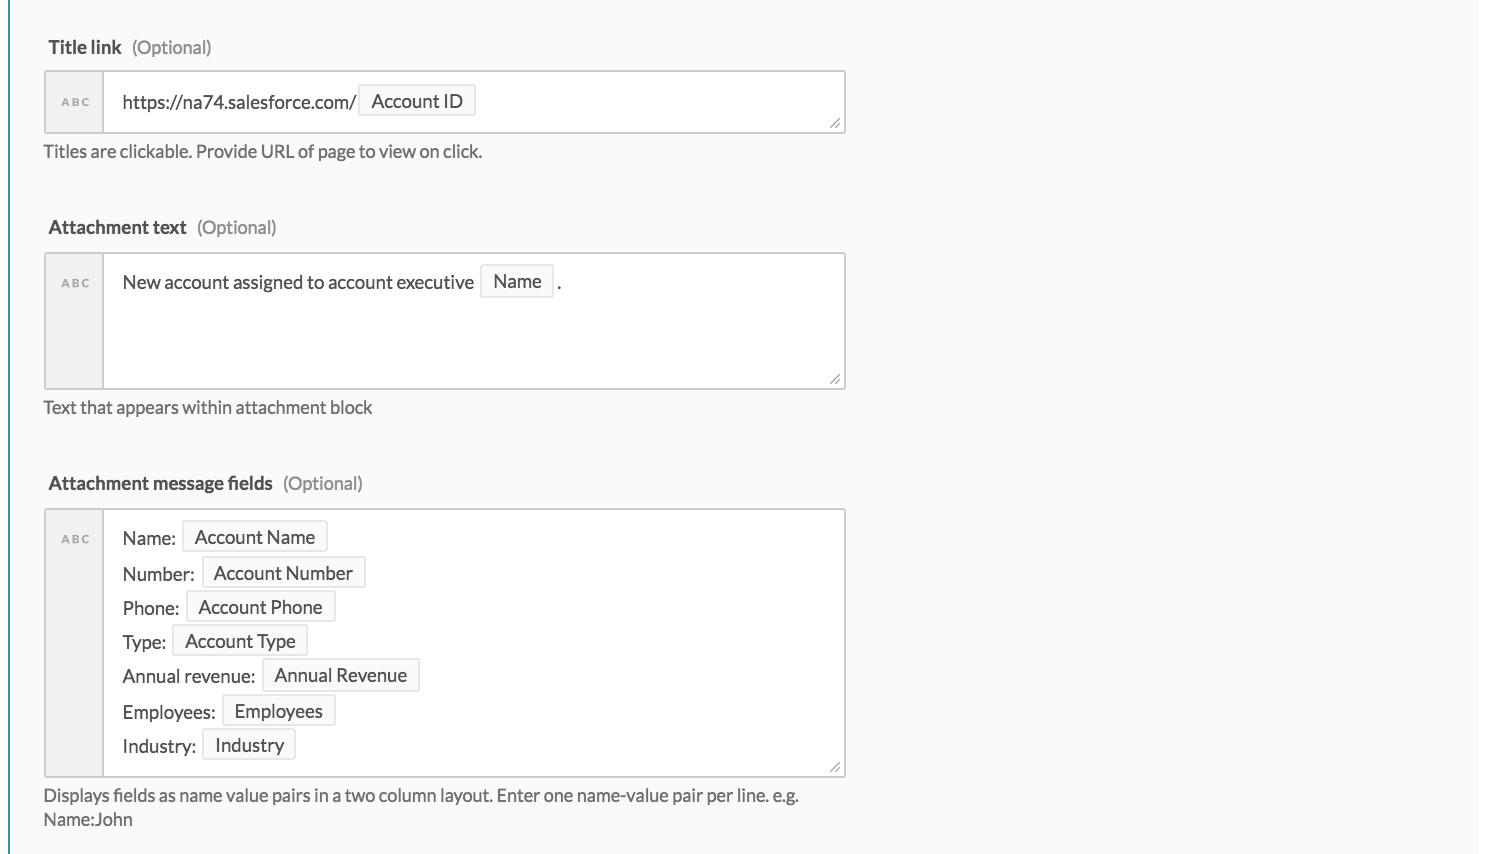 Post message action configuration - message with attachment.
Using Slack message buttons
Use Slack buttons to interact with messages in Slack. Refer to Legacy message buttons for more information. To use Slack buttons, you need the following recipes:
A recipe with a Post message action that has buttons configured. This recipe must refer to the following button action handler recipe in the button configuration.
A button click handler recipe (a recipe with a New button click trigger) that picks up button clicks. In the actions, there must be recipe logic that carries out actions depending on which button is clicked.
The two ways to build interactive Slack buttons recipes are:
- Using IF conditions. Refer to Examples of using IF conditions to build interactive Slack button recipes for more information.
- Using the Slack action Respond to button. Refer to Examples of using Slack respond to button action recipes for more information.
Examples of using IF conditions to build interactive Slack buttons recipes
Possible use cases for building your recipe with IF conditional recipe steps are team polls, where multiple button clicks are acceptable.
Example recipe with a post message action with buttons configured
Example recipe #1A: recipe with a post message action with buttons configured
The following example shows added buttons configuration to the basic recipe. Refer to Example message with attachment for more information. The buttons configured in this recipe are displayed in Slack in the following example.
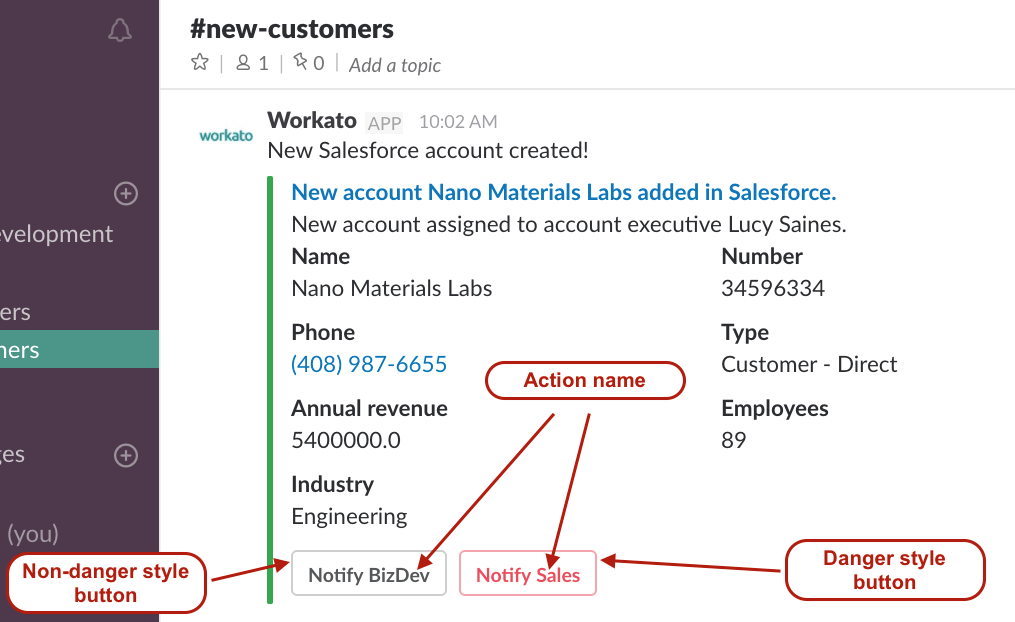 Corresponding buttons generated from the above configuration
Button styles: danger and non-danger
There are two available button styles: non-danger and danger. After the non-danger styled buttons are clicked, Slack records the button click immediately and triggers the second recipe with the New button click trigger.
After the danger styled buttons are clicked, Slack generates a popup prompt that asks the Slack user for confirmation of their click.
The popup prompt is completely configurable in the button configuration in the Slack action Post message.
Button definitions
See the following example for the button configuration for both button styles. This is a pre-built recipe. Refer to New Salesforce account button response recipe - Notify BizDev & Notify Sales (with post message action) for more information. All recipes with the Slack trigger New button click display in this picklist. Select the recipe you built to respond to this set of buttons.
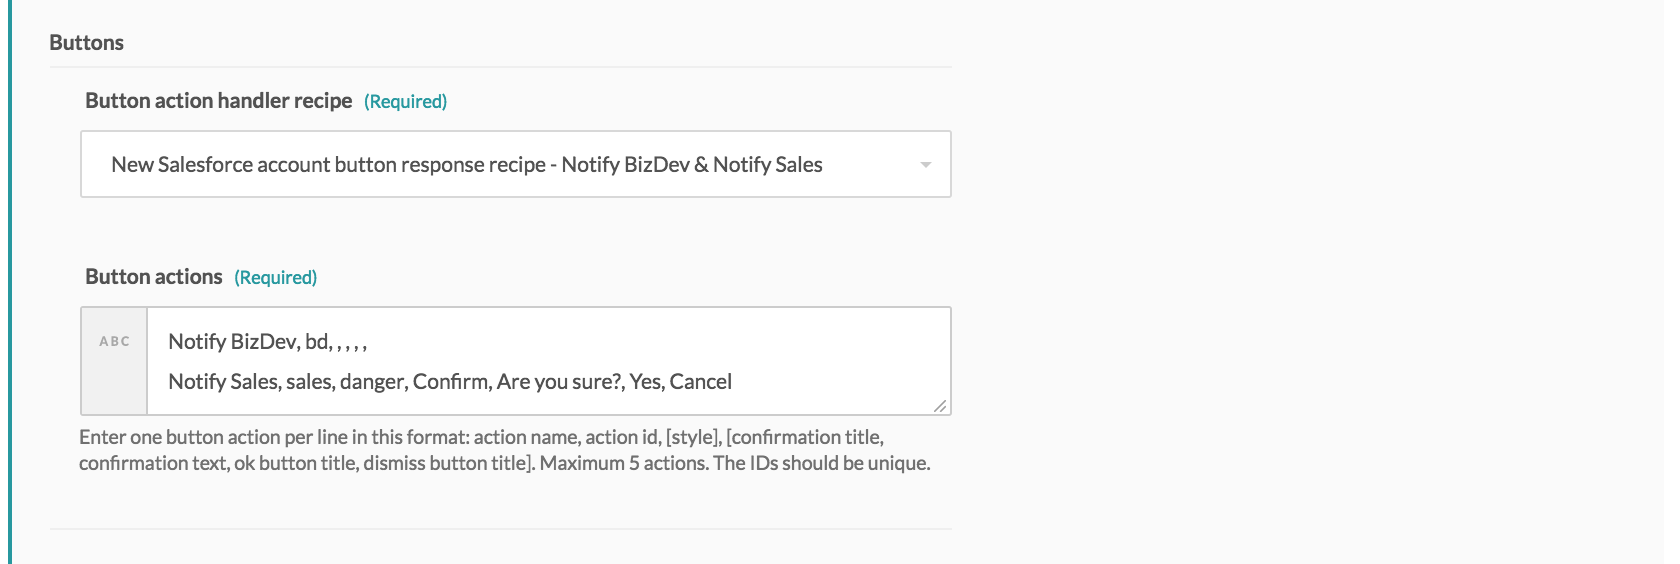 Button configuration for post message action step
| Button definition input fields | Description |
|---|---|
| Action name | Button label visible to Slack user interacting with the buttons. |
| Action ID | Internal value of button, needs to be unique, not visible on Slack to anyone. |
| Style | Leave blank for non-danger styled actions. Use danger to generate a red button with a popup prompt. Fill in remaining fields. |
| Confirmation title | Displays in popup prompt as header. |
| Confirmation text | Displays in popup prompt as body text. |
| Ok button title | Button label in popup prompt to confirm button click. |
| Dismiss button title | Button label in popup prompt to cancel button click. |
Example recipe with a new button click trigger with IF condition
Example recipe 1B: button action handler recipe - recipe with a new button click trigger with IF conditional logic defining the actions to carry out upon each button click
Using IF conditions is more versatile than using the Slack action Respond to button because you can carry out multiple steps in the IF condition and in multiple apps.
This example recipe checks which button was clicked using an IF condition and the button name. If the name matches Notify BizDev, it posts a message for the business development team. If the name matches Notify Sales, it posts a message for the sales team. Refer to New Salesforce account button response recipe - Notify BizDev & Notify Sales (with post message action) for more information.
Output of the Slack trigger - new button click
The datapills used in the IF conditions come from the Slack New button click trigger. The datapills are variables the recipe builder can use when building recipe actions.
| New button click trigger output datapills | Description |
|---|---|
| Action name | Button label visible to Slack user interacting with the buttons. |
| Action ID | Internal value of button, needs to be unique, not visible on Slack to anyone. |
| Channel | Channel where button click occurred. Retrieve channel internal Slack ID and channel name. |
| User | User who clicked the button. You can obtain both user internal Slack ID and username. |
| Team | Slack team where the button click occurred. You can obtain both unique domain and internal team ID. |
| Action timestamp | Epoch time when button click occurred. |
| Message ID | Epoch time when the message with buttons was sent. Can be used to populate Thread ID input fields to create a thread under this message. |
| Attachment ID | ID of attachment sent with initial Slack message with buttons, if any. |
| Response URL | Used by Workato to respond to button click, used in Slack action Respond to button. |
Examples of using Slack respond to button action recipes
Possible use cases for building your recipe with a new button click trigger with IF conditions are approval workflows, where you only want the button to be clicked once. For example, approving leave or approving expenses.
Example recipe with two post message actions with buttons configured
Example recipe #2A: recipe with two post message actions with buttons configured
This recipe is similar to the same recipe as the example recipe #1A except this recipe breaks up the single Slack action Post message into two separate Post message actions. Refer to Example recipe #1A: recipe with a post message action with buttons configured for more information. The first action posts notification information (in this case, my Salesforce account information), and the second action only posts button data. Refer to New Salesforce accounts post messages in Slack - message with attachment and buttons (with respond to button action) for the recipe.
When the button is clicked, it's immediately replaced by a message notifying either the business development or sales team. The input field Replace original? has been marked as true in the Respond to button action configuration.
You can remove the buttons from the Slack channel once they're clicked to prevent multiple clicks. The recipe breaks up the notification information and the buttons data into two separate actions to replace only the buttons with the new message, and not replace the notification information.
Example recipe with new button click trigger
Example recipe #2B: button action handler recipe - recipe with a new button click trigger with Slack action Respond to button that responds to each button click with a Slack message
This recipe is another way to build the interactive scenario on Slack. Similarly, it posts different messages back in the channel depending on which button is clicked. Use the Slack action Respond to button to immediately post a message back into the channel.
With the Respond to button action, simply pass in the button response URL, and the recipe knows at run-time, which button was clicked. For example, to post a generic message that tells the channel which button was clicked, use this action.
Input of the Slack action - respond to button action
The following are the new input fields that the Slack action Respond to button introduces to the usual input fields in the Post message action.
| Respond to button action input field | Description |
|---|---|
| Button response URL | Provide the Response URL datapill from the output datatree of the Slack New button click trigger. This tells the action which button click to respond to. |
| Response type | In channel posts the message like a normal chat message. Ephemeral posts are only visible to the user. |
| Replace original | If yes, new message overwrites original message with buttons and is posted in same position in channel. If no, original message with buttons remains in same position in channel. New message is added to end of channel conversation. |
| Delete original | If yes, the original message with buttons is removed from the channel, and a new message is added to the end of the channel conversation. If no, the original message with buttons remains in the same position in the channel, and a new message is added to the end of the channel conversation. |
Using Slack threads
Slack threads allow you to group related messages together, making it easier to follow conversations in Slack channels or groups. Refer to Threading messages for more information.
To use Slack threads, you can do one of the following:
- Reply to a message ID and start a thread to continue a conversation.
- Reply to the parent message ID (first message of the thread) to continue a conversation.
- Reply to the thread ID to continue an existing thread.
You must specify the message ID, parent message ID, or thread ID in the Thread ID input field to start or continue a thread.
Example recipe #1: recipe that replies to a message ID and starts a thread
Example recipe 1B creates a new thread by posting under the original message when a user clicks Notify BizDev. Refer to New Salesforce account button response recipe - Notify BizDev & Notify Sales (with post message action) for the recipe. Refer to Example recipe 1B: button action handler recipe - recipe with a new button click trigger with IF conditional logic defining the actions to carry out upon each button click for the example.
The configuration in the recipe passes the original Slack message ID into the Thread ID input field. It creates a new thread because the message currently has no thread.
Respectively, if a Slack user clicks on the Notify Sales button, it creates a new thread and posts under the original message.
Example recipe #2: recipe that replies to a parent message ID and continues a thread
Using Example recipe 1B again, using the parent message ID also works to post to an existing thread. For example, when a user clicks the Notify BizDev button again, it posts to the same thread.
In the action's thread configuration, specify the parent message ID in the Thread ID input field, which is the initial message that the thread is under.
Last updated: