# SDK Reference - connection
This section enumerates all the possible keys available when defining your connection.
Quick Overview
To put it simply, the connection hash contains all the instructions your connector needs to establish a successful connection.
- The
fieldskey tells your connector what input fields to show so it can collect information for authorization. - The
extended_fieldskey allows you to dynamically show more connection fields based on previous inputs. This field is optional to define. - The
authorizationkey tells your connector what to do with the information it has collected - use that to exchange it for an access_token. - The
base_urikey tells your connector what to prepend to every HTTP request after connection is successful. This allows you to use relative paths in your connector code when defining actions and triggers.
# Structure
  connection: {
    fields: Array,

    extended_fields: lambda do |connection|
      Array
    end,

    authorization: Hash,

    base_uri: lambda do |connection|
      String
    end
  }
# fields
The 'fields' key has the following attributes:
- Key
fields- Type
- Array
- Required
- False
- Description
- Accepts an array of hashes. Each hash in this array corresponds to a separate input field.
To learn how to define input fields in Workato, see SDK Reference - Schema.
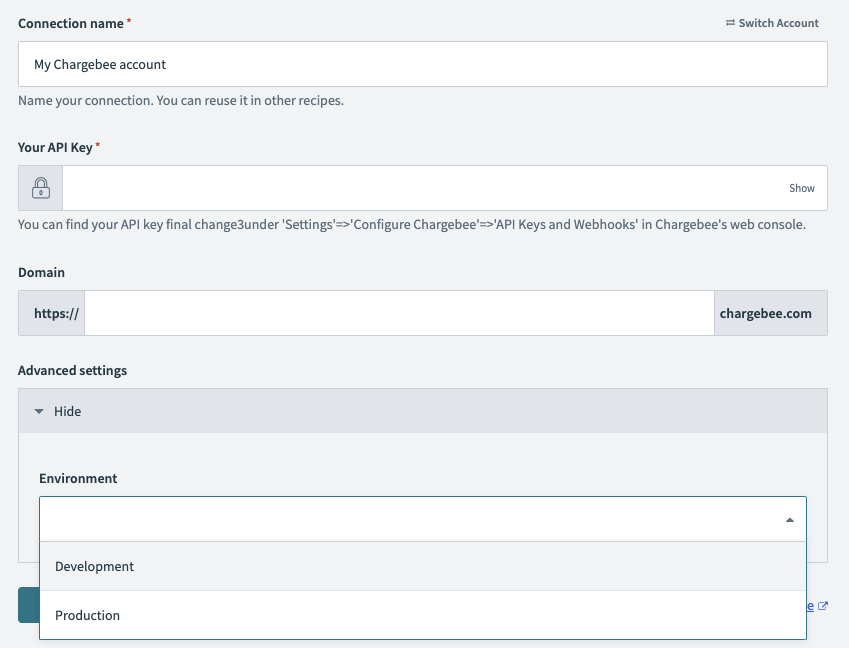
# Picklists in connection fields
For fields with control_type defined as select or multiselect, use the options attribute to define a static picklist instead of the pick_list attribute.
Picklist does not apply to connection hash
References to any picklists you defined in your connector are not accessible in the connection hash because no credentials have been received at this time.
# Example: Connection fields with picklist nested in advanced settings

    fields: [
      {
        name: 'api_key',
        control_type: 'password',
        hint: 'You can find your API key final change3' \
          "under 'Settings'=>'Configure Chargebee'=>'API Keys and Webhooks'" \
          " in Chargebee's web console.",
        label: 'Your API Key',
        default: "helloaaaabbb",
        optional: false
      },
      {
        name: 'domain',
        control_type: 'subdomain',
        url: 'chargebee.com'
      },
      {
        name: "advanced_settings",
        type: "object",
        optional: "true",
        properties: [
          {
            name: "environment",
            optional: true,
            control_type: "select",
            options: [
              ["Development", "dev"],
              ["Production", "prod"]
            ]
          }
        ]
      }
    ],
# extended_fields
The 'extended_fields' key has the following attributes:
- Key
extended_fields- Type
- lambda function
- Required
- False
- Description
- Allows you to optionally display more input fields based on your connection. The output is expected to be a valid Workato schema. Find out more about SDK Reference - Schema.
# How to use extended_fields
With extended_fields, you can dynamically display additional fields based on previous input fields. If your connection setup is complex and consists of many input fields, consider limiting the number of fields that a user can see. Instead of displaying all fields at the same time, use extended_fields to control how many fields to display to the user initially, and when to display additional fields.
In this case, extended_fields provides you with the added benefit of controlling which fields to display for the users during connection setup, and guiding them through the experience. In some cases, you may also restrict some fields from the display when they are not relevant.
# Example: Connection fields with extended_fields
    fields: [
      {
        name: "api_key",
        control_type: "password",
        hint: "You can find your API key " \
          "under 'Settings'=>'Configure Chargebee'=>'API Keys and Webhooks'" \
          " in Chargebee's web console.",
        label: "Your API Key"
      },
      {
        name: "custom_domain",
        label: "Are you using a custom domain?",
        extends_schema: true,
        control_type: "checkbox"
      }
    ],

    extended_fields: lambda do |connection|
      if connection['custom_domain'] == "true"
        [
          {
            name: "domain",
            control_type: "subdomain",
            extends_schema: true,
            url: ".acme.com"
          }
        ]
      end
    end,
Workato passes the connection hash to all other lambdas, including authorization and execute. The connection hash contains values from both fields and extended_fields.
# Example: Connection fields with extended_fields and extends_schema
The following example shows how to use extends_schema within extended_fields to create a connection setup that has multiple steps.
  connection: {
    fields: [
      {
        name: "api_key",
        control_type: "password",
        hint: "You can find your API key " \
          "under 'Settings'=>'Configure Chargebee'=>'API Keys and Webhooks'" \
          " in Chargebee's web console.",
        label: "Your API Key"
      },
      {
        name: "custom_domain",
        label: "Are you using a custom domain?",
        extends_schema: true,
        control_type: "checkbox"
      }
    ],

    extended_fields: lambda do |connection|
        [
          (
            if connection['custom_domain'] == "true"
              {
                name: "domain",
                control_type: "subdomain",
                optional: false,
                url: ".acme.com"
              }
            end
          ),
          (
            if connection['custom_domain'] == "true"
              {
                name: "instance_type",
                control_type: "select",
                extends_schema: true,
                optional: false,
                options: [ ["Production", "production"], ["Sandbox", "sandbox"]]
              }
            end
          ),
          (
            if connection['instance_type'] == "sandbox"
              {
                name: "protocol",
                control_type: "select",
                optional: false,
                options: [ ["HTTPS", "https://"], ["HTTP", "http://"]]
              }
            end
          )
        ].compact
    end,

    authorization: {
      type: 'basic',

      apply: lambda { |connection, access_token|
        headers("x-api-key": "#{connection['api_key']}")
      }
    },

    base_uri: lambda do |connection|
        if connection['custom_domain'] == "true"
          "#{connection['protocol']}#{connection['domain']}.acme.com/"
        else
          "https://api.acme.com/"
        end
    end
  },
# authorization
The 'authorization' key has the following attributes:
- Key
authorization- Type
- Hash
- Required
- True
- Description
- Accepts an object with child keys corresponding to different types of authentication
Find out more about the authorization hash in SDK Reference - authorization.
# base_uri
The 'base_uri' key has the following attributes:
- Key
base_uri- Type
- lambda function
- Required
- False. However, we recommend it.
- Description
- Defines the base URI for all future HTTP requests.
- Possible Arguments
- connection
- Hash that represents user-provided inputs defined in
Connection.
- Expected Output
String, such as one of:
"https://#{connection['host']}.com/""https://api.acme.com"
# Configuring your base_uri
When you define your base_uri key, make sure to note the final URI that you provide. There are two scenarios when using base_uri in conjunction with any downstream HTTP requests.
When you have a preceding "/" (forward slash) in the verb method (such as
get('/hello/there')), we ignore any path parameters in thebase_uri.For example,
https://api.hubapi.com/test/defined as yourbase_urieffectively becomeshttps://api.hubapi.com. The request is sent tohttps://api.hubapi.com/hello/there.If you don’t have a preceding "/" (forward slash) in the verb method (such as
get('hello/there')), we adopt the path parameters in yourbase_uri.For example,
https://api.hubapi.com/test/defined as yourbase_uriremainshttps://api.hubapi.com/test/. The request is sent tohttps://api.hubapi.com/test/hello/there.
Last updated: 5/21/2025, 5:22:32 AM