Set up HR Self Service Genie
Use this guide to install and configure HR Self Service Genie in your workspace.
Prerequisites
Complete the following before you begin setup:
- Confirm that the Genie Installer is already installed in your workspace. Contact your Workato account team to complete this one-time setup if it isn't already installed.
- Have access to a Workday tenant with the HR domains and business processes configured for the self-service capabilities you plan to deploy.
- Create a Workday Integration System User (ISU) with the domain security permissions required by the operations you enable, including the Worker Data, Time Off, and Organization domains. Refer to Configure connections for more information.
- Make sure users access the genie through an authenticated session. The genie resolves each request to an employee identity before applying employee and manager authorization boundaries.
Additionally, complete the following for each extension you plan to enable:
- Employee information updates, employee lookup, or worker documents: Have a Workday Web Services connection available.
- Employee information updates: Prepare the mandatory fields and reference values for your Workday tenant and countries. Refer to Configure Workday validation fields for more information.
- HR ticketing: Have a Jira Service Management tenant with an HR service project, configured request types and required fields, and permissions to create and retrieve tickets.
- HR knowledge Q&A: Have a Confluence connection and a space that contains the approved HR policies and documentation to ingest.
Install HR Self Service Genie
Complete the following steps to install the required packages for HR Self Service Genie:
Go to Agentic | Installer > Templates > FUNC | [SAMPLE] 3. Install Genie Module.
Click Edit, then do the following:
Refresh the recipe to load the latest available packages.
In Step 2, select the latest version of Agentic | HR Self Service Genie from the Genie Module drop-down menu. Set Get dependencies to No.
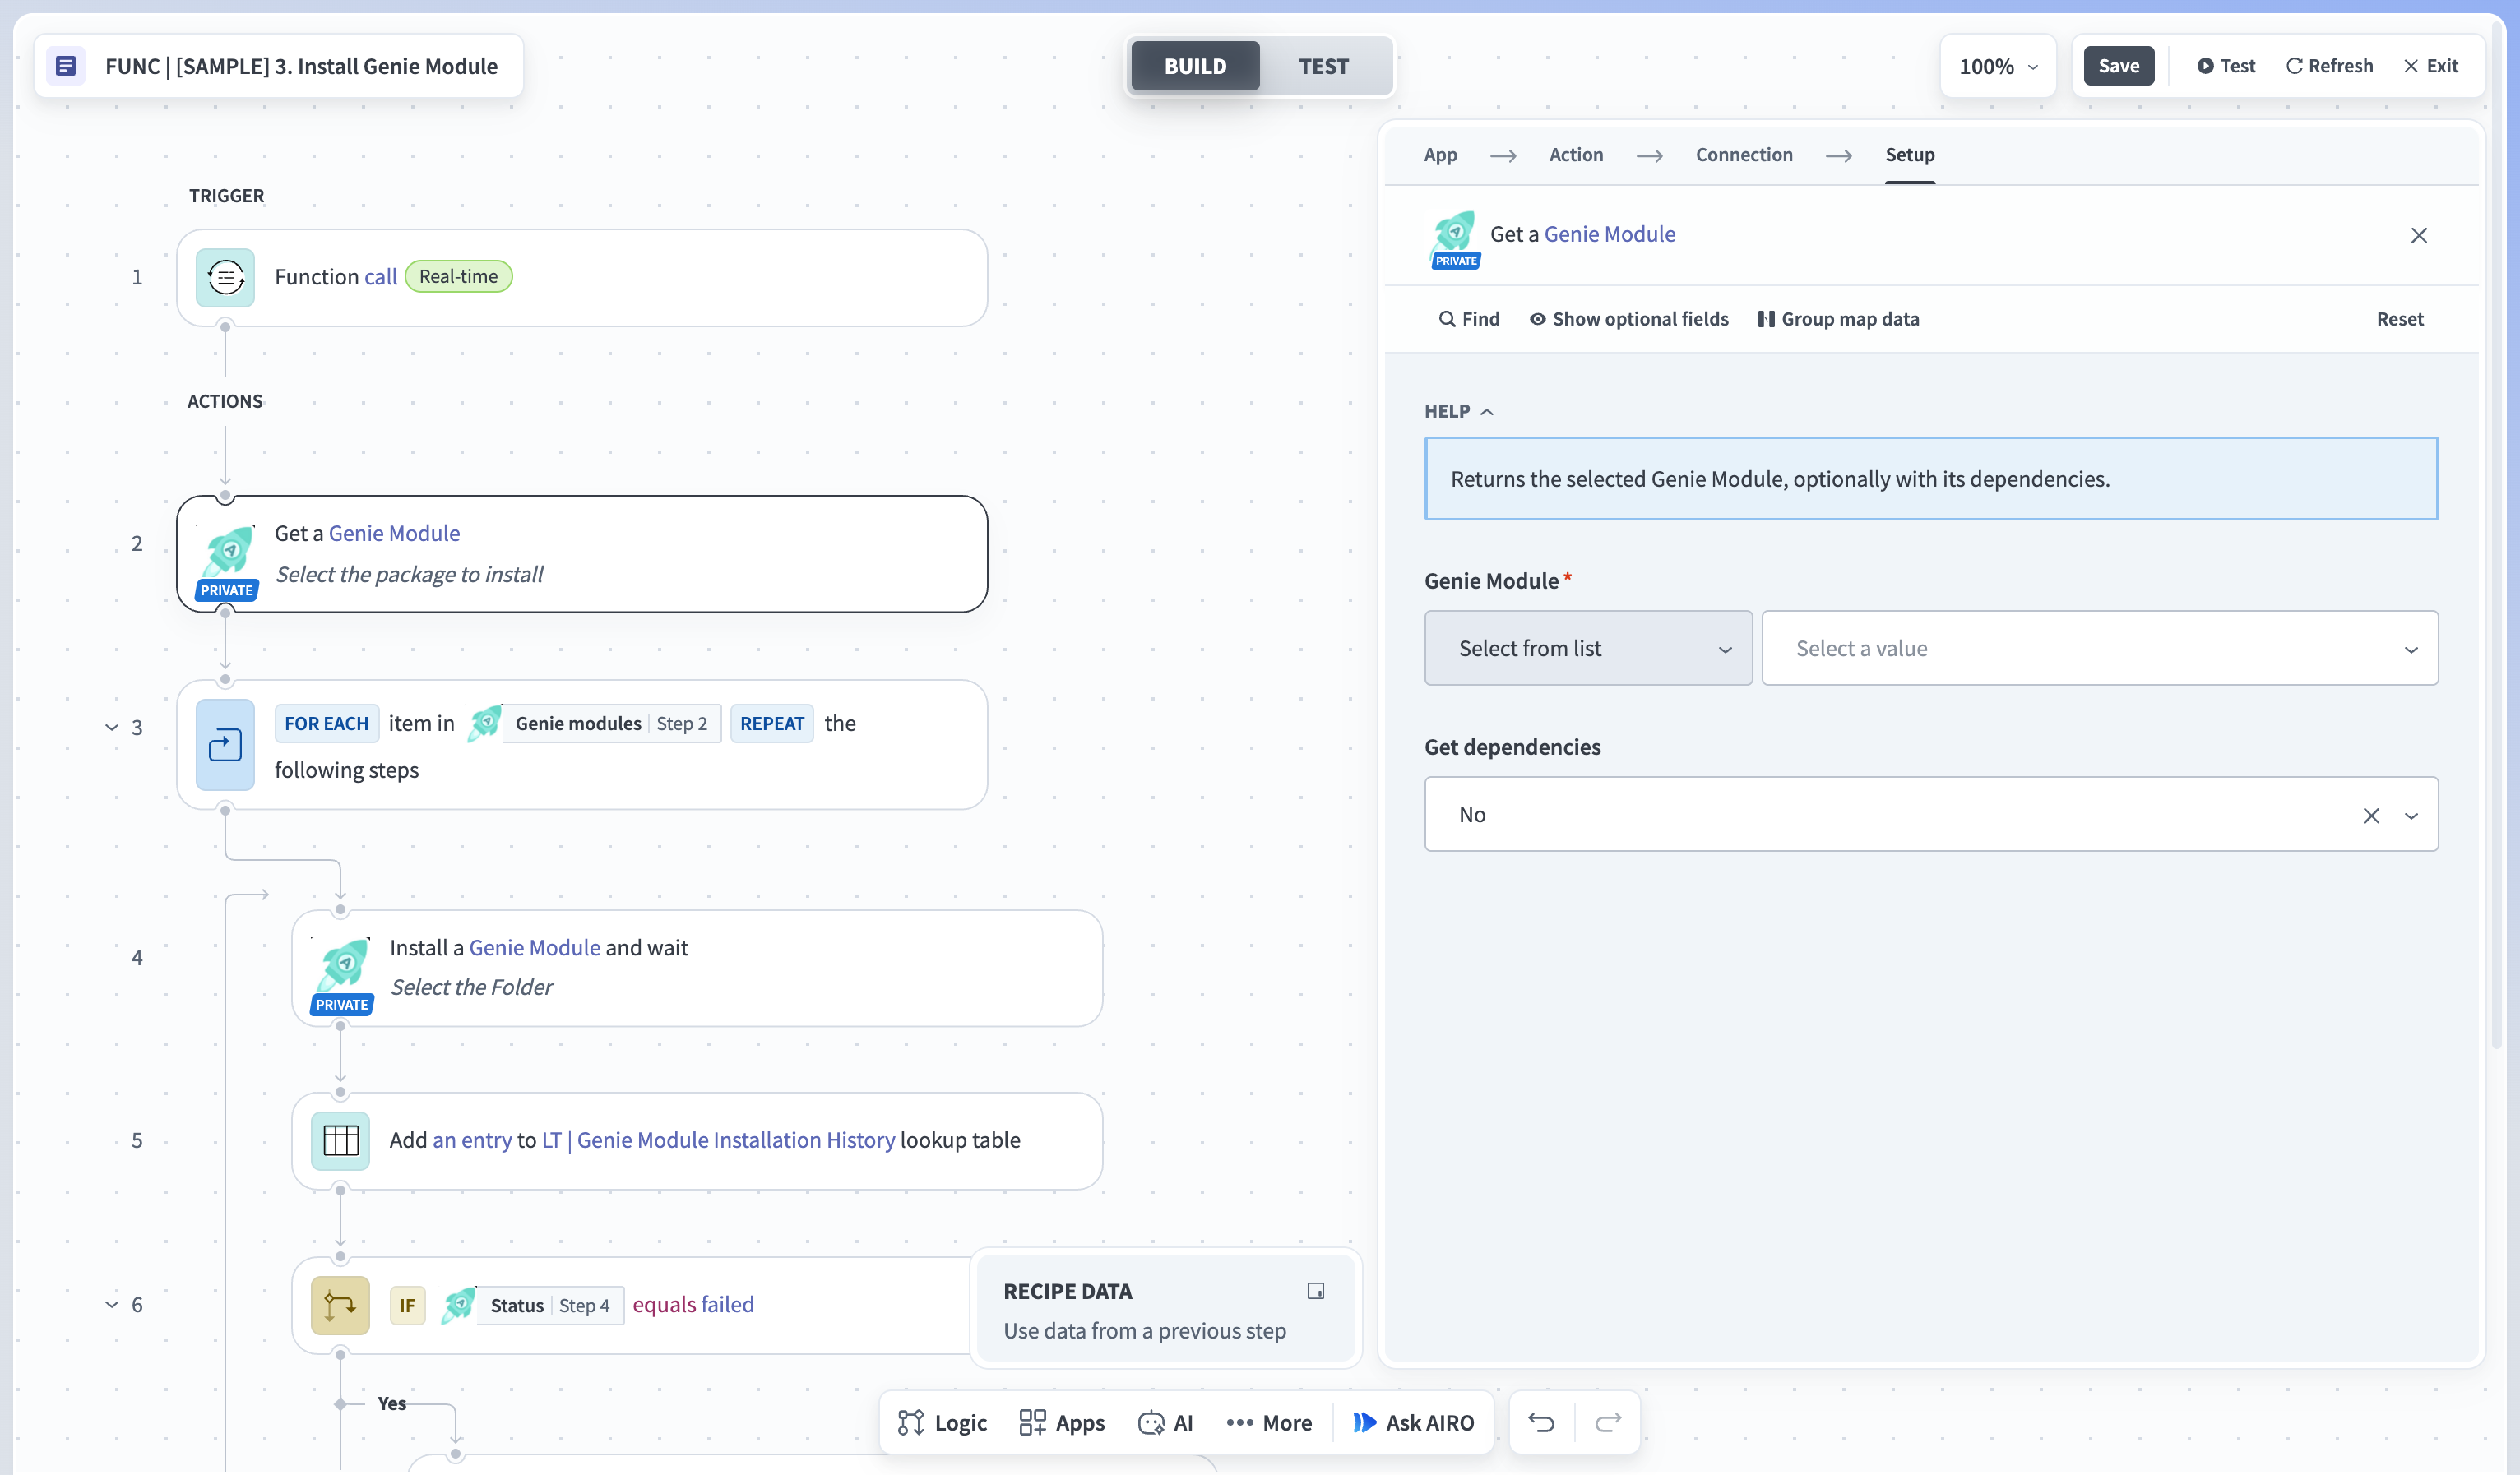 Select the latest version of the genie module
MODULE NOT VISIBLE
If Agentic | HR Self Service Genie doesn't appear in the drop-down menu, your workspace may not have been granted access. Contact your Workato account team and repeat this step once access is confirmed.
In Step 4, set the Folder field based on your install type:
- Fresh install: Leave the field empty. If you see an x icon next to the Folder field, click it to clear the cached value before running the job.
- Upgrade: Select the existing Agentic | HR Self Service Genie project. This preserves your existing configuration.
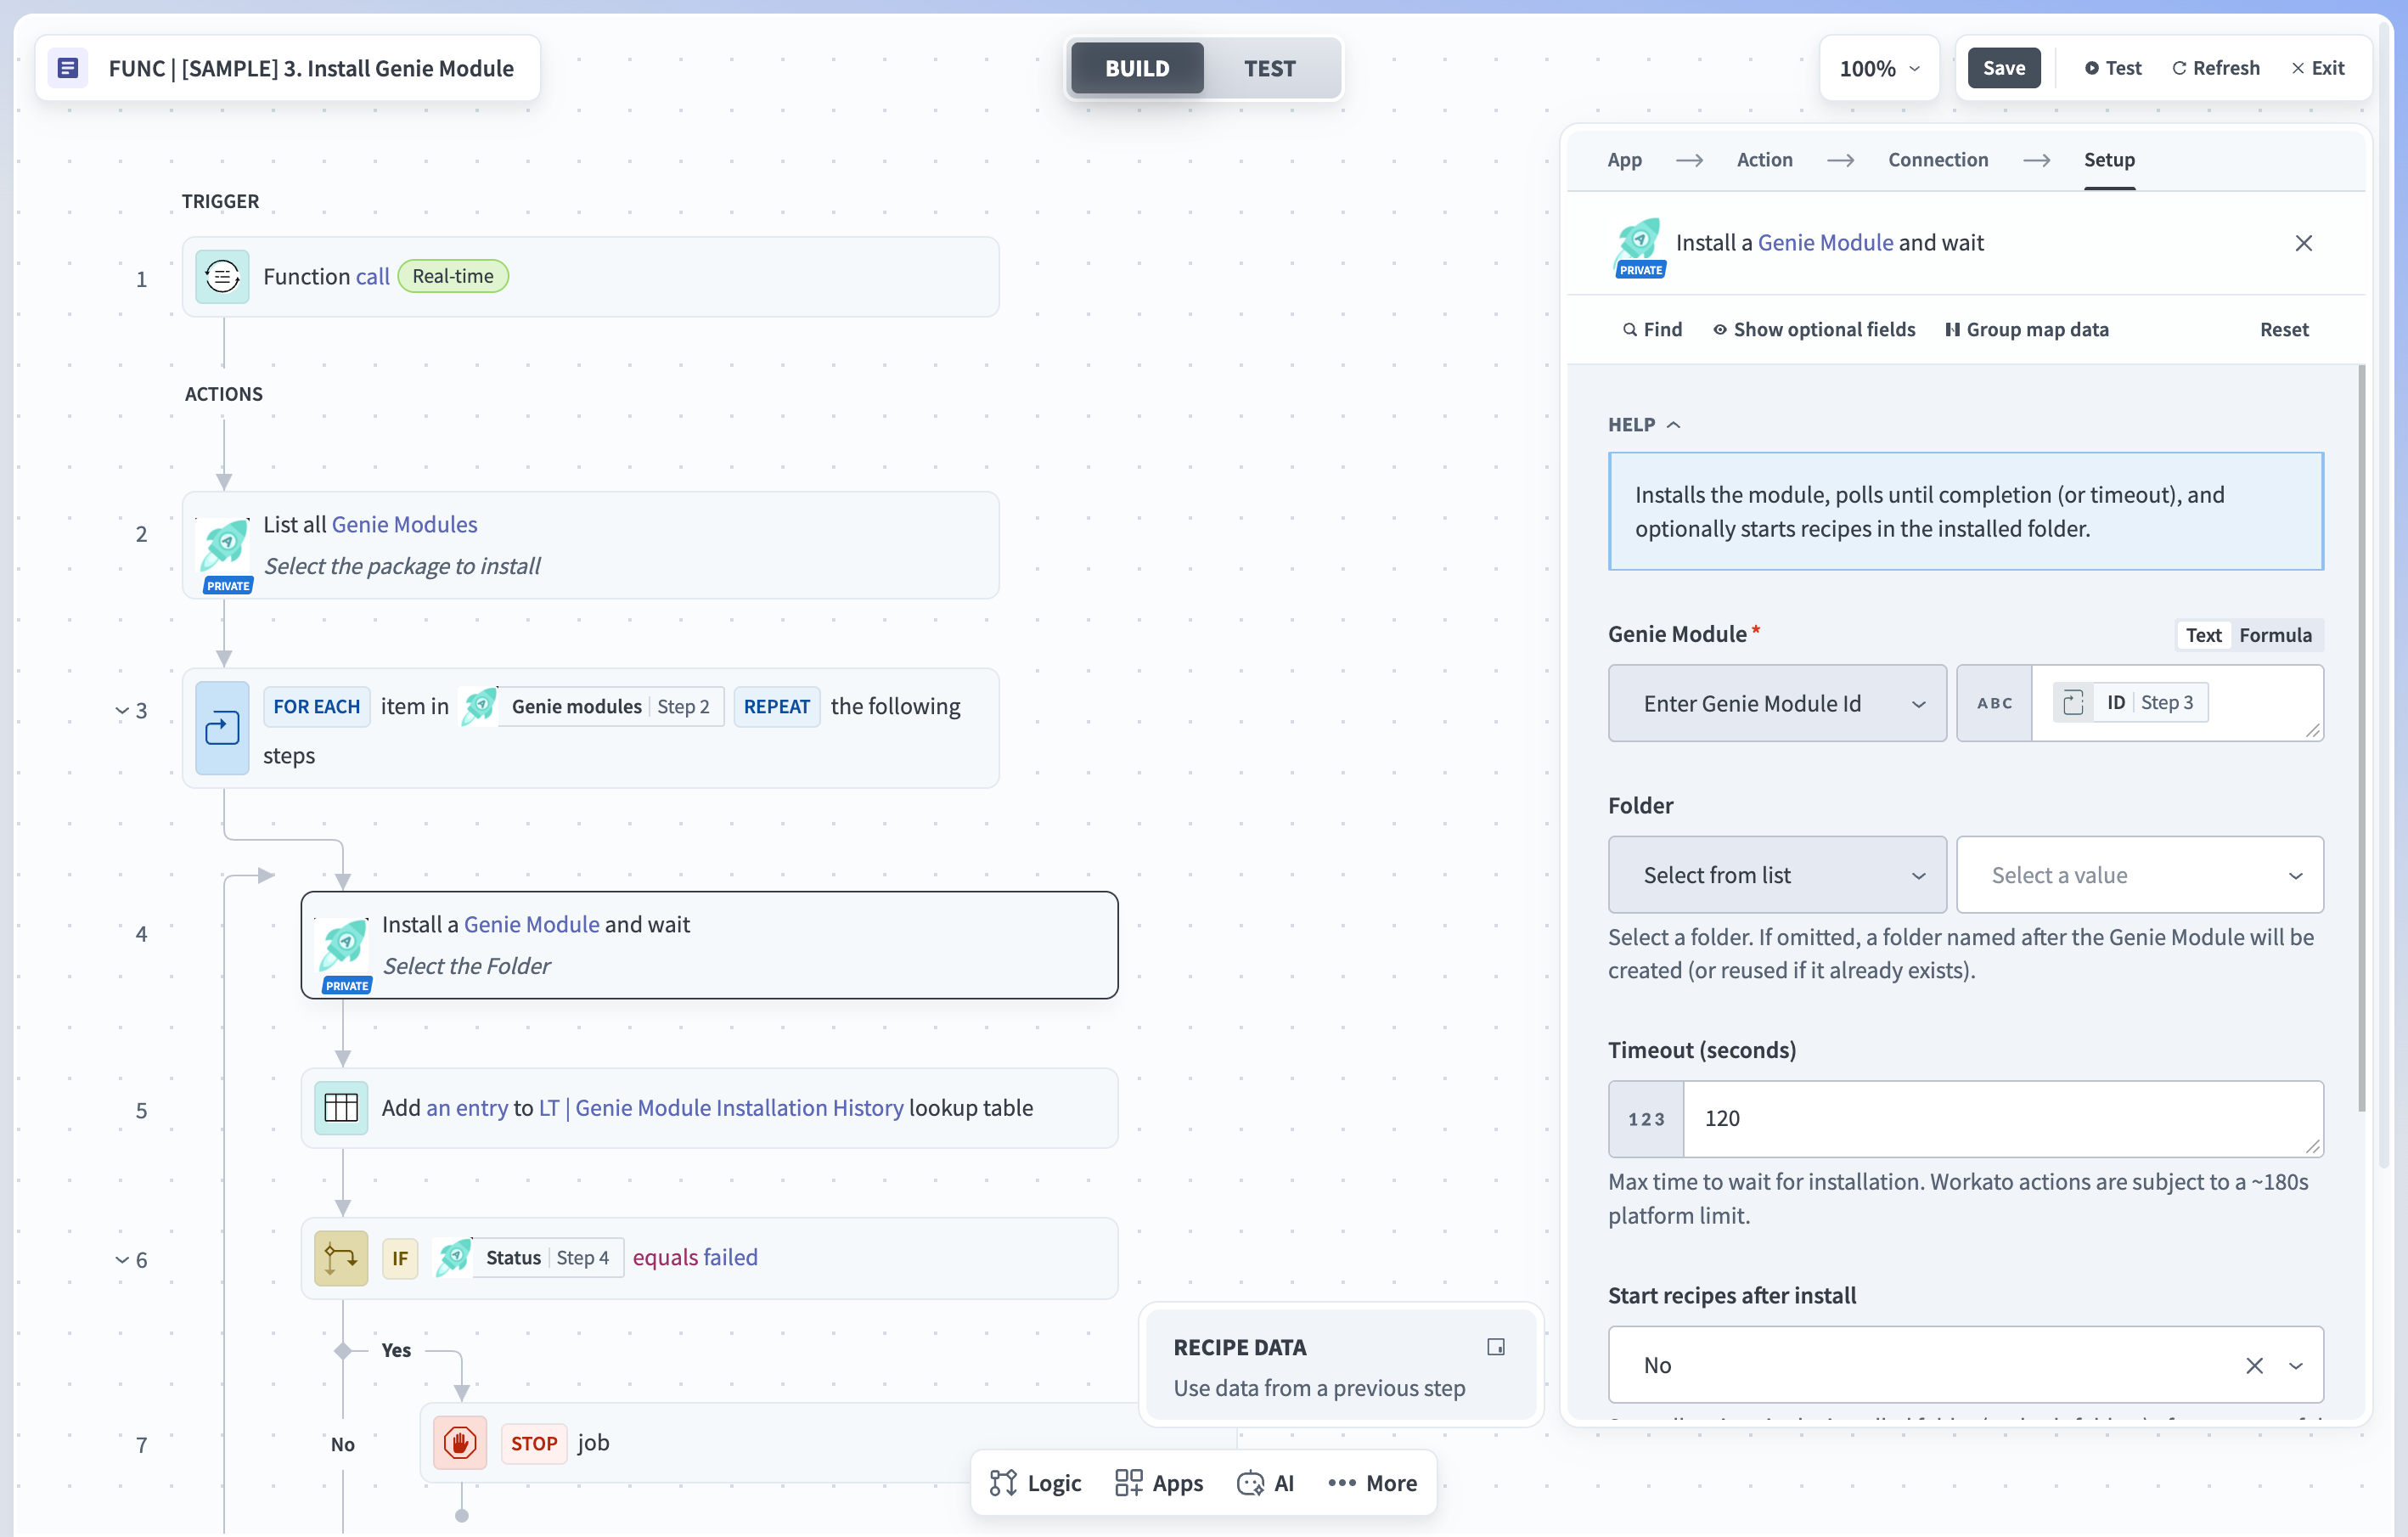 Select the folder to install HR Self Service Genie
Click Test and wait for it to complete. Confirm that the output of Step 4 in the recipe shows a success status.
Confirm that Agentic | HR Self Service Genie now appears in your workspace's projects list.
Configure connections
Complete the following steps to configure your connections:
Review the requirements for each app you plan to use and complete any required configuration before creating its connection.
Workday REST
This connection is required. The core skills use it to look up employee profiles and organization details, handle time off, find managers and direct reports, and process approvals.
Refer to the Workday connector documentation for connection details.
| Capability | Domain security permissions | Access |
|---|---|---|
| All operations | Integration Debug, Integration Build, Integration Process, Integration Event, Worker Data: Public Worker Reports, Workday Query Language | Get for all, except Workday Query Language, which requires View and Modify. |
| Employee profile | Worker Data: Workers, Worker Data: Staffing, Person Data: Personal Information, Person Data: Work Email | Get and Put |
| Time off | Worker Data: Time Off (Time Off Balances), Worker Data: Time Off (Time Off), Worker Data: Time Off (Time Off Manager View), Process: Enter or Correct Time | Get and Put |
| Worker documents | Worker Data: Add Worker Documents, Worker Data: Edit and Delete Worker Documents | Get and Put |
| Organizations | Organization: Supervisory Organization, Organization: Cost Center, Organization: Region, Organization: Custom Organization, Organization: Company, Manage: Organization Integration, Set Up: Organization, Process: Organization, Manage: Organization Roles, Manage: Organization Integration Documents, Reports: Organization | Get and Put |
Grant the ISU permission to initiate the following business processes: Change Personal Information, Adjust Time Off, and Enter Time Off.
An operation can fail because of a missing permission. Find it by searching for View Security for Securable Item in Workday and entering the endpoint or field. The result identifies the required security domain, access type, and scope.
Workday Web Services
This connection is required only if you enable extension skills for employee name, contact, demographic, biographic, or identification updates, for employee lookup, or for worker documents. The ISU needs access to the Workday domains and business processes used by those operations. Refer to the Workday connector documentation for connection details.
Confluence
This connection is required to ingest HR knowledge from Confluence. Make sure it can access the spaces and pages you choose as sources. Refer to the Confluence connector documentation for connection details.
Jira Service Management
This connection is required only if you enable HR ticketing. Make sure the connected account can access the HR project and its request types, create and read tickets, and add comments. Refer to the Jira Service Desk connector documentation for connection details.
Go to Agentic | HR Self Service Genie > Config > Connection and configure a connection for each app you plan to use.
Configure metadata
This section configures the ingestion schedule for the HR knowledge base.
OPTIONAL SECTION
Complete this section only if you plan to enable HR knowledge Q&A.
Go to Agentic | HR Self Service Genie > Config > Metadata > Data Ingestion | Scheduler. This table defines the schedule and data source for knowledge base ingestion.
 The Data Ingestion | Scheduler table
| Column | Description |
|---|---|
| Data Source | Enter the name of the source application, such as Confluence. |
| Type | Enter delta to ingest only changes since the last run, or full to load all specified data. |
| Frequency | Enter how often ingestion runs, such as daily, weekly, monthly, or initial. |
| Day/Date/Time | Enter when ingestion runs, in the format Mon/09:00 (weekly), 15/09:00 (monthly), or 09:00 (daily). Enter NA to run on every hourly check. |
| Filter/Path | Enter the scope of content to ingest. For Confluence, this is a space or content hierarchy that contains your HR content. |
| Is Active? | Set to TRUE to activate ingestion for this data source. |
| Exclusions | Enter a JSON object that excludes Confluence pages. file_name_regex excludes pages with a matching title. parent_file_name_regex excludes matching pages and their child pages. For example, { "file_name_regex": ["IT", "Network"] }. Leave blank to exclude nothing. |
| Encrypt | Leave blank unless your deployment requires encryption of ingested content. |
| Anonymize | Leave blank unless your deployment requires anonymization during ingestion. |
| Flags | Enter any additional ingestion or processing options. |
| Genie Name | Enter the genie to which the ingestion configuration applies. For example, HR Self Service Genie. |
| Knowledge Base | Enter the name of the target knowledge base. The name must match the KB_Name project property. |
| deleteFilesOlderThan_inDays | Enter the number of days after which files are deleted. This setting is not implemented for all data sources. |
Configure project properties
Go to Agentic | HR Self Service Genie > Settings > Project properties and edit the following properties:
| Property | Description |
|---|---|
| ApprovalWorkflow.EmployeeNotificationTriggerSchedule | Set the cron schedule for notifying employees when their time-off requests are actioned in Workday. For example, 0 */4 * * 1-5. |
| ApprovalWorkflow.ManagerNotificationTriggerSchedule | Set the cron schedule for checking pending time-off requests and sending approval notifications to managers. For example, 0 9,17 * * 1-5. |
| Delete Files Older Than in Days | Set the number of days before temporary worker documents and HR reference letters are eligible for cleanup. For example, 5. |
| Extensions.FileStorageDirectoryPath | Enter the path of the Workato FileStorage directory that extension workflows use for worker documents and HR reference letters. For example, /Worker Documents from Workday. Create the directory before entering its path. Required only for worker documents and HR reference letters. |
| JiraServiceDesk.hr.projects | Enter the key of the Jira Service Management HR project that the genie searches for employee tickets. For example, HSSG. Required only if you enable HR ticketing. |
| KB_Name | Enter the name of the HR knowledge base that the genie uses for policy and information retrieval. For example, Confluence | HR. Required only if you enable HR knowledge Q&A. |
| TimeOffBalances.RetrieveBalanceForDaysFollowing | Set the number of days into the future for which the genie retrieves time-off balances from Workday. The default value is 90. |
| TimeOffRequests.ReminderFrequencyDays | Set the number of days between reminders for time-off requests that are awaiting action. For example, 3. |
| Workday Organisation List | Enter the Workday organization IDs that scope the retrieval and processing of time-off requests. Separate multiple IDs with commas. For example, ORG-12345,ORG-67890. The genie searches all organizations in Workday when this property is blank. |
Configure Workday validation fields
The genie validates each personal information update against the Workday Validation Fields knowledge base before it runs the update. The knowledge base holds the mandatory fields and allowed reference values for your Workday tenant.
OPTIONAL SECTION
Complete this section if you plan to enable employee personal information updates.
Validation field values
The following sections list the values the knowledge base needs. The values are the defaults for the USA. Edit any value that differs in your Workday tenant, and add values for each other country you support. Values differ by tenant and country.
Update contact data
Applies when updating an email address.
| Field | Mandatory | Default / allowed | Details |
|---|---|---|---|
| Type_Reference | Yes | Default: HOME | Set to HOME by default because the WORK address must not be updated. |
| Primary | Yes | True / False | The user must state whether the email address being updated is the primary one. |
Update name data
Applies when updating any part of a name.
| Field | Mandatory | Default / allowed | Details |
|---|---|---|---|
| Last_Name | Yes | User provided | Required for every name update, even when only the first name is changing. |
| Type | Yes | Primary, Secondary, Tertiary | The name type under which the last name update falls must be specified. |
Update employee IDs data
Applies when updating government or national IDs.
| Field | Mandatory | Default / allowed | Details |
|---|---|---|---|
| Government ID Type Name | Yes | See the following table | The type of ID being updated in Workday. Values differ by tenant and country. |
| Country | Government ID Type Name |
|---|---|
USA | USA-SSNUSA-ITIN |
IND | Add values for your tenant |
CAN | Add values for your tenant |
Update demographic data
Mandatory reference values depend on which attribute is being updated. Values differ by country. The following values apply to the USA.
| Attribute | Mandatory | Field | Allowed values (USA) |
|---|---|---|---|
| Marital status | Yes | Marital Status Reference | Divorced Married Partnered Separated Single Widowed |
| Ethnicity | Yes | Ethnicity Reference | Asian Black or African American Hispanic or Latino Native Hawaiian or Other Pacific Islander Two or More Races White Other American Indian or Alaska Native |
| Citizenship status | Yes | Citizenship Status Reference | Citizen Naturalized Citizen Permanent Resident Temporary Resident Visitor |
Applicable country ISO codes
| Country | ISO code |
|---|---|
| United States of America | USA |
| India | IND |
| Canada | CAN |
Add the values to the knowledge base
The genie reads the validation values from a PDF in the Workday Validation Fields knowledge base. Complete the following steps to create the PDF and upload it:
Create a document that starts with your organization name, Workday tenant, completed-by details, and date. Add the tables from Validation field values with your edits and additions. Your Workato team can help you complete it.
Export the document as a PDF.
Go to Agentic | HR Self Service Genie > Extensions > Knowledge Ingestion > Workday and upload the PDF to the Workday Validation Fields knowledge base.
Confirm that the document is ingested and available to the genie before you enable the update skills.
Configure HR reference letter message templates
HR Self Service Genie generates HR reference letters from Workato message templates. The packaged extension ships with a template for each supported letter type, already wired into the get_hr_reference_letters skill. Customize their content before enabling the extension. Base them on your HR policies, branding, wording, and document requirements.
OPTIONAL SECTION
Complete this section if you plan to enable HR reference letters.
Complete the following steps to customize the templates:
Go to Tools > Message templates.
Open each packaged HR reference letter template listed below.
Configure the letter content, formatting, static text, and dynamic employee fields in each template. Don't delete the templates, because the skill references them by ID.
The packaged extension includes the following templates:
| Message template | Letter type |
|---|---|
| HR Letters | Employment Verification Letter | Template | Employment Verification Letter |
| HR Letters | No Objection Certificate | Template | No Objection Certificate |
| HR Letters | Business Employment Verification Invitation | Template | Business Visa Application – Employment Letter |
| HR Letters | Business Invitation Letter | Template | Business Visa Application – Invitation Letter |
Configure HR Self Service Genie
Complete the following steps to configure the genie:
Go to Agentic | HR Self Service Genie, open the genie, and click Edit.
Select your AI model and chat interface. Leave the genie description unchanged.
Open the following recipe, select HR Self Service Genie in the Genie field of each Send business event to Genie action, and start the recipe:
| Recipe | Location |
|---|---|
| FUNC | Notification & Approval Manager | Extensions > App Events |
Confirm that the following core skills are started under Enterprise skills. Click the name of any skill that isn't started, then click Start recipe:
| Skill | Location |
|---|---|
| get_my_time_off_balances | Core > Skills > Workday REST |
| list_my_time_off_requests | Core > Skills > Workday REST |
| submit_time_off_request | Core > Skills > Workday REST |
| cancel_time_off_request | Core > Skills > Workday REST |
| list_time_off_types | Core > Skills > Workday REST |
| get_direct_report_time_off_requests | Core > Skills > Workday REST |
| get_direct_report_time_off_balances | Core > Skills > Workday REST |
| action_time_off_request | Core > Skills > Workday REST |
| get_my_profile | Core > Skills > Workday REST |
| get_my_manager | Core > Skills > Workday REST |
| get_my_reporting_chain | Core > Skills > Workday REST |
| list_my_direct_reports | Core > Skills > Workday REST |
| Get holiday calendar | Core > Skills > Workday REST |
Go to Agentic | HR Self Service Genie > Core. Select the All assets filter, choose Recipes, and start any packaged recipes that are not already running.
CORE CONFIGURATION COMPLETE
Core configuration is complete. Extend HR Self Service Genie to add HR knowledge, reference letters, HR ticketing, and custom skills, or go to Activate and test to start the genie and confirm it works.
Extend HR Self Service Genie
You can extend HR Self Service Genie with optional capabilities. The steps in this section are not required to start or use the core genie. Complete the sections for the capabilities you plan to use before you start the genie.
The Core folder contains the genie's foundational logic and is read-only. Extend the genie through Extensions and Custom Extensions without modifying the default behavior.
Enable HR knowledge Q&A
Complete the following steps to make approved HR content, such as policies, benefits, and leave guidelines, available to the genie:
Go to Agentic | HR Self Service Genie > Extensions > Knowledge Ingestion > Confluence and start the required recipes.
Add an entry to Config > Metadata > Data Ingestion | Scheduler. Refer to Configure metadata for more information.
Set the entry's Type to full for the initial run, then add a delta entry for recurring synchronization.
Edit the genie and add the Confluence | HR knowledge base.
Go to Agentic | HR Self Service Genie > Extensions > Knowledge Ingestion > Confluence and start the Log User Conversation skill. Add the skill to the genie so it records questions that the knowledge base cannot answer. Review the KB Gap User Conversations data table in Runtime Data to identify HR content to add or update.
Enable HR reference letters
Complete the following steps to let employees generate HR reference letters:
Go to Agentic | HR Self Service Genie > Extensions > Skills > Workday SOAP and start the get_hr_reference_letters skill.
Add the HR reference letter skill, get_hr_reference_letters, to HR Self Service Genie.
Confirm that the Workday connection can retrieve the employee and employment information required by the letter templates.
Set the Extensions.FileStorageDirectoryPath project property to the FileStorage directory for generated files. Select the same directory in each extension recipe that uses it, including Periodic Cleanup of Worker Documents from FileStorage. File creation, retrieval, and cleanup then use the same location.
Test each enabled letter type before making the capability available to users.
The packaged extension stores generated PDFs in Workato FileStorage. You can use another document-management system, such as Google Drive, by cloning the storage logic into Custom Extensions and configuring it there.
Enable employee data and worker document extensions
Complete the following steps to enable the extensions that let employees update personal information, look up colleagues, and retrieve worker documents:
Configure the Workday Web Services connection and confirm that the ISU has the domain security permissions required by the operations you enable.
Confirm that you completed Configure Workday validation fields if you enable the update skills.
Go to Agentic | HR Self Service Genie > Extensions > Skills > Workday SOAP and start the skills you need. Available skills cover employee name, contact, demographic, biographic, and identification updates, as well as employee lookup and worker-document listing and retrieval.
Add the started skills to the genie.
If you enable worker documents, set the Extensions.FileStorageDirectoryPath project property to the FileStorage directory for retrieved documents. Select the same directory in each extension recipe that uses it, including Periodic Cleanup of Worker Documents from FileStorage. File retrieval and cleanup then use the same location.
Enable HR ticketing
Complete the following steps to let employees raise and track HR tickets in Jira Service Management:
Make sure the Jira Service Management connection can access your HR project. Refer to Configure connections for more information.
Set the JiraServiceDesk.hr.projects project property to your HR project key.
Go to Tools > FileStorage and upload hr_service_desk_request_types.json to the root directory. The file lists the HR request types and their fields. It must match your Jira project, including its service desk ID, request type IDs, and required fields. The List Request Types & Fields recipe reads the file from the root directory. Update the file reference in the recipe if you store the file elsewhere.
Go to Agentic | HR Self Service Genie > Extensions > Ticketing > Apps > Jira Service Desk and start the ticketing recipes.
Add the following skills to the genie: List Open Requests of a User, Get Jira Service Desk Issue Details, Check For Known Problem, List Request Types & Fields, Create HR Request, and Add Comment to Jira Service Desk Issues.
Test ticket creation, retrieval, and comments with an authenticated employee account.
Custom extensions
Go to Agentic | HR Self Service Genie > Custom Extensions. Use this folder to develop new skills and integrations, customize cloned extension assets, or implement deployment-specific knowledge-ingestion patterns without modifying the packaged Core or Extensions folders.
For HR knowledge use cases, a reusable Confluence KB partition template is available in Custom Extensions > Knowledge Ingestion > Templates > Confluence KB partition. Use it to divide a large Confluence HR knowledge source into logical knowledge bases, such as by region, business unit, policy category, or content domain. Partitioning reduces the retrieval scope for each query and can improve response relevance and performance when one knowledge base contains a large volume of content.
Customize the template for your Confluence source and partitioning logic, configure the corresponding runtime and knowledge-base assets, and add the resulting knowledge bases to the genie.
For other custom requirements, create or adapt the assets you need in Custom Extensions and add the relevant skills to the genie. All custom implementations must preserve the genie's authentication, authorization, and employee-data access controls.
Activate and test
Complete the following steps to verify your setup. Run extension steps only if you enabled the associated capability:
Go to Agentic | HR Self Service Genie, open the genie, and click Start genie.
Open the HR Self Service Genie app in your chat interface and start a new conversation.
Enter Who are you?. Confirm that the response names HR Self Service Genie and describes its HR self-service capabilities.
Enter Show me my time-off balances. Confirm that the genie returns balances for the authenticated employee.
Enter I want to take annual leave from Monday to Wednesday next week. Confirm that the genie gathers any missing details, checks the employee's balance, submits the request to Workday, and returns the resulting status.
Sign in as a manager and enter Show me the pending time-off requests from my direct reports. Then enter Approve EMPLOYEE_NAME's time-off request. Confirm that the manager can act only on confirmed direct reports.
Confirm that scheduled manager notifications, approval reminders, and employee status updates arrive in your chat interface. Include a request that was actioned directly in Workday.
Enter What holidays are coming up? Confirm that the genie returns location-specific holidays and, if HR knowledge Q&A is enabled, Global Days Off in one table.
Enter What is our work-from-home policy? Confirm that the response comes from your HR knowledge base. Run this step only if HR knowledge Q&A is enabled.
Enter Raise an HR ticket for my missing payslip. Confirm that the genie checks for known problems, collects the required fields, creates a ticket in Jira Service Management, and returns the ticket details. Then enter Show me my open HR tickets. and confirm that the response lists only your tickets. Run this step only if HR ticketing is enabled.
Test each enabled employee-data, employee-lookup, worker-document, or HR reference-letter skill with one supported request, and confirm that it completes successfully.
Enter Cancel my pending annual leave request. Confirm that the genie cancels the request you submitted earlier, so the test leaves no pending request in Workday.
Last updated: