Azure Monitor
Azure Monitor is a comprehensive monitoring and observability platform for Azure resources. The Azure Monitor connector can send custom logs from your Workato recipes to Azure Monitor Logs for centralized monitoring, troubleshooting, and compliance tracking.
The connector also supports streaming Workato audit logs to Azure Monitor for enhanced visibility into platform activity.
API version
The Azure Monitor connector uses one of the following APIs, depending on the authentication method:
- Logs Ingestion API: Used with client credentials authentication. This is the recommended API for all new integrations.
- HTTP Data Collector API: Used with shared key authentication. This API is deprecated and will no longer be functional as of September 2026.
MIGRATION REQUIRED
Microsoft has deprecated the HTTP Data Collector API, which is used by the Send custom log action with shared key authentication. Both the action and authentication method will be deprecated on December 8, 2025. Subsequently, the API will stop working in September 2026.
We recommend that you migrate to the new Inject custom logs action with client credentials authentication. This action uses the Logs Ingestion API.
Prerequisites
Ensure you have the following before connecting to Azure Monitor:
- An active Azure subscription
- A Log Analytics workspace
- Appropriate permissions to create app registrations in the Azure portal
How to connect to Azure Monitor
MICROSOFT MFA ENFORCEMENT
Microsoft is rolling out mandatory multifactor authentication (MFA) gradually to different applications and accounts in phases. This enforcement continues throughout 2025 and beyond. Refer to the Microsoft Mandatory multifactor authentication for Azure and admin portals documentation for more information.
We strongly recommend enabling MFA now for all Microsoft accounts used with Workato to avoid service disruptions from short-notice enforcement changes.
Complete the following steps to maintain uninterrupted service:
Enable MFA for your Microsoft organization following the Microsoft MFA setup guide. Refer to Set up multifactor authentication for Microsoft 365 for more information.
Reconnect your Microsoft connection in Workato.
Complete the OAuth flow with MFA when prompted.
Test your recipes to ensure they work with the updated connection.
The Azure Monitor connector supports the following authentication methods:
Client credentials
This method uses the Azure Monitor Logs Ingestion API and requires the following:
- Tenant ID
- Client ID
- Client secret
- Data collection endpoint
Register the Workato app in the Azure Portal
Complete the following steps to register the Workato app and obtain a tenant ID, client ID, and client secret for client credentials grant connections.
Register the Workato app in the Azure Portal
Complete the following steps to register the Workato app in the Azure portal:
Sign in to the Azure portal.
Select App registrations > + New registration.
Enter a unique name for the application.
Use the Supported account types drop-down menu to select an account type.
Select Web from the Select a platform drop-down menu.
Use the following URI for the Redirect URI:
https://www.workato.com/oauth/callbackSelect Register.
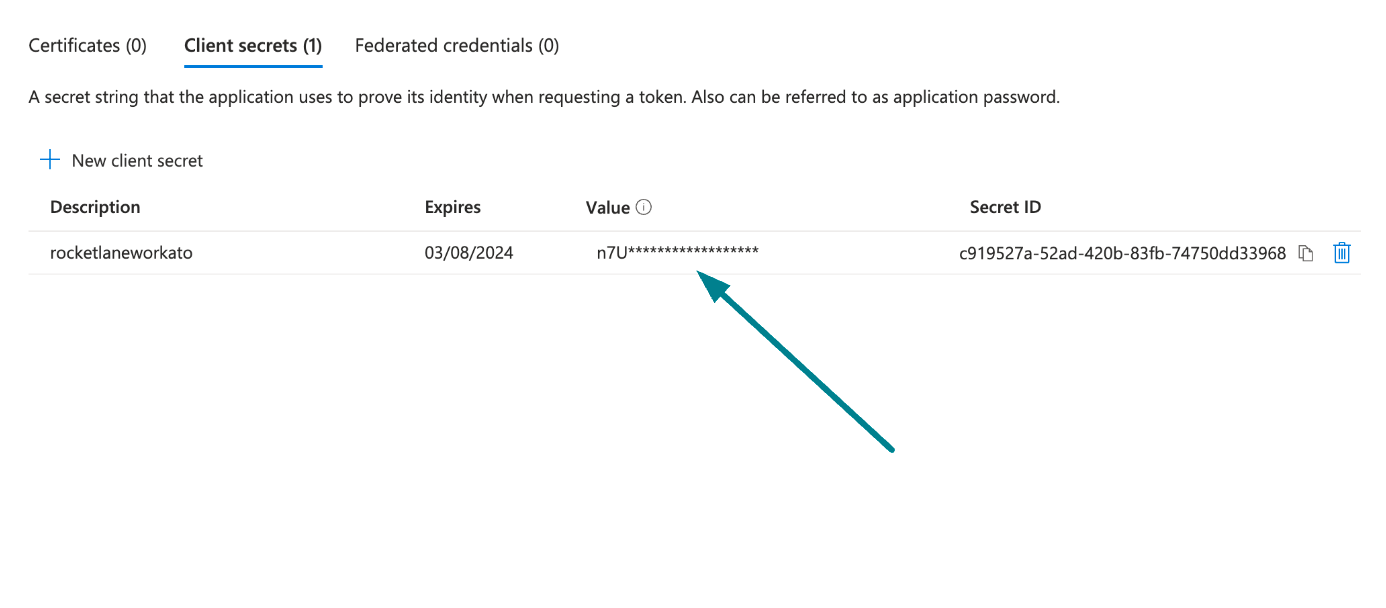
Generate a client secret
Complete the following steps to generate a client secret:
Go to Manage > Certificates & Secrets > Client secrets.
Click + New client secret.
Provide a Description for the client secret and specify an Expires date.
Click Add.
Copy and save the client secret Value—not the Secret ID—for use in Workato.
 Copy and save the client secret value
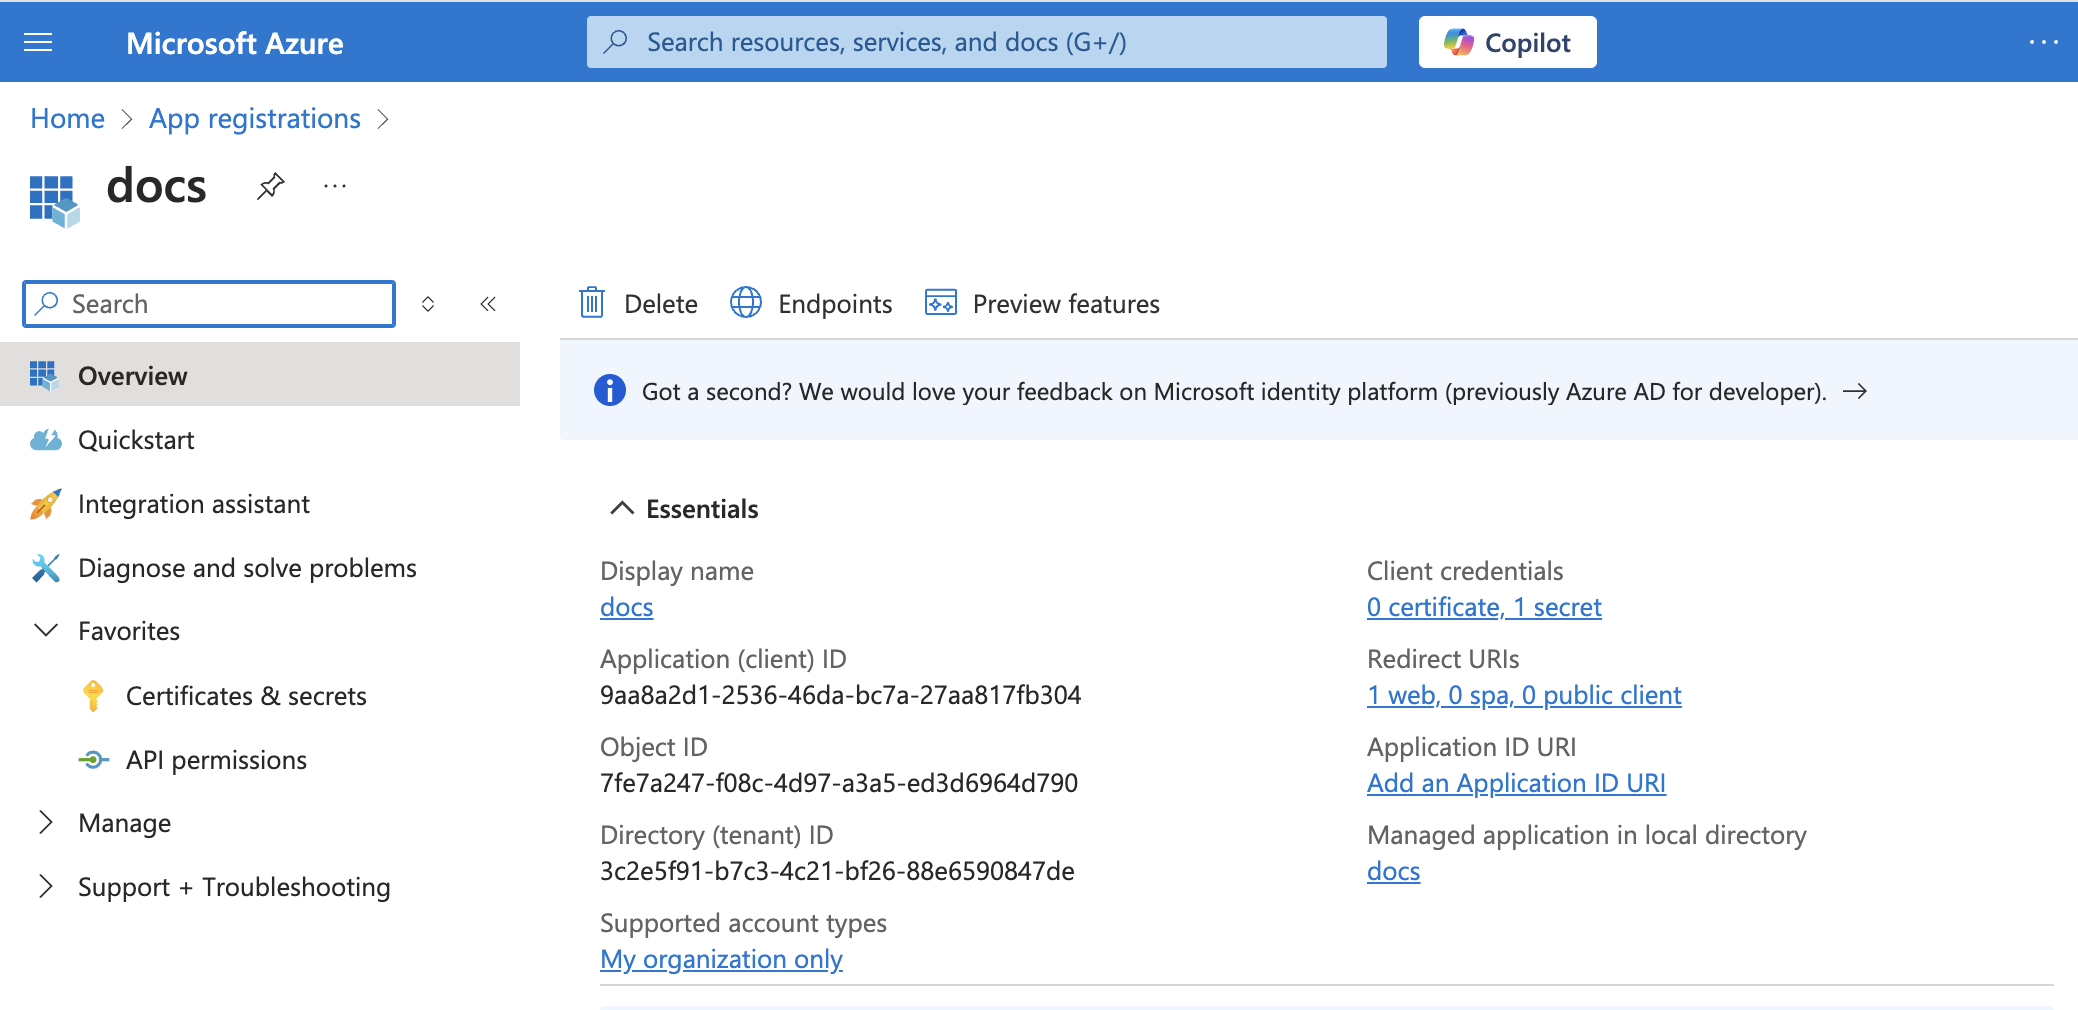
Obtain the Application (client) ID and Directory (tenant) ID from the Azure Portal
Go to the Overview > Essentials section.
 App details
Copy the Application (client) ID and the Directory (tenant) ID for use in Workato.
Create a data collection endpoint and obtain the Logs Ingestion URL
Go to Monitor and select Data Collection Endpoints from the Settings section.
Click Create to create a new data collection endpoint.
Enter a Name for the data collection endpoint.
Select the Subscription and Resource group from the drop-down menus.
Select the Region. Choose a region that matches your Log Analytics workspace location for optimal performance.
Click Review + create.
Review the settings and click Create.
After the deployment completes, open the data collection endpoint you created.
Copy the Logs Ingestion URL for use in Workato.
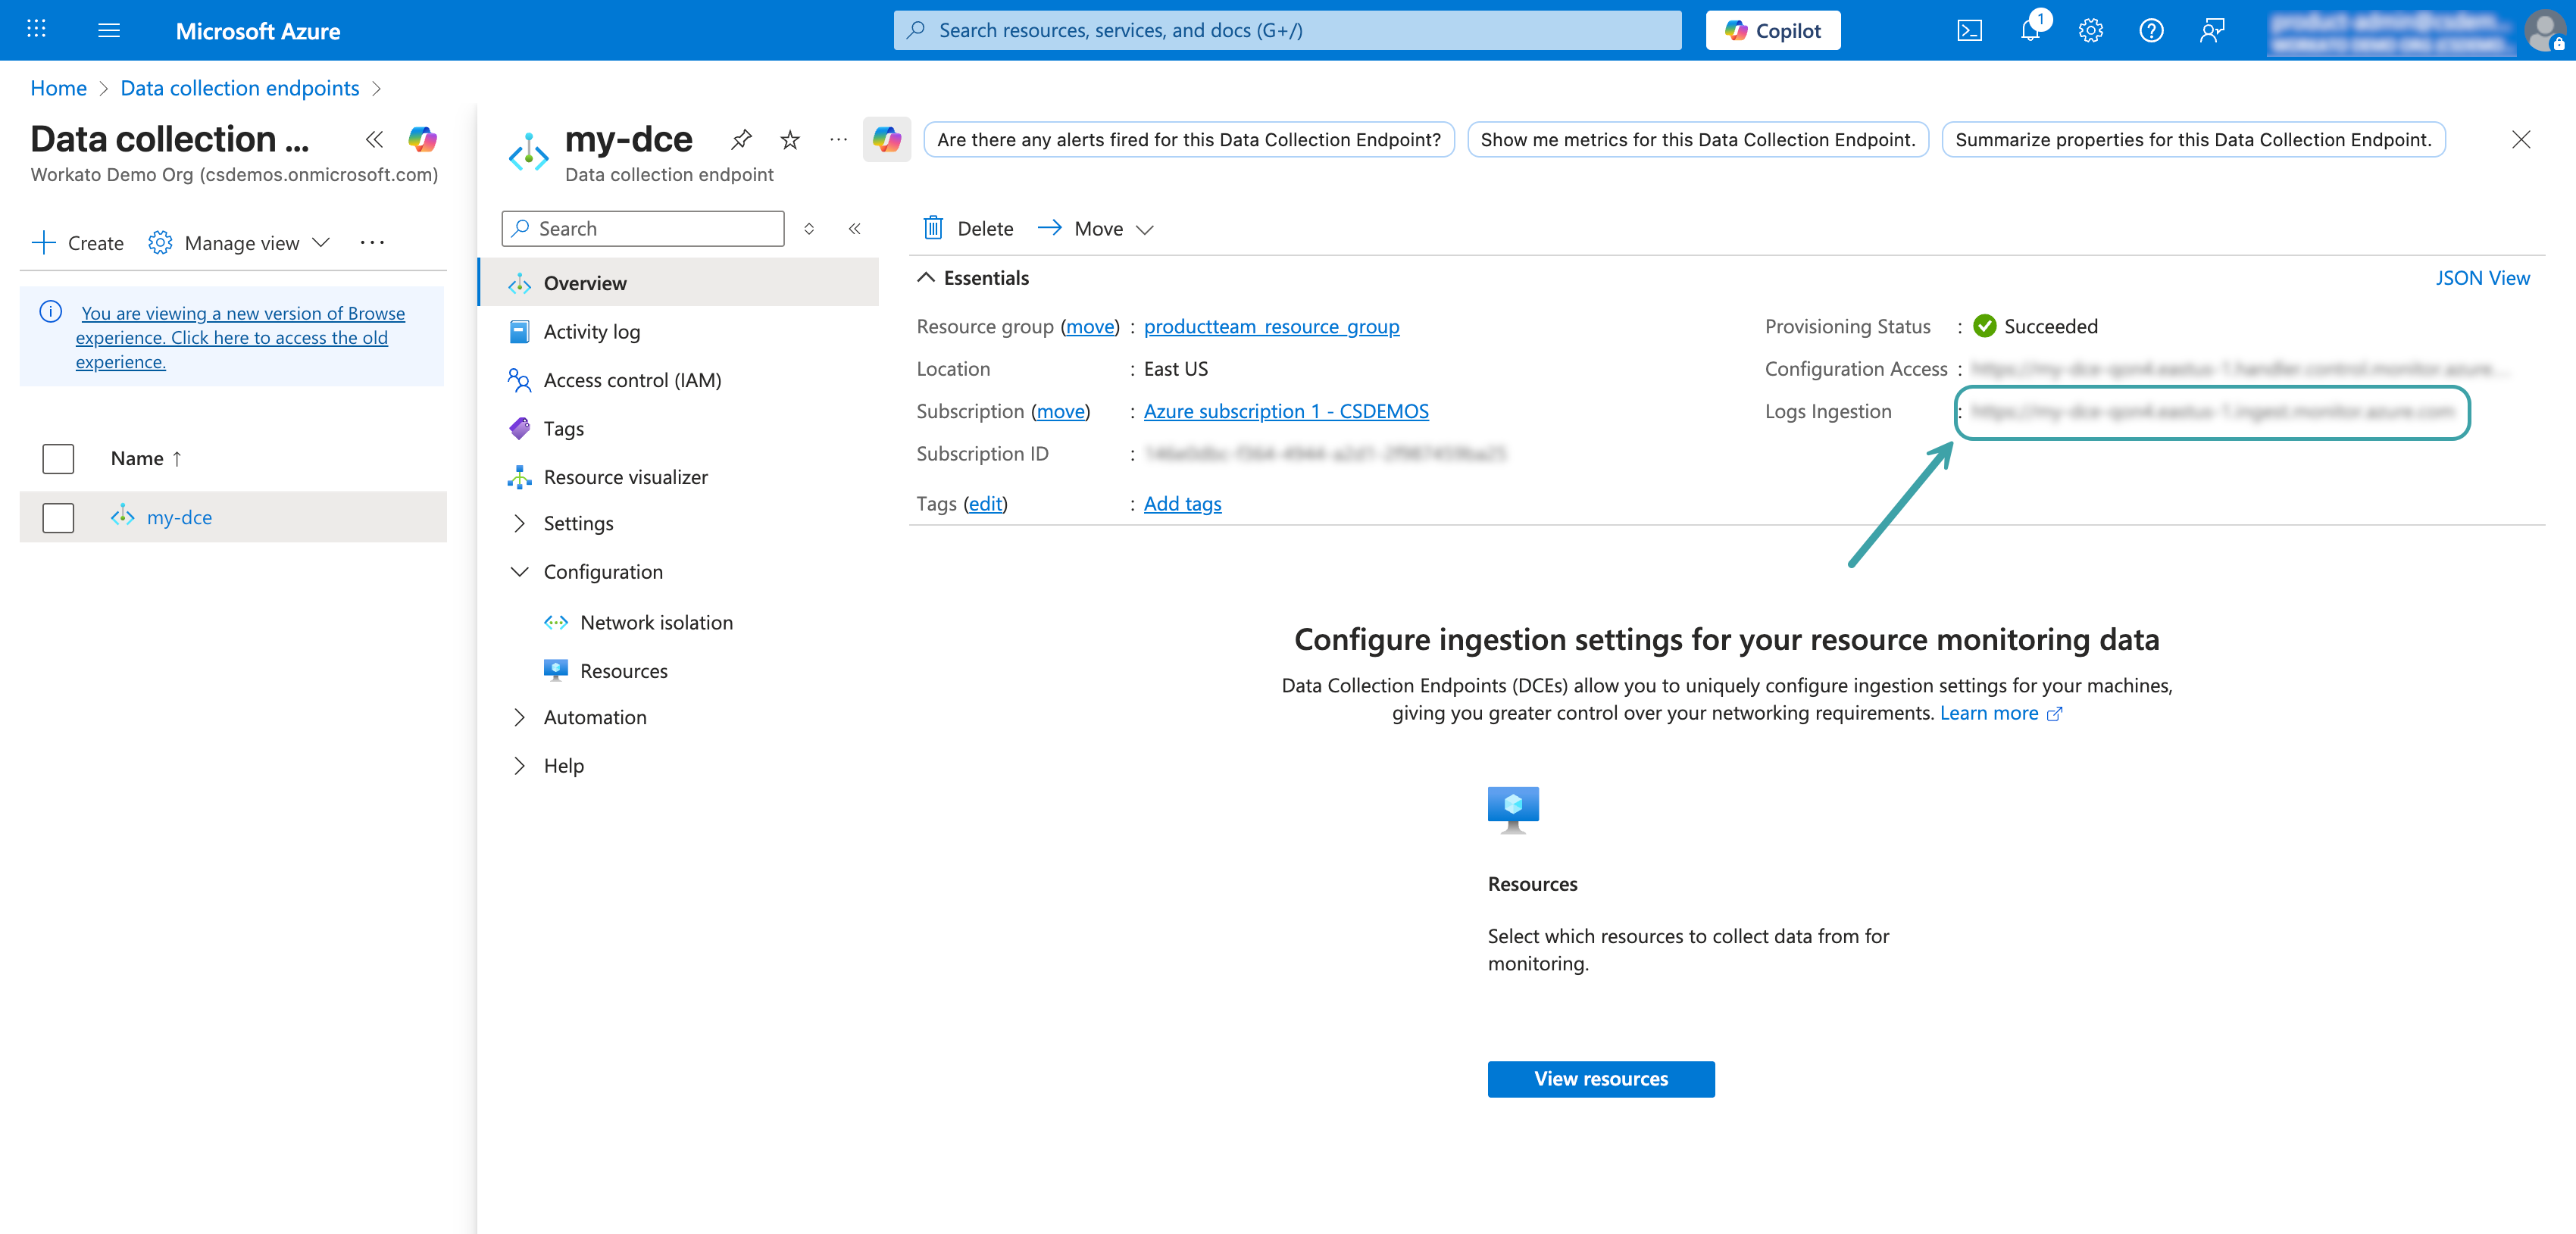 Copy the Logs Ingestion URL
Refer to the Microsoft Data collection endpoints documentation for more information.
Create a data collection rule and assign permissions
A data collection rule defines how data is collected and where it is sent. These steps outline how to create a custom table, configure the data collection rule, and grant your app registration the required permissions.
Go to your Log Analytics workspace in the Azure portal.
Select Tables from the Settings section.
Click Create > New custom log (DCR-based).
Enter a Table name for your custom table. Note that Azure automatically appends _CL (custom log) to your table name. For example, if you enter WorkatoLogs, the full table name is WorkatoLogs_CL.
Click Create a new data collection rule.
Enter a Data collection rule name.
Select the Subscription and Resource group from the drop-down menus.
Use the Data collection endpoint drop-down menu to select the data collection endpoint you created in the previous step.
Click Next.
Enter the following sample log events to automatically generate the table schema:
Sample log events JSON
[
  {
    "source": "apim-mcp-gateway",
    "log_level": "INFO",
    "job_handle": "j-AYETNJfP-xYGrB6-B6",
    "date_time": "2026-02-26T11:23:29.694Z",
    "user_id": 32443,
    "flow_id": 477766,
    "log_entry_sequence": 1,
    "data": "{\"message_type\":\"tool_call\",\"environment_id\":32443,\"auth_method\":\"token\",\"ip_address\":\"192.0.2.255\",\"user_agent\":\"Ruby\",\"request_id\":\"ad29825db1224a53b77d4b6c71159abc\",\"server_name\":\"CarData - MCP Server Auto Test\",\"duration_seconds\":2.734584499,\"details\":{\"input\":\"{\\\"make\\\":\\\"Subaru\\\",\\\"model\\\":\\\"Impreza\\\"}\",\"method\":\"tools/call\",\"name\":\"Search_CarData_by_make_and_model\",\"output\":\"{\\\"car_data\\\":{\\\"make\\\":\\\"Subaru\\\",\\\"model\\\":\\\"Impreza\\\",\\\"year\\\":1999,\\\"price\\\":70000.0,\\\"is_sold\\\":false}}\",\"succeeded\":true}}"
  },
  {
    "source": "data-pipeline-conductor",
    "log_level": "INFO",
    "job_handle": "dpr-AYEXsoer-BARdJk-B6#019c9a41-ceff-7889-9dcc-5db023c97dea",
    "date_time": "2026-02-26T14:02:16.000Z",
    "user_id": 32443,
    "project_id": 35489,
    "log_entry_sequence": 4,
    "pipeline_event_type": "OBJECT_RUN_CANCEL",
    "pipeline_id": "dpr-AYEXsoer-BARdJk-B6",
    "pipeline_workato_id": 0,
    "pipeline_sync_id": "019c9a41-9cb9-74e1-8310-f3d554f32006",
    "pipeline_object_name": "test",
    "pipeline_object_run_id": "019c9a41-ceff-7889-9dcc-5db023c97dea",
    "operation": "test#OBJECT_RUN_CANCEL",
    "data": "{\"context\":{\"event\":\"OBJECT_RUN_CANCEL\",\"start_time\":\"2026-02-26T14:02:08.303Z\",\"end_time\":\"2026-02-26T14:02:16.366Z\",\"pipeline_id\":\"dpr-AYEXsoer-BARdJk-B6\",\"workato_pipeline_id\":0,\"pipeline_sync_id\":\"019c9a41-9cb9-74e1-8310-f3d554f32006\",\"object_run_id\":\"019c9a41-ceff-7889-9dcc-5db023c97dea\",\"source\":\"GOOGLE_DRIVE-68412\",\"destination\":\"SNOWFLAKE-83875\",\"duration\":\"8 seconds\",\"object_name\":\"test\"},\"error_message\":\"Running pipeline was stopped by user\",\"sync_mode\":\"INCREMENTAL_MERGE\"}"
  },
  {
    "source": "data-pipeline-conductor",
    "log_level": "ERROR",
    "job_handle": "dpr-AYEXsoer-BARdJk-B6#",
    "date_time": "2026-03-02T00:03:11.000Z",
    "user_id": 32443,
    "project_id": 35489,
    "log_entry_sequence": 1,
    "pipeline_event_type": "PIPELINE_SYNC_ERROR",
    "pipeline_id": "dpr-AYEXsoer-BARdJk-B6",
    "pipeline_workato_id": 4921,
    "pipeline_sync_id": "019cabbf-a974-73b3-9150-2475b0602f3d",
    "operation": "#PIPELINE_SYNC_ERROR",
    "data": "{\"context\":{\"event\":\"PIPELINE_SYNC_ERROR\",\"start_time\":\"2026-03-02T00:03:11.208Z\",\"end_time\":\"2026-03-02T00:03:11.533Z\",\"pipeline_id\":\"dpr-AYEXsoer-BARdJk-B6\",\"workato_pipeline_id\":4921,\"pipeline_sync_id\":\"019cabbf-a974-73b3-9150-2475b0602f3d\",\"source\":\"GOOGLE_DRIVE-68412\",\"destination\":\"SNOWFLAKE-59555\",\"duration\":\"0 seconds\"},\"started_at\":\"2026-03-02T00:03:11.208Z\",\"next_sync_at\":\"2026-03-02T00:33:10.288Z\",\"succeeded_objects_count\":0,\"failed_objects_count\":0,\"reason\":\"Operation 'Check connection' error - NullPointerException on state [INITIALIZATION]\",\"sync_type\":\"REGULAR\"}"
  },
  {
    "adapter": "logger",
    "source": "job",
    "log_level": "INFO",
    "job_handle": "j-AYGYrdPt-CoQaFe-B6",
    "date_time": "2026-03-02T10:38:45.968Z",
    "user_id": 32443,
    "flow_id": 507206,
    "project_id": 37163,
    "line_number": 3,
    "log_entry_sequence": 1,
    "operation": "Log message",
    "data": "{\"input\":{},\"output\":{\"message\":\"Hello from logger\"}}"
  },
  {
    "agent": "logging4",
    "agent_id": 31237,
    "source": "opa",
    "log_level": "INFO",
    "on_prem_group": "kafka",
    "on_prem_group_id": 3821,
    "date_time": "2026-03-19T06:41:16.025Z",
    "user_id": 16468,
    "log_entry_sequence": 11784,
    "data": "{\"message\":\"SAP subscriptions monitor started.\",\"logger\":\"com.workato.agent.sap.SapReceiverHub\"}"
  },
  {
    "source": "webhook",
    "log_level": "ERROR",
    "date_time": "2026-03-02T08:45:15.379Z",
    "user_id": 32443,
    "data": "{\"message\":\"Error accepting webhook event\",\"http_code\":404,\"url\":\"/webhooks/rest/c4034159-c62e-49d7-ab79-7d5192293a2c/event\",\"method\":\"POST\",\"count\":1,\"last_error_seen_at\":\"2026-03-02T08:40:15.219Z\",\"aggregation_window_start\":\"2026-03-02T08:40:15.219Z\",\"aggregation_window_end\":\"2026-03-02T08:45:15.219Z\"}"
  },
  {
    "source": "lcap",
    "log_level": "ERROR",
    "date_time": "2026-03-02T17:15:03.140Z",
    "user_id": 32443,
    "lcap_app_uid": "zTthn6xz1qgyteks7Row",
    "lcap_user_uid": "945hPemr4MMYCrJ7YNUusD",
    "data": "{\"message\":\"An error has occurred on the page: \\\"Widget configuration error\\\"\",\"debug_info\":[\"\\\"Button\\\" widget\",\"Handler for click event\"],\"events_count\":1,\"is_public_page\":false,\"page_path\":\"blank-page\"}"
  },
  {
    "event": "recipe_started",
    "details": {
      "run_once": false
    },
    "user": {
      "id": 16468,
      "external_id": null,
      "email": "[email protected]",
      "name": "Jade Taylor",
      "environment_id": 16468,
      "environment_type": "dev",
      "account_id": 16468,
      "account_name": "Jade Taylor",
      "hq_account_id": 16468,
      "hq_account_name": "Jade Taylor"
    },
    "team": {
      "id": 16468,
      "external_id": null,
      "email": "[email protected]",
      "name": "teamID16468",
      "environment_id": 16468,
      "environment_type": "dev",
      "account_id": 16468,
      "account_name": "Jade Taylor",
      "hq_account_id": 16468,
      "hq_account_name": "Jade Taylor"
    },
    "resource": {
      "type": "Flow",
      "id": 509836,
      "name": "Logger",
      "path": "Home/ARK Imported",
      "folder_id": 37535
    },
    "timestamp": "2026-03-19T06:48:00.000Z"
  },
  {
    "status": "success",
    "title": "Processed Event",
    "recipe_id": 123,
    "job_url": "https://example.workato.com/jobs/job-handle-123",
    "id": "job-handle-123",
    "master_job_id": "master-job-handle-456",
    "calling_job_id": "calling-job-handle-789",
    "calling_recipe_id": 456,
    "is_repeat": false,
    "is_test": false,
    "is_test_case_job": false,
    "started_at": "2026-03-19T06:30:00.000Z",
    "completed_at": "2026-03-19T06:34:56.000Z",
    "repeat_count": 0,
    "action_count": 3,
    "flow_id": 123,
    "error_type": null,
    "is_poll_error": false,
    "account_id": 1001,
    "account_name": "Example Account",
    "environment_type": "production",
    "environment_id": 2002,
    "hq_account_id": 3003,
    "hq_account_name": "Example HQ Account",
    "error": null,
    "context": {
      "user_id": 42,
      "user_name": "Jane Doe",
      "user_email": "[email protected]",
      "recipe_id": 123,
      "recipe_url": "https://example.workato.com/recipes/123",
      "recipe_name": "Example Recipe",
      "recipe_path": "/Examples/Example Recipe",
      "is_test": false,
      "user_external_id": null
    },
    "root_job_id": "root-job-handle-000",
    "root_recipe_id": 999
  },
  {
    "event_id": "3d62f9ed-586b-4f1d-9eca-eb728f429341",
    "event_type": "llm_call_completed",
    "chat_type": "GENIE",
    "workspace_id": 52718,
    "environment_id": 52718,
    "identity_user_id": "9Af5GRAXR4wB1u4ZFSqZ8E",
    "conversation_id": "conversation-01KS34RAWWDJ00EQBA6M5FNYGY",
    "genie_run_id": "95ce2c49-de8f-418e-9818-2f648e15aff2",
    "genie_id": "2341",
    "genie_handle": "gin-GgDdAaLX-sYHkWn-B2",
    "request_id": "00-e999dfff564597e0e7d45e19d5857ba6-08ab45fa94da0d05-01",
    "date_time": "2026-05-20T16:51:05.935356Z",
    "data": {
      "message": "",
      "tool_calls": [
        {
          "name": "enterprise_search",
          "args": {
            "query": "How do I back up my data?",
            "knowledge_base_names": ["IT FAQ"]
          }
        }
      ]
    },
    "app_type": "slack",
    "stage": "MID_EXECUTION",
    "llm_call_id": "e66e3132-241f-4ccb-b2ec-fe1418a0fbc5",
    "model_name": "bedrock/claude-sonnet-4-6",
    "input_tokens": 3412,
    "output_tokens": 113,
    "call_result": "SUCCESS"
  },
  {
    "event_id": "1da5cd9e-ffdd-435b-a4dd-0faee02c4c38",
    "event_type": "genie_run_start",
    "workspace_id": 52718,
    "environment_id": 52718,
    "genie_id": "2341",
    "genie_handle": "gin-GgDdAaLX-sYHkWn-B2",
    "identity_user_id": "9Af5GRAXR4wB1u4ZFSqZ8E",
    "conversation_id": "conversation-01KS34RAWWDJ00EQBA6M5FNYGY",
    "genie_run_id": "95ce2c49-de8f-418e-9818-2f648e15aff2",
    "date_time": "2026-05-20T16:51:02.55Z",
    "app_type": "slack",
    "genie_run_trigger": "user",
    "first_run_in_conversation": true,
    "test_run": false
  },
  {
    "event_id": "94dd2c8f-5c19-4eae-a604-1ef86a07cb52",
    "event_type": "genie_run_start",
    "workspace_id": 52718,
    "environment_id": 52718,
    "genie_id": "2341",
    "genie_handle": "gin-GgDdAaLX-sYHkWn-B2",
    "identity_user_id": "5XwUVCPmbmjWxBbRrt7X2D",
    "conversation_id": "conversation-01KSR1JDQMT001AWVTPMTRJ3K8",
    "genie_run_id": "1a11ce5f-f04f-44a3-8dd7-818d24fc3ce1",
    "date_time": "2026-05-28T19:39:21.403Z",
    "app_type": "genie_task",
    "genie_run_trigger": "genie_task",
    "first_run_in_conversation": true,
    "test_run": false,
    "genie_executor": "genie_task_source_recipe",
    "genie_executor_id": "j-AaJL4YeN-FNdEnW-B6",
    "genie_executor_related_id": "1658592",
    "call_stack": ["2341:1a11ce5f-f04f-44a3-8dd7-818d24fc3ce1"]
  },
  {
    "event_id": "e45f671c-fe92-40a4-b4fe-b8084735cd35",
    "event_type": "tool_execution_started",
    "chat_type": "GENIE",
    "workspace_id": 52718,
    "environment_id": 52718,
    "identity_user_id": "9Af5GRAXR4wB1u4ZFSqZ8E",
    "conversation_id": "conversation-01KSJPZNN9ZCJ4CKP4R53223HX",
    "genie_run_id": "e5929bae-750c-4ef6-8f26-888dddd5bc2c",
    "genie_id": "2341",
    "genie_handle": "gin-GgDdAaLX-sYHkWn-B2",
    "request_id": "00-5eabd4632d86b23064f919f6946746c1-8cf046b1dd7a6163-01",
    "date_time": "2026-05-26T17:58:16.509868Z",
    "data": {
      "user_name": "Alex",
      "issue_description": "Monitor is not working."
    },
    "app_type": "slack",
    "tool_call_id": "tooluse_l525qY8mmydN1vJurIWpb1",
    "tool_name": "Log support ticket",
    "tool_description": "Use this skill when the user wants to log, submit, or create a support ticket. Extract the user's name and a brief description of their issue from the conversation.",
    "tool_type": "EXTERNAL",
    "external_tool_ids": ["recipe:1649985"],
    "call_result": "SUCCESS"
  },
  {
    "event_id": "e88a1dc7-28e9-4534-8a14-5969fa312e88",
    "event_type": "genie_skill_run",
    "workspace_id": 52718,
    "environment_id": 52718,
    "genie_id": "2341",
    "genie_handle": "gin-GgDdAaLX-sYHkWn-B2",
    "identity_user_id": "9Af5GRAXR4wB1u4ZFSqZ8E",
    "conversation_id": "conversation-01KSJPZNN9ZCJ4CKP4R53223HX",
    "genie_run_id": "e5929bae-750c-4ef6-8f26-888dddd5bc2c",
    "date_time": "2026-05-26T17:58:21.535Z",
    "app_type": "slack",
    "first_run_in_conversation": false,
    "test_run": false,
    "tool_call_id": "tooluse_l525qY8mmydN1vJurIWpb1",
    "job_id": "j-AaHGJpoK-n3dWo9-B6",
    "event_ts": "2026-05-26T17:58:21.465Z"
  },
  {
    "event_id": "15a0bcec-afaf-421a-8a8c-877679e6f86c",
    "event_type": "llm_call_started",
    "chat_type": "GENIE",
    "workspace_id": 52718,
    "environment_id": 52718,
    "identity_user_id": "9Af5GRAXR4wB1u4ZFSqZ8E",
    "conversation_id": "conversation-01KS34RAWWDJ00EQBA6M5FNYGY",
    "genie_run_id": "95ce2c49-de8f-418e-9818-2f648e15aff2",
    "genie_id": "2341",
    "genie_handle": "gin-GgDdAaLX-sYHkWn-B2",
    "request_id": "00-e999dfff564597e0e7d45e19d5857ba6-08ab45fa94da0d05-01",
    "date_time": "2026-05-20T16:51:03.14646Z",
    "data": {
      "message": "How do I back up my data?",
      "conversation_history": [
        {
          "type": "system",
          "content": "You are an AI Agent System with the sole purpose of following user instructions.",
          "truncated": true,
          "tool_calls": null
        },
        {
          "type": "human",
          "content": "How do I back up my data?",
          "truncated": false,
          "tool_calls": null
        }
      ]
    },
    "app_type": "slack",
    "stage": "USER_QUERY",
    "llm_call_id": "e66e3132-241f-4ccb-b2ec-fe1418a0fbc5",
    "call_result": "SUCCESS"
  },
  {
    "event_id": "fbc9ee11-70b6-4092-b7f5-21309a84e221",
    "event_type": "user_message",
    "chat_type": "GENIE",
    "workspace_id": 52718,
    "environment_id": 52718,
    "identity_user_id": "9Af5GRAXR4wB1u4ZFSqZ8E",
    "conversation_id": "conversation-01KS34RAWWDJ00EQBA6M5FNYGY",
    "genie_run_id": "95ce2c49-de8f-418e-9818-2f648e15aff2",
    "genie_id": "2341",
    "genie_handle": "gin-GgDdAaLX-sYHkWn-B2",
    "request_id": "00-e999dfff564597e0e7d45e19d5857ba6-08ab45fa94da0d05-01",
    "date_time": "2026-05-20T16:51:03.117732Z",
    "data": {
      "message": "How do I back up my data?",
      "context": {
        "file_paths": [],
        "files": null,
        "location": null,
        "workato_context": null,
        "timestamp": "Wednesday, May 20, 2026 at 04:51:01 PM UTC",
        "author": null
      },
      "metadata": {}
    },
    "app_type": "slack"
  },
  {
    "event_id": "667f689a-0cf2-422f-92d4-0f556edae59c",
    "event_type": "guardrail_evaluated",
    "chat_type": "GENIE",
    "workspace_id": 52718,
    "environment_id": 52718,
    "identity_user_id": "9Af5GRAXR4wB1u4ZFSqZ8E",
    "conversation_id": "conversation-01KS34RAWWDJ00EQBA6M5FNYGY",
    "genie_run_id": "95ce2c49-de8f-418e-9818-2f648e15aff2",
    "genie_id": "2341",
    "genie_handle": "gin-GgDdAaLX-sYHkWn-B2",
    "request_id": "00-e999dfff564597e0e7d45e19d5857ba6-08ab45fa94da0d05-01",
    "date_time": "2026-05-20T16:51:03.128767Z",
    "data": {
      "results": [
        {
          "policy_type": "harmful_content",
          "action": "passed",
          "direction": "input",
          "execution_time_ms": 397.645614000794,
          "findings": [],
          "severity": null,
          "evaluated_step_id": "e66e3132-241f-4ccb-b2ec-fe1418a0fbc5"
        }
      ],
      "response_message": null
    },
    "app_type": "slack"
  },
  {
    "event_id": "fc979af5-6c44-4838-bc95-f9a0d99829c5",
    "event_type": "tool_execution_completed",
    "chat_type": "GENIE",
    "workspace_id": 52718,
    "environment_id": 52718,
    "identity_user_id": "9Af5GRAXR4wB1u4ZFSqZ8E",
    "conversation_id": "conversation-01KS34RAWWDJ00EQBA6M5FNYGY",
    "genie_run_id": "95ce2c49-de8f-418e-9818-2f648e15aff2",
    "genie_id": "2341",
    "genie_handle": "gin-GgDdAaLX-sYHkWn-B2",
    "request_id": "00-e999dfff564597e0e7d45e19d5857ba6-08ab45fa94da0d05-01",
    "date_time": "2026-05-20T16:51:06.792985Z",
    "data": {
      "message": null,
      "artifact": {
        "knowledge_fragments": [
          {
            "document_id": "1lrNyRTpddxSc2t_QCimKYoVxKyAJDwqRo30cwZqXfX4",
            "title": "IT FAQ",
            "url": null,
            "content": "[Passage 1]\nTitle: IT FAQ\n\nHow do I back up my files? All files saved to your OneDrive folder are automatically backed up."
          }
        ]
      }
    },
    "app_type": "slack",
    "tool_call_id": "tooluse_sdDMAh6qWShfw7XIOcbjUi",
    "tool_name": "enterprise_search",
    "tool_type": "BUILTIN",
    "call_result": "SUCCESS"
  },
  {
    "event_id": "c6e63073-2584-4527-b4ed-746696dc342b",
    "event_type": "tool_execution_completed",
    "chat_type": "GENIE",
    "workspace_id": 52718,
    "environment_id": 52718,
    "identity_user_id": "9Af5GRAXR4wB1u4ZFSqZ8E",
    "conversation_id": "conversation-01KSJPZNN9ZCJ4CKP4R53223HX",
    "genie_run_id": "e5929bae-750c-4ef6-8f26-888dddd5bc2c",
    "genie_id": "2341",
    "genie_handle": "gin-GgDdAaLX-sYHkWn-B2",
    "request_id": "00-59adf691336c3fb3e4f0fc0db1f9a46f-21ca607eb3911b5b-01",
    "date_time": "2026-05-26T17:58:24.892012Z",
    "data": {
      "message": "{\"Confirmation\":\"Ticket successfully created for Alex\"}",
      "artifact": null
    },
    "app_type": "slack",
    "tool_call_id": "tooluse_l525qY8mmydN1vJurIWpb1",
    "tool_name": "Log support ticket",
    "tool_type": "EXTERNAL",
    "call_result": "SUCCESS"
  },
  {
    "event_id": "d055f354-882b-4350-b6f4-4c333ae1ae37",
    "event_type": "structured_output_formatting_started",
    "chat_type": "GENIE",
    "workspace_id": 52718,
    "environment_id": 52718,
    "identity_user_id": "9Af5GRAXR4wB1u4ZFSqZ8E",
    "conversation_id": "conversation-01KRGRQN8DP5MR8Y4D33K5CPCJ",
    "genie_run_id": "dcda0a4d-decc-4092-a6f8-fba4d4b1c36b",
    "genie_id": "2341",
    "genie_handle": "gin-GgDdAaLX-sYHkWn-B2",
    "request_id": "00-6e6d1dfc66633621c2c807d43a344cd3-f6e1213b0a8c6a1a-01",
    "date_time": "2026-05-13T13:34:35.653011Z",
    "data": {
      "message": "Based on the details provided, this appears to be a hardware or performance-related issue.",
      "output_schema": "{\"type\":\"object\",\"properties\":{\"Category\":{\"type\":\"string\"},\"Priority\":{\"type\":\"string\"},\"Summary\":{\"type\":\"string\"}},\"required\":[\"Category\",\"Priority\",\"Summary\"]}"
    },
    "app_type": "genie_task"
  },
  {
    "event_id": "04b12c52-ec5b-4651-b54f-e4cf0b335905",
    "event_type": "topic_assigned",
    "chat_type": "GENIE",
    "workspace_id": 52718,
    "environment_id": 52718,
    "identity_user_id": "9Af5GRAXR4wB1u4ZFSqZ8E",
    "conversation_id": "conversation-01KS34RAWWDJ00EQBA6M5FNYGY",
    "genie_run_id": "unknown",
    "genie_id": "2341",
    "genie_handle": "gin-GgDdAaLX-sYHkWn-B2",
    "request_id": "00-e999dfff564597e0e7d45e19d5857ba6-08ab45fa94da0d05-01",
    "date_time": "2026-05-20T16:51:14.369385Z",
    "data": "Data backup using OneDrive",
    "app_type": "slack"
  }
]Click Transformation editor to open the transformation menu.
Enter the following transformation script, which adds the TimeGenerated field required by Azure and the log_type field that categorizes each log by its Workato event type:
source
| extend TimeGenerated = now()
| extend log_title = tostring(['title'])
| extend log_type = case(
    source == "apim-mcp-gateway",    "mcp",
    source == "data-pipeline-conductor", "data_pipeline",
    source == "opa",                 "opa",
    source == "webhook",             "webhook",
    source == "lcap",                "lcap",
    source == "job" and isnotempty(tostring(adapter)), "logger",
    isnotempty(tostring(job_url)),   "job",
    isnotempty(tostring(genie_run_id)), "genie",
    isnotempty(tostring(event)),     "user_activity",
    "unknown"
)
| project-away ['title']
Refer to the Microsoft custom tables documentation for more information about table customization.
Click Run, then click Apply.
Click Next and review your settings.
Click Create to create the custom table and data collection rule.
Go to Monitor and select Settings > Data Collection Rules.
Select the data collection rule you created.
Copy the Immutable Id (also called DCR ID) for use in Workato. This value is required to configure the Inject custom logs action.
Click Configuration > Data sources in the left menu and note the Data source name (for example, Custom-WorkatoLogs_CL). This is the stream name, and is required for the Inject custom logs action in Workato.
Assign permissions to your app registration. In the data collection rule, click Access control (IAM) in the left menu.
Click Add > Add role assignment.
Select Monitoring Metrics Publisher role and click Next.
Click Select members and search for the app registration you created earlier.
Select your app registration and click Select.
Click Review + assign to complete the role assignment.
Refer to the Microsoft Data collection rules documentation for more information.
Return to Workato to complete the connection setup.
Complete setup in Workato
Complete the following steps to establish an Azure Monitor connection using client credentials authentication:
Click Create > Connection or press C twice.
Search for and select Azure Monitor on the New connection page.
Enter a name for your connection in the Connection name field.
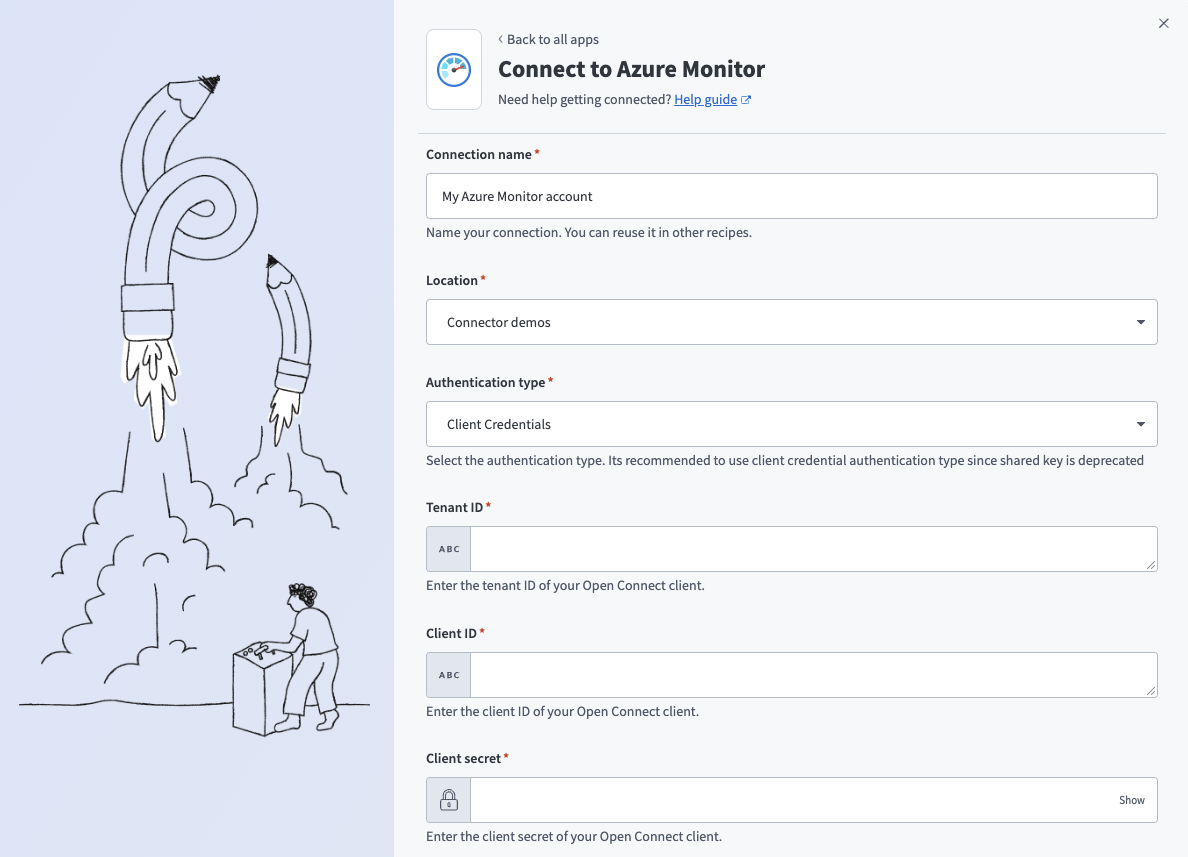 Connect to Azure Monitor
Use the Location drop-down menu to select the project where you plan to store the connection.
Use the Authentication type drop-down menu to select Client Credentials.
Enter the tenant ID from your Azure app registration in the Tenant ID field.
Enter the client ID from your Azure app registration in the Client ID field.
Enter the client secret from your Azure app registration in the Client secret field.
Enter your data collection endpoint URL in the Data collection endpoint field. For example, https://YOUR-INSTANCE-NAME.eastus-1.ingest.monitor.azure.com. This is labeled as the Logs Ingestion value in the Azure portal.
Click Connect.
Shared key
DEPRECATED - MIGRATION REQUIRED
This authentication method uses the legacy HTTP Data Collector API, which is deprecated and will stop working in September 2026. Migrate to client credentials authentication instead.
This method requires the following values:
- Workspace ID
- Shared key
Retrieve your workspace ID and shared key
Complete the following steps to retrieve your workspace ID and shared key:
 Open the Cloud Shell
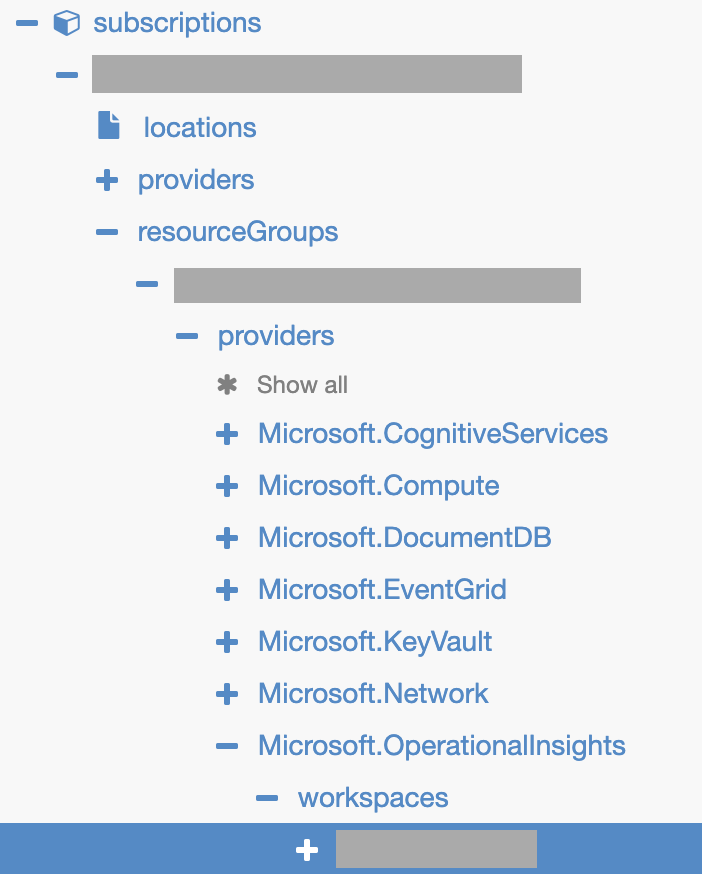 The Azure resource tree
Complete setup in Workato
Complete the following steps to establish an Azure Monitor connection using shared key authentication:
Click Create > Connection or press C twice.
Search for and select Azure Monitor on the New connection page.
Enter a name for your connection in the Connection name field.
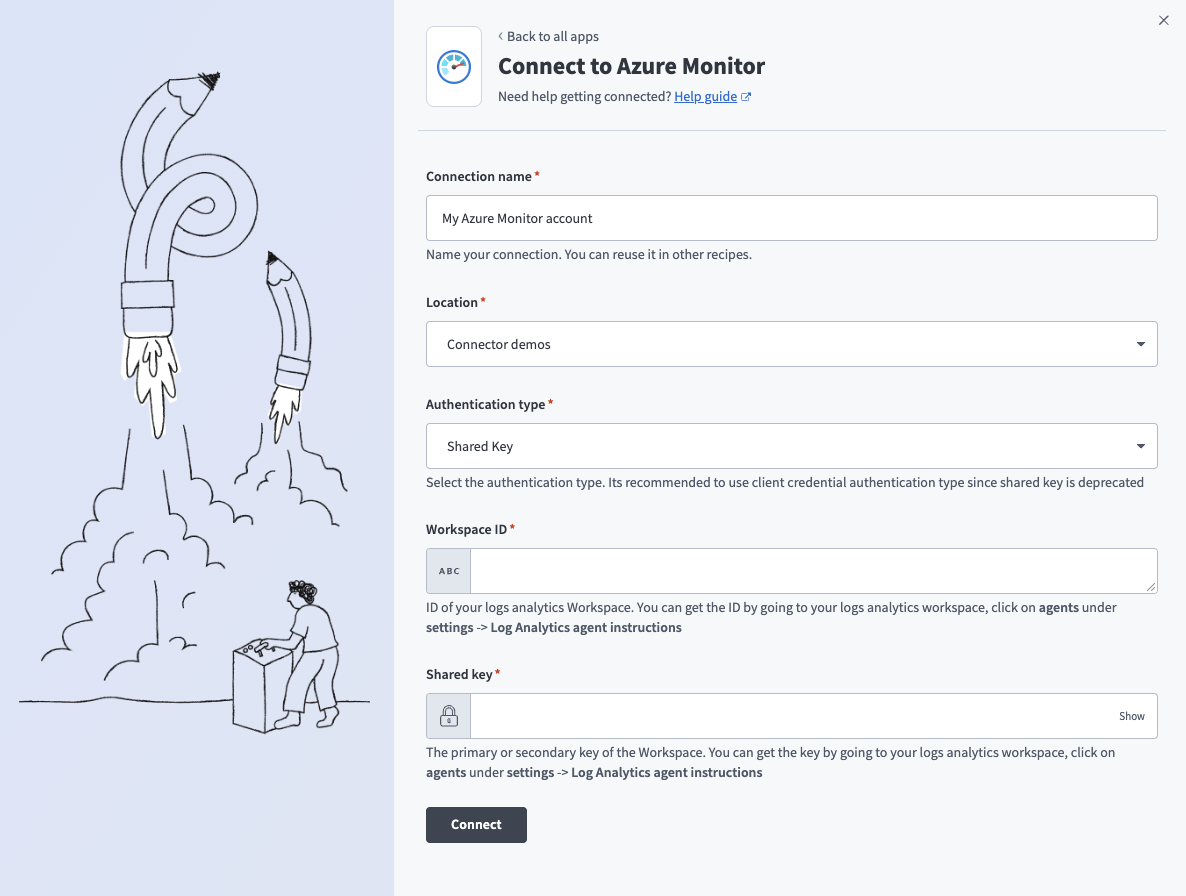 Connect to Azure Monitor
Use the Location drop-down menu to select the project where you plan to store the connection.
Use the Authentication type drop-down menu to select Shared Key.
Enter the Workspace ID.
Enter the Shared key.
Click Connect.
Last updated: