# Power BI
Power BI (opens new window) is a Microsoft business analytics platform that offers interactive visualizations and business intelligence tools. It enables users to create reports and dashboards.
# API version
The Power BI connector uses the Power BI REST API v1.0 (opens new window).
# Prerequisites
Complete the following steps before you establish a connection to Power BI:
- Register an application in Azure portal
- Generate a client ID (application ID)
- Generate a client secret
- Assign API permissions
- Retrieve a tenant ID (for single-tenant accounts)
After you complete these prerequisites, proceed to connect to Power BI on Workato.
# Register an application in Azure portal
Complete the following steps to register an application in Azure portal:
Go to the Microsoft Entra admin center (opens new window) and sign in with your Azure admin credentials.
Go to Microsoft Entra ID (formerly Azure Active Directory) in the left-hand menu.
Click App registrations.
Click New registration.
Enter the following details:
- Name: Enter a unique name for your application.
- Supported Account Type: Choose Single Tenant (only your organization) or Multi-Tenant (multiple organizations).
- Redirect URI: Optional. Enter
https://www.workato.com/oauth/callback
Click Register to create the app.
# Generate a client ID (application ID)
Complete the following steps to generate a client ID (application ID):
Go to the Overview page after the app is registered.
Copy the Application (client) ID. This is your Client ID. Refer to the Set up Power BI Embedded (opens new window) article for more information.
# Generate a client secret
Go to Certificates & secrets.
Click New client secret in the Client secrets section.
Provide a Description and choose an Expiration period, such as 6 months, 1 year, or 2 years.
Click Add to generate the client secret.
Copy and save the client secret Value immediately. You can't view it later.
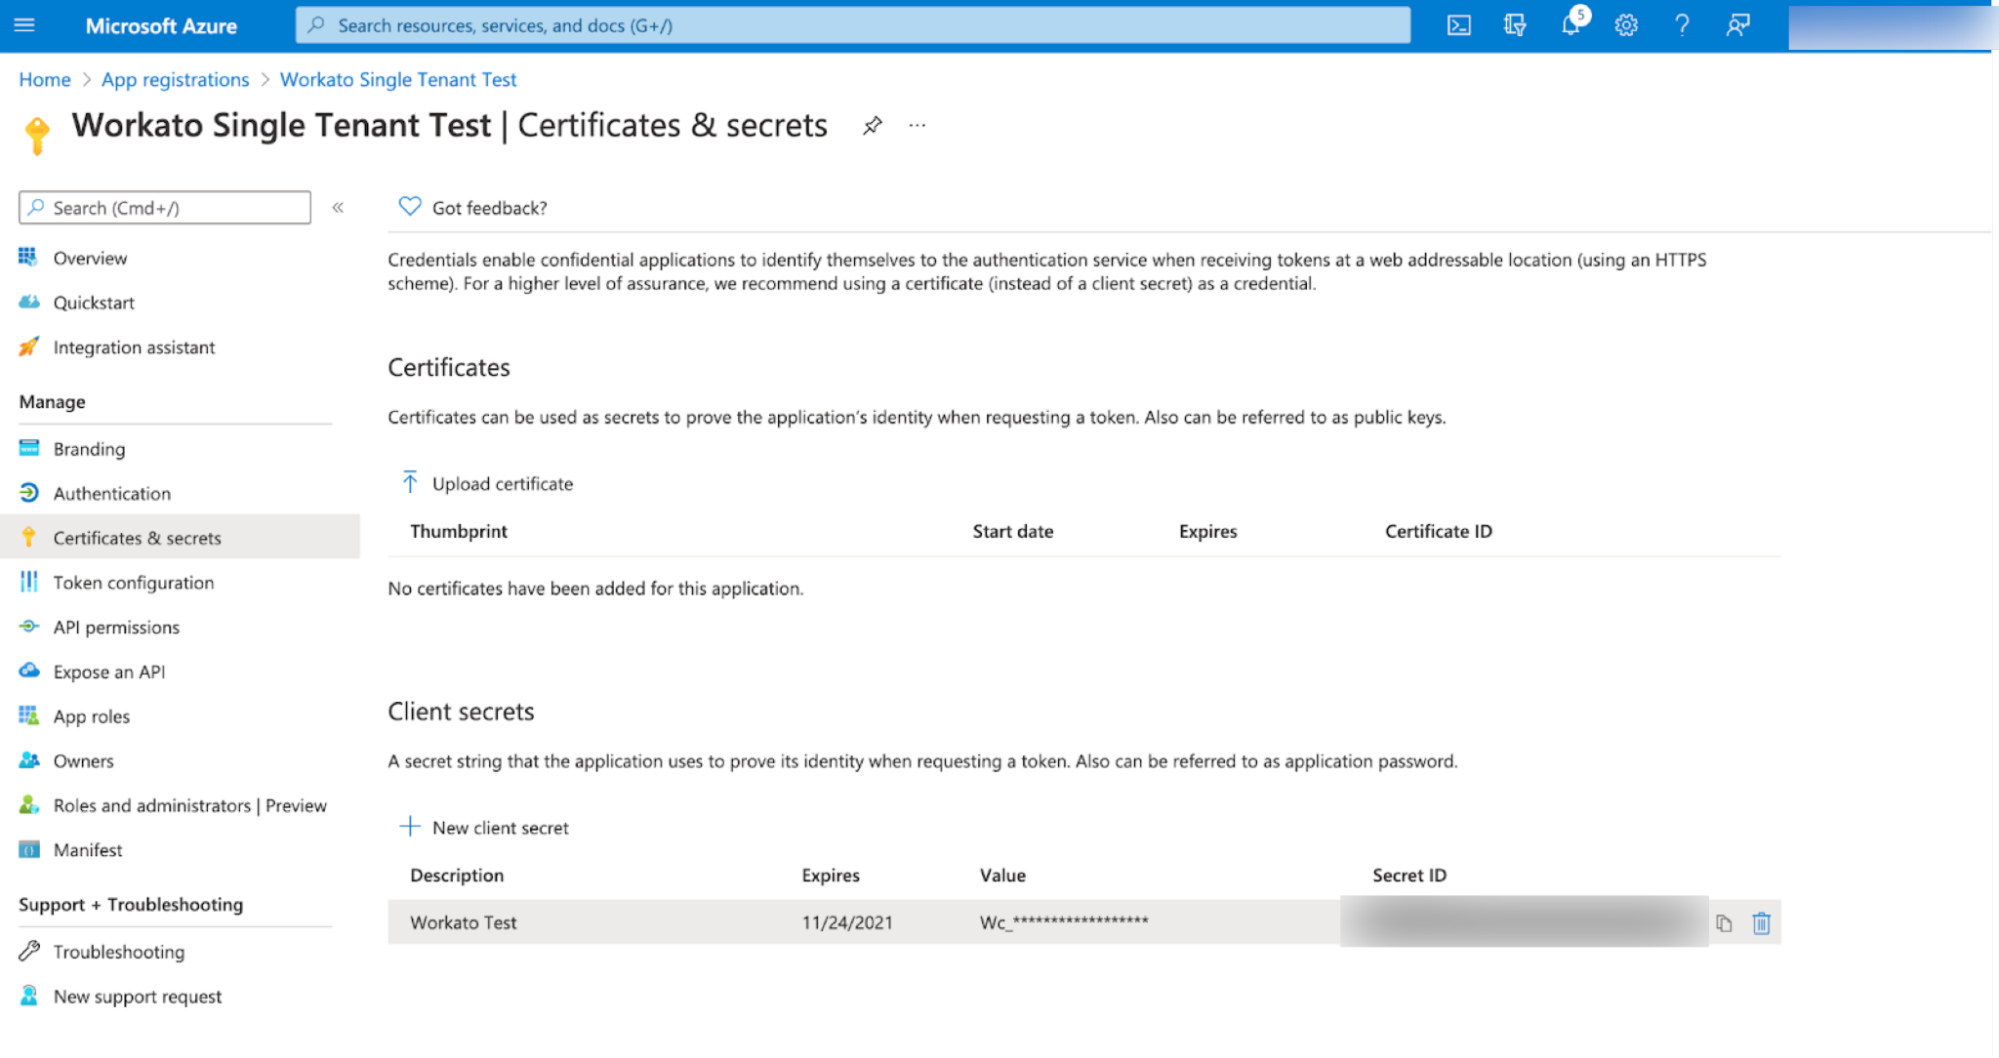 Power BI Certificate
# Assign API permissions
Complete the following steps to assign API permissions for Power BI:
Go to API permissions.
Click Add a permission and select Power BI Service.
Select the required permissions, such as App.Read.All, Dataset.ReadWrite.All, and Workspace.Read.All.
Click Add permissions, then Grant admin consent if required.
# Retrieve a tenant ID (for single-tenant accounts)
Complete the following steps to retrieve your tenant ID:
Open Microsoft Entra ID, then select Overview.
Copy the Directory (tenant) ID. This is your tenant ID.
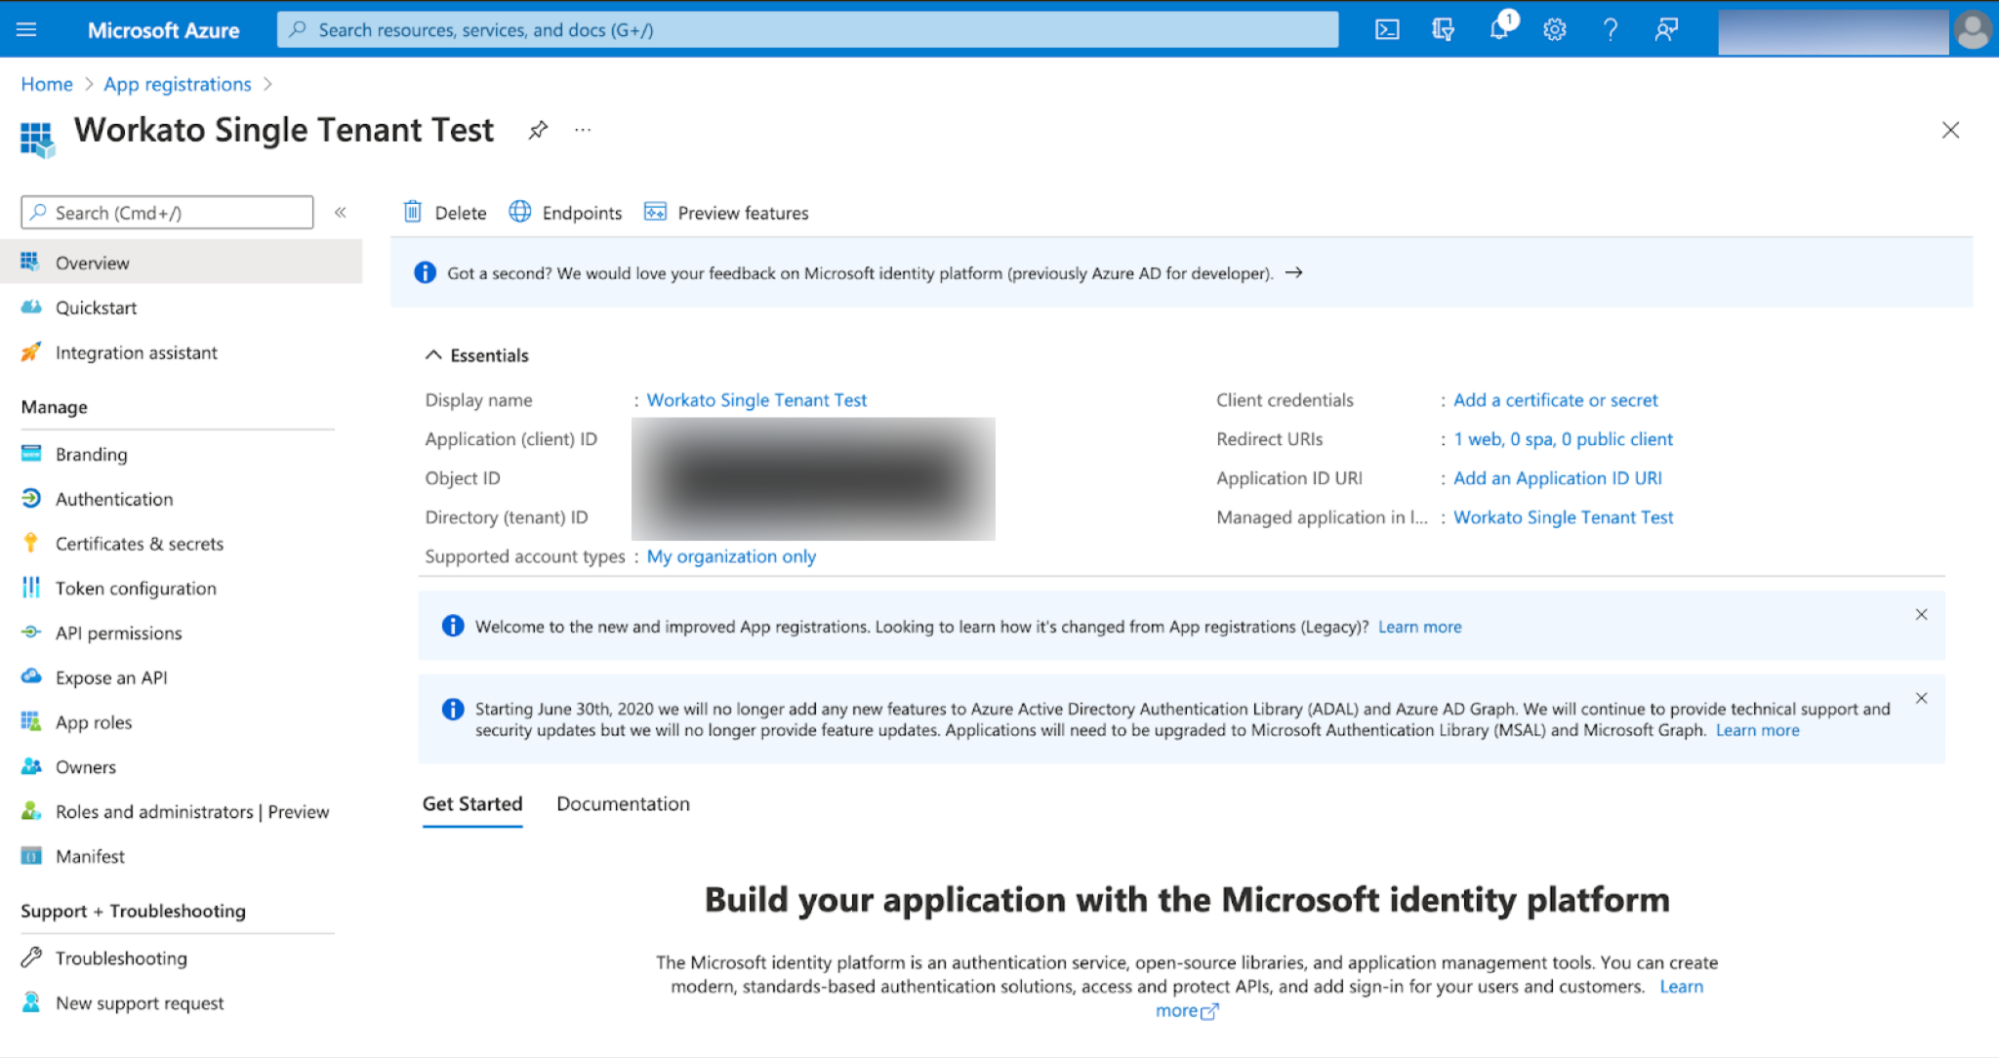 Power BI Tenant ID
# How to connect to Power BI
MICROSOFT MFA ENFORCEMENT
Microsoft is rolling out mandatory multifactor authentication (MFA) gradually to different applications and accounts in phases. This enforcement continues throughout 2025 and beyond. Refer to the Microsoft Mandatory multifactor authentication for Azure and admin portals (opens new window) documentation for more information.
We strongly recommend enabling MFA now for all Microsoft accounts used with Workato to avoid service disruptions from short-notice enforcement changes.
Complete the following steps to maintain uninterrupted service:
Enable MFA for your Microsoft organization following the Microsoft MFA setup guide. Refer to Set up multifactor authentication for Microsoft 365 (opens new window) for more information.
Reconnect your Microsoft connection in Workato.
Complete the OAuth flow with MFA when prompted.
Test your recipes to ensure they work with the updated connection.
The Power BI connector supports OAuth 2.0 authentication. Choose one of the following authentication methods based on your workspace requirements:
# OAuth 2.0 Authorization code
Use this method to access the user's default workspace (My workspace). This workspace is tied to a single user's identity and doesn't support sharing with service principals, groups, or other users.
Complete the following steps to establish a Power BI connection using OAuth 2.0 Authorization Code authentication:
Click Create > Connection or press C twice.
Search for and select Power BI as your connection on the New connection page.
Enter a name for your connection in the Connection name field.
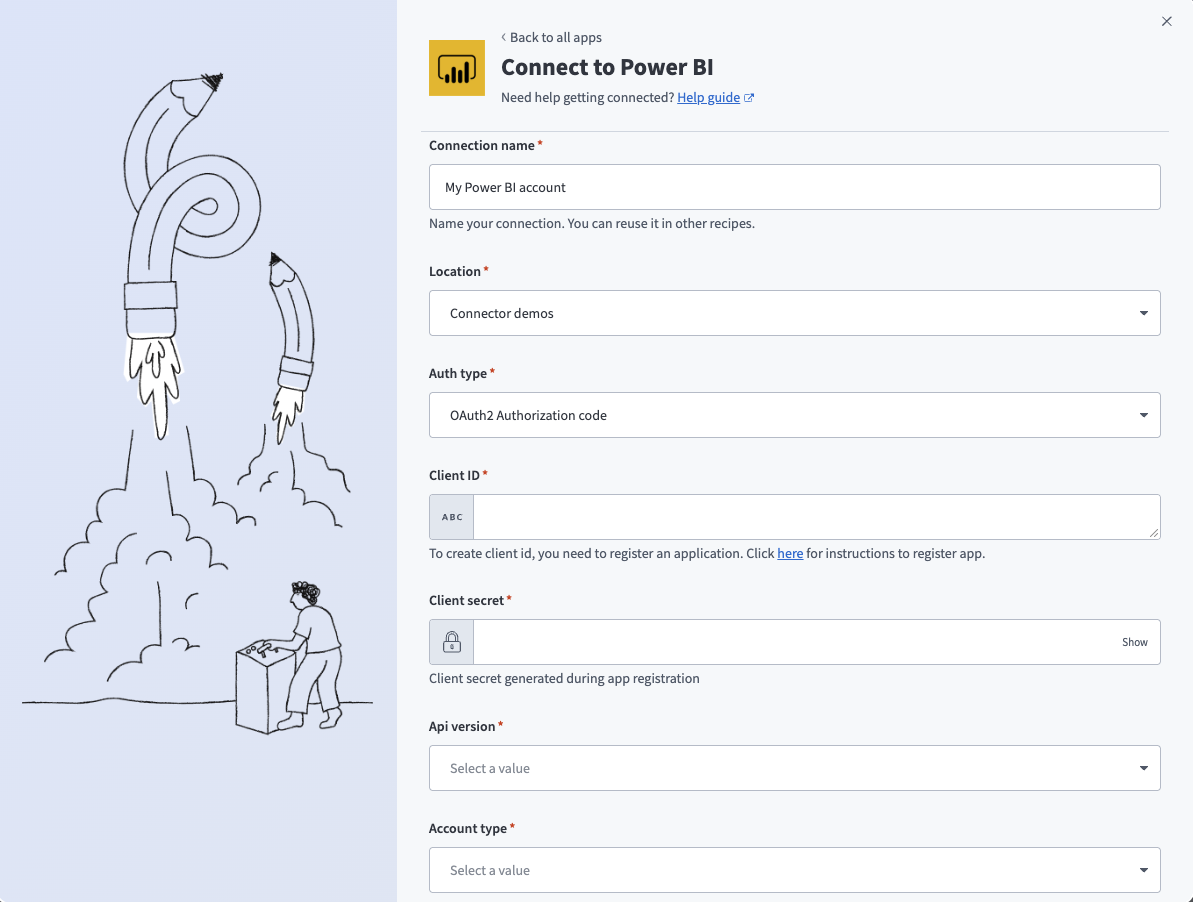 Connect to Power BI
Use the Location drop-down menu to select the project or folder where you plan to store your connection.
Select OAuth2 Authorization code as the Auth type.
Enter the Client ID used for authentication with Power BI.
Provide the Client secret required for authentication with Power BI.
Specify the API version to use.
Select your registered Account type in Power BI from the following options:
- Single tenant
- Multitenant
- Active directory multitenant
Enter the Tenant ID for authentication if you selected Single tenant as the Account type.
Click Connect.
# OAuth 2.0 Client credentials
Use this method to access shared workspaces with a service principal. You must grant the service principal access to each shared workspace. This method doesn't support My workspace.
Complete the following steps to establish a Power BI connection using OAuth 2.0 client credentials authentication:
Click Create > Connection or press C twice.
Search for and select Power BI as your connection on the New connection page.
Enter a name for your connection in the Connection name field.
 Connect to Power BI
Use the Location drop-down menu to select the project or folder where you plan to store your connection.
Select OAuth2 Client credentials as the Auth type.
Enter the Client ID used for authentication.
Enter the Client secret used for authentication.
Specify the API version to use.
Enter the Tenant ID. This can be in GUID format or a friendly name format.
Click Connect.
Last updated: 4/30/2026, 3:06:08 PM