# Build a personal assistant genie with Telegram
This use case connects your Telegram account to a genie configured with a specialized skill recipe that turns your genie into a personal assistant. The genie automates your scheduling workflow by intelligently evaluating incoming Telegram messages and creating Google Calendar events for meetings, appointments, or reminders on your behalf. This removes the need to manually switch between apps to log appointments.
# What does this genie do?
This genie enables you to connect Telegram to a Workato recipe and genie to process incoming messages intelligently. It uses a custom skill recipe to teach your genie how to detect calendar events in messages and create Google Calendar events automatically.
# Build your Telegram personal assistant bot
Complete the following steps to create a personal assistant bot on Telegram that intelligently processes your messages and creates Google Calendar events on your behalf:
USE CASES ARE INTENDED AS EXAMPLES ONLY
Use cases are intended to serve as examples. Genie modifications, such as triggers, actions, or connection permissions may require adjustments for your specific setup.
Sign in to Workato.
Set up your Telegram bot.
# Set up your Telegram bot
This step creates a new Telegram bot and retrieves the API token needed to connect it to Workato.
Sign in to your Telegram app and search for the @BotFather account.
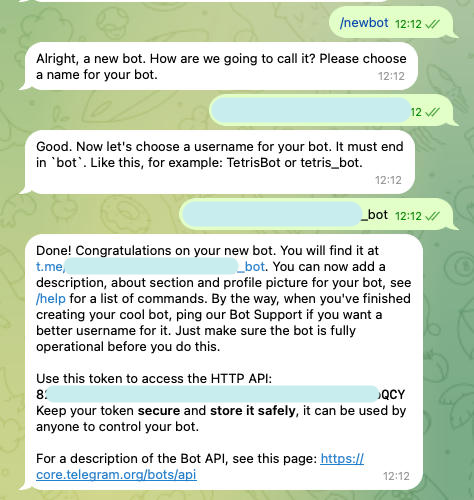
Start a conversation with @BotFather and enter the /newbot command.
 Create a new Telegram bot
Enter a human-readable name for your bot when prompted. For example: Workato PA genie.
Enter a unique bot username that ends with bot when prompted. For example: workato_bot.
Copy the secret API token that @BotFather provides in the confirmation message. You must use this token to connect your bot to Workato.
Create a Telegram connection.
# Create a Telegram connection
This step installs the Telegram community connector and creates a connection between Workato and your Telegram bot.
Sign in to your Workato account.
Go to Community Library > Custom Connectors.
Search for Telegram and select it as your app.
Click Install.
 Install the Telegram community connector
Enter a name for your connection in the Name field.
Use the Save connection in drop-down menu to select a location for your connection.
Enter the API token you received from @BotFather in the API token field.
Click Connect.
Create a Google Calendar connection.
# Create a Google Calendar connection
This step creates a connection between Workato and your Google Calendar account to allow your genie to create calendar events on your behalf.
Refer to the following sections to set up your Google Calendar connection:
# OAuth 2.0 authentication
Complete the following steps to set up your Google Calendar connection using OAuth 2.0:
View OAuth 2.0 authentication steps
Click Create > Connection or press C twice.
Search for and select Google Calendar as your connection on the New connection page.
Provide a name for your connection in the Connection name field.
Select the project where you plan to store the connection from the Location drop-down menu.
Select OAuth 2.0 as the Authentication type.
Click Sign in with Google, then sign in to your Google account. Ensure your Google account has sufficient permissions to manage the events and calendars you plan to use in Workato.
 Click Sign in with Google.
# Service account authentication
View Service account authentication steps
A Google service account is a specialized Google account associated with a Google Cloud Project (GCP) that can run API requests on your behalf.
Service accounts provide the following benefits:
- Continuous operation: Service accounts ensure that operations continue even if individual user permissions change.
- Dedicated permissions: Service accounts can only access projects that you share with them.
- Dedicated API quotas: You can manage a service account's API quotas through GCP and request quota increases directly from Google.
Refer to the Google service account documentation (opens new window) to learn more about service accounts.
Service account authentication consists of the following actions:
# Minimum scopes for service account connections
The following scopes are required to connect to Google Calendar using a service account:
https://www.googleapis.com/auth/calendarhttps://www.googleapis.com/auth/calendar.eventshttps://www.googleapis.com/auth/admin.directory.resource.calendarhttps://www.googleapis.com/auth/taskshttps://www.googleapis.com/auth/userinfo.email
A 401 Unauthorized error may occur when the service account uses the Owner role or lacks required scopes. Assign the Editor role to the service account in the Google Cloud Console and confirm it includes all required scopes listed above. This ensures the service account can authenticate and access Google Calendar successfully.
Refer to the Google Calendar API scopes (opens new window) documentation for a complete list of supported scopes.
# Set up a Google service account
View Set up a Google service account steps
Complete the following steps to set up a Google service account:
Create a service account (opens new window) in your GCP project.
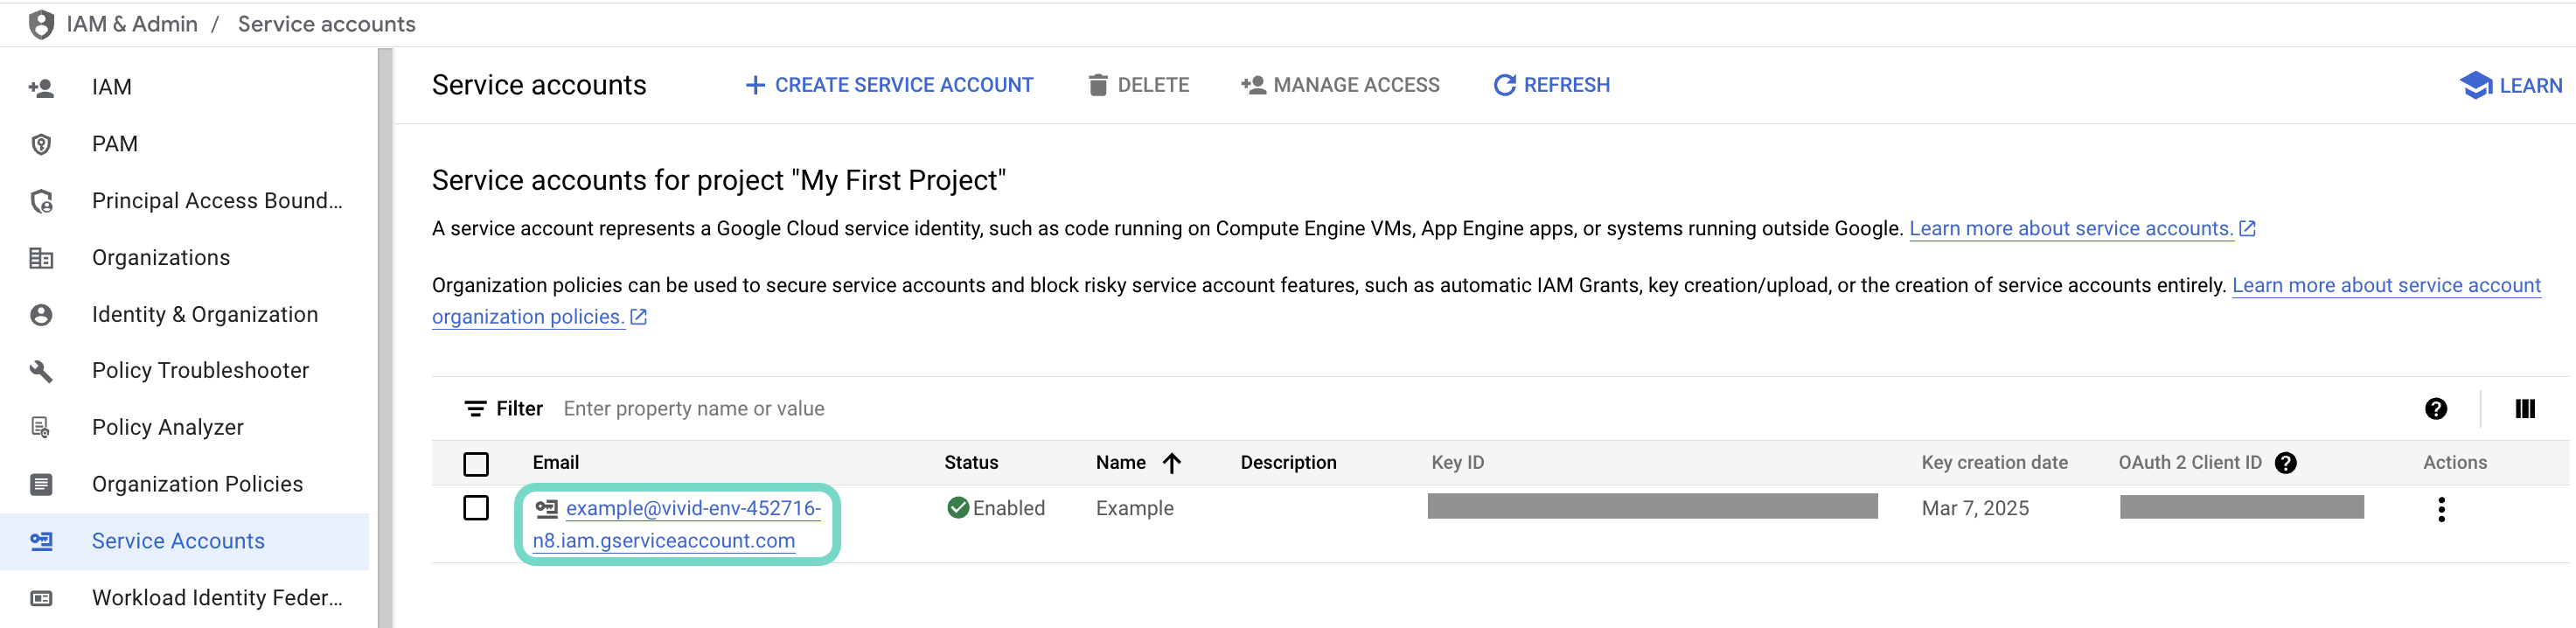
Go to IAM & Admin > Service accounts. Ensure your dashboard is scoped to the project that contains your service account.
 Check the scope of your dashboard.
Click the Email of the service account you intend to use.
 Click the Email of the service account you intend to use.
Copy the service account's Email and save it to configure your connection later.
 Copy the account's Email.
Go to the KEYS tab.
Generate a private key (opens new window) and download it in JSON format. You can only download the key once.
Open the JSON file, then copy the entire private key from -----BEGIN PRIVATE KEY----- to -----END PRIVATE KEY-----\n (inclusive) and save it to configure your connection later.
# Enable the Google Calendar API
View Enable the Google Calendar API steps
You must enable the Google Calendar API before you return to Workato to finish setting up your connection.
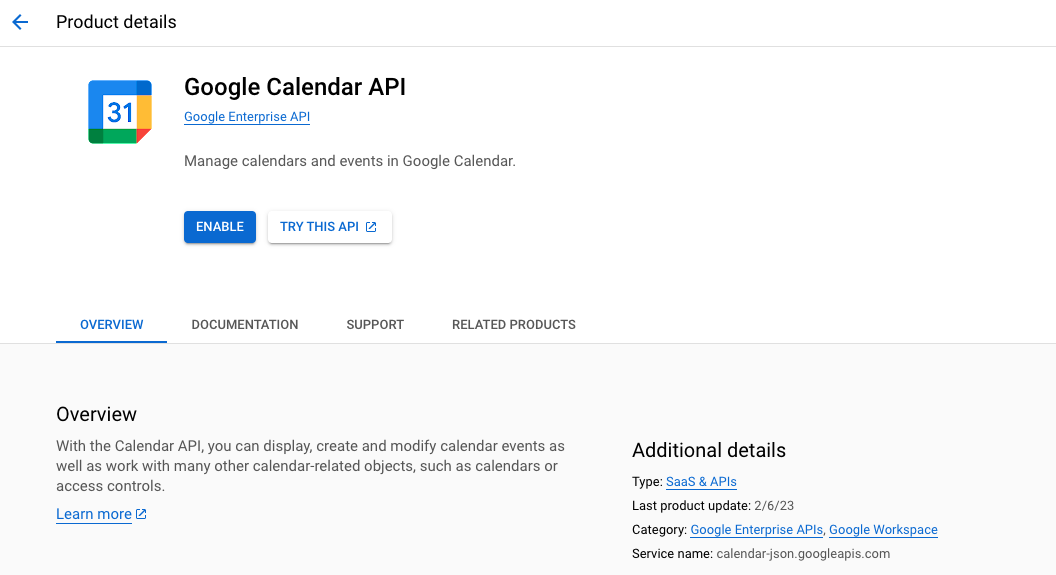
Sign in to Google's API library (opens new window).
Search for and select the Google Calendar API.
Click Enable to enable the API.
 Enable the
 Google Calendar API
# Complete setup in Workato
View Workato setup steps
Complete the following steps in Workato to set up your Google Calendar connection using a service account:
Click Create > Connection or press C twice.
Search for and select Google Calendar as your connection on the New connection page.
Provide a name for your connection in the Connection name field.
Use the Location drop-down menu to select the project where you plan to store the connection.
Select Service account as the Authentication type.
Enter your service account's Private key.
Provide the User email of the account you plan to impersonate.
User impersonation lets the service account act on behalf of a designated user, accessing and managing events in their Google Calendar. Impersonating a user ensures data accuracy and enforces the permissions and access controls set for that user in Google Calendar. Refer to Google's Service account impersonation (opens new window) guide for more information.
Click Sign in with Google to complete the setup.
 Configure Google Calendar service account connection
Set up a recipe to process incoming Telegram messages.
# Set up a recipe to process incoming Telegram messages
This step ensures that messages sent to your Telegram bot reach Workato and are processed correctly.
Go to the project where you plan to store your recipe and click Create > Recipe or press C+R.
Enter a name for your recipe in the Name field and use the Save recipe in drop-down menu to select a project location.
Click Pick a starting point > Select an app.
Search for Telegram and select it as your app.
Select the New Event trigger and connect using the Telegram connection you created in the preceding steps.
Click + Add step and search for and select Telegram.
 Set up your Telegram Send message action
Select the Send message action.
Map the Telegram Message > Chat ID Step 1 datapill to the Chat ID field.
Enter Message received in the Message to send field.
Optional. Click Test recipe and send a message to your Telegram bot. Your recipe is configured correctly if you receive a reply.
Add a genie to the recipe.
# Add a genie to the recipe
This step creates a genie that intelligently processes incoming Telegram messages and decides when to create a calendar event Google Calendar.
Go to the project where you plan to store your genie and click Create > Genie, or press C+G.
Enter a request or goal for your genie in the What would you like your genie to help with? field. For example:
You are a personal assistant who responds to users' messages. If the message contains
information about an upcoming event, you can create a calendar event for the user
with the given information.
Use the Save genie in drop-down menu to select a location for your genie.
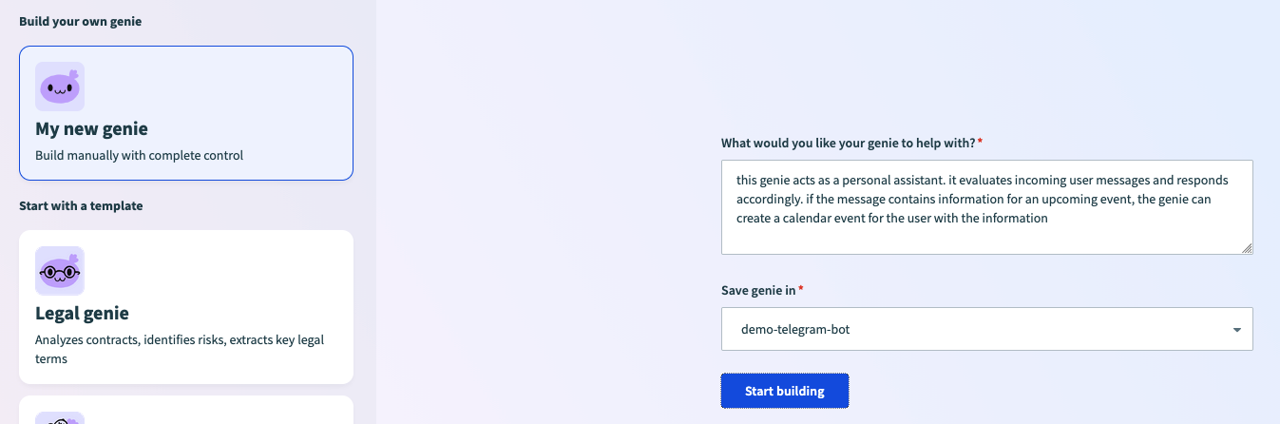 Create a new genie
Click Start building. The genie Build page displays with the Job description automatically generated based on the input you provided. You can edit this to suit your requirements.
Return to the recipe editor and click + Add step before the Telegram Send Message action step.
 Click + Add step before the Telegram Send Message action step
Select Action in app, search for Workato Genie, and select it as your app.
Select the Assign task to genie action.
Use the Genie drop-down menu to select the genie you created in the preceding steps.
Enter a description that instructs the genie to process the incoming message and use the Google Calendar skill when appropriate in the Task Description field.
Map the Telegram trigger Text Step 1 datapill after your description in the Task Description field.
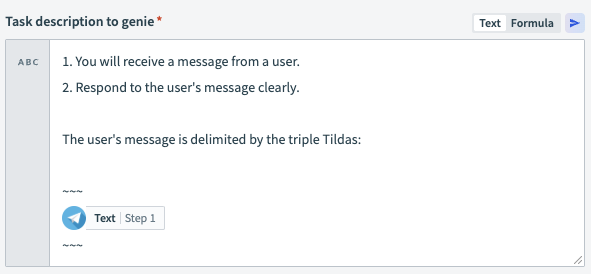 Configure the Task Description field
Click Save.
Create a Data table to store conversation IDs.
# Create a Data table to store conversation IDs
This step creates a Data table to persist the genie's conversation ID against each Telegram user's ID. This allows the genie to retain context across multiple messages from the same user.
Go to the project where you plan to store your data table and click Create > Data table or press C+T.
Enter a name for your Data table in the Name field.
Use the Save in drop-down menu to select a location for your Data table.
Click Create > Data table or press C+T.
Add a column with the label telegram-id to store the Telegram user's sender ID.
Add a second column with the label genie-conversation-id to store the genie's conversation ID.
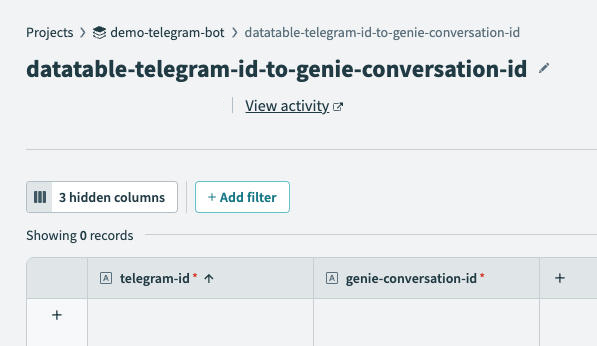 Add columns to your data table
Click Save.
Add the Conversation ID to the recipe.
# Add the Conversation ID to the recipe
This steps adds a Workato Data tables Search records action that allows the recipe to refer to the Data table to see if the sender's Telegram ID has a corresponding Conversation ID in the data table. An existing Conversation ID indicates that there's a previous conversation which the genie can refer to.
Return the recipe editor and click + Add step before the Assign task to genie action step.
Select Action in app, search for Workato Data Tables, and select it as your app.
Select the Search records action.
Use the Data table drop-down menu to select the data table you created in the preceding steps.
Go to the Filter section and click Add filter.
Use the Column name drop-down menu to select telegram-id.
Use the Operand drop-down menu to select equals.
Map the Telegram ID Step 1 datapill to the Value field. This datapill is located under Telegram > Message > From.
 Configure the data table to search Telegram
Click + Add step after the Assign task to genie action step.
Select Action in app, search for Workato Data Tables, and select it as your app.
Select the Upsert record action.
Use the Data table drop-down menu to select the data table you created in the preceding steps.
 Configure the Upsert record action
Use the Primary key drop-down menu to select telegram-id.
Go to the Record fields section and map the Telegram From ID Step 1 datapill to the telegram-id field.
Map the Workato Genie Conversation ID Step 3 datapill to the genie-conversation-id field.
Click Save.
Create a skill recipe to convert messages into Google Calendar events.
# Create a skill recipe to convert messages into Google Calendar events
This step creates a custom skill recipe that enables your genie to detect messages that should be converted into Google Calendar events.
Go to the Build page of the genie you created in the preceding steps.
Go to the Skills section and click + Add > Skill.
Select New skill and click Create new skill.
Alternatively, you can create a skill from the Projects page by clicking Create > Skill or pressing C+S.
Provide a name for your skill in the Name field. For example: Create Google Calendar event.
Use the Location drop-down menu to select a location for your skill recipe.
Click Start building. The recipe editor opens with the Start workflow trigger and Return response action automatically selected.
Select the Start workflow trigger.
Go to the What inputs will your genie require to run this skill? section and click Add fields manually. Add the following fields:
| Label | Data type |
|---|---|
event_title | String |
event_date | Date |
event_time | String |
event_description | String |
Go to the What should be returned to the genie after this skill is run? section and add the following field:
| Label | Data type |
|---|---|
created_event | Boolean |
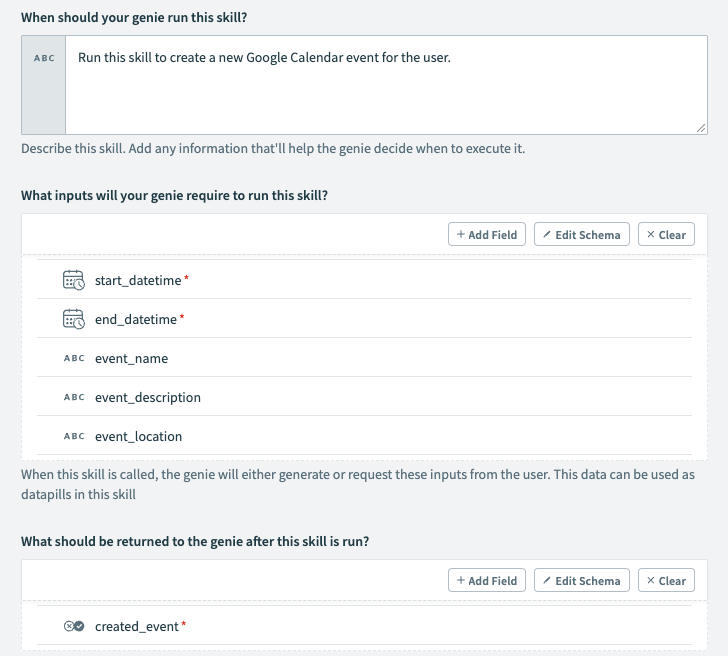 Configure inputs and output
Click + Add step, search for Google Calendar, and select it as your app.
Select the Create event action.
Map the Start datetime Step 1 datapill to the Start date time field.
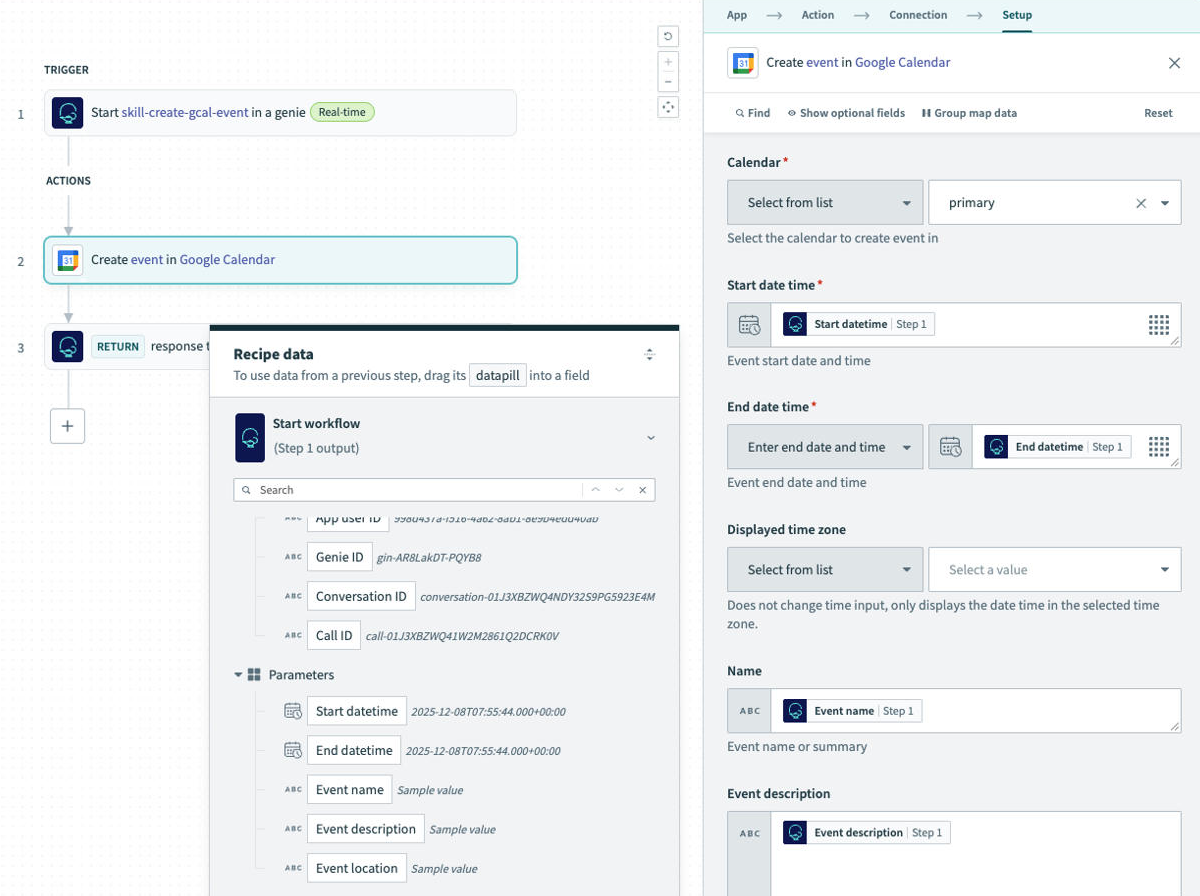 Configure the Create event action
Map the End datetime Step 1 datapill to the End date time field.
Map the Event name Step 1 datapill to the Name field.
Map the Event description Step 1 datapill to the Event description field.
Click + Add step and select IF condition to handle the result of the calendar event creation.
Map the Google Calendar ID Step 2 datapill to the Data field.
Use the Condition drop-down menu to select is present.
Go to the Yes branch and click Select and app and action.
Search Workato Genie and select it as your app.
Select Return response to genie as your action.
Go to the Results section and use the Created Event drop-down menu to select Yes.
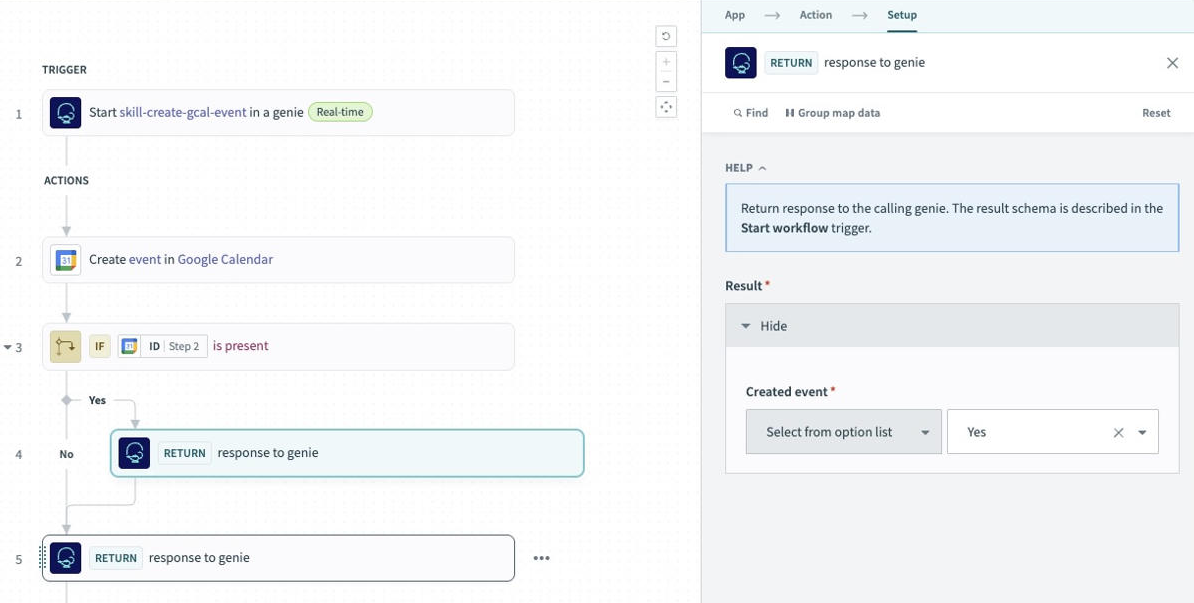 Set up your IF condition
Go to the No branch. The Return response to genie action should already be present.
Click the Return response to genie action to open it.
Configure the Yes and No paths of the IF block to return the appropriate created_event boolean response to the genie.
Click Save.
Update your genie task description.
# Update your genie task description
This step updates the genie task description to include instructions on how the genie should use the Google Calendar skill.
Click the Assign task to genie step in the recipe editor.
Go to the Task Description field and update the description to use the following instructions:
DON'T REMOVE THE TELEGRAM DATAPILL
Don't remove the Telegram datapill you mapped to the Task Description field in previous steps.
Do the following based on the user's message and conversation history:

1. Identify if the message contains an event where you need to set up a calendar event.
2. If yes, then call the skill to create the event in Google Calendar.
3. If not, then respond normally.
4. When responding, you do not need to include your classification of whether it was a task.
Click Save.
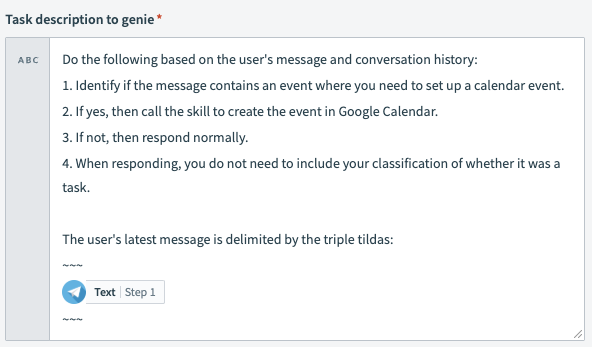 Update the Task Description
Last updated: 4/30/2026, 3:06:08 PM