IT Support Ticket Lifecycle MCP server
The IT Support Ticket Lifecycle MCP server enables LLMs to interact with Jira Service Desk for the employee side of the IT support ticket lifecycle through natural conversation. It provides tools to search a linked Confluence knowledge base for a grounded troubleshooting answer, and to create, track, comment on, and close IT support tickets you own, without requiring direct interaction with the Jira Service Desk portal.
Uses
Use the IT Support Ticket Lifecycle MCP server to perform the following actions:
- Search a linked Confluence knowledge base to answer questions
- Create a new IT support ticket after validating the request type against Jira Service Desk
- Check the status of a ticket you've raised
- List your open, closed, or all tickets
- View full details for a ticket you own
- Add a comment to a ticket you own
- Close a resolved ticket you own using the close transition configured for your Jira Service Desk connection
Example prompts
Use the following example prompts to invoke IT Support Ticket Lifecycle MCP server tools:
My VPN is not connecting. What should I do?How do I reset my password?Create a ticket for laptop repair.What's the status of my ticket IT-1234?Show me all my open tickets.Add a comment to IT-1234 saying I've rebooted.Close my access request, it's resolved.List my closed tickets from this month.File a ticket for a broken monitor.What tickets have I raised this month?
IT Support Ticket Lifecycle MCP server tools
The IT Support Ticket Lifecycle MCP server provides the following tools:
| Tool | Description |
|---|---|
| search_confluence | Searches the IT service desk's linked Confluence knowledge base and retrieves bounded article content for the top matches. |
| resolve_ticket_metadata | Extracts a summary, description, and request type from your request, and reports required, missing, and unsupported fields. |
| create_ticket | Drafts a ticket, validates it against Jira Service Desk, presents a preview for your approval, then creates it. |
| list_my_tickets | Lists your tickets and filters them by status. |
| get_my_ticket | Retrieves full detail for a ticket you own, including its public comments across multiple pages. |
| add_comment_to_ticket | Drafts a comment for a ticket you own, presents a preview for your approval, then posts it. |
| close_my_ticket | Looks up the close transition for a ticket you own, presents a preview for your approval, then closes the ticket and returns the resulting status. |
Install the IT Support Ticket Lifecycle MCP server
Complete the following steps to install a prebuilt MCP server to your project:
Sign in to your Workato account.
Go to AI Hub > Enterprise MCP.
Click + Create MCP server.
Go to the Start with pre-built MCP Servers using your connected apps section and select the prebuilt MCP server you plan to use.
Click Use this server.
Provide a name for your MCP server in the Server name field.
Use the Location drop-down menu to select the project for the MCP server.
Go to the Connections section and connect to your app account.
Select the connection type you plan to use for the MCP server template.
- User's connection: MCP server tools perform actions based on the identity and permissions of the user who connects to the application. Users authenticate with their own credentials to execute the skill.
- Your connection: This option uses the connection established by the recipe builder and follows the same principles as normal app connections.
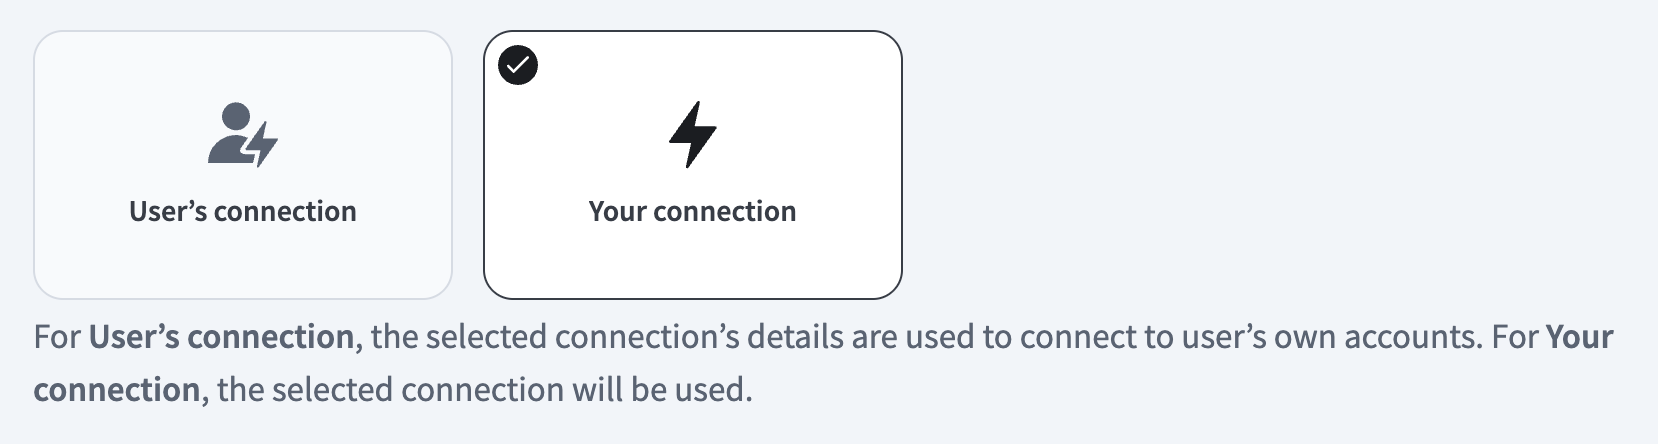 Select your connection type
VERIFIED USER ACCESS AUTHENTICATION REQUIREMENTS
Only app connections that use OAuth 2.0 authorization code grant are available for user's connection. Refer to Verified user access for more information.
Complete the app-specific connection setup steps in the following section.
IT Support Ticket Lifecycle connection setup
Refer to the following sections to connect the IT Support Ticket Lifecycle MCP server to Jira Service Desk:
View IT Support Ticket Lifecycle connection setup steps
Jira Service Desk API version
The Jira Service Desk connector uses the Jira Service Desk Cloud REST API.
Jira Service Desk supported editions and versions
The Jira Service Desk connector works with both cloud and on-prem instances 7.x and later.
The Jira Service Desk connector supports the following authentication types:
Jira Service Desk API token
View API token authentication steps
Use API token authentication to connect to Jira Service Desk with a token generated from your Atlassian account. Use basic authentication with password for on-prem instances.
Get an API token
Refer to Manage API tokens for your Atlassian account in the Atlassian documentation.
Connect to Jira Service Desk using an API token
Complete the following steps to set up an API token connection to Jira Service Desk in Workato:
Click Create > Connection or press C twice.
Search for and select Jira Service Desk on the New connection page.
Enter a name for your connection in the Connection name field.
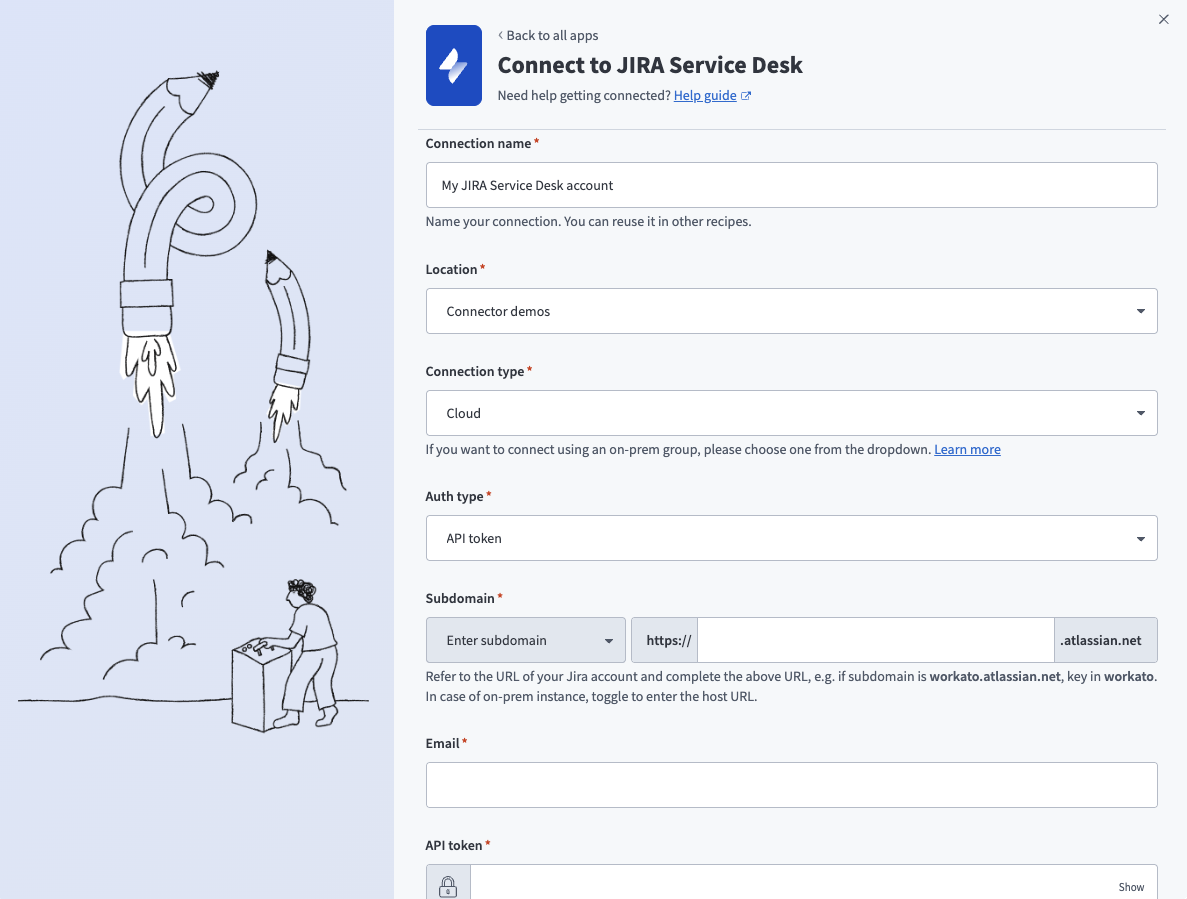 API token connection setup
Use the Location drop-down menu to select the project where you plan to store the connection.
Use the Connection type drop-down menu to select Cloud.
Use the Auth type drop-down menu to select API token.
Enter your Jira Service Desk subdomain in the Subdomain field.
Enter the email address for your Jira Service Desk account in the Email field.
Enter your API token in the API token field.
Optional. Use the Custom OAuth profile drop-down menu to select a custom OAuth profile for your connection.
Click Connect.
Jira Service Desk OAuth 2.0
View OAuth 2.0 authentication steps
Use OAuth 2.0 to connect to Jira Service Desk by signing in and granting access through Atlassian's authorization flow.
Default scopes
Workato requests the following scopes by default:
read:jira-userread:jira-workwrite:jira-workmanage:jira-projectmanage:jira-configurationmanage:jira-webhookread:servicedesk-requestwrite:servicedesk-requestmanage:servicedesk-customer
Connect to Jira Service Desk using OAuth 2.0
Complete the following steps to set up an OAuth 2.0 connection to Jira Service Desk in Workato:
Click Create > Connection or press C twice.
Search for and select Jira Service Desk on the New connection page.
Enter a name for your connection in the Connection name field.
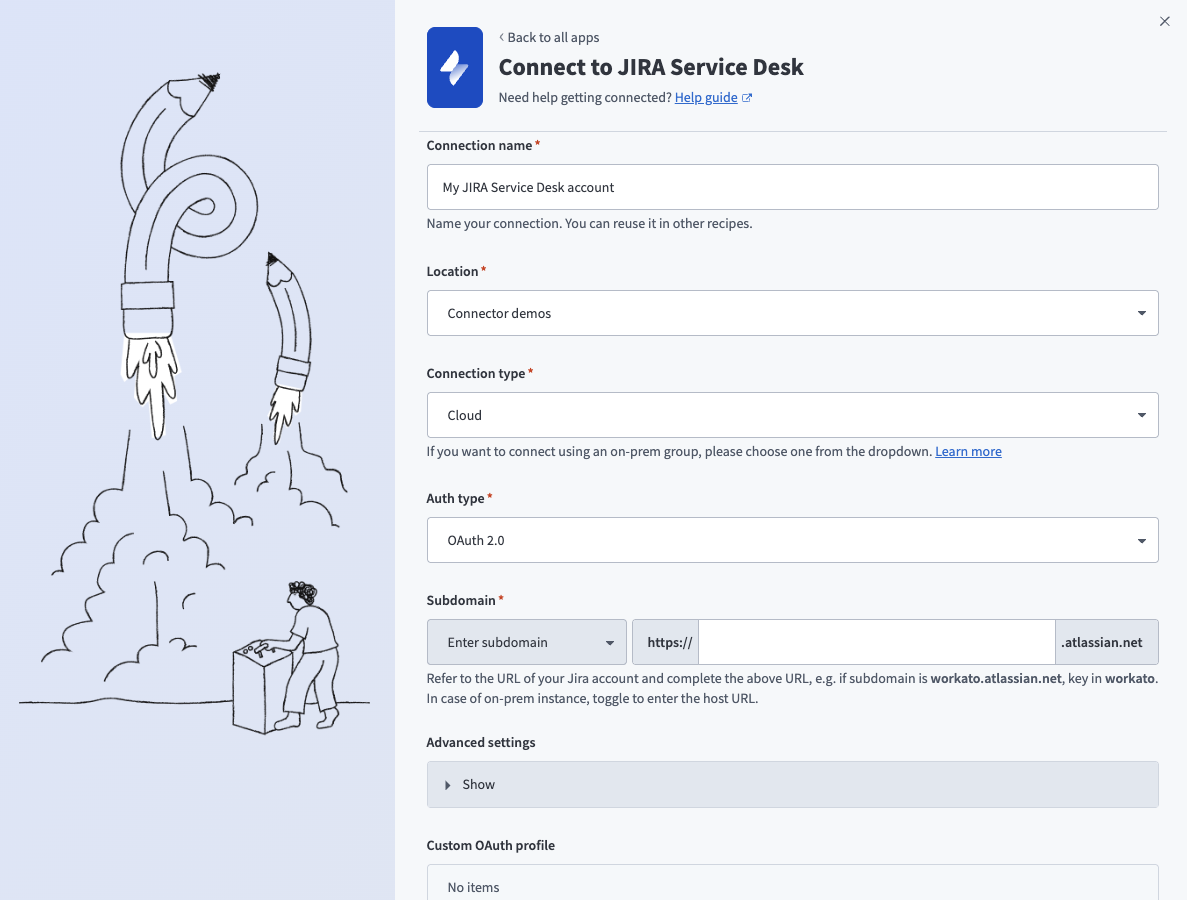 OAuth 2.0 connection setup
Use the Location drop-down menu to select the project where you plan to store the connection.
Use the Connection type drop-down menu to select Cloud.
Use the Auth type drop-down menu to select OAuth 2.0.
Enter your Jira Service Desk subdomain in the Subdomain field.
Optional. Expand Advanced settings and use the Scopes field to request additional scopes. Refer to Default scopes for the list of scopes Workato requests by default.
Optional. Use the Custom OAuth profile drop-down menu to select a custom OAuth profile for your connection.
Click Connect and sign in to your Jira Service Desk instance using your account username and password when prompted.
Authorize Workato's request to access your Jira Service Desk instance.
Jira Service Desk basic authentication with password
View basic authentication steps
Atlassian deprecated basic authentication with password for Jira Service Desk (cloud only) on December 1, 2018, in favor of API tokens. On-prem Jira Service Desk connections aren't affected by this change.
Connect to Jira Service Desk using basic authentication
Complete the following steps to set up a basic authentication connection to Jira Service Desk in Workato:
Click Create > Connection or press C twice.
Search for and select Jira Service Desk on the New connection page.
Enter a name for your connection in the Connection name field.
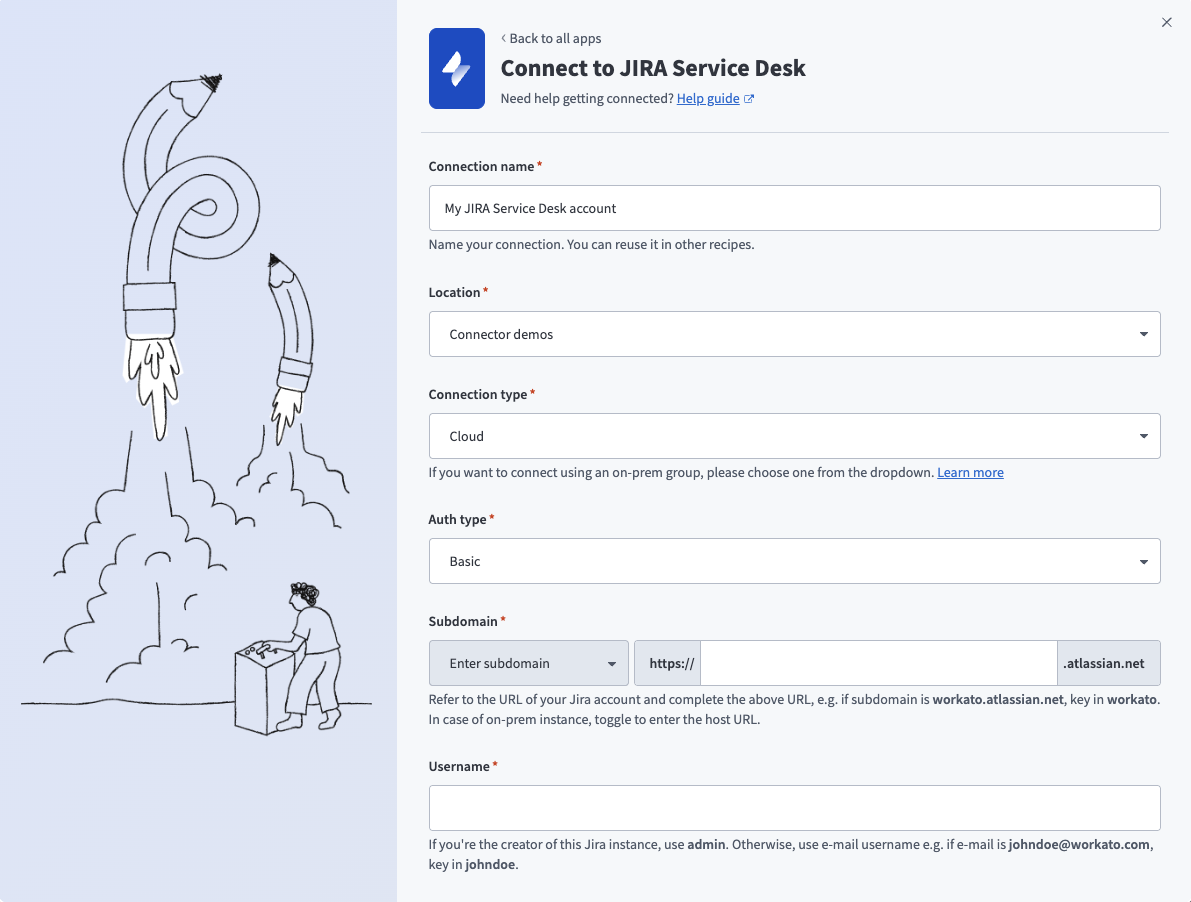 Basic authentication connection setup
Use the Location drop-down menu to select the project where you plan to store the connection.
Use the Connection type drop-down menu to specify whether this is a cloud or on-prem connection.
Use the Auth type drop-down menu to select Basic.
Enter your Jira Service Desk subdomain in the Subdomain field.
Enter your Jira Service Desk username in the Username field.
Enter your Jira Service Desk password in the Password field.
Optional. Use the Custom OAuth profile drop-down menu to select a custom OAuth profile for your connection.
Click Connect.
Jira Service Desk role requirements
Each tool's availability depends on the permissions granted to the connected account. A tool call that lacks the required permission returns a permission_denied outcome instead of a partial result.
The IT Support Ticket Lifecycle MCP server requires the following permissions in Jira Service Desk:
- Read and write access for customer requests
- Read access for Confluence knowledge bases
This server reaches the Confluence knowledge base entirely through the Jira Service Desk connection. No separate Confluence connection is required.
By default, only a ticket's reporter can view, comment on, or close a ticket through this server. The ownership.allow_participants project property extends these actions to participants, if the Jira Service Desk permission scheme allows participant access.
Project property configuration
The IT Support Ticket Lifecycle MCP server supports the following project-level properties to control behavior and defaults:
| Project-level property | Description |
|---|---|
jsm.service_desk_id | Enter the service desk ID for your Jira Service Desk connection. The server injects this ID on every request. The LLM never supplies it directly. |
supported_request_types | Enter the allowlist of request-type IDs this server can populate. Each allowlisted type must have no Jira Service Management Forms, user pickers, cascading selects, or asset lookups. |
close_transition_map | Map each supported request type ID to the transition ID that closes or resolves a customer request for that type. |
confluence.enabled | Configure whether search_confluence is available. Defaults to true. |
confluence.max_results_in_search | Enter the maximum number of Confluence articles to return for each search. Defaults to 5, up to a maximum of 10. |
confluence.max_articles_fetched_for_content | Enter the number of top search results the server retrieves full content for. Defaults to 3, up to a maximum of 5. |
confluence.content_chars_per_article | Enter the maximum number of characters of article content to retrieve for each article. Defaults to 4000. |
taxonomy.request_type_cache_ttl_seconds | Enter how long, in seconds, the server caches resolved request-type field metadata. Defaults to 900. |
ownership.allow_participants | Configure whether ticket participants can comment on, close, or view a ticket through this server. This requires that the Jira Service Desk permission scheme allows participant access. Defaults to false. |
server_limits.max_query_chars | Enter the maximum length for the natural-language query that search_confluence and resolve_ticket_metadata accept. Defaults to 500. |
server_limits.min_confluence_query_chars | Enter the minimum query length search_confluence requires. Defaults to 3. |
server_limits.max_comment_chars | Enter the maximum length of a comment body. Defaults to 10000. |
server_limits.rate_limit_calls_per_minute | Enter the maximum number of calls this deployment can make each minute before hitting Jira Service Desk's rate limits. Defaults to 20. |
View project-level property configuration steps
Complete the following steps to configure your project-level properties:
Sign in to your Workato account and go to Projects.
Go to the project that contains your MCP server.
Click the Settings tab.
 Click the Settings tab.
Select Project properties.
Go to the project property you plan to update and click the Edit (pencil) icon.
Go to the Value field and make your changes. For example, set confluence.enabled to false or server_limits.max_query_chars to 400.
How to use IT Support Ticket Lifecycle MCP server tools
Refer to the following sections for detailed information on available tools:
search_confluence tool
The search_confluence tool searches the IT service desk's linked Confluence knowledge base and retrieves bounded article content for the top matches. Your LLM uses this tool first for troubleshooting or how-do-I questions, before offering to create a ticket.
Try asking:
My VPN is not connecting.How do I set up my email on my phone?Is there a guide for connecting to the office Wi-Fi?
resolve_ticket_metadata tool
The resolve_ticket_metadata tool extracts a summary, description, and request type from your request, and reports required, missing, and unsupported fields. Your LLM uses this tool after a Confluence search finds no answer, or when you explicitly ask to file a ticket.
Try asking:
Create a ticket for laptop repair.File a ticket, my monitor won't turn on.I need an access request ticket for the finance shared drive.
create_ticket tool
The create_ticket tool drafts a ticket, validates it against Jira Service Desk, presents a preview for your approval, then creates it. Your LLM calls this tool once to draft and validate the ticket and display the preview, then calls it again after you approve it to create the ticket.
Try asking:
Show me what this ticket will look like before you create it.Go ahead and create the ticket.Change the priority to high before you submit it.
list_my_tickets tool
The list_my_tickets tool lists your tickets and filters them by status. Your LLM uses this tool when you ask about your tickets in general terms rather than a specific ticket.
Try asking:
Show me all my open tickets.List my closed tickets from this month.What tickets have I raised?
get_my_ticket tool
The get_my_ticket tool retrieves full detail for a ticket you own, including its public comments across multiple pages. Your LLM uses this tool when you reference a specific ticket by ID or key.
Try asking:
What's the status of IT-1234?Show me the comments on my ticket IT-5678.Give me the details on my last access request.
add_comment_to_ticket tool
The add_comment_to_ticket tool drafts a comment for a ticket you own, presents a preview for your approval, then posts it. Your LLM calls this tool once to draft the comment and display a preview, then calls it again after you approve it to post the comment.
Try asking:
Add a comment to IT-1234 saying I've rebooted.Let IT know on my ticket that the issue is still happening.Post an update on my access request ticket.
close_my_ticket tool
The close_my_ticket tool looks up the close transition for a ticket you own, presents a preview for your approval, then closes the ticket and returns the resulting status. Your LLM calls this tool once to look up the transition and display a preview, then calls it again after you approve it to close the ticket.
Try asking:
Close my access request, it's resolved.Mark IT-1234 as done.Resolve my laptop repair ticket.
Getting started
View and manage your MCP server tools in the Overview page Tools section. Tool management provides the following capabilities:
TOOLS MUST BE STARTED
Your LLM can only access active tools in your MCP server connector.
Last updated: