Provision Jira and Okta users for new employees in Workday recipe
This use case guides you through connecting Workday, Jira, and Okta to Workato to create a multi-application automation.
What does this recipe do?
This recipe monitors Workday for new employees. The recipe creates a new user in Jira and Okta when a new employee is detected in Workday.
Create your recipe
Complete the following steps to create a recipe that monitors Workday for new employees. When activity is detected, it creates a new user in Jira and a new user in Okta:
USE CASES ARE INTENDED AS EXAMPLES ONLY
This use case serves as an example. Modifications to triggers, actions, or conditional logic may be necessary to adapt this recipe to your workflow.
Sign in to Workato.
Select the project where you plan to create the recipe.
Create connections for Workday, Jira, and Okta:
Create a Workday connection.
Create a Workday connection
This step creates a connection between Workato and your Workday account.
Before connecting to Workday
Before integrating with Workday using third-party services like Workato, we recommend using an Integration System User (ISU). Using an ISU ensures that all integration operations are logged under a designated user, separate from regular workflow processes. This is essential as changes to a regular worker’s security profile or their termination could disrupt integrations reliant on their account. For enhanced security, limit each ISU to a single integration system, such as Workato.
Additionally, if your integration involves custom objects in Workday, you must register a Workday API client. This step is required as the Workday REST API requires authentication through an OAuth client setup.
Authentication requirements
The Workday connector supports both OAuth 2.0 and basic authentication methods. However, OAuth 2.0 authentication is required for working with the Workday REST API and custom objects. We recommend that you avoid using the deprecated Hybrid authentication method.
Connection setup using OAuth 2.0 authentication
Complete the following steps to configure your Workday connection in Workato using OAuth 2.0 authentication:
Enter a unique Connection name to identify your Workday account in Workato.
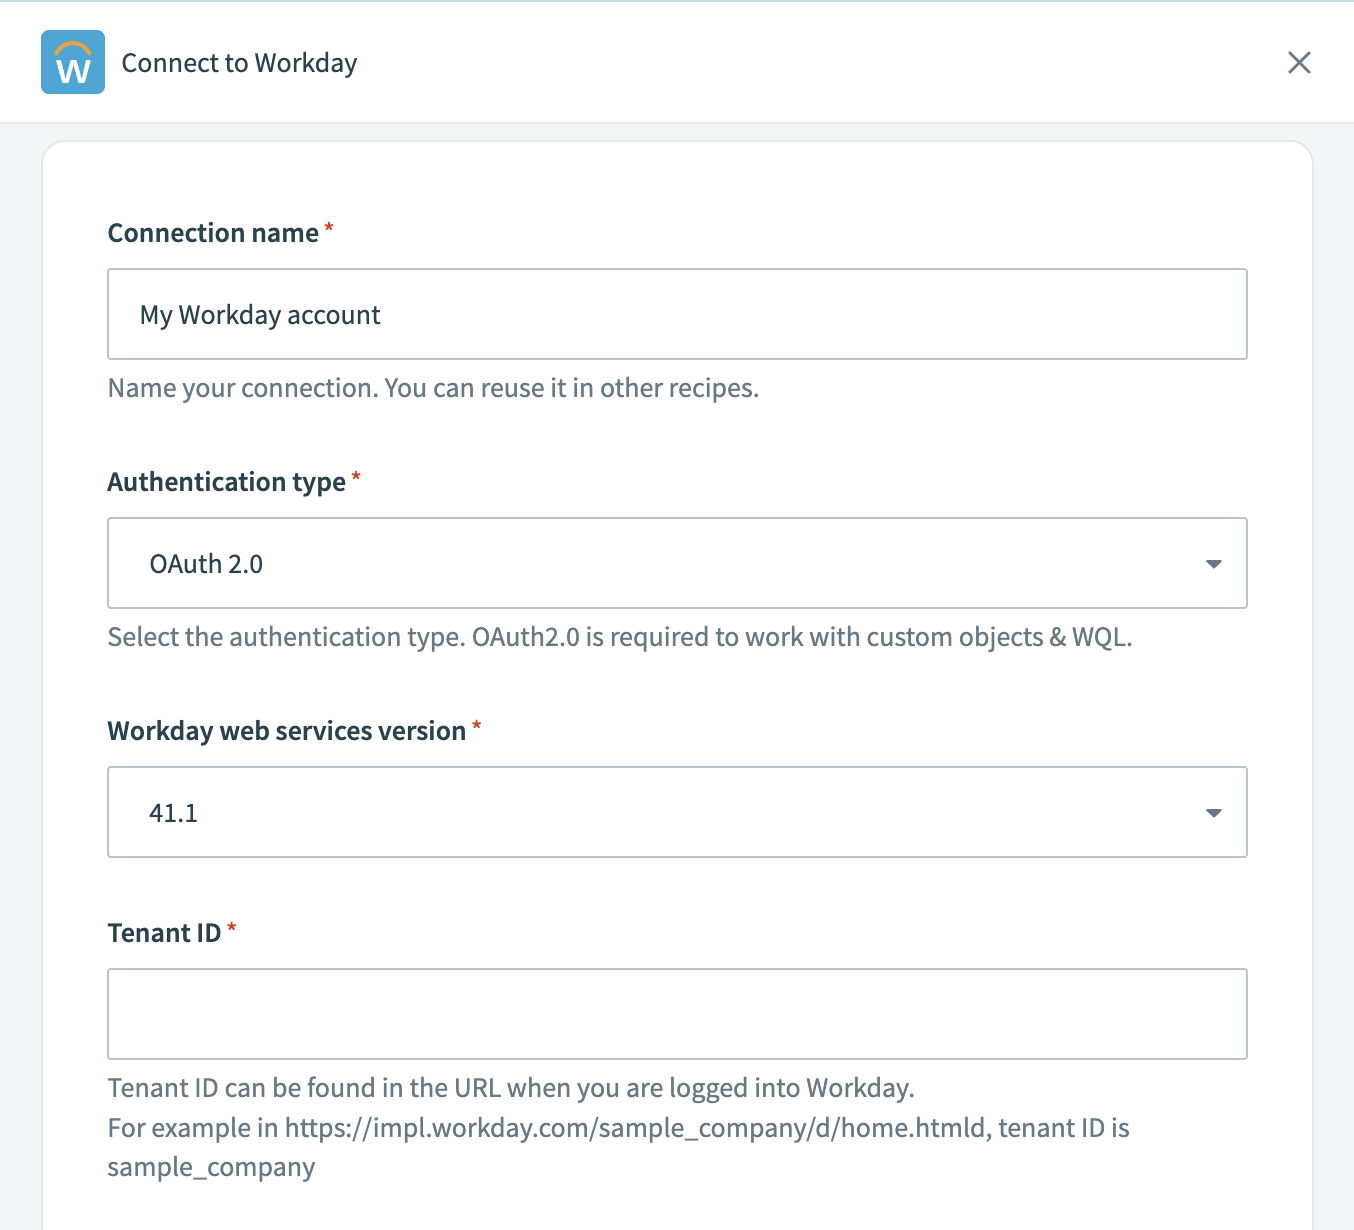 Label your connection
Choose OAuth 2.0 as the Authentication type. This method is required for working with custom objects and for querying data using Workday Query Language (WQL) with the Workday REST API.
Select the Workday web services version appropriate for your Workday tenant. We recommend choosing the newest version available for access to the latest features and updates.
Locate and enter your Tenant ID from the URL when logged into Workday. For example, in https://impl.workday.com/sample_company/d/home.htmld, the tenant ID is sample_company.
Provide the WSDL URL associated with your Workday services.
Enter the Client ID and Client Secret from your API client settings.
Optional. Input your Refresh token if you are using an API client for integrations.
Enter your Authorization endpoint and Token endpoint from your API Client settings to complete the OAuth flow.
Select the Workday tenant timezone that matches your Workday tenant's settings. By default, Workday uses Pacific Standard Time (PST).
Optional. Click Advanced settings to configure the Advanced XML payload for multiple ID values field.
Workato wraps each value in fields with multiple values within individual containers when constructing the XML from your input by default.
For example:
<languages><language>english</language></languages><languages><language>chinese</language></languages>Set the value to Yes to allow Workato to unwrap and present the values in a single container:
<languages><language>english</language><language>chinese</language></languages>Consider setting this field to Yes if you encounter invalid payload errors.
Review the information you entered to ensure it's correct.
Click Connect to initiate the authorization process and complete the connection setup.
Connection setup using basic authentication
Complete the following steps to set up your Workday connection in Workato with basic authentication:
Enter a unique Connection name to identify your Workday account in Workato.
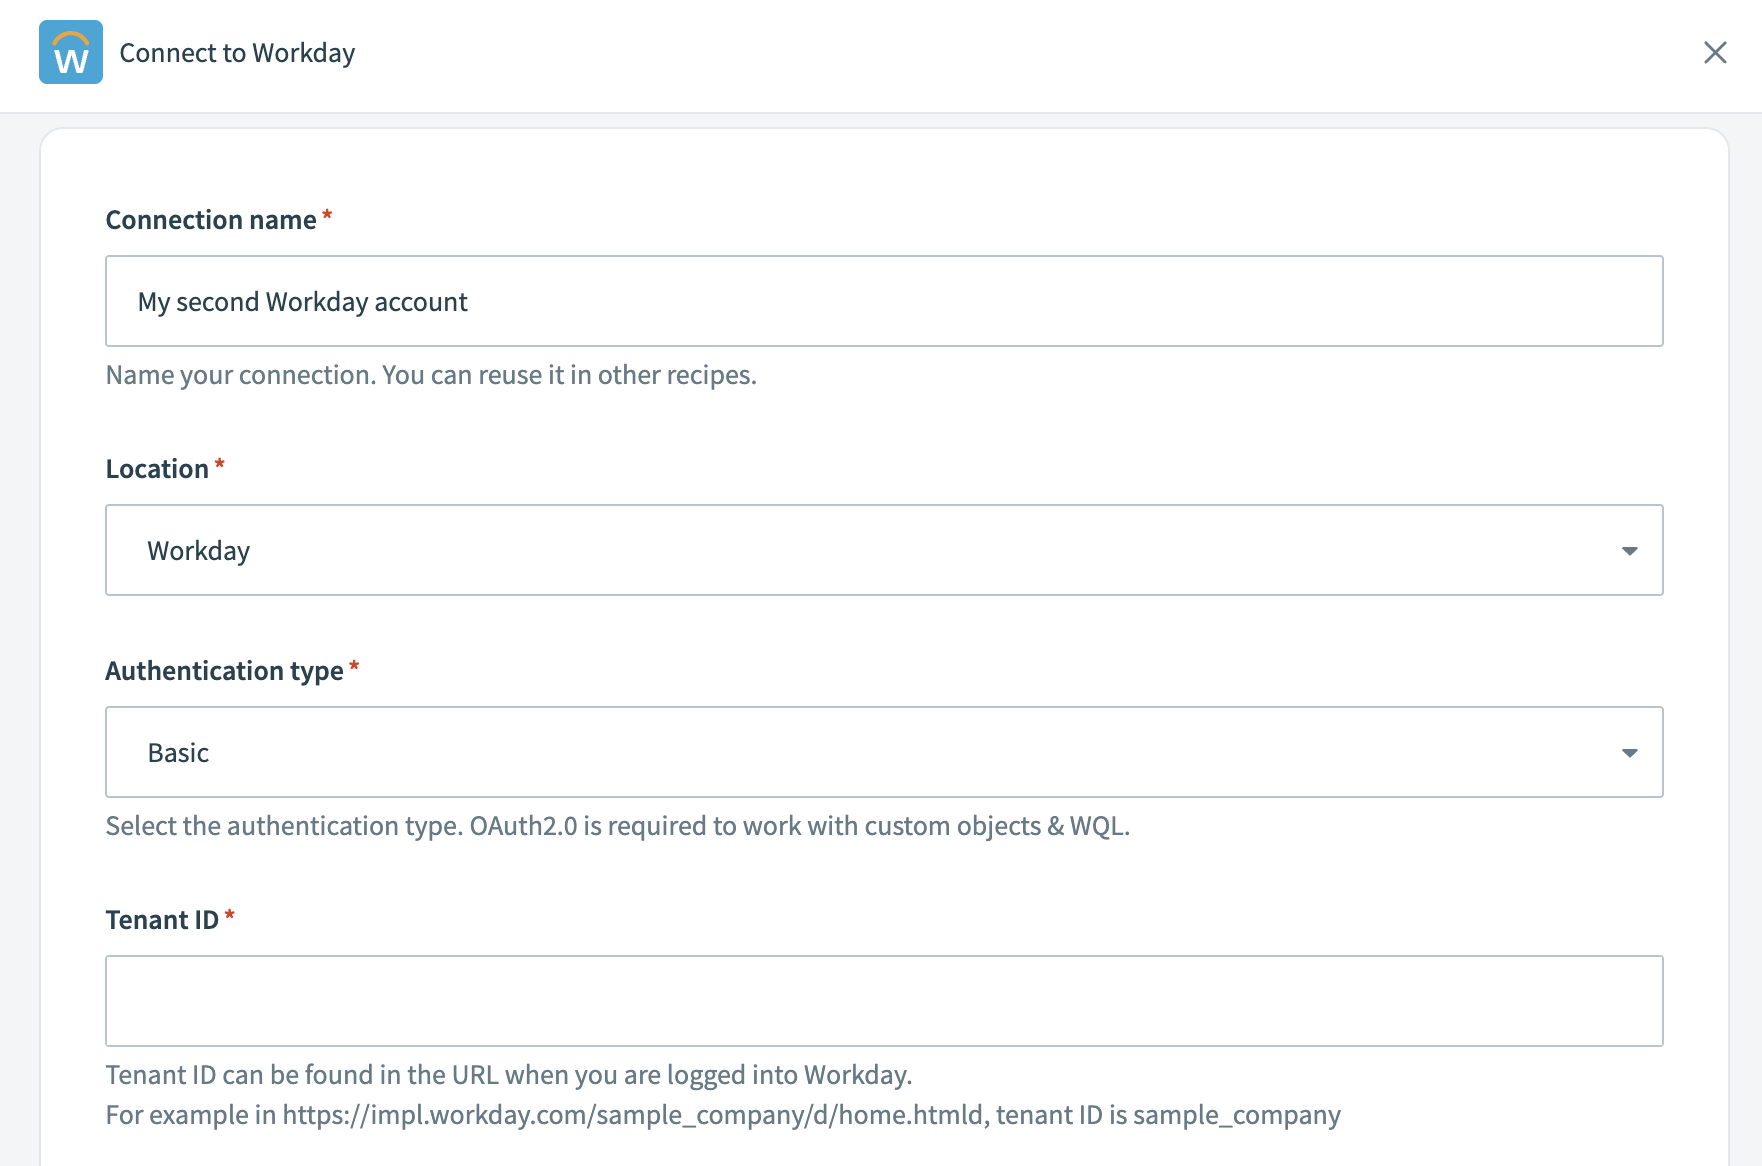 Label your connection
Select Basic as the Authentication type. This method uses your Workday username and password for integration.
Select the Workday web services version appropriate for your Workday tenant. We recommend choosing the newest version available to access the latest features and updates.
Locate and enter your Tenant ID from the URL when logged into Workday. For example, if your URL is https://impl.workday.com/sample_company/d/home.htmld, the tenant ID is sample_company.
Provide the WSDL URL associated with your Workday services.
Input your Workday Login name and Password.
Select your Workday tenant timezone that matches your Workday tenant's settings. By default, Workday uses Pacific Standard Time (PST).
Click Advanced settings to configure the Advanced XML payload for multiple ID values field. By default, fields with multiple values are wrapped within a container. Set this option to yes to unwrap the values.
Review the information you entered to ensure it's correct.
Click Connect to initiate the authorization process and complete the connection setup.
Create a Jira connection.
Create a Jira connection
This step creates a connection between Workato and your Jira account.
Click Create > Connection or press C twice.
Search for and select Jira on the New connection page.
Enter a name for your Jira connection in the Connection name field.
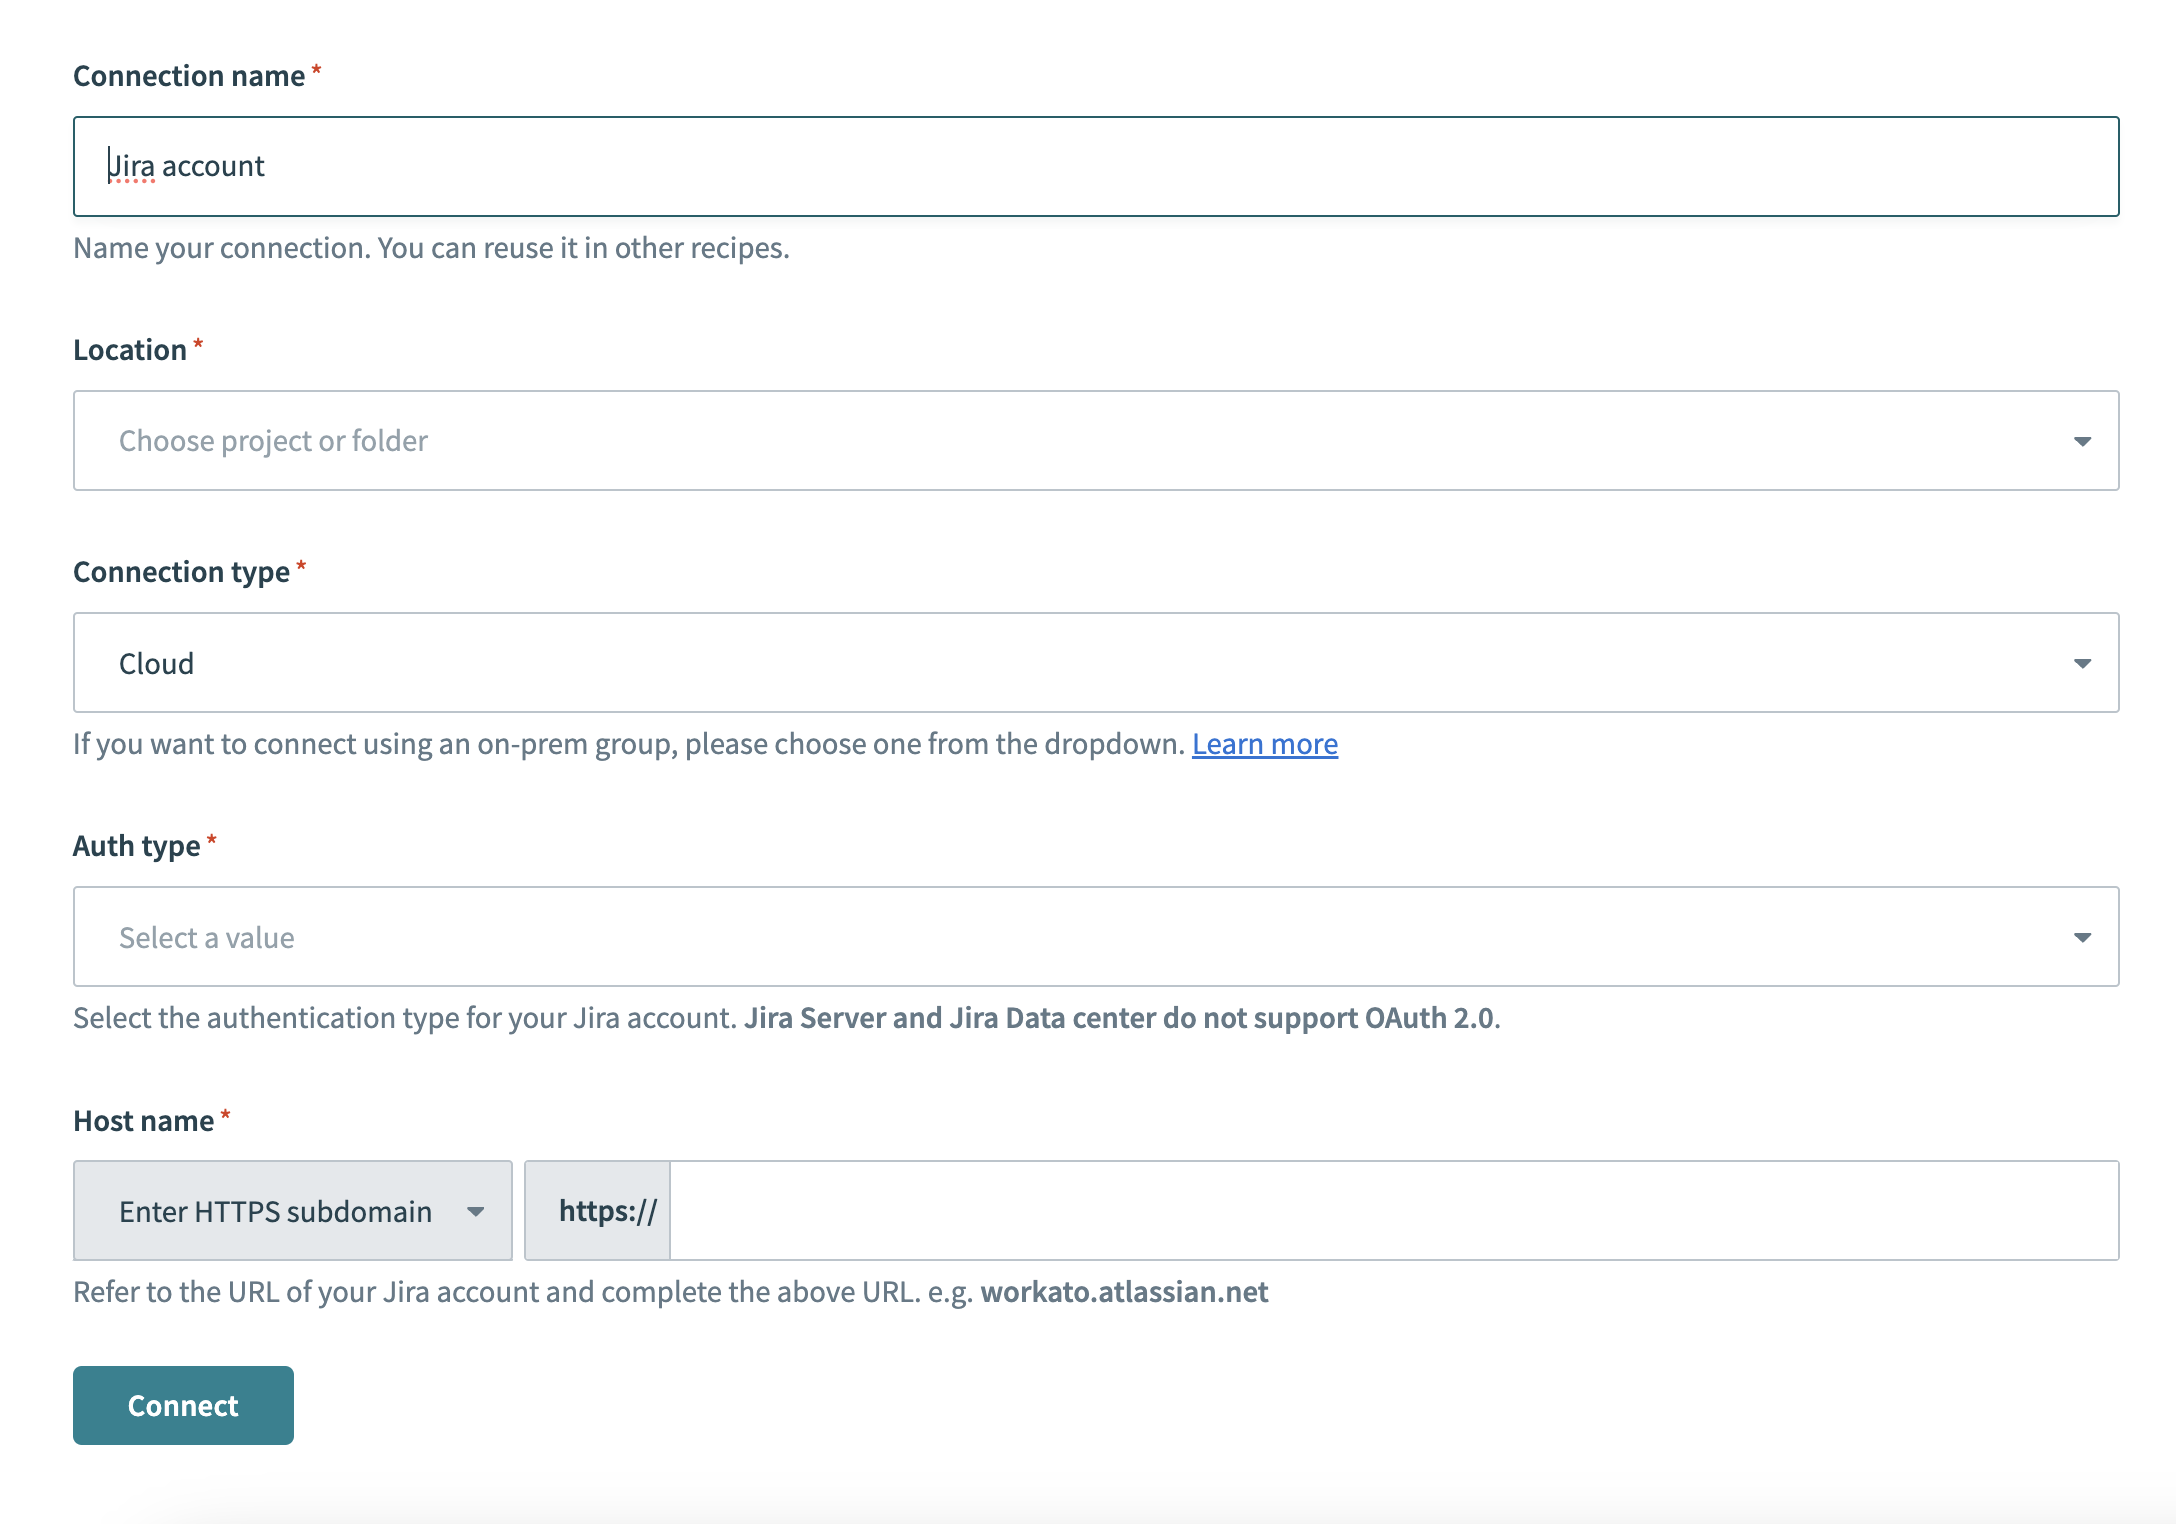 Jira connection setup
Use the Location drop-down menu to select the project where you plan to store the connection.
Select your Connection type.
Use the Auth type drop-down menu to select your authentication method. Supported options include Basic, API token, OAuth 2.0, and Personal access token.
Provide your Host name. For example, if your Jira URL is https://acme.atlassian.net, your host name is acme.atlassian.net.
Click Connect.
Create an Okta connection.
Create an Okta connection
This step creates a connection between Workato and your Okta account.
Search for and select Okta on the New connection page.
 Select Okta as your app
Provide a name for your connection in the Connection name field.
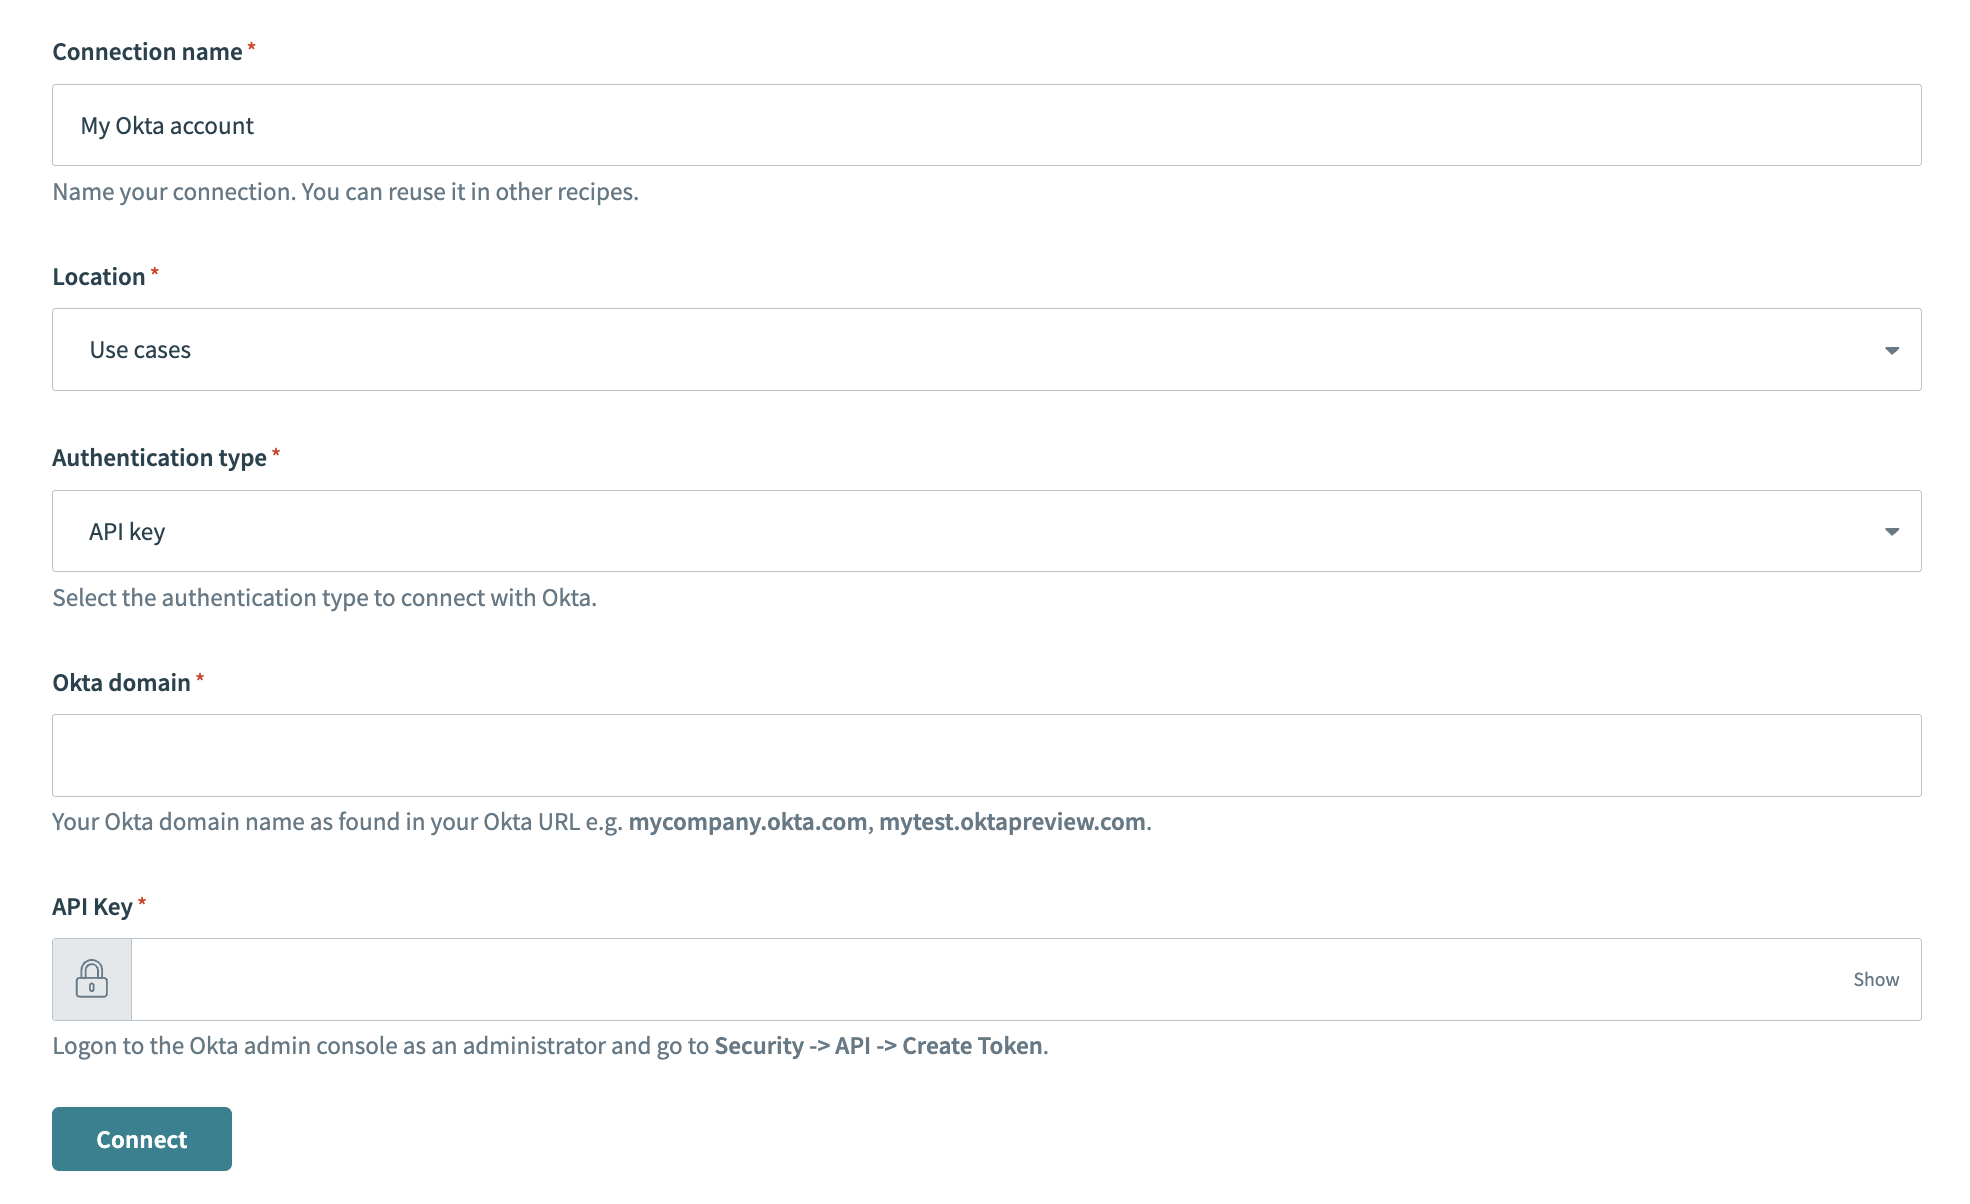 Okta connection setup
Use the Location drop-down menu to select the project where you plan to store the connection.
Select the Authentication type you plan to use for your connection. Options are Authorization code grant, Client credentials, and API key.
Provide your Okta domain. You can find it in your Okta URL (for example, mycompany.okta.com or mytest.oktapreview.com).
Fill in other fields as required by your selected authentication method.
Click Connect.
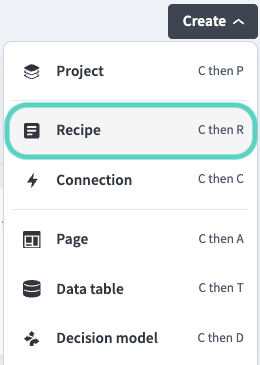
Go back to your project and click Create > Recipe or press C+R.
 Create a new recipe
Enter a name for your recipe in the Name field.
Select the project where you plan to store the recipe from the Location drop-down menu.
Click Start building.
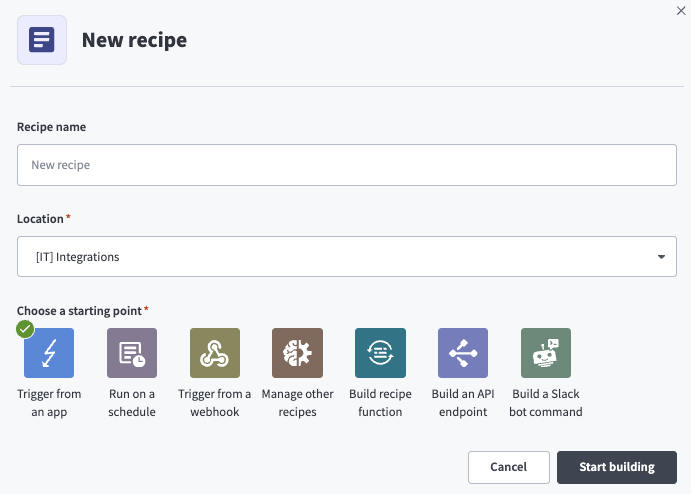 Start building your recipe
Click Pick a starting point, then select Trigger from an app.
Click Select an app and trigger event.
Set up your Workday New business object trigger.
Set up Workday New business object trigger
This trigger monitors your Workday account for New business objects.
Search for Workday and select it as your app.
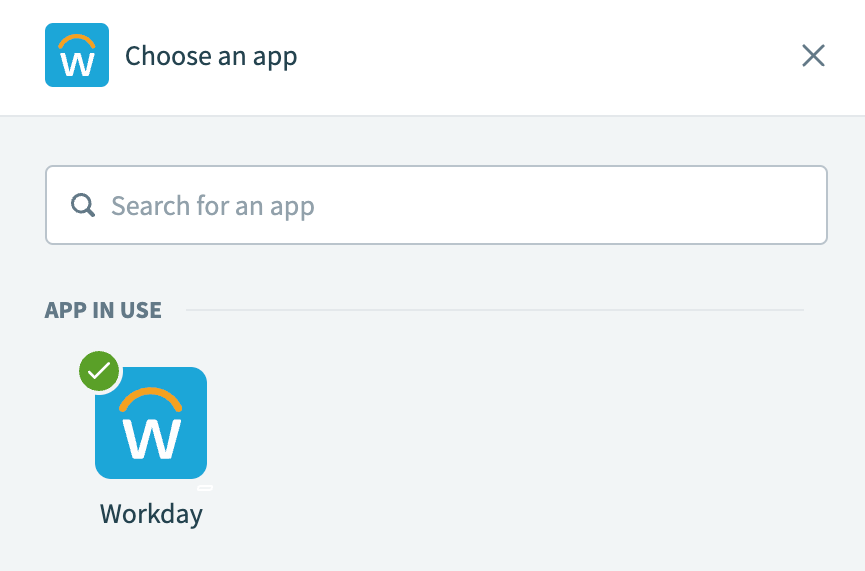 Select Workday as your app
Select the New/updated business object trigger.
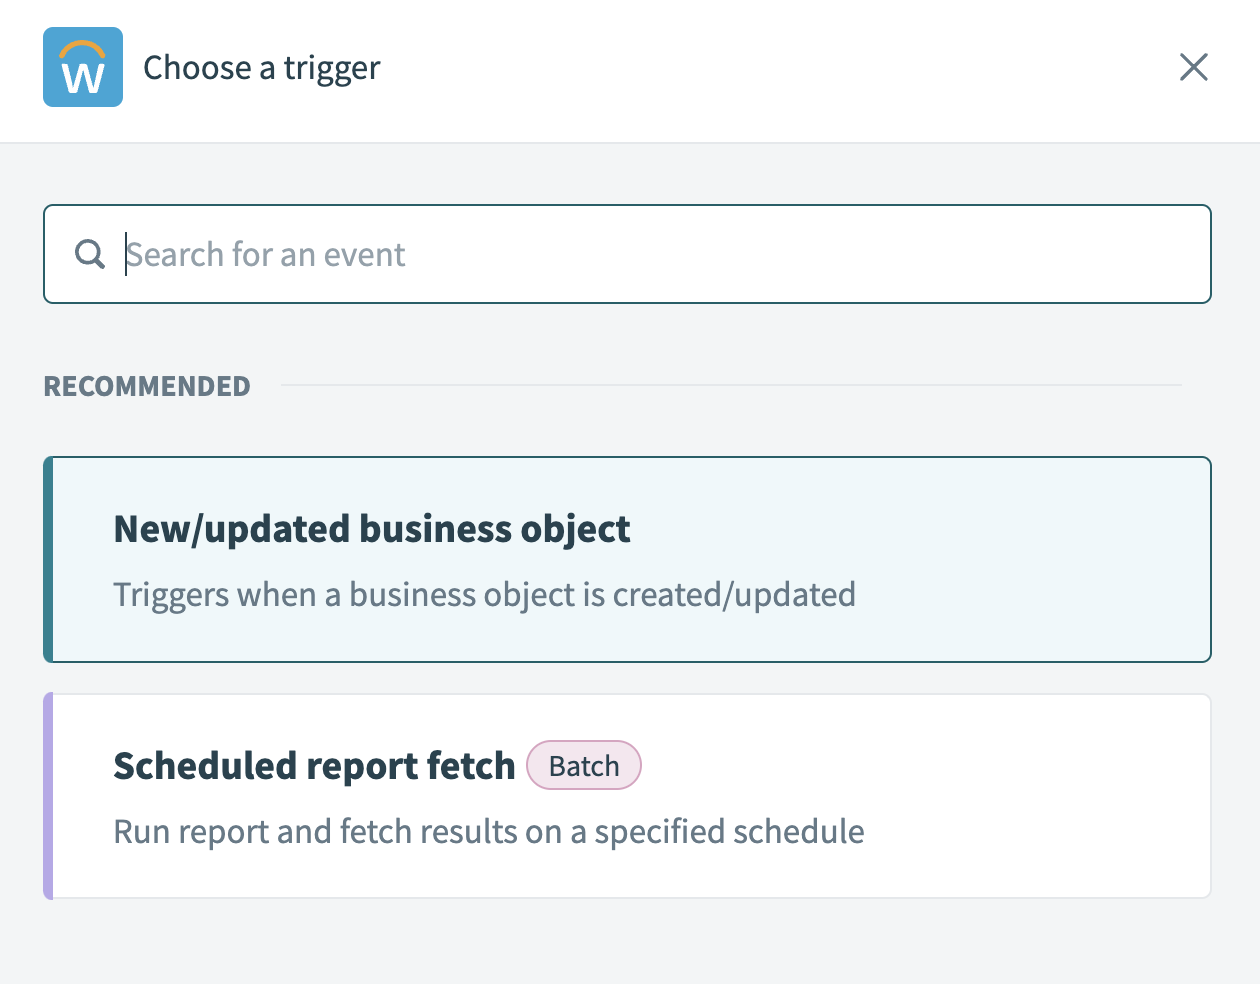 Select the New/updated business object trigger
Use the calendar modal to select the date from which your recipe should begin to monitor events in the When first started, this recipe should pick up events from field. Refer to Triggers to learn more about this input field.
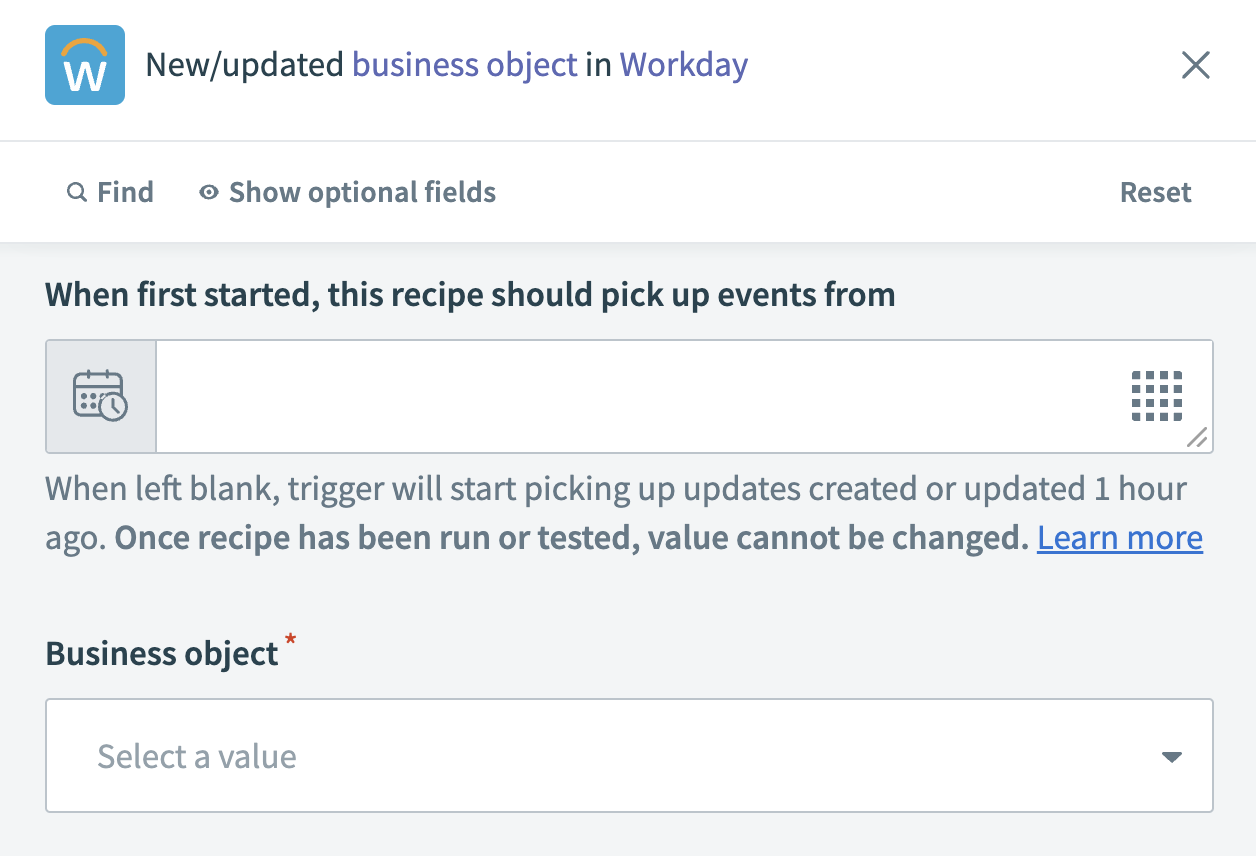 Set up your trigger
Use the Business object drop-down menu to select the object you plan to monitor for changes. For example, workers or employees.
Click Save.
Click + Add step and select Action in app.
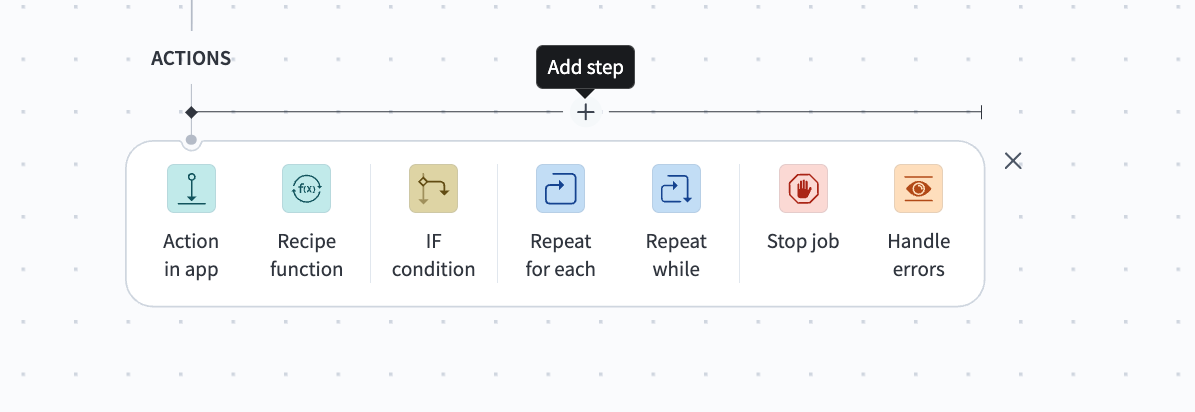 Click Add step > Add action in app
Set up your Jira Create user action.
Set up Jira Create user action
This step creates a new user in Jira using with the corresponding Workday email and name.
Search for Jira and select it as your app.
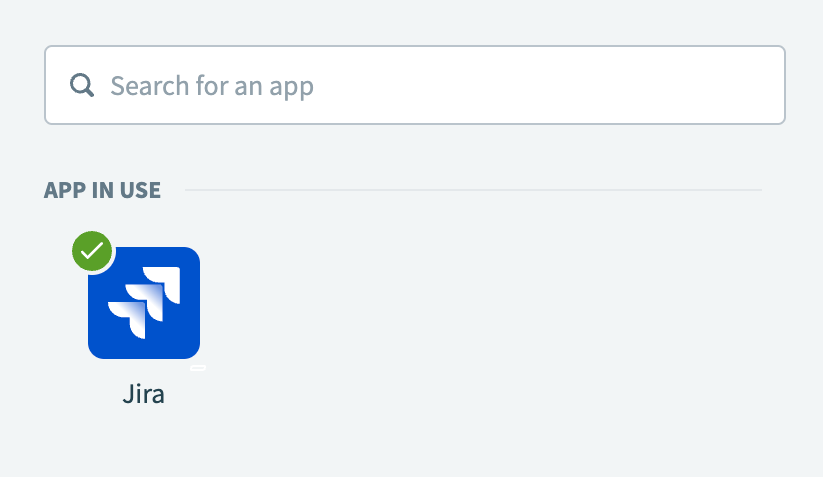 Choose Jira as your app
Select the Create user action.
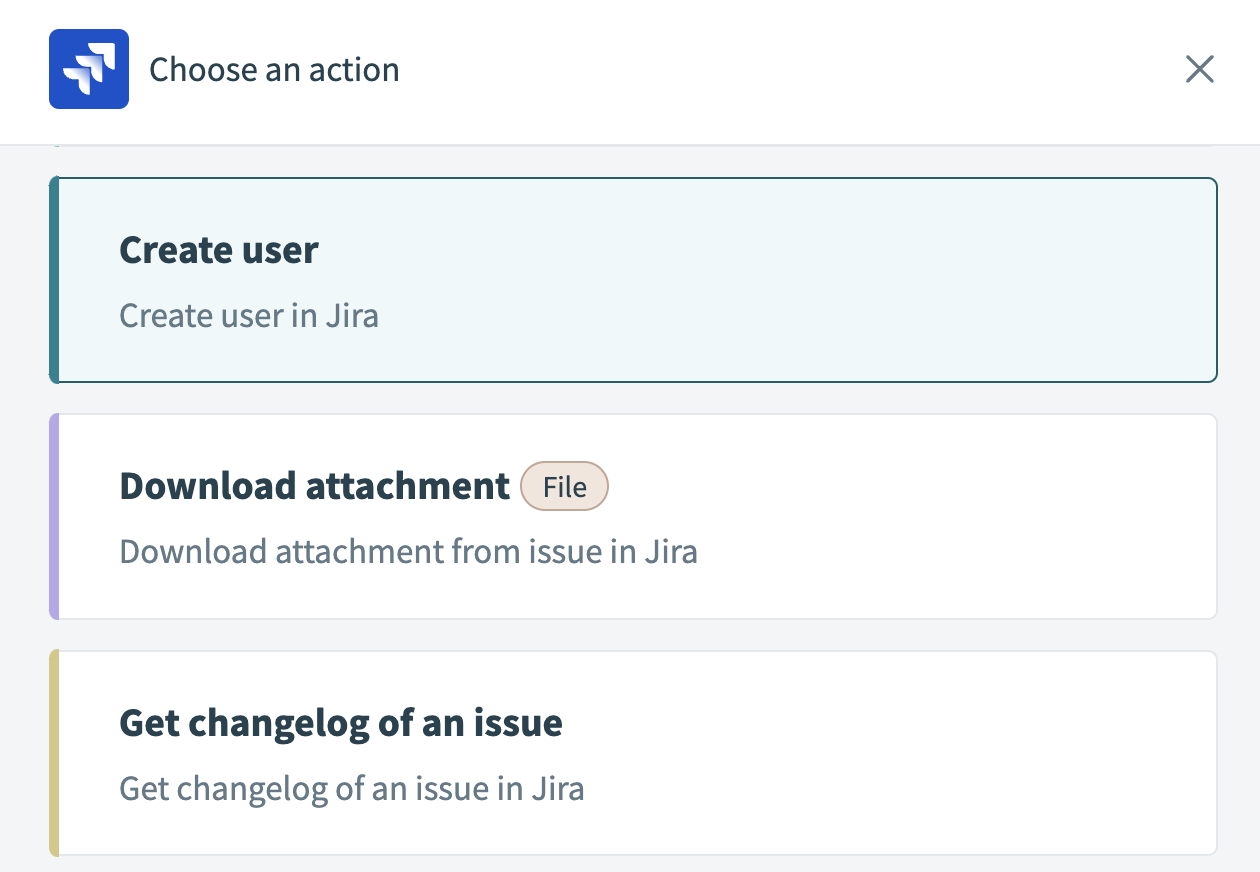 Select Create user
Map the Workday Email addressStep 1 datapill into the Email address field.
 Set up Create user
Map the Workday Worker_Reference(Employee ID)Step 1 datapill into the Display name field.
Use the Products drop-down menu to select the products for which you plan to grant access to the user.
Click Save.
Click + Add step and select Action in app.
Set up your Okta Create user action.
Set up Okta Create user action
This step creates a new user in Okta using with the corresponding Workday email and name.
Search for Okta and select it as your app.
Select the Create user action.
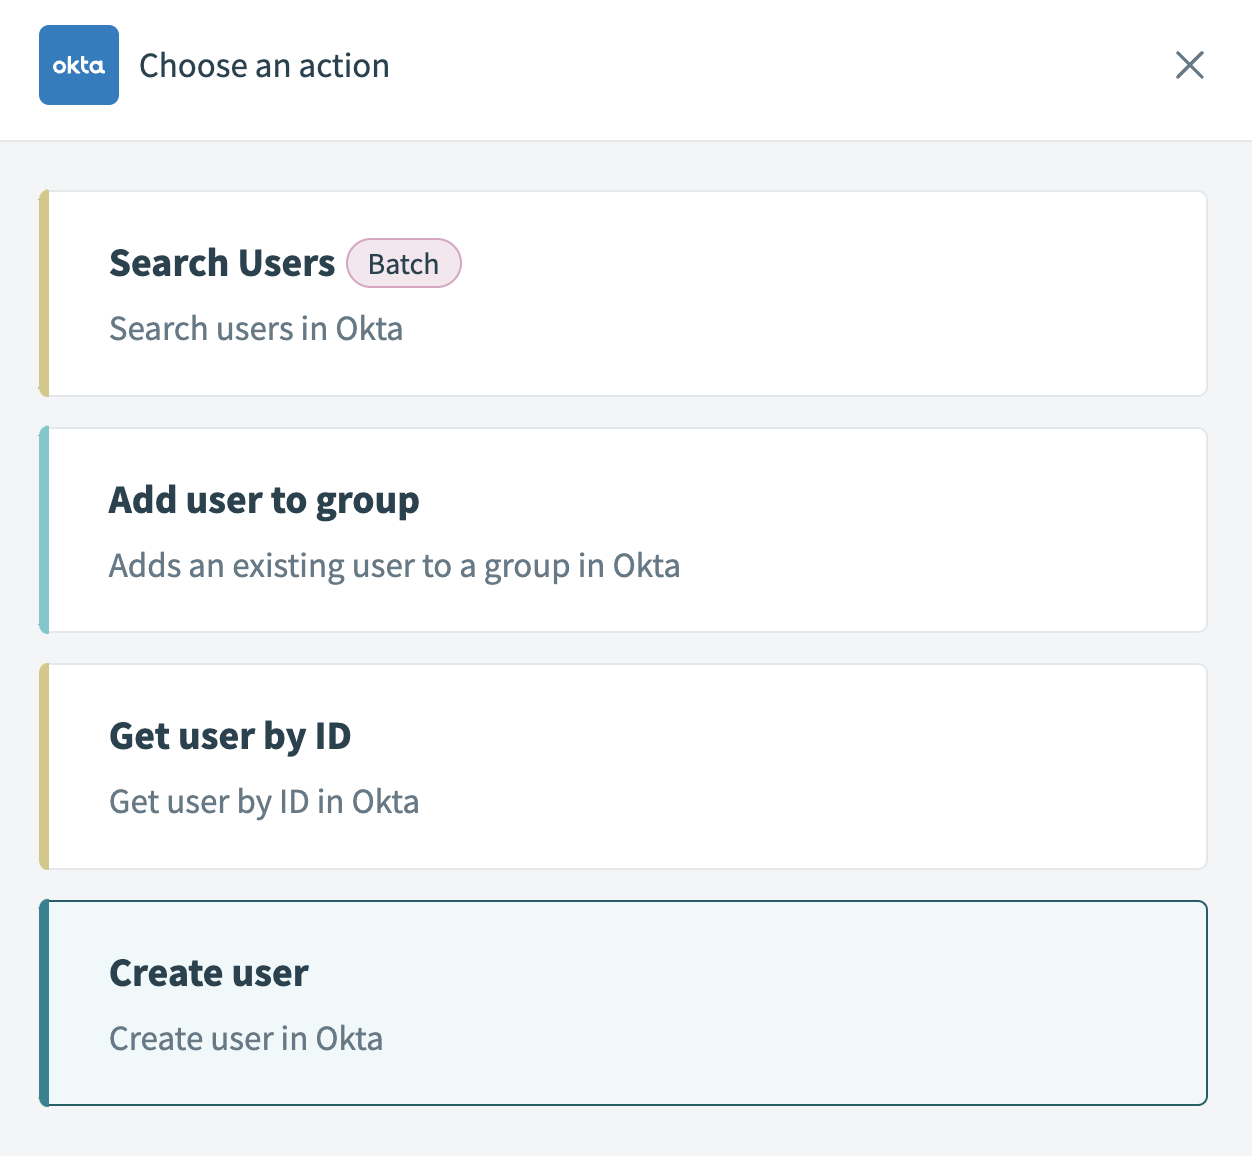 Select the Create user action
Map the Workday First nameStep 1 datapill into the First name field.
Map the Workday Last nameStep 1 datapill into the Last name field.
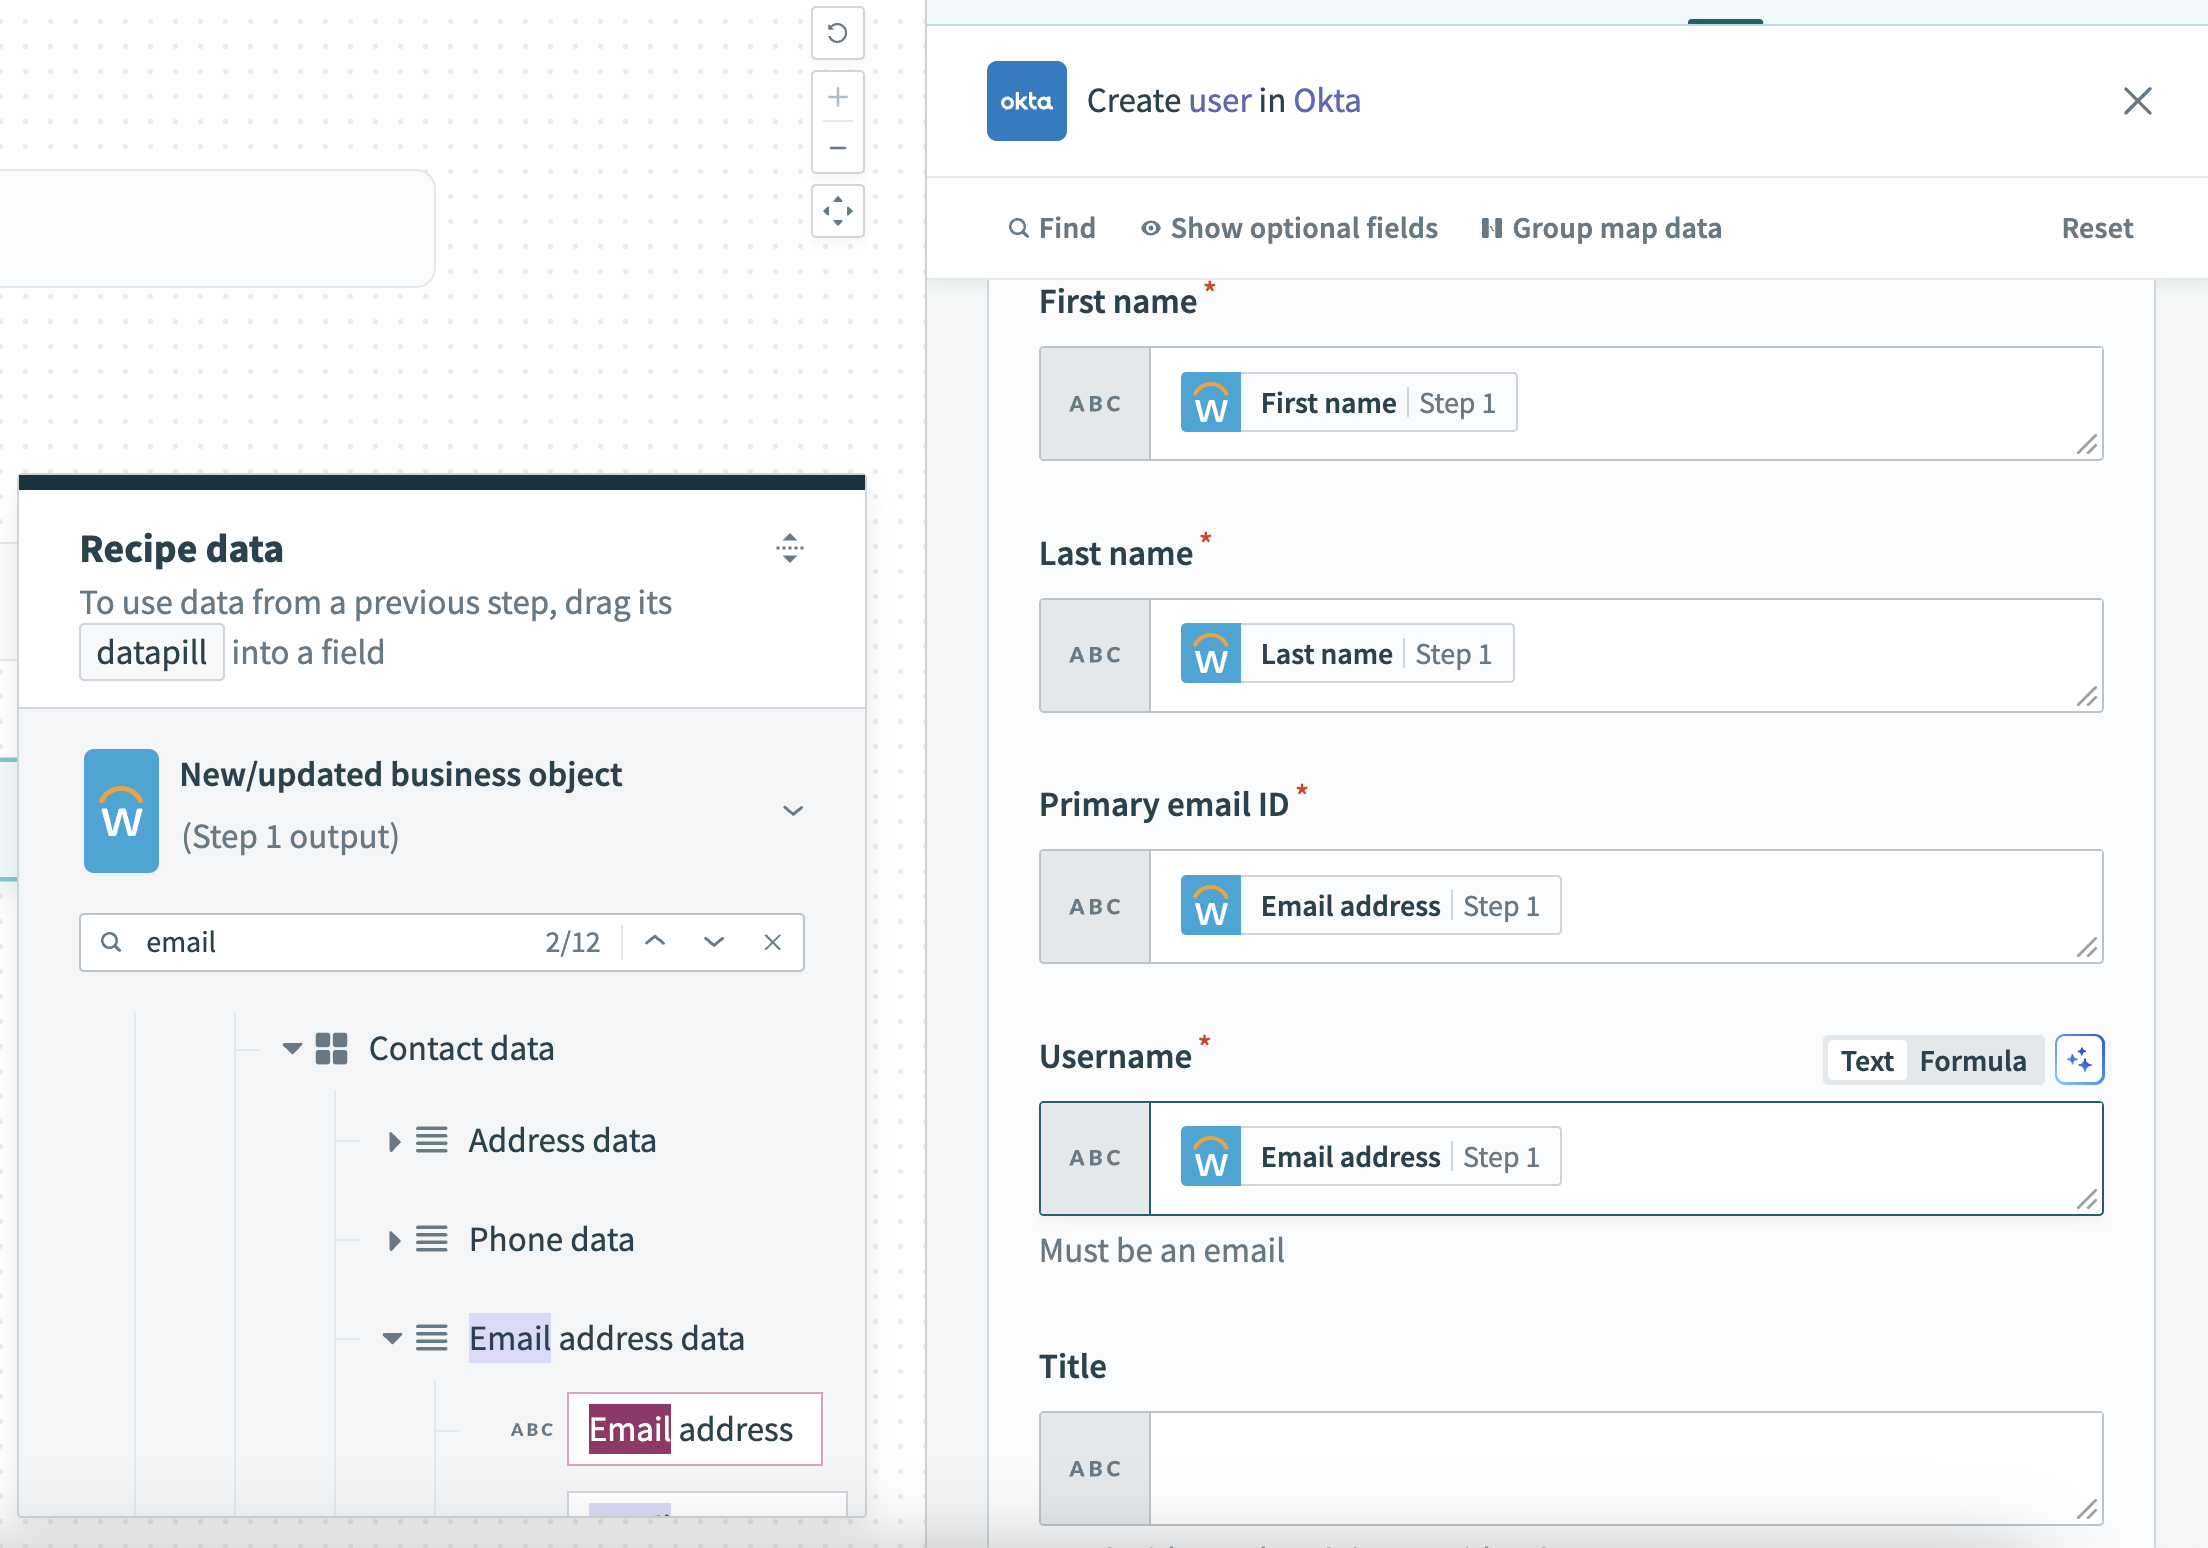 Map the datapills for your action
Map the Workday Email addressStep 1 datapill to the Primary email ID field.
Map the Workday Email addressStep 1 datapill to the Username field. The Username field must contain an email address.
Click Save.
Your Provision Jira and Okta users for new employees in Workday recipe is ready to test and implement.
Last updated: