Configure SCIM in Microsoft Entra ID
Workato supports the System for Cross-domain Identity Management (SCIM 2.0) protocol with the Microsoft Entra ID identity provider.
NEW NAME FOR AZURE AD
Microsoft has renamed Azure Active Directory to Microsoft Entra ID. You may see either name in the Azure Portal during the transition period.
Configuring SCIM for Microsoft Entra ID involves the following steps:
- Prerequisites
- Step 1: Configure custom extension attributes
- Step 2: Configure automatic provisioning on Microsoft Entra ID
- Step 3: Configure attribute mappings between Microsoft Entra ID and Workato
- Step 4: Provision users
HYBRID MODEL
Workato’s new permission model uses a hybrid approach:
- SCIM provisions and deprovisions user accounts, and syncs core profile attributes such as userName, email, and, active.
- SAML assigns environment roles and collaborator group memberships dynamically at login.
While Microsoft Entra ID supports extension attributes for role values through SCIM, Workato recommends that you manage role and group assignments through SAML attribute mappings and group claims.
Prerequisites
In Workato:
- You must be a workspace admin.
- Your organization must have the Data Monitoring/Advanced Security & Compliance capability.
- You must have SAML SSO successfully set up with your identity provider.
- You must have already configured SCIM in Workato.
In Microsoft Entra ID:
- You must be able to access the Microsoft Graph API.
- You must have access to Microsoft Entra ID with sufficient permissions.
Step 1: Configure custom extension attributes
By default, Workato roles and collaborator groups aren't provisioned through SCIM. These are assigned dynamically through SAML attribute mappings and group claims.
You may extend the Microsoft Entra ID user schema to include a custom attribute specifying the user's Workato role.
RECOMMENDATION
Workato recommends using SAML attribute mappings and group claims for role assignment. SCIM should remain focused on user lifecycle management.
If you plan to create extension attributes, complete the following steps.
Navigate to Microsoft Graph Explorer.
Run a Microsoft Graph query to list your Azure tenant's applications:
- Select GET from the HTTP verb drop-down menu.
- Enter
https://graph.microsoft.com/v1.0/applicationsin the query box. - Select Run query.
 Example request to list applications using Microsoft Graph Explorer
Find your application's id field in the output.
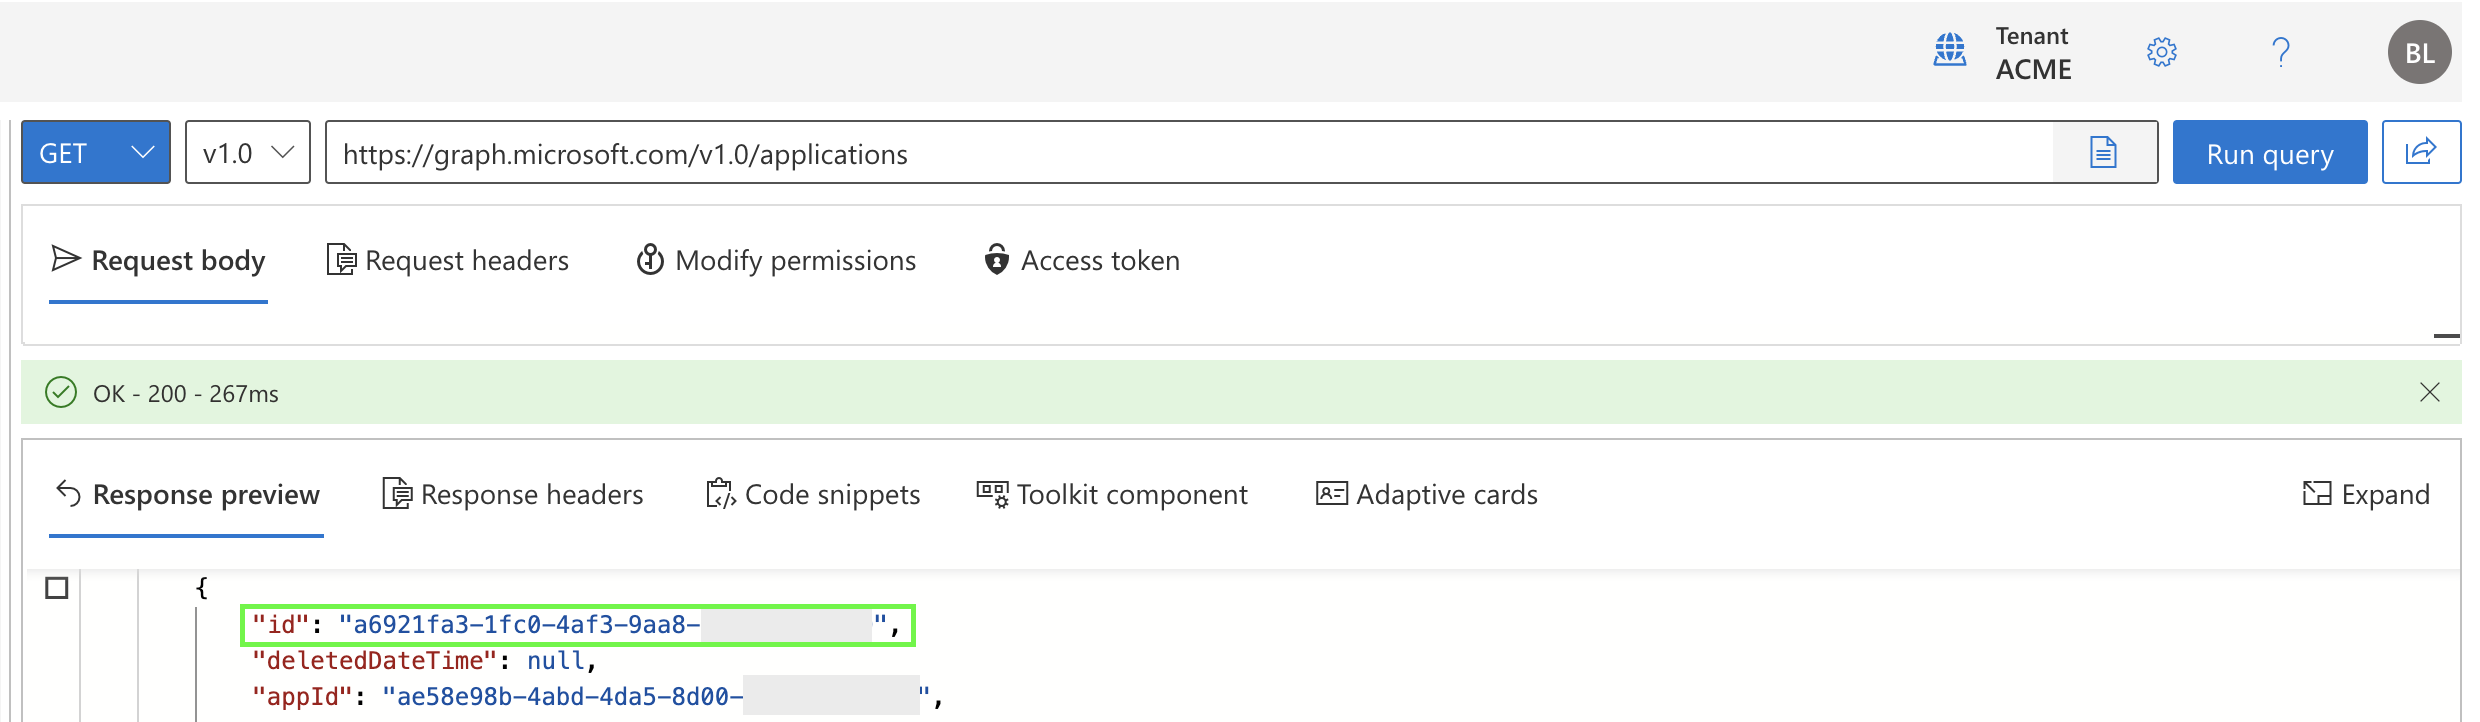 Find the
 id field
ID FIELD
The id field is distinct from the appId field. Do not use appId.
Create an extension attribute called workato_role. In a later step, you will use this attribute to assign each user's role in your workspace. Note that in workspaces with the Environments feature enabled, workato_role is used to assign a role for the default DEV environment.
Select POST from the HTTP verb drop-down menu.
Enter the following URL in the query box and replace
{id}with your application's ID:https://graph.microsoft.com/v1.0/applications/{id}/extensionPropertiesPaste the following JSON in the Request body field:
json{ "name": "workato_role", "dataType": "string", "targetObjects": [ "User" ] }Select Run query.
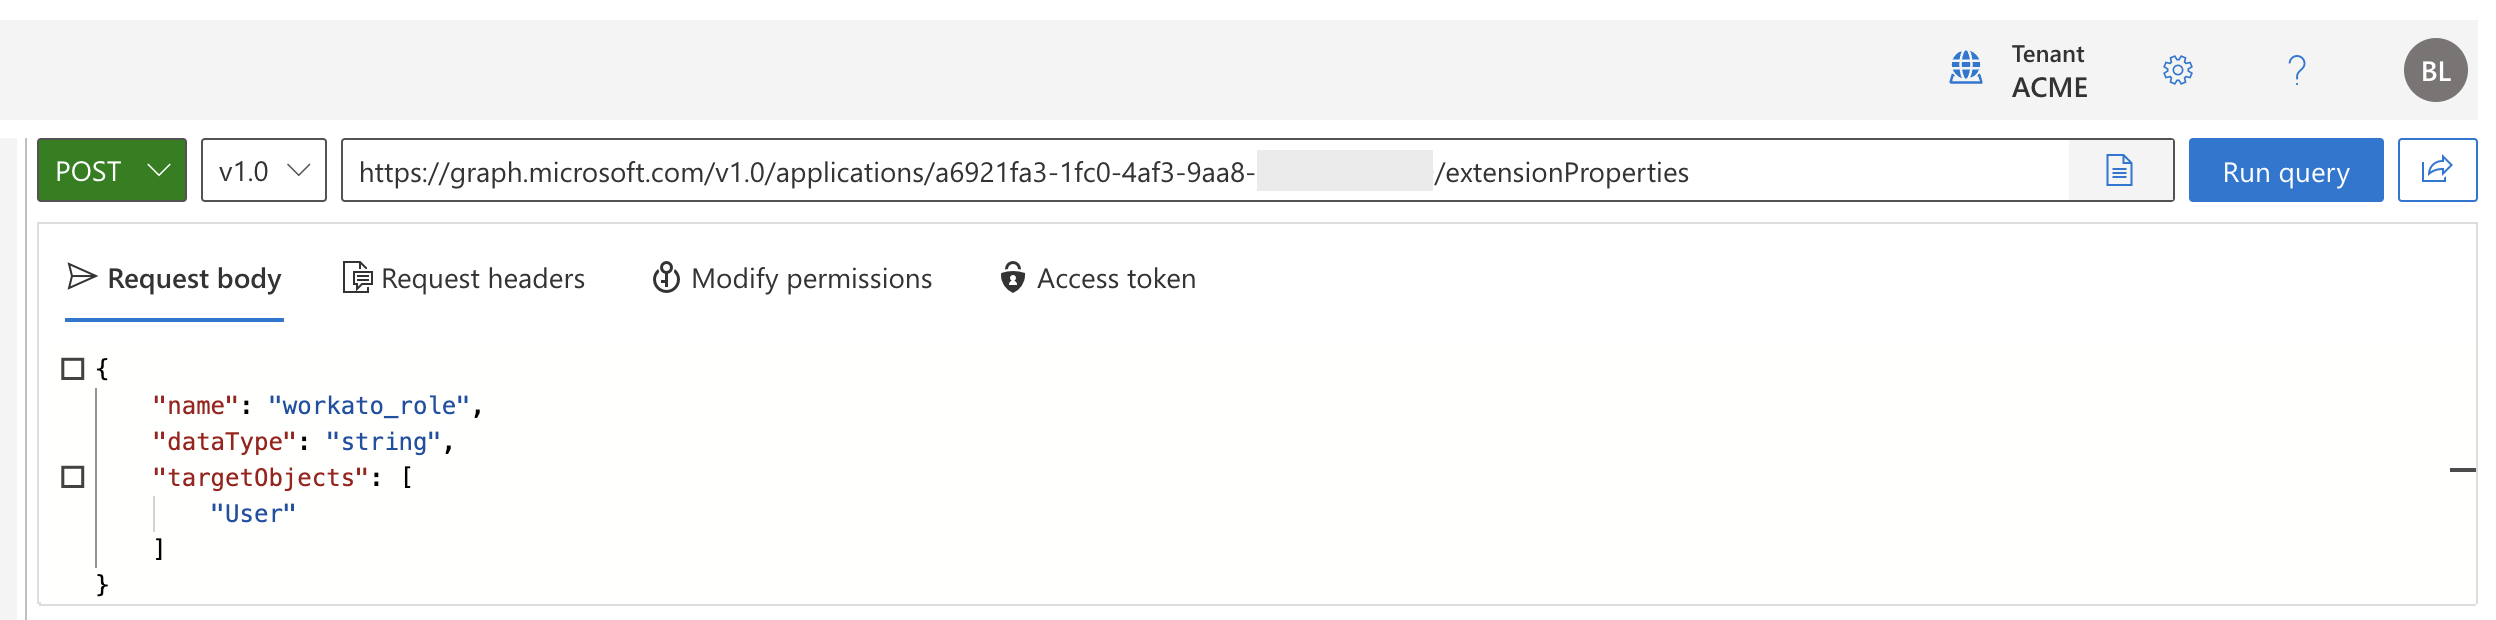 Example request to create an extension attribute in Microsoft Graph Explorer
Locate the name field in the output and copy its value. It will look something like this:
extension_ae58e98b4abd4da58d00abcd1234abcd_workato_role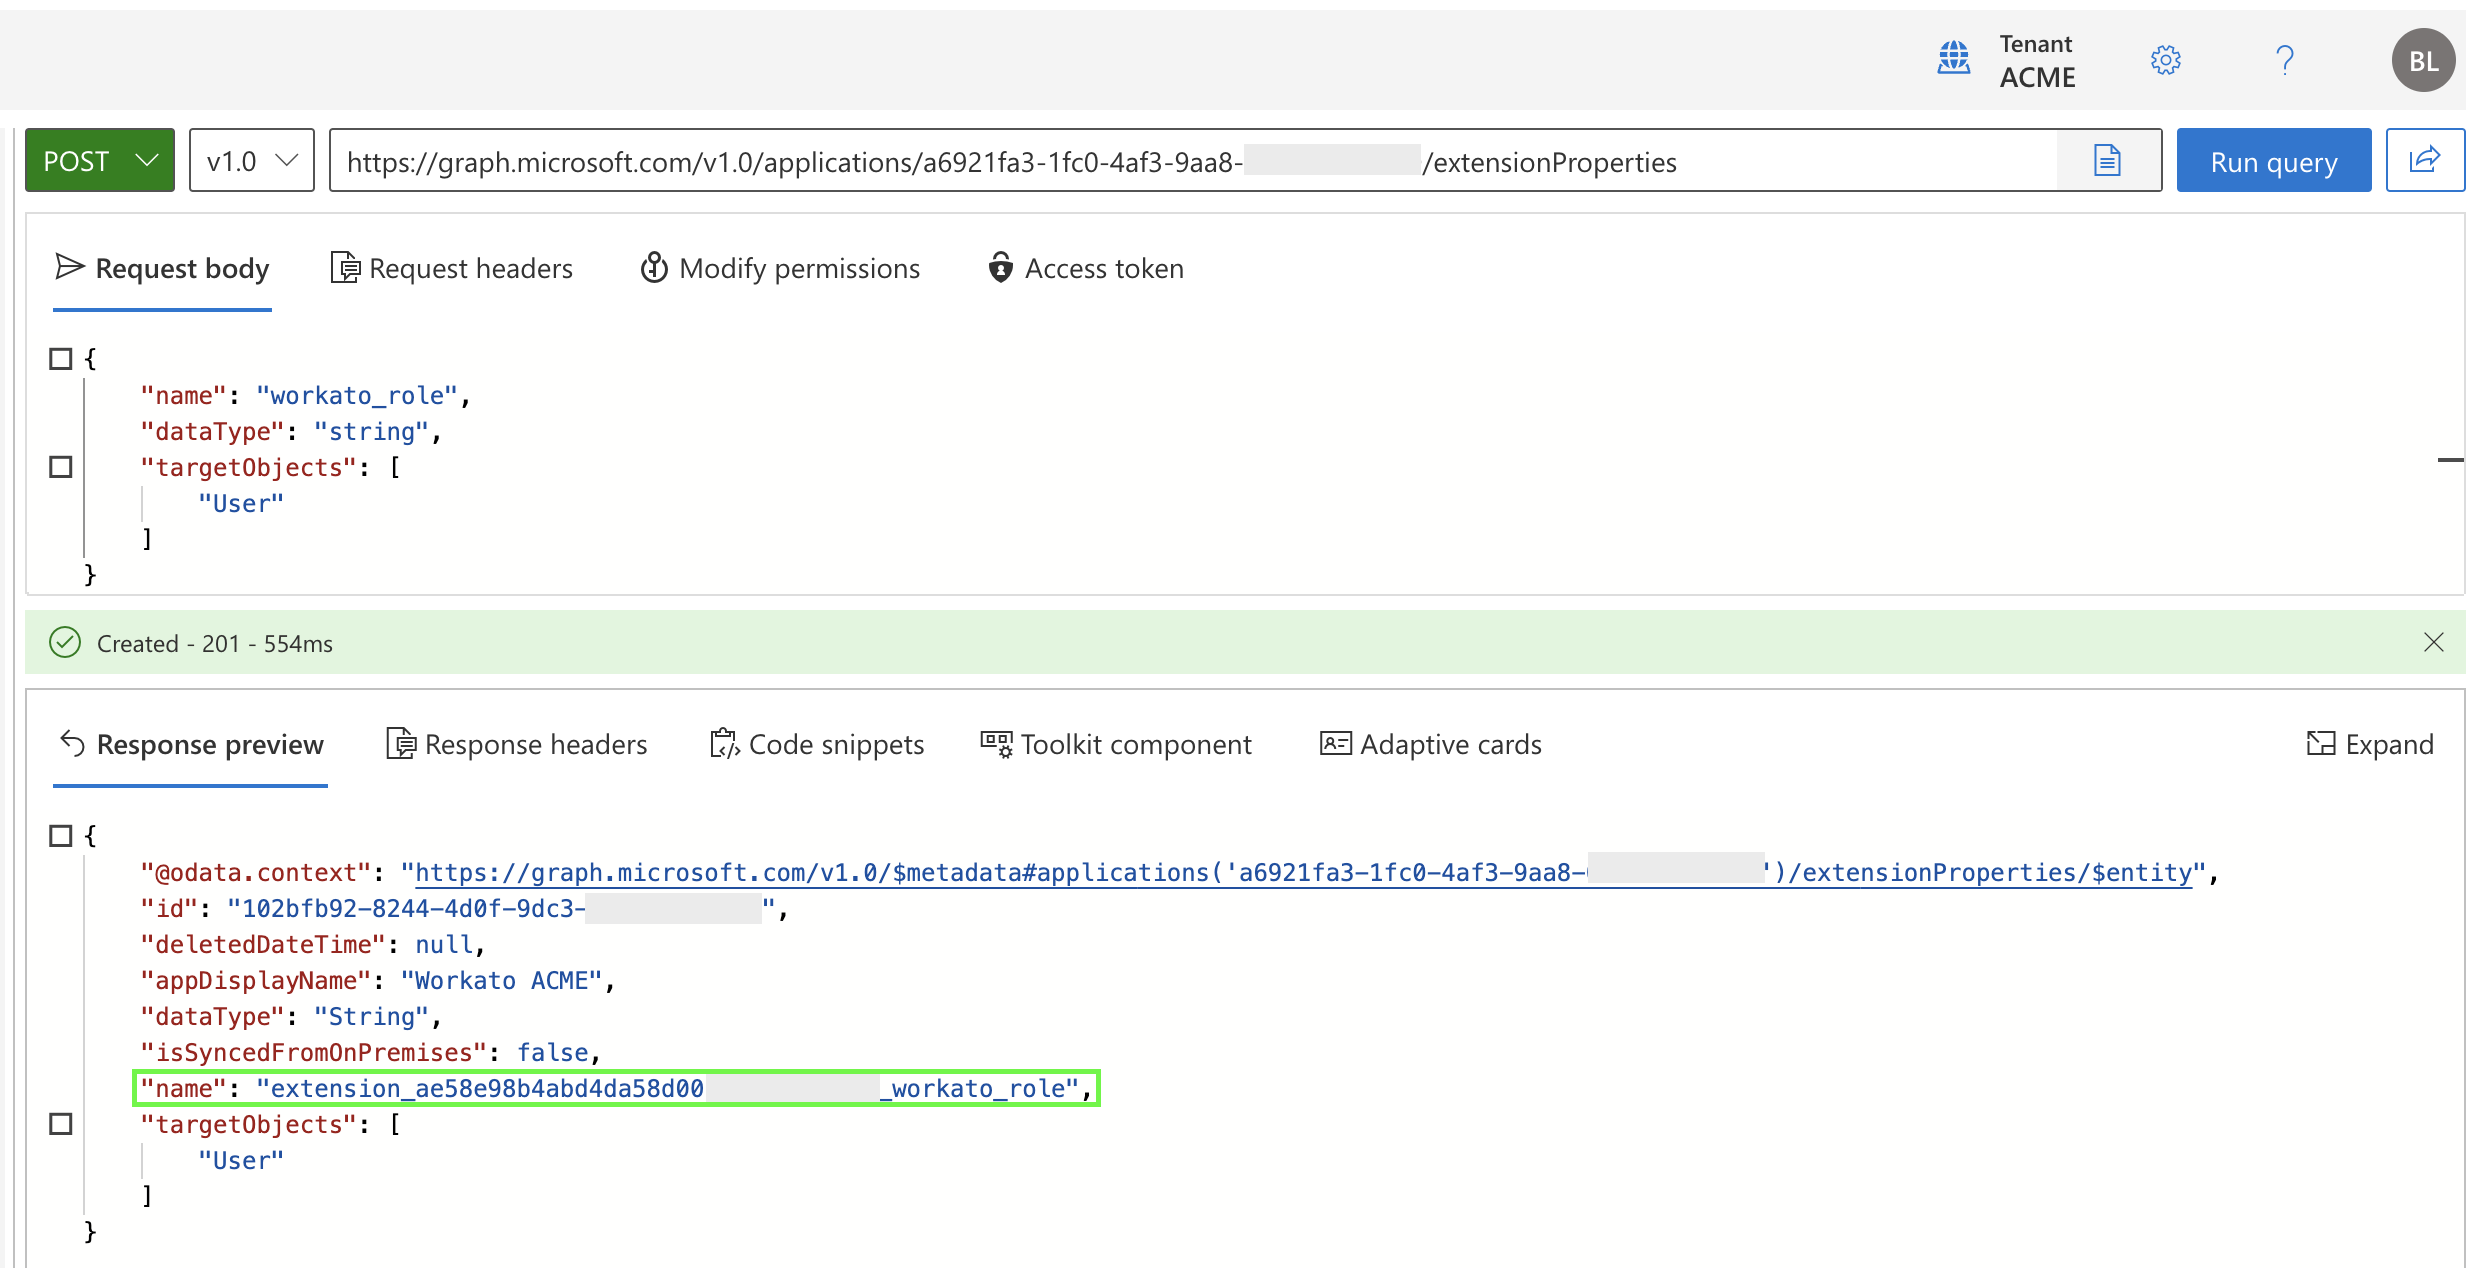 Find the
 name field in the output
If your organization has the Environments feature in Workato: Repeat the preceding two steps using the example request bodies below. Send one request to create an extension attribute for the PROD environment, and another request for the TEST environment:
{
  "name": "workato_role_prod",
  "dataType": "string",
  "targetObjects": [
    "User"
  ]
}{
"name": "workato_role_test",
"dataType": "string",
"targetObjects": [
"User"
]
}Ensure that you copy the value of the name field in each response.
Find the ID of the user you want to provision to Workato:
- Select GET from the HTTP verb drop-down menu.
- Enter
https://graph.microsoft.com/v1.0/usersin the query box. - Select Run query.
- Look for the user in the output and copy the value of their
idattribute.
Assign the extension attribute(s) and the desired role to the user:
Select PATCH from the HTTP verb drop-down menu.
Enter the following URL in the query box and replace
{id}with the user's ID:https://graph.microsoft.com/v1.0/users/{id}Create a request body based on the following JSON, substituting the appropriate values, and paste it in the Request body field:
json{ "{extension attribute name}": "{system role or custom role to assign the user}" }EXAMPLE REQUEST BODY WITHOUT ENVIRONMENTS
The following example assigns the user an Admin role in a workspace without the Environments feature enabled:
json{ "extension_ae58e98b4abd4da58d00abcd1234abcd_workato_role": "Admin" }EXAMPLE REQUEST BODY WITH ENVIRONMENTS
The following example assigns the user a different system role for each environment:
json{ "extension_ae58e98b4abd4da58d00abcd1234abcd_workato_role": "Admin", "extension_ae58e98b4abd4da58d00abcd1234abcd_workato_role_prod": "Operator", "extension_ae58e98b4abd4da58d00abcd1234abcd_workato_role_test": "Analyst" }Select Run query.
If the request is successful, the response is simply {}.
 Successful role assignment
Confirm that the extension has been assigned to the user:
Select GET from the HTTP verb drop-down menu.
Enter the following URL into the search box, replacing
{id}with the user's ID and{extension attribute name}with the extension name you want to confirm:https://graph.microsoft.com/v1.0/users/{id}?$select={extension attribute name}For example:
https://graph.microsoft.com/v1.0/users/4a5b1db8-415b-4207-ab8d-1a2b3c4d5e6f?$select=extension_ae58e98b4abd4da58d00abcd1234abcd_workato_roleSelect Run query.
Check the response to confirm that the user has an extension attribute with the desired role. You should see output like this:
json{ "@odata.context": "https://graph.microsoft.com/v1.0/$metadata#users(extension_ae58e98b4abd4da58d00abcd1234abcd_workato_role)/$entity", "extension_ae58e98b4abd4da58d00abcd1234abcd_workato_role": "Admin" }
Step 2: Configure automatic provisioning on Microsoft Entra ID
After you extend the Microsoft Entra ID user schema, you must configure automatic provisioning on Microsoft Entra ID.
Navigate to the Workato SAML application you created in Microsoft Entra ID.
CONFIGURE SAML SSO
If you have not yet configured SAML SSO for your Workato application, set up a non-gallery SAML application in Microsoft Entra ID to access your Workato workspace.
Navigate to Manage > Provisioning.
Select Automatic from the Provisioning Mode drop-down menu.
In the Admin Credentials section, enter the Tenant URL and Secret Token fields using the base URL and SCIM token you generated when you configured SCIM in Workato.
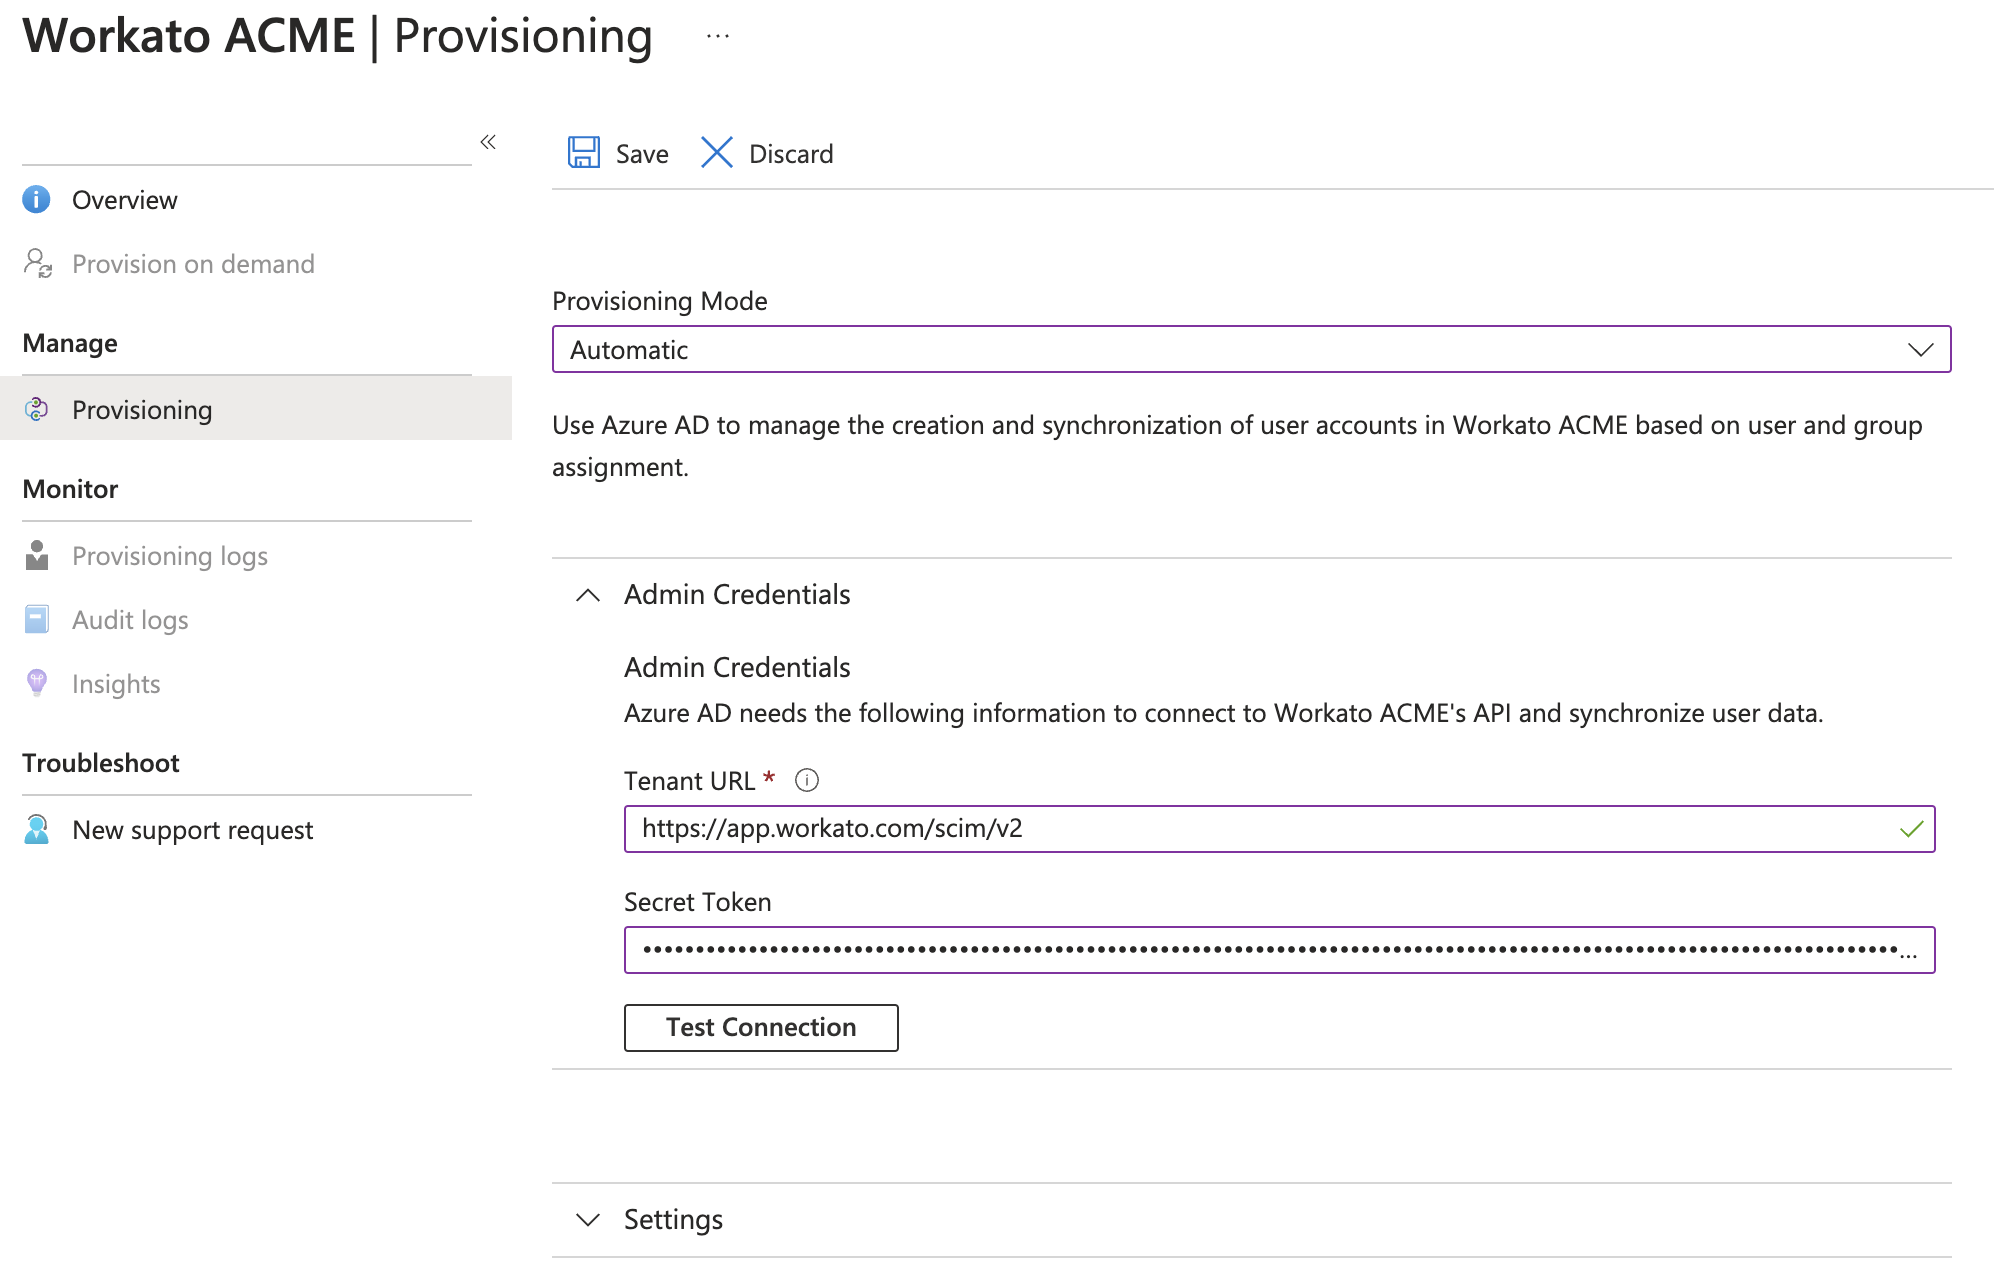 Configure automatic provisioning
Select Test Connection. If the test is successful, Azure will display the message "The supplied credentials are authorized to enable provisioning":
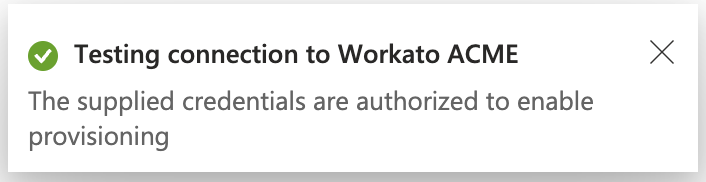 Successful test connection
Disable group provisioning. Microsoft Entra ID enables this option by default, but Workato SCIM only supports user-level provisioning.
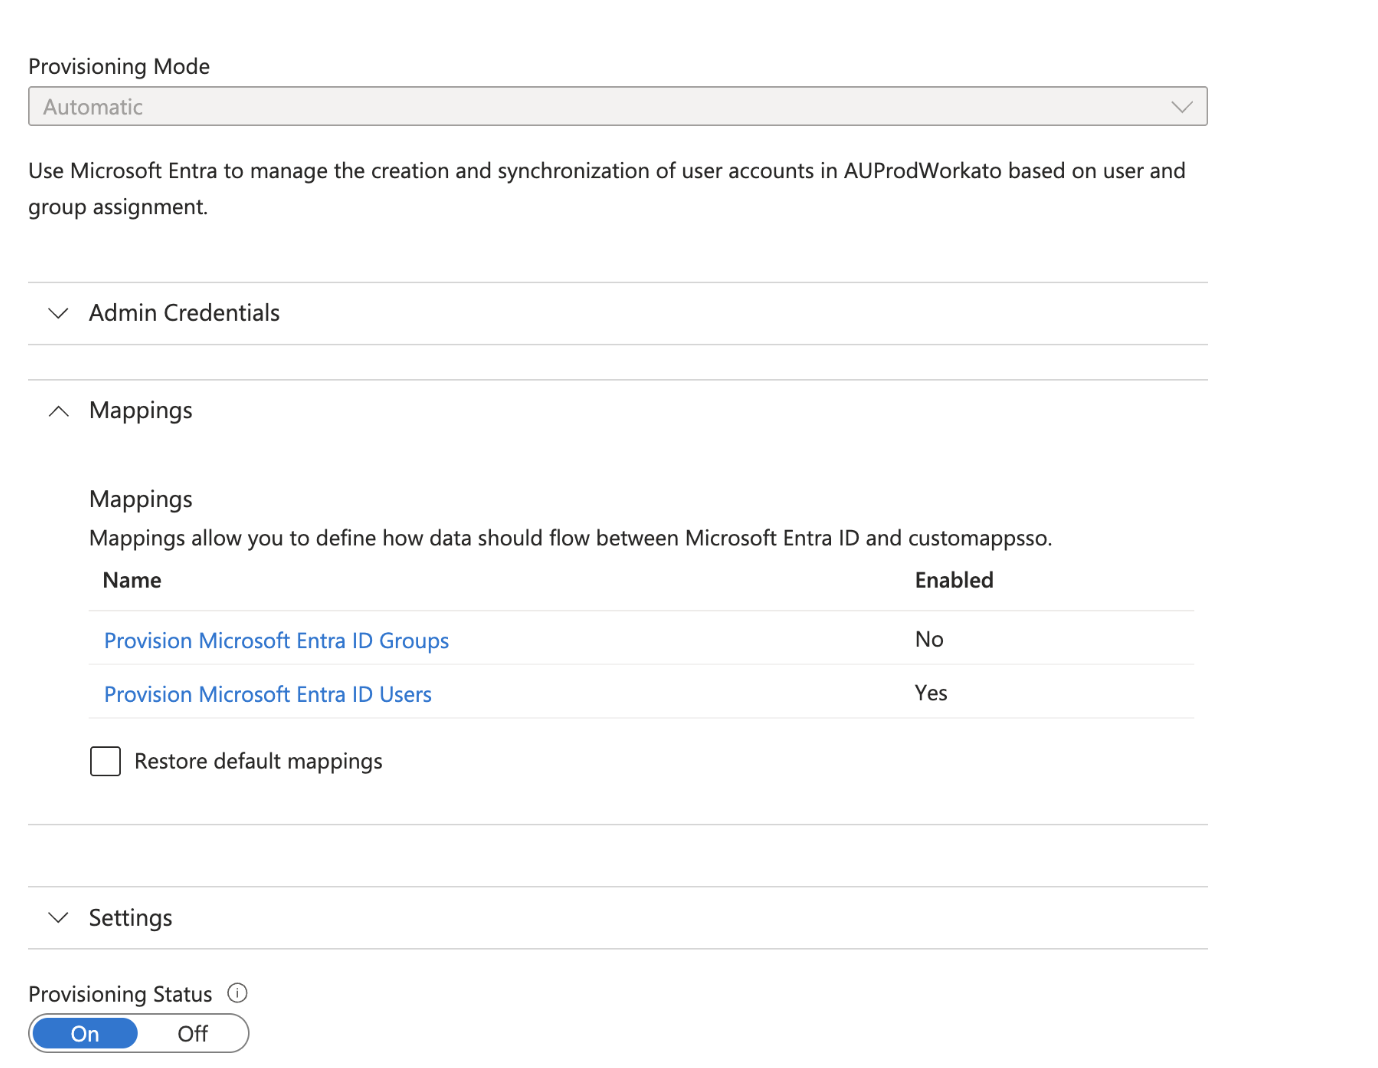 Disable group provisioning
Select Save.
Step 3: Configure attribute mappings between Microsoft Entra ID and Workato
You must configure which Microsoft Entra ID attributes are passed into Workato through SCIM.
REQUIRED MAPPINGS
At minimum, map only the core attributes needed for lifecycle management. Don't map environment roles or collaborator groups through SCIM. These are managed by SAML at log in to ensure dynamic evaluation of group claims.
If your organization requires role assignment through SCIM, you can map extension attributes (for example, workato_role_test or workato_role_prod). However, Workato recommends using SAML for role and group assignments to ensure dynamic evaluation.
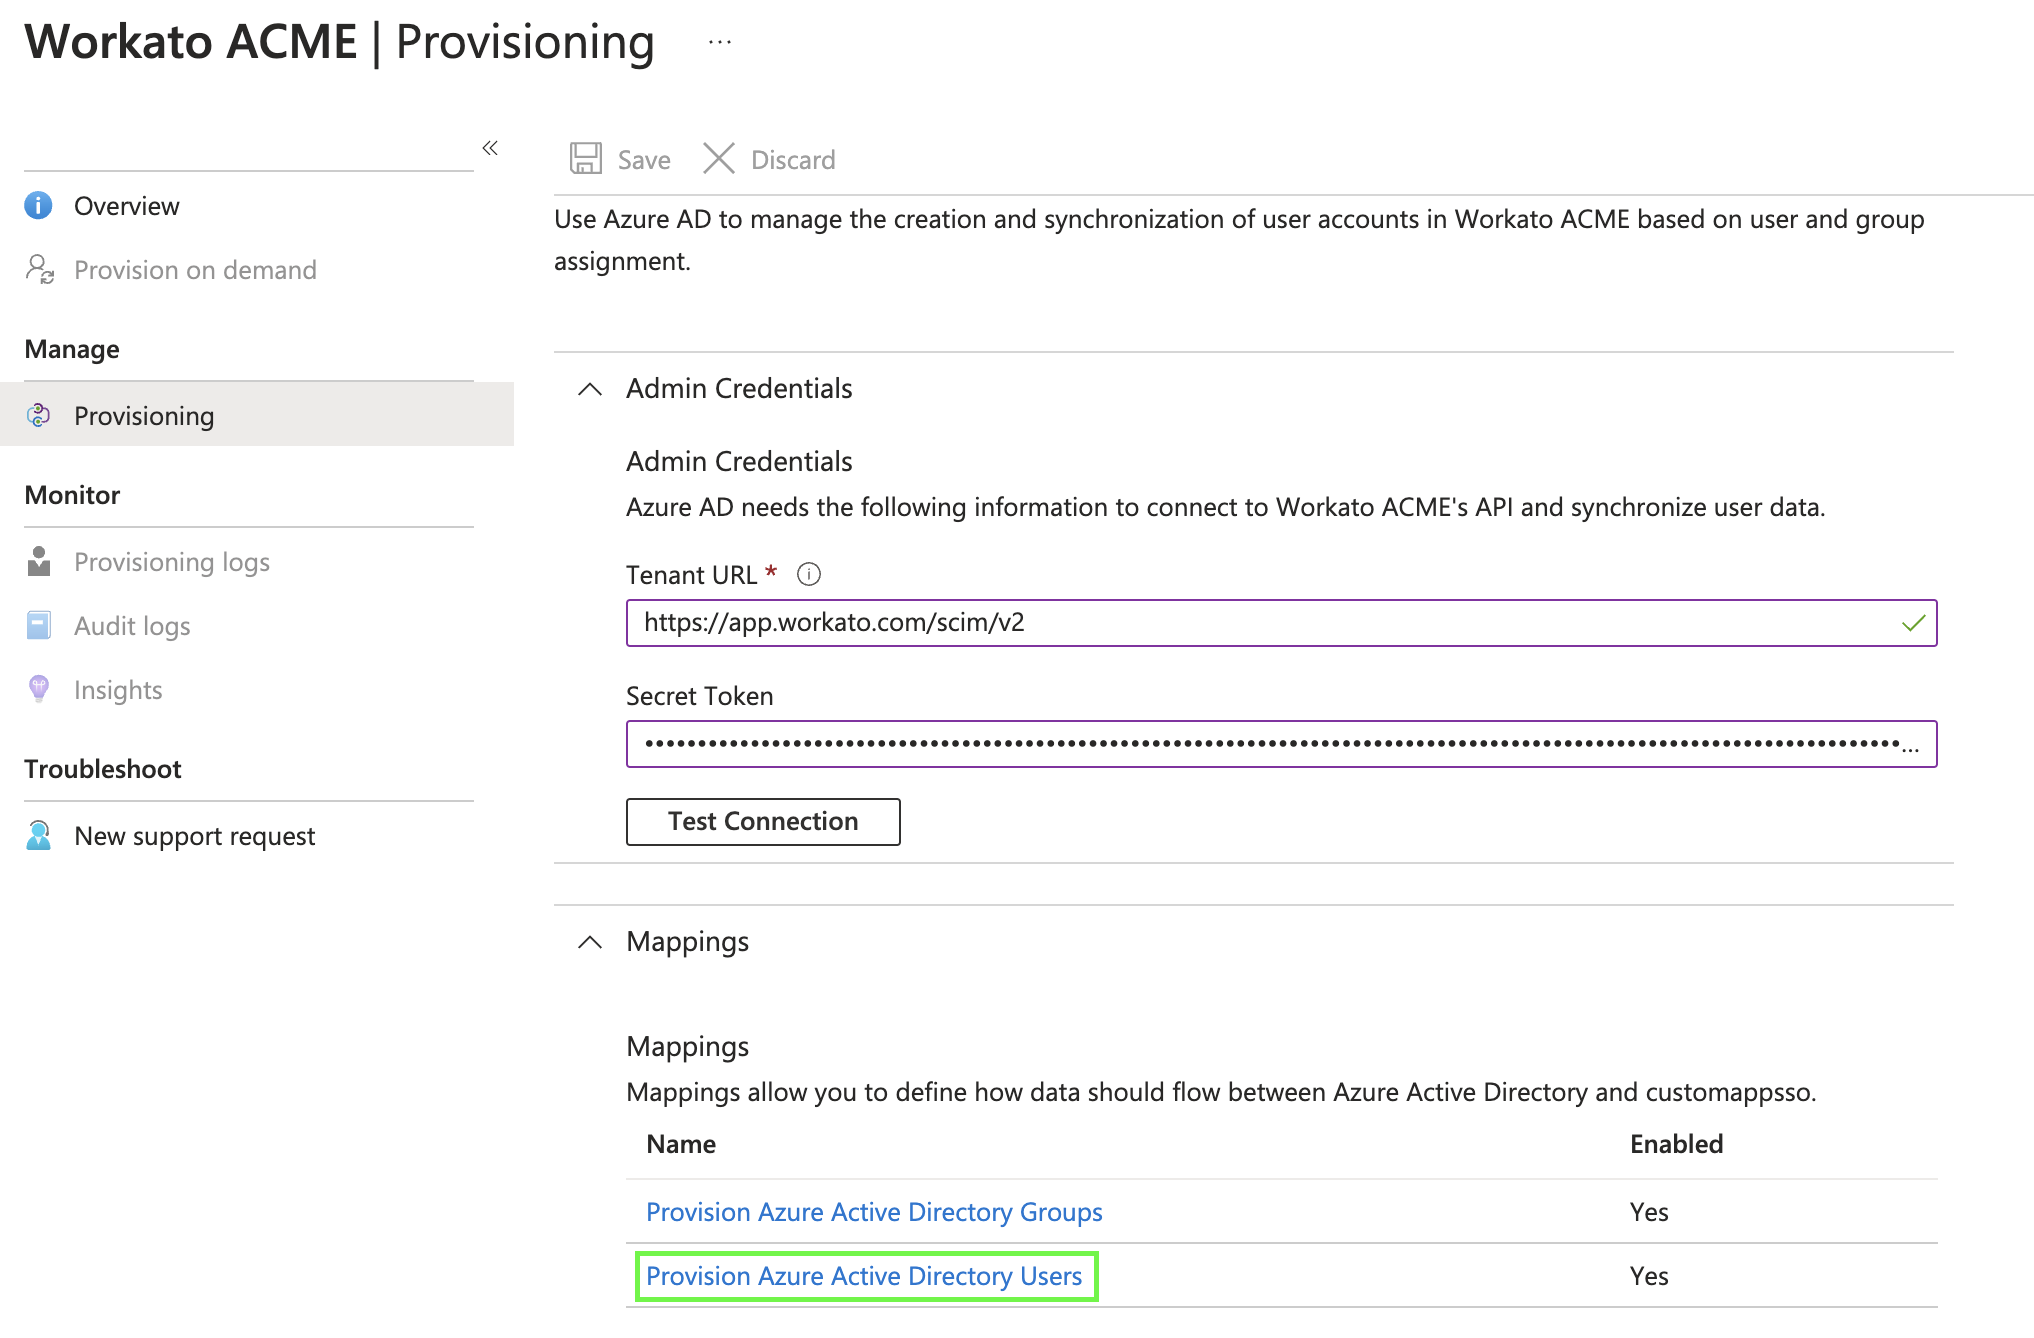
Navigate to your Workato SAML application in Microsoft Entra ID.
Expand the Mappings section and select Provision Microsoft Entra ID Users.
 Provision Microsoft Entra ID Users setting
Ensure Enabled is set to Yes.
In the Target Object Actions section, check the boxes for Create and Update.
At the bottom of the page, select the Show advanced options checkbox.
Select Edit attribute list for customappsso.
At the bottom of the customappsso User Attributes list, add the following attribute name in the Name field and set Type to String:
urn:ietf:params:scim:schemas:workato:1.0:WorkatoRole:workato_roleIf your organization has the Environments feature in Workato: Repeat the previous step to add the extension attributes for the TEST and PROD environments, using each of the following attribute names with Type set to String:
urn:ietf:params:scim:schemas:workato:1.0:WorkatoRole:workato_role_testurn:ietf:params:scim:schemas:workato:1.0:WorkatoRole:workato_role_prod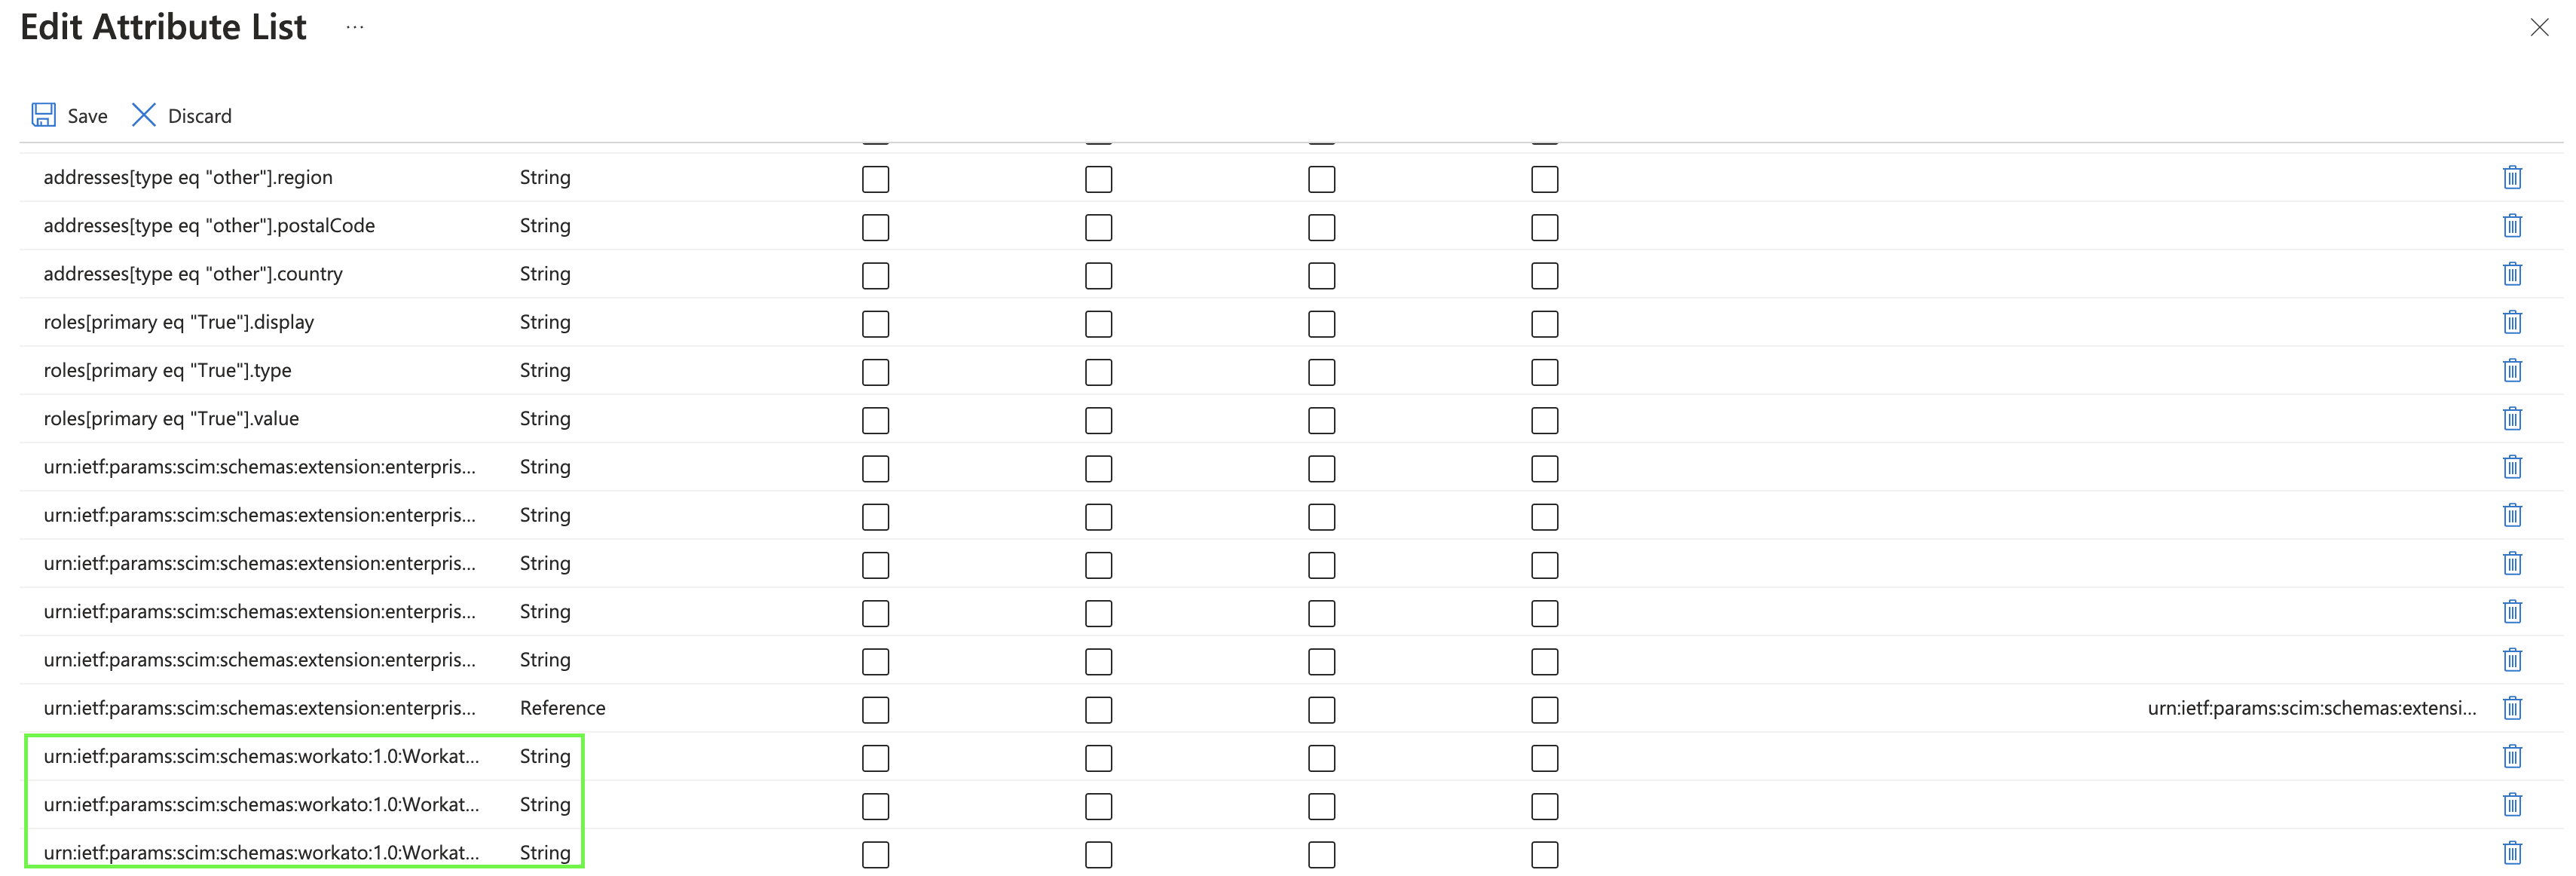 Extension attributes for an organization with the Environments feature enabled
Select Save and then Yes to confirm that you want to make the changes. You are returned to the Attribute Mapping page.
Select Add New Mapping.
In the Mapping type field, select Direct.
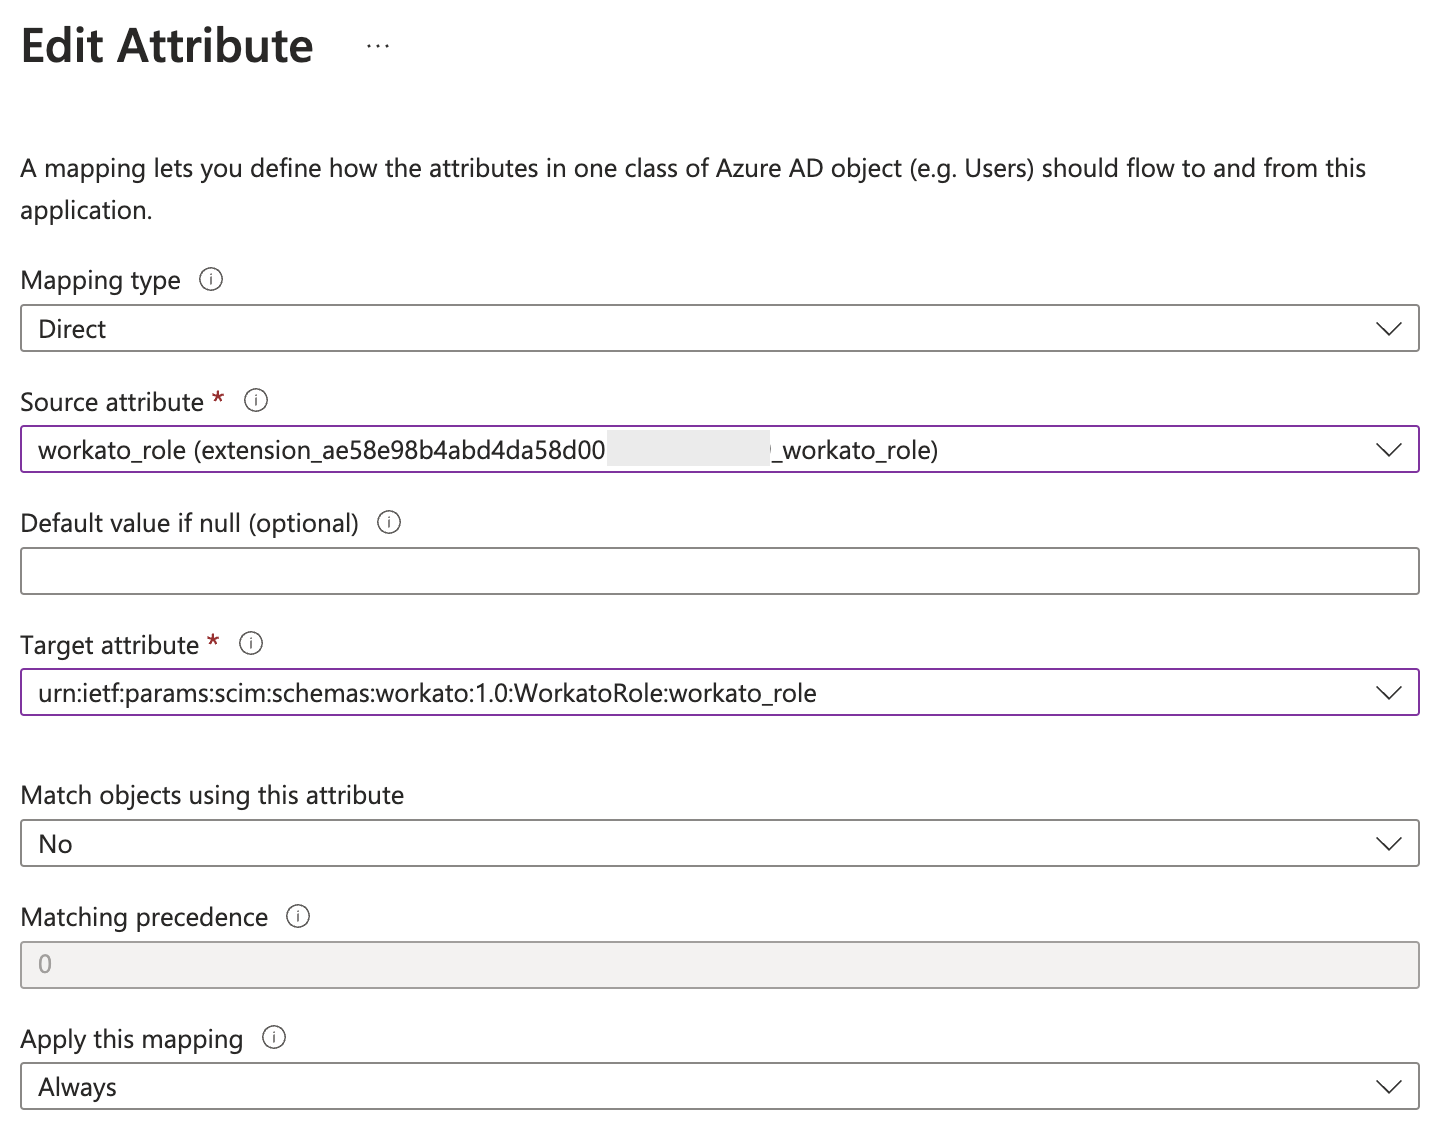
In the Source attribute field, select the workato_role extension attribute you configured previously, as shown in the following example:
workato_role (extension_ae58e98b4abd4da58d00abcd1234abcd_workato_role)In the Target attribute field, select the corresponding attribute you configured, as shown in the following example:
urn:ietf:params:scim:schemas:workato:1.0:WorkatoRole:workato_roleSelect Always from the Apply this mapping drop-down menu if it is not already selected.
 Edit attribute mapping for
 workato_role
Select OK.
If your organization has the Environments feature in Workato: Select Add New Mapping and repeat the previous steps to map the extension attributes for the TEST and PROD environments:
MAP EXTENSION ATTRIBUTES FOR TEST ENVIRONMENT
Example source attribute:
workato_role (extension_ae58e98b4abd4da58d00abcd1234abcd_workato_role_test)Example target attribute:
urn:ietf:params:scim:schemas:workato:1.0:WorkatoRole:workato_role_testMAP EXTENSION ATTRIBUTES FOR PROD ENVIRONMENT
Example source attribute:
workato_role (extension_ae58e98b4abd4da58d00abcd1234abcd_workato_role_prod)Example target attribute:
urn:ietf:params:scim:schemas:workato:1.0:WorkatoRole:workato_role_prodThe Attribute Mapping page should then look like the following image:
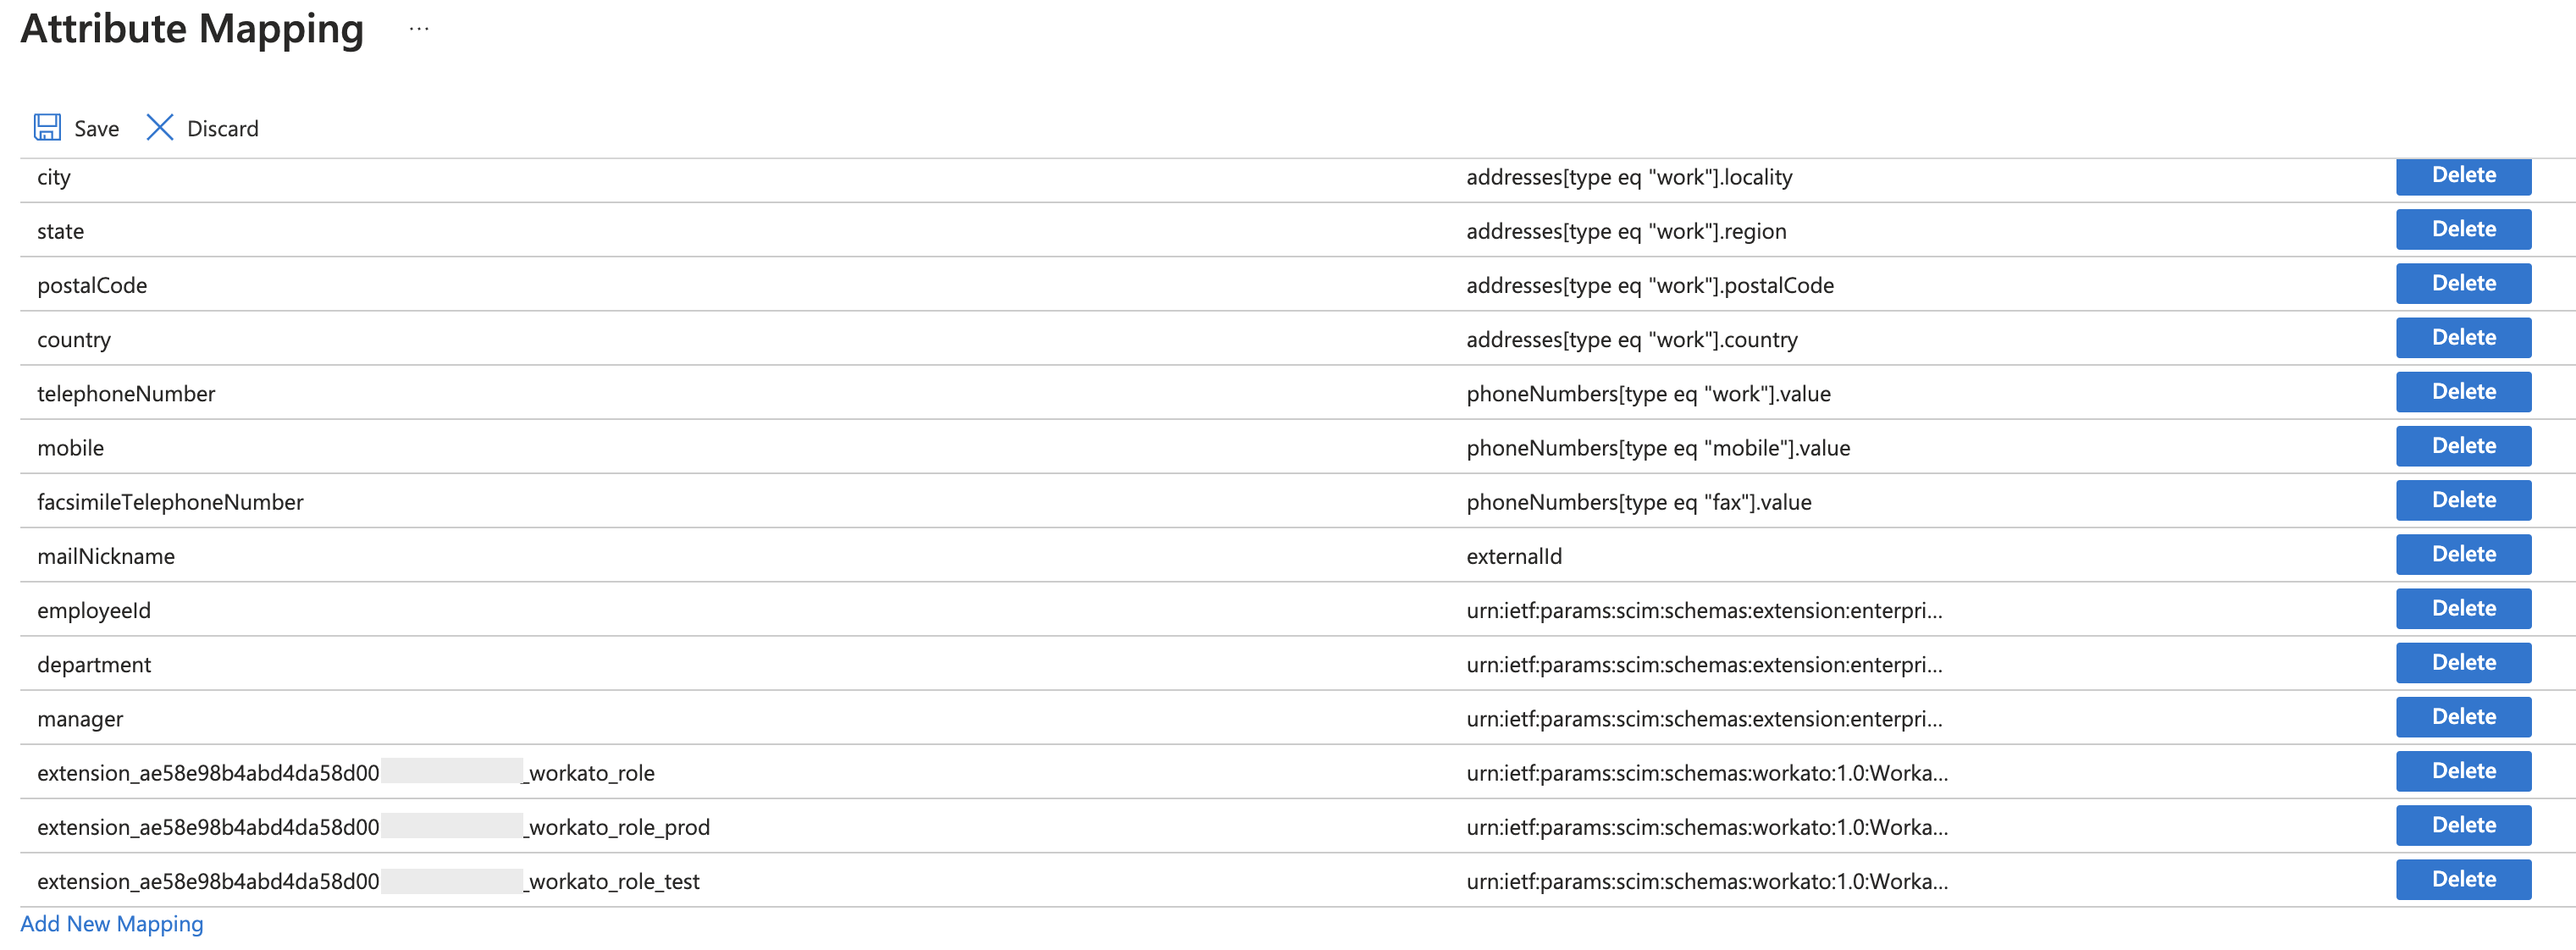 Mapped extension attributes for a workspace with the Environments feature enabled
Select Save and then Yes to confirm you want to save your changes.
Step 4: Provision users
After you configure automatic provisioning, you can assign Microsoft Entra ID users and groups to your Workato application and then provision them.
Navigate to your Workato SAML application's overview in Microsoft Entra ID.
Select Users and groups.
Select Add user/group.
Select None selected and search for the user or group you want to provision to Workato.
Select the user or group and click Select.
Select Assign.
In the sidebar, select Provisioning.
Choose whether to provision users automatically or on demand:
PROVISIONING USERS AUTOMATICALLY
To run a cycle that automatically provisions users once every 40 minutes, select Start provisioning.
Between cycles, you can trigger a provisioning request immediately by selecting Stop provisioning and then Start provisioning.
PROVISIONING USERS ON DEMAND
To provision users on demand:
Select Provision on demand.
Search for the user you want to provision and select their name.
Select Provision.
If provisioning is successful, you'll see the following confirmation:
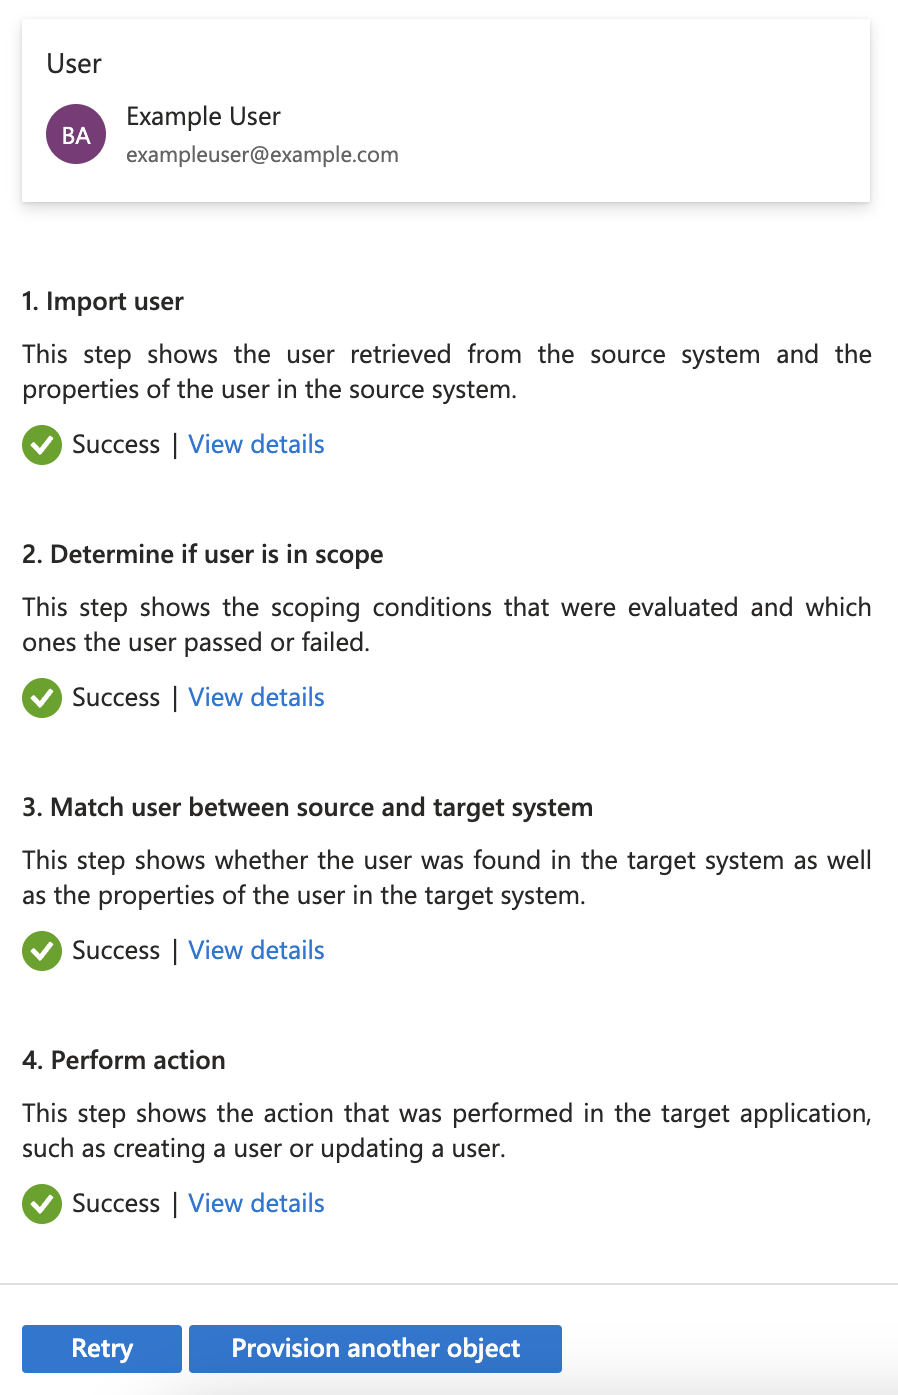 Successful user provisioning
Workato sends an email invitation to the selected users. Ask the user to verify their email address by clicking on the link in the email:
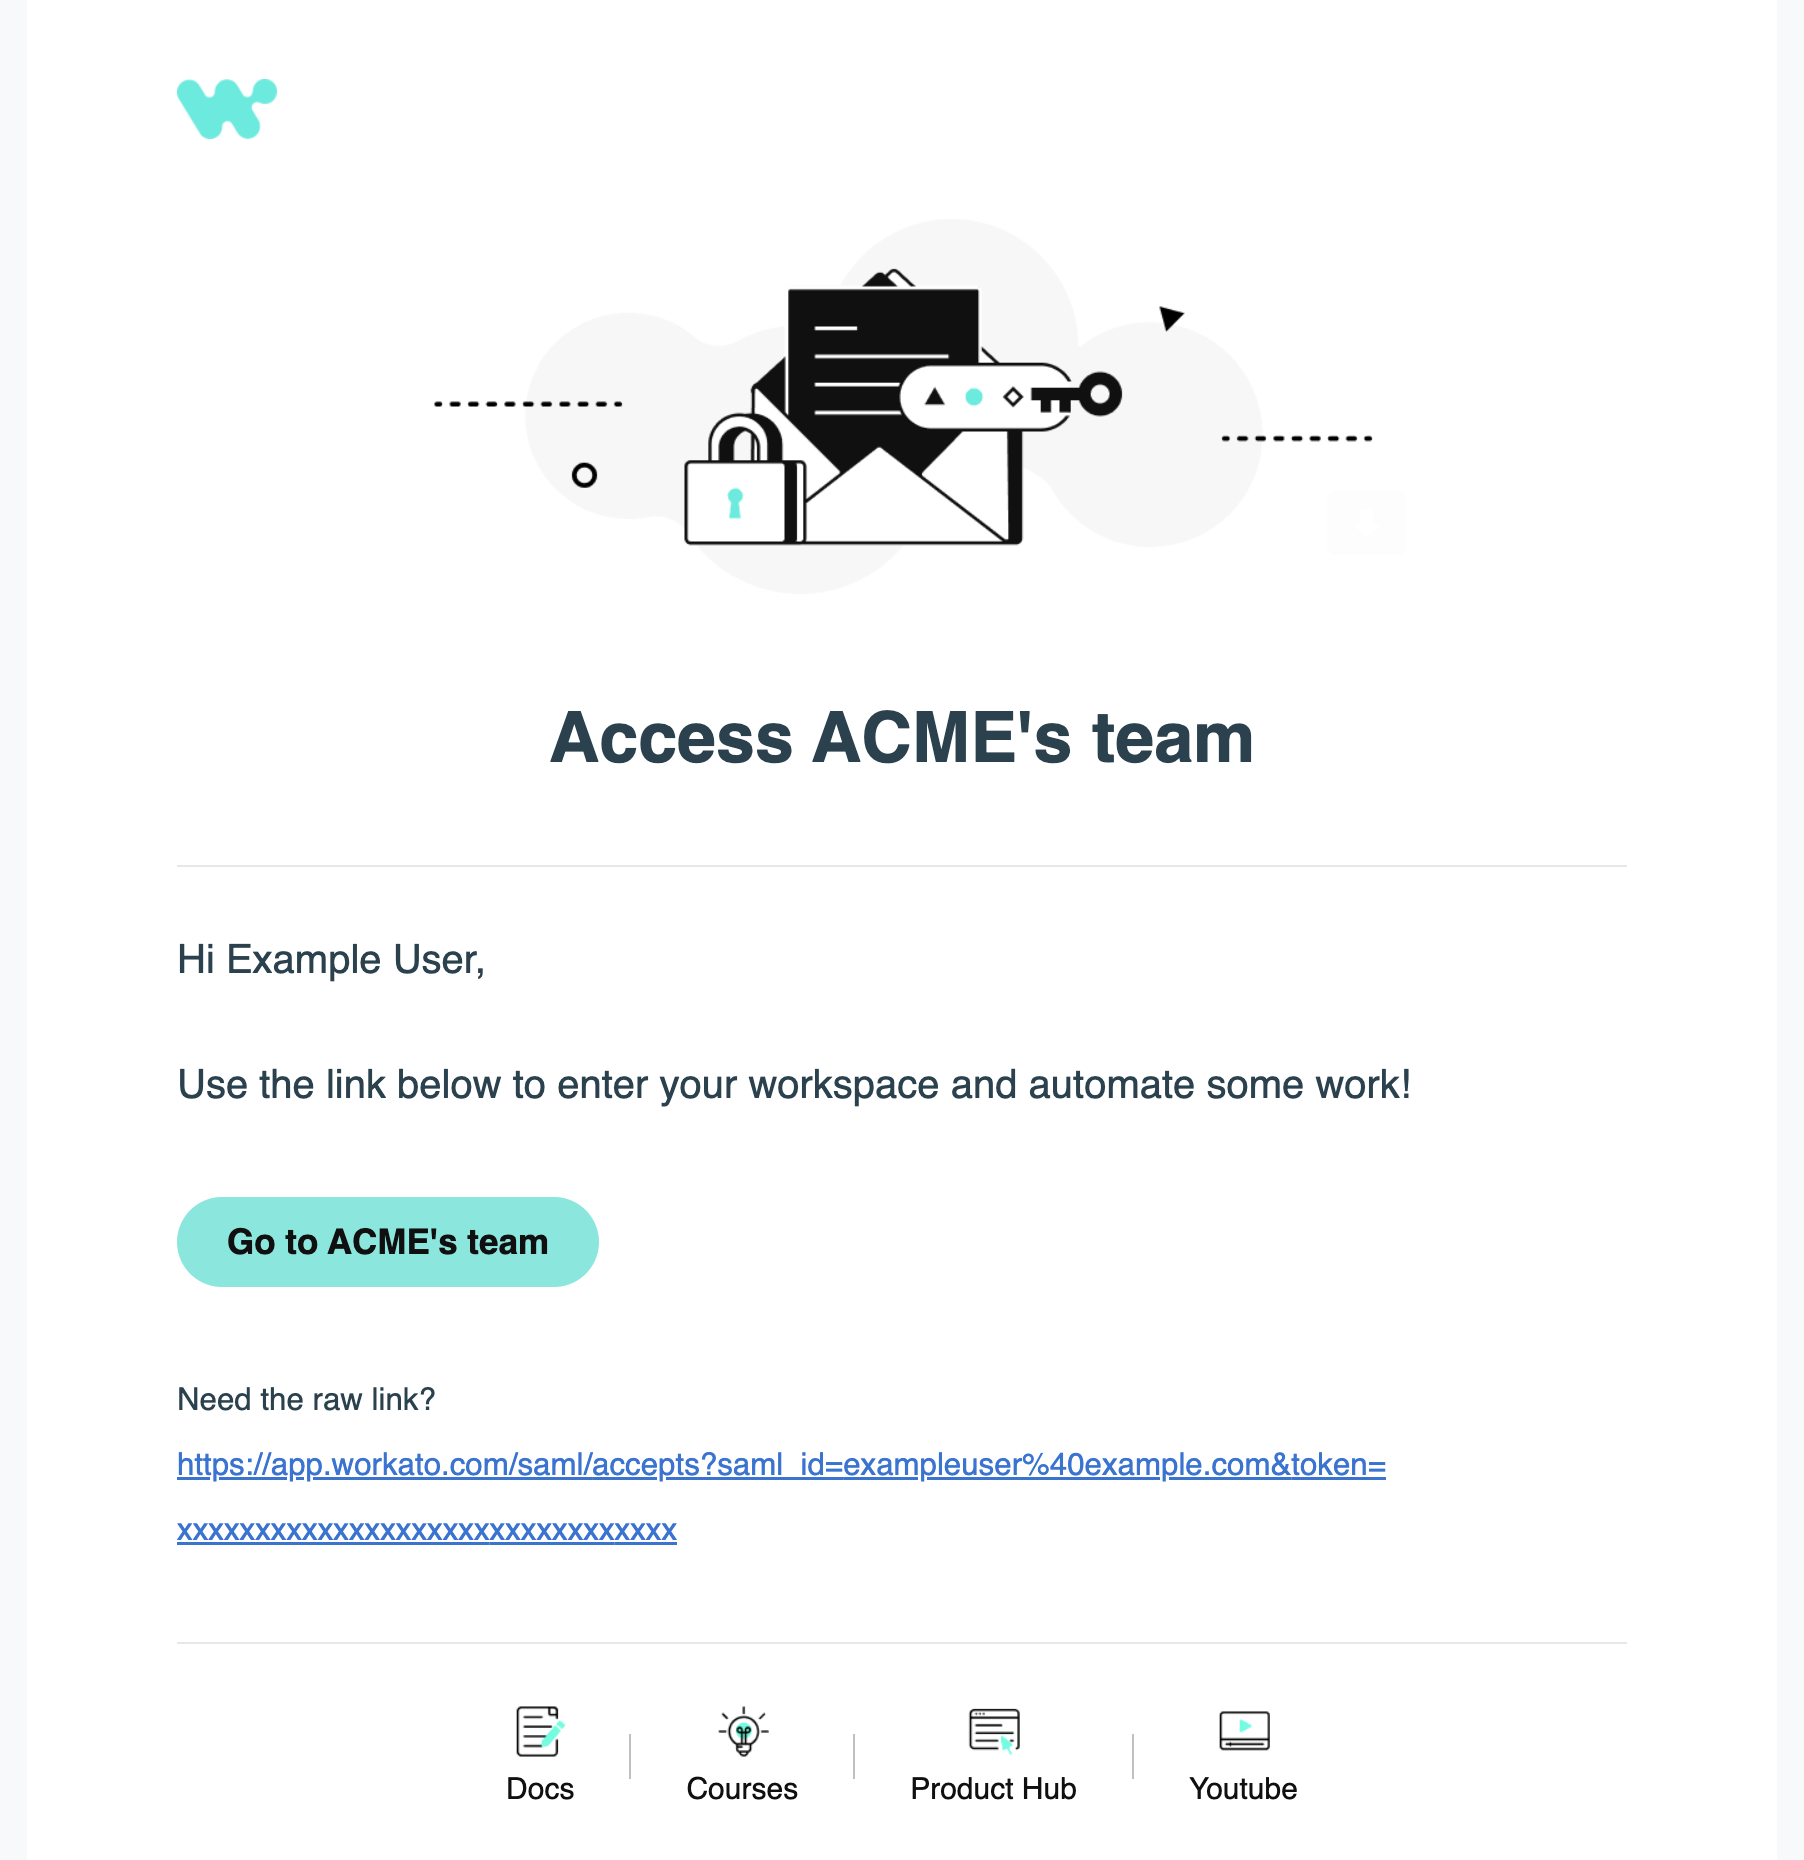 Email invitation to join a workspace
The collaborator can then sign in to the assigned workspace with the role(s) you configured.
TROUBLESHOOTING
If clicking on the invitation email redirects you to the Workato login page instead of your organization’s workspace, it is likely that you already have a Workato account associated with the same email. If you have forgotten your login credentials, reset your password.
You may optionally verify that the user has been added from the Workato activity audit log:
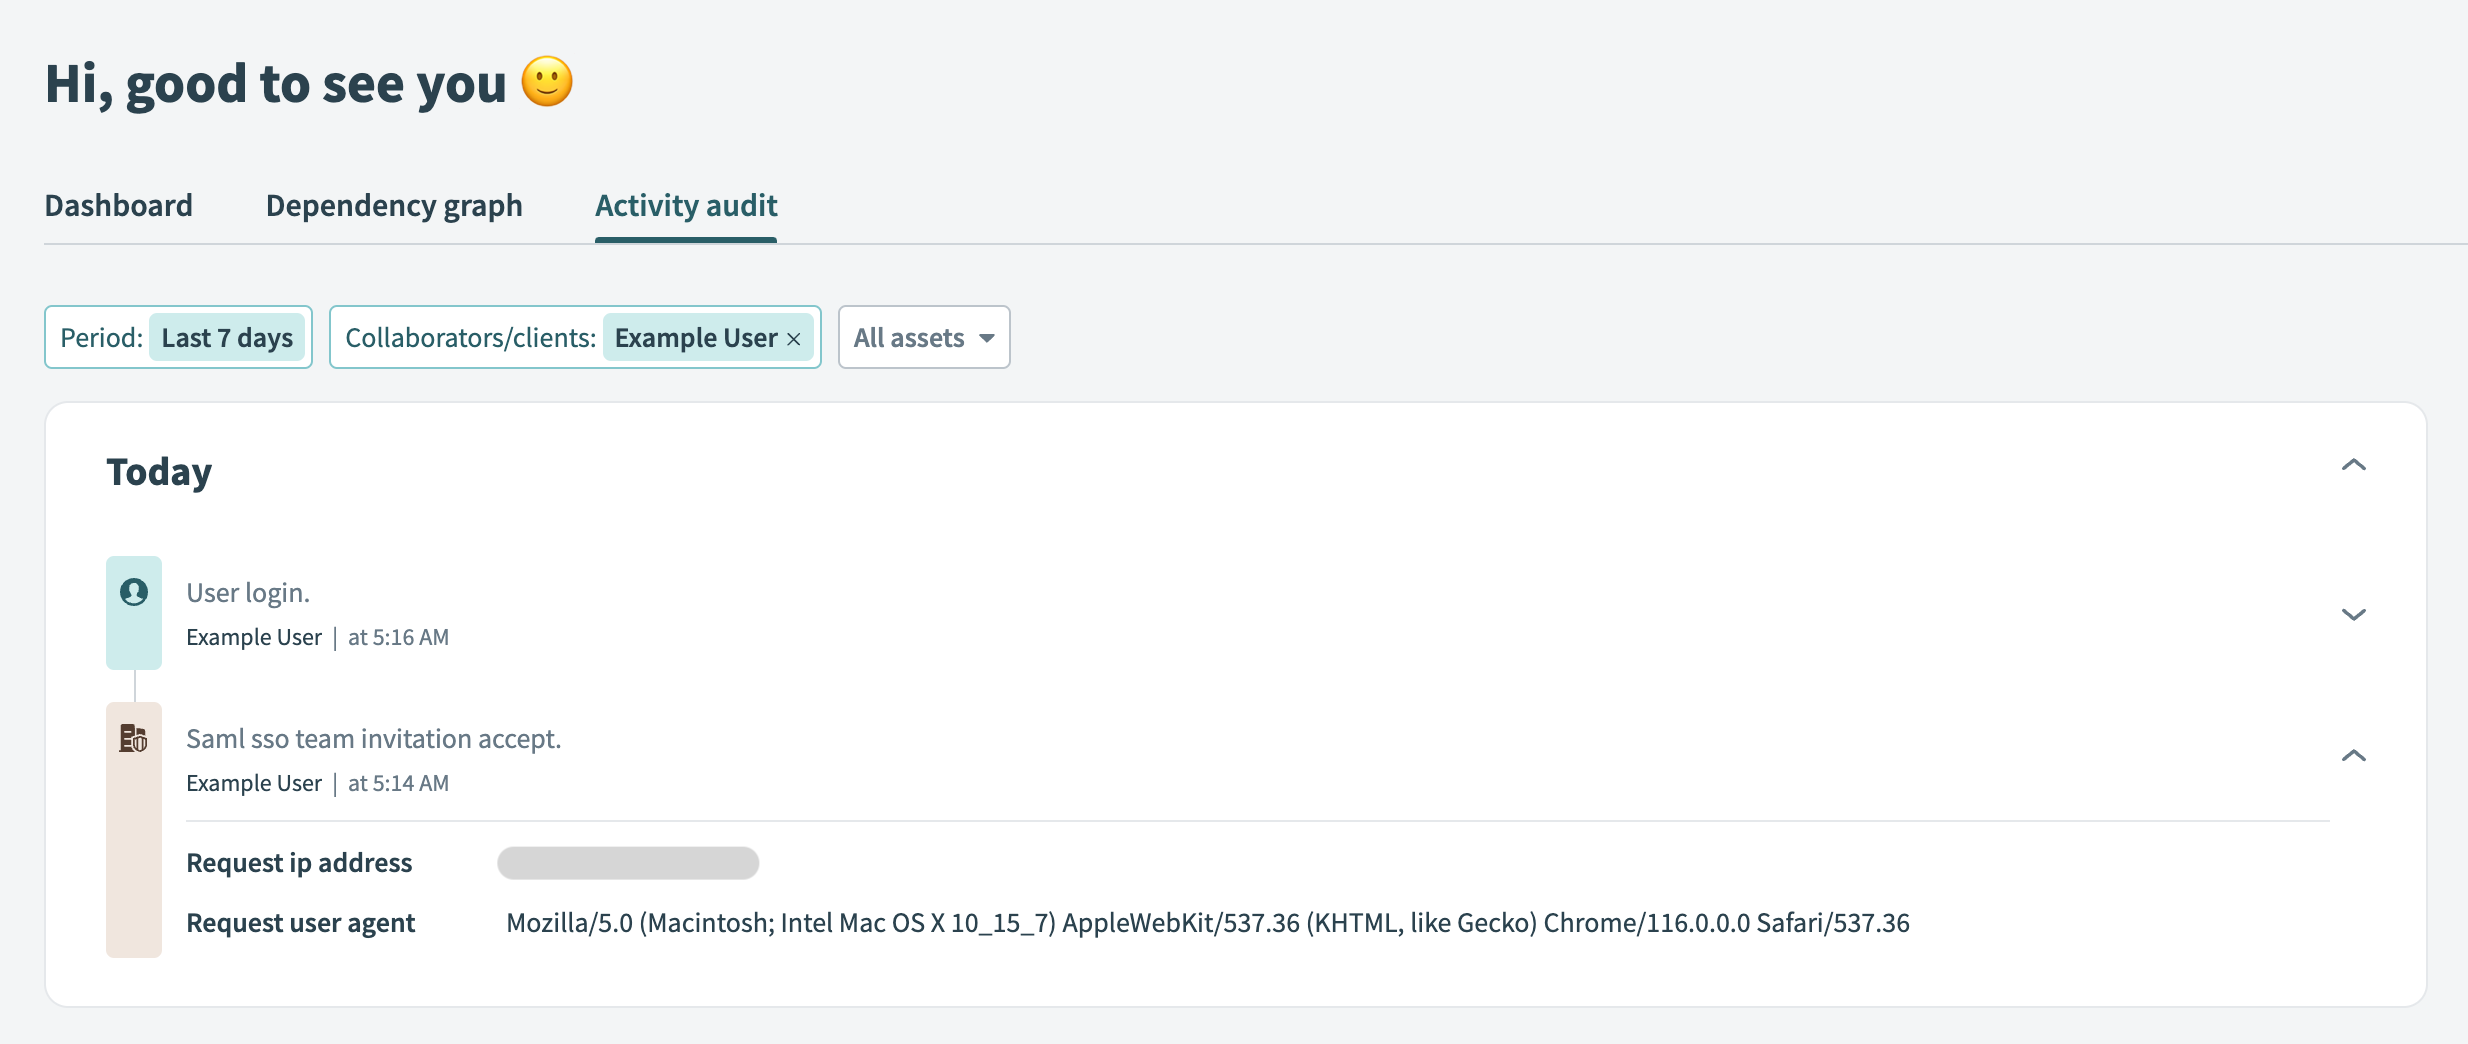 Activity audit log showing that a user has accepted an invitation
Update users
To update a user's Workato role(s) from Microsoft Entra ID, you must update their custom attributes.
Navigate to Microsoft Graph Explorer.
Run a Microsoft Graph query to update the desired user's custom attributes:
Select PATCH from the HTTP verb drop-down menu.
Enter the following URL in the query box and replace
{id}with the user's ID:https://graph.microsoft.com/v1.0/users/{id}Paste the following JSON in the Request body field, substituting the appropriate values:
json{ "{extension attribute name}": "{system role or custom role to assign the user}" }For example, the following request body updates a user's role to
NoAccessin the PROD environment of a workspace with the Environments feature enabled:json{ "extension_ae58e98b4abd4da58d00abcd1234abcd_workato_role_prod": "NoAccess" }Select Run query.
If the request is successful, the response is simply {}.
 Updating a user's attributes using Microsoft Graph Explorer
Run a provisioning cycle on demand in Microsoft Entra ID or wait for the next scheduled cycle.
Deprovision users
There are two ways to deprovision a user:
Either way, the deprovisioned user is no longer able to access the Workato workspace. However, their recipes and connections remain available to the rest of the team.
DEPROVISIONING DURING AN ACTIVE SESSION
If users are deprovisioned during an active session, their next action locks them out from the workspace. Their data, such as recipes and connections, remain accessible to other users in the workspace.
App assignment removal
In Microsoft Entra ID, navigate to Users.
Select the user you want to deactivate.
Select the Workato SAML application from the Applications section.
Select Remove.
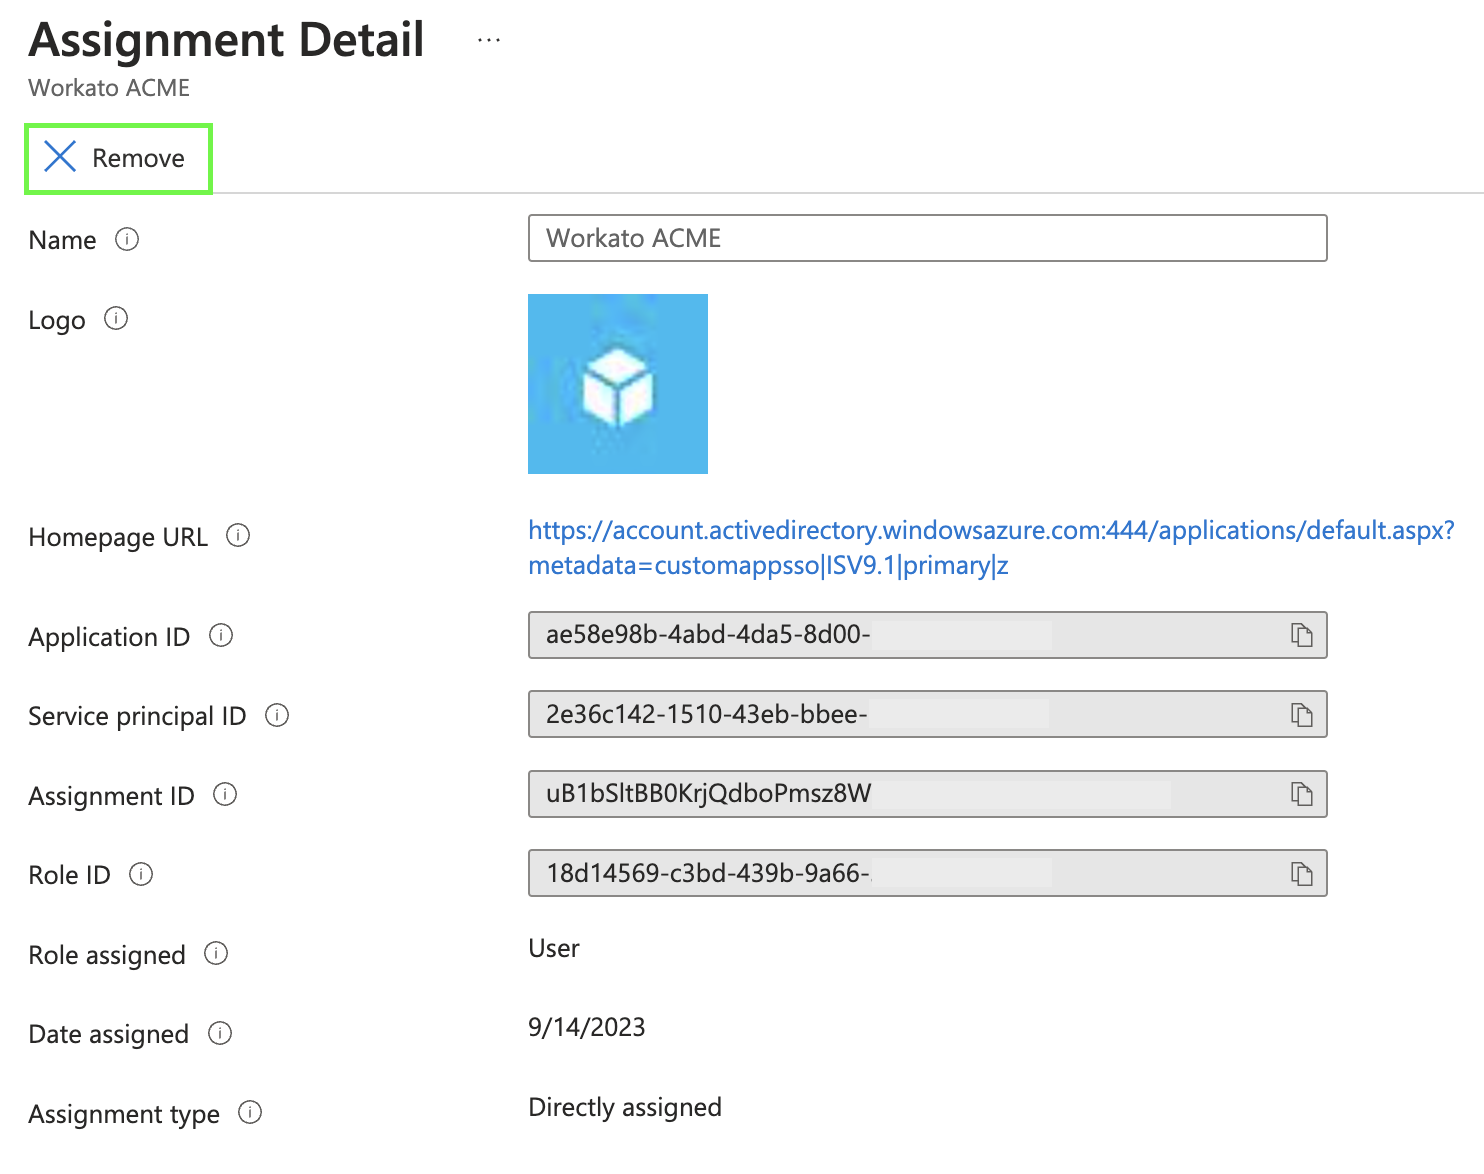 Removing the app assignment for a user
User deletion (soft)
Soft deletions allow you to recover user accounts if needed.
In Microsoft Entra ID, navigate to Users.
Select the user you want to deactivate.
Select Delete.
Select Delete again.
Disable SCIM
To disable SCIM from within Microsoft Entra ID:
In Microsoft Entra ID, navigate to the Workato application.
In the Provisioning interface, change the provisioning method from Automatic to Manual.
This action breaks your SCIM connection. User data cannot be synced between Microsoft Entra ID and Workato.
You can also disable SCIM from within Workato. See Disabling SCIM.
Last updated: