Connect Amazon Key Management Service (KMS) to Workato EKM
Using Amazon Key Management Service (KMS) with Workato Enterprise Key Management (EKM) allows you to bring your own encryption keys to Workato. In addition to meeting compliance and security requirements, you can view detailed activity logs in AWS KMS and stay informed of when and where you can access data.
This guide explains how to create a key in AWS KMS and configure EKM in Workato.
Prerequisites
To perform the tasks in this guide, you'll need:
The following in Workato:
- An account with the Enterprise Key Management feature enabled
- A user role with the Key management privilege
The following in Amazon Web Services (AWS):
- Permissions that allow you to create and update keys in AWS KMS. For more information, see Permissions for creating KMS keys.
Step 1: Create and configure the key
- Step 1.1: Retrieve the Workato key policy
- Step 1.2: Configure the key in AWS
- Step 1.3: Enable auto-rotation
Step 1.1: Retrieve the Workato key policy
Sign in to Workato if you haven't already.
Go to Workspace admin > Settings > Encryption keys.
In the How do you want to encrypt your data? field, select AWS KMS key from the drop-down.
Click Step 1 to access the key policy.
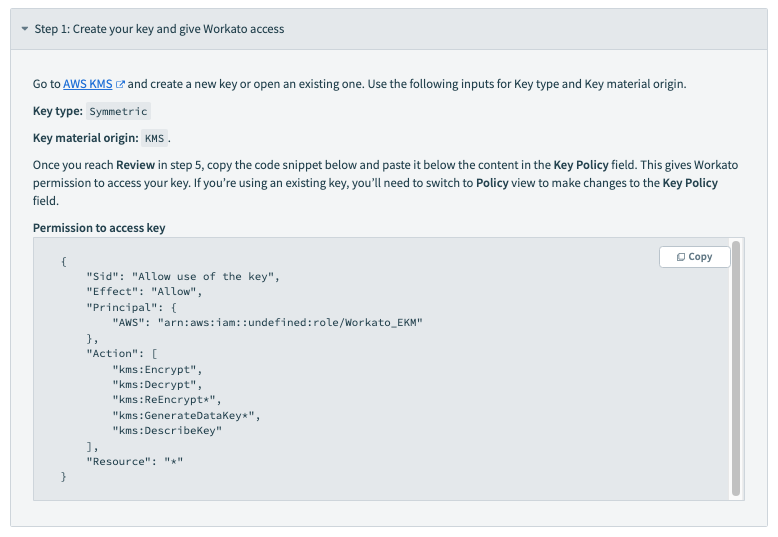
You need this page to complete the next step.
Step 1.2: Configure the key in AWS
Complete the following steps to configure a key in AWS:
NOTE
While this tutorial explains how to create a new key, you can use an existing key.
Sign in to your AWS Management Console and open the KMS console.
In the navigation pane, click Customer managed keys.
On the Customer managed keys page, click Create key.
On the Step 1 - Configure key page:
Configure the following fields:
- Key type: Select Symmetric. For more information about this key type, see the AWS KMS documentation.
- Advanced options > Key material origin: Select KMS.
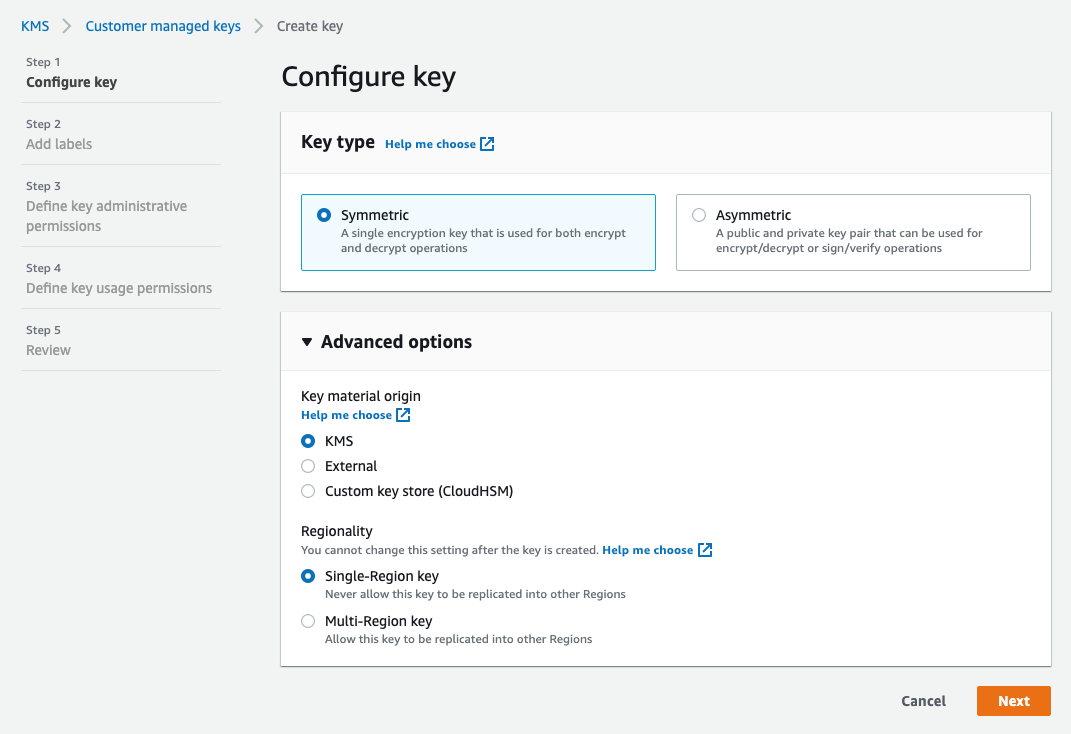
Click Next.
On the Step 2 - Add labels page:
In the Alias field, enter a display name for the key.
Configure other fields as needed.
Click Next.
Proceed through the remaining steps in AWS, configuring fields as needed. Click Next to proceed to the next page.
When you reach the Step 5 - Review page:
Return to the Workato workspace admin settings tab from step 1.1.
Copy the contents of the Permission to access key field.
In AWS, paste the contents into the Statement property of the default policy in the Key policy field.
Note: If there are multiple objects in the Statement property you must keep, add commas (,) after all but the last object:
Key policy with multiple Statement objects
{
    "Id": "key-consolepolicy-3",
    "Version": "2012-10-17",
    "Statement": [
        {
            "Sid": "Enable IAM User Permissions",
            "Effect": "Allow",
            "Principal": {
                "AWS": "arn:aws:iam::TODO-ACCOUNTID:root"
            },
            "Action": "kms:*",
            "Resource": "*"
        },	 /* Comma before next object */
        {
	        "Sid": "Allow use of the key",
	        "Effect": "Allow",
	        "Principal": {
	            "AWS": "arn:aws:iam::TODO - ACCOUNTID:role/Workato_EKM"
	        },
	        "Action": [
	            "kms:Encrypt",
	            "kms:Decrypt"
	        ],
	        "Resource": "*"
	    }
    ]
}
Otherwise, the key policy is similar to the following:
Key policy with a single Statement object
{
    "Id": "key-consolepolicy-3",
    "Version": "2012-10-17",
    "Statement": [
	    {
	        "Sid": "Allow use of the key",
	        "Effect": "Allow",
	        "Principal": {
	            "AWS": "arn:aws:iam::TODO - ACCOUNTID:role/Workato_EKM"
	        },
	        "Action": [
	            "kms:Encrypt",
	            "kms:Decrypt"
	        ],
	        "Resource": "*"
	    }
   ]
}Click Finish to create the key.
Step 1.3: Enable auto-rotation
Complete the following steps to enable auto-rotation:
NOTE
Enabling automatic key rotation is a best practice, but not required.
Navigate to the Customer managed keys page.
Locate the key you created in the list and click to open.
Click the Key rotation tab.
Check the Automatically rotate this KMS key every year box:
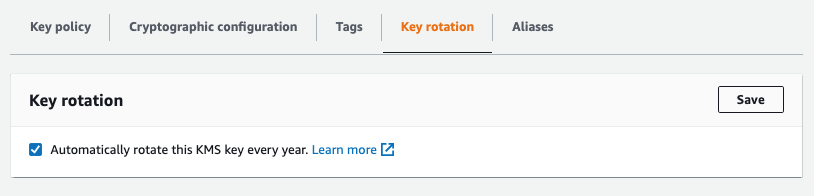
Click Save.
Step 2: Add the key in Workato
Step 2.1: Retrieve the key ARN in AWS
Navigate to the Customer managed keys page, and click the key you created to open its details page.
On the key's details page, locate the General configuration section and the ARN field:
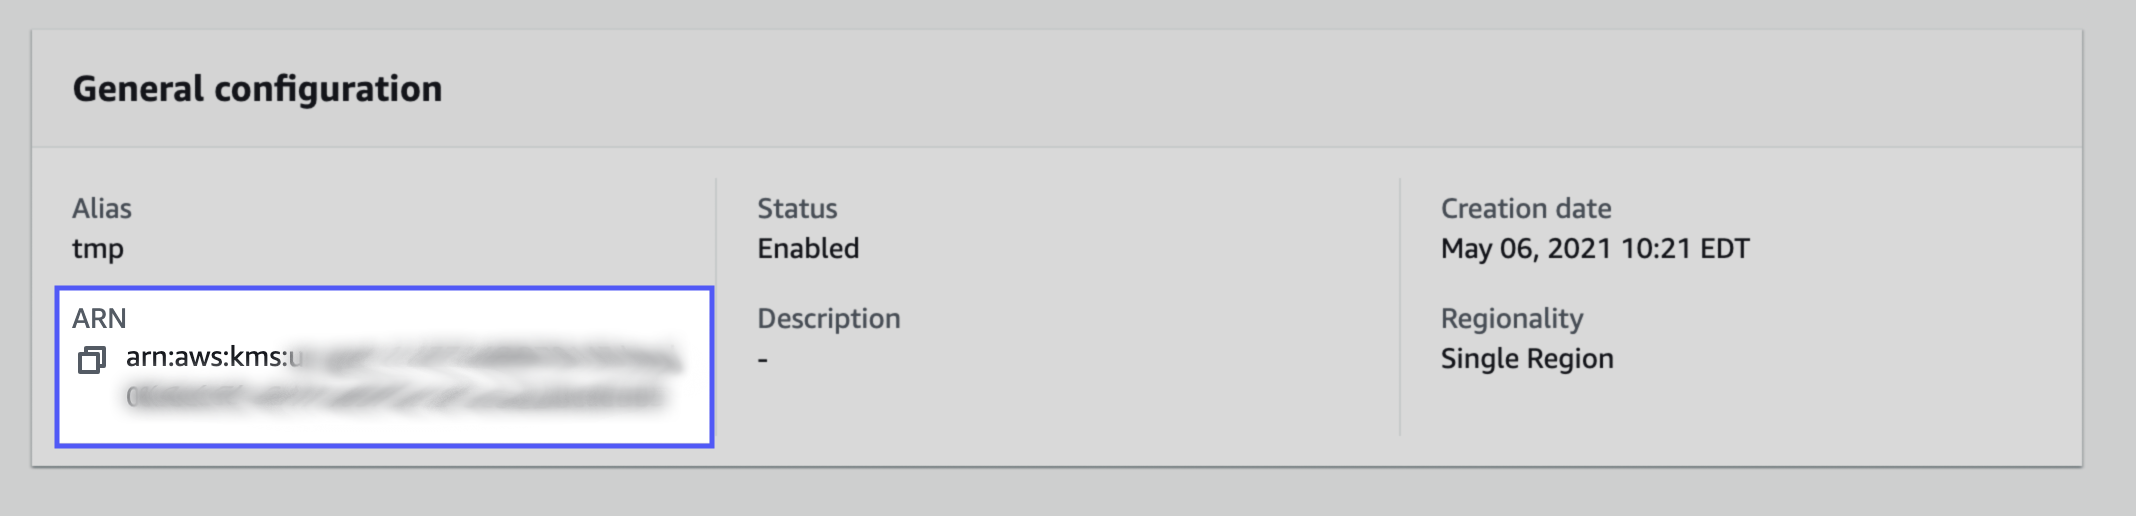
Copy the ARN, as you'll need it to complete the next step.
Step 2.2: Set up the key in Workato
Return to the Workspace admin > Settings tab.
Paste the ARN in the Key ARN field.
Click Update key.
Troubleshoot key validation errors
If you encounter an error after clicking Update key, verify that:
- You correctly added the key policy to the key in AWS KMS. Verify that the key policy is valid JSON and contained in the
Statementproperty. - You pasted the correct key ARN into Workato. Verify the key ARN doesn't contain extra spaces or characters, and that you pasted the correct value into Workato.
- AWS KMS isn't experiencing downtime. If you've verified the key policy and ARN are correct, check the AWS Health Dashboard for potential outages in KMS.
Last updated: