# Example use case: CRM app
This example demonstrates how to use Run recipe actions to create a front-end app for a third-party application, such as a CRM, and uses Salesforce as an example.
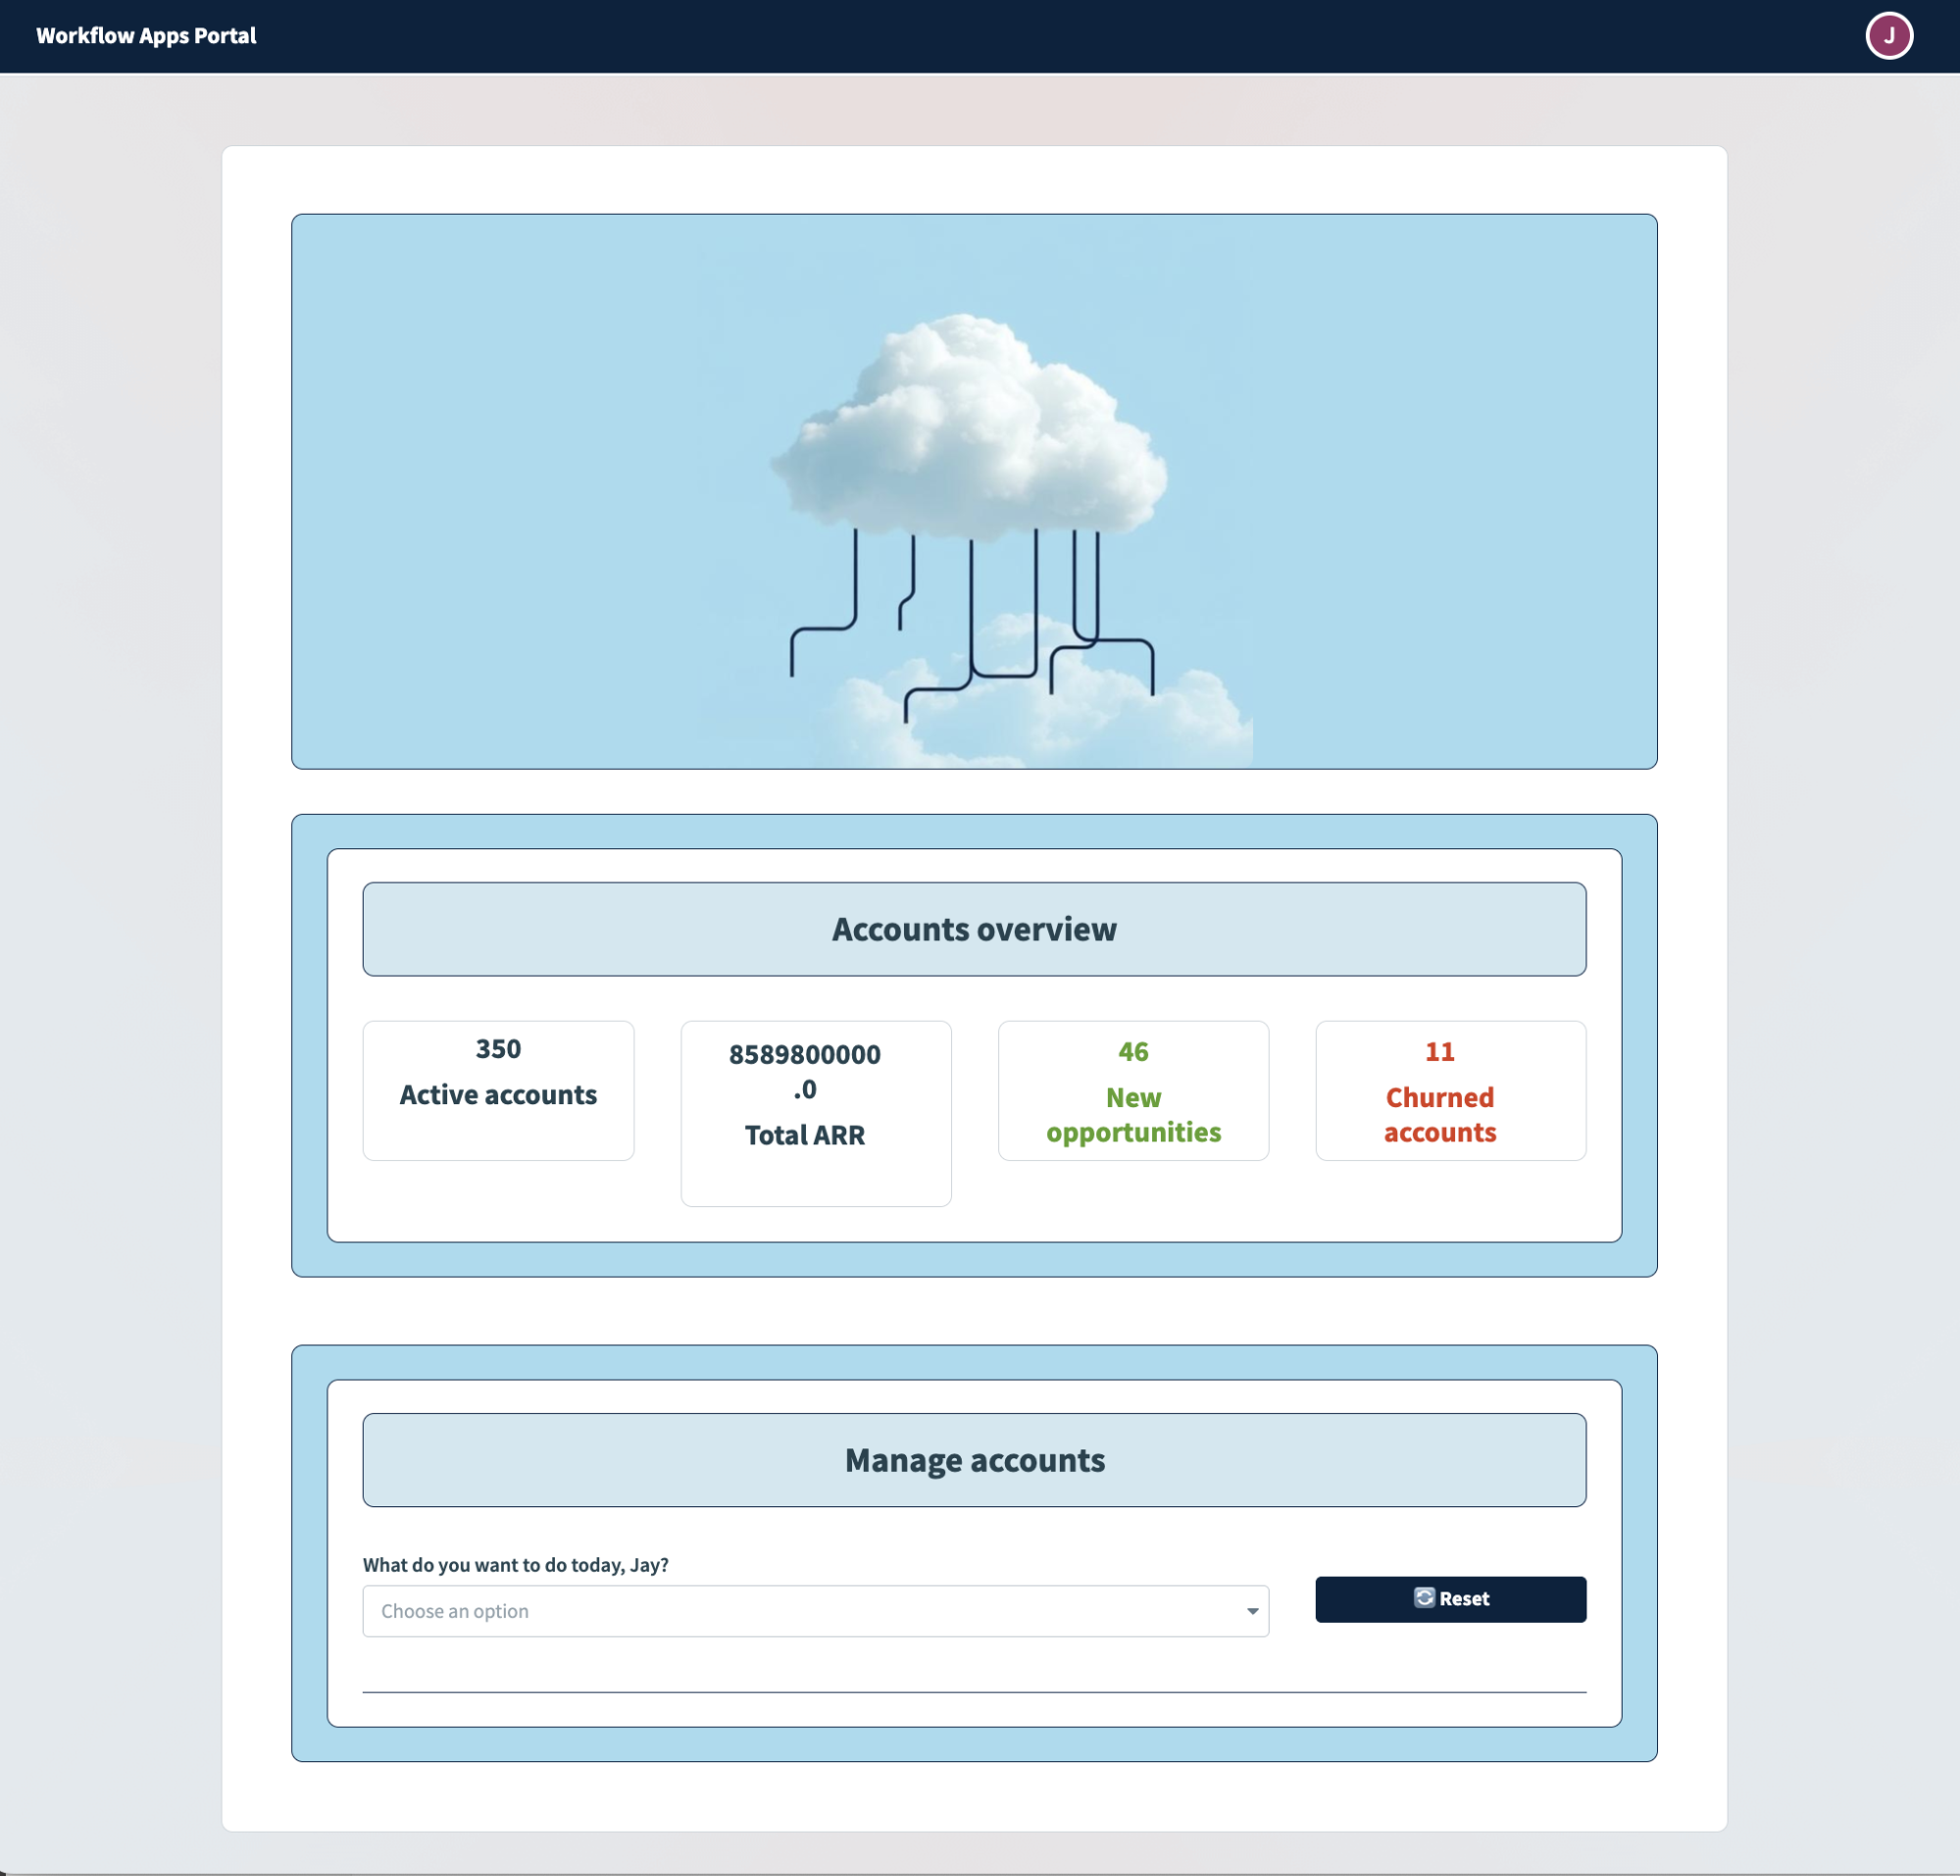 Front-end app for Salesforce powered by Run recipe actions
In this example, the end-users of the application are business users who need limited access to Salesforce. This app must deliver the following functionality:
- Provide a high-level overview of accounts
- Provide a detailed look into an account users specify
- Enable users to create, update, and delete accounts
The following table describes the recipes we plan to create to accomplish these goals:
| Recipe name and action | Description |
|---|---|
| On page load | Surface high-level data about all accounts from Salesforce and surfaces it in the application read-only mode on page load. |
| Get data for drop-down (accounts) | Get a list of accounts from Salesforce and surface them as options in a single-select drop-down component. |
| Get account details | Get detailed information about a specific account in Salesforce and surface it in the application. |
| Create/update/delete account | Create, update, or delete an account in Salesforce, depending on user input. |
| Update an opportunity | Update an opportunity in Salesforce based on user input. |
EXAMPLE USE CASE
This guide uses a sales lead processing use case and is intended to serve as an example. Recipe modifications, such as trigger, action, and conditional logic configuration, may require additional customizations to suit your specific requirements.
# Prerequisites
You must have the following to complete the instructions in this guide:
- A Salesforce connection
- Workflow apps with the Run recipe and Reset/reload components actions enabled
# Action: On page load
To collect high-level information about Salesforce accounts, you must build a recipe that retrieves data from Salesforce and configure page components to surface the data in the Workflow app.
This involves the following steps:
- Enable action on page load
- Configure a recipe to fetch data from Salesforce
- Surface recipe data in page components
# Enable action on page load
Complete the following steps to enable action on page load:
Go to the page editor.
Click the page canvas.
Go to the Action panel.
Use the Action drop-down menu to select Run recipe.
Use the Recipe drop-down menu to select Create recipe. This opens the Set up your recipe page in a new tab.
# Configure a recipe to fetch data from Salesforce
Customizing this recipe consists of modifying the trigger, adding additional recipe steps, and modifying the Return data to component action.
Complete the following steps to set up your recipe:
Go to the Name field and enter Page load as the recipe name.
Use the Location drop-down menu to ensure the recipe is in the same folder as your app page.
Click Start building.
Workato generates a recipe pre-configured with the New component event (real-time) trigger and the Return data to component action:
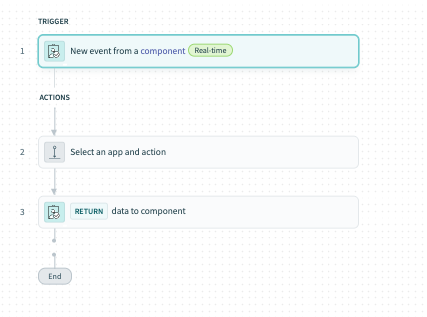 Recipe outline
Modify the New component or drop-down event trigger
Complete the following steps to modify the trigger:
Select the New component or drop-down event trigger.
Go to the Setup tab.
Go to Output parameters and click + Add field.
Go to the Name field and provide a unique name for this parameter, such as totalAccounts.
Go to the Label field and provide a unique name for this field, such as Total accounts.
Go to the Data type field and select Integer.
Go to the Optional field and select No. When No, this field is required.
Optional. Go to the Hint field and provide a hint to help users fill out this field.
Your configuration should look as follows:
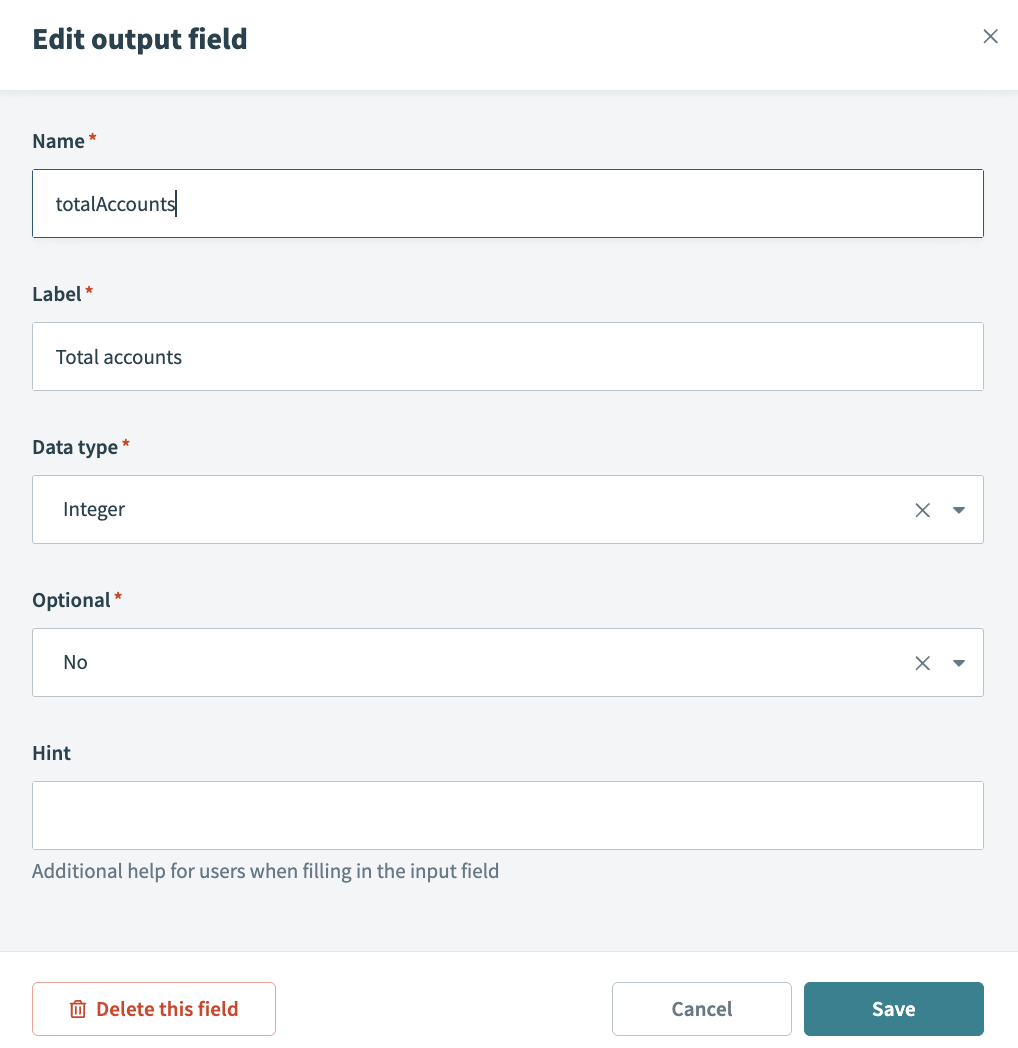 Configure the output schema
Create the following additional output fields:
| Name | Label | Data type | Optional |
|---|---|---|---|
| TotalArr | Total arr | Number | No |
| NewOpps | Total opps | Integer | No |
| ChurnedAccs | Churned accounts | Integer | No |
Click Save.
Configure a Search for records using SOQL query in Salesforce (Batch) action.
This action fetches the total number of accounts and populates the totalAccounts output field.
Click Select an app and action step in the recipe.
Search for and select Salesforce as your app.
Select the Search for records using SOQL query in Salesforce (Batch) action.
Select the connection type you plan to use for this action.
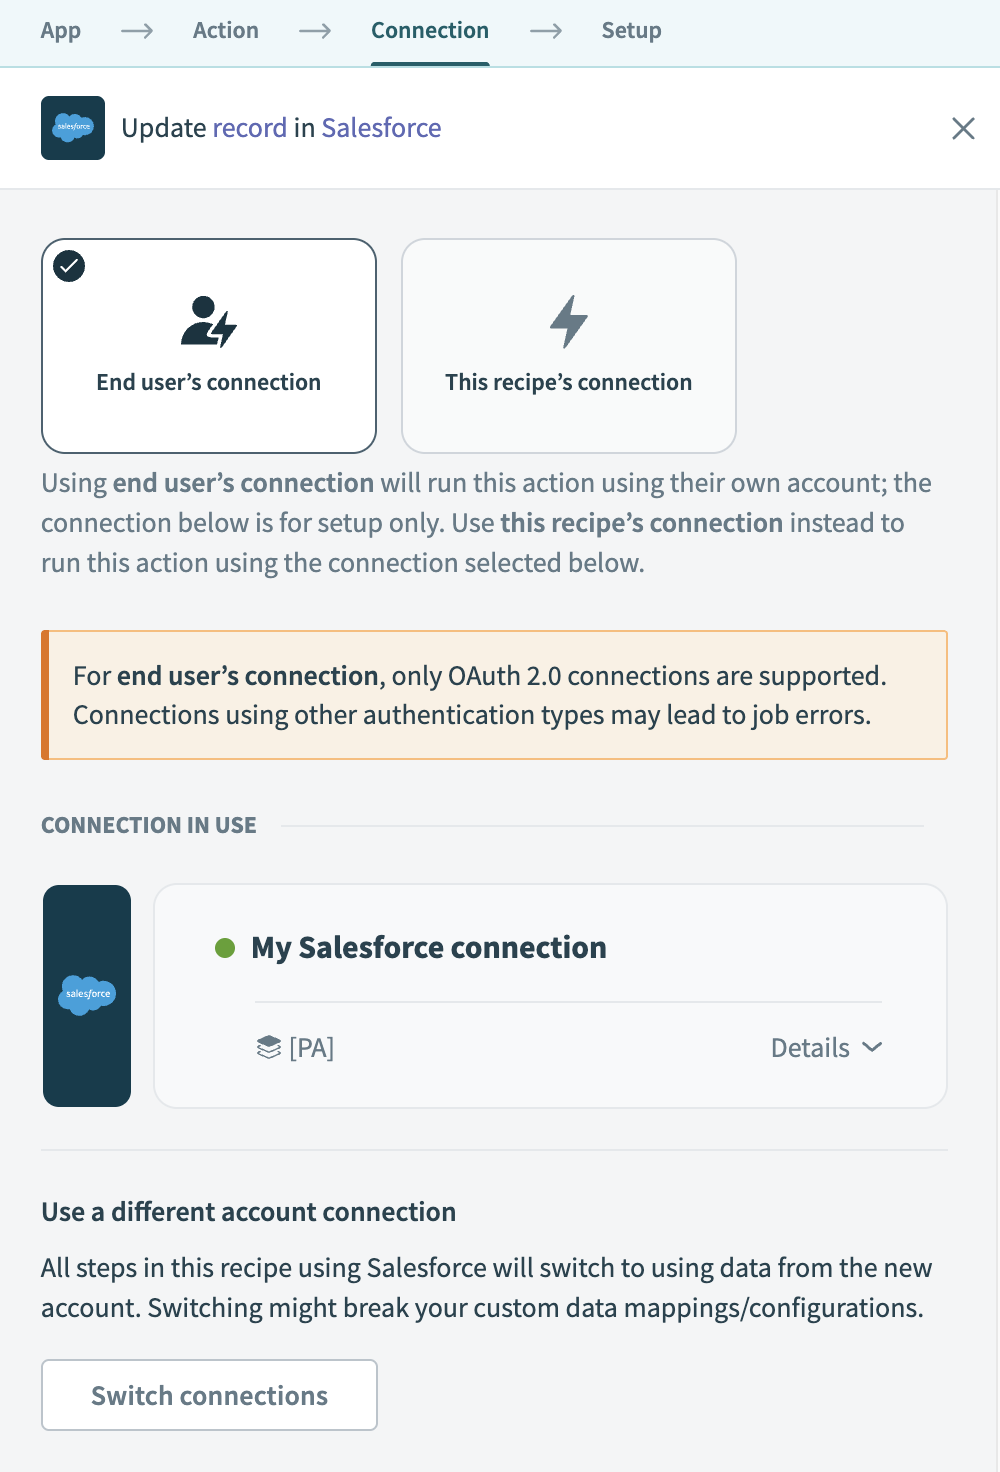 Choose a connection type
- End user's connection: Workflow apps recipes perform actions based on the identity and permissions of the user who connects to the application. End users authenticate with their own credentials to retrieve or modify data in an external app.
- This recipe's connection: This option uses the connection established by the recipe builder and follows the same principles as normal app connections.
Only app connections that use OAuth 2.0 authorization code grant are available for end user's connection. Refer to Verified user access for more information.
Select an existing connection or click + New connection to create a new connection.
Go to the SOQL query field and type SELECT COUNT() FROM Account.
Go to the Output schema field and click Use SOQL.
Type the same SOQL query as above, SELECT COUNT() FROM Account.
Click Next and Generate schema. Workato generates the output schema by default.
Your configuration should look as follows:
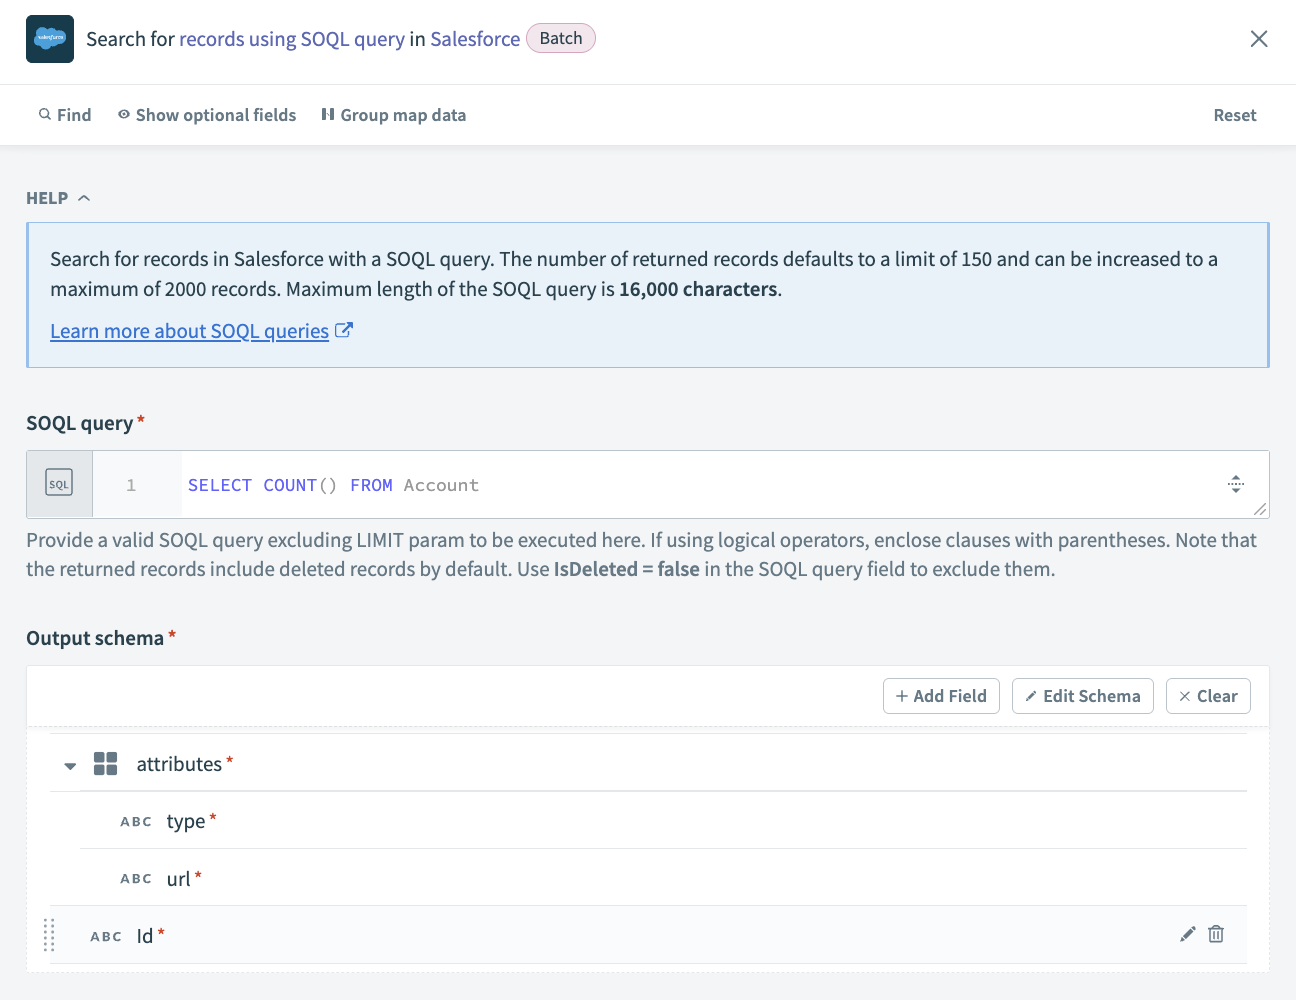 Search for records using SOQL query in Salesforce action
Configure a Search Opportunities using SOQL query WHERE clause in Salesforce (Batch) action.
This action fetches new opportunities and populates the newOppsoutput field.
Click + and select Action in an app.
Search for and select Salesforce as your app.
Select the connection type you plan to use for this action.
 Choose a connection type
- End user's connection: Workflow apps recipes perform actions based on the identity and permissions of the user who connects to the application. End users authenticate with their own credentials to retrieve or modify data in an external app.
- This recipe's connection: This option uses the connection established by the recipe builder and follows the same principles as normal app connections.
Only app connections that use OAuth 2.0 authorization code grant are available for end user's connection. Refer to Verified user access for more information.
Select an existing connection or click + New connection to create a new connection.
Select the Search records using SOQL query WHERE clause (Batch) action.
Use the Search for drop-down menu to select Opportunity.
Go to the SOQL WHERE clause field and type CreatedDate = THIS_WEEK.
Use the Fields to retrieve drop-down menu to select Opportunity ID, Name, and Created date.
Your configuration should look as follows:
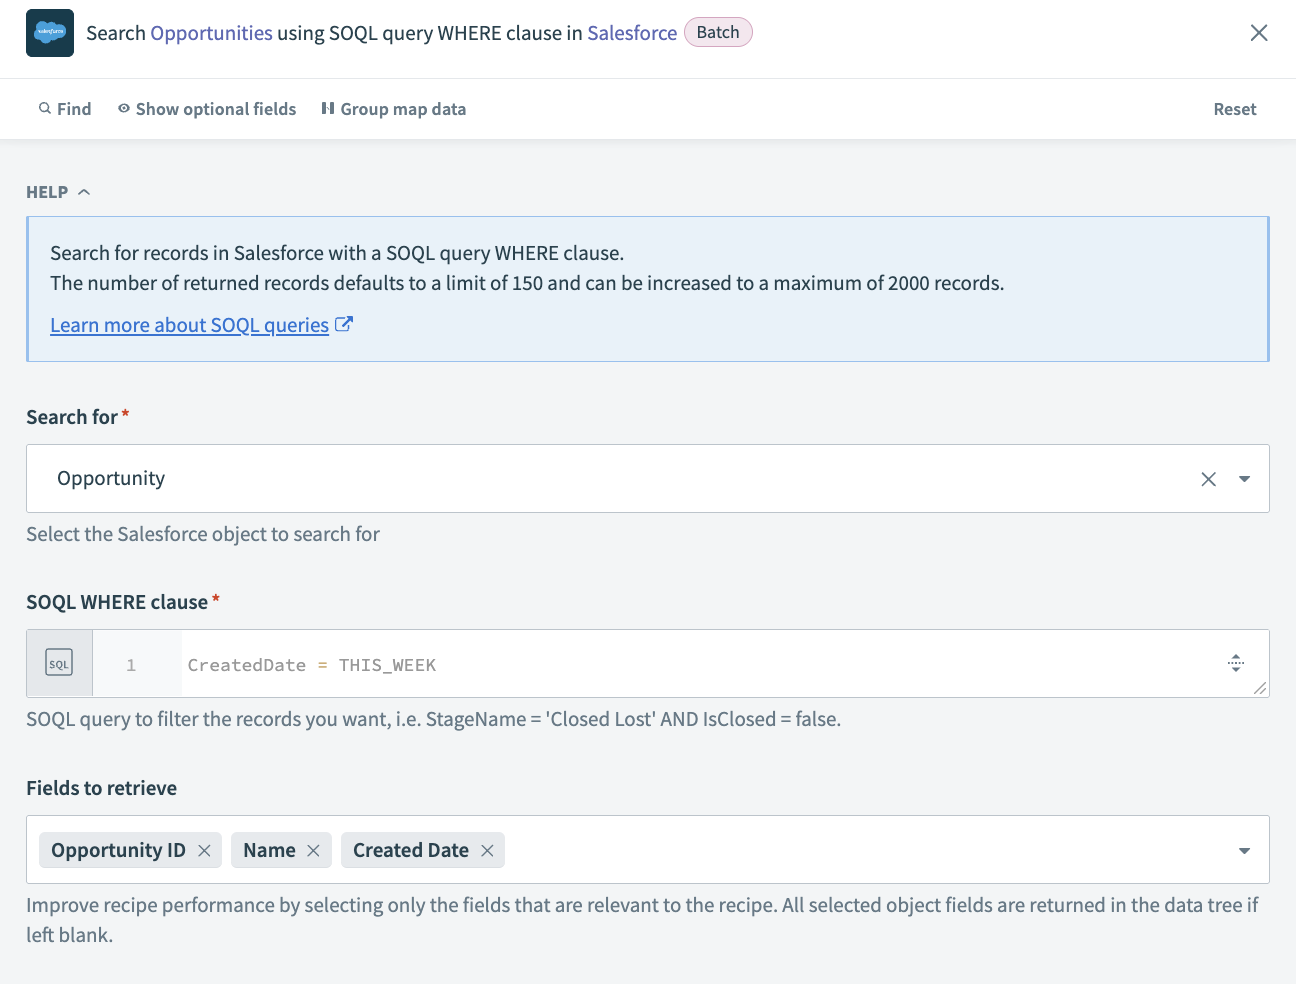 Search Opportunities SOQL query WHERE clause action configuration
Configure a Search Accounts using SOQL query WHERE clause in Salesforce (Batch) action
This action fetches the ARR from all accounts in Salesforce and its output populates the totalARR output field.
Click + and select Action in an app.
Search for and select Salesforce as your app.
Select the Search records using SOQL query WHERE clause (Batch) action.
Select the connection type you plan to use for this action.
 Choose a connection type
- End user's connection: Workflow apps recipes perform actions based on the identity and permissions of the user who connects to the application. End users authenticate with their own credentials to retrieve or modify data in an external app.
- This recipe's connection: This option uses the connection established by the recipe builder and follows the same principles as normal app connections.
Only app connections that use OAuth 2.0 authorization code grant are available for end user's connection. Refer to Verified user access for more information.
Select an existing connection or click + New connection to create a new connection.
Use the Search for drop-down menu to select Account.
Go to the SOQL WHERE clause field and type IsDeleted = false .
Use the Fields to retrieve drop-down menu to select Annual revenue, and Account name.
Your configuration should look as follows:
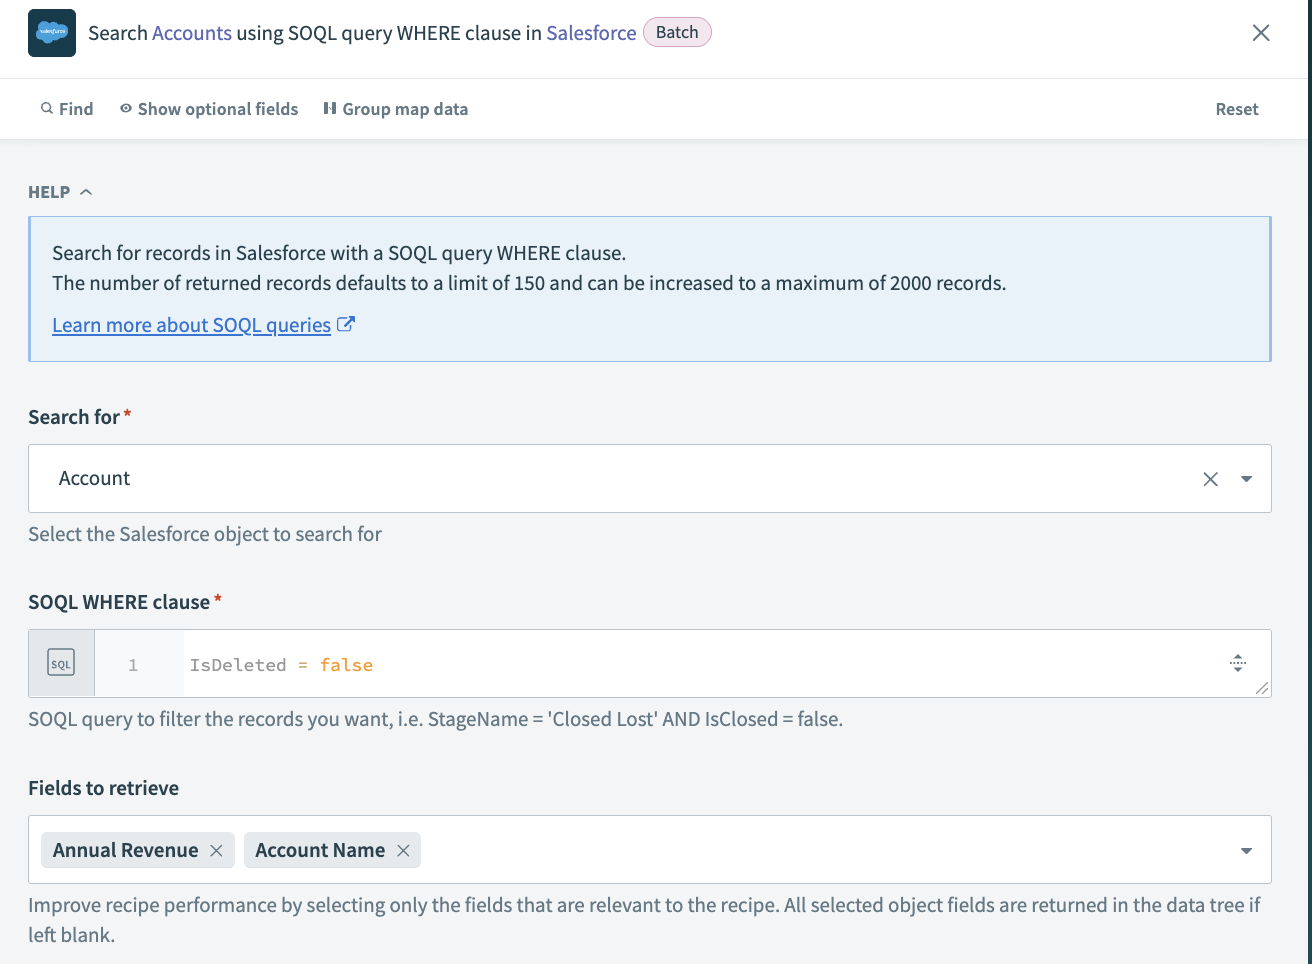 Search accounts using SOQL query WHERE clause action
Create a variable
This action aggregates the total ARR from all accounts in Salesforce.
Click + and select Action in an app.
Search for and select Variables by Workato as your app.
Select the Create variable action.
Click + Add variable and click Formula to use formula mode to create your variable.
Map in the Accounts Step 4 datapill and type .pluck("AnnualRevenue").compact.sum.
Your configuration should look as follows:
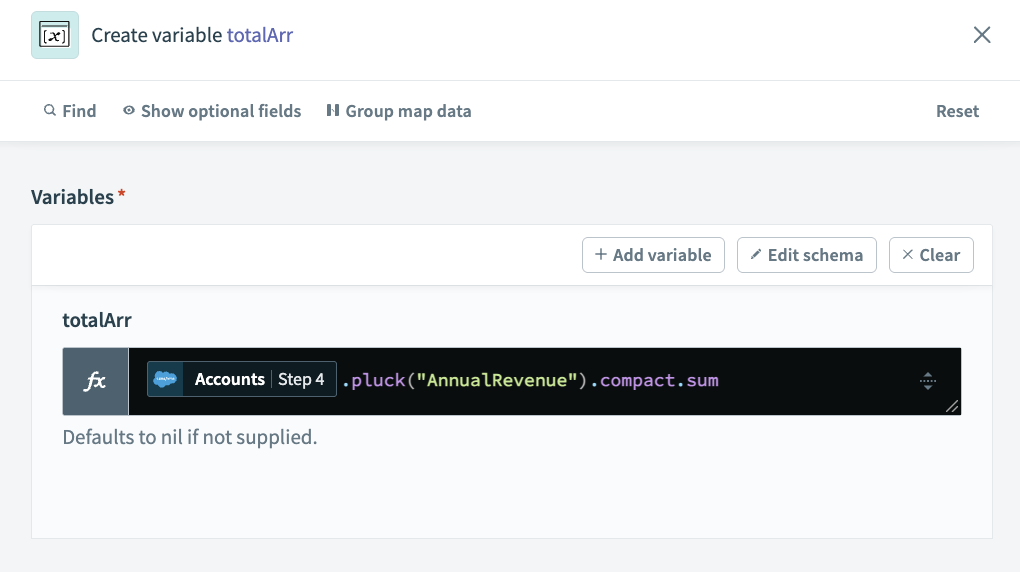 Create a variable to find the total ARR
Configure a Search Accounts using SOQL query WHERE clause in Salesforce (Batch) action
This action fetches the total number of inactive accounts from Salesforce and populates the churnedAccs output field.
Click + and select Action in an app.
Search for and select Salesforce as your app.
Select the Search records using SOQL query WHERE clause (Batch) action.
Select the connection type you plan to use for this action.
 Choose a connection type
- End user's connection: Workflow apps recipes perform actions based on the identity and permissions of the user who connects to the application. End users authenticate with their own credentials to retrieve or modify data in an external app.
- This recipe's connection: This option uses the connection established by the recipe builder and follows the same principles as normal app connections.
Only app connections that use OAuth 2.0 authorization code grant are available for end user's connection. Refer to Verified user access for more information.
Select an existing connection or click + New connection to create a new connection.
Use the Search for drop-down menu to select Account.
Go to the SOQL WHERE clause field and type Active__c = 'No' .
Use the Fields to retrieve drop-down menu to select Account name.
Modify the Return data to component action
Select the Return data to component action.
Go to the Consider action as successful field and select Yes.
Go to the Output section and map datapills to the following fields:
| Output field name | Datapill |
|---|---|
| Total accounts | Total size Step 2 |
| Total opps | List size Step 3 |
| Total arr | totalArr Step 5 |
| Churned accounts | List size Step 6 |
Your configuration should look as follows:
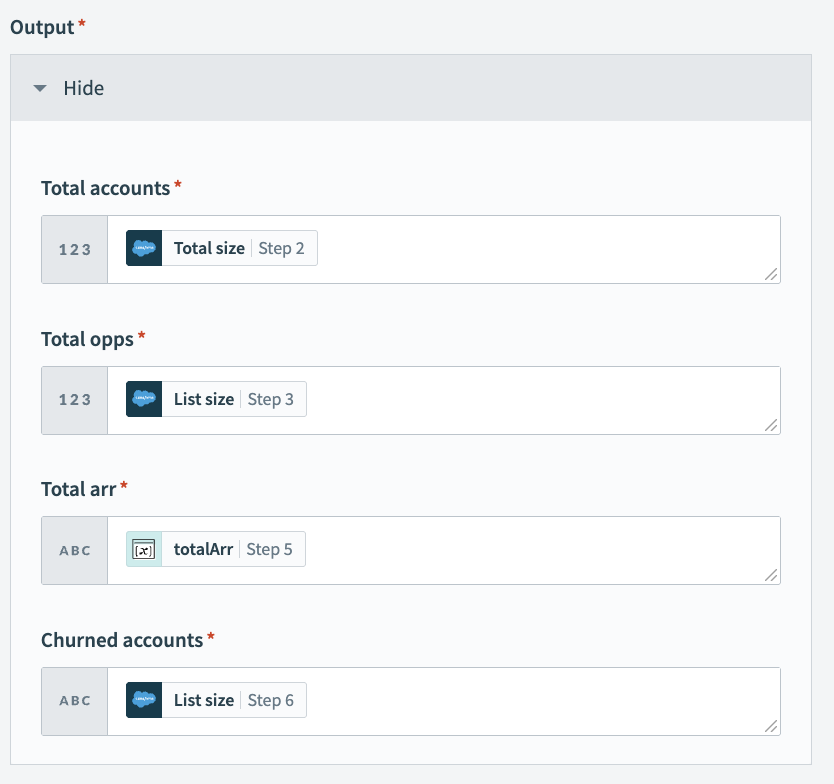 Return values fetched from Salesforce to your page
Optional. Go to the Successful toast message field and provide a custom success message.
Click Save and Exit.
Click Start recipe.
Your completed recipe should look as follows:
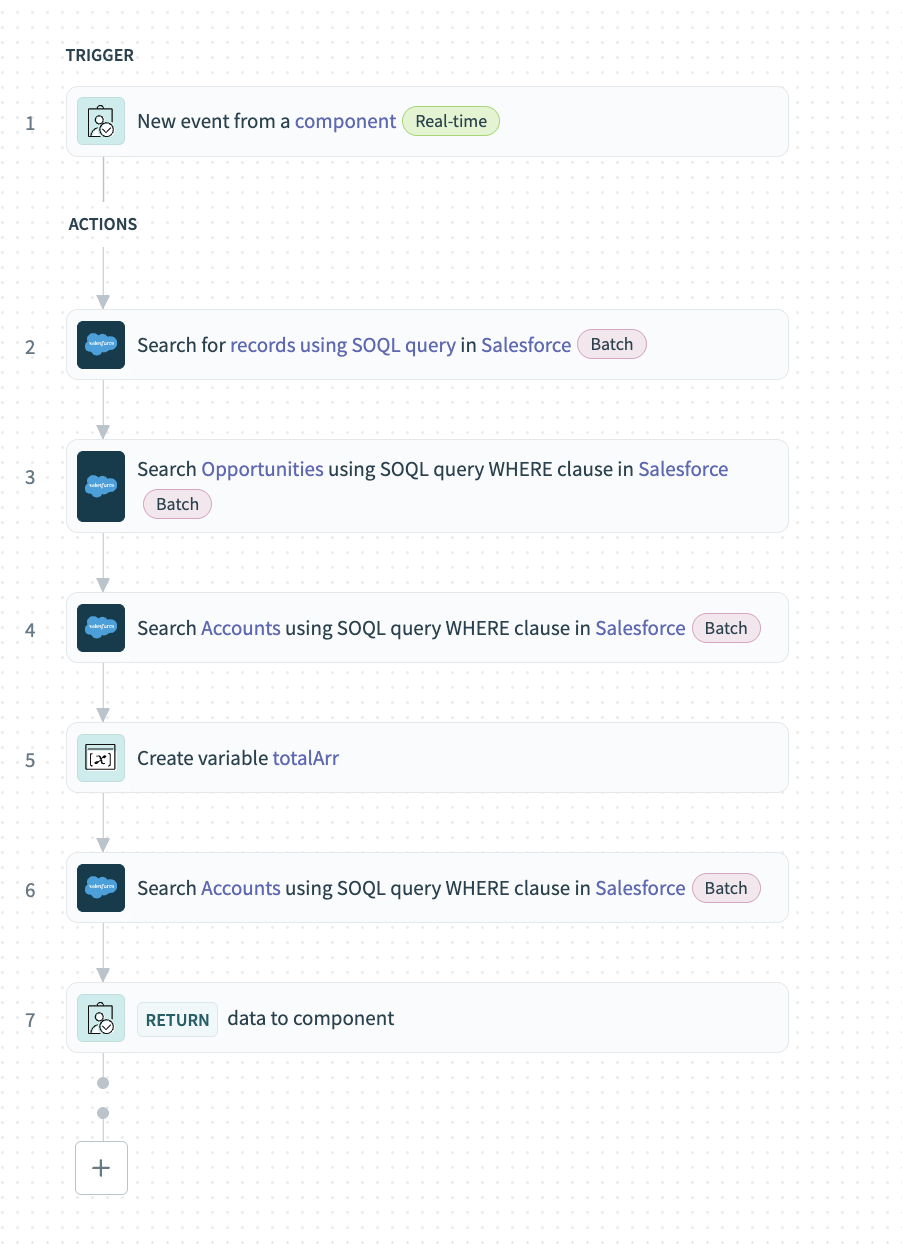 Completed recipe
# Surface recipe output in page components
Surfacing recipe data in your app involves creating variables, setting variable values, and mapping variables into page components.
Complete the following steps to surface recipe data in page components using the page editor:
Create variables
Complete the following steps to create and configure the variables required to surface high-level account data in your app. These variables correspond to the output schema defined in the Page load recipe created in the previous step.
Click the page canvas.
Go to the Design panel.
Click + Add variable.
Go to the Name field and type a unique name for your variable, such as ActiveAccounts. This variable represents the total number of active accounts in Salesforce.
Go to the Data type menu and select integer as the data type.
Optional. Go to the Default value field and provide a default value for your variable, such as <null>.
Click Done.
Your configuration should look as follows:
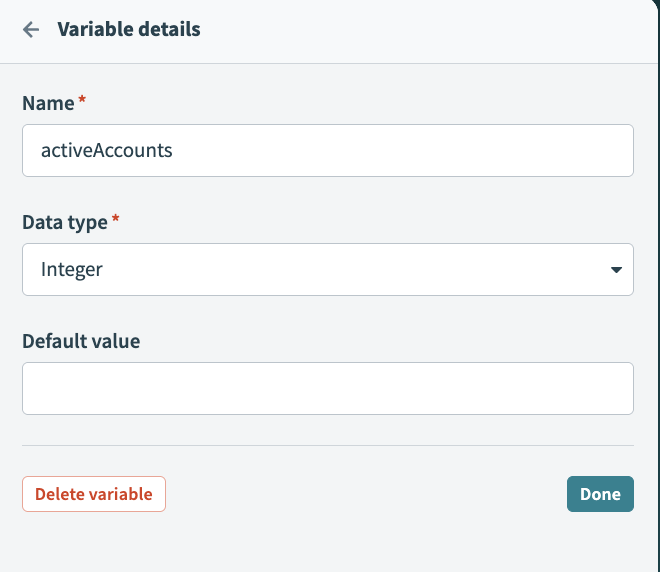 Variable details
Create the following additional variables:
| Name | Data type | Description |
|---|---|---|
| TotalArr | Number | Total ARR for all accounts. |
| NewOpps | Integer | Number of new opportunities across all accounts. |
| ChurnedAccs | Integer | Total number of churned accounts. |
Note: All variables must match the data type specified in the output schema of the corresponding recipe.
Use recipe output to set variable values
Click the page canvas.
Go to the Action panel.
Go to the Recipe output to set value section and use the Recipe output drop-down menu to select Total accounts.
Use the Set Value for field to select the totalAccounts variable.
Click + Add item and map the following recipe outputs and variables:
| Recipe output to set value field | Set value for field |
|---|---|
| Total opps | newOpps |
| Total arr | totalArr |
| Churned accounts | churnedAccs |
Map variables into page components
This example has separate Text block components to hold each variable, which are located in the account overview section of our app.
Complete the following steps to map variables into page components:
Click a text block component to select it.
Go to the Text field and click it. The Page data modal appears.
Go to Variables and select totalAccounts.
Add a label to help identify your variable, such as Active accounts.
Apply styling, such as Markdown and color, as appropriate.
Your configuration should look as follows:
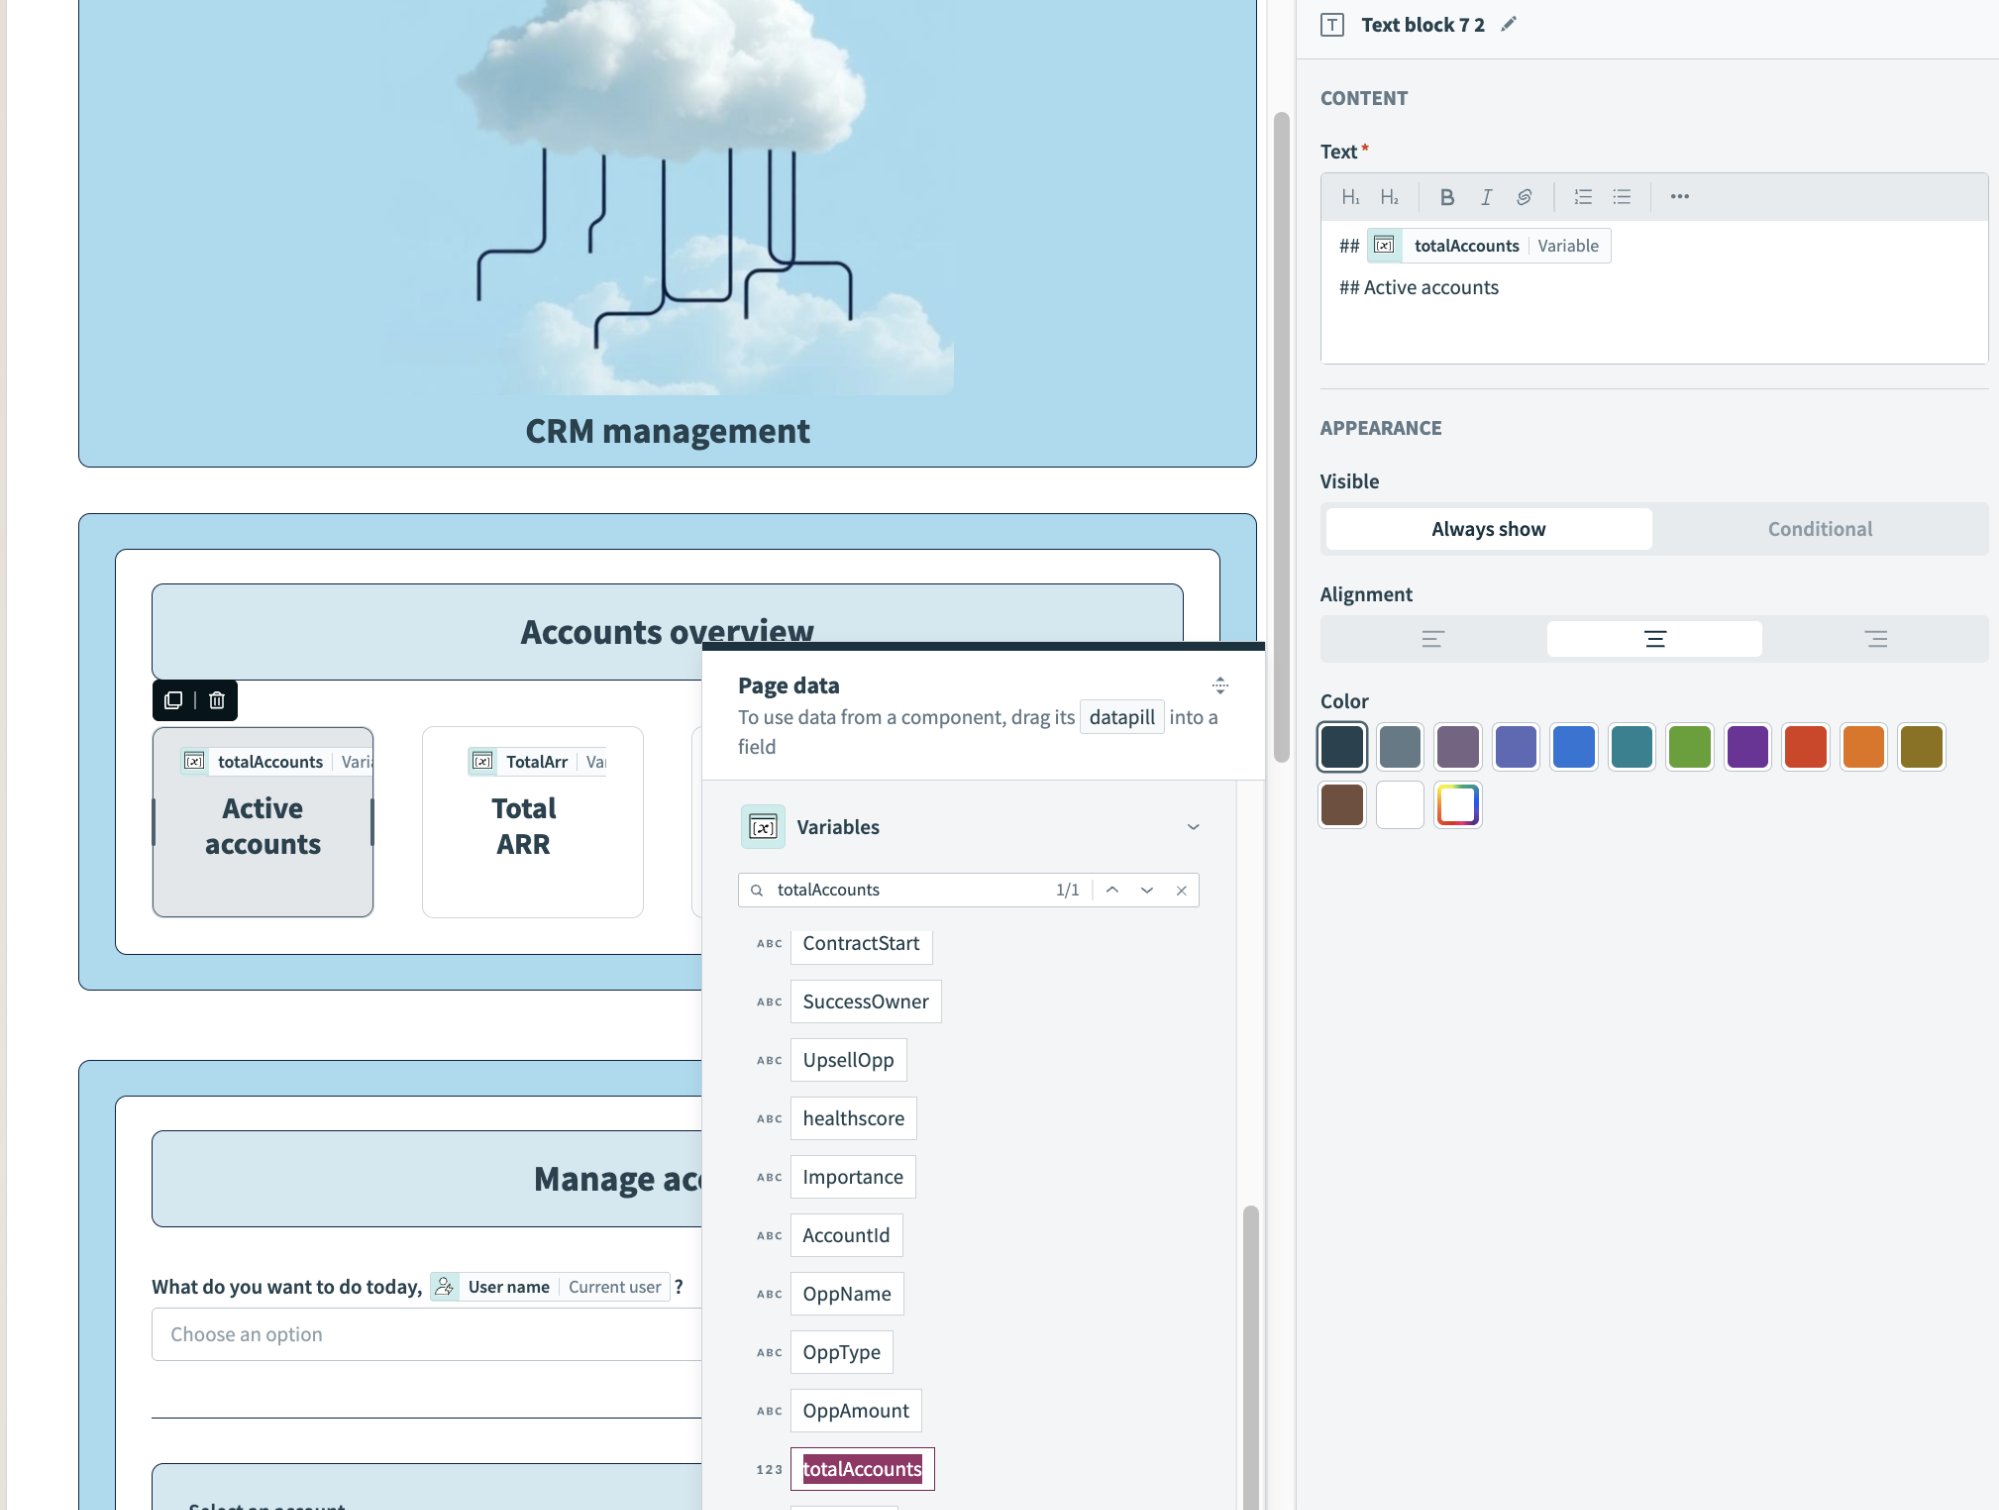 Map variables into page components
Repeat this process for all remaining variables.
Click Save.
# Action: Get data for drop-down (accounts)
This part of the setup involves building a recipe to fetch data from Salesforce and configuring page components to display that data in your app. It populates a drop-down component with a list of accounts from Salesforce, which users can select. Refer to our Drop-downs with recipe data source documentation to learn how to enable this functionality in your app.
# Action: Get account details
- Enable action on drop-down menu selection
- Configure a recipe to fetch data from Salesforce
- Surface recipe data in page components
# Enable action on drop-down menu selection
Complete the following steps to enable action when users select an option from a drop-down menu:
Go to the page editor.
Click the Select an account drop-down component.
Go to the Action panel.
Use the Action drop-down menu to select Run recipe.
Use the Recipe drop-down menu to select Create recipe. This opens the Set up your recipe page in a new tab.
# Configure a recipe to fetch data about a specific account from Salesforce
Customizing this recipe consists of modifying the trigger, adding additional recipe steps, and modifying the Return data to component action.
Complete the following steps to set up your recipe:
Go to the Name field and enter Get account details as the recipe name.
Use the Location drop-down menu to ensure the recipe is in the same folder as your app page.
Click Start building.
Workato generates a recipe pre-configured with the New component event (real-time) trigger and the Return data to component action:
 Recipe outline
Modify the trigger
Select the New component or drop-down event trigger.
Go to the Setup tab.
Go to Input parameters and click + Add field.
Go to the Name field and provide a unique name for this parameter, such as account_id.
Go to the Label field and provide a unique name for this parameter, such as Account ID.
Go to the Data type field and select String.
Go to the Optional field and select Yes.
Optional. Go to the Hint field and provide a hint to help users fill out this field.
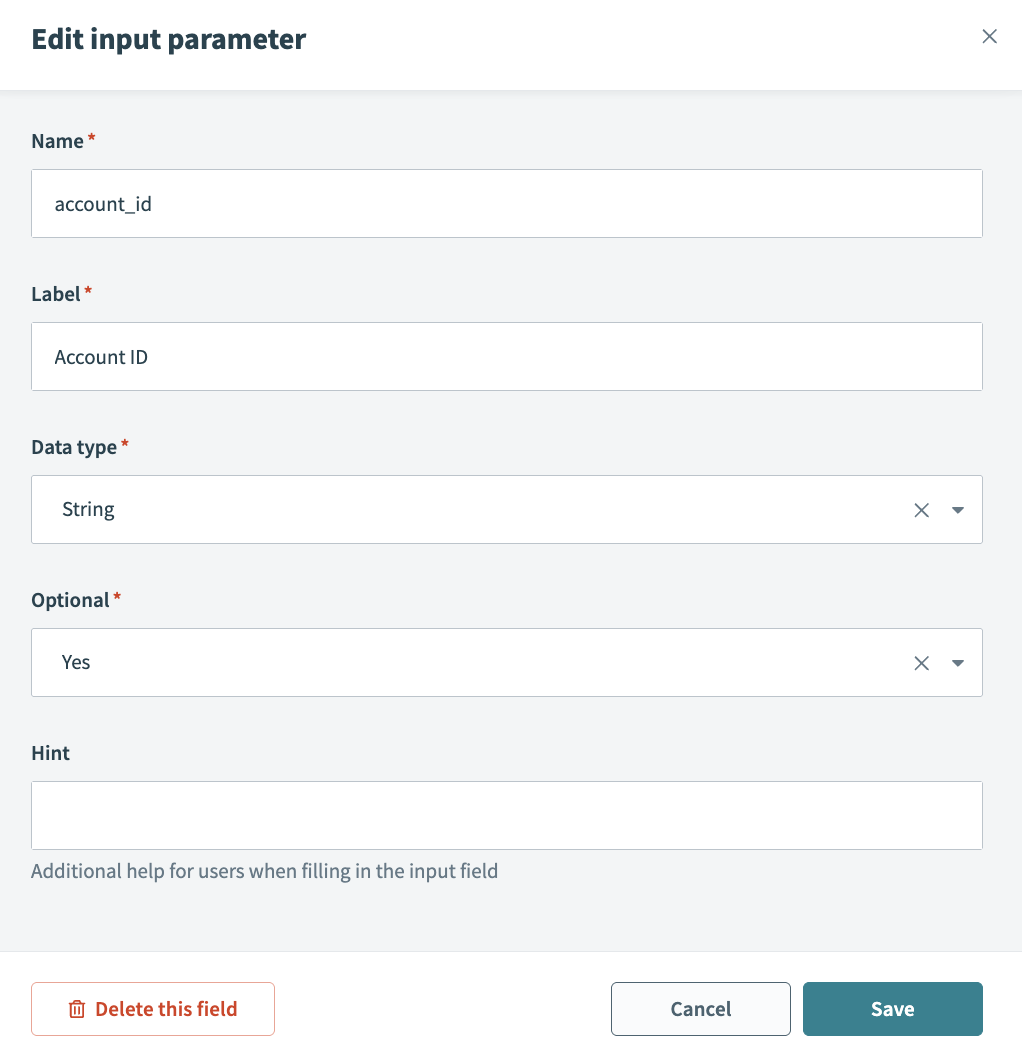 Configure an input parameter
Go to Output parameters and click + Add field.
Go to the Name field and provide a unique name for this parameter, such as arr.
Go to the Label field and provide a unique name for this field, such as Arr.
Go to the Data type field and select Number.
Go to the Optional field and select No. When No, this field is required.
Your configuration should look as follows:
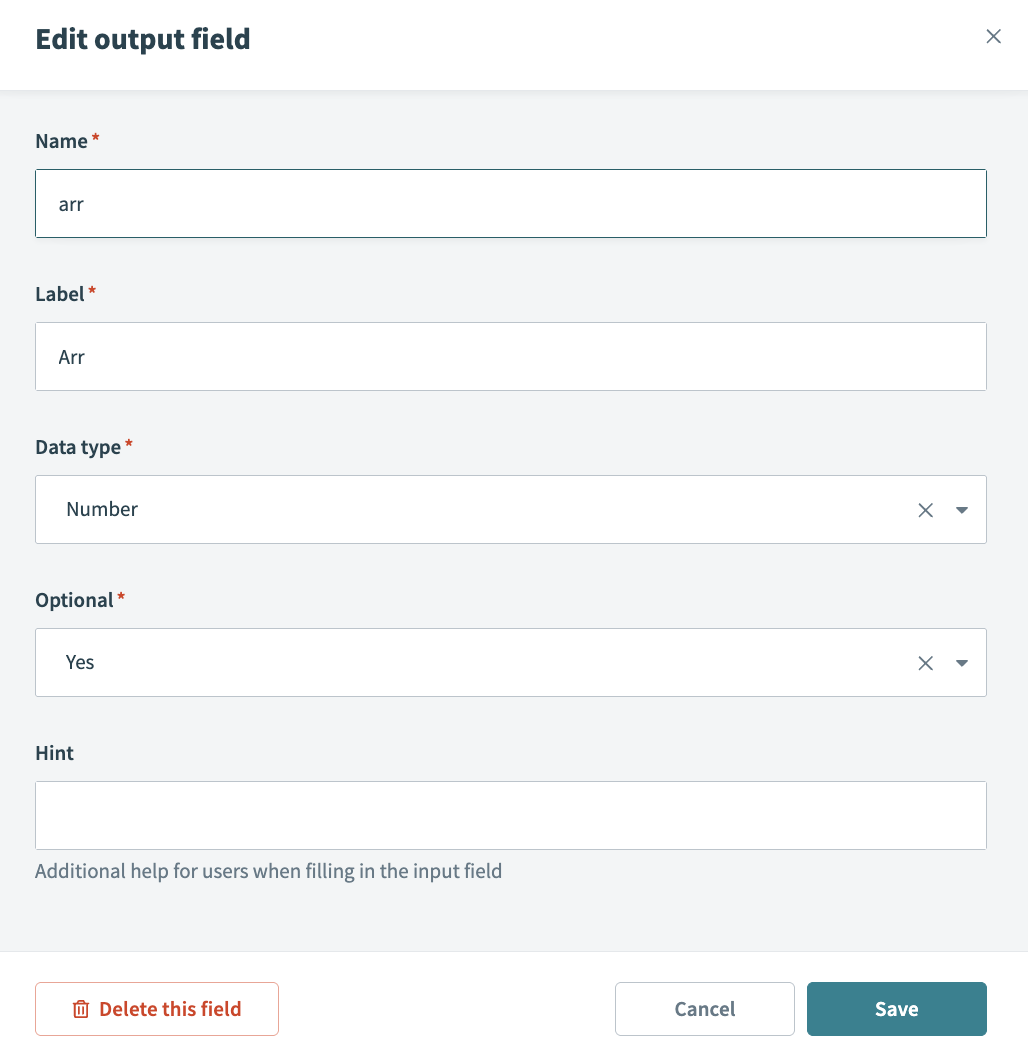 Configure an output parameter
Configure a Get details of a specific Account in Salesforce action
This action fetches the ARR for a specific account in Salesforce and populates the arr output field. You can modify it to get additional account details to surface in your app.
Click Select an app and action step in the recipe.
Search for and select Salesforce as your app.
Select the Get details of specific Account in Salesforce action.
Select the connection type you plan to use for this action.
 Choose a connection type
- End user's connection: Workflow apps recipes perform actions based on the identity and permissions of the user who connects to the application. End users authenticate with their own credentials to retrieve or modify data in an external app.
- This recipe's connection: This option uses the connection established by the recipe builder and follows the same principles as normal app connections.
Only app connections that use OAuth 2.0 authorization code grant are available for end user's connection. Refer to Verified user access for more information.
Select an existing connection or click + New connection to create a new connection.
Use the Object drop-down menu to select Account.
Map the Account ID Step 1 datapill into the Object ID field.
Your configuration should look as follows:
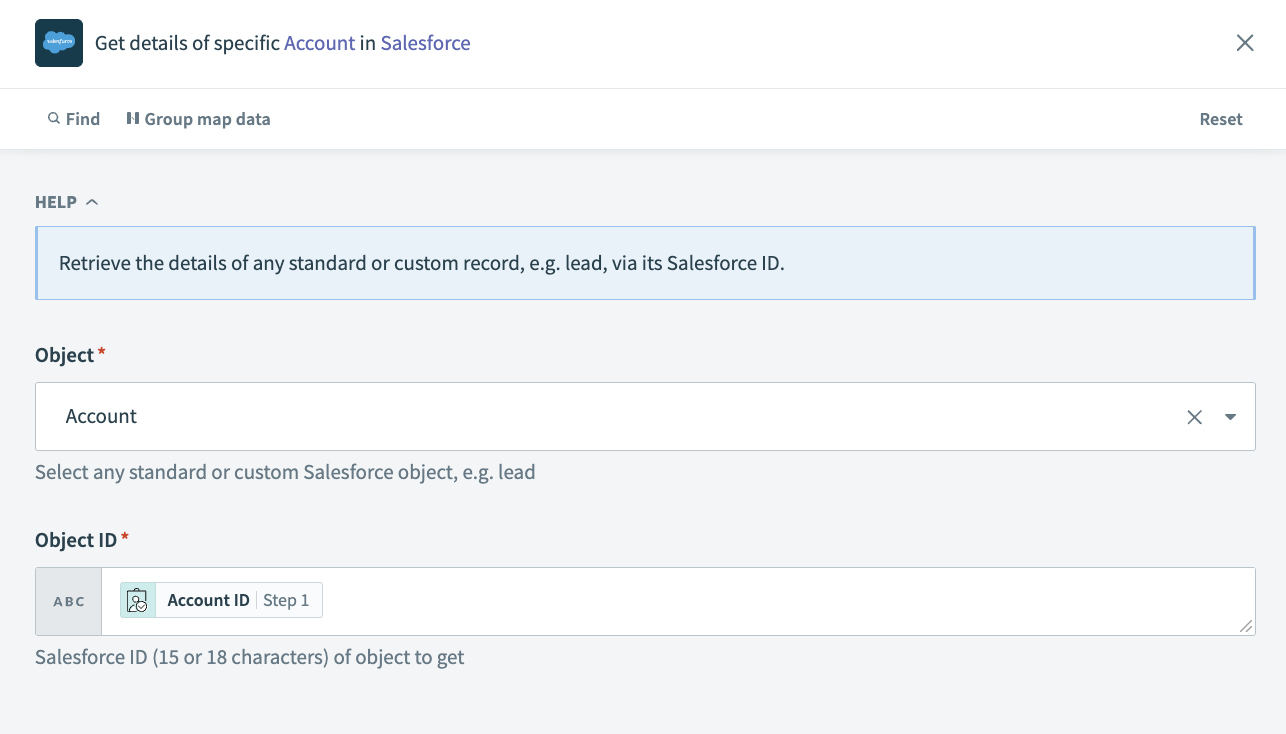 Get details of a specific Account in Salesforce action
Modify the Return data to component action
Select the Return data to component action.
Go to the Consider action as successful field and select Yes.
Go to the Output section and map the Annual Revenue Step 2 datapill to the Arr field.
Optional. Type a custom toast message into the Successful toast message field.
Your configuration should look as follows:
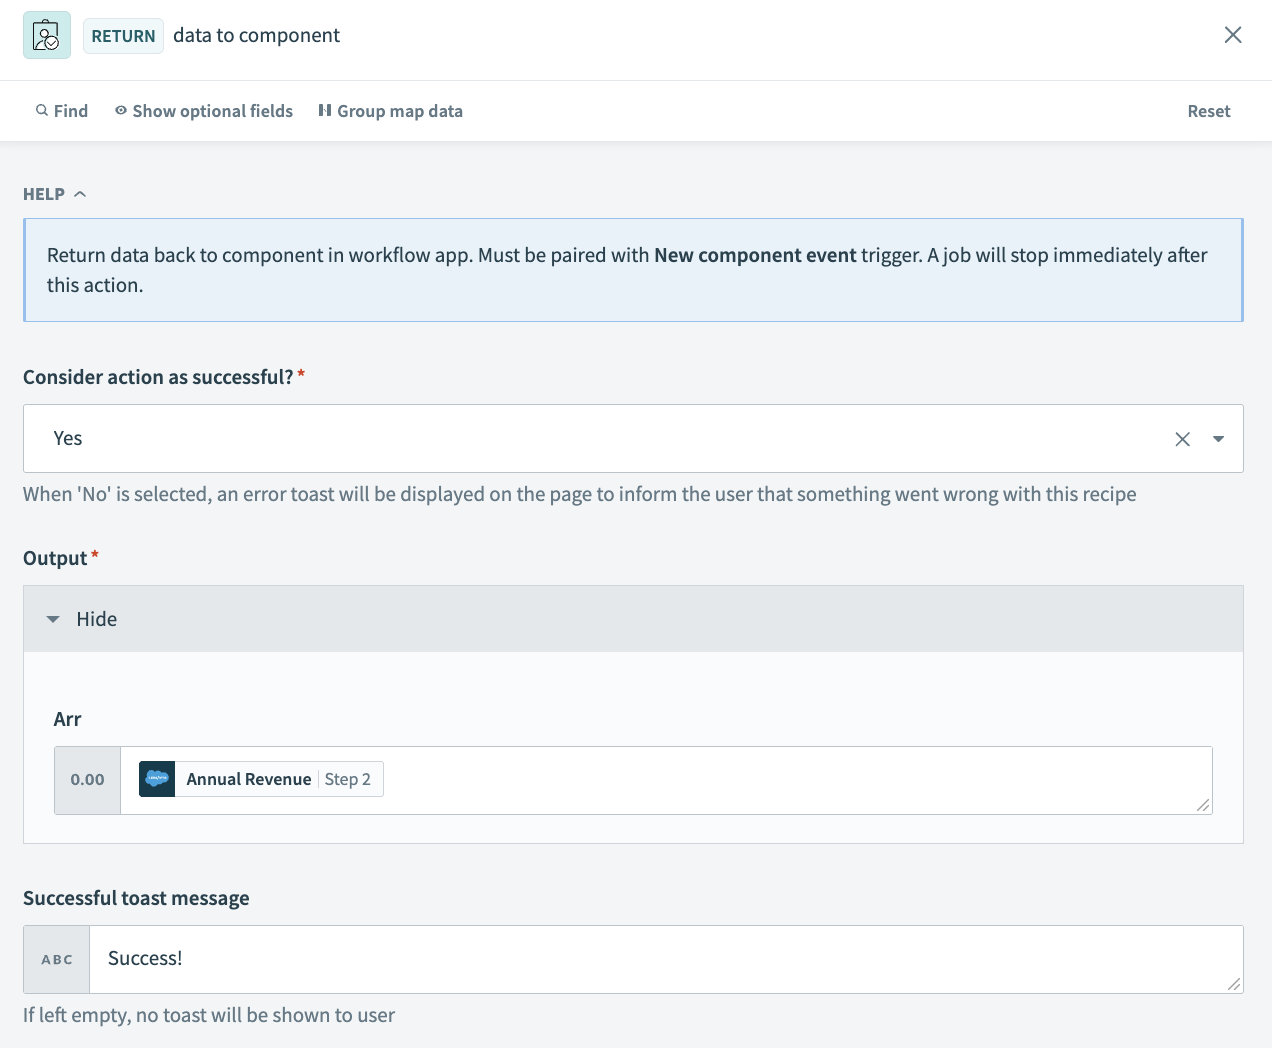 Configure the Return data to component action
Click Save and Exit.
Click Start recipe.
Your completed recipe should look as follows:
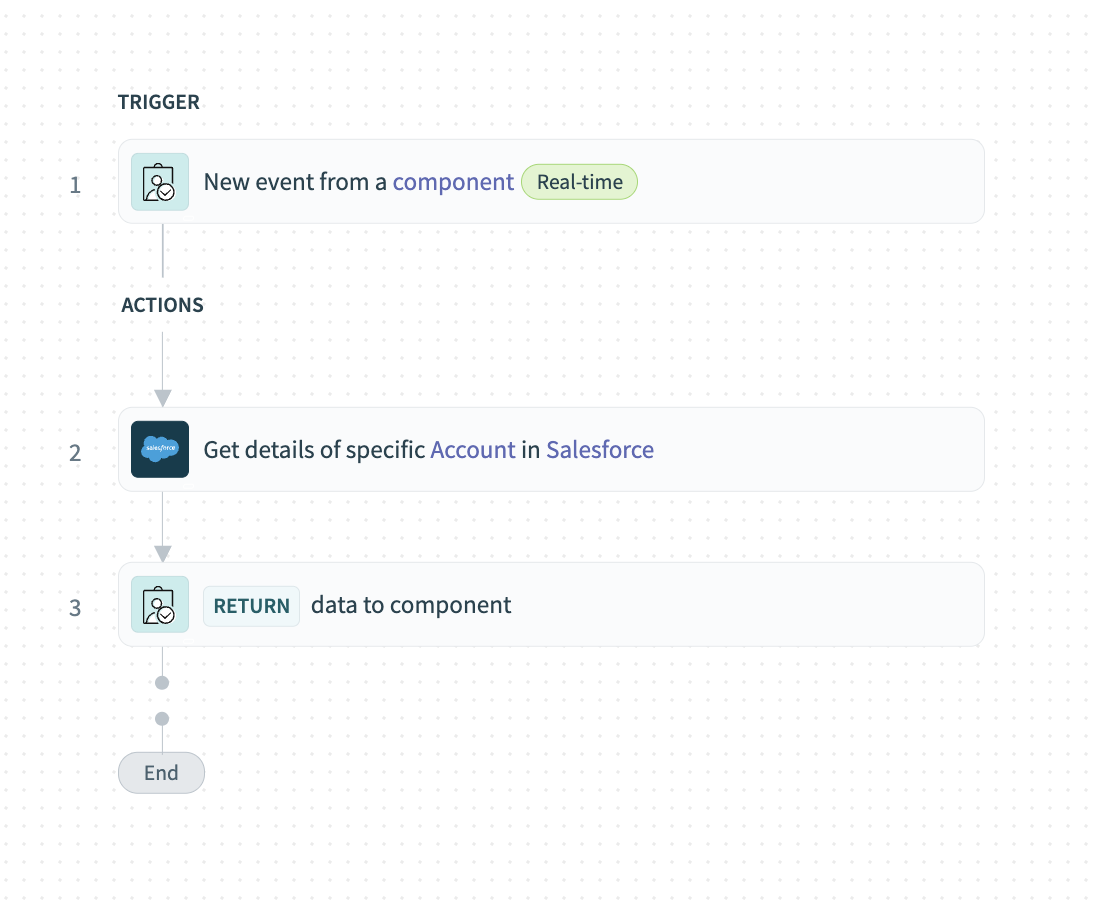 Completed recipe
# Surface recipe output in page components
Surfacing recipe data in your app involves creating variables, setting variable values, and mapping variables into page components.
Complete the following steps to surface recipe data in page components using the page editor:
Create variables in the page editor
Complete the following steps to create and configure the variable required to surface the ARR for a specific account in your app. This variable corresponds to the output field defined in the Get account details recipe created in the previous step and must have the same data type.
Click the page canvas.
Go to the Design panel.
Click + Add variable.
Go to the Name field and type a unique name for your variable, such as arr. This variable represents the ARR for a specific account in Salesforce.
Go to the Data type menu and select number as the data type.
Optional. Go to the Default value field and provide a default value for your variable, such as <null>.
Click Done.
Your configuration should look as follows:
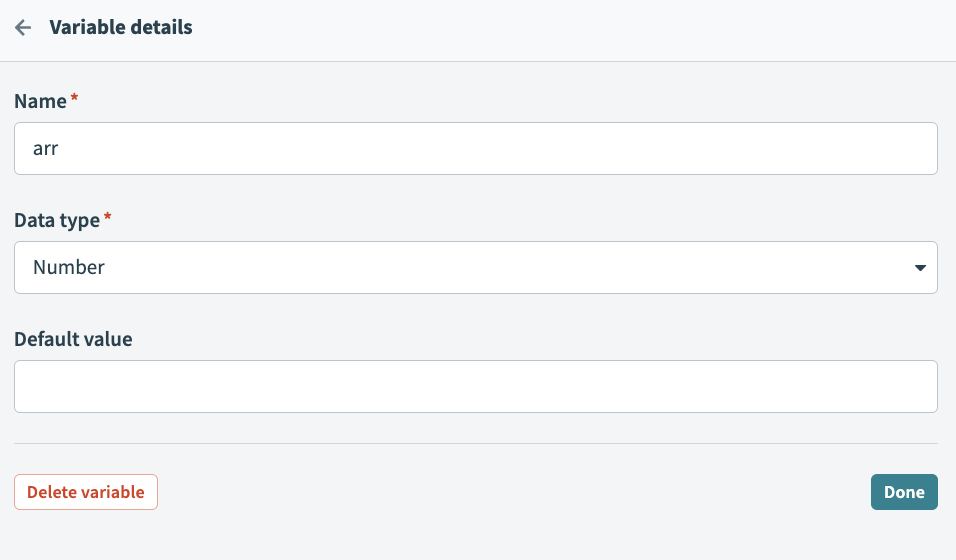 Configure a variable
Configure recipe input parameters and use recipe output to set variable values
Click the page canvas.
Go to the Action panel.
Go to the Recipe input parameters section and use the Account ID drop-down menu to select the Selected value Select an account datapill.
Click the page canvas.
Go to the Action panel.
Go to the Recipe output to set value section.
Use the Recipe output drop-down menu to select Arr.
Use the Set value for drop-down menu to select arr.
Your configuration should look as follows:
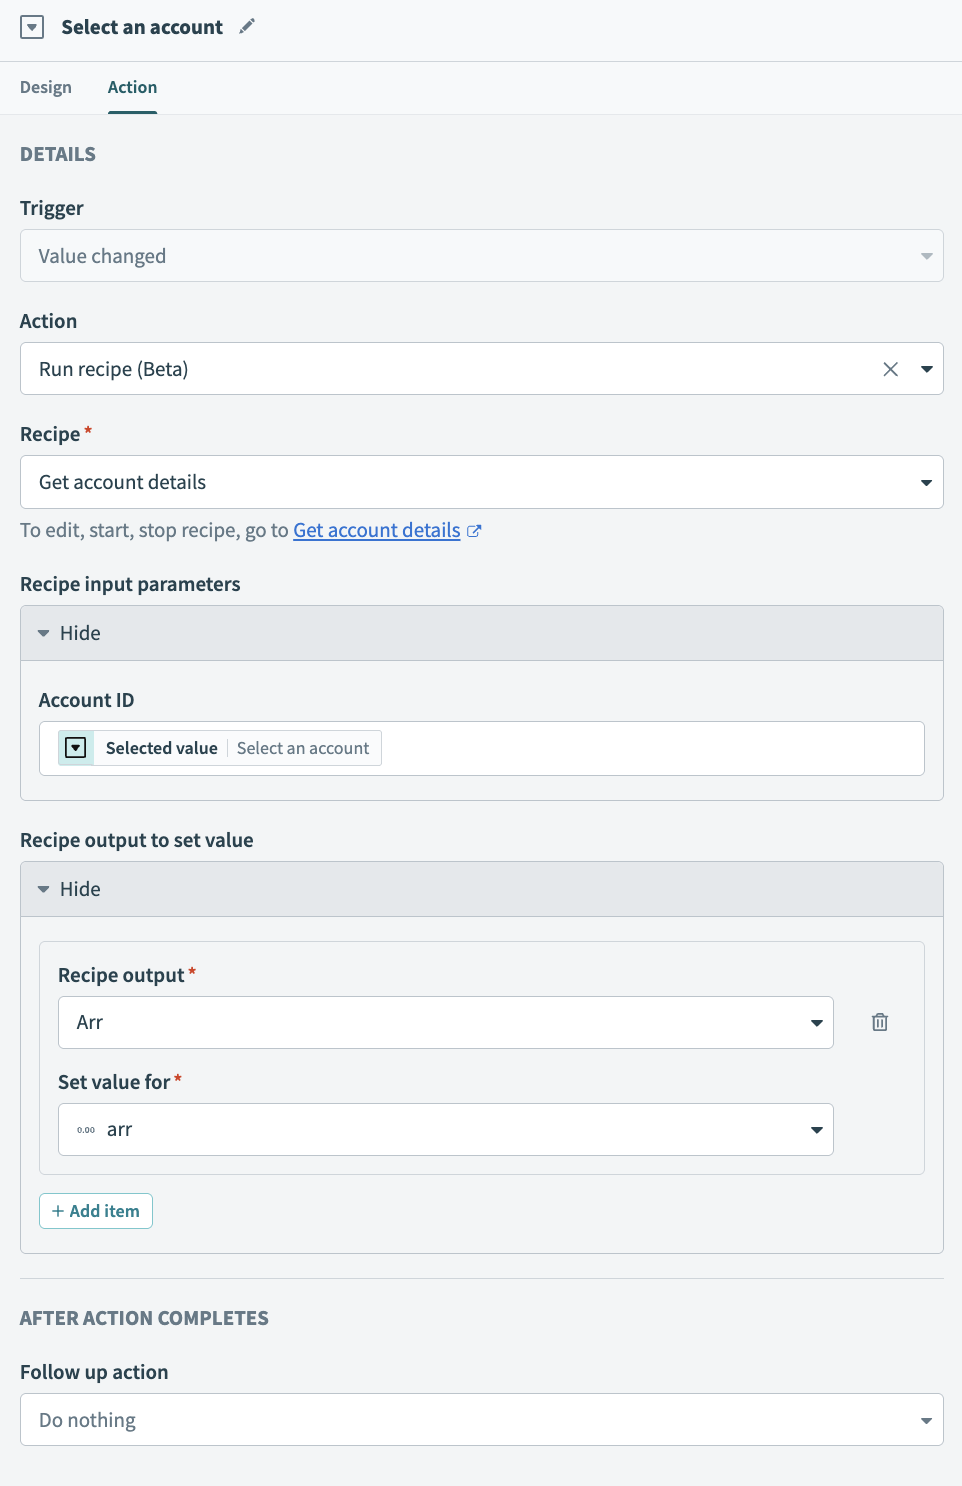 Recipe input and output configuration
Map variables into page components
This example is configured with a Text block component to hold the variable, which is located in the Manage accounts section of the app.
Complete the following steps to map a variable into a page component:
Click a text block component to select it.
Go to the Text field and click it. The Page data modal appears.
Go to Variables and select arr.
Add a label to help identify your variable, such as ARR.
Apply styling, such as Markdown and color, as appropriate.
Your configuration should look as follows:
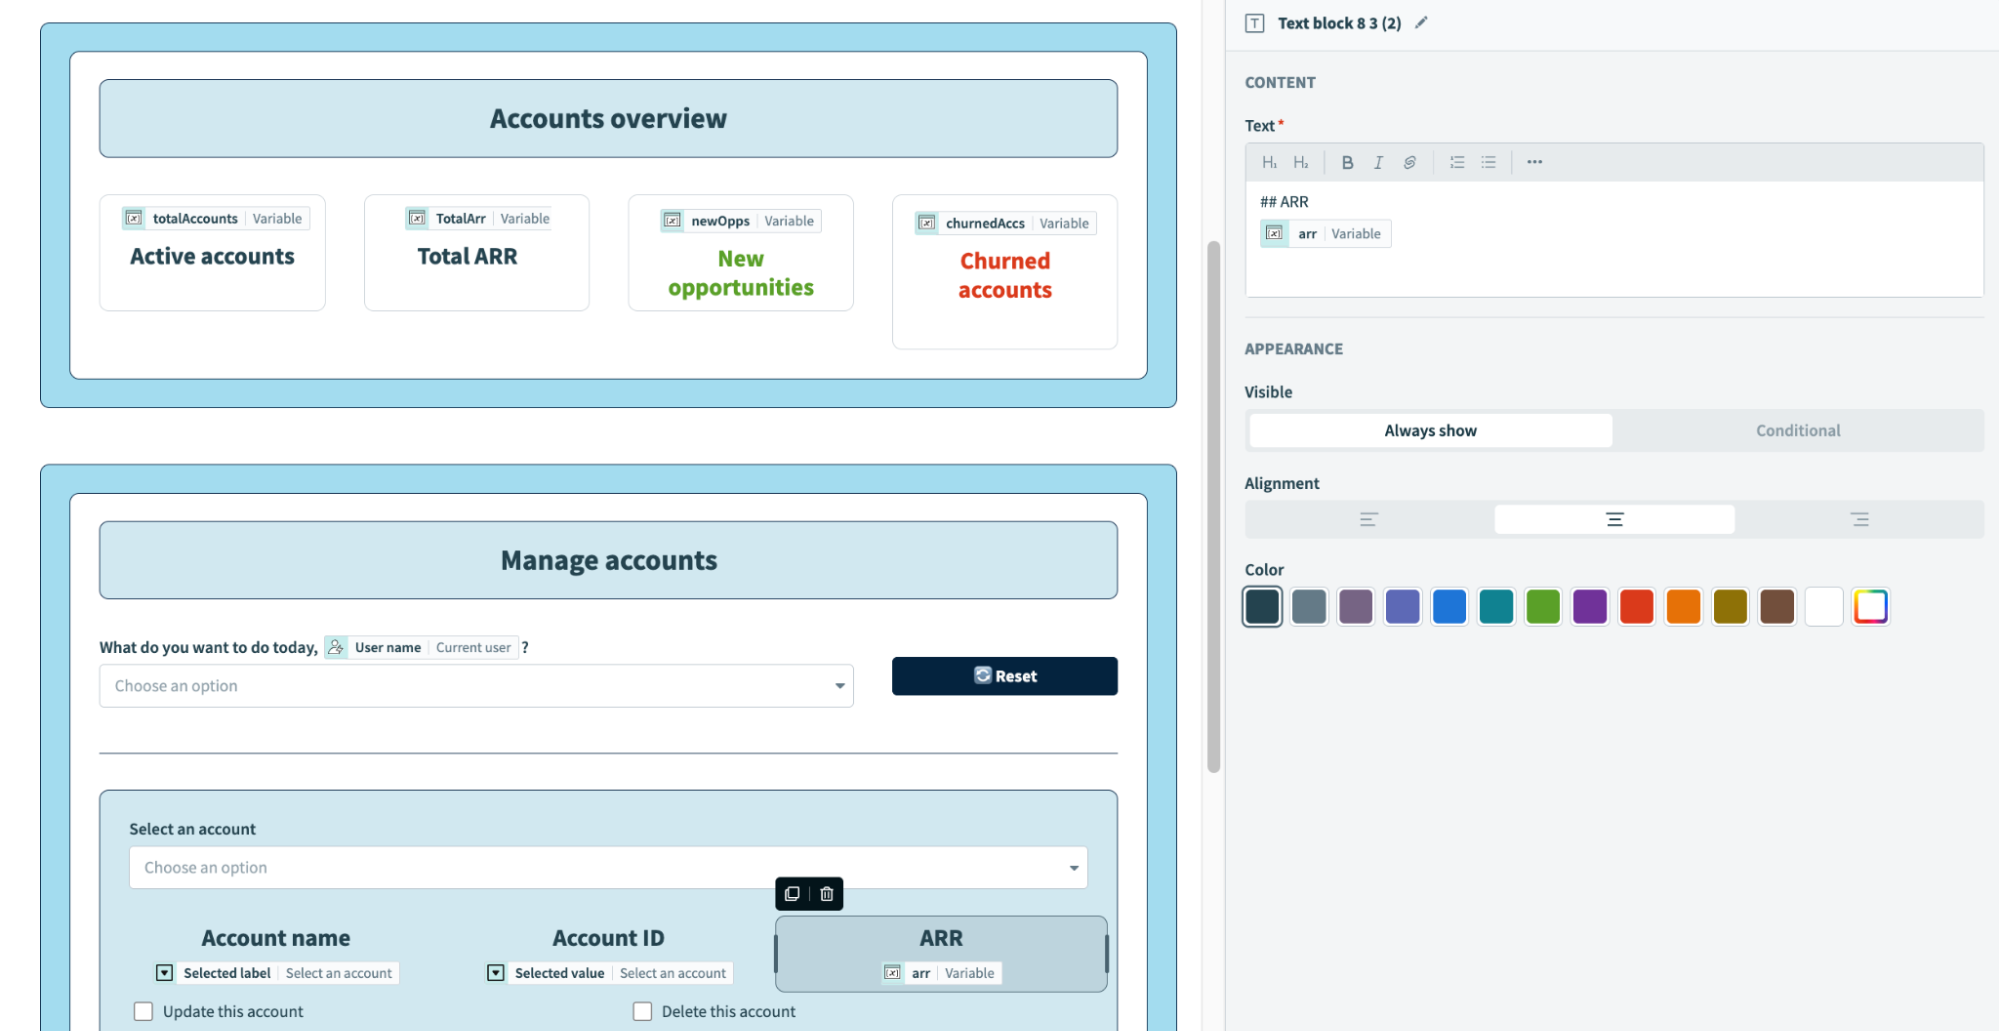 Map the ARR variable
Click Save.
# Action: Create, update, or delete an account
This portion of the app enables users to create, update, or delete an account in Salesforce.
This consists of the following steps:
- Enable action on button click
- Configure a recipe to create, update, or delete an account
- Surface recipe output in page components
# Enable action on button click
The Manage CRM application page is configured with the following buttons, which enable users to perform actions in Salesforce:
- Update account
- Delete account
- Create account
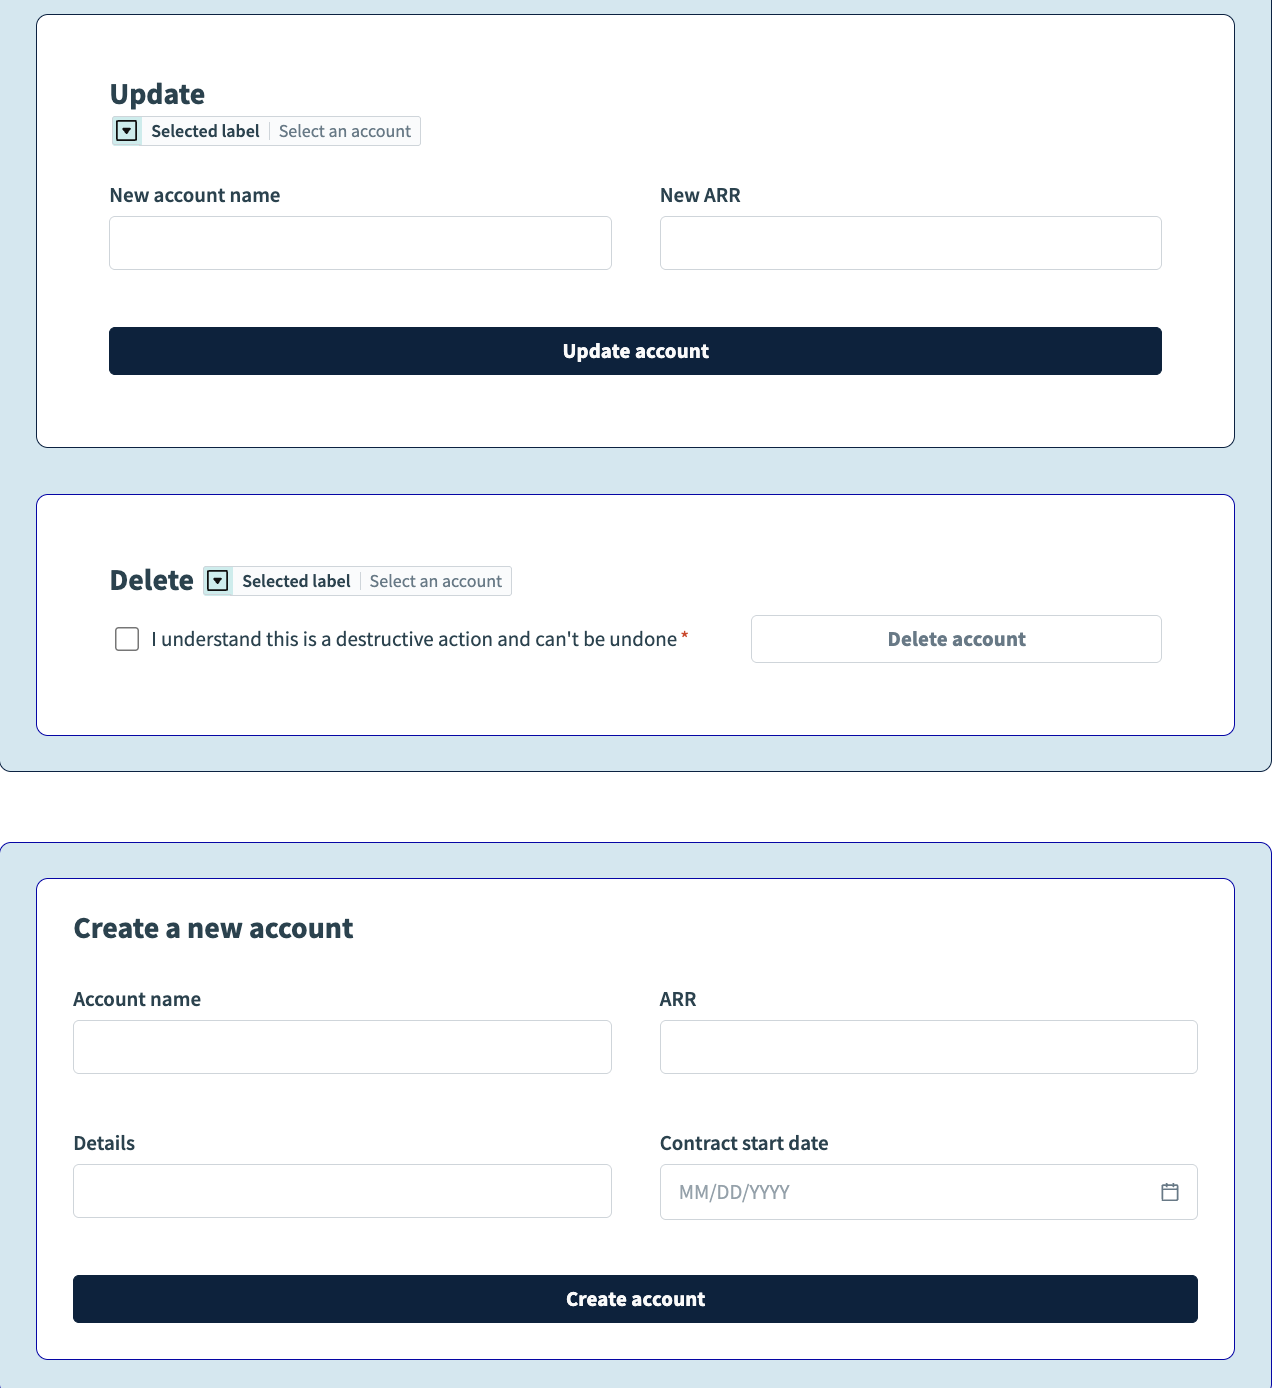 Buttons for updating, deleting, and creating an account
Complete the following steps to enable action when users click a button:
Go to the page editor.
Click the Update account button.
Go to the Action panel.
Use the Action drop-down menu to select Run recipe.
Use the Recipe drop-down menu to select Create recipe. This opens the Set up your recipe page in a new tab.
# Configure a recipe to create, update, or delete an account
Customizing this recipe consists of modifying the trigger, adding additional actions, and returning data to your page components.
Complete the following steps to set up your recipe:
Go to the Name field and enter Create, update, or delete account as the recipe name.
Go to the Location drop-down menu and ensure the recipe is in the same folder as your app page.
Click Start building.
Workato generates a recipe pre-configured with the New component event (real-time) trigger and the Return data to component action:
 Recipe outline
Modify the trigger
Complete the following steps to modify the trigger:
Select the New component or drop-down event trigger.
Go to the Setup tab.
Go to Input parameters and click + Add field.
Go to the Name field and provide a unique name for this parameter, such as action.
Go to the Label field and provide a unique name for this field, such as Action.
Go to the Data type field and select String.
Go to the Optional field and select No. When No, this field is required.
Create the following additional input parameters:
| Name | Label | Data type | Optional |
|---|---|---|---|
| accountID | Account ID | String | Yes |
| accountName | Account name | String | Yes |
| arr | ARR | Number | Yes |
| details | Details | string | Yes |
Go to Output parameters and click + Add field.
Go to the Name field and provide a unique name for this parameter, result.
Go to the Label field and provide a unique name for this field, such as Result.
Go to the Data type field and select String.
Go to the Optional field and select No. When No, this field is required.
Your configuration should look as follows:
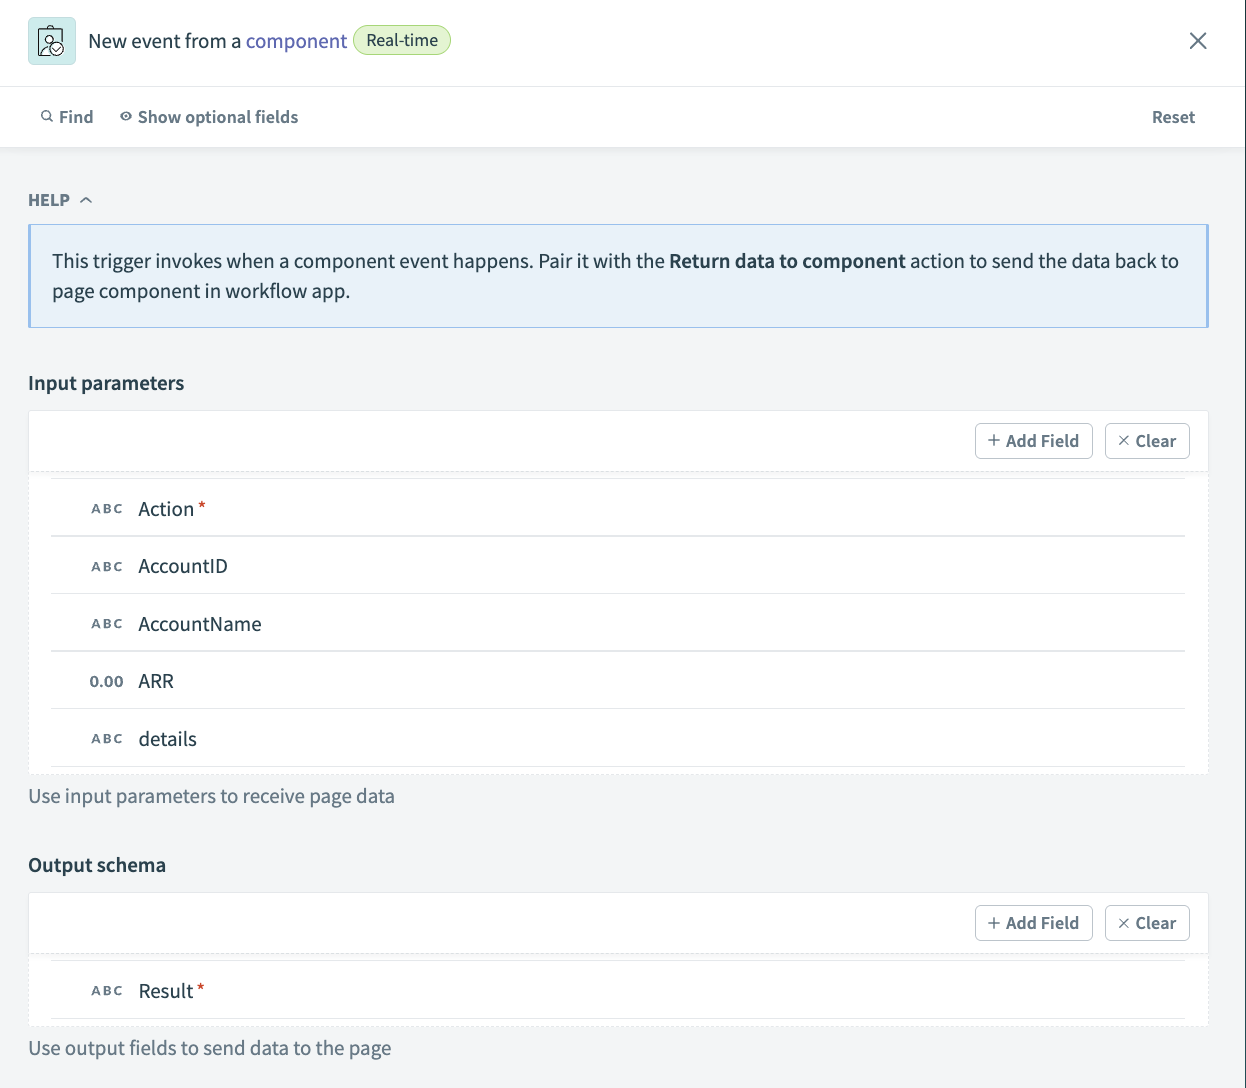 Input and output parameter configuration
Configure conditional logic
Click Select an app and action step in the recipe.
Click Handle errors to add a Monitor block to your recipe.
Click + and select IF condition.
Map the Action Step 1 datapill into the Data field field.
Use the Condition drop-down menu to select equals.
Type Delete in the Value field.
Configure a Delete Account in Salesforce action
Click + and select Action in an app.
Search for and select Salesforce as your app.
Select the Delete Account in Salesforce action.
Select the connection type you plan to use for this action.
 Choose a connection type
- End user's connection: Workflow apps recipes perform actions based on the identity and permissions of the user who connects to the application. End users authenticate with their own credentials to retrieve or modify data in an external app.
- This recipe's connection: This option uses the connection established by the recipe builder and follows the same principles as normal app connections.
Only app connections that use OAuth 2.0 authorization code grant are available for end user's connection. Refer to Verified user access for more information.
Select an existing connection or click + New connection to create a new connection.
Use the Object drop-down menu to select Account.
Map the Account ID Step 1 datapill into the Object ID field.
Your configuration should look as follows:
 Delete an account in Salesforce action
Configure conditional logic and an Update Account in Salesforce action
Click + and select ELSE IF Condition.
Map the Action Step 1 datapill into the Data field field.
Use the Condition drop-down menu to select equals.
Type Update in the Value field.
Configure an Update account in Salesforce action
Click + and select Action in an app.
Search for and select Salesforce as your app.
Select the Update Account in Salesforce action.
Select the connection type you plan to use for this action.
 Choose a connection type
- End user's connection: Workflow apps recipes perform actions based on the identity and permissions of the user who connects to the application. End users authenticate with their own credentials to retrieve or modify data in an external app.
- This recipe's connection: This option uses the connection established by the recipe builder and follows the same principles as normal app connections.
Only app connections that use OAuth 2.0 authorization code grant are available for end user's connection. Refer to Verified user access for more information.
Select an existing connection or click + New connection to create a new connection.
Use the Object drop-down menu to select Account.
Map the Account ID Step 1 datapill into the Object ID field.
Map the Details Step 1 datapill into the Account Description field.
Map the Account name Step 1 datapill into the Account Name field.
Map the ARR Step 1 datapill into the Annual Revenue field.
Your configuration should look as follows:
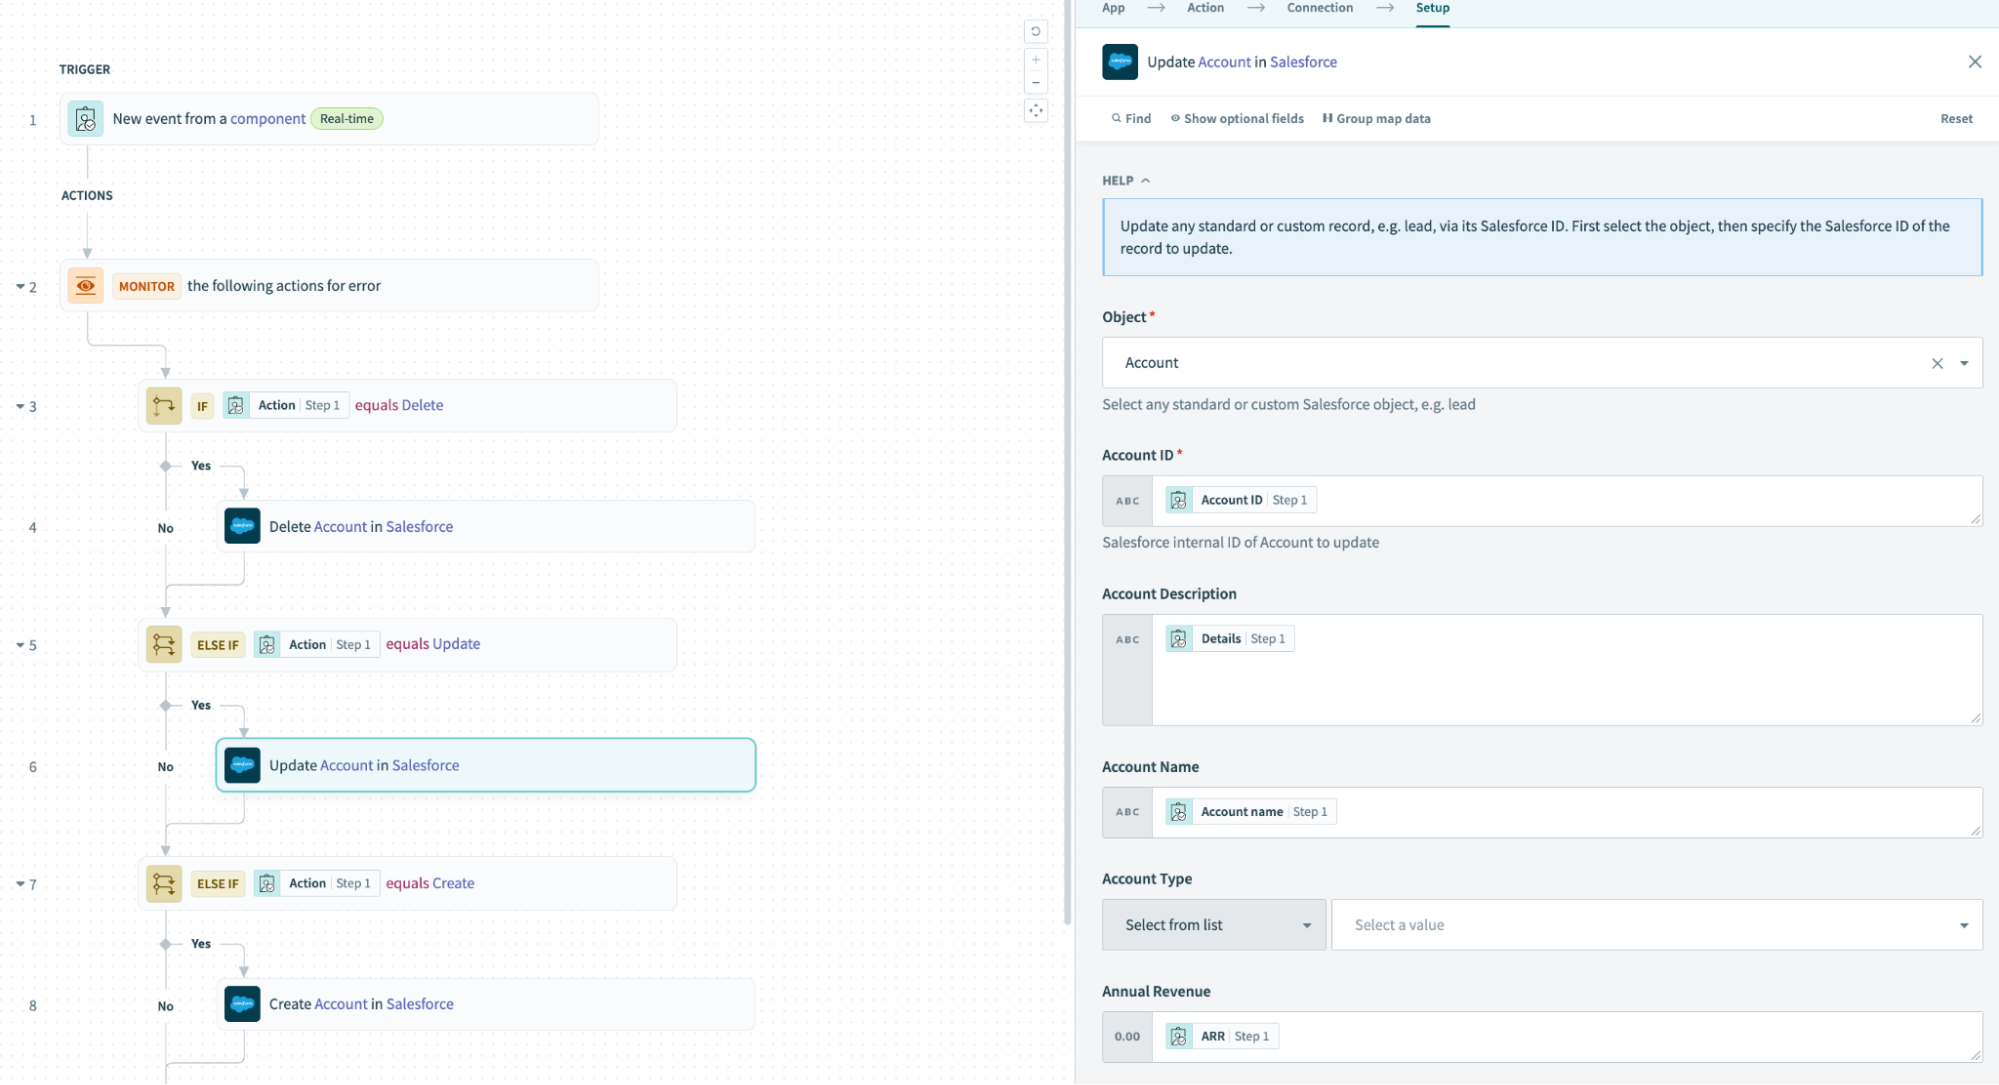 Update an account in Salesforce action
Configure conditional logic and a Create Account in Salesforce action
Click + and select ELSE IF Condition.
Map the Action Step 1 datapill into the Data field field.
Use the Condition drop-down menu to select equals.
Type Create in the Value field.
Configure a Create Account in Salesforce action
Click + and select Action in an app.
Search for and select Salesforce as your app.
Select the Create record action.
Select the connection type you plan to use for this action.
 Choose a connection type
- End user's connection: Workflow apps recipes perform actions based on the identity and permissions of the user who connects to the application. End users authenticate with their own credentials to retrieve or modify data in an external app.
- This recipe's connection: This option uses the connection established by the recipe builder and follows the same principles as normal app connections.
Only app connections that use OAuth 2.0 authorization code grant are available for end user's connection. Refer to Verified user access for more information.
Select an existing connection or click + New connection to create a new connection.
Use the Object drop-down menu to select Account.
Map the Account name Step 1 datapill into the Account Name field.
Map the Details Step 1 datapill into the Account Description field.
Map the ARR Step 1 datapill into the Annual Revenue field.
Your configuration should look as follows:
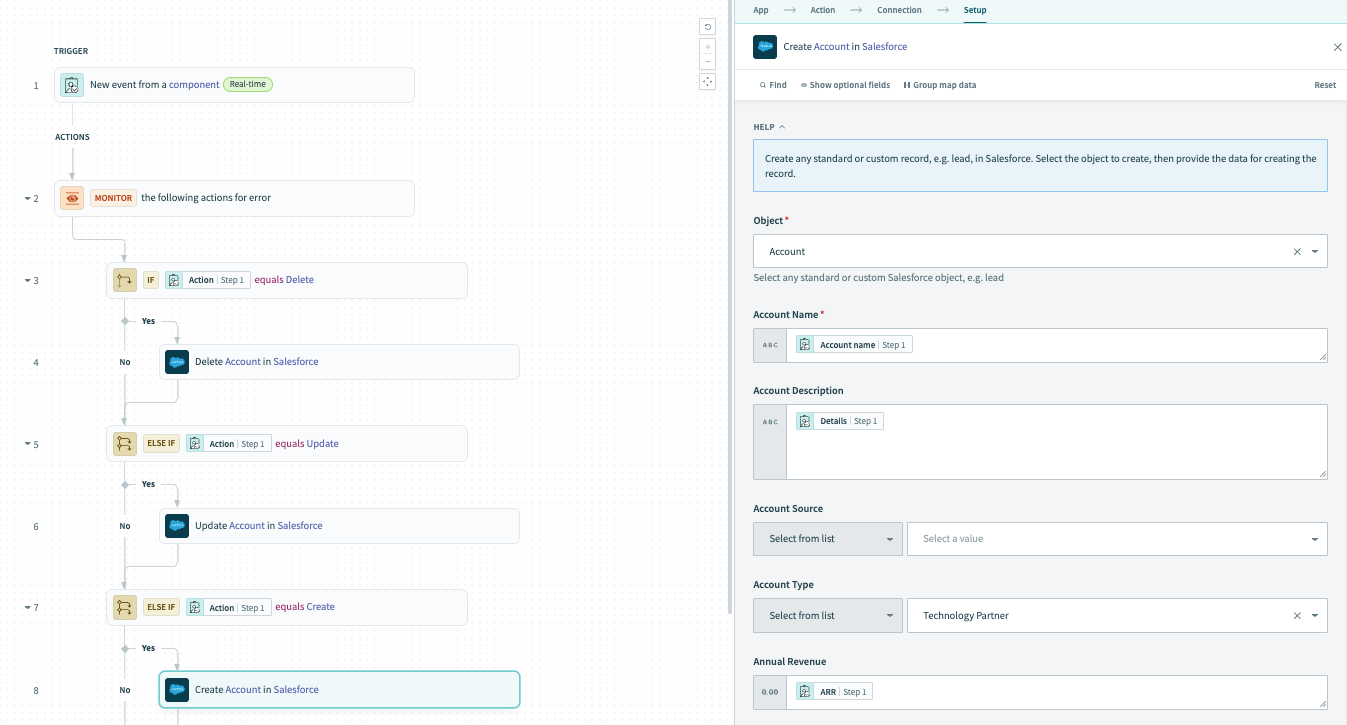 Create an account in Salesforce action
Modify the Return data to component action and configure conditional logic
This portion of the workflow sends either a successful toast message back to the application or an error message based on whether the action is executed successfully.
Click + and select ELSE.
Click + and select Action in an app.
Search for and select Workflow apps as your app.
Select the Return data to component action.
Use the Consider action as successful? drop-down menu to select No.
Type Unsupported action in the Error message field.
Go to the Error found? section and click the Do not retry action. Use the Retry actions in Monitor block drop-down menu to select Do not retry.
Click the Select an app and action step and search for and select Workflow apps as your app.
Select the Return data to component action.
Use the Consider action as successful? drop-down menu to select No.
Type a custom error message in the Error message field, such as Error occurred.
Configure the Return data to component action
Click the Return data to component action to select it.
Use the Consider action as successful? drop-down menu to select Yes.
Go to the Output section and type Success! in the Result field.
Go to the Successful toast message field and map in the Action Step 1 datapill.
Type in === 'Delete' ? "Successfully deleted account" : "Done!"
Your configuration should look as follows:
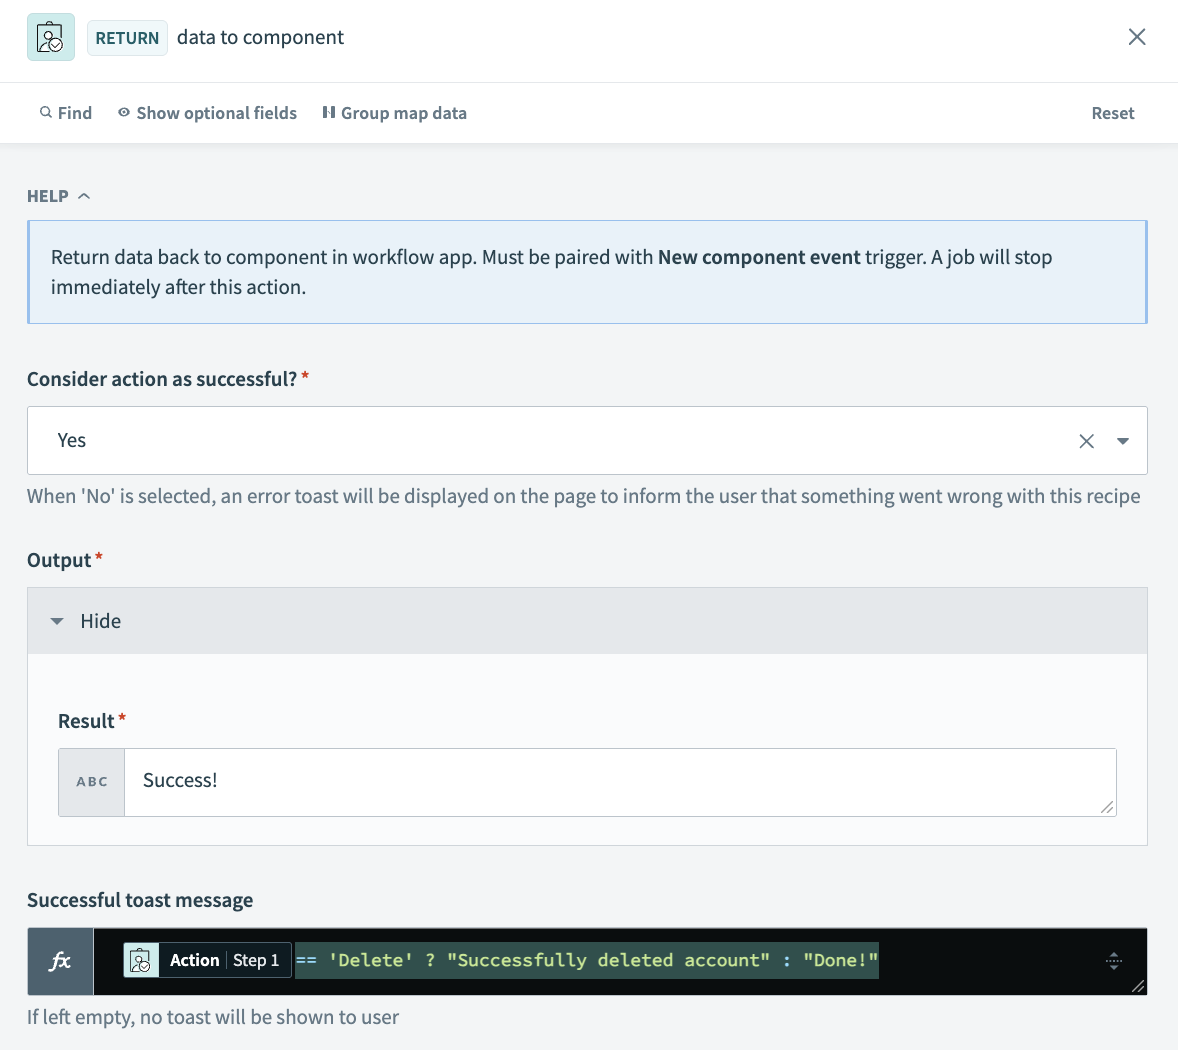 Configure the Return data to component action
Click Save and Exit.
Click Start recipe.
Your completed recipe should look as follows:
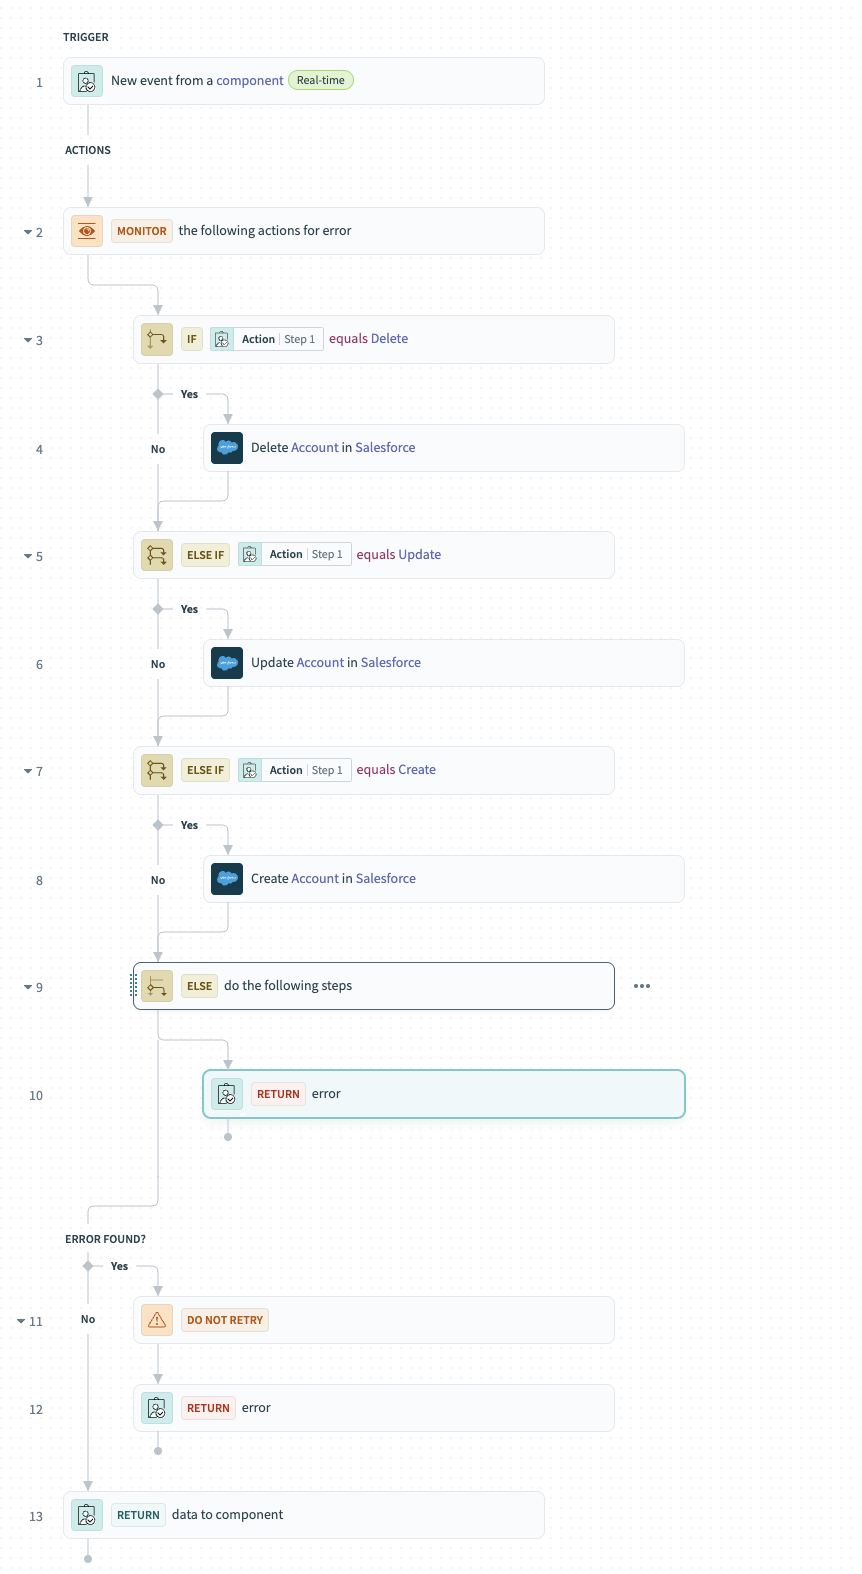 Complete recipe
# Surface recipe output in page components
Surfacing recipe data in your app involves creating variables, setting variable values, and mapping variables into page components.
Complete the following steps to surface recipe data in page components using the page editor:
Configure the Update account button
Select the Update account button.
Go to the Action panel.
Go to the Recipe input parameters section and set up input parameters for use in the Create, update, or delete account recipe created in the previous step.
Type Update into the Action field.
Map the Selected value Select an account page component datapill into the Account ID field.
Map the Value New account name page component datapill into the Account name field.
Map the Value ARR page component datapill into the ARR field.
Map the Value Details page component datapill into the Details field.
Leave the Recipe output to set value and Follow up action fields blank.
Your configuration should look as follows:
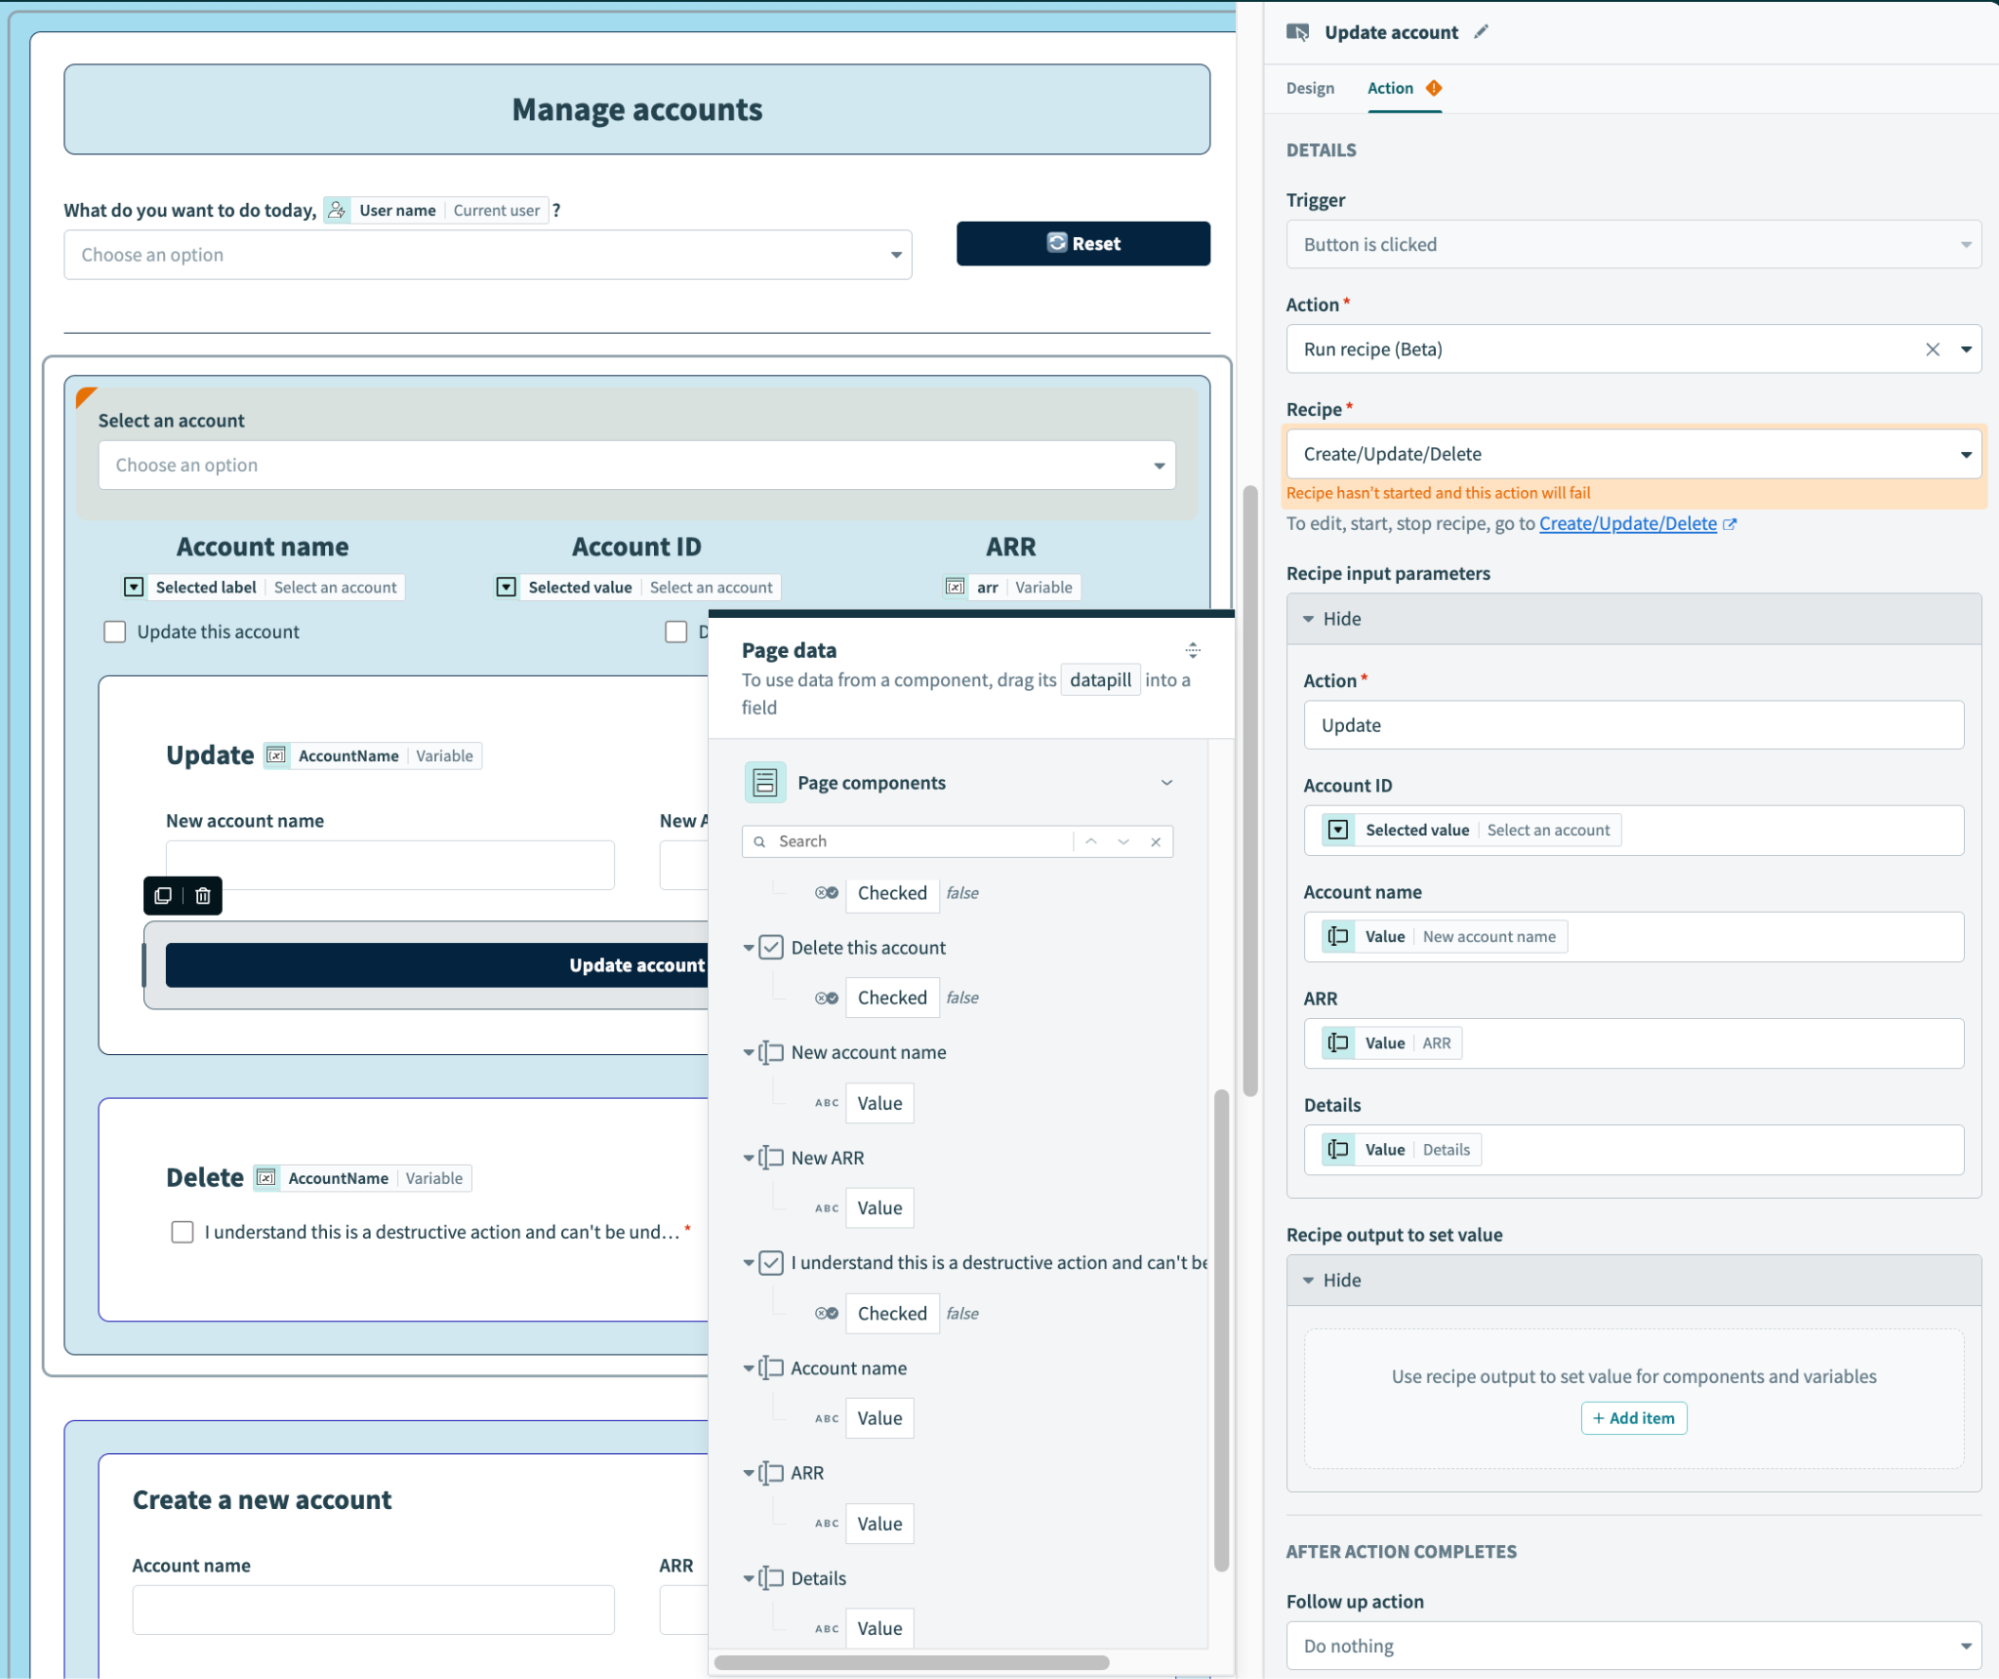 Update account button configuration
Configure the Delete account button
Select the Delete account button.
Go to the Action panel.
Go to the Recipe input parameters section to set up input parameters for use in the Create, update, or delete account recipe created in the previous step.
Type Delete into the Action field.
Map the Selected value Select an account page component datapill into the Account ID field.
Leave the Recipe output to set value and Follow up action fields blank.
Your configuration should look as follows:
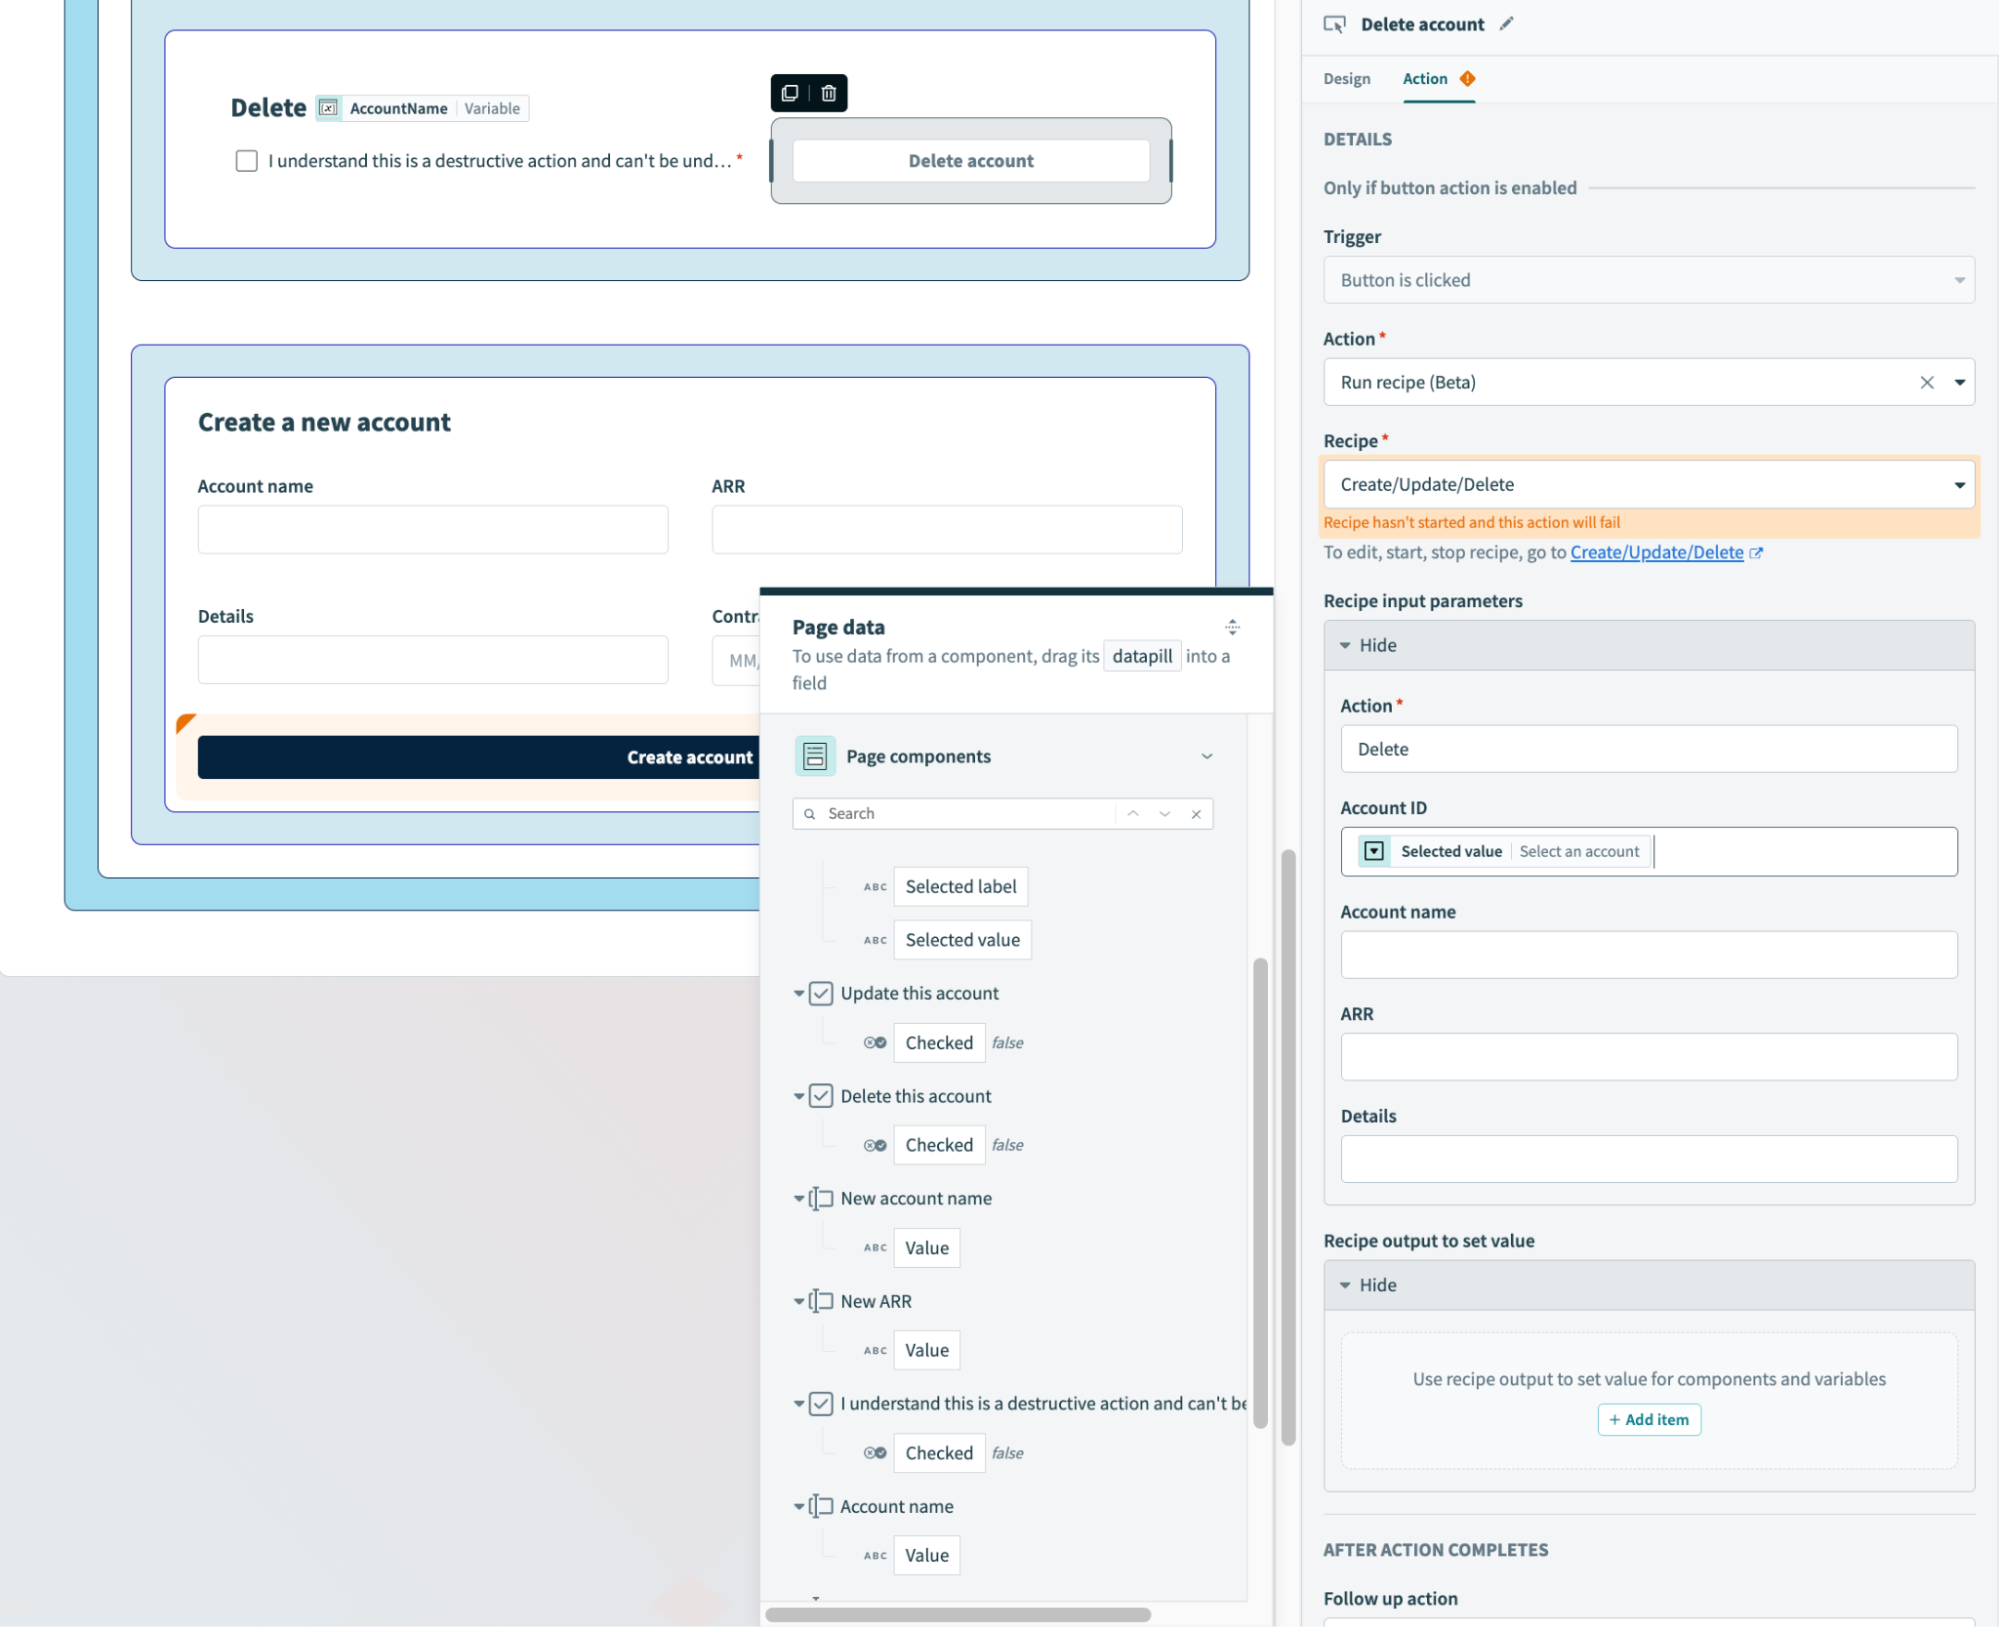 Delete account button configuration
Configure the Create account button
Select the Create account button.
Go to the Action panel.
Go to the Recipe input parameters section to set up input parameters for use in the Create, update, or delete account recipe created in the previous step.
Type Create into the Action field.
Map the Value Account name page component datapill into the Account name field.
Map the arr Variable page component datapill into the ARR field.
Map the Value Details page component datapill into the Details field.
Leave the Recipe output to set value and Follow up action fields blank.
Your configuration should look as follows:
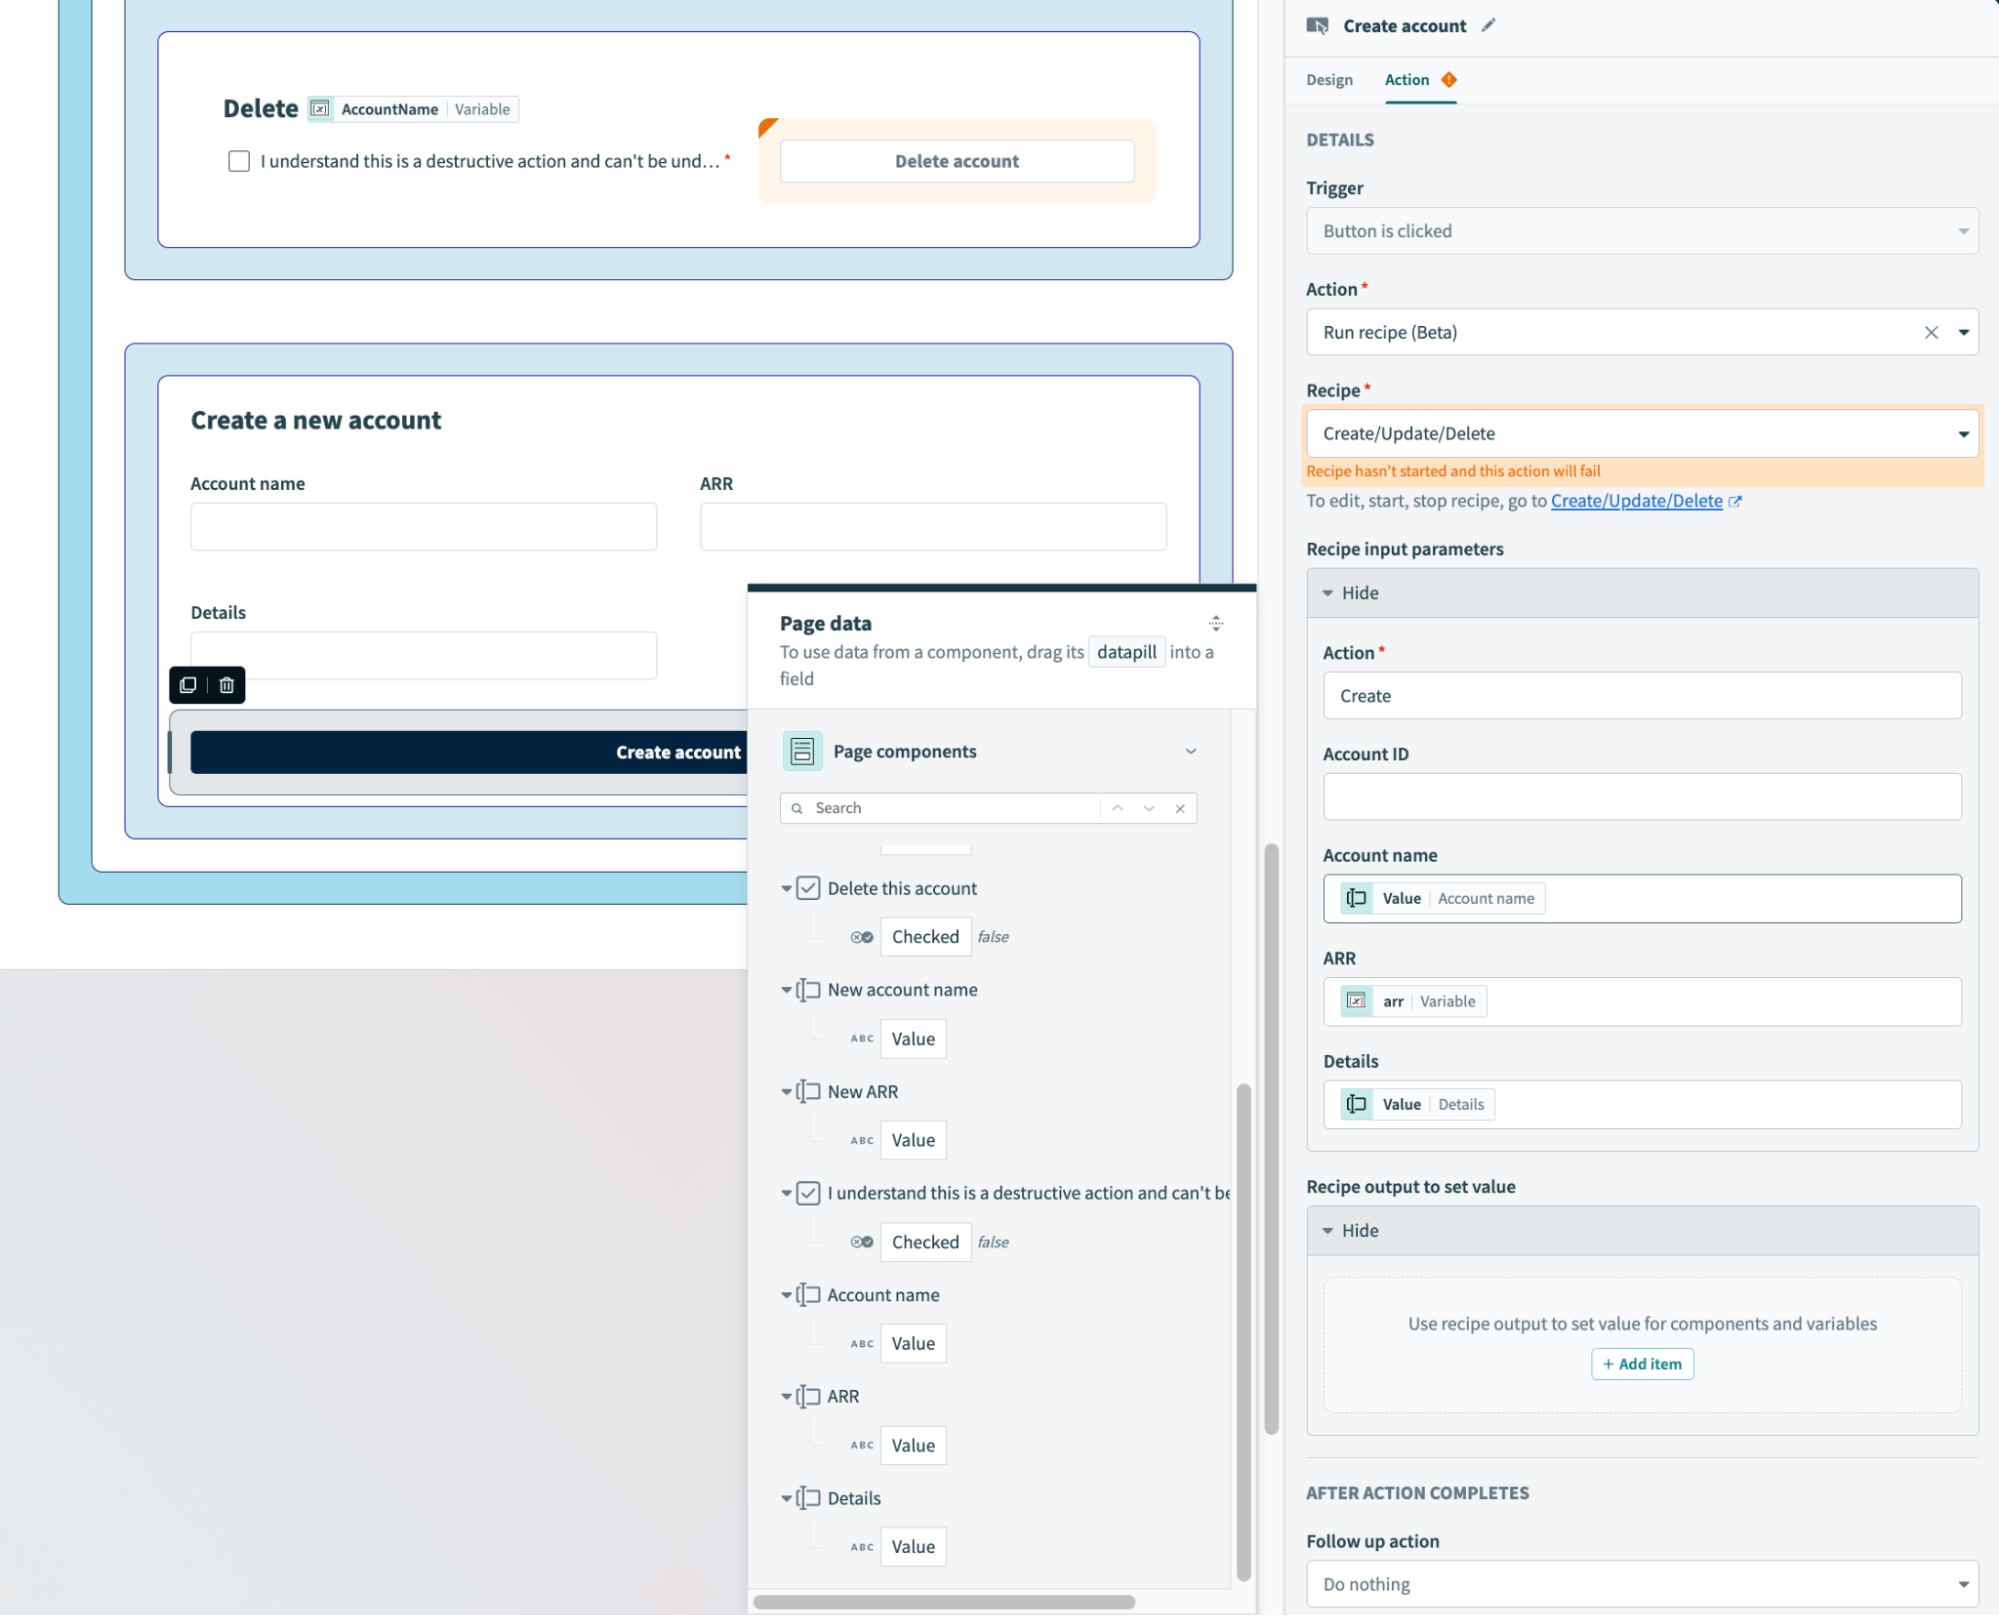 Create account button configuration
Click Save.
# Action: Update an opportunity
This portion of the app enables users to update an opportunity in Salesforce.
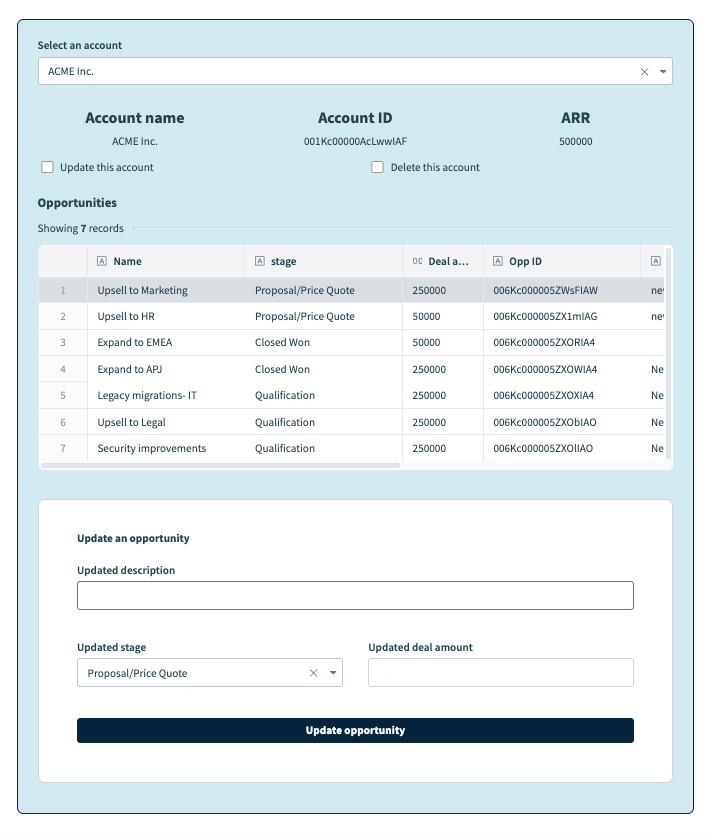 Update an opportunity
This consists of the following steps:
- Enable action on table row selection
- Configure a recipe to update an opportunity
- Define input parameters and reload page components
# Enable action on table row selection
The Manage CRM application page includes a table that lists all opportunities for the selected account.
Complete the following steps to enable action when users select a row in a table:
Go to the page editor.
Click the Opportunities table component.
Go to the Action panel.
Use the Action drop-down menu to select Run recipe.
Use the Recipe drop-down menu to select Create recipe. This opens the Set up your recipe page in a new tab.
# Configure a recipe to update an opportunity in Salesforce
Customizing this recipe consists of modifying the trigger, adding additional actions, and returning data to your page components.
Complete the following steps to set up your recipe:
Go to the Name field and enter Update opportunity (on table row click) as the recipe name.
Go to the Location drop-down menu and ensure the recipe is in the same folder as your app page.
Click Start building.
Workato generates a recipe pre-configured with the New component event (real-time) trigger and the Return data to component action:
 Recipe outline
Modify the trigger
Complete the following steps to modify the trigger:
Select the New component event trigger.
Go to the Setup tab.
Go to Input parameters and click + Add field.
Go to the Name field and provide a unique name for this parameter, such as opp_id.
Go to the Label field and provide a unique name for this field, such as Opportunity ID.
Go to the Data type field and select String.
Go to the Optional field and select No. When No, this field is required.
Create the following additional input parameters:
| Name | Label | Data type | Optional |
|---|---|---|---|
| updated_description | Updated description | String | Yes |
| updated_deal | Updated deal amount | Number | Yes |
| updated_stage | Updated stage | String | Yes |
Go to Output parameters and click + Add field.
Go to the Name field and provide a unique name for this parameter, such as new_deal.
Go to the Label field and provide a unique name for this field, such as New deal amount.
Go to the Data type field and select Number.
Go to the Optional field and select Yes.
Create the following additional output parameters:
| Name | Label | Data type | Optional |
|---|---|---|---|
| new_description | New description | String | Yes |
| new_stage | New stage | String | Yes |
Your configuration should look as follows:
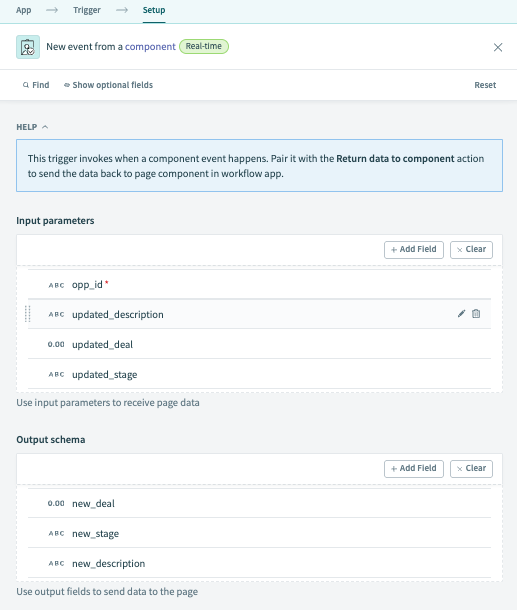 Input and output parameter configuration
Configure conditional logic
Click Select an app and action step in the recipe.
Click Handle errors to add a Monitor block to your recipe.
Click Select an app and action.
Search for and select Salesforce as your app.
Select the Update record in Salesforce action.
Select the connection type you plan to use for this action.
 Choose a connection type
- End user's connection: Workflow apps recipes perform actions based on the identity and permissions of the user who connects to the application. End users authenticate with their own credentials to retrieve or modify data in an external app.
- This recipe's connection: This option uses the connection established by the recipe builder and follows the same principles as normal app connections.
Only app connections that use OAuth 2.0 authorization code grant are available for end user's connection. Refer to Verified user access for more information.
Select an existing connection or click + New connection to create a new connection.
Use the Object drop-down menu to select Opportunity.
Map the Opportunity ID Step 1 datapill into the Opportunity ID field.
Map the Updated deal Step 1 datapill into the Amount field.
Map the Updated description Step 1 datapill into the Description field.
Map the Updated stage Step 1 datapill into the Stage field.
Your configuration should look as follows:
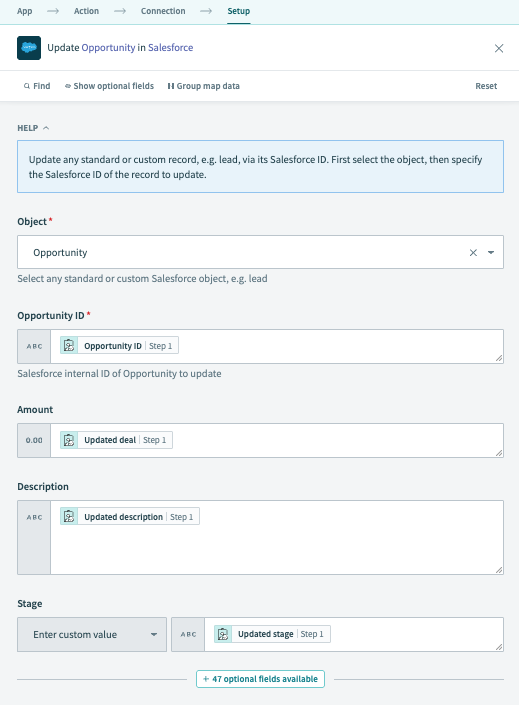 Update an opportunity in Salesforce action
Modify the Return data to component action and configure error handling
This portion of the workflow sends an error message to the application if the Update opportunity in Salesforce action fails.
Go to the Error found? section and click the Do not retry action. Use the Retry actions in Monitor block drop-down menu to select Do not retry.
Click Select an app and action.
Search for and select Workflow apps as your app.
Select the Return data to component action.
Use the Consider action as successful? drop-down menu to select No.
Type Unable to update opportunity. Contact your portal admin to learn more. in the Error message field.
Configure the Return data to component action
Click the Select an app and action step and search for and select Workflow apps as your app.
Select the Return data to component action in step 6.
Use the Consider action as successful? drop-down menu to select Yes.
Your configuration should look as follows:
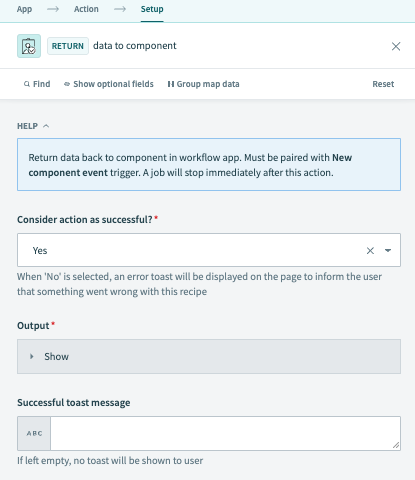 Configure the Return data to component action
Click Save and Exit.
Click Start recipe.
Your completed recipe should look as follows:
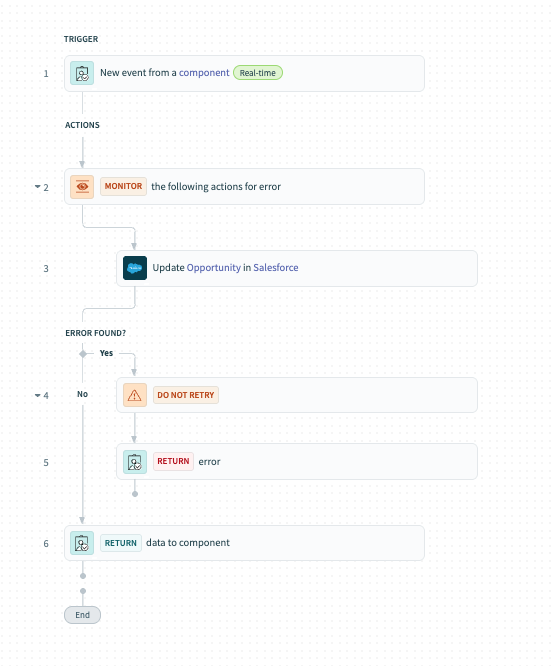 Complete recipe
# Define input parameters and reload page components
This part of the setup focuses on defining input parameters and setting up a follow-up action to reload page components. Since the table data is directly sourced from Salesforce, there is no need to map recipe outputs into page components or variables
Complete the following steps to reload page components using the page editor:
Configure recipe input parameters
Select the Opportunities table.
Go to the Action panel.
Go to the Recipe input parameters section and map page data into the provided fields.
Map the Opp ID Opportunities table into the Opportunity ID field.
Map the Value Updated description into the Updated description field.
Map the Value Updated deal amount into the Updated deal amount field.
Map the Value Updated stage into the Updated stage field.
You configuration should look as follows:
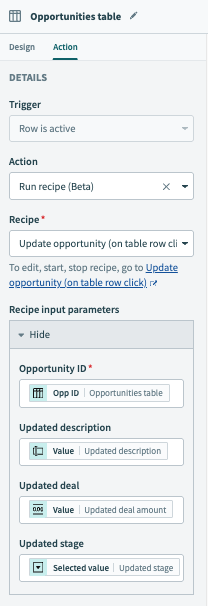 Table row selection configuration
Reload the table component
This step reloads the Opportunities table with updated user-provided data.
Select the Update opportunity button.
Go to the Action panel.
Use the Action drop-down to select Reset/reload components.
Use the Components field to select the component values to reload on button click, the update opps container and Opportunities table.
Click Save.
Your configuration should look as follows:
Reset table component
Last updated: 2/5/2026, 4:12:34 PM