# On-prem file trigger - New CSV file in folder trigger (Batch)
The New CSV file in folder batch trigger monitors an on-prem folder for new CSV files on a schedule you define.
The trigger detects all existing files in the folder when you start the recipe for the first time. Only newly added files are processed on subsequent runs.
Use this trigger when you have an on-prem folder to which you frequently add CSV files, such as weekly sales reports or daily data dumps from other systems. You can use this trigger to build a recipe that reads new CSV files and imports them into other systems, for example, Salesforce.
REQUIRED OPA VERSION
This trigger requires an on-prem agent version 2.10.2 or later.
# File renaming
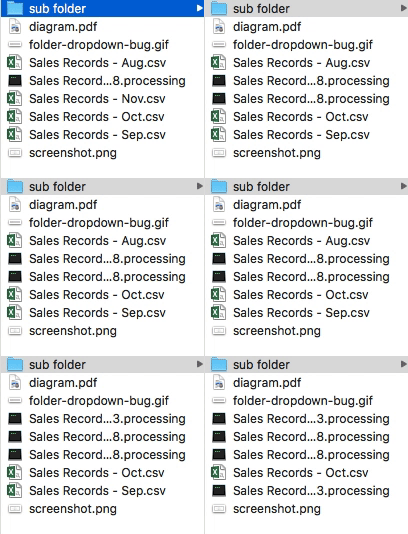
This trigger appends a numerical ID and .processing to the names of processed files, for example: sales_report.csv is renamed to sales_report.csv.1526632883663.processing. This prevents the recipe from triggering on the same file in subsequent runs.
 Trigger renames processed files
# Input
| Input field | Description |
|---|---|
| Trigger poll interval | Define how frequently the recipe checks for new files. The minimum and default value is 5 minutes. |
| Trigger on | Select whether to search at a Specific interval or Specific date/time. |
| Folder | Select the folder to monitor for new files. |
| Include files in sub-folders? | Select whether to monitor subfolders for new files. |
| Filter files by naming pattern | Optional. Define a naming pattern that files must use to trigger a job. |
| Columns | Define the columns in your CSV files. Click Upload a sample CSV file to generate columns automatically or click Add column and define columns manually. |
| Column delimiter | Select the character used to separate column values within each CSV row. |
| Quote character | Select the character used to quote cell values. Set to None if no quote character is used. |
| Contains header line? | Select whether the first CSV line is a header line containing column names. |
| File encoding | Select the encoding for the CSV file. This field defaults to UTF-8. |
| Batch size | Enter the number of CSV rows to process in each batch. Refer to Batch processing for more information. This field defaults to 100 and supports a maximum of 2,000 lines. |
ADDITIONAL INPUT FIELDS
The recipe editor generates additional input fields in the Schedule settings section based on your Trigger on selection. Use these fields to specify the trigger schedule.
# Output
| Output field | Description |
|---|---|
| CSV lines | Contains information about the contents of the CSV file, such as the List size, List index, and the column names. |
| File path (original) | The path to the file before it was processed, for example: C:/Program Files/sales_report.csv. |
| File name (original) | The name of the file before it was processed, for example: sales_report.csv. |
| File path (processed) | The path to the file after it was processed, for example: C:/Program Files/sales_report.csv.1526632883663.processing. |
| File name (processed) | The name of the file after it was processed, for example: sales_report.csv.1526632883663.processing. |
| File size (bytes) | The size of the file in bytes. |
| Created time | The time the file was created. This value is set by your OS. |
| Last modified time | The time the file was last modified. This value is set by your OS. |
| Batch size | The batch size that you configured in this trigger's input. |
| Batch number | The numerical ID of the current batch. |
| First batch | Indicates whether the current batch is the first batch. |
| Last batch | Indicates whether the current batch is the last batch. |
Last updated: 10/6/2025, 10:00:57 PM