Quickbase - Create and update records in bulk from CSV file action
Use this action to create and update records in bulk from a CSV file.
How it works
This action takes CSV file data then creates or updates records in bulk into a Quickbase table. The maximum CSV file size is 20MB. This action either create or update records, based on the merge field you select.
This action divides your CSV file into smaller chunks of rows to submit to Quickbase. When one row in a chunk fails, that whole chunk will fail, but other chunks will not be affected. Note that this action is considered "complete" when your CSV file is successfully submitted to Quickbase, even if some CSV rows are not successfully created/updated into Quickbase records.
HOW TO HANDLE FAILED CSV ROWS
It is important to always handle failed CSV rows in your recipe. Use the output datapill CSV contents of failed records to get all failed CSV rows. Check the job report for details on failures. Correct the failed CSV rows and use this action to submit the rows again.
If your Quickbase table uses default key field - Record ID
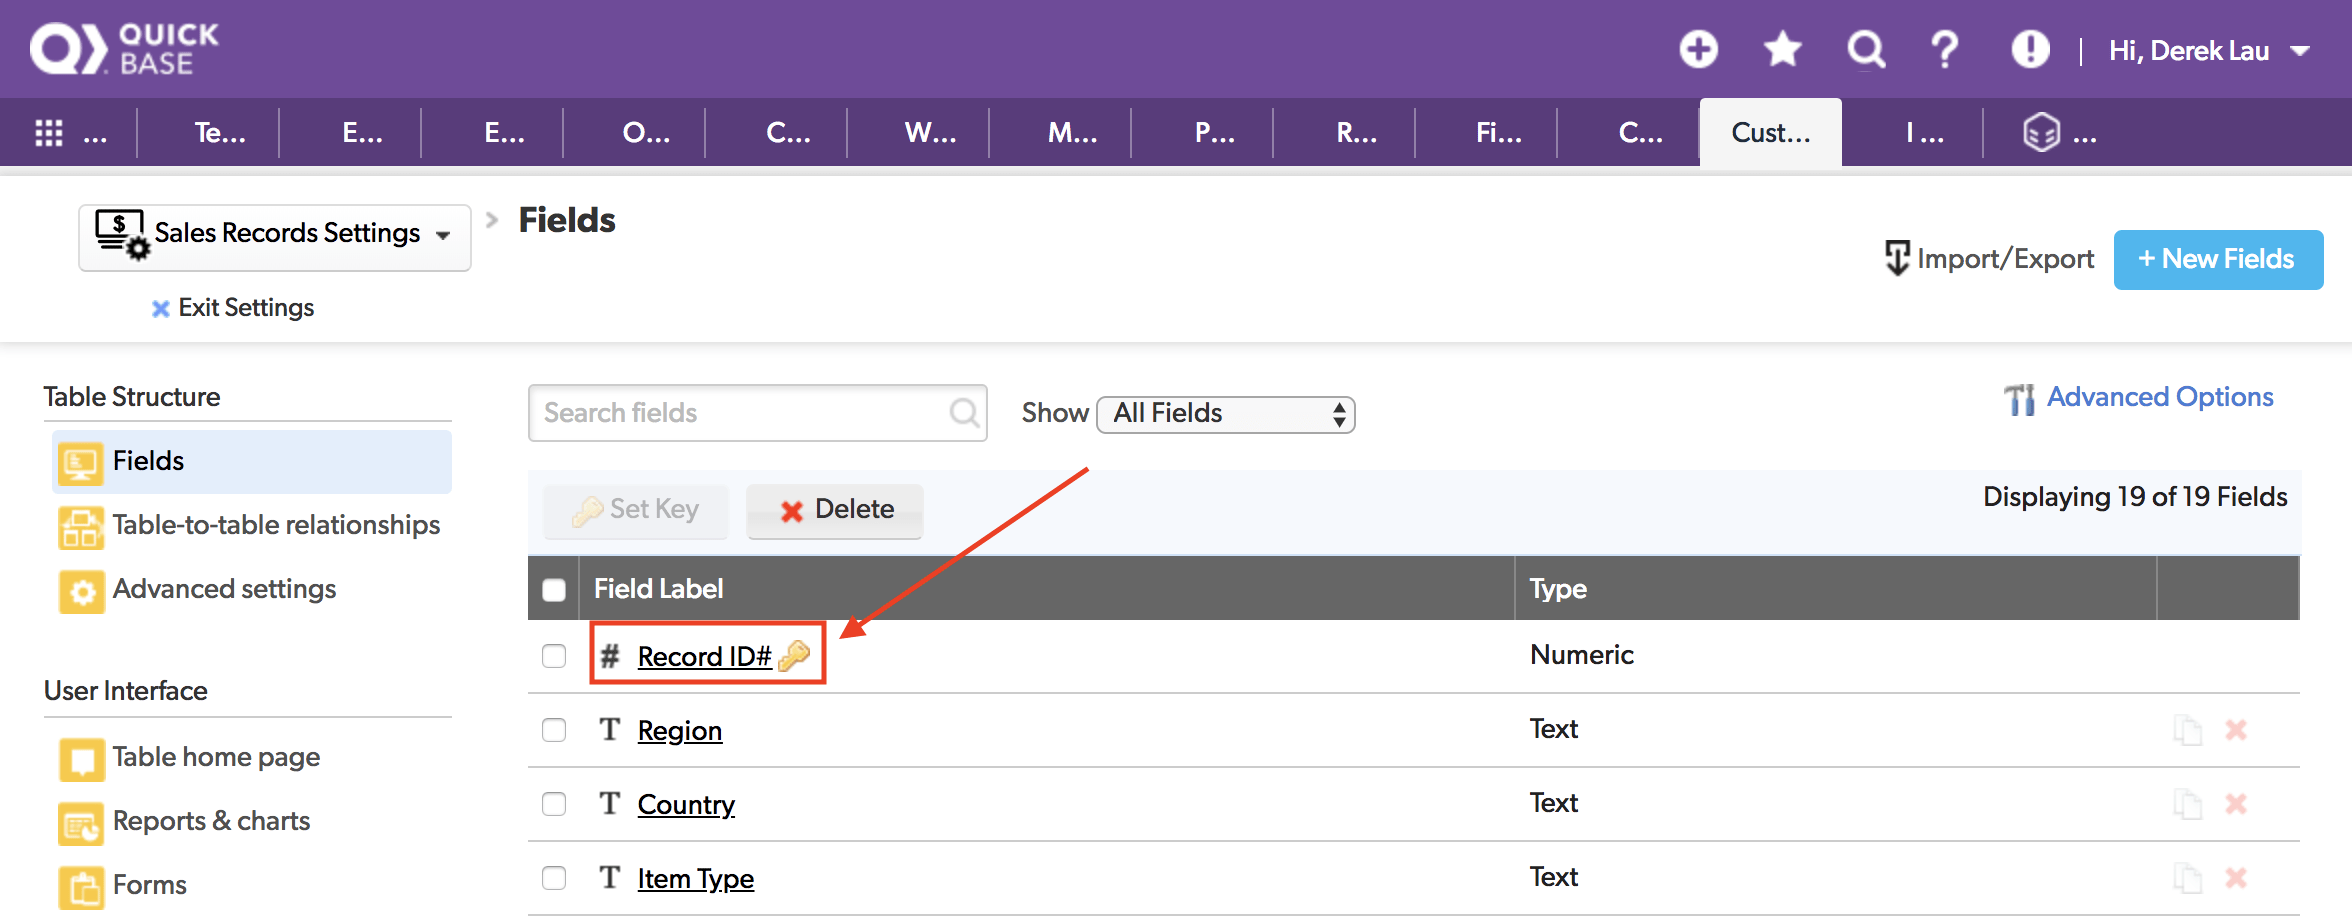 Quickbase default record
The default key field Record ID is automatically generated by Quickbase. In this situation, you can choose to do one of the following:
- Create new records only
- Create and update records using the default key field
- Create and update records using the custom merge field
Create new records only
Navigate to Workato's Quickbase table settings and select Key field as the default Record ID.
Leave the first field labeled Record ID# in the Column mappings section blank. Because the default Record ID is auto-generated, you are not required to provide this ID when creating new records.
Create and update records using the default key field
You can use the default key field Record ID# to create and update Quickbase records at the same time.
Include a column containing a Quickbase record ID in your CSV file.
Navigate to Workato's Quickbase table settings and select Key field as the default Record ID.
Locate the Column mappings section and map your table's Record ID column with the record ID column in your CSV file.
Quickbase uses the record IDs you provide from the CSV file to determine whether to create or update records. Quickbase uses the following rules to process each CSV row:
- If the record ID is empty or doesn't exist in Quickbase, the action creates a new Quickbase record.
- If the record ID is present and exists in Quickbase, the action updates the record.
- If record ID is present, search for the matching record ID in Quickbase then
updatethat record. If no matching record ID is found in Quickbase, that CSV row will fail.
Create and update records using custom merge field
You can use an unique custom merge field like Order ID to create and update records, instead of the default key field Record ID. In this situation, the Order ID is used to determine if a CSV record already exists in Quickbase.
Ensure you have the Order ID column in your CSV file.
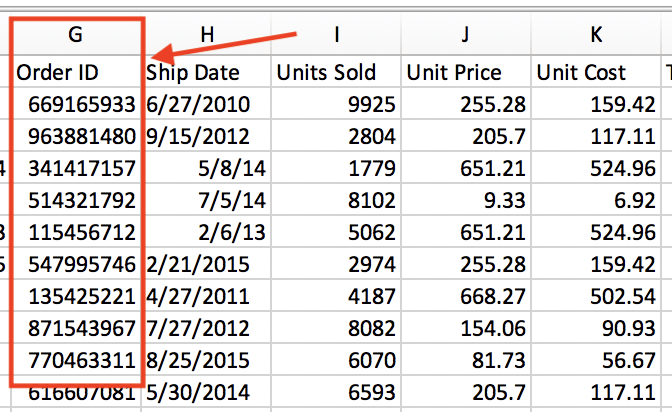 Custom ID column in CSV file
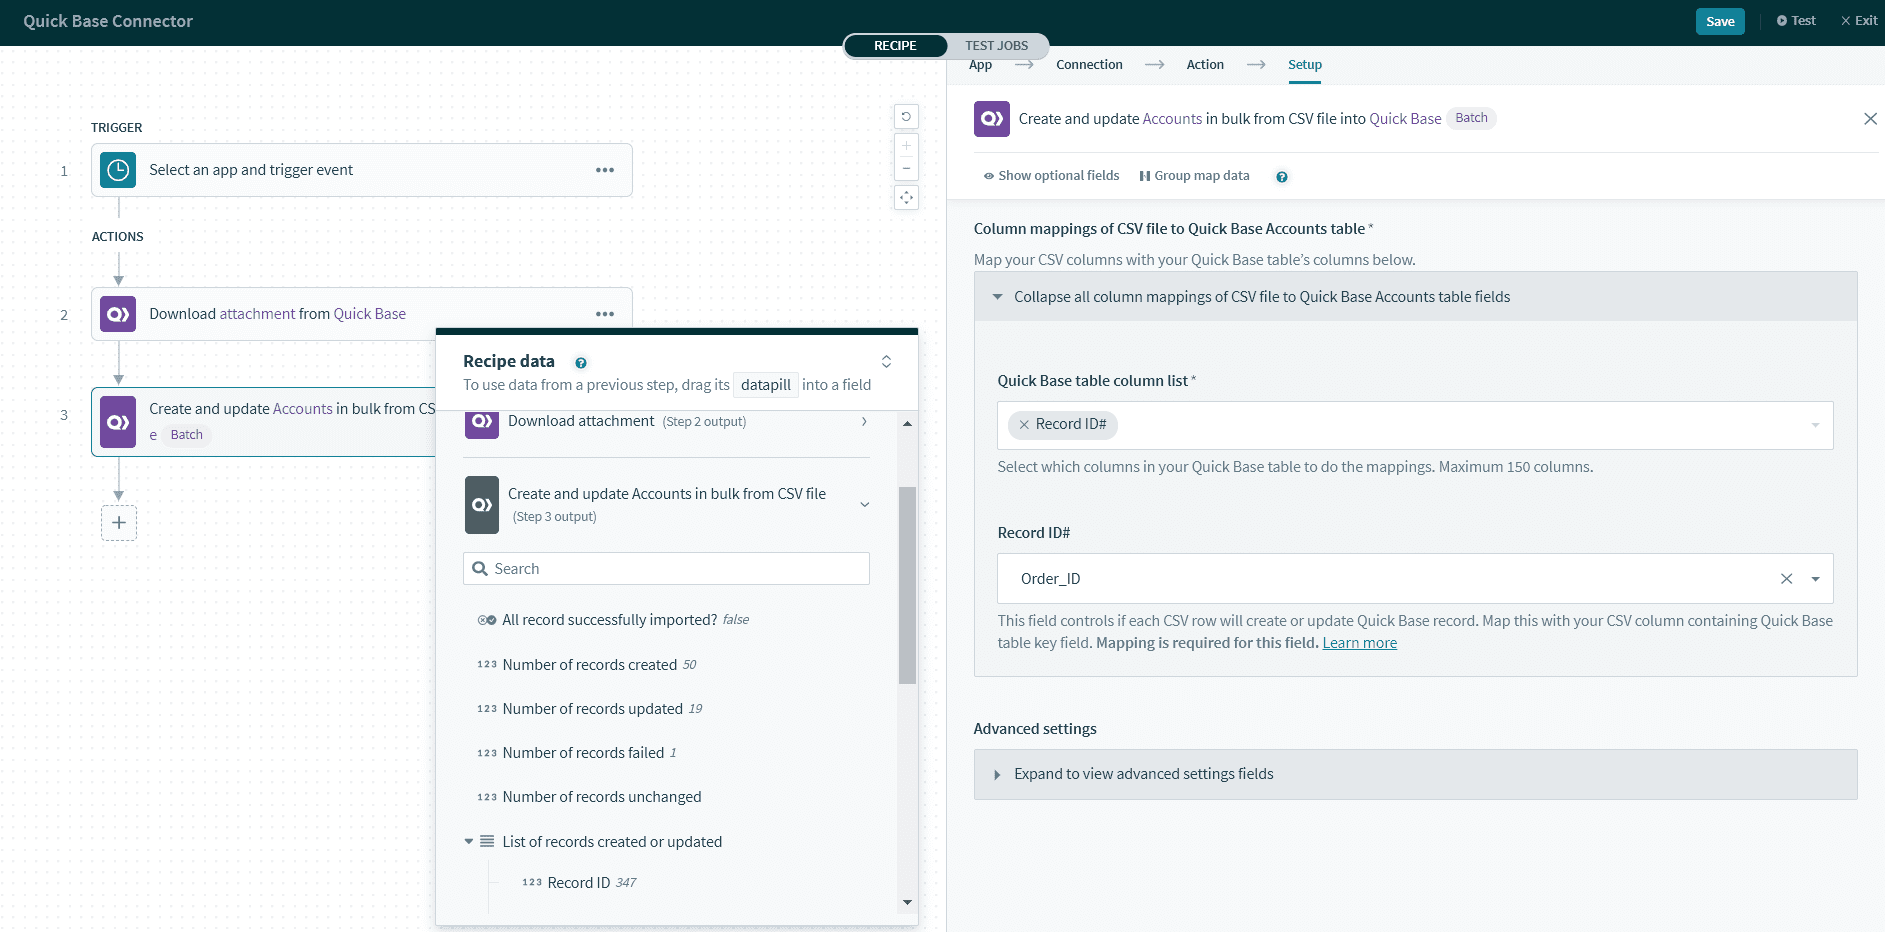
Navigate to Workato's Quickbase table settings, select Use custom merge field, then select the Order ID column in your Quickbase table.
Locate the Column mappings section and map your table's Order ID column to your CSV file's Order ID column.
Quickbase uses the record IDs you provide from the CSV file to determine whether to create or update records. Quickbase uses the following rules to process each CSV row:
- If the ID is empty or doesn't exist in Quickbase, Workato creates a new Quickbase record.
- If the ID is present and exists in Quickbase, Workato updates that record.
If your Quickbase table uses custom key field
In the preceding example, this Quickbase table uses Order ID as the custom key field, instead of the default Record ID. In this situation, you can choose to do one of the following:
- Create and update records using custom key field
- Update records using custom merge field
Create and update records using custom key field
Custom key field is not automatically generated by Quickbase, so you always need to provide it as a column in your CSV file. In this case, Order ID.
Custom ID column in CSV file
In Workato's Quickbase table settings, select Order ID as the Key field.
Map the first field in the Column mappings section with the appropriate key field in your CSV file.
 Custom record ID
Quickbase uses the record IDs you provide to determine whether to create or update records. Quickbase uses the following rules to process each CSV row:
- If ID is present, search for the matching record ID in Quickbase then
updatethat record. If no matching ID is found in Quickbase, create a new Quickbase record with that ID. - If ID is empty, that CSV row will fail.
Update records using custom merge field
You can use an unique custom merge field like Item Type to update records, instead of using the key field Order ID. In this situation, the Item Type is used to determine if a CSV record already exists in Quickbase.
Navigate to Workato's Quickbase table settings, select Use custom merge field, and then select Item Type.
Map the first field in the Column mappings section with the appropriate field in your CSV file.
Quickbase uses the record IDs you provide from the CSV file to update the records. Quickbase uses the following rules to process each CSV row:
- If the ID is present, Workato searches for the matching record ID in Quickbase then updates that record. If no matching ID is found in Quickbase, that CSV row fails.
- If the ID is empty, that CSV row fails.
Handling failed CSV rows
This action uses batch processing. It divides your CSV file into smaller chunks of rows (or batches) before submitting the data to Quickbase. When one row in a chunk is not successfully created or updated in the Quickbase records, Quickbase rejects the entire chunk, but other chunks are not affected.
When some rows fail, however, the action may still be considered complete. This is because Quickbase has successfully accepted the CSV file. Quickbase API sends back a success response with a list of successful and failed records. We recommend that you check the action output to assess whether all chunks processed successfully or not.
Remember to always handle failed CSV rows in your recipe. The output datapill CSV contents of failed records contains all failed CSV rows. You can use this to save the failed rows into a CSV file. This enables you to check the job report for the cause of the error, fix the failed rows, and use this action to re-import the rows later.
This sample recipe saves the failed rows into a CSV file in Box. You can save the CSV file into other file storage systems, using connectors such as Amazon S3, SFTP, On-prem files, and more.
Input
| Field | Description |
|---|---|
| Application | Select an application in your Quickbase account. |
| Application token | This field is required if this application has been configured to require tokens for data access. You can obtain the token from the application's Settings > App properties > Manage Application Token. |
| Table | Select the table where you plan to create the record. You can either select the table from the drop-down, or provide the table ID. |
| Key field | Select your Quickbase table's key field. This setting determines if each CSV row will create or update a Quickbase record. |
| File contents | File contents of the CSV file to import. The file must be comma-separated and in valid UTF-8 format. The maximum file size is 20MB. |
| Contains header line? | Select Yes if your CSV file content has a header line, otherwise, select No. |
| Column names | Provide the column names from your CSV file. |
| Column mappings of CSV file to Quickbase Documents table | Map your CSV columns with your Quickbase table’s columns. |
| Quickbase table column list | Select which columns in your Quickbase table to map to. Workato can support a maximum of 150 fields from a Quickbase table. If your table has more than 150 columns, select the fields you plan to use. These fields are dynamic and change based on the Table you select. |
| Document name | This field controls if each CSV row will create or update Quickbase record. Map this with your CSV column containing Quickbase table key field. Mapping is required for this field. |
| Chunk size (KB) | Your CSV file is automatically divided into chunks of this size (in kilobytes) to not exceed Quickbase API limit. The maximum size is 5120 KB. |
Configure the following sections to set up this action:
Quickbase table
Configure the Quickbase table where you plan to import the data.
Pay attention to the field Key field. It is important to select the correct column that represents Quickbase key field in your table. This ID must be unique for each record. Workato uses this field to search for and update the correct record. You can also switch to Use custom merge field.
Quickbase uses a field named Record ID by default. However, you use a custom column in place of the record ID, for example Sales Order ID or Customer ID.
CSV file input
Provide the contents of your CSV file and describe the column structure.
You can get the File contents datapill from other connectors' actions or triggers. Some examples include: New CSV file in folder trigger from file connectors, such as Box, Amazon S3, On-prem files, or Workato tools Compose CSV action.
Note that the file contents must be comma-separated and in UTF-8 format.
Column mappings
This section lists all columns in your Quickbase table. You must map these columns with the respective columns in your CSV file.
Pay attention to the first input field, Record ID. Make sure to map it with the correct record ID column in your CSV file, so Workato can use that to search for and update records in Quickbase. The following sample CSV file uses column Quickbase Record ID:
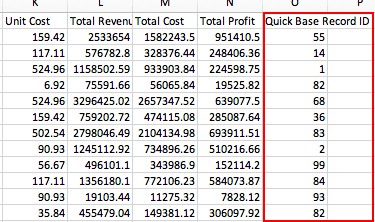 Record ID in CSV file
Advanced settings
This action uses batch processing to divide your CSV file into smaller chunks of rows before submitting the data to Quickbase. This allows you to submit a large CSV file without exceeding the Quickbase API limit.
You can use Chunk size (KB) to customize the chunk size (in kilobytes) to meet your requirements. In general, larger chunk sizes shorten the transfer time of a large file.
Output
| Field | Description |
|---|---|
| Number of records created | Number of records successfully created in Quickbase. |
| Number of records updated | Number of records successfully updated in Quickbase. |
| Number of records failed | Number of CSV rows that failed to be created or updated into Quickbase records. |
| Number of records unchanged | Number of records unchanged after this action. |
| List of records created or updated | This is a List datapill. This list includes the Quickbase Record IDs of all successfully created and updated records. |
| CSV contents of failed records | This datapill includes the contents of all CSV rows that failed to be created or updated into Quickbase records. You can use this datapill to create a CSV file containing all failed rows, for you to correct and re-submit later. |
| List of chunks | This is a List pill. Since the action divides your CSV into smaller chunks of rows, this list includes all of those chunks with their attributes below. |
| Chunk number | The ID of this chunk. |
| Successful import to Quickbase? | True or False. |
| Starting row | The first CSV row in this chunk |
| Ending row | The last CSV row in this chunk |
| Error code | The error code Quickbase returns when there is problem importing this chunk. |
| Error text | The error message Quickbase returns when there is problem importing this chunk. This is useful when you need to determine what is wrong with your CSV file. |
Last updated: