# Optional: Configure IDocs to/from Workato in SAP
This section consists of the following steps:
- Define a port for Workato
- Create a logical system for Workato
- Create partner profile for Workato
- Create a distribution model for the partner
REQUIRED STEPS
If you plan to only use RFCs and not IDocs with the SAP RFC connector, skip to Create a Workato integration user in SAP.
LOGICAL SYSTEM/PARTNER PROFILE, PROGRAM ID, AND RFC DESTINATION
As a requirement for an IDoc exchange through the Workato RFC connector, the logical system representing Workato and the program ID from the RFC destination used for the Workato connection must have the same name. Alternatively, you must configure at least one IDoc message type in the Outbound partner profile in WE20. This message type must have a port corresponding to the program ID from the RFC destination used for the Workato connection.
To maintain consistency, we recommend using the same name for the logical system, program ID, and RFC destination in SAP for Workato whenever possible.
This recommendation is not mandatory for the Send IDoc (Advanced) action.
# Configuration for partner type LS
# Define a port
Log in to the SAP system and go to the transaction code WE21 to define a port for sending and receiving IDocs with the Transactional RFC type.
Click Create and when prompted for your port, you can select to either create a new port or have one generated for you.
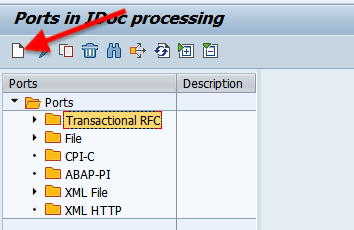
Save this port name as you must use it later in the ALE configuration process.
Enter your RFC Destination created in the preceding steps (refer to this section for more details). In this example, the RFC Destination is WORKATOTST.
# Create a Logical System
Go to transaction code SALE and define a Logical System dedicated for Workato.
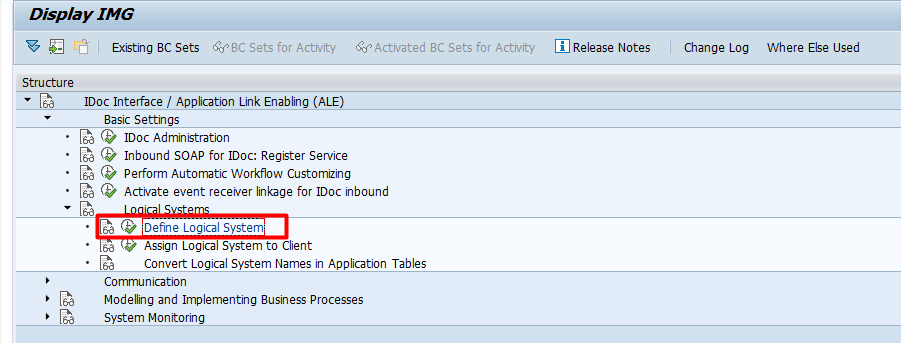
Create a new Logical System to interface IDocs. The name you select is also used for the Partner Profile created in the following steps.
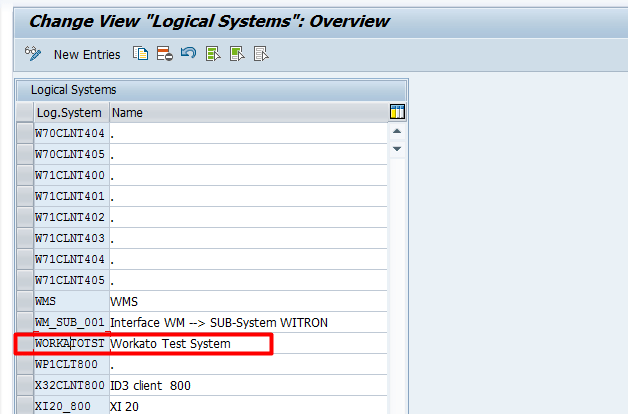
# Create a Partner profile
Go to transaction code WE20 to define a Partner profile to send and receive IDocs.
Create a Partner profile with the LS (Logical System) type. Use the same name as the Logical System in the preceding step.
Define the Message types that you plan to send and receive in Workato.
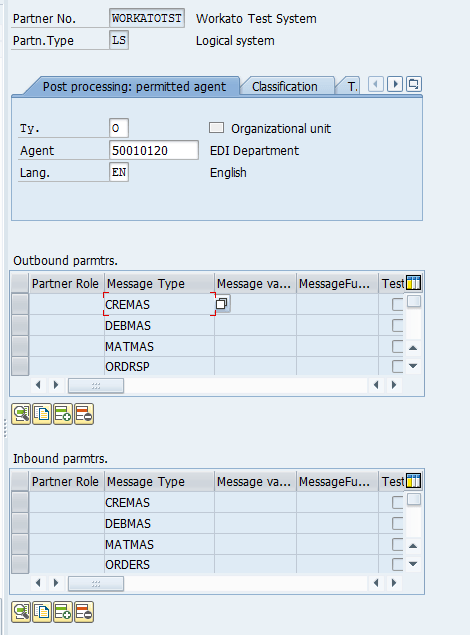
- Outbound parameters
- Outbound parameters correspond to IDocs sent from SAP to Workato.
- Inbound parameters
- Inbound parameters correspond to IDocs sent from Workato to SAP.
MESSAGE TYPES
The message types you define here are the only message types you can use in your Workato recipes.
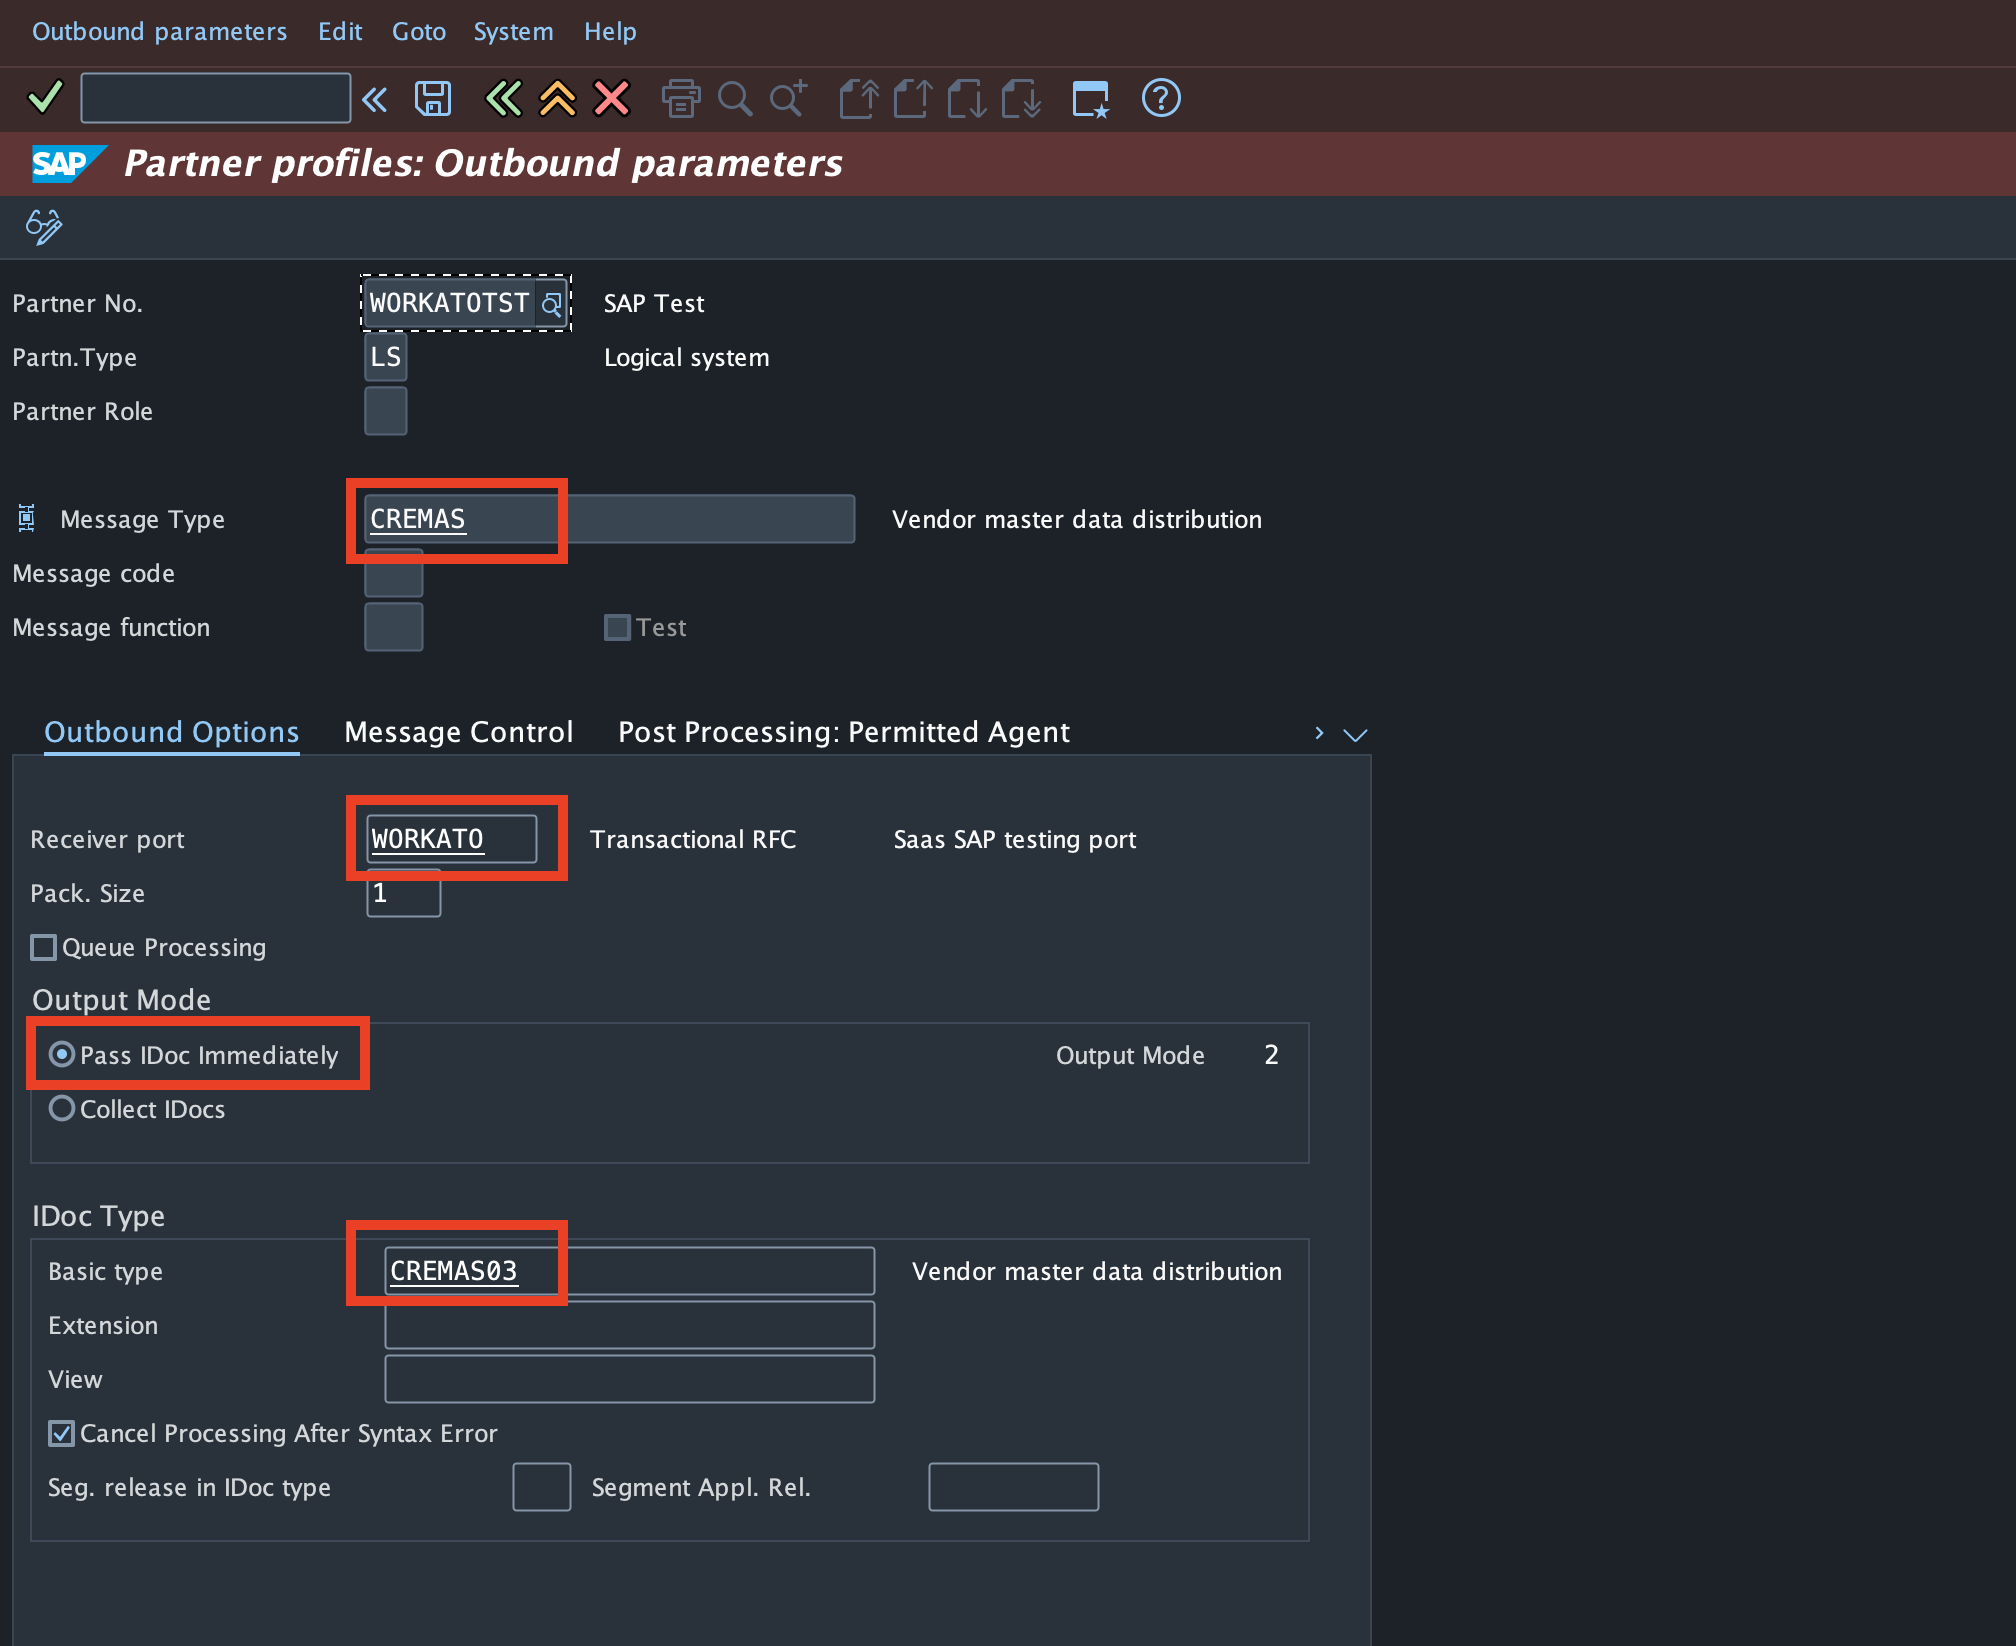
While adding Outbound parameters, when prompted for the Basic Type of the IDoc message type, register all of the IDocs you plan to use individually. For IDocs with extensions, ensure that you enter the extension as well.
UNRELEASED SEGMENTS, EXTENSIONS
We do not populate schema for unreleased IDoc segments and extensions. If you plan to use the extended IDocs, ensure that you release the custom extension and segments where applicable.
Provide the same port you defined in the preceding steps when prompted for your receiver port, and then toggle the Output Mode to Pass IDoc Immediately.
HANDLE BATCH TRIGGER
To configure batch trigger for sending IDocs from SAP to Workato, select Collect IDocs where ABAP program RSEOUT00 can be scheduled in the background to trigger IDocs at regular intervals and the field “Pack. Size” in the partner profile will be used to control how many IDocs are submitted for processing at a time. Additionally, please refer to the section New IDocs batch trigger of this guide for more information.
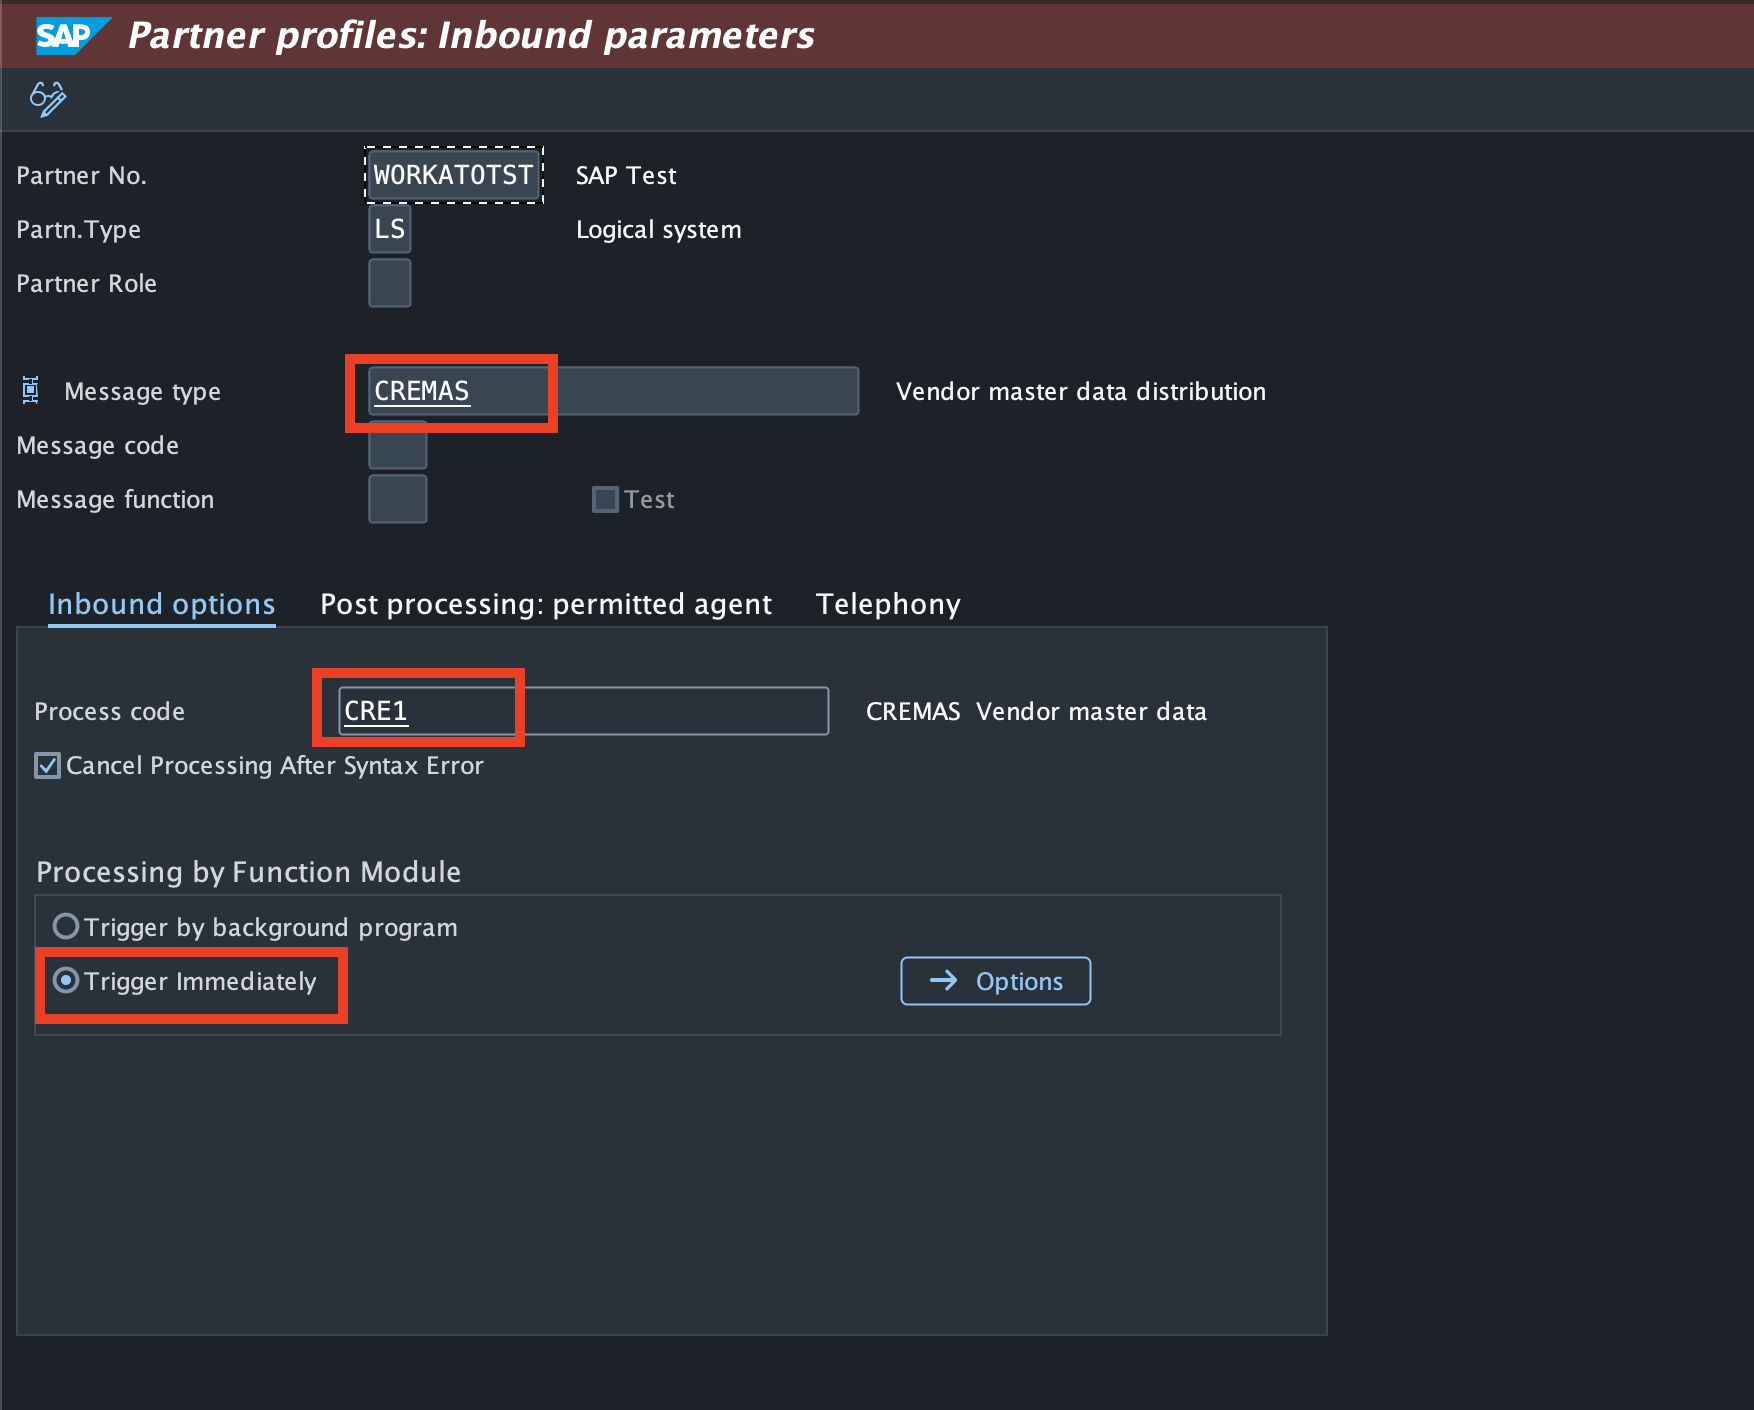
Add the Inbound parameters you plan to use when prompted for the process code, and choose the appropriate process code for the message type.
Toggle the Processing by Function Module to Trigger Immediately and select the Cancel Processing After Syntax Error check box.
# Create a distribution model and add message types
Complete the following steps to create your distribution model and add message types:
Go to transaction code BD64 to create a Distribution Model for IDocs that interfaces with the Workato system. The direction of flow for the IDocs are configured in this transaction based on the attributes Sender, Receiver, and Message type.
 Distribution Model
Click the Create Model View icon and provide a relevant Short text as the description and Technical Name for the model view. For example, Short text can be Model view for Workato and Technical Name can be WORKATOTST.
Click the model view you created in the previous step and Add Message Type across Sender and Receiver respectively to configure both inbound and outbound scenarios.
Distribute the model view under Edit > Model View > Distribute to validate the ALE configuration. The following image shows the expected output if the ALE configuration is intact:

ALE INTERFACE FOR BAPI
We support ALE interface for BAPIs which are created in transaction code BDBG. Complete the following prerequisite steps to configure your ALE interface:
Add BAPI in the distribution model in transaction code BD64.
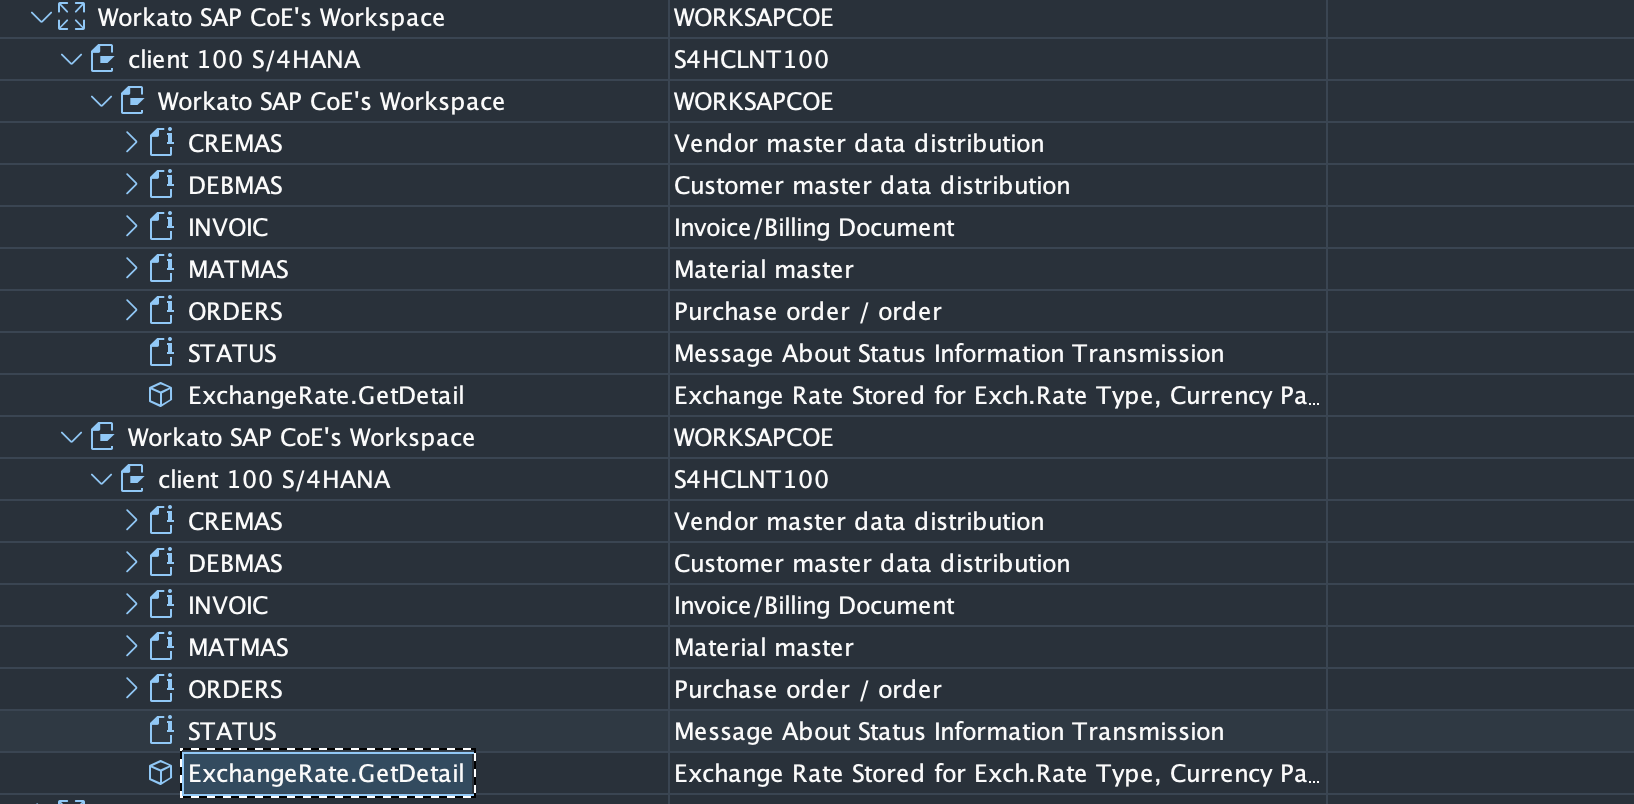 Example: ExchangeRate Object added with method GetDetail
Add one dummy message type (for example:SYNCH) in the model view for both inbound and outbound scenarios if you only intend to use ALE interface for BAPI.
 Distribution Model
Add message type in inbound (process code: BAPI) and outbound profile parameters in transaction code WE20.
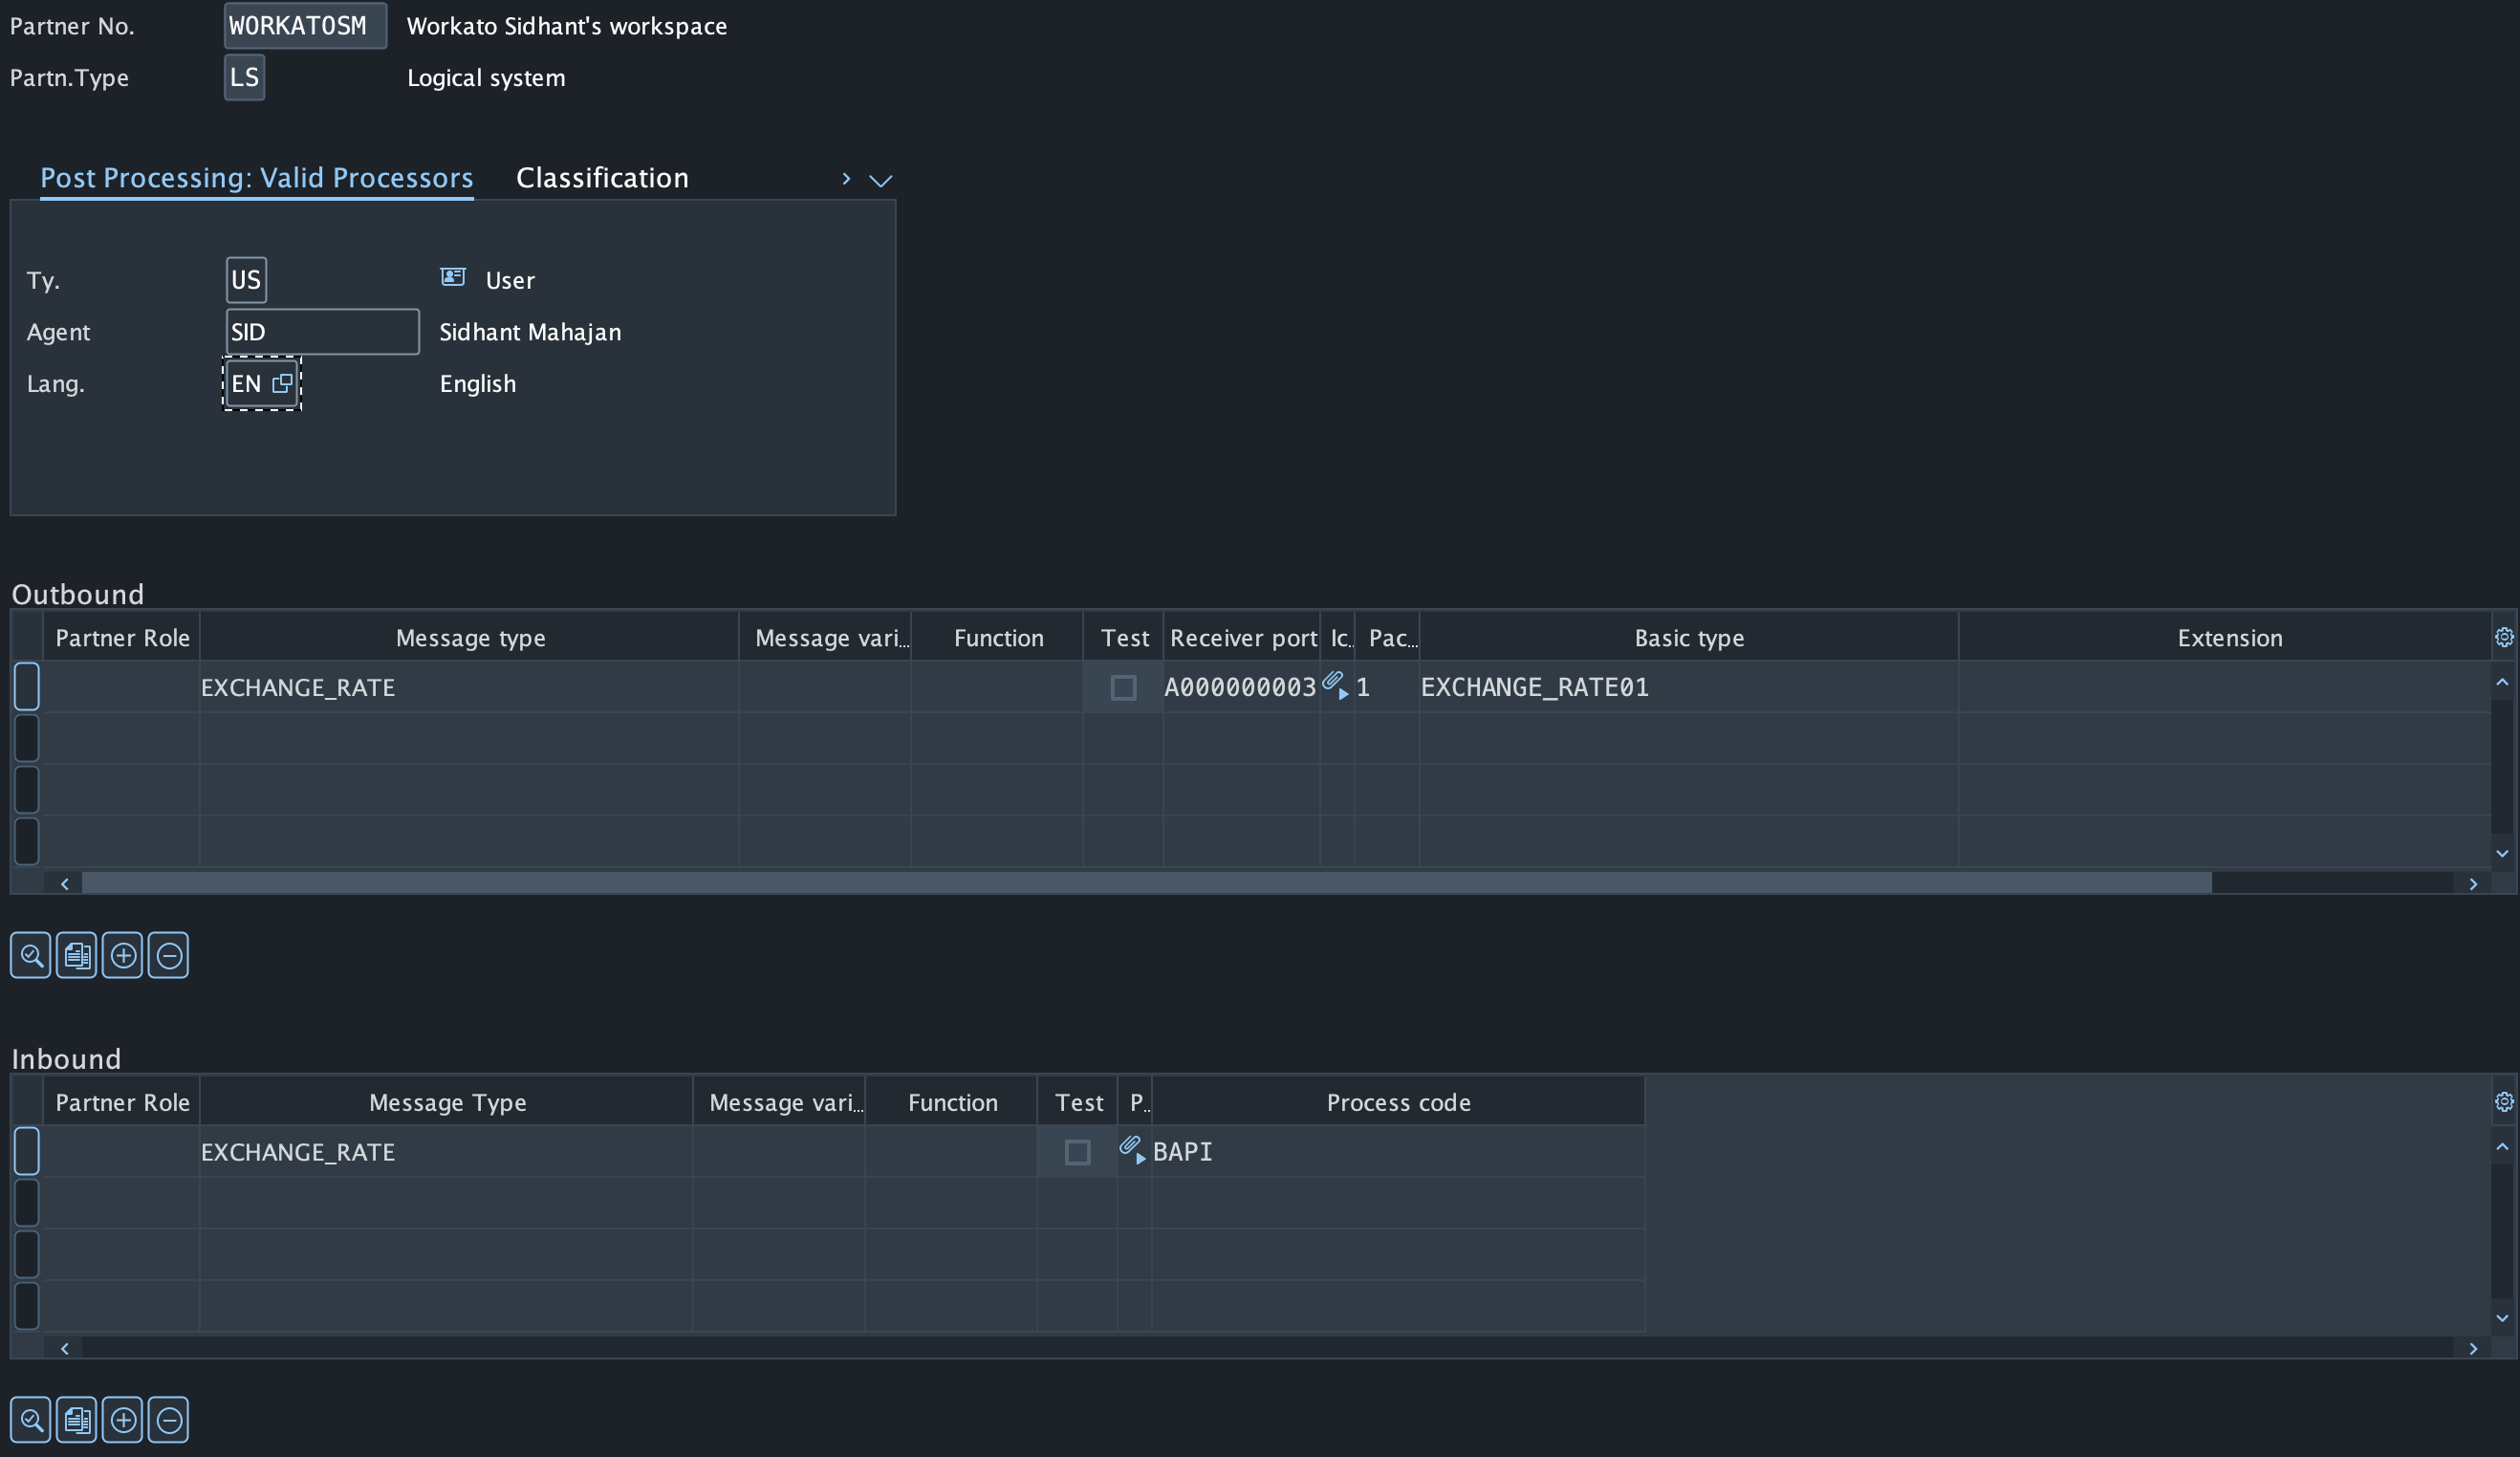 Partner profile
# Example
- Sender:
T90CLNT090(SAP system)- Receiver:
WORKATOTST(Logical system for Workato)- Message type:
DEBMAS,MATMAS,CREMAS
The following configuration in the distribution model enables SAP to send DEBMAS IDocs to Workato. A Workato recipe receives them using the New IDoc trigger.
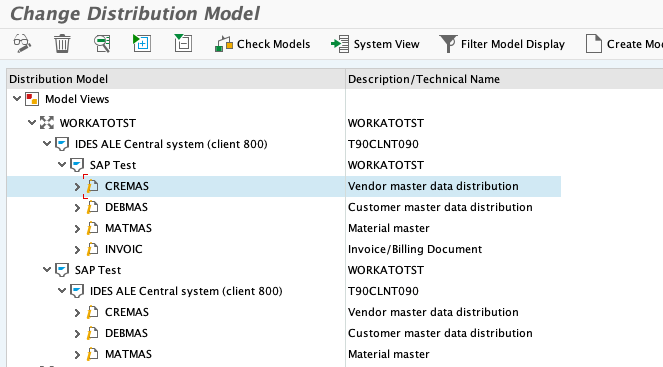
Create separate entries for each inbound and outbound IDoc registered on your partner profile in WE20. In the preceding example, the image demonstrates under the model view, WORKATO Test System Model, that:
- T90CLNT090 can send WORKATOTST 4 types of IDocs:
CREMAS,DEBMAS,MATMAS, andINVOIC. These correlate to the OUTBOUND parameters set in your Partner profile. - WORKATOTST can send T90CLNT090 3 types of IDocs:
CREMAS,DEBMAS, andMATMAS. These correlate to the INBOUND parameters set in your Partner profile.
# Configuration for non-LS partner types
We support all non-LS partner types including B, BP, GP, KU, LI, and US.
# Prerequisites
Configure the partner profile and receiver port in transaction code WE20 and WE21 respectively, to use IDoc trigger in Workato for non-LS partner types.
NEXT STEPS FOR SEND IDOC ACTION ONLY
The following steps are mandatory for the Send IDOC action only and aren't required for your trigger. However, the following steps don't apply to the Send IDoc (Advanced) action. Configure only the respective partner types required for the Send IDoc (Advanced) action.
Complete the following steps to load the IDoc schema for a non-LS partner type in the Send IDoc action in Workato even if you do not plan to use partner type LS:
Add the same message type to the inbound parameters of the partner type LS as well in transaction code WE20.
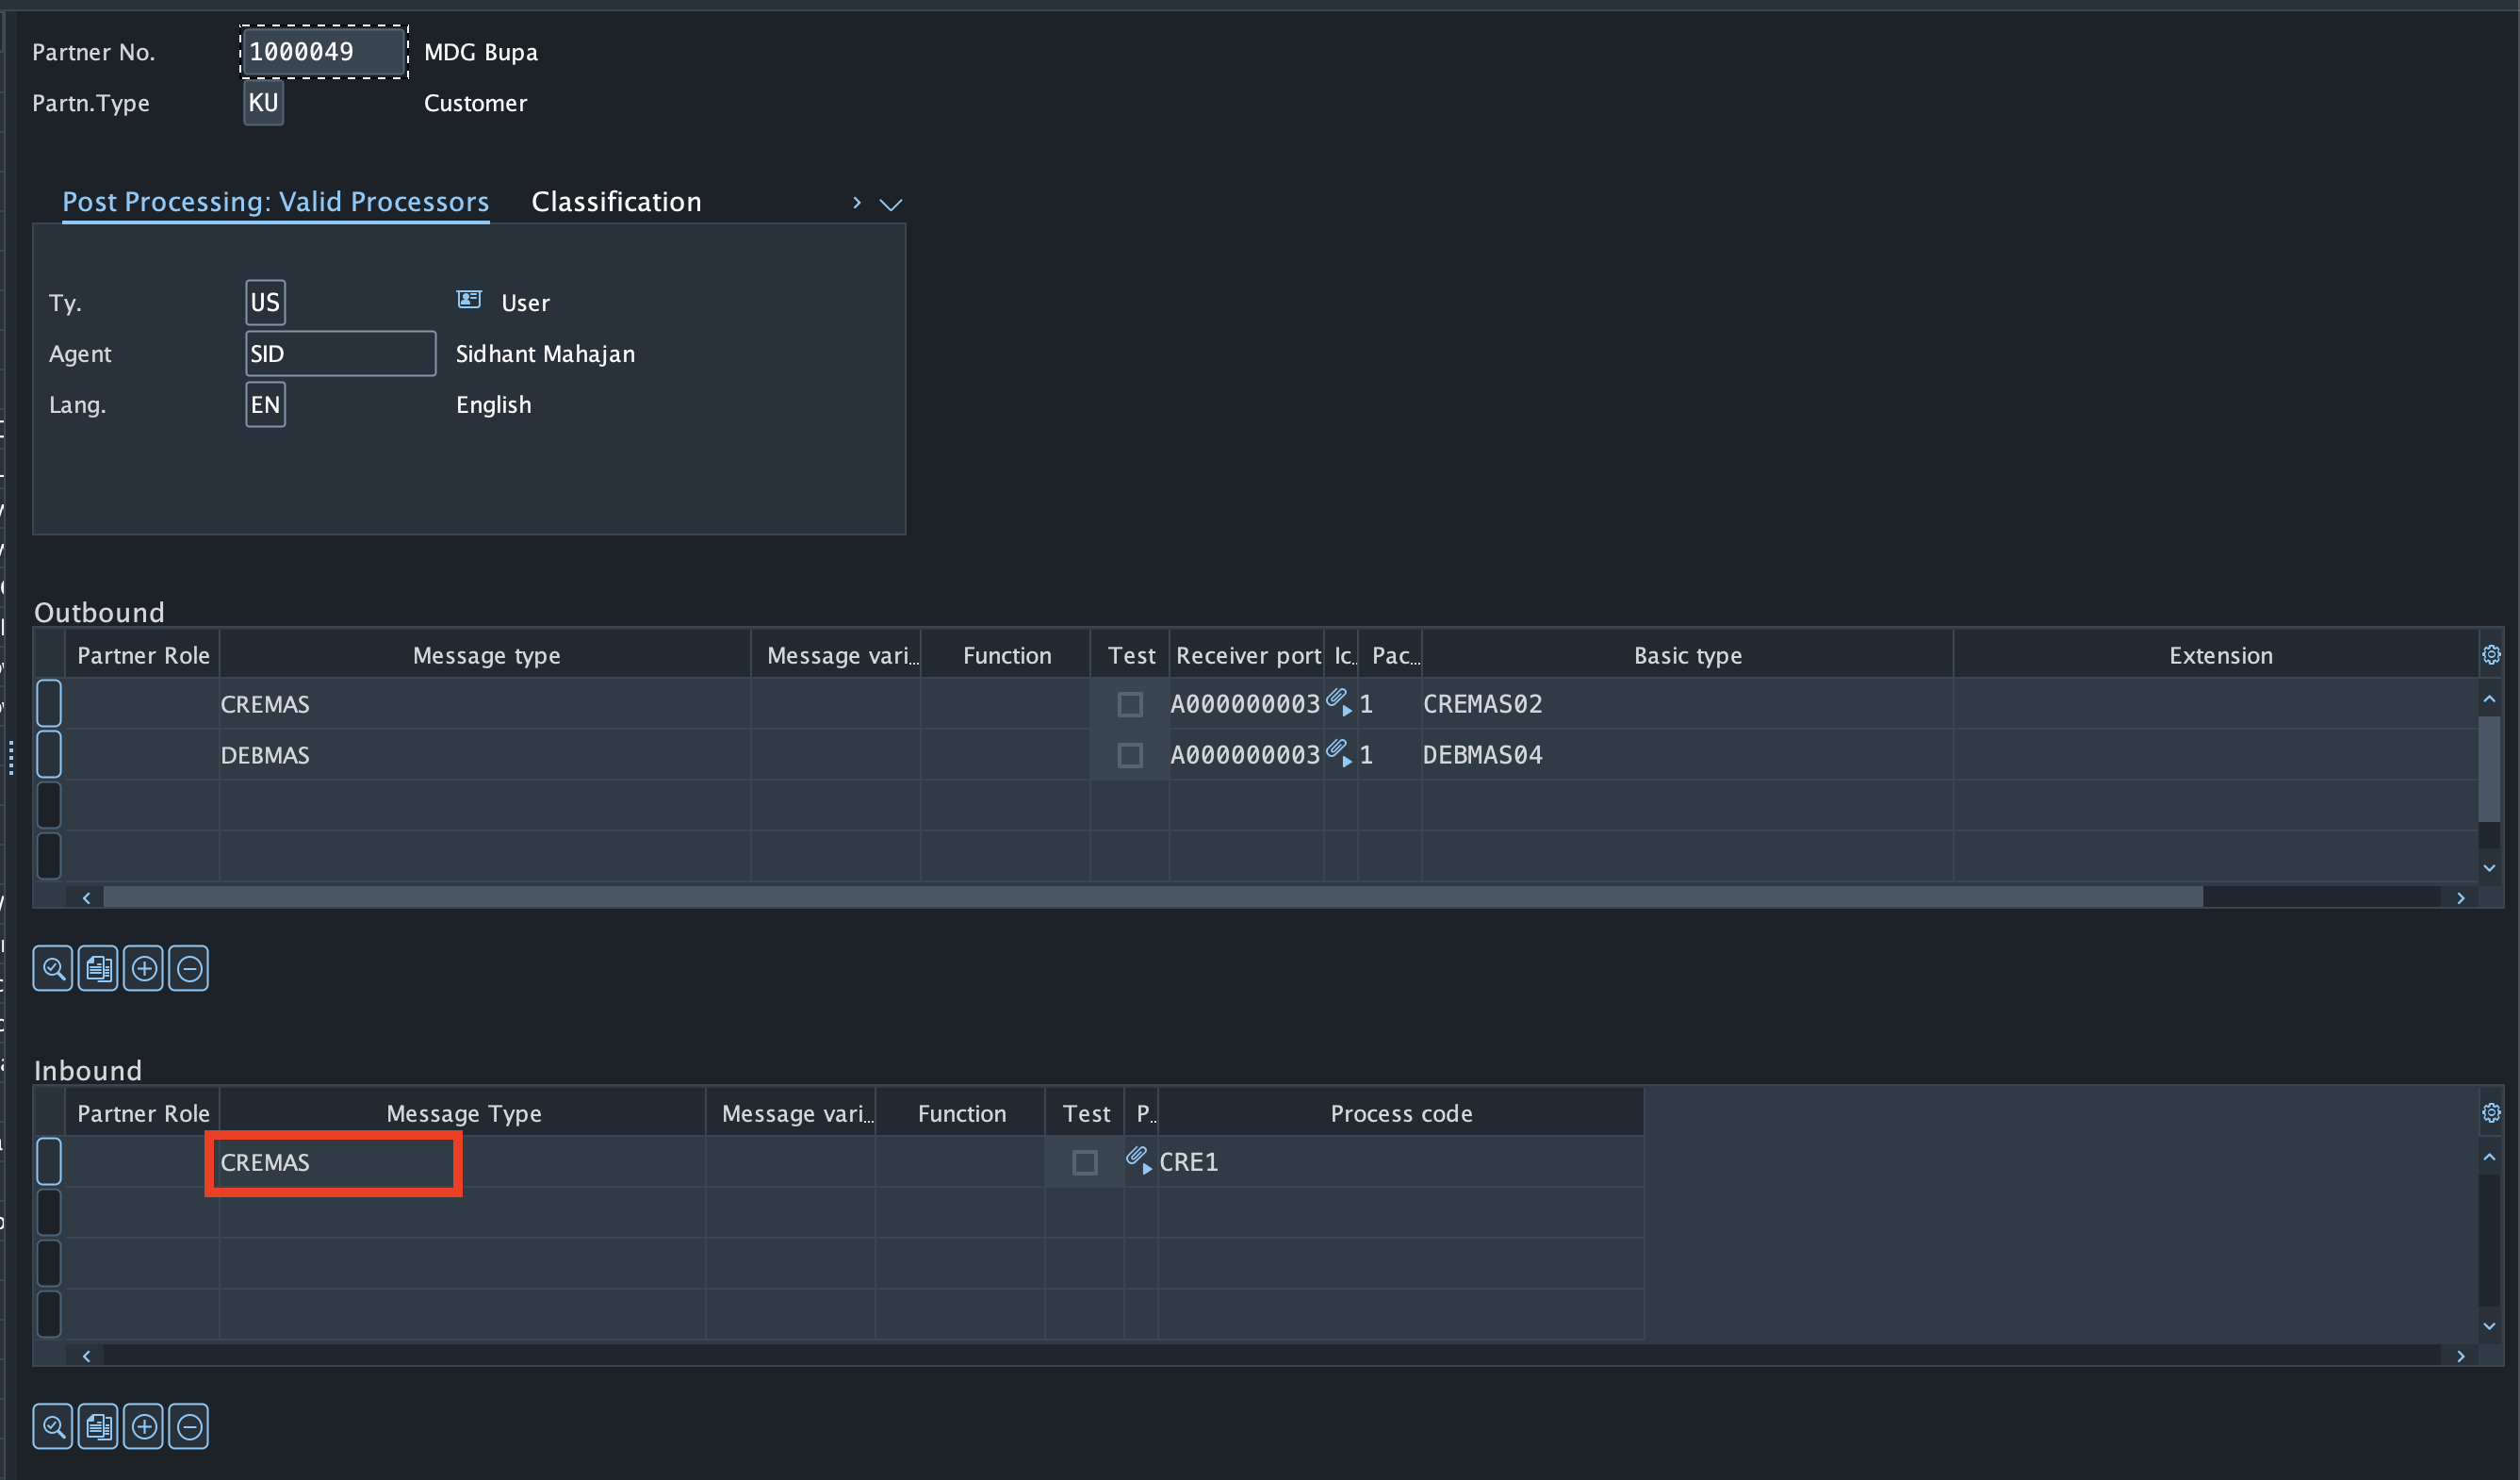 Example from Partner type KU
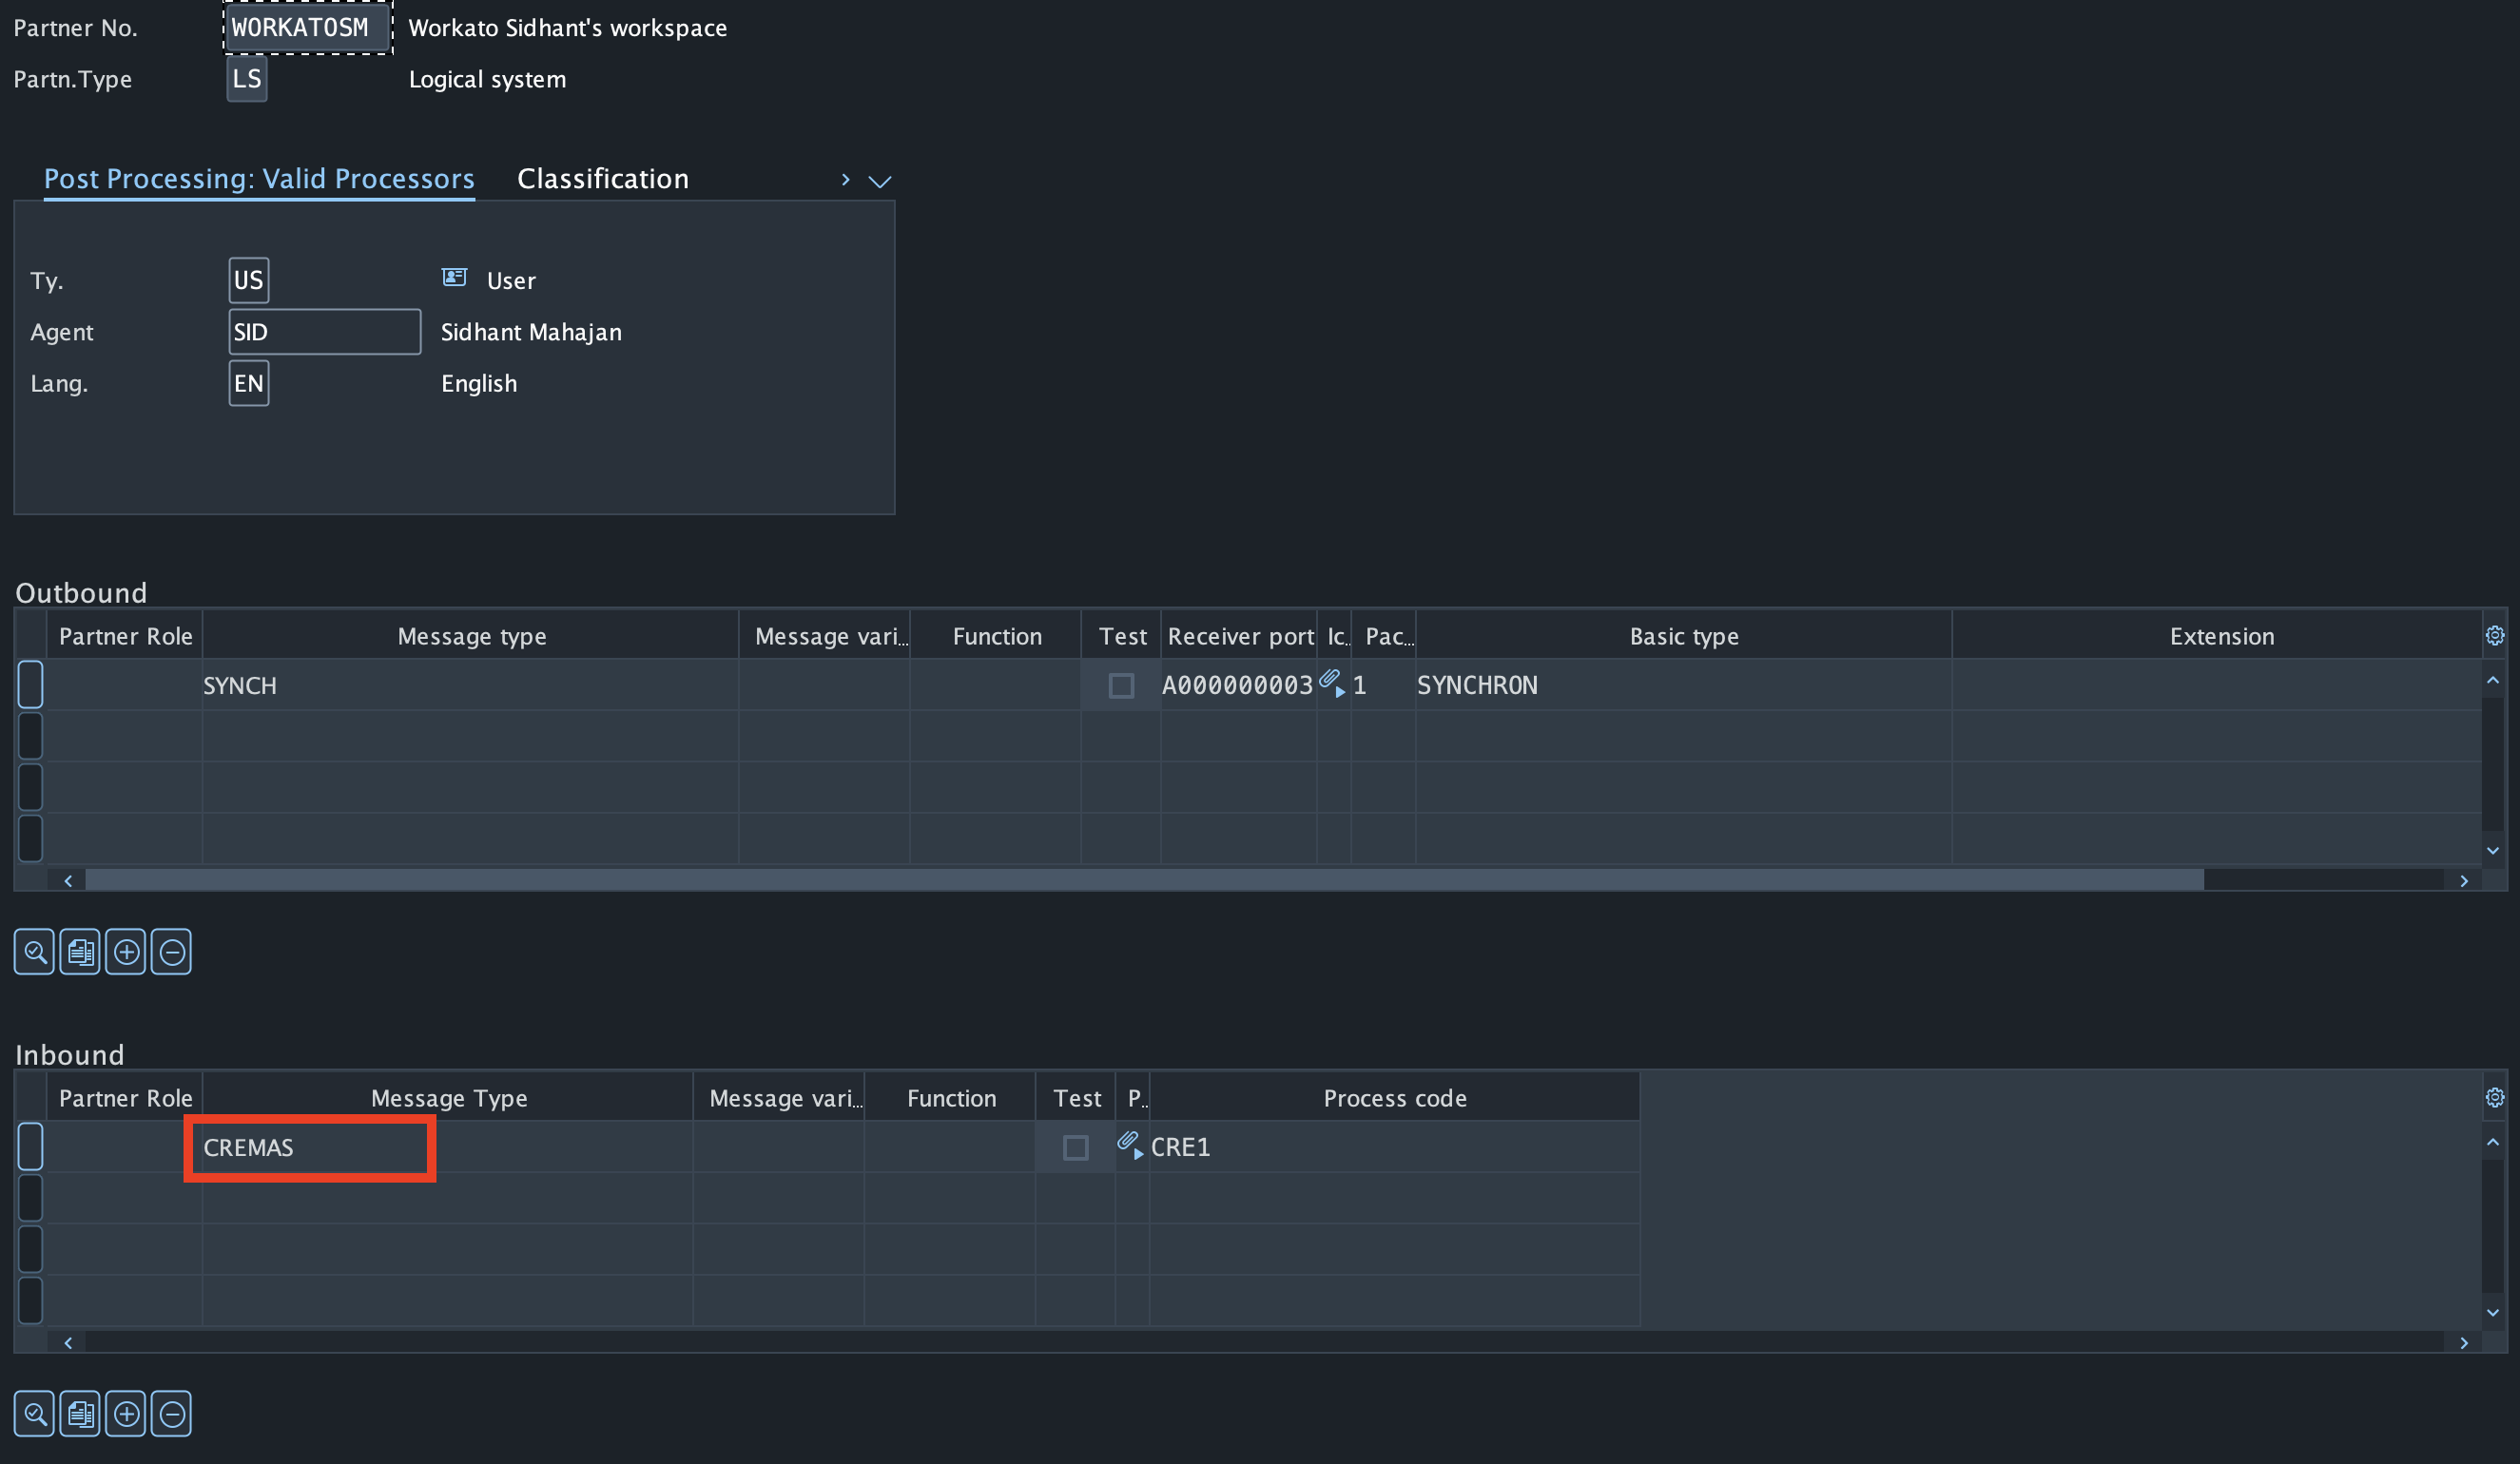 Example from Partner type LS
Configure outbound parameters in transaction code WE20 to use the same receiver port for non-LS partner types as used and created for partner type LS.
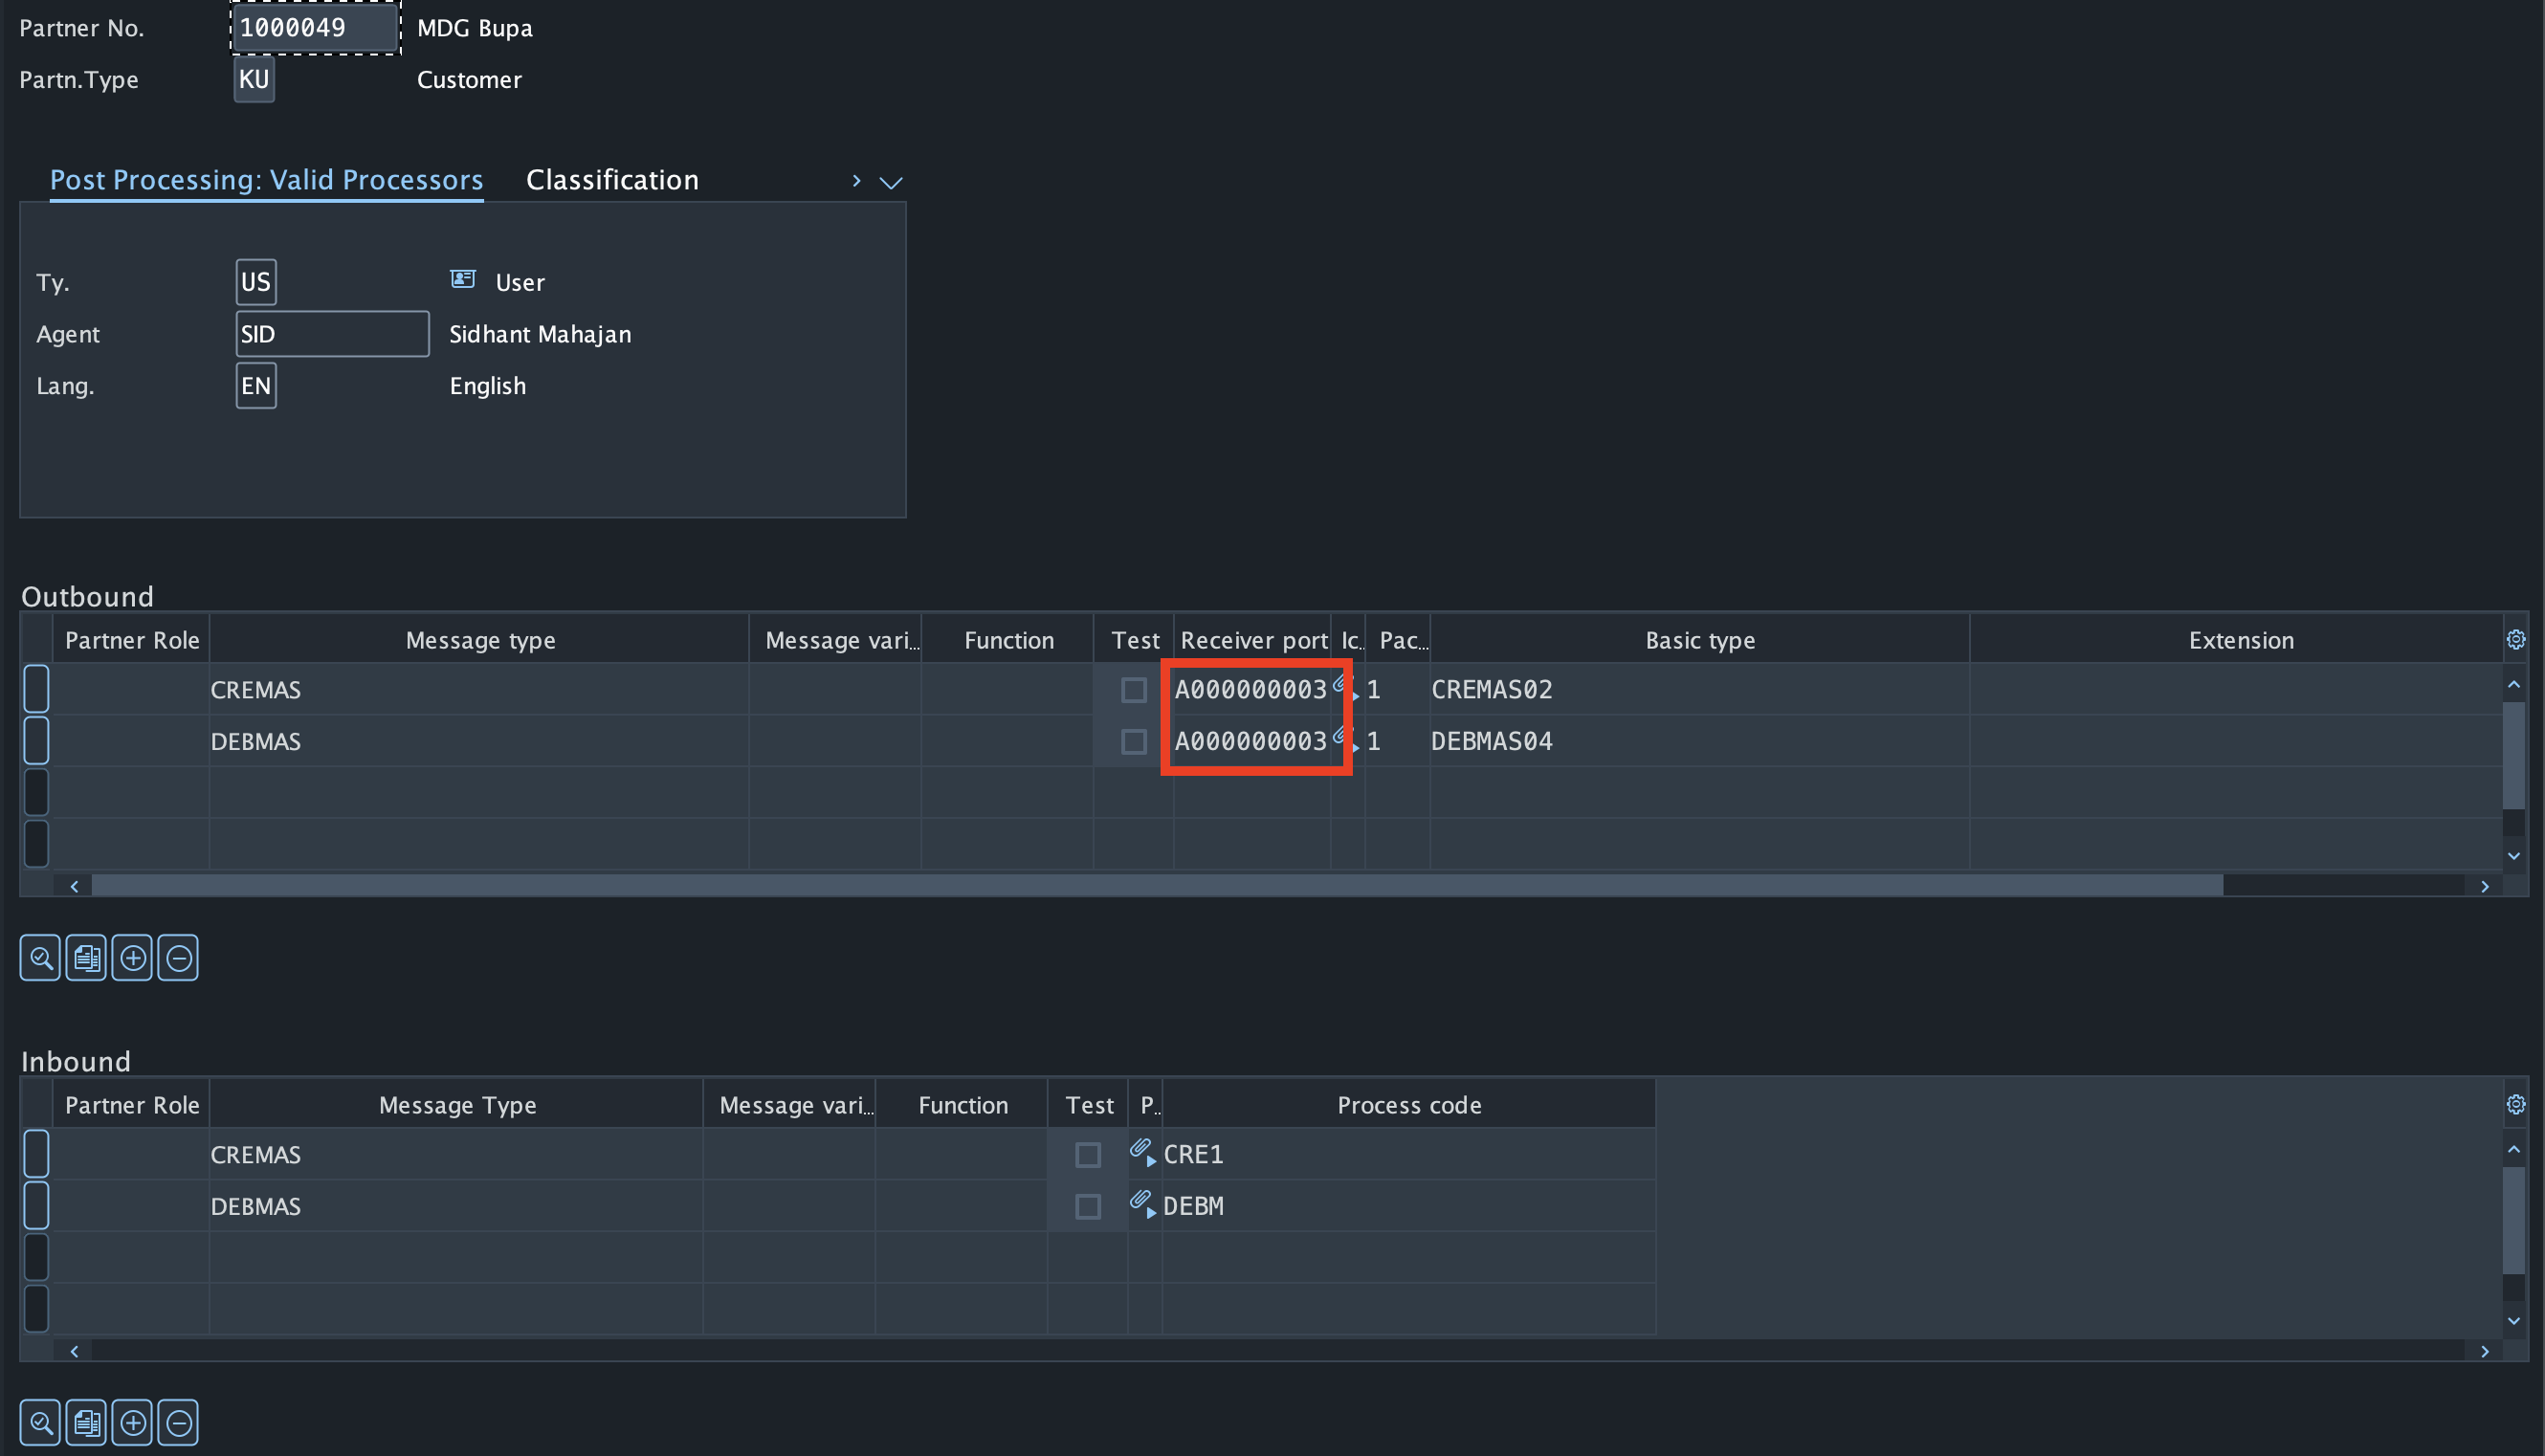 Example from Partner type KU
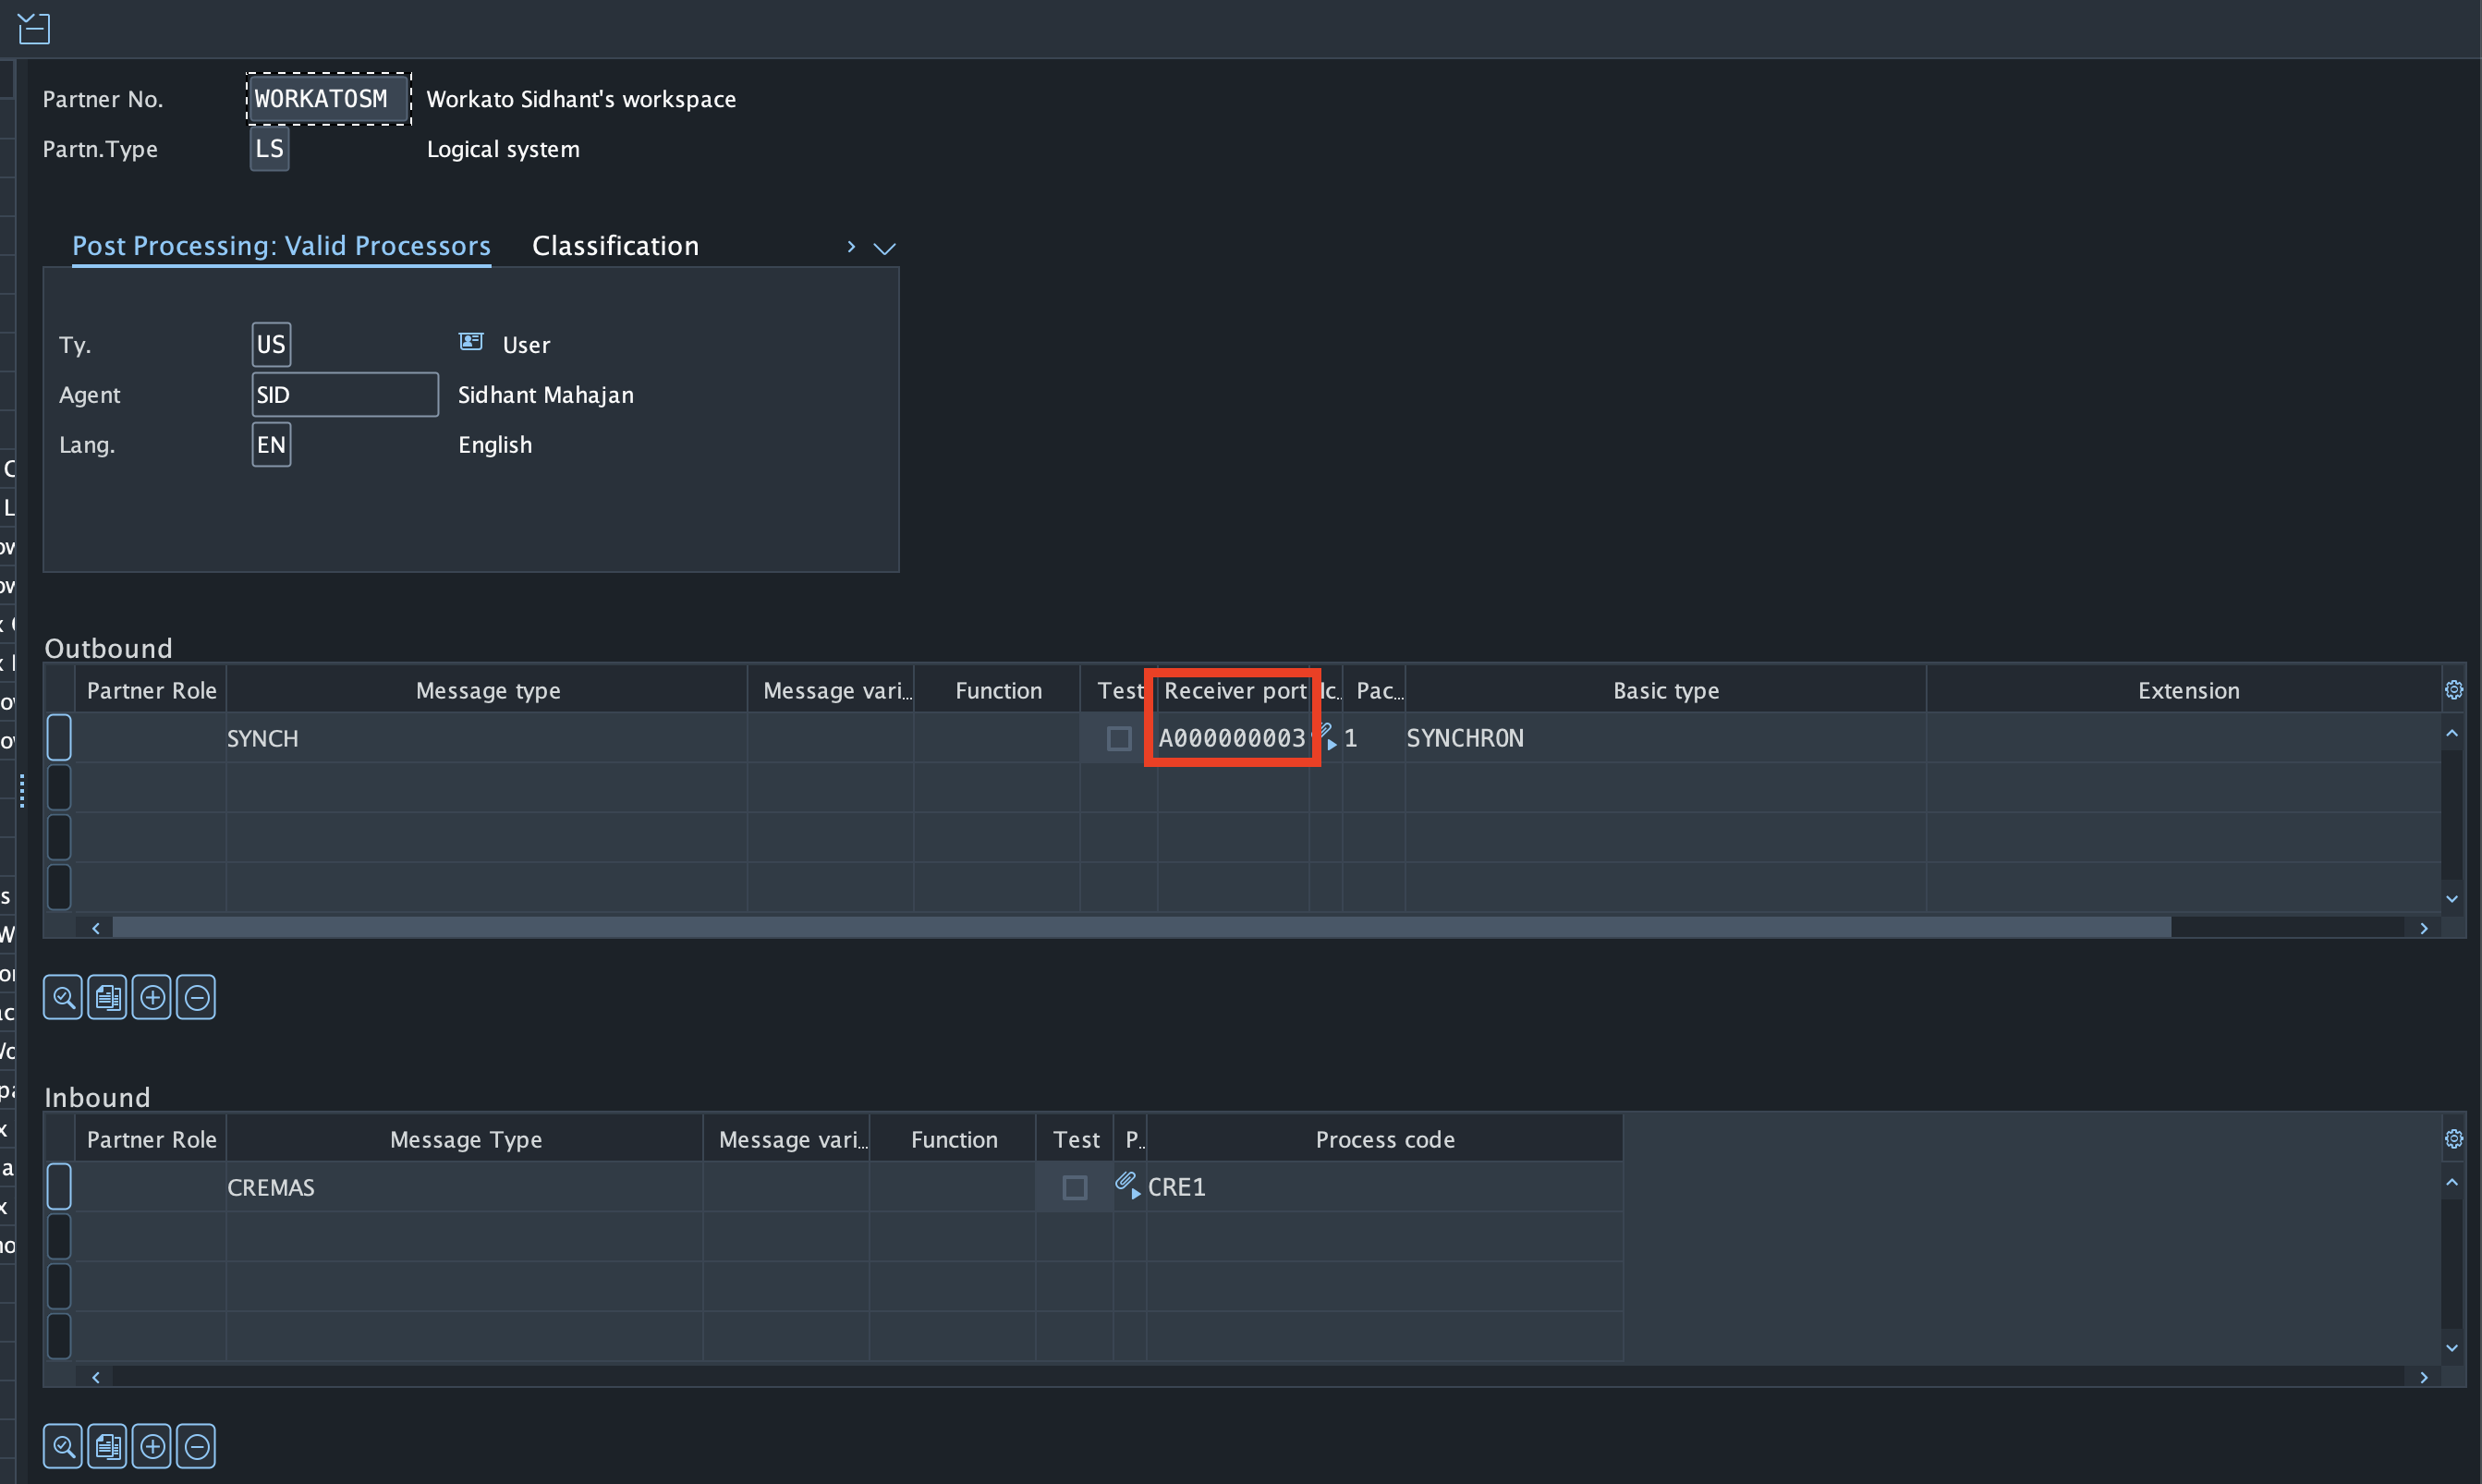 Example from Partner type LS
Create a distribution model with both inbound and outbound scenarios (using logical systems) in transaction code BD64. You can use a dummy message type, for example: SYNCH.
 Distribution Model
# Send IDoc action
Complete the following steps to send your IDoc action:
Select the IDoc name from the drop-down to load the IDoc schema.
Modify the RCVPRT (Partner type of receiver) in EDI_DC40 segment, refer here for more details.
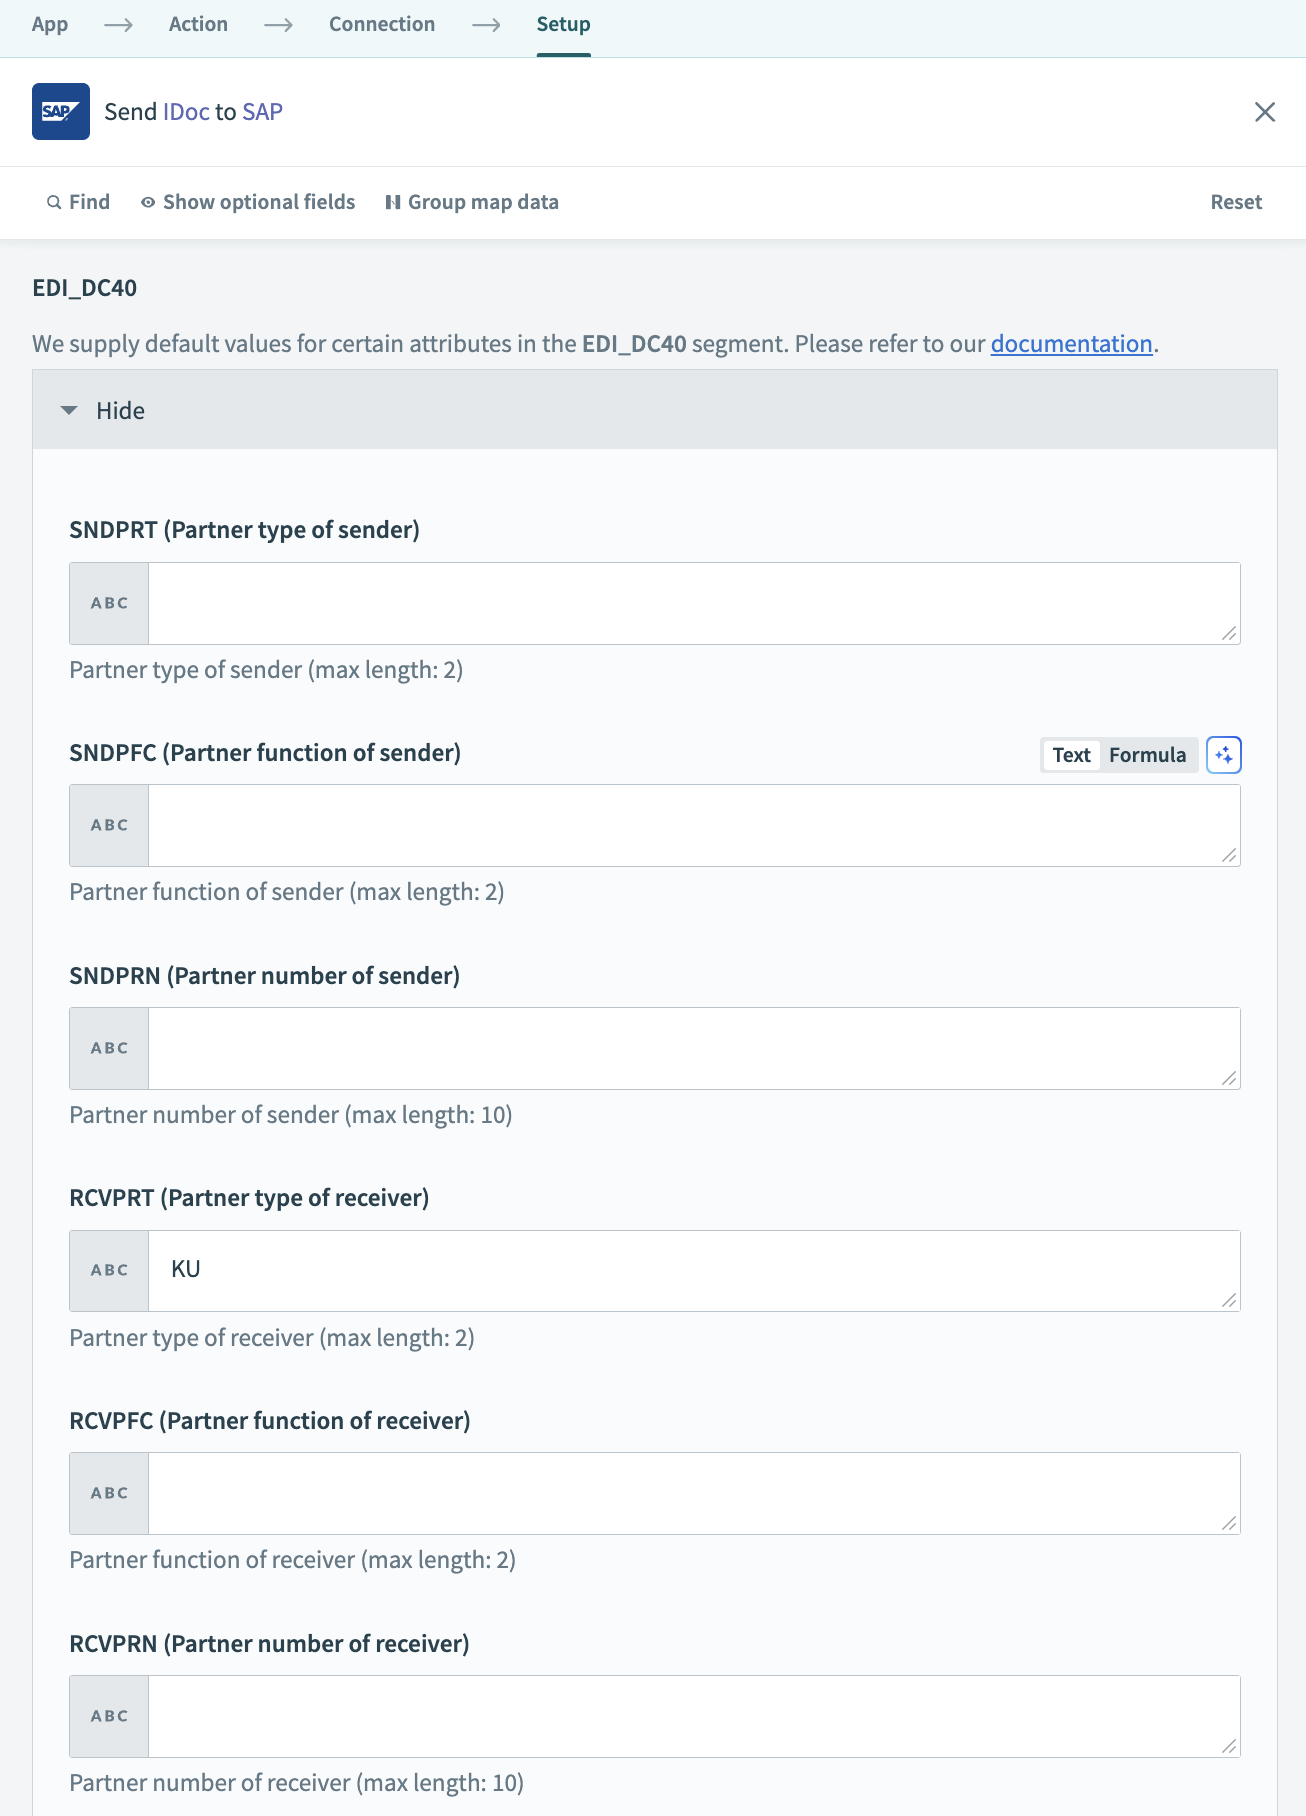 EDI_DC40 segment
FURTHER READING
To complete your connection to SAP RFC, read the following guides:
Last updated: 1/13/2026, 4:27:00 PM