How-to Guide - OAuth 2.0 Authorization Code Variant
The OAuth 2.0 Authorization code flow is a way for Workato to impersonate a specific user when authenticating to an API. This is done by getting the user's consent via a browser popup when they first attempt to connect.
Sample Connector - Podio
{
  title: 'My Podio connector',

  connection: {
    fields: [
      {
        name: 'client_id',
        optional: false
      },
      {
        name: 'client_secret',
        optional: false,
        control_type: 'password'
      }
    ],

    authorization: {
      type: "oauth2",

      authorization_url: lambda do
        "https://percolate.com/auth/oauth2"
      end,

      token_url: lambda do
        "https://podio.com/oauth/token"
      end,

      client_id: lambda do |connection|
        connection['client_id']
      end,

      client_secret: lambda do |connection|
        connection['client_secret']
      end,

      apply: lambda do |connection, access_token|
        headers("Authorization": "OAuth2 #{access_token}")
      end,

      refresh_on: [401, 403],

      refresh: lambda do |connection, refresh_token|
        response = post("https://podio.com/oauth/token").
                      payload(
                        grant_type: "refresh_token",
                        client_id: connection["client_id"],
                        client_secret: connection["client_secret"],
                        refresh_token: refresh_token
                      )
        [
          { # This hash is for your tokens
            access_token: response["access_token"],
            refresh_token: response["refresh_token"]
          }
        ]
      end,
    }
  },

  test: lambda do |connection|
    get('/oauth/scope')
  end,

  #More connector code here
}- Check out the Podio API
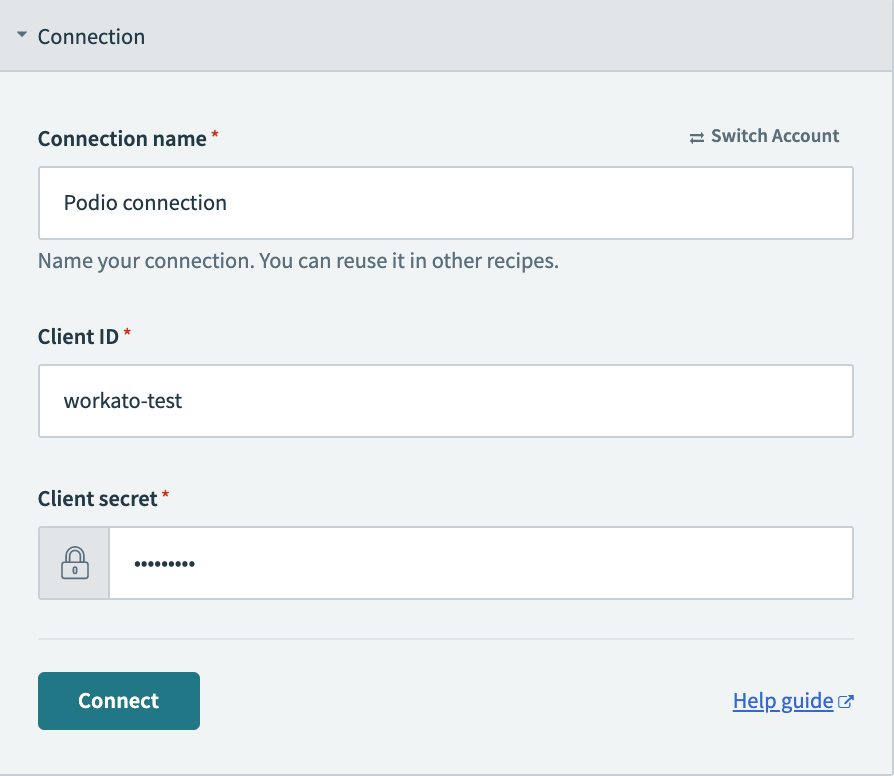
Step 1 - Defining Connection fields
This component tells Workato what fields to show to a user trying to establish a connection. In the case of Authentication code authentication, you would need the Client ID and Client Secret that the user has generated in Podio.
| Information needed | Description |
|---|---|
| Client ID | This is the "username" that this specific custom connector has registered with the API. This might mean signing Workato up as a verified application in the application. |
| Client secret | This is the "password" that this specific custom connector has registered with the API. This might mean signing Workato up as a verified application in the application. Never share your client secret with others |
This is done in the fields key, which accepts an array of hashes. Each hash in this array corresponds to a separate input field.
    fields: [
      {
        name: 'client_id',
        optional: false
      },
      {
        name: 'client_secret',
        optional: false,
        control_type: 'password'
      }
    ],
TIP
When defining fields, you need to at least provide the name key. Additional attributes like optional, hint and control_type allow you to customize other aspects of these fields. For sensitive information like Client Secrets, remember to use the control_type as password.
Refer to Connection fields for more information on defining input fields in Workato.
Using environment properties to store static client IDs and secrets for your organization
When building a connector for your entire organization, it is often inefficient to have each individual provide client IDs and secrets when making connections. Workato allows you to use environment properties for this very purpose, to securely store these credentials.
You can remove the fields for client_id or client_secret from the connection code, and use the account_property method instead, to reference properties that point to the appropriate values.
Example for HubSpot
authorization_url: lambda do |connection|
  client_id = account_property('hubspot_webhook_client_id')
  "https://app.hubspot.com/oauth/authorize?client_id=#{client_id}&response_type=code&scope=crm.objects.companies.read crm.objects.contacts.read crm.objects.deals.read"
end,

acquire: lambda do |connection, auth_code, redirect_uri|
  client_id = account_property('hubspot_webhook_client_id')
  client_secret = account_property('hubspot_webhook_client_secret')
  response = post("https://api.hubapi.com/oauth/v1/token").
    payload(client_id: client_id,
      client_secret: client_secret,
      grant_type: 'authorization_code',
      code: auth_code,
      redirect_uri: redirect_uri).
    request_format_www_form_urlencoded
  [
    {
      access_token: response['access_token'],
      refresh_token: response['refresh_token']
    },
    nil,
    nil
  ]
end,
Step 2 - Defining the authorization type
This component instructs Workato what to do with the values received from the input fields to establish a connection. This is handled through your authorization key. In this key, you begin by first defining the type of authorization. In this case, you should use oauth2.
type: "oauth2",Step 3 - Defining client ID, client secret, authorization url, and token url
VIRTUAL PRIVATE WORKATO (VPW) CUSTOMERS
This feature requires configuration steps that are specific to your Virtual Private Workato (VPW) instance. If you are a VPW customer, refer to your VPW private documentation for the configuration details for your instances.
With the authorization code grant variant of OAuth 2, you supply 4 key attributes to your connector:
- The authorization url - where we will redirect the user via a browser popup to provide authorization.
- The token url - where this connector will send a request to receive an access token after receiving an auth code from the authorization url
- The client ID - The public ID of the OAuth app assigned to this connection.
- The client secret - The private key of the OAuth app assigned to this connection.
    authorization_url: lambda do |connection|
      "https://podio.com/oauth/authorize"
    end,

    token_url: lambda do |connection|
      "https://podio.com/oauth/token"
    end,

    client_id: lambda do |connection|
      connection['client_id']
    end,

    client_secret: lambda do |connection|
      connection['client_secret']
    end,
When defining the authorization_url lambda function, you do not have to explicitly pass in the client ID, redirect URI, or state. Workato does that for you. Sometimes, you may have to add scope to the URL.
However, if the application requires you to register the redirect URI beforehand, use this callback URL:
https://www.workato.com/oauth/callbackThis unified callback URL works across all Workato data centers.
When defining the token_url lambda function, you do not have to explicitly pass in the client ID, client secret, and grant_type. Workato does that for you. For the token_url request, we follow RFC standards and use a POST request with the relevant information in the payload body.
When defining the client_id and client_secret, you may use inputs from the end user, which you previously collected from the fields portion. Workato does not recommend that you code these inputs.
When Workato exchanges the short-lived authorization code for a longer-living access token, we expect the response from the token_url endpoint to contain 2 main values - access_token and refresh_token. Here is a sample response:
{
  "access_token": "my-authentication-token",
  "token_type": "bearer",
  "expires_in": "seconds-until-expiration",
  "refresh_token": "my-refresh-token",
  "error": "optional-error-message",
  "ref":
  {
    "type": "user",
    "id": USER_ID
  }
}
The authentication stores the values associated with access_token and refresh_token.
Step 4 - Applying the access token to subsequent HTTP requests
In the apply key, we apply the acquired access token as a header input.
We can retrieve the access_token by referencing simply passing in access_token as a parameter into the apply key. This argument access_token is automatically assigned from the output of the token_url lambda function.
    apply: lambda do |connection, access_token|
      headers("Authorization": "OAuth2 #{access_token}")
    end,
To learn more about the available parameters and keys in the connection object, see SDK Reference - connection.
Step 5 - Defining token refresh behavior
In most cases, OAuth 2.0 Authentication has both short-lived access tokens and long-lived refresh tokens. Sometimes, refresh tokens never expire.
WARNING
Not all APIs issue refresh token credentials. Check with the API about this requirement.
When the access-token expires, you can define the behavior that your connector should take to refresh the access token using the refresh token.
    refresh_on: [401, 403],

    refresh: lambda do |connection, refresh_token|
      response = post("https://podio.com/oauth/token").
                    payload(
                      grant_type: "refresh_token",
                      client_id: connection["client_id"],
                      client_secret: connection["client_secret"],
                      refresh_token: refresh_token,
                      redirect_uri: 'https://www.workato.com/oauth/callback'
                    )
      [
        {
          access_token: response["access_token"],
          refresh_token: response["refresh_token"]
        }
      ]
    end,
To refresh your access token, you have to use two keys in the authorization key - refresh_on and refresh. refresh_on accepts an array that may contain HTTP response codes or regex strings. If an HTTP request in the connector receives any of the HTTP response codes, or if the body of the payload matches a regex string, it will execute the code in the refresh key to attempt to retrieve a new access token.
In the refresh key, you have access to an argument that represents the refresh_token received from the initial token request. The expected output of this lambda function is an array where the first index is a hash denoting the new access_token as well as the new refresh_token if applicable. These will be used to update the initial values for a long lasting connection.
To learn more about the refresh lambda, see SDK Reference - authorization.
Step 6 - Setting the API's base URI
This component tells Workato what the base URL of the API is. This key is optional but allows you to provide only relative paths in the rest of your connector when defining HTTP requests. Refer to base URI configuration for more information on configuring your base_uri.
    base_uri: lambda do |connection|
      'https://podio.com'
    end
TIP
This lambda function also has access to the connection argument. This is especially useful if the base URI of the API might change based on the user's instance. The connection argument can be accessed in the following format:
    base_uri: lambda do |connection|
      "https://#{connection['domain'].com/api}"
    end
Step 7 - Testing the connection
Now that we have defined the fields we need to collect from an end user and what to do with the inputs from those fields, we now need a way to test this connection. This is handled in the test key.
    test: lambda do
      get('/oauth/scope')
    end,
In this block, you need to provide an endpoint that allows us to send a sample request using the new credentials we just received. If we receive a 200 OK HTTP response, we show the connection as Successful. In the example above, we are sending a GET request to the /oauth/scope endpoint and expecting a 200 response if the API key is valid.
Auth code grant variations
In cases that deviate from the normal standard authentication flows, use our acquire block. This block allows you to define the HTTP calls that occurs during the authentication process. For example, some APIs require the authorization token to be obtained by using a POST request with basic authentication.
TIP
Using the acquire block instead of the token_url block is often recommended for users who need greater control. The acquire block allows you to control all aspects of the API request to retrieve access tokens as well as greater flexibility in terms scheduling automatic token refreshes via the refresh_token_expires_in key and storing other metadata such as OAuth scopes in the connection hash.
Using the acquire key
In the case below, we used the acquire key to send a POST HTTP call with basic authentication since our token_url block defaults to header authentication. You can then pull the access_token and refresh_token from the response to the POST call.
    authorization: {
      type: "oauth2",

      authorization_url: lambda do |connection|
        params = {
          response_type: "code",
          client_id: connection["client_id"]
        }.to_param

        "https://login.mypurecloud.com/oauth/authorize?" + params
      end,

      acquire: lambda do |connection, auth_code|
        response = post("https://login.mypurecloud.com/oauth/token").
          payload(
            grant_type: "authorization_code",
            code: auth_code,
            redirect_uri: "https://www.workato.com/oauth/callback"
          ).
          user(connection["client_id"]).
          password(connection["client_secret"]).
          request_format_www_form_urlencoded

        # After defining the POST method, we now need to define the
        # output of the acquire key in a fashion that we can recognise
          [
            {
              access_token: response["access_token"],
              refresh_token: response["refresh_token"],
              refresh_token_expires_in: response["expires_in"] # Expiration time of the refresh token from now in seconds
            },
            nil,
            # Optional. Will be merged into connection hash
            { instance_id: nil }
          ]
        end,

        apply: lambda do |connection, access_token|
          headers("Authorization": "Bearer #{connection["access_token"]}")
        end
      }
    },
The methods .user and .password are the equivalent of appending Authorization: BASIC and <user>:<password> in BASE-64 String encoding in the POST request header. Note that the request must be sent with request_format_www_form_urlencoded.
Upon receiving a the request, the API returns a JSON response like below:
{
  "access_token": "token",
  "token_type": "bearer",
  "expires_in": 86400,
  "refresh_token": "my-refresh-token",
  "error": "optional-error-message"
}
Take note that an array of hashes is the expected output when using the acquire key for OAuth 2.0 authentication methods. Each index in the array should have the following values in sequence:
- Tokens - Must be a hash with the exact keys for
access_token,refresh_tokenandrefresh_token_expires_in.refresh_tokenandrefresh_token_expires_invalues are optional but recommended - Owner ID - This is an optional value used for clobber detection (substitute with
nilif not used) - Other values - Here you can supply an optional hash that will be merged with the original connection hash.
Which matches the connector code here:
  [
    {
      access_token: response["access_token"],
      refresh_token: response["refresh_token"],
      refresh_token_expires_in: response["expires_in"] # in seconds
    },
    nil,
    # Optional. Will be merged into connection hash
    { instance_id: nil }
  ]
Connections SDK reference
To be more familiar with the available keys within the connection key and their parameters, check out our SDK reference.
Last updated: