Employee Onboarding MCP server
The Employee Onboarding MCP server enables LLMs to interact with Workday, Slack, and Google Calendar for employee onboarding through natural conversation. It provides tools to resolve the hire, preview and commit the initial kickoff, and manage self-service onboarding for both the new hire and the manager. This server works alongside the Access Provisioning, ServiceNow ITSM, or Confluence MCP servers if they're installed. For example, if a Confluence server is installed, it answers onboarding and policy questions, and escalate_or_create_ticket handles issues only.
Uses
Use the Employee Onboarding MCP server to perform the following actions:
- Resolve a new hire by name, work email, or Worker ID and confirm their approved Workday hire event, including their region and employment context
- Preview then commit the kickoff, including the initial meeting, the hire's welcome email, and a manager pre-arrival notification
- Check onboarding status for a specific hire
- Get checklist items due for either the new hire's onboarding checklist or the manager's own pre-boarding checklist
- Mark a checklist item complete or reopen it
- Schedule additional onboarding meetings after the kickoff
- Notify HR about a new hire's issue or question over Slack, or ask general policy questions when a Confluence server isn't available as a knowledge source
- List onboardings in progress or upcoming, or cancel an onboarding
Example prompts
Use the following example prompts to invoke Employee Onboarding MCP server tools:
Kick off onboarding for Jordan Lee, starting the 22nd.Does Jordan Lee have an approved hire event yet?Show me the kickoff plan before anything gets scheduled.What's my onboarding status?What do I need to do this week?Mark the benefits enrollment item as done.What's on my pre-boarding checklist for Jordan Lee?My laptop hasn't shown up yet.Show me everyone starting this month.
Employee Onboarding MCP server tools
The Employee Onboarding MCP server provides the following tools:
| Tool | Description |
|---|---|
| find_new_hire | Resolves a new hire and returns their identity, hiring manager, region and employment context, and approved Workday hire event. |
| initiate_onboarding | Previews the kickoff, then schedules the initial meeting, sends the hire's welcome email, and notifies a manager. |
| get_onboarding_status | Returns the current status of one new hire's onboarding. |
| get_onboarding_checklist | Returns checklist items due, for either the new hire's onboarding checklist or the manager's own pre-boarding checklist. |
| update_checklist_item_status | Marks a checklist item complete or reopens it. |
| schedule_onboarding_meeting | Schedules an additional onboarding meeting. |
| escalate_or_create_ticket | Notifies HR about a new hire's issue or question over Slack. |
| list_onboardings | Lists onboardings by status, hire, manager, or date range. |
| cancel_onboarding | Cancels a scheduled or in-progress onboarding. |
Install the Employee Onboarding MCP server
Complete the following steps to install a prebuilt MCP server to your project:
Sign in to your Workato account.
Go to AI Hub > Enterprise MCP.
Click + Create MCP server.
Go to the Start with pre-built MCP Servers using your connected apps section and select the prebuilt MCP server you plan to use.
Click Use this server.
Provide a name for your MCP server in the Server name field.
Use the Location drop-down menu to select the project for the MCP server.
Go to the Connections section and connect to your app account.
Select the connection type you plan to use for the MCP server template.
- User's connection: MCP server tools perform actions based on the identity and permissions of the user who connects to the application. Users authenticate with their own credentials to execute the skill.
- Your connection: This option uses the connection established by the recipe builder and follows the same principles as normal app connections.
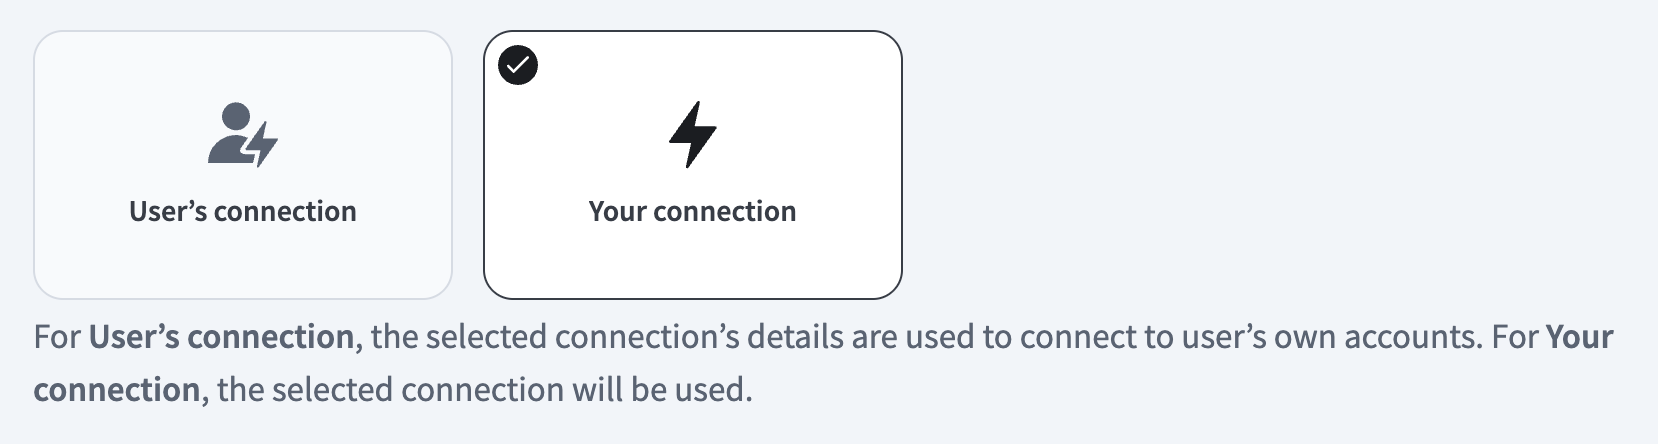 Select your connection type
VERIFIED USER ACCESS AUTHENTICATION REQUIREMENTS
Only app connections that use OAuth 2.0 authorization code grant are available for user's connection. Refer to Verified user access for more information.
Complete the app-specific connection setup steps in the following section.
Employee Onboarding connection setup
View Employee Onboarding connection setup steps
Configure the following connections to set up the Employee Onboarding MCP server:
- Workday: Required. Provides information about approved hires.
- Slack: Required. Sends the manager pre-arrival notification as a direct message, posts escalations to the Slack user or channel configured in
escalation.hrbp_notification_target, and serves as the Q&A fallback when Confluence isn't available. - Google Calendar: Required. Schedules meetings.
Employee Onboarding role requirements
Each tool's availability depends on the permissions of the connected account. Calling a tool without the required permission returns a permission_denied outcome rather than a partial result.
- Workday: The connected API client must be able to read hire events.
- Slack: The connected account's OAuth scopes must include
chat:writeto post the manager pre-arrival notification, Q&A fallback answers, and escalations. - Google Calendar: The connected account must have permission to create events and invite attendees.
Additionally, initiate_onboarding and cancel_onboarding are only available to users in the server's hr_persons allowlist. list_onboardings gives hr_persons members a complete view of every onboarding, scopes any other caller to onboardings where they're recorded as the hire's manager, and denies a hire's own request outright.
Workday connection setup steps
View Workday REST connection setup steps
The Workato Workday connector is categorized into three distinct types: the main Workday connector, the Workday Web Services connector, and the Workday REST connector. Each type follows a similar authentication pattern but differs slightly in support capabilities and functionalities.
The Workday REST API requires authentication through an OAuth client setup.
API CLIENTS FOR INTEGRATION NOT SUPPORTED
Register a standard Workday API client to complete this connection. Workday API clients for Integration aren't supported in the Employee Onboarding MCP server.
Register a new API client in Workday
View API client setup steps
The Employee Onboarding MCP server authenticates each user individually through their own Workday login. The server doesn't use an Integration System User (ISU) like the Workday connector.
Register a new API client
Complete the following steps to register an API client in Workday REST:
Sign in to your Workday REST account.
Enter Register API Client to locate the Register API Client task.
Enter a name for your API client in the Client Name field.
Go to the Client Grant Type section and select Authorization Code Grant.
Go to the Access Token Type section and select Bearer.
Enter https:www.workato.com/oauth/callback in the Redirection URI field.
Enter 30 in the Refresh Token Timeout (in days) field.
Enter the scopes for the connection in the Scope (Functional Areas) field. Refer to Workday End User MCP server Minimum permissions if you're connecting to the Workday End User MCP server.
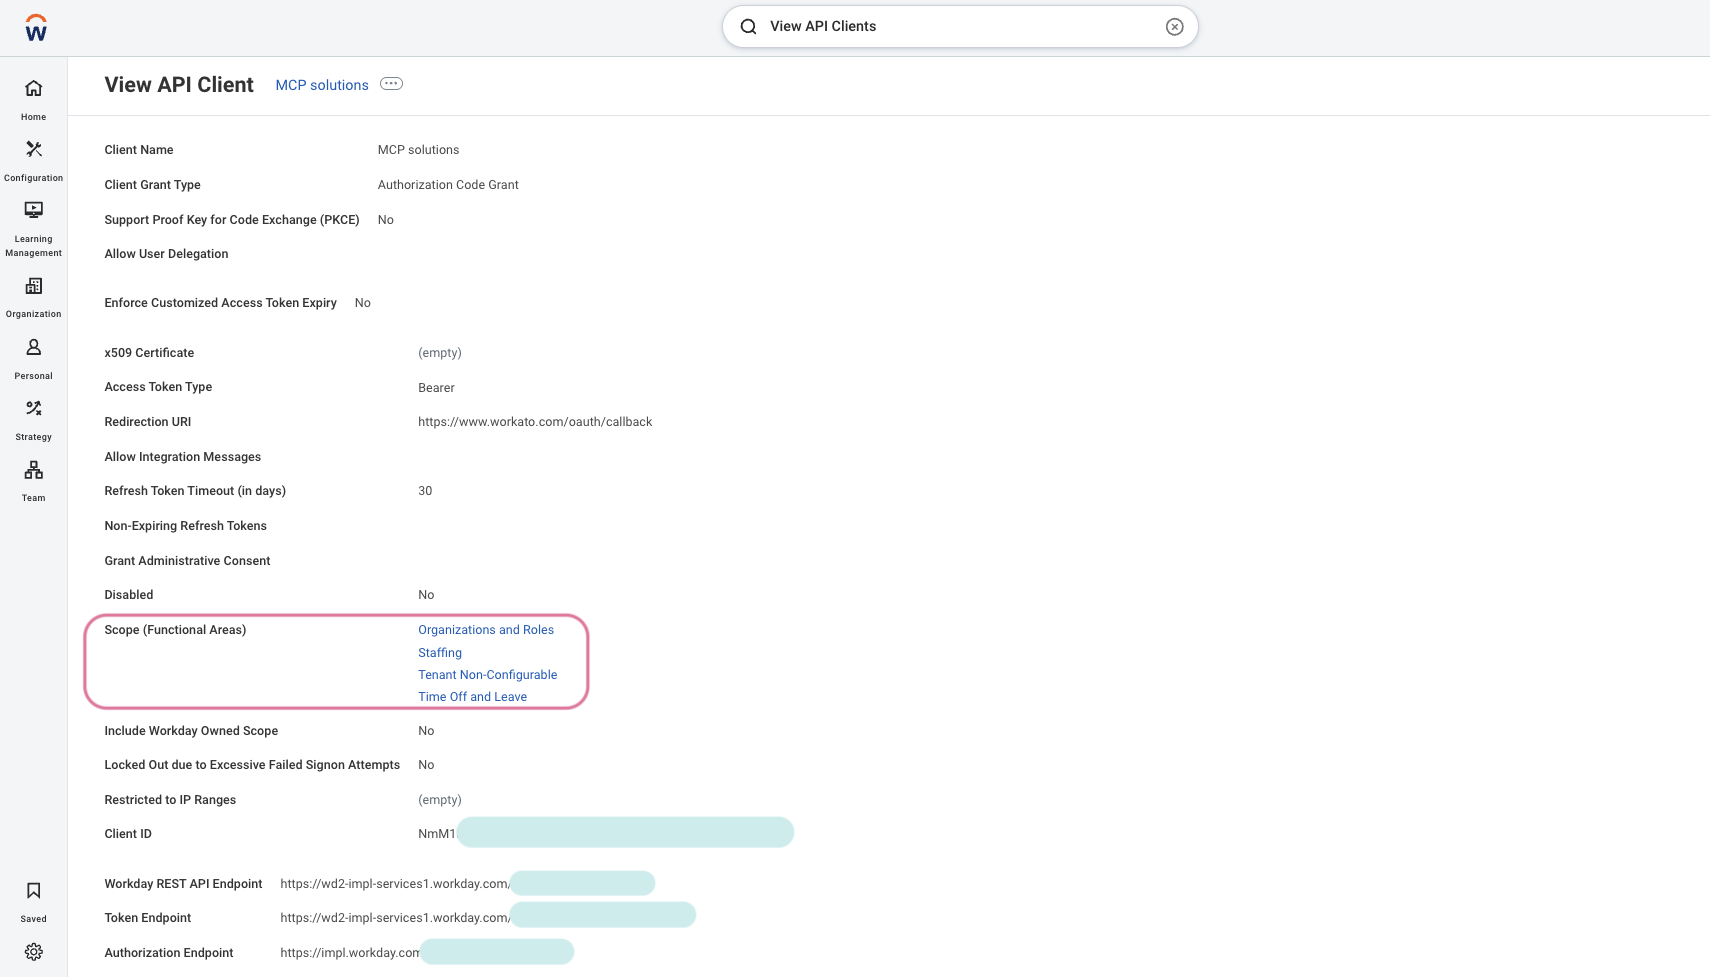 Enter the scopes for the connection in the Scope (Functional Areas) field
Enter your client ID in the Client ID field.
Enter your REST API endpoint in the Workday REST API Endpoint field. You can find this endpoint in your API client details page in Workday. For example: https://wd2-impl-services1.workday.com/xxx/api/v1/example
Enter your token endpoint in the Token Endpoint field. You can find this endpoint in your API client details page in Workday. For example: https://wd2-impl-services1.workday.com/xxx/oauth2/example/token
Enter your authorization endpoint in the Authorization Endpoint field. You can find this endpoint in your API client details page in Workday. For example: https://impl.workday.com/example/authorize
Click Done.
Find your token endpoint URL
Complete the following steps to find your token endpoint URL in Workday:
Enter View API Clients into the search field in Workday.
Access the View API Clients report from the search results.
Save the URLs listed in the Token Endpoint and Authorization Endpoint fields. These URLs are required for the OAuth 2.0 connection.
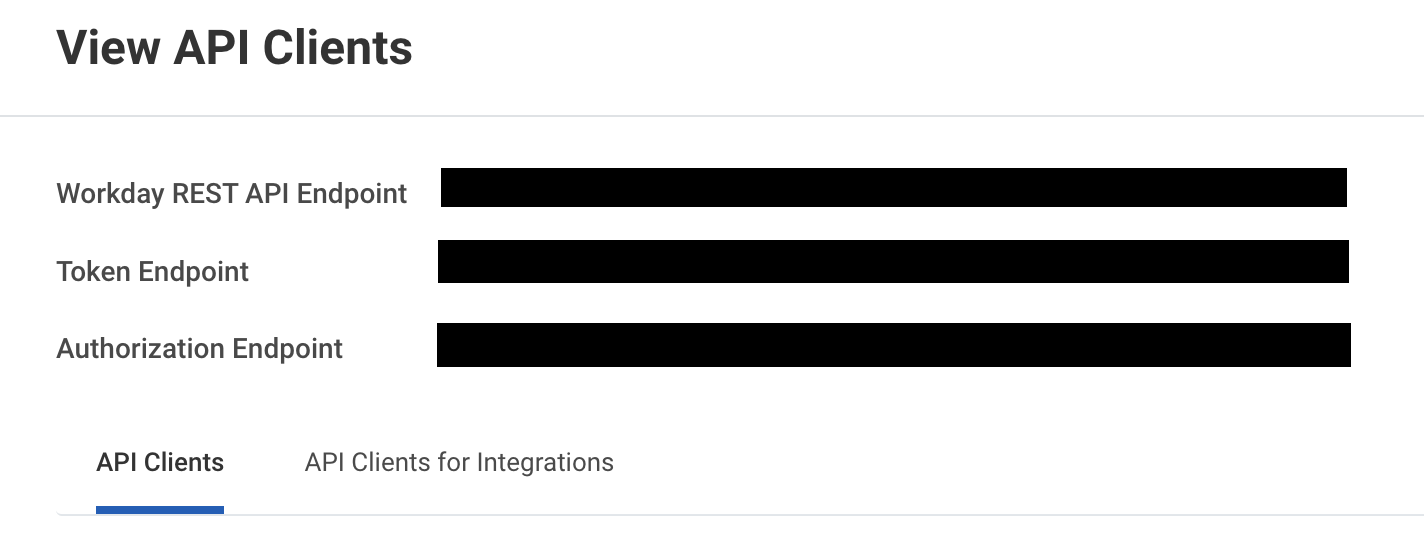 Save the token endpoint and authorization endpoint URLs
Complete setup in Workato
Complete the following steps to configure your Workday connection in Workato using OAuth 2.0 authentication:
View OAuth 2.0 authentication steps
Enter a unique Connection name to identify your Workday account in Workato.
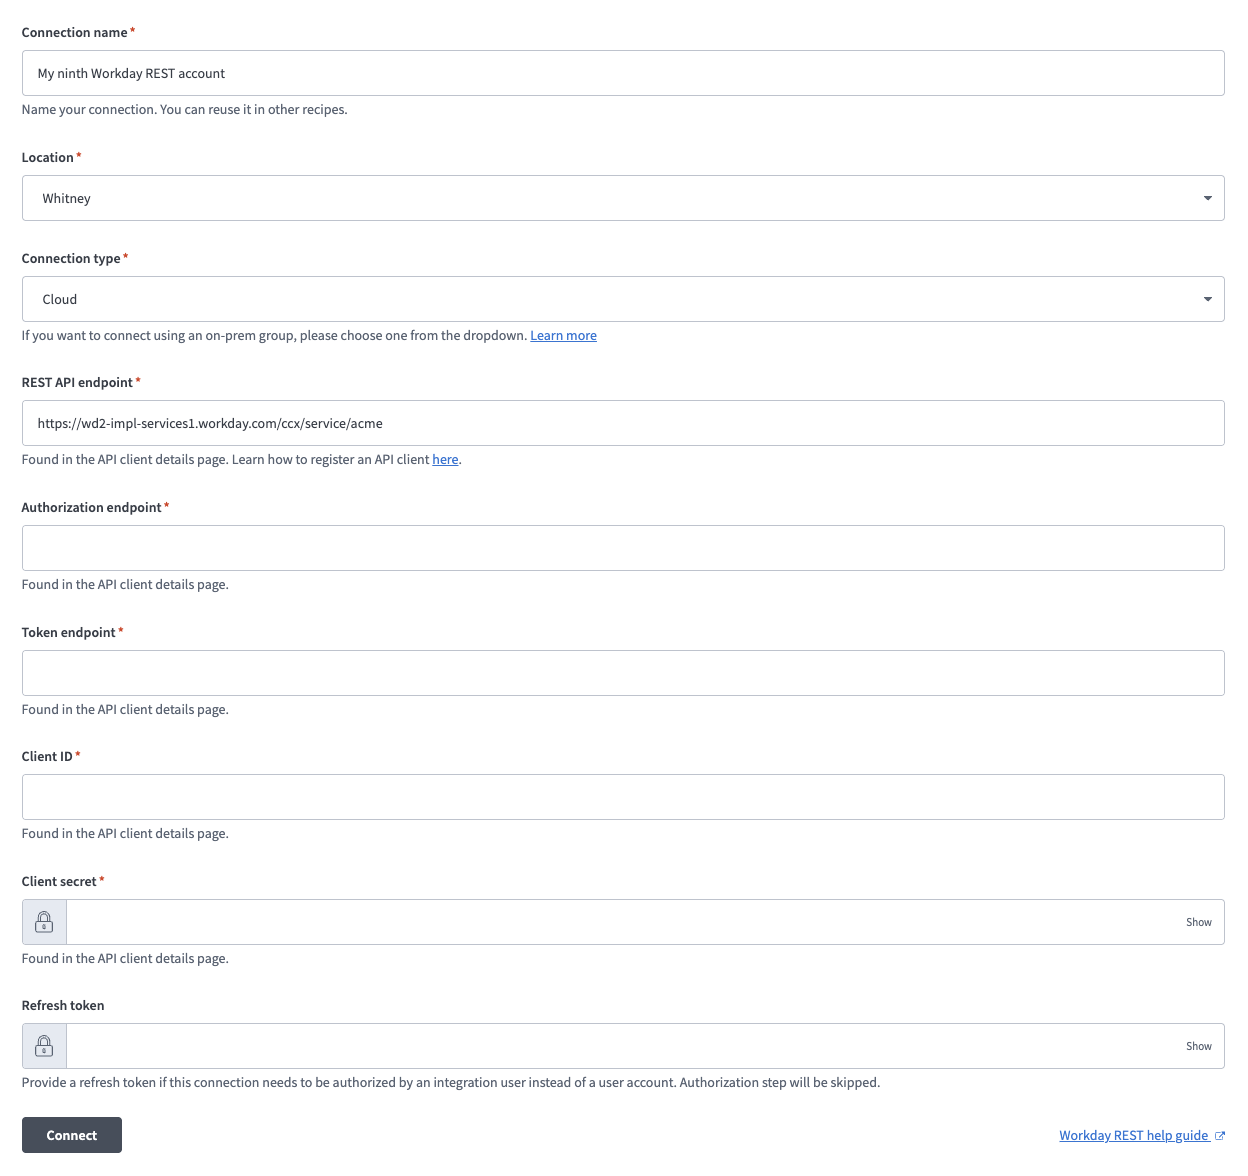 Set up your connection
Use the Location drop-down to select the project or folder to store this connection.
Use the Connection type drop-down menu to select Cloud.
Enter your REST API endpoint in the REST API endpoint field. You can find this endpoint in your API client details page in Workday. For example: https://wd2-impl-services1.workday.com/xxx/api/v1/example
Enter your authorization endpoint in the Authorization endpoint field. You can find this value in your Workday API client details. For example: https://impl.workday.com/example/authorize
Enter your token endpoint in the Token endpoint field. You can find this endpoint in your API client details page in Workday. For example: https://wd2-impl-services1.workday.com/xxx/oauth2/example/token
Enter your client ID in the Client ID field.
Enter your client secret in the Client Secret field.
Enter your refresh token in the Refresh token field.
DON'T PROVIDE A REFRESH TOKEN FOR MCP SERVERS
Don't provide a refresh token if you're connecting Workday to an MCP server.
Click Connect.
Slack connection setup steps
View Slack connection setup steps
API version
The Slack connector uses the Slack Web API v1 with the endpoint URL https://slack.com/api/METHOD.
Supported editions and versions
Workato connects to both Slack for teams (for single workspaces) and Slack Enterprise Grid (for multiple workspaces).
The Slack connector supports OAuth 2.0 authentication. You must log in to Slack and authorize the permissions that Workato requests.
Default scopes
You can customize the OAuth user scopes that Workato requests during connection setup. Workato requests the following default scopes unless you select your own in the OAuth user scopes field:
channels:readchannels:writechat:writegroups:readgroups:writeim:readim:writempim:readmpim:writeusers:readusers:read.email
Connect to Slack using OAuth 2.0 authentication
Complete the following steps to connect to Slack in Workato:
Click Create > Connection or press C twice.
Search for Slack and select it as your app.
Enter a name for your connection in the Connection name field.
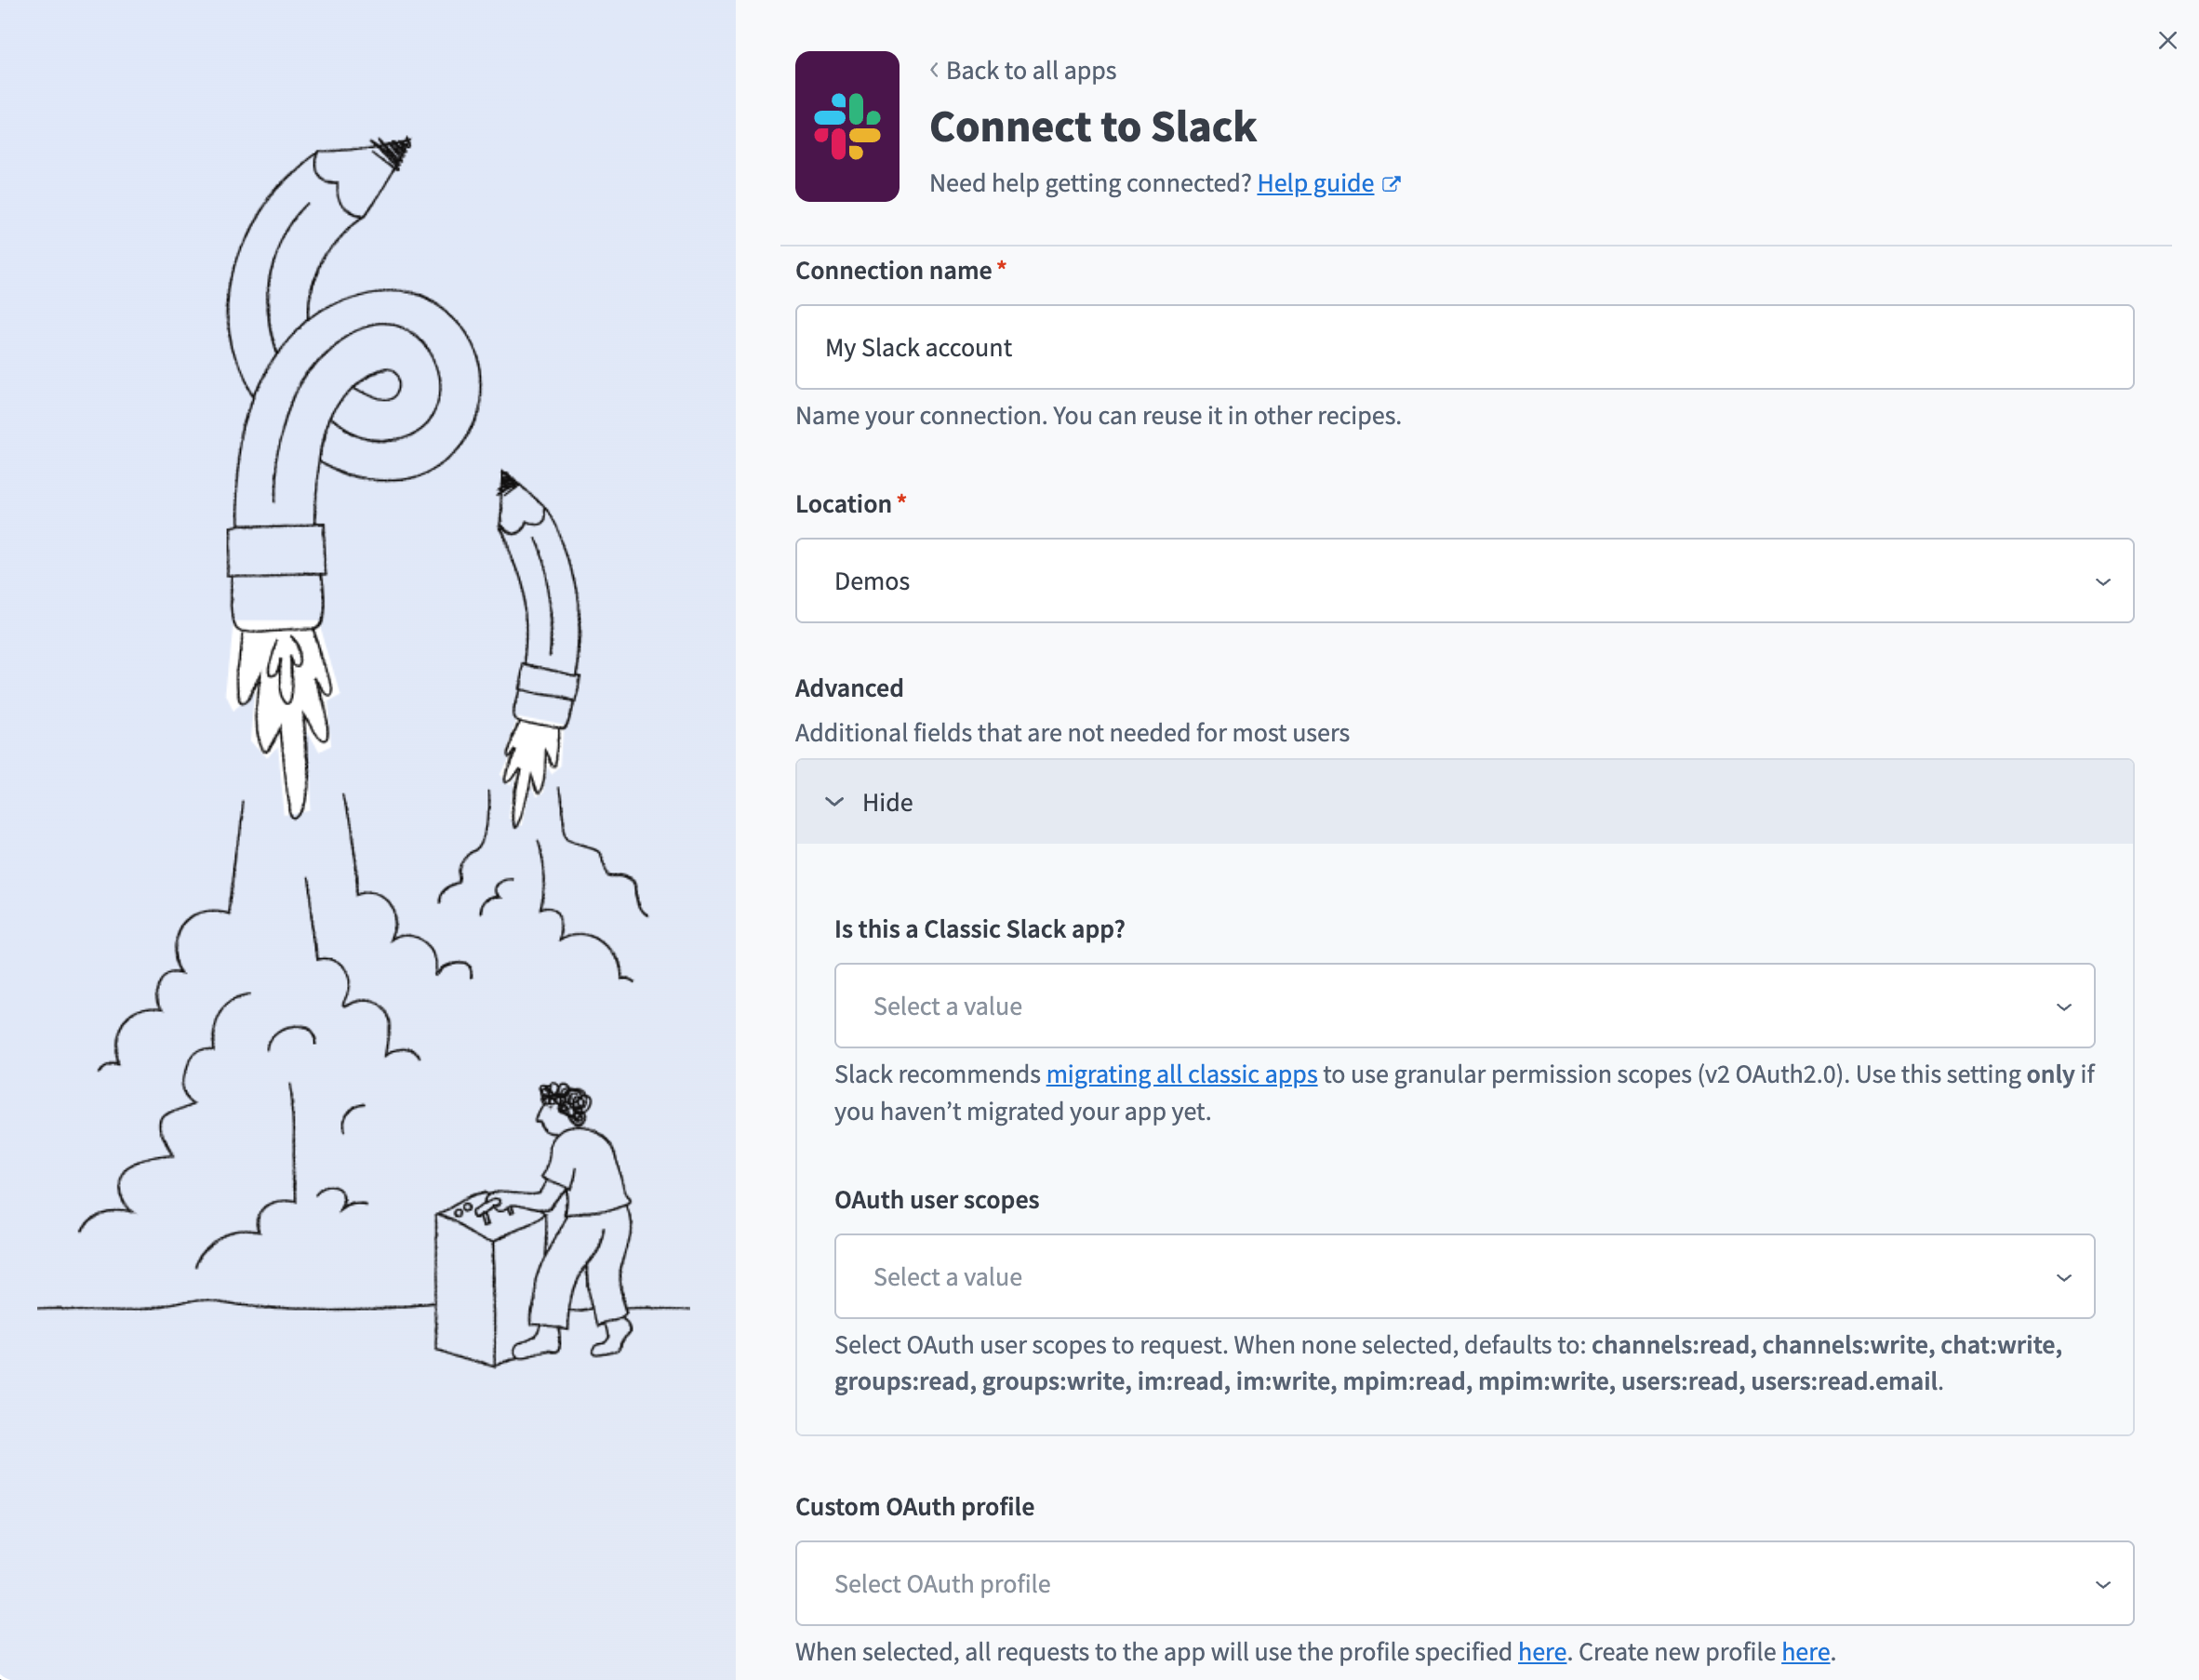 Slack connection
Use the Location drop-down menu to select the project where you plan to store the connection.
Optional. Expand Advanced and use the Is this a Classic Slack app? drop-down menu to select Yes or No. Select Yes only if you haven't migrated your Slack app to granular permission scopes. Refer to Moving to granular permission scopes for more information.
Optional. Use the OAuth user scopes drop-down menu to select the OAuth user scopes to request for your connection. Leave this field empty to request the default scopes.
Optional. Use the Custom OAuth profile drop-down menu to select a custom OAuth profile for your connection. Refer to Custom OAuth profiles for Slack for more information.
Click Connect.
Click Allow to grant Workato permission to access your account.
Google Calendar connection setup steps
View Google Calendar connection setup steps
API version
The Google Calendar connector uses the Google Calendar API v3.
Workato supports the following types of connections to Google Calendar:
You can use a service account to authenticate without a personal user account. Workato recommends service account authentication for consistent use.
OAuth 2.0 authentication
Complete the following steps to set up your Google Calendar connection using OAuth 2.0:
Click Create > Connection or press C twice.
Search for and select Google Calendar as your connection on the New connection page.
Provide a name for your connection in the Connection name field.
Select the project where you plan to store the connection from the Location drop-down menu.
Select OAuth 2.0 as the Authentication type.
Click Sign in with Google, then sign in to your Google account. Ensure your Google account has sufficient permissions to manage the events and calendars you plan to use in Workato. 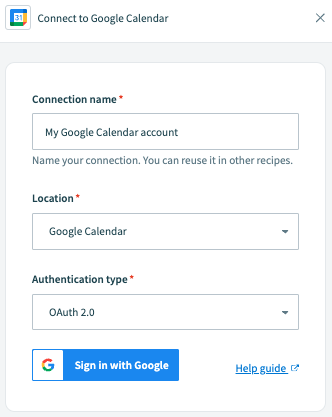 Click Sign in with Google.
Service account authentication
A Google service account is a specialized Google account associated with a Google Cloud Project (GCP) that can run API requests on your behalf.
Service accounts provide the following benefits:
- Continuous operation: Service accounts ensure that operations continue even if individual user permissions change.
- Dedicated permissions: Service accounts can only access projects that you share with them.
- Dedicated API quotas: You can manage a service account's API quotas through GCP and request quota increases directly from Google.
Refer to the Google service account documentation to learn more about service accounts.
Service account authentication consists of the following actions:
Minimum scopes for service account connections
The following scopes are required to connect to Google Calendar using a service account:
https://www.googleapis.com/auth/calendarhttps://www.googleapis.com/auth/calendar.eventshttps://www.googleapis.com/auth/admin.directory.resource.calendarhttps://www.googleapis.com/auth/taskshttps://www.googleapis.com/auth/userinfo.email
A 401 Unauthorized error may occur when the service account uses the Owner role or lacks required scopes. Assign the Editor role to the service account in the Google Cloud Console and confirm it includes all required scopes listed above. This ensures the service account can authenticate and access Google Calendar successfully.
Refer to the Google Calendar API scopes documentation for a complete list of supported scopes.
Set up a Google service account
Complete the following steps to set up a Google service account:
Create a service account in your GCP project.
Go to IAM & Admin > Service accounts. Ensure your dashboard is scoped to the project that contains your service account. 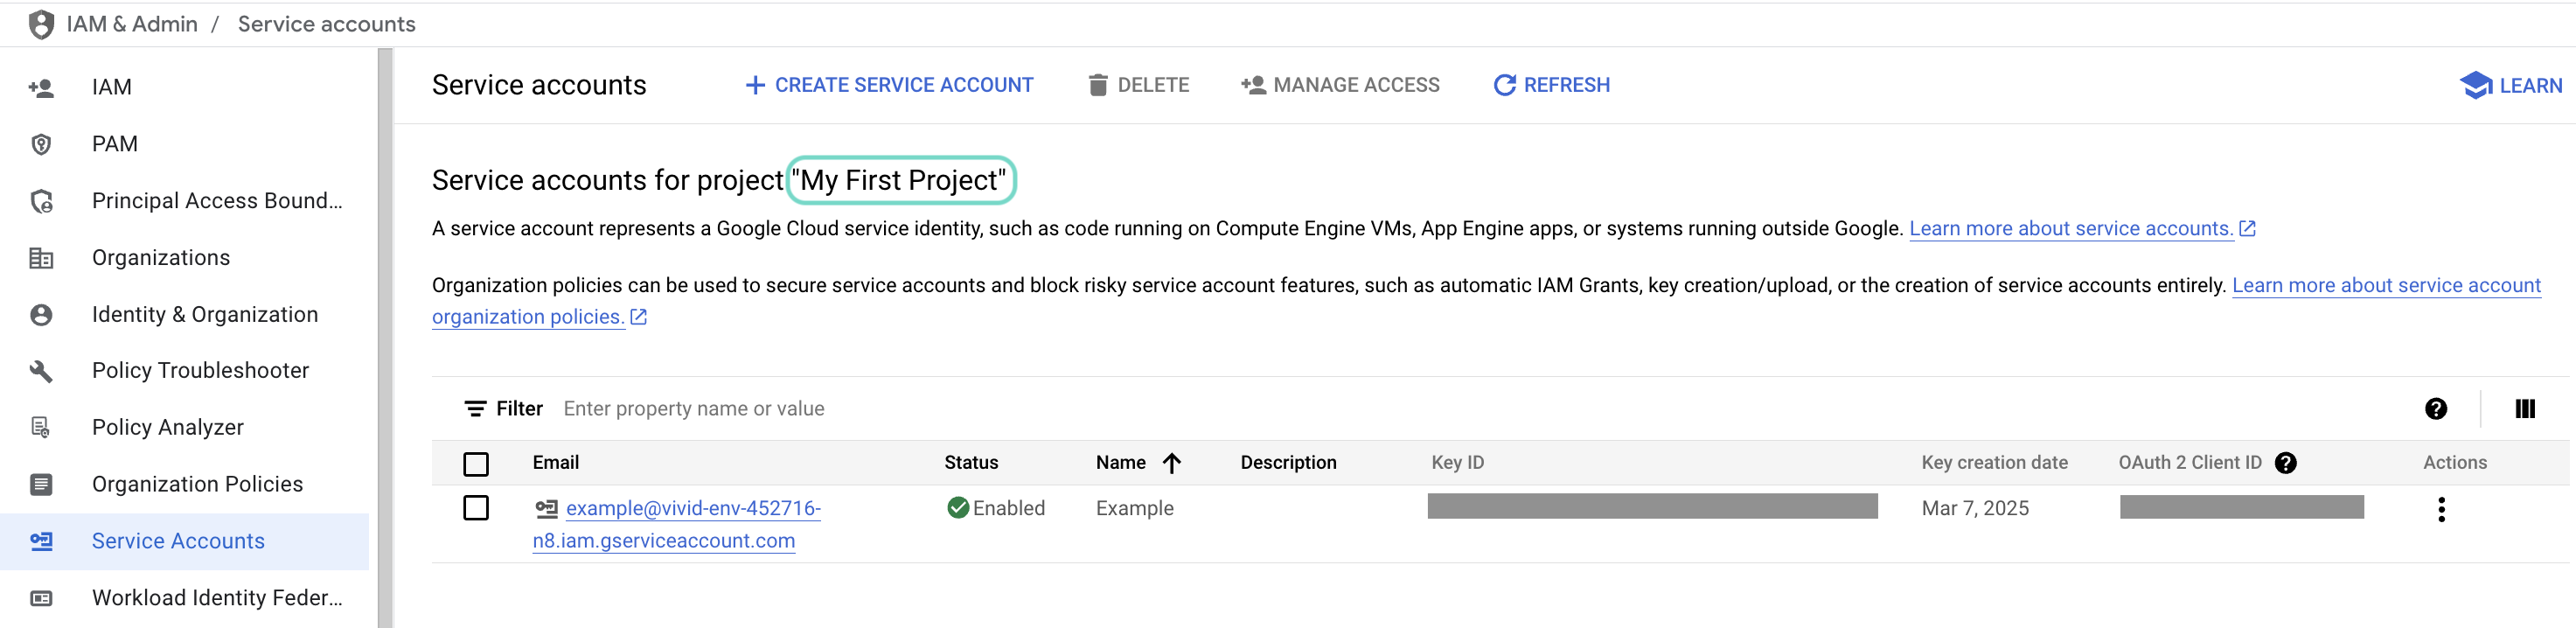 Check the scope of your dashboard.
Click the Email of the service account you intend to use. 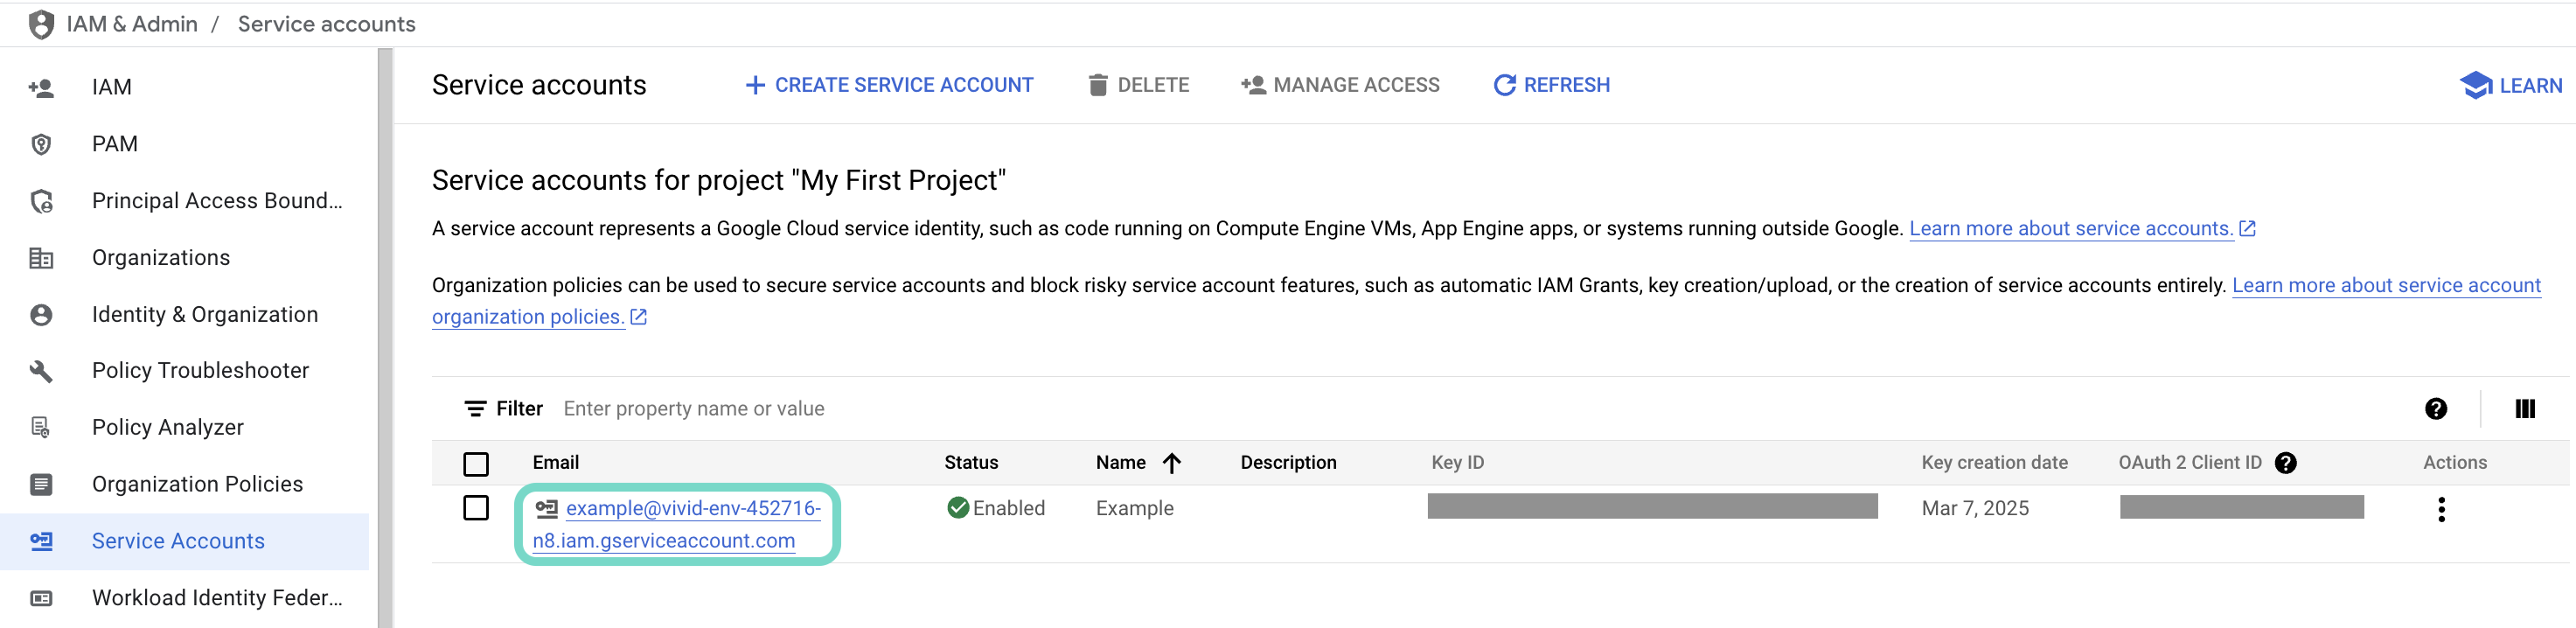 Click the Email of the service account you intend to use.
Copy the service account's Email and save it to configure your connection later. 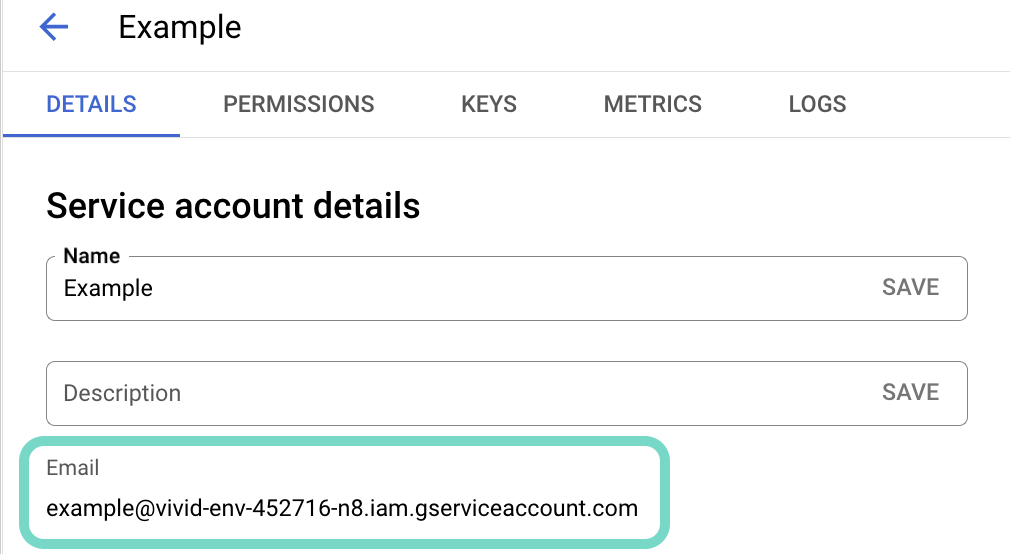 Copy the account's Email.
Go to the KEYS tab.
Generate a private key and download it in JSON format. You can only download the key once.
Open the JSON file, then copy the entire private key from -----BEGIN PRIVATE KEY----- to -----END PRIVATE KEY-----\n (inclusive) and save it to configure your connection later.
Enable the Google Calendar API
You must enable the Google Calendar API before you return to Workato to finish setting up your connection.
Sign in to Google's API library.
Search for and select the Google Calendar API.
Click Enable to enable the API. 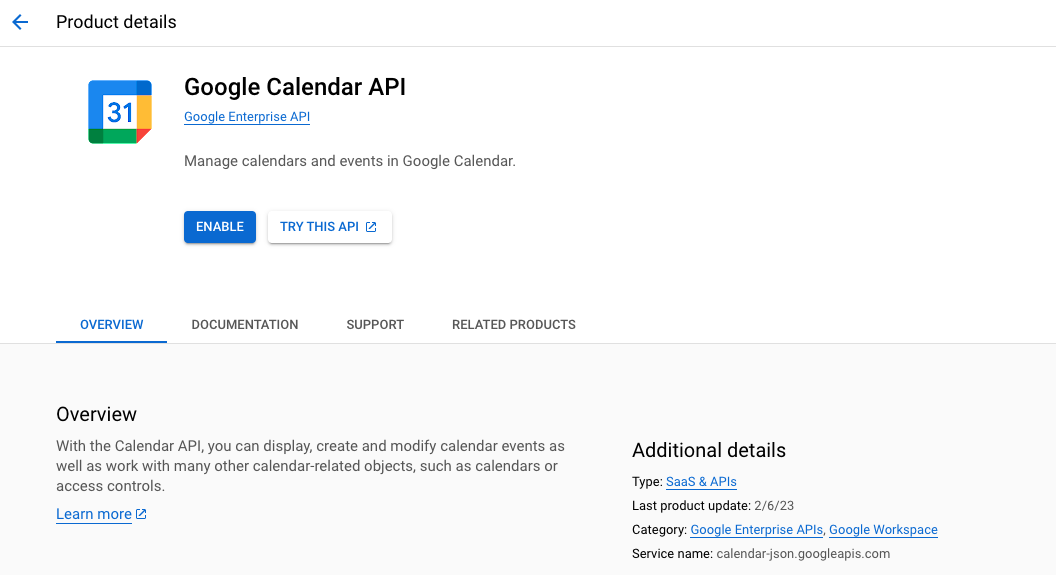 Enable the
 Google Calendar API
Complete setup in Workato
Complete the following steps in Workato to set up your Google Calendar connection using a service account:
Click Create > Connection or press C twice.
Search for and select Google Calendar as your connection on the New connection page.
Provide a name for your connection in the Connection name field.
Use the Location drop-down menu to select the project where you plan to store the connection.
Select Service account as the Authentication type.
Enter your service account's Private key.
Provide the User email of the account you plan to impersonate.
User impersonation lets the service account act on behalf of a designated user, accessing and managing events in their Google Calendar. Impersonating a user ensures data accuracy and enforces the permissions and access controls set for that user in Google Calendar. Refer to Google's Service account impersonation guide for more information.
Click Sign in with Google to complete the setup. 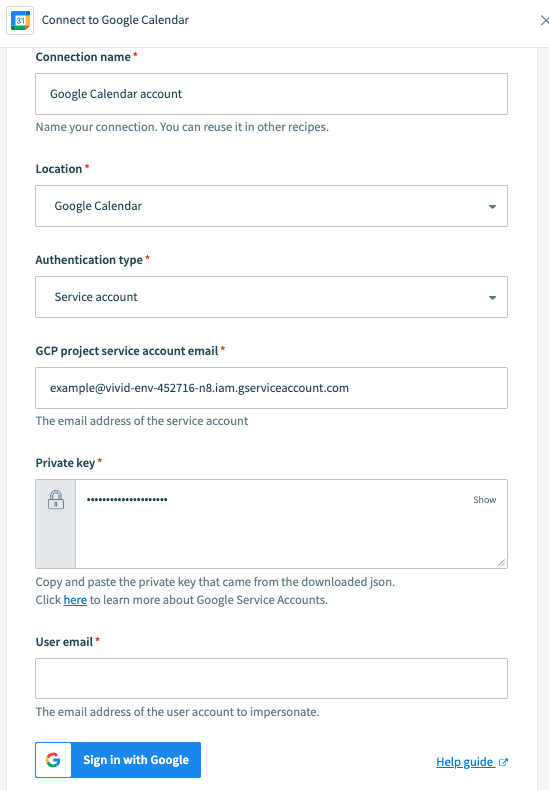 Configure Google Calendar service account connection
Data table configuration
The Employee Onboarding MCP server contains the following data tables that configure behavior and defaults:
hr_persons: Enter the names and email addresses of users to grant access to initiate_onboarding and cancel_onboarding, and a complete view of list_onboardings.checklist_template: Define the checklist items for get_onboarding_checklist to return. Create a new row for each item and include whether the item belongs to the new hire or manager.onboarding_configcontains the following keys:
| Key | Description |
|---|---|
calendar_id | Required. Enter the ID of the Google Calendar for initiate_onboarding and schedule_onboarding_meeting to create events on. |
welcome_email.template | Enter the body text of the hire's initial welcome email. Tell the hire how to reach this server, for example by naming the Claude app or Claude Tag in Slack. |
onboarding_meeting.default_time_of_day | Specify the default local time to use for the initial meeting. Defaults to 09:00. |
hire_event_descriptor_prefix | Specify the Workday business-process-event descriptor prefix for find_new_hire to match when identifying a hire event. Rehire: always matches, regardless of this value. Defaults to Hire:. |
escalation.hrbp_notification_target | Required for escalate_or_create_ticket. Enter the Slack user or channel ID for escalate_or_create_ticket to notify. |
server_limits.max_schedule_days_out | Specify how far out schedule_onboarding_meeting can book a meeting. Defaults to 60 days. |
server_limits.max_checklist_items_per_response | Specify how many items get_onboarding_checklist returns for scope=all_due in one response. Defaults to 10. |
server_limits.rate_limit_calls_per_minute | Record the intended rate limit for downstream apps. Workato doesn't enforce this limit. This field is for documentation purposes. Enforce limits directly in downstream connections. Defaults to 20. |
audit.log_retention_days | Specify how long to keep audit records before deleting them. Set this value to 0 to never delete records. Defaults to 365 days. |
View data table configuration steps
Complete the following steps to configure settings using the MCP's data tables:
Sign in to your Workato account and go to Projects.
Go to the project that contains your MCP server.
Open the Employee Onboarding folder.
Open the Data tables folder.
Select the hr_persons, checklist_template, or onboarding_config data table.
Edit the table's rows to make your changes. For example, add a row to hr_persons with a user's name and email address, or add a row to onboarding_config with key calendar_id and your Google Calendar's ID as the value.
How to use Employee Onboarding MCP server tools
Refer to the following sections for detailed information on available tools.
find_new_hire tool
The find_new_hire tool finds a new hire in Workday and returns their identity, hiring manager, region and employment context, and the approved Workday hire event. This tool doesn't perform directory searches for other purposes. Your LLM uses this tool to resolve a hire you name, or to identify a new hire who gives their own name or email at the start of a self-service session.
Try asking:
Look up Jordan Lee.Find the new hire with Worker ID 100483.Does Jordan Lee have an approved hire event?Show me [email protected], including completed onboardings.
initiate_onboarding tool
The initiate_onboarding tool returns a kickoff plan for your approval, then schedules an initial meeting, sends the hire's welcome email, and notifies the manager. Your LLM uses this tool to kick off, start, or set up onboarding for a hire with an approved Workday hire event.
Try asking:
Kick off onboarding for Jordan Lee, starting the 22nd.Show me the kickoff plan before anything gets scheduled.Set up Jordan Lee's initial meeting for 9am.
get_onboarding_status tool
The get_onboarding_status tool returns the status of a hire's onboarding. It has no visibility into other MCP servers such as Access Provisioning or ServiceNow ITSM. A new hire can only check their own status, and a manager can only check the status of their own hires. Users in hr_persons can query any hire's record. Your LLM uses this tool to check how onboarding is progressing, or to report initial progress right after you confirm a kickoff plan.
Try asking:
What's my onboarding status?How is Jordan Lee's onboarding going?Which step failed on this onboarding?What's the next item on my checklist?
get_onboarding_checklist tool
The get_onboarding_checklist tool returns checklist items due in either the new hire's onboarding checklist or the manager's own pre-boarding checklist. Your LLM uses this tool to show what's on a hire's or manager's checklist, what's due this week, or what to do next.
Try asking:
What do I need to do this week?What's on my pre-boarding checklist for Jordan Lee?Show me everything that's due so far.Has the benefits enrollment item come up yet?
update_checklist_item_status tool
The update_checklist_item_status tool marks a checklist item complete or reopens it. Your LLM uses this tool to mark a checklist item you've finished, or to reopen one you marked done by mistake.
Try asking:
Mark the benefits enrollment item as done.I finished setting up my workstation. Check that off.Reopen the IT equipment item, it's not actually done.Mark the pre-boarding desk setup item complete for Jordan Lee.
schedule_onboarding_meeting tool
The schedule_onboarding_meeting tool schedules an onboarding meeting. Your LLM uses this tool to set up time with someone during onboarding.
Try asking:
Schedule 30 minutes with IT to go over my laptop setup.Book a benefits walkthrough for next Tuesday afternoon.Show me the proposed time before you send the invite.
escalate_or_create_ticket tool
The escalate_or_create_ticket tool notifies HR about a new hire's issue or question over Slack. Your LLM uses this tool to escalate a problem you report or explicitly ask to escalate, and falls back on it for general onboarding or policy questions when a Confluence MCP isn't available.
Try asking:
My laptop hasn't shown up yet.I can't log into my new account.Can you escalate this to HR?What's our policy on remote work during onboarding?
list_onboardings tool
The list_onboardings tool lists onboardings by status, hire, manager, or date range. Users in hr_persons see every onboarding matching the filters. Other callers only see onboardings where they're recorded as the hire's manager. The server directs new hires asking about onboardings to get_onboarding_status instead. Your LLM uses this tool to list onboardings in progress or coming up, or to find a specific onboarding.
Try asking:
Show me everyone starting this month.List onboardings in progress.Which onboardings are flagged for attention?Find the onboarding for Jordan Lee.
cancel_onboarding tool
The cancel_onboarding tool cancels a scheduled or in-progress onboarding. This performs an operational undo rather than a rehire or rescission action. It doesn't reverse anything done through the Access Provisioning or ServiceNow ITSM servers. Your LLM uses this tool to cancel an onboarding when an offer is rescinded, a start date changes materially, or you ask to cancel one already in flight.
Try asking:
Cancel Jordan Lee's onboarding. The offer was rescinded.Stop the onboarding for Worker 100483.What would canceling this onboarding actually undo?Cancel the remaining steps. The start date moved.
Getting started
View and manage your MCP server tools in the Overview page Tools section. Tool management provides the following capabilities:
TOOLS MUST BE STARTED
Your LLM can only access active tools in your MCP server connector.
Last updated: