Tables with recipe data source
Workflow apps enable you to use recipes as a data source for table components. This allows you to dynamically populate tables with data from your other applications. This ensures data consistency and reduces manual effort.
You can create new recipes directly from the page editor.
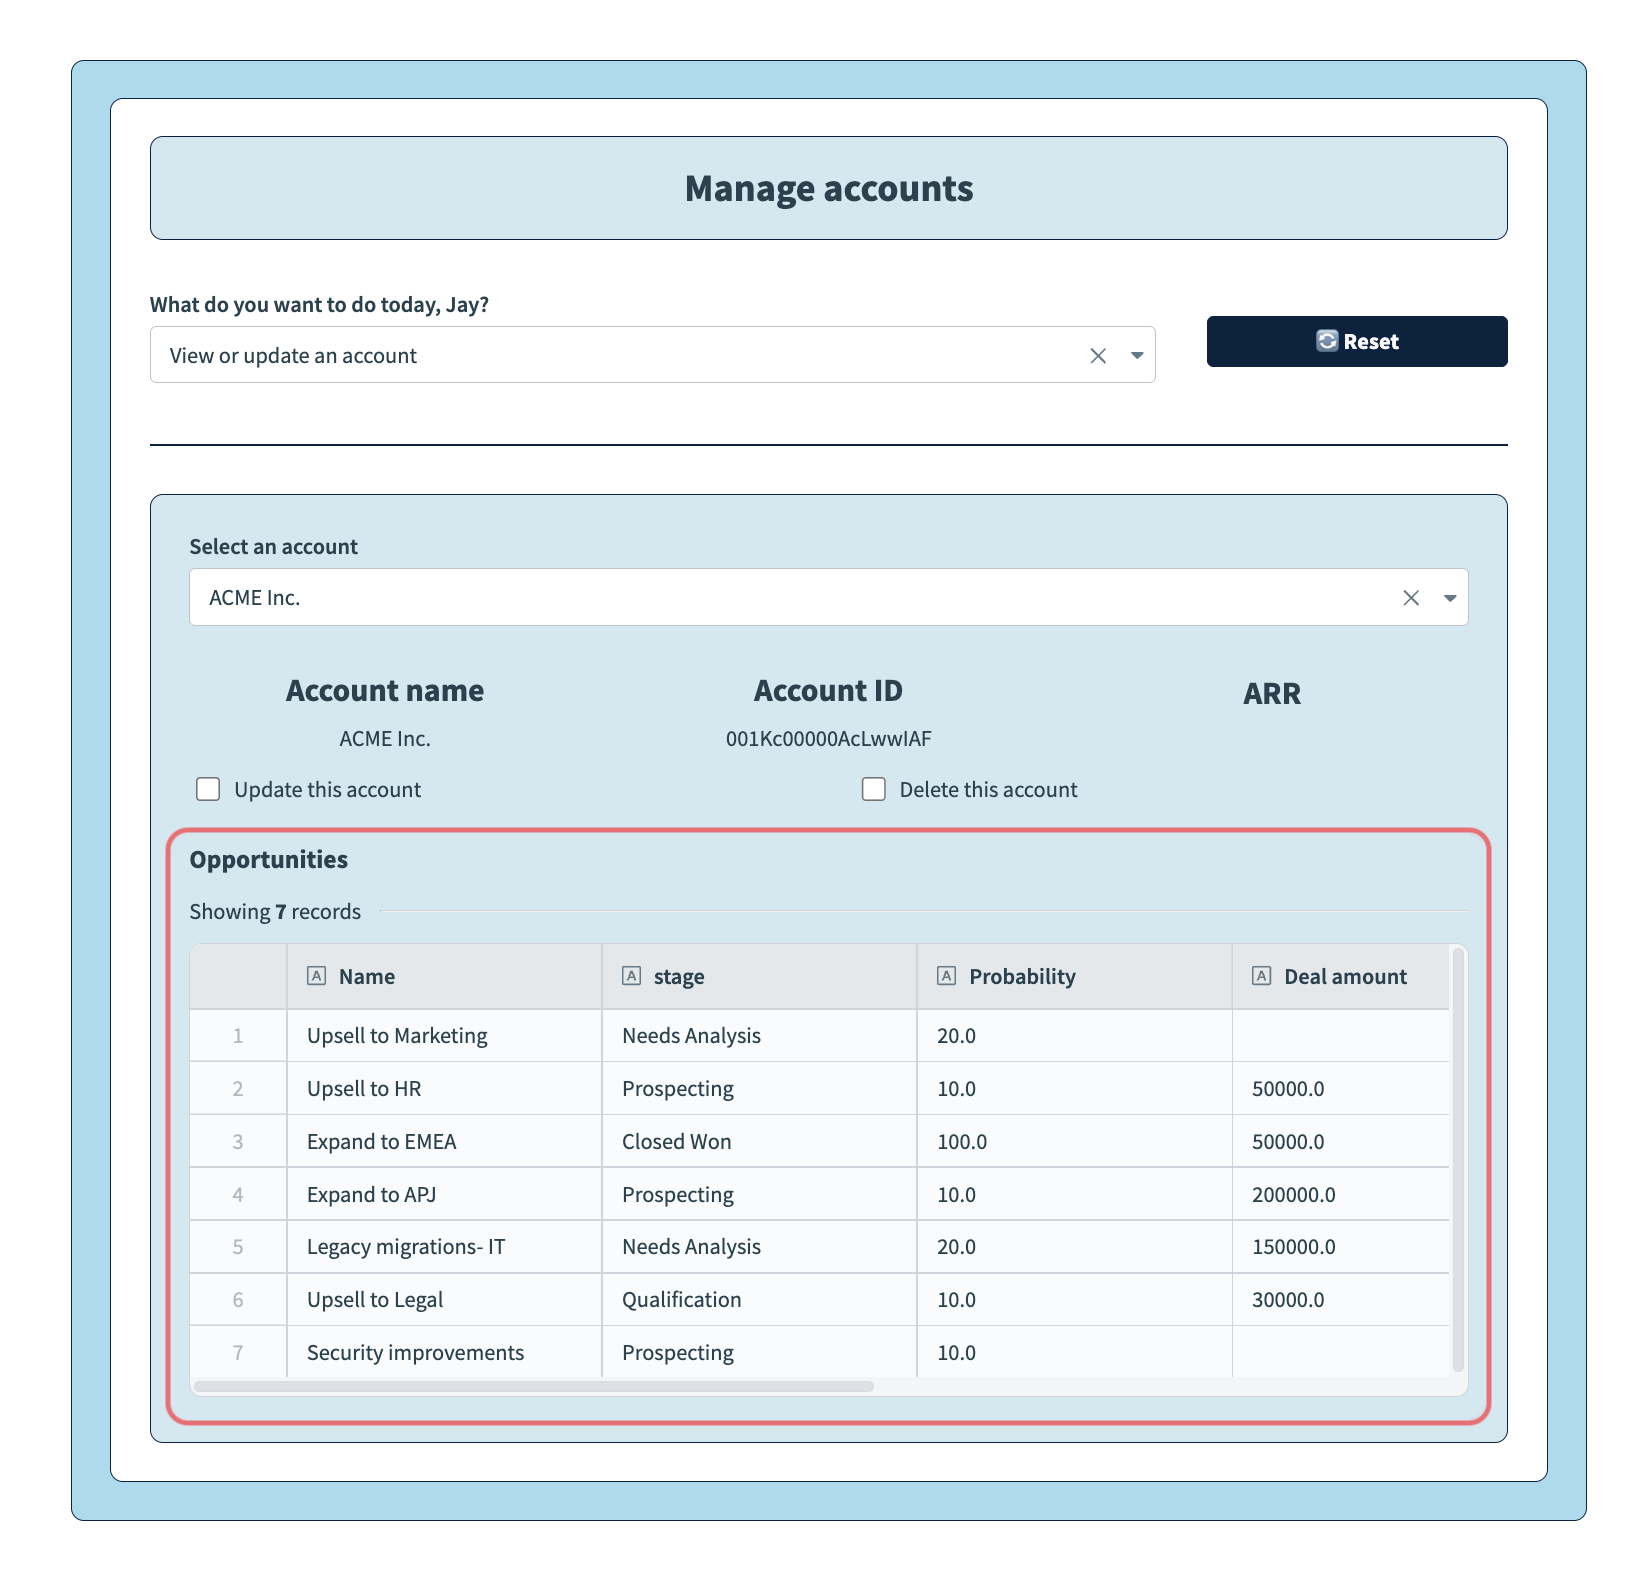 Table component populated by recipe data
Use cases
The following use cases provide examples of how you can use this feature to address your business objectives.
Customer support
- Scenario: A customer support workflow requires updating customer account information, which is dynamically populated based on data from a CRM system.
- Solution: A recipe retrieves a list of customer accounts from Salesforce in real-time, ensuring that the table reflects the most up-to-date data. The employee can then update the account using a Workflow apps page. Submitting the page triggers an additional recipe that updates the account in the CRM.
Sales lead processing
Scenario: Sales representatives must review accounts and related opportunities as part of a lead processing workflow. They require details about opportunities such as the name, description, and amount. Opportunities are stored in a CRM such as Salesforce and change frequently.
Solution: A recipe fetches the latest opportunities for a specific account from Salesforce and returns them to your app page in table format.
HR onboarding
Scenario: An HR team needs to assign new hires to various departments, which are stored in a database and frequently updated.
Solution: A recipe fetches the latest list of departments from the database whenever the page loads, ensuring the HR team always sees the most current options.
Limitations
This feature has the following limitations:
- Pages can have a maximum of one table that uses a recipe as its data source. If your page includes additional tables, they must be configured to use data tables as the data source.
- Table component recipes have a maximum run time of 10 seconds.
- Long-running actions are not supported in table component recipes.
- Runtime user connections are not supported in table component recipes.
- Public (anonymous) pages don’t support recipes as a data source for table components.
How to set up recipes as a data source
EXAMPLE USE CASE
This guide uses a sales lead processing use case and is intended to serve as an example. Recipe modifications such as trigger and action configuration may require additional customizations to suit your specific requirements.
Configuring recipes as a data source for table components consists of the following steps:
Configure your recipe
Complete the following steps to set up this functionality in your Workflow app:
Sign in to Workato and create a Workflow app or select one of your existing Workflow apps.
Create a new page or edit an existing page.
Add a Table component to your page and select Recipe as the data source.
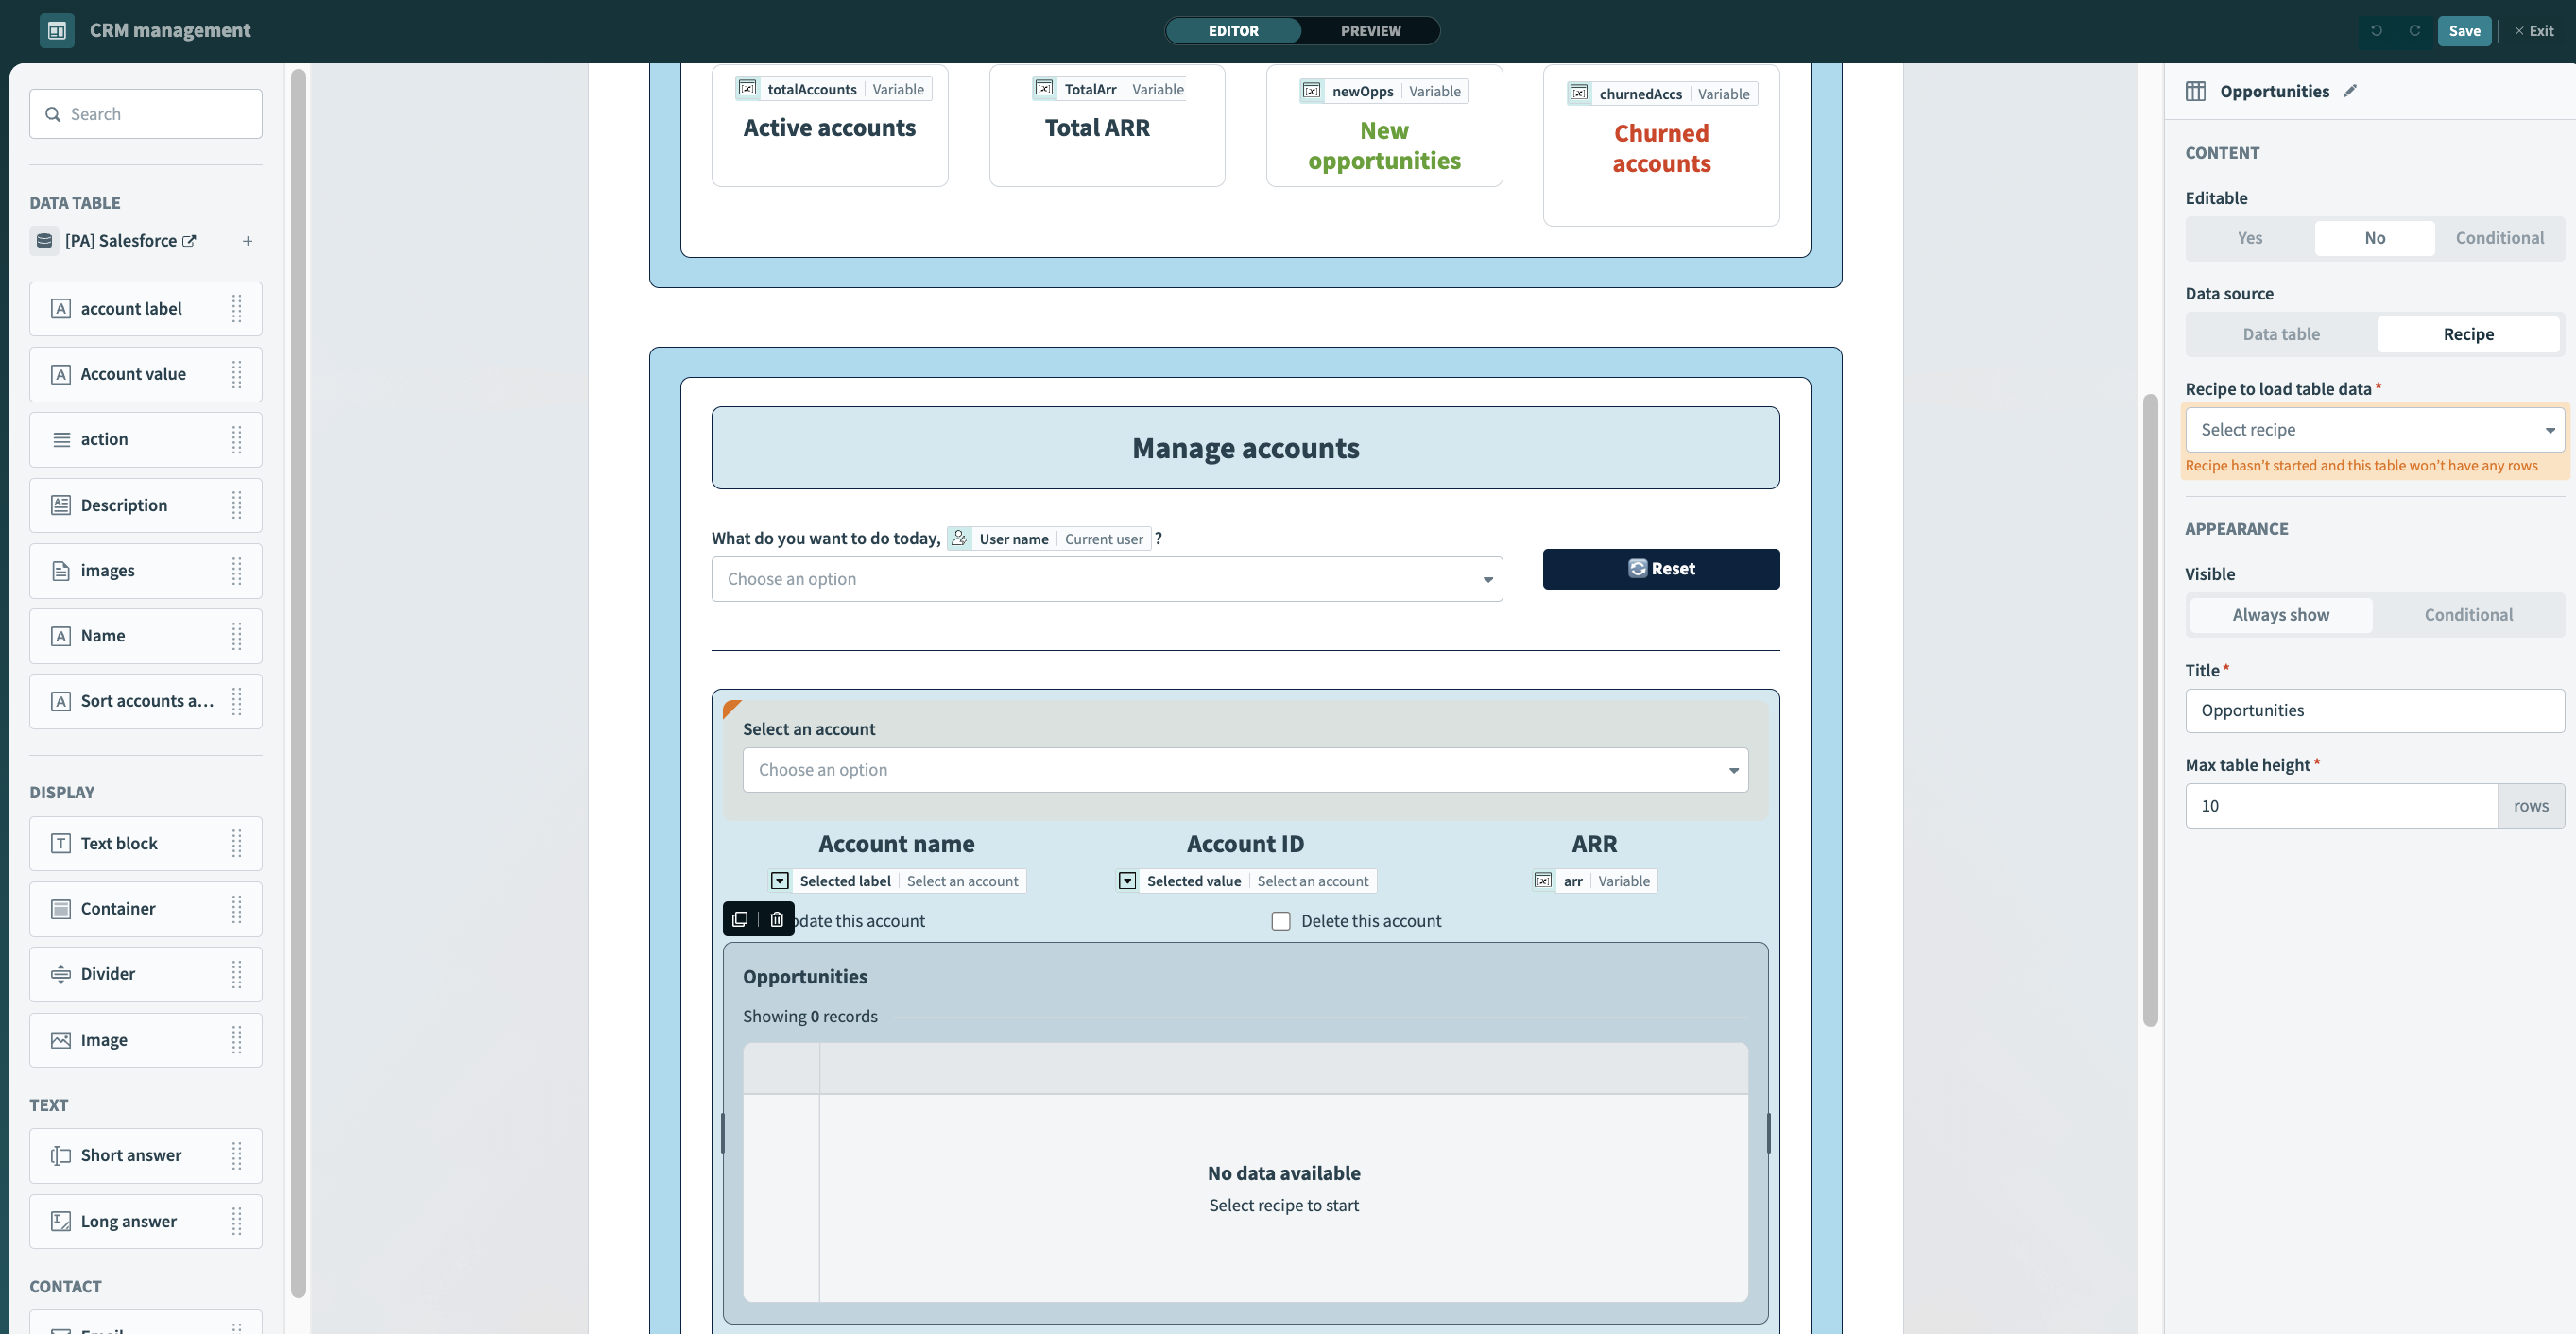 Select recipe as the data source
If existing recipes in your Workflow apps project contain the New component event (Drop-down) trigger, Workato displays them here. Otherwise, click Create recipe.
Set up your recipe
Go to the Name field and enter Get opportunities for table as the recipe name.
Go to the Location drop-down menu and ensure the recipe is in the same folder as your app page.
Click Start building.
Workato generates a recipe pre-configured with the New load event from table (real-time) trigger and the Return data to component action:
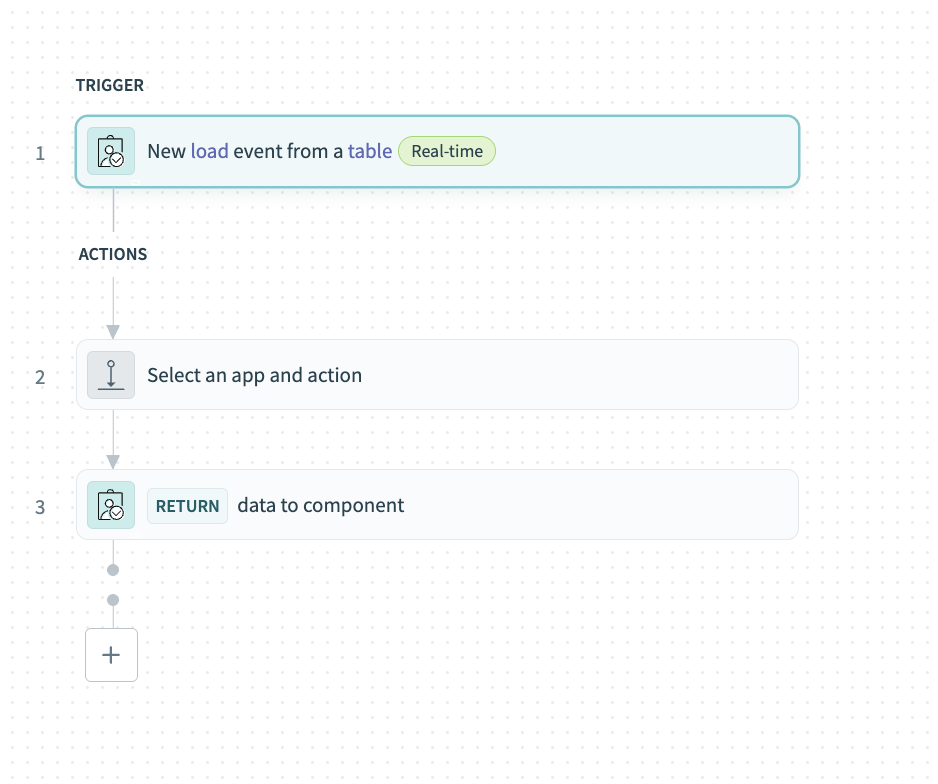 Recipe outline
Modify the New load event trigger
Complete the following steps to modify the New load event trigger:
Select the New load event trigger.
Go to the Setup tab.
Go to Input parameters and click + Add field
Go to the Name field and provide a unique name for this parameter, such as account_id.
Go to the Label field and provide a unique name for this field, such as Account ID.
Go to the Data type field and select String.
Go to the Optional field and select No. When No, this field is required.
Go to Output parameters and click + Add field.
Go to the Name field and provide a unique name for this output parameter, name.
Go to the Label field and provide a unique name for this field, such as Name.
Go to the Data type field and select String.
Go to the Optional field and select No. When No, this field is required.
Create the following additional output parameters:
| Name | Label | Data type | Optional |
|---|---|---|---|
| description | Description | String | Yes |
| opp_type | Opp type | String | Yes |
| stage | Stage | String | Yes |
| deal_amount | Deal amount | Number | Yes |
| probability | Probability | Number | Yes |
| opp_id | Opp ID | String | Yes |
Your configuration should look as follows:
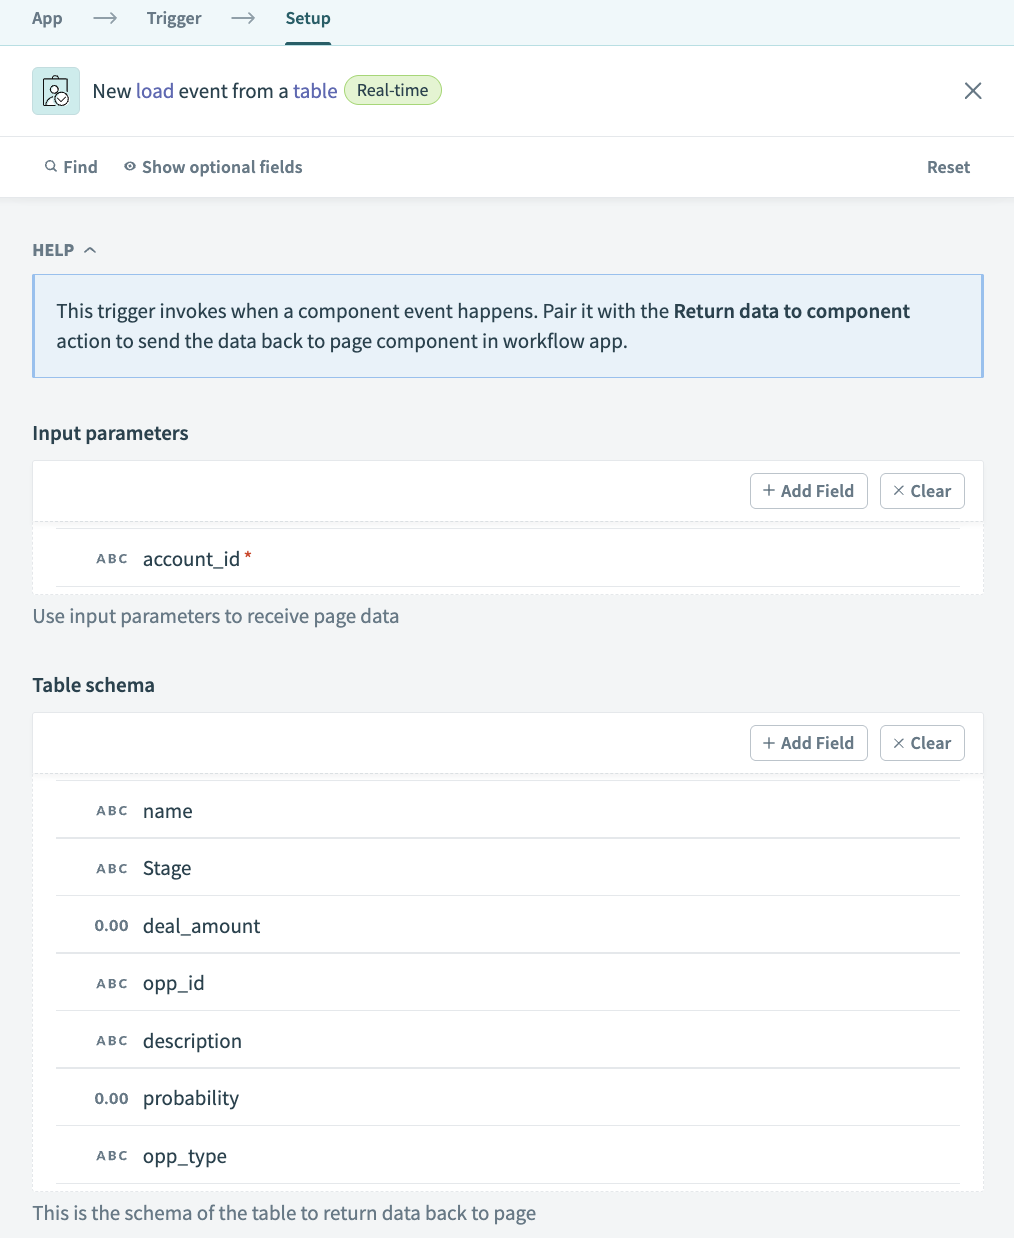 New Load event from a table trigger
Configure a Search for Opportunities in Salesforce (Batch) action
This action fetches the opportunities and related details for an account you specify. The output populates the output fields specified in the New load event trigger.
Click Select an app and action step in the recipe.
Search for and select Salesforce as your app and select the Search for Opportunities in Salesforce (Batch) action.
Select the connection type you plan to use for this action.
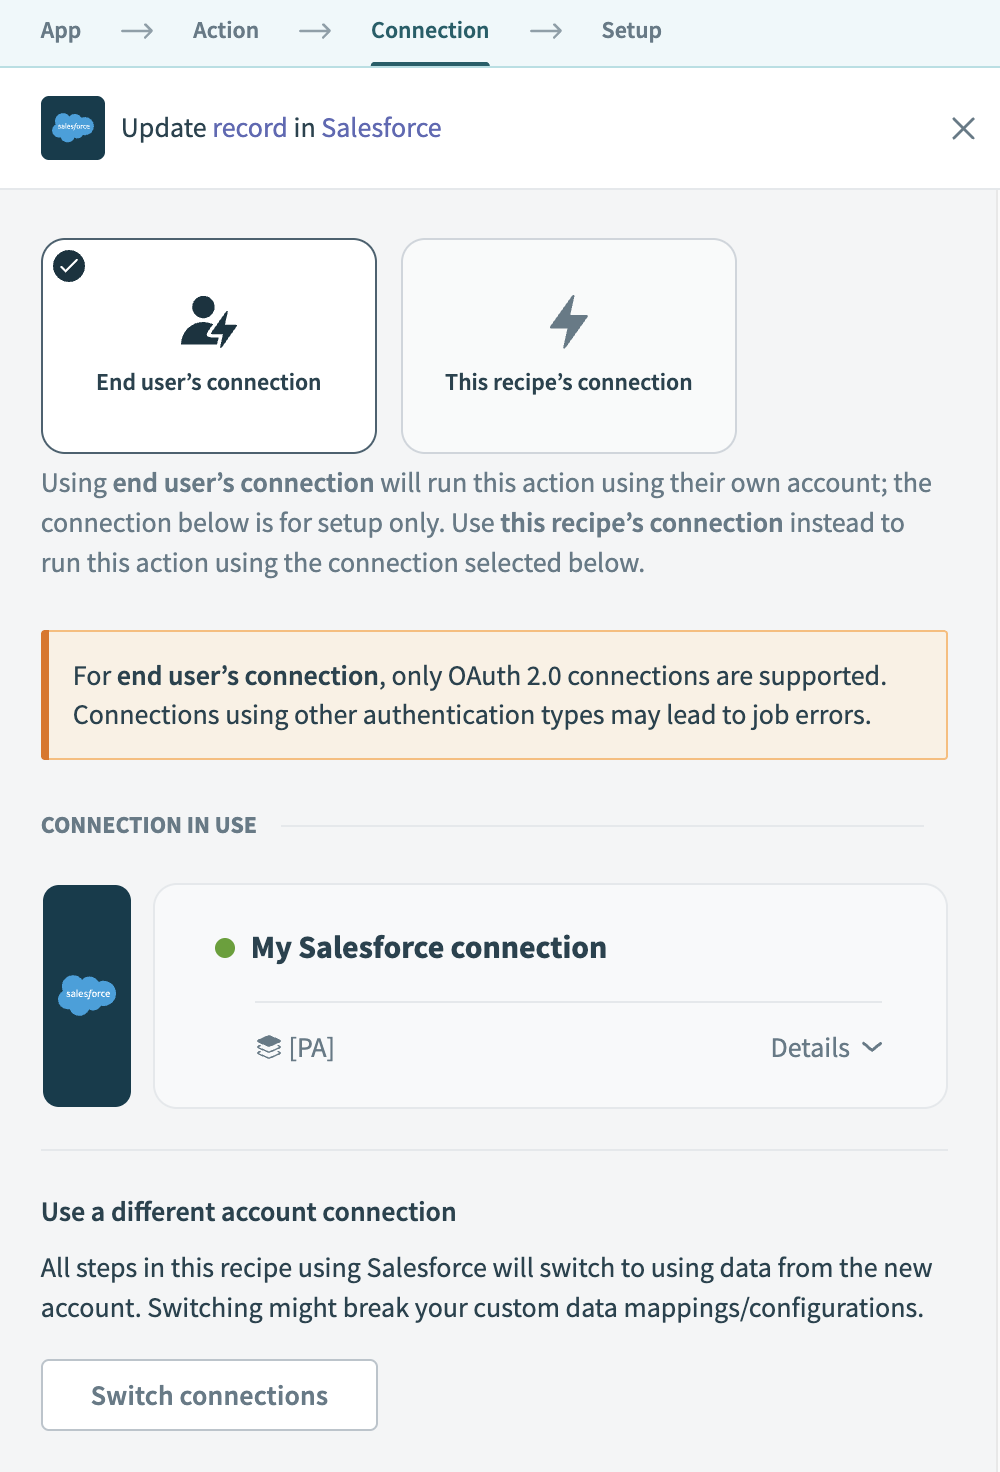 Choose a connection type
- End user's connection: Workflow apps recipes perform actions based on the identity and permissions of the user who connects to the application. End users authenticate with their own credentials to populate components with recipe data.
- This recipe's connection: This option uses the connection established by the recipe builder and follows the same principles as normal app connections.
Only app connections that use OAuth 2.0 authorization code grant are available for end user's connection. Refer to Verified user access for more information.
Select an existing connection or click + New connection to create a new connection.
Use the Object drop-down menu to select Opportunities
Use the Fields to retrieve drop-down menu to select Opportunity ID, Name, Description, Stage, Amount, Probability (%), and Opportunity Type.
Map the Account IDStep 1 datapill into the Account ID field.
Your configuration should look as follows:
 Search for Opportunities in Salesforce (Batch) action
Modify the return data to drop-down action
Select the Return data to component action.
Go to the Table data source options field and map in the OpportunitiesStep 2 datapill.
Go to the Table data section and map datapills into the following fields:
| Field | Datapill |
|---|---|
| Name | NameStep 2 |
| stage | StageStep 2 |
| Deal amount | AmountStep 2 |
| Opp ID | OpportunityStep 2 |
| Description | DescriptionStep 2 |
| Probability | ProbabilityStep 2 |
| Opp type | Opportunity typeStep 2 |
You configuration should look as follows:
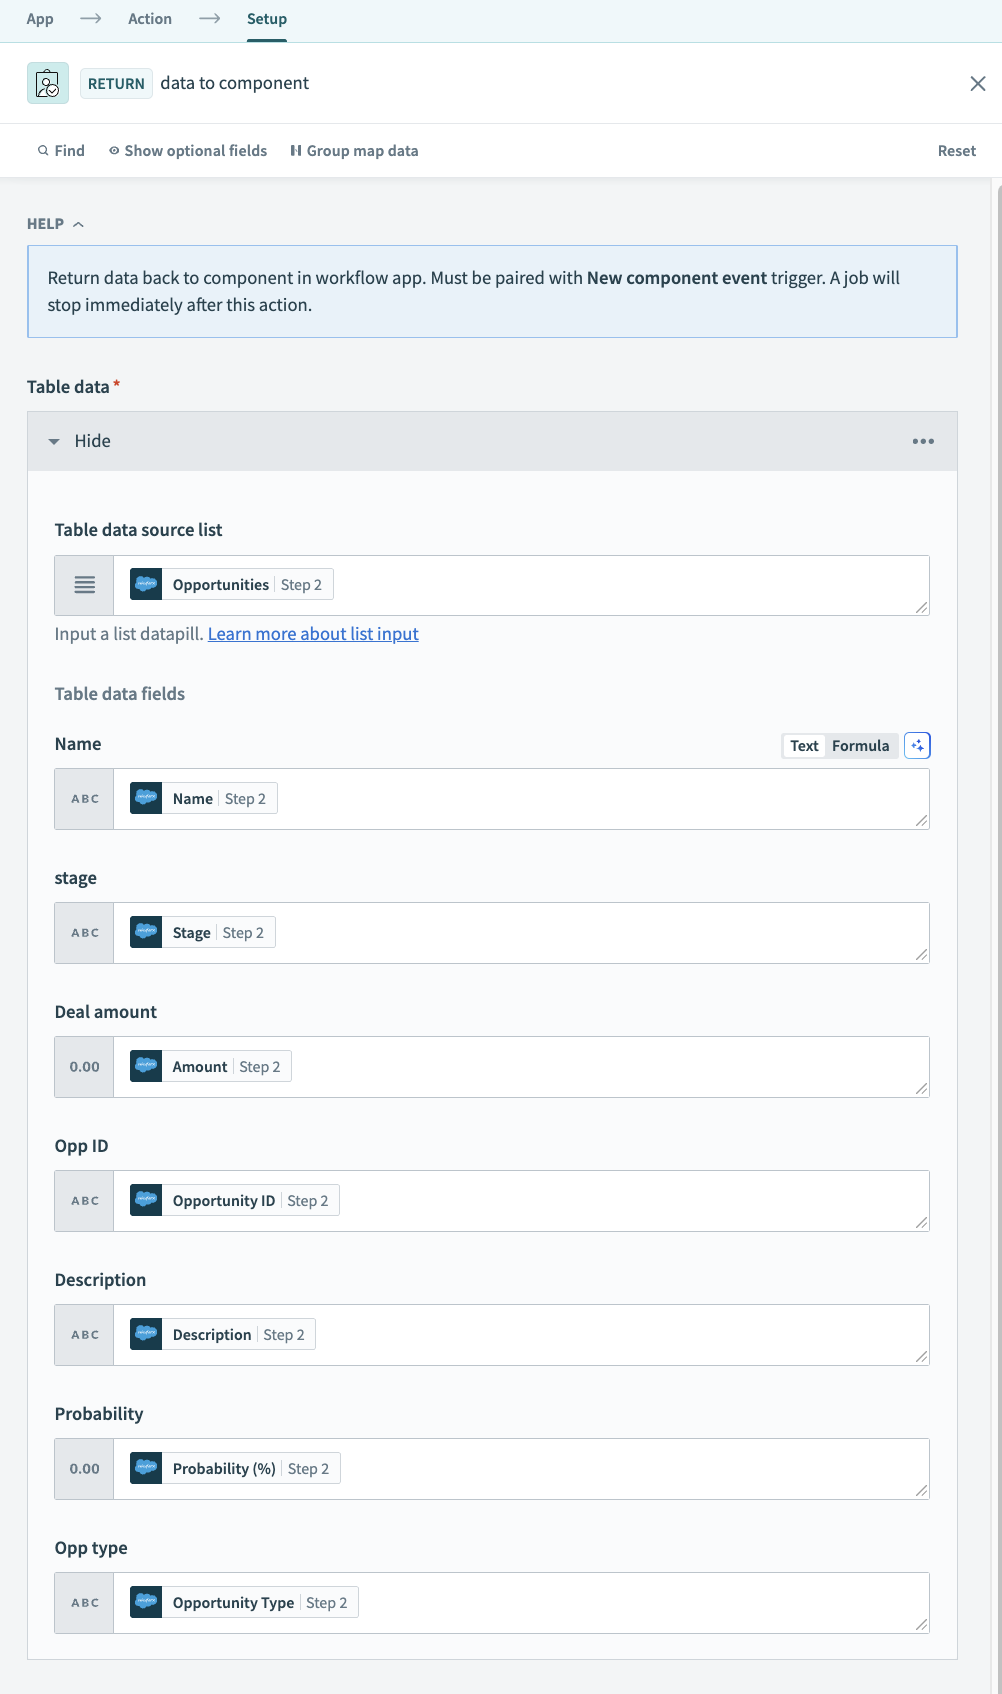 Return data to component action
Click Save.
Your completed recipe should look as follows:
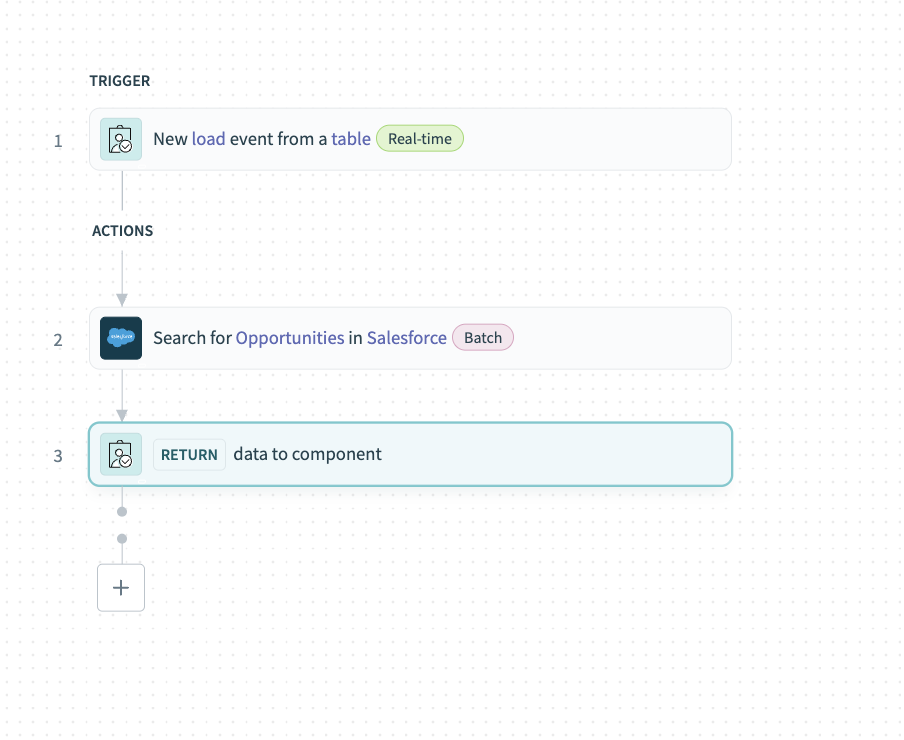 Completed Get data for table recipe
Configure page components
Complete the following steps to configure your recipe as a data source for table components in the page editor:
Click the Data table component to select it.
Go to the Properties panel.
Use the Recipe input parameters section to set up an input parameter for use in the Get data for table recipe created in the previous step:
- Map the Selected valueSelect an account page component datapill into the Account ID field.
Use the Displayed columns menu to select the columns you plan to display on your page.
Configure component visibility
Complete the following steps to configure this component to be visible only after a user selects an account:
Go to the Appearance section.
Click Conditional.
Map in the Selected labelSelect an account datapill to the Data field.
Use the Condition drop-down menu to select Is present.
Type Opportunities into the Title field.
Enter 10 into the Max table height field.
Click Save.
Your configuration should look as follows:
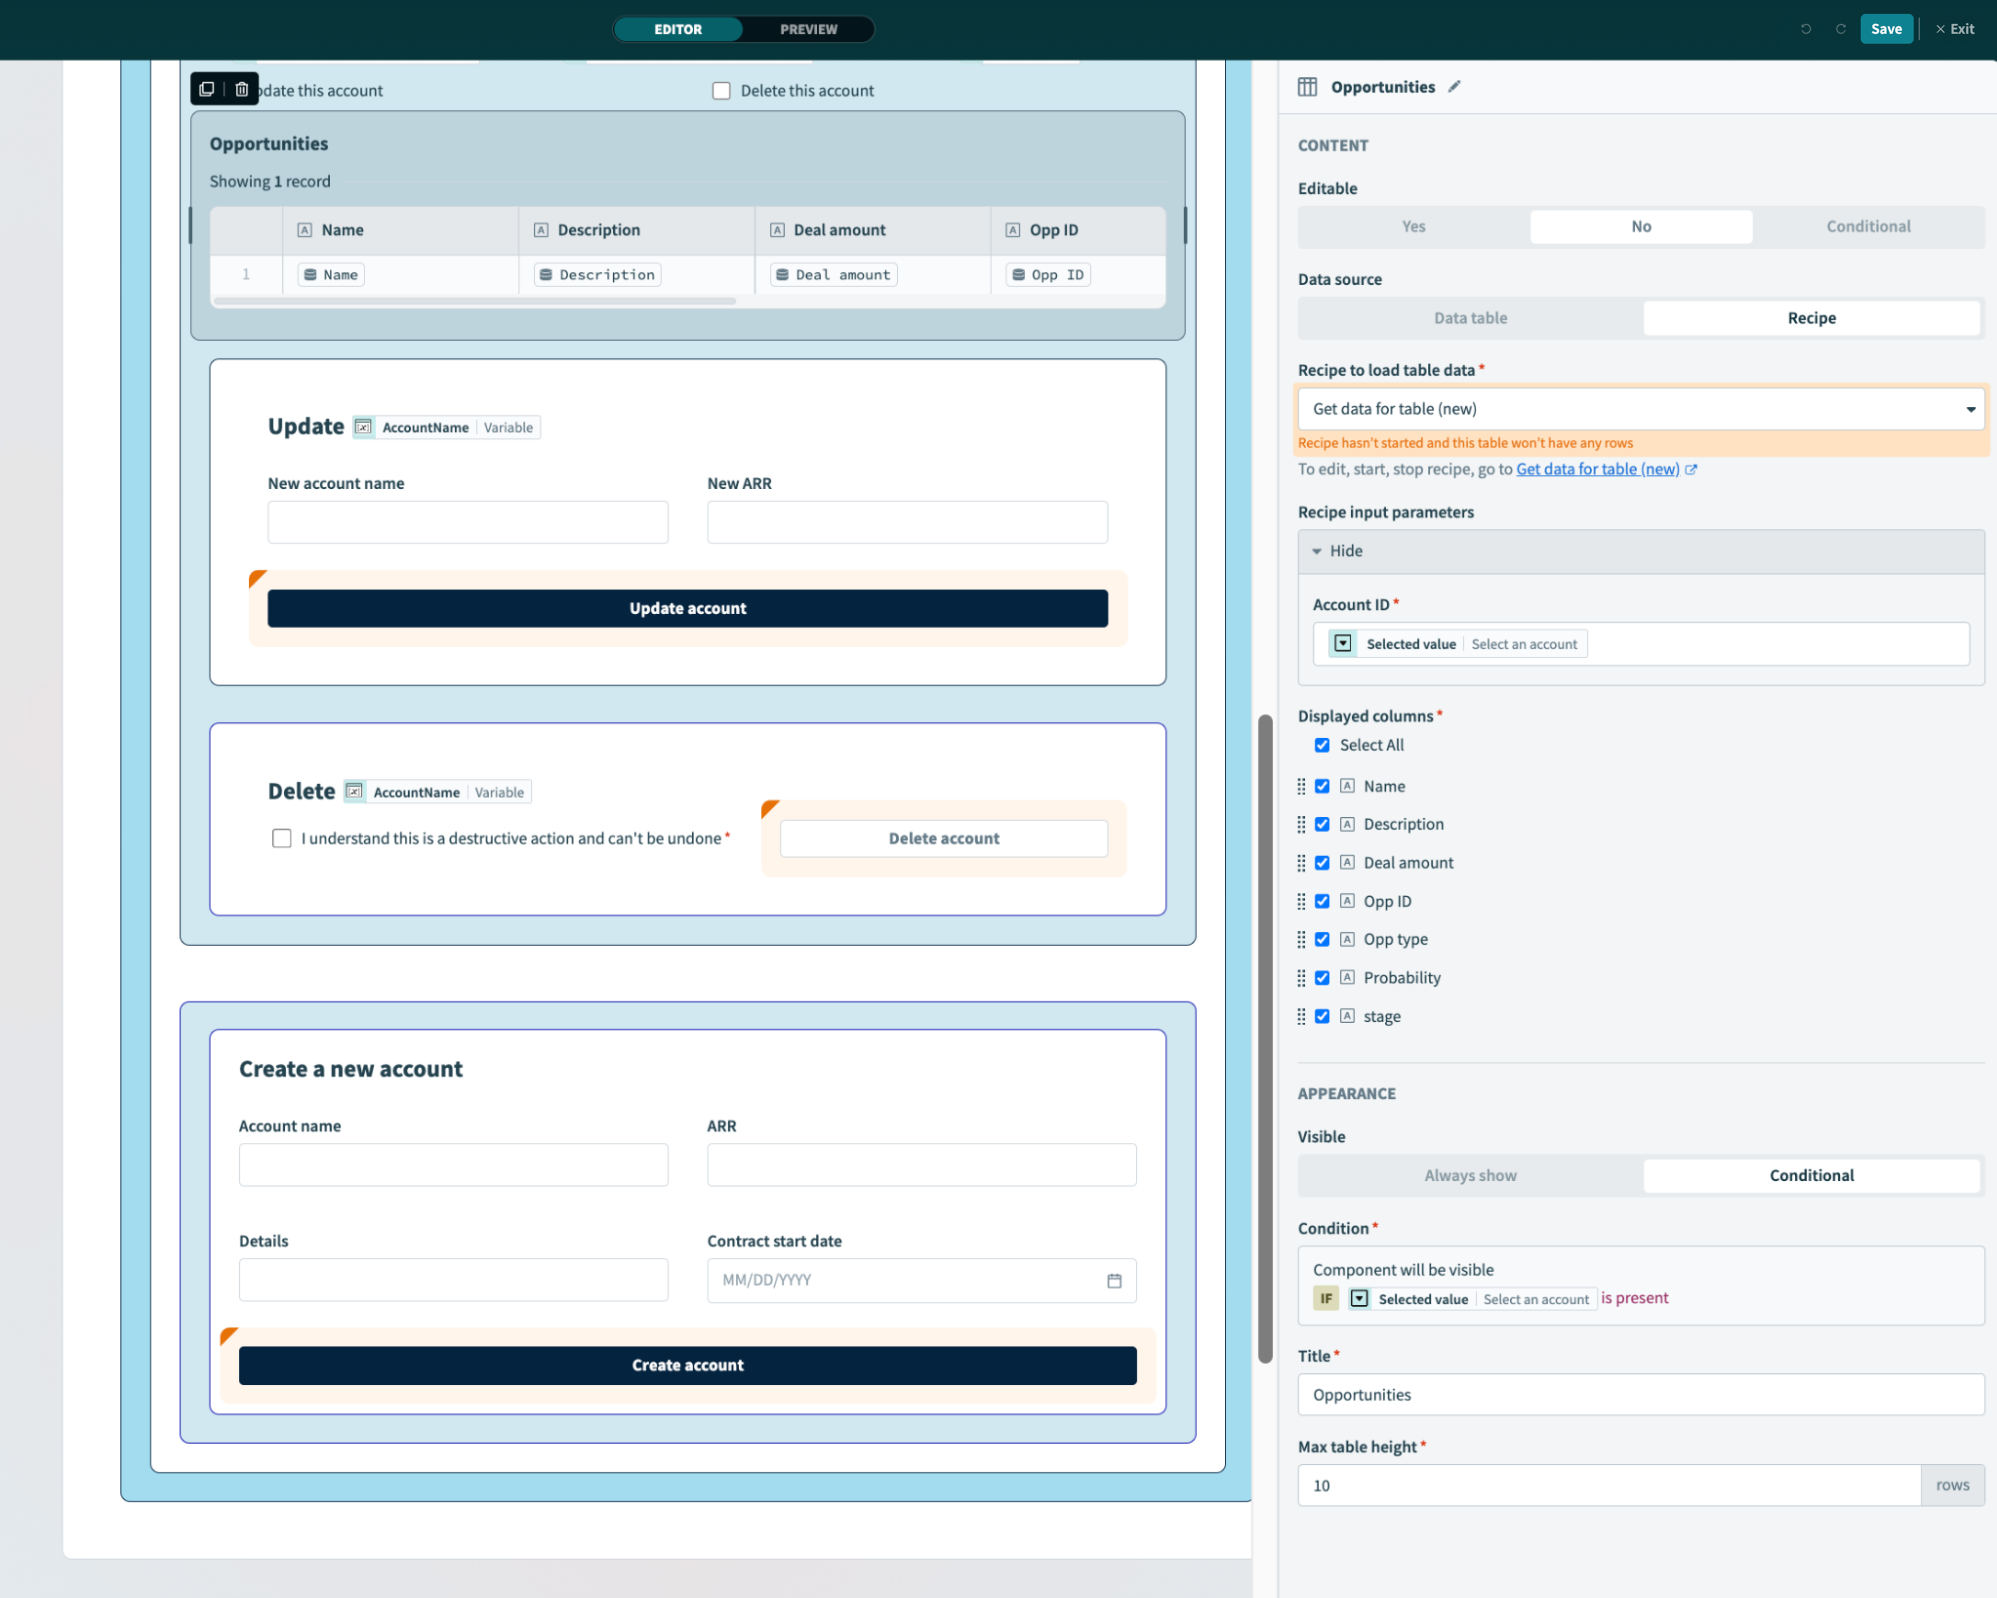 Component configuration
Last updated: