Sample use case - Change data capture
Every day new data is available at the source system that must be fetched and loaded into a destination system. Often, the source application can only provide a full extract of the data rather than just the new or updated data as an extract. This makes it challenging to fetch and ingest the new/updated data because it requires you to match incoming data with historical data and compare and extract only the differences between the two.
SQL Transformations enables users to easily compare historical data with the incoming extract and fetch the differences alone, all in a single action. The historical data can permanently reside within Workato FileStorage, alleviating any dependencies on an external database, and you can refresh it with every extract. The incoming data can be from any business application, database, or file system.
SQL Transformations fetches the extract, compares it with the persisted historical data, and produces the changed data as the output. The utility is powerful enough to easily handle volumes of data in the order of millions of rows.
Sample recipe: Fetch extract from on-prem system, find the changed data and load it to S3
Consider the following scenario in which a company has the following business process:
Every day, it extracts all its contacts and makes the records available as a CSV data file on its on-prem system. The company wants to fetch only the newly-added contacts from this extract and send it to a cloud storage destination, like S3. Then, another Workato recipe picks up this information from here to perform targeted marketing.
Because the volume of contacts is quite large (about 1.5 million records), the company's typical workflow consists of many steps. A Workato recipe extracts the data from the source, the company stores all the contacts in an external database as historical data, the company must load the new extract to another table, and find the difference between the two tables to get the changed data. Then, they must load the data back into Workato for further processing.
This process is quite cumbersome and creates a dependency on an external database system.
With SQL Transformations, you can achieve the same workflow in three simple steps!
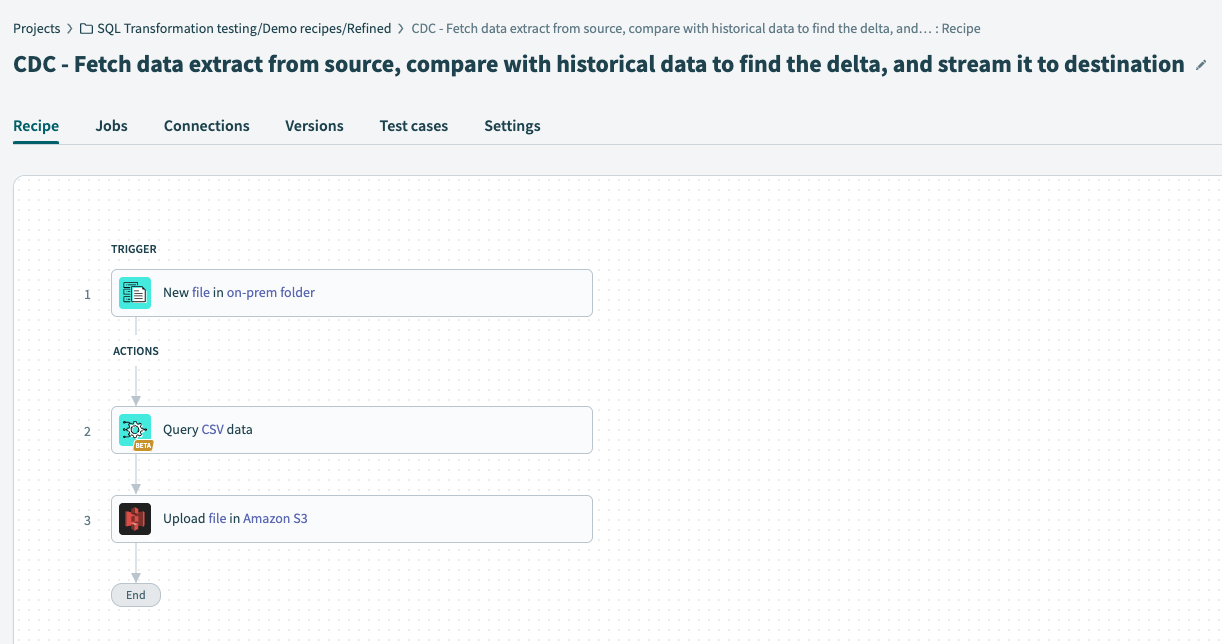 Recipe workflow
In the recipe trigger, configure the source from which we plan to extract data (the on-prem system) and set it up to look for a new incoming extract.
Set up the Query CSV action from the SQL Transformations connector, which can compare the extract with historical data and produce the changed data as output.
Send the data to a cloud storage destination, like S3.
How to leverage SQL Transformations for change data capture
This section describes how to set up different sections of the Query CSV action, enabling you to leverage SQL Transformations for change data capture.
Follow along
See this recipe link to follow along and modify a sample recipe to suit your own workflow.
Data Source setup
Connect the different data sources on which SQL Transformations performs the query.
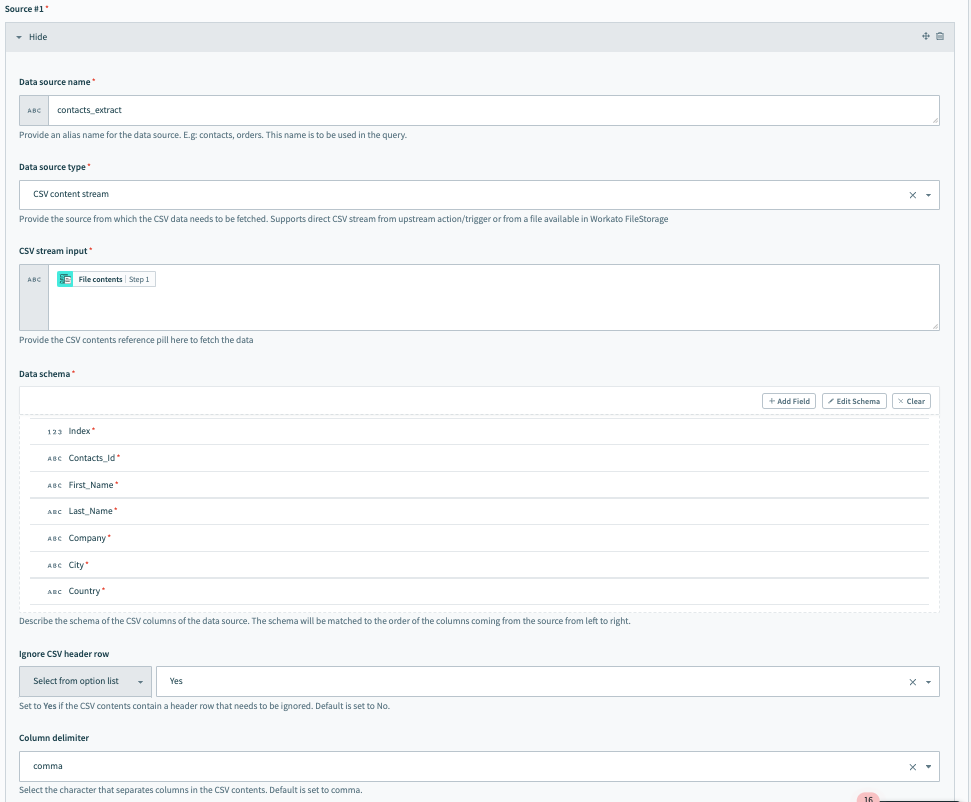
To connect Source #1, fill in the following fields. In our example, Source #1 is the incoming extract from an on-prem system.
Data source name
Give a meaningful name for the Data source name, for example contacts_extract.
Data source type
Select the Data source type. In our example, this is CSV content stream because the CSV data comes in from the upstream on-prem system.
CSV stream input
After you set the data source as CSV content stream, you can now set the CSV stream input. This is where you pass the file contents coming from the on-prem files trigger.
Data schema
Set the Data schema. You can do this easily by importing a CSV file containing a few sample contacts data.
 Configure Source #1, the incoming data extract
Configure CSV-specific options. These include the following fields:
Ignore CSV header row
This allow users to specify whether the incoming data has a heading column that must be ignored and not considered as part of the data.
Column delimiter
Select the delimiter used in the CSV file to separate columns.. Available options include a , (comma), ; (semicolon), and more.
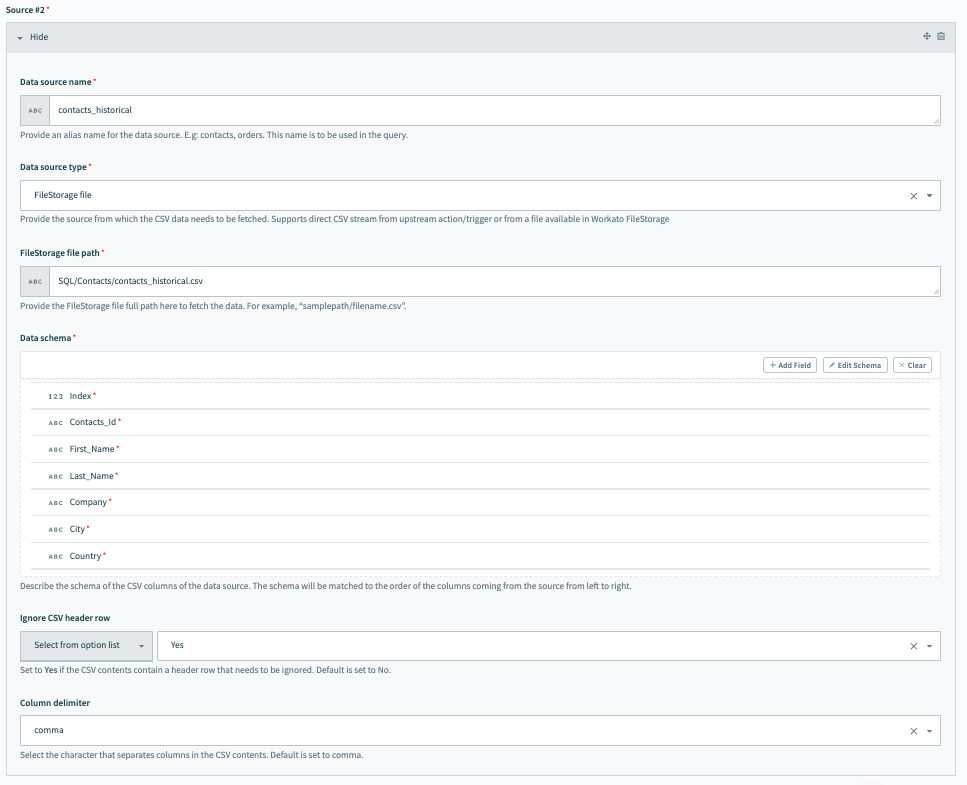
To connect Source 2, fill in the following fields. In our example, this source points to the historical data. It is easy to store and handle this data using FileStorage, Workato's internal persistent file storage system.
Data source name
Give a meaningful name for the Data source name, for example contacts_historical.
Data source type
Select the Data source type. In our example, this is FileStorage file.
FileStorage file path
Provide the path within FileStorage where the historical data file is available.
Data schema
Set the Data schema. You can do this easily by importing a CSV file containing a few sample contacts data. The schema is matched to the order of the columns coming from the source from left to right.
 Configure Source #2, the historical data
Configure CSV-specific options. These include the following fields:
Ignore CSV header row
This allow users to specify whether the incoming data has a heading column that must be ignored and not considered as part of the data.
Column delimiter
Select the delimiter used in the CSV file to separate columns. Available options include a , (comma), ; (semicolon), and more.
Query setup
Next, set up the query that works on the data sources and produces the transformed output.
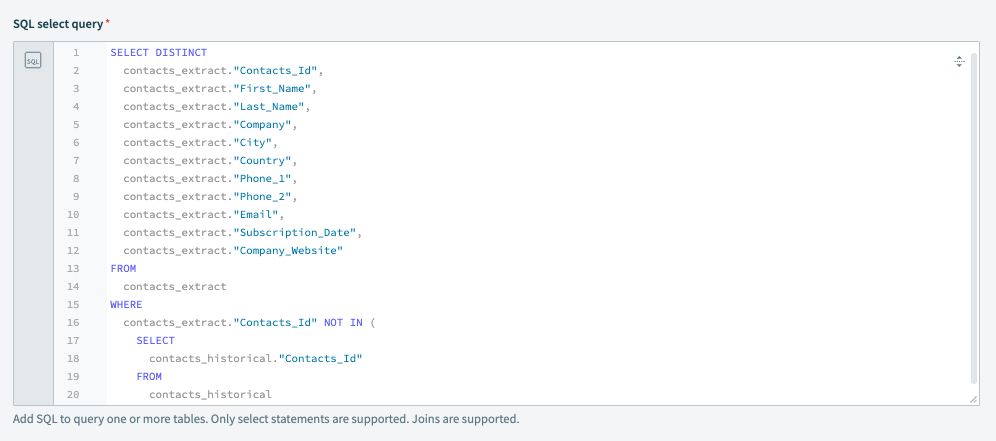
In this example, the objective is to retrieve new records only from the contacts extract. Thus, our query compares the Contacts_Id between the two data sources ( contacts_extract and contacts_historical) and returns the records where Contacts_Id is present in contacts_extract but not in contacts_historical. This means Workato returns the newly-created contacts that are not available in the historical data.
Output setup
Finally, define the format of the output by configuring the following fields.
Our example sends the new records data to S3 for further processing.
Fill in the following fields:
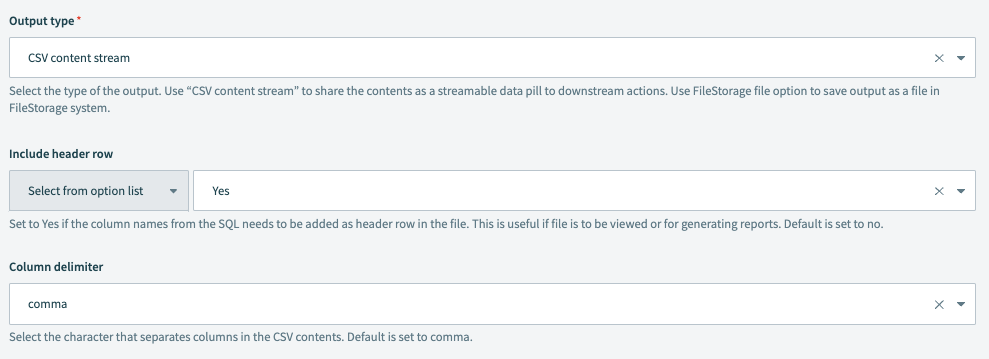
Output type
Select the type of the output. Use CSV content stream to share the contents as a streamable datapill to downstream actions.
Include header row
Set to Yes if the column names from the data must be added as header rows in the file. This is useful if you plan to use the file for generating reports. The default value is No.
Column delimiter
Select the delimiter used in the CSV file to separate columns. Available options include a , (comma), ; (semicolon), and more.
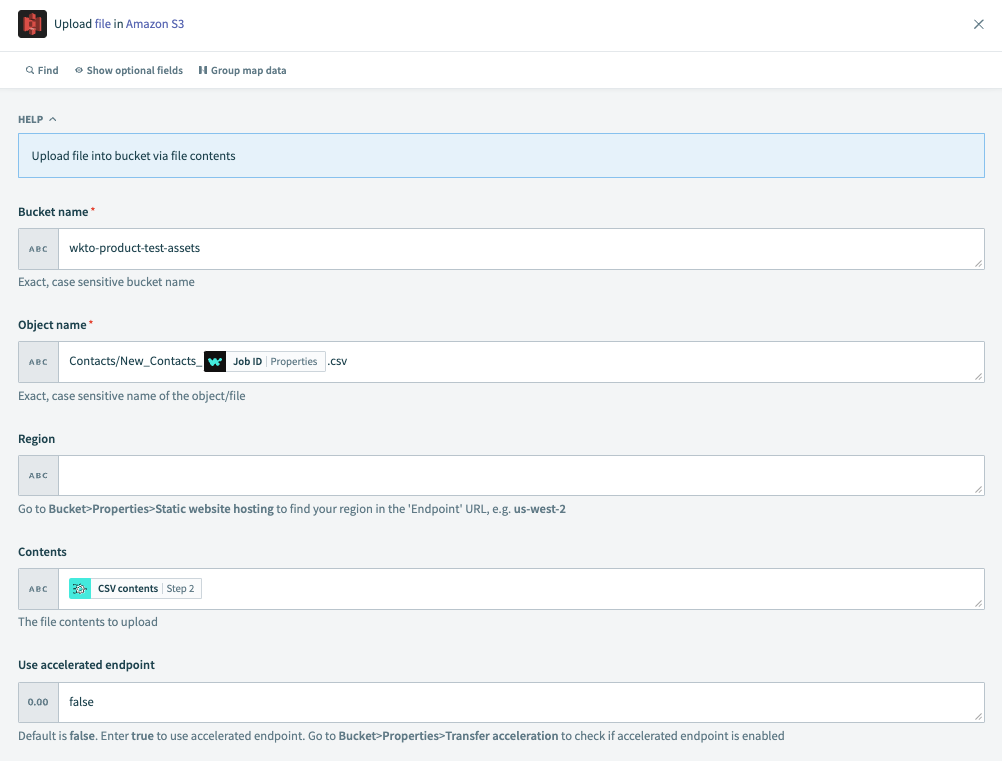
Select the Upload file in Amazon S3 action.
Configure the following fields:
Bucket name
The exact, case-sensitive name of the bucket.
Object name
The exact, case-sensitive name of the object/file.
Region
To find your region, in S3 navigate to Bucket > Properties > Static website hosting to find your region in the
Endpoint URL. For example,us-west-2.Contents
The file contents you plan to upload. Pass the CSV contents datapill from Step 2 Query CSV data action.
Use accelerated endpoint
Default is false. Set to true to use an accelerated endpoint. In S3, go to Bucket > Properties > Transfer acceleration to check if accelerated endpoints are enabled.
Read next
Sample use cases
To view more sample use cases, read the following guides:
Last updated: