SQL Server
SQL Server is a relational database management system by Microsoft. It supports transactional processes, business intelligence and analytics applications for enterprises. Workato's integrations with SQL server help you to accomplish a wide range of tasks such as migrating data, building data pipelines to data warehouses and lakes, backing up data automatically or transforming and exporting data to build complex workflows. Find out how to set up connections to your SQL server from Workato and how Workato can work with SQL server to fulfill your business needs.
Supported versions
All versions of SQL Server are supported. However, some triggers and actions are restricted to newer versions. Refer to the individual trigger and action documentation to learn more.
How to connect to SQL Server
The SQL Server connector supports the following connection types:
Cloud
Complete the following steps to connect to SQL Server using a cloud connection:
Click Create > Connection or press C twice.
Search for and select SQL Server as your connection on the New connection page.
Provide a Connection name that identifies which SQL Server instance Workato is connected to.
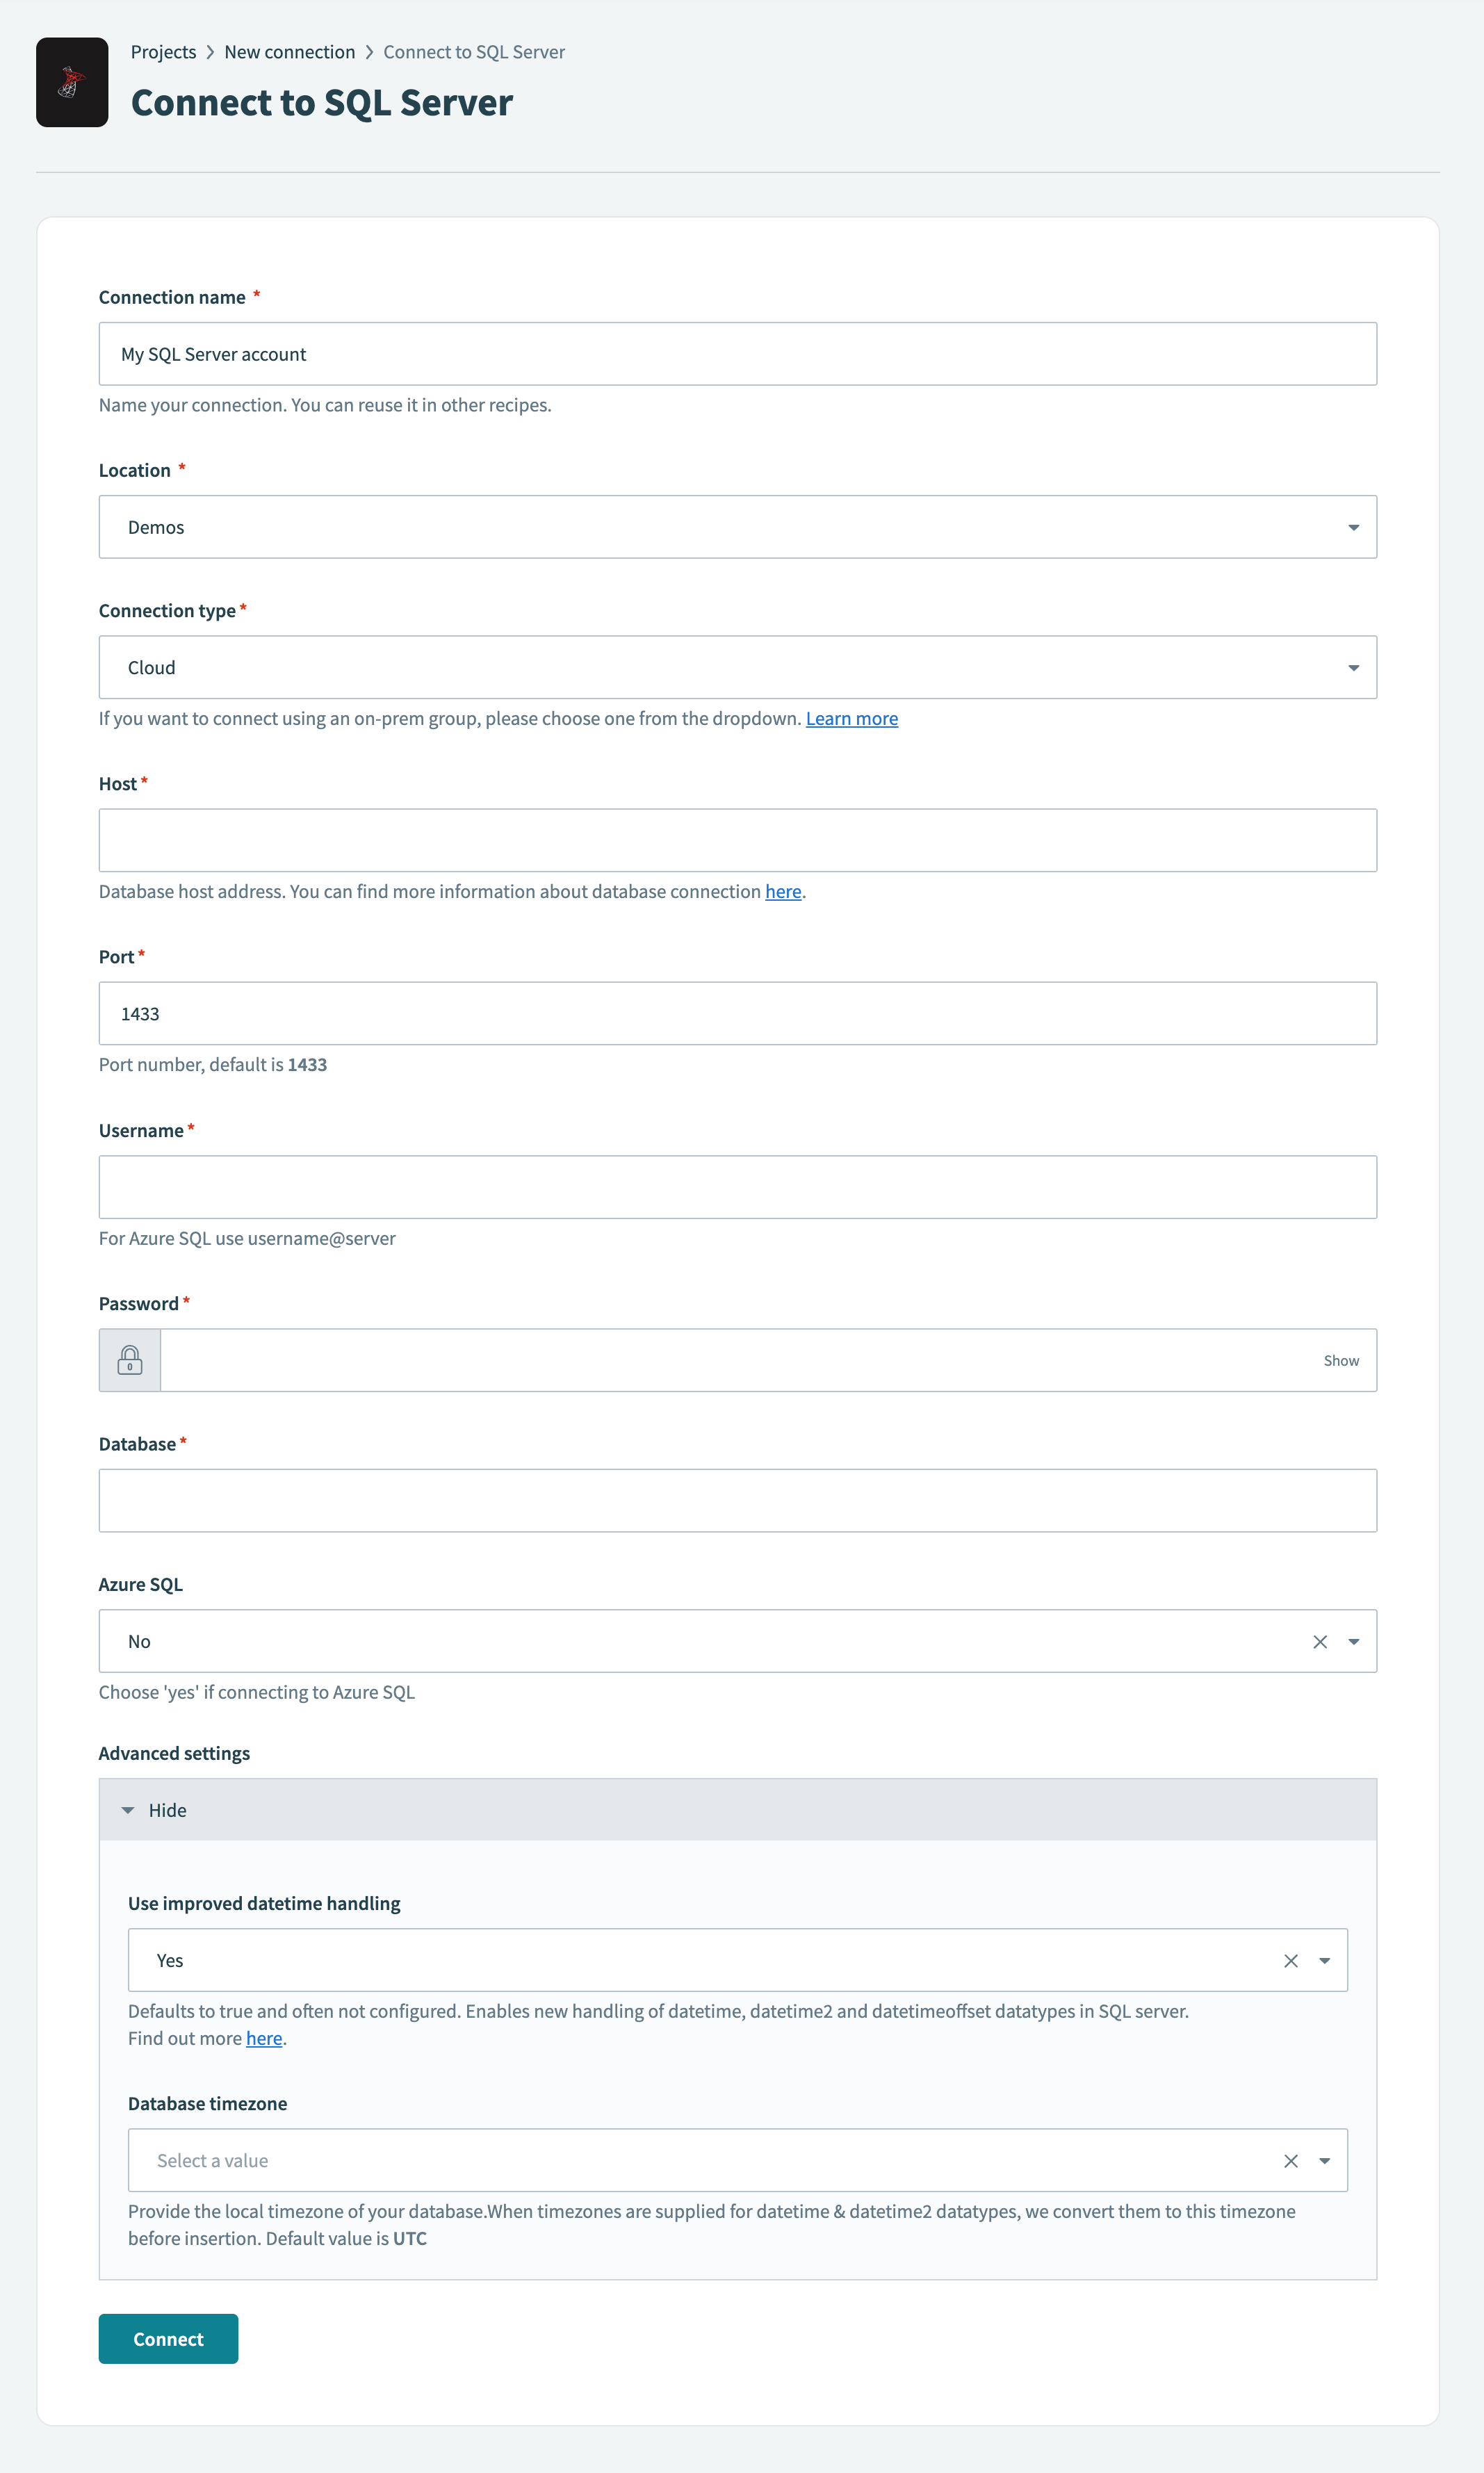 Connect to SQL Server using a cloud connection
Use the Location drop-down menu to select the project or folder where you plan to store this connection.
Use the Connection type drop-down menu to select Cloud.
Enter the URL of your hosted server in the Host field.
Enter the port number your server runs on in the Port field. The default port for SQL Server is 1433.
Enter the username to connect to SQL Server in the Username field.
Enter the password to connect to SQL Server in the Password field.
Enter the name of the SQL Server database you plan to connect to in the Database field.
Optional. Specify whether you're connecting to an Azure SQL instance in the Azure SQL field. The default is No.
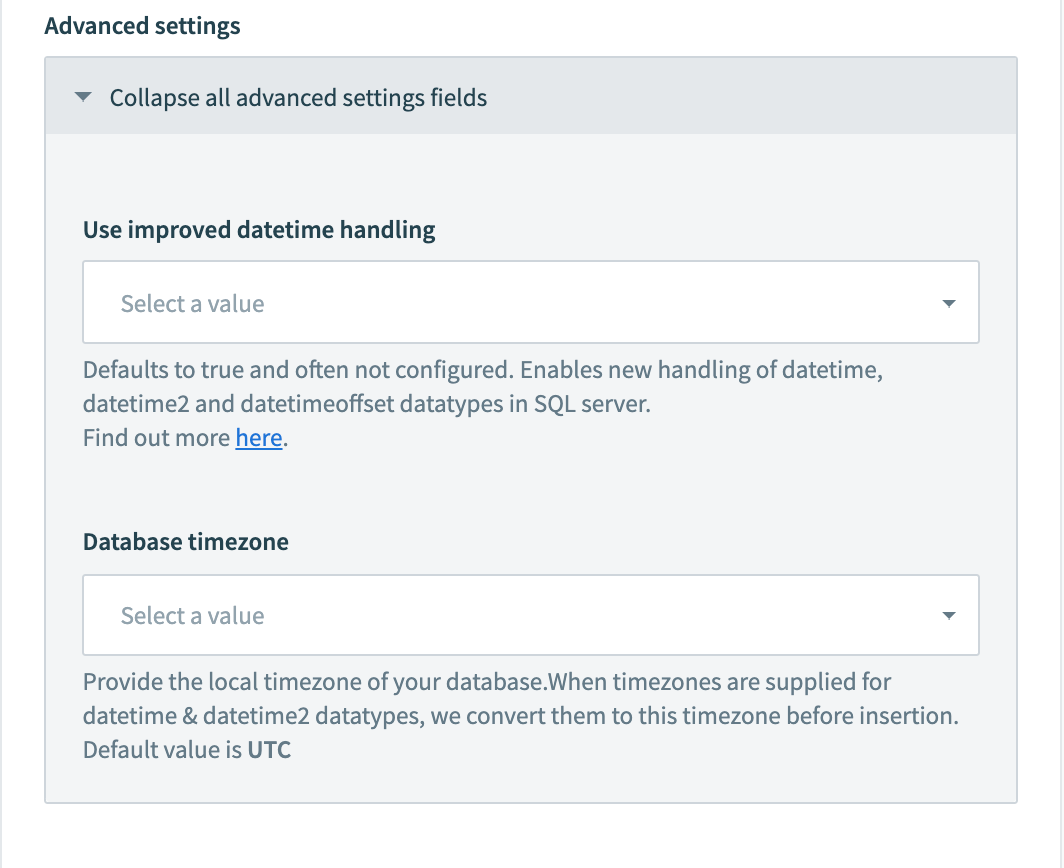
Optional. Expand the Advanced settings field to configure additional settings:
| Field | Description |
|---|---|
| Use improved datetime handling | Enable enhanced handling of datetime, datetime2, and datetimeoffset datatypes in SQL Server. Defaults to true. Refer to the Improved datetime handling section for more information. |
| Database timezone | Set your database's local timezone. When timezones are provided for datetime and datetime2 datatypes, values convert to this timezone before insertion. Default is UTC. |
Click Connect.
On-prem
Complete the following steps to connect to SQL Server using an on-prem connection:
Click Create > Connection or press C twice.
Search for and select SQL Server as your connection on the New connection page.
Provide a Connection name that identifies which SQL Server instance Workato is connected to.
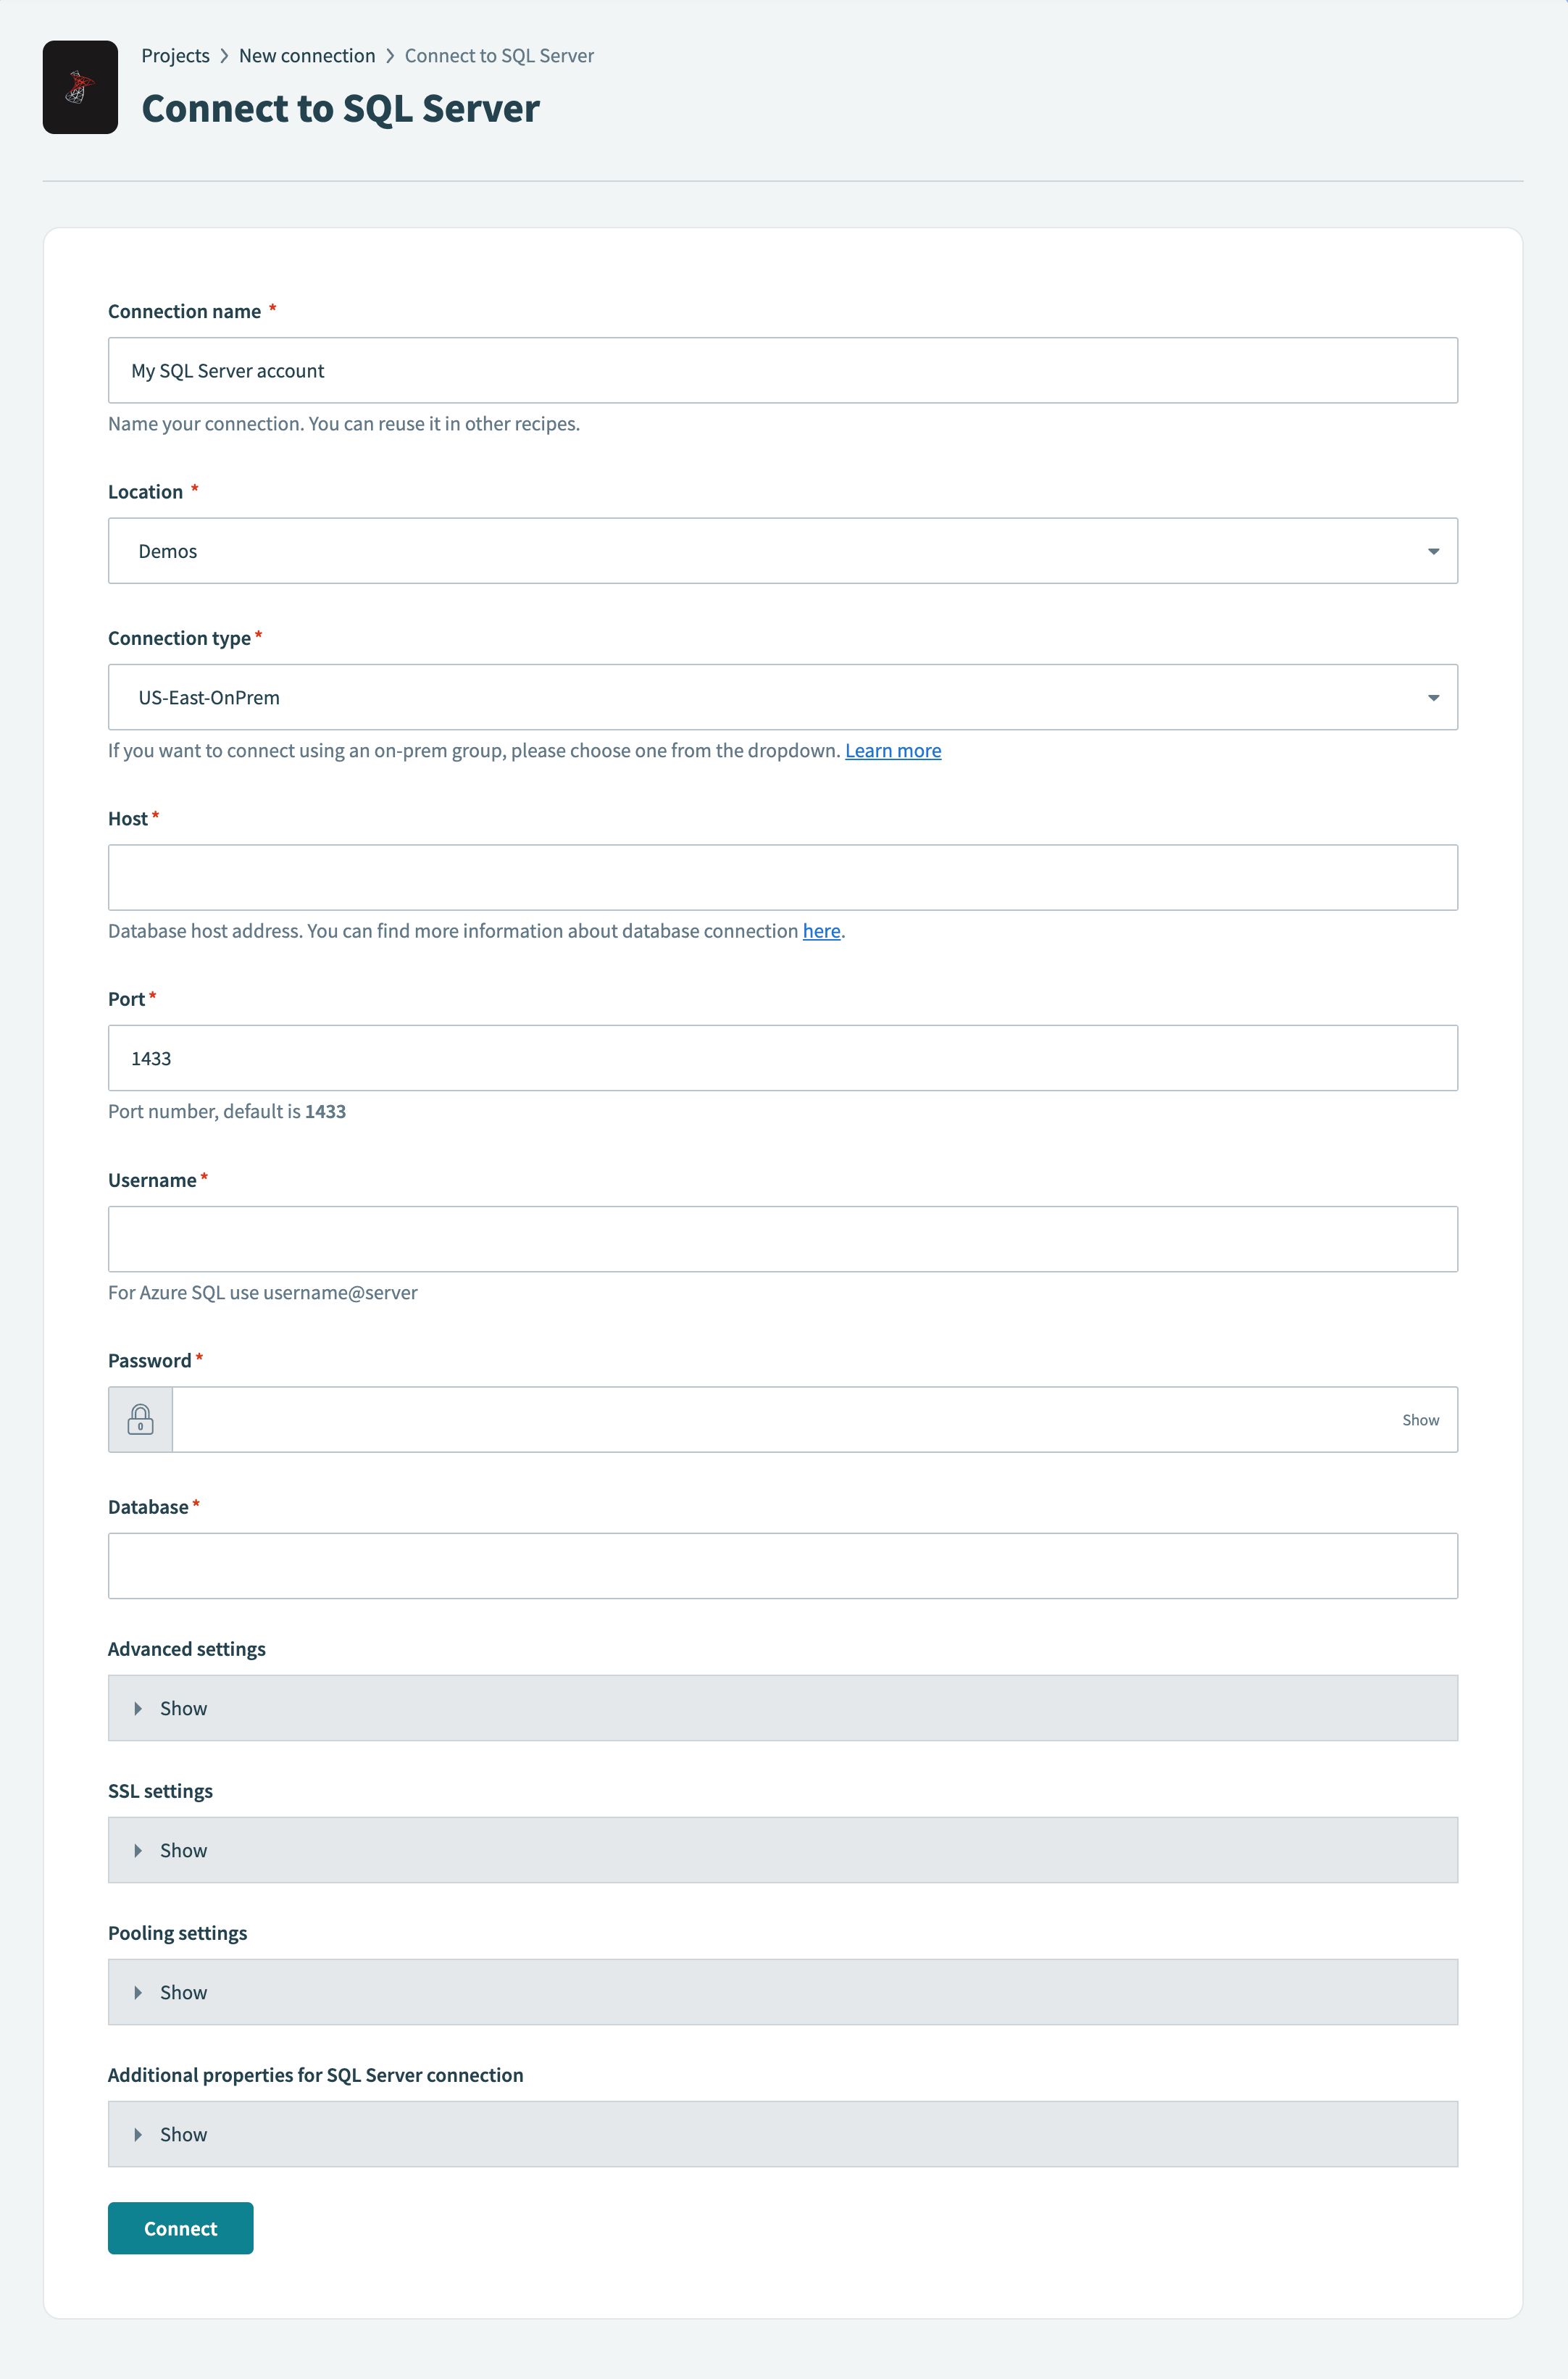 Connect to SQL Server using an on-prem connection
Use the Location drop-down menu to select the project or folder where you plan to store this connection.
Use the Connection type drop-down menu to select your on-prem group.
Enter the URL of your hosted server in the Host field.
Enter the port number your server runs on in the Port field. The default port for SQL Server is 1433.
Enter the username to connect to SQL Server in the Username field.
Enter the password to connect to SQL Server in the Password field.
Enter the name of the SQL Server database you plan to connect to in the Database field.
Optional. Expand the Advanced settings section to configure additional settings:
| Field | Description |
|---|---|
| Use improved datetime handling | Enable enhanced handling of datetime, datetime2, and datetimeoffset datatypes in SQL Server. Defaults to true. Refer to the Improved datetime handling section for more information. |
| Database timezone | Set your database's local timezone. When timezones are provided for datetime and datetime2 datatypes, values convert to this timezone before insertion. Default is UTC. |
Optional. Expand the SSL settings section to configure the following fields:
| Field | Description |
|---|---|
| Server certificate | Provide the X509 server certificate in .pem format. |
| SSL certificate | Provide the X509 client certificate in .pem format. |
| SSL certificate key | Provide the RSA client key in .pem format. |
| Trust all | Specify whether the client should trust any certificate chain. Self-signed server certificates are supported. |
Optional. Expand the Pooling settings section to set connection pool behavior:
| Field | Description |
|---|---|
| Minimum pool size | Set the minimum connections OPA maintains in the pool, including idle and active connections. Default is 1. |
| Maximum pool size | Set the maximum pool size. When full with no idle connections available, new connection requests block until timeout. Default is 10. |
| Idle timeout | Set how long (in seconds) connections can remain idle before removal. Use 0 to never remove idle connections. Default is 30 minutes. |
| Maximum lifetime | Set the maximum connection lifespan (in seconds). Connections are removed when they reach this age, even if recently used. Default is 30 minutes. |
| Timeout | Set how long (in seconds) clients wait for pool connections. Use 0 for no timeout. Default is 30 seconds. |
Optional. Expand the Additional properties for SQL Server connection section to add custom connection parameters, such as required properties for Windows Authentication or Managed Identity.
Click Connect.
Windows Authentication
Follow the on-prem connection setup, then expand the Additional properties for SQL Server connection section and add integratedSecurity: true. The Username and Password fields can be left blank.
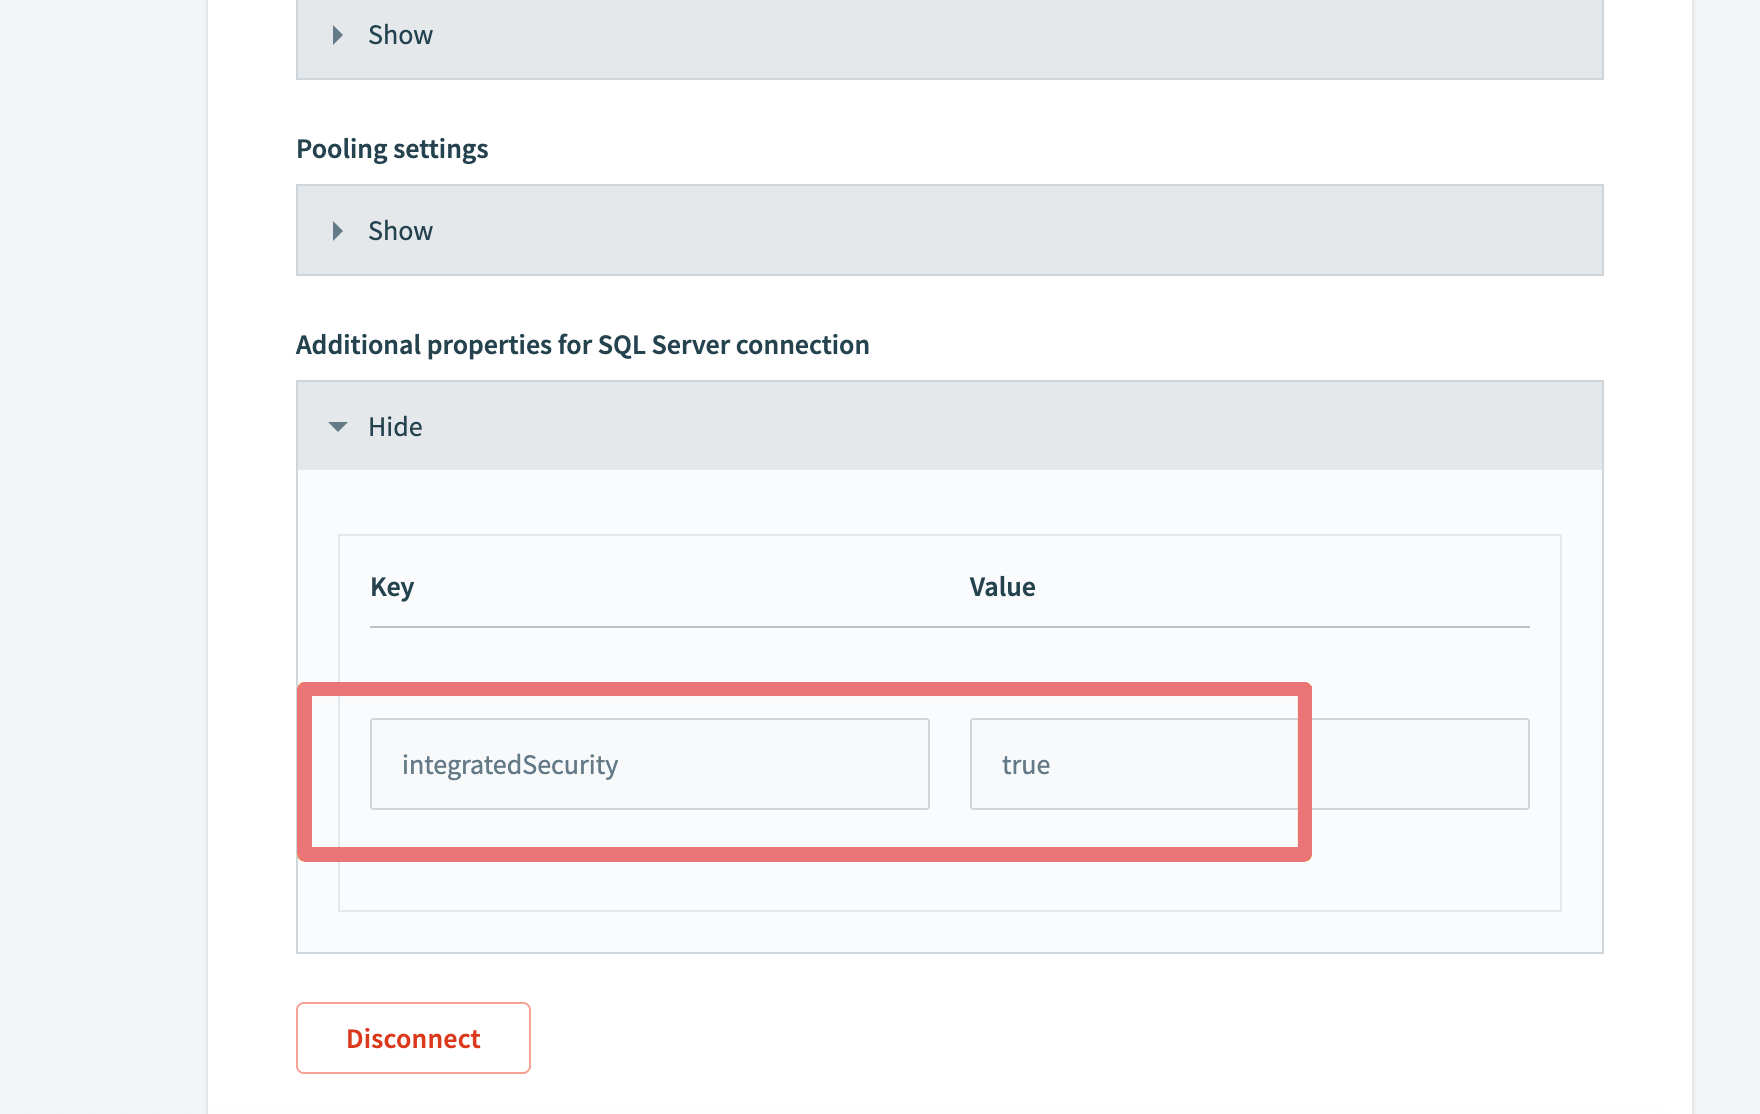 Set
Set integratedSecurity to true for Windows authentication connections
Managed Identity
Follow the on-prem connection setup, then expand the Additional properties for SQL Server connection section and add the following:
| Key | Value |
|---|---|
authentication | ActiveDirectoryMSI |
msiClientId | Enter the client ID of the Managed Identity in Azure that has been granted access to SQL Server. |
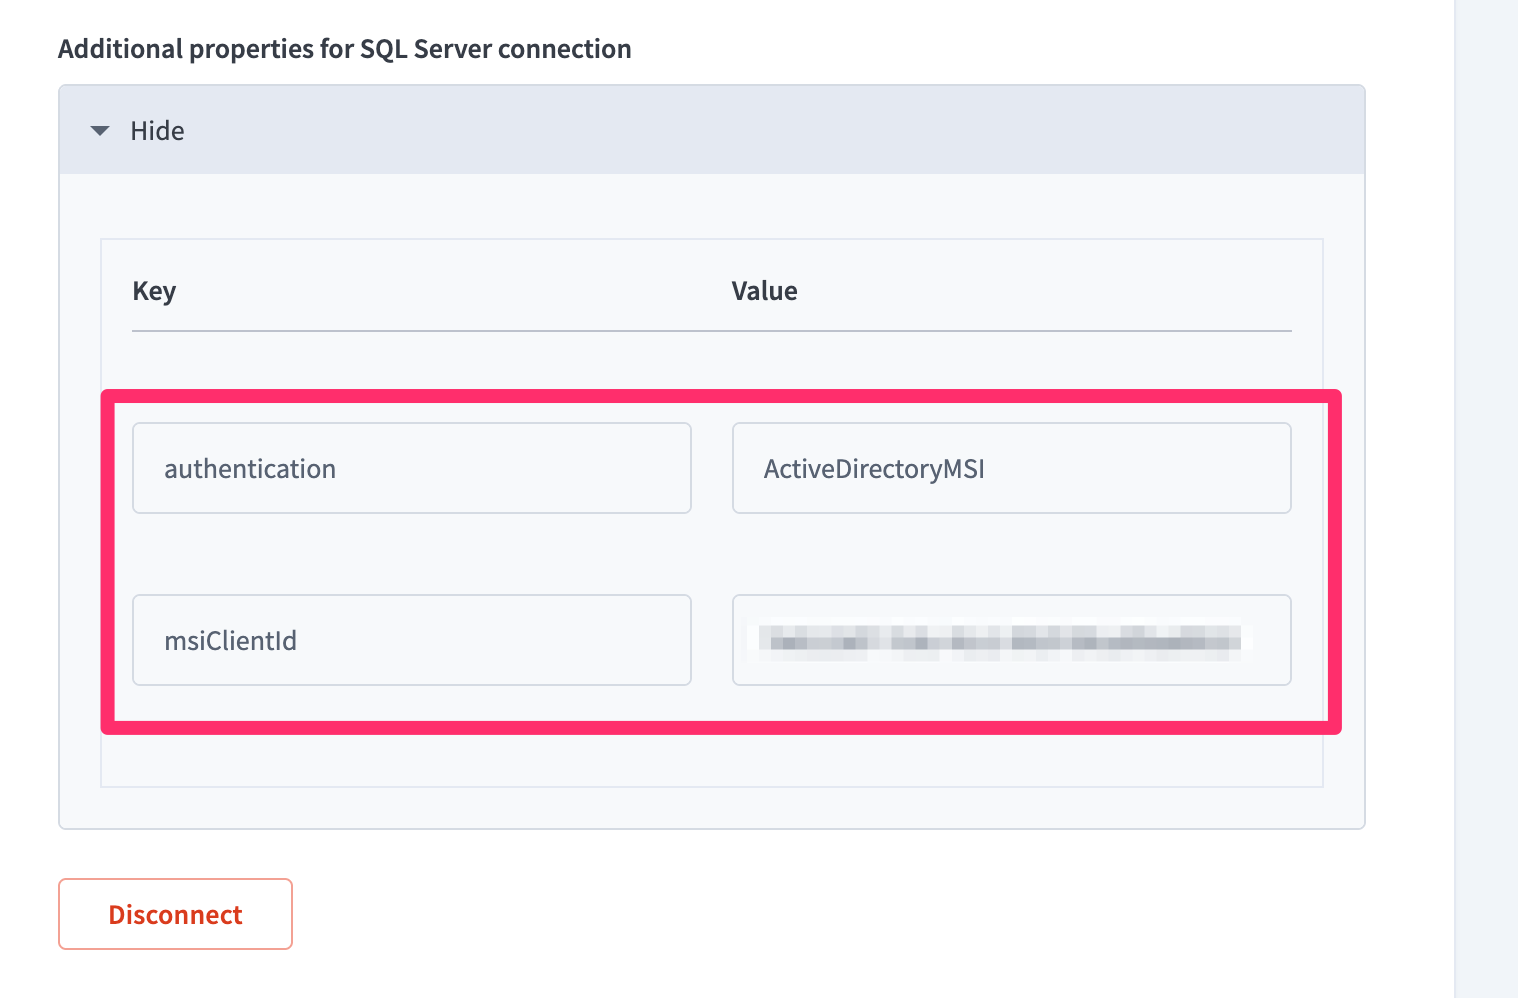 Add Managed Identity properties in the Additional properties section
The Username and Password fields can be left blank.
Improved datetime handling
The SQL Server connector now has the option to utilize improved handling of datetime, datetime2, and datetimeoffset datatype. This can be enabled in the connection settings of each SQL server connection. This defaults to Yes for all new connections and defaults to UTC timezones. Change this to the local timezone of your database if needed. This affects all actions that insert rows into SQL server.
 Configure this in the setting of your SQL server connection
Summary of behavior
| Datatype | Workato input | Improved datetime handling set to false/unselected | Improved datetime handling set to true |
|---|---|---|---|
| datetime/datetime2 | Time with no timezone | Workato workspace timezone assumed. Converted to UTC before insertion. | No TZ assumed. Inserted as is. |
| datetime/datetime2 | Time with timezone | Converted to UTC before insertion. | Converted to database timezone in connection setting timezone before insertion. |
| datetimeoffset | Time with no timezone | Workato workspace timezone assumed. Converted to UTC before insertion with +00:00 tz | Inserted with +00:00 timezone assumed. |
| datetimeoffset | Time with timezone | Converted to UTC before insertion with +00:00 timezone. | Insert with given timezone . |
Note
When using the calendar datepicker for datetime/datetime2/datetimeoffset fields, times are defined using your Workato workspace timezone.
Permissions required to connect
At minimum, the database user account must be granted SELECT permission to the database specified in the connection. Check out the example below to find out more about how to set permissions if you are the one setting up the SQL server connection for your business.
Click here to find out how to set up permissions
If we are trying to connect to a named database (HR_PROD) in a SQL Server instance, using a new database user workato, the following example queries can be used.
First, create a new login and user dedicated to integration use cases with Workato.
CREATE LOGIN workato WITH PASSWORD = 'password1234';
USE HR_PROD;
CREATE USER workato FOR LOGIN workato;
Replace password1234 with a secure password. Remember to set a password that you and others in your organization can remember.
This allows the user to have login access to the SQL Server instance. However, this user will not have access to any tables.
The next step is to grant permission to the necessary tables. There are a few ways to do this. One of the simplest ways is to grant access based on a ROLE.
Find out more about database-level roles here
ALTER ROLE db_datareader ADD MEMBER workato;
Alternatively, we can grant access to all tables defined by a SCHEMA, HR.
GRANT SELECT,INSERT ON SCHEMA :: HR TO workato;
To grant permissions only for certain tables, specify their table names separately and run this query.
GRANT SELECT,INSERT ON tablename1 TO workato;
GRANT SELECT,INSERT ON tablename2 TO workato;
Granting selective permission are useful for databases that have sensitive information. Only give Workato access to the tables that contain the information you need for recipes.
Finally, check that this user has the necessary permissions. Run a query to see all permissions.
SELECT
  pr.name,
  pr.type_desc,
  perm.permission_name,
  perm.class_desc,
  object_name(perm.major_id) AS "object",
  schema_name(perm.major_id) AS "schema"
FROM sys.database_principals pr
LEFT JOIN sys.database_permissions perm ON perm.grantee_principal_id = pr.principal_id
WHERE pr.name = 'workato';
This should return the following minimum permission to create a SQL Server connection on Workato.
+---------+-----------+-----------------+------------+--------+-------------+
| name    | type_desc | permission_name | class_desc | object | schema      |
+---------+-----------+-----------------+------------+--------+-------------+
| workato | SQL_USER  | CONNECT         | DATABASE   | NULL   | NULL        |
| workato | SQL_USER  | INSERT          | SCHEMA     | NULL   | workatodemo |
| workato | SQL_USER  | SELECT          | SCHEMA     | NULL   | workatodemo |
+---------+-----------+-----------------+------------+--------+-------------+
3 rows in set (0.20 sec)
Working with the SQL Server connector
Using tables, views, and stored procedures
After successfully connecting to your SQL Server and selecting an action/trigger in your recipe, you will often be prompted to select either a table, view, or stored procedure. This tells Workato which tables you want to pull or send data to.
Tables & Views
The SQL Server connector works with all tables and views. These are available in pick lists in each trigger/action or you can provide the exact name. Views can be called using this as well and be used in the same way as a table.
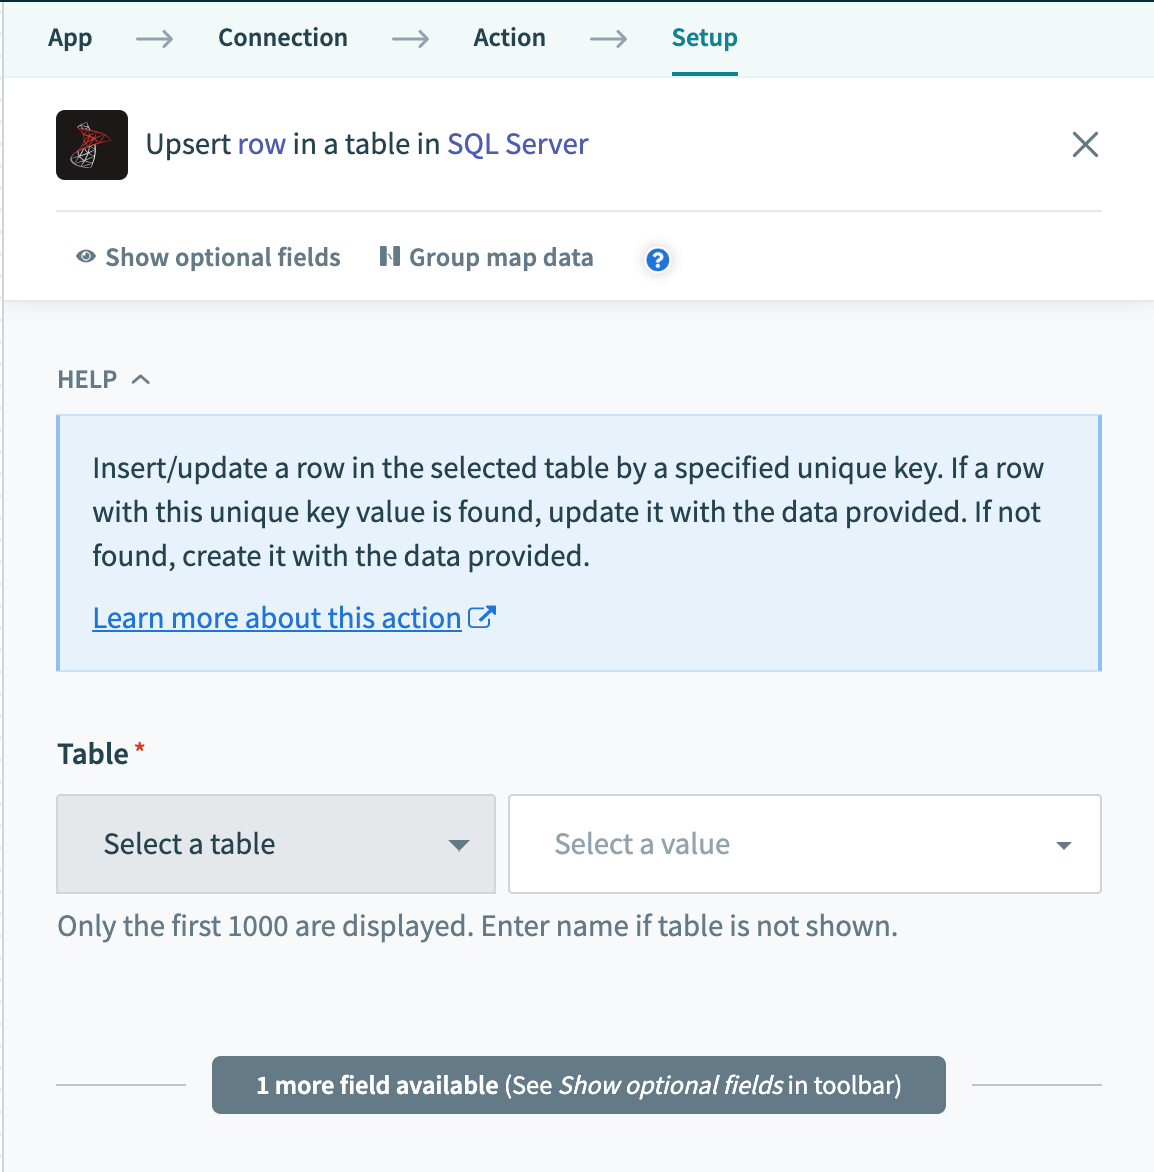 Select a table/view from pick list
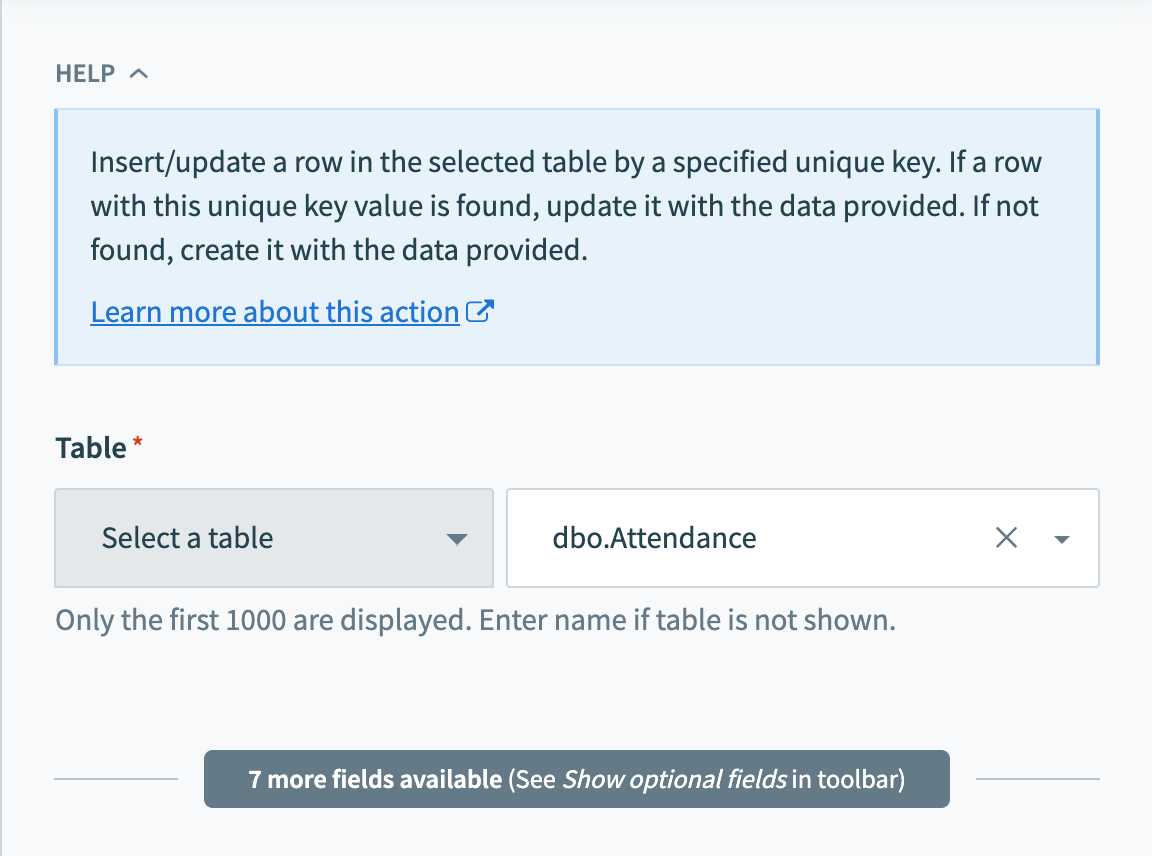 Provide exact table/view name in a text field
Case sensitivity of the name of a table/view depends on your database implementation. A default SQL Server is case insensitive. Databases or database objects with CS in the COLLATION indicates that it is case sensitive.
Stored Procedures
Stored procedures are custom written SQL statements that are written and saved within your SQL server. They are able to do a range of functionalities including creating, updating, and deleting rows. They can also accept parameters. Find out more about how Workato works with stored procedures.
Using WHERE conditions
This input field is used to filter and identify rows to perform an action on. It is used in multiple triggers and actions in the following ways:
- filter rows to be picked up in triggers
- filter rows in Select rows action
- filter rows to be deleted in Delete rows action
This clause will be used as a WHERE statement in each request. This should follow basic SQL syntax. Refer to this SQL Server documentation for a comprehensive list of rules for constructing WHERE statements. Below, we go through some basics needed to form your WHERE statements.
TIP
Examples below showcase how to use WHERE conditions directly with user input. For added security, use WHERE conditions with parameters to prevent SQL injection. Learn more
Operators
At the foundation of any WHERE statement, we have operators that help us filter and identify what rows we want returned in Workato. By chaining operators in the same way you would do it in SQL, you'll be able to use them to create robust and complex filters on your data directly from Workato.
Click here for a list of operators
| Operator | Description | Example |
|---|---|---|
| = | Equal | WHERE ID = 445 |
| != <> | Not equal | WHERE ID <> 445 |
| > >= | Greater than Greater than or equal to | WHERE PRICE > 10000 |
| < <= | Less than Less than or equal to | WHERE PRICE > 10000 |
| IN(...) | List of values | WHERE ID IN(445, 600, 783) |
| LIKE | Pattern matching with wildcard characters (% to represent zero or more characters and _ to represent a single character) | WHERE EMAIL LIKE '%@workato.com' |
| BETWEEN | Retrieve values with a range | WHERE ID BETWEEN 445 AND 783 |
| IS NULL IS NOT NULL | NULL values check Non-NULL values check | WHERE NAME IS NOT NULL |
| AND | Requires both preceding and proceeding conditions to be fulfilled to be true | WHERE ID = 445 AND NAME IS NOT NULL |
| OR | Requires either the preceding and proceeding conditions to be fulfilled to be true | WHERE ID = 445 OR NAME IS NOT NULL |
Data types
The other component of a WHERE condition would be to use these operators in conjunction with the proper datatypes. When writing WHERE statements, make sure you compare a variable of data type = integer in your table with a variable of data type = integer instead of data type = string.
Workato also helps to reveal the data types expected for each input field when you select
- Update rows actions
- Upsert rows actions
They appear directly below the output field, allowing you to know the expected data type to be sent while building the recipe. Use these hints to send the proper data types over to your SQL server as failing to do so might lead to unexpected behavior or failed jobs.
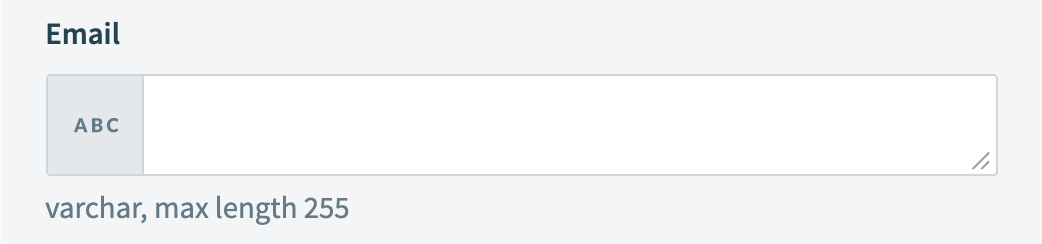 Hints below each input field inform you about the data type expected
Here are some common data types you can expect to see. A more comprehensive list can be found in the SQL data types reference
Click here for a list of common data types
| Data type | Description | Example |
|---|---|---|
| int | Allows whole numbers between -2,147,483,648 and 2,147,483,647 | -100,1,30,000 |
| decimal | Fixed precision and scale numbers that are exact. This is commonly used. Max length can be specified but defaults to | 1.11,2.0761,1.61803398875 |
| smallint | Allows whole numbers from 0 to 255 | 1,245,100 |
| bigint | Allows whole numbers between -9,223,372,036,854,775,808 and 9,223,372,036,854,775,807 | 10,000,000,000 |
| bit | Integer that can be 0, 1, or NULL | 1,0,NULL |
| varchar(n) | Variable width character string of length n | Foo_bar |
| nchar(n) | Fixed width character string of length n | Foo where n = 3 |
| datetime | From January 1, 1753 to December 31, 9999 with an accuracy of 3.33 milliseconds | 2011-09-16 13:23:18.767 |
| datetime2 | From January 1, 0001 to December 31, 9999 with an accuracy of 100 nanoseconds | 2011-09-16 13:23:18.7676720 |
| date | Store a date only. From January 1, 0001 to December 31, 9999 | 2012-10-11 |
| time | Store a time only to an accuracy of 100 nanoseconds. Minimum length hh:mm:ss and maximum length hh:mm:ss.nnnnnnnn | 08:30:12,09:12:20.12898400 |
Writing WHERE conditions
Now that we've gone through operators and data types, we are ready to write our WHERE conditions. String values must be enclosed in single quotes ('') and columns used must exist in the table/view.
A simple WHERE condition to filter rows based on values in a single column looks like this.
country = 'United States of America'If used in a Select rows action, this WHERE condition will return all rows that has the value 'USD' in the currency column. Just remember to wrap datapills with single quotes in your inputs.
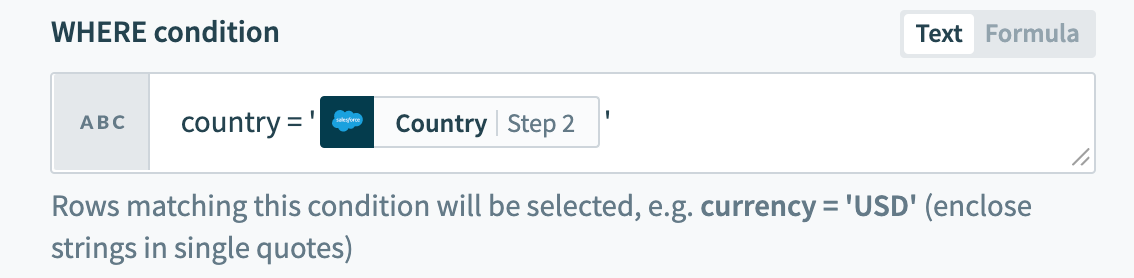 Using datapills in
 WHERE condition
Column names with spaces or special characters must be enclosed in double quotes ("") or square brackets ([]). For example, currency code must to enclosed in brackets to be used as an identifier.
[country code] = 'USA'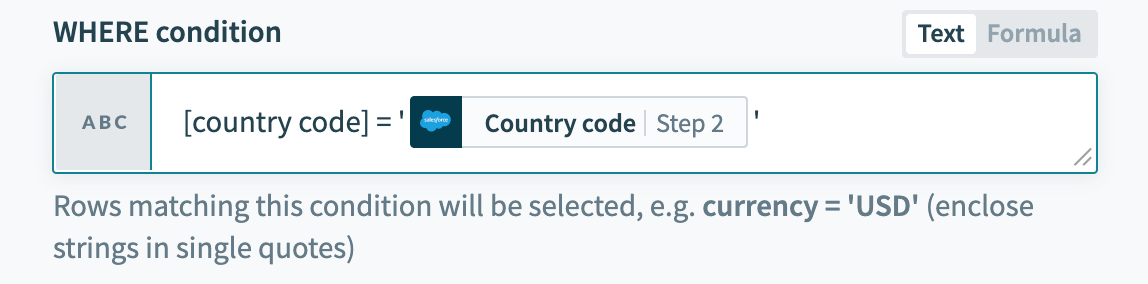
WHERE condition with enclosed identifier
Click the tabs below for more details into the functionality you can explore with your WHERE conditions.
Using AND and OR in your WHERE conditions
WHERE conditions can also be used in conjunction with basic SQL logical operators like AND and OR to add more filters on the rows you return.
([currency code] = 'USD' AND totalAmt >1000) OR totalAmt>2000 When used together, this WHERE condition will return all rows that either have the value 'USD' in the currency code column AND more than 1000 in the totalAmt column OR more than 2000 in the totalAmt column
Using sub-queries in your WHERE conditions
Your WHERE condition can also contain subqueries. The following query can be used on the compensation table.
id in (select compensation_id from users where active = 0)When used in a Delete rows action, this will delete all rows in the compensation table related to users who are no longer active (active = 0).
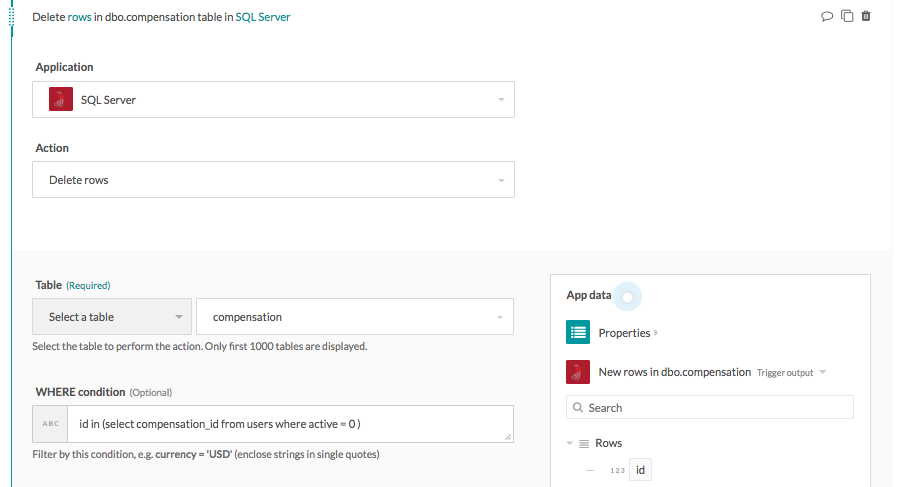 _Using subquery in WHERE condition_
 Using Parameters
Parameters are used in conjunction with WHERE conditions to add an additional layer of security against SQL injection. To use parameters in your WHERE conditions, you will first need to declare bind variables in your input. Bind parameters must be declared in the form :bind_variable where the variable name is preceded with a :. After this is done, declare the parameter in the section directly below using the exact name you have given.
TIP
Bind variables should only be used in place of column values and not column names.
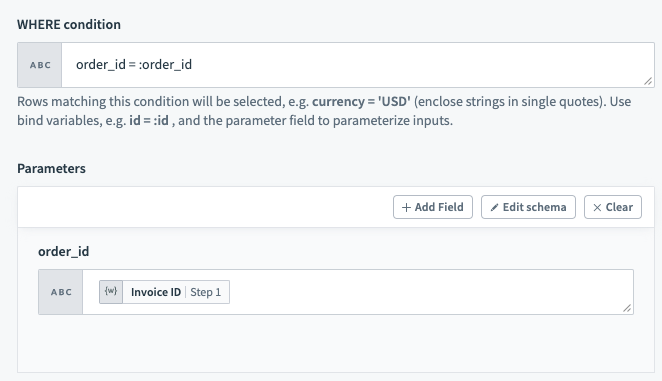
WHERE condition with bind variable
You can provide as many bind variables as you'd like and each one should have a unique name. We distinguish bind variables from column names and static values by ignoring any : inside single quotes ('), double quotes (") and square brackets ([]).
Configuring triggers
SQL Server connector has triggers for both new and updated rows. For the triggers to work, both Unique keys must be configured.Sort columns need to be configured for triggers that find recently updated rows.
A table must satisfy some constraints to be used in a trigger. The following sections contain more information about specific constraints. Read our best practices to find out how you can prepare your table for use with Workato.
Unique keys
In all triggers and some actions, this is a required input. Values from this selected column are used to uniquely identify rows in the selected table. As such, the values in the selected column must be unique. Typically, this column is the primary key of the table (for example, ID).
When used in a trigger, this column must be incremental. This constraint is required because the trigger uses values from this column to look for new rows. In each poll, the trigger queries for rows with a unique key value greater than the previous greatest value.
Click here for a detailed example
Let's use a simple example to illustrate this behavior. We have a New row trigger that processed rows from a table. The unique key configured for this trigger is ID. The last row processed has 100 as it's ID value. In the next poll, the trigger will use >= 101 as the condition to look for new rows. Performance of a trigger can be improved if the column selected to be used as the unique key is indexed.
Sort column
This is required for New/updated row triggers. Values in this selected column are used to identify updated rows.
When a row is updated, the Unique key value remains the same. However, it should have it's Sort column updated to reflect the last updated time. Following this logic, Workato keeps track of values in this column together with values in the selected Unique key column. When a change in the Sort column value is observed, an updated row event will be recorded and processed by the trigger.
For SQL Server, only datetime2 and datetime column types can be used.
Click here for a detailed example
Let's use a simple example to illustrate this behavior. We have a new/updated row trigger that processed rows from a table. The Unique key and Sort column configured for this trigger is ID and UPDATED_AT respectively. The last row processed by the trigger has ID value of 100 and UPDATED_AT value of 2018-05-09 16:00:00.000000. In the next poll, the trigger will query for new rows that satisfy either of the 2 conditions:
UPDATED_AT'2018-05-09 16:00:00.000000'ID> 100 ANDUPDATED_AT = '2018-05-09 16:00:00.000000'
Using single row actions/triggers vs using batch of rows actions/triggers
SQL Server connector can read or write to your database either as a single row or in batches. When using batch triggers/actions, you have to provide the batch size you wish to work with. The batch size can be any number between 1 and 100, with 100 being the maximum batch size. Batch triggers and actions are great for jobs when you expect to read, create, or update a large number of rows. Choosing to batch your job runs rather than having them split into separate jobs runs not only saves operations but reduces recipe runtimes and decreases load on your servers.
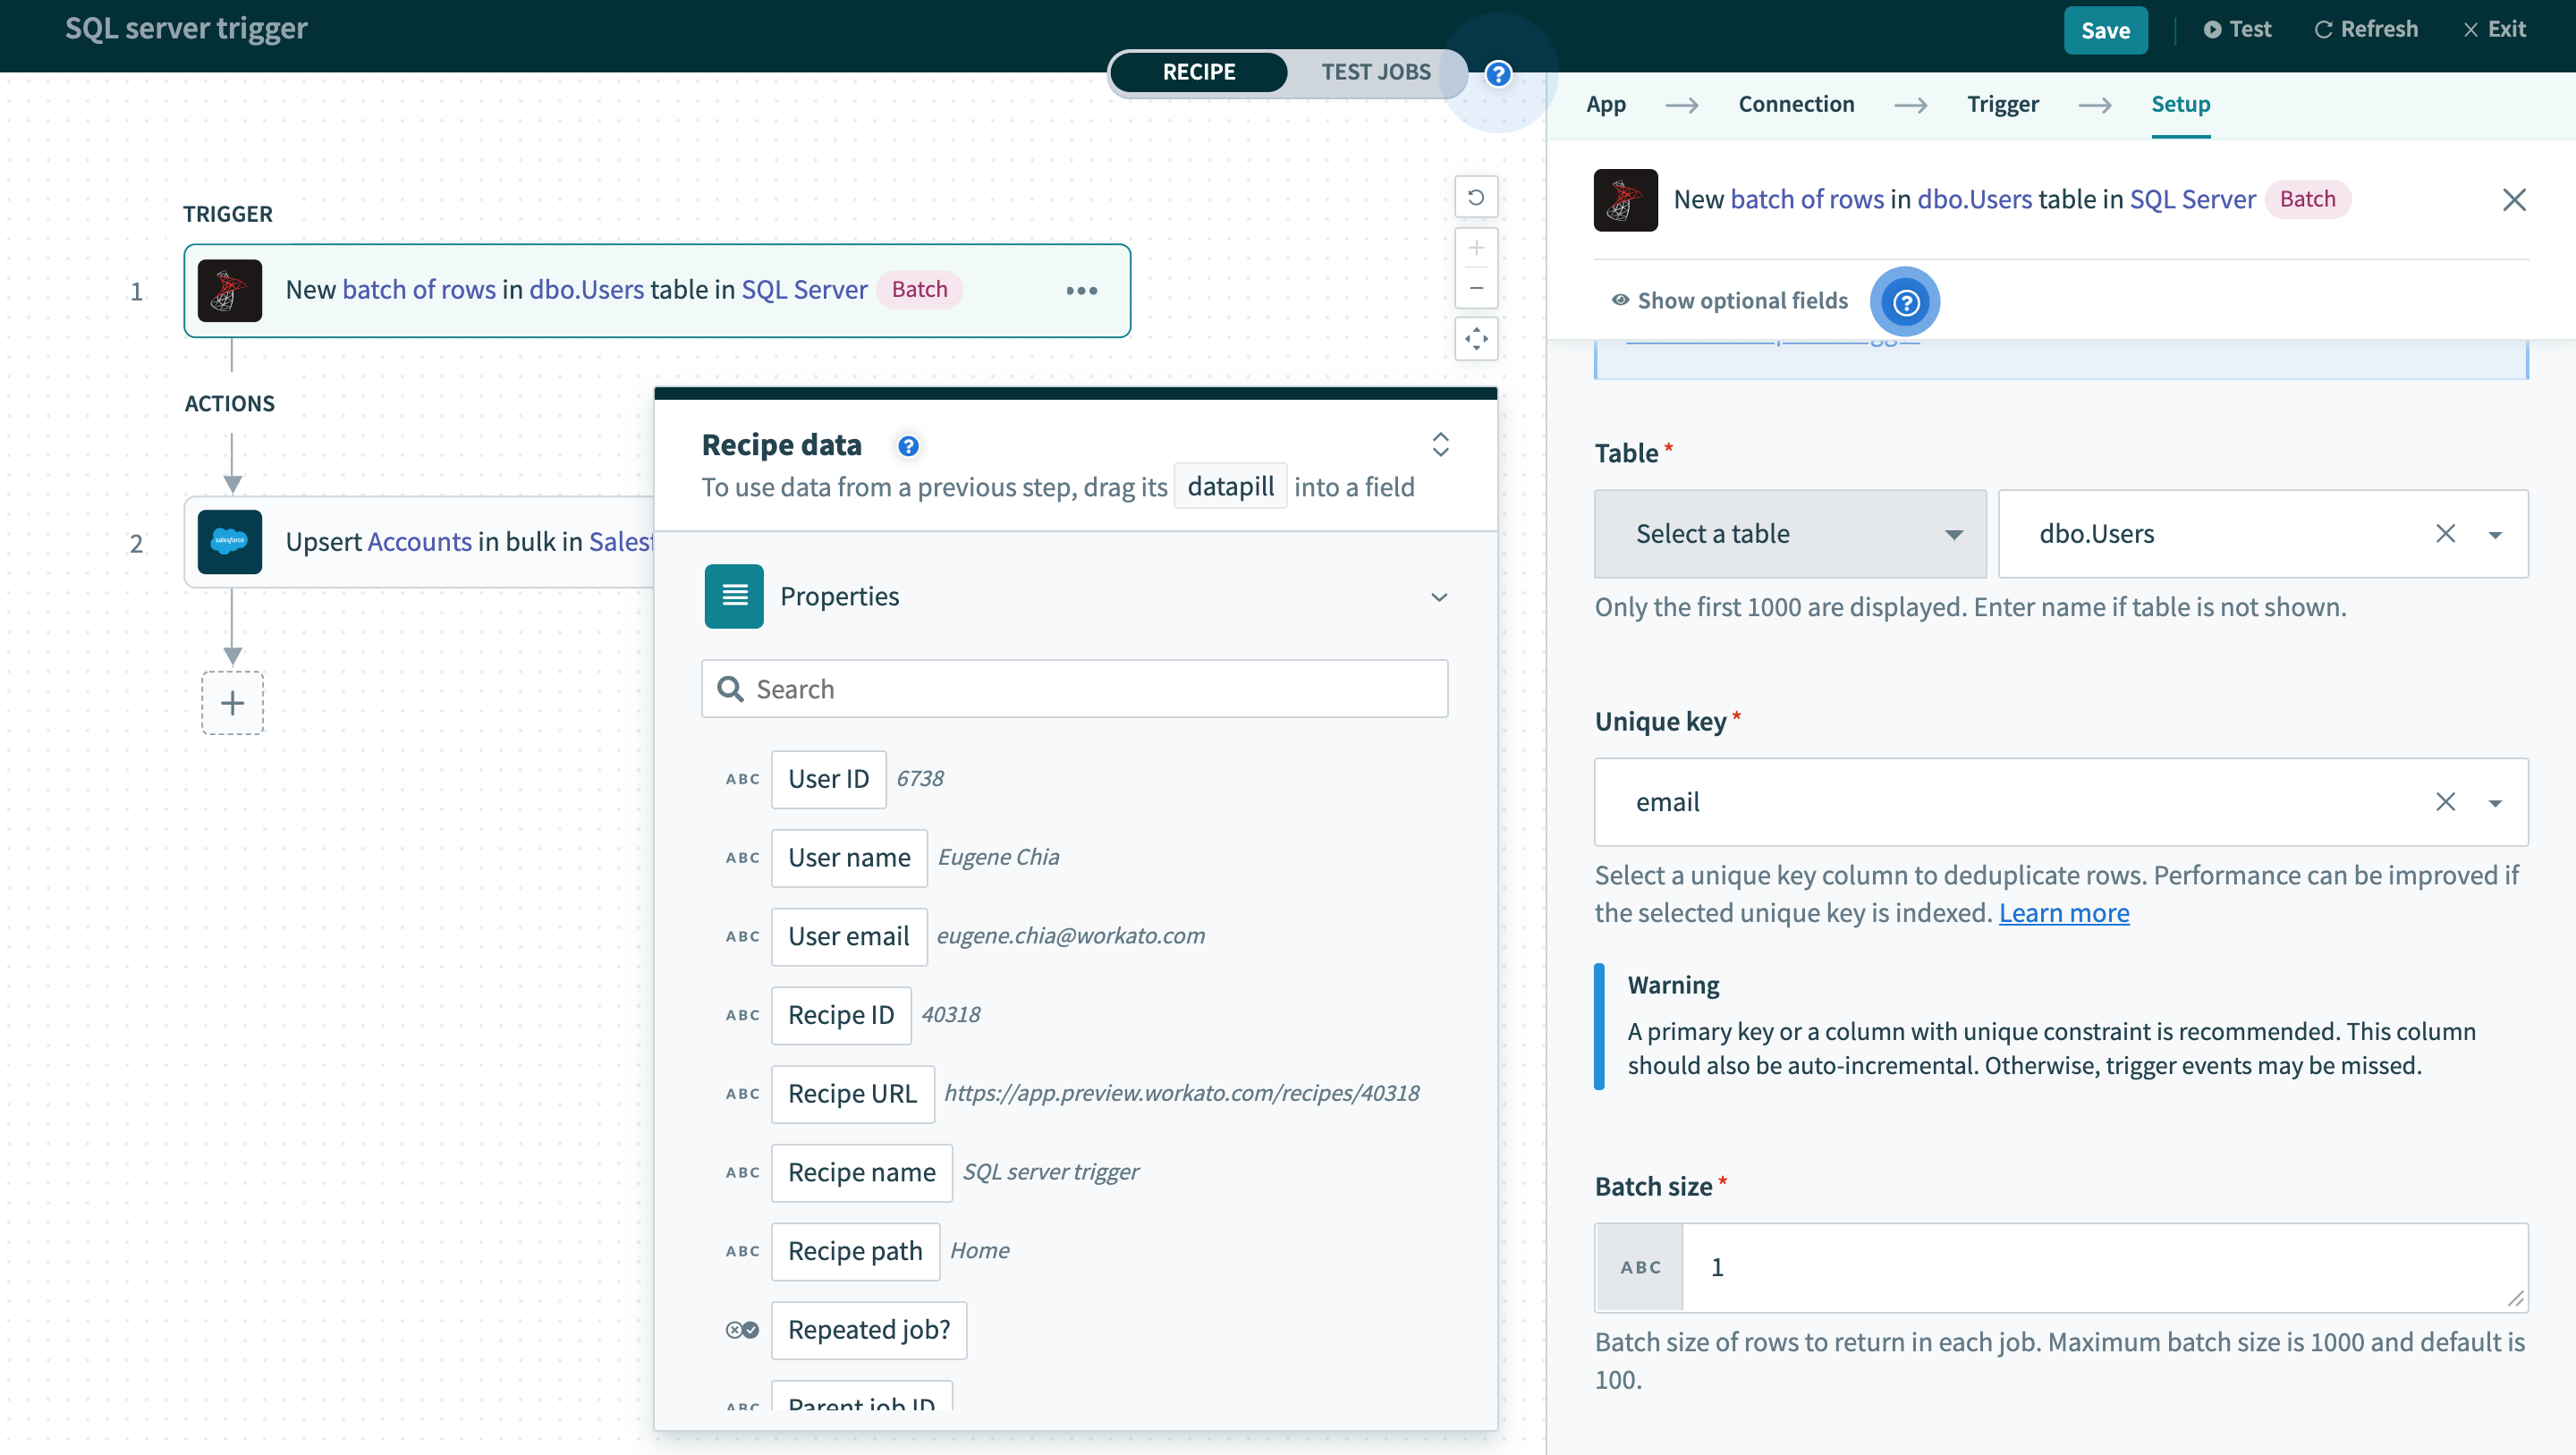 Batch trigger inputs
Besides the difference in input fields, there is also a difference between the outputs of these 2 types of operations. A trigger that processes rows one at a time will have an output datatree that allows you to map data from that single row.
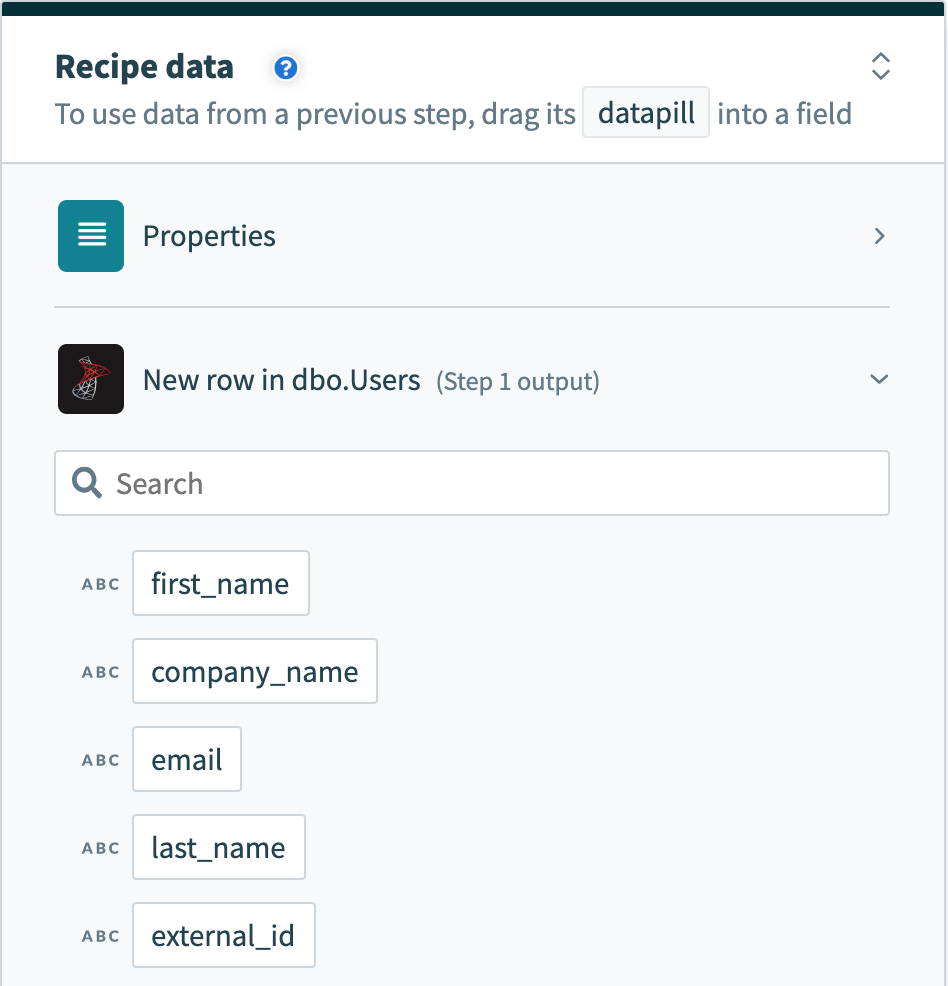 Single row output
However, a trigger that processes rows in batches will output them as an array of rows. The Rows datapill indicates that the output is a list containing data for each row in that batch.
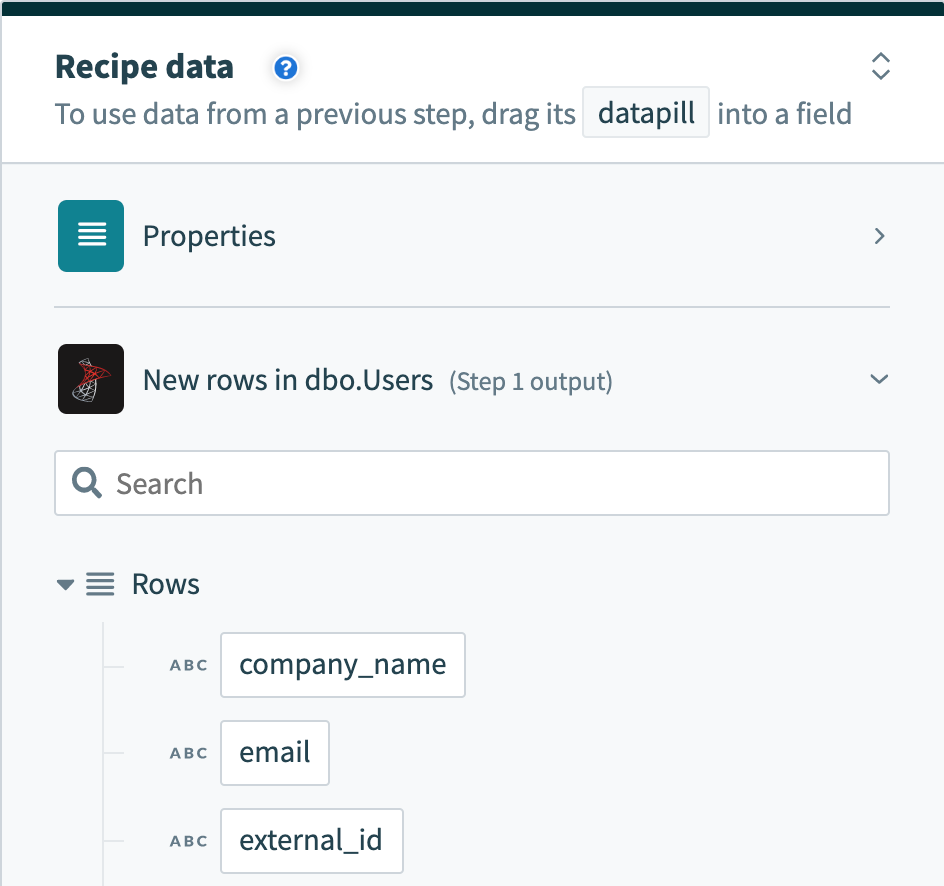 Batch trigger output
As a result, the output of batch triggers/actions needs to be handled differently. This recipe uses a batch trigger for new rows in the users table. The output of the trigger is used in a Salesforce bulk create action that requires mapping the Rows datapill into the source list.
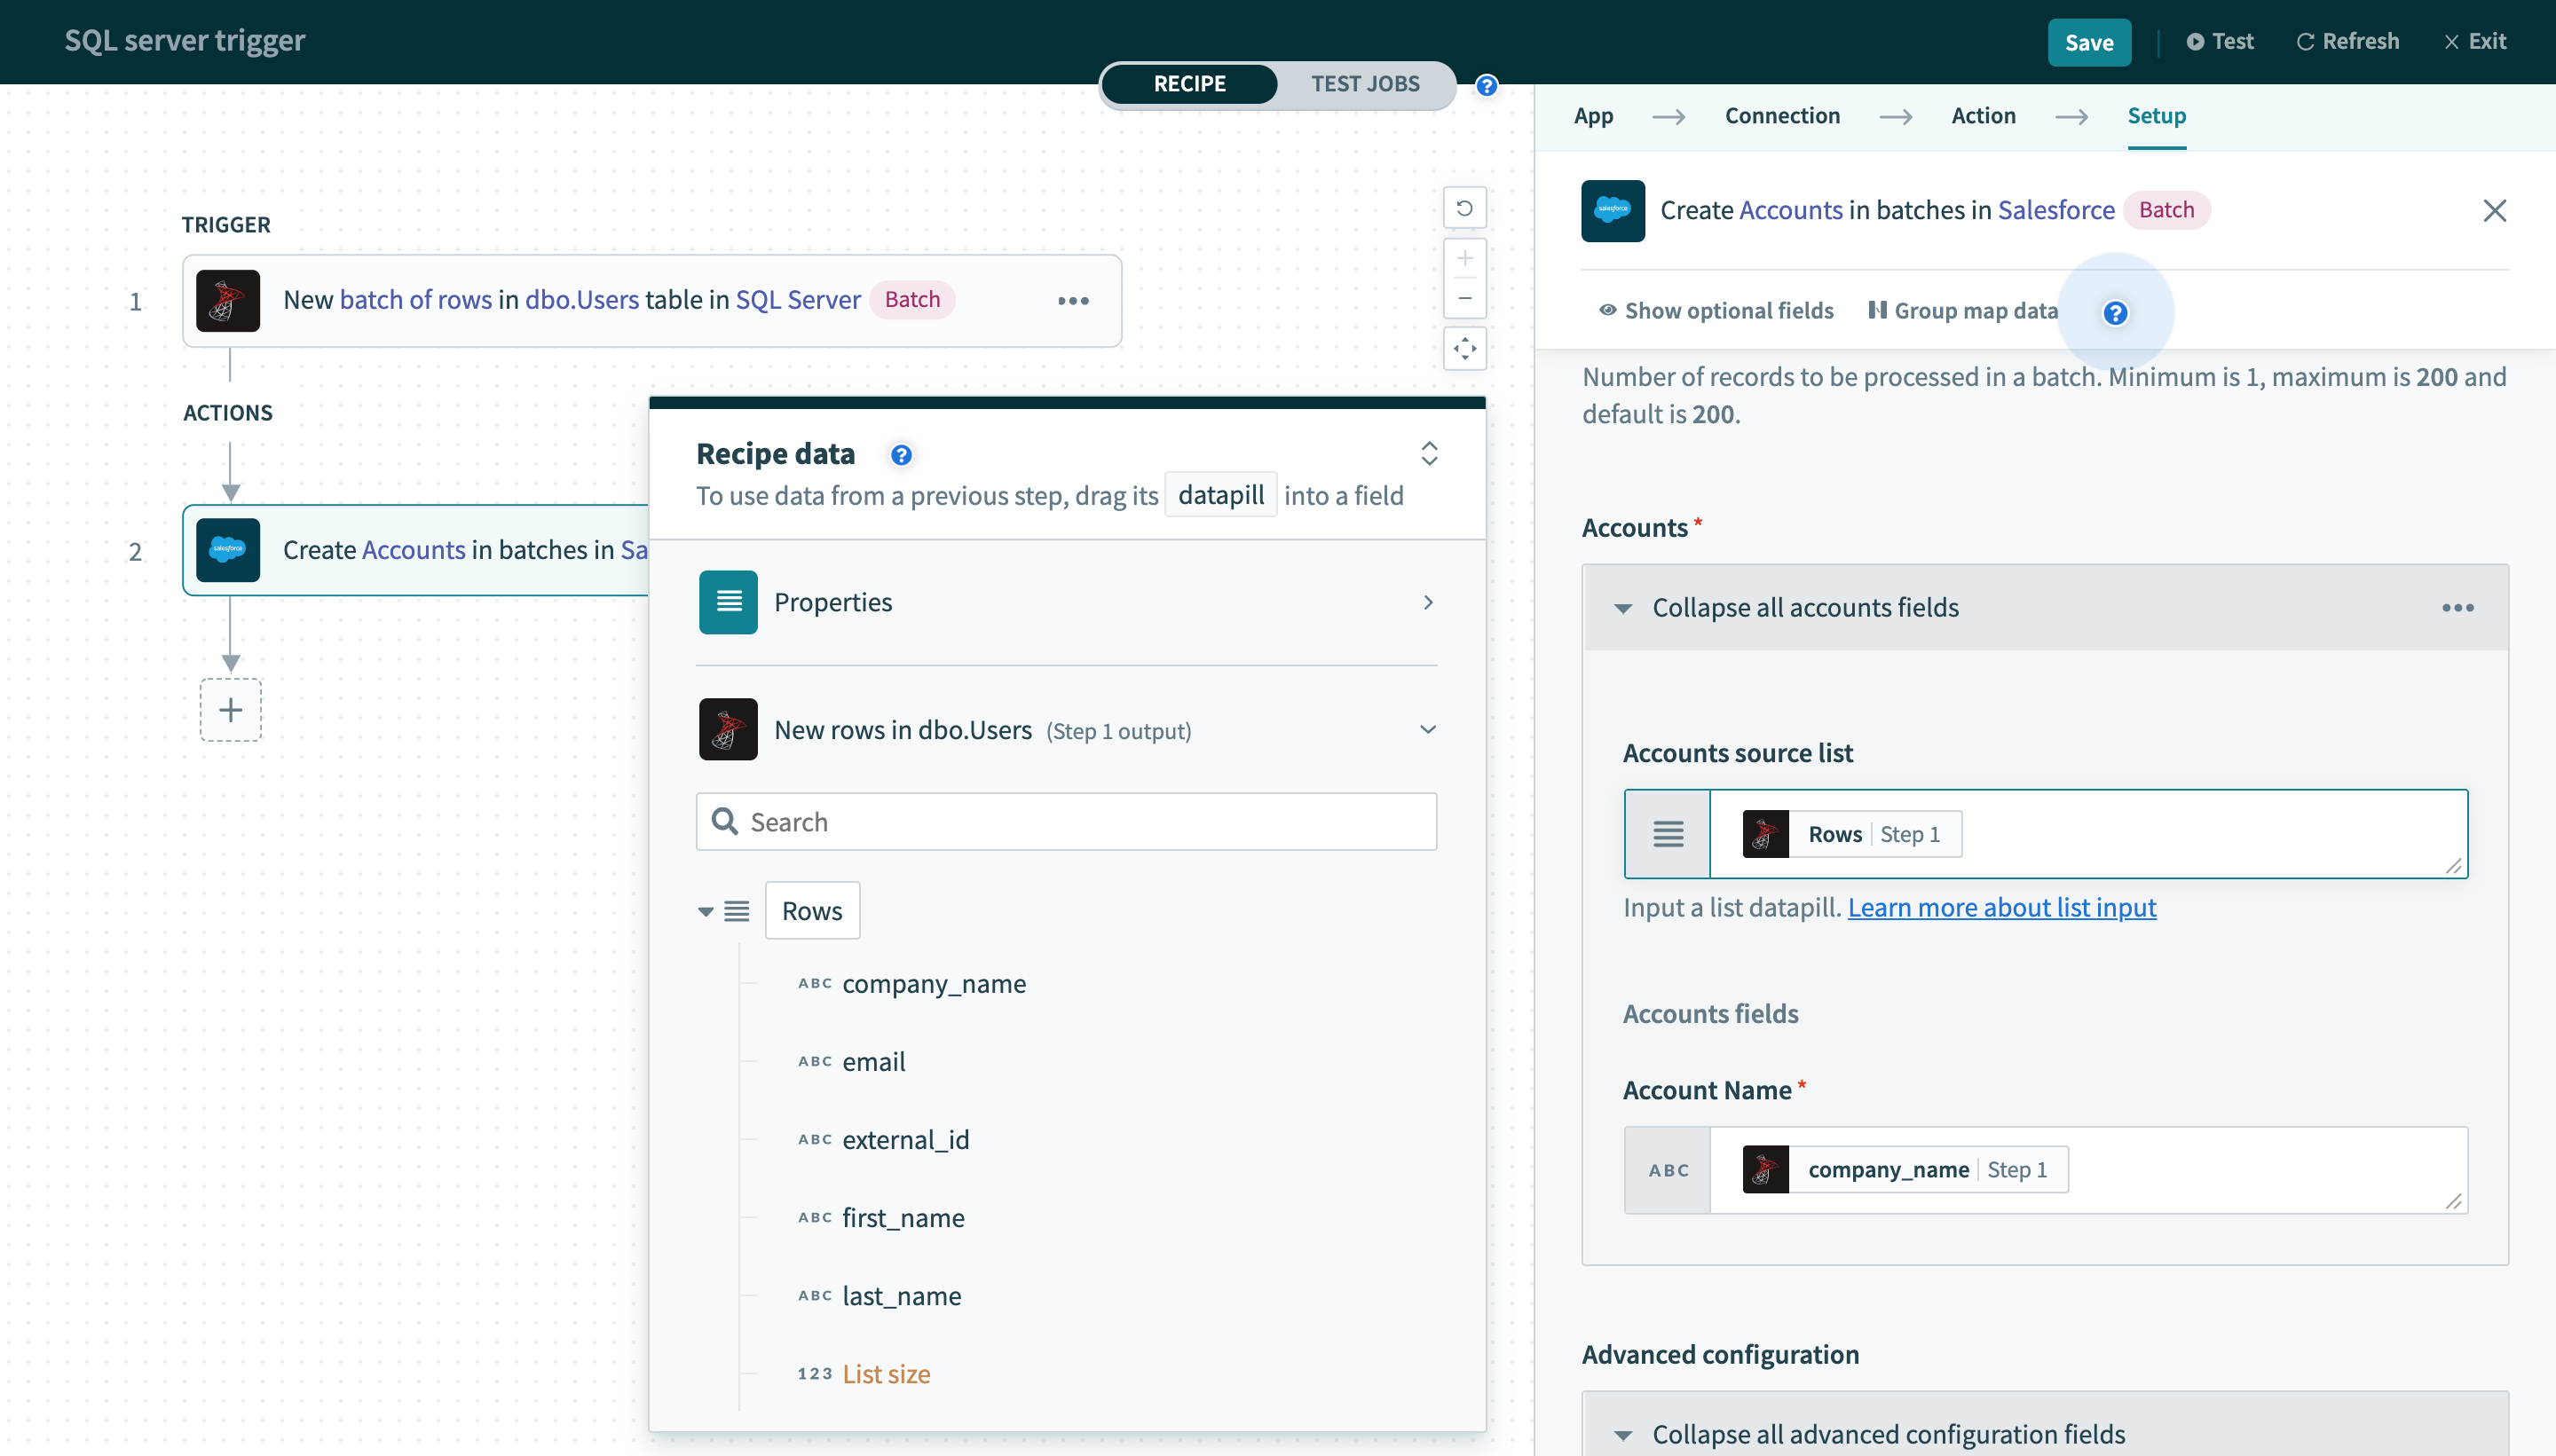 Using batch trigger output
Outputs from batch triggers/actions can also be used outside of actions that work specifically with lists. By using Workato's repeat step, you'll be able to control batch outputs and use them with any action built for single rows..
Unsure when to use batch actions and single row actions? Check out our best practices section for recipe design tips!
List of Workato triggers and actions
Workato currently supports the following triggers and actions. Find out more details about each by clicking on the links below. You can also navigate to them through the side bar.
Or get busy building your recipes now! Check out our
Last updated: