AgentX Support - Deploy AI agents
You can deploy your AI agent across different platforms, including websites, help centers, mobile apps, and e-commerce stores. This guide includes setup instructions for each platform.
Website deployments
Add to a website
Complete the following steps to add your AI agent to a website:
Select your AI agent.
Go to Settings > Advanced Features > Deployment.
Copy the snippet for your AI agent.
VERSIONS
You can toggle between the draft and published versions of your AI agent. If you use the draft version, the URL includes the &draft=true parameter. This allows you to test and deploy changes before publishing them.
Paste the script into the <head> or <body> tag of the webpages where you intend for the AI agent to appear.
Go to the webpage where you added the script. The AI agent should appear.
 Deployed agent
Add to Zendesk Help Center
Complete the following steps to add your AI agent to Zendesk Help Center:
Select your AI agent.
Go to Settings > Advanced Features > Deployment.
Copy the snippet for your AI agent.
VERSIONS
You can toggle between the draft and published versions of your AI agent. If you use the draft version, the URL includes the &draft=true parameter. This allows you to test and deploy changes before publishing them.
Sign in to your Zendesk account.
Go to Knowledge and click Knowledge admin.
Click Customize design (the eye icon) in the sidebar.
Click Customize to modify your theme.
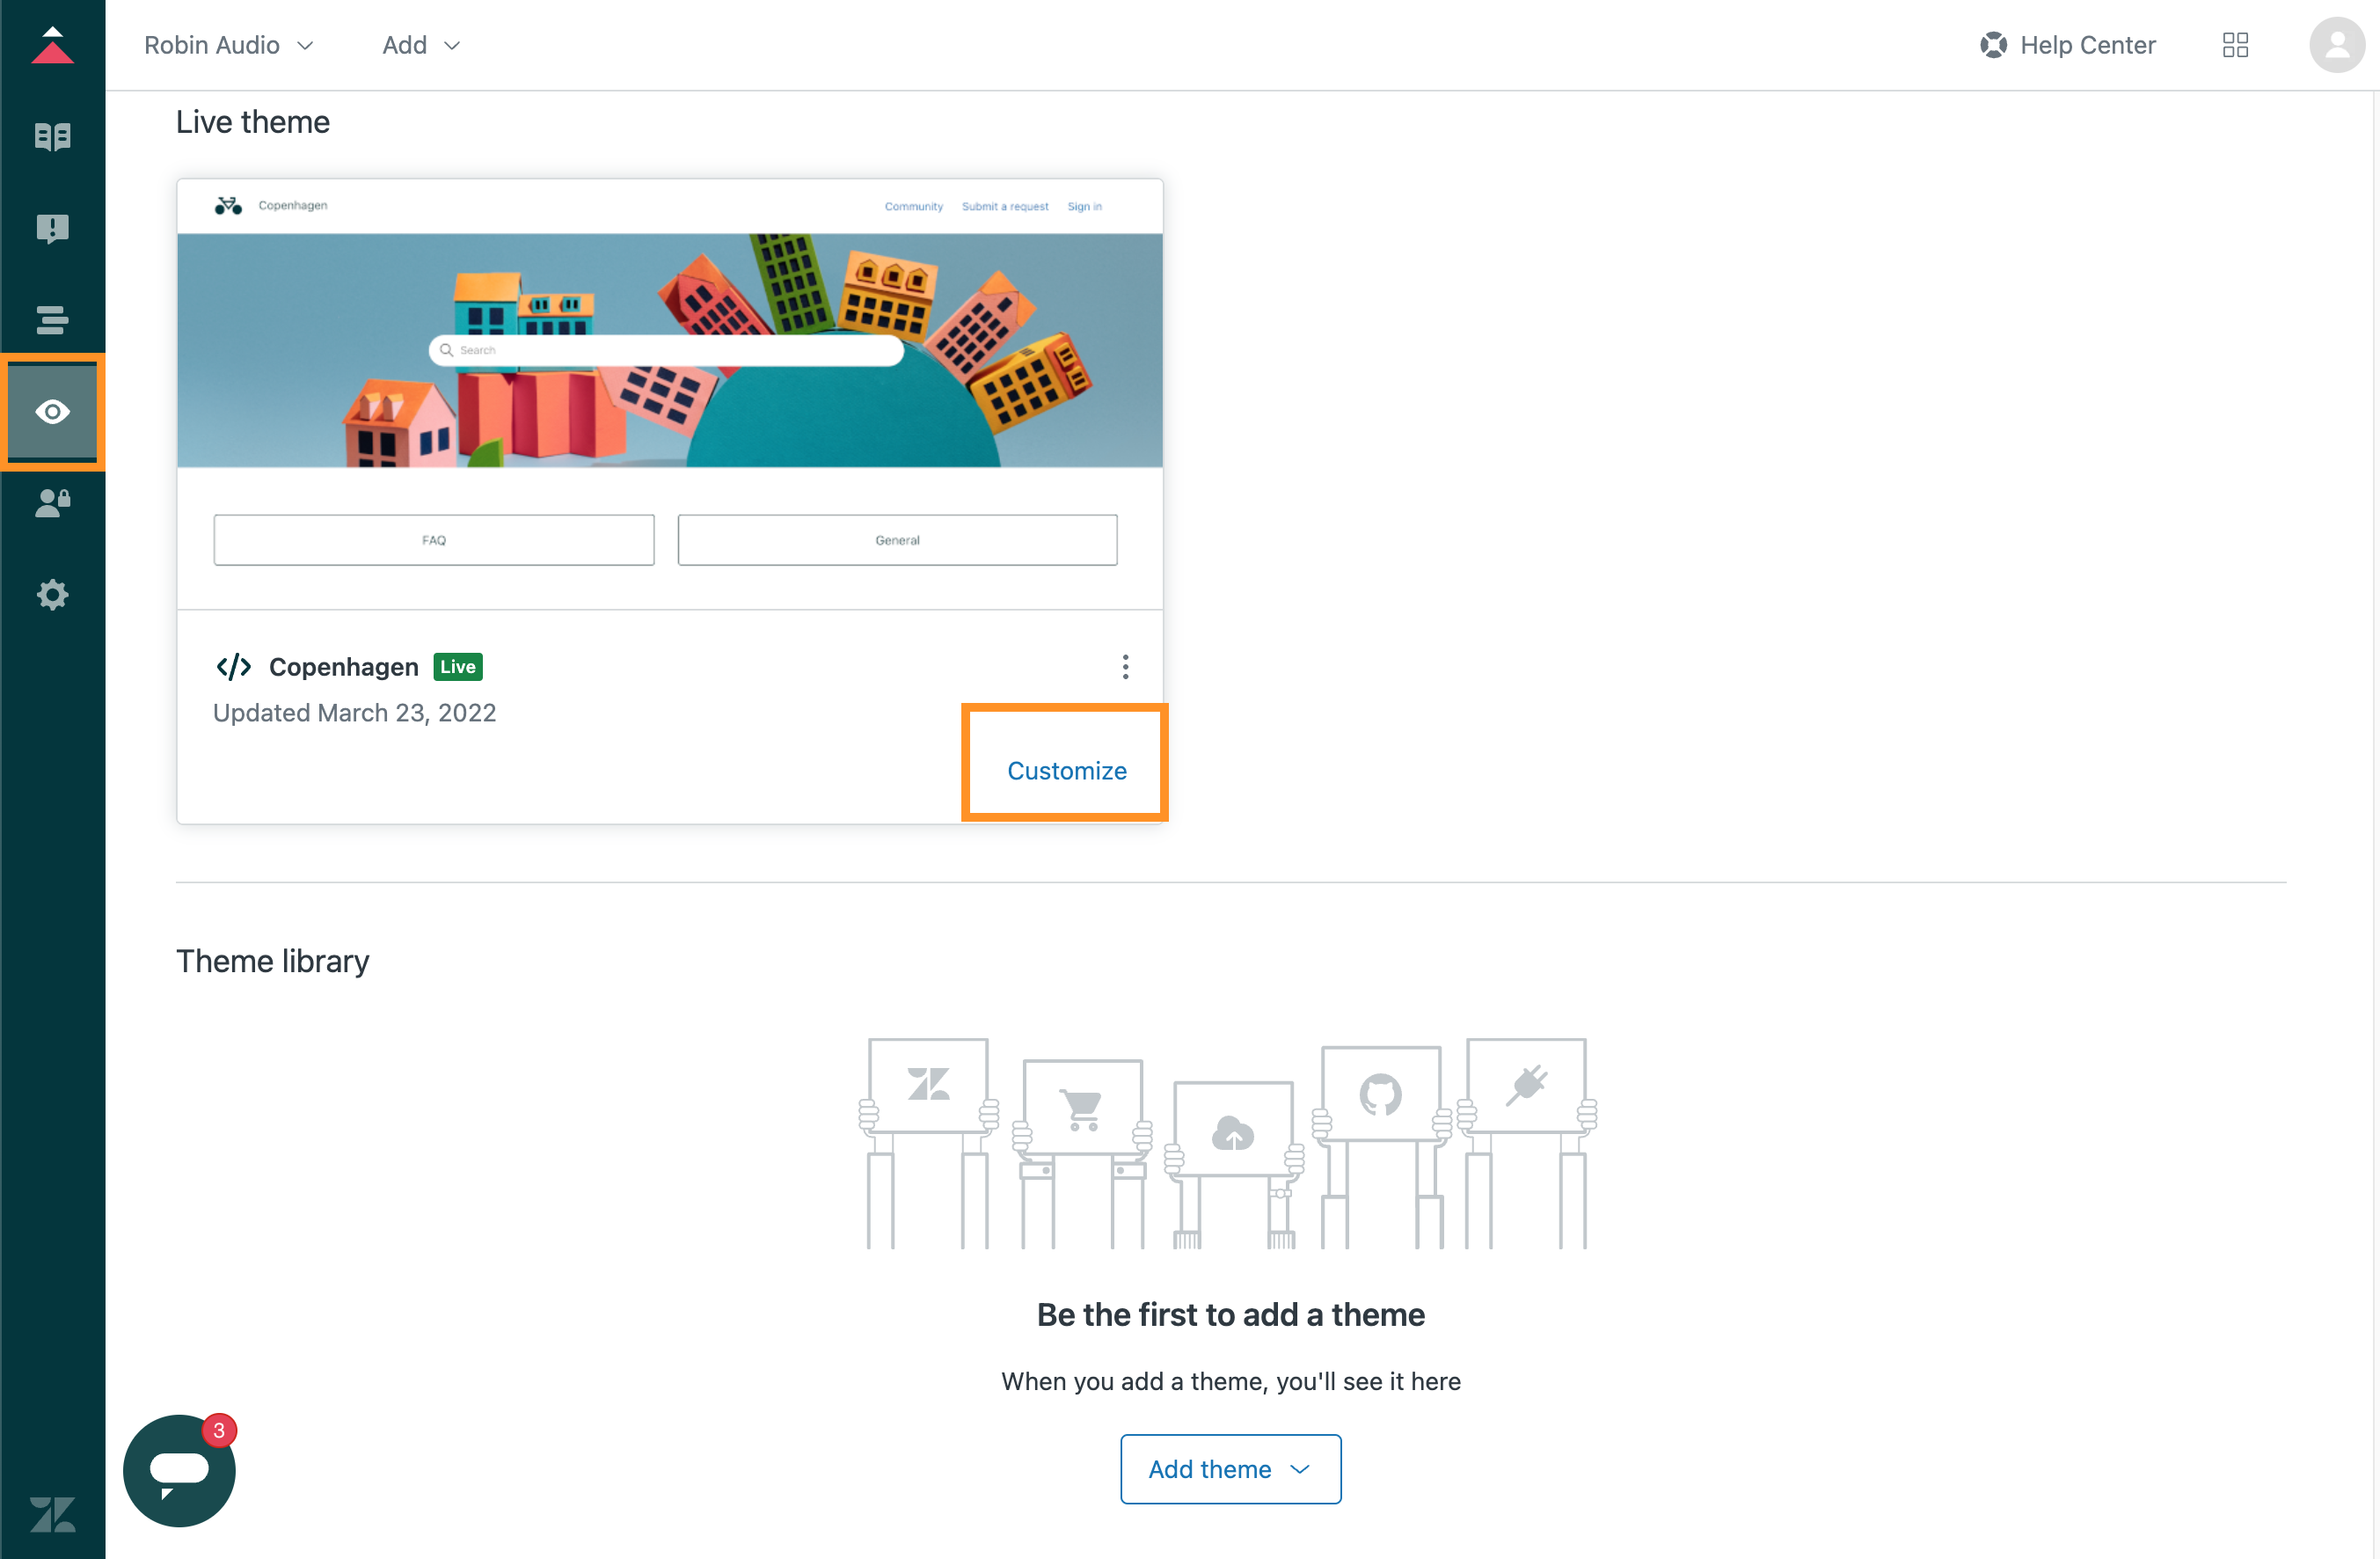 Customize the theme
Click Edit code.
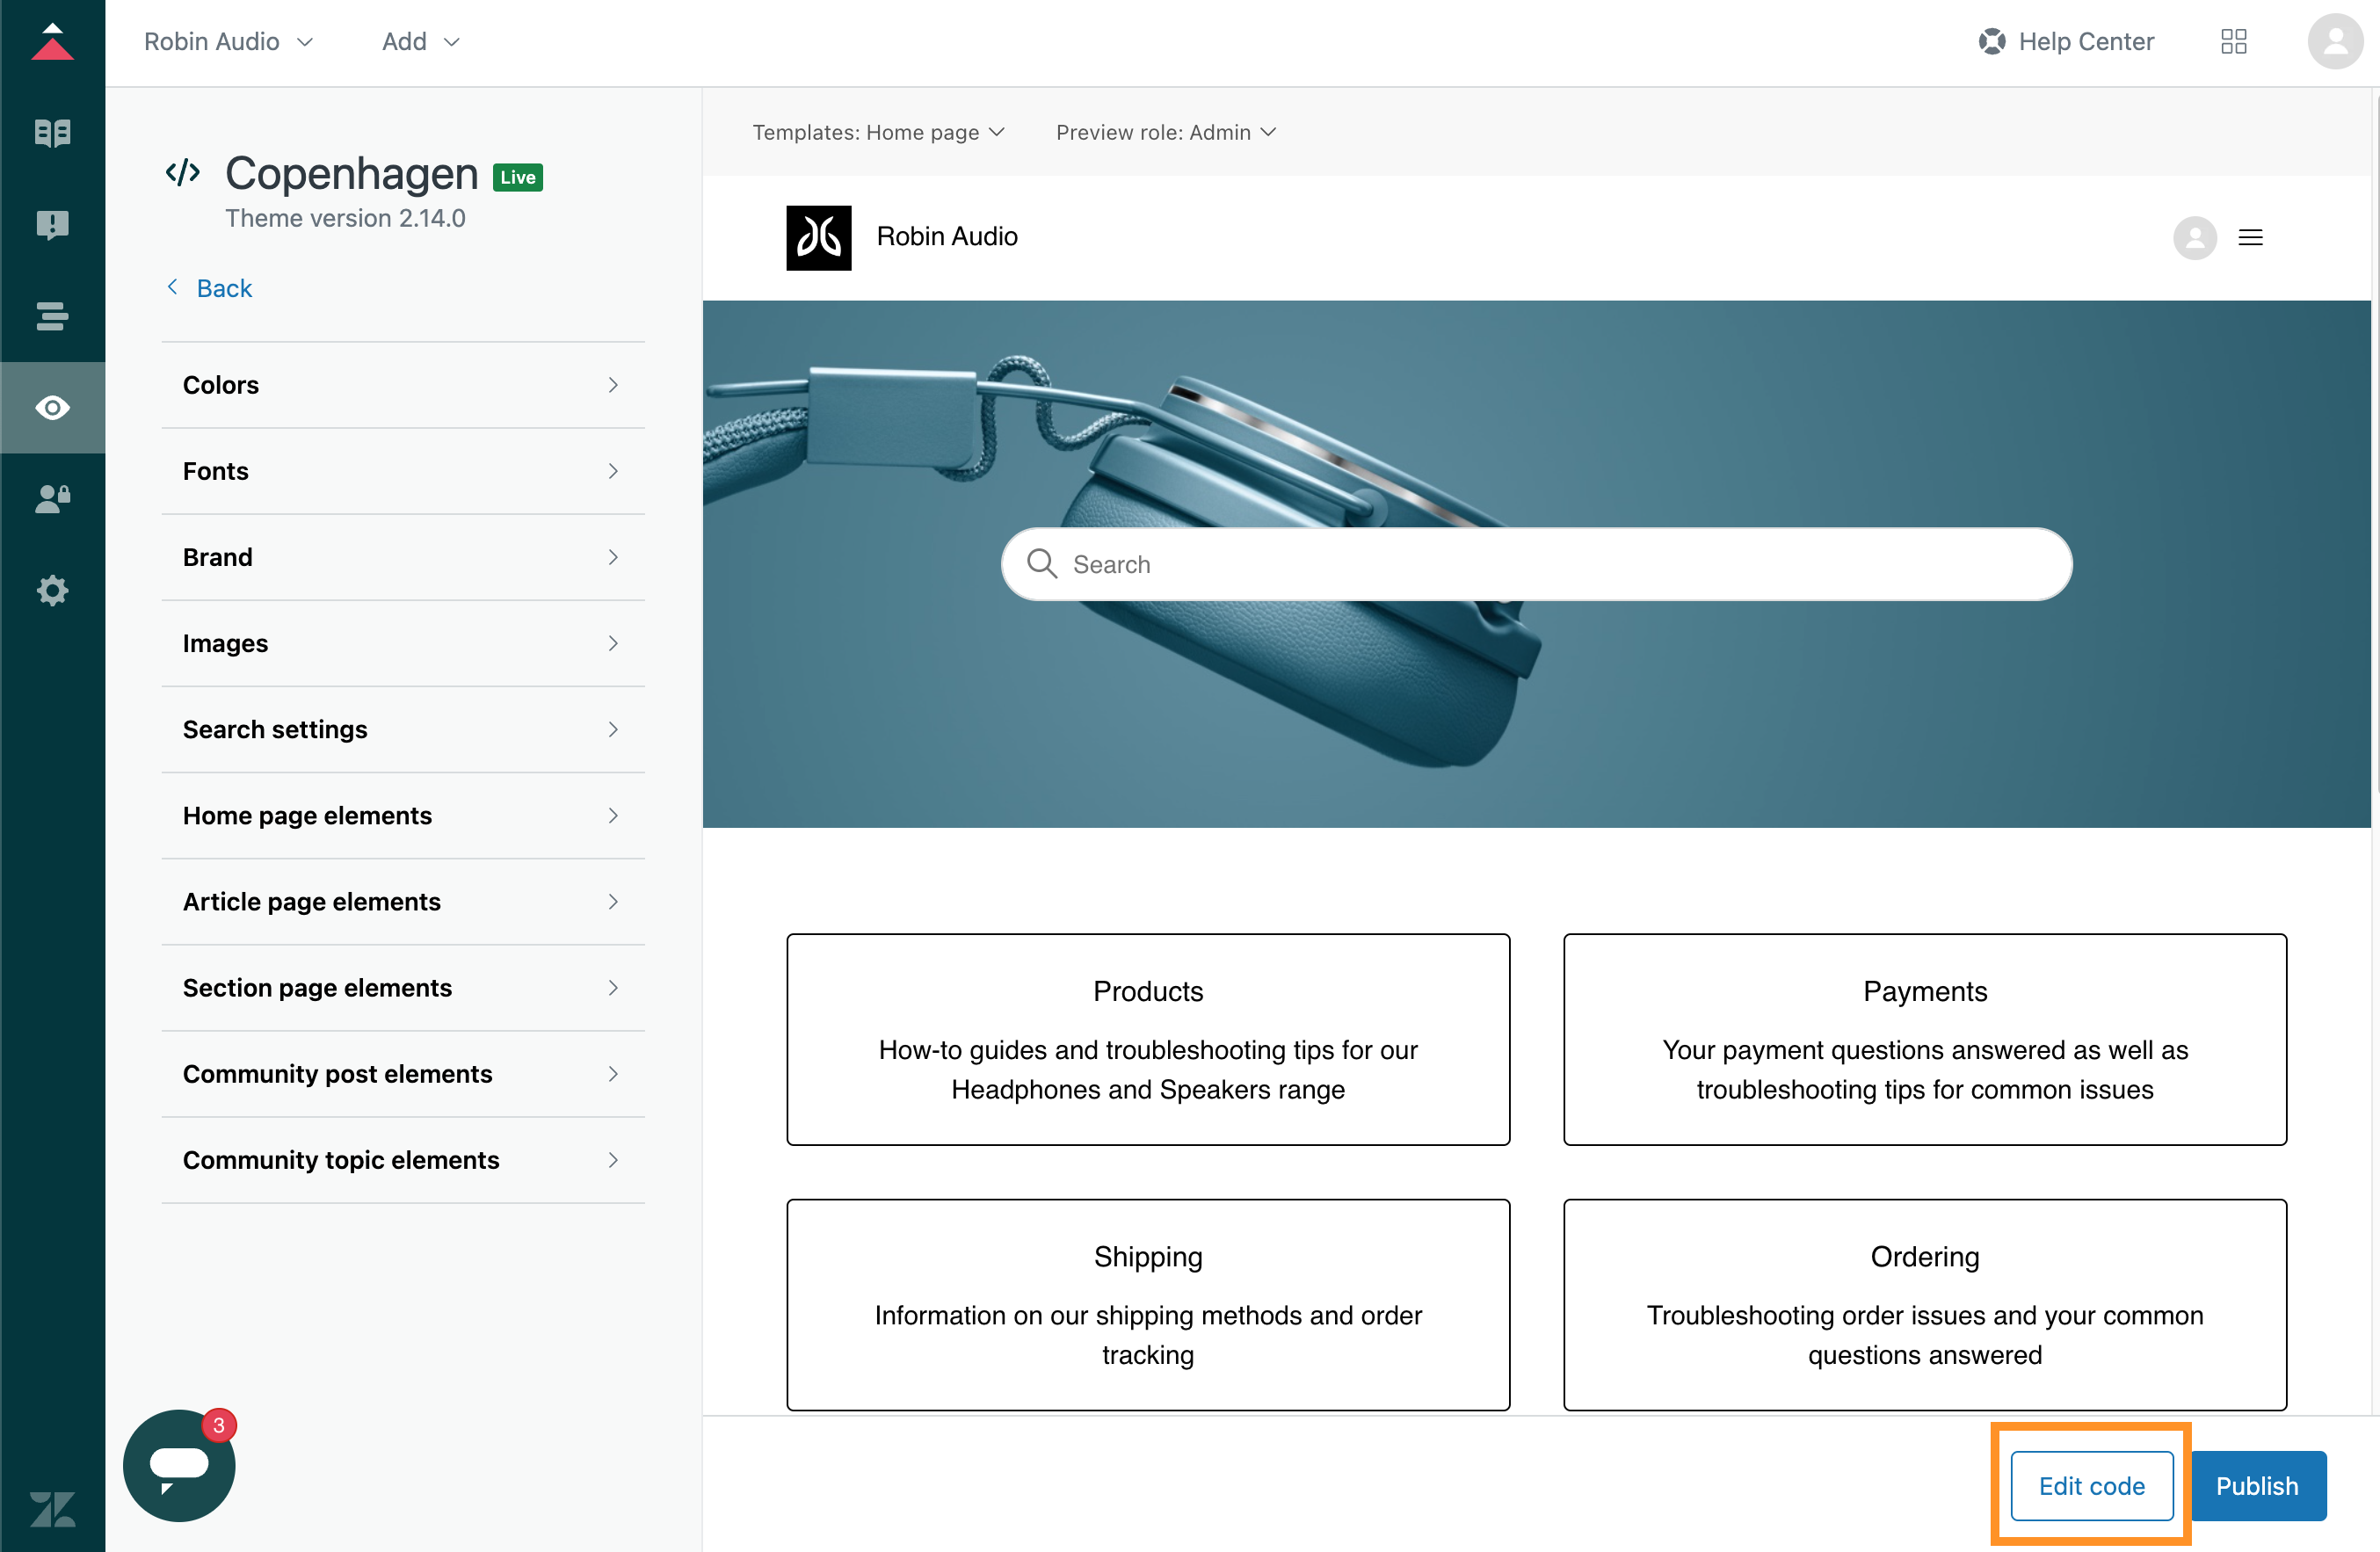 Edit the theme code
Click Access code to confirm that you intend to edit the theme's code.
EDITED CODE STOPS AUTOMATIC UPDATES
Editing your theme code unlinks it from Zendesk's automatic updates. You must manually apply new theme updates in the future.
Select document_head.hbs and paste the AI agent script snippet.
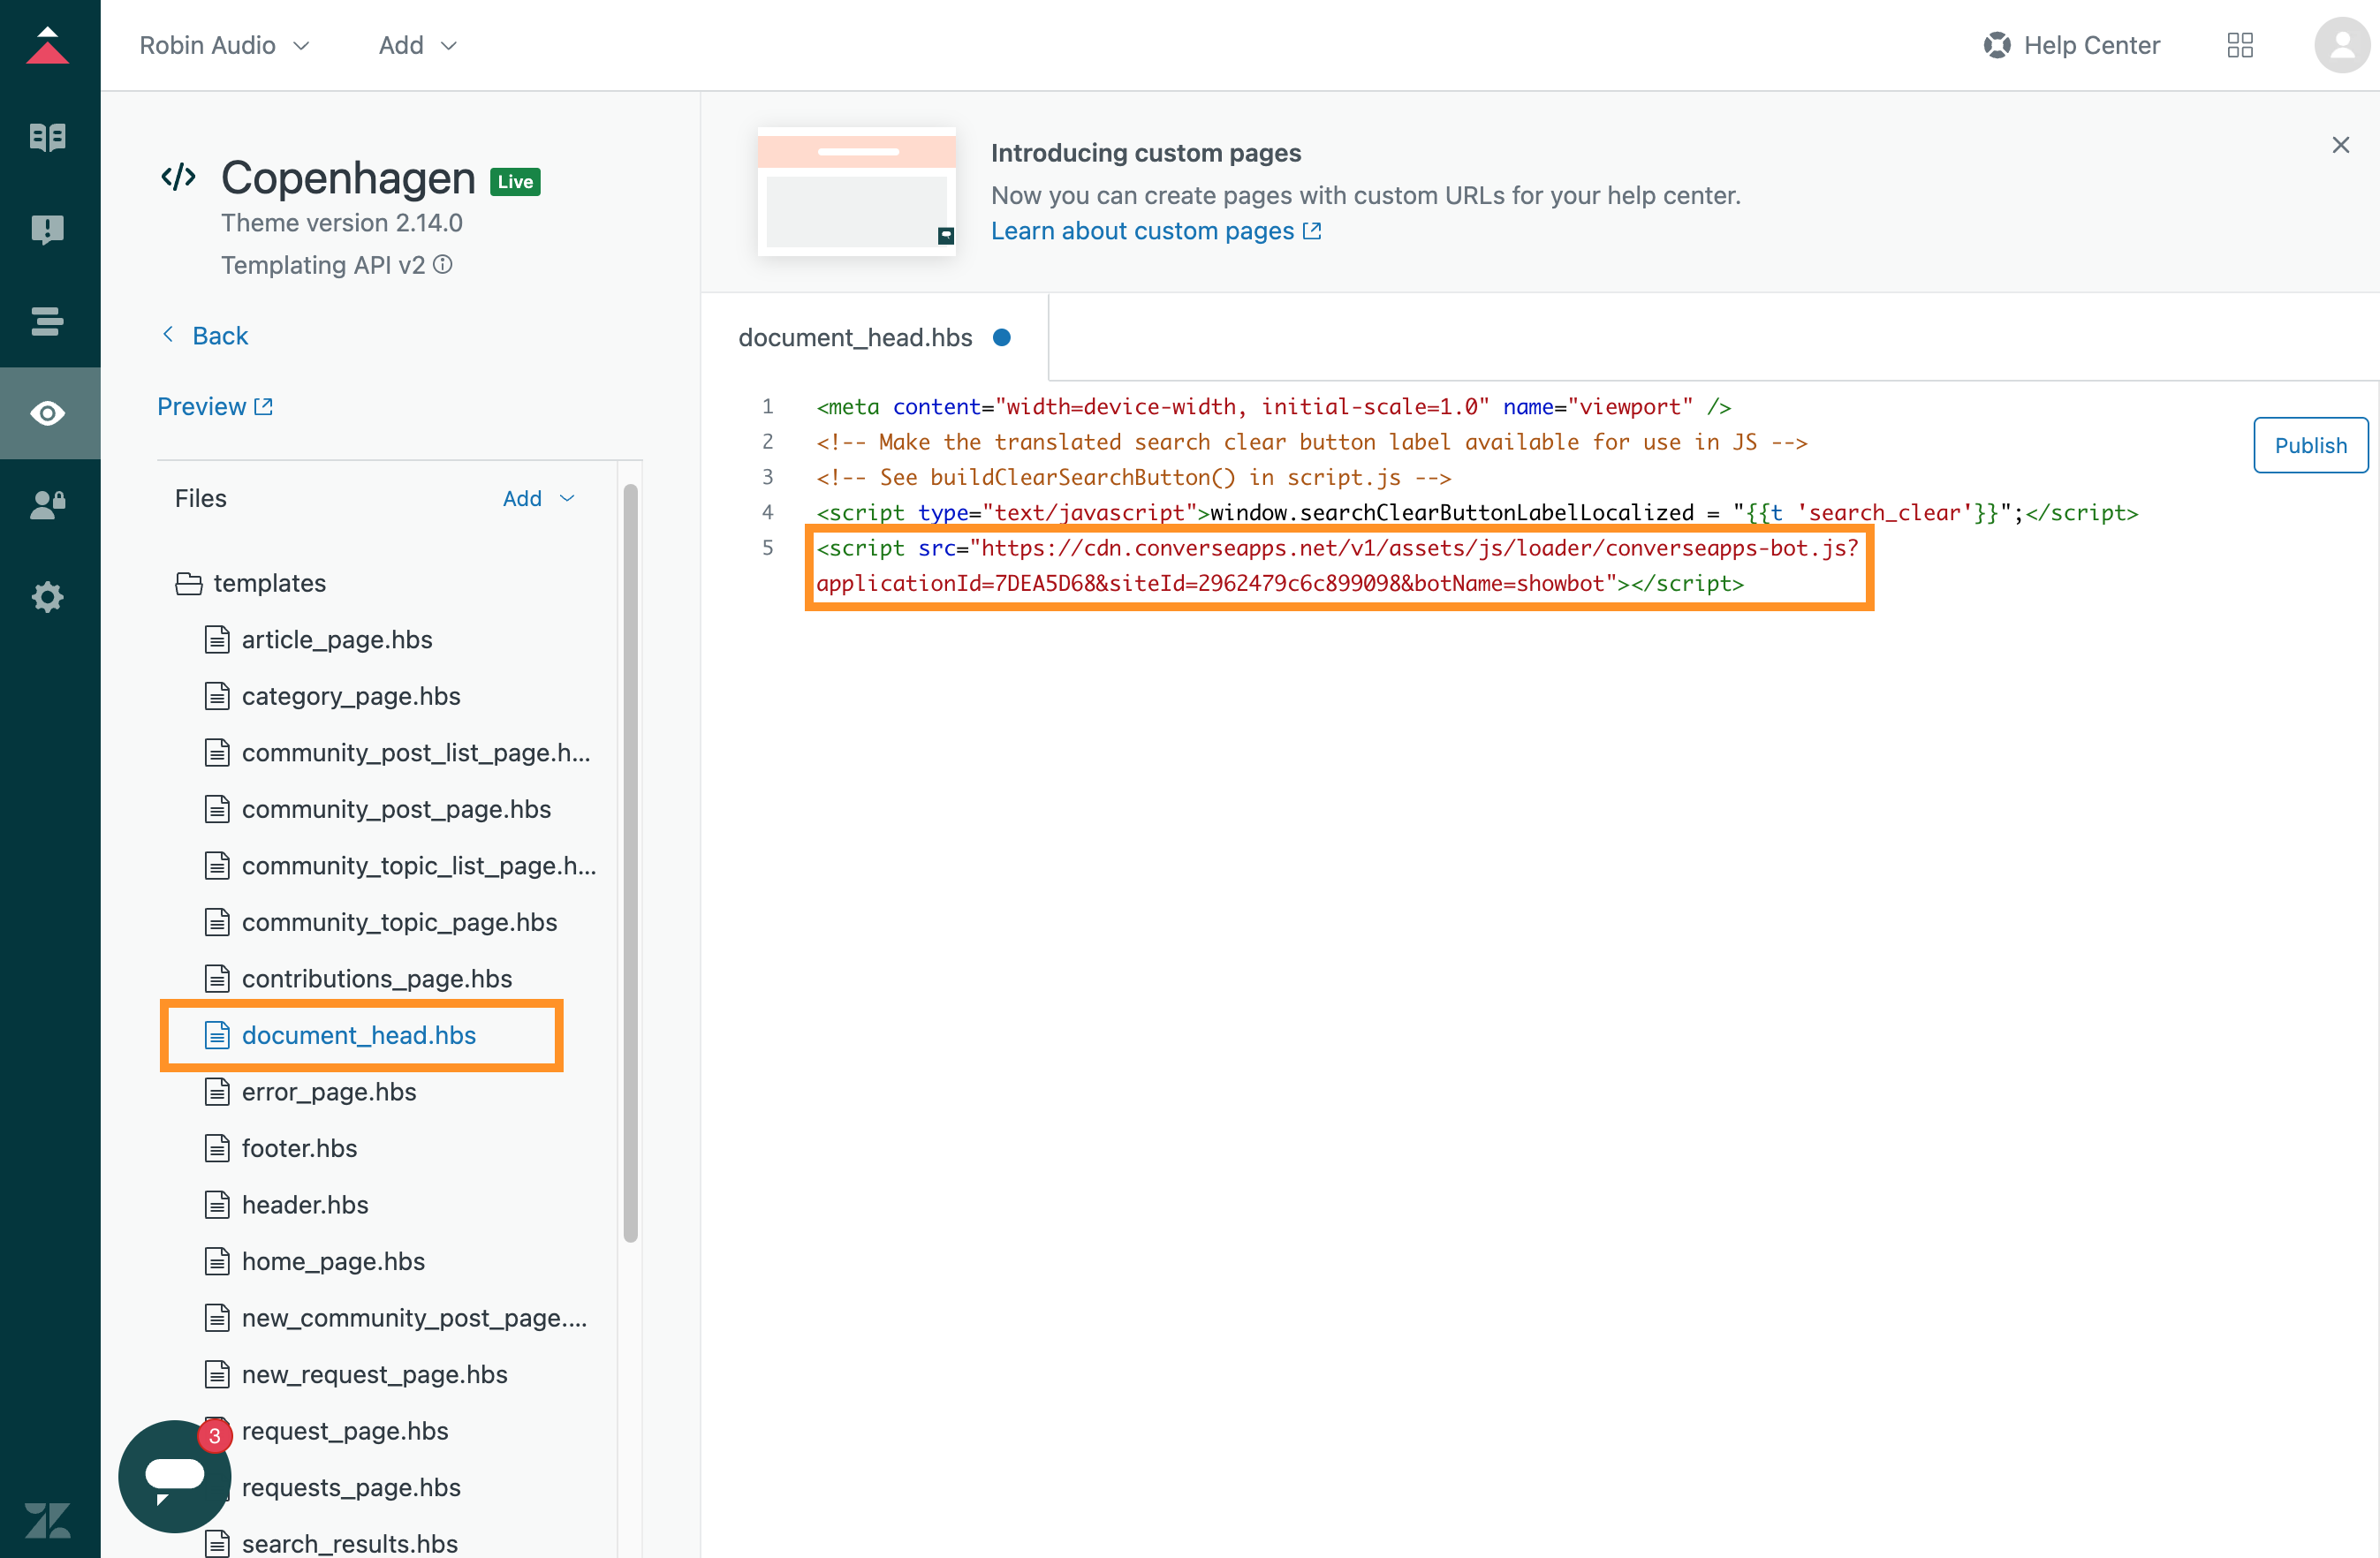 Paste the AI agent script snippet
Click Publish to apply the changes.
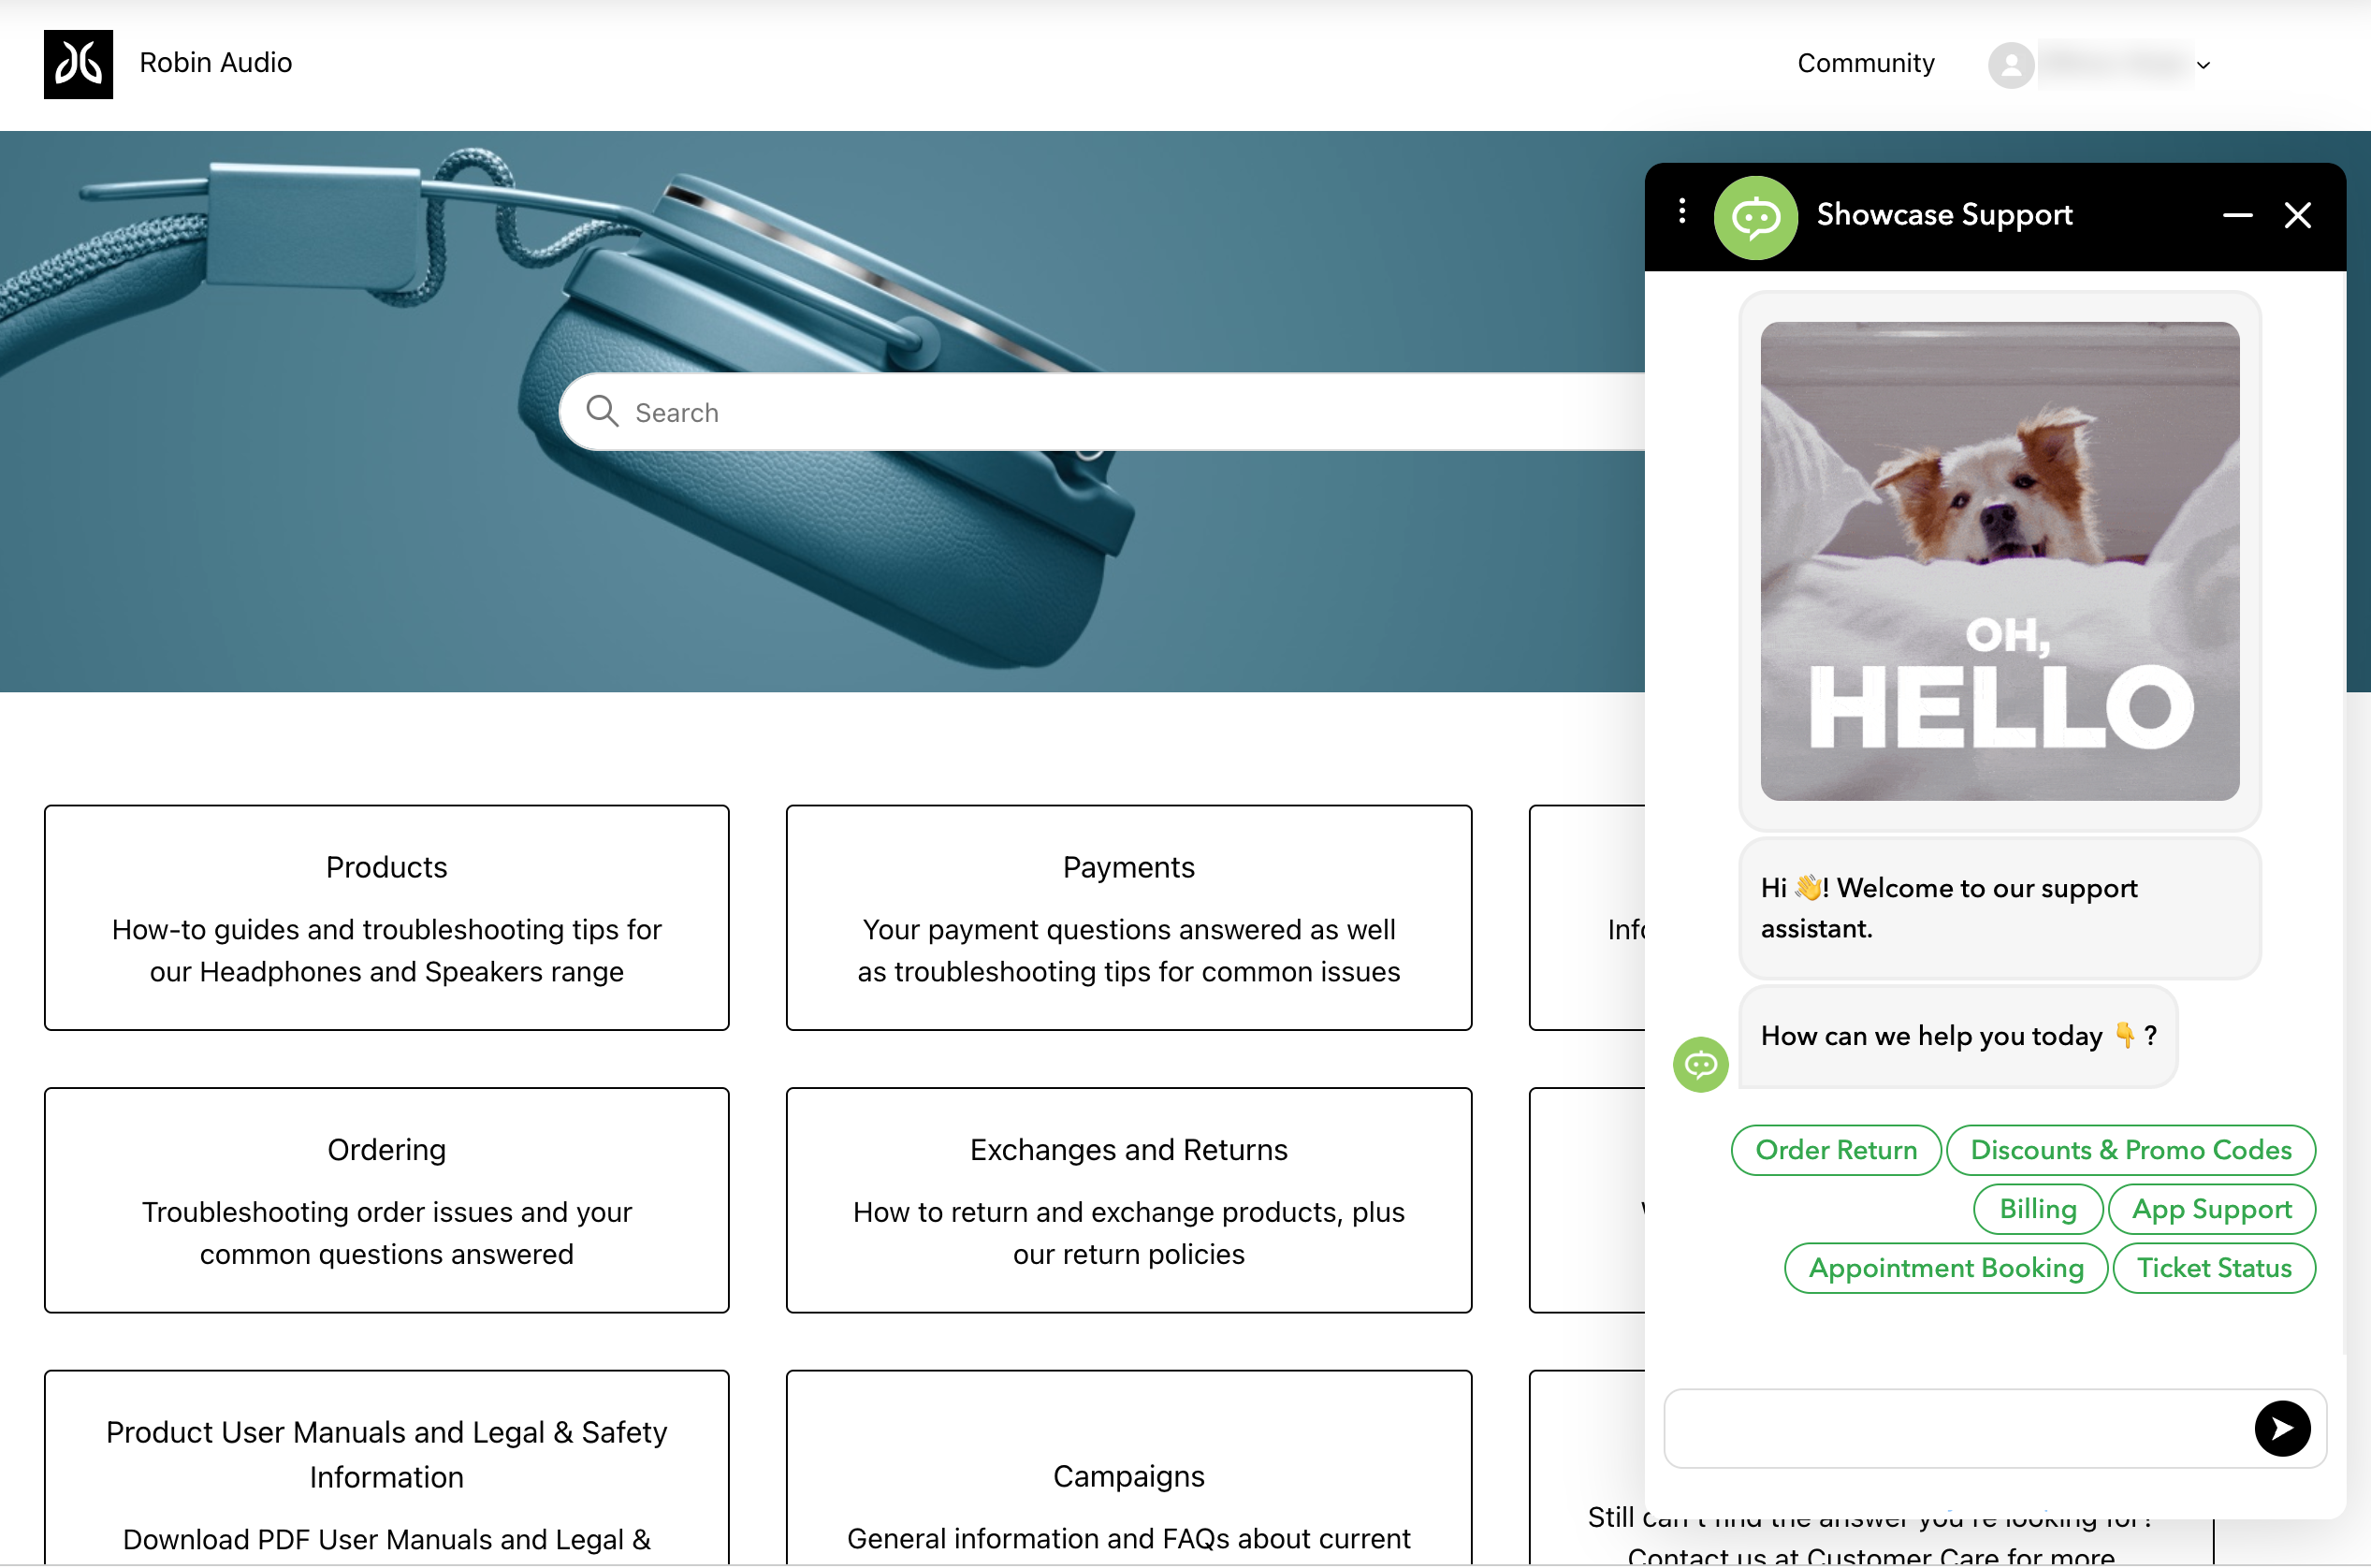
Go to your help center. The AI agent should appear.
Deployed agent
Refer to the Zendesk documentation to learn how to prevent the Zendesk Web Widget from appearing by default.
Add to Shopify
Complete the following steps to add your AI agent to a Shopify store:
Select your AI agent.
Go to Settings > Advanced Features > Deployment.
Copy the snippet for your AI agent.
VERSIONS
You can toggle between the draft and published versions of your AI agent. If you use the draft version, the URL includes the &draft=true parameter. This allows you to test and deploy changes before publishing them.
Sign in to your Shopify account at accounts.shopify.com.
Open your store's admin at admin.shopify.com.
Go to Online Store > Themes.
Find your current theme and click the ••• (three dots) next to Customize, then select Edit code.
Open the theme.liquid file (under the layout folder).
Paste the script snippet just before the closing </head> tag.
Click Save.
Preview your store. You should see the AI agent icon on the page.
Optional. Click Hide bar to dismiss the Shopify preview banner.
Your AI agent is now installed. Publish your theme to make the changes live.
Mobile SDKs
MOBILE SDKS AND CUSTOM WEBVIEW ACCESS
The Mobile SDKs (iOS, Android) and Custom Webview are available through the existing DeepConverse GitHub organization until the migration to the Workato environment is complete.
iOS SDK
AgentX Support provides an SDK for integrating the AI agent into your iOS mobile app.
Installation
Install the SDK using CocoaPods by adding the following to your Podfile:
pod 'DeepConverse', :git => 'https://github.com/converselabs/ios-sdk.git', :branch => 'release'Setup
The following ViewController example demonstrates how to initialize the SDK and load the AI agent when a button is tapped. You can also pass metadata to the agent during setup.
Replace <DOMAIN> and <BOT_NAME> with values from AgentX Support.
import UIKit

import DeepConverse

class ViewController: UIViewController {

    private var sdk : DeepConverseSDK? = nil

    override func viewDidLoad() {
        super.viewDidLoad()
        // Do any additional setup after loading the view.
        var metadata = [String:String]()
        metadata["draft"] = "true"

        let session = DeepConverseSDKSession.init(
            subDomain: <DOMAIN>,
            botName: <BOT_NAME>,
            metadata: metadata,
            webViewTimeout: 60.0
        )

        sdk = DeepConverseSDK(delegate: self, session: session)
    }


    @IBAction func Click(_ sender: Any) {
        sdk?.openBot(viewController: self)
    }
}

extension ViewController: DeepConverseDelegate {

    func didWebViewFail(withError: DeepConverseWebHostError) {
        print("Did fail with error")
    }

    func didReceiveEvent(event: [String : Any]) {

    }

    func didCloseBot() {
        print("Did Close")
    }

    func didOpenBot() {
        print("Did Open")
    }
}
Android SDK
AgentX Support provides an SDK for integrating the AI agent into your Android mobile app.
Installation
Locate your root build.gradle file and add the following JitPack repository under allprojects:
allprojects {
 repositories {
  ...
  maven { url 'https://jitpack.io' }
 }
}Add the SDK dependency in your app-level build.gradle:
dependencies {
  implementation 'com.github.converselabs:android-sdk:1.0.6'
}
Setup
The following MainActivity example demonstrates how to initialize the SDK and load the AI agent when a button is tapped. You can also pass metadata to the agent at runtime.
Replace DOMAIN and BOT_NAME with values from AgentX Support.
package com.sample.webviewapp;

import android.os.Bundle;
import android.view.View;
import android.widget.Button;
import android.widget.LinearLayout;

import androidx.appcompat.app.AppCompatActivity;

import com.deepconverse.android_sdk.DeepConverseSDK;
import com.deepconverse.webviewapp.R;

import java.util.HashMap;
import java.util.Map;


public class MainActivity extends AppCompatActivity implements DeepConverseSDK.WebViewCallback {

    private Button openWebViewButton;
    private LinearLayout webUrlContainer;
    private DeepConverseSDK deepConverseSDK;

    @Override
    protected void onCreate(Bundle savedInstanceState) {
        super.onCreate(savedInstanceState);
        setContentView(R.layout.activity_main);

        openWebViewButton = findViewById(R.id.openWebViewButton);
        webUrlContainer = findViewById(R.id.webUrlContainer);

        openWebViewButton.setOnClickListener(new View.OnClickListener() {
            @Override
            public void onClick(View v) {
                if (deepConverseSDK != null) {
                    // Remove the existing WebUrlView if present
                    webUrlContainer.removeView(deepConverseSDK);
                    deepConverseSDK.destroyView();
                }

                // Create a new instance of WebUrlView
                Map<String, String> metadata = new HashMap<>();
                metadata.put("draft", "true");
                deepConverseSDK = new DeepConverseSDK(MainActivity.this, DOMAIN,
                        BOT_NAME, metadata);
                deepConverseSDK.setLayoutParams(new LinearLayout.LayoutParams(
                        LinearLayout.LayoutParams.MATCH_PARENT,
                        LinearLayout.LayoutParams.MATCH_PARENT));
                deepConverseSDK.setWebViewCallback(MainActivity.this);
                deepConverseSDK.load();
                webUrlContainer.addView(deepConverseSDK);

                // Show the webUrlContainer and trigger a layout pass
                webUrlContainer.setVisibility(View.VISIBLE);
                webUrlContainer.requestLayout();
            }
        });
    }

    @Override
    public void onViewClosed() {
        // Remove the WebUrlView from the container
        if (deepConverseSDK != null) {
            webUrlContainer.removeView(deepConverseSDK);
            deepConverseSDK.destroyView();
            deepConverseSDK = null;
            webUrlContainer.setVisibility(View.GONE);
        }
    }
}
Custom webviews
You can use a custom webview when the AI agent needs to be embedded within a tailored user interface or requires integration with specific app elements.
SDK REPOSITORY
We provide an open-source SDK as a reference implementation, available on our GitHub repository. The repository is currently hosted under AgentX Support’s previous organization name, DeepConverse. This may change in a future update.
You can use the following URL to load the AI agent in a webview. It is pre-configured to automatically open the AI agent when a trigger event is received.
https://cdn.deepconverse.com/v1/assets/widget/embedded-chatbot?hostname=<SUBDOMAIN>-<BOT_ID>.deepconverse.comReplace <SUBDOMAIN> and <BOT_ID> with the values from AgentX Support.
The webview loads the URL in response to a button click or another action, and invokes the following JavaScript in the webview:
// Load the AI agent with Metadata
private func actionButtonJs() -> String {
    do {
        var metadataJSON = json(from: self.session.metadata)
        print("[DeepConverseSDK] Metadata:", metadataJSON)
        let s = """
    setTimeout(function () {var evt = new CustomEvent('botWidgetInit', { detail: (metadataJSON!) });document.dispatchEvent(evt);}, 100)

    document.addEventListener('dc.bot', function(e) {
      let payload = { action: e.detail.action };
      window.webkit.messageHandlers.actionTapped.postMessage(payload);
    });
    """
        return s;
    } catch {
        print("[DeepConverseSDK] Error in Metadata" + error.localizedDescription);

        // Fallback to load without metadata

        let s = """
        setTimeout(function () {var evt = new CustomEvent('botWidgetInit', { detail: {} });document.dispatchEvent(evt);}, 100)

        document.addEventListener('dc.bot', function(e) {
          let payload = { action: e.detail.action };
          window.webkit.messageHandlers.actionTapped.postMessage(payload);
        });
        """
        return s;
    }


}
The following example demonstrates how to configure the webview and use the function that loads the AI agent:
// Some code
private func configureWebview() {

    let webConfiguration = WKWebViewConfiguration()
    let contentController = WKUserContentController()
    let js: String = actionButtonJs();
    let userScript = WKUserScript(source: js, injectionTime: WKUserScriptInjectionTime.atDocumentEnd, forMainFrameOnly: false)
    contentController.removeAllUserScripts()
    contentController.addUserScript(userScript)
    contentController.add(
                self,
                name: "actionTapped"
            )
    webConfiguration.userContentController = contentController

    self.webview = WKWebView(frame: self.view.frame, configuration: webConfiguration)
    self.webview.navigationDelegate = self
    self.view.addSubview(self.webview)

    self.webview.scrollView.isScrollEnabled = false
    let webRequest = URLRequest(url: url,
                                cachePolicy: .useProtocolCachePolicy,
                                timeoutInterval: timeout)

    let layoutGuide = self.view.safeAreaLayoutGuide
    self.webview.translatesAutoresizingMaskIntoConstraints = false
    self.webview.leadingAnchor.constraint(
          equalTo: layoutGuide.leadingAnchor).isActive = true
    self.webview.trailingAnchor.constraint(
          equalTo: layoutGuide.trailingAnchor).isActive = true
    self.webview.topAnchor.constraint(
          equalTo: layoutGuide.topAnchor).isActive = true
    self.webview.bottomAnchor.constraint(
          equalTo: layoutGuide.bottomAnchor).isActive = true

    self.webview.load(webRequest)

    DispatchQueue.main.asyncAfter(deadline: .() + timeout) {
        if (self.webview.isLoading) {
            self.webview.stopLoading()
            self.delegate.didWebViewFail(withError: DeepConverseWebHostError.WebViewTimeout)
        }
    }
}
We also provide callbacks to assist closing the webview.
The previous code snippet registers the actionTapped handler to listen to the callbacks. Three main actions are sent back in open, minimize, and close.
// Some code
extension DeepConverseHostViewController : WKScriptMessageHandler {
    public func userContentController (
        _ userContentController: WKUserContentController,
        didReceive message: WKScriptMessage
    ) {
        do {
            print("[DeepConverseSDK] message:", message.body);
            guard let payload = message.body as? [String: String] else { return }
            print("struct:", payload["action"])

            switch (payload["action"]) {
            case "open":
                print("[DeepConverseSDK] open action");
                break;
            case "minimize":
                print("[DeepConverseSDK] minimize action")
                self.dismiss(animated: true, completion: nil);
                break;
           case "close":
                print("[DeepConverseSDK] close action");
                break;
            default:
                print("[DeepConverseSDK] unkn action")
            }

            delegate.didReceiveEvent(event: payload)
        } catch {
            print("[DeepConverseSDK] Event error")
        }
    }
}
A configured webview enables you to set the custom view controller as a child or top-level container within your app.
Open AI agent with JavaScript
You can trigger an AI agent to open on the click of a button or another external event. Use the following JavaScript code to configure the trigger event for your AI agent:
window.dispatchEvent(new CustomEvent('dc.bot.show'));Custom initialization and passing metadata
By default, the AI agent script displays the agent on page load. However, if you need more control over when the agent appears or plan to pass custom metadata, you can override the trigger function to manually initialize the agent on your webpage.
Initialize the AI agent
The AI agent works based on events passed through the script. You can customize when the event is sent, such as after a button click or another user action.
Complete the following steps to configure custom initialization:
Select your AI agent.
Go to Settings > Features > Trigger Function.
Edit the following JavaScript code as required for your use case:
document.dispatchEvent(new CustomEvent("botWidgetInit", {"detail": {"origin": "support"}}));Pass metadata
You can pass custom metadata to the AI agent to make decisions within the workflow. This metadata lives in the conversation context and is available for use in routing, API calls, and other actions.
Complete the following steps to pass metadata:
Select your AI agent.
Go to Settings > Features > Trigger Function.
Edit the following JavaScript code as required for your use case:
let metadata = {
    "origin": "support",
    "tags": ["ios", "vip"]
}
document.dispatchEvent(new CustomEvent("botWidgetInit", {"detail": metadata}));Last updated: