Transfer orchestration
ファイル転送は、システム間でのファイルの移動を自動化します。 各転送は、検出、検証、変換、配信、削除を含むライフサイクル全体を管理します。 転送には、スケジュール設定、処理、エラー処理が組み込まれています。
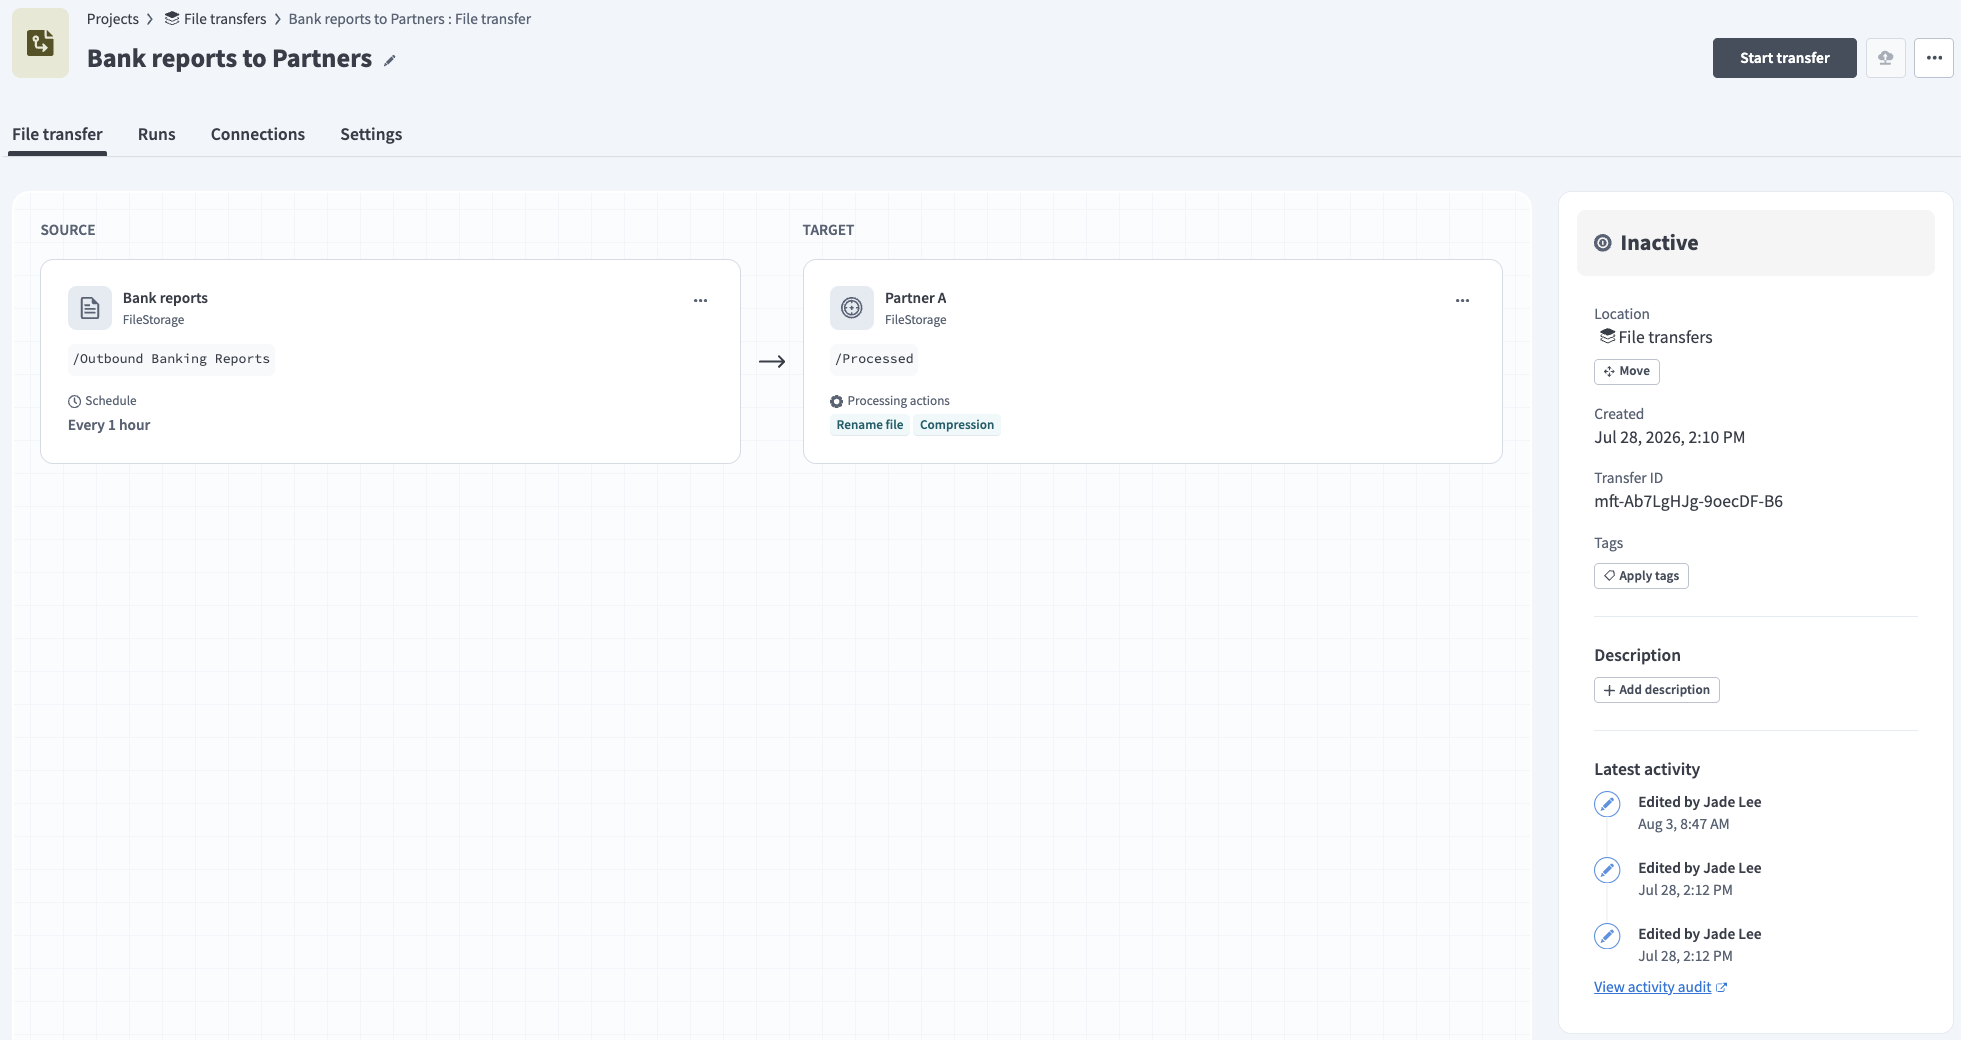 設定済みのファイル転送
Source: 新しいファイルがあるかどうかロケーションを監視し、スケジュールに基づいて取得します。
Target: File transfers upload files to a target location after processing.
サポートされるエンドポイントタイプ
File transfers support the following connections as a source or target:
- Workato FileStorage
- External SFTPサーバー
Workato plans to support the following additional connections:
- Amazon S3
- Azure Blob Storage
- Sharepoint
- HTTPS
コネクションの詳細については、ソースの追加およびターゲットの追加セクションを参照してください。
ON-PREMISES ENDPOINTS
Use the Workato OPA for dedicated MFT use cases such as transferring files directly between two on-premises SFTP servers without routing file payloads through the Workato Cloud.
ファイル転送の設定
Each file transfer supports one source and one target. システム間のファイル移動を自動化する新しいファイル転送を作成するには、次の手順を完了します:
Click Create > File transfer. Create a file transferモーダルが表示されます。
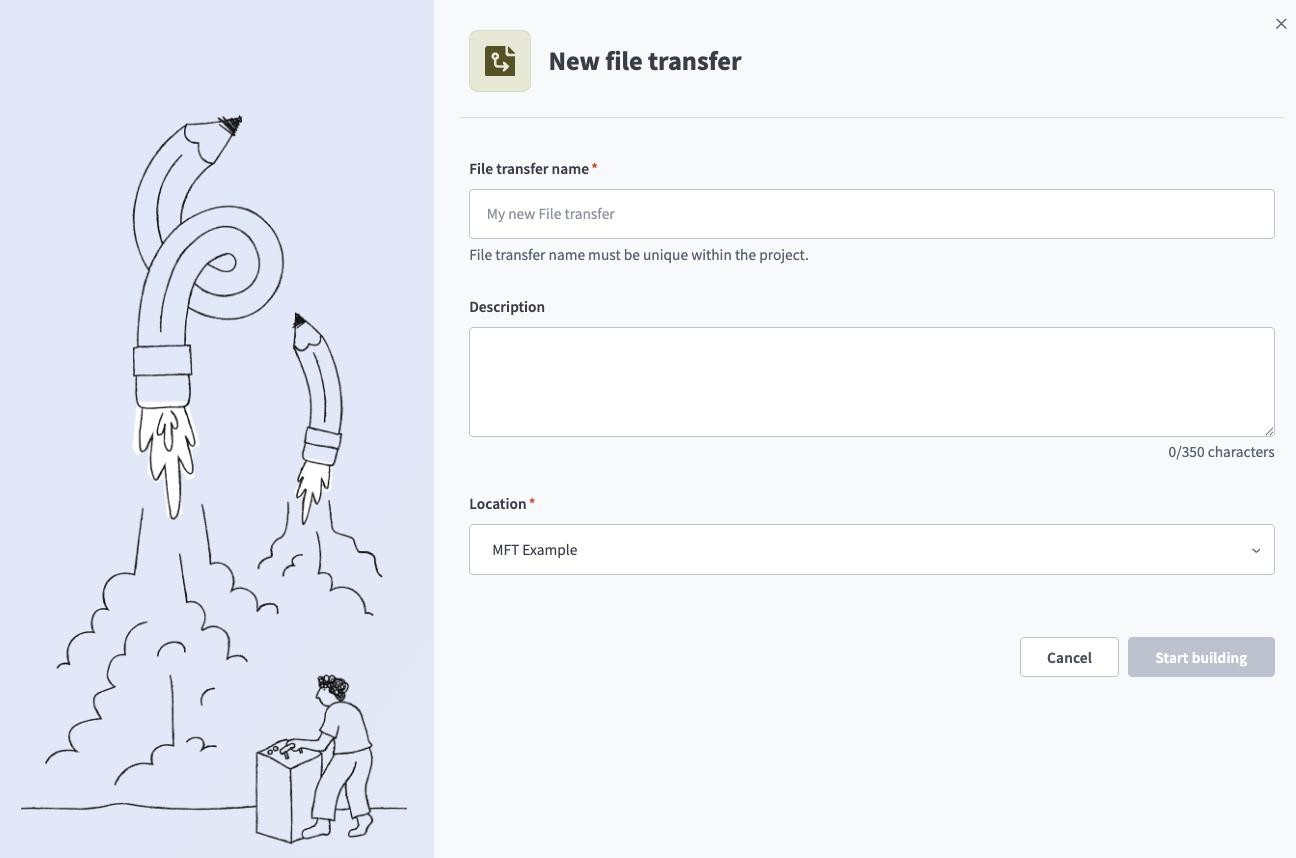 Create a file transferモーダル
Enter a descriptive Transfer name. 例: Partner Orders ImportまたはDaily Report to S3。 名前はプロジェクト内で一意である必要があります。
任意です。 転送の内容を示すDescriptionを入力します。 このフィールドの最大文字数は350文字です。
Locationドロップダウンメニューを使用して、ファイル転送を保存する予定のプロジェクトを選択します。
ビルドを開始をクリックします。 The file transfer is created in an Inactive state and the Transfer page displays.
ソースの追加
Sources define where to pick up files, when to check for new files, and how to handle source files after a successful transfer.
Complete the following steps to add a source to your file transfer:
設定するFile transferアセットを選択します。
Click + Add source. The Add source setup wizard displays.
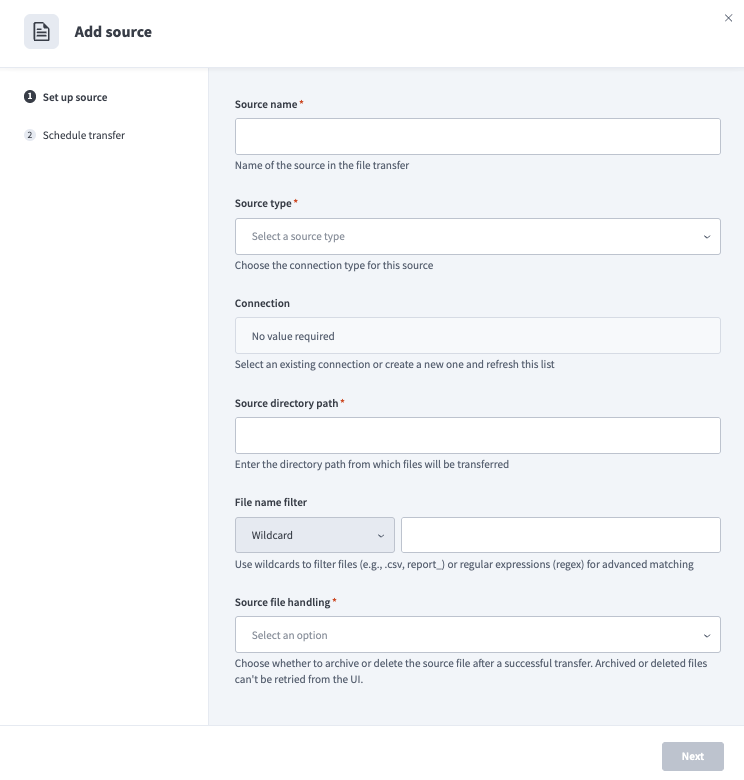 The Add source setup wizard
Source nameフィールドにわかりやすい名前を入力します。 例: Partner SFTPまたはBank Reports。 この名前はログと監視に表示されます。
Source typeドロップダウンメニューを使用して、コネクションタイプを選択します。 Workatoは次のコネクションをサポートしています:
- Workato FileStorage
- External SFTPサーバー
Workato plans to support the following additional connections:
- Amazon S3
- Azure Blob Storage
- Sharepoint
- HTTPS
Connections are reusable across all flow assets including file transfers. Use the Connection drop-down menu to select a connection if your Source type is External SFTP. You can also click Create new connection, then click Refresh to update the list.
ファイルを取得するフォルダパスをSource directory pathフィールドに入力します。 Ensure the source connection has permission to download from this path.
Use the Only transfer files with a successful virus scan toggle to set the transfer's security scan behavior if your Source type is FileStorage. FileStorage automatically scans files up to 100 MB.
Enter a pattern to filter files by in the File name filter field. Use the drop-down menu to select a pattern type. 単純なパターンにはWildcardを選択し、高度な照合にはRegexを選択します。
ワイルドカード
ワイルドカードパターンは次の形式を使用します:
単一文字ワイルドカード
?任意の1文字の1インスタンスを表します。 たとえば、
Report_draft_?.pdfはReport_draft_1.pdf、Report_draft_2.pdf、またはReport_draft_3.pdfを表すことができます。複数文字ワイルドカード
*任意の文字の0個以上のインスタンスを表します。 たとえば、
Report_draft*.pdfはReport_draft.pdf、Report_draft_1.pdf、Report_draft_2.pdf、またはReport_draft_3.pdfを表すことができます。
Use the Source file handling to configure what happens to files at the source after a successful transfer:
- Keep at source (default): Files remain at the source directory.
- Archive: Moves the file to a configured archive subfolder. Requires write and delete permission at the source. Archived files can't be retried from the UI.
- Delete: Permanently deletes the file. Requires delete permission at the source. Deleted files can't be retried from the UI.
Nextをクリックし、転送のスケジュール設定セクションを参照して転送スケジュールを設定します。
転送のスケジュール設定
ソースを追加した後にファイル転送をスケジュールするには、次の手順を完了します:
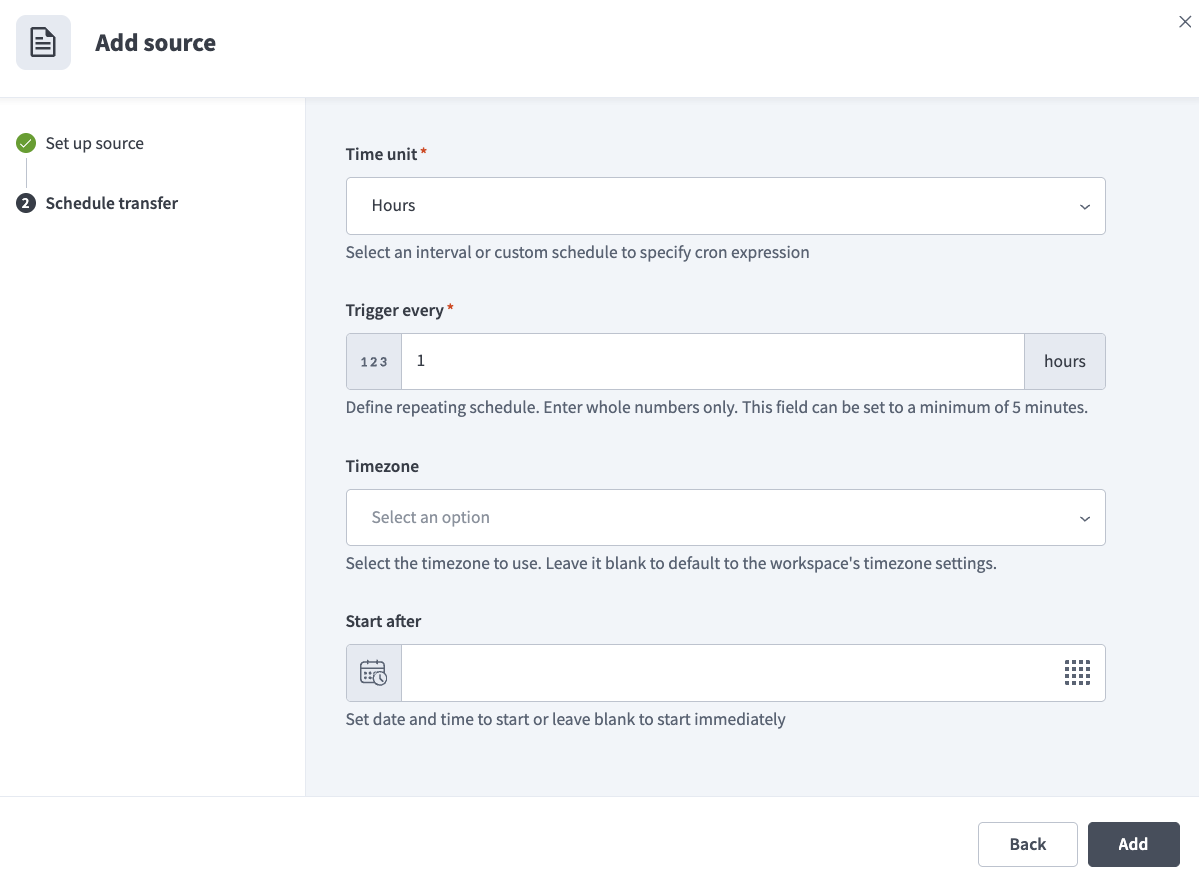 Schedule transferページ
ターゲットの追加
Targets define where to deliver files and what processing actions to perform on files before delivery.
Complete the following steps to add a target to your file transfer:
設定するFile transferアセットを選択します。
Click + Add target. The Add target setup wizard displays.
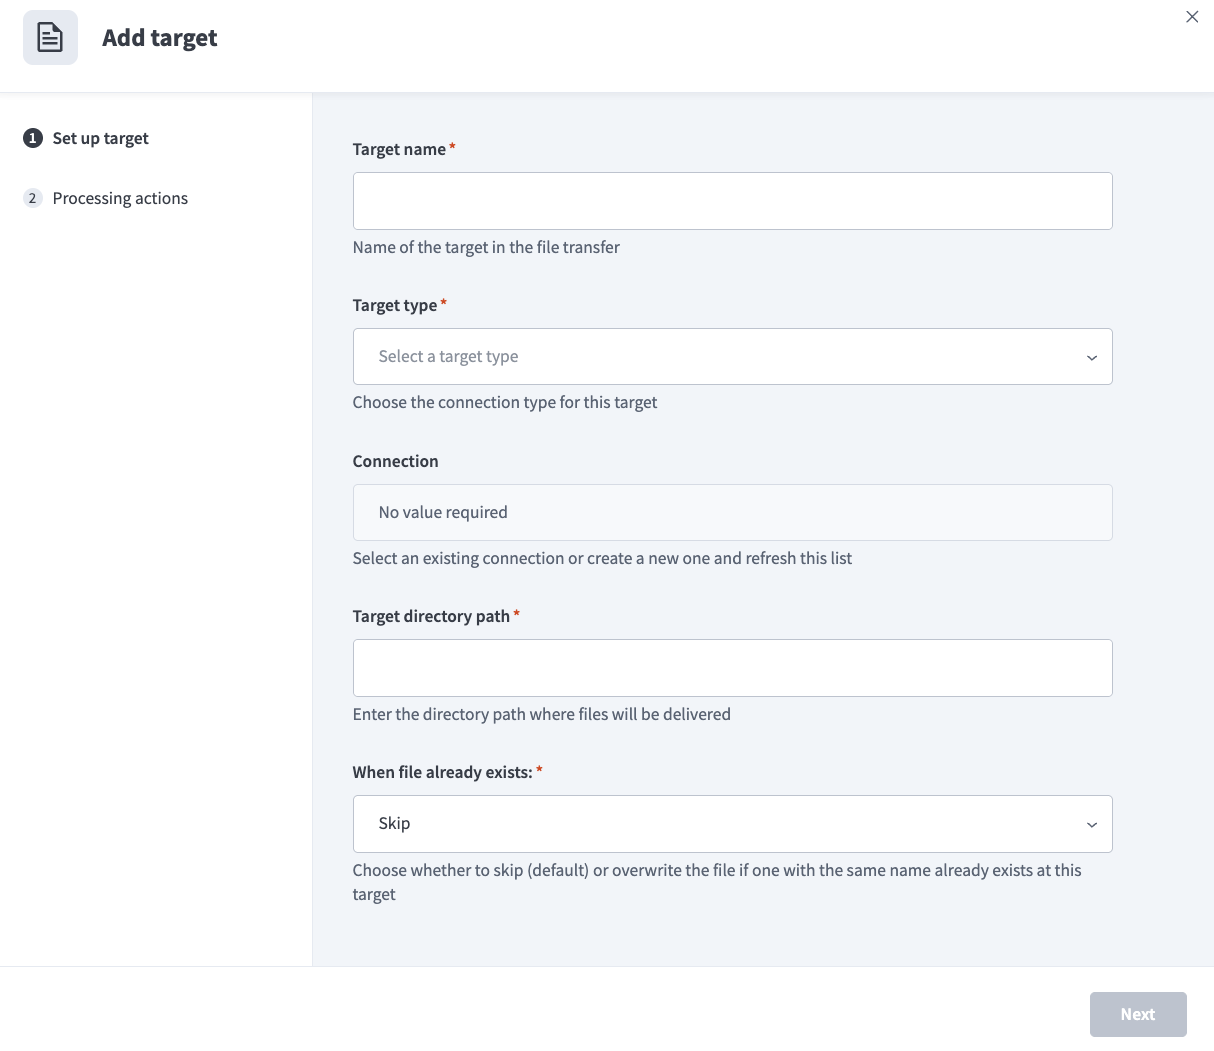 The Add target setup wizard
Target nameフィールドにターゲットのわかりやすい名前を入力します。 この名前はログと監視に表示されます。
Target typeドロップダウンメニューを使用して、コネクションタイプを選択します。 Workatoは次のコネクションをサポートしています:
- Workato FileStorage
- External SFTPサーバー
Workato plans to support the following additional connections:
- Amazon S3
- Azure Blob Storage
- Sharepoint
- HTTPS
Use the Connection drop-down menu to select a connection if your Target type is External SFTP. Connections are reusable across all flow assets including file transfers. You can also click Create new connection, then click Refresh to update the list.
ファイルを配信するフォルダパスをTarget directory pathフィールドに入力します。 Ensure the target connection has the permission to upload to this path.
Use the When a file already exists at destination field to configure conflict resolution:
- Skip (default): Doesn't transfer the file and logs the event as Skipped. Note that skipped files are considered successful runs, so the source-file handling rule configured in Set up source still applies.
- Overwrite: Replaces the existing file at the destination. The original file is permanently replaced and can't be recovered.
Click Next, then continue to Processing actions.
Processing actions
Processing actions are performed on files after pickup from the source and before delivery to the target. Workato MFT supports the following processing actions:
| アクション | 説明 |
|---|---|
| PGP encryption | PGP公開鍵を使用してファイルを暗号化します。 Create and select a connection to the PGP tools by Workato connector to define your PGP keys for this transfer. |
| PGP decryption | PGP秘密鍵を使用してファイルを復号化します。 Create and select a connection to the PGP tools by Workato connector to define your PGP keys for this transfer. |
| 名前の変更 | Rename files dynamically using functions and the following variables:
|
Complete the following steps to define processing actions after you add a target:
設定するFile transferアセットを選択します。
Click ... (ellipsis) on the target.
Click Edit processing actions.
Click + Add action to add a new processing action.
Configure the action, then click Save.
Configure settings
The Settings page allows you to configure the following aspects of your file transfer:
転送の開始
Complete the following steps to start a file transfer after adding a source and a target:
開始するFile transferアセットを選択します。
Start transferをクリックします。 ステータスがInactiveからActiveに変わります。 転送は、ソースのセットアップ中に設定したスケジュールとStart after時刻に基づいて開始されます。 Restarting a stopped transfer doesn't trigger an immediate poll; it waits until the next scheduled poll time.
Check for files now
Complete the following steps to poll a file transfer immediately, without waiting for its next scheduled poll:
Select the File transfer asset you plan to poll.
実行タブに移動します。
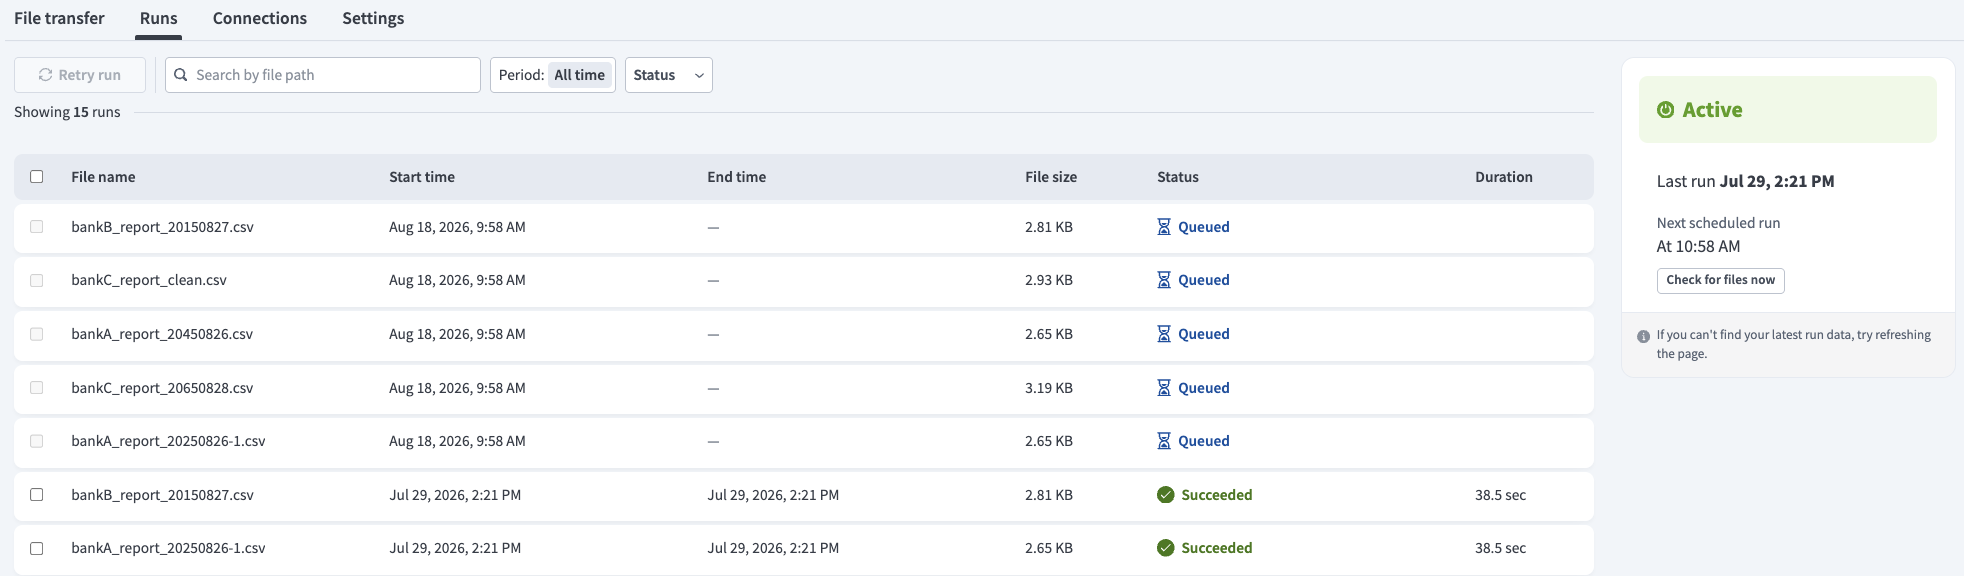 実行タブ
実行タブ
Click Check for files now.
The transfer checks for new files and reschedules the next poll based on the current time and the configured poll interval.
転送の停止
Complete the following steps to stop a file transfer:
停止するFile transferアセットを選択します。
Stop transferをクリックします。 ステータスがActiveからInactiveに変わります。
スケジュールされた実行は一時停止され、進行中のファイル転送は完了します。 Transfers you resume continue processing files from the poll event where they stopped.
制限
File transfers have the following limits:
| 説明 | クォータ |
|---|---|
| ファイル転送の最大ファイルサイズ | 制限なし |
| 1回の転送試行の最大期間 | 8時間 |
機能の提供状況
Workato MFTへのアクセスについては、カスタマーサクセスマネージャーにお問い合わせください。
最終更新日: