Customers
The Customers tab is an essential tab within the Embedded Admin Console that gives partners a detailed look into usage and statistics within customer workspaces. Here, partners can view more details of each customer, add/remove and manage customers, and access their workspaces.
The following sections cover how to use the information provided in the customer tab to your best advantage.
Customer table
 Customer table
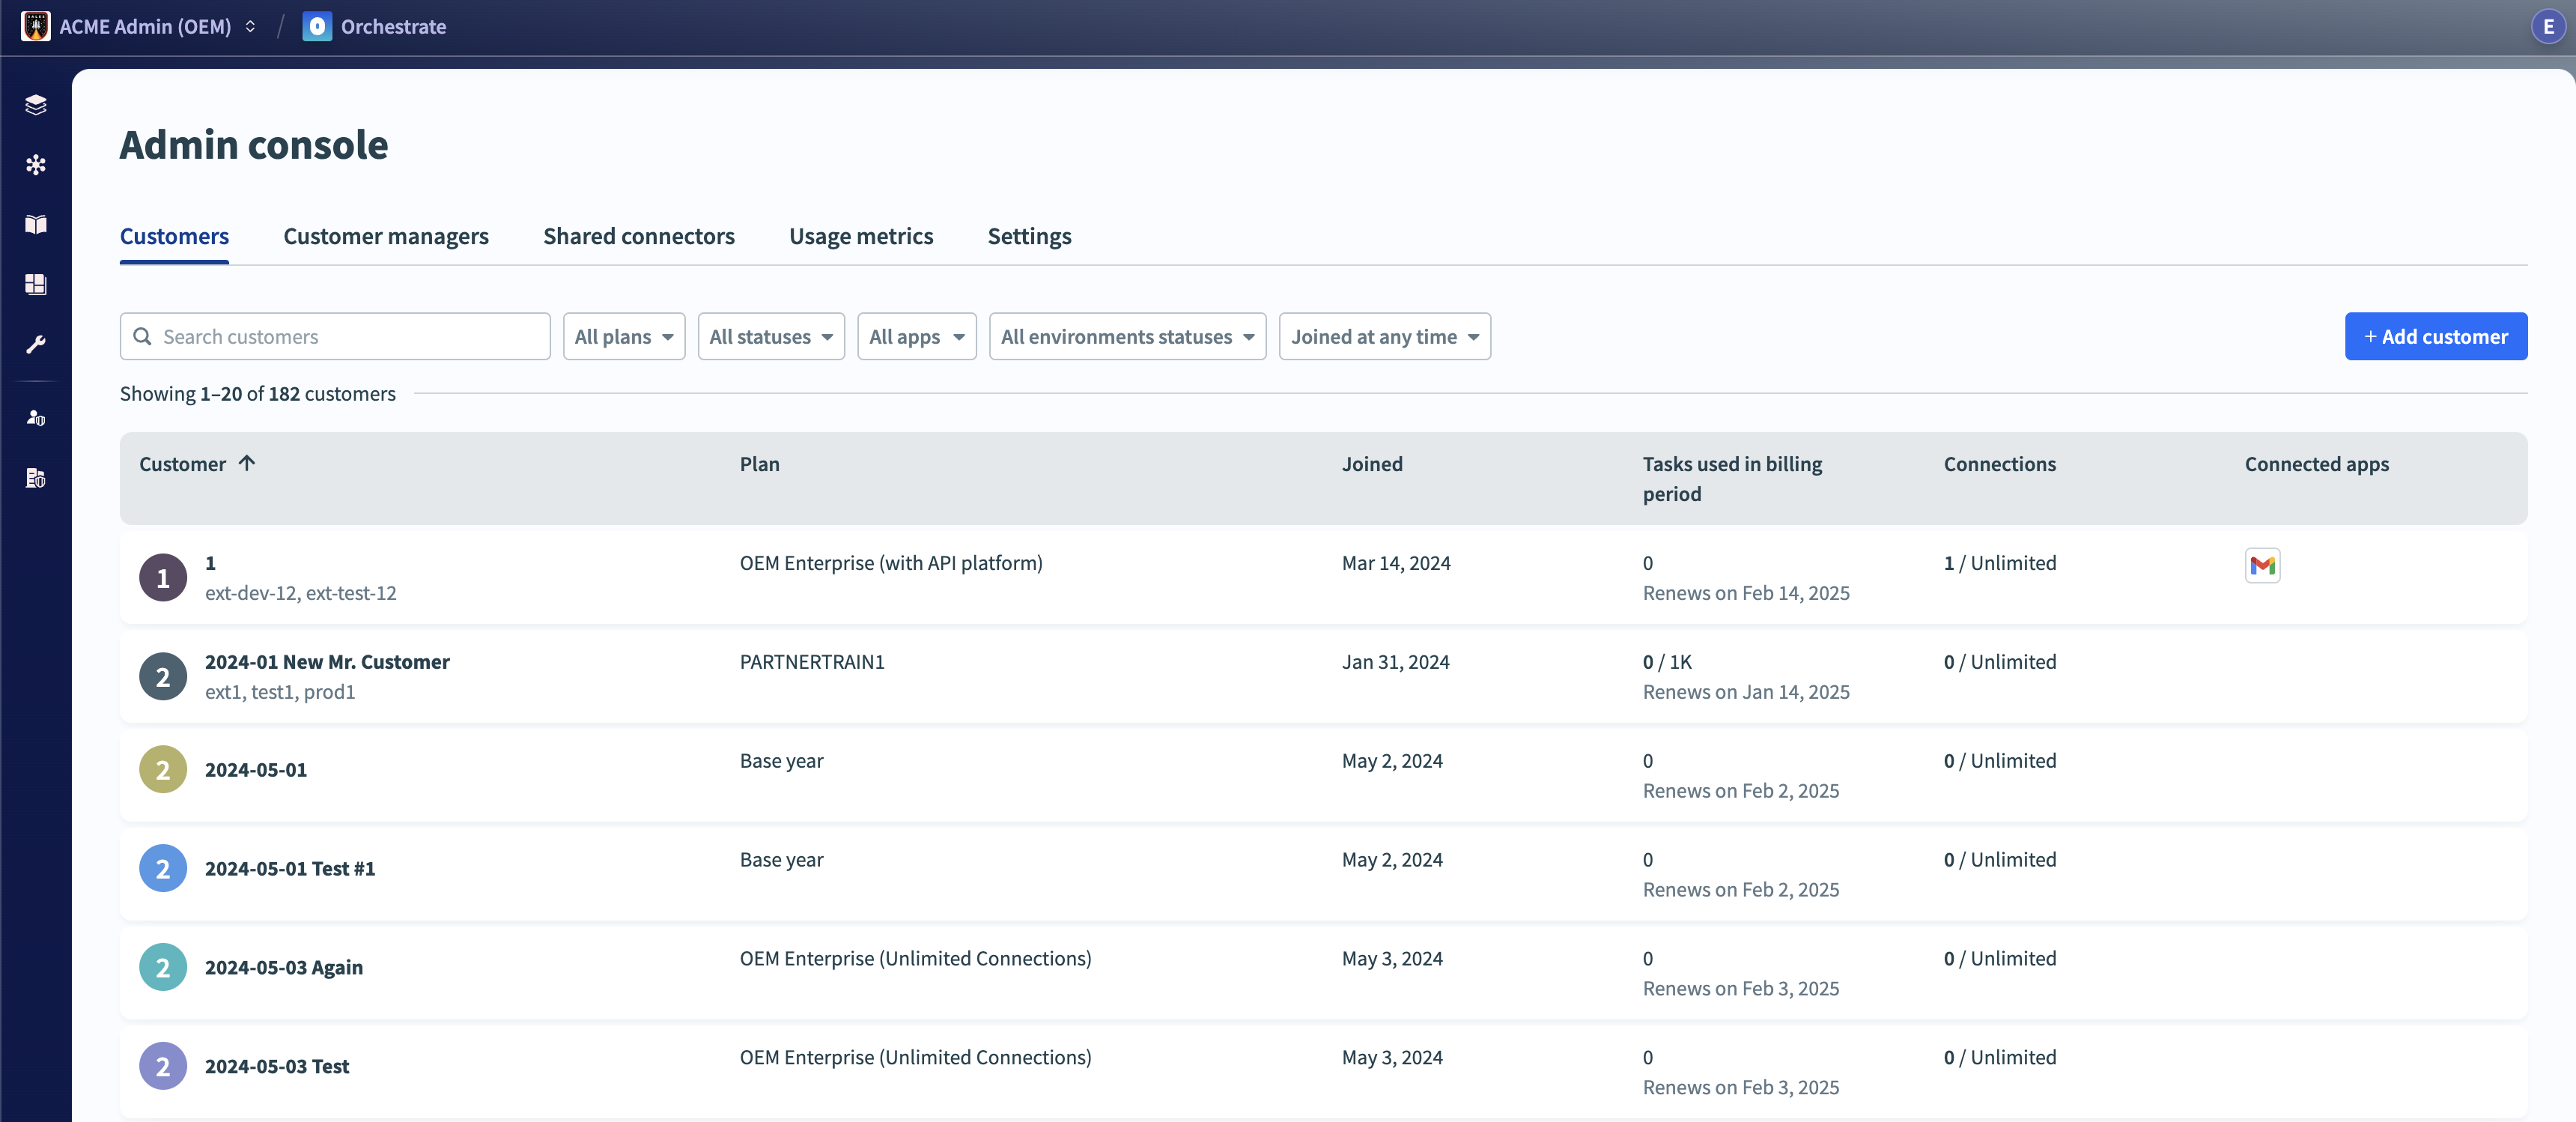
The customer table displays the full list of customers and the following information for each customer:
- Customer
- Displays the customer name, external ID (in brackets if present), and plan. You can change these values in the customer's Settings tab.
- Joined
- The customer was created on this date.
- Tasks used in billing period
- This is the number of tasks available to the customer each month. The plan type determines the task limit.
- Connections
- The number of authenticated connections. The plan type determines the connection limit.
- Connected apps
- Icons of the top five apps connected to the account.
Sorting, Searching, & Filtering
Sorting
You can sort the preceding table headers, except for Connected apps. Sorting is enabled by clicking the table headers. Clicking twice reverses the sorting order.
- Customer
- Sorts customer name alphabetically.
- Joined
- Sorts records by date joined.
- Tasks
- Sorts records by the number of tasks consumed.
- Connections
- Sorts records by the number of authenticated connections.
Search/Filter
Use the search bar and tabs to search and filter by the following:
- Search
- Search by customer name or external ID. Searched terms are highlighted in the results.
- Plan
- Filter by plans available. This list of plans corresponds to your list of custom plans. To add or remove plans, contact your Customer Success Representative.
- Status
- A customer's status can be Active, Expired subscription, or In trial. Customers with an Expired subscription are enrolled in a Workato Community (free) plan. This plan has a limit of 100 tasks/month and reflects a plan downgrade. Remove customers when their subscription ends.
- App
- Use this filter to view specific customers using a selected app.
- Date joined
- Filter customers by date joined. Select an available date range or provide a custom date range.
Add a customer
There are two ways to add customers:
- Directly in the user interface
- Using a Embedded platform API
To add a customer in the Workato app:
Click the + Add customer button.
Enter the following information for the customer:
- Customer name
- Notification email
- This email receives notifications for the events listed under Workspace admin > Settings > Notifications.
- Plan
- External ID (optional)
 Adding a customer in the app
Customer information
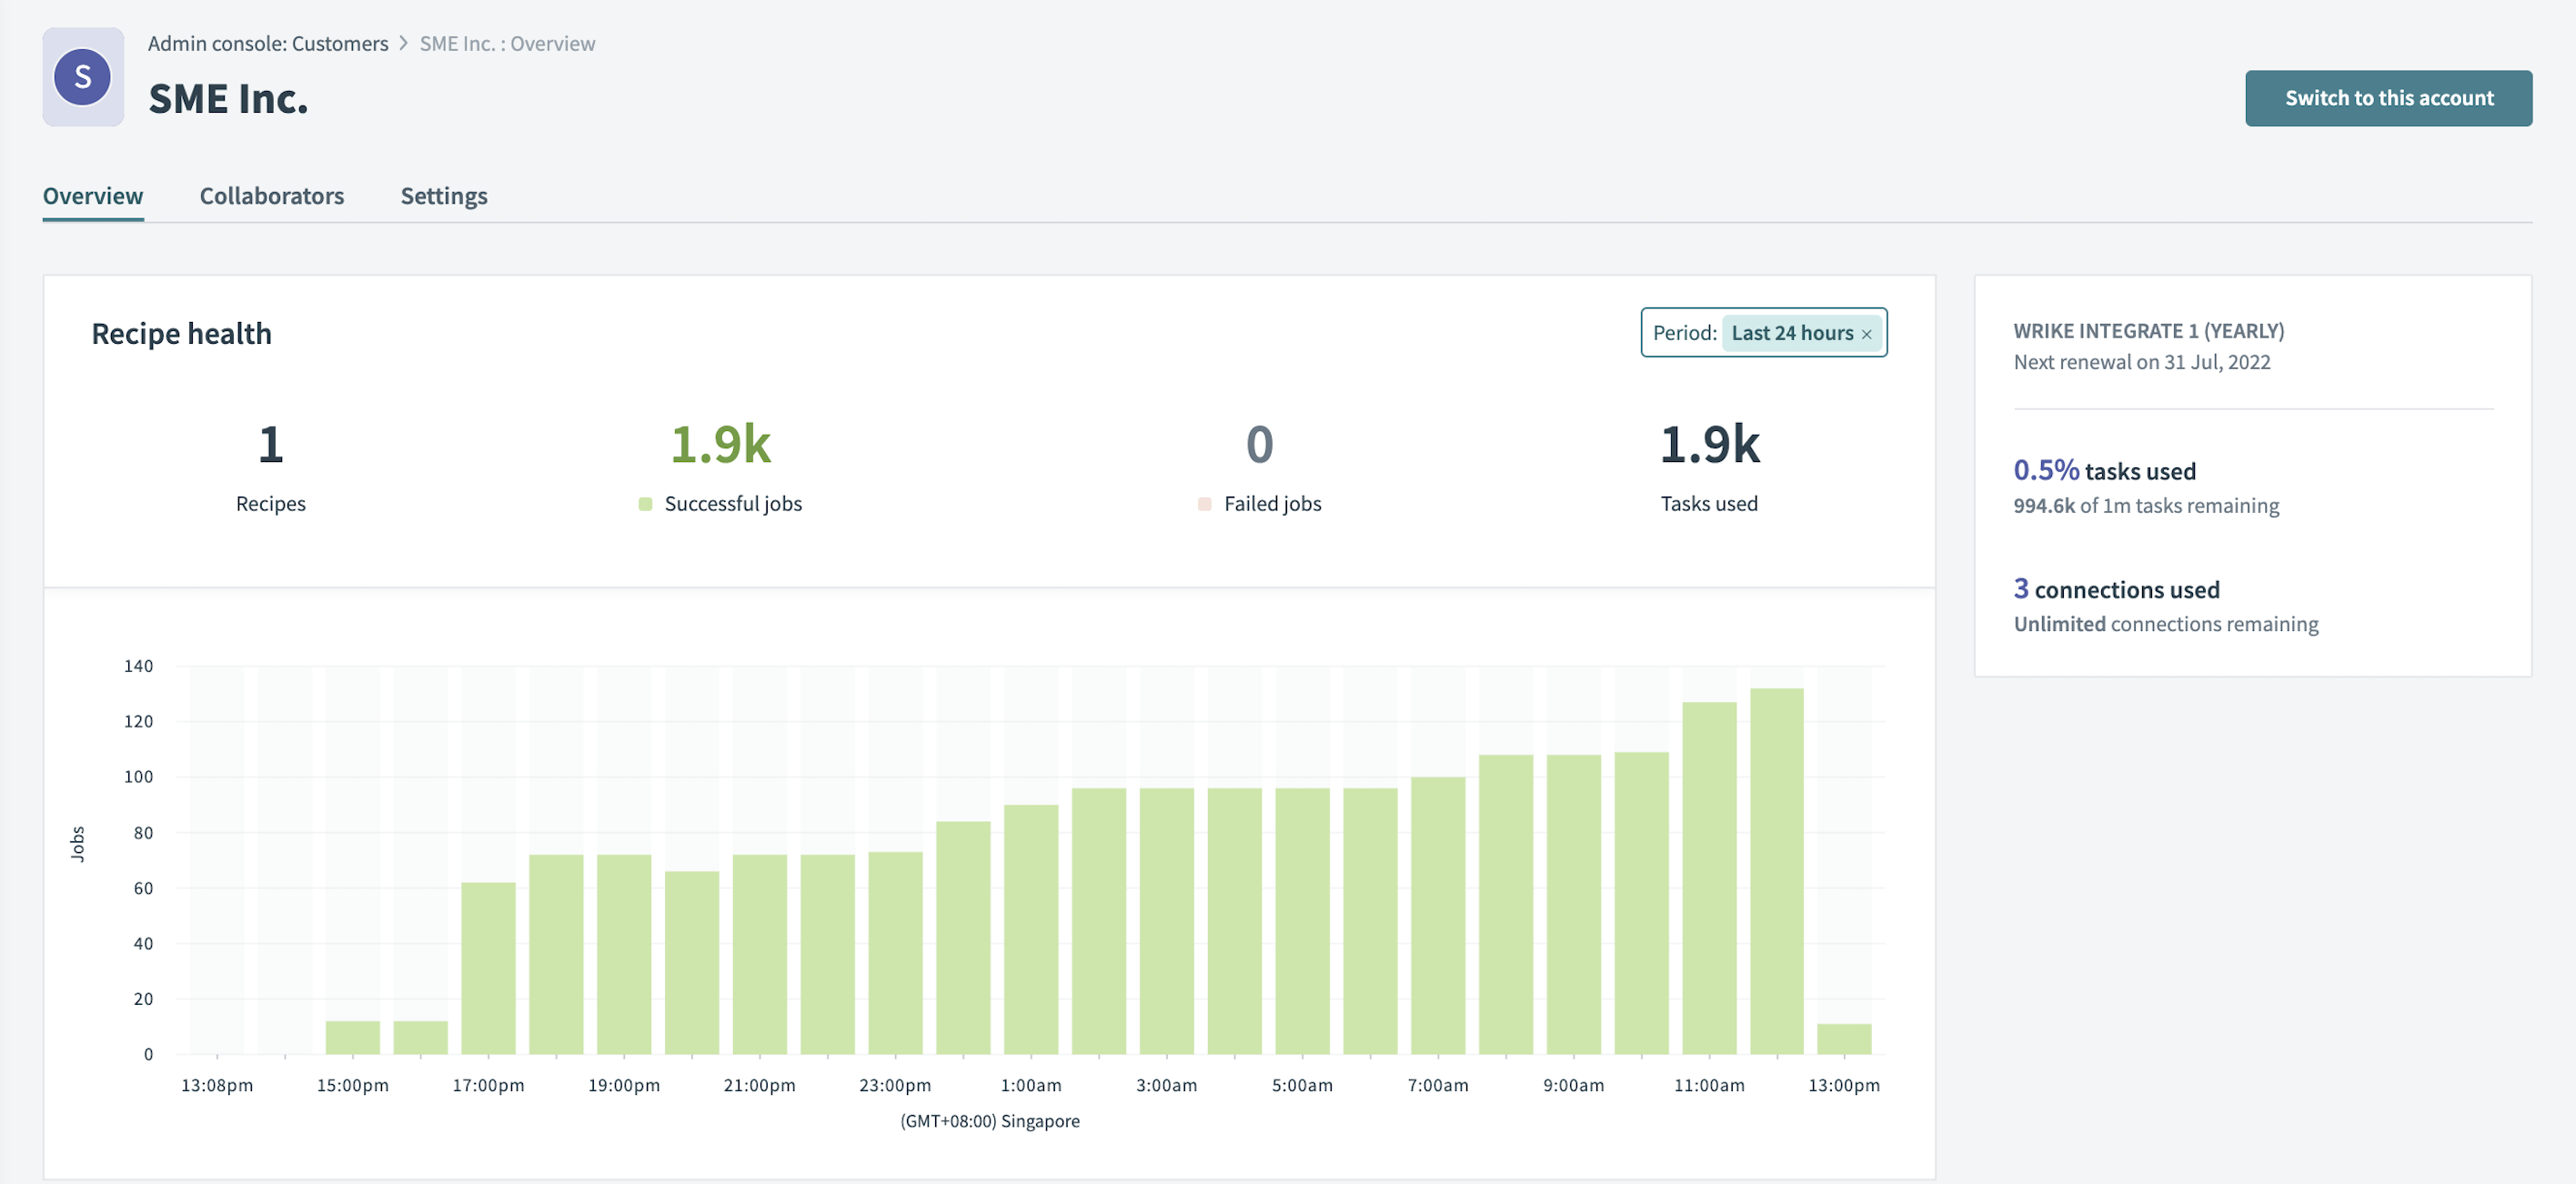
Individual customer information pages are available when you click a customer in the table. This page lets admins view the customer's dashboard and customer team collaborators. You can also change customer workspace settings.
Customer dashboard
The dashboard displays the number of active recipes running and the success/error rates across the recipes. You can filter the recipes by time period.
 Customer information page
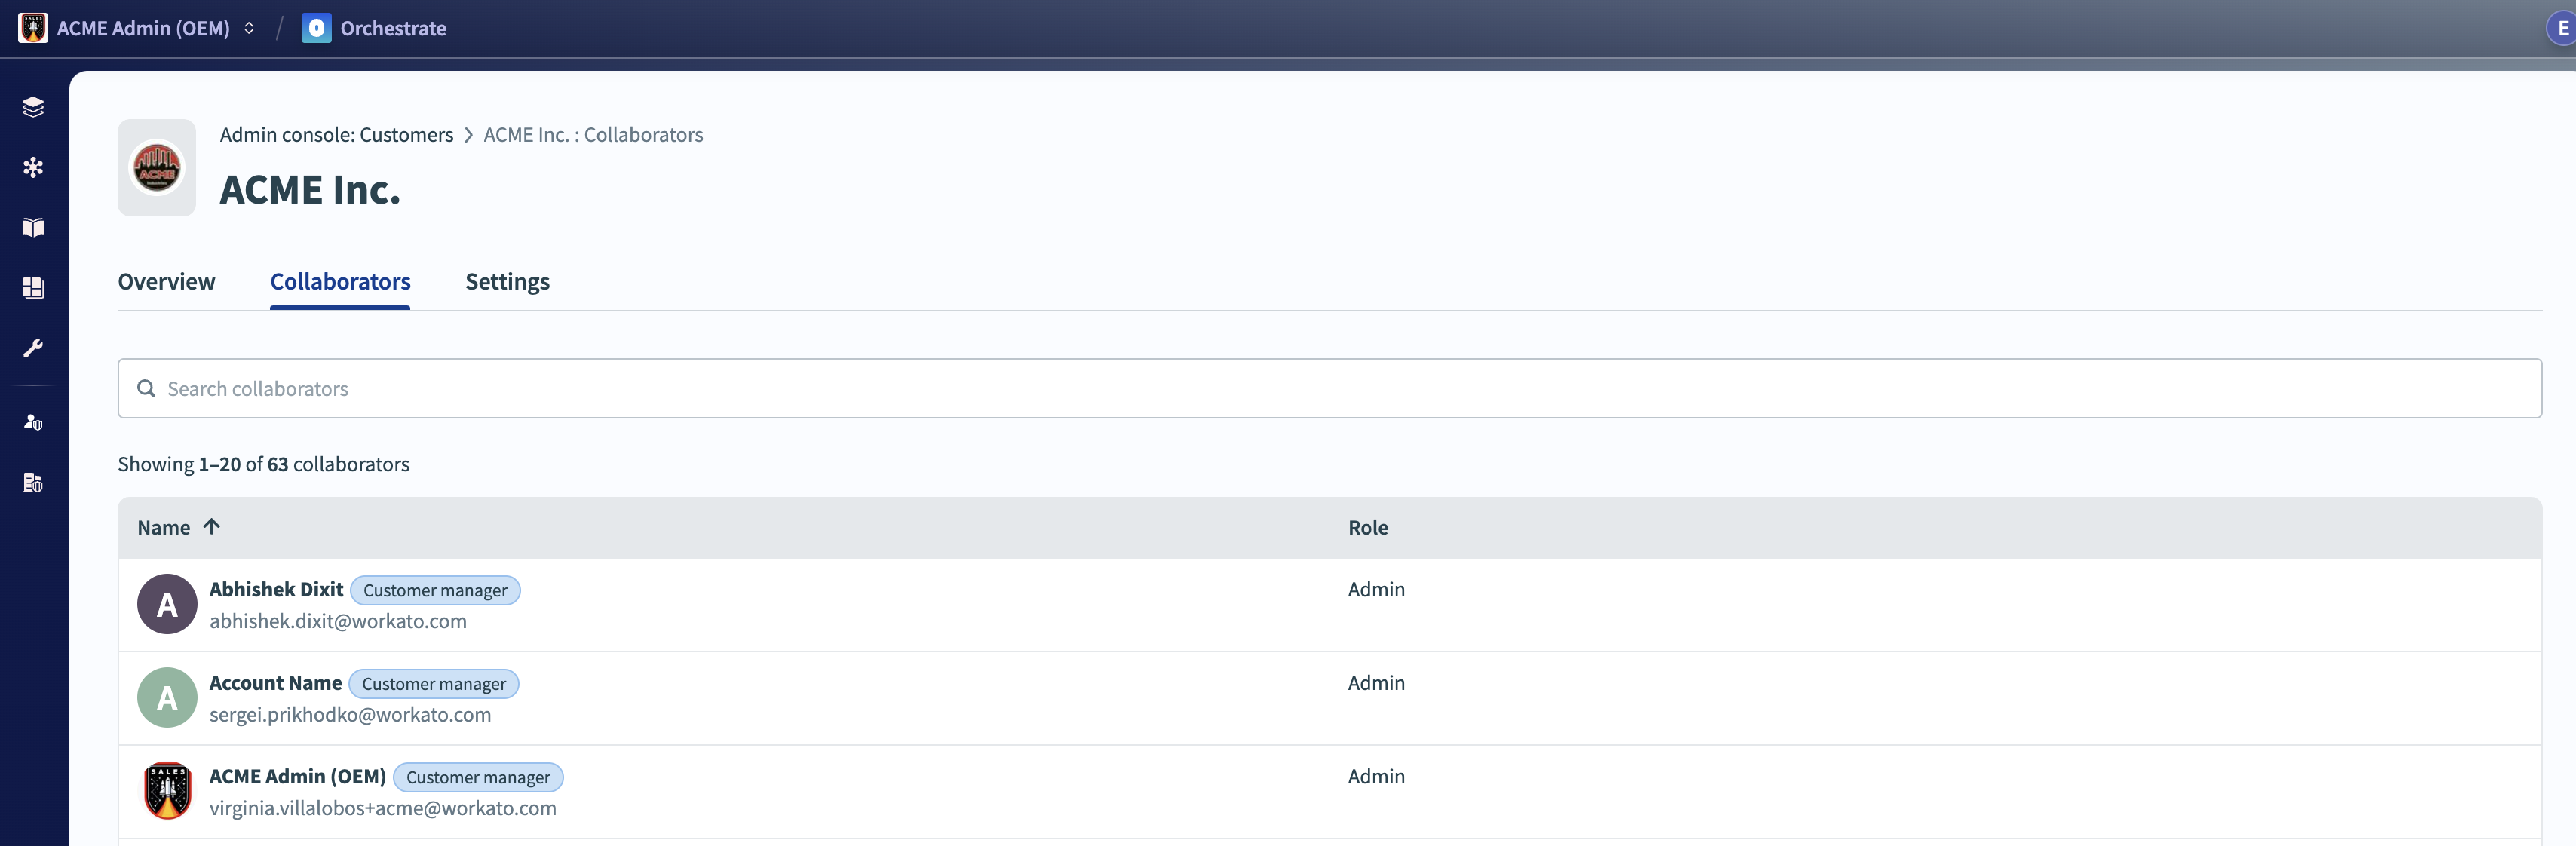
Collaborators
The Collaborators tab displays the team members in the account, including their names, emails, and roles. A unique tag identifies Customer managers.
 Customer team collaborators
Switching to customer workspaces
To access a customer's account, customer managers and collaborators of the customer's workspace can select the Switch to this account button on the top right of the page.
If additional team members require access to the workspace, you can manually add them to the team while in the customer workspace.
Settings
The Settings tab controls the configuration for the customer's account, including:
- Plan
- App access
- External ID
iframeorigin URL (for Embedded/Embedded connection widget only)- Account deletion
Updating customer name
To update a customer's name, navigate to the Customer's workspace to edit the workspace name. Learn more about how to update a customer name.
Plan
Complete the following steps to change a customer's plan or trial status:
Go to Manage customers.
Select the customer you plan to update.
Go to Settings > Plan.
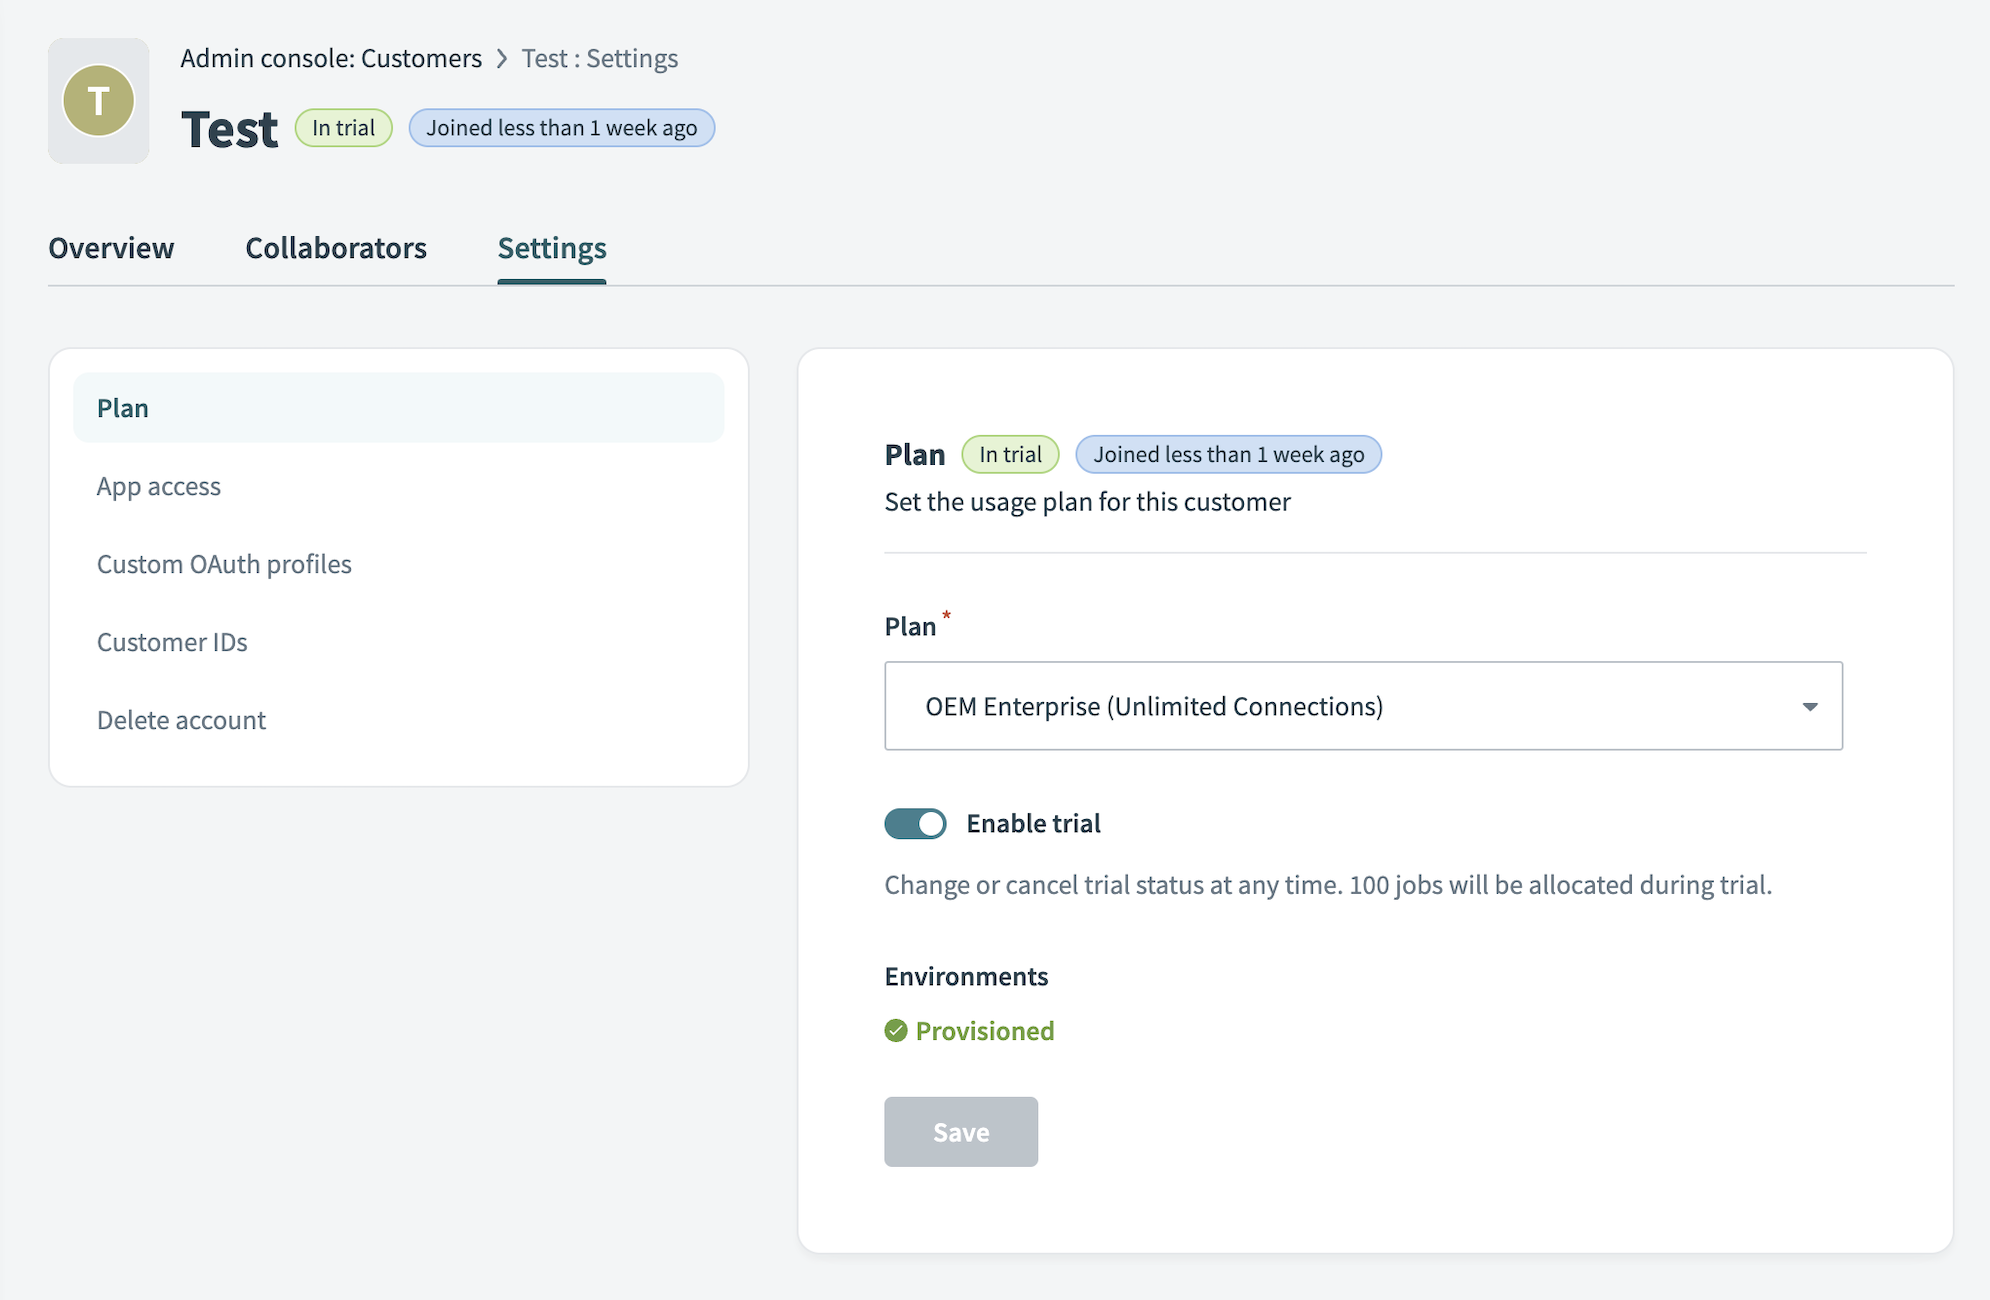 The Customer > Settings > Plan tab
Configure plan settings for the workspace:
Use the Plan drop-down menu to select an existing plan. Contact your Customer Success Manager to add or remove plans.
Click the Enable trial toggle to put a new customer workspace on a temporary plan with 100 jobs allocated. You can only enable trial plans for workspaces that are less than 5 days old. If enabled, trial plans automatically expire 30 days after the workspace is created. When a trial plan expires, the workspace returns to the plan assigned during setup.
App access
Customers you create can access all available apps by default. You can select the apps a customer can access in the App access tab.
Customers can only discover and connect to the apps you selected. This also applies to apps in the Community Library.
Complete the following steps to modify the list of available apps for a customer:
Open the customer's Settings > App access tab in your partner account.
Click the Edit button in the App access tab.
Select the apps you plan to allow the customer to access.
Click Apply changes.
Adding apps
You must manually add new apps to the accessible apps list to grant the customer access after selecting apps.
External ID
The external ID is a customer ID assigned to the customer by the Embedded partner. This ID usually corresponds to a customer ID within your CRM. You can change the value anytime, but doing so affects any APIs using the external ID as an input.
Additionally, Workato assigns each customer a unique customer workspace ID. This ID appears in the URL of the Customer Information page:
https://app.workato.com/admin_console/customers/4676/dashboard
In this example, the customer workspace ID is 4676.
iframe origin URL
Feature availability
The iframe origin URL setting is available only for customers using Embedded.
Entering a URL into the iframe origin URL field appends the value set in the Embedded partner admin account.
Consider a situation where an Embedded partner workspace has an origin URL of https://company.com. If you don't configure an origin URL in the customer workspace, the customer inherits the origin from the partner account.
If the customer has a unique domain they log in with, for example, https://customer.company.com, you can use the iframe origin URL setting to define and apply this only to that specific customer.
If your application supports multiple custom domains or workspaces, this setting enables those features.
Multiple origins per customer
In addition to setting customer-specific origin URLs, you can define multiple origins per customer.
In the iframe origin URL field, enter a list of URLs separated by commas. For example:
https://na1.company.com,https://eu1.company.com,https://na2.company.comWhen defined, the origins should be provided as origin after generating the JWT. After the user signs in using the JWT, the provided origin is saved into the session object and used for the session's lifetime until the user signs out. For more info about JWT direct linking, refer to this guide.
Delete account
The Embedded partner may delete a customer at any time. Deleting a customer is permanent and removes all data and recipes associated with the account. You cannot recover deleted customers.
Update customer name
To update a customer name, you must first switch to the customer workspace.
Required privileges
Only customer managers with Collaborator privileges are allowed to update the customer name.
Select the customer to update from the Customer table > Click on Switch to this account located on the top right.
Switch to customer workspace button
Log in to the customer workspace and navigate to Workspace admin on the left side navigation bar.
In the Settings tab, you will be able to update the Team name.
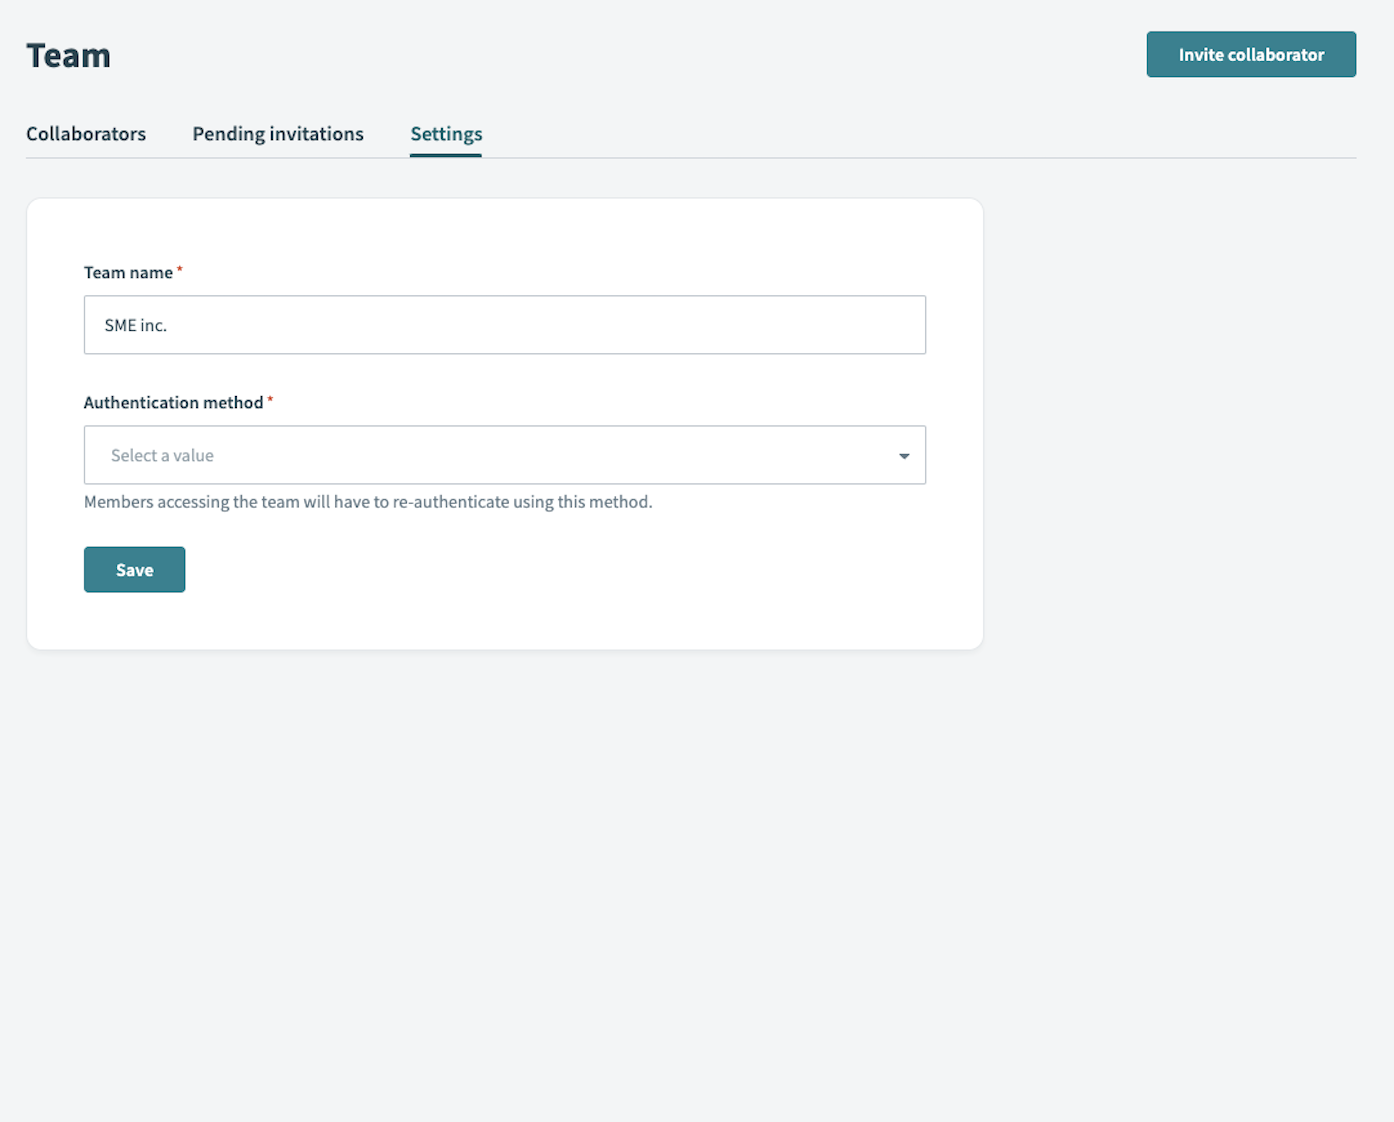 Settings - Update customer name
Customer management APIs
Refer to Customer management APIs for a complete list of functions available in a customer workspace.
Last updated: