Enable Single Sign-On for a Workato workspace
Workato supports authentication using SAML-based Single Sign-On (SSO), allowing you to provide authorized access to Workato for multiple workspace members.
You can use just-in-time (JIT) provisioning to eliminate pre-provisioning Workato accounts.
ENFORCE SAML AUTHENTICATION
You can enforce SAML SSO for your workspace. When you do so, all workspace members (except for the workspace account owner) must authenticate through your identity provider. They cannot access the workspace and its resources by logging in with a Workato username and password.
Note that the account owner of the workspace cannot use SAML-based SSO to authenticate with the workspace. They must sign in with their username and password instead.
VIRTUAL PRIVATE WORKATO (VPW) CUSTOMERS
This feature requires configuration steps that are specific to your Virtual Private Workato (VPW) instance. If you are a VPW customer, refer to your VPW private documentation for the configuration details for your instances.
Prerequisites
You must have the following information to configure SSO for Workato:
SAML SSO privileges in Workato.
Knowledge of which Workato data center supports your account. The values for some configuration settings vary depending on your account's data center.
Refer to the following data center URLs for configuring a SAML app:
- US Data Center (USDC):
https://www.workato.com - European Union Data Center (EUDC):
https://app.eu.workato.com - Japan Data Center (JPDC):
https://app.jp.workato.com - Singapore Data Center (SGDC):
https://app.sg.workato.com - Australia Data Center (AUDC):
https://app.au.workato.com - Israel Data Center (ILDC):
https://app.il.workato.com - China Data Center (CNDC):
https://app.workatoapp.cn - South Korea Data Center (KRDC):
https://app.kr.workato.com - Developer trials:
https://app.trial.workato.com
- US Data Center (USDC):
Privileges in your SAML provider that enable you to complete the following actions:
- Create and modify SAML applications.
- Assign applications to users.
Step 1: Create a Workato SAML application
You must create a SAML application for dedicated Workato use in your SAML provider to enable SSO for Workato.
Locate the instructions for your SAML provider to get started:
KNOW YOUR WORKATO DATA CENTER?
Verify which data center your Workato account is in before proceeding.
Make sure to use the SSO URLs for your data center when setting up your SAML application.
Google Workspace
FEATURE AVAILABILITY
Google Workspace isn't available as an IdP for workspaces in the China data center. This reflects local regulatory requirements and applies to our multi-tenant and Virtual Private Workato (VPW) offerings.
VIEW GOOGLE WORKSPACE INSTRUCTIONS
Refer to the Google Workspace Admin documentation for more details.
In Workato
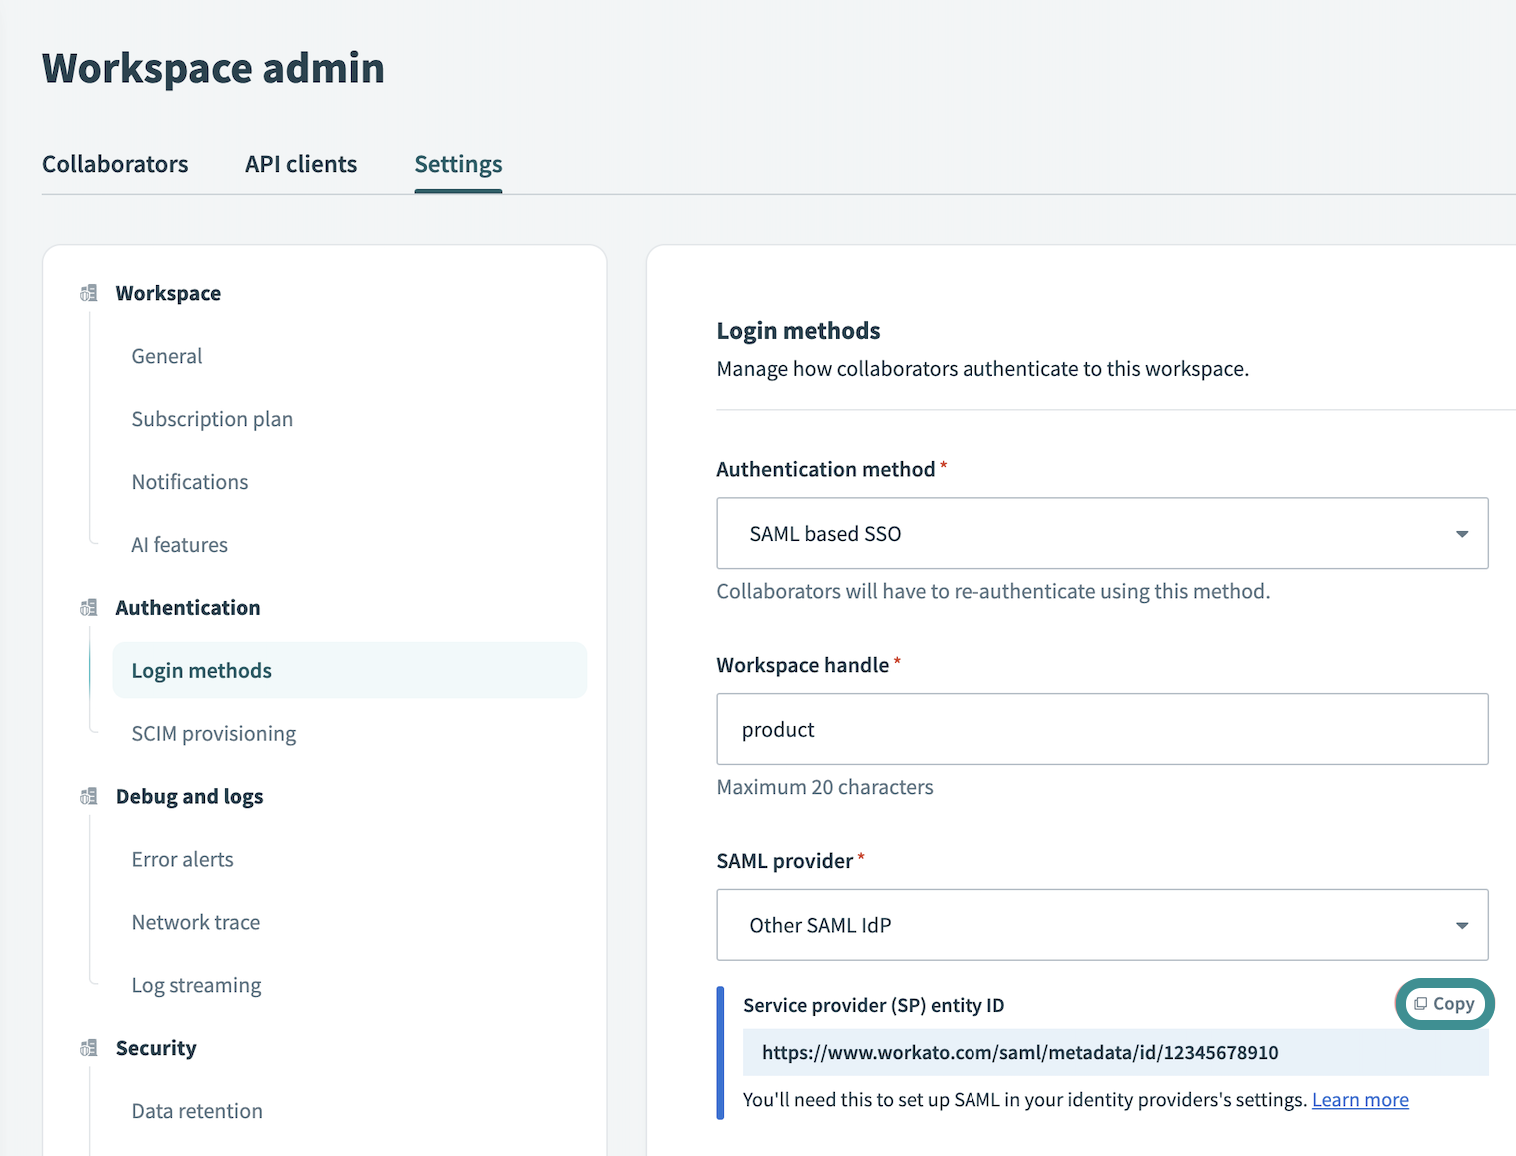
Go to Workspace admin > Settings > Login methods.
Use the Authentication method drop-down menu to select SAML based SSO.
Provide a Workspace handle for the workspace. The maximum length is 20 characters. Workato converts any uppercase letters you enter in this field to lowercase.
Use the SAML provider drop-down menu to select Other SAML IdP.
Copy the Service provider (SP) entity ID.
 Retrieve entity ID
In your Google Admin console
Go to Apps > Web and mobile apps.
Click Add App > Add custom SAML app.
Go to the Service Provider Details section and provide the following configuration information:
- ACS URL
- Use the URL for your Workato data center:
- US data center:
https://www.workato.com/saml/consume- EU data center:
https://app.eu.workato.com/saml/consume- JP data center:
https://app.jp.workato.com/saml/consume- SG data center:
https://app.sg.workato.com/saml/consume- AU data center:
https://app.au.workato.com/saml/consume- IL data center:
https://app.il.workato.com/saml/consume- Developer sandbox:
https://app.trial.workato.com/saml/consume
- Entity ID
- Enter the Service provider (SP) entity ID obtained from Workato.
- Start URL
- Optional. This sets the RelayState parameter in a SAML request, which can be a URL to redirect users to after authentication. We recommend leaving this field empty, or providing the final destination to which you plan to direct users.
Finish configuring the app and defining settings as needed.
Complete the set up in Workato.
Microsoft Entra ID
VIEW MICROSOFT ENTRA ID INSTRUCTIONS
Follow the Microsoft documentation for a complete step-by-step guide on configuring SAML-based SSO in Microsoft Entra ID.
In your Workato account
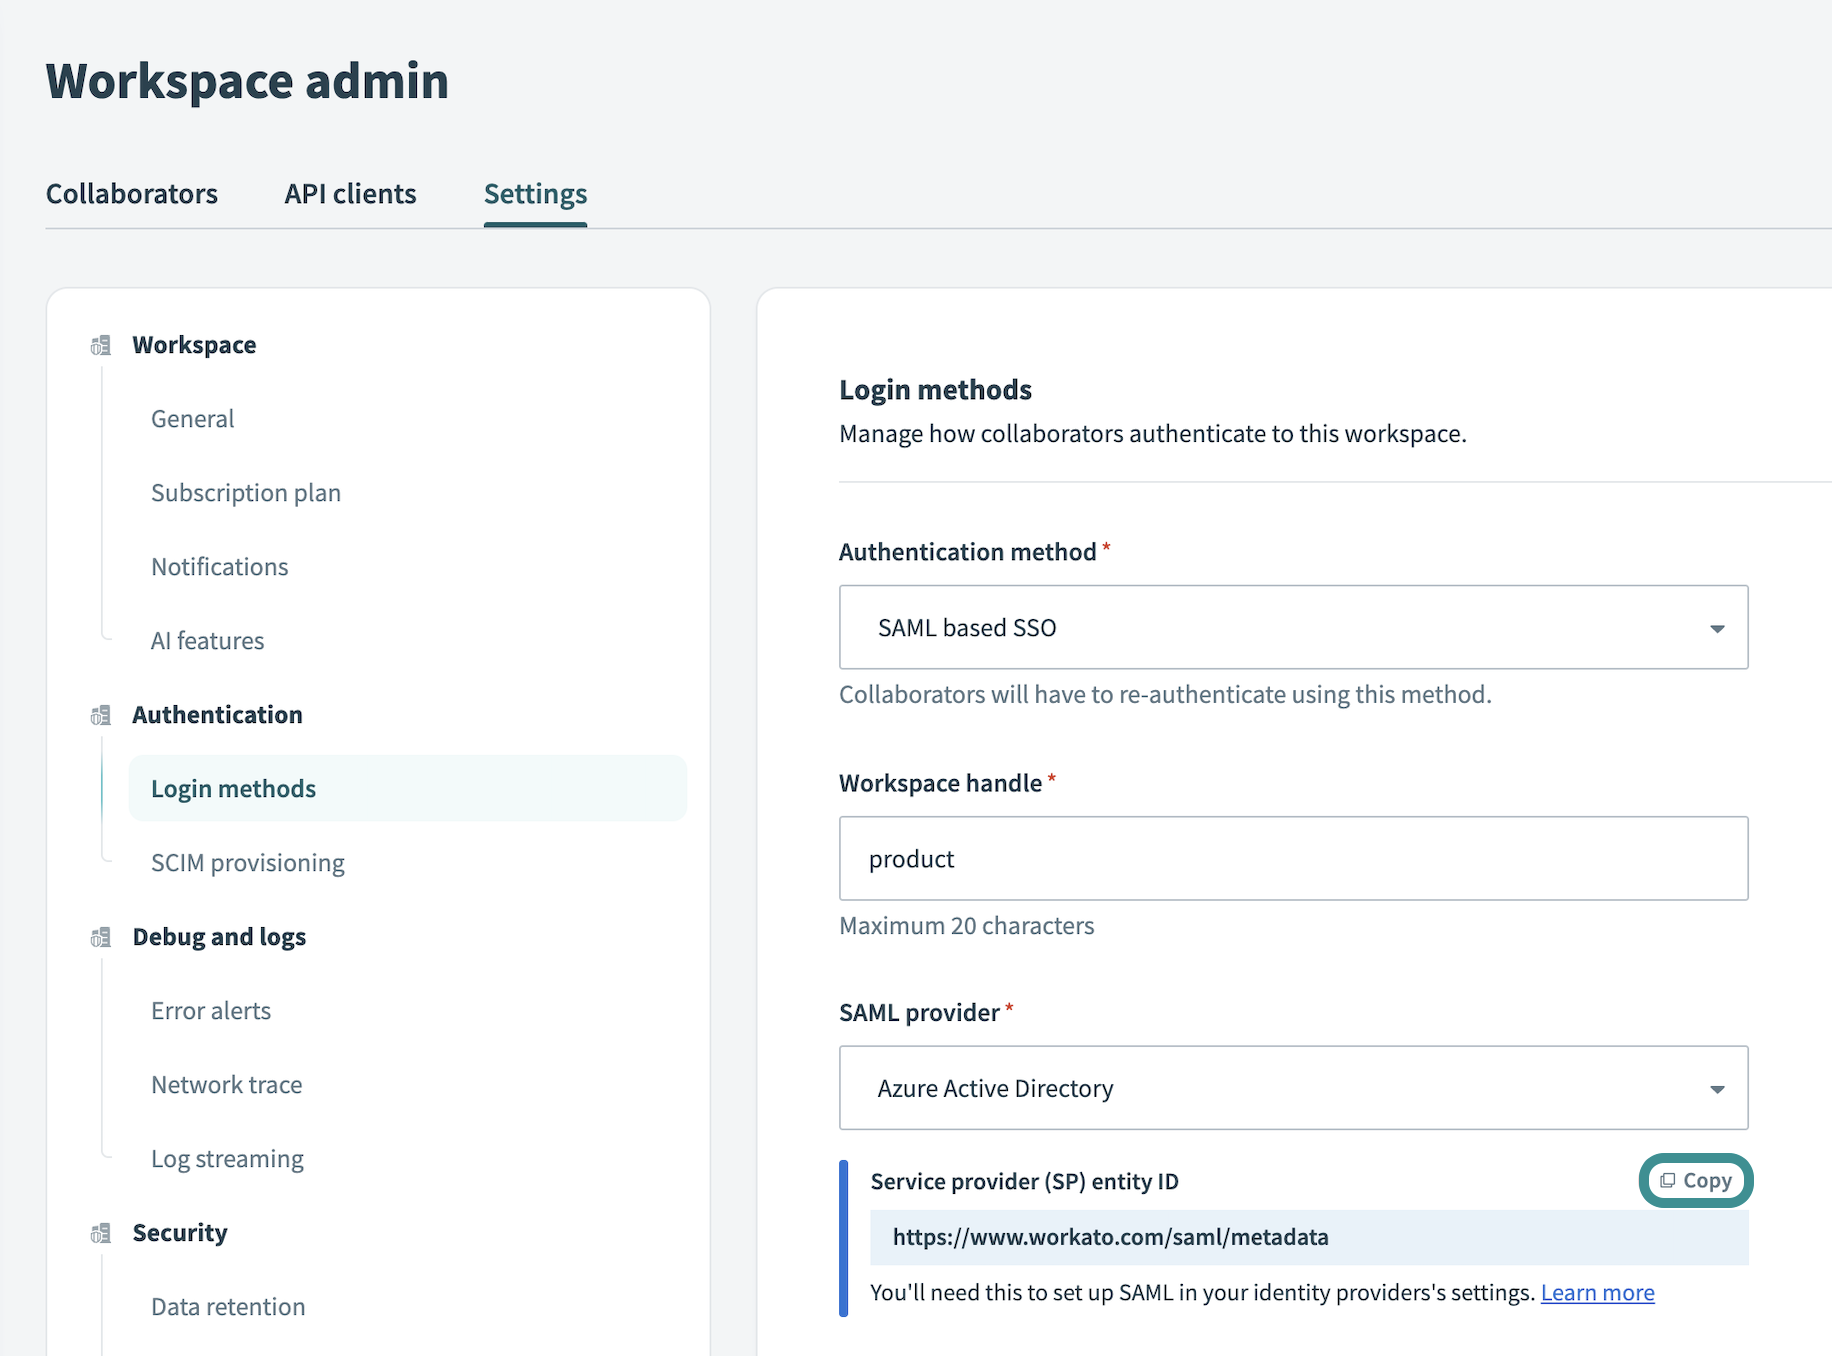
Go to Workspace admin > Settings > Login methods.
Select SAML based SSO in the Authentication method menu.
Fill in the Workspace handle field. The maximum length is 20 characters. Workato converts any uppercase letters you enter in this field to lowercase.
Select Microsoft Entra ID in the SAML provider menu.
Copy the Service provider (SP) entity ID:
 Retrieve entity ID
In your Azure portal
Create a Non-gallery application to connect Microsoft Entra ID SSO to Workato:
- Select Microsoft Entra ID > Enterprise applications.
- Create a New application and choose Non-gallery application.
Refer to the Azure documentation for more details.
Go to the new application's Single sign-on tab and select SAML.
Fill in the configuration details as follows:
Identifier (Entity ID)
Enter the Service provider (SP) entity ID obtained from Workato.
Reply URL (Assertion Consumer Service URL)
Use the URL for your Workato data center:
US Data center:
https://www.workato.com/saml/consumeEU Data center:
https://app.eu.workato.com/saml/consumeJP Data center:
https://app.jp.workato.com/saml/consumeSG Data center:
https://app.sg.workato.com/saml/consumeAU Data center:
https://app.au.workato.com/saml/consumeIL Data center:
https://app.il.workato.com/saml/consumeCN Data center:
https://app.workatoapp.cn/saml/consumeDeveloper sandbox:
https://app.trial.workato.com/saml/consume
Sign on URL
Locate your Workspace handle in Workato. Then, configure the URL for the data center you use. Replace
{WORKSPACE_HANDLE}in the following URL with your actual workspace handle:US Data center:
https://www.workato.com/saml/init?team_handle={WORKSPACE_HANDLE}EU Data center:
https://app.eu.workato.com/saml/init?team_handle={WORKSPACE_HANDLE}JP Data center:
https://app.jp.workato.com/saml/init?team_handle={WORKSPACE_HANDLE}SG Data center:
https://app.sg.workato.com/saml/init?team_handle={WORKSPACE_HANDLE}AU Data center:
https://app.au.workato.com/saml/init?team_handle={WORKSPACE_HANDLE}IL Data center:
https://app.il.workato.com/saml/init?team_handle={WORKSPACE_HANDLE}CN Data center:
https://app.workatoapp.cn/saml/init?team_handle={WORKSPACE_HANDLE}Developer sandbox:
https://app.trial.workato.com/saml/init?team_handle={WORKSPACE_HANDLE}
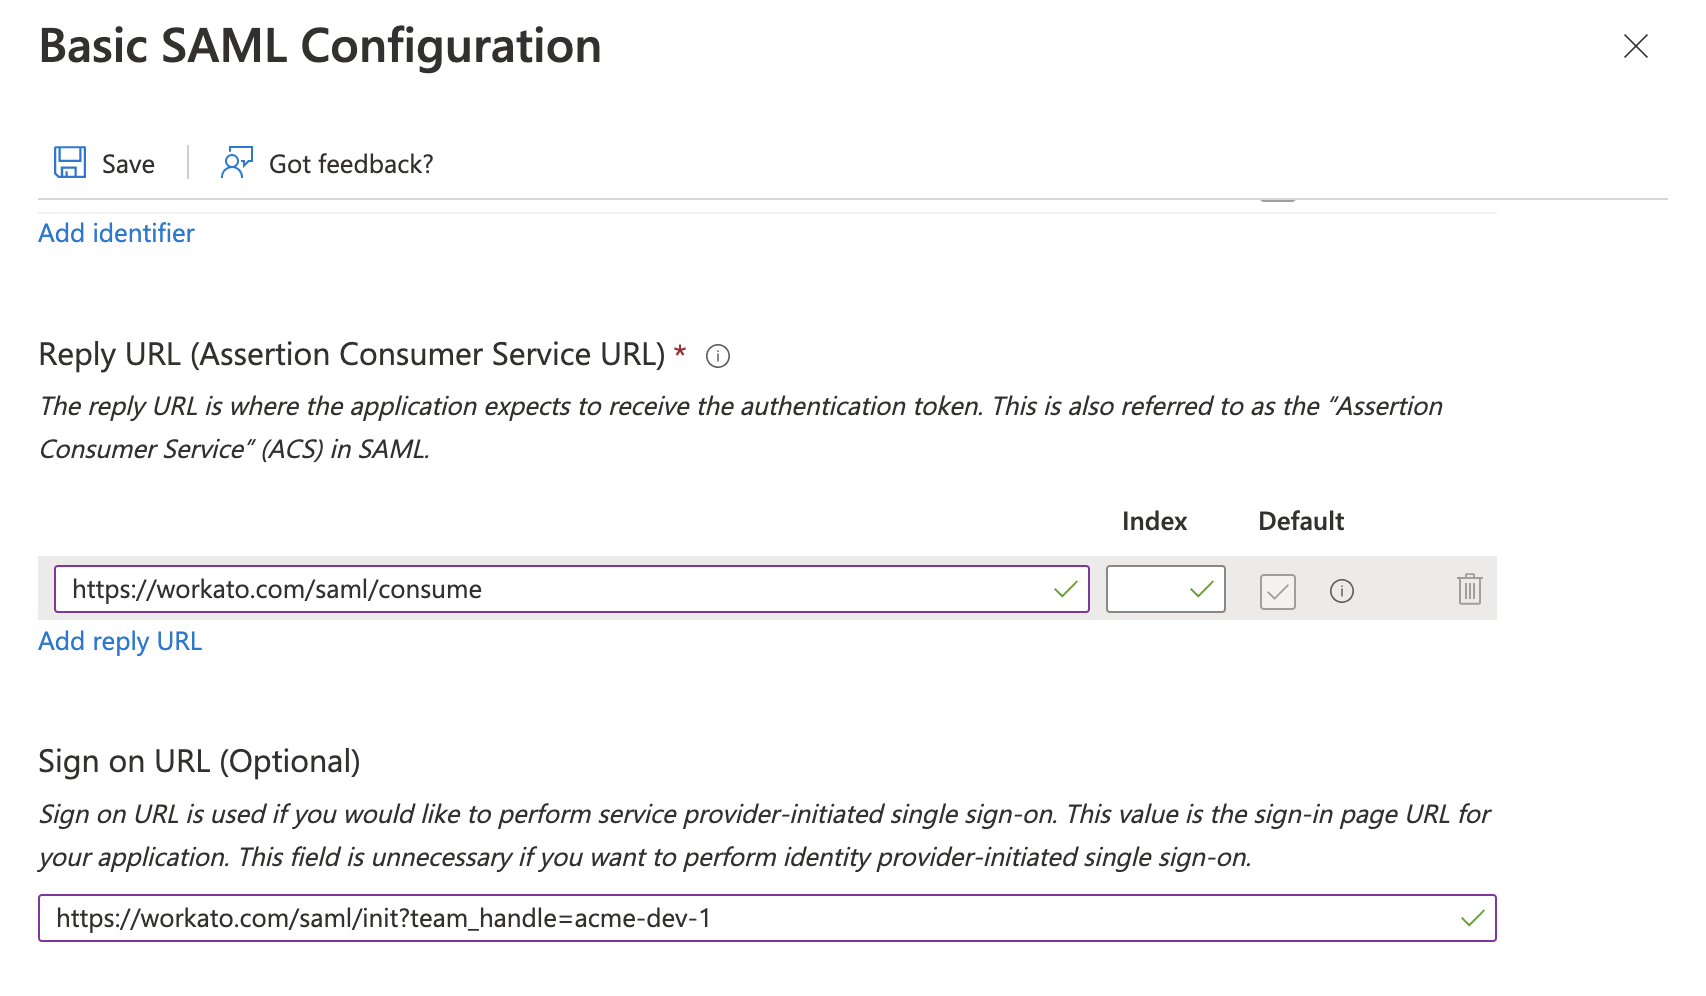 Azure SAML Configuration
Click Save.
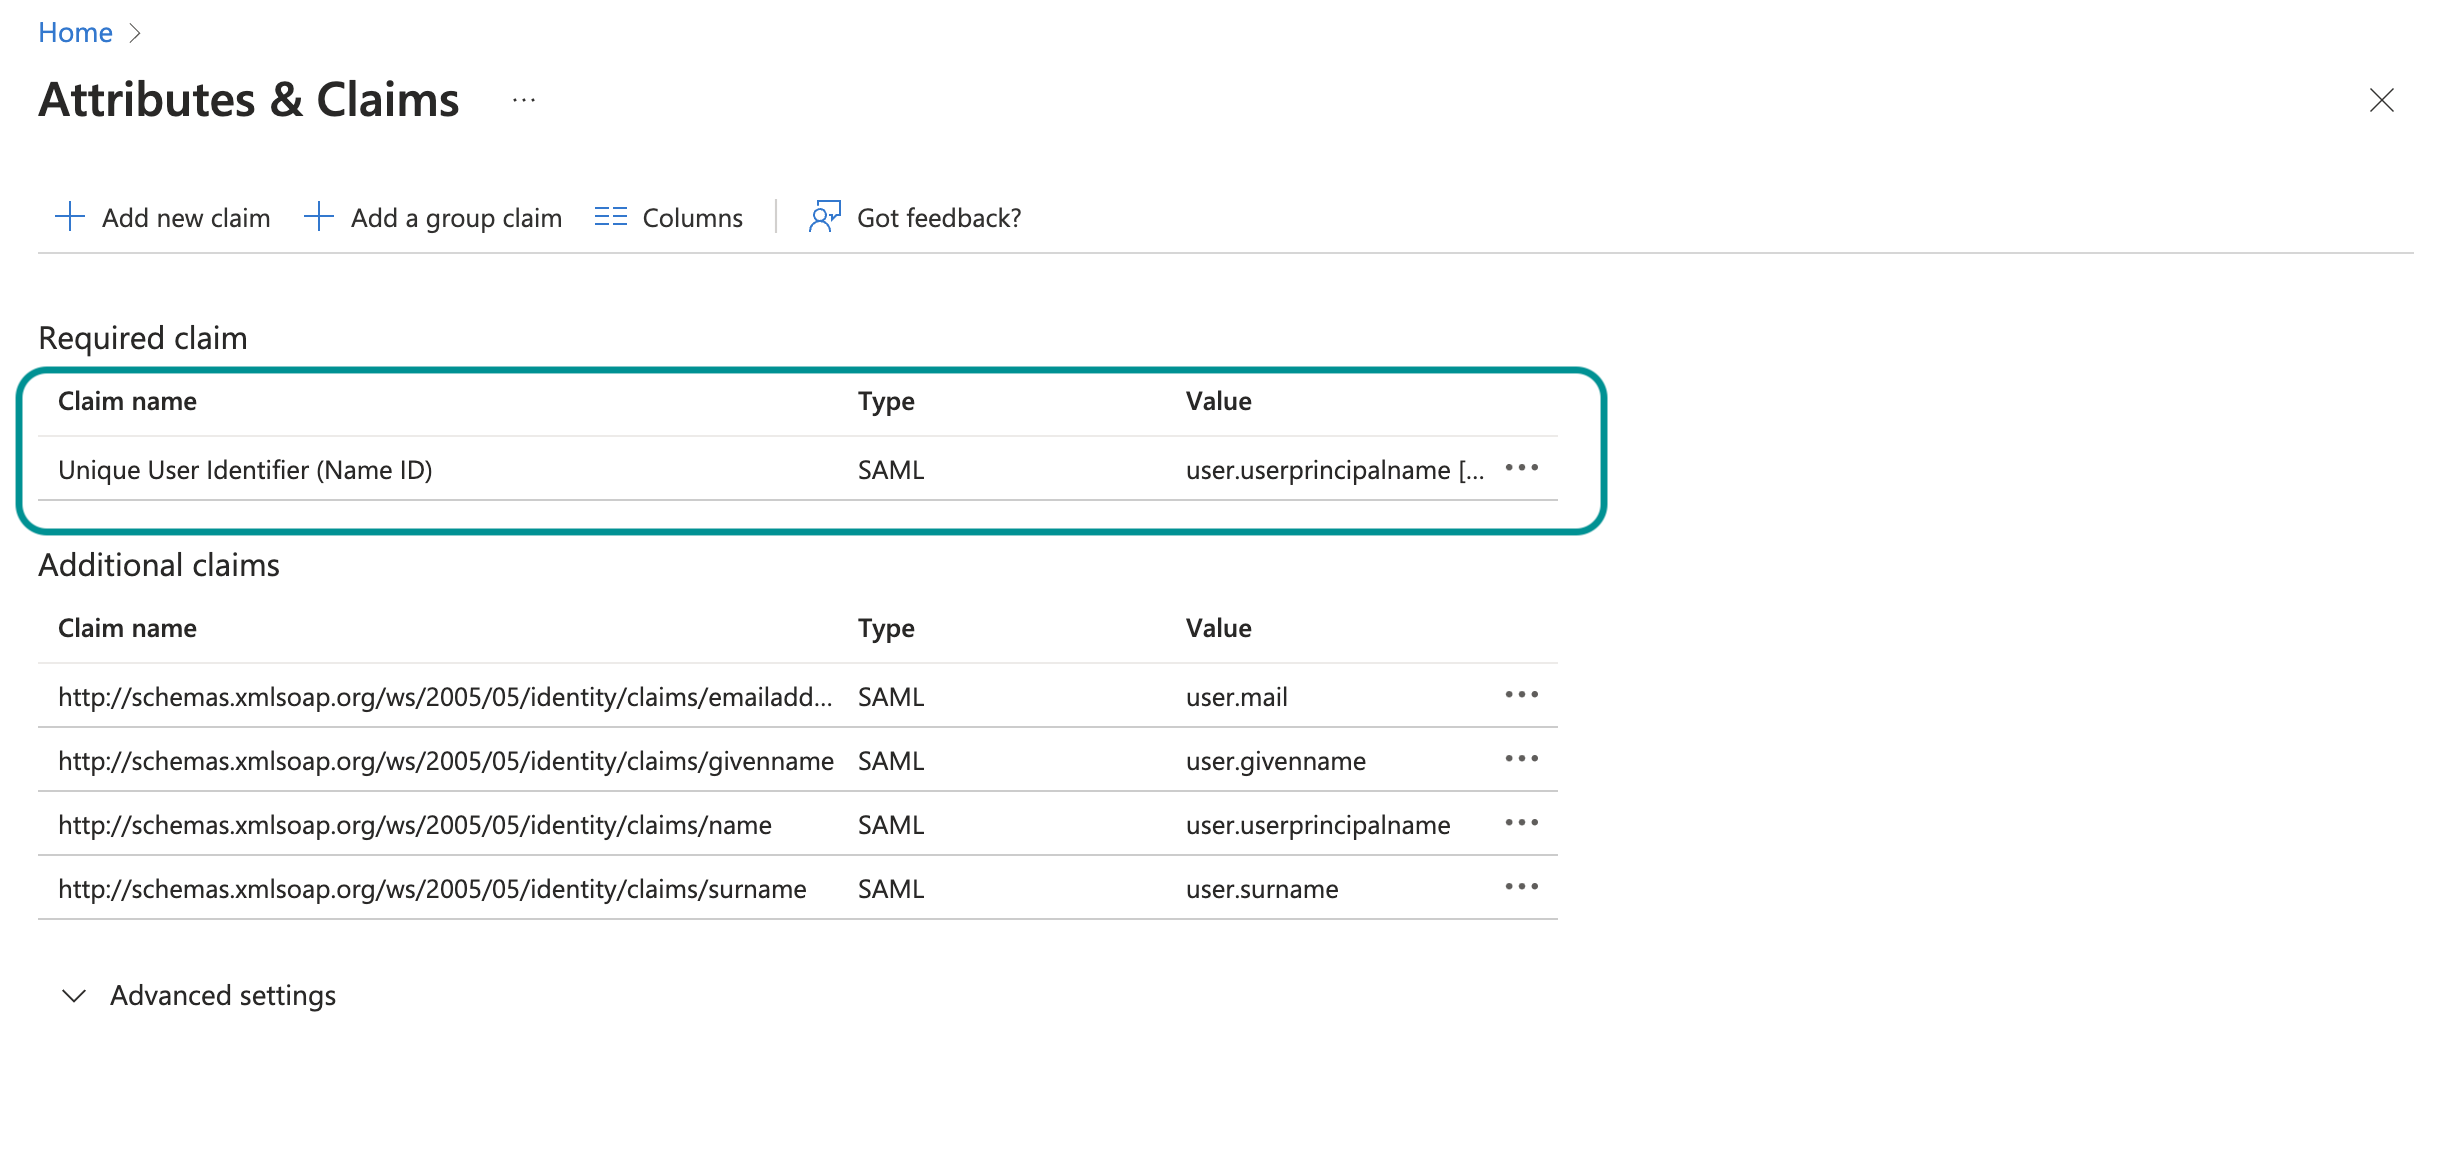
You must configure the Attributes & Claims section to ensure email addresses are transformed to lowercase after saving the SAML configuration. This prevents case-sensitive login issues. Complete the following steps to configure Attributes & Claims:
Go to the Attributes & Claims section.
Click Edit.
Click Unique User Identifier (Name ID) to open and edit the required claim.
 Edit required claim
Set the Source to Transformation on the Manage claim page.
 Set the source
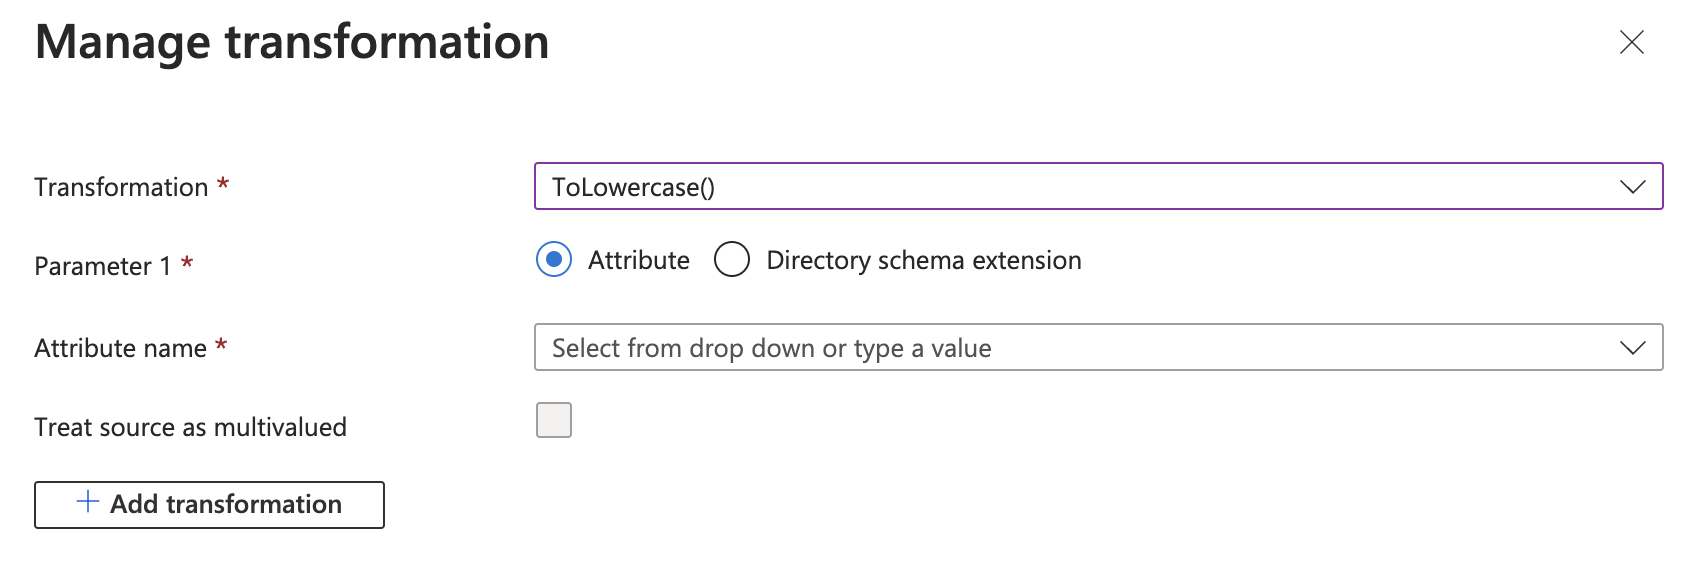
Choose ToLowercase() from the Transformation drop-down menu on the Manage transformation page.
 Select your transformation
Select Attribute as the parameter.
Enter user.mail in the Attribute name field.
Click Add to add the transformation.
Click Save to complete the configuration.
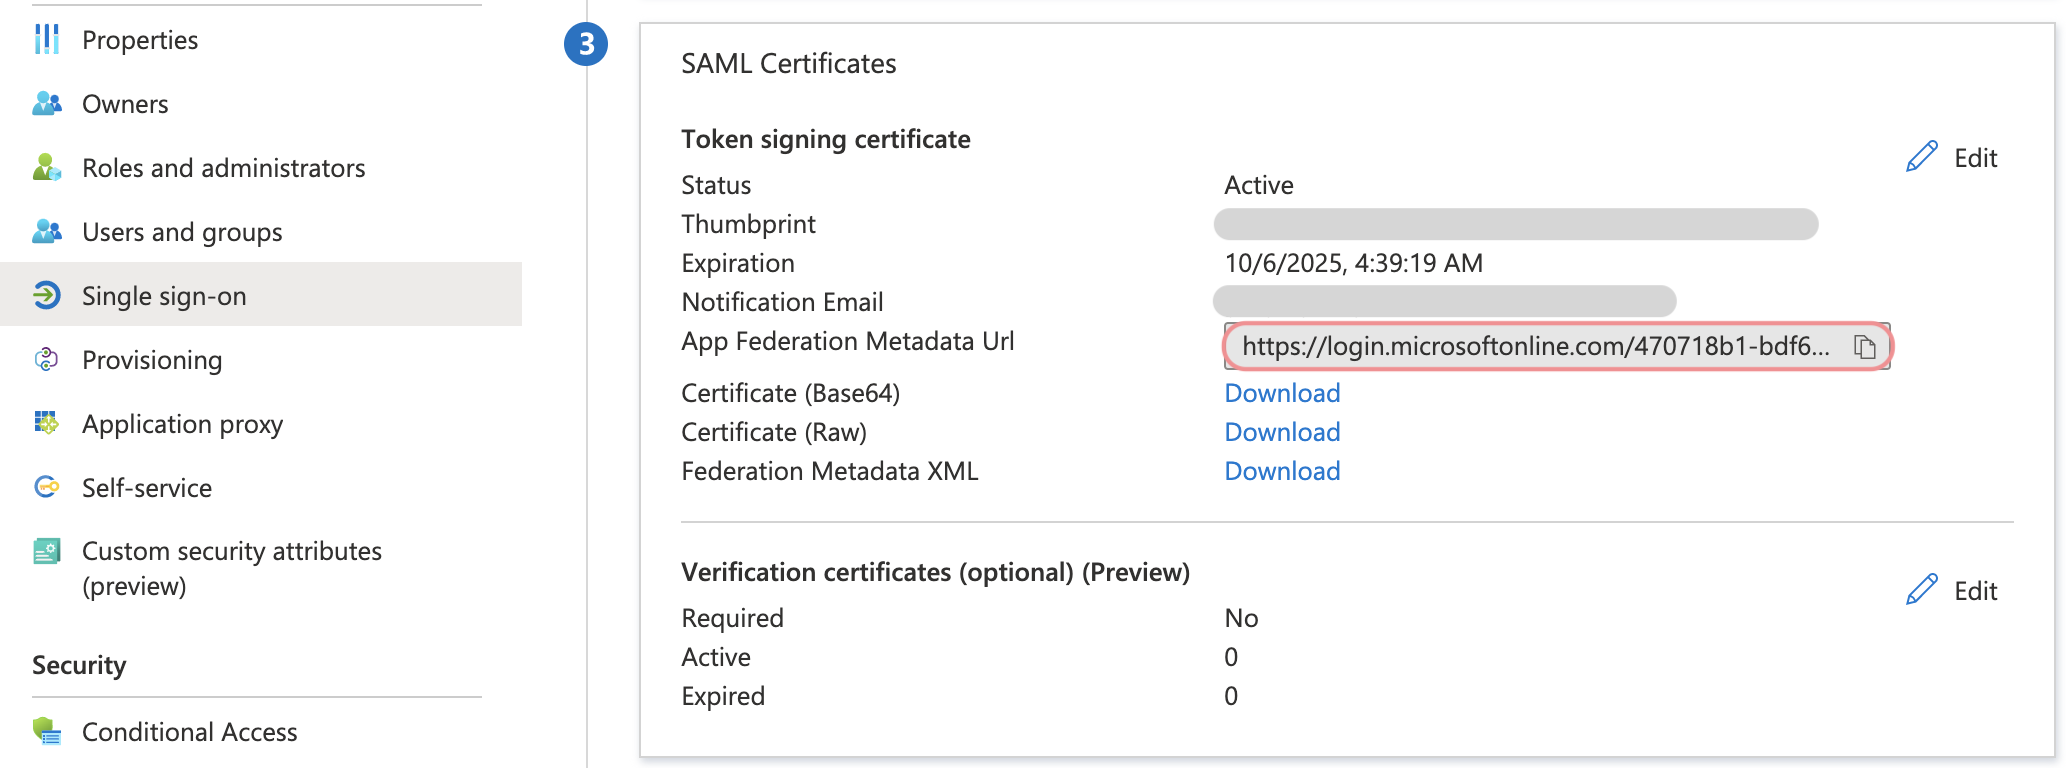
Next, obtain your Azure AD Metadata URL. This is required to complete the SSO setup in Workato.
Go to the Single sign-on tab and locate the SAML Certificate details.
Copy the App Federation Metadata URL.
 Microsoft Entra ID metadata URL
After you've finished the preceding steps, proceed to the next step to complete the setup.
CyberArk Identity
VIEW CYBERARK IDENTITY INSTRUCTIONS
In CyberArk Identity
Sign in to your CyberArk Identity admin console.
Go to the Apps & Widgets sidebar and select Add custom SAML app.
Name the application Workato.
Click Trust to configure SAML Settings.
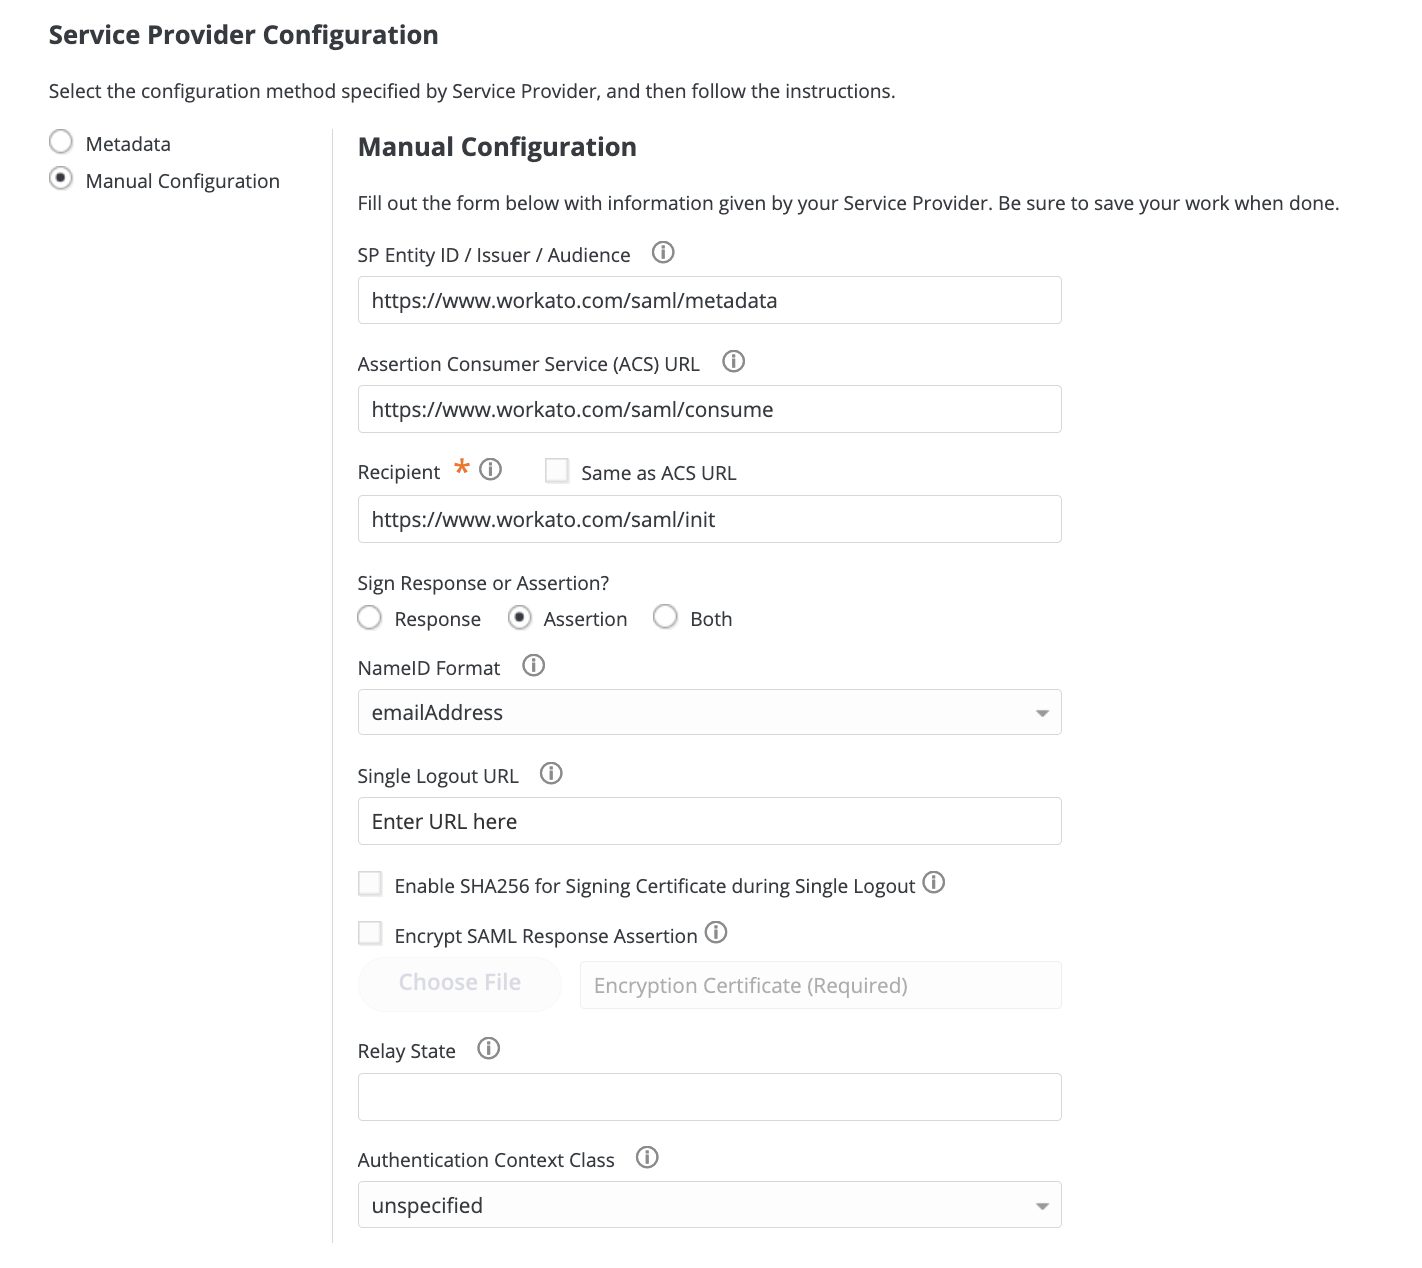
Go to the Service Provider Configuration section and select Manual Configuration.
Provide the SAML settings as follows:
- Audience
- Use the URL for your Workato data center:
- US data center:
https://www.workato.com/saml/metadata- EU data center:
https://app.eu.workato.com/saml/metadata- JP data center:
https://app.jp.workato.com/saml/metadata- SG data center:
https://app.sg.workato.com/saml/metadata- AU data center:
https://app.au.workato.com/saml/metadata- IL data center:
https://app.il.workato.com/saml/metadata- CN data center:
https://app.workatoapp.cn/saml/metadata- Developer sandbox:
https://app.trial.workato.com/saml/metadata
- Recipient
- Use the URL for your Workato data center:
- US data center:
https://www.workato.com/saml/consume- EU data center:
https://app.eu.workato.com/saml/consume- JP data center:
https://app.jp.workato.com/saml/consume- SG data center:
https://app.sg.workato.com/saml/consume- AU data center:
https://app.au.workato.com/saml/consume- IL data center:
https://app.il.workato.com/saml/consume- CN data center:
https://app.workatoapp.cn/saml/consume- Developer sandbox:
https://app.trial.workato.com/saml/consume
- ACS (Consumer) URL Validator
- Use the URL for your Workato data center:
- US data center:
^https:\/\/www.workato.com\/saml\/*$- EU data center:
^https:\/\/app.eu.workato.com\/saml\/*$- JP data center:
^https:\/\/app.jp.workato.com\/saml\/*$- SG data center:
^https:\/\/app.sg.workato.com\/saml\/*$- AU data center:
^https:\/\/app.au.workato.com\/saml\/*$- IL data center:
^https:\/\/app.il.workato.com\/saml\/*$- CN data center:
^https:\/\/app.workatoapp.cn\/saml\/*$- Developer sandbox:
^https:\/\/app.trial.workato.com\/saml\/*$
- ACS (Consumer) URL
- Use the URL for your Workato data center:
- US data center:
https://www.workato.com/saml/consume- EU data center:
https://app.eu.workato.com/saml/consume- JP data center:
https://app.jp.workato.com/saml/consume- SG data center:
https://app.sg.workato.com/saml/consume- AU data center:
https://app.au.workato.com/saml/consume- IL data center:
https://app.au.workato.com/saml/consume- CN data center:
https://app.workatoapp.cn/saml/consume- Developer sandbox:
https://app.trial.workato.com/saml/consume
Select Assertion.
Leave other settings as the default unless otherwise specified by your Workato implementation details.
 CyberArk Identity service provider configuration
Click Save.
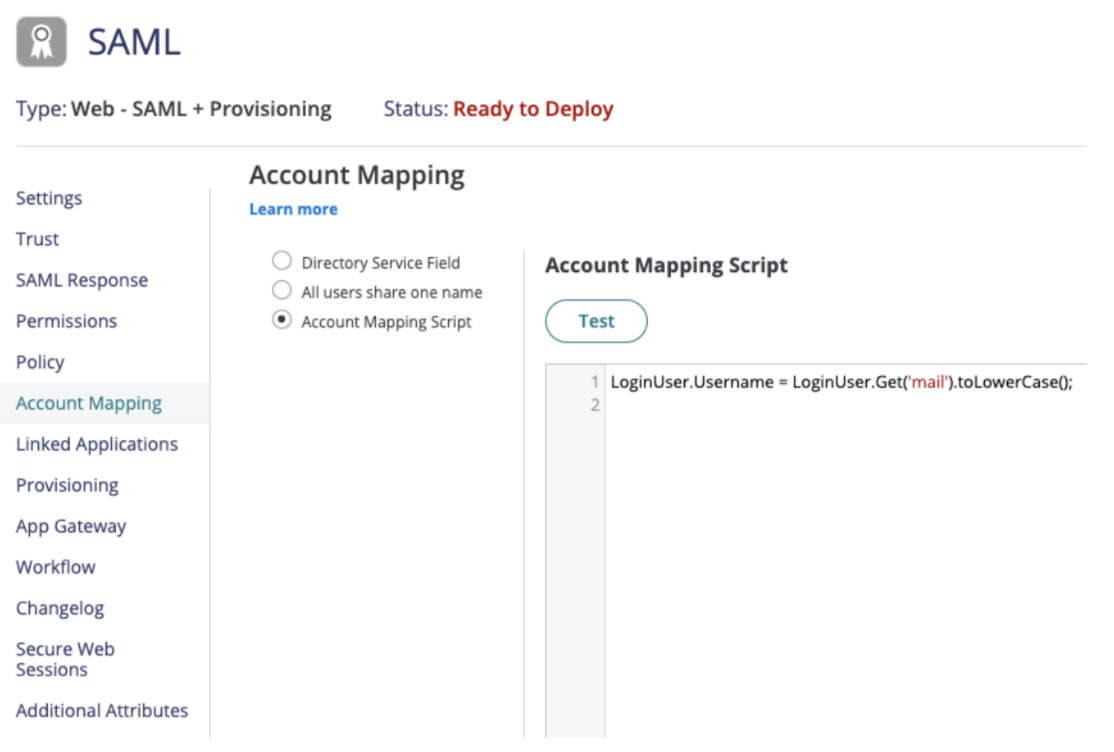
After saving the basic SAML configuration, you must configure user account mapping to ensure email addresses are lowercase:
Go to the Account Mapping page.
Select the Account Mapping Script option.
Add the following custom JavaScript to map the login email to lowercase:
LoginUser.Username = LoginUser.Get('mail').toLowerCase();This script retrieves the user's email from the mail attribute in Active Directory, converts it to lowercase, and assigns it as the LoginUser.Username. This ensures consistency and prevents case-sensitive login issues in Workato.
Click Test to verify the script.
 Verify the script
Click Save to apply the account mapping changes.
After you configure account mapping, complete the following steps to finalize the SAML setup:
Locate and copy the Metadata URL provided by CyberArk Identity. This is required to complete the SSO setup in Workato.
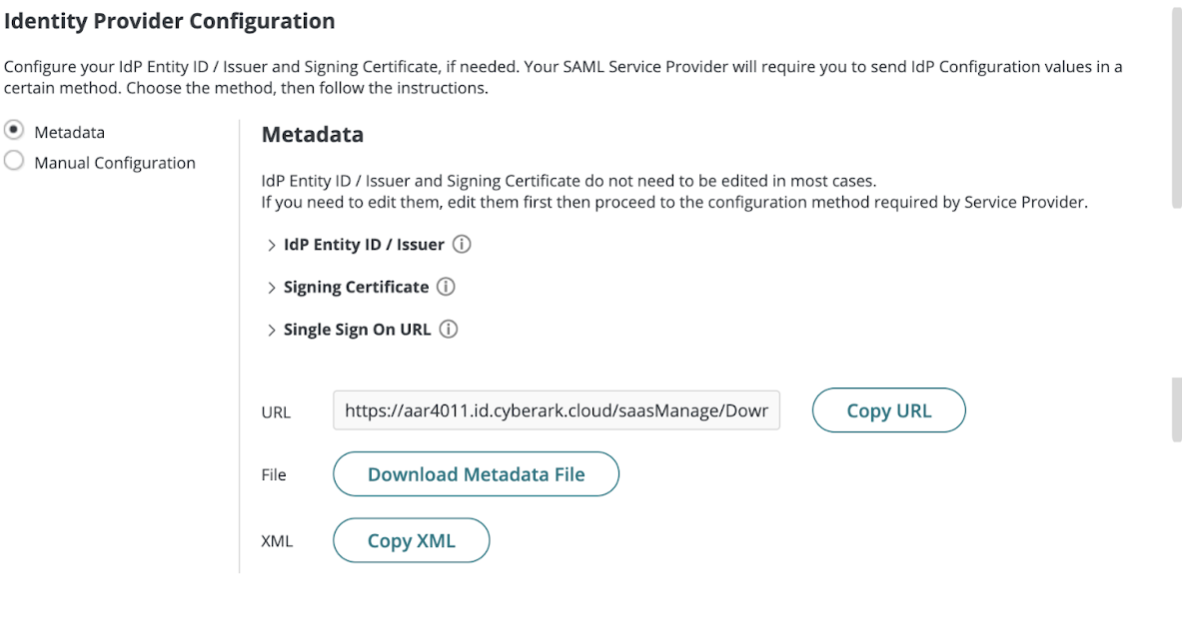 CyberArk Identity metadata URL configuration
Obtain your Identity provider single sign-on URL, Identity provider issuer, and Signing certificate from CyberArk Identity. These values are required to complete the SSO setup in Workato.
Deploy the Workato SAML app to make it available to users in CyberArk Identity.
Go to the Permissions section in your CyberArk Identity admin console.
Click Add and select a user, typically a system administrator responsible for app deployment.
Click Save to deploy the Workato SAML app.
You must assign role permissions to the Workato SAML app so that users can access Workato. Complete the following steps to assign role permissions:
Go to Core Services > Roles in your CyberArk Identity admin console.
Select Add Role and name the role Workato Users to define permissions for users using Workato.
Go to Assigned Applications, locate the Workato SAML app, and click Add to associate it with the Workato Users role.
Click Save to confirm the role assignments and complete the setup process.
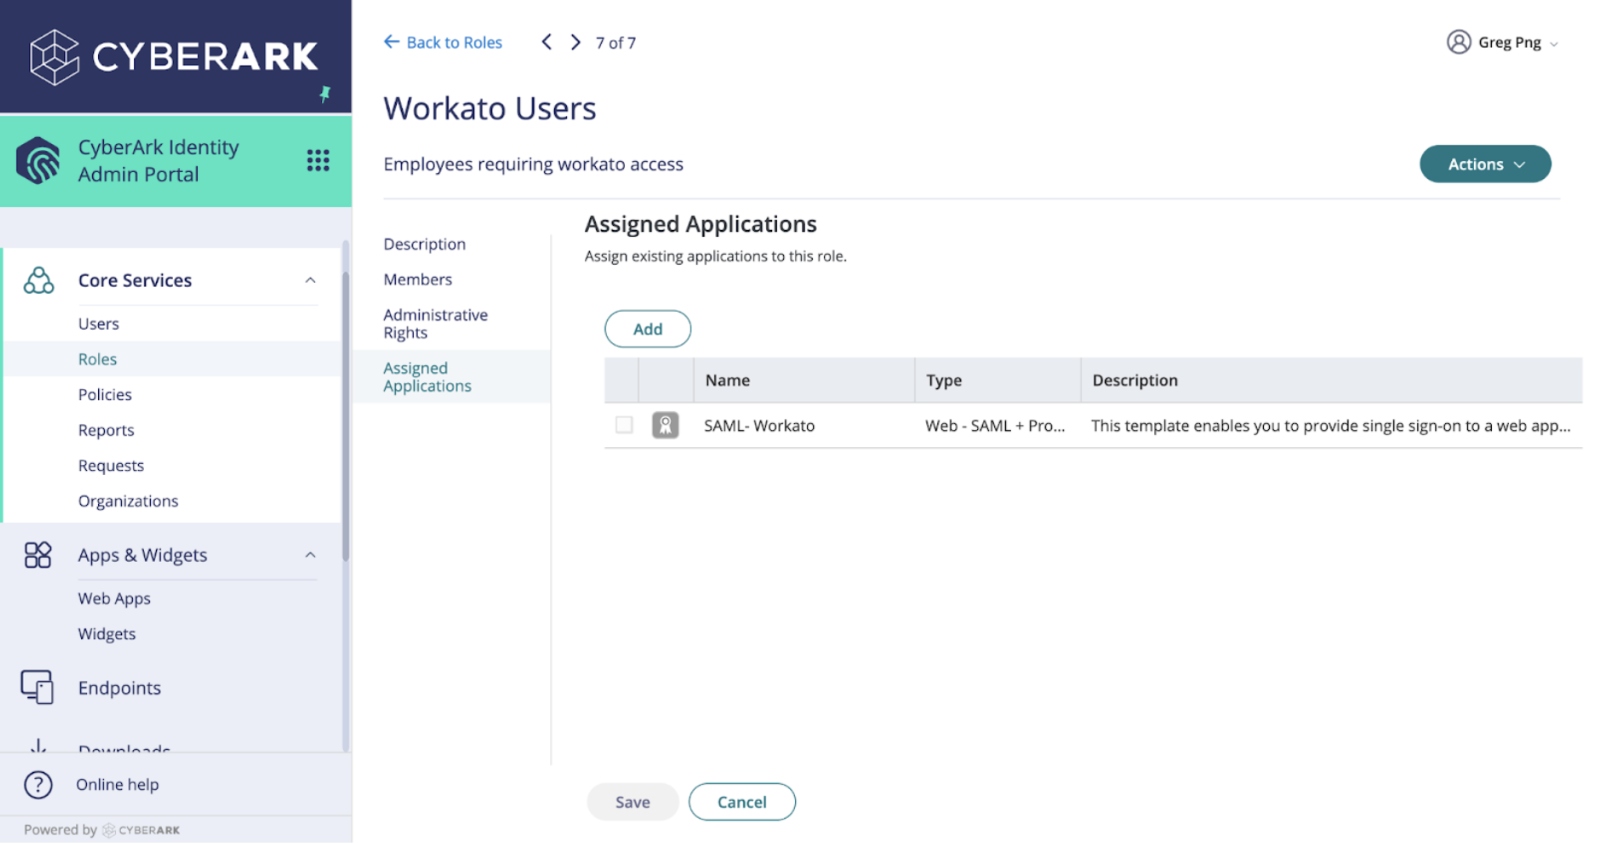 Assign the Workato SAML app to roles
Users assigned the Workato Users role can find the Workato SAML app in their CyberArk Identity user portal. Clicking this app enables them to sign in to Workato and automatically provisions their account.
After you've finished the preceding steps, continue to the next step to complete the setup in Workato.
Okta
VIEW OKTA INSTRUCTIONS
In Okta
Sign in to your Okta instance.
Go to Applications > Applications.
Click Create App Integration.
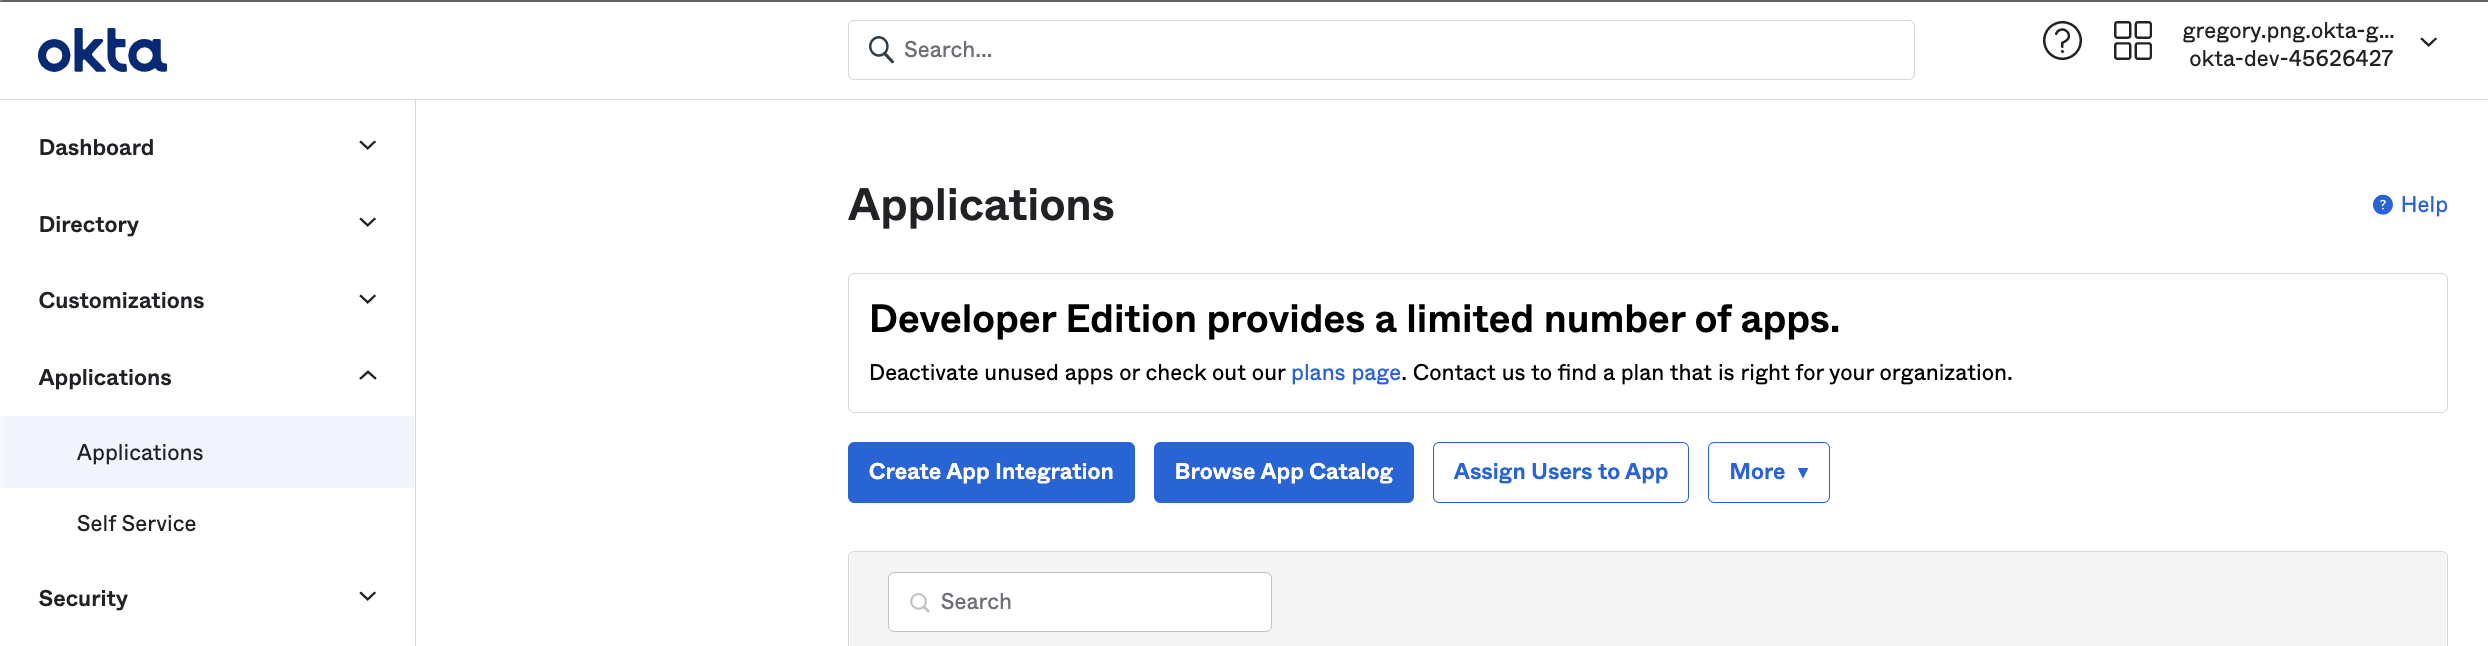 Add application on Okta
Refer to the Okta documentation for more information.
Select SAML 2.0 for the Sign on method.
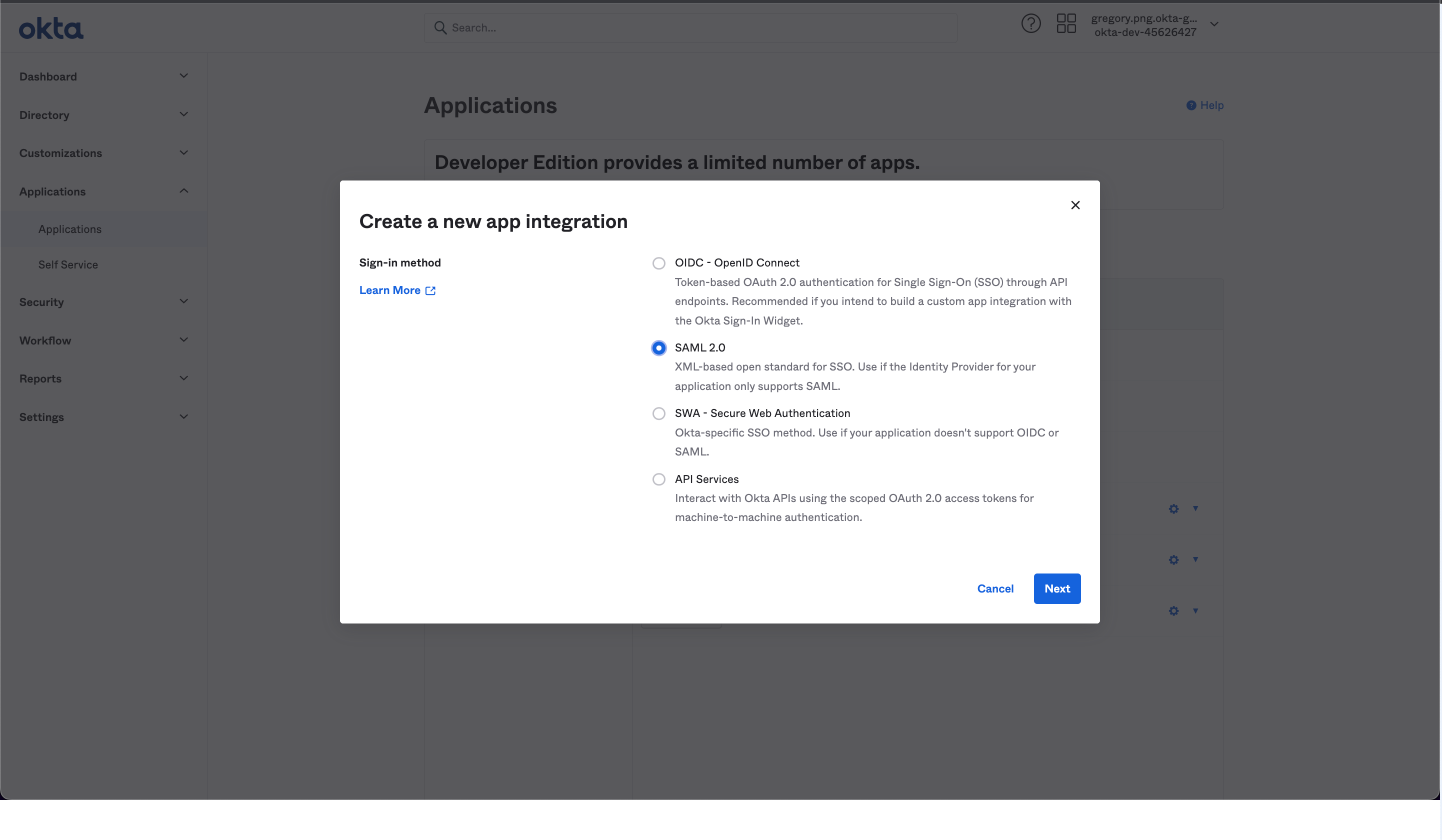 Create a new application on Okta
Click Next.
Provide an App name for your SAML application. This can be any descriptive name (such as "Workato") and doesn't need to match your Workato workspace handle.
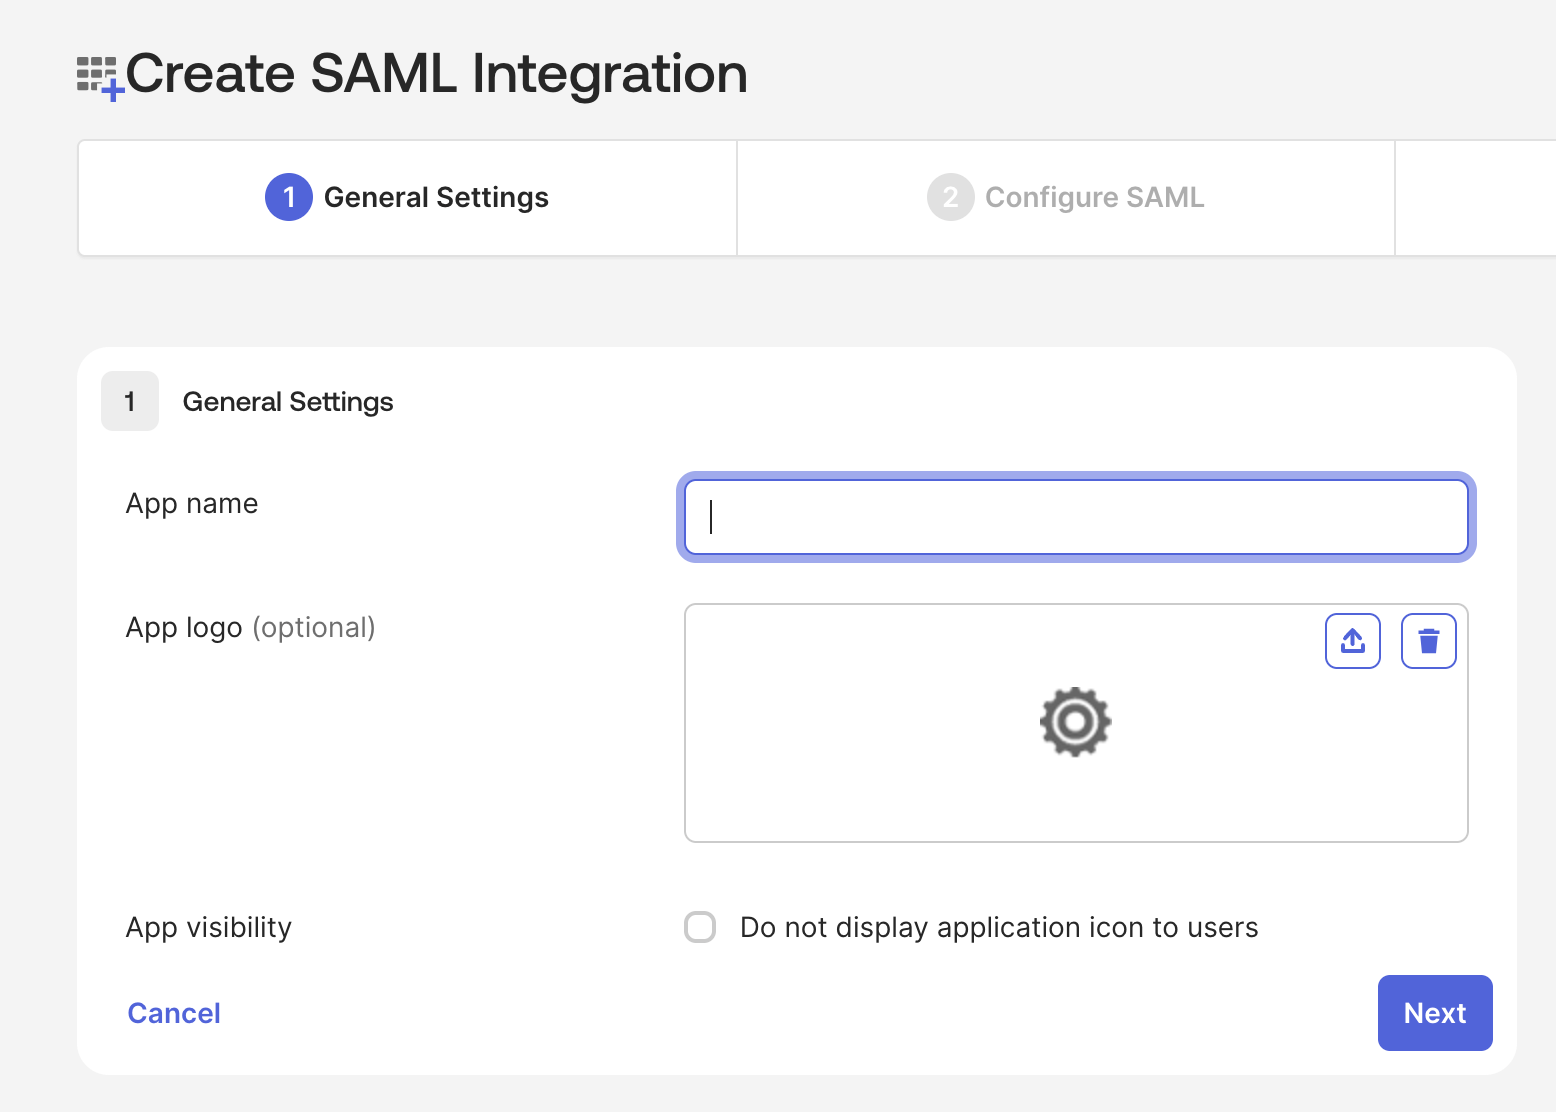 Provide an App name for your SAML application
Click Next to continue to the SAML configuration settings.
Provide the Single Sign-On URL for your Workato data center:
- US data center:
https://www.workato.com/saml/consume - EU data center:
https://app.eu.workato.com/saml/consume - JP data center:
https://app.jp.workato.com/saml/consume - SG data center:
https://app.sg.workato.com/saml/consume - AU data center:
https://app.au.workato.com/saml/consume - IL data center:
https://app.il.workato.com/saml/consume - KR data center:
https://app.kr.workato.com/saml/consume - CN data center:
https://app.workatoapp.cn/saml/consume - Developer sandbox data center:
https://app.trial.workato.com/saml/consume
Select the Use this for Recipient URL and Destination URL checkbox.
Provide the Audience URI (SP Entity ID) for your Workato data center:
- Workato data centers
- US data center:
https://www.workato.com/saml/metadata- EU data center:
https://app.eu.workato.com/saml/metadata- JP data center:
https://app.jp.workato.com/saml/metadata- SG data center:
https://app.sg.workato.com/saml/metadata- AU data center:
https://app.au.workato.com/saml/metadata- IL data center:
https://app.il.workato.com/saml/metadata- CN data center:
https://app.workatoapp.cn/saml/metadata- Developer sandbox:
https://app.trial.workato.com/saml/metadata
Set Application username to Custom and enter the following expression to convert user email addresses to lowercase:
toLowerCase(user.email)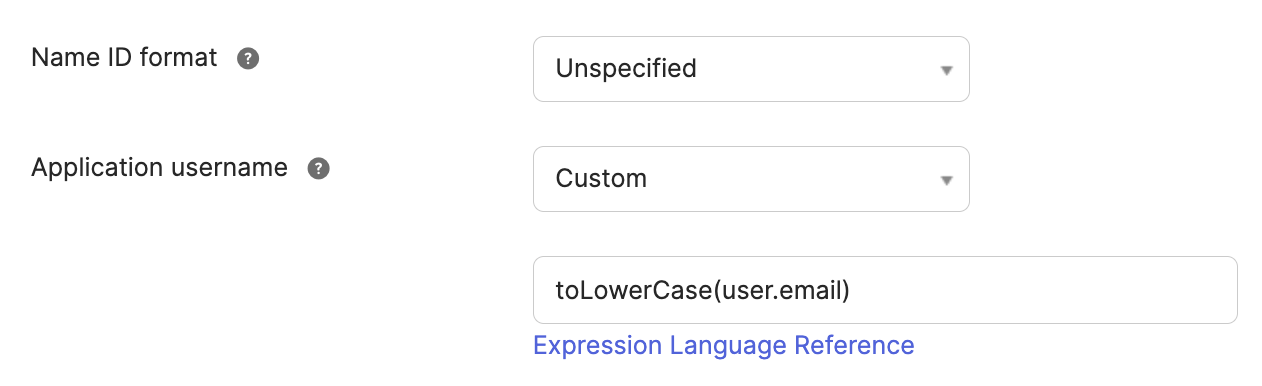 Set Application username to Custom
Optional. Click Show Advanced Settings. In the Other Requestable SSO URLs field, click Add Another and provide the ACS URL for your Workato data center:
- Workato data centers
- US data center:
https://www.workato.com/saml/consume- EU data center:
https://app.eu.workato.com/saml/consume- JP data center:
https://app.jp.workato.com/saml/consume- SG data center:
https://app.sg.workato.com/saml/consume- AU data center:
https://app.au.workato.com/saml/consume- IL data center:
https://app.il.workato.com/saml/consume- CN data center:
https://app.workatoapp.cn/saml/consume- Developer sandbox:
https://app.trial.workato.com/saml/consume
Click Next and then click Finish to complete the SAML application setup.
Copy the Metadata URL from Okta.
After you've finished the preceding steps, continue to the next step to complete the setup in Workato.
OneLogin
VIEW ONELOGIN INSTRUCTIONS
In OneLogin
Sign in to your OneLogin instance.
Go to Applications > Applications.
Click Add App.
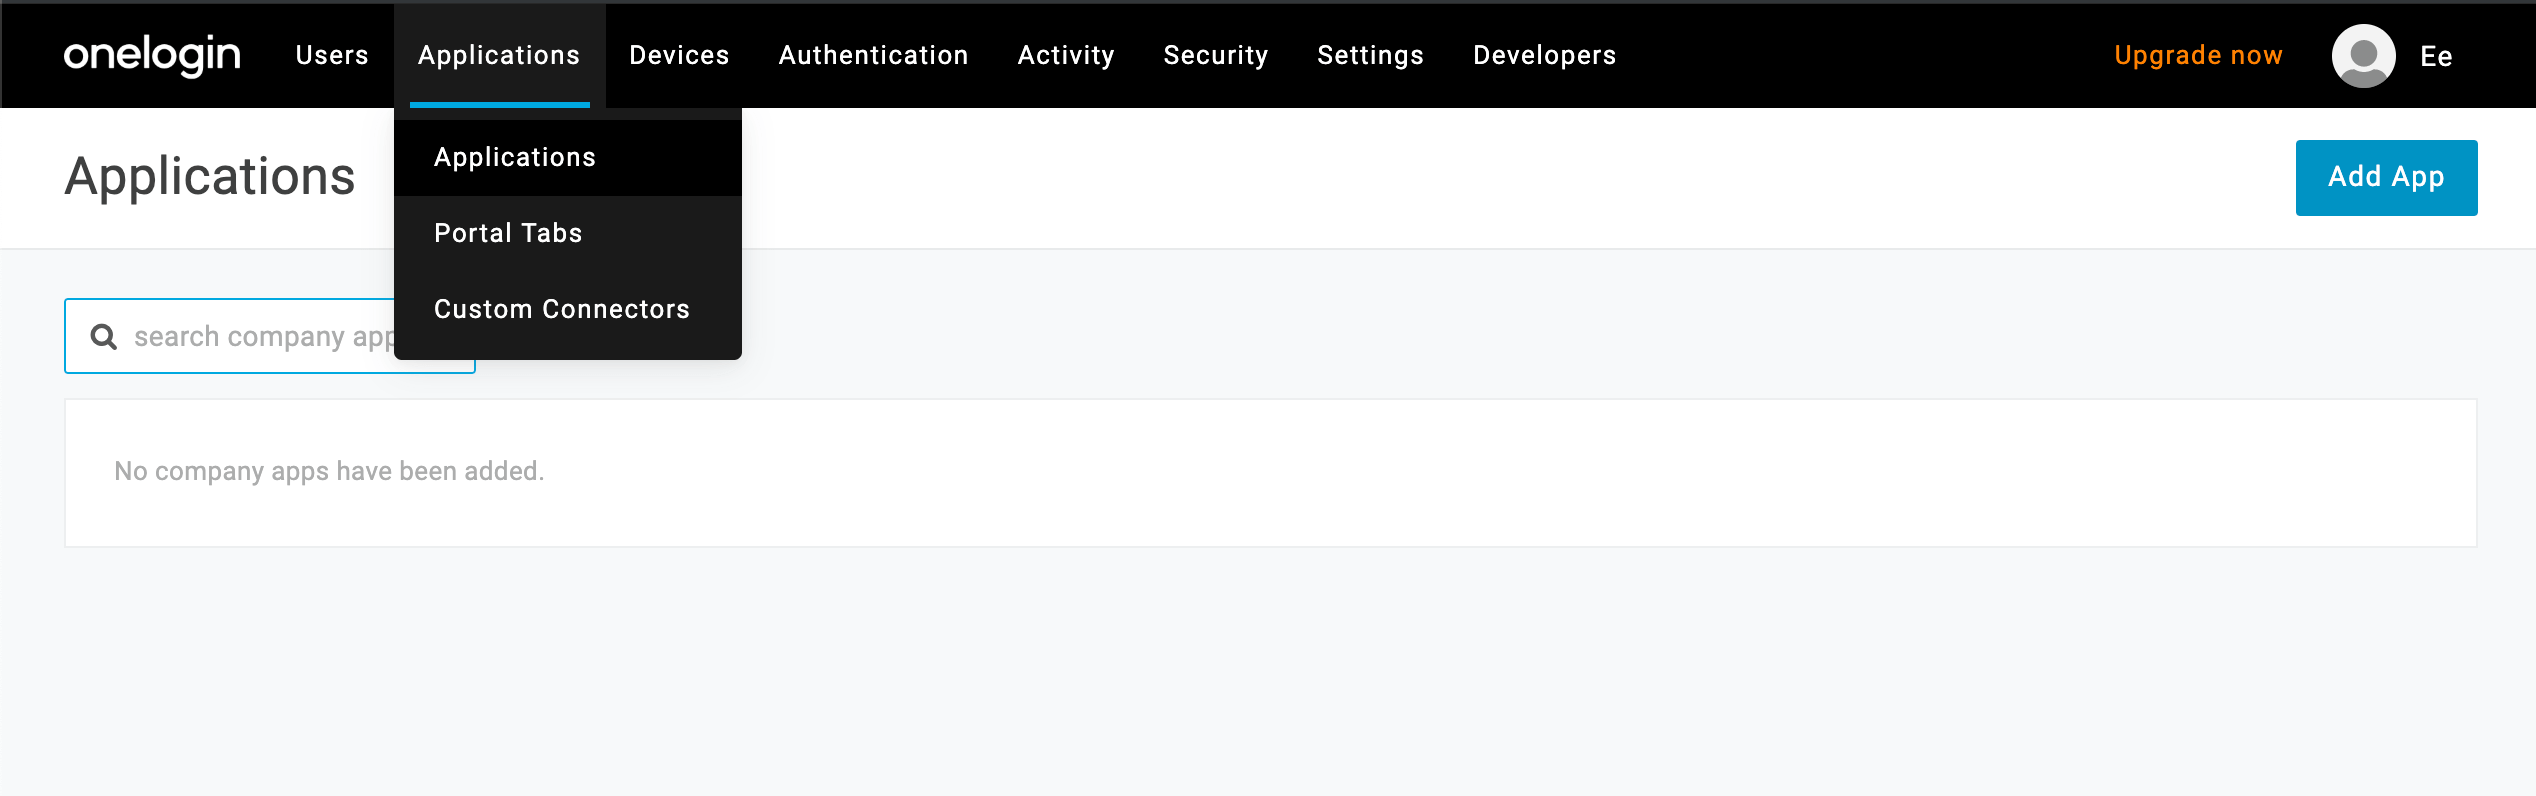 Add application on OneLogin
Search for and select SAML Test Connector (IdP w/ attr w/ sign response).
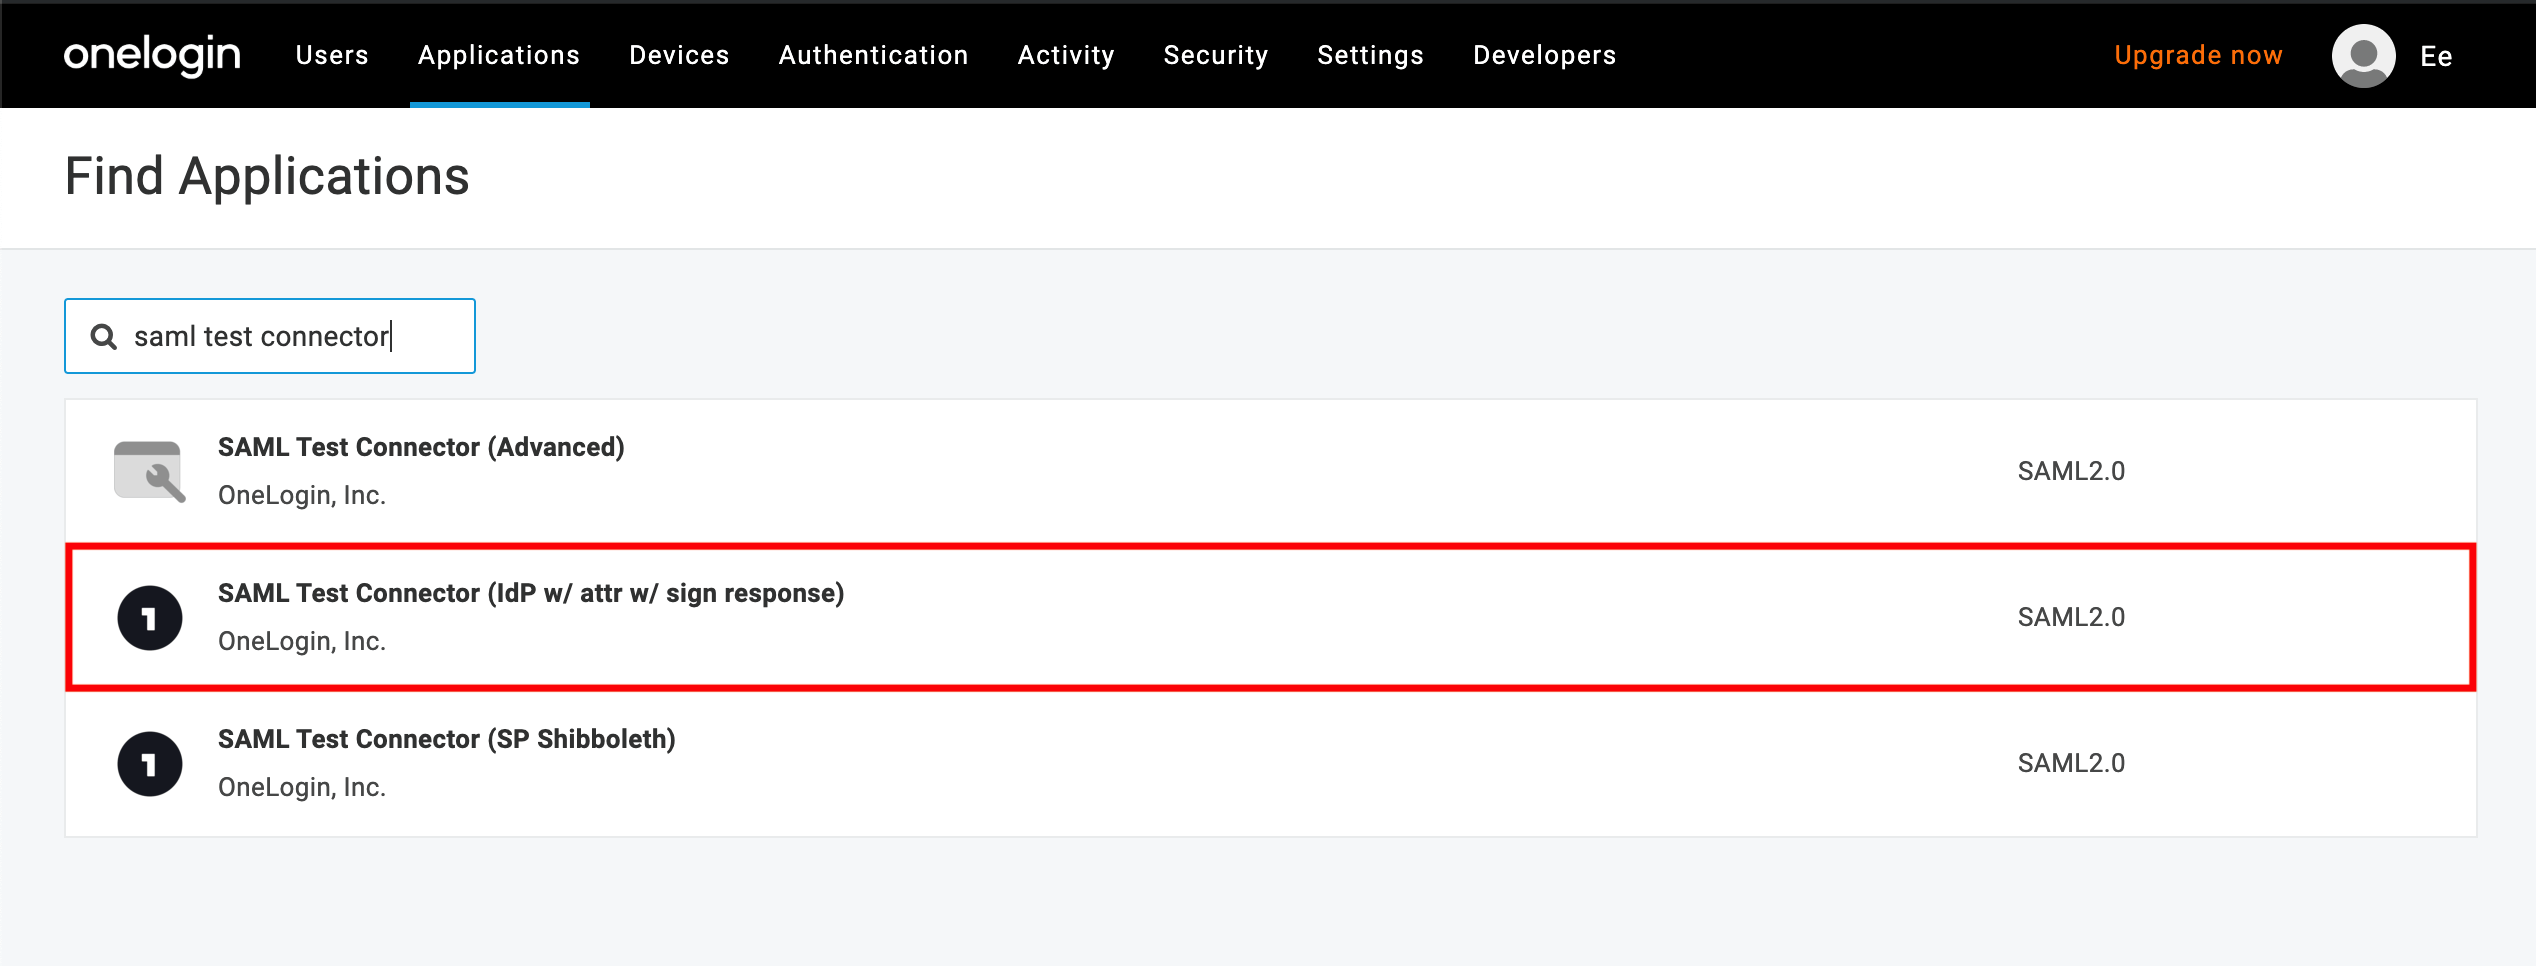 SAML test connector
In the Application details, fill in the configuration details as follows:
- Audience
- Use the URL for your Workato data center:
- US data center:
https://www.workato.com/saml/metadata- EU data center:
https://app.eu.workato.com/saml/metadata- JP data center:
https://app.jp.workato.com/saml/metadata- SG data center:
https://app.sg.workato.com/saml/metadata- AU data center:
https://app.au.workato.com/saml/metadata- IL data center:
https://app.il.workato.com/saml/metadata- CN data center:
https://app.workatoapp.cn/saml/metadata- Developer sandbox:
https://app.trial.workato.com/saml/metadata
- Recipient
- Use the URL for your Workato data center:
- US data center:
https://www.workato.com/saml/consume- EU data center:
https://app.eu.workato.com/saml/consume- JP data center:
https://app.jp.workato.com/saml/consume- SG data center:
https://app.sg.workato.com/saml/consume- AU data center:
https://app.au.workato.com/saml/consume- IL data center:
https://app.il.workato.com/saml/consume- CN data center:
https://app.workatoapp.cn/saml/consume- Developer sandbox:
https://app.trial.workato.com/saml/consume
- ACS (Consumer) URL Validator
- Use the URL for your Workato data center:
- US data center:
^https:\/\/www.workato.com\/saml\/*$- EU data center:
^https:\/\/app.eu.workato.com\/saml\/*$- JP data center:
^https:\/\/app.jp.workato.com\/saml\/*$- SG data center:
^https:\/\/app.sg.workato.com\/saml\/*$- AU data center:
^https:\/\/app.au.workato.com\/saml\/*$- IL data center:
^https:\/\/app.il.workato.com\/saml\/*$- CN data center:
^https:\/\/app.workatoapp.cn\/saml\/*$- Developer sandbox:
^https:\/\/app.trial.workato.com\/saml\/*$
- ACS (Consumer) URL
- Use the URL for your Workato data center:
- US data center:
https://www.workato.com/saml/consume- EU data center:
https://app.eu.workato.com/saml/consume- JP data center:
https://app.jp.workato.com/saml/consume- SG data center:
https://app.sg.workato.com/saml/consume- AU data center:
https://app.au.workato.com/saml/consume- IL data center:
https://app.il.workato.com/saml/consume- CN data center:
https://app.workatoapp.cn/saml/consume- Developer sandbox:
https://app.trial.workato.com/saml/consume
Click Save.
Next, retrieve your OneLogin Metadata URL. This is needed to complete the SSO setup in Workato.
- On the application's page, click More Actions.
- Right-click SAML Metadata and select Copy link address:
 OneLogin metadata URL
After you've finished the preceding steps, proceed to the next step to complete the setup.
Other Identity Providers
OTHER IDENTITY PROVIDERS INSTRUCTIONS
If your Identity Provider (IdP) is not listed, you can still configure SAML-based Single Sign-On (SSO) in Workato using the common SAML 2.0 standard.
Complete the following steps to configure SAML SSO for other Identity Providers:
Sign in to your Identity Provider (IdP) and begin setting up a SAML application.
Provide the Audience URI (SP Entity ID) for your Workato data center in the SAML configuration settings:
US data center:
https://www.workato.com/saml/metadataEU data center:
https://app.eu.workato.com/saml/metadataJP data center:
https://app.jp.workato.com/saml/metadataSG data center:
https://app.sg.workato.com/saml/metadataAU data center:
https://app.au.workato.com/saml/metadataIL data center:
https://app.il.workato.com/saml/metadataCN data center:
https://app.workatoapp.cn/saml/metadataDeveloper sandbox:
https://app.trial.workato.com/saml/metadata
Provide the ACS URL (Assertion Consumer Service URL) based on your data center:
US data center:
https://www.workato.com/saml/consumeEU data center:
https://app.eu.workato.com/saml/consumeJP data center:
https://app.jp.workato.com/saml/consumeSG data center:
https://app.sg.workato.com/saml/consumeAU data center:
https://app.au.workato.com/saml/consumeIL data center:
https://app.il.workato.com/saml/consumeCN data center:
https://app.workatoapp.cn/saml/consumeDeveloper sandbox:
https://app.trial.workato.com/saml/consume
Optional. Provide the SSO URL (Single Sign-On URL). This URL may be optional depending on your Identity Provider. You must locate your Workspace handle in Workato and replace {WORKSPACE_HANDLE} in the URL for the data center you use:
US Data center:
https://www.workato.com/saml/init?team_handle={WORKSPACE_HANDLE}EU Data center:
https://app.eu.workato.com/saml/init?team_handle={WORKSPACE_HANDLE}JP Data center:
https://app.jp.workato.com/saml/init?team_handle={WORKSPACE_HANDLE}SG Data center:
https://app.sg.workato.com/saml/init?team_handle={WORKSPACE_HANDLE}AU Data center:
https://app.au.workato.com/saml/init?team_handle={WORKSPACE_HANDLE}IL Data center:
https://app.il.workato.com/saml/init?team_handle={WORKSPACE_HANDLE}CN Data center:
https://app.workatoapp.cn/saml/init?team_handle={WORKSPACE_HANDLE}Developer sandbox:
https://app.trial.workato.com/saml/init?team_handle={WORKSPACE_HANDLE}
Set additional parameters required by your Identity Provider and Save your SAML application setup.
Retrieve the Metadata URL from your Identity Provider. This URL is required to complete the SSO setup in Workato.
After you've finished the preceding steps, proceed to set up your Workato SSO to complete the setup.
Step 2: Finish setup in Workato
Sign in to Workato and go to Workspace admin > Settings > Login methods.
Use the Authentication method drop-down menu to select SAML based SSO.
Provide a Workspace handle for the workspace. The maximum length is 20 characters. Workato converts uppercase letters to lowercase in this field.
Use the SAML provider drop-down menu to select your SAML provider. Select Other SAML IdP if using Google Workspace.
Locate the Do you have your identity provider metadata URL? field and select Yes or No depending on whether you have access to your IdP metadata URL.
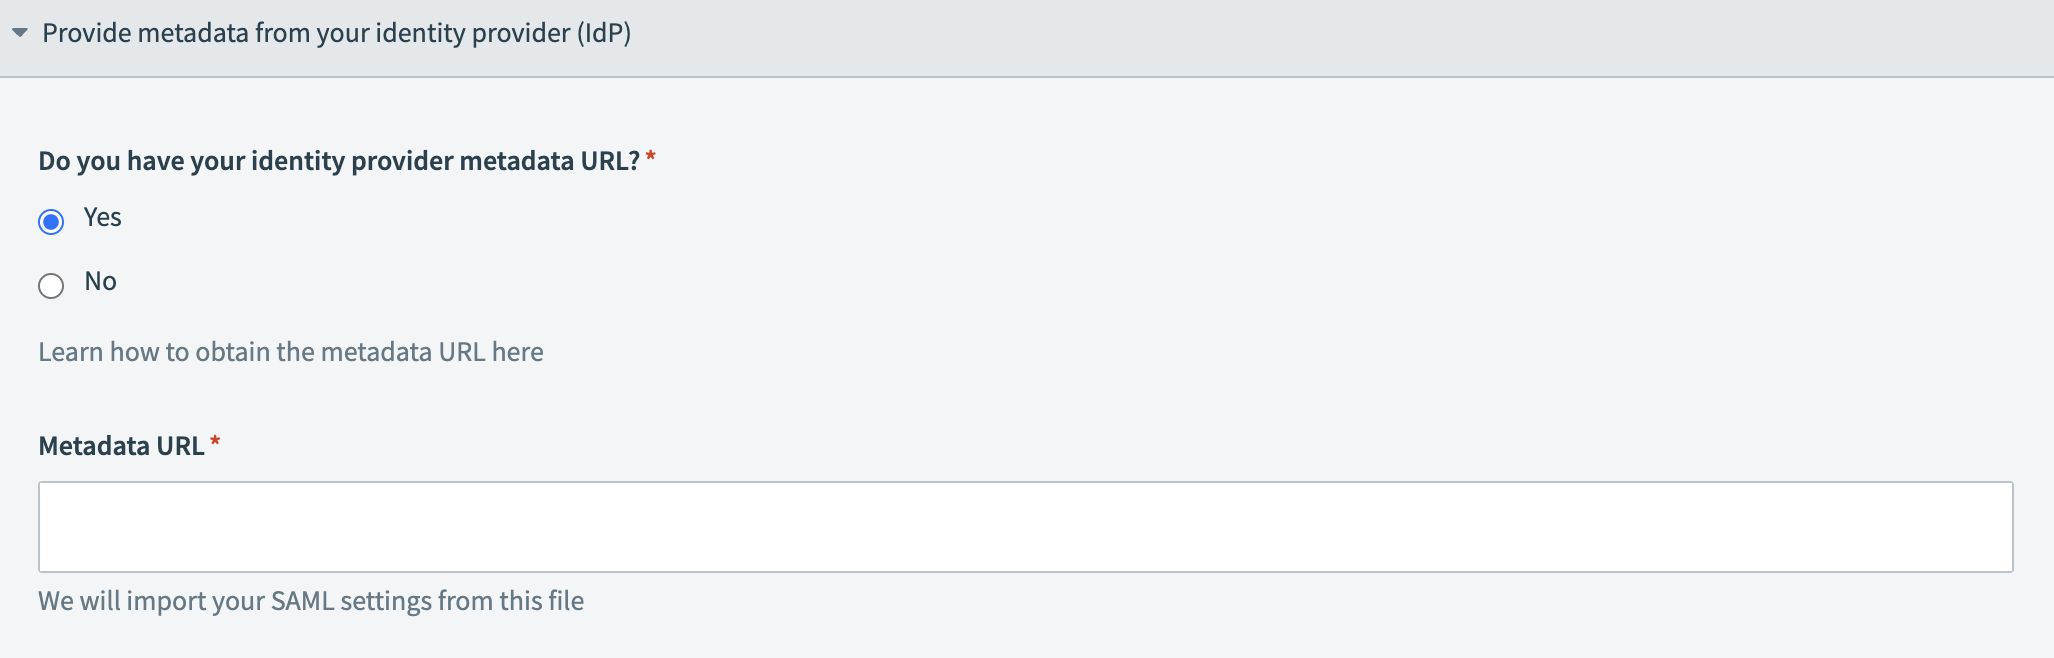 Provide your metadata URL
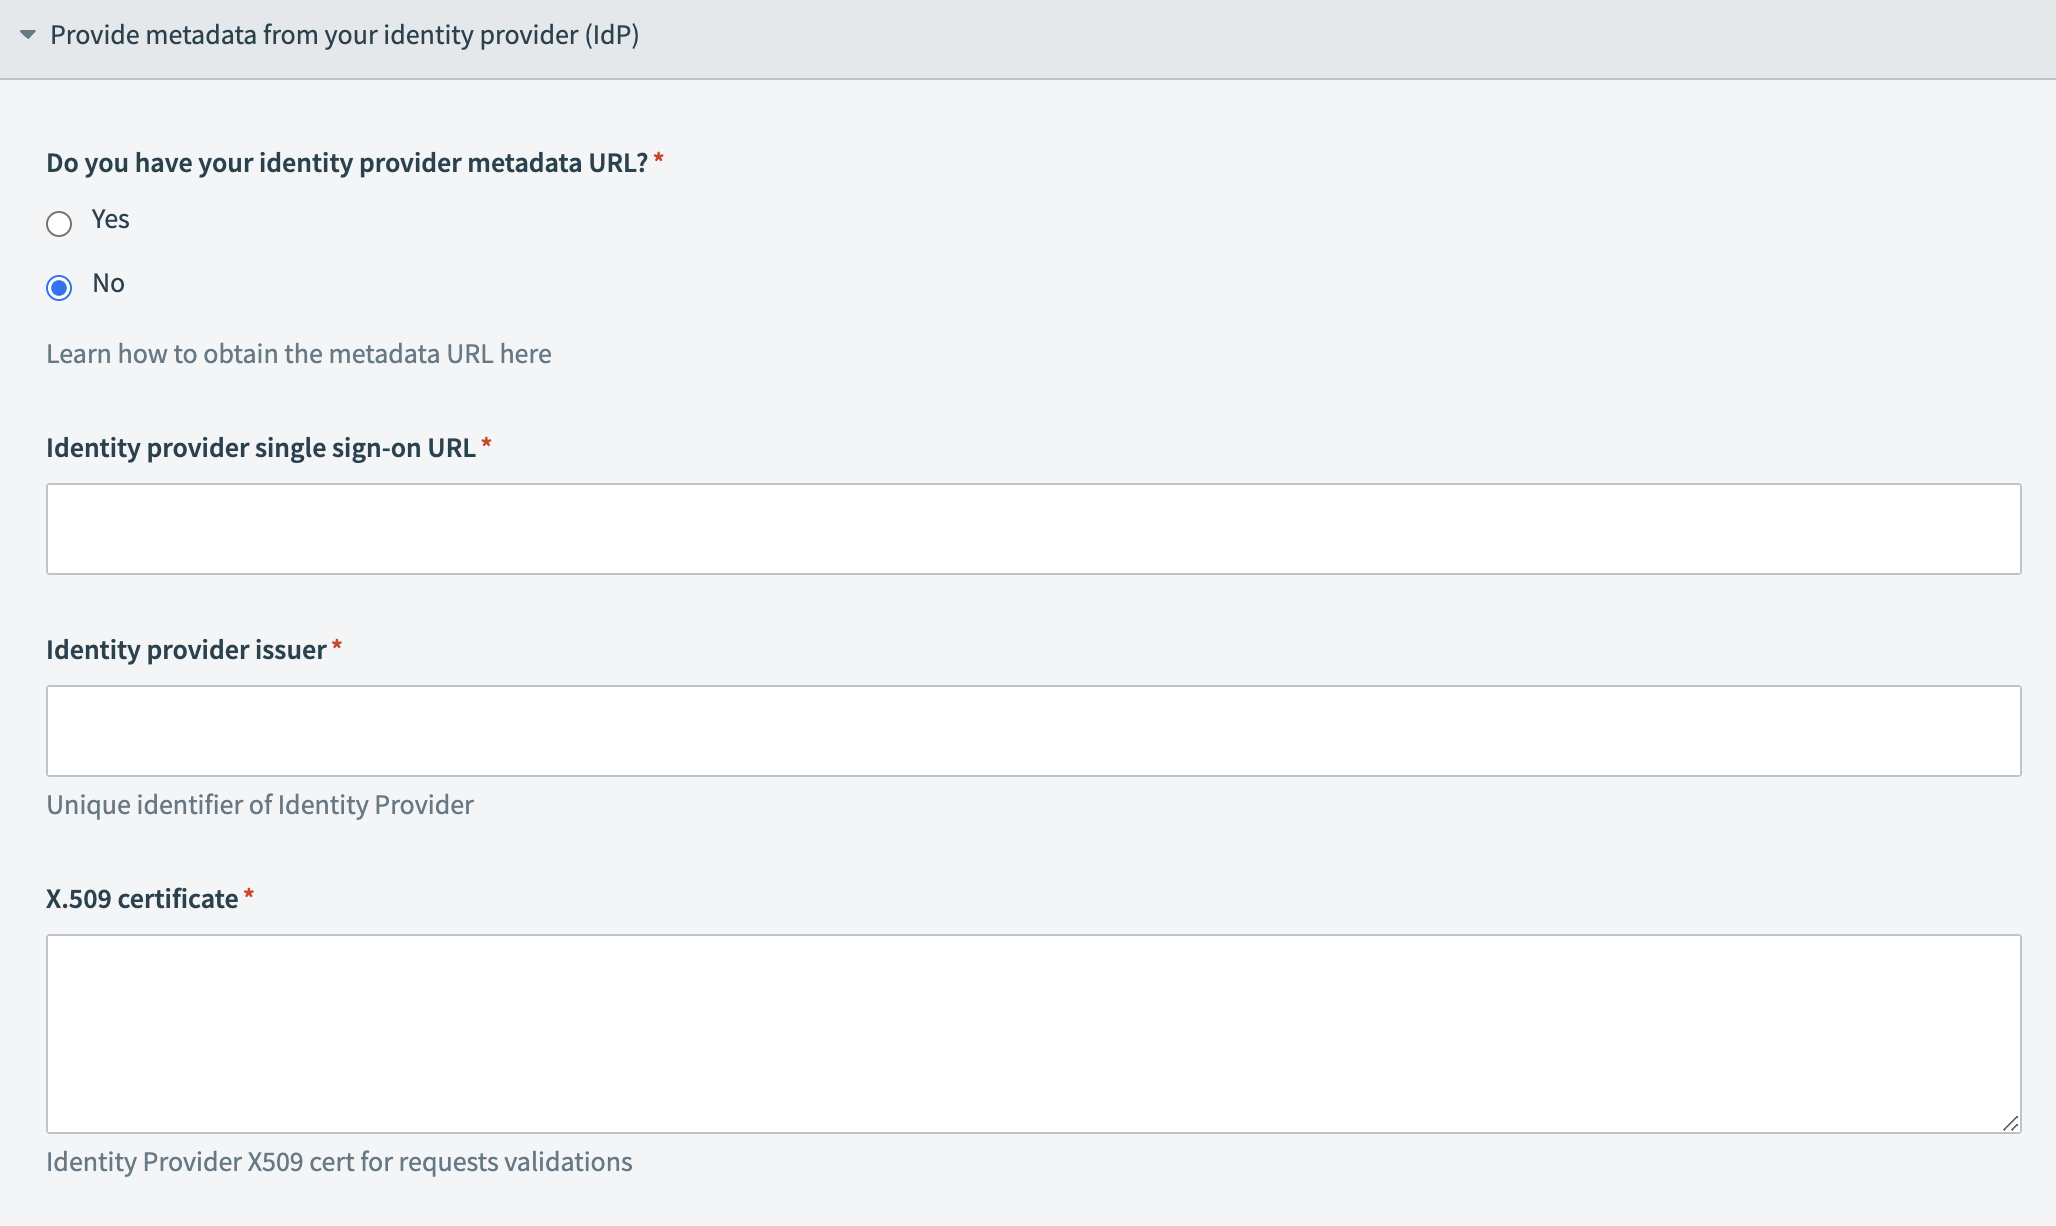 Provide your IdP information
Enable JIT provisioning. Refer to our Just-in-time provisioning guide for more information.
Enforce SAML SSO for all users. Workato requires all collaborators (except the workspace owner) to authenticate through your identity provider when you enable the Enforce SAML authentication for all users toggle. You can't disable SAML for individual users while enforcement is enabled.
You must disable the Enforce SAML authentication for all users toggle at the workspace level to allow a user to access the workspace without SAML authentication.
Click Validate settings.
VALIDATION ERROR
Perform the following actions if you encounter a validation error:
Verify that the certificate is valid with a tool like sslshopper. Certificates must start with -----BEGIN CERTIFICATE----- and end with -----END CERTIFICATE-----.
Verify that your IdP SSO URL/metadata URL is in a valid format. Refer to your identity provider's SAML configuration guide.
Click Save after successful validation.
Step 3: Assign SAML to users
You can assign the SAML application to your workspace members after completing the SSO configuration.
The following example uses an Okta application:
Go to the newly created SAML application in Okta:
- Applications > Workato > Assignments > Assign Users to App.
Use list to assign workspace members to the application.
Sign in to an SSO-enabled Workato workspace
WORKSPACE ACCOUNT OWNERS
Workspace owners cannot use SAML-based SSO to authenticate with the workspace. They must use their username and password instead.
Your SAML provider controls access to a Workato workspace when you enable SSO in Workato. You must assign the SAML application to your workspace members to grant them access to a Workato workspace. Workspace members can then access their Workato accounts from the SAML provider, such as:
- Google Workspace
- Use your company or organization sign-in URL. For example,
google.com/abc-example - Microsoft Entra ID
https://myapps.microsoft.com/- Okta
- Use your company or organization sign-in URL. For example,
123-example.okta.com - OneLogin
- Use your company or organization sign-in URL. For example,
xyz-example.onelogin.com
REQUEST THE SSO URL FROM YOUR ADMIN
Reach out to your admin to request the SSO URL for your company or organization.
The steps to sign in to an SSO-enabled Workato workspace can vary depending on the SAML provider and the configuration set by your administrator. For instance, Okta and OneLogin accounts usually provide dashboards that allow you to select Workato (and other) applications with SSO enabled. In the Okta dashboard, you can click the Workato application to sign in:
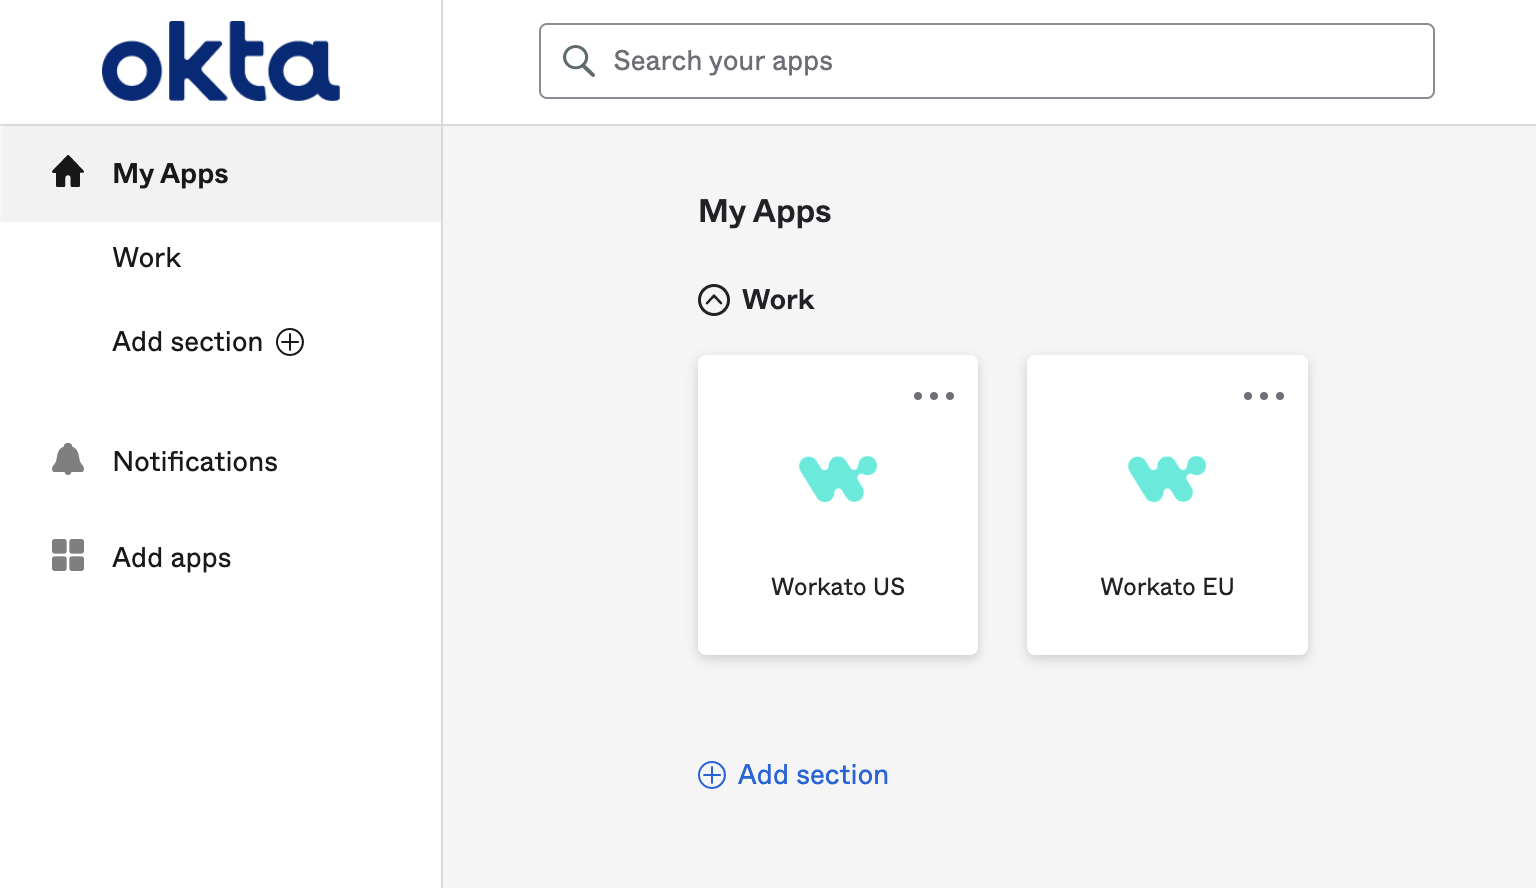 Workato app on Okta
Workspace members must authenticate through the SAML provider when switching from their personal account to an SSO-enabled workspace account. This process varies depending on the SAML provider and the configuration selected by the administrator. The following example demonstrates this process:
 Switch to workspace account with Okta authorization
Email verification for SAML JIT provisioning
A user logging in for the first time through either SP-initiated SSO or IdP-initiated SSO must verify their email address for SAML JIT Provisioning.
Workato prompts users to verify their email when accessing the workspace for the first time.
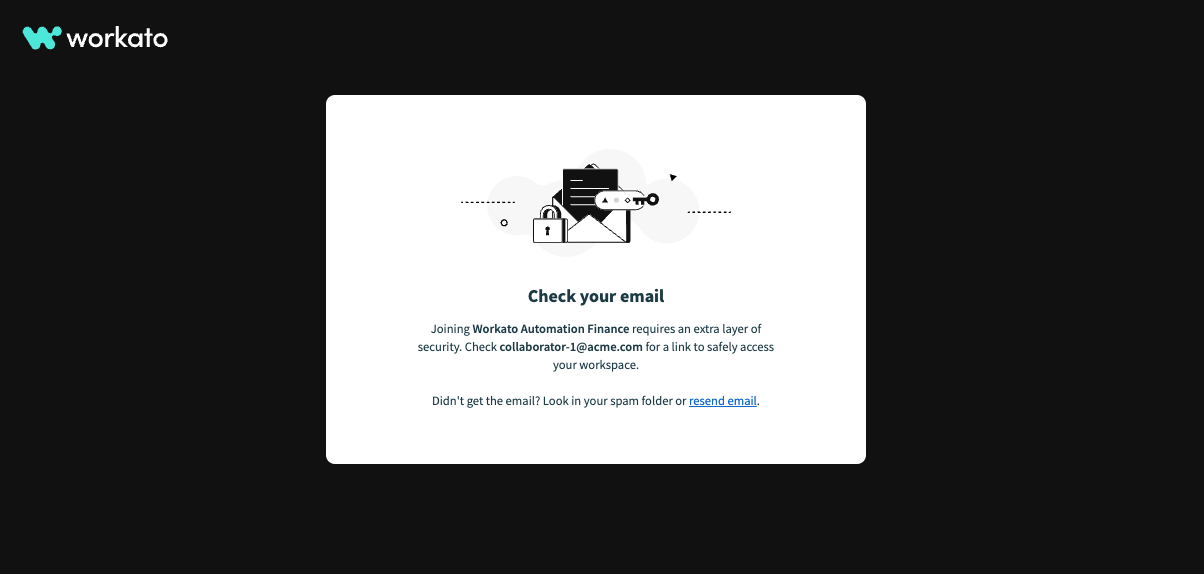
Receive Invitation Email: Workato sends an email invitation to the selected users. Instruct users to click the link in the email to verify their email address:
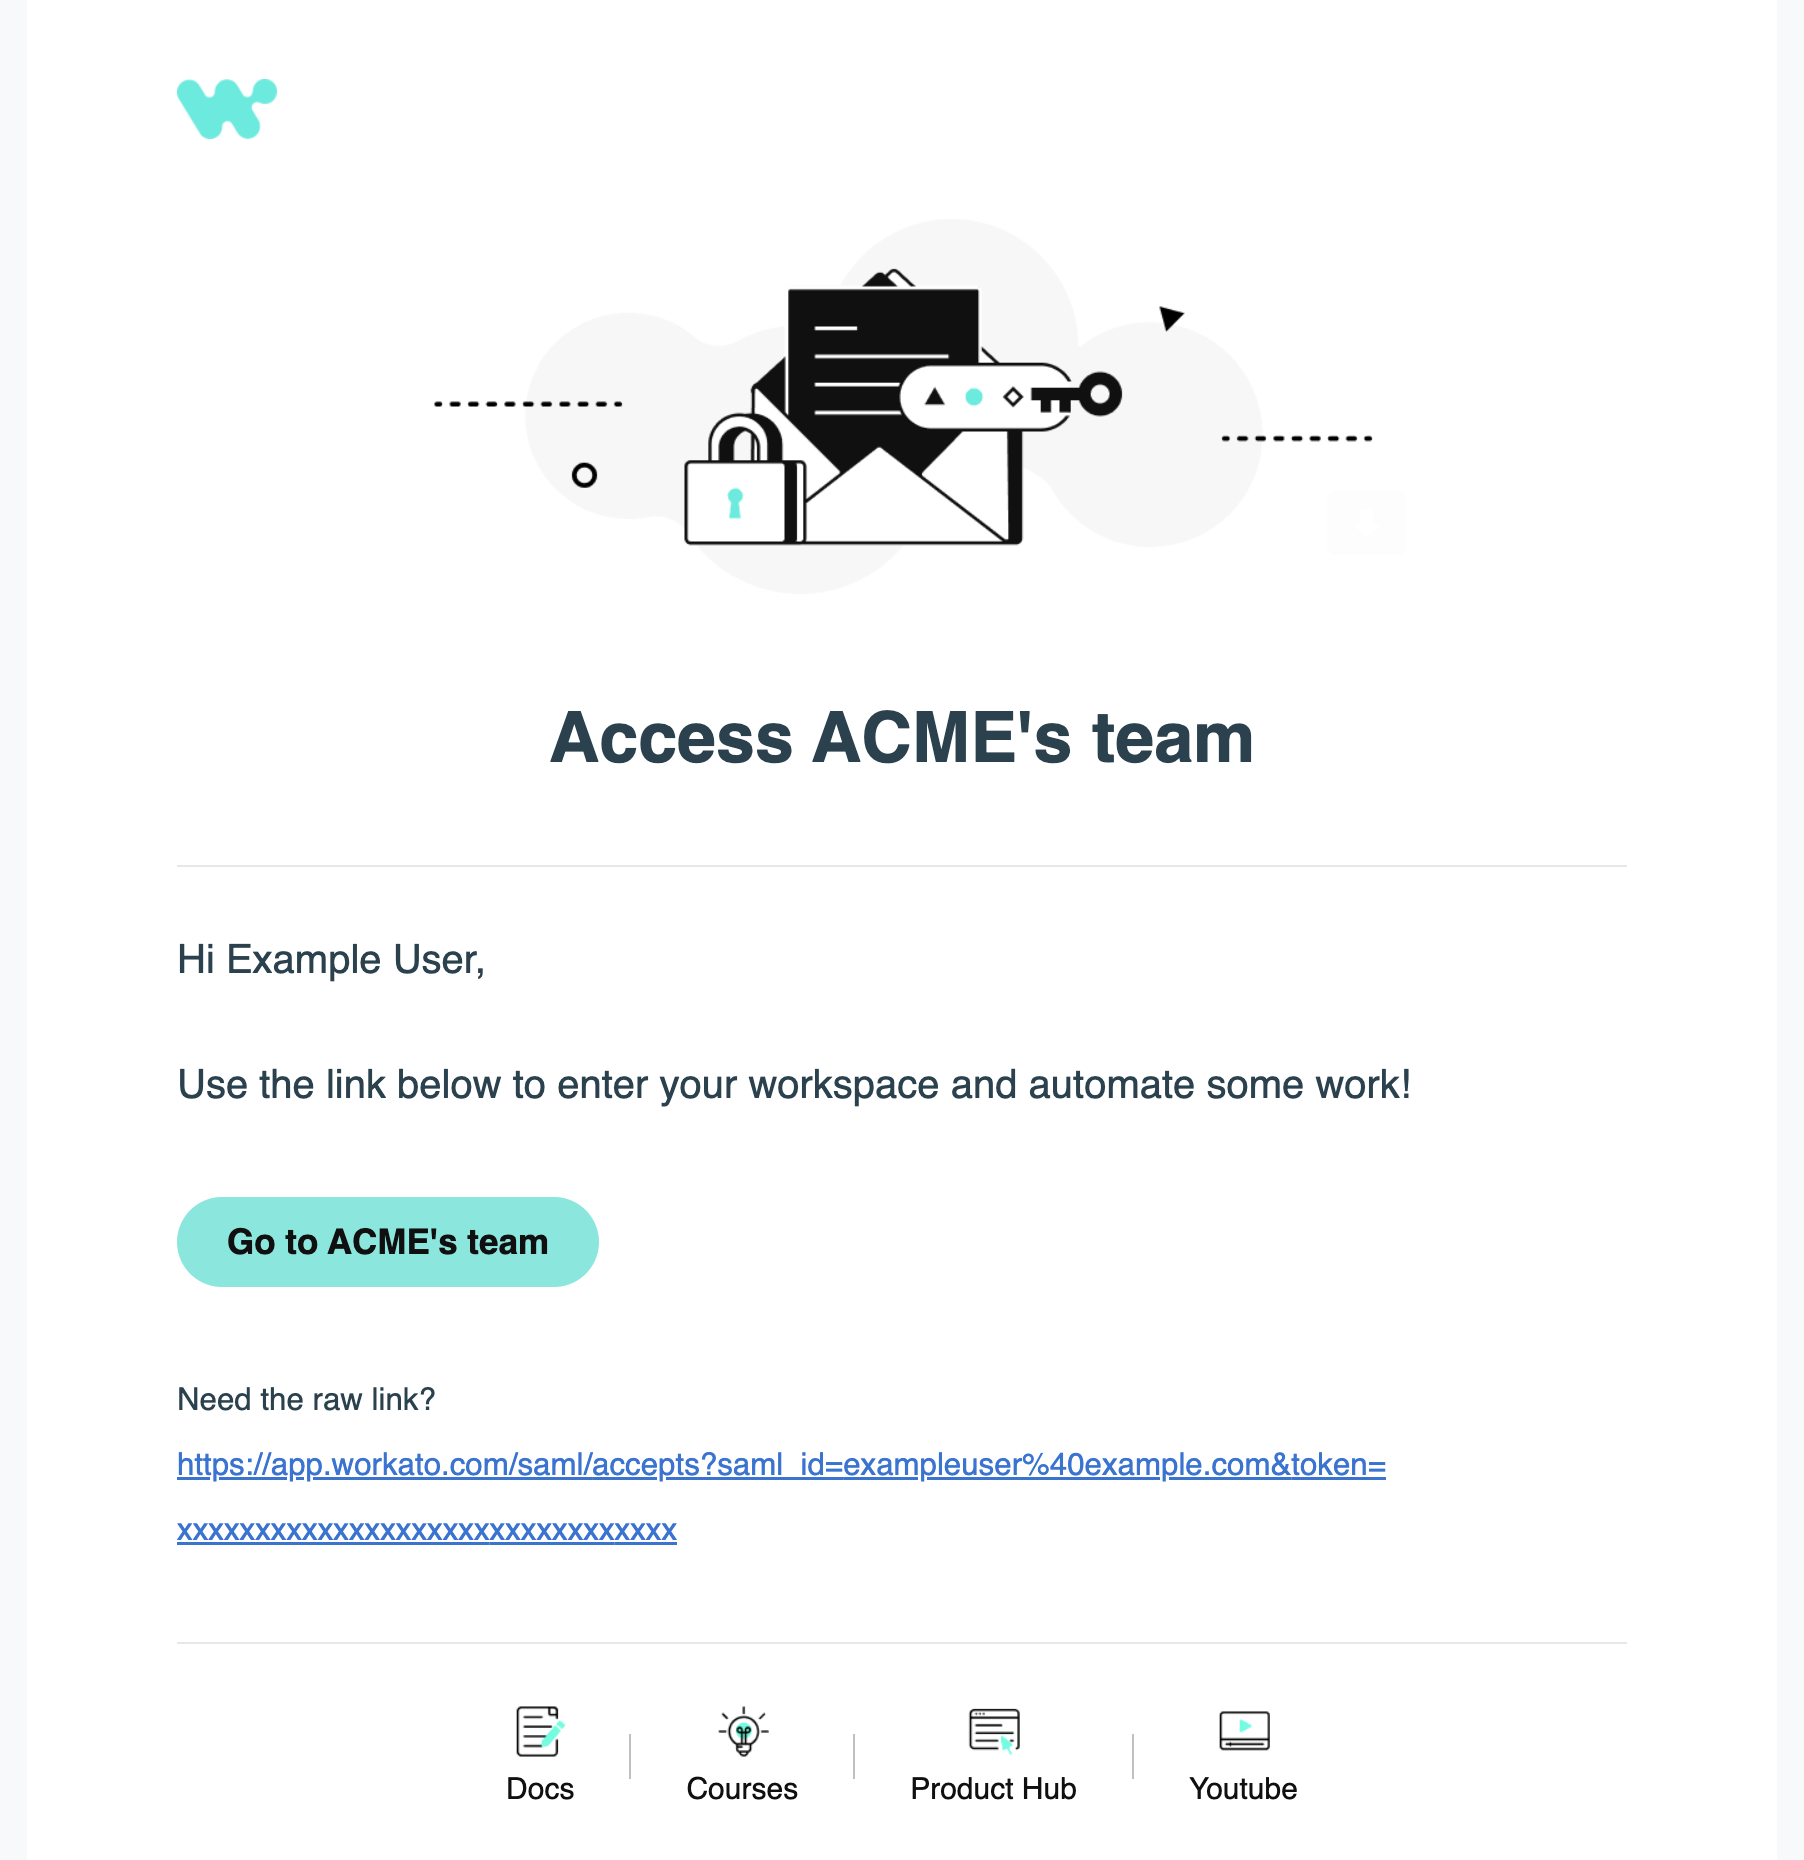 Email invitation to join a workspace
The collaborator can then sign in to the assigned workspace with the roles you have configured.
TROUBLESHOOTING
You likely already have a Workato account associated with the same email if you click the invitation and are redirected to the Workato login page instead of your organization’s workspace. Reset your password if you have forgotten your login credentials.
Verify Activity Audit Log: You can check the Workato activity audit log to confirm the addition of the user:
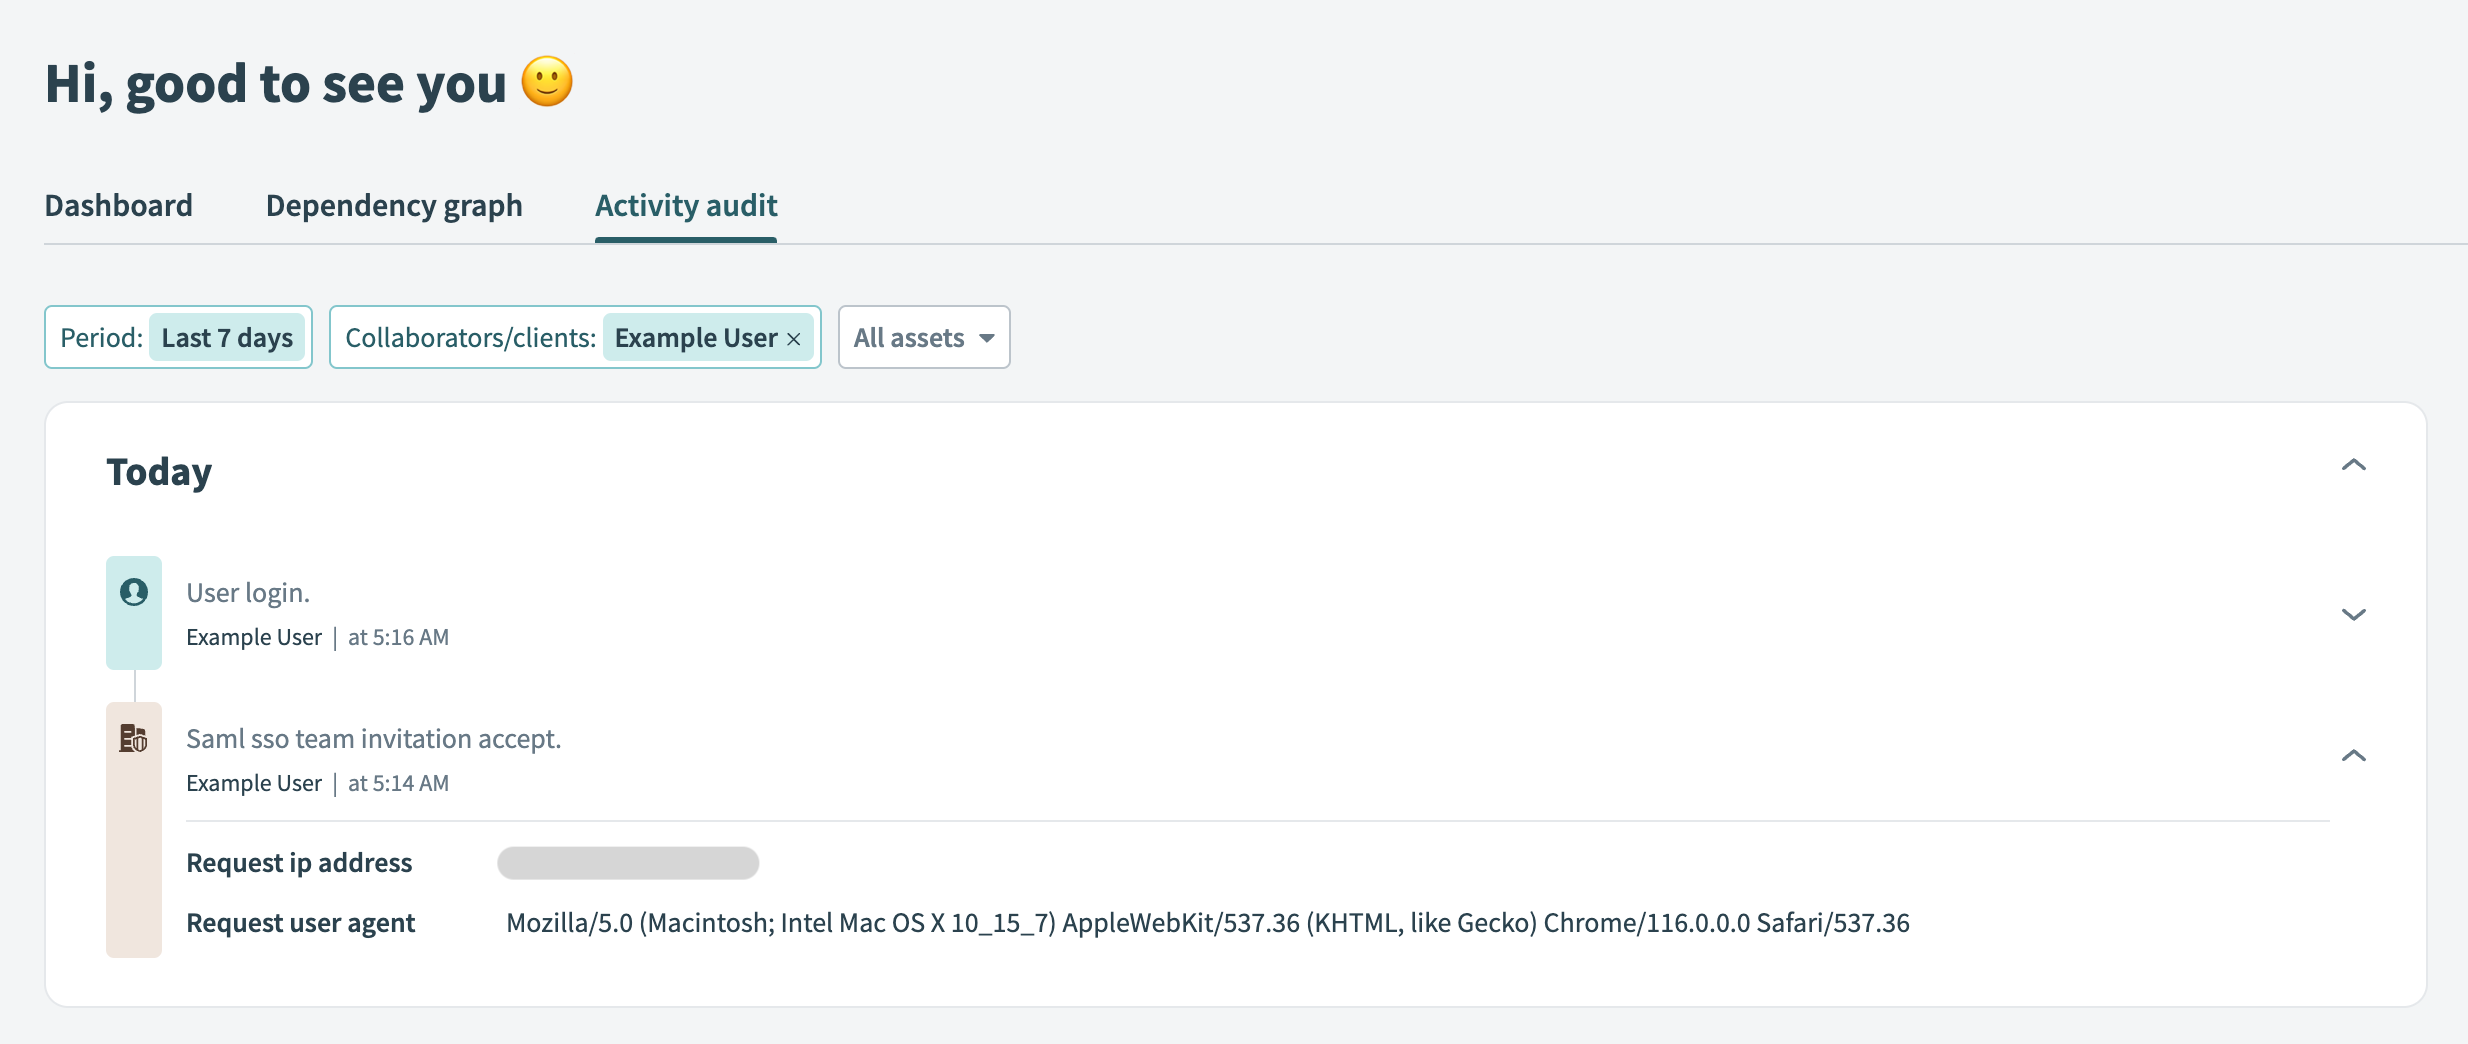 Activity audit log showing that a user has accepted an invitation
IdP-initiated SSO flow
The IdP may provide the team_id as a GET parameter to execute IdP-initiated flows (accepting SAML Responses directly generated by the IdP). This allows Workato to identify the workspace the user is trying to access. The SAML Response is ignored and Workato starts a fresh SP-initiated SSO flow if Workato doesn't have the team_id information.
Configure the following value at the IdP:
- ACS URL: Use the URL for your Workato data center
- US data center:
https://www.workato.com/saml/consume?team_id={WORKSPACE_HANDLE} - EU data center:
https://app.eu.workato.com/saml/consume?team_id={WORKSPACE_HANDLE} - JP data center:
https://app.jp.workato.com/saml/consume?team_id={WORKSPACE_HANDLE} - SG data center:
https://app.sg.workato.com/saml/consume?team_id={WORKSPACE_HANDLE} - AU data center:
https://app.au.workato.com/saml/consume?team_id={WORKSPACE_HANDLE} - IL data center:
https://app.il.workato.com/saml/consume?team_id={WORKSPACE_HANDLE} - KR data center:
https://app.kr.workato.com/saml/consume?team_id={WORKSPACE_HANDLE} - CN data center:
https://app.workatoapp.cn/saml/consume?team_id={WORKSPACE_HANDLE} - Developer sandbox data center:
https://app.trial.workato.com/saml/consume?team_id={WORKSPACE_HANDLE}
Where {WORKSPACE_HANDLE} is the Workspace handle configured in Workspace admin > Settings > Login methods.
Last updated: