# Enforce SAML-based SSO authentication for Okta
This guide demonstrates how to set up SAML-based SSO authentication for Workflow apps using Okta. It includes instructions for enabling user groups syncing between Workflow apps and Okta, allowing you to manage access to specific Workflow apps through your Identity Provider (IdP).
Group syncing is enforced each time a user signs into the portal through their IdP.
DEFAULT SESSION DURATION
The default session duration is seven days when you authenticate using SAML-based SSO without group syncing enabled. When group syncing is enabled, the default session timeout is one day. You can extend the session duration by customizing the SessionNotOnOrAfter parameter. Refer to the Create an app integration section to learn more.
# Prerequisites
To complete the steps in this guide, you must have the following:
In Workato:
- The Project admin, Advanced builder, or Builder role.
- The legacy Admin or Analyst collaborator role
- A custom collaborator role with the App access and role management privilege.
- Workflow apps
In Okta:
- Privileges that enable you to add, edit, and manage an app integration.
- Privileges that enable you to create users and groups, assign users to groups, and assign users and groups to applications.
# Step 1: Create an app integration
VIRTUAL PRIVATE WORKATO (VPW) CUSTOMERS
This feature requires configuration steps that are specific to your Virtual Private Workato (VPW) instance. If you are a VPW customer, refer to your VPW private documentation for the configuration details for your instances.
Sign in to your Okta (opens new window) account.
Navigate to Applications > Applications and click Create App Integration.
 Add application in Okta
Refer to the Okta documentation (opens new window) for more information.
Select SAML 2.0 as the Sign-in method.
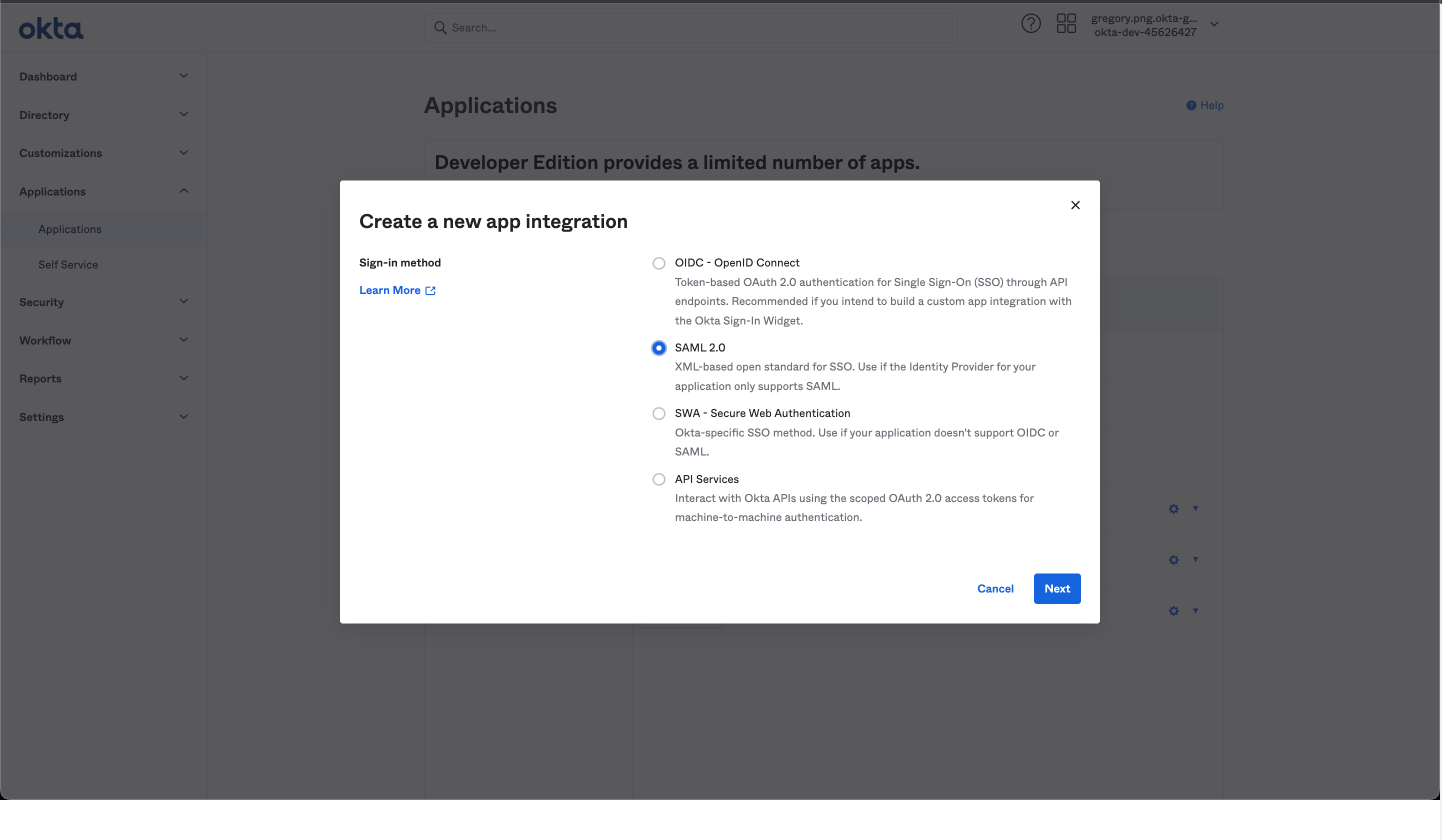 Create a new application in Okta
Provide a unique App name in the General settings tab. For example, Workflow apps.
Click Next.
Optionally, upload an App logo and determine the visibility of this app to your end users.
Click Next.
Enter your Single Sign-On URL
In Workato, go to Platform > Workflow apps portal > Settings > Security.
Copy and paste the Single Sign-On URL into its corresponding field in Okta.
SSO URL FORMAT VARIES
The Single Sign-On URL (SSO URL) format varies and is unique to your Workflow apps portal subdomain/domain and the data center in which your account is located.
If you are using the default domain, the Single Sign-On URL follows this format:
https://{subdomain}.workato.app/portal/sso/saml/acs
Where {subdomain} is your portal's subdomain.
If you are using a custom domain, the Single Sign-On URL follows this format:
https://{custom-domain}/portal/sso/saml/acs
Where {custom-domain} is your custom domain name.
Select Use this for Recipient URL and Destination URL.
Enter your Audience URI (SP Entity ID)
In Workato, go to Platform > Workflow apps portal > Settings > Security.
Copy the Service provider (SP) entity ID and paste it into the Audience URI (SP Entity ID) field in Okta.
AUDIENCE URI (SP ENTITY ID) FORMAT VARIES
The Audience URI (SP Entity ID) format varies and is unique to your Workflow apps portal subdomain/domain and the data center in which your account is located.
If you are using the default domain, the Audience URI (SP Entity ID) follows this format:
https://{subdomain}.workato.app/portal/sso/saml/metadata
Where {subdomain} is your portal's subdomain.
If you are using a custom domain, the Audience URI (SP Entity ID) follows this format:
https://{custom-domain}/portal/sso/saml/metadata
Where {custom-domain} is your custom domain name.
Select EmailAddress as the Name ID format.
Set the Application username to Custom and enter the following expression. This expression converts the user email to lowercase:
toLowerCase(user.email)
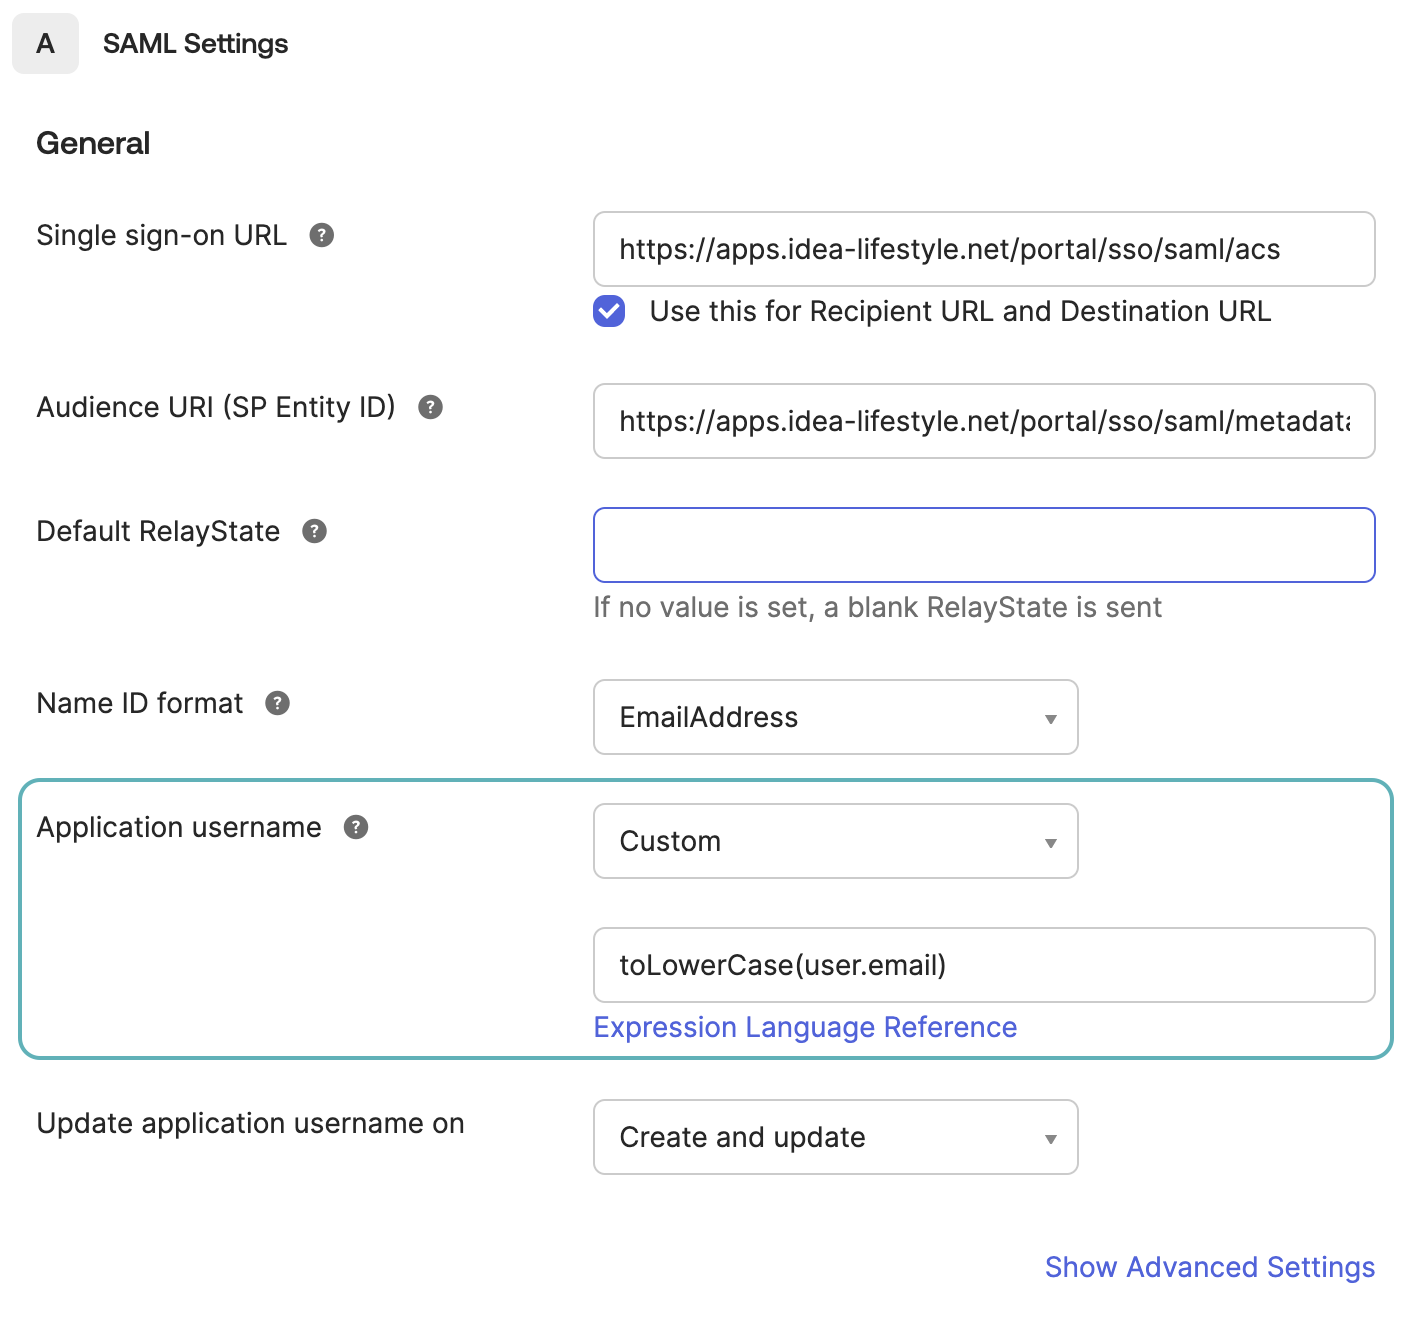 Set the Application username to Custom
Optionally, you can customize the session duration. By default, the session duration is seven days without group syncing enabled. When group syncing is enabled, the default session timeout is one day.
Customize the session duration
Click Advanced options.
In the Maximum app session lifetime field, select the Send value in response checkbox.
Specify the maximum app session lifetime. For example, enter 10 minutes. This is the new session timeout duration. The maximum limit is 90 days.
 Customize session timeout
Assign Attribute Statements to your App Integration
In the Attribute Statements section, add the following attribute statements:
| Name | Value | |
|---|---|---|
| Attribute 1 | workato_app_user_name | user.displayName |
| Attribute 2 | workato_app_user_groups | appuser.workato_app_user_groups |
The resulting attribute statements should look like this:
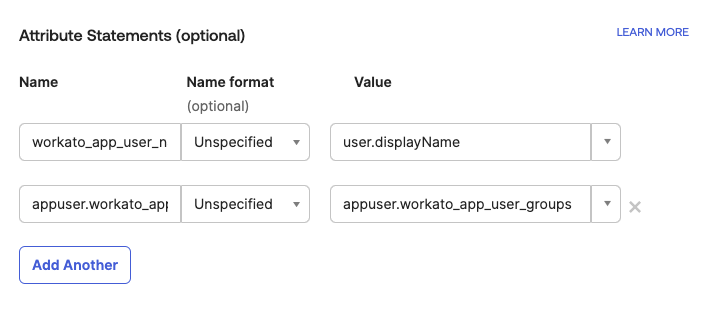 Add Attribute Statements to your App
Click Next.
Optionally, provide feedback to Okta on how you used this interface and click Finish.
# Step 2: Configure Okta SAML user groups sync
When using Okta as your identity provider (IdP), you can sync user groups configurations. This section of the guide demonstrates how to configure Okta to sync with user group assignments in Workflow apps.
This step involves the following tasks:
- Configure user groups
- Set up a custom attribute for groups
- Assign groups to the app
- Verify the SAML assertion
# Configure user groups
If you already have user groups configured in Okta, you can skip the following instructions and proceed to Set up a custom attribute for groups.
In Okta, navigate to Directory > People and click + Add person.
Provide the user's details and click Save. Alternatively, you can select Save and Add another to add additional users.
Go to Directory > Groups and click + Add group to add groups to your Okta instance.
Add one or more groups. For example, you might create one group named Managers and another named Members.
Select a group, such as Managers.
Click Assign people and select the users you plan to add to this group.
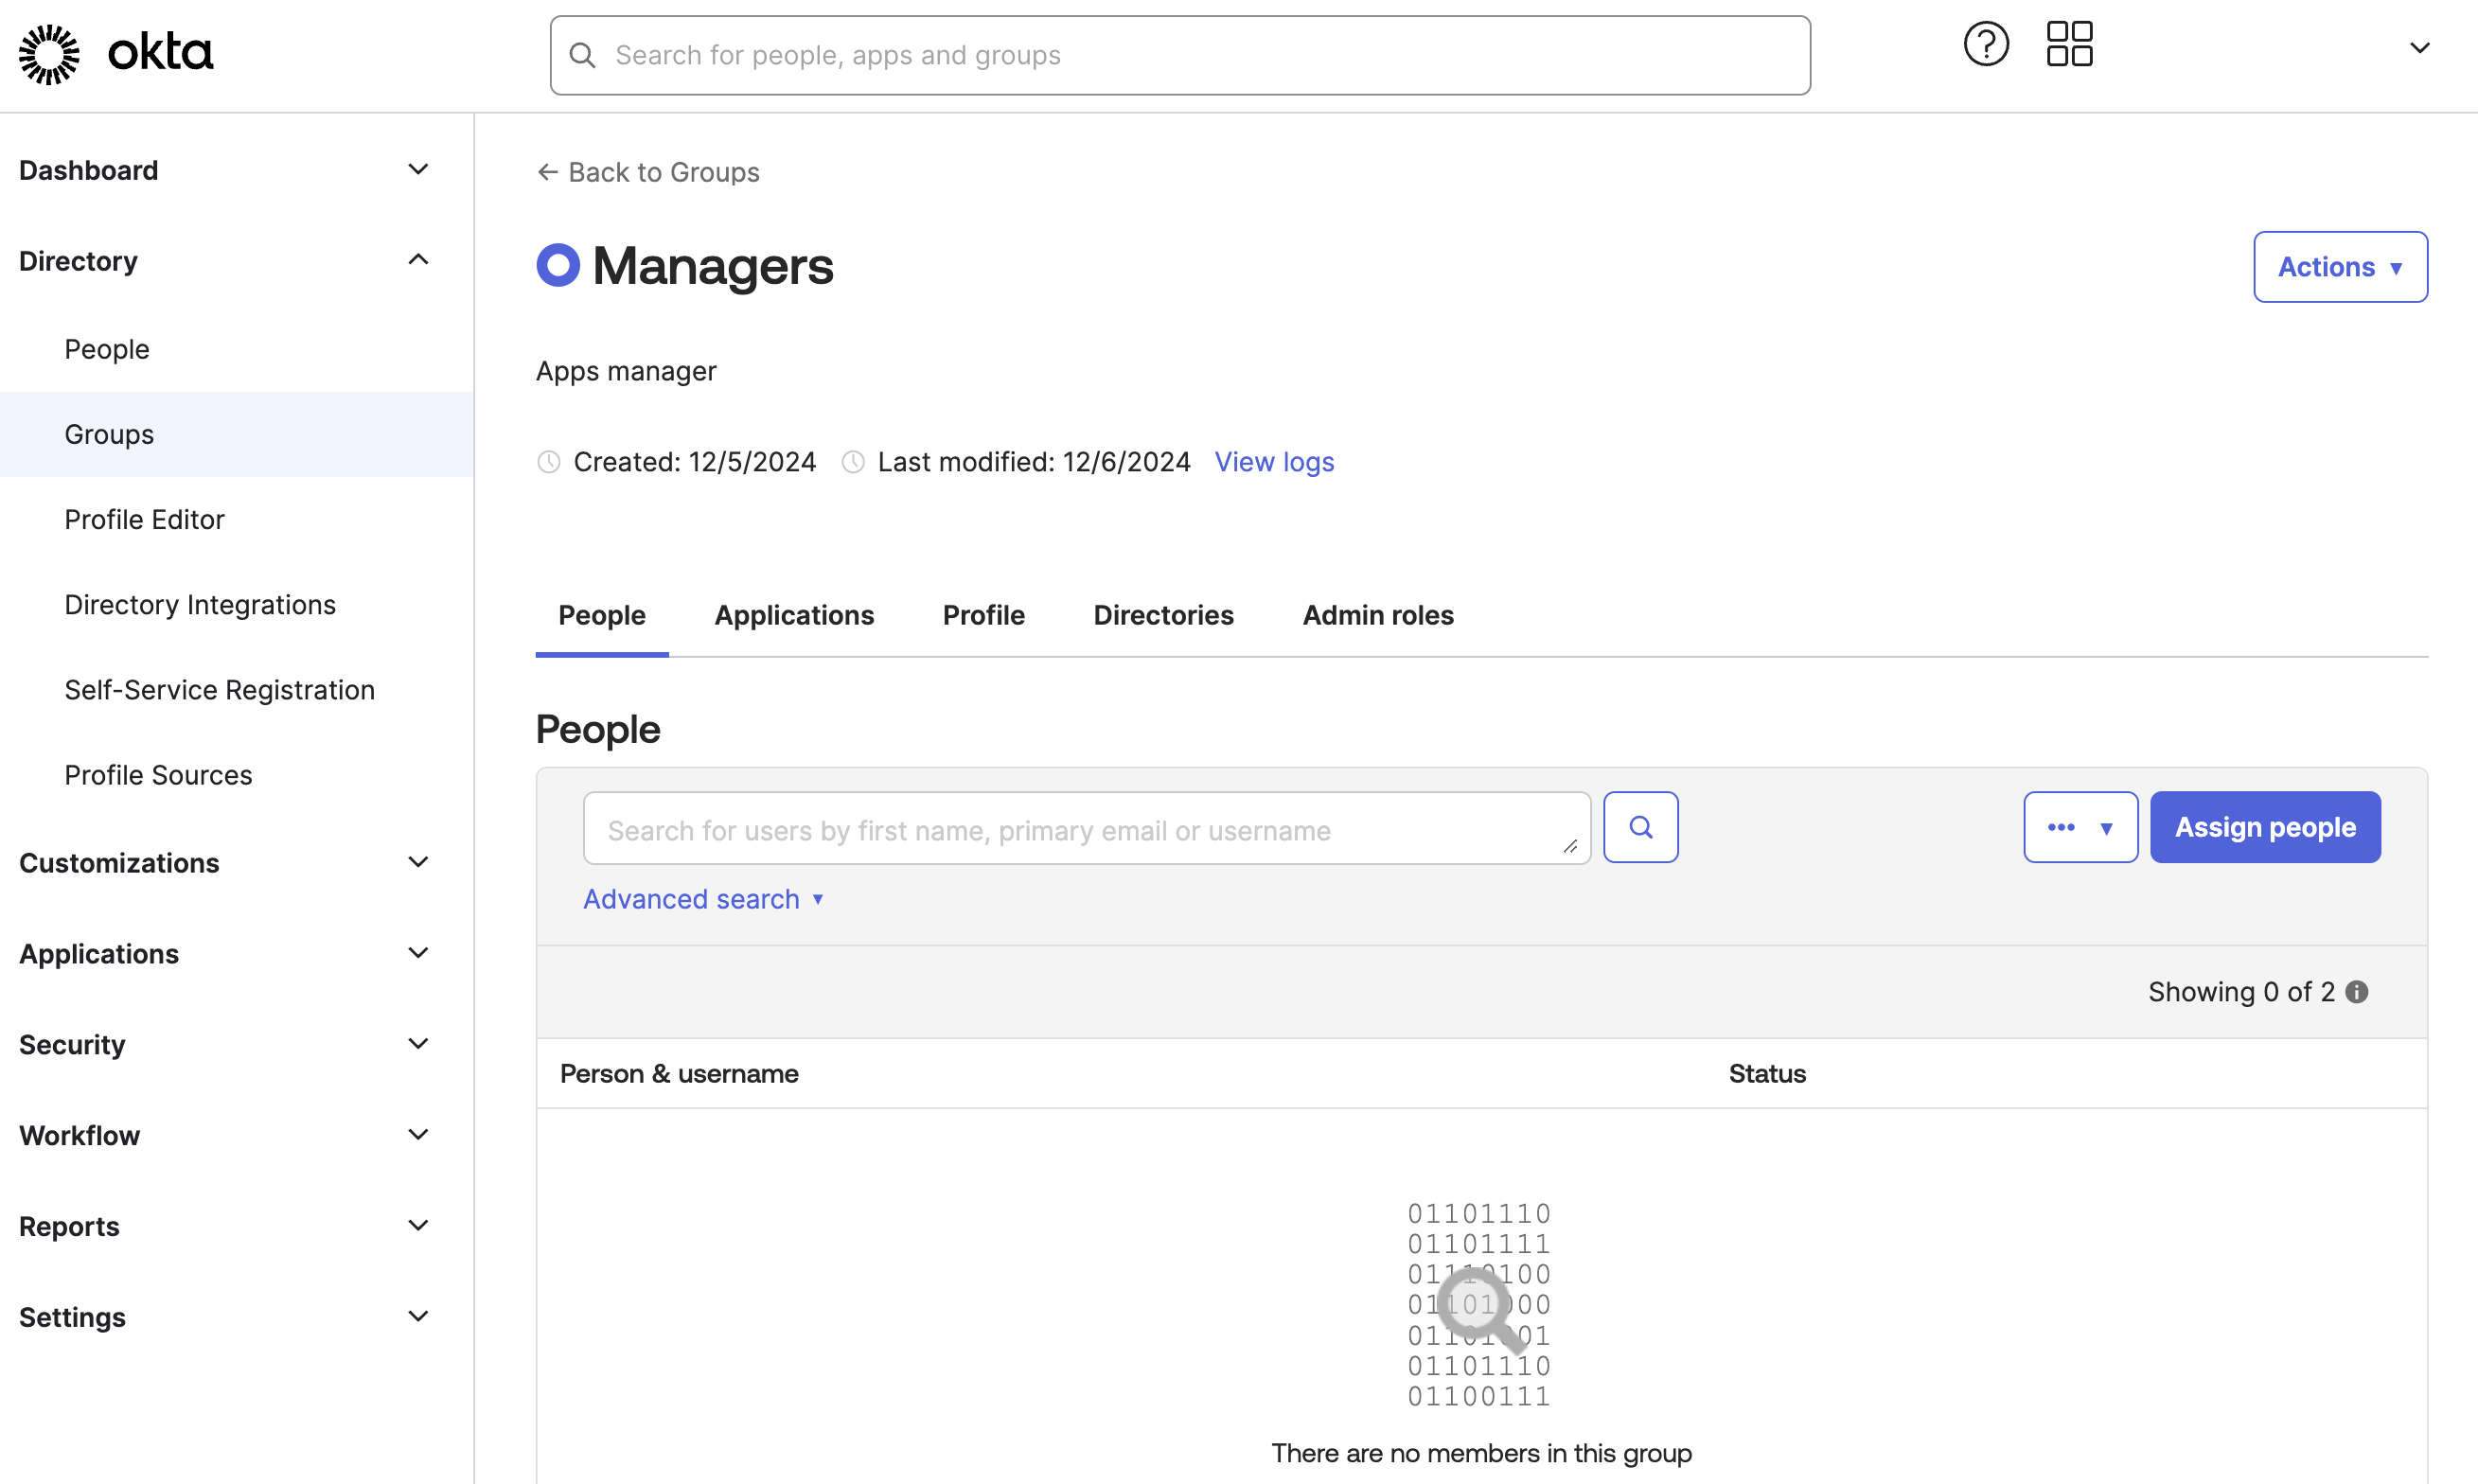 Assign users to groups
# Set up a custom attribute for groups
Go to Directory > Profile editor > {App name} User and click + Add Attribute.
Select string array as the Data type.
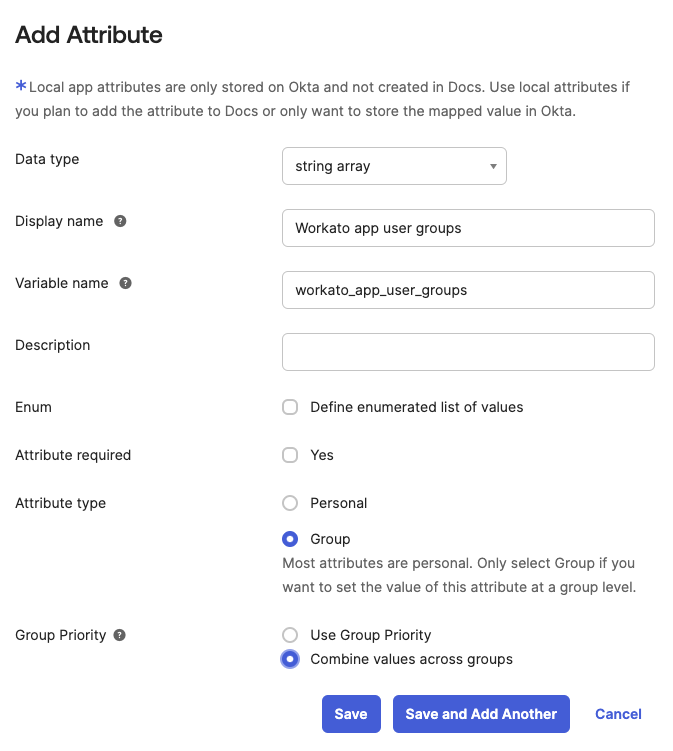 Add attribute
Enter Workato app user groups as the Display name.
Enter workato_app_user_groups as the Variable name.
Select Group as the Attribute type.
Optionally, set the Group priority to Combine values across groups.
Click Save.
# Assign groups to the app
Complete the following steps to assign your Okta groups to your app. This process involves assigning a custom attribute to your groups.
In Okta, go to Applications > Applications and select your app.
Click Assignments > Assign and select Assign to groups.
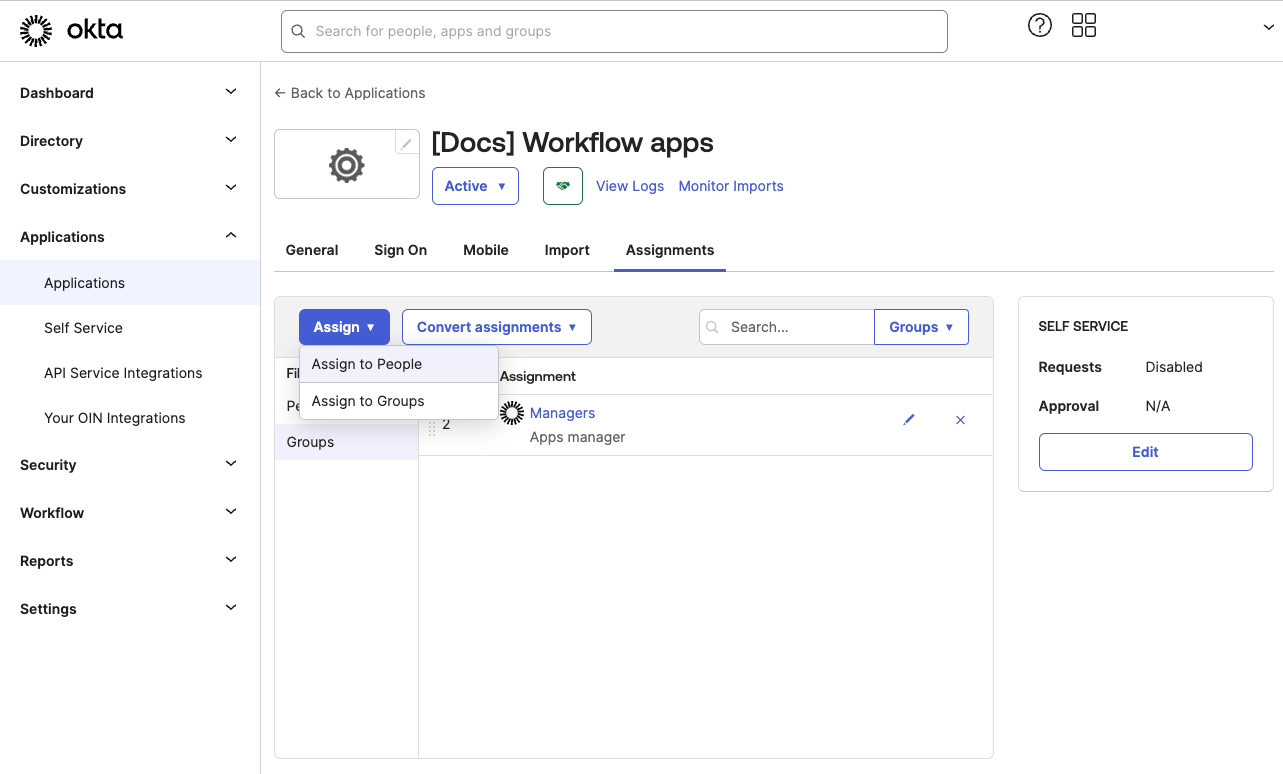 Click assign to select the groups to assign to this app
Select the group you plan to assign.
Next to the Workflow app user groups, click Add another and enter a group name from your Workflow apps portal. This syncs group assignments between Okta and the Workflow apps portal, ensuring that this Okta group has the app access afforded to the group you specify. In this example, we've assigned Members to the Sales group.
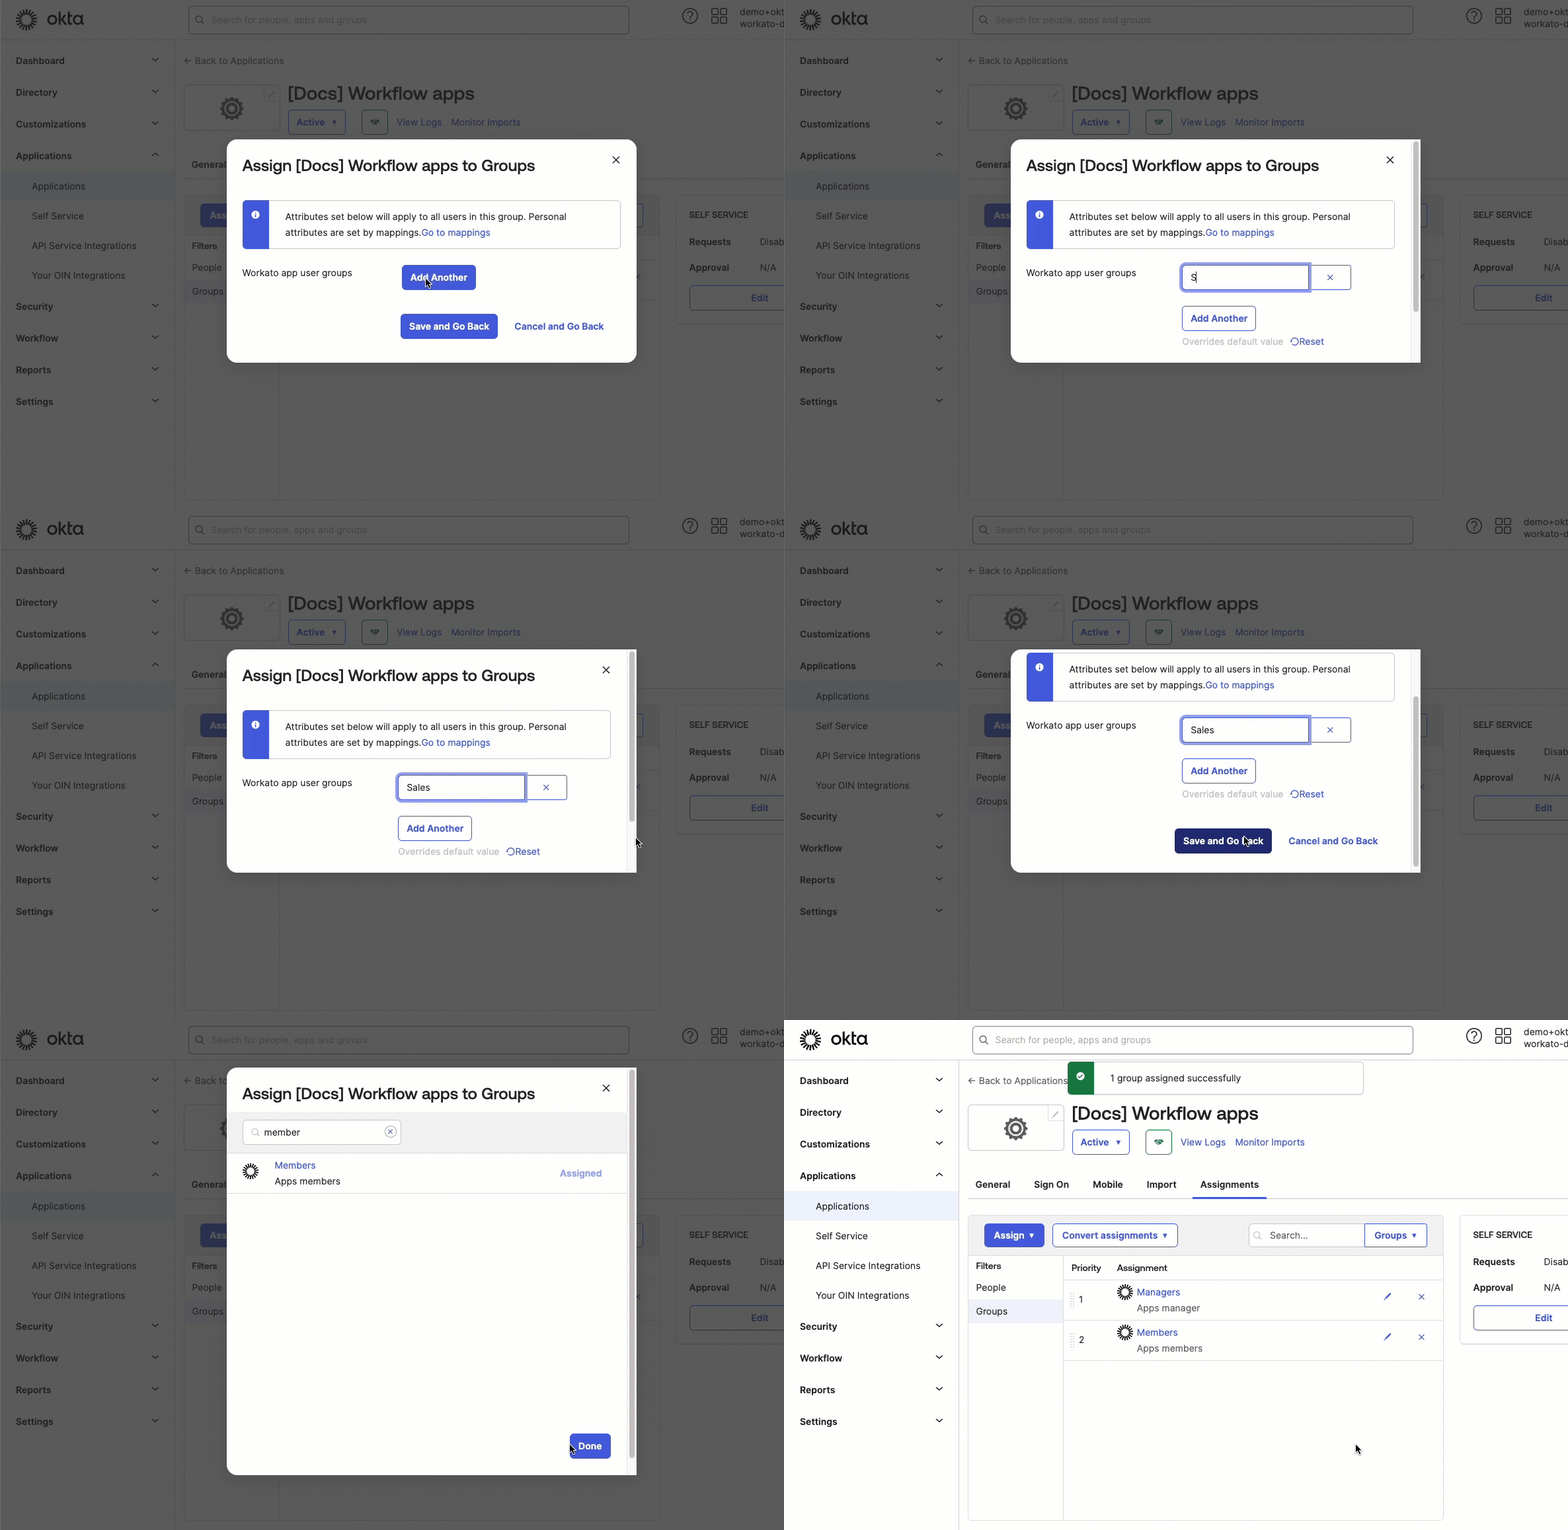 Assign groups
GROUPS MUST EXIST IN WORKFLOW APPS PORTAL
The user group must already exist in Workato to assign it to your Okta groups.
Optionally, click Add another to assign one or more additional groups.
Click Save and go back, and then click Done.
Assign additional Okta groups to this application as required.
# Verify the SAML assertion
Complete the following steps to ensure that SAML SSO is set up correctly. In this step, we preview the SAML assertion sent between apps to enforce SAML SSO.
Go to Applications > Applications and select your app.
In the General tab, go to SAML Settings and click Edit.
Navigate to Configure SAML and click Preview SAML assertion.
Review the generated assertion. This assertion should contain the Attribute Statements you created in the preceding steps. For example:
View preview assertion
 <saml2:AttributeStatement>
        <saml2:Attribute Name="workato_app_user_name" NameFormat="urn:oasis:names:tc:SAML:2.0:attrname-format:unspecified">
            <saml2:AttributeValue
                xmlns:xs="http://www.w3.org/2001/XMLSchema"
                xmlns:xsi="http://www.w3.org/2001/XMLSchema-instance" xsi:type="xs:string">
            </saml2:AttributeValue>
        </saml2:Attribute>
        <saml2:Attribute Name="workato_app_user_groups" NameFormat="urn:oasis:names:tc:SAML:2.0:attrname-format:unspecified">
            <saml2:AttributeValue
                xmlns:xs="http://www.w3.org/2001/XMLSchema"
                xmlns:xsi="http://www.w3.org/2001/XMLSchema-instance" xsi:type="xs:string">managers
            </saml2:AttributeValue>
        </saml2:Attribute>
    </saml2:AttributeStatement>
# Step 3: Complete setup in Workato
Sign in to your Workato account.
Go to Platform > Workflow apps portal > Settings > Security.
In the Authentication method field, select SAML based SSO.
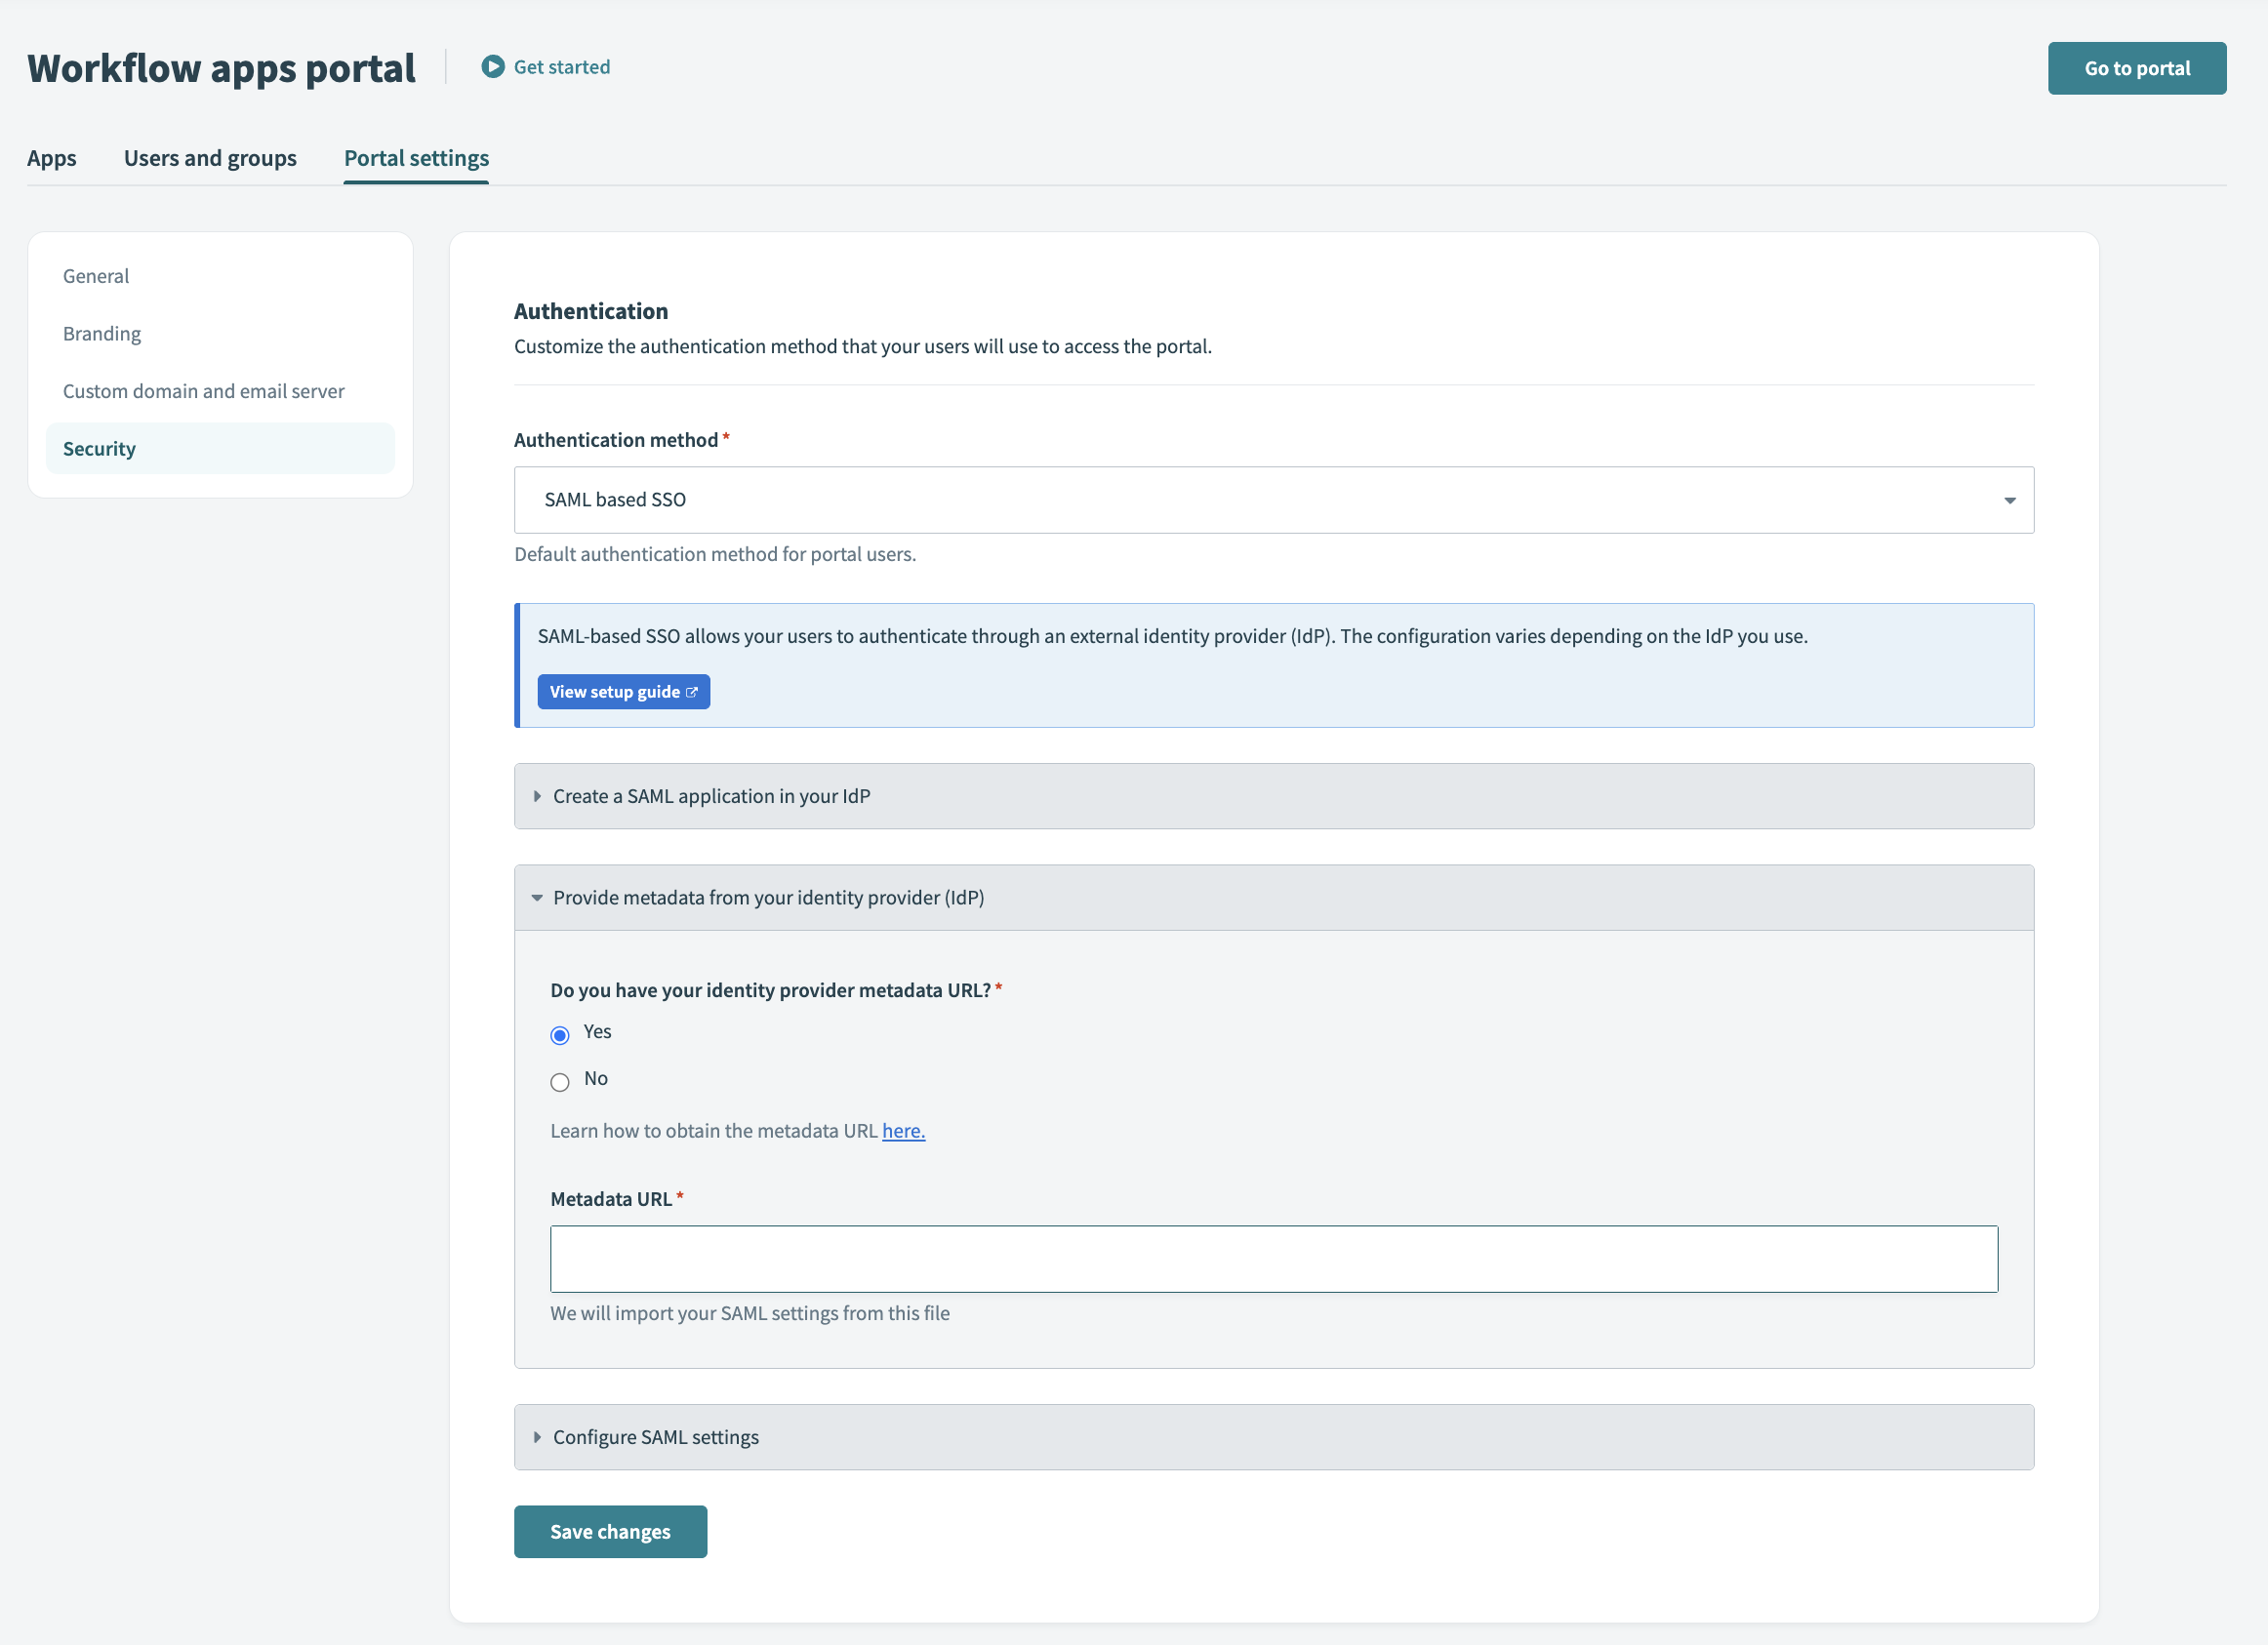 Workato SAML setup
Provide metadata from your IdP. In the Do you have your identity provider metadata URL field, select Yes or No.
In the Enforce SAML authentication for field, decide whether to enforce SAML authentication for all Workflow apps users or only specific domains.
Users outside those domains can sign in using password authentication. This approach is useful for complying with organizational SSO policies while allowing external users without an identity provider account to access Workflow apps.
Optionally, click Enable JIT (Just-In-Time) provisioning to automatically add users to the portal after identity provider authentication.
When JIT is enabled, any user signing in to Workato through SSO for the first time is automatically added to the portal.
Click Enable user groups syncing to sync user groups from your IdP. This step is mandatory if you plan to manage user groups through your IdP.
User group syncing does not take effect immediately. Group syncing is enforced each time a user signs into the portal through their IdP.
If you plan to enable user groups syncing
If you completed all instructions in Step 1: Create an app integration, this process is already complete.
Specify the following SAML attributes in Okta:
| Name | Value | |
|---|---|---|
| Attribute 1 | workato_app_user_name | user.displayName |
| Attribute 2 | workato_app_user_groups | appuser.workato_app_user_groups |
Optionally, customize the session duration for the Workflow apps portal by modifying the SessionNotOnOrAfter attribute in Okta. By default, the session duration is seven days without group syncing enabled. When group syncing is enabled, the default session timeout is one day.
If you completed all instructions in Step 1: Create an app integration, this process is already complete.
Click Save changes.
Last updated: 10/7/2025, 3:50:03 PM
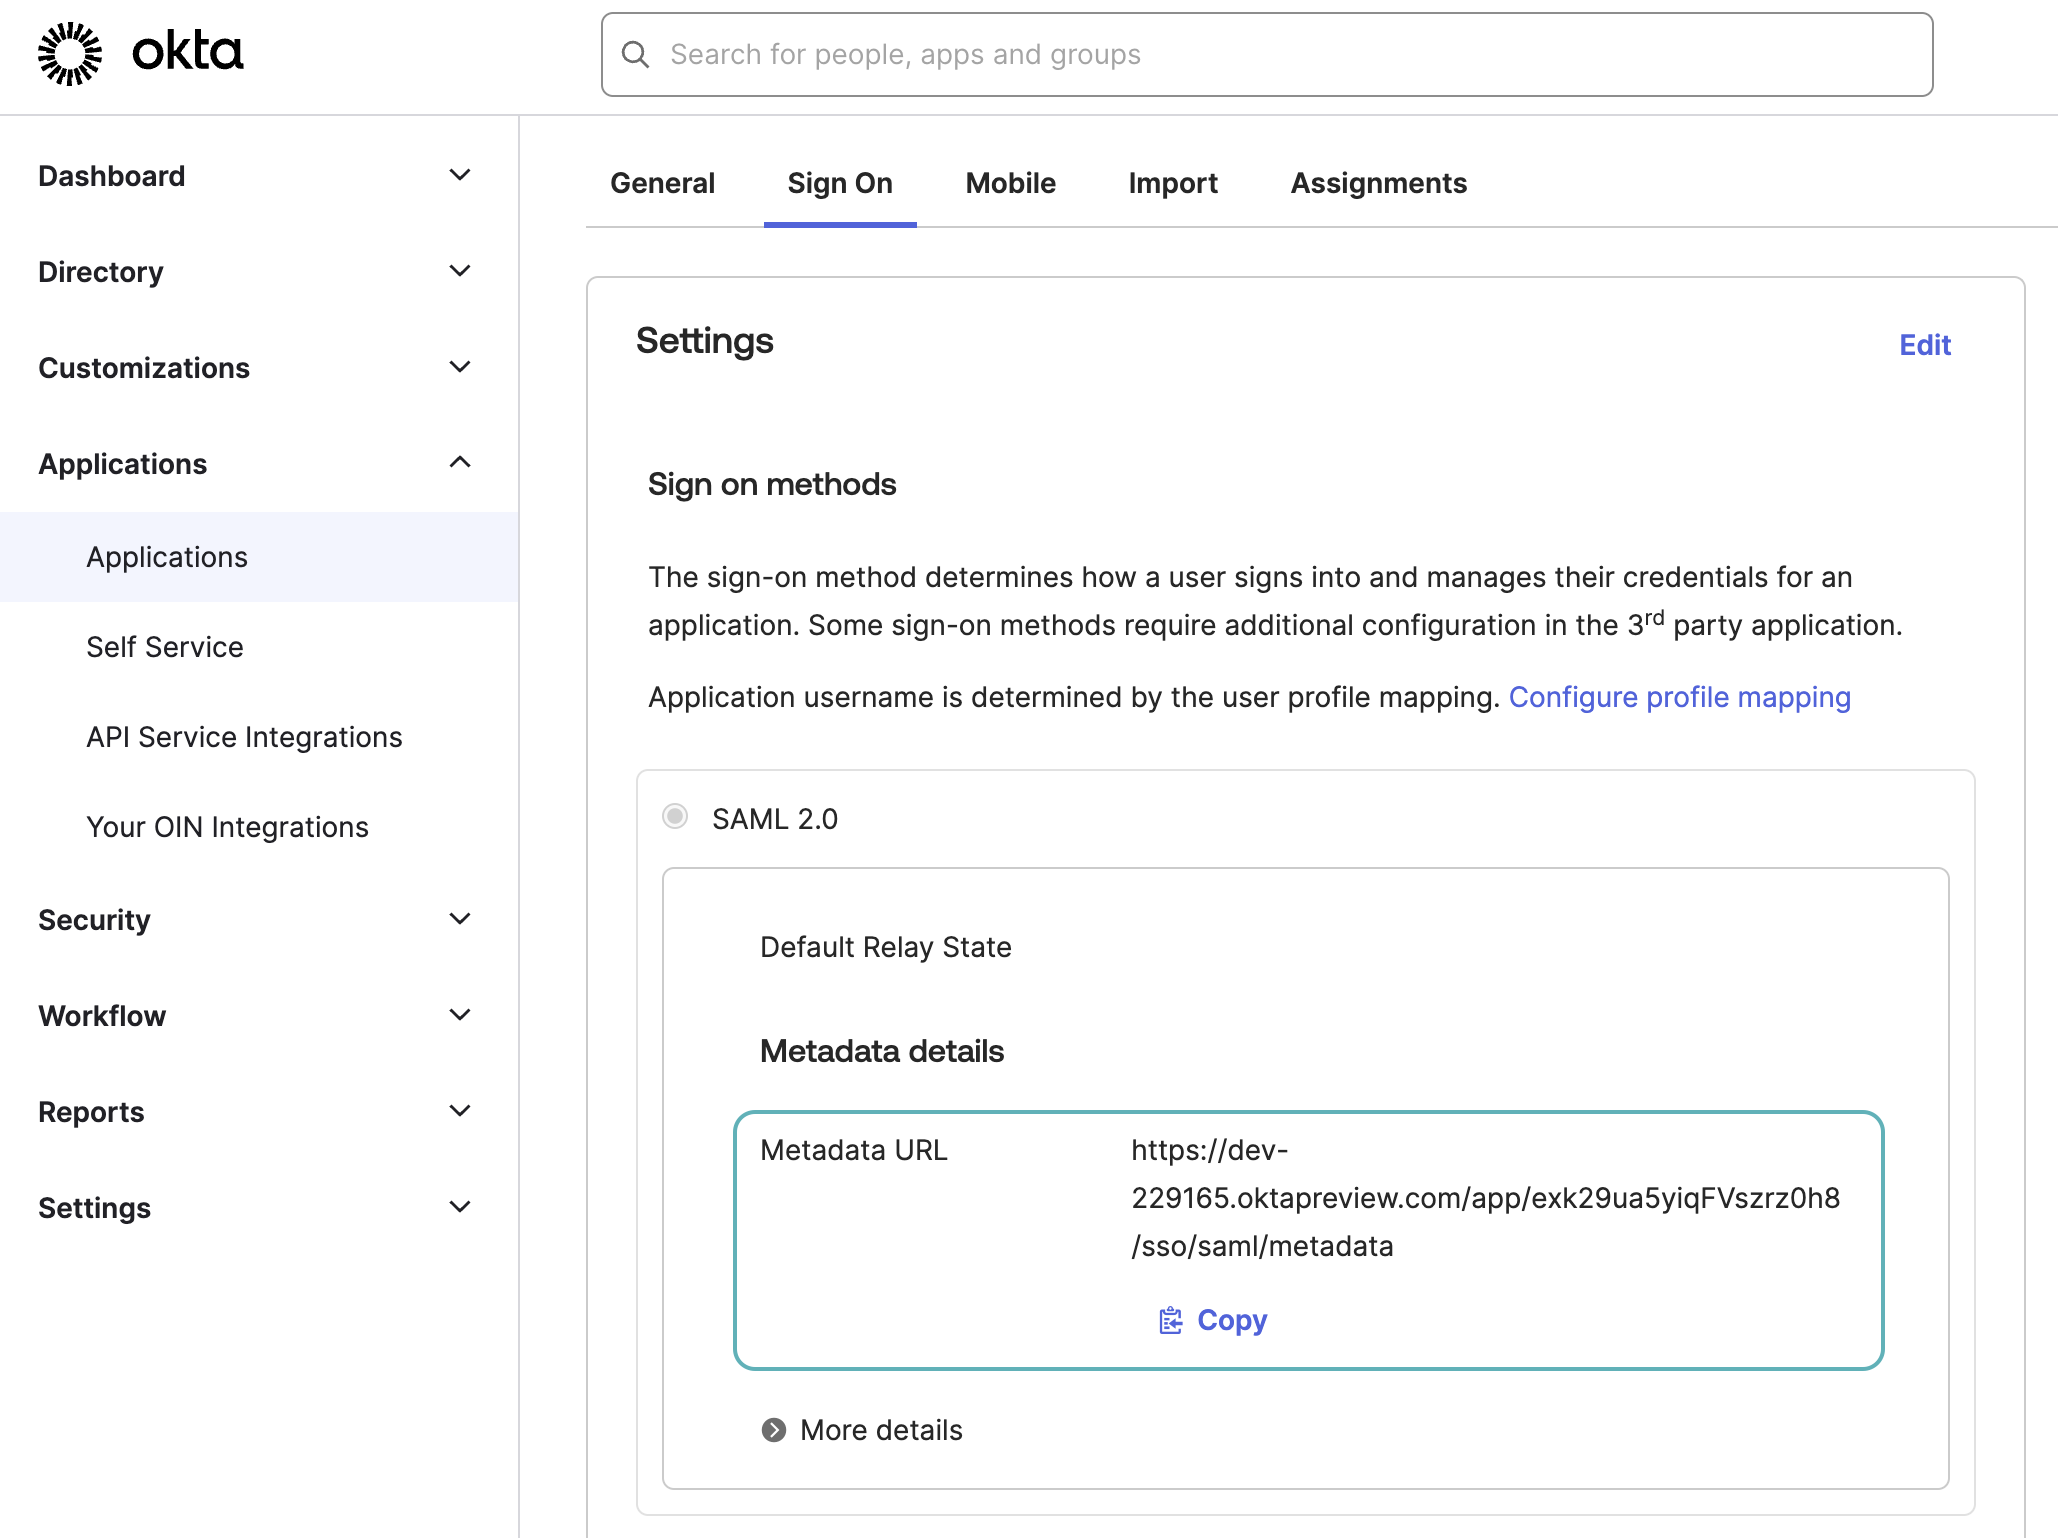 Copy the metadata URL
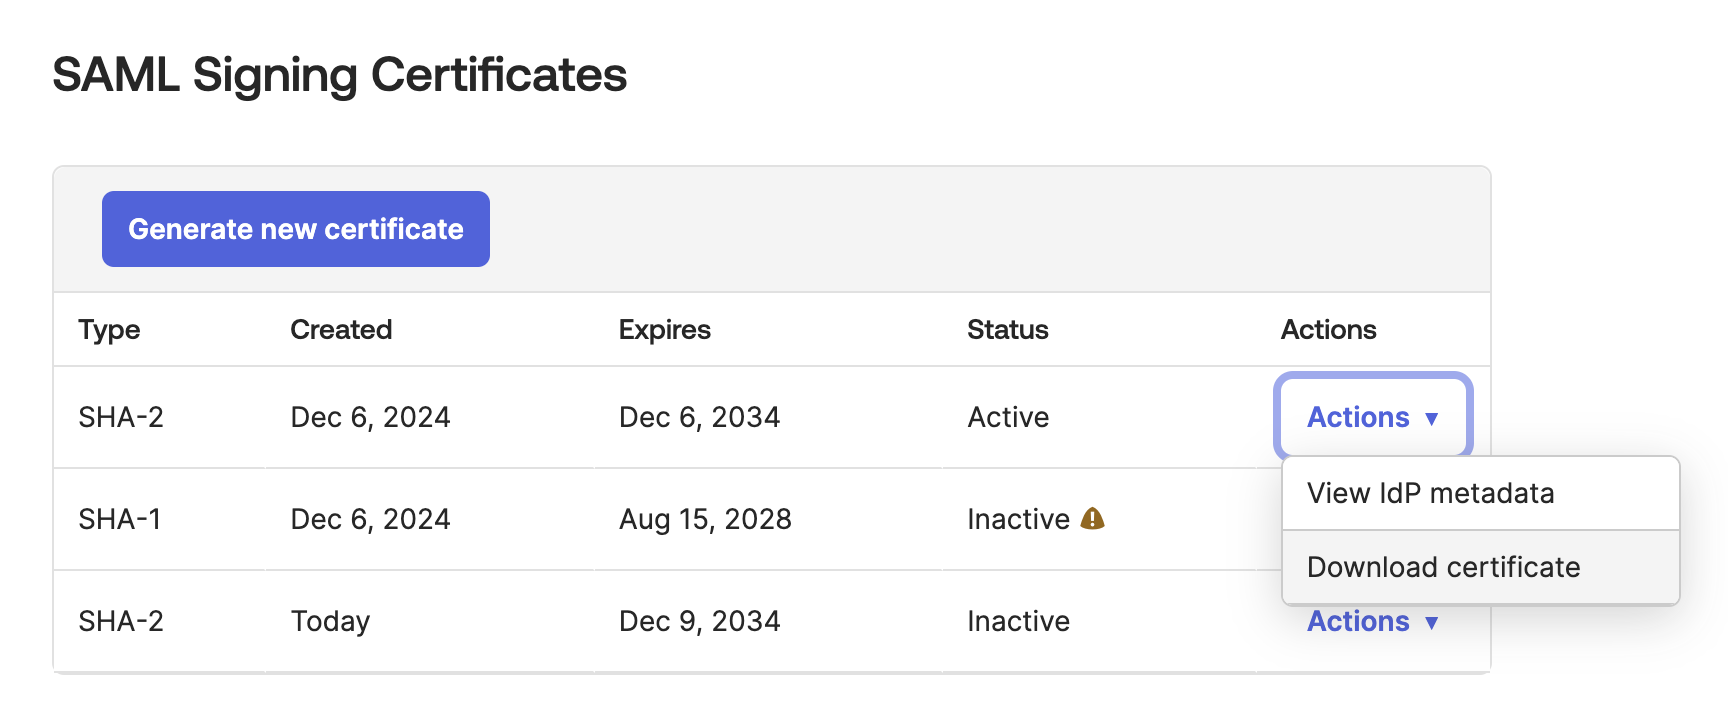 Download certificate